Embed Size (px)
Citation preview

Monster Hand Puppet Pattern © Copyright Good Critters Ltd
Monster Hand Puppet Pattern
Sheet 1
To celebrate the 1st anniversary of the Good Critters newsletter we’ve put together a really special pattern.
Following the Halloween theme of our very first free pattern, we’ve made a scary, in a good way, hand puppet.
He’ll use all the skills you’ve learnt making finger puppets, and then some. Are you up for the challenge? He’s well worth it!
We’d love you to share a picture of your monster on our facebook page: www.facebook.com/goodcrittersuk
1st anniversary special

Monster Hand Puppet Pattern © Copyright Good Critters Ltd
Felt (or similar stiff fabric)60x80 cm for the head, body, mouth and arms8x12 cm red or pink for the tongue14x25 cm white or yellow for the teeth and eyes5x8 cm for the pupils 15x25 cm for the spikes
Extra for decoration
Stranded embroidery thread To match the colours of the felt you’re using for the tongue, eyes, pupils and decoration.
AdditionalStuffing for the eyesAlternative decoration; sequins, ribbon or fabric paint
Sheet 2
What you’ll need
Your finished puppet should be 30x20 cm, although size may vary slightly from printer to printer.
I’ve used a combination of hand and machine sewing but please feel free to use whichever option suits you.
If you are hand sewing, you can skip any tacking required in the pattern and just pin and sew.
Seams should be sewn 5-7mm from the edge of the fabric.
Notes
Cut line Hand sewing guide Fold line

Monster Hand Puppet Pattern © Copyright Good Critters Ltd
Sheet 3
a
a
b
b
c
c
D
D
D
DHeadcut 2
Monster Hand Puppet Pattern © Copyright Good Critters Ltd
D
D
cc
D
cc
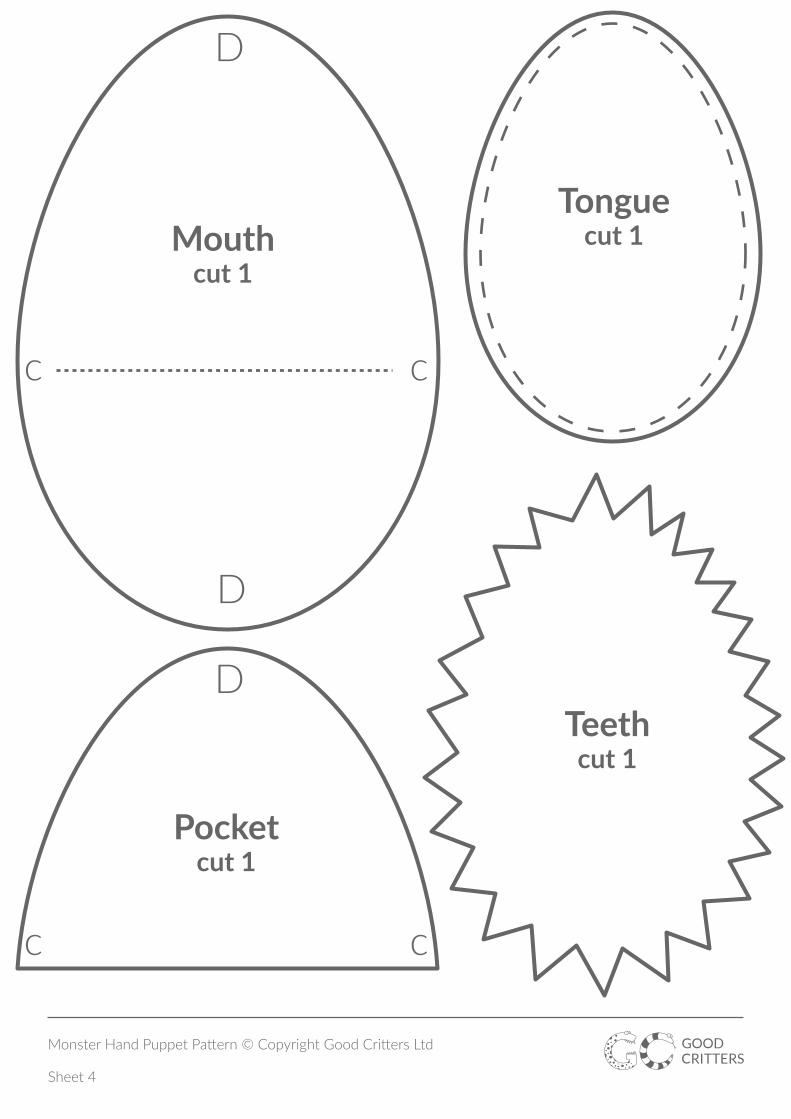
Mouthcut 1
Pocketcut 1
Tonguecut 1
Teethcut 1
Sheet 4

Monster Hand Puppet Pattern © Copyright Good Critters Ltd
Head spikescut 1
Body spikescut 2
Armcut 2
Eyecut 4
Pupilcut 2
Sheet 5
Monster Hand Puppet Pattern © Copyright Good Critters Ltd
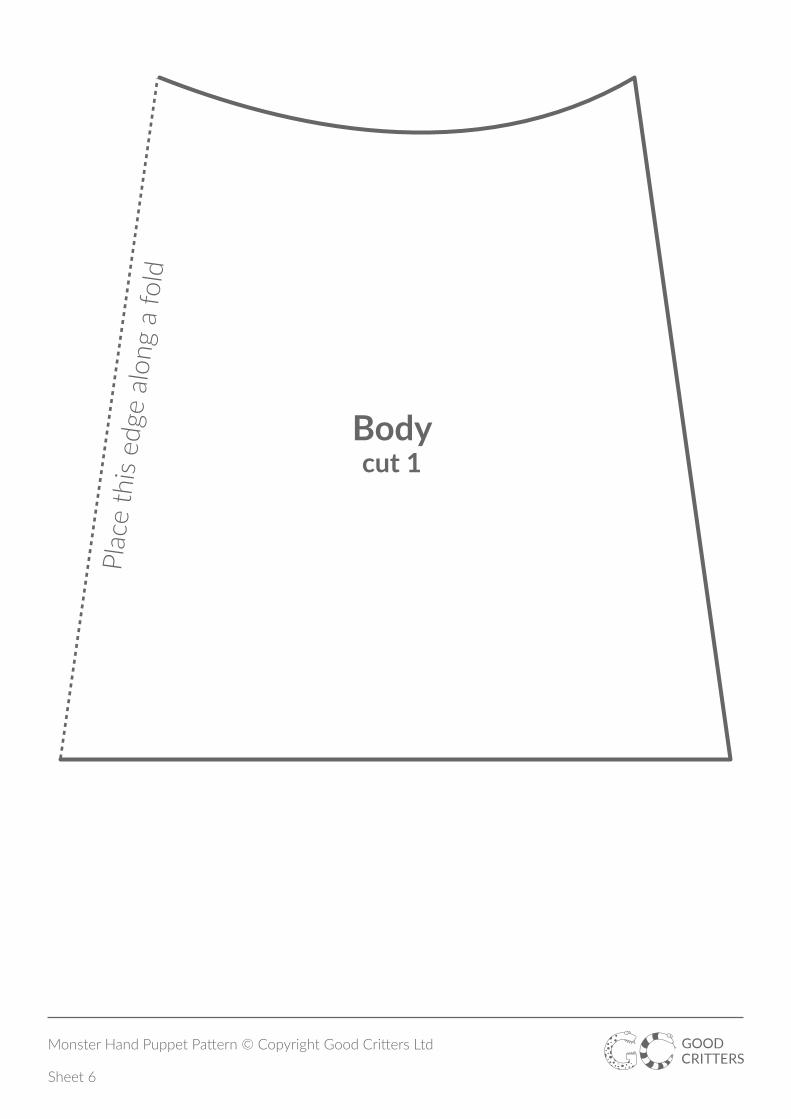
Sheet 6
Plac
e th
is ed
ge a
long
a fo
ld
Bodycut 1

Monster Hand Puppet Pattern © Copyright Good Critters Ltd
Sheet 7
Step 1 : the head
Cut out your pattern pieces and pin onto the felt. Carefully cut out the shapes.
On each head piece, pin, tack and sew ‘a’ to ‘a’, ‘b’ to ‘b’ and ‘c’ to ‘c’.
Pin ‘D’ to ‘D’, inserting the head spikes between the two halves. Make sure the spikes are on the right side (the outside) of the head.
Tack and sew the seams together. Leave a small, un-sewn gap at the end of each seam, this will help when joining the head to the mouth and body.
A
B
C
Monster Hand Puppet Pattern © Copyright Good Critters Ltd
Sheet 8
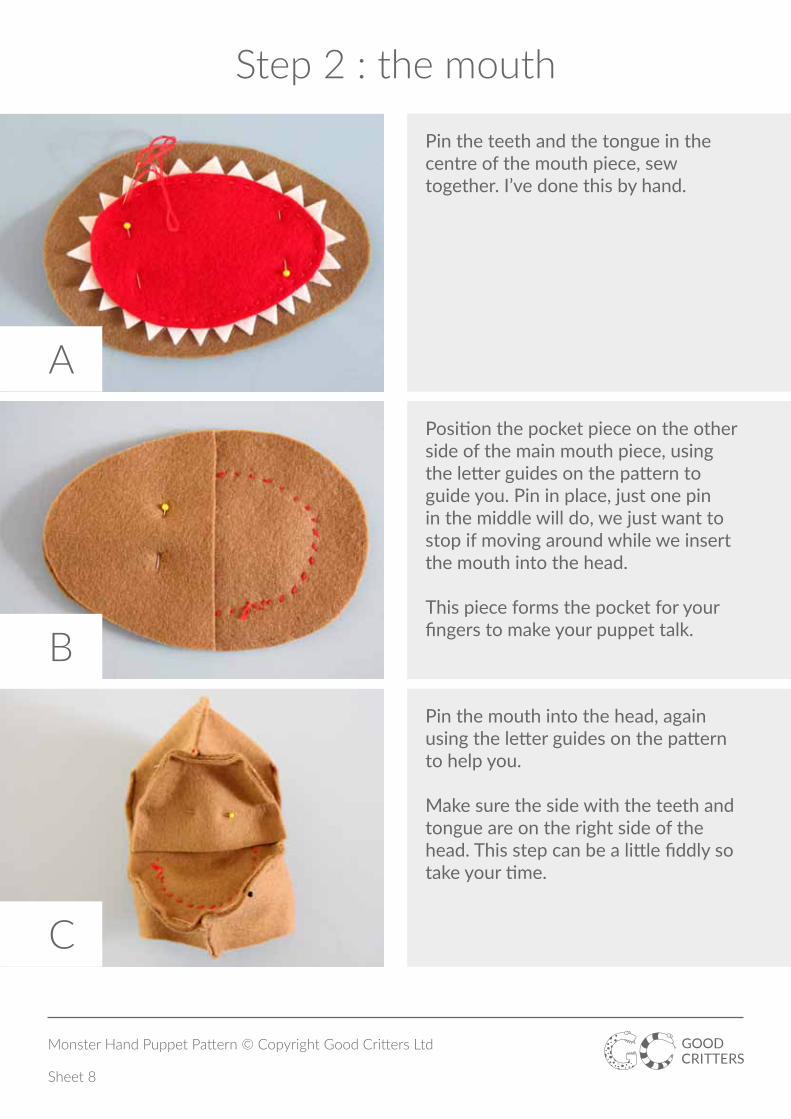
Step 2 : the mouth
Pin the teeth and the tongue in the centre of the mouth piece, sew together. I’ve done this by hand.
Position the pocket piece on the other side of the main mouth piece, using the letter guides on the pattern to guide you. Pin in place, just one pin in the middle will do, we just want to stop if moving around while we insert the mouth into the head.
This piece forms the pocket for your fingers to make your puppet talk.
Pin the mouth into the head, again using the letter guides on the pattern to help you.
Make sure the side with the teeth and tongue are on the right side of the head. This step can be a little fiddly so take your time.
A
B
C
Monster Hand Puppet Pattern © Copyright Good Critters Ltd
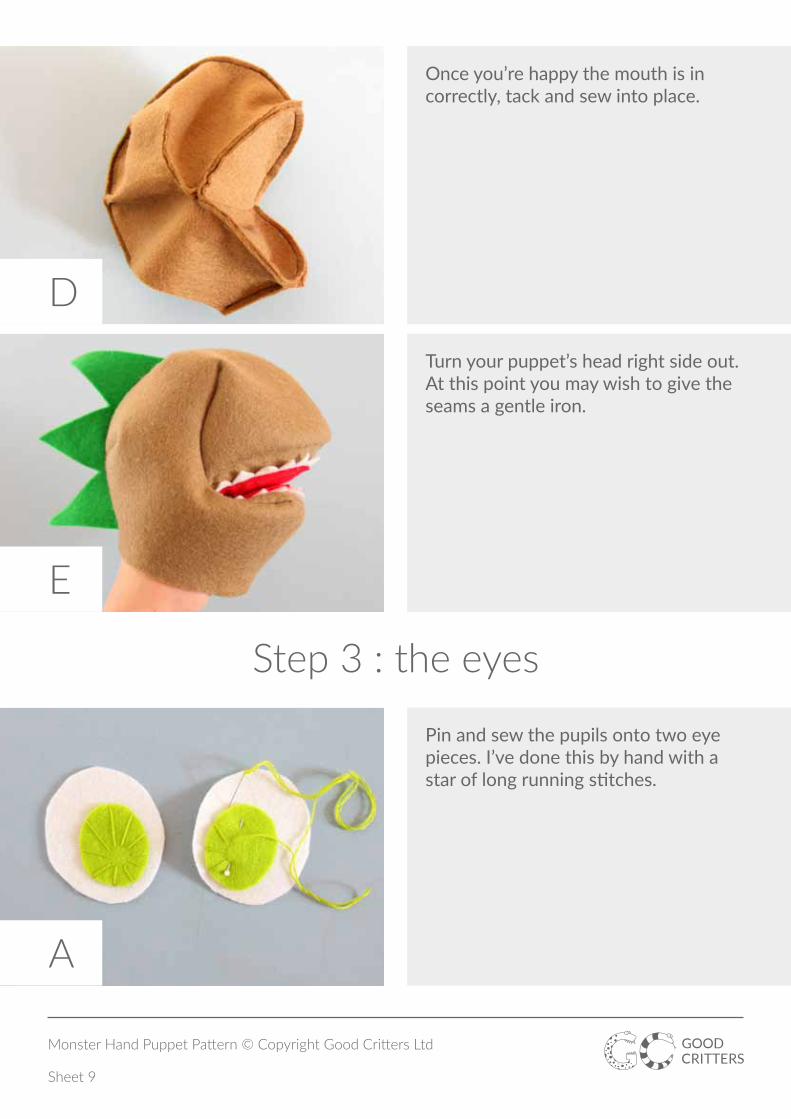
Once you’re happy the mouth is in correctly, tack and sew into place.
Turn your puppet’s head right side out. At this point you may wish to give the seams a gentle iron.
D
E
Sheet 9
Step 3 : the eyes
Pin and sew the pupils onto two eye pieces. I’ve done this by hand with a star of long running stitches.
A
Monster Hand Puppet Pattern © Copyright Good Critters Ltd
Sheet 10
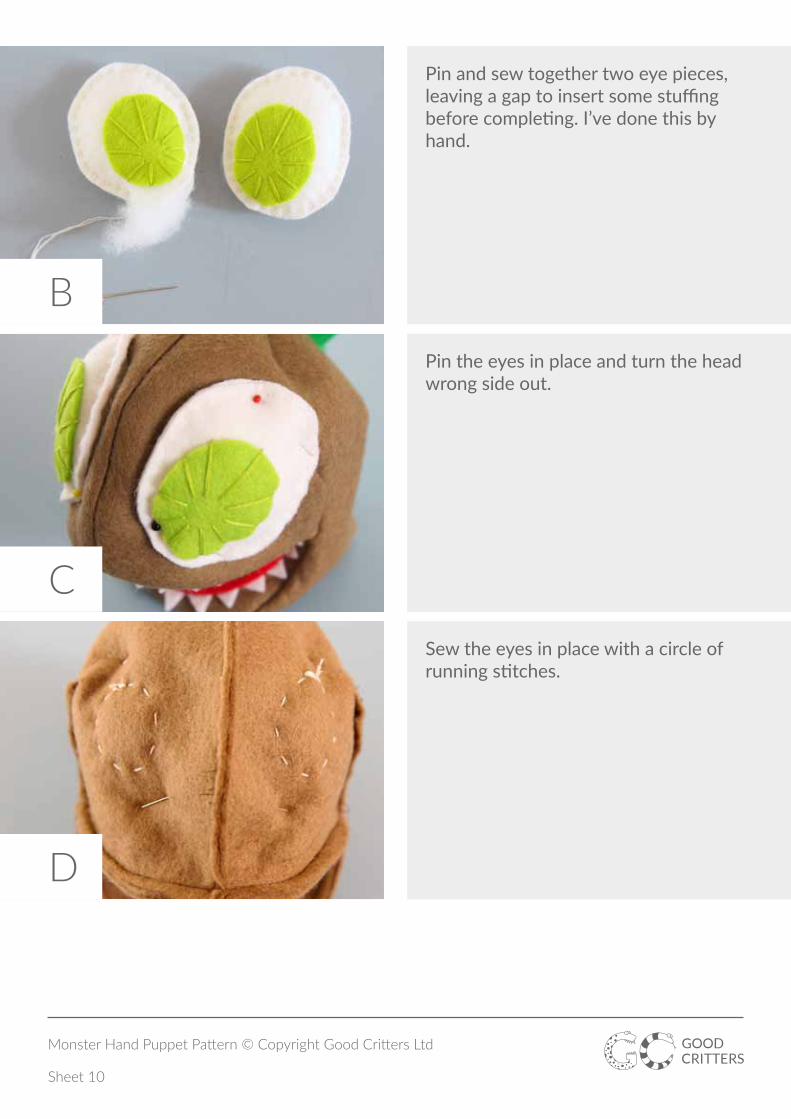
Pin and sew together two eye pieces, leaving a gap to insert some stuffing before completing. I’ve done this by hand.
Pin the eyes in place and turn the head wrong side out.
Sew the eyes in place with a circle of running stitches.
B
C
D
Monster Hand Puppet Pattern © Copyright Good Critters Ltd
Sheet 11
Step 4 : the body
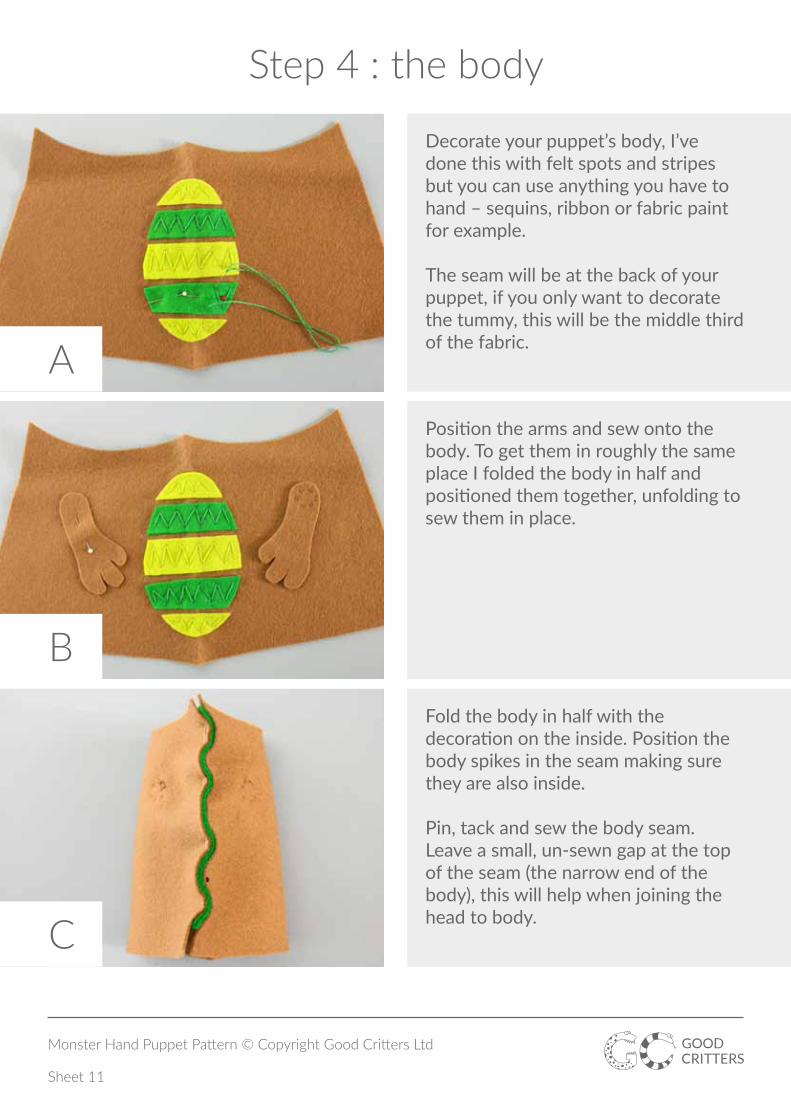
Decorate your puppet’s body, I’ve done this with felt spots and stripes but you can use anything you have to hand – sequins, ribbon or fabric paint for example.
The seam will be at the back of your puppet, if you only want to decorate the tummy, this will be the middle third of the fabric.
Position the arms and sew onto the body. To get them in roughly the same place I folded the body in half and positioned them together, unfolding to sew them in place.
Fold the body in half with the decoration on the inside. Position the body spikes in the seam making sure they are also inside.
Pin, tack and sew the body seam. Leave a small, un-sewn gap at the top of the seam (the narrow end of the body), this will help when joining the head to body.
A
B
C
Monster Hand Puppet Pattern © Copyright Good Critters Ltd
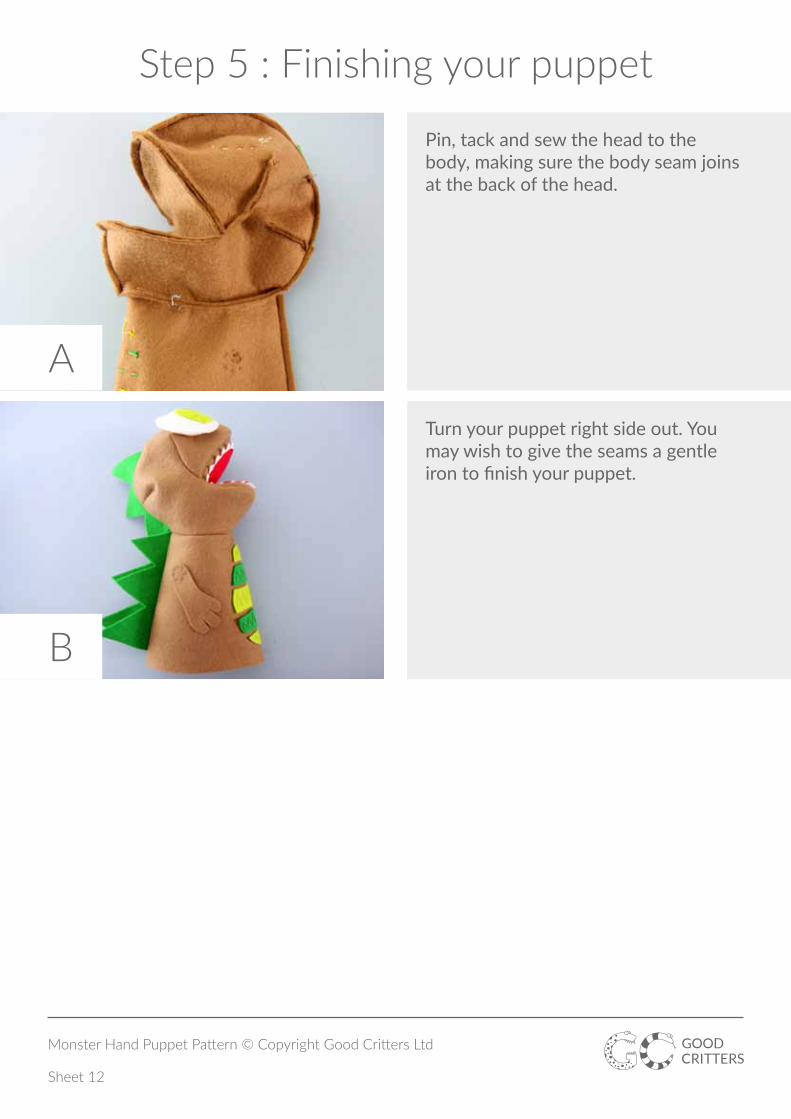
Pin, tack and sew the head to the body, making sure the body seam joins at the back of the head.
A
Sheet 12
Step 5 : Finishing your puppet
Turn your puppet right side out. You may wish to give the seams a gentle iron to finish your puppet.
B
Monster Hand Puppet Pattern © Copyright Good Critters Ltd
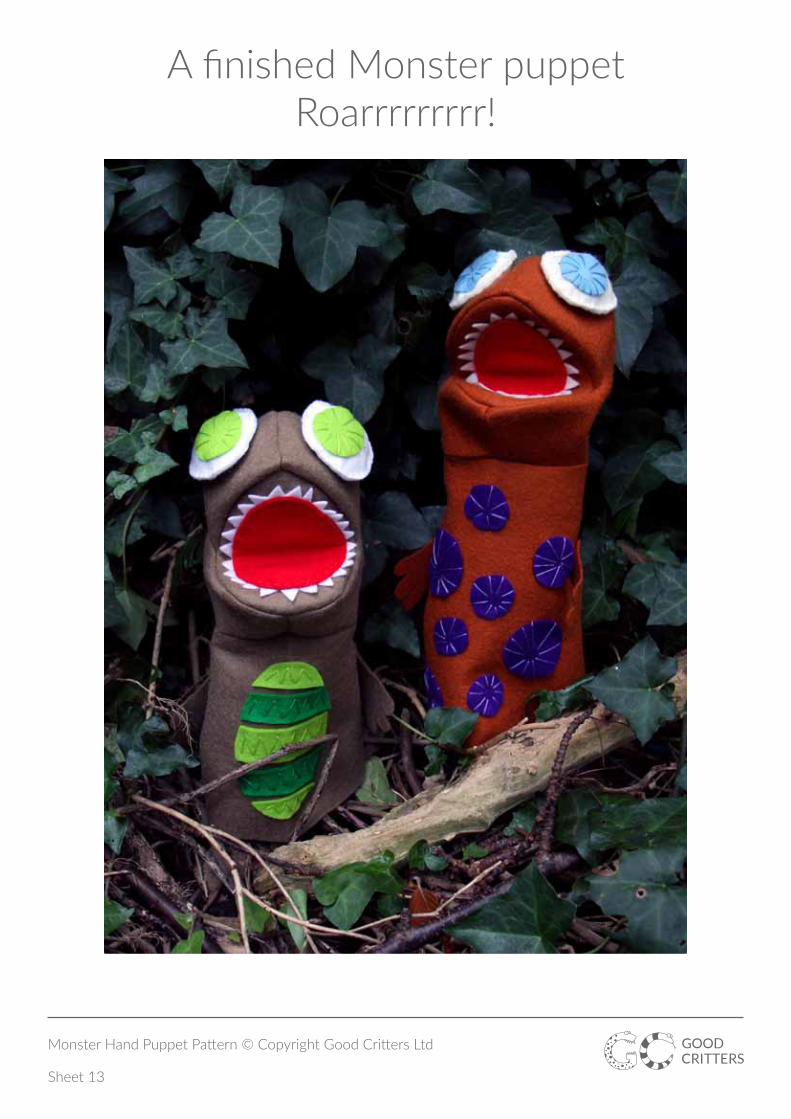
A finished Monster puppetRoarrrrrrrrr!
Sheet 13