Embed Size (px)
Citation preview

VDP
SMART
SMART
PROJE
FOCO
SMART
USER GEBRUNOTICMANUBEDIE
PL1003
T LED BEAM
T LED PROJ
ECTEUR SMA
SMART LED
T LED-SCHE
MANUAL UIKERSHANDCE D’EMPLOIAL DEL USU
ENUNGSANLE
3xW
M - 10 x 3W
JECTOR - 10
ART LED - 1
D - 10 LEDs
EINWERFER
DLEIDING I
UARIO EITUNG
W WHITE LE
0 x 3W WIT
10 LED DE 3
s DE 3W
R - 10 x 3W
VDP
VDPL
39
15 21 27
EDs
TTE LEDS
3W
W LEDs
PL1003CW
L1003WW
W
cold whkoud wiblanc froblanco fkaltweiß
W
warm wwarm wblanc chblanco cwarmwe
ite t oid frío ß
white wit haud cálido eiß

25.03.20
1
How to tControllModifierModificaDie Cont
011
turn the contrer line van 3-pr la ligne du coar la línea del ctroller-Linie vo
roller line frompin naar 5-pinontrôleur de 3controlador deon 3-Pin nach
VDPL100
2
r
m 3-pins into 5 aanpassen (s broches en 5 e 3 polos y 5 p 5-Pin anpasse
03xW
eindésistance de t
tTe
5-pins (plug anstekker en con broches (fichepolos (conectoen (Stecker un
terminatordweerstandterminaisonterminaciónerminierung
nd socket) ntact). e et contact)
or y contacto) nd Buchse).
©Vellem
man nv

25.03.20
1. IntTo all reImporta
TcwtI
Thank yoservice. IFor morour web
2. Saf
• This quali
• Makemanu
• Do nnece
• Resp• Use a• Insta
subst• Keep
3. GeRefer to t
• Famiby unof the
• All mto th
011
troduction esidents of theant environmeThis symbol on could harm the waste; it shouldto your distributIf in doubt, coou for choosing If the device wae info concern
bsite www.hqp
fety Instruc
Be very celectrosho
Always diactivities
Indoor uliquids.
Keep this
Caution:
Do not st- epile- temp- perm
There areservice an
device falls undfied person carr
e sure that the aual. ot crimp the possary. ect a minimuman appropriate sall the VDPL100tances. Keep th
p the air vents fr
neral Guidethe Velleman®
Keep thare cleathe ope
Protect
liarise yourself nqualified people device.
modifications of te device is not c
e European Unntal informati the device or th environment. Dd be taken to a tor or to a local
ontact your locHQ-power! Plea
as damaged in tning this produpower.eu.
ctions
areful during thocks.
sconnect mainsare performed.
se only. Keep t
device away fro
device heats up
tare directly aeptic seizure in sporarily loss of smanent (irrevers
e no user-servicend/or spare part
der protection clry out the electravailable voltag
wer cord and pr
distance of 0.5safety cable to f03xW at a minie VDPL1003xWree at all times.
elines ® Service and Q
is device away ar at all times. Fnings.
this device from
with the functioe. Any damage
the device are fcovered by the
VDPL100
3
User m
ion on about this he package indiDo not dispose ospecialized com recycling servic
cal waste dispoase read the matransit, do not inuct and the lat
he installation: t
s power when de Handle the pow
this device awa
om children and
p during use.
at the light sousensitive peoplesight (flash blinsible) eye dama
eable parts insidts.
ass I. It is thereric connection. e does not exce
rotect it against
m between thefix the device (eimal distance ofW at a minimal Never cover th
Quality Warra
from dust and eFor sufficient air
m shocks and ab
ons of the device that may occur
forbidden for saf warranty.
03xW
anual
product cates that dispoof the unit (or b
mpany for recyclce. Respect theosal authoritieanual thoroughlynstall or use it atest version of
touching live wir
evice not in usewer cord by the
y form rain, mo
d unauthorized
urce, as this mae dness)
age
de the device. R
efore essential t eed the voltage
t damage. Have
device’s light oe.g. VDLSC7 orf 0.5 m from fla distance of 1 mhe device, nor p
anty on the last
extreme heat. Mr circulation, lea
buse. Avoid brut
e before actuallr will most prob
fety reasons. Da
osal of the devicbatteries) as unsing. This device local environmes. y before bringinand contact youf this user man
res can cause lif
e or when servic plug only.
oisture, splashin
users.
ay cause
Refer to an auth
that the device
stated in the sp
e an authorised
output and any ir VDLSC8). mmable and ex
m from the lighteartially, nor com
pages of this m
Make sure the vave at least 1” (
te force when o
y using it. Do nably be due to
amage caused b
©Vellem
ce after its lifecysorted municipae should be retuental rules.
g this device inr dealer. nual, please vi
fe-threatening
cing or maintena
ng and dripping
horized dealer fo
be earthed. Hav
pecifications of t
dealer replace i
lluminated surf
xplosive objectsed surface. mpletely.
manual.
entilation openi±2.5 cm) in fro
operating the de
ot allow operatiunprofessional u
by user modifica
man nv
ycle al rned
to
isit
ance
or
ve a
this
t if
ace.
or
ings nt of
evice.
ion use
ations

VDPL1003xW
25.03.2011 ©Velleman nv 4
• Mechanical wear is not covered by warranty. • Only use the device for its intended purpose. All other uses may lead to short circuits, burns,
electroshocks, lamp explosion, crash, etc. Using the device in an unauthorised way will void the warranty.
• Damage caused by disregard of certain guidelines in this manual is not covered by the warranty and the dealer will not accept responsibility for any ensuing defects or problems.
• A qualified technician should install and service this device. • Do not switch the device on immediately after it has been exposed to changes in temperature.
Protect the device against damage by leaving it switched off until it has reached room temperature. • This device is designed for professional use on stage, in discos, theatres, etc. The VDPL1003xW can
be used indoor (<35°C, <75%RH) with an alternating current of max. 240V AC/50Hz. • Lighting effects are not designed for permanent operation: regular operation breaks will prolong their
lives. • Use the original packaging if the device is to be transported. • Keep this manual for future reference.
4. Features • 12 channel in DMX mode for separate control of each LED • master dimmer and shutter via DMX mode • built-in programs for stand-alone and sound activated modes • pulse effect with adjustable speed • additional power output up to 10pcs at 230VAC • truss or floor mounting
5. Overview Refer to the illustrations on page 2 of this manual.
1 display with control buttons 4 DMX output A MODE button 5 sound sensitivity adjustment knob B UP button 6 power input/fuse holder C DOWN button 7 GND
2 microphone 8 power output 3 DMX input
6. Installation Refer to the illustrations on page 2 of this manual.
a) Overhead mounting • Have the device installed by a qualified person, respecting EN 60598-2-17 and all other applicable
norms. • The construction to which the device is attached should be able to support 10 times the weight of
the device for one hour without deformation. • The installation must always be secured with a secondary attachment e.g. a safety cable. • Never stand directly below the device when it is being mounted, removed or serviced. Have a
qualified technician check the device once a year and once before you bring it into service. • Install the device in a location with few passers-by and inaccessible to unauthorised persons. • Overhead mounting requires extensive experience: calculating workload limits, determining the
installation material to be used… Have the material and the device itself checked regularly. Do not attempt to install the device yourself if you lack these qualifications as improper installation may result in serious injuries.
• For truss-mounting, use an appropriate clamp (not incl.) and fit an M10 bolt through the centre of the (folded) bracket.
• Adjust the desired inclination angle via the mounting bracket and tighten the bracket screws.
b) DMX-512 connection • When applicable, connect an XLR cable to the female 3-pin XLR output of a controller (not incl.)
and the other side to the male 3-pin XLR input of the VDPL1003xW. Multiple VDPL1003xW’s can be linked through serial linking. The linking cable should be a dual core, screened cable with XLR input and output connectors.
• Maximum recommended serial data link distance is 500 meters (1640 ft). Maximum recommended number of fixtures on a serial data link is 32 fixtures.
• A DMX terminator is recommended for installations where the DMX cable has to run a long distance or is in an electrically noisy environment (e.g. discos). The terminator prevents corruption of the

25.03.20
digresin t
c) gene• Ma
coo• Hav• All
rhesw
• The
7. OpRefer to t
Menu F
stan
d-
alo
ne
Sla
ve
DM
X
Stand-AAuto M
• P• U
• P• U
SoundThis m• P• U
s
Slave MThis mActive • S• O
DMX MoThis m• A
stin
• W011
gital control signsistor between pthe chain.
eral ke sure there isoling. ve a qualified e fixtures must beostat or dimmeitch. e installation ha
eration the illustrations
Functions
menu
Alone Mode Mode
Press <MODE> Use <UP> or <D
~ Press <MODE> Use <UP> or <D
= fast). d-Active Mode mode allows a siPress <MODE> Use the audio sesensitive.
Mode ode allows a unmode.
Set the master uOn each slave u
ode mode allows youAll DMX-controllsignals. This digo the DMX contndividual addreWhen all devices
nal by electrical pins 2 and 3, wh
s no flammable
lectrician carry be powered direer circuit, even i
as to be approve
s on page 2 of th
function
built-in progra
~
speed
~
sound mod
slave mode
address
channel mod
until is dispDOWN> to selec
). until is dispDOWN> to selec ngle unit to rununtil is ensitivity knob o
nit to follow the
unit to auto or snit, press <MOD
to control the fed devices needital start addrestroller. The samss can be set fos have the same
VDPL100
5
noise. The DMXhich is then plug
material within
out the electricctly off a grounif the rheostat o
ed by an expert
his manual.
ams
select
(
select
e set th
e set th
set DM
de selecc
selecc
played. ct the desired p
played. ct the desired ru
to the beat of tdisplayed. on the back of t
output of a mas
sound-activatedDE> until
fixture by any ud a digital start ss is the channee starting addre
or every device.e address, all th
03xW X terminator is sgged into the XL
a 50cm radius
al connection. ded switched cior dimmer chan
t before the dev
t between switc
= loop of
t running speed
= slow,
he LED bar into s
he LED bar into s
MX address (
ción modo DMX
ción modo DMX
rogram
unning speed
the music.
the fixture [5] t
ster unit which
d mode. is displayed.
universal DMX co address so thatel number from ess can be used he units will “list
simply an XLR pLR output socke
of the device an
rcuit and cannonel is used sole
vice is taken into
description
hing and fading
~
of the internal
= fast
sound activated
slave mode
~ )
5 canales (+dir
12 canales (+d
~ (
~
to make the fixt
has been set to
ontroller. t the correct dev which the devicd for a whole gro
ten” to the cont©Vellem
plug with a 120Ωet of the last dev
nd there is suffi
ot be run off a ely for 0% to 10
o service.
built-in progra
)
program
d mode
)
rección)
dirección)
= loop of
( = slo
ture more or les
o Auto or Sound
vice responds toce starts to “listoup of devices o
trol signal on onman nv
Ω vice
cient
0%
ms
ow,
ss
-
o the en” or an
ne

25.03.20
psn
Exam• I
1o
• It(
• P• U• P• U
DMX C
5
011
particular channsimultaneously. number. Changimple: n case of the 5-
1 (CH1~5), the on. n case of the 12o 1 (CH1~12),
(CH25~36), andPress <MODE> Use <UP> or <DPress <MODE> Use <UP> or <D
Channel Values
5-Channel Mod
channel fro1 00
2 0001
3
000104070912141619212425
4 00
fro
5
00000000010101020202030303030404040505050606060607
nel. In other wor If you set indivng the settings
-channel VDPL1second unit to 6
2-channel VDPLthe second unit
d so on. until the DMX cDOWN> to selecuntil the DMX aDOWN> to set t
s
de
om to 00 255 dim00 009 no 10 255 Str00 010 no 11 047 Aut48 071 Aut72 095 Aut96 119 Aut20 143 Aut44 167 Aut68 191 Aut92 215 Aut16 239 Aut40 249 Aut50 255 sou00 255 Aut
om to L100 002
03 005
06 008 -09 011 -12 014 -15 017 -18 020 -21 023 -24 026 -27 029 -30 032 -33 035
36 038
39 041
42 044
45 047
48 050
51 053
54 056
57 059
60 062 -63 065 -66 068 -69 071 -72 074 -
VDPL100
6
rds: changing thvidual addresses of one channel
1003xW, you w6 (1 + 5) (CH6~
L1003xW, yout to 13 (1 + 12)
hannel mode (ct the desired Daddress (the desired start
mmer 0 ~ 100% function robe: slow ~ fast function to 1 to 2 to 3 to 4 to 5 to 6 to 7 to 8 to 9 to 10 (=loop of Aund controlled to-speed: slow ~
1 L2 L3 - - - - - - - - - - - - - - - - - - - - - - - - - - - - - - - - - - - - - - - - - - - - - - - - - - - -
03xW he settings of os, each device w will only affect
will have to set ~10), the third
will have to set) (CH13~24), th
orDMX mode (
) is shown. ting address (
descriptio
t (max. 20Hz)
Auto 1 ~ Auto 9)
~ fast (when chan
L4 L5 L6
- - -- - -- - - - -- -- -
- - -- - -- - -- - -- - -- - - - -- -- -
- - -- - -- - -- - -- - - - -- -- -
- - -
ne channel will will “listen” to a the device in q
the start addresto 11 (6 + 5) (C
t the start addrehe third to 25 (1
) is displayed. or m
~
on
nnel 3 = 011~24
6 L7 L8
- - - - - - - - - -
- - - - - - - - - - - - - - - -
- - - - - - - - - - - - - -
- - -
©Vellem
affect all deviceseparate channuestion.
ss of the first unCH11~15), and
ess of the first u13 + 12)
. mode)
).
49)
L9 L10 - - - - - - - - - - - - - - - - - - - - - - - - - - - - - - - - - - - - - - - - - - - -
man nv
es el
nit to so
unit

VDPL1003xW
25.03.2011 ©Velleman nv 7
from to L1 L2 L3 L4 L5 L6 L7 L8 L9 L10 075 077 - - - - - - - - 078 080 - - - - - - - - 081 083 - - - - - - - - 084 086 - - - - - - - - 087 089 - - - - - - - - 090 092 - - - - - - - - 093 095 - - - - - - - - 096 098 - - - - - - - - 099 101 - - - - - - - - 102 104 - - - - - - - - 105 107 - - - - - - - - 108 110 - - - - - - - - 111 113 - - - - - - - - 114 116 - - - - - - - - 117 119 - - - - - - - - 120 122 - - - - - - - - 123 125 - - - - - - - - 126 128 - - - - - - - - 129 131 - - - - - - - - 132 134 - - - - - - - - 135 137 - - - - - - - - 138 140 - - - - - - - - 141 143 - - - - - - - - 144 146 - - - - - - - - 147 149 - - - - - - - - 150 152 - - - - - - - - 153 155 - - - - - - - - 156 158 - - - - - - - - 159 161 - - - - - - - - 162 164 - - - - - - - - 165 167 - - - - - - - - 168 170 - - - - - - 171 173 - - - - - - 174 176 - - - - - - 177 179 - - - - - - 180 182 - - - - - - 183 185 - - - - - - 186 188 - - - - - - 189 191 - - - - - - 192 194 - - - - - - 195 197 - - - - - - - 198 200 - - - - - - - 201 203 - - - - - - - 204 206 - - - - - - - 207 209 - - - - - - - 210 212 - - - - - - - 213 215 - - - - - - - 216 218 - - - - - - - 219 221 - - - - 222 224 - - - - - - 225 227 228 230 - - - - 231 233 - - - - - 234 236 - - - - - 237 255
VDPL1003xW
25.03.2011 ©Velleman nv 8
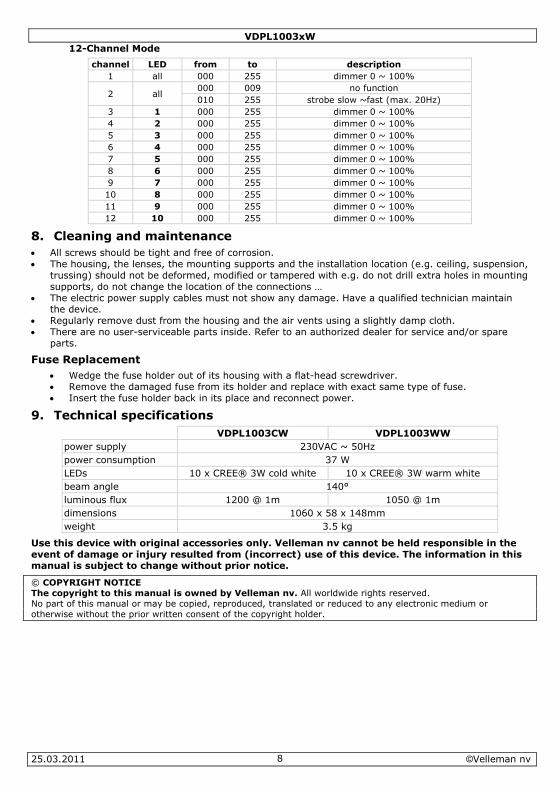
12-Channel Mode
channel LED from to description 1 all 000 255 dimmer 0 ~ 100%
2 all 000 009 no function 010 255 strobe slow ~fast (max. 20Hz)
3 1 000 255 dimmer 0 ~ 100% 4 2 000 255 dimmer 0 ~ 100% 5 3 000 255 dimmer 0 ~ 100% 6 4 000 255 dimmer 0 ~ 100% 7 5 000 255 dimmer 0 ~ 100% 8 6 000 255 dimmer 0 ~ 100% 9 7 000 255 dimmer 0 ~ 100% 10 8 000 255 dimmer 0 ~ 100% 11 9 000 255 dimmer 0 ~ 100% 12 10 000 255 dimmer 0 ~ 100%
8. Cleaning and maintenance • All screws should be tight and free of corrosion. • The housing, the lenses, the mounting supports and the installation location (e.g. ceiling, suspension,
trussing) should not be deformed, modified or tampered with e.g. do not drill extra holes in mounting supports, do not change the location of the connections …
• The electric power supply cables must not show any damage. Have a qualified technician maintain the device.
• Regularly remove dust from the housing and the air vents using a slightly damp cloth. • There are no user-serviceable parts inside. Refer to an authorized dealer for service and/or spare
parts.
Fuse Replacement • Wedge the fuse holder out of its housing with a flat-head screwdriver. • Remove the damaged fuse from its holder and replace with exact same type of fuse. • Insert the fuse holder back in its place and reconnect power.
9. Technical specifications VDPL1003CW VDPL1003WW power supply 230VAC ~ 50Hz power consumption 37 W LEDs 10 x CREE® 3W cold white 10 x CREE® 3W warm white beam angle 140° luminous flux 1200 @ 1m 1050 @ 1m dimensions 1060 x 58 x 148mm weight 3.5 kg
Use this device with original accessories only. Velleman nv cannot be held responsible in the event of damage or injury resulted from (incorrect) use of this device. The information in this manual is subject to change without prior notice.
© COPYRIGHT NOTICE The copyright to this manual is owned by Velleman nv. All worldwide rights reserved. No part of this manual or may be copied, reproduced, translated or reduced to any electronic medium or otherwise without the prior written consent of the copyright holder.

25.03.20
1. InlAan alleBelangr
w
t
Hebt u vDank u vtoestel beVoor mewww.hq
2. Vei
• Dit toegescho
• De beshandle
• De voekabel p
• Zorg voopperv
• Maak h• Installe
stoffen• Zorg da
bedekk
3. AlgRaadplee
• Leer eemogen
011
eiding e ingezetenen vijke milieu-infDit symbool op weggeworpen, dbatterijen) niet terechtkomen vrecyclagepunt bvragen, contacvoor uw aankoopeschadigd tijdeneer informatieqpower.eu.
iligheidsins
Wees voododelijke
Trek de sten als u h
Gebruik hopspatten
Houd dit t
Let op: d
Kijk niet r- epile- tijde- permte vermijd
Er zijn gereserveon
stel valt onder boolde technicus schikbare netspaiding.
edingskabel magplaatsen. oor een minimu
vlak het toestel vast eer het toestel o. Houd het toesat de ventilatieoken.
gemene richeg de Velleman
Beschermgeraken. V
Bescherm
erst de functies dit toestel niet
GEBRU
van de Europeformatie betre het toestel of ddit toestel schad bij het gewonevoor recyclage. brengen. Respeccteer dan de pp! Lees deze hans het transport over dit produ
structies
rzichtig bij de inelektroshocks t
tekker uit het sthet niet gebruikt
het toestel enkende vloeistoffen.
toestel uit de bu
it toestel wordt
rechtstreeks in depsieaanvallen blijke blindheid (
manente en onhden.
en door de gebrnderdelen, conta
beschermingsklmoet de elektrisanning mag niet
g niet beschadig
umafstand van 0
met een geschiop een minimumstel op een miniopeningen nooit
htlijnen n® service- en
m tegen stof en eVoorzie een ruim
m tegen schokke
van het toestel gebruiken. Mee
VDPL100
9
UIKERSHA
ese Unie effende dit prode verpakking gede kan toebreng huishoudelijke U moet dit toescteer de plaatselaatselijke aut
andleiding grondt, installeer hetuct en de mee
nstallatie: raak e vermijden.
topcontact (trekt.
el binnenshuis.
uurt van kindere
zeer warm tijd
de lichtbron ombij gevoelige pe(flitsblindheid) erroepelijke sch
ruiker vervangbacteer uw deale
asse I, wat wil zsche aansluitingt hoger zijn dan
gd zijn of ingeko
0,5 m tussen de
kte veiligheidskmafstand van 0,mumafstand vat verstopt zijn. U
kwaliteitsgara
extreme hitte. Zmte van minste
en en vermijd br
kennen voor uestal is beschad
03xW
ANDLEID
oduct eeft aan dat, alsgen aan het mil afval; het moettel naar uw ver
elijke milieuwetgtoriteiten betrdig voor u het to dan niet en raa
est recente ver
geen kabels aa
k niet aan de ka
. Bescherm teg
en en onbevoeg
ens het gebruik
rsonen
hade aan de oge
bare onderdelenr.
zeggen dat het g verzorgen. n de spanning in
ort worden. Laa
e lichtuitgang va
kabel (bv. VDLS5 m van ontvla
an 1 m van het U mag het toest
antie achteraan
Zorg dat de verlens 2,5 cm tusse
rute kracht tijde
het gaat gebrudiging het gevolg
DING
s het na zijn levieu. Gooi dit toet bij een gespecdeler of naar eegeving. reffende de veoestel in gebruikadpleeg uw dealrsie van deze h
n die onder stro
abel!) voordat u
en regen, vocht
gden.
k.
en
in dit toestel. V
toestel geaard
n de specificatie
t uw dealer zo n
an het toestel en
SC7 of VDLSC8mbare en explobelichte oppervtel nooit gedeel
n deze handleidi
luchtingsopeninen het toestel e
ens de bediening
iken. Ongeschog van onprofess
©Vellem
venscyclus wordestel (en eventucialiseerd bedrijfen lokaal
rwijdering. k neemt. Werd ler. handleiding, z
oom staan om
het toestel rein
tigheid en
Voor onderhoud
moet zijn. Een
s achteraan de
nodig een nieuw
n het belichte
). osieve voorwerplak. telijk of volledig
ing.
gen niet verston elk ander obje
g.
oolde personen sioneel gebruik.
man nv
dt uele f
het
ie
nigt
d of
we
pen of
g
pt ect.

VDPL1003xW
25.03.2011 ©Velleman nv 10
• Om veiligheidsredenen mag u geen wijzigingen aanbrengen. Schade door wijzigingen die de gebruiker heeft aangebracht valt niet onder de garantie.
• Mechanische slijtage valt niet onder de garantie. • Gebruik het toestel enkel waarvoor het gemaakt is. Andere toepassingen kunnen leiden tot kort-
sluitingen, brandwonden, elektrische schokken, enz. Bij onoordeelkundig gebruik vervalt de garantie. • De garantie geldt niet voor schade door het negeren van bepaalde richtlijnen in deze handleiding en uw
dealer zal de verantwoordelijkheid afwijzen voor defecten of problemen die hier rechtstreeks verband mee houden.
• Laat dit toestel installeren en onderhouden door een geschoolde technicus. • Om beschadiging te vermijden, zet u het toestel best niet aan onmiddellijk nadat het werd blootgesteld
aan temperatuurschommelingen. Wacht tot het toestel op kamertemperatuur gekomen is. • Dit toestel is ontworpen voor professioneel gebruik op podia, in disco's, enz. U mag dit toestel enkel
binnenshuis gebruiken (<35°C, <75%RH). Sluit aan op 240 VAC/50 Hz. • Lichteffecten zijn niet ontworpen voor continue werking: regelmatige onderbrekingen doen ze langer
meegaan. • Gebruik de oorspronkelijke verpakking wanneer u het toestel vervoert. • Bewaar deze handleiding voor verdere raadpleging.
4. Eigenschappen • 12-kanaals DMX-sturing met afzonderlijke aansturing van elke led • masterdimmer en -sluiter in DMX-sturing • stand-alone- en muzieksturing met ingebouwde effecten • pulse-effect met instelbare snelheid • extra 230V-voedingsuitgang geschikt voor aansluiting tot 10 projectoren • geschikt voor montage in de hoogte of op de vloer
5. Overzicht Raadpleeg de figuren op pagina 2 van deze handleiding.
1 display met bedieningsknoppen 4 DMX-uitgang A MODE-knop 5 instelknop gevoeligheid B UP-knop 6 voedingsingang/zekeringhouder C DOWN-knop 7 GND-aansluiting
2 microfoon 8 voedingsuitgang 3 DMX-ingang
6. Installatie Raadpleeg de figuren op pagina 2 van deze handleiding.
a) Het toestel monteren • Laat een geschoolde technicus dit toestel installeren conform EN 60598-2-17 en andere toepasselijke
normen. • De constructie waaraan het toestel wordt bevestigd, moet gedurende 1 uur 10 x het gewicht van dit
toestel kunnen dragen zonder te vervormen. • Maak het toestel ook vast met een veiligheidskabel. • Sta nooit recht onder het toestel wanneer u het monteert, verwijdert of schoonveegt. Laat het toestel
controleren door een geschoolde technicus voor u het in gebruik neemt en laat het 1 x per jaar volledig nakijken.
• Installeer dit toestel op een plaats waar niemand langs moet lopen, kan neerzitten of het toestel kan aanraken.
• Een degelijke praktijkervaring is vereist voor de plaatsing van dit toestel. U moet de maximumbelasting van de draagconstructie kunnen berekenen, weten welk constructiemateriaal u kunt gebruiken en u moet het gebruikte materiaal en het toestel af en toe laten nakijken. Monteer het toestel niet zelf indien u er geen ervaring mee heeft. Een slechte montage kan leiden tot verwondingen.
• Regel de gewenste invalshoek door middel van de montagebeugel en draai de regelschroeven stevig aan.
• Een geschoolde elektricien moet het toestel aansluiten. • Sluit het toestel via de stekker aan op het lichtnet. Sluit het niet aan op een dimmerpack.

25.03.20
b) DMXRaadplee
• Indie(nietkunt Gebr
• De meenz
• Een Domgehet dstekkde XL
c) Alge• Verw
koeli• Een g• Alle t
weerals e
• De in
7. GeRaadplee
Menufu
stan
d-a
lon
e
slave
DM
X
Stand-aAutom
• Dru• Kie• Dru• Kie
MuziekSturing• Dru• Ge• Het
011
X512-aansluieg de figuren op
en van toepassin meegeleverd) e verscheidene Vruik daarvoor eemaximaal aanbevelfde aansluitingDMX eindweersteving met veel edigitale controleker met een weeLR-uitgang van
emeen wijder alle brandng. geschoolde elektoestellen moetrstand of dimcircen 0% tot 100%nstallatie moet v
bruik eg de figuren op
uncties
menu
i
alone matische sturin
uk op <MODE>es het gewensteuk op <MODE>es de gewenste
= snel). ksturing g van een enkeuk op <MODE>bruik de instelkt toestel reagee
iting p pagina 2 van d
ng, sluit een XLen de andere ka
VDPL1003xW’sen 2-aderige afgvolen kabellengg is 32. tand is aanbevoelektrische ruissignaal door eleerstand van 120 het laatste toes
baar materiaal
ktricien moet he via een geaardcuit gevoed wor% inschakeling. voor het eerste
p pagina 2 van d
functie
interne program
~
snelheid
~
muzieksturin
slave
adres
kanaalmodu
ng
tot op de lce programma ( tot op de luitvoersnelheid
l toestel naarge tot op
knop achteraan ert nu op de bea
VDPL100
11
deze handleidin
R-kabel aan de ant van de mans aan elkaar kopgeschermde kabgte is 500 meter
olen als de DMX (bv. een discotektrische ruis. D0 Ω van pin 2 nstel in de reeks.
in een straal va
et toestel aanslu stopcontact gerden, ook al geb gebruik gekeur
deze handleidin
mma’s
internoverg
(
select
ng schak
schak
stel h
us 5-kan
12-ka
cd-display versc ~
cd-display versc ( ~
elang de beat vade lcd-display vhet toestel [5] at van de muzie
03xW
g.
vrouwelijke 3-pnelijke 3-pin XL
ppelen met behubel met XLR ingar, het aanbevole
-kabel vrij langtheek). De eindwDe DMX eindweeaar 3. Deze XLR.
an 0,5 m rond h
uiten. evoed worden enbruikt u de varia
rd worden door
g.
ne programma’sang
= lus van
teer de snelheid
= traag,
kel de muziekstu
kel de slavefunct
et DMX-adres in
naals DMX- sturi
anaals DMX- stu
chijnt. ) met <UP> e
chijnt. ) met <UP
an de muziek. verschijnt. om de gevoeligek dankzij de int
pin XLR-uitgangLR-ingang van dulp van een serang- en uitgangen maximumaan
is of wordt gebweerstand voorerstand is niets R-stekker wordt
het toestel en vo
n mogen niet viabele weerstand
een expert.
omschrijving
s met plotselinge
~
d van het interne
= snel
uring in
tie in
n ( ~
ing
ring
en <DOWN>.
> en <DOWN>
gheid in te stelleterne microfoon
©Vellem
van een controde VDPL1003xiële koppeling. gsaansluitingen.ntal toestellen o
bruikt in een komt corruptie meer dan een Xt dan aangeslote
oorzie voldoende
a een variabeled of het dimcircu
e of geleidelijke
)
e programma
)
( = traa
en. .
man nv
oller W. U
. op
van XLR-en op
e
e uit
e
ag,

25.03.20
Slavef
Een toemuziek• Sch• Dru
DMX-s
Sturing• Alle D
op designakunt
• Wannandeop rekanatoest
Bijvoo• In he
(CH15) (C
• In he(CH1(13 +
• Druk• Druk• Druk• Kies
DMX-wa
5
011
functie
estel in slavefunksturing). hakel de automuk op elk slavet
sturing
g van het toesteDMX-gestuurdee signalen. Dit daal van de DMX per toestel eenneer u een enke
ere woorden: waeageren. Wanneal. Met andere wtel op dat kanaaorbeeld: et geval van de 1~5) moeten insCH11~15), enz.et geval van de 1~12) moeten in+ 12) (CH25~36k op <MODE> tok op <UP> of <Dk op <MODE> tohet DMX-starta
aarden per kan
5-kanaals mod
kanaal va1 00
2 0001
3
000104070912141619212425
4 00
va
5
000000000101010202020303
nctie volgt het p
atische of muzietoestel op <MOD
el via een univer toestellen hebbdigitale startadr controller. U ku nieuw startadr
el startadres insanneer u de insteer u verschillenwoorden: wannal reageren.
5-kanaals VDPstellen, van het 12-kanaals VDPnstellen, van he6), enz. ot de DMX-kanaDOWN> en seleot het DMX-adredres met <UP>
naal
dus
an tot 00 255 dim00 009 stro10 255 stro00 010 gee11 047 aut48 071 aut72 095 aut96 119 aut20 143 aut44 167 aut68 191 aut92 215 aut16 239 aut40 249 aut50 255 mu00 255 aut
an tot L100 002
03 005
06 008 -09 011 -12 014 -15 017 -18 020 -21 023 -24 026 -27 029 -30 032 -33 035
VDPL100
12
programma van
eksturing in op DE> tot
rsele DMX-contrben een digitaalres is het kanaaunt één enkel stres ingeven. stelt, zullen alletellingen voor 1nde adressen inseer u de instelli
L1003xW, zult tweede toestel
PL1003xW, zuet tweede toeste
aalmodus (ecteer de gewenes ( ) op
> of <DOWN> (
mmer 0 ~ 100% oboscoop uit oboscoop: traag en functie to 1 to 2 to 3 to 4 to 5 to 6 to 7 to 8 to 9 to 10 (= lus van uzieksturing tomatische snelh
1 L2 L3 - - - - - - - - - - - - - - - - - - - - - - - - - - - -
03xW
het mastertoes
het mastertoes op de lcd-displa
roller. startadres nodlnummer van wtartadres gebrui
toestellen ‘luist kanaal verandestelt, dan luisteingen van een k
t u het startadre op 6 (1 + 5) (C
ult u het startadel op 13 (1 + 12
of ) onste DMX-sturing de lcd-display v
~
omschrijv
~ snel (max. 20
auto 1 ~ auto 9)
eid: traag ~ sne
L4 L5 L6
- - -- - -- - - - -- -- -
- - -- - -- - -- - -- - -
stel (automatisc
tel. ay verschijnt.
ig, zodat het juwaarop het toestiken voor een g
teren’ naar hetzert, zullen alle trt elk toestel nakanaal verander
es van het eerstCH6~10), van h
res van het eer2) (CH13~24), v
p de lcd-displayg ( ofverschijnt.
).
ing
Hz)
)
l (als kanaal 3 =
6 L7 L8
- - - - - - - - - -
- - - - - - - - - -
©Vellem
che of
iste toestel reagtel ‘luistert’ naaroep toestellen
zelfde kanaal. Mtoestellen er tegaar een ander rt, zal enkel het
te toestel op 1 het derde op 11
ste toestel op 1van het derde o
y verschijnt. ).
011~249
L9 L10 - - - - - - - - - - - - - - - - - - - -
man nv
geert r het of u
et gelijk
(6 +
op 25

VDPL1003xW
25.03.2011 ©Velleman nv 13
van tot L1 L2 L3 L4 L5 L6 L7 L8 L9 L10 036 038 - - - - - - - - 039 041 - - - - - - - - 042 044 - - - - - - - - 045 047 - - - - - - - - 048 050 - - - - - - - - 051 053 - - - - - - - - 054 056 - - - - - - - - 057 059 - - - - - - - - 060 062 - - - - - - - - 063 065 - - - - - - - - 066 068 - - - - - - - - 069 071 - - - - - - - - 072 074 - - - - - - - - 075 077 - - - - - - - - 078 080 - - - - - - - - 081 083 - - - - - - - - 084 086 - - - - - - - - 087 089 - - - - - - - - 090 092 - - - - - - - - 093 095 - - - - - - - - 096 098 - - - - - - - - 099 101 - - - - - - - - 102 104 - - - - - - - - 105 107 - - - - - - - - 108 110 - - - - - - - - 111 113 - - - - - - - - 114 116 - - - - - - - - 117 119 - - - - - - - - 120 122 - - - - - - - - 123 125 - - - - - - - - 126 128 - - - - - - - - 129 131 - - - - - - - - 132 134 - - - - - - - - 135 137 - - - - - - - - 138 140 - - - - - - - - 141 143 - - - - - - - - 144 146 - - - - - - - - 147 149 - - - - - - - - 150 152 - - - - - - - - 153 155 - - - - - - - - 156 158 - - - - - - - - 159 161 - - - - - - - - 162 164 - - - - - - - - 165 167 - - - - - - - - 168 170 - - - - - - 171 173 - - - - - - 174 176 - - - - - - 177 179 - - - - - - 180 182 - - - - - - 183 185 - - - - - - 186 188 - - - - - - 189 191 - - - - - - 192 194 - - - - - - 195 197 - - - - - - - 198 200 - - - - - - - 201 203 - - - - - - - 204 206 - - - - - - - 207 209 - - - - - - -

VDPL1003xW
25.03.2011 ©Velleman nv 14
van tot L1 L2 L3 L4 L5 L6 L7 L8 L9 L10 210 212 - - - - - - - 213 215 - - - - - - - 216 218 - - - - - - - 219 221 - - - - 222 224 - - - - - - 225 227 228 230 - - - - 231 233 - - - - - 234 236 - - - - - 237 255
12-kanaals modus
kanaal LED van tot omschrijving 1 alle 000 255 dimmer 0 ~ 100%
2 alle 000 009 stroboscoop uitgeschakeld 010 255 stroboscoop traag ~snel (max. 20 Hz)
3 1 000 255 dimmer 0 ~ 100% 4 2 000 255 dimmer 0 ~ 100% 5 3 000 255 dimmer 0 ~ 100% 6 4 000 255 dimmer 0 ~ 100% 7 5 000 255 dimmer 0 ~ 100% 8 6 000 255 dimmer 0 ~ 100% 9 7 000 255 dimmer 0 ~ 100% 10 8 000 255 dimmer 0 ~ 100% 11 9 000 255 dimmer 0 ~ 100% 12 10 000 255 dimmer 0 ~ 100%
8. Reiniging en onderhoud • Alle gebruikte schroeven moeten goed zijn aangespannen en mogen geen sporen van roest vertonen. • De behuizing, de lenzen, de montagebeugels en de montageplaats (bv. het plafond of het gebinte)
mogen niet vervormd zijn of aangepast worden (geen extra gaten in montagebeugels, aansluitingen niet verplaatsen, etc.)
• De voedingskabels mogen niet beschadigd zijn. Laat het toestel onderhouden door een geschoolde technicus.
• Verwijder regelmatig het stof van de behuizing en de ventilatieopeningen met een vochtige doek. • U mag geen onderdelen vervangen. Raadpleeg uw erkende verdeler voor eventuele reserveonderdelen.
De zekering vervangen • Maak de zekeringhouder los met behulp van een schroevendraaier met platte punt. • Verwijder de oude zekering en vervang door een zekering van hetzelfde type. • Plaats de zekeringhouder terug in het toestel en koppel het toestel aan het lichtnet.
9. Technische specificaties
VDPL1003CW VDPL1003WW voeding 230 VAC ~ 50 Hz verbruik 37 W leds 10 x CREE® 3 W koud wit 10 x CREE® 3 W warm wit stralingshoek 140° lichtstroom 1200 @ 1 m 1050 @ 1 m afmetingen 1060 x 58 x 148 mm gewicht 3,5 kg
Gebruik dit toestel enkel met originele accessoires. Velleman nv is niet aansprakelijk voor schade of kwetsuren bij (verkeerd) gebruik van dit toestel. De informatie in deze handleiding kan te allen tijde worden gewijzigd zonder voorafgaande kennisgeving.
© AUTEURSRECHT Velleman nv heeft het auteursrecht voor deze handleiding. Alle wereldwijde rechten voorbehouden. Het is niet toegestaan om deze handleiding of gedeelten ervan over te nemen, te kopiëren, te vertalen, te bewerken en op te slaan op een elektronisch medium zonder voorafgaande schriftelijke toestemming van de rechthebbende.

25.03.20
1. IntAux résiDes info
l’environnNous voul’appareilrevendeuPour pluvisiter n
2. Con
• Cet appUn tech
• La tensnotice.
• Le câblrenouv
• Respec• Fixer l’a• Installe
explosi• Ne jam
3. DirSe référe
• Se fampersonprofess
011
troduction idents de l'Uni
ormations enviCe symbole surpeut polluer l'eéventuelles) pal’appareil en qurecyclage localnement. En casus remercions dl. Si l’appareil aur. us d’informationotre site web
nsignes de
Être prudeélectrocho
Débranchdébranche
Utiliser ceprojection
Garder ho
Attention
Ne pas re- de c- d’ave- d’end
Il n’y a auéventuelle
pareil ressort à hnicien qualifié sion réseau ne p le d’alimentationveler le câble d’acter une distancappareil à l’aideer le VDPL1003f. Installer le V
mais obstruer les
rectives géner à la garantie
Protéger cde ventilaprojecteu
Protéger c
miliariser avec lenes non qualifiésionnel.
NO
ion européennironnementaler l'appareil ou l'
environnement. armi les déchetsuestion. Renvoy. Il convient de s de questionse votre achat ! été endommag
on concernant www.hqpowe
sécurité
ent lors de l’instocs mortels.
er l’appareil s’iler l'appareil ; no
et appareil uniqns d’eau.
ors de la portée
n : le boîtier du
garder directemrise d’épilepsie euglement tempdommagement
ucune pièce maies chez votre re
la classe de prodoit établir la copeut pas dépass
n ne peut pas êalimentation si ne minimum de 0
e d’un câble de s3xW à une distaDPL1003xW às fentes d’aérati
nérales e de service et
contre la poussiation ne soient pr et tout autre o
contre les chocs
fonctionnemenées d’opérer cet
VDPL100
15
OTICE D
ne es importantesemballage indiqNe pas jeter uns municipaux noyer les équipeme respecter la régs, contacter lesLire la présente
gé pendant le tr
t cet article et er.eu.
tallation : touch
n’est pas utiliséon pas le câble.
uement à l'int
de personnes n
spot chauffe pe
ment dans la souchez les personporaire (aveugle permanent et i
intenable par l’uevendeur.
otection I, ce quonnexion électrser la tension m
être replissé ou enécessaire. 0,5 m entre la ssécurité adéquaance minimale d une distance mion. Éviter de co
de qualité Ve
ère. Protéger copas bloquées. Laobjet.
s et le traiter av
nt de l’appareil at appareil. La plu
03xW
’EMPLOI
s concernant cque que l’éliminn appareil électron sujets au tri ents usagés à vglementation locs autorités loce notice attentivansport, ne pas
la version la p
her un câble sou
é ou pour le net
térieur. Protége
non qualifiées et
endant l’usage.
urce lumineuse nnes sujettes ement par éclairréversible de l’
utilisateur. Com
ui implique que ique.
mentionnée dans
endommagé. D
sortie lumière dat (p.ex. VDLSCde 0,5 m de tou
minimale de 1 mouvrir, entièrem
lleman® à la fi
ontre la chaleuraisser une dista
vec circonspectio
avant de l’utiliseupart des dégât
I
ce produit ation d’un apparique ou électronsélectif ; une dé
votre fournisseucale relative à la
cales pour élimvement avant las l’installer et co
plus récente d
us tension peut
ttoyer. Tirer la f
er de la pluie, d
t de jeunes enfa
afin d’éviter les
r) ’œil
mander des piè
l’appareil doit ê
s les spécificatio
emander à votr
e l’appareil et laC7 ou VDLSC8)ut objet ou prodm de la surface iment ou partielle
n de cette notic
r extrême. Veillence de minimum
on pendant l’opé
er. Ne pas permts sont causés p
©Vellem
reil en fin de vinique (et des piéchèterie traiterr ou à un servica protection de
mination. mise en service
onsulter votre
e cette notice,
causer des
fiche pour
e l’humidité et
ants.
s risques
èces de rechang
être mis à la terr
ons à la fin de ce
re revendeur de
a surface illumin). duit inflammablelluminée.
ement, l’apparei
ce.
er à ce que les fm 2,5 cm entre
ération.
mettre pas aux par un usage no
man nv
e les ra ce de
e de
,
des
e
re.
ette
née.
e ou
il.
fentes le
on

VDPL1003xW
25.03.2011 ©Velleman nv 16
• Toute modification est interdite pour des raisons de sécurité. Les dommages occasionnés par des modifications par le client ne tombent pas sous la garantie.
• L’usure mécanique ne tombe pas sous la garantie. • N’utiliser votre VDPL1003xW qu’à sa fonction prévue. Tout autre usage peut causer des courts-
circuits, des brûlures, des électrochocs, etc. Un usage impropre annule d'office la garantie. • La garantie ne s’applique pas aux dommages survenus en négligeant certaines directives de cette
notice et votre revendeur déclinera toute responsabilité pour les problèmes et les défauts qui en résultent.
• Confier l’installation et l’entretien à un personnel qualifié. • Ne pas brancher l’appareil après exposition à des variations de température. Afin d’éviter des
dommages, attendre jusqu’à ce que l’appareil ait atteint la température ambiante avant de l’utiliser. • Cet appareil a été développé pour usage professionnel dans des discothèques, des théâtres, etc.
N’utiliser cet appareil qu’à l’intérieur (<35°C, <75°RH). Le raccorder à une source de courant CA de. 240 VCA/50 Hz.
• Un effet lumineux n’est pas conçu pour une opération continue. Des pauses régulières prolongeront sa vie.
• Transporter l’appareil dans son emballage originel. • Garder cette notice pour toute référence ultérieure.
4. Caractéristiques • mode DMX à 12 canaux pour un pilotage séparé de chaque LED • variateur et obturateur master en mode DMX • modes autonome et de pilotage par le son avec effets préprogrammés • effet de pulsation avec vitesse réglable • sortie 230V supplémentaire pour l'interconnexion jusqu'à 10 projecteurs • convient pour un montage en hauteur ou au sol
5. Description Se référer aux illustrations à la page 2 de cette notice.
1 afficheur avec boutons de configuration 4 sortie DMX A bouton de sélection MODE 5 réglage de sensibilité B bouton UP 6 prise d’alimentation/porte-fusible C bouton DOWN 7 connexion GND
2 microphone 8 sortie d’alimentation 3 entrée DMX
6. Installation Se référer aux illustrations à la page 2 de cette notice.
a) Montage de l’appareil • Un technicien qualifié doit installer l’appareil en respectant EN 60598-2-17 et toute autre norme
applicable. • La construction portante de l’appareil doit être capable de supporter 10 x le poids de l’appareil
pendant une heure, sans qu’une déformation de la construction en résulte. • Fixer votre VDPL1003xW à l’aide d’un câble de sécurité (sécurité supplémentaire). • Éviter de vous positionner en dessous de l’appareil pour l’enlever ou lors du montage ou du
nettoyage. Un technicien qualifié doit réviser l’appareil avant la mise en service. Organiser une révision minutieuse annuelle.
• Installer l’appareil à un endroit où personne ne peut passer ou s’asseoir et où personne ne peut le toucher.
• L’installation de cet appareil exige une solide expérience pratique : le calcul de la charge max. de la construction, les matériaux d’installation requis etc. De temps en temps, un technicien qualifié doit vérifier la construction portante et l’appareil même. Ne pas essayer d’installer cet appareil vous-même si vous n’avez pas les qualifications requises ; une installation incorrecte peut entraîner des blessures.
• Déterminer l’angle d’inclinaison au moyen de l’étrier de montage et serrer les vis de montage. • Un électricien qualifié doit établir la connexion électrique. • Brancher l’appareil sur le réseau électrique par la fiche d’alimentation. Ne pas le brancher sur un bloc
de puissance. b) Connexion DMX512 • Si nécessaire, connecter un câble à fiche XLR à la sortie XLR femelle à 3 broches de votre contrôleur

25.03.20
(nonplusiecond
• Longsérie
• Une distadiscopar lerésistconn
c) En g• Enlev
venti• Un é• Tout
alimeutilis
• Un ex
7. EmSe référe
Fonctio
mo
de
au
ton
om
e
esc
lave
DM
X
Mode aPilotag
• Enf• Sél
bou• Enf• Sél
lenPilota
Ce m• Enf• Rég• Le
Mode eUn projou par • Act
011
incl.) et l’autreeurs VDPL1003ucteurs avec deueur maximalelle : 32. résistance de tence ou s’il est u
othèque). La rése bruit électriqutance de 120 Ωectée à la sortieénéral ver tout matériailation suffisantelectricien qualifi projecteur doitenté depuis un ré comme un intxpert doit appro
mploi er aux illustratio
ons du menu
menu
autonome ge automatiqu
foncer la touchelectionner le proucle de foncer la touchelectionner le pro
nt ou = age par le son mode permet defoncer la touchegler la sensibilit projecteur réag
esclave jecteur en mode le son). tiver le mode pi
fiche XLR mâle3xW à partir d’es connecteurs d de la connexion
erminaison DMXutilisé dans un esistance de termue. La résistance de broche 2 vee XLR du dernie
au inflammable e. ié doit établir la être branché surhéostat ou un cterrupteur marcouver l’installati
ons en page 2 d
fonction
programme int
~
vitesse
~
pilotage par le
mode esclav
adresse
pilotage DM
ue
e <MODE> jusqogramme ( ~ ). e <MODE> jusqogramme (rapide).
faire réagir un e <MODE> jusqté depuis le bougit au rythme de
e esclave suit le
lotage automat
VDPL100
17
e à 3 broches à ’une connexion d’entrée et de sn : 500 mètres.
X est à recommaenvironnement aminaison préviene de terminaisoers broche 3 (voer appareil de la
dans un rayon
connexion élecur une prise de circuit variateurche/arrêt (de 0%on avant qu’elle
e cette notice.
terne
sélect
sélect
son activa
ve activa
adres
MX sélect
sélect
qu’à ce que ~ ) a
qu’à ce que ~ ) a
seul appareil auqu’à ce que ton de réglage
e la musique de
e programme du
ique ou par le s
03xW l’entrée du VDPsérielle. Utiliser
sortie XLR. Nombre maxim
ander si le câbleavec beaucoup nt la corruption n DMX n’est rie
oir illustration à série.
de 0,5 m autou
ctrique. courant mise àr, même si le rh% à 100%). e puisse être pr
tion effet à trans
tion vitesse prog
= lent,
ation du mode d
ation du mode d
sage DMX (
tion mode DMX
tion mode DMX
s’affiche. avec les touche
s’affiche. avec les touche
u rythme de la m s’affiche.
à l’arrière du prpuis le microph
u projecteur ma
son sur le projec
PL1003xW. Il er un câble de co
mal d’unités sur
e DMX doit couvde bruit électriqdu signal de con d’autre qu’un gauche). Cette
r de l’appareil e
la terre et ne phéostat ou le circ
rise en service.
description
sition subite ou
grammes intern
= rapide
de pilotage par l
de pilotage escla
~ )
5 canaux
12 canaux
es <UP> et <DO
s <UP> et <DO
musique.
rojecteur [5]. one interne.
aître (mode de p
cteur maître.
©Vellem
est possible de rnnexion blindé
une connexion
vrir une grande que (p.ex. une ntrôle numérique fiche XLR ave fiche XLR est
et assurer une
peut pas être cuit variateur es
graduelle
nes
e son
ave
OWN> (
OWN> (
pilotage automa
man nv
relier à 2
ue c une
st
=
=
atique

25.03.20
• Enf
Mode dCe mod• Tous
que lindiqune s
• DanscanaAvecconsé
Exemp• Pour
deux• Pour
deux• Enfon• Enfon• Enfon• Sélec
Valeu
Mode
011
foncer la touche
de pilotage Dde permet de pi les appareils pies appareils corue le numéro dseule adresse ds le cas d’une sel. Tous les appa des adresses déquent, un ajusple : le VDPL1003x
xième 6 (1 + 5) le VDPL1003x
xième 13 (1 + 1ncer la touche <ncer la touche <ncer la touche <ctionner l’adress
rs DMX par ca
5 canaux
canal d1 00
2 0001
3
000104070912141619212425
4 00
d
5
000000000101010202020303030304040405
e <MODE> sur c
DMX iloter votre projilotés par un sigrrects réagissene canal sur leque départ pour toeule adresse, toareils seront donde départ individstement des rég
xW à 5 canaux, (CH6~10), du txW à 12 canaux2) (CH13~24),
<MODE> jusqu’<UP> ou <DOW<MODE> jusqu’se DMX (
anal
de à 00 255 obt00 009 pas10 255 stro00 010 pas11 047 aut48 071 aut72 095 aut96 119 aut20 143 aut44 167 aut68 191 aut92 215 aut16 239 aut40 249 aut50 255 pilo00 255 vite
e à L100 002
03 005
06 008 -09 011 -12 014 -15 017 -18 020 -21 023 -24 026 -27 029 -30 032 -33 035
36 038
39 041
42 044
45 047
48 050
51 053
VDPL100
18
chaque projecte
ecteur sans congnal DMX demannt sur les signauuel l’appareil écooute une série dus les appareilsnc influencés lorduelles, chaque glages d’un cana
l’adresse de détroisième 11 (6x, l’adresse de d du troisième 25’à ce que le mod
WN> et sélection’à the DMX addr ~ ) ave
turateur 0 ~ 100s de fonction oboscope : lent ~s de fonction to 1 to 2 to 3 to 4 to 5 to 6 to 7 to 8 to 9 to 10 (= boucle dotage par le son esse: lent ~ rapi
1 L2 L3 - - - - - - - - - - - - - - - - - - - - - - - - - - - - - - - - - - - - - - -
03xW eur esclave jusq
ntrôleur DMX. ndent une adresux de contrôle. Coute le contrôled’appareils ou us « écouteront »rsque vous chan appareil « écoual n’influence qu
épart du premie + 5) (CH11~15
départ du premi5 (13 + 24) (CHde DMX (nner le mode DMress ( ) sec les touches <
descriptio0%
~ rapide (max. 2
de auto 1 ~ auto
de (si canal 3 =
L4 L5 L6
- - -- - -- - - - -- -- -
- - -- - -- - -- - -- - -- - - - -- -- -
- - -- - -
qu’à ce que
sse de départ DCette adresse dur DMX. Vous a
une adresse de d» les mêmes signgez les réglageutera » son propue l'appareil sur
r appareil est 15), etc. er appareil est
H25~36), etc. ou ) s’
MX ( ous’affiche. <UP> et <DOW
on
20 Hz)
9)
011~249)
6 L7 L8
- - - - - - - - - -
- - - - - - - - - - - - - - - -
- - - -
©Vellem
s’affiche.
DMX pour assuree départ numér
avez le choix endépart par appanaux, sur un se
es d’un seul canpre canal. Par ce canal.
(CH1~5), du
1 (CH1~12), du
’affiche. ).
N>.
L9 L10 - - - - - - - - - - - - - - - - - - - - - - - - - - - - - - - -
man nv
er rique tre
areil. eul al.
u

VDPL1003xW
25.03.2011 ©Velleman nv 19
de à L1 L2 L3 L4 L5 L6 L7 L8 L9 L10 054 056 - - - - - - - - 057 059 - - - - - - - - 060 062 - - - - - - - - 063 065 - - - - - - - - 066 068 - - - - - - - - 069 071 - - - - - - - - 072 074 - - - - - - - - 075 077 - - - - - - - - 078 080 - - - - - - - - 081 083 - - - - - - - - 084 086 - - - - - - - - 087 089 - - - - - - - - 090 092 - - - - - - - - 093 095 - - - - - - - - 096 098 - - - - - - - - 099 101 - - - - - - - - 102 104 - - - - - - - - 105 107 - - - - - - - - 108 110 - - - - - - - - 111 113 - - - - - - - - 114 116 - - - - - - - - 117 119 - - - - - - - - 120 122 - - - - - - - - 123 125 - - - - - - - - 126 128 - - - - - - - - 129 131 - - - - - - - - 132 134 - - - - - - - - 135 137 - - - - - - - - 138 140 - - - - - - - - 141 143 - - - - - - - - 144 146 - - - - - - - - 147 149 - - - - - - - - 150 152 - - - - - - - - 153 155 - - - - - - - - 156 158 - - - - - - - - 159 161 - - - - - - - - 162 164 - - - - - - - - 165 167 - - - - - - - - 168 170 - - - - - - 171 173 - - - - - - 174 176 - - - - - - 177 179 - - - - - - 180 182 - - - - - - 183 185 - - - - - - 186 188 - - - - - - 189 191 - - - - - - 192 194 - - - - - - 195 197 - - - - - - - 198 200 - - - - - - - 201 203 - - - - - - - 204 206 - - - - - - - 207 209 - - - - - - - 210 212 - - - - - - - 213 215 - - - - - - - 216 218 - - - - - - - 219 221 - - - - 222 224 - - - - - - 225 227

VDPL1003xW
25.03.2011 ©Velleman nv 20
de à L1 L2 L3 L4 L5 L6 L7 L8 L9 L10 228 230 - - - - 231 233 - - - - - 234 236 - - - - - 237 255
Mode 12 canaux
canal LED de à description 1 toutes 000 255 obturateur 0 ~ 100%
2 toutes 000 009 pas de fonction 010 255 stroboscope : lent ~ rapide (max. 20 Hz)
3 1 000 255 obturateur 0 ~ 100% 4 2 000 255 obturateur 0 ~ 100% 5 3 000 255 obturateur 0 ~ 100% 6 4 000 255 obturateur 0 ~ 100% 7 5 000 255 obturateur 0 ~ 100% 8 6 000 255 obturateur 0 ~ 100% 9 7 000 255 obturateur 0 ~ 100% 10 8 000 255 obturateur 0 ~ 100% 11 9 000 255 obturateur 0 ~ 100% 12 10 000 255 obturateur 0 ~ 100%
8. Nettoyage et entretien • Serrer les écrous et les vis et vérifier qu’ils ne rouillent pas. • Le boîtier, les lentilles, les supports de montage et la construction portante ne peuvent pas être
déformés, adaptés ou bricolés p.ex. pas de trous additionnels dans un support, ne pas déplacer les connexions, etc.
• Les câbles d'alimentation ne peuvent pas être endommagés. Un technicien qualifié doit entretenir l’appareil.
• Dépoussiérer régulièrement le boîtier et les fentes d’aération avec un chiffon humide. • Il n’y a aucune pièce maintenable par l’utilisateur. Commander des pièces de rechange éventuelles
chez votre revendeur.
Remplacement du fusible • Retirer le porte-fusible de son emplacement à l’aide d’un tournevis à lame plate. • Retirer le fusible usagé et le remplacer par un fusible du même type. • Réinsérer le porte-fusible dans son emplacement et reconnecter l’alimentation.
9. Spécifications techniques VDPL1003CW VDPL1003WW alimentation 230 VCA ~ 50 Hz consommation 37 W LED 10 x CREE® 3 W blanc froid 10 x CREE® 3 W blanc chaud angle de rayonnement 140° flux lumineux 1200 @ 1 m 1050 @ 1 m dimensions 1060 x 58 x 148 mm poids 3,5 kg
N’employer cet appareil qu’avec des accessoires d’origine. SA Velleman ne sera aucunement responsable de dommages ou lésions survenus à un usage (incorrect) de cet appareil. Toutes les informations présentées dans cette notice peuvent être modifiées sans notification préalable.
© DROITS D’AUTEUR SA Velleman est l’ayant droit des droits d’auteur pour cette notice. Tous droits mondiaux réservés. Toute reproduction, traduction, copie ou diffusion, intégrale ou partielle, du contenu de cette notice par quelque procédé ou sur tout support électronique que se soit est interdite sans l’accord préalable écrit de l’ayant droit.

25.03.20
1. IntA los ciuImporta
Si tiene ¡Gracias usarlo. SdistribuidPara máusuario,
2. Ins
• Este a tier
• Aseg• No a
supe• Resp• Fije e• Insta
explo• Nunc
3. NoVéase la
• Famiapara
• Por r
011
troducción udadanos de laantes informac
Este símbolo endañar el mediodoméstica; debdistribuidor o aambiente.
dudas, contacpor haber compi el aparato ha
dor. ás información, visite nuestra
strucciones
Cuidado dcable cone
Desconectantes de lpropio cab
Utilice el aningún tip
Mantenga
¡Ojo!: la c
No mire d- un a- cegu- lesio
El usuariodistribuido
aparato pertenerra. La conexiónúrese de que laplaste el cable drficie afilada. Siete una distancel aparato con uale el aparato a osivo. Instale elca bloquee los o
rmas gener Garantía de se
No exponAsegúresemín. 2,5c
No agite e
liarícese con el ato. La mayoríarazones de segu
MAN
a Unión Europeciones sobre en este aparato o
o ambiente. No tbe ir a una empa la unidad de re
cte con las autprado el VDPL1sufrido algún da
n sobre este pra página www
s de segurid
durante la instalectado a la red
te siempre el aplimpiarlo. Tire sble.
aparato sólo enpo de salpicadur
a el aparato lejo
caja del proyect
directamente a ltaque epiléptico
uera temporal (cones permanent
o no habrá de efor si necesita pi
ece a la clase den eléctrica debea tensión de redde alimentacióni es necesario, pcia de mín. 0.5mun cable de seguuna distancia m aparato a una
orificios de venti
rales ervicio y calid
ga este equipo e de que los orifm entre el apar
el aparato. Evite
funcionamiento de los daños so
uridad, las modif
VDPL100
21
NUAL DEL
ea el medio ambieo el embalaje intire este aparatresa especializaeciclaje local. Re
toridades loca1003xW! Lea ataño en el transp
roducto y la vew.hqpower.eu.
dad
lación: puede su eléctrica.
parato si no va iempre del ench
n interiores. Nra o goteo.
s del alcance de
tor se calienta d
a fuente luminoo en personas sceguera por deses e irreversible
fectuar el manteiezas de recamb
e protección I. P llevarse a cabo no sea mayor q y protéjalo conpida a su distribm entre la salidauridad adecuado
mínima de 0,5mdistancia mínimlación. No cubra
ad Velleman ®
a polvo. No expficios de ventilarato y cualquier
e usar excesiva
o del aparato. Sóon causados poficaciones no au
03xW
L USUAR
ente concerniendica que, si tirao (ni las pilas, sada en reciclaje.espete las leyes
les para residutentamente las porte no lo insta
ersión más rec
ufrir una peligro
a usarlo duranthufe para desco
o exponga este
e personas no c
durante su oper
osa para evitar ensibles stello) es del ojo
enimiento de nibio.
Por lo tanto, eso por un técnicoque la tensión intra posibles dabuidor reemplaza de luz y el áreo (p.ej. VDLSC7 de cualquier ob
ma de 1 m de laa, ni entero ni e
® al final de este
ponga este equición no estén b otro objeto.
fuerza durante
ólo personas cur un uso inadec
utorizadas del a
RIO
ente a este proa las muestras isi las hubiera) e. Devuelva estes locales en rela
uos. instrucciones de
ale y póngase e
ciente de este
osa descarga elé
e un largo perioonectar el cable
equipo a lluvia
capacitadas y ni
ración.
nguna pieza. Co
esencial que el cualificado. ndicada en las eños causados par el cable de aa iluminada. 7 o VDLSC8). bjeto o producto superficie ilumien parte, el apa
e manual del usu
po a temperatubloqueados. Deje
el manejo y la
ualificadas puedecuado. parato están pr
©Vellem
oducto nservibles, pod
en la basura aparato a su
ación con el med
el manual antesn contacto con
manual del
éctrica al tocar u
odo de tiempo o de red, nunca d
, humedad ni a
ños.
ontacte con su
aparato esté p
especificacionesor algún tipo delimentación.
o inflamable o inada. rato.
uario.
ras extremas. e una distancia
instalación.
en manejar este
rohibidas. Los da
man nv
rían
dio
s de su
un
o del
uesto
s. e
de
e
años

VDPL1003xW
25.03.2011 ©Velleman nv 22
causados por modificaciones no autorizadas, no están cubiertos por la garantía. • El desgaste mecánico no está cubierto por la garantía. • Utilice sólo el VDPL1003xW para aplicaciones descritas en este manual a fin de evitar p.ej.
cortocircuitos, quemaduras, descargas eléctricas, etc. Un uso desautorizado puede causar daños y anula la garantía completamente.
• Los daños causados por descuido de las instrucciones de seguridad de este manual invalidarán su garantía y su distribuidor no será responsable de ningún daño u otros problemas resultantes.
• La instalación y el mantenimiento deben ser realizados por personal especializado. • No conecte el aparato si ha estado expuesto a grandes cambios de temperatura. Espere hasta que el
aparato llegue a la temperatura ambiente. • Este aparato ha sido diseñado para uso profesional en una discoteca, un teatro, etc. y es apto para
un uso sólo en interiores (<35°C, <75%RH). Conéctelo a una fuente de corriente CA de máx. 240VCA / 50Hz.
• No ha sido diseñado para un uso ininterrumpido. Introduzca frecuentemente una pausa para prolongar la vida del aparato.
• Transporte el aparato en su embalaje original. • Guarde este manual del usuario para cuando necesite consultarlo.
4. Características • modo DMX de 12 canales para un control separado de cada LED • dimmer y obturador maestro en el modo DMX • modo autónomo (stand alone) y control por la música con efectos preprogramados • efecto de pulsación con velocidad ajustable • salida de 230V adicional para la interconexión hasta 10 focos • ideal para un montaje en altura o en el suelo
5. Descripción Véase las figuras en la página 2 de este manual del usuario.
1 pantalla con botones de ajuste 4 salida DMX A botón de selección MODE 5 ajuste de sensibilidad B botón UP 6 entrada de alimentación/portafusibles C botón DOWN 7 conexión GND
2 micrófono 8 salida de alimentación 3 entrada DMX
6. Instalación Véase las figuras en la página 2 de este manual del usuario.
a) Montaje del aparato • Respete la directiva EN 60598-2-17 y toda norma nacional antes de instalar el aparato. La
instalación debe ser realizada por un técnico especializado. • El soporte donde irá el aparato, debe ser capaz de sostener 10 veces el peso de éste durante una
hora, sin que se produzca una deformación de dicho soporte. • Fije siempre el VDPL1003xW con un cable de seguridad (seguridad adicional). • Evite ponerse debajo del aparato durante el montaje, la limpieza, etc. Un técnico especializado
debe revisar el aparato antes de la puesta en marcha. Después, debe revisarlo una vez al año. • Instale el aparato fuera del alcance de personas no autorizadas y en un lugar con poca gente. • La instalación de este aparato exige una sólida experiencia práctica: debe poder calcular la carga
máx. del soporte, debe conocer los materiales necesarios para la instalación, etc. De vez en cuando, una verificación de la estructura y del aparato mismo debe ser llevada a cabo por un técnico especializado. No intente instalar este aparato si no tiene las cualificaciones requeridas; una instalación incorrecta puede causar lesiones.
• Ajuste el ángulo de inclinación a su gusto mediante un soporte de montaje y fije los tornillos del soporte.
• Pregunte a un electricista cómo hacer la conexión eléctrica. • Conecte el aparato a la red eléctrica con la conexión de alimentación. Normalmente, no se
conectan efectos luminosos a dimmer packs (reguladores).

25.03.20
b) Cone• Si f
delconcon
• Lon• Se
meeléXLRXLR
c) gene• Qu
una• Pre• Ase
si u• Un
7. UsoVéase las
Funcion
mo
do
au
tón
om
o
(sta
nd
alo
ne)
esc
lavo
D
MX
Modo aModo
• P• S
• P• S
ControEste m• P• A• E
Modo eUn focopor la m• A• P
011
exión DMX51fuera necesariol controlador y enectar varios VDnectores XLR dengitud máx. de l recomienda unedio ambiente coéctrico corrompaR con una resistR del último apa
eral ite todo materiaa ventilación suegunte a un elecegúrese de queutiliza el reóstat experto debe p
o s figuras en la p
nes del menú
menú
c
autónomo automático
Pulse la tecla <MSeleccione el pro
~ Pulse la tecla <MSeleccione la ve
= rápidool por el sonid
modo permite haPulse la tecla <MAjuste la sensibiEl foco reacciona
esclavo o en el modo esmúsica). Active el modo dPulse la tecla <M
12 , conecte un cael otro conectorDPL1003xW ene entrada y de sla conexión: 500a terminación son mucho ruidoa la señal de contencia de 120Ωarato de la serie
al inflamable enficiente. ctricista cómo h los aparatos noto o el circuito dprobar la instala
página 2 de este
ú
función
programa inte
~
velocidad
~
control por la m
modo esclav
dirección
modo cana
MODE> hasta qograma (
). MODE> hasta qlocidad (o). do acer reaccionar MODE> hasta qilidad con el bota por el micrófo
sclavo sigue el p
de control automMODE> until
VDPL100
23
ble con conector XLR macho den serie. Use un salida VDPL1000 metros. Númesi el cable DMX do eléctrico (ej. untrol numérico. de polo 2 a pole.
n un radio de 0.5
hacer la conexióo estén alimentadimmer como unación antes de la
e manual del us
erno
efecto
(
veloci
música activa
vo activa
direcc
al selecc
selecc
ue se visualice ~ ) co
ue se visualice ~ ) co
sólo un aparatoue se visualice tón de ajuste deono interno al rit
programa del fo
mático o el cont is displaye
03xW
or XLR (no incl.) 3 polos a la entcable blindado
03xW. ro máx. de uniddebe cubrir una
una discoteca). L La terminacióno 3. Este conec
5m alrededor de
n eléctrica. ados por un reón interruptor /a puesta en ma
suario.
o con cambio sú
= bucle de
dad del program
= lento,
ación del modo d
ación del modo d
ción DMX (
ción modo DMX
ción modo DMX
. on las teclas <U
. n las teclas <UP
o al ritmo de la .
e la parte trasertmo de la músic
co maestro (mo
trol por la músiced.
a la salida XLRtrada del VDPLde doble hilo co
dades en una cona gran distanciaLa terminación DMX no es mátor XLR está co
el aparato y ase
óstato o un circu/OFF (de 0% a rcha.
descripción
úbito o gradual
~
ma interno
= rápido
de control por la
de control escla
~ )
5 canales
12 canales
P> y <DOWN>
P> y <DOWN>
música.
ra del aparato [ca.
odo de control a
ca en el foco ma
©Vellem
R hembra de 3 pL1003xW. Es poonductor con
nexión en serie: o si se usa en uimpide que el rus que un conectnectado a la sa
egúrese de que
uito dimmer, inc100%).
)
a música
avo
( = buc
( = lent
5].
automático o co
aestro.
man nv
polos osible
32. un uido tor lida
haya
cluso
cle de
to,
ntrol

25.03.20
Modo dEste m• Si s
apacanent
• Cosinajuindcue
Ejemplo• En
del• En
del• Pul• Pul• Pul• Sel
Valore
Modo
011
de control DModo permite cose usa una señaaratos reaccionenal en el cual eltre una sola diren una sola direccronizadamente
ustes de todos lodependientemenestión.
o: el caso del VDPl segundo apara el caso del VDPl segundo aparalse la tecla <MOlse la tecla <UPlse la tecla <MOleccione la direc
es DMX por ca
de 5 canales
canal d1 00
2 0001
3
000104070912141619212425
4 00
d
5
00000000010101020202030303030404040505
MX ntrolar su foco sal DMX, cada apen a las señales aparato reaccioección inicial pacción inicial parae a la misma seos canales. Connte. Por lo tanto
PL1003xW deato 6 (1 + 5) (CPL1003xW deato 13 (1 + 12) ODE> hasta queP> o <DOWN> yODE> hasta quección DMX (
anal
de a 00 255 shu00 009 sin10 255 est00 010 sin11 047 Aut48 071 Aut72 095 Aut96 119 Aut20 143 Aut44 167 Aut68 191 Aut92 215 Aut16 239 Aut40 249 Aut50 255 con00 255 vel
e a L100 002
03 005
06 008 -09 011 -12 014 -15 017 -18 020 -21 023 -24 026 -27 029 -30 032 -33 035
36 038
39 041
42 044
45 047
48 050
51 053
54 056
VDPL100
24
sin controlador parato tiene su s de control corronará a las señaara toda una sera una serie de añal. Por lo tanto varias direccio
o, cambiar los aj
5 canales, la diCH6~10), del ter 12 canales, la d (CH13~24), dee se visualice el y seleccione el me se visualice la
~ ) c
utter 0 ~ 100% función troboscopio: lento función to 1 to 2 to 3 to 4 to 5 to 6 to 7 to 8 to 9 to 10 (=bucle dentrol por la músicocidad: lento ~ r
1 L2 L3 - - - - - - - - - - - - - - - - - - - - - - - - - - - - - - - - - - - - - - - - -
03xW
DMX. propia direcciónrectas. Esta direales DMX del corie de aparatos aparatos, todos o, cambiar los anes iniciales, cajustes de un sol
irección inicial drcer aparato 11dirección inicial el tercer aparato modo DMX (modo DMX ( dirección DMX con las teclas <
descripció
o ~ rápido (máx
e Auto 1 ~ Auto 9ca rápido (si canal 3
L4 L5 L6
- - -- - -- - - - -- -- -
- - -- - -- - -- - -- - -- - - - -- -- -
- - -- - -- - -
n inicial DMX paección inicial digontrolador DMX.o una dirección los aparatos reajustes de un soada aparato reaclo canal sólo afe
del primer apara (6 + 5) (CH11~ del primer aparo 25 (13 + 12) (
o ) o ).
( ). <UP> y <DOWN
ón
. 20Hz)
9)
3 = 011~249)
6 L7 L8
- - - - - - - - - -
- - - - - - - - - - - - - - - -
- - - - - -
©Vellem
ra asegurar quegital es el prime Es posible eleg inicial por aparaccionarán
olo canal afecta ccionará ecta al canal en
ato es 1 (CH1~5~15), etc. rato es 1 (CH1~(CH25~36), etc).
>.
L9 L10 - - - - - - - - - - - - - - - - - - - - - - - - - - - - - - - - -
man nv
e los r
gir rato.
a los
5),
~12), c.

VDPL1003xW
25.03.2011 ©Velleman nv 25
de a L1 L2 L3 L4 L5 L6 L7 L8 L9 L10 057 059 - - - - - - - - 060 062 - - - - - - - - 063 065 - - - - - - - - 066 068 - - - - - - - - 069 071 - - - - - - - - 072 074 - - - - - - - - 075 077 - - - - - - - - 078 080 - - - - - - - - 081 083 - - - - - - - - 084 086 - - - - - - - - 087 089 - - - - - - - - 090 092 - - - - - - - - 093 095 - - - - - - - - 096 098 - - - - - - - - 099 101 - - - - - - - - 102 104 - - - - - - - - 105 107 - - - - - - - - 108 110 - - - - - - - - 111 113 - - - - - - - - 114 116 - - - - - - - - 117 119 - - - - - - - - 120 122 - - - - - - - - 123 125 - - - - - - - - 126 128 - - - - - - - - 129 131 - - - - - - - - 132 134 - - - - - - - - 135 137 - - - - - - - - 138 140 - - - - - - - - 141 143 - - - - - - - - 144 146 - - - - - - - - 147 149 - - - - - - - - 150 152 - - - - - - - - 153 155 - - - - - - - - 156 158 - - - - - - - - 159 161 - - - - - - - - 162 164 - - - - - - - - 165 167 - - - - - - - - 168 170 - - - - - - 171 173 - - - - - - 174 176 - - - - - - 177 179 - - - - - - 180 182 - - - - - - 183 185 - - - - - - 186 188 - - - - - - 189 191 - - - - - - 192 194 - - - - - - 195 197 - - - - - - - 198 200 - - - - - - - 201 203 - - - - - - - 204 206 - - - - - - - 207 209 - - - - - - - 210 212 - - - - - - - 213 215 - - - - - - - 216 218 - - - - - - - 219 221 - - - - 222 224 - - - - - - 225 227 228 230 - - - -

VDPL1003xW
25.03.2011 ©Velleman nv 26
de a L1 L2 L3 L4 L5 L6 L7 L8 L9 L10 231 233 - - - - - 234 236 - - - - - 237 255
Modo de 12 canales
canal LED de a descripción 1 todos 000 255 shutter 0 ~ 100%
2 todos 000 009 sin función 010 255 estroboscopio: lento ~ rápido (máx. 20Hz)
3 1 000 255 shutter 0 ~ 100% 4 2 000 255 shutter 0 ~ 100% 5 3 000 255 shutter 0 ~ 100% 6 4 000 255 shutter 0 ~ 100% 7 5 000 255 shutter 0 ~ 100% 8 6 000 255 shutter 0 ~ 100% 9 7 000 255 shutter 0 ~ 100% 10 8 000 255 shutter 0 ~ 100% 11 9 000 255 shutter 0 ~ 100% 12 10 000 255 shutter 0 ~ 100%
8. Limpieza y mantenimiento • Apriete bien las tuercas y los tornillos y verifique que no hay señales de oxidación. • No modifique la caja, los soportes y las conexiones p.ej. no taladre agujeros adicionales en un
soporte o no modifique las conexiones, etc. • No dañe los cables de alimentación. Contacte con un técnico especializado para instalar el aparato. • Quite el polvo regularmente de la caja y los orificios de ventilación con un paño húmedo. • El usuario no habrá de efectuar el mantenimiento de ninguna pieza. Contacte con su distribuidor si
necesita piezas de recambio.
Reemplazar el fusible
• Desatornille el portafusibles con el destornillador con punta plana. • Saque el fusible fundido y reemplácelo. • Vuelva a poner el portafusibles en su lugar.
9. Especificaciones VDPL1003CW VDPL1003WW alimentación 230VAC ~ 50Hz consumo 37 W LEDs 10 x CREE® 3W blanco frío 10 x CREE® 3W blanco cálido ángulo del haz 140° flujo luminoso 1200 @ 1m 1050 @ 1m dimensiones 1060 x 58 x 148mm peso 3.5 kg
Utilice este aparato sólo con los accesorios originales. Velleman NV no será responsable de daños ni lesiones causados por un uso (indebido) de este aparato. Se pueden modificar las especificaciones y el contenido de este manual sin previo aviso.
© DERECHOS DE AUTOR Velleman NV dispone de los derechos de autor para este manual del usuario. Todos los derechos mundiales reservados. Está estrictamente prohibido reproducir, traducir, copiar, editar y guardar este manual del usuario o partes de ello sin previo permiso escrito del derecho habiente.

25.03.20
1. EinAn alle EWichtige
Falls ZwWir bedaInbetriebsein, verwFür mehBedienu
2. Sic
• Der Ageerd
• Vergebesch
• Achtewerd
• Beacbeleu
• Mach• Sorg
exploGerä
• Beacvöllig
3. AllgSiehe Ve
011
nführung Einwohner dere UmweltinforDieses Symbol Produktes nachEinheit (oder veverwendeten Bwerden. Diese retourniert wer
weifel bestehennken uns für de
bnahme sorgfältwenden Sie das
hr Informationungsanleitung,
cherheitshin
Seien SieSpannungführen.
Trennen Sdazu den
VerwendeFeuchte. S
Halten Sie
Achtung:auf.
Blicken Si- epile- zeitli- perm zu ve
Es gibt keFachhänd
Aufbau des Gerädet sein. Der eleewissern Sie sichrieben in dieseen Sie darauf, den kann. Bei Behten Sie eine muchteten Flächehen Sie das Geräen Sie für einenosiven Gegenstät und einer belehten Sie, dass d
g.
gemeine Rielleman® Serv
SchützeBeachteminima
Vermeidund Bed
BEDIE
r Europäischenrmationen übe auf dem Produkh seinem Lebenserwendeten Batatterien müssenEinheit muss anrden. Respektiern, wenden Sieen Kauf des VDtig durch. Überps Gerät nicht unnen zu diesem , siehe www.h
nweise während der Ing stehenden Leit
Sie das Gerät be Netzstecker an
en Sie das GerätSetzen Sie das
e Kinder und Un
: Berühren Sie d
e nicht direkt ineptische Anfälle iche Blindheid (
manente und unermeiden
eine zu wartendeler.
ätes entspricht ektrische Anschch, dass die anzer Bedienungsandass die Netzleiteschädigungen s
minimale Entfern. ät mit einem gen Abstand von mänden oder Stofeuchteten Oberfdie Lüftungssch
ichtlinien vice- und Quali
en Sie das Geräten Sie, dass diele Entfernung v
den Sie Erschüttdienung des Ger
VDPL100
27
ENUNGS
n Union er dieses Produkt oder der Verpszyklus der Umwtterien) nicht alsn von einer spezn den Händler oren Sie die örtlic sich für EntsoPL1003xW! Leprüfen Sie, ob Td wenden Sie s Produkt und d
hqpower.eu.
nstallation des Gtungen könnte z
ei Nichtbenutzu der Grifffläche
t nur im InnenGerät keiner Flü
nbefugte vom G
das Gehäuse wä
n die Lichtquelle bei empfindlichBlitzblindheid) widerrufliche Au
en Teile. Bestel
der Schutzklasshluss darf nur vozuschließende Nnleitung. tung nicht gequsoll eine Fachkrnung von 0.5m z
eeigneten Sichemin. 0,5 m zwiscffen. Sorgen Siefläche. litze nie blockie
itätsgarantie a
t vor Staub. Sch Lüftungsschlitzon 2.5cm zwisc
terungen. Vermrätes.
03xW
ANLEITU
ukt packung zeigt awelt Schaden zus unsortiertes Hzialisierten Firm
oder ein örtlichechen Umweltvoorgungsrichtlinesen Sie diese Bransportschädeich an Ihren Hädie neueste Ve
Gerätes sehr vozu lebensgefähr
ng und vor jede an und ziehen S
nbereich. Schütüssigkeit wie z.B
erät fern.
ährend des Betr
e, um hen Menschen
ugenschäden
len Sie eventue
se I. Gemäß denon einer Fachkraetzspannung ni
etscht oder durraft das Kabel erzwischen der Lic
rheitskabel festchen dem Geräte für einen Absta
ert sind. Bedeck
am Ende dieser
hützen Sie das Gze nicht blockierhen dem Gerät
meiden Sie rohe
UNG
an, dass die Entsufügen kann. EnHausmüll; die Eima zwecks Recycs Recycling-Untrschriften. nien an Ihre ö
Bedienungsanleitn vorliegen. So
ändler. ersion dieser
rsichtig: das Berlichen elektrisc
er Reinigung vomSie nie an der N
tzen Sie das GeB. Tropf- oder S
riebs nicht, denn
elle Ersatzteile b
n Vorschriften maft durchgeführtcht höher ist als
rch scharfe Kantrsetzen. chtausbeute un
(z.B. VDLSC7 t und entflammand von min. 1
en Sie das Gerä
Bedienungsanle
Gerät vor extrert werden. Beac und jedem and
Gewalt während
©Vellem
sorgung dieses ntsorgen Sie dienheit oder cling entsorgt ternehmen
örtliche Behördtung vor llte dies der Fal
erühren von untehen Schlägen
m Netz. FassenNetzleitung.
erät vor Regen uSpritzwasser, au
n das Gehäuse
bei Ihrem
muss das Gerät t werden. s die Netzspann
ten beschädigt
d irgendeiner
oder VDLSC8).baren und m zwischen de
ät weder partiell
eitung.
men Temperatuhten Sie eine
deren Gegenstan
d der Installatio
man nv
e
de.
l
er
Sie
und us.
heizt
nung
.
m
l noch
uren.
nd.
on

VDPL1003xW
25.03.2011 ©Velleman nv 28
• Nehmen Sie das Gerät erst in Betrieb, nachdem Sie sich mit seinen Funktionen vertraut gemacht haben. Lassen Sie das Gerät nicht von Personen bedienen, die sich nicht mit dem Gerät auskennen. Meist ist die Beschädigung des Gerätes das Ergebnis von unfachmännischer Bedienung.
• Eigenmächtige Veränderungen sind aus Sicherheitsgründen verboten. Bei Schäden verursacht durch eigenmächtige Änderungen erlischt der Garantieanspruch.
• Mechanischer Schaden werden nicht durch die Garantie gedeckt. • Verwenden Sie das Gerät nur für Anwendungen beschrieben in dieser Bedienungsanleitung sonst
kann dies zu Schäden am Produkt führen und erlischt der Garantieanspruch. Jede andere Verwendung ist mit Gefahren wie Kurzschluss, Brandwunden, elektrischem Schlag, usw. verbunden.
• Bei Schäden, die durch Nichtbeachtung der Bedienungsanleitung verursacht werden, erlischt der Garantieanspruch. Für daraus resultierende Folgeschäden übernimmt der Hersteller keine Haftung.
• Lassen Sie dieses Gerät von einem Fachmann installieren und warten. • Das Gerät bei Temperaturschwankungen nicht sofort einschalten. Schützen Sie das Gerät vor
Beschädigung, indem Sie es ausgeschaltet lassen bis es akklimatisiert ist (Zimmertemperatur erreicht hat).
• Dieses Gerät wurde für den professionellen Einsatz auf Bühnen, in Discotheken, Theatern, usw. entworfen und eignet sich nur für die Anwendung im Innenbereich (<35°C, <75%RH). Verwenden Sie das Gerät mit einer Wechselspannung von max. 240VAC / 50Hz.
• Das Gerät eignet sich nicht für permanenten Betrieb: eine regelmäßige Pause verlängert die Lebensdauer.
• Verwenden Sie die Originalverpackung, wenn das Gerät transportiert werden soll. • Bewahren Sie diese Bedienungsanleitung für künftige Einsichtnahme auf.
4. Eigenschaften • 12-Kanal DMX-Modus mit separater Ansteuerung jeder LED • Masterdimmer und -Shutter über DMX-Modus • Stand-Alone-Modus und musikgesteuerter Modus mit eingebauten Effekten • Pulse-Effekt mit einstellbarer Geschwindigkeit • zusätzlicher 230V-Netzteilausgang zum Anschließen von bis zu 10 Scheinwerfern • eignet sich für Höhen- oder Bodenmontage
5. Umschreibung Siehe Abbildungen, Seite 2 dieser Bedienungsanleitung.
1 Display mit Einstellknöpfen 4 DMX-Ausgang A MODE-Taste 5 Einstellknopf Empfindlichkeit B UP-Taste 6 Netzeingang/Sicherungshalter C DOWN-Taste 7 GND-Anschluss
2 Mikrofon 8 Netzausgang 3 DMX-Eingang
6. Installation Siehe Abbildungen, Seite 2 dieser Bedienungsanleitung.
a) Das Gerät montieren • Lassen Sie das Gerät von einem Fachmann und gemäß den EN 60598-2-17 und allen anderen
zutreffenden Normen installieren. • Die Konstruktion muss während einer Stunde eine Punktlast von maximal 10 x dem Gewicht des
Geräts tragen können, ohne dass Verformung verursacht wird. • Das Gerät muss immer mit einer zweiten Befestigung z.B. mit einem Sicherheitskabel gesichert
werden. • Stehen Sie während der Montage, Entfernung oder Wartung nie direkt unter dem Gerät. Lassen Sie
das Gerät jährlich und vor der Inbetriebnahme von einem Fachmann prüfen. • Montieren Sie das Gerät an einem Ort, an dem es wenig Vorübergehende gibt und der
unzugänglich ist für Unbefugte. • Oberirdische Montage erfordert erhebliche Sachkenntnis in Bezug auf das Berechnen der
maximalen Lasten, das geeignete Montagematerial…Lassen Sie das Material und das Gerät regelmäßig kontrollieren. Versuchen Sie das Gerät nicht selber zu installieren, denn wenn Sie nicht über diese Qualifikationen verfügen, könnte es zu Verletzungen führen.
• Regeln Sie den Neigungswinkel über den Montagebügel und drehen Sie die Schrauben fest an. • Lassen Sie das Gerät von einem qualifizierten Elektriker anschließen. • Schließen Sie das Gerät an das Hauptnetz und nicht an einen Dimmer an.

25.03.20
b) DMX• We
mitvermit
• Diedem
• Einist AbsDe3,
c) Gene• Ach
und• Las• Bea
odeEIN
• Die
7. AnwSiehe Ab
Menüfu
Sta
nd
-Alo
ne
Sla
ve
DM
X
AutonoAutom• D• W
S• D• W
MusikSteuer• D• V
e• D
Slave-MEin GerMusiks• Sch• Drü
011
X512-Anschluenn nötig, so vetgeliefert) und drschiedene VDPt XLR Ein- und Ae max. empfohlemselben Anschln DMX-Abschlus oder in einer Uschlusswiderstar DMX-Abschlusdie den XLR-Au
eral hten Sie darauf,d beachten Sie,ssen Sie das Geachten Sie, daser Dimmkreis veN/AUS-Schaltere Installation mu
wendung bildungen, Seite
unktionen Menü
omer Modus matische SteueDrücken Sie aufWählen Sie das Schleife von Drücken Sie aufWählen Sie die g
= langsaksteuerung rung eines einziDrücken Sie aufVerwenden Sie deinzustellen. Das Gerät reagie
Modus rät im Slave-Moteuerung). halten Sie den aücken Sie <MOD
uss rbinden Sie eindie andere SeitePL1003xWin SeAusgangsanschlene Kabellängeuss ist 32. swiderstand istmgebung mit vi
and verhindert Ssswiderstand istsgang des letzt
, dass sich kein dass es genüge
erät von einem qs alle Geräte übersorgt werden, (0% bis 100%)uss vor Inbetrie
e 2 dieser Bedie
Funktion
interne Program ~
Geschwindigk ~
Musiksteueru
Slave-Modu
Adresse
Kanal-Modu
(Stand-Alonerung <MODE> bis gewünschte Pro
~ <MODE> bis gewünschte Gesam, = s
gen Gerätes ab <MENÜ> bis den Einstellknop
ert nun dank de
odus befolgt das
automatischen MDE> auf jedem
VDPL100
29
XLR-Kabel mit e mit dem 3-Pinerie schalten. Velüssen. ist 500 Meter, d
empfehlenswerielem elektrischStörung des digit nur eine XLR-Ben Geräts in de
entflammbaresend Kühlung gibqualifizierten Eleber eine geerdet, auch wenn Sie) verwenden. ebnahme von ei
enungsanleitung
mme
internÜberg(
keit
wähleaus
ung schalt
us schalt
stellen
us 5-Kan12-Ka
e)
im LCD-Dispogramm ().
im LCD-Dispschwindigkeit schnell).
hängig vom Tak im LCD-D
pf auf der Rücks
es internen Mikr
s Programm des
Modus oder die Slave-Gerät bis
03xW
dem 3-Pin XLR-n XLR-Eingang derwenden Sie e
die Höchstzahl v
rt für Installatiohem Rauschen (italen SteuersigBuchse mit einer Kette angesch
s Material in einbt. ektriker anschliete Steckdose une den Regelwide
nem Experten g
g.
ne Programme mgang
= Schleife ven Sie die Gesch
= langsam, ten Sie die Musi
ten Sie die Slav
n Sie die DMX-Anal DMX- Steueranal DMX- Steue
play erscheint. ~ ) m
play erscheint. ~
kt der Musik. Display erscheinseite des Geräte
rofons auf den T
s Master-Geräte
Musiksteuerungs im LCD
-Ausgang der Sdes VDPL1003xin zweipoliges a
von Geräten, ve
nen, bei denen z.B. Discos). Denals durch elekm 120Ω Widers
hlossen wird.
em Umkreis von
eßen. nd nicht über einerstand oder den
genehmigt werd
Beschreibungmit plötzliche od
on ~ hwindigkeit der
= schneksteuerung ein
e-Funktion ein
Adresse ein (rung erung
mit <UP> und <D
) mit <UP> un
nt. es [5], um die E
Takt der Musik.
es (automatische
g auf dem MasteD-Display ersche
©Vellem
teuerung (nichtxW. Sie könnenabgeschirmtes K
erbunden mit
das DMX-Kabeler trisches Rauschstand zwischen
n 50 cm befinde
nen Regelwidersn Dimmkreis als
den.
der allmähliche
) internen Progra
ell
~ )
DOWN> (
nd <DOWN> (
Empfindlichkeit
er Modus oder
er-Gerät ein. eint.
man nv
t n Kabel
l lang
hen. 2 und
et
stand s
amme
=

25.03.20
DMX-StSteuer• Alle
SigBefgan
• WeStewejednur
Beispi• Im
(CH(CH
• Im(CH(CH
• Drüers
• Drüode
• Drü• WäDMX-W
5-Ka
011
teuerung rung vom Geräte DMX-gesteuergnale reagieren fehle der DMX-Snze Gruppe vonenn alle Geräte euersignal empfrden alle Geräte
des Gerät auf eir das besagte Gel: Falle des 5-KanH1~5), der zweH11~15) usw. e Falle des 12-KaH1~12), der zwH25~36) usw. eücken Sie auf <scheint. ücken Sie auf <er ). ücken Sie auf <ählen Sie die DMWerte pro Kan
anal-Modus
Kanal Vo1 00
2 0001
3
000104070912141619212425
4 00
Vo
5
0000000001010102020203030303
t über einen unirten Geräte brakann. Diese digSteuerung empfn Geräten verwedieselbe Startadfangen. Mit andee zur gleichen Znem anderen Ka
Gerät beeinflusst
nal VDPL1003xiten Einheit aufeinstellen müsseanal VDPL1003
weiten Einheit aueinstellen müsseMODE> bis der
UP> oder <DOW
MODE> bis dieMX-Startadressenal
on bis 00 255 Dim00 009 kei10 255 Str00 010 kei11 047 Aut48 071 Aut72 095 Aut96 119 Aut20 143 Aut44 167 Aut68 191 Aut92 215 Aut16 239 Aut40 249 Aut50 255 Mu
00 255 aut= 0
on bis L100 002
03 005
06 008 -09 011 -12 014 -15 017 -18 020 -21 023 -24 026 -27 029 -30 032 -33 035
36 038
39 041
VDPL100
30
versellen DMX-Cuchen eine digitgitale Startadresfängt und ausfüenden oder einedresse haben, weren Worten, wZeit beeinflusst.anal Signale emt.
xW, werden Sief 6 (1 + 5) (CH6en. 3xW, werden Suf 13 (1 + 12) (en. r gewünschte DM
WN> und wähle
DMX- Adresse e mit <UP> ode
mmer 0 ~ 100% ne Funktion
roboskop: langsane Funktion to 1 to 2 to 3 to 4 to 5 to 6 to 7 to 8 to 9 to 10 (=Schleife siksteuerung tomatische Gesch011~249)
1 L2 L3 - - - - - - - - - - - - - - - - - - - - - - - - - - - - - - -
03xW
Controller. tale Startadresssse ist die Kanaührt. Sie können separate Starta
werden sie auf eenn Sie die Eins Wenn Sie versc
mpfangen. Wenn
e die Startadres6~10), der dritte
ie die StartadreCH13~24), der
MX-Modus (
en Sie den gewü
( )im LCr <DOWN> (
Umschreib
m ~ schnell (ma
von Auto 1 ~ Au
hwindigkeit: lang
L4 L5 L6
- - -- - -- - - - -- -- -
- - -- - -- - -- - -- - -- - - - -
se, sodass das rlnummer, von d
n dieselbe Startaadresse für jedeeinem spezifischstellungen von echiedene Adressn Sie die Einstel
se des ersten Gen Einheit auf 1
esse des ersten r dritten Einheit
oder
ünschten DMX-M
D-Display ersch ~
ung
ax. 20Hz)
uto 9)
gsam ~ schnell (a
6 L7 L8
- - - - - - - - - -
- - - - - - - - - - - - - -
©Vellem
richtige Gerät auder das Gerät diadresse für einees Gerät eingebhen Kanal das einem Kanal änsen einstellen, wlungen ändern,
Gerätes auf 1 11 (6 + 5)
Gerätes auf 1 auf 25 (13 + 12
) im LCD-Disp
Modus aus (
heint. ).
als Kanal 3
L9 L10 - - - - - - - - - - - - - - - - - - - - - - - -
man nv
uf die ie e ben.
dern, wird wird
2)
play

VDPL1003xW
25.03.2011 ©Velleman nv 31
Von bis L1 L2 L3 L4 L5 L6 L7 L8 L9 L10 042 044 - - - - - - - - 045 047 - - - - - - - - 048 050 - - - - - - - - 051 053 - - - - - - - - 054 056 - - - - - - - - 057 059 - - - - - - - - 060 062 - - - - - - - - 063 065 - - - - - - - - 066 068 - - - - - - - - 069 071 - - - - - - - - 072 074 - - - - - - - - 075 077 - - - - - - - - 078 080 - - - - - - - - 081 083 - - - - - - - - 084 086 - - - - - - - - 087 089 - - - - - - - - 090 092 - - - - - - - - 093 095 - - - - - - - - 096 098 - - - - - - - - 099 101 - - - - - - - - 102 104 - - - - - - - - 105 107 - - - - - - - - 108 110 - - - - - - - - 111 113 - - - - - - - - 114 116 - - - - - - - - 117 119 - - - - - - - - 120 122 - - - - - - - - 123 125 - - - - - - - - 126 128 - - - - - - - - 129 131 - - - - - - - - 132 134 - - - - - - - - 135 137 - - - - - - - - 138 140 - - - - - - - - 141 143 - - - - - - - - 144 146 - - - - - - - - 147 149 - - - - - - - - 150 152 - - - - - - - - 153 155 - - - - - - - - 156 158 - - - - - - - - 159 161 - - - - - - - - 162 164 - - - - - - - - 165 167 - - - - - - - - 168 170 - - - - - - 171 173 - - - - - - 174 176 - - - - - - 177 179 - - - - - - 180 182 - - - - - - 183 185 - - - - - - 186 188 - - - - - - 189 191 - - - - - - 192 194 - - - - - - 195 197 - - - - - - - 198 200 - - - - - - - 201 203 - - - - - - - 204 206 - - - - - - - 207 209 - - - - - - - 210 212 - - - - - - - 213 215 - - - - - - -

VDPL1003xW
25.03.2011 ©Velleman nv 32
Von bis L1 L2 L3 L4 L5 L6 L7 L8 L9 L10 216 218 - - - - - - - 219 221 - - - - 222 224 - - - - - - 225 227 228 230 - - - - 231 233 - - - - - 234 236 - - - - - 237 255
12-Kanal-Modus
Kanal LED Von bis Umschreibung 1 alle 000 255 Dimmer 0 ~ 100%
2 alle 000 009 keine Funktion 010 255 Stroboskop: langsam ~ schnell (max. 20Hz)
3 1 000 255 Dimmer 0 ~ 100% 4 2 000 255 Dimmer 0 ~ 100% 5 3 000 255 Dimmer 0 ~ 100% 6 4 000 255 Dimmer 0 ~ 100% 7 5 000 255 Dimmer 0 ~ 100% 8 6 000 255 Dimmer 0 ~ 100% 9 7 000 255 Dimmer 0 ~ 100% 10 8 000 255 Dimmer 0 ~ 100% 11 9 000 255 Dimmer 0 ~ 100% 12 10 000 255 Dimmer 0 ~ 100%
8. Reinigung und Wartung • Verwendete Schrauben müssen fest angespannt werden und dürfen keine Rostspuren zeigen. • Das Gehäuse, die Linsen, die Montagebügel und der Montageort (z.B. Decke oder Gebinde) dürfen
nicht angepasst werden, z.B. bohren Sie keine zusätzlichen Löcher in Montagebügeln, verändern Sie die Anschlüsse nicht, usw.
• Sorgen Sie dafür, dass die Netzkabel nicht beschädigt sind. Lassen Sie das Gerät von einer Fachkraft installieren.
• Entfernen Sie den Staub regelmäßig mit einem feuchten Tuch vom Gehäuse und den Lüftungsschlitzen.
• Die Teile dürfen nicht eigenmächtig ersetzt werden. Bestellen Sie eventuelle Ersatzteile bei Ihrem Fachhändler.
Die Sicherung ersetzen • Lockern Sie den Sicherungshalter mit einem Schlitz-Schraubendreher. • Entfernen Sie die defekte Sicherung und setzen Sie eine neue Sicherung gleichen Typs ein. • Bringen Sie den Sicherungshalter wieder in das Gehäuse ein und verbinden Sie das Gerät mit dem
Netz.
9. Technische Daten VDPL1003CW VDPL1003WW Stromversorgung 230VAC ~ 50Hz Stromverbrauch 37 W LEDs 10 x CREE® 3W kaltweiß 10 x CREE® 3W warmweiß Abstrahlwinkel 140° Lichtstrom 1200 @ 1m 1050 @ 1m Abmessungen 1060 x 58 x 148mm Gewicht 3.5 kg
Verwenden Sie dieses Gerät nur mit originellen Zubehörteilen. Velleman NV übernimmt keine Haftung für Schaden oder Verletzungen bei (falscher) Anwendung dieses Gerätes. Alle Änderungen ohne vorherige Ankündigung vorbehalten.
© URHEBERRECHT Velleman NV besitzt das Urheberrecht für diese Bedienungsanleitung. Alle weltweiten Rechte vorbehalten. Ohne vorherige schriftliche Genehmigung des Urhebers ist es nicht gestattet, diese Bedienungsanleitung ganz oder in Teilen zu reproduzieren, zu kopieren, zu übersetzen, zu bearbeiten oder zu speichern.

Velleman® Service and Quality Warranty Velleman® has over 35 years of experience in the electronics world and distributes its products in more than 85 countries. All our products fulfil strict quality requirements and legal stipulations in the EU. In order to ensure the quality, our products regularly go through an extra quality check, both by an internal quality department and by specialized external organisations. If, all precautionary measures notwithstanding, problems should occur, please make appeal to our warranty (see guarantee conditions).
General Warranty Conditions Concerning Consumer Products (for EU): • All consumer products are subject to a 24-month warranty on production flaws and defective material as from the original date of purchase. • Velleman® can decide to replace an article with an equivalent article, or to refund the retail value totally or partially when the complaint is valid and a free repair or replacement of the article is impossible, or if the expenses are out of proportion. You will be delivered a replacing article or a refund at the value of 100% of the purchase price in case of a flaw occurred in the first year after the date of purchase and delivery, or a replacing article at 50% of the purchase price or a refund at the value of 50% of the retail value in case of a flaw occurred in the second year after the date of purchase and delivery. • Not covered by warranty: - all direct or indirect damage caused after delivery to the article (e.g. by oxidation, shocks, falls, dust, dirt, humidity...), and by the article, as well as its contents (e.g. data loss), compensation for loss of profits; - frequently replaced consumable goods, parts or accessories such as batteries, lamps, rubber parts, drive belts... (unlimited list); - flaws resulting from fire, water damage, lightning, accident, natural disaster, etc. …; - flaws caused deliberately, negligently or resulting from improper handling, negligent maintenance, abusive use or use contrary to the manufacturer’s instructions; - damage caused by a commercial, professional or collective use of the article (the warranty validity will be reduced to six (6) months when the article is used professionally); - damage resulting from an inappropriate packing and shipping of the article; - all damage caused by modification, repair or alteration performed by a third party without written permission by Velleman®. • Articles to be repaired must be delivered to your Velleman® dealer, solidly packed (preferably in the original packaging), and be completed with the original receipt of purchase and a clear flaw description. • Hint: In order to save on cost and time, please reread the manual and check if the flaw is caused by obvious causes prior to presenting the article for repair. Note that returning a non-defective article can also involve handling costs. • Repairs occurring after warranty expiration are subject to shipping costs. • The above conditions are without prejudice to all commercial warranties.
The above enumeration is subject to modification according to the article (see article’s manual).
Velleman® service- en kwaliteitsgarantie Velleman® heeft ruim 35 jaar ervaring in de elektronicawereld en verdeelt in meer dan 85 landen. Al onze producten beantwoorden aan strikte kwaliteitseisen en aan de wettelijke bepalingen geldig in de EU. Om de kwaliteit te waarborgen, ondergaan onze producten op regelmatige tijdstippen een extra kwaliteitscontrole, zowel door onze eigen kwaliteitsafdeling als door externe gespecialiseerde organisaties. Mocht er ondanks deze voorzorgen toch een probleem optreden, dan kunt u steeds een beroep doen op onze waarborg (zie waarborgvoorwaarden).
Algemene waarborgvoorwaarden consumentengoederen (voor Europese Unie): • Op alle consumentengoederen geldt een garantieperiode van 24 maanden op productie- en materiaalfouten en dit vanaf de oorspronkelijke aankoopdatum. • Indien de klacht gegrond is en een gratis reparatie of vervanging van een artikel onmogelijk is of indien de kosten hiervoor buiten verhouding zijn, kan Velleman® beslissen het desbetreffende artikel te vervangen door een gelijkwaardig artikel of de aankoopsom van het artikel gedeeltelijk of volledig terug te betalen. In dat geval krijgt u een vervangend product of terugbetaling ter waarde van 100% van de aankoopsom bij ontdekking van een gebrek tot één jaar na aankoop en levering, of een vervangend product tegen 50% van de kostprijs of terugbetaling van 50 % bij ontdekking na één jaar tot 2 jaar. • Valt niet onder waarborg: - alle rechtstreekse of onrechtstreekse schade na de levering veroorzaakt aan het toestel (bv. door oxidatie, schokken, val, stof, vuil, vocht...), en
door het toestel, alsook zijn inhoud (bv. verlies van data), vergoeding voor eventuele winstderving. - verbruiksgoederen, onderdelen of hulpstukken die regelmatig dienen te worden vervangen, zoals bv. batterijen, lampen, rubberen onderdelen, aandrijfriemen... (onbeperkte lijst). - defecten ten gevolge van brand, waterschade, bliksem, ongevallen, natuurrampen, enz. - defecten veroorzaakt door opzet, nalatigheid of door een onoordeelkundige behandeling, slecht onderhoud of abnormaal gebruik of gebruik van het toestel strijdig met de voorschriften van de fabrikant. - schade ten gevolge van een commercieel, professioneel of collectief gebruik van het apparaat (bij professioneel gebruik wordt de garantieperiode herleid tot 6 maand). - schade veroorzaakt door onvoldoende bescherming bij transport van het apparaat. - alle schade door wijzigingen, reparaties of modificaties uitgevoerd door derden zonder toestemming van Velleman®. • Toestellen dienen ter reparatie aangeboden te worden bij uw Velleman®-verdeler. Het toestel dient vergezeld te zijn van het oorspronkelijke aankoopbewijs. Zorg voor een degelijke verpakking (bij voorkeur de originele verpakking) en voeg een duidelijke foutomschrijving bij. • Tip: alvorens het toestel voor reparatie aan te bieden, kijk nog eens na of er geen voor de hand liggende reden is waarom het toestel niet naar behoren werkt (zie handleiding). Op deze wijze kunt u kosten en tijd besparen. Denk eraan dat er ook voor niet-defecte toestellen een kost voor controle aangerekend kan worden. • Bij reparaties buiten de waarborgperiode zullen transportkosten aangerekend worden. • Elke commerciële garantie laat deze rechten onverminderd.
Bovenstaande opsomming kan eventueel aangepast worden naargelang de aard van het product (zie handleiding van het betreffende product).
Garantie de service et de qualité Velleman® Velleman® jouit d’une expérience de plus de 35 ans dans le monde de l’électronique avec une distribution dans plus de 85 pays. Tous nos produits répondent à des exigences de qualité rigoureuses et à des dispositions légales en vigueur dans l’UE. Afin de garantir la qualité, nous soumettons régulièrement nos produits à des contrôles de qualité supplémentaires, tant par notre propre service qualité que par un service qualité externe. Dans le cas improbable d’un défaut malgré toutes les précautions, il est possible d’invoquer notre garantie (voir les conditions de garantie).
Conditions générales concernant la garantie sur les produits grand public (pour l’UE) :
• tout produit grand public est garanti 24 mois contre tout vice de production ou de matériaux à dater du jour d’acquisition effective ; • si la plainte est justifiée et que la réparation ou le remplacement d’un article est jugé impossible, ou lorsque les coûts s’avèrent disproportionnés, Velleman® s’autorise à remplacer ledit article par un article équivalent ou à rembourser la totalité ou une partie du prix d’achat. Le cas échéant, il vous sera consenti un article de remplacement ou le remboursement complet du prix d’achat lors d’un défaut dans un délai de 1 an après l’achat et la livraison, ou un article de remplacement moyennant 50% du prix d’achat ou le remboursement de 50% du prix d’achat lors d’un défaut après 1 à 2 ans. • sont par conséquent exclus : - tout dommage direct ou indirect survenu à l’article après livraison (p.ex. dommage lié à l’oxydation, choc, chute, poussière, sable, impureté…) et provoqué par l’appareil, ainsi que son contenu (p.ex. perte de données) et une indemnisation éventuelle pour perte de revenus ; - tout bien de consommation ou accessoire, ou pièce qui nécessite un remplacement régulier comme p.ex. piles, ampoules, pièces en caoutchouc, courroies… (liste illimitée) ; - tout dommage qui résulte d’un incendie, de la foudre, d’un accident, d’une catastrophe naturelle, etc. ; - out dommage provoqué par une négligence, volontaire ou non, une utilisation ou un entretien incorrects, ou une utilisation de l’appareil contraire aux prescriptions du fabricant ; - tout dommage à cause d’une utilisation commerciale, professionnelle ou collective de l’appareil (la période de garantie sera réduite à 6 mois lors d’une utilisation professionnelle) ; - tout dommage à l’appareil qui résulte d’une utilisation incorrecte ou différente que celle pour laquelle il a été initialement prévu comme décrit dans la notice ; - tout dommage engendré par un retour de l’appareil emballé dans un conditionnement non ou insuffisamment protégé. - toute réparation ou modification effectuée par une tierce personne sans l’autorisation explicite de SA Velleman® ; - frais de transport de et vers Velleman® si l’appareil n’est plus couvert sous la garantie. • toute réparation sera fournie par l’endroit de l’achat. L’appareil doit nécessairement être accompagné du bon d’achat d’origine et être dûment conditionné (de préférence dans l’emballage d’origine avec mention du défaut) ;

• tuyau : il est conseillé de consulter la notice et de contrôler câbles, piles, etc. avant de retourner l’appareil. Un appareil retourné jugé défectueux qui s’avère en bon état de marche pourra faire l’objet d’une note de frais à charge du consommateur ; • une réparation effectuée en-dehors de la période de garantie fera l’objet de frais de transport ; • toute garantie commerciale ne porte pas atteinte aux conditions susmentionnées.
La liste susmentionnée peut être sujette à une complémentation selon le type de l’article et être mentionnée dans la notice d’emploi.
Garantía de servicio y calidad Velleman® Velleman® disfruta de una experiencia de más de 35 años en el mundo de la electrónica con una distribución en más de 85 países. Todos nuestros productos responden a normas de calidad rigurosas y disposiciones legales vigentes en la UE. Para garantizar la calidad, sometemos nuestros productos regularmente a controles de calidad adicionales, tanto a través de nuestro propio servicio de calidad como de un servicio de calidad externo. En el caso improbable de que surgieran problemas a pesar de todas las precauciones, es posible recurrir a nuestra garantía (véase las condiciones de garantía). Condiciones generales referentes a la garantía sobre productos de venta al público (para la Unión Europea): • Todos los productos de venta al público tienen un período de garantía de 24 meses contra errores de producción o errores en materiales desde la adquisición original; • Si la queja está fundada y si la reparación o sustitución de un artículo no es posible, o si los gastos son desproporcionados, Velleman® autoriza reemplazar el artículo por un artículo equivalente o reembolsar la totalidad o una parte del precio de compra. En este caso, usted recibirá un artículo de recambio o el reembolso completo del precio de compra si encuentra algún fallo hasta un año después de la compra y entrega, o un artículo de recambio al 50% del precio de compra o el reembolso del 50% del precio de compra si encuentra un fallo después de 1 año y hasta los 2 años después de la compra y entrega. Por consiguiente, están excluidos entre otras cosas: - todos los daños causados directa o indirectamente al aparato (p.ej. por oxidación, choques, caída,...) y a su contenido (p.ej. pérdida de datos) después de la entrega y causados por el aparato, y cualquier indemnización por posible pérdida de ganancias; - partes o accesorios que deban ser reemplazados regularmente, como por ejemplo baterías, lámparas, partes de goma, etc. (lista ilimitada) - defectos causados por un incendio, daños causados por el agua, rayos, accidentes, catástrofes naturales, etc.; - defectos causados a conciencia, descuido o por malos tratos, un mantenimiento inapropiado o un uso anormal del aparato contrario a las instrucciones del fabricante; - daños causados por un uso comercial, profesional o colectivo del aparato (el período de garantía se reducirá a 6 meses con uso profesional); - daños causados por un uso incorrecto o un uso ajeno al que está previsto el producto inicialmente como está descrito en el manual del usuario; - daños causados por una protección insuficiente al transportar el aparato. - daños causados por reparaciones o modificaciones efectuadas por una tercera persona sin la autorización explícita de Velleman®; - se calcula gastos de transporte de y a Velleman® si el aparato ya no está cubierto por la garantía. • Cualquier artículo que tenga que ser reparado tendrá que ser devuelto a su distribuidor Velleman®. Devuelva el aparato con la factura de compra original y transpórtelo en un embalaje sólido (preferentemente el embalaje original). Incluya también una buena descripción del fallo; • Consejo: Lea el manual del usuario y controle los cables, las pilas, etc. antes de devolver el aparato. Si no se encuentra un defecto en el artículo los gastos podrían correr a cargo del cliente; • Los gastos de transporte correrán a carga del cliente para una reparación efectuada fuera del período de garantía. • Cualquier gesto comercial no disminuye estos derechos. La lista previamente mencionada puede ser adaptada según el tipo de artículo (véase el manual del usuario del artículo en cuestión)
Velleman® Service- und Qualitätsgarantie
Velleman® hat gut 35 Jahre Erfahrung in der Elektronikwelt und vertreibt seine Produkte in über 85 Ländern.
Alle Produkte entsprechen den strengen Qualitätsforderungen und gesetzlichen Anforderungen in der EU. Um die Qualität zu gewährleisten werden unsere Produkte regelmäßig einer zusätzlichen Qualitätskontrolle unterworfen, sowohl von unserer eigenen Qualitätsabteilung als auch von externen spezialisierten Organisationen. Sollten, trotz aller Vorsichtsmaßnahmen, Probleme auftreten, nehmen Sie bitte die Garantie in Anspruch (siehe Garantiebedingungen).
Allgemeine Garantiebedingungen in Bezug auf Konsumgüter (für die Europäische Union):
• Alle Produkte haben für Material- oder Herstellungsfehler eine Garantieperiode von 24 Monaten ab Verkaufsdatum.
• Wenn die Klage berechtigt ist und falls eine kostenlose Reparatur oder ein Austausch des Gerätes unmöglich ist, oder wenn die Kosten dafür unverhältnismäßig sind, kann Velleman® sich darüber entscheiden, dieses Produkt durch ein gleiches Produkt zu ersetzen oder die Kaufsumme ganz oder teilweise zurückzuzahlen. In diesem Fall erhalten Sie ein Ersatzprodukt oder eine Rückzahlung im Werte von 100% der Kaufsumme im Falle eines Defektes bis zu 1 Jahr nach Kauf oder Lieferung, oder Sie bekommen ein Ersatzprodukt im Werte von 50% der Kaufsumme oder eine Rückzahlung im Werte von 50 % im Falle eines Defektes im zweiten Jahr.
• Von der Garantie ausgeschlossen sind:
- alle direkten oder indirekten Schäden, die nach Lieferung am Gerät und durch das Gerät verursacht werden (z.B. Oxidation, Stöße, Fall, Staub, Schmutz, Feuchtigkeit, ...), sowie auch der Inhalt (z.B. Datenverlust), Entschädigung für eventuellen Gewinnausfall.
- Verbrauchsgüter, Teile oder Zubehörteile, die regelmäßig ausgewechselt werden, wie z.B. Batterien, Lampen, Gummiteile, Treibriemen, usw. (unbeschränkte Liste).
- Schäden verursacht durch Brandschaden, Wasserschaden, Blitz, Unfälle, Naturkatastrophen, usw.
- Schäden verursacht durch absichtliche, nachlässige oder unsachgemäße Anwendung, schlechte Wartung, zweckentfremdete Anwendung oder Nichtbeachtung von Benutzerhinweisen in der Bedienungsanleitung.
- Schäden infolge einer kommerziellen, professionellen oder kollektiven Anwendung des Gerätes (bei gewerblicher Anwendung wird die Garantieperiode auf 6 Monate zurückgeführt).
- Schäden verursacht durch eine unsachgemäße Verpackung und unsachgemäßen Transport des Gerätes.
- alle Schäden verursacht durch unautorisierte Änderungen, Reparaturen oder Modifikationen, die von einem Dritten ohne Erlaubnis von Velleman® vorgenommen werden.
• Im Fall einer Reparatur, wenden Sie sich an Ihren Velleman®-Verteiler. Legen Sie das Produkt ordnungsgemäß verpackt (vorzugsweise die Originalverpackung) und mit dem Original-Kaufbeleg vor. Fügen Sie eine deutliche Fehlerbeschreibung hinzu.
• Hinweis: Um Kosten und Zeit zu sparen, lesen Sie die Bedienungsanleitung nochmals und überprüfen Sie, ob es keinen auf de Hand liegenden Grund gibt, ehe Sie das Gerät zur Reparatur zurückschicken. Stellt sich bei der Überprüfung des Geräts heraus, dass kein Geräteschaden vorliegt, könnte dem Kunden eine Untersuchungspauschale berechnet.
• Für Reparaturen nach Ablauf der Garantiefrist werden Transportkosten berechnet.
• Jede kommerzielle Garantie lässt diese Rechte unberührt.
Die oben stehende Aufzählung kann eventuell angepasst werden gemäß der Art des Produktes (siehe Bedienungsanleitung des Gerätes