Embed Size (px)
Citation preview

Serial Number Purchase Date
ATTACH YOUR RECEIPT HERE
Lowes.com/masterforge
Español p. 54
Français p. 27
2-Door Gas Smoker
ITEM #0411913
MODEL #MFX784BDP
Master Forge & M Design® are registered trademarks of LF, LLC. All rights reserved.
Questions, problems, missing parts? Before returning to your retailer, call our customer service department at 1-800-963-0211, 8:00 a.m. – 6:00 p.m. EST, Monday – Thursday, 8:00 a.m. – 5:00 p.m. EST, Friday.
1#70-10-023Rev. 10/12
ANS Z21.89b-2012 CSA 1.18b-2012

2Lowes.com/masterforge
taBle oF coNteNts
Safety Information ............................................................................................................... 2
Package Contents ............................................................................................................... 5
Hardware Contents.............................................................................................................. 6
Preparation .......................................................................................................................... 6
Assembly Instructions.......................................................................................................... 6
Operating Instructions ....................................................................................................... 13
Care and Maintenance ...................................................................................................... 21
Troubleshooting ................................................................................................................. 23
Warranty ............................................................................................................................ 24
Replacement Parts List ..................................................................................................... 25
Assembler/Installer: This instruction manual contains important information necessary for the proper assembly and safe use of this appliance. Read and follow all warnings and instructions before assembling and using this appliance. leave these instructions with the consumer.
Consumer/User: Follow all warnings and instructions when using this appliance. keep these instructions for future reference.
DaNGer: Failuretofollowtheseinstructionscouldresultinfire,explosion,orburnhazard which could cause property damage, personal injury or death.
DaNGer if you smell gas: 1. shut off gas to the appliance. 2.Extinguishopenflame 3. open lid. 4. if odor continues, keep away from the appliance
and immediately call your gas supplier or your firedepartment.
1. Never operate this appliance unattended. 2. Never operate this appliance within 10 feet (3 m) of any structure, combustible material
or other gas cylinder. 3.Neveroperatethisappliancewithin25feet(7.5m)ofanyflammableliquid. 4.Neverallowoilorgreasetogethotterthan400°For200°C.Ifthetemperatureexceeds
400°F (200°C) or if oil begins to smoke, immediately turn the burner or gas supply OFF. 5.Heatedliquidsremainatscaldingtemperatureslongafterthecookingprocess.Never
touchcookingapplianceuntilliquidshavecooledto115°F(45°C)orless. 6.Ifafireshouldoccur,keepawayfromtheapplianceandimmediatelycallyourfire
department.Donotattempttoextinguishanoilorgreasefirewithwater.
DaNGer:
Failure to follow these instructions could result infire,explosion,orburnhazard which could cause property damage, personal injury or death.
DaNGer

3Lowes.com/masterforge
3
saFetY iNFormatioN
Please read and understand this entire manual before attempting to assemble, operate or install the product.Ifyouhaveanyquestionsregardingtheproduct,pleasecallcustomerserviceat: 1-800-963-0211, 8:00 a.m. – 6:00 p.m. EST, Monday – Thursday, 8:00 a.m. – 5:00 p.m. EST, Friday.
caliForNia ProPositioN 65 •Fuelsusedingasoroil-firedappliancesandtheproductsofcombustionofsuchfuelscontain
chemicals known to the state of California to cause cancer, birth defects or other reproductive harm. This product contains chemicals, including lead and lead compounds, known to the state of California to cause cancer, birth defects or other reproductive harm. Wash hands after handling.
•Do Not use this product for anything other than its intended purpose. It is Not intended for
commercial use. It is Not intended to be installed or used in or on a recreational vehicle and/or boat.
•Keepafireextinguishernearthisproductatalltimes.•Thisapplianceisforoutdooruseonlyinwell-ventilatedareas.Do Not operate it in a building,
garage or any other enclosed area, or under overhead construction.•Aminimumclearanceof36inches(92cm)tocombustiblematerialisrequiredonthefront,sides
and back. It is very important to always maintain proper clearances to combustibles.•Do Notobstructtheflowofcombustionairorventilationairfortheappliance.•Whencooking,thesmokermustbeonalevel,stablenoncombustiblesurfaceinanareaclearof
combustible material, including tall or dry grass.•Careshouldbetakentoprotectthefuelsupplyhosefromdamagefromeitherpedestrianor vehicletraffic.
•Cleanandinspectthehosebeforeeachuseoftheappliance.Ifthereisevidenceofabrasion,wear, cuts or leaks, the hose must be replaced prior to the appliance being used. The replacement hose assemblyshallbethatspecifiedbythemanufacturer.
•Beforeeachusecheckthatnodeadleavesordebrisareundertheappliance.•Storethisapplianceinadry,protectedlocation.•Theuseofalcohol,prescriptionornonprescriptiondrugsmayimpairtheuser’sabilitytoproperly
assemble and safely operate this appliance.•Allowthesmokertocoolto115°F(45°C)beforemovingorstoring.Usecautionwhenliftingand
moving the appliance to avoid back strain or back injury. Do Not move the appliance while it is in use.•Alwayshangtheregulatoronthetankretentionwirewhilenotinuseordisconnectedwiththe LP(liquidpropane)tank.keeP the fuel supply hose away from any heated surface(s).•Do Notstoreandusethisapplianceneargasolineorothercombustibleliquidsorwhereother
combustible vapors may be present.•Do Not use this appliance as a heater.•Do Notleavetheapplianceunattendedwhileinuse.Keepchildrenandpetsawayfromthe
appliance at all times.

4Lowes.com/masterforge
saFetY iNFormatioN
•Ifyoumustdisposeofashesinlesstimethanittakesfortheashestocompletelycooldown, remove the ashes from the appliance, keeping them in the heavy-duty foil, and soak them completely with water before disposing of them in a noncombustible container.
•Thisappliancewillbehotduringandafteruse.Useinsulatedovenmittsorglovesforprotectionfromhotsurfacesorsplatterfromcookingliquids.
•Makesurethattheorificeofthecontrolvalveproperlymateswiththeburnermixingtubeby visual observation. Please refer to maintenance section.
•Usecautionwhenopeningthedoorofthesmokerwhileinoperation.Keephands,faceandbody safefromhotsteamorflare-ups.Do Not inhale smoke.
•Do Not wear loose clothing while operating the smoker. Tie back long hair while operating the smoker. alWaYs wear shoes that fully cover your feet while operating the smoker.
•Allowthesmokeranditscomponentstocoolcompletelybeforeconductinganyroutinecleaning or maintenance.•NeVer use glassware, plastic or ceramic cookware on or in your smoker. Use metallic cookware only.•NeVer operate the smoker without water in the water bowl. NEVER allow the water to completely
evaporate. Check the water level at least every 2 hours. A sizzling sound may indicate a low water level. Follow instructions in this manual for adding water while operating (see the Operating Instructions section).
•Whenusingflavoringwood,addasufficientamountpriortooperationtoavoidhavingtoaddwood while operating. Adding wood while operating may splash hot water and cause serious injury.
•Useofaccessoriesnotintendedforthissmokerisnotrecommendedandmayleadtoinjuryorproperty damage.
•AnLPcylindernotconnectedforuseshouldnotbestoredinthevicinityofthesmokeroranyother appliance. Do Not store spare LP cylinders within 10 feet of the smoker. LP cylinders must be stored outdoors, out of reach of children. Do Not store LP cylinders in a building, garage or any other enclosed area.•Do Not store LP gas cylinders inside or on top of the smoker. Improper storage of cylinders could leadtoexplosion,fireand/orpersonalinjury.Cylindersaretobestoredoutdoors,outofreachofchildren and must not be stored in a building, garage or any other enclosed area.
•Whilethesmokerisnotinuse,thegasmustbeturnedoffatthesupplycylinder.•LPgasesareheavierthanair,tendtopoolandcollectinlow-lyingareas,areeasilyignitedandarehighlyflammable.Propercareandcautionshouldbeemployedwhendealingwithanysuchfuels.
•Thesmokershouldbeturnedoffandallsupplyvalves(onpipingoronfuelcylinders)shouldbeclosedin the event that the odor of unburned gas is detected. Do not attempt to use the appliance until any gasleaksarefixedand/orthesourceoftheunburnedgasodorisaccountedfor.
•Do Not use the smoker if the burner fails to light or fails to remain lit. Under such conditions, gas should be turned off and the fuel cylinder should be disconnected.
•Useinhighwindconditionsthatresultinpoorburneroperationsuchasblowingoutandflaringshouldbe avoided. If repositioning the appliance does not improve operation under such wind conditions, the appliance should be turned off.
•Readandfollowallwarningsandinstructionsbeforeassemblingandusingtheappliance.•Followallwarningsandinstructionswhenusingtheappliance.
NOTE:Theinstallationmustconfirmwithlocalcodesor,intheabsenceoflocalcodes,witheitherthe National Fuel Gas Code, ANSI Z223.1/NFPA 54, Natural Gas and Propane Installation Code,CSA B149.1, or Propane Storage and Handling Code, B149.2, or the Standard for RecreationalVehicles, ANSI A 119.2/ NFPA 1192, and CSA Z240 RV Series, Recreational Vehicle Code, asapplicable.

5Lowes.com/masterforge
A
C
D
E
F
HG
L
J
K
B
NM
I
P
S
R
T
O
Q
U
V
Part DescriPtioN QUaNtitYA Side Table 1B Side Table Front Support 1C Side Table Rear Support 1D Smoke Stack 1E Rear Handle 1F Hose Retention 1G Tank Retention 1H Tank Heat Shield 1I Door Locking Bracket 2J Door Handle 2K Smoker Body 1L Burner & Control Unit 1
Part DescriPtioN QUaNtitYM Rear Leg Assembly 1N Leg 2O WoodChipBox 1P WoodChipBoxLid 1Q Water Bowl 1R Cooking Grate 4S Temperature Gauge
& Bezel1
T Cooking Grate Support 12U Upper Door 1V Lower Door 1
PackaGe coNteNts
6Lowes.com/masterforge
PreParatioN
Before beginning assembly of product, make sure all parts are present. Compare parts with package contents list and hardware contents list. If any part is missing or damaged, do not attempt to assemble the product.
estimated assembly time: 30 minutes
ToolsRequiredforAssembly(notincluded):Phillipsscrewdriver,adjustablewrench,andpliers.
assemBlY iNstrUctioNs
1. Turnthesmokerbody(K)upsidedown.Alignthe legs (N) on the front corners of the smoker body(K).SecurewithsixM6x12bolts(AA).Tighten all bolts.
1
1
2
N
K
1
AA
Hardware Used
M6x12Bolt x6aa
M6x
12 B
olt
Qty
. 34
M5x
12 B
olt
Qty
. 8S
prin
g C
lipQ
ty. 2
M5
Nut
Qty
. 2
AA
BB
CC
DD
M6x12 BoltQty. 34
M5x12 BoltQty. 8
Spring ClipQty. 2
M5 NutQty. 2
AA BB CC DD
HarDWare coNteNts (shown actual size)

7
assemBlY iNstrUctioNs
Lowes.com/masterforge
4. caUtioN: this unit is HeaVY! Do not attempt this step without assistance!
Close the bottom door (V). With the assistance of a helper, stand the unit upright on its legs on afirmandlevelsurface.(Makesurethattheburner/control unit and legs are attached.) Align the hose retention (F) on the back of the smoker body(K).SecurewithtwoM6x12bolts(AA).Tighten all bolts.
2. Align the rear leg assembly (M) on the smoker body(K).SecurewithsixM6x12bolts(AA).Tighten all bolts.
3. Open bottom door (V). Turn the burner and control unit (L) upside down and place it on the bottom of the smoker body(K).Alignthefourmountingholesontheburnerandcontrolunit(L)withtheholesonthesmokerbody(K). SecurewithfourM6x12bolts(AA).Tighten all bolts.
Note: The control knob should be on the same side as the door. Check that the burner is properly installed on the orificebeforeattachingtheburnerandcontrolunit(L).
F
AA
4K
11
2
L
K
3AA
1
1
2
M
K
2AA
Hardware Used
M6x12Bolt x6aa
M6x
12 B
olt
Qty
. 34
M5x
12 B
olt
Qty
. 8S
prin
g C
lipQ
ty. 2
M5
Nut
Qty
. 2
AA
BB
CC
DD
Hardware Used
M6x12Bolt x4aa
M6x
12 B
olt
Qty
. 34
M5x
12 B
olt
Qty
. 8S
prin
g C
lipQ
ty. 2
M5
Nut
Qty
. 2
AA
BB
CC
DD
Hardware Used
M6x12Bolt x2aa
M6x
12 B
olt
Qty
. 34
M5x
12 B
olt
Qty
. 8S
prin
g C
lipQ
ty. 2
M5
Nut
Qty
. 2
AA
BB
CC
DD

8
assemBlY iNstrUctioNs
Lowes.com/masterforge
7. Open the upper door (U). Position the smoke stack (D) with control arm to the left as shown. UsingfourM6x12bolts(AA),securesmokestack(D)tothetopofsmokerbody(K).Tightenall bolts.
6. Remove pre-assembled cotter pin from the tank retention wire (G). Attach the ends of the tank retention wire (G) on the back of the tank heat shield (H) as shown, then insert the cotter pin.
5. Align the tank heat shield (H) on the back of the smokerbody(K).SecurewithfourM6x12 bolts (AA). Tighten all bolts.
1
2
D
K
7AA
G
6
H
1
1
2
H
5K
AA
Hardware Used
M6x12Bolt x4aa
M6x
12 B
olt
Qty
. 34
M5x
12 B
olt
Qty
. 8S
prin
g C
lipQ
ty. 2
M5
Nut
Qty
. 2
AA
BB
CC
DD
Hardware Used
M6x12Bolt x4aa
M6x
12 B
olt
Qty
. 34
M5x
12 B
olt
Qty
. 8S
prin
g C
lipQ
ty. 2
M5
Nut
Qty
. 2
AA
BB
CC
DD

9
assemBlY iNstrUctioNs
Lowes.com/masterforge
1
2
E
AA
10
K
T
9
1
3
2
K
T
8T
8. Insert the cooking grate support (T) into the correspondingholesinsidethesmokerbody(K)from the bottom up.
9. Repeat step 8 for the remaining cooking grate supports (T).
NOTE: There are 8 positions to install the cooking grate supports. The cooking grate supports can be installed into positions according to the need of the owner.
10. Align rear handle (E) with holes on the back of smokerbody(K).SecurewithfourM6x12 bolts (AA). Tighten all bolts.
Hardware Used
M6x12Bolt x4aa
M6x
12 B
olt
Qty
. 34
M5x
12 B
olt
Qty
. 8S
prin
g C
lipQ
ty. 2
M5
Nut
Qty
. 2
AA
BB
CC
DD

10
assemBlY iNstrUctioNs
Lowes.com/masterforge
1
1
2
K
13
BBB
C
1
12
J
R
12
CC
1
1
2
K
11
IAA
11. Align the door locking brackets (I) with the holes ontherightsideofthesmokerbody(K).Secureeach bracket with two bolts (AA). Tighten all bolts.
12. Open doors (U, V). Slide door handle (J) through brackets in door. Using pliers, slide a spring clip (CC) over the groove in the door handle as shown. Make sure both of the spring clips are securely attached in the grooves of the handles.
13. Align the side table rear support (C) and side table front support (B) on side of smoker body (K).Arrowscutoutofthesupportsindicatethecorrect position of the support. Secure each supportwithfourM5x12bolts(BB).Tightenallbolts.
NOTE: Side Table Supports (C, B) will be used for left side table placement.
Hardware Used
M6x12Bolt x4aa
M6x
12 B
olt
Qty
. 34
M5x
12 B
olt
Qty
. 8S
prin
g C
lipQ
ty. 2
M5
Nut
Qty
. 2
AA
BB
CC
DD
Hardware Used
Spring Clip x2cc
M6x12 BoltQty. 34
M5x12 BoltQty. 8
Spring ClipQty. 2
M5 NutQty. 2
AABBCCDD
Hardware Used
M5x12Bolt x8BB
M6x
12 B
olt
Qty
. 34
M5x
12 B
olt
Qty
. 8S
prin
g C
lipQ
ty. 2
M5
Nut
Qty
. 2
AA
BB
CC
DD
11
assemBlY iNstrUctioNs
Lowes.com/masterforge
1
Q
16
K
21
O
15
P
K
3
4
1 2
A A
K
14
B
C
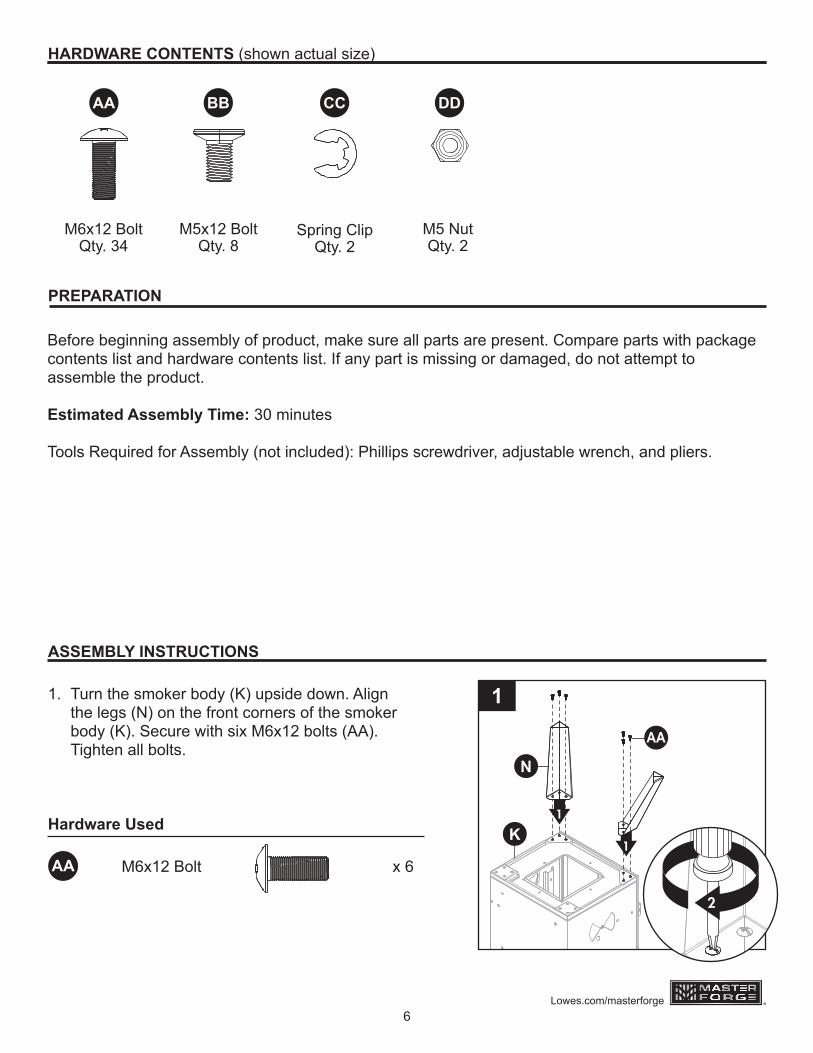
15.Opendoors(U,V).Slidethewoodchipbox(O)onto the lowest cooking grate supports inside thesmokerbody(K)andputthewoodchipboxlid (P) on top.
16. Slide the water bowl (Q) onto the cooking grate supportsinsidethesmokerbody(K)abovethewoodchipboxasshown.
14. With the side table (A) in a perpendicular position, align the slots in the side table with the side table supports (B, C) and insert. To lock the side table (A) in the upright position, swing the side table (A) 90 degrees up, push towards thebody(K),andpressdownontheside table (A) near the body until it is fully fastened in place.
12
assemBlY iNstrUctioNs
Lowes.com/masterforge
1
2
18S
17R
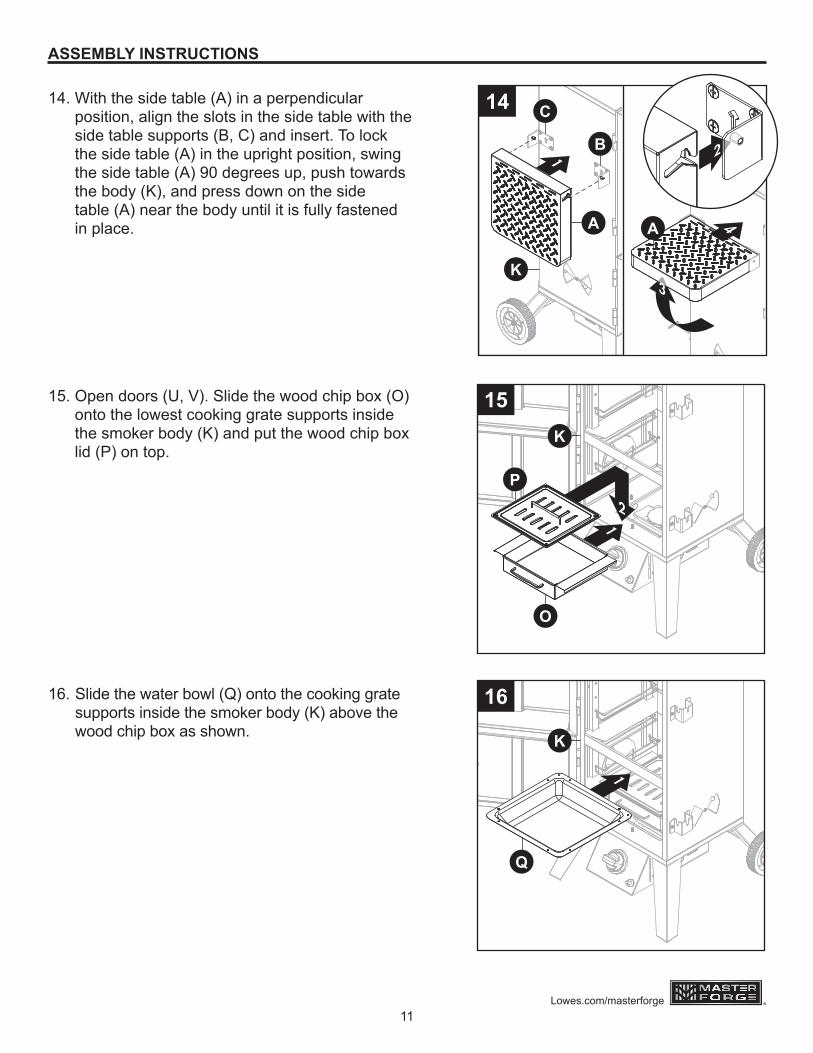
17. Slide the four cooking grates (R) into the top cooking grate supports (T) inside the smoker body(K).
18. Insert the probe of the temperature gauge assembly (S) through hole in top door (U) from the outside. Secure using two M5 nuts (DD) on inside panel. Tighten with wrench.
Hardware Used
M5 Nut x2DD
M6x12 BoltQty. 34
M5x12 BoltQty. 8
Spring ClipQty. 2
M5 NutQty. 2
AABBCCDD

13Lowes.com/masterforge
OPERATING INSTRUCTIONS
Connecting the LP Tank WARNING: ALL INSTRUCTIONS AND SAFEGUARDS ON THIS PAGE MUST BE FOLLOWED TO PREVENT FIRE, DAMAGE AND/OR INJURY.
1. The knob on the LP tank must be closed. Make sure that the knob is turned clockwise to a full stop. The cylinder supply system must be arranged for vapor withdrawal.
2. Check that the control knob on the control unit is turned O OFF.3. Fold out the LP tank platform extension located on the back of the rear leg assembly (see Diagram
1) and place the LP tank onto the platform (see Diagram 2A).4. Secure the tank by the retention wire onto the top of the tank (see Diagram 2B). 5. Remove the protective cap from the LP tank valve and coupling nut.6. Hold the regulator in one hand and insert the nipple into the valve outlet. Be sure the nipple is
centered in the valve outlet. The coupling connects to the large outside threads on the valve outlet. Use care – do not cross thread the connection.
7. Hand tighten the coupling clockwise until it comes to a full stop (see Diagram 3). Firmly tighten by hand only. Do not use tools.
AC UTION: In the connection process, make sure the regulator inlet connector mates with the cylinder valve outlet properly, safely and
AC UTION: Make sure the hose is not touching the smoker body.
Any fuel supply cylinder used must be constructed and marked in accordance with for propane cylinders of the U.S. Department of Transportation (DOT) CFR 49, or the Standard for Cylinders, Spheres and Tubes for the Transportation of Dangerous Goods, CAN/CSA B339. The appliance is to be used only with the 20-pound, vertical standing vapor withdrawal type tank and must include a collar to protect the cylinder valve.A. DO NOT store spare LP cylinders under or near the smoker.B. NEVER cylinder more than 80% full.C. DO NOT store cylinder indoors.
WARNING: ALL INSTRUCTIONS AND SAFEGUARDS ON THIS PAGE MUST BE FOLLOWED TO PREVENT FIRE, DAMAGE AND/OR INJURY.
WARNING: If instructions A, B and C are not followed exactly, a causing death or serious injury may occur.
21
Diagram 1 Diagram 2 Diagram 32a
2b2b

14Lowes.com/masterforge
oPeratiNG iNstrUctioNs
This smoker is designed to operate on LP gas only. The gas cylinder used must include a collar to protect the cylinder valve. The cylinder supply system must be arranged for vapor withdrawal. Do not allow dirt or foreign material to get into or onto tank connection when it is not attached to the fuel supply system. Use the protective cap provided.
WarNiNG: ALL INSTRUCTIONS AND SAFEGUARDS ON THIS PAGE MUST BE FOLLOWED TO PREVENT FIRE, DAMAGE AND/OR INJURY.
The cylinder outlet must have Type 1 gas connection termination in order to mate with gas hose provided with smoker. The pressure regulator and hose assembly supplied by the manufacturer with the appliance must be used. Replacement pressure regulators and hose assemblies must be those specifiedbytheappliancemanufacturer.
This unit is not to be utilized with a non-self-contained LP-gas supply system.
Valve/pressure regulators are factory set to the correct operating pressures. No attempts should bemade to adjust these settings.
moving the smoker with lP tank attached
caUtioN: DONOTATTEMPTTOMOVETHESMOKERWHILETHELPTANKORBURNERISTURNEDON,ORWHENTHEREAREWOODCHIPSANDWATERINSIDETHESMOKER.DOING SO MAY RESULT IN FIRE, DAMAGE, AND/OR INURY. Please follow the procedures in the section titled “Turning off the Smoker”, on Page 20, before attempting to move the smoker.
caUtioN: MAKESUREYOUHAVECOMPLETELYSECUREDTHETANKTOTHEBACKOFTHESMOKERBEFOREATTEMPTINGTOMOVETHESMOKER.REFERTOTHESECTIONTITLED“CONNECTINGTHELPTANK”,ONPAGE13,FORMOREINFORMATION.
1. Tightly grip the back handle with both hands and place one foot on the back of the wheel (left or right).
2. While using your foot to keep the smoker from sliding, slowly tilt the smoker back.
WarNiNG: DONOTATTEMPTTOTIPTHESMOKERMORE THAN A 35° ANGLE. THIS MAY RESULT IN DAMAGETOSMOKERANDTHELPTANK.
3. Once the smoker is tilted, keep both hands on the back handleandremoveyourfootfromthewheelaxle.Movethesmoker to the desired location.
If the product is not in use, the gas must be turned off at the supply cylinder and the cylinder should be disconnected from the appliance.
Storage of the appliance indoors is only permissible if the cylinder is disconnected and removed from the appliance. Do not store cylinder indoors.
WarNiNG: ALL INSTRUCTIONS AND SAFEGUARDS ON THIS PAGE MUST BE FOLLOWED TO PREVENT FIRE, DAMAGE AND/OR INJURY.
35°

15Lowes.com/masterforge
Disconnect the lP tankMake sure that the knob on the LP tank is turned clockwise to a full stop (CLOSED).
Hold the regulator in one hand, turn the coupling to the valve outlet counterclockwise and unthread the connection by hand only. Do not use tools.
Place dust cap on cylinder valve outlet whenever the cylinder is not in use. Only install the type ofdust cap on the cylinder valve outlet that is provided with the cylinder valve. Other types of caps orplugs may result in leakage of propane.
Always hang the regulator on the tank retention wire while not in use, disconnected fromthe LP tank, and when the unit has cooled down.
checking for leaksAfterconnectionsaremade,checkallconnectionsandfittingsforleakswithasoapsolution.
1.Withallvalvesclosed,applytheleakchecksolution(50/50mixofdishwashingsoapandwater)toallgascarryingconnectionsandfittings.
2. Open tank valve.
Presence of bubbles at areas of wet solution indicates a gas leak. If leaks are detected or you smell or hear gas, shut off the valve and repair the leak or replace the defective part. Do not use the smoker until all leaks are corrected.
For vapor withdrawal, LP tanks are intended to be operated in the upright position only.
If the product is not in use, the gas must be turned off at the supply cylinder and the cylinder shouldbe disconnected from the appliance.
Storage of the appliance indoors is only permissible if the cylinder is disconnected and removed from the appliance. Do not store cylinder indoors.
Before First UseRemove all hangings or plastic straps, if present.
Before you cook food in your smoker, it is important to “season” your smoker. Seasoning seals the paintandinteriorofyoursmokertoenhanceflavoring,durabilityandoverallperformance.
To season your smoker, simply use it as you normally would only do not cook any food. You will need tofollowalloftheoperatingproceduresinthenextfewsectionsofthismanual.
Usingyourdesiredflavoringwoodsandmarinades,burnyoursmokeratlowtemperature(around175˚F/79.4˚C)for45–60minutes.Letthesmokercoolandcleanoutthewaterandwood.
Onceseasoningiscomplete,yoursmoker’sinteriorwillhaveadurable,seasonedcoating.
oPeratiNG iNstrUctioNs

16Lowes.com/masterforge
adding WaterToaddwaterbeforecooking,simplyremovethewaterbowlandfillitwithwaterslightlybelowtherim.Place the bowl back into the smoker. Adding water before cooking is recommended. To add water while cooking, if a sizzling sound indicating lack of water is heard, or there is a need to add water, open the bottom door with care and avoid taking in the smoke. Use a long nose kettle-like water can, standasfarfromthesmokerasyoucan,fillthewaterbowlupto1inchbelowtherim.
caUtioN: Do Not pull the water bowl out beyond the rack when the smoker is hot.
cooking tipLine the water bowl with aluminum foil before each use. This will make it easy to clean and help your water bowl last longer.
To make adding water easier and safer, use a clean watering can with a long spout.
adding Wood chipsToaddwoodchipsbeforecooking,simplyfillthewoodchipboxwithyourchoiceofflavoringhardwood chips. The amount and type of wood you use is entirely dependent on the desired amount offlavor.Oncetheboxisfilled,placethelidontopoftheboxandsettheboxinthesmoker.
To add wood chips while cooking, we recommend using tongs or long handled pliers to remove theboxlidandtoplacethepiecesintothewoodchipboxwithoutremovingthebox.Itisnotrecommendedtoremovethewoodchipboxwhilethesmokerisinoperation.
caUtioN: Thewoodchipboxandlidgetveryhot.Avoidhandlingthemwhileinuse.Alwayswear protective oven mitts when handling hot components.
•Smallwoodchipsworkbestinsidethewoodchipbox.•Usedryhardwoodssuchashickory,pecan,apple,cherryormesquite.•Toproducemoresmokeandpreventfastburning,pre-soakthewoodchipsinaseparatebowlof
water for at least 20 minutes, or wrap the chips in perforated aluminum foil.•Mostsmokeflavoringoccurswithinthefirsthourofcooking.Addingwoodchipsafterthefirsthouristypicallynotnecessaryunlessextrasmokeflavoringisdesired.
Always follow the manufacturer's recommendations for cleaning and care. Monitor your fuel supply, running out of propane halfway through the smoking process isn't fun. Consider purchasing a spare tank as a back-up.
oPeratiNG iNstrUctioNs

17Lowes.com/masterforge
tips on smokingHere's a list of the most popular smoking woods and information about each.
type of Wood suggested Food commentsApple All meats Mildandsweetflavorwithaslighthintoffruityflavor.Each
species of apple wood should give off a slightly different flavor.Applesmokeproducesanattractivebrowningeffect.
Almond All meats Producesasweetsmokewithanaturalnuttyflavor.Ash Fish and red meat Verylightflavor
Citrus Pork and chicken Lemonandorangewoodproducelightbutfruityflavor.Cherry Pork and beef Lightandfruityflavor.
Fruitwood Pork,poultryandfish Wood such as peach, pear and plum produce a mild but sweetsmokewithahintoffruityflavor.
Grapevine Poultry, game and lamb
Grapevine wood produces a lot of smoke. A little wood goesalongway.Itproducesatartflavorthathasa
hint of fruit.Hickory Pork and beef Hickory is arguably the favorite wood for smoking. Hickory
producesverystrongflavorsowerecommendedstartingslow with this wood.
Maple Pork and poultry Light and sweet.Mesquite Beef,chickenandfish This wood burns very hot so be aware. Much like hickory,
mesquiteisverypopularandproducesastrongflavor.Oak Red meats, game,
ribsandfishAnother wood that produces a heavy smoke.
Start slow with this wood.Pecan Ribs and red meat Producesalightsmokethatoffersasweetandnuttyflavor.
oPeratiNG iNstrUctioNs
18Lowes.com/masterforge
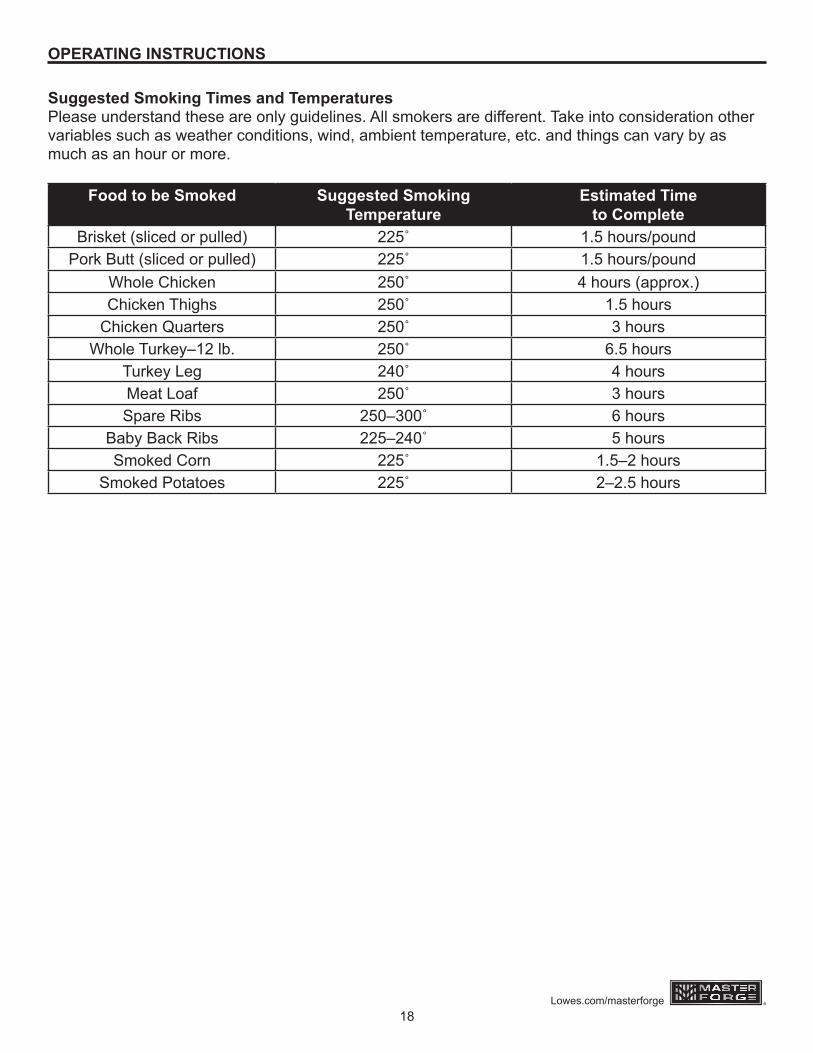
suggested smoking times and temperaturesPlease understand these are only guidelines. All smokers are different. Take into consideration other variables such as weather conditions, wind, ambient temperature, etc. and things can vary by as much as an hour or more.
Food to be smoked suggested smoking temperature
estimated time to complete
Brisket (sliced or pulled) 225˚ 1.5 hours/poundPork Butt (sliced or pulled) 225˚ 1.5 hours/pound
Whole Chicken 250˚ 4hours(approx.)Chicken Thighs 250˚ 1.5 hours
Chicken Quarters 250˚ 3 hoursWhole Turkey–12 lb. 250˚ 6.5 hours
Turkey Leg 240˚ 4 hoursMeat Loaf 250˚ 3 hoursSpare Ribs 250–300˚ 6 hours
Baby Back Ribs 225–240˚ 5 hoursSmoked Corn 225˚ 1.5–2 hours
Smoked Potatoes 225˚ 2–2.5 hours
oPeratiNG iNstrUctioNs

19Lowes.com/masterforge
oPeratiNG iNstrUctioNs
lighting instructions caUtioN:Iftheflameextinguishesaccidentallyduringignitionoroperation,immediatelyTURNOFF the cylinder valve and then TURN OFF the control knob.
1.Checkallconnectionsforleaksusingthe“soapwater”testasexplainedonpage15 for “Checking For Leaks.”
2. Open both of the smoker cabinet doors. Always keep the doors open during lighting.3. Check for any blockage to the venturi tube or burner, damper setting, ventilation setting. Remove
any foreign objects or matter.4. Be sure the burner control knob is in the o OFF position.
Warning: Always light your smoker with both doors open.
5. Open the LP cylinder valve by turning counterclockwise6. Push and turn the control knob to HIGH while pressing downfirmlyandrapidlyontheignitor.Youshouldheara click from the ignitor. Let the ignitor button return to its starting position and press it again. Repeat the action until the burner ignites.
7. If ignition does not take place within 5 seconds, immediately turn the control knob to o OFF. Wait 5 minutes and repeat steps 6 and 7.
8. If burner still fails to light, try match lighting using the instructions shown below.
9. Once the burner is lit, close the doors to allow heat to accumulate. The smoke stack on the top of the smoker can be adjusted to the desired setting to allow proper ventilation and combustion.
match lighting Procedure – lP Gas1. Repeat Steps 1 through 5 of the igniter lighting system.2. Open both doors. Place a lit match on to the burner as shown below. Quickly press and turn the
control knob to HIGH. If the burner does not light in 5 seconds, turn the control knob to o OFF, wait at least 5 minutes and for the gas to clear. Repeat the process.
Pezio ignitionsymbol?
Pezio ignitionsymbol?
Pezio ignitionsymbol?

20Lowes.com/masterforge
cooking tip–Damper adjustments WarNiNG: The dampers on the smoker body and the handle on the smoke stack may become very hot while cooking. Always wear a heat resistant glove when adjusting.
• Forbestperformance,rotatethesmokersothatthefrontorbackofthebodyisfacingthewind.This allows the adjustment of the dampers to be more effective and accurate.
• Thetwodampersonsmokerbodyshouldneverbefullyclosed.• Openingthedamperofthesmokestackhelpstoexhaustboththeheatandsmoke.• Thekeytoeffectivesmokingistowatchyourheatindicatoronthedoorandadjustthedamper
accordingly.• Temperaturemaintenanceisbestcontrolledbydifferentdamperadjustmentconfigurations.
turning off the smoker caUtioN: The smoker can become very hot while in use. Do not touch any portion of the smokerexceptforthedoorhandleandburnercontrolknob.Itmaybenecessarytouse protective gloves.
1.Turntheburnercontrolknoboffbypushinginandrotatingto“OFF”.Theburnerflameshouldgoout.
2. Turn off the LP cylinder valve by turning the knob clockwise until it cannot go any farther. Follow all warnings and safety precautions before removing meat from smoker or preparing the unit for storage.
adding Wood chipsAdditionalwoodmayberequiredtomaintainorincreasecookingtemperature.
WarNiNG:Usecautionsinceflamescanflare-upwhenfreshairsuddenlycomesincontact withfire.Whenopeningthedoor,keephands,faceandbodyasafedistancefromhotsteam andflameflare-ups.
1.Standbackandcarefullyopensmokerboxdoorallowingheatandsteamtoescapeawayfromyourface.Usecautionsinceflamescanflare-upwhenfreshairsuddenlycomesincontactwithfire.Inspectthelevelinpan.
2.Wearingflameretardantovenmitts/gloves,standbackasafedistanceanduselongcookingtongsto lightly brush aside ashes on hot coals. Use cooking tongs to add wood to pan, being careful not to stir-up ashes and sparks
WarNiNG:Neveraddcharcoallightingfluidtohotorevenwarmcoalsasflashbackmayoccurcausing severe burns.
3.Closesmokerboxdoorandallowfoodtocontinuecooking.
Allow the ashes to completely cool before reusing or cleaning the smoker.
oPeratiNG iNstrUctioNs

21Lowes.com/masterforge
oPeratiNG iNstrUctioNs
after Use safety and maintenance WarNiNG: Use caution when lifting and moving the smoker to avoid strain injuries.
•Do Notstorethesmokerneargasolineorothercombustibleliquidsorwherecombustiblevapors maybepresent.Keeptheareaaroundthesmokerclearandfreeofcombustiblematerialsandvapors.
•Do Not store this smoker in an area accessible to children or pets. Store the smoker in a dry, protected location. Disconnect cylinder from smoker.
•Do Not allow anyone to conduct activities around the smoker following use until it has cooled. It is hot during operation and remains hot for a period of time following use.
•Do Not leave hot ashes unattended until the smoker cools completely.•Thesmokerbecomesextremelyhot–allowthesmokertocoolcompletelybeforehandling.Ifyou
must handle the smoker while it is hot, ALWAYS wear protective oven mitts or heat-resistant gloves. Allow the smoker to cool before removing and cleaning the grease pan.
•Disposeofcoldashesbywrappingtheminheavy-dutyaluminumfoilandputtingtheminanoncombustible container.
•Ifyoumustdisposeoftheashesinlesstimethanittakesforthemtocompletelycool,removethewoodchipboxfromthesmokerusingheat-resistantgloves.Placetheashesinheavydutyfoilandsoak them completely with water before disposing of them in a noncombustible container.
caUtioN: All care and maintenance procedures are to be performed while the smoker is turned offandcooled.Alwaysperformmaintenancebyaqualifiedserviceperson.
Clean the water bowl and cooking grate with hot, soapy water. Rinse and dry thoroughly. You mayprefer to coat the water bowl and cooking grid lightly with cooking oil or cooking spray.
Frequentlycheckandcleantheventuriandburnertubesforinsectsandinsectnests.Acloggedtubecanleadtofirebeneaththesmoker.Alsomakesurethesmokerdoesnothaveanyforeignobjectsobstructingtheflowofcombustionandventilationair.
To clean the inside and outside of the smoker cabinet, simply use a damp cloth. Spray-washing witha water hose is not recommended. Moisture should be wiped away and not allowed to stand inside oron top of the smoker. Once cleaned, you may prefer to lightly coat the interior of the smoker cabinetwith cooking oil or cooking spray.
Ifrustispresentontheexteriorsurfaceofthesmoker,cleantheareawithsteelwooloremeryclothand use heavy-duty, heat-resistant paint.
NeVer apply additional paint to the interior of the smoker. If rust is present on the interior of thesmoker, clean it thoroughly with steel wool or emery cloth and lightly coat the area with cooking oilor cooking spray to help minimize recurring rust.
When an LP tank is not connected, and to help prevent dirt or other foreign particles from cloggingthe regulator connector, hang the end of the hose and regulator assembly on the tank retention wire.
care aND maiNteNaNce

22Lowes.com/masterforge
care aND maiNteNaNce
Keeptheventilationopening(s)ofthecylinderenclosurefreeandclearofdebris.
Inspecttheflamesattheburnerbylookingthroughtheobservingholeonleftsideoftheburnerandcontrolunit.Agoodflameshouldbebluewithayellowtip1to2inchhigh.Ifflamesareexcessivelyyellow and irregular, oil residue and food deposits may be collecting on the burner. Try cleaning theburner surface with hot, soapy water and cleaning the holes with a pipe cleaner to improve the flames.
Badflamesmayalsobecausedbypoorventuriattachmenttotheorifice.Turnoffthecontrolknoband cylinder valve. Always let the smoker cool before cleaning or checking the assembly. Make suretheorificeofthecontrolvalveproperlymateswiththeburnermixingtubebyvisualobservationfromthebottomoftheappliance.Theburnerventuritubeshouldoverlaptheorificeandtheyshouldforma straight line as shown.
WarNiNG: Iftheinstructionsabovearenotfollowed,anexplosionmayresult,possiblycausingserious bodily injury or death.
To protect your smoker from weather conditions, always keep it covered while not in use.
Correct Wrong Wrong
Good Flame
2”
Yellow
Light Blue
Blue
Bad Flame

23Lowes.com/masterforge
troUBlesHootiNG
ProBlem PossiBle caUse correctiVe actioNThe burner will notlight using the igniter procedure.
1. The igniter electrode may be covered with grease or residue.
2. No spark is being generated.
3.Nogasfloworcylindervalvenotopen.
4. Vapor lock at coupling nut to LP cylinder.
1. Clean the igniter electrode.
2. Check the connection and reconnect any loose or disconnected wires
3. Make sure LP cylinder is not empty or open cylinder valve.
4. Turn off knob and LP cylinder valve. Disconnect coupling nut from LP cylinder. Reconnect and retry.
The burner will notlight with a match.
1.Nogasfloworanobstructedgasflow.
1. Check the fuel level. Clean the venturi tube and burner.
Theflamegoesout. 1 . Disconnected gas supply hose.
2. High or gusting winds.
1. Reconnect the gas supply hose.
2. Move the grill out of the windy area.
Flare-up. 1.Excessivecookingtemperatures.
2. Grease and residue build-up.
3.Excessivefatinthemeat.
4.Excessiveoilinthemarinade.
1.Reducetheflamelevel.
2. Clean the components.
3. Trim fat from the meat before cooking.
4. Use a non-oil based marinade.Yellowsootyflame. 1.Excessivecookingtemperature.
2.Obstructionofgasflow.
3. Ventilation closed. Damper closed.
1.Reducetheflamelevel.
2. Check and clean venturi tube and burner.
3. Adjust ventilation and damper accordingly.

24Lowes.com/masterforge
WarraNtY
This vertical gas smoker is warranted against broken or damaged parts at the time of purchase. The stainless steel burner is warranted for 3 years. All other parts carry a one (1) year limited warranty exceptthewaterbowl,whichiswarrantedtobefreeofdefectsfor90days.Paintiswarrantedtobefreeofdefectsfor90daysexceptforrust,whichmayappearafterrepeateduse.
Thiswarrantydoesnotcoverdamageorissuesrelatedtoneglect,abuseormodificationstotheappliance. Repair labor is not covered.
AllpartsthatmeetthewarrantyrequirementswillbeshippedatnochargeviathediscretionofGHPGroup Inc. (ground shipments, US Mail or Parcel Post ONLY). Any special handling charges (i.e. Second Day, Overnight, etc.) will be the responsibility of the consumer.
Allwarrantyclaimsapplyonlytotheoriginalpurchaserandrequireaproofofpurchaseverifyingpurchasedate.DonotreturnpartstoGHPaddresswithoutfirstobtainingareturnauthorizationnumberfrom our customer service. This service is available by calling toll free 1-800-963-0211, 8:00 a.m. – 6:00 p.m., EST, Monday – Thursday 8:00 a.m. – 5:00 p.m., EST, Friday.
Somestatesdonotallowtheexclusionorlimitationofincidentalorconsequentialdamagesorlimitationsonhowlonganimpliedwarrantylasts,sotheabovelimitationsorexclusionsmaynotapplytoyou.Thiswarrantygivesyouspecificlegalrights,andyoumayhaveotherrightsthatvaryfromstateto state.
GHP Group Inc.8280 Austin AvenueMorton Grove, IL, USA60053-3207
Item name: LP Gas Vertical SmokerModel #: MFX784BDPItem #: 0411913Rated BTU: 15,000 BTU/Hr
25Lowes.com/masterforge
rePlacemeNt Parts list
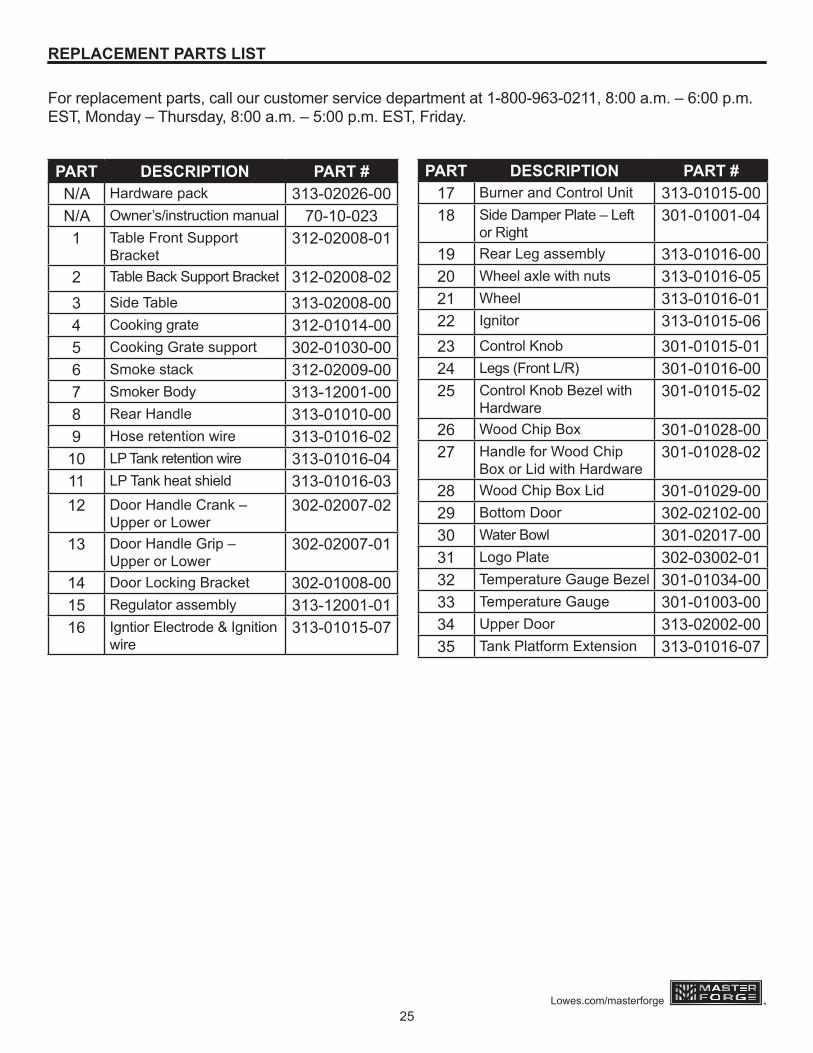
For replacement parts, call our customer service department at 1-800-963-0211, 8:00 a.m. – 6:00 p.m. EST, Monday – Thursday, 8:00 a.m. – 5:00 p.m. EST, Friday.
Part DescriPtioN Part #N/A Hardware pack 313-02026-00N/A Owner’s/instructionmanual 70-10-0231 Table Front Support
Bracket312-02008-01
2 Table Back Support Bracket 312-02008-023 Side Table 313-02008-004 Cooking grate 312-01014-005 Cooking Grate support 302-01030-006 Smoke stack 312-02009-007 Smoker Body 313-12001-008 Rear Handle 313-01010-009 Hose retention wire 313-01016-0210 LP Tank retention wire 313-01016-0411 LP Tank heat shield 313-01016-0312 Door Handle Crank –
Upper or Lower302-02007-02
13 Door Handle Grip – Upper or Lower
302-02007-01
14 Door Locking Bracket 302-01008-0015 Regulator assembly 313-12001-0116 Igntior Electrode & Ignition
wire313-01015-07
Part DescriPtioN Part #17 Burner and Control Unit 313-01015-0018 Side Damper Plate – Left
or Right301-01001-04
19 Rear Leg assembly 313-01016-0020 Wheelaxlewithnuts 313-01016-0521 Wheel 313-01016-0122 Ignitor 313-01015-0623 ControlKnob 301-01015-0124 Legs (Front L/R) 301-01016-0025 ControlKnobBezelwith
Hardware301-01015-02
26 WoodChipBox 301-01028-0027 Handle for Wood Chip
BoxorLidwithHardware301-01028-02
28 WoodChipBoxLid 301-01029-0029 Bottom Door 302-02102-0030 Water Bowl 301-02017-0031 Logo Plate 302-03002-0132 Temperature Gauge Bezel 301-01034-0033 Temperature Gauge 301-01003-0034 Upper Door 313-02002-0035 TankPlatformExtension 313-01016-07

26Lowes.com/masterforge
28
31 30
34
12 3
68
11
13
1415
18
19
3520
17
21
24
22
23
12
7
59
4
16
252627
29
32
33
10
rePlacemeNt Parts list