Embed Size (px)
Citation preview

Xerox® 8254E™ / 8264E™ Color Wide Format PrinterUser Guide
November 2009701P50270

©2009 Xerox Corporation. All Rights Reserved. Unpublished rights reserved under the copyright laws of the United States. Contents of this publication may not be reproduced in any form without permission of Xerox Corporation.
Xerox®, the sphere of connectivity design, and the Xerox® 8254E™ / 8264E™ Color Wide Format Printer are trademarks of Xerox Corporation in the United States and/or other countries. Copyright protection claimed includes all forms of matters of copyrightable materials and information now allowed by statutory or judicial law or hereinafter granted, including without limitation, material generated from the software programs which are displayed on the screen such as styles, templates, icons, screen displays, looks, etc.
Microsoft Windows 2000P® is a registered trademark of Microsoft® Corporation in the United States and/or other countries. Intel Pentium III® is a registered trademark of Intel Incorporation in the United States and/or other countries.
Changes are periodically made to this document. Changes, technical inaccuracies, and typographic errors will be corrected in subsequent editions.

Xerox 8254E / 8264E Color Wide Format PrinterUser Guide
iii
Contents
1 Safety Instructions
Introduction . . . . . . . . . . . . . . . . . . . . . . . . . . . . . . . . . . . . . . . . . . . . . . . . . . . . . . . . . . . . . . . . . . . . . . . . . . . . 1-1Warnings, Cautions and Notes . . . . . . . . . . . . . . . . . . . . . . . . . . . . . . . . . . . . . . . . . . . . . . . . . . . . . . . . . . . 1-2Important Safety Instructions. . . . . . . . . . . . . . . . . . . . . . . . . . . . . . . . . . . . . . . . . . . . . . . . . . . . . . . . . . . . 1-3Electro/Mechanical Certifications. . . . . . . . . . . . . . . . . . . . . . . . . . . . . . . . . . . . . . . . . . . . . . . . . . . . . . . . . 1-7
FCC Notices for the USA . . . . . . . . . . . . . . . . . . . . . . . . . . . . . . . . . . . . . . . . . . . . . . . . . . . . . . . . . . . . . 1-7EME Compliance for Canada . . . . . . . . . . . . . . . . . . . . . . . . . . . . . . . . . . . . . . . . . . . . . . . . . . . . . . . . . 1-7
Product Safety Certification. . . . . . . . . . . . . . . . . . . . . . . . . . . . . . . . . . . . . . . . . . . . . . . . . . . . . . . . . . . . . . 1-8Certifications in Europe . . . . . . . . . . . . . . . . . . . . . . . . . . . . . . . . . . . . . . . . . . . . . . . . . . . . . . . . . . . . . . 1-8
Warning Labels . . . . . . . . . . . . . . . . . . . . . . . . . . . . . . . . . . . . . . . . . . . . . . . . . . . . . . . . . . . . . . . . . . . . . . . . . 1-9Handling the Warning Labels. . . . . . . . . . . . . . . . . . . . . . . . . . . . . . . . . . . . . . . . . . . . . . . . . . . . . . . . . 1-9Location and Type of Warning Labels . . . . . . . . . . . . . . . . . . . . . . . . . . . . . . . . . . . . . . . . . . . . . . . .1-10
8254E Only-Operational Procedure Labels . . . . . . . . . . . . . . . . . . . . . . . . . . . . . . . . . . . . . . . . . . . . . . .1-14Handling the Operational Procedure Labels . . . . . . . . . . . . . . . . . . . . . . . . . . . . . . . . . . . . . . . . . .1-14Location and Type of Operational Procedure Labels . . . . . . . . . . . . . . . . . . . . . . . . . . . . . . . . . .1-15
Product Recycling & Disposal. . . . . . . . . . . . . . . . . . . . . . . . . . . . . . . . . . . . . . . . . . . . . . . . . . . . . . . . . . . .1-16USA & Canada . . . . . . . . . . . . . . . . . . . . . . . . . . . . . . . . . . . . . . . . . . . . . . . . . . . . . . . . . . . . . . . . . . . . .1-16Other Countries . . . . . . . . . . . . . . . . . . . . . . . . . . . . . . . . . . . . . . . . . . . . . . . . . . . . . . . . . . . . . . . . . . . .1-16European Union . . . . . . . . . . . . . . . . . . . . . . . . . . . . . . . . . . . . . . . . . . . . . . . . . . . . . . . . . . . . . . . . . . . .1-16
2 Product Overview
Introduction . . . . . . . . . . . . . . . . . . . . . . . . . . . . . . . . . . . . . . . . . . . . . . . . . . . . . . . . . . . . . . . . . . . . . . . . . . . . 2-1Features . . . . . . . . . . . . . . . . . . . . . . . . . . . . . . . . . . . . . . . . . . . . . . . . . . . . . . . . . . . . . . . . . . . . . . . . . . . . . . . . 2-1Part Names and Functions . . . . . . . . . . . . . . . . . . . . . . . . . . . . . . . . . . . . . . . . . . . . . . . . . . . . . . . . . . . . . . . 2-2
8264E Printer Front Section . . . . . . . . . . . . . . . . . . . . . . . . . . . . . . . . . . . . . . . . . . . . . . . . . . . . . . . . . . 2-28254E Printer Front Section . . . . . . . . . . . . . . . . . . . . . . . . . . . . . . . . . . . . . . . . . . . . . . . . . . . . . . . . . . 2-4Printer Rear . . . . . . . . . . . . . . . . . . . . . . . . . . . . . . . . . . . . . . . . . . . . . . . . . . . . . . . . . . . . . . . . . . . . . . . . . 2-6Position and Function of the Heating Elements . . . . . . . . . . . . . . . . . . . . . . . . . . . . . . . . . . . . . . . . 2-8Printer Control Panel . . . . . . . . . . . . . . . . . . . . . . . . . . . . . . . . . . . . . . . . . . . . . . . . . . . . . . . . . . . . . . . .2-10
3 Preparing For A Job
Introduction . . . . . . . . . . . . . . . . . . . . . . . . . . . . . . . . . . . . . . . . . . . . . . . . . . . . . . . . . . . . . . . . . . . . . . . . . . . . 3-1Connection . . . . . . . . . . . . . . . . . . . . . . . . . . . . . . . . . . . . . . . . . . . . . . . . . . . . . . . . . . . . . . . . . . . . . . . . . . . . . 3-1
8264E Power Cable Connections . . . . . . . . . . . . . . . . . . . . . . . . . . . . . . . . . . . . . . . . . . . . . . . . . . . . . 3-28254E Power Cable Connection . . . . . . . . . . . . . . . . . . . . . . . . . . . . . . . . . . . . . . . . . . . . . . . . . . . . . . 3-2
Turning the Printer Power On/Off. . . . . . . . . . . . . . . . . . . . . . . . . . . . . . . . . . . . . . . . . . . . . . . . . . . . . . . . . 3-5Turning the Power On. . . . . . . . . . . . . . . . . . . . . . . . . . . . . . . . . . . . . . . . . . . . . . . . . . . . . . . . . . . . . . . . 3-5Turning the Power Off . . . . . . . . . . . . . . . . . . . . . . . . . . . . . . . . . . . . . . . . . . . . . . . . . . . . . . . . . . . . . . . 3-6

Contents
Xerox 8254E / 8264E Color Wide Format PrinterUser Guide
iv
Connecting the Network Interface . . . . . . . . . . . . . . . . . . . . . . . . . . . . . . . . . . . . . . . . . . . . . . . . . . . . . . . 3-9System Requirements. . . . . . . . . . . . . . . . . . . . . . . . . . . . . . . . . . . . . . . . . . . . . . . . . . . . . . . . . . . . . . . . 3-9Preparing Cables . . . . . . . . . . . . . . . . . . . . . . . . . . . . . . . . . . . . . . . . . . . . . . . . . . . . . . . . . . . . . . . . . . . . 3-9Connecting a Network Interface Cable. . . . . . . . . . . . . . . . . . . . . . . . . . . . . . . . . . . . . . . . . . . . . . .3-10
Media Handling . . . . . . . . . . . . . . . . . . . . . . . . . . . . . . . . . . . . . . . . . . . . . . . . . . . . . . . . . . . . . . . . . . . . . . . .3-12Loading Roll Media . . . . . . . . . . . . . . . . . . . . . . . . . . . . . . . . . . . . . . . . . . . . . . . . . . . . . . . . . . . . . . . . .3-12
Setting Roll Media. . . . . . . . . . . . . . . . . . . . . . . . . . . . . . . . . . . . . . . . . . . . . . . . . . . . . . . . . . . . . . . . . . . . . .3-198264E Setting Roll Media . . . . . . . . . . . . . . . . . . . . . . . . . . . . . . . . . . . . . . . . . . . . . . . . . . . . . . . . . . .3-19Setting Media Type. . . . . . . . . . . . . . . . . . . . . . . . . . . . . . . . . . . . . . . . . . . . . . . . . . . . . . . . . . . . . . . . .3-31
Test Printing . . . . . . . . . . . . . . . . . . . . . . . . . . . . . . . . . . . . . . . . . . . . . . . . . . . . . . . . . . . . . . . . . . . . . . . . . . .3-33Set Up List . . . . . . . . . . . . . . . . . . . . . . . . . . . . . . . . . . . . . . . . . . . . . . . . . . . . . . . . . . . . . . . . . . . . . . . . .3-36Nozzle Check . . . . . . . . . . . . . . . . . . . . . . . . . . . . . . . . . . . . . . . . . . . . . . . . . . . . . . . . . . . . . . . . . . . . . . .3-37Mode Print . . . . . . . . . . . . . . . . . . . . . . . . . . . . . . . . . . . . . . . . . . . . . . . . . . . . . . . . . . . . . . . . . . . . . . . . .3-38Color Palette . . . . . . . . . . . . . . . . . . . . . . . . . . . . . . . . . . . . . . . . . . . . . . . . . . . . . . . . . . . . . . . . . . . . . . .3-38
Adjust Print . . . . . . . . . . . . . . . . . . . . . . . . . . . . . . . . . . . . . . . . . . . . . . . . . . . . . . . . . . . . . . . . . . . . . . . . . . . .3-39
4 Handling the Printer
Introduction . . . . . . . . . . . . . . . . . . . . . . . . . . . . . . . . . . . . . . . . . . . . . . . . . . . . . . . . . . . . . . . . . . . . . . . . . . . . 4-1Drawing Flow . . . . . . . . . . . . . . . . . . . . . . . . . . . . . . . . . . . . . . . . . . . . . . . . . . . . . . . . . . . . . . . . . . . . . . . . . . . 4-1Printer Status . . . . . . . . . . . . . . . . . . . . . . . . . . . . . . . . . . . . . . . . . . . . . . . . . . . . . . . . . . . . . . . . . . . . . . . . . . . 4-3
Ready to Print . . . . . . . . . . . . . . . . . . . . . . . . . . . . . . . . . . . . . . . . . . . . . . . . . . . . . . . . . . . . . . . . . . . . . . . 4-3Setup Menu Display . . . . . . . . . . . . . . . . . . . . . . . . . . . . . . . . . . . . . . . . . . . . . . . . . . . . . . . . . . . . . . . . . 4-3Changing Printer Status. . . . . . . . . . . . . . . . . . . . . . . . . . . . . . . . . . . . . . . . . . . . . . . . . . . . . . . . . . . . . . 4-3
Using Media . . . . . . . . . . . . . . . . . . . . . . . . . . . . . . . . . . . . . . . . . . . . . . . . . . . . . . . . . . . . . . . . . . . . . . . . . . . . 4-5Media Type . . . . . . . . . . . . . . . . . . . . . . . . . . . . . . . . . . . . . . . . . . . . . . . . . . . . . . . . . . . . . . . . . . . . . . . . . 4-5Precautions for Handling Media . . . . . . . . . . . . . . . . . . . . . . . . . . . . . . . . . . . . . . . . . . . . . . . . . . . . . . 4-6Precautions for Storing Media . . . . . . . . . . . . . . . . . . . . . . . . . . . . . . . . . . . . . . . . . . . . . . . . . . . . . . . . 4-6Printing area . . . . . . . . . . . . . . . . . . . . . . . . . . . . . . . . . . . . . . . . . . . . . . . . . . . . . . . . . . . . . . . . . . . . . . . . 4-7
Head Height Adjustment . . . . . . . . . . . . . . . . . . . . . . . . . . . . . . . . . . . . . . . . . . . . . . . . . . . . . . . . . . . . . . . . 4-8When raising the print head. . . . . . . . . . . . . . . . . . . . . . . . . . . . . . . . . . . . . . . . . . . . . . . . . . . . . . . . . . 4-8When returning the print head to the original position . . . . . . . . . . . . . . . . . . . . . . . . . . . . . . . .4-11
Menu Overview . . . . . . . . . . . . . . . . . . . . . . . . . . . . . . . . . . . . . . . . . . . . . . . . . . . . . . . . . . . . . . . . . . . . . . . .4-15Setup menu Setup item 1 of 7 total) . . . . . . . . . . . . . . . . . . . . . . . . . . . . . . . . . . . . . . . . . . . . . . . . .4-16Test Print Menu (Setup item 2 of 7 total). . . . . . . . . . . . . . . . . . . . . . . . . . . . . . . . . . . . . . . . . . . . .4-48Adjust Print Menu (Setup item 3 of 7 total). . . . . . . . . . . . . . . . . . . . . . . . . . . . . . . . . . . . . . . . . . .4-49Cleaning Menu (Setup item 4 of 7 total) . . . . . . . . . . . . . . . . . . . . . . . . . . . . . . . . . . . . . . . . . . . . .4-50Selection Menu (Setup item 5 of 7 total) . . . . . . . . . . . . . . . . . . . . . . . . . . . . . . . . . . . . . . . . . . . . .4-50Version Menu (Setup item 6 of 7 total). . . . . . . . . . . . . . . . . . . . . . . . . . . . . . . . . . . . . . . . . . . . . . .4-53Sleep Mode Menu (Setup item 7 of 7 total) . . . . . . . . . . . . . . . . . . . . . . . . . . . . . . . . . . . . . . . . . .4-53
Menu Setups on the Control Panel. . . . . . . . . . . . . . . . . . . . . . . . . . . . . . . . . . . . . . . . . . . . . . . . . . . . . . .4-57Menu Set Up Procedure . . . . . . . . . . . . . . . . . . . . . . . . . . . . . . . . . . . . . . . . . . . . . . . . . . . . . . . . . . . . .4-57Panel Set Up Menu Overview . . . . . . . . . . . . . . . . . . . . . . . . . . . . . . . . . . . . . . . . . . . . . . . . . . . . . . . .4-59

Contents
Xerox 8254E / 8264E Color Wide Format PrinterUser Guide
v
Operating from the Control Panel . . . . . . . . . . . . . . . . . . . . . . . . . . . . . . . . . . . . . . . . . . . . . . . . . . . . . . .4-60Feeding Media . . . . . . . . . . . . . . . . . . . . . . . . . . . . . . . . . . . . . . . . . . . . . . . . . . . . . . . . . . . . . . . . . . . . .4-60Media Feed Compensation. . . . . . . . . . . . . . . . . . . . . . . . . . . . . . . . . . . . . . . . . . . . . . . . . . . . . . . . . .4-608264E only - Installing Media Holder Plates . . . . . . . . . . . . . . . . . . . . . . . . . . . . . . . . . . . . . . . . . .4-74Controlling the Heater Elements . . . . . . . . . . . . . . . . . . . . . . . . . . . . . . . . . . . . . . . . . . . . . . . . . . . . .4-79
Control Panel During Printing . . . . . . . . . . . . . . . . . . . . . . . . . . . . . . . . . . . . . . . . . . . . . . . . . . . . . . . . . . .4-92Feeding Media . . . . . . . . . . . . . . . . . . . . . . . . . . . . . . . . . . . . . . . . . . . . . . . . . . . . . . . . . . . . . . . . . . . . .4-92Stopping Printing Operation. . . . . . . . . . . . . . . . . . . . . . . . . . . . . . . . . . . . . . . . . . . . . . . . . . . . . . . . .4-93Changing and Confirming Set Values While Printing . . . . . . . . . . . . . . . . . . . . . . . . . . . . . . . . . .4-94Pausing printing . . . . . . . . . . . . . . . . . . . . . . . . . . . . . . . . . . . . . . . . . . . . . . . . . . . . . . . . . . . . . . . . . . . .4-96
Operations After Printing . . . . . . . . . . . . . . . . . . . . . . . . . . . . . . . . . . . . . . . . . . . . . . . . . . . . . . . . . . . . . . .4-97Cutting Media. . . . . . . . . . . . . . . . . . . . . . . . . . . . . . . . . . . . . . . . . . . . . . . . . . . . . . . . . . . . . . . . . . . . . .4-97
5 Troubleshooting
Introduction . . . . . . . . . . . . . . . . . . . . . . . . . . . . . . . . . . . . . . . . . . . . . . . . . . . . . . . . . . . . . . . . . . . . . . . . . . . . 5-1Failures and Malfunctions of the Printer . . . . . . . . . . . . . . . . . . . . . . . . . . . . . . . . . . . . . . . . . . . . . . . . . . 5-1
Problems in Installation and Introduction . . . . . . . . . . . . . . . . . . . . . . . . . . . . . . . . . . . . . . . . . . . . . 5-1Cannot Print at all . . . . . . . . . . . . . . . . . . . . . . . . . . . . . . . . . . . . . . . . . . . . . . . . . . . . . . . . . . . . . . . . . . . 5-2Media-related Troubleshooting . . . . . . . . . . . . . . . . . . . . . . . . . . . . . . . . . . . . . . . . . . . . . . . . . . . . . . . 5-5Printing-related Troubleshooting . . . . . . . . . . . . . . . . . . . . . . . . . . . . . . . . . . . . . . . . . . . . . . . . . . . . . 5-8
Error Messages . . . . . . . . . . . . . . . . . . . . . . . . . . . . . . . . . . . . . . . . . . . . . . . . . . . . . . . . . . . . . . . . . . . . . . . . .5-12Status Messages . . . . . . . . . . . . . . . . . . . . . . . . . . . . . . . . . . . . . . . . . . . . . . . . . . . . . . . . . . . . . . . . . . .5-12Error Message Display and Remedies . . . . . . . . . . . . . . . . . . . . . . . . . . . . . . . . . . . . . . . . . . . . . . . .5-14Data Error Display and Remedies . . . . . . . . . . . . . . . . . . . . . . . . . . . . . . . . . . . . . . . . . . . . . . . . . . . .5-16Command Error Display and Remedies. . . . . . . . . . . . . . . . . . . . . . . . . . . . . . . . . . . . . . . . . . . . . . .5-16Error Requiring Restart . . . . . . . . . . . . . . . . . . . . . . . . . . . . . . . . . . . . . . . . . . . . . . . . . . . . . . . . . . . . . .5-17
When Media Jams Occur. . . . . . . . . . . . . . . . . . . . . . . . . . . . . . . . . . . . . . . . . . . . . . . . . . . . . . . . . . . . . . . .5-18
6 Maintenance
Introduction . . . . . . . . . . . . . . . . . . . . . . . . . . . . . . . . . . . . . . . . . . . . . . . . . . . . . . . . . . . . . . . . . . . . . . . . . . . . 6-1Replacing Consumable Components. . . . . . . . . . . . . . . . . . . . . . . . . . . . . . . . . . . . . . . . . . . . . . . . . . . . . . 6-1
Replacing Ink Cartridges . . . . . . . . . . . . . . . . . . . . . . . . . . . . . . . . . . . . . . . . . . . . . . . . . . . . . . . . . . . . . 6-1Replacing Roll Media . . . . . . . . . . . . . . . . . . . . . . . . . . . . . . . . . . . . . . . . . . . . . . . . . . . . . . . . . . . . . . . . 6-78264E only - Replacing the Flushing-box Sponges . . . . . . . . . . . . . . . . . . . . . . . . . . . . . . . . . . . .6-13
Cleaning . . . . . . . . . . . . . . . . . . . . . . . . . . . . . . . . . . . . . . . . . . . . . . . . . . . . . . . . . . . . . . . . . . . . . . . . . . . . . . .6-16Cleaning the Outer Case . . . . . . . . . . . . . . . . . . . . . . . . . . . . . . . . . . . . . . . . . . . . . . . . . . . . . . . . . . . .6-16Cleaning the Inside of the Printer. . . . . . . . . . . . . . . . . . . . . . . . . . . . . . . . . . . . . . . . . . . . . . . . . . . .6-17Cleaning the Head. . . . . . . . . . . . . . . . . . . . . . . . . . . . . . . . . . . . . . . . . . . . . . . . . . . . . . . . . . . . . . . . . .6-21Cleaning the Cleaning Wiper . . . . . . . . . . . . . . . . . . . . . . . . . . . . . . . . . . . . . . . . . . . . . . . . . . . . . . . .6-22Cleaning Around the Cap . . . . . . . . . . . . . . . . . . . . . . . . . . . . . . . . . . . . . . . . . . . . . . . . . . . . . . . . . . .6-318264E - Cleaning around the print head. . . . . . . . . . . . . . . . . . . . . . . . . . . . . . . . . . . . . . . . . . . . . .6-338254E - Cleaning Around the Print Head . . . . . . . . . . . . . . . . . . . . . . . . . . . . . . . . . . . . . . . . . . . . .6-40
Maintenance Performed by Authorized Technician . . . . . . . . . . . . . . . . . . . . . . . . . . . . . . . . . . . . . . .6-45Periodic Replacement of Parts . . . . . . . . . . . . . . . . . . . . . . . . . . . . . . . . . . . . . . . . . . . . . . . . . . . . . . .6-45Periodic Inspection . . . . . . . . . . . . . . . . . . . . . . . . . . . . . . . . . . . . . . . . . . . . . . . . . . . . . . . . . . . . . . . . .6-45
Long Term Storage of the Printer . . . . . . . . . . . . . . . . . . . . . . . . . . . . . . . . . . . . . . . . . . . . . . . . . . . . . . . .6-46

Contents
Xerox 8254E / 8264E Color Wide Format PrinterUser Guide
vi
7 Appendix
Product Specifications . . . . . . . . . . . . . . . . . . . . . . . . . . . . . . . . . . . . . . . . . . . . . . . . . . . . . . . . . . . . . . . . . . . 7-18264E Printer Specifications. . . . . . . . . . . . . . . . . . . . . . . . . . . . . . . . . . . . . . . . . . . . . . . . . . . . . . . . . . 7-18254E Printer Specifications. . . . . . . . . . . . . . . . . . . . . . . . . . . . . . . . . . . . . . . . . . . . . . . . . . . . . . . . . . 7-3
Interface Specification . . . . . . . . . . . . . . . . . . . . . . . . . . . . . . . . . . . . . . . . . . . . . . . . . . . . . . . . . . . . . . . . . . 7-5Network interface specification. . . . . . . . . . . . . . . . . . . . . . . . . . . . . . . . . . . . . . . . . . . . . . . . . . . . . . . 7-5
Options/Supply List . . . . . . . . . . . . . . . . . . . . . . . . . . . . . . . . . . . . . . . . . . . . . . . . . . . . . . . . . . . . . . . . . . . . . . 7-6Consumables. . . . . . . . . . . . . . . . . . . . . . . . . . . . . . . . . . . . . . . . . . . . . . . . . . . . . . . . . . . . . . . . . . . . . . . . 7-6

Xerox 8254E / 8264E Color Wide Format PrinterUser Guide
1-1
1Safety Instructions
Introduction
This chapter explains the precautions that must be taken when installing and operating the Xerox®
8254E™ and/or the 8264E™ Color Wide Format Printer. It describes the warning and caution terms that operators need to know and points out warning labels on the printer main unit.
WARNINGS:• When installing and operating this printer, be sure to follow the directions and warnings in this
User Guide.
Please read the following instructions carefully before operating the machine and refer to them as needed to ensure the continued safe operation of your machine.
Your Xerox product and supplies have been designed and tested to meet strict safety requirements. These include safety agency evaluation and certification, and compliance with electromagnetic regulations and established environmental standards.
The safety and environment testing and performance of this product have been verified using Xerox materials only.
CAUTIONS:• Unauthorized alterations, which may include the addition of new functions or connection of
external devices, may impact the product certification. Please contact your Xerox representative for more information.

Safety Instructions
Xerox 8254E / 8264E Color Wide Format PrinterUser Guide
1-2
Warnings, Cautions and Notes
There are three categories of warnings used in the documents for this printer and on the labels attached to the printer itself. These are based upon the potential bodily injury to the operator or potential damage to the printer.
Understand the meanings of the following warning terms and follow the instructions in this manual.
Symbol Definition
WARNINGS:
Used for dangerous situations where slight, medium, or serious personal injury may result.
CAUTIONS: Used for dangerous situations that may cause the printer may be damaged
Note: /
Notes:
Used for special circumstances and for information that needs to be emphasized.

Safety Instructions
Xerox 8254E / 8264E Color Wide Format PrinterUser Guide
1-3
Important Safety Instructions
This section explains general precautions that must be followed in order to use this printer safely.
Your Xerox equipment and supplies have been designed and tested to meet strict safety requirements. These include safety agency examination, approval, and compliance with established environmental standards.
To ensure the continued safe operation of your Xerox equipment, follow these safety guidelines at all times.
WARNINGS:• Always follow all warnings and instructions that are marked on or supplied with the equipment.• Do not install the printer in the following places. Injury or damage to the printer could result.
– On an unstable stand
– On an unstable surface
– On an uneven or slanted surface
– In an area subject to vibration by other equipment
• Do not stand on or place heavy objects on the printer. Doing so may result in the printer tipping or falling over, causing injury or damage.
• Do not cover the fresh air inlet of the printer. Doing so may result in fire.• Do not install the printer in humid or dusty areas. Doing so may result in electrical shock or fire.• Do not use a damaged power supply cable. Doing so may cause electric shock or fire.• Do not connect or disconnect the power supply cable with wet hands. Doing so may cause electric
shock.• Do not connect ground lines to the following locations:
– Gas piping. There will be a possibility of causing fire or explosion.
– Telephone ground lines and lightning rods. A large current may flow if there is a lightning strike.
– Water piping and faucets If a part of the piping is plastic, it will not serve as a ground.
• Do not store combustible materials on the platen. Doing so may result in fire.• Do not spill flammable liquid over the platen. Doing so may result in fire.• Do not insert or drop metal or flammable objects into the printer through openings such as a fresh
air inlet. Doing so may result in an electric shock or fire.• If foreign substances or liquids such as water enter the printer, do not use the printer. Doing so may
result in an electric shock or fire.– Immediately press the printer’s [Power] key to turn it OFF, disconnect the power supply cable
from the building’s electrical outlet, and contact your local Xerox dealer.
• Before cleaning this product, unplug the product from the electrical outlet. Always use materials specifically designated for this product, the use of other materials may result in poor performance and create a hazardous situation.

Safety Instructions
Xerox 8254E / 8264E Color Wide Format PrinterUser Guide
1-4
• Do not use aerosol cleaners. Aerosol cleaners can be explosive or flammable when used on electromechanical equipment.
• Always exercise care when moving or relocating equipment. Please contact your local Xerox Service Department to arrange relocation of the copier to a location outside of your building.
• Always locate the machine on a solid support surface (not on plush carpet) that has adequate strength to support the weight of the machine.
• Always locate the machine in an area that has adequate ventilation and room for servicing.• Always unplug this equipment from the electrical outlet before cleaning.• Never attempt any maintenance function that is not specifically described in this documentation.• Never locate the machine near a radiator or any other heat source.• Never override or “cheat” any of the electrical or mechanical interlock devices.• Never place this equipment where people might step on or trip on the power cord.• This equipment should not be placed in a room unless proper ventilation is provided. Please
contact your local Authorized dealer for further information.• The power receptacle for the machine must meet the requirements stated on the data plate on the
rear of the machine. If you are not sure that your electrical supply meets the requirements, please consult your local power company or an electrician for advice.
• Use the power cable that is supplied with your machine. Do not use an extension cord or remove or modify the power cord plug.
• Do not override or disable electrical or mechanical interlock devices.• Do not push objects into slots or openings on the machine. Electrical shock or fire may result.• The power cable is the disconnect device for this equipment. It is attached to the back of the
machine as a plug-in device. To remove all electrical power from the equipment, disconnect the power cable from the electrical outlet.
• Any operator product maintenance procedures will be described in the user documentation supplied with the product.
• Do not carry out any maintenance on this product which is not described in the customer documentation.
• Store all consumables in accordance with the instructions given on the package or container. • Keep all consumables away from the reach of children.• Wire the various cables as directed in the User Guide. Incorrect wiring could cause a fire.• Be sure to use the power cable(s) supplied with the printer. Using other power cables can cause an
electric shock or fire.• Make sure to use only the type of electrical power specified for your printer (AC 100 V - 120 V or AC
220 V - 240 V). If other than the specified voltage is used, it could cause an electric shock or fire.• Plug the printer directly into the building’s electrical outlet (AC 100 V - 120 V or AC 220 V - 240 V).
Do not plug multiple power supply cables into the same electrical outlet. Doing so could generate heat and might cause a fire.
• Be sure to use a dedicated building electrical outlet with a ground wire for the power supply, and connect it to the ground wire. If the ground wire is not connected, an electric shock or fire may occur.
• The waste fluid from the printer is industrial waste. Proper waste fluid disposal according to industrial waste disposal laws and ordinances of your local government is required. Consign disposal of waste fluids to a specialized processor.
Safety Instructions
Xerox 8254E / 8264E Color Wide Format PrinterUser Guide
1-5
CAUTIONS:• Pay attention to the following points when handling the power cables.
– Do not put heavy objects on the power cables.
– Do not bend, twist or pull the power cables by force.
– Do not route the power cables near heating appliances.
• Pay attention to the following points when handling any power supply cable. Any mishandling of a power cable could cause a fire.– Make sure that no foreign substances such as dust, etc. are stuck to the cable’s plug.
– Make sure that the cable’s plug is completely and firmly inserted into the building’s electrical outlet.
• When handling ink cartridges, pay attention so that ink does not get into your eyes or stick to your skin. If ink gets into your eyes or sticks to your skin, immediately wash it off with water. Failing to do so might cause irritation or
• Do not disassemble ink cartridges. If disassembled, there is a possibility that ink might come into contact with your eyes or skin.
• Do not operate the media loading lever during initial operation. The print head portion may touch the pressurizing roller portion, and cause a malfunction.
• Do not touch the media guide during printing. It is hot and may cause a burn.• Do not touch the media feed slot, platen or media guide while heaters are operating. They are hot
and may cause a burn.• Do not use volatile solvents such as thinner, benzene, or alcohol. These solvents could cause
damage to the paint on the printer’s covers.• Be careful that no moisture enters the printer. There is a possibility that the electric circuit inside
the printer could short out.• Do not, under any circumstances, open any covers that are attached using screws. Doing so may
cause an electric shock or a malfunction.• Do not drop waste fluid when replacing the flushing-box sponges. If waste fluid comes into contact
with the grid roller, the surface of the grid roller will be damaged, and the media feed function may be affected.
• When cleaning the cleaning wiper:– Do not touch the cleaning wiper and head cap unit with your fingers. Oil from your hands can
cause print head cleaning to not be performed correctly.
– For the 8264E, clean the wiper using a dry cleaning stick.
– For the 8254E, clean the wiper using a dry poly-knit wiper.
– Do not immerse the head of the cleaning stick or the poly-knit wiper in water. A wet cleaning stick or poly-knit wiper may cause the print head to clog.
– Do not re-use the cleaning stick or poly-knit wiper. Dust attached to the stick or wiper may damage the print head.
Safety Instructions
Xerox 8254E / 8264E Color Wide Format PrinterUser Guide
1-6
• When cleaning around the 8264E print head only:– Do not touch the print head itself. Doing so may damage the print head.
– Do not touch the head of the cleaning stick with your fingers. Oil on your hands may get on the cleaning stick, causing damage to the print head.
– Do not immerse the head of the cleaning stick in water. A wet cleaning stick may damage the print head.
– Do not re-use the cleaning stick. Dust attached to the cleaning stick may damage the print head.
• Do not lean the printer, prop it against a wall, or turn it upside down. There is a possibility that ink inside the printer may leak. Moreover, normal operation after shifting to these positions cannot be guaranteed.
• For safety reasons, if you are not going to use the printer for a long period, make sure to disconnect the power supply cable from the building’s electrical outlet.
• Make sure to connect a ground wire to a ground connection that meets the following standards:– Use only electrical outlets that are connected to a ground.
– The ground wire should be attached to a copper plate which is buried in the ground to a depth of 650mm (25") or more.
• Keep the work area well-ventilated. This prevents fire, and prevents operators from feeling sick from fumes.
• When printing is finished, the media guide is hot. Wait until the media guide cools off before touching it.
• Pay attention to the following points when you cut roll media. Mishandling the razor blade may cause a cut on your finger or hand.– When you hold the media, do not place your finger on the media cut groove.
– Move the razor blade along the media cut groove.
• When cleaning the printer, be sure to first press the printer’s [Power] key to turn it OFF and disconnect the power supply cable(s) from the building’s electrical outlet.
• Whenever you move the printer, keep it in an upright, horizontal position.
Safety Instructions
Xerox 8254E / 8264E Color Wide Format PrinterUser Guide
1-7
Electro/Mechanical Certifications
FCC Notices for the USA
This equipment has been tested and found to comply with the limits for a Class A digital device, pursuant to Part 15 of the FCC Rules. These limits are designed to provide reasonable protection against harmful interference when the equipment is operated in a commercial environment. This equipment generates, uses, and can radiate radio frequency energy and, if not installed and used in accordance with the instruction manual, may cause harmful interference to radio communications. Operation of this equipment in a residential area is likely to cause harmful interference in which case the user will be required to correct the interference at his own expense.
EME Compliance for Canada
This Class “A” digital apparatus complies with Canadian ICES-003.
Cet appareil numérique de la classe “A” est conforme à la norme NMB-003 du Canada.

Safety Instructions
Xerox 8254E / 8264E Color Wide Format PrinterUser Guide
1-8
Product Safety Certification
This product is certified by the following Agency using the Safety standards listed: Agency
MET LABORATORIES, INC.
Standard
UL60950-1 1st (2003) (USA)
IEC60950-1 Edition 1 (2001)
CAN/CSA-C22.2 No. 60950-1-03 (Canada)
Certifications in Europe
CE The CE mark applied to this product, symbolizes Xerox’ declaration of conformity with the following applicable European Union Directives, as of the dates indicated:
December 12,2006: Council Directive 2006/95/EC as amended. Approximation of the laws of the member states related to low voltage equipment.
December 15, 2004: Council Directive 2004/108/EC as amended. Approximation of the laws of the member states related to electromagnetic compatibility.
March 9, 1999: Council Directive 99/5/EC, on radio equipment and telecommunications terminal equipment and the mutual recognition of the conformity.
A full declaration of conformity, defining the relevant directives and referenced standards, can be obtained from your Xerox Limited representative.
Safety Instructions
Xerox 8254E / 8264E Color Wide Format PrinterUser Guide
1-9
Warning Labels
This section explains the handling of warning labels, as well as their location and types.
Warning labels are attached to parts of the printer that require special caution. Understand the locations and the descriptions of the danger associated with each label before operating the printer.
Handling the Warning LabelsNotes:
• If any of the labels are dirty and cannot be read, use cloth, water and neutral detergent to remove the dirt. Avoid either organic solvents or gasoline.
• It is necessary to replace the labels if they are damaged, lost or illegible. If the warning labels have to be replaced, contact your local Xerox dealer.

Safety Instructions
Xerox 8254E / 8264E Color Wide Format PrinterUser Guide
1-10
Location and Type of Warning Labels
8264E Warning Labels
Locations of the 8264E warning labels are shown in the following two figures.
Safety Instructions
Xerox 8254E / 8264E Color Wide Format PrinterUser Guide
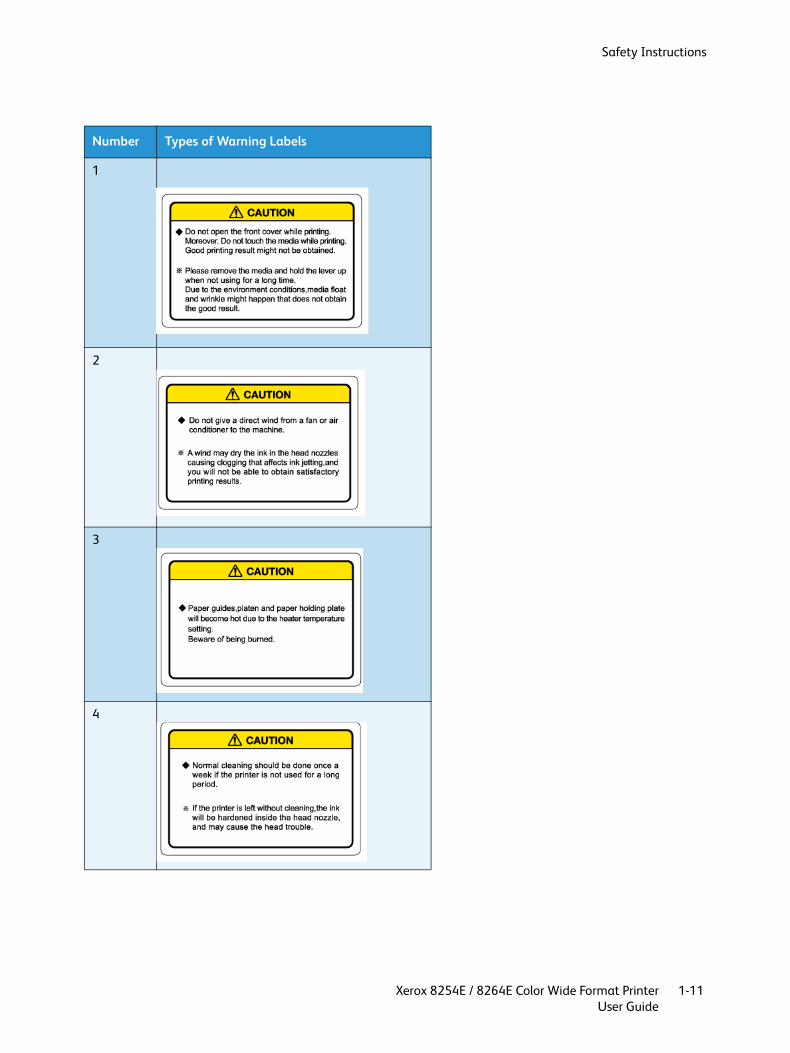
1-11
Number Types of Warning Labels
1
2
3
4

Safety Instructions
Xerox 8254E / 8264E Color Wide Format PrinterUser Guide
1-12
5
6
7
8
9
Number Types of Warning Labels

Safety Instructions
Xerox 8254E / 8264E Color Wide Format PrinterUser Guide
1-13
8254E Warning labels
Locations of the 8254E warning labels are shown in the following figure.
No. Types of warning labels
1
2
3
Safety Instructions
Xerox 8254E / 8264E Color Wide Format PrinterUser Guide
1-14
8254E Only-Operational Procedure Labels
This section explains the handling of the 8254E’s operational procedure labels, as well as their location and types.
The 8264E has no operational procedure labels.
Handling the Operational Procedure Labels
When handling the warning labels, be careful about the following points.
Note:
• If any of the labels are dirty and cannot be read, use cloth, water and neutral detergent to remove the dirt. Avoid either organic solvents or gasoline.
• It is necessary to replace the labels if they are damaged, lost or illegible. If the warning labels have to be replaced, contact your local Xerox dealer.

Safety Instructions
Xerox 8254E / 8264E Color Wide Format PrinterUser Guide
1-15
Location and Type of Operational Procedure Labels
The locations of the operation procedure labels are shown in the following two figures.
No. Types of operational procedure labels Reference
1
Setting Roll Media on page 19
2Replacing Ink
Cartridges

Safety Instructions
Xerox 8254E / 8264E Color Wide Format PrinterUser Guide
1-16
Product Recycling & Disposal
USA & Canada
Xerox operates a worldwide equipment take back and reuse/recycle program. Contact your Xerox sales representative (1-800-ASK-XEROX) to determine whether this Xerox product is part of the program. For more information about Xerox environmental programs, visit www.xerox.com/environment.html.
If your product is not part of the Xerox program and you are managing its disposal, please note that the product may contain lead and other materials whose disposal may be regulated due to environmental considerations. For recycling and disposal information, contact your local authorities. In the United States, you may also refer to the Electronic Industries Alliance web site: www.eiae.org.
Other Countries
Please contact your local waste authorities and request disposal guidance.
European Union
WEEE Directive 2002/96/EC
Some equipment may be used in both a domestic/household and a professional/business application
Product Recycling and Disposal (EU Professional/Business Environment)
Application of this symbol on your equipment is confirmation that you must dispose of this equipment in compliance with agreed national procedures. In accordance with European legislation, end of life electrical and electronic equipment subject to disposal must be managed within agreed procedures.

Safety Instructions
Xerox 8254E / 8264E Color Wide Format PrinterUser Guide
1-17
Product Recycling and Disposal (EU Domestic/Household Environment)
Application of this symbol on your equipment is confirmation that you should not dispose of the equipment in the normal household waste stream. In accordance with European legislation, end of life electrical and electronic equipment subject to disposal must be segregated from household waste.
Private households within EU member states may return used electrical and electronic equipment to designated collection facilities free of charge. Please contact your local disposal authority for information.
In some member states, when you purchase new equipment, your local retailer may be required to take back your old equipment free of charge. Please ask you retailer for information.
Prior to disposal, please contact your local dealer or Xerox representative for end of life take back information.
Information on users on collection and disposal of old and used batteries (EU Battery Directive)
These symbols on the products, and/or accompanying documents mean that used electrical and electronic products and batteries should not be mixed with general household waste.
For proper treatment, recovery and recycling of old products and used batteries, please take them to applicable collection points, in accordance with your national legislation and the Directive 2002/96/EC and 2006/66/EC.
By disposing of these products and batteries correctly, you will help to save valuable resources and prevent any potential negative effects on human health and the environment which could otherwise arise from inappropriate waste handling.
For more information about collection and recycling of old products and batteries, please contact your local municipality, your waste disposal service or the point of sale where you purchased the items.Penalties may be applicable for incorrect disposal of this waste, in accordance with national legislation.
Safety Instructions
Xerox 8254E / 8264E Color Wide Format PrinterUser Guide
1-18
For business users in the European Union
If you wish to discard electrical and electronic equipment, please contact your dealer or supplier for further information.
Information on disposal in other countries outside the European Union
These symbols are only valid in the European Union. If you wish to discard these items, please contact your local authorities or dealer and ask for the correct method of disposal.
Note for the battery symbol
This wheeled bin symbol may be used in combination with a chemical symbol. This establishes compliance with the requirements set out by the Directive.
Removal
Batteries should only be replaced by a MANUFACTURER approved service facility.
Product Environment Requirements
Xerox operates a worldwide equipment take back and reuse/recycle program. Contact your Xerox sales representative (1-800-ASK-XEROX) to determine whether this Xerox product is part of the program. For more information about Xerox environmental programs, visit: http://www.xerox.com/environment.
If you are managing the disposal of your Xerox product, please note that the product may contain lead, mercury, Perchlorate, and other materials whose disposal may be regulated due to environmental considerations. The presence of these materials is fully consistent with global regulations applicable at the time that the product was placed on the market. For recycling and disposal information, contact your local authorities. In the United States, you may also refer to the Electronic Industries Alliance web site: http://www.eiae.org/. Perchlorate Material - This product may contain one or more Perchlorate-containing devices, such as batteries. Special handling may apply; please see: http://www.dtsc.ca.gov/hazardouswaste/perchlorate/

Xerox 8254E / 8264E Color Wide Format PrinterUser Guide
2-1
2Product Overview
Introduction
This chapter explains the features of the 8264E and 8254E printers along with the name and function of each part.
Features
This section explains the main features of the 8264E and 8254E printers.
1. High-speed output– The new type print head achieves high-speed output.
8264E - The print head can print up to 1,615 mm (64.6") in width.
– 8254E - The print head can print up to 1,355.5 mm (54.2") in width when set up for one-way printing or up to 1,336.5mm (53.5") when set up for two-way printing.
2. Wide variety of compatible mediaThe print head is adjustable to two levels of height and can print over a range of media thickness.
The print head can print onto media between 0.08 and 0.30mm in thickness.
3. Vibrant color reproductionFour colors of ink are used for printing in order to reproduce sharp and vivid colors. This 8254E uses 220 ml large-capacity solvent ink cartridges. The 8254E can use 220 ml or 440 ml cartridges. Each cartridge contains a dedicated IC (integrated circuit) chip. This chip can control the quantity of ink used for printing, improving productivity.Use of variable dots can also improve color reproduction.
4. Multiple heatersThe media heating system developed for the 8264E and 8254E series printers is designed for solvent ink. Heaters are installed at three locations (before the platen, at the platen, and after the platen), allowing solvent ink to fix better on the media and to dry more quickly.
5. Effective use of mediaAn origin feature is provided to allow setting of the print starting position as required. Printing can be performed on media that has already been printed. This allows effective use of left margins.

Product Overview
Xerox 8254E / 8264E Color Wide Format PrinterUser Guide
2-2
Part Names and Functions
This section explains the name and function of each part.
8264E Printer Front Section
No. Name Function
1 Media loading lever Used for fixing or releasing media.•Lower the lever to fix the media. •Lower the lever more to fix the media more firmly. Used to improve the accuracy of media feeding.• Raise the lever to release the media.
2 Control panel Used to control operational condition settings and to view printer status and various function settings.Printer Control Panel
3 Front cover Used to prevent the user from coming into contact with the driving mechanism during the printer operation. Opened and closed when media is set or jammed. It is normally closed.
Product Overview
Xerox 8254E / 8264E Color Wide Format PrinterUser Guide
2-3
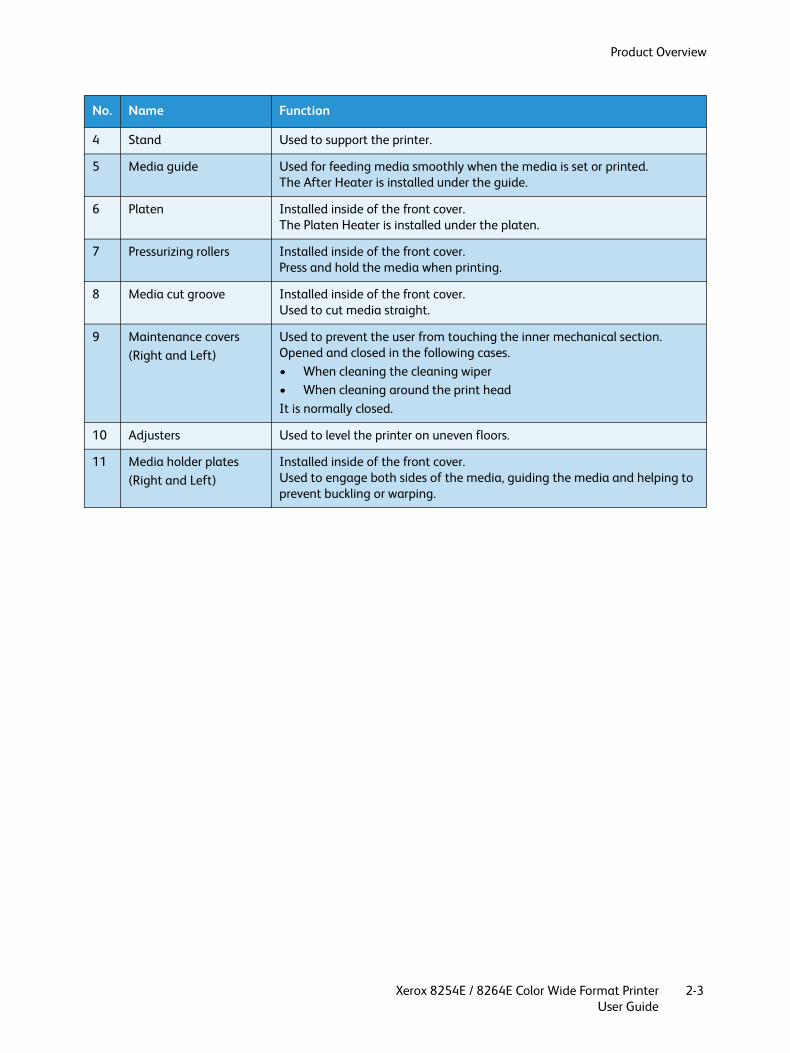
4 Stand Used to support the printer.
5 Media guide Used for feeding media smoothly when the media is set or printed.The After Heater is installed under the guide.
6 Platen Installed inside of the front cover.The Platen Heater is installed under the platen.
7 Pressurizing rollers Installed inside of the front cover.Press and hold the media when printing.
8 Media cut groove Installed inside of the front cover.Used to cut media straight.
9 Maintenance covers(Right and Left)
Used to prevent the user from touching the inner mechanical section.Opened and closed in the following cases.• When cleaning the cleaning wiper• When cleaning around the print headIt is normally closed.
10 Adjusters Used to level the printer on uneven floors.
11 Media holder plates(Right and Left)
Installed inside of the front cover.Used to engage both sides of the media, guiding the media and helping to prevent buckling or warping.
No. Name Function

Product Overview
Xerox 8254E / 8264E Color Wide Format PrinterUser Guide
2-4
8254E Printer Front Section
No. Name Function
1 Media loading lever Used for fixing or releasing media.•Lower the lever to fix the media. • Raise the lever to release the media.
2 control panel Used to control operation condition settings and to view printer status and various function settings.
3 Front cover Used for preventing the user from coming in contact with the driving mechanism during the printer operation. Opened and closed when media is set or jammed. It is normally closed.
4 Stand Used to support the printer.
5 Book holder Quick Start Guide, etc. can be stored here. Can be mounted on either leg of stand.
6 Media guide Used for feeding media smoothly when the media is set or printed.The heater to dry the ink is installed under the guide.
7 Media cut groove Used to cut media straight.

Product Overview
Xerox 8254E / 8264E Color Wide Format PrinterUser Guide
2-5
8 Pressurizing rollers Installed inside of the front cover.Press and hold the media when printing.
9 Platen Installed inside of the front cover.The Platen Heater is installed under the platen.
No. Name Function
Product Overview
Xerox 8254E / 8264E Color Wide Format PrinterUser Guide
2-6
Printer Rear
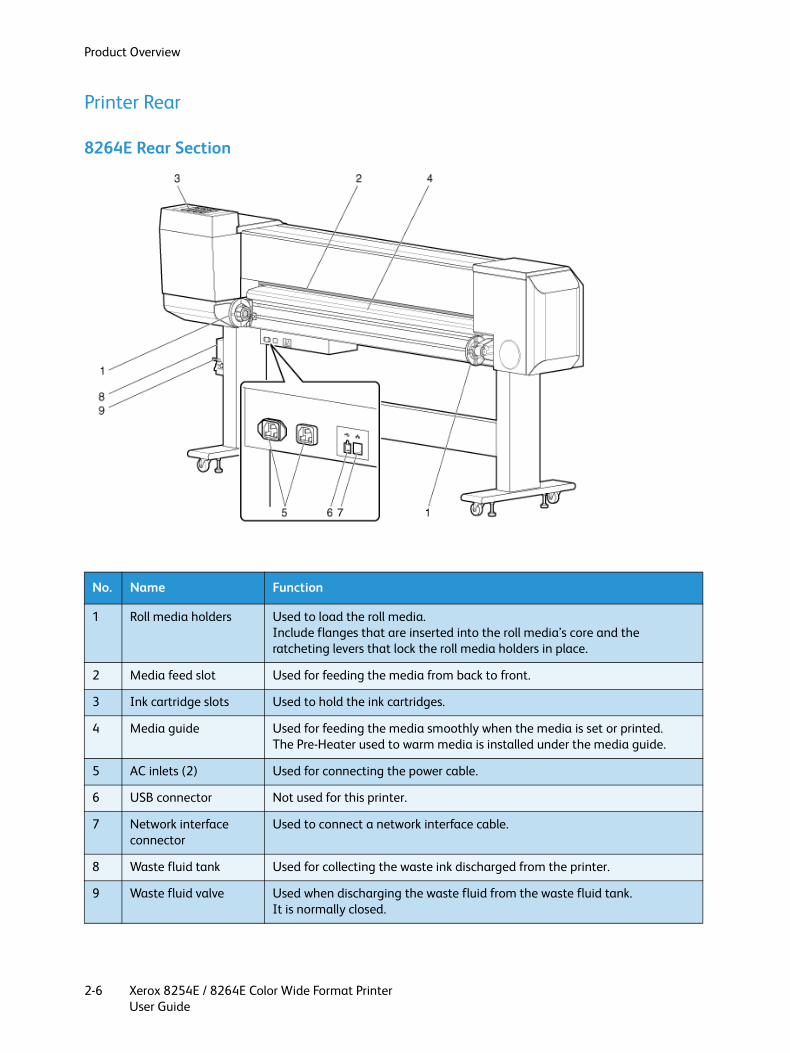
8264E Rear Section
No. Name Function
1 Roll media holders Used to load the roll media.Include flanges that are inserted into the roll media’s core and the ratcheting levers that lock the roll media holders in place.
2 Media feed slot Used for feeding the media from back to front.
3 Ink cartridge slots Used to hold the ink cartridges.
4 Media guide Used for feeding the media smoothly when the media is set or printed.The Pre-Heater used to warm media is installed under the media guide.
5 AC inlets (2) Used for connecting the power cable.
6 USB connector Not used for this printer.
7 Network interface connector
Used to connect a network interface cable.
8 Waste fluid tank Used for collecting the waste ink discharged from the printer.
9 Waste fluid valve Used when discharging the waste fluid from the waste fluid tank.It is normally closed.

Product Overview
Xerox 8254E / 8264E Color Wide Format PrinterUser Guide
2-7
8254E Rear Section
No. Name Function
1 AC inlet Used for connecting the power cable.
2 Network interface connector
Used to connect a network interface cable.
3 USB connector Not used for this printer.
4 Scroller receiver Used to set the scroller when roll media is used.
5 Media feed slot Used for feeding the media from back to front.
6 Ink cartridge slots Used to hold the ink cartridges.
7 Media guide Used for feeding media smoothly when the media is set or printed.The Pre-Heater used to warm the media is installed under the media guide.
8 Waste fluid tank Used for collecting the waste ink discharged from the printer.
9 Waste fluid valve Used when discharging the waste fluid from the waste fluid tank.It is normally closed.

Product Overview
Xerox 8254E / 8264E Color Wide Format PrinterUser Guide
2-8
Position and Function of the Heating Elements
Pre-Heater
The Pre-Heater is located at the rear of the printer, between the Roll media and the Print head. It is used to preheat the media before printing. This opens the pores of the media, making it more receptive to receiving the ink.
Platen Heater
The Platen Heater is located under the Platen, which is directly under the Print head. It is used to warm up the ink. This improves the fixation of the ink to both coated and uncoated media and optimizes the dot gain control, all of which produces improved print quality.
No. Name
1 Roll media guide
2 Pre-Heater
3 Print head
No. Name
1 Roll media guide
2 Platen Heater
3 Print head

8254E / 8264E User Guide 2-9
After Heater
The After Heater is located under the Media Guide. It is used to complete the fixation process, making the printed media dry to the touch.
No. Name
1 Roll media guide
2 After Heater
3 Print head

Product Overview
Xerox 8254E / 8264E Color Wide Format PrinterUser Guide
2-10
Printer Control Panel
The control panel is used for setting the operation conditions and to display the status of the printer and various functions. This section describes the names of each operation key and explains each status display, and each function.
Notes:• Refer to the following for details regarding the use of the control panel.
– When performing menu settings from the control panel: Menu Setups on the Control Panel
– When performing various other operations within the control panel: Operating from the Control Panel

Product Overview
Xerox 8254E / 8264E Color Wide Format PrinterUser Guide
2-11
Operation KeysNote:
• The operation keys are assigned with different names and functions, depending on the printer’s status. For details about printer status, refer to Printer Status.
No. Name Standard menu display Setup menu display
1 [Menu] key Causes the Setup menu to display.
•Pressing the [Menu] key causes "Menu 1: Setup>" to be displayed.•This is the first of seven menus that can be displayed.•Pressing the [+] key or [–] key allows you to select any of the other six menus.
2 [Enter] key 8254E only - Restarts printing during printing.
•The menu to set is selected and it shifts to the next hierarchy.• The setting is determined and saved.
[Cleaning] key Press and hold this key for two seconds or more to begin the Head Cleaning procedure.
—
3 [Cancel] key •While printing:Forcefully terminates printing and deletes one file of the remaining data.•While receiving or analyzing:Deletes the data file that has already been received and analyzed, then deletes the subsequent data file.
•Returns to the previous menu hierarchy, discarding any changes that have not been saved.•Shifts from the Setup menu display to the Standard menu display.
4 [<] key
—
• Increments you up the menu level in the directory tree.• In the Origin menu, pressing the [<] key increases the print head transferring distance.
[Nozzle Check] key Press and hold for two seconds or more to perform the Nozzle Check procedure.
—
5 [>] key Sets Cleaning Mode.•The lamp of the particular Cleaning Mode you select lights up in green.
• Moves the display to the sub-menu of a selected menu if there is one.• Used, along with the < key, in the sub-menus of the Selection menu to select and de-select items that will be displayed in the Setup menu.• Increments you down the menu level in the directory tree.
Product Overview
Xerox 8254E / 8264E Color Wide Format PrinterUser Guide
2-12
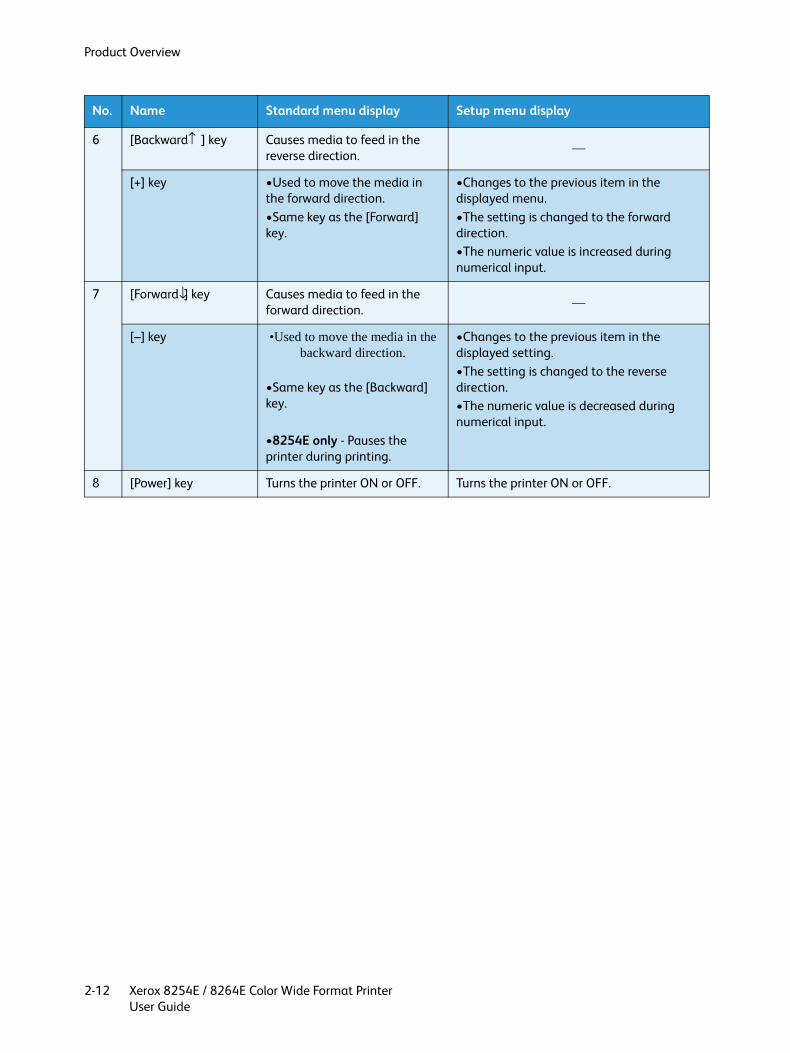
6 [Backward↑ ] key Causes media to feed in the reverse direction. —
[+] key •Used to move the media in the forward direction.•Same key as the [Forward] key.
•Changes to the previous item in the displayed menu.•The setting is changed to the forward direction.•The numeric value is increased during numerical input.
7 [Forward↓] key Causes media to feed in the forward direction. —
[–] key •Used to move the media in the backward direction.
•Same key as the [Backward] key.
•8254E only - Pauses the printer during printing.
•Changes to the previous item in the displayed setting.•The setting is changed to the reverse direction.•The numeric value is decreased during numerical input.
8 [Power] key Turns the printer ON or OFF. Turns the printer ON or OFF.
No. Name Standard menu display Setup menu display

Product Overview
Xerox 8254E / 8264E Color Wide Format PrinterUser Guide
2-13
Display section
No. Name Color Status Description
9 Power lamp Green Lamp ON
Power ON.
Lamp blinks
An error has occurred.Error content displays on the LCD.
Lamp OFF
Power OFF.
10 Data lamp Orange Lamp ON
•Analyzing received data.•Printing in progress.
Lamp blinks
Receiving data.
Lamp OFF
Data is not being received.
11 High lamp Green Lamp ON
The head height is set to "High."
Lamp OFF
The head height is set to "Low."
12 Low lamp Green Lamp ON
The head height is set to "Low."
Lamp OFF
The head height is set to "High."
13 Wave lamp Green Lamp ON
The Effect menu is set to "Wave."
Lamp OFF
The Effect menu is set to "None."
14 Fine &S.Fine lamp
Green Lamp ON
The Effect menu is set to "Fine" or "Super Fine."
Lamp OFF
The Effect menu is set to "Wave."•When the Wave lamp is turned OFF, the Effect menu is set to "None."
15 Strong lamp Green Lamp ON
•Cleaning Mode is set to "Strong."•When the Normal lamp is also turned on, Cleaning Mode is set to "Economy."
Lamp OFF
Cleaning Mode is set to "Normal."

Product Overview
Xerox 8254E / 8264E Color Wide Format PrinterUser Guide
2-14
Notes:• When an error requiring restart (a fatal malfunction for the printer operation) occurs, all
lamps blink with an alarm.Error Requiring Restart
• If the error persists even when the malfunction is fixed, contact your local Xerox dealer.
16 Normal lamp Green Lamp ON
•Cleaning Mode is set to "Normal."•When the Strong lamp is also turned on, Cleaning Mode is set to "Economy."
Lamp OFF
Cleaning Mode is set to "Strong."
17 LCD display section — —
Displays the operational status of the printer or an error message.
No. Name Color Status Description

Xerox 8254E / 8264E Color Wide Format PrinterUser Guide
3-1
3Preparing For A Job
Introduction
This chapter explains necessary steps to take before using the printer.
Connection
This section explains how to connect the power cable(s).
WARNINGS:• Be sure to use the power cable(s) supplied with the printer. Using other power cables can cause an
electric shock or fire.• Do not use a damaged power cable. It could lead to an electric shock and fire.
CAUTIONS:• Pay attention to the following points when handling power cables.• Do not put heavy objects on the power cables.• Do not bend, twist or pull the power cables by force.• Do not route the power cables near heating appliances.
Note:
• Contact your local Xerox dealer in case of power cable damage.
Follow the procedure below to install the power cable(s).
1. Connect the power cable(s) to the AC inlet(s) on the rear of the printer.2. Insert the power cable plug(s) firmly and completely into the inlet(s).

Preparing For A Job
Xerox 8254E / 8264E Color Wide Format PrinterUser Guide
3-2
8264E Power Cable Connections
8254E Power Cable Connection
Note:
• Only the cable with the 90o angle plug will work for the 8254E. The straight cable that is supplied with the 8254E’s winder will not work. It will interfere with the media roller.
No. Name
1 AC inlets (2)
2 Power cables (2)
No. Name
1 AC inlet
2 Power cable with 90°angle plug
Preparing For A Job
Xerox 8254E / 8264E Color Wide Format PrinterUser Guide
3-3
WARNINGS:• Do not connect or disconnect a power cable with a wet hand. This could lead to an electric shock.• Make sure to use only the power supply specified for your printer (AC 100 V - 120 V or AC 220 V -
240 V). If a power supply with other than the specified voltage is used, it could cause an electric shock and fire.
• Plug the printer directly into the building’s electrical outlet (AC 100 V - 120 V or AC 220 V - 240 V). Do not use multiple power cables on the same electrical outlet. This could generate heat and might cause fire.
• For the power supply, make sure to use a dedicated electrical outlet with a ground terminal, connected to a ground. If the ground wire is not connected, an electric shock or fire may occur.
• Do not connect a ground wire to the following places.• Gas pipe
There is a possibility of ignition and explosion.• Ground wire of telephone cables and lightning rods
Heavy current might flow whenever lightning strikes.• Water pipe and faucet
The ground might not work if a plastic pipe is connected in the middle of the metal pipe.• Pay attention to the following points when handling any power cable. Any mishandling of a power
cable could cause a fire.• Make sure that no foreign substances such as dust, etc. are stuck to the power cable’s plug.• Make sure that the power cable’s plug is firmly and completely inserted into the building’s
electrical outlet.• For safety, if you do not plan to use the printer for a long period, make sure to disconnect the power
cable(s) from the electrical outlet.• Make sure to connect a ground wire to a ground connection that meets the following standards.
• Use only building electrical outlets that are connected to a ground.• The ground wire should be attached to a copper plate which is buried in the ground to a
depth of 650mm (25").

Preparing For A Job
Xerox 8254E / 8264E Color Wide Format PrinterUser Guide
3-4
Notes:• Contact the retail outlet of purchase if the ground connection cannot be established, or
if the ground connection is not given.• Never disconnect the printer’s power cable(s) from the building’s electrical outlet without
first pressing the [Power] key to turn the printer’s power OFF. Doing so can cause the printer to misread how much ink is still in the cartridges. It may indicate a cartridge is empty when it is not. If this happens, there is no option but to replace the cartridge. This can lead to dramatic waste of ink. The same problem may occur in the event a building loses power.
• Whenever the power cable is disconnected from the electrical outlet, allow one minute or more to go by before re-connecting the power cable to the outlet.
• The 8264E’s two power cables require a total capacity of 17A. If a single electrical outlet cannot supply the required total capacity, plug one of the power supply cables into one outlet and the other power supply cable into a different outlet.
No. Name
1 Power supply cable

Preparing For A Job
Xerox 8254E / 8264E Color Wide Format PrinterUser Guide
3-5
Turning the Printer Power On/Off
This section explains how to turn the printer On and Off.
Turning the Power On
Follow the procedure below to turn the power ON.
1. Press the [Power] key to turn the printer ON.
– The Power lamp on the control panel lights up in green.
– The printer starts initial operation.
– When the initial operation is complete, "Media width" displays in the control panel.
2. Press the [Menu] key. "Ready to Print" displays in the control panel.
Note:
• If there is a problem during initial operation, the printer will display a message in the control panel and may stop operating. If operation stops, refer to Troubleshooting and deal with the problem.

Preparing For A Job
Xerox 8254E / 8264E Color Wide Format PrinterUser Guide
3-6
Turning the Power OffNote:
• Never disconnect the printer’s power cable(s) from the building’s electrical outlet without first pressing the [Power] key to turn the printer’s power OFF. Doing so can cause the printer to misread how much ink is still in the cartridges. It may indicate a cartridge is empty when it is not. If this happens, there is no option but to replace the cartridge. This can lead to dramatic waste of ink. The same problem may occur in the event a building loses power.
Follow the procedure below to turn the power OFF.
Only Step 1 is a little different for the 8264E and the 8254E. The rest of the steps are the same for both printers.
8264E1. Verify the following regarding the operational condition of the printer.
– Printing or other operations are not in progress.
– The control panel displays "Ready to Print."
8254E1. Verify the following regarding the operational condition of the printer.
– Printing or other operations are not in progress.
– The control panel displays "Ready to Print."
– The Low lamp on the control panel lights up in green.
Notes:• 8254E - If the High lamp on the control panel lights up in green, the head height is set to
"High." • For both the 8264E and the 8254E, if the media being used requires that the head
height be set to "High," leave it at that setting. Otherwise, return the head height to "Low" before turning the power OFF. When returning the print head to the original position

Preparing For A Job
Xerox 8254E / 8264E Color Wide Format PrinterUser Guide
3-7
2. Press the [Power] key to turn the printer OFF.
– The Power lamp on the control panel turns OFF.
– The printer starts the procedure to turn the power OFF.
– "Power Off" displays in the control panel.
– All of the lamps on the control panel and the LCD monitor are turned OFF.
– The printer automatically turns the power OFF.
Notes:• If the control panel is in the following status, the power is ON.
– The [Power] key is pressed in.– The green Power lamp is lit.
• Press the [Power] key once again to turn the power OFF.• If the head height is set to High, “Change Head Gap Low” will be displayed in the control
panel and the procedure to turn the power OFF stops.• To restart the procedure, return the head height to "Low." When returning the print head
to the original position• If there is a problem during the turning OFF operation, a message displays in the control
panel and the printer may stop operating. If the printer does stop operating, refer to Troubleshooting and deal with the problem.
• After turning the printer OFF, wait for ten seconds or longer to turn it ON again.
Preparing For A Job
Xerox 8254E / 8264E Color Wide Format PrinterUser Guide
3-8
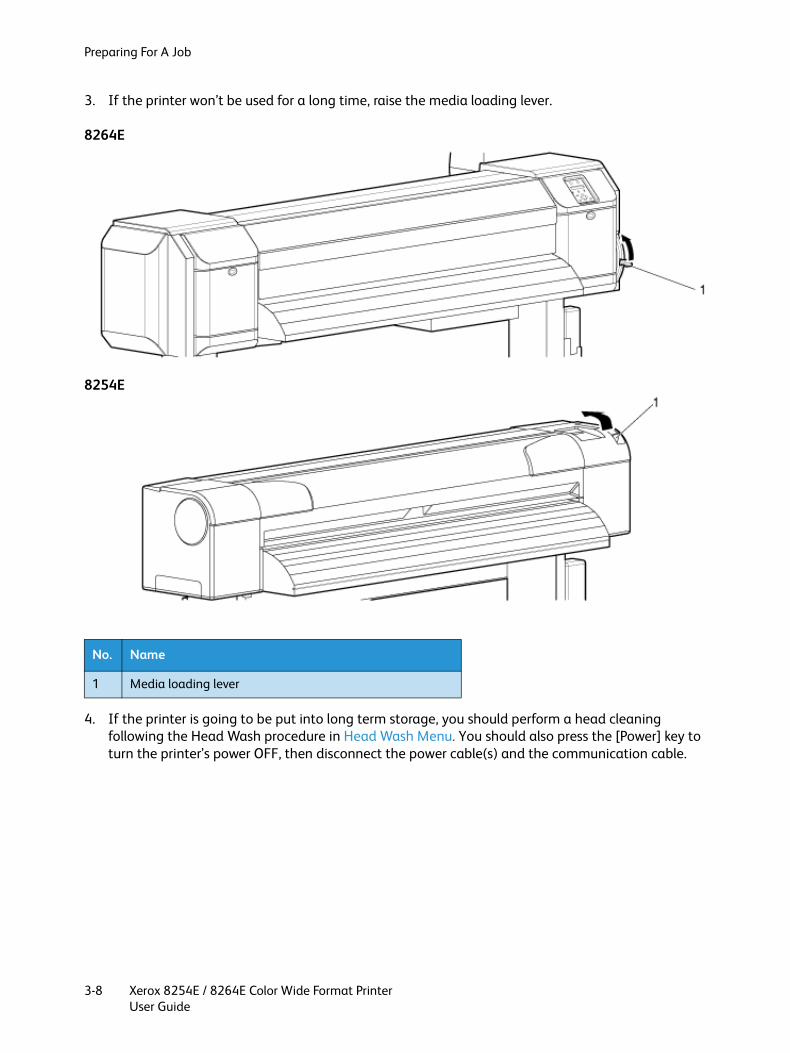
3. If the printer won’t be used for a long time, raise the media loading lever.
8264E
8254E
4. If the printer is going to be put into long term storage, you should perform a head cleaning following the Head Wash procedure in Head Wash Menu. You should also press the [Power] key to turn the printer’s power OFF, then disconnect the power cable(s) and the communication cable.
No. Name
1 Media loading lever

Preparing For A Job
Xerox 8254E / 8264E Color Wide Format PrinterUser Guide
3-9
Connecting the Network Interface
This section explains how to connect the printer to a PC.
System Requirements
The following are the system requirements for this printer and software server RIP (optional).
Notes:• The required memory varies depending on the application software and the print data
type.• A large hard disk and memory are recommended.
Preparing Cables
The printer is equipped with a network interface for connecting with a PC. You need a network interface cable to connect this printer to a PC. Prepare the cable according to the PC that will be connected.
Notes:• For information about connecting a network interface cable, refer to Connecting a
Network Interface Cable.• For the recommended cable specifications, refer to Interface Specification.
Operating system Windows 2000® Professional, Linux
CPU Pentium III® processor 1 GHz or more
Memory (RAM) 512 MB or more
Hard disk free space 10 GB or more
Preparing For A Job
Xerox 8254E / 8264E Color Wide Format PrinterUser Guide
3-10
Connecting a Network Interface Cable
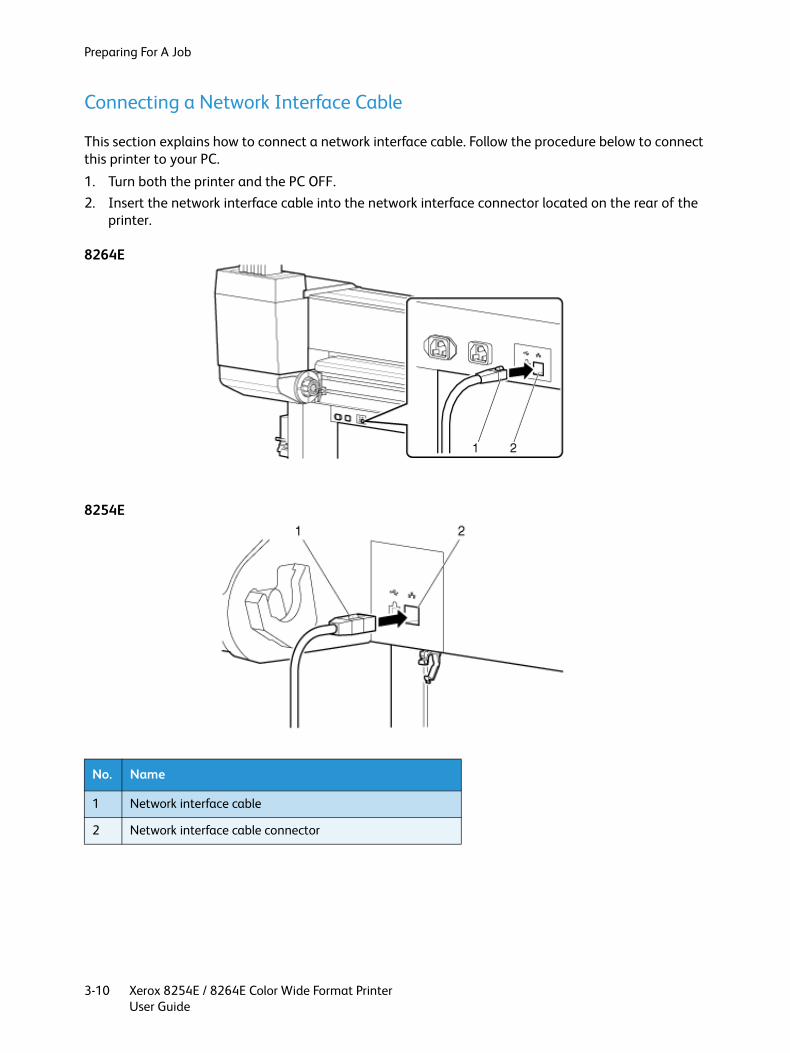
This section explains how to connect a network interface cable. Follow the procedure below to connect this printer to your PC.
1. Turn both the printer and the PC OFF.2. Insert the network interface cable into the network interface connector located on the rear of the
printer.
8264E
8254E
No. Name
1 Network interface cable
2 Network interface cable connector

Preparing For A Job
Xerox 8254E / 8264E Color Wide Format PrinterUser Guide
3-11
3. Insert the network interface cable into the cable clamp.
8254E
4. Connect the other connector of the network interface cable to your PC.
Notes:• For information about connecting to your PC, refer to the User Guide included with the
PC.• For network setting on the side of the printer, refer to Panel Set Up Menu Overview.
No. Name
1 Network interface cable
2 Cable clamp
Preparing For A Job
Xerox 8254E / 8264E Color Wide Format PrinterUser Guide
3-12
Media Handling
This section explains how to set the media and describes the settings for each media type.
Notes:• Refer to the following for details about handling media.
Using Media• Refer to the following for types and details of recommended media.
Media TypeOptions/Supply List
Loading Roll Media
This section explains how to load roll media.
Notes:• Roll media that does not exceed the following measurements can be attached to the
scroller supplied with these printers:– Media tube diameter: 77mm (3")– Outside diameter of media: 150mm (5.9")– Weight of media: – 8264E maximum = 30kg (66lb.)– 8254E maximum = 19kg (41.8lb.)

Preparing For A Job
Xerox 8254E / 8264E Color Wide Format PrinterUser Guide
3-13
8264E Loading Roll Media
Follow the procedure below to load roll media on the 8264E.
1. Loosen the left side and right side roll media holders at the rear of the printer. To do this, pull the lever towards you to release it from the ratchet. Then rotate the lever clockwise until you can no longer firmly grasp it. Release the lever (so the ratchet engages), then rotate the lever counter-clockwise until the media holders can be slid on their track.
2. Move both roll media holders outward. 3. Temporarily set the distance between the roll media holders a little wider than the width of the roll
media you are loading.
4. Engage the damper drive switching plates and their locking brackets on the end of each roll media holder to increase tension on the media roll to avoid slack and "No media found" errors.
No. Name
1 Roll media holder (Left)
2 Roll media holder (Right)
3 Roll media
4 Fixing lever
Preparing For A Job
Xerox 8254E / 8264E Color Wide Format PrinterUser Guide
3-14
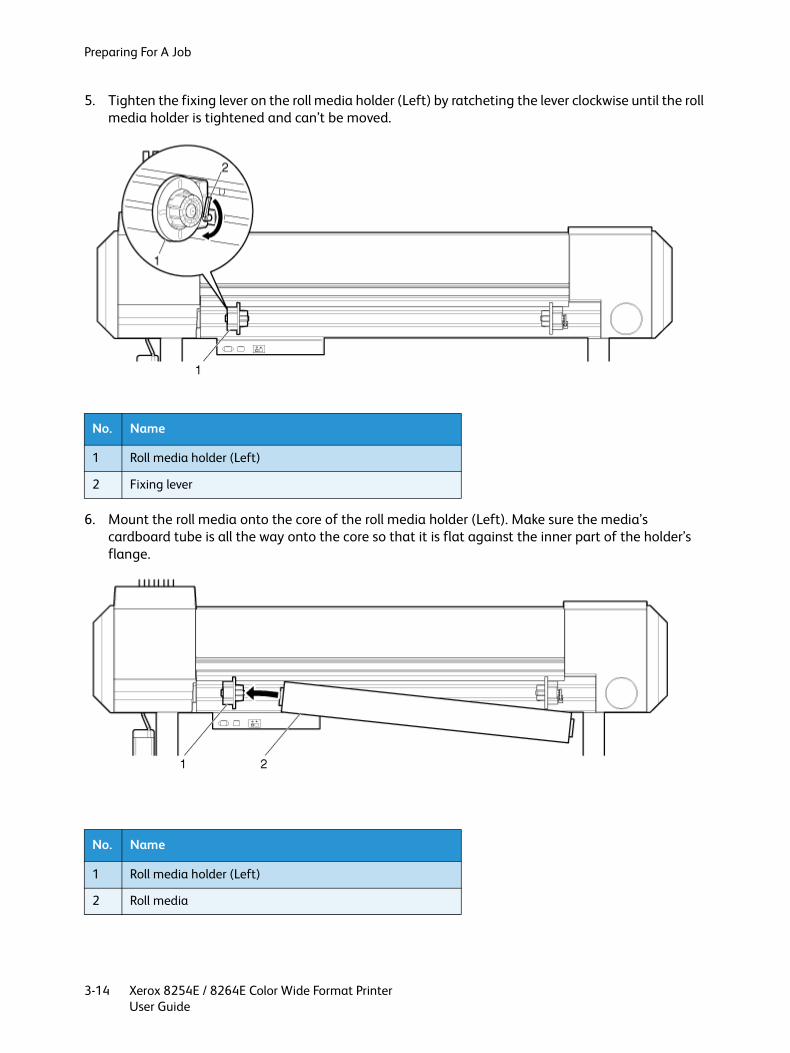
5. Tighten the fixing lever on the roll media holder (Left) by ratcheting the lever clockwise until the roll media holder is tightened and can’t be moved.
6. Mount the roll media onto the core of the roll media holder (Left). Make sure the media’s cardboard tube is all the way onto the core so that it is flat against the inner part of the holder’s flange.
No. Name
1 Roll media holder (Left)
2 Fixing lever
No. Name
1 Roll media holder (Left)
2 Roll media

Preparing For A Job
Xerox 8254E / 8264E Color Wide Format PrinterUser Guide
3-15
7. Slide the roll media holder (Right) toward the left and insert its core into the roll media’s cardboard tube. Make sure the media holder is inserted all the way into the tube so that the inside surface of its flange is flat against the cardboard tube. Do not tighten the fixing lever.
8. Return to the fixing lever of the roll media holder (Left) and ratchet it counter-clockwise to loosen the media holder again. With both media holders loose, move the entire assembly to the center.
9. Tighten both fixing levers.
No. Name
1 Roll media holder (Right)
2 Roll media
3 Fixing lever

Preparing For A Job
Xerox 8254E / 8264E Color Wide Format PrinterUser Guide
3-16
10. Engage the damper drive switching plates and their locking brackets on the end of each roll media holder to increase tension on the media roll to avoid slack and "No media found" errors.
No. Name
1 Roll media holder (Left)
2 Roll media holder (Right)
3 Roll media
4 Fixing lever

Preparing For A Job
Xerox 8254E / 8264E Color Wide Format PrinterUser Guide
3-17
8254E Loading Roll Media
Follow the procedure below to load roll media on the 8254E.
CAUTION:
• Load roll media on a horizontal surface such as a desk or table.If you load roll media with the scroller standing vertically, there is a possibility that the scroller might get damaged.
1. Load the roll media onto the scroller so that the media’s loose end "flap" points in a counter-clockwise direction (toward the left) when viewed from the fixed flange, as shown below.
2. Push the fixed flange into the roll media until its cardboard core is firmly against the inside surface of the fixed flange.
No. Name
1 Fixed flange
2 Roll media

Preparing For A Job
Xerox 8254E / 8264E Color Wide Format PrinterUser Guide
3-18
3. Attach the movable flange firmly to the roll media so that the inside surface of the flange is flat against the cardboard core.
4. Set the scroller onto the scroller receiver so that the fixed flange faces the side with the ink cartridge slots.
No. Name
1 Movable flange
2 Roll media
No. Name
1 Scroller
2 Fixed flange
3 Ink cartridges
4 Scroller receiver

Preparing For A Job
Xerox 8254E / 8264E Color Wide Format PrinterUser Guide
3-19
Setting Roll Media
This section explains how to set the roll media.
8264E Setting Roll Media
Follow the procedure below to set the roll media.
1. Press the [Power] key to turn the printer ON.
– The Power lamp on the control panel lights up in green.
– The printer starts the initializing operation.
– "Media End" displays in the control panel.
CAUTION:
• Do not operate the media loading lever during initial operation. The print head portion may touch the pressurizing roller portion, and cause a malfunction.

Preparing For A Job
Xerox 8254E / 8264E Color Wide Format PrinterUser Guide
3-20
2. Raise the media loading lever. "Lever Up" displays in the control panel.
3. Open the front cover.
4. From the rear, insert the roll media into the media feed slot.
Note:
• Engaging and locking the damper drive switching plates while previously loading the roll media should prevent slack in the roll media. However, if the roll media does develop some slack, rewind it tightly and then reload it.
No. Name
1 Media loading lever
No. Name
1 Front cover

Preparing For A Job
Xerox 8254E / 8264E Color Wide Format PrinterUser Guide
3-21
5. Pull the roll media out about one meter (39") from the front media feed slot which is located inside the front cover.
No. Name
1 Roll media
2 Media feed slot
No. Name
1 Roll media
2 Media feed slot
Preparing For A Job
Xerox 8254E / 8264E Color Wide Format PrinterUser Guide
3-22
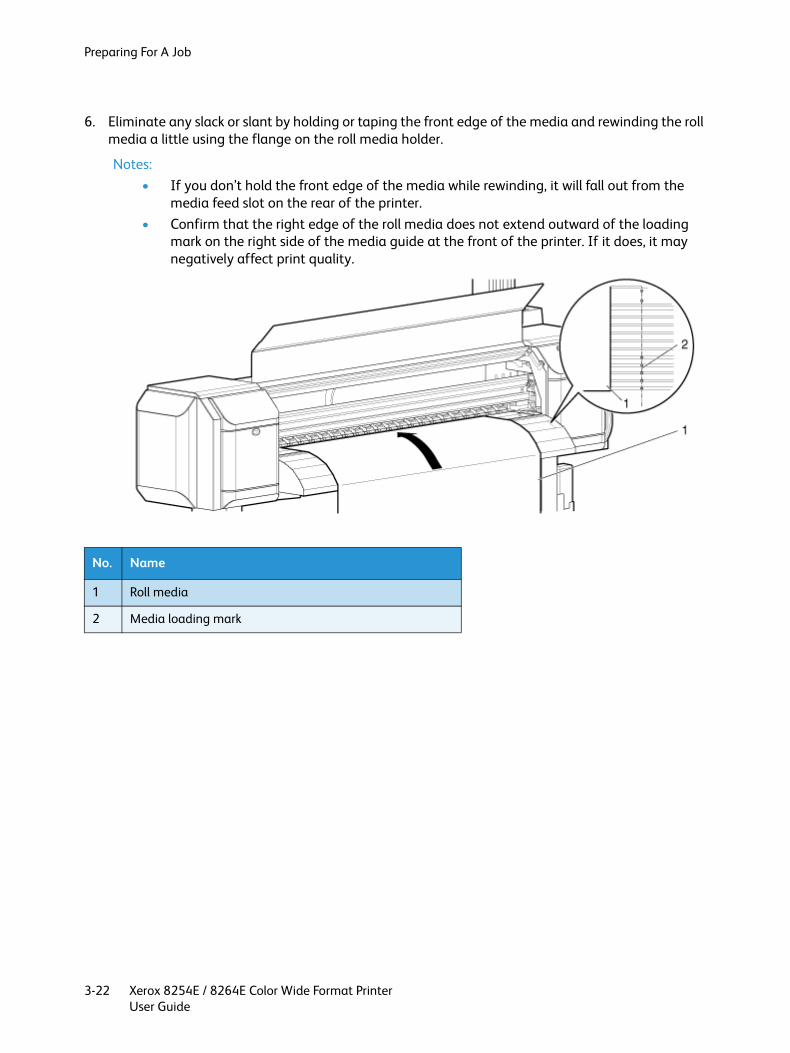
6. Eliminate any slack or slant by holding or taping the front edge of the media and rewinding the roll media a little using the flange on the roll media holder.
Notes:• If you don’t hold the front edge of the media while rewinding, it will fall out from the
media feed slot on the rear of the printer.• Confirm that the right edge of the roll media does not extend outward of the loading
mark on the right side of the media guide at the front of the printer. If it does, it may negatively affect print quality.
No. Name
1 Roll media
2 Media loading mark

Preparing For A Job
Xerox 8254E / 8264E Color Wide Format PrinterUser Guide
3-23
Note:
• When setting the roll media, set both sides of the media at least 5mm away from the edge of the pressurizing roller. If you don’t do this, slippage or creasing may occur during printing.
No. Name
1 Roll media
2 Pressurizing rollers

Preparing For A Job
Xerox 8254E / 8264E Color Wide Format PrinterUser Guide
3-24
7. If the edge of the roll media is set less than 5mm from the edge of the pressurizing roller, follow the procedure below to adjust the position of the roll media.a. Loosen the fixing levers of the right and left roll media holders, and move the roll media to the left or
right.b. After moving the roll media, fix it in place by re-tightening both fixing levers.
Note:
• Fix the roll media holders by pressing the holders to the printer.
No. Name
1 Roll media holder (Left)
2 Roll media holder (Right)
3 Roll media
4 Fixing lever

Preparing For A Job
Xerox 8254E / 8264E Color Wide Format PrinterUser Guide
3-25
8. Lower the media loading lever.
Notes:• When loading the roll media, cut the front edge of the media if it is not straight.
8264E Cutting Media• To increase the pressure on the media, lower the media loading lever further.
No. Name
1 Media loading lever
No. Name
1 Media loading lever (second arrow indicating more pressure applied)
Preparing For A Job
Xerox 8254E / 8264E Color Wide Format PrinterUser Guide
3-26
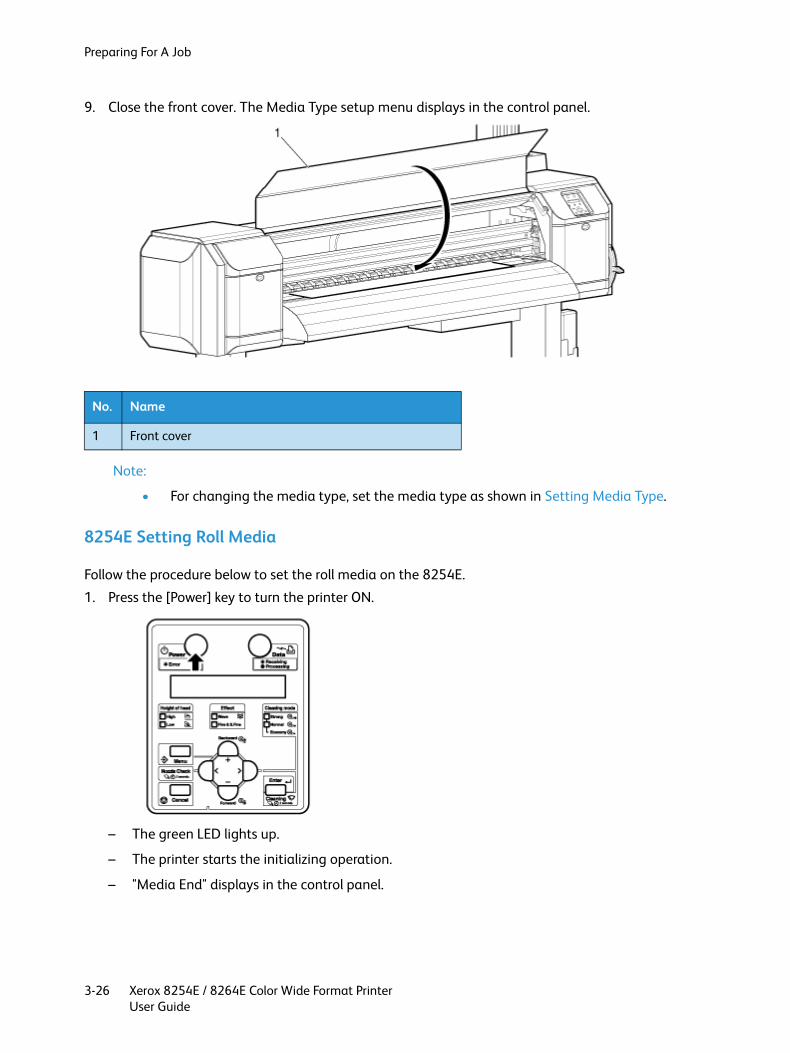
9. Close the front cover. The Media Type setup menu displays in the control panel.
Note:
• For changing the media type, set the media type as shown in Setting Media Type.
8254E Setting Roll Media
Follow the procedure below to set the roll media on the 8254E.
1. Press the [Power] key to turn the printer ON.
– The green LED lights up.
– The printer starts the initializing operation.
– "Media End" displays in the control panel.
No. Name
1 Front cover
Preparing For A Job
Xerox 8254E / 8264E Color Wide Format PrinterUser Guide
3-27
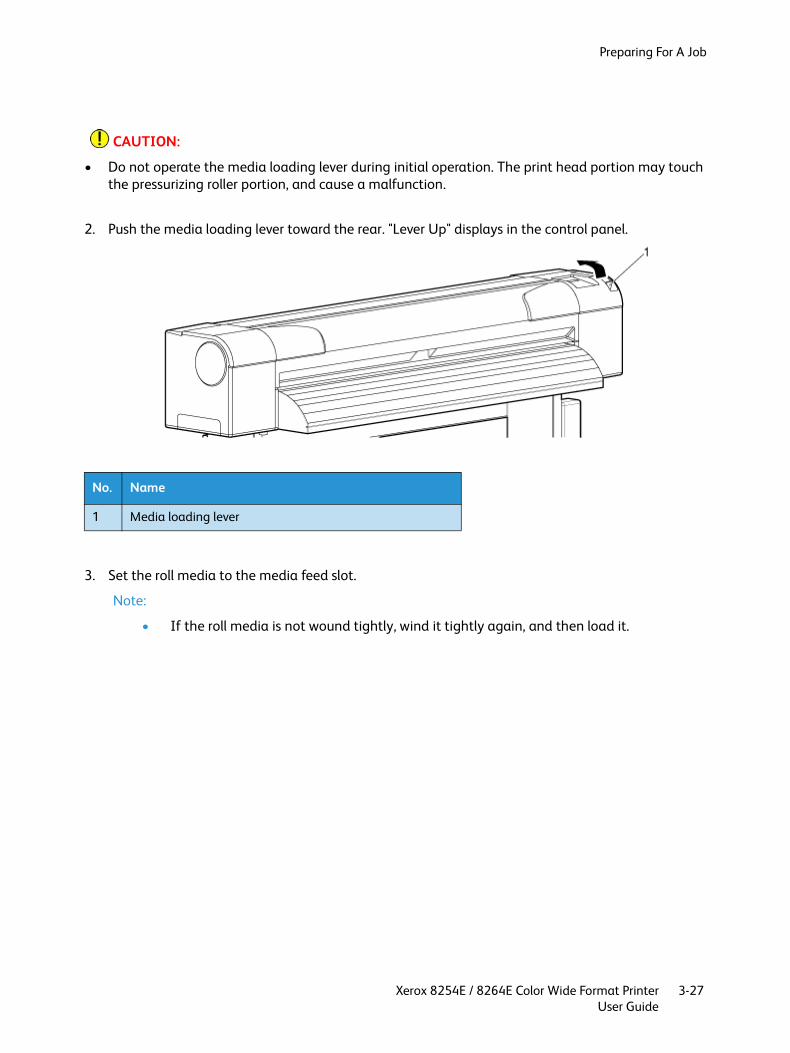
CAUTION:
• Do not operate the media loading lever during initial operation. The print head portion may touch the pressurizing roller portion, and cause a malfunction.
2. Push the media loading lever toward the rear. "Lever Up" displays in the control panel.
3. Set the roll media to the media feed slot.
Note:
• If the roll media is not wound tightly, wind it tightly again, and then load it.
No. Name
1 Media loading lever
Preparing For A Job
Xerox 8254E / 8264E Color Wide Format PrinterUser Guide
3-28
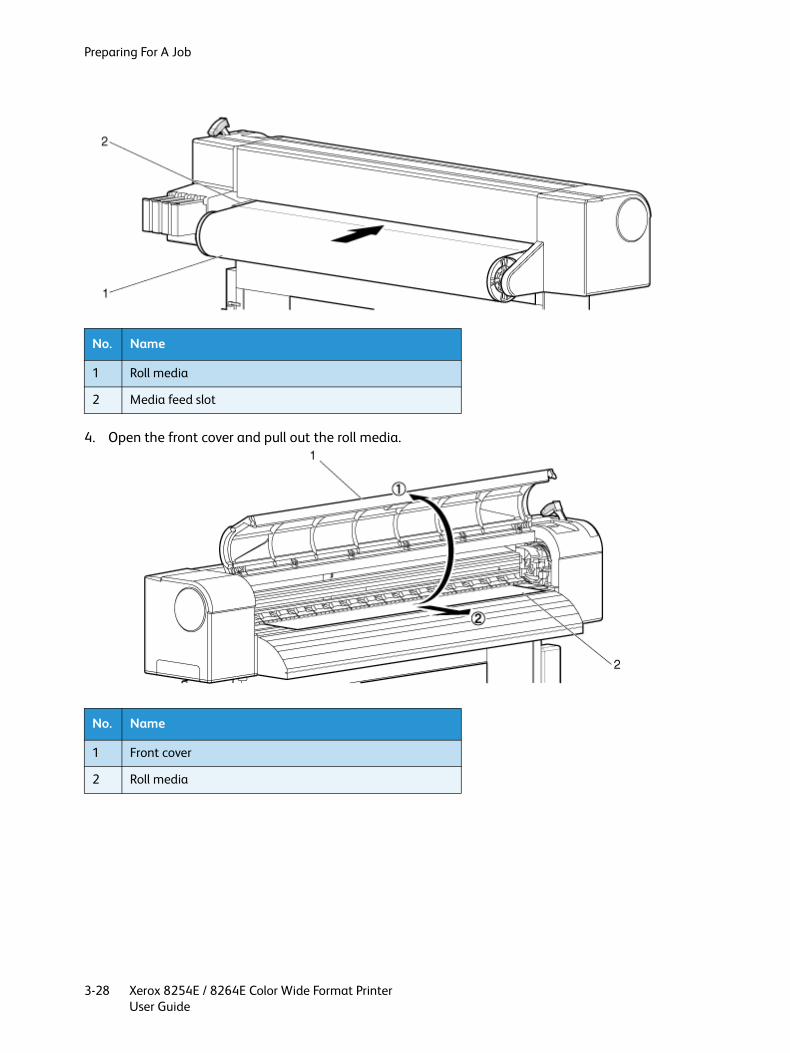
4. Open the front cover and pull out the roll media.
No. Name
1 Roll media
2 Media feed slot
No. Name
1 Front cover
2 Roll media
Preparing For A Job
Xerox 8254E / 8264E Color Wide Format PrinterUser Guide
3-29
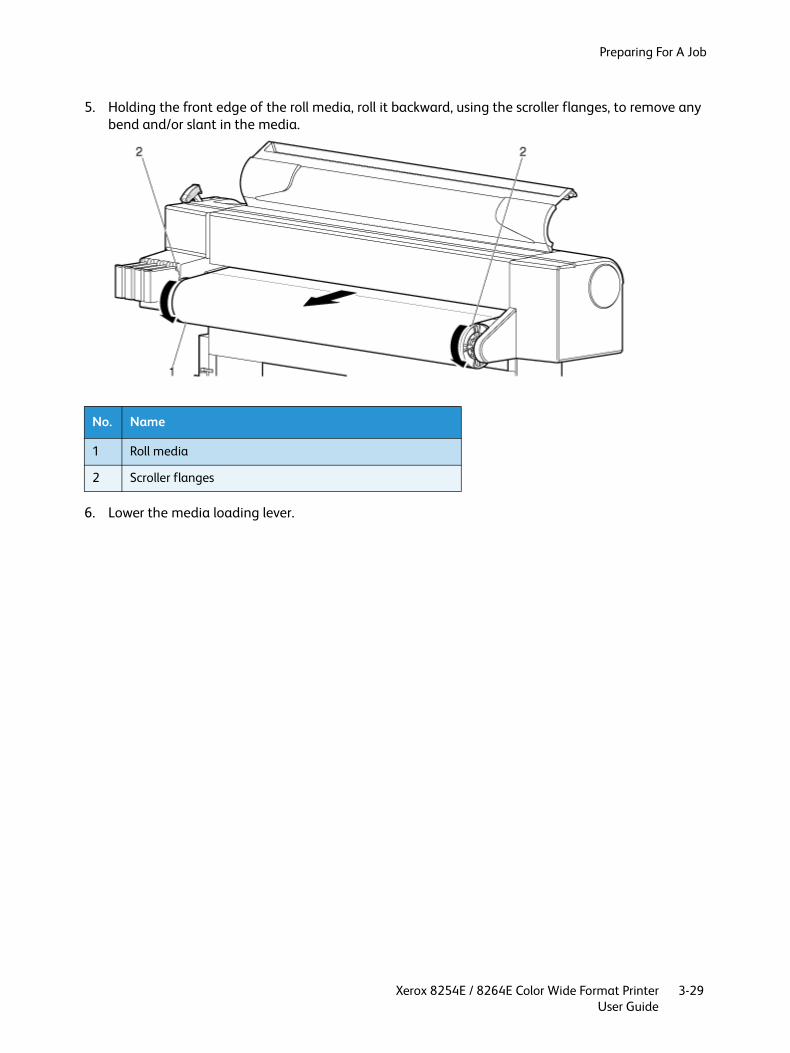
5. Holding the front edge of the roll media, roll it backward, using the scroller flanges, to remove any bend and/or slant in the media.
6. Lower the media loading lever.
No. Name
1 Roll media
2 Scroller flanges

Preparing For A Job
Xerox 8254E / 8264E Color Wide Format PrinterUser Guide
3-30
Notes:• When loading the new roll media, cut the front edge of the media if it is not straight.
– 8254E Cutting media when the Media Cut menu is set to “Manual”– 8254E Cutting media when the Media Cut menu is set to “Off”
• By default, the Media Cut feature is set to "Off" and it is not even visible among the menu selections. The operator must first turn on the display of the feature via the Selection menu. Then, he can select between "Manual" and "Off."
– Selection Menu (Setup item 5 of 7 total)7. Close the front cover.
No. Name
1 Media loading lever
No. Name
1 Front cover
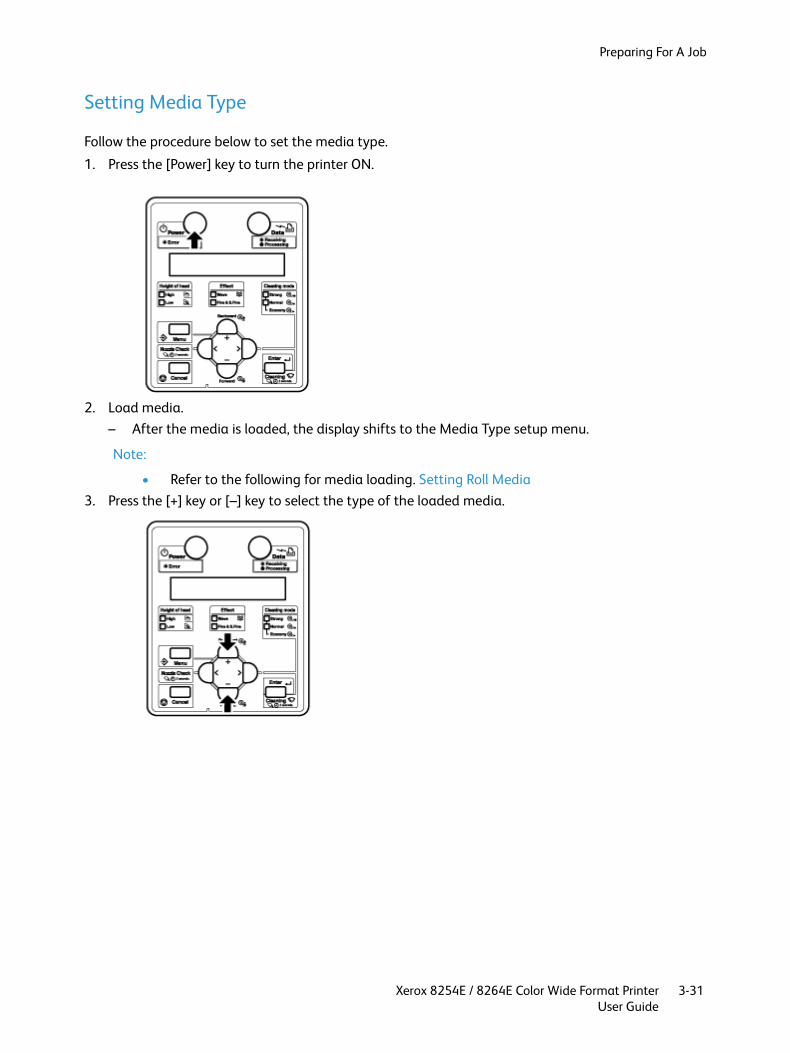
Preparing For A Job
Xerox 8254E / 8264E Color Wide Format PrinterUser Guide
3-31
Setting Media Type
Follow the procedure below to set the media type.
1. Press the [Power] key to turn the printer ON.
2. Load media.– After the media is loaded, the display shifts to the Media Type setup menu.
Note:
• Refer to the following for media loading. Setting Roll Media3. Press the [+] key or [–] key to select the type of the loaded media.

Preparing For A Job
Xerox 8254E / 8264E Color Wide Format PrinterUser Guide
3-32
4. Press the [Enter] key. "Media Initial" displays in the control panel.
– The media type is set.
– Media initial operation starts.
Notes:• If the following operations are performed in the media type setup menu, the printer
starts the media initial operation:– Pressing the [Cancel] key.– No keys on the control panel are pressed for ten seconds.
• Any time the media loading lever is raised then lowered, the printer will display "Media: Type x OK?" The "x" represents the printer’s default media type. From the factory that default is Type 1. Otherwise, the media type will be the last one that was used. If no keys are pressed, the printer will default to that media type. It will display "Media Initial." The print head will move across the width of the media and then display the media's width. Press any key and the display will return to "Ready to Print."– The control panel displays the Media Width.
5. If correct, press [Enter] or [Cancel]. "Ready to Print" displays in the control panel. 6. When using roll media, wind it backwards with the roll media scroller flanges until any slack is
removed.
This media loading procedure is complete.

Preparing For A Job
Xerox 8254E / 8264E Color Wide Format PrinterUser Guide
3-33
Test Printing
Follow the procedure below to perform test printing to confirm that the printer works correctly.
1. Press the [Power] key to turn the printer ON.
2. Load the roll media.Setting Roll Media
3. Confirm that "Ready to Print" is displayed in the control panel.4. Display the Test Print menu in the control panel by doing the following.
a. Press the [Menu] key. "Menu 1: Setup>" displays in the control panel.
b. Press the [+] key or [–] key to select "Menu2: Test Print>."
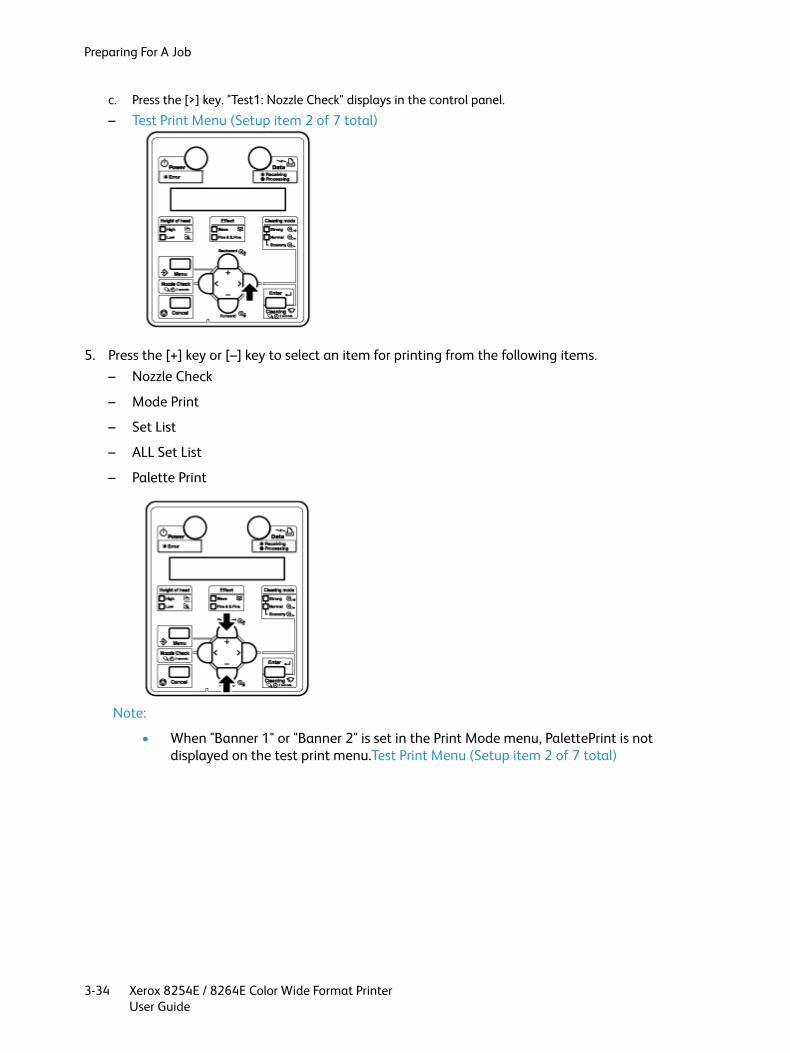
Preparing For A Job
Xerox 8254E / 8264E Color Wide Format PrinterUser Guide
3-34
c. Press the [>] key. "Test1: Nozzle Check" displays in the control panel.
– Test Print Menu (Setup item 2 of 7 total)
5. Press the [+] key or [–] key to select an item for printing from the following items.– Nozzle Check
– Mode Print
– Set List
– ALL Set List
– Palette Print
Note:
• When "Banner 1" or "Banner 2" is set in the Print Mode menu, PalettePrint is not displayed on the test print menu.Test Print Menu (Setup item 2 of 7 total)

Preparing For A Job
Xerox 8254E / 8264E Color Wide Format PrinterUser Guide
3-35
6. Press the [Enter] key.
– The printer begins generating a test print for the selected item.
Note:
• Refer to the following for details on each of the print list items.Nozzle Check through Color Palette
7. Repeat Step 4 and Step 5 when you are generating a test print for other items.8. Press the [Cancel] key to exit from Test Print. "Ready to Print" displays in the control panel.
Test printing is complete.
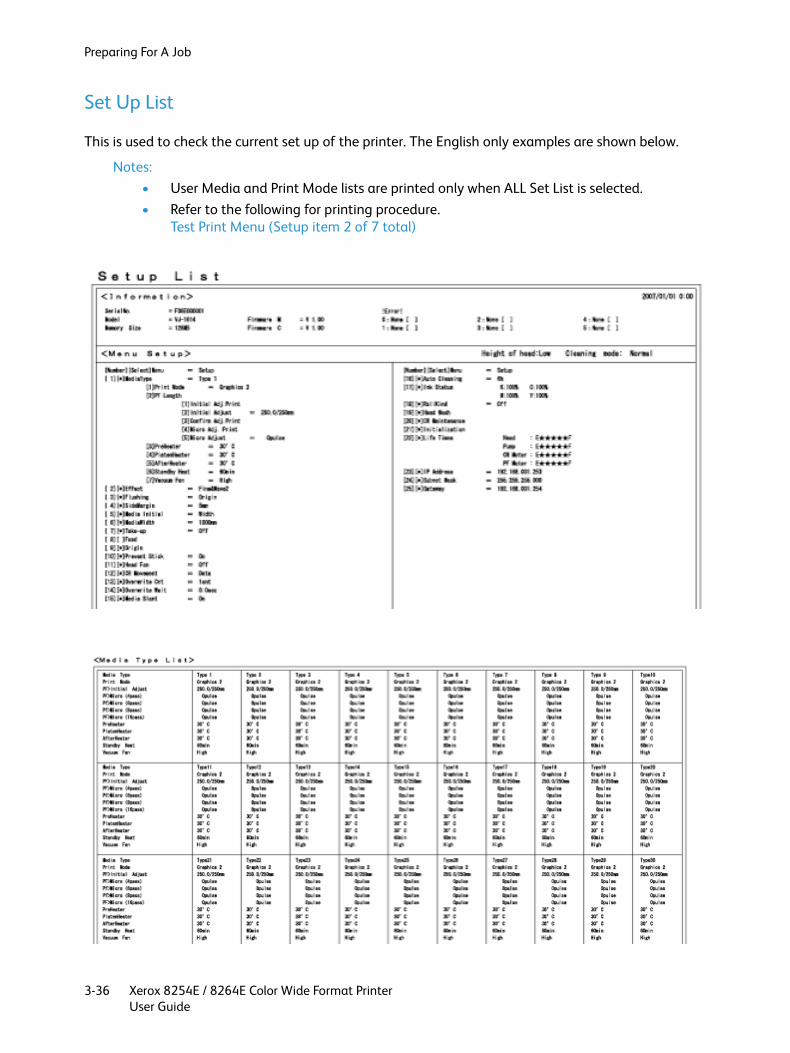
Preparing For A Job
Xerox 8254E / 8264E Color Wide Format PrinterUser Guide
3-36
Set Up List
This is used to check the current set up of the printer. The English only examples are shown below.
Notes:• User Media and Print Mode lists are printed only when ALL Set List is selected.• Refer to the following for printing procedure.
Test Print Menu (Setup item 2 of 7 total)
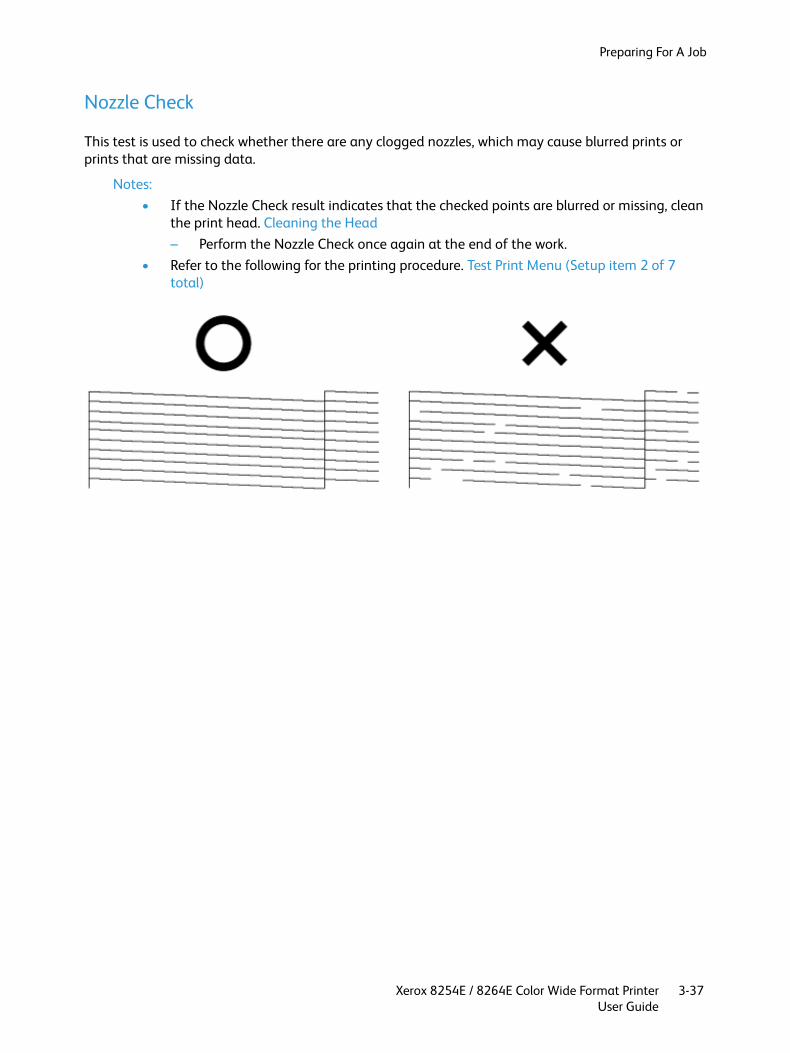
Preparing For A Job
Xerox 8254E / 8264E Color Wide Format PrinterUser Guide
3-37
Nozzle Check
This test is used to check whether there are any clogged nozzles, which may cause blurred prints or prints that are missing data.
Notes:• If the Nozzle Check result indicates that the checked points are blurred or missing, clean
the print head. Cleaning the Head– Perform the Nozzle Check once again at the end of the work.
• Refer to the following for the printing procedure. Test Print Menu (Setup item 2 of 7 total)
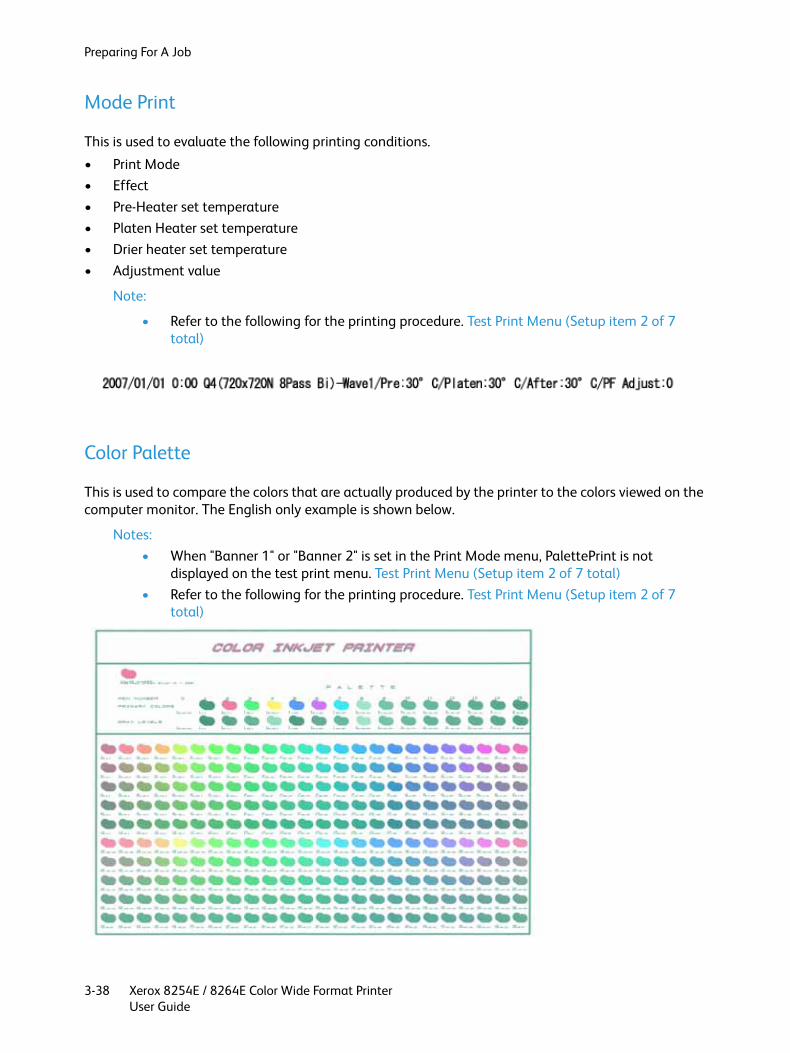
Preparing For A Job
Xerox 8254E / 8264E Color Wide Format PrinterUser Guide
3-38
Mode Print
This is used to evaluate the following printing conditions.
• Print Mode• Effect• Pre-Heater set temperature• Platen Heater set temperature• Drier heater set temperature• Adjustment value
Note:
• Refer to the following for the printing procedure. Test Print Menu (Setup item 2 of 7 total)
Color Palette
This is used to compare the colors that are actually produced by the printer to the colors viewed on the computer monitor. The English only example is shown below.
Notes:• When "Banner 1" or "Banner 2" is set in the Print Mode menu, PalettePrint is not
displayed on the test print menu. Test Print Menu (Setup item 2 of 7 total)• Refer to the following for the printing procedure. Test Print Menu (Setup item 2 of 7
total)

Preparing For A Job
Xerox 8254E / 8264E Color Wide Format PrinterUser Guide
3-39
Adjust Print
This is used for optimizing the image quality of prints.
Alignment must be set for each and every printing mode type.
After selecting the printing mode that you want to use, follow the procedure below to perform Alignment.
Note:
• This printer was adjusted at the factory to produce optimum print quality.You may have to adjust the print head if the print quality is reduced after the installation environment or the media has been changed.
1. Press the [Power] key to turn the printer ON. "Ready to Print" displays in the control panel2. Load the roll media.
.Setting Roll Media3. Display the Printing mode menu in the control panel by doing the following.
a. Press the [Menu] key. "Menu 1: Setup>" displays in the control panel.
b. Press the [>] key. "Set1: MediaType" displays in the control panel.

Preparing For A Job
Xerox 8254E / 8264E Color Wide Format PrinterUser Guide
3-40
c. Press the [Enter] key. "Media: Type 1" displays in the control panel.
d. Press the [+] key or [–] key to select the media type to use.
e. Press the [Enter] key. "**>1: Print Mode" displays in the control panel.
Note:
• The selected media (Type 1 to 30) is displayed in "**". Media Type Menu

Preparing For A Job
Xerox 8254E / 8264E Color Wide Format PrinterUser Guide
3-41
f. Press the [Enter] key. "Mode: Graphics 2 – >" displays in the control panel. Print Mode menu
4. Select the printing mode that you want to use.a. Press the [+] key or [–] key to select the printing mode to use.
b. Press the [Cancel] key several times. "Ready to Print" displays in the control panel.
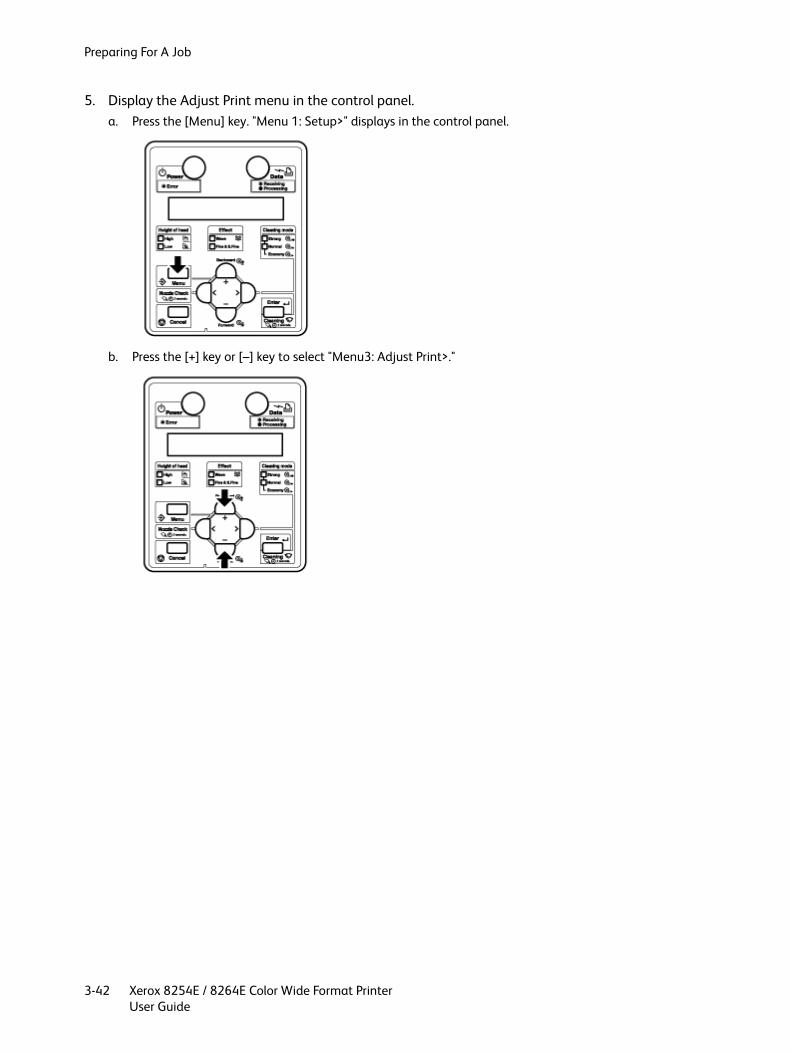
Preparing For A Job
Xerox 8254E / 8264E Color Wide Format PrinterUser Guide
3-42
5. Display the Adjust Print menu in the control panel.a. Press the [Menu] key. "Menu 1: Setup>" displays in the control panel.
b. Press the [+] key or [–] key to select "Menu3: Adjust Print>."

Preparing For A Job
Xerox 8254E / 8264E Color Wide Format PrinterUser Guide
3-43
c. Press the [>] key. "Adj.1: Confirm" displays in the control panel. Adjust Print Menu (Setup item 3 of 7 total)
6. Press the [Enter] key.
• A confirmation pattern for quality adjustment is printed.
• After the confirmation pattern is printed, "Adj.1: Confirm" displays in the control panel.
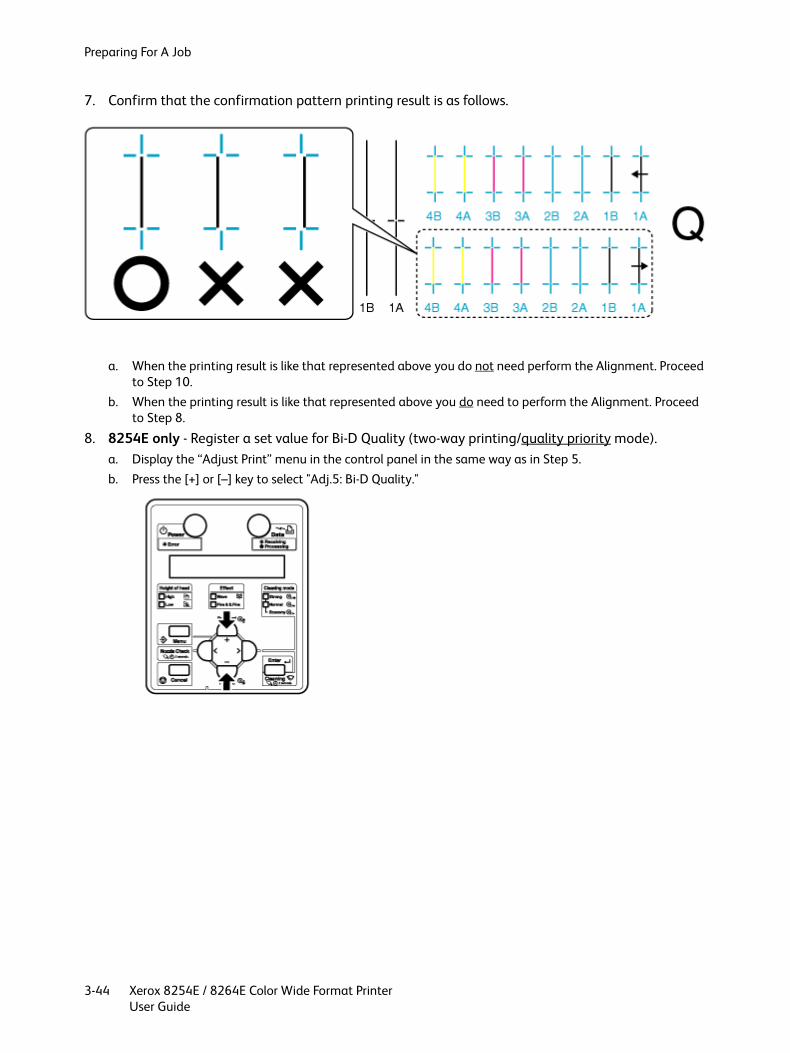
Preparing For A Job
Xerox 8254E / 8264E Color Wide Format PrinterUser Guide
3-44
7. Confirm that the confirmation pattern printing result is as follows.
a. When the printing result is like that represented above you do not need perform the Alignment. Proceed to Step 10.
b. When the printing result is like that represented above you do need to perform the Alignment. Proceed to Step 8.
8. 8254E only - Register a set value for Bi-D Quality (two-way printing/quality priority mode).a. Display the “Adjust Print” menu in the control panel in the same way as in Step 5.b. Press the [+] or [–] key to select "Adj.5: Bi-D Quality."
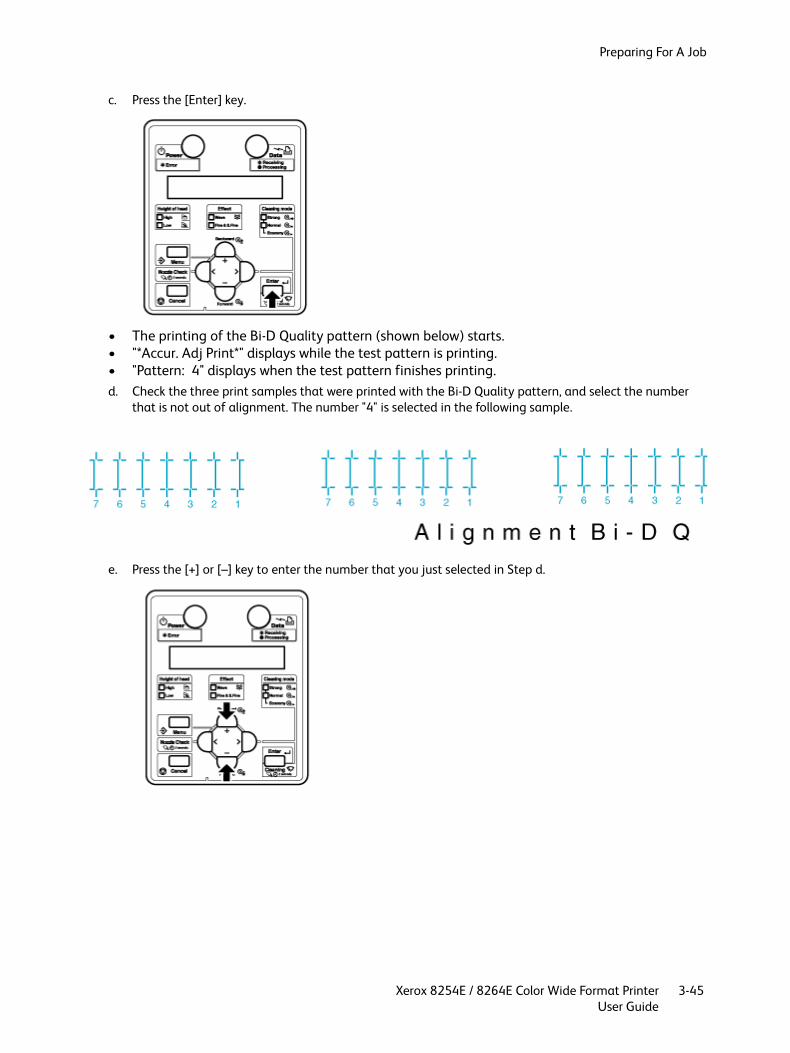
Preparing For A Job
Xerox 8254E / 8264E Color Wide Format PrinterUser Guide
3-45
c. Press the [Enter] key.
• The printing of the Bi-D Quality pattern (shown below) starts. • "*Accur. Adj Print*" displays while the test pattern is printing.• "Pattern: 4" displays when the test pattern finishes printing.d. Check the three print samples that were printed with the Bi-D Quality pattern, and select the number
that is not out of alignment. The number "4" is selected in the following sample.
e. Press the [+] or [–] key to enter the number that you just selected in Step d.
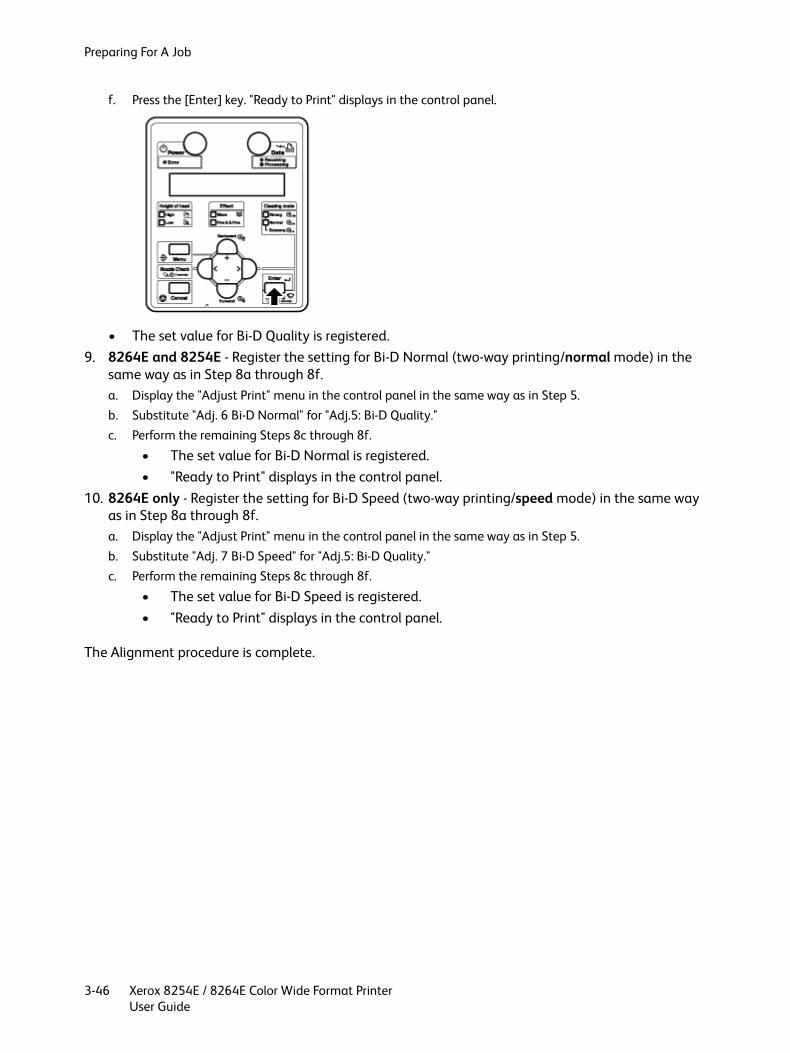
Preparing For A Job
Xerox 8254E / 8264E Color Wide Format PrinterUser Guide
3-46
f. Press the [Enter] key. "Ready to Print" displays in the control panel.
• The set value for Bi-D Quality is registered.9. 8264E and 8254E - Register the setting for Bi-D Normal (two-way printing/normal mode) in the
same way as in Step 8a through 8f.a. Display the "Adjust Print" menu in the control panel in the same way as in Step 5.b. Substitute "Adj. 6 Bi-D Normal" for "Adj.5: Bi-D Quality."c. Perform the remaining Steps 8c through 8f.
• The set value for Bi-D Normal is registered.• "Ready to Print" displays in the control panel.
10. 8264E only - Register the setting for Bi-D Speed (two-way printing/speed mode) in the same way as in Step 8a through 8f.a. Display the "Adjust Print" menu in the control panel in the same way as in Step 5.b. Substitute "Adj. 7 Bi-D Speed" for "Adj.5: Bi-D Quality."c. Perform the remaining Steps 8c through 8f.
• The set value for Bi-D Speed is registered.• "Ready to Print" displays in the control panel.
The Alignment procedure is complete.
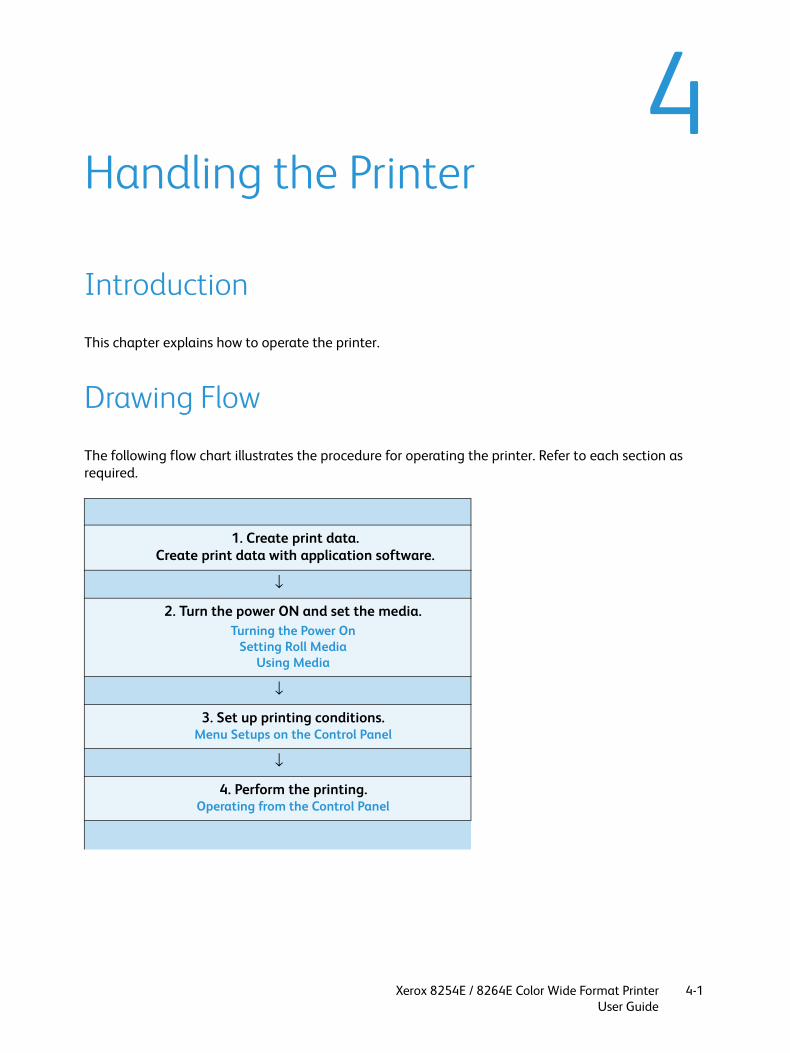
Xerox 8254E / 8264E Color Wide Format PrinterUser Guide
4-1
4Handling the Printer
Introduction
This chapter explains how to operate the printer.
Drawing Flow
The following flow chart illustrates the procedure for operating the printer. Refer to each section as required.
1. Create print data. Create print data with application software.
↓
2. Turn the power ON and set the media. Turning the Power On
Setting Roll Media Using Media
↓
3. Set up printing conditions. Menu Setups on the Control Panel
↓
4. Perform the printing. Operating from the Control Panel

Handling the Printer
Xerox 8254E / 8264E Color Wide Format PrinterUser Guide
4-2
WARNINGS:• Do not store combustible materials on the platen. It could lead to fire.• Do not spill flammable liquid over the platen. This could lead to fire.
CAUTIONS:• Do not touch the media guide during printing. It is hot and may cause a burn.• Do not touch the media feed slot, platen or media guide while heaters are operating. They are hot
and may cause a burn.• Keep the work area well-ventilated. This will help to prevent fire and odor.
Notes:• Do not open the front cover during printing. If the front cover is opened, printing will be
interrupted.• Printing restarts if you close the front cover. However, the interruption may cause a loss
in print quality.

Handling the Printer
Xerox 8254E / 8264E Color Wide Format PrinterUser Guide
4-3
Printer Status
This chapter explains printer status.
Ready to Print
Printing is possible when media is loaded. The various functions for printing can be performed on the control panel.
Setup Menu Display
The various settings and functions regarding printing can be made from the control panel.The display contents in the LCD monitor of the control panel are as follows.
Changing Printer Status
Follow the procedure below to change printer status.
1. Changing Standard menu display to Setup menu display– Press the [Menu] key when "Ready to Print" is displayed. "Menu 1: Setup>" displays in the
control panel.
Note:
• For details regarding the Setup menu, refer to Menu Setups on the Control Panel.
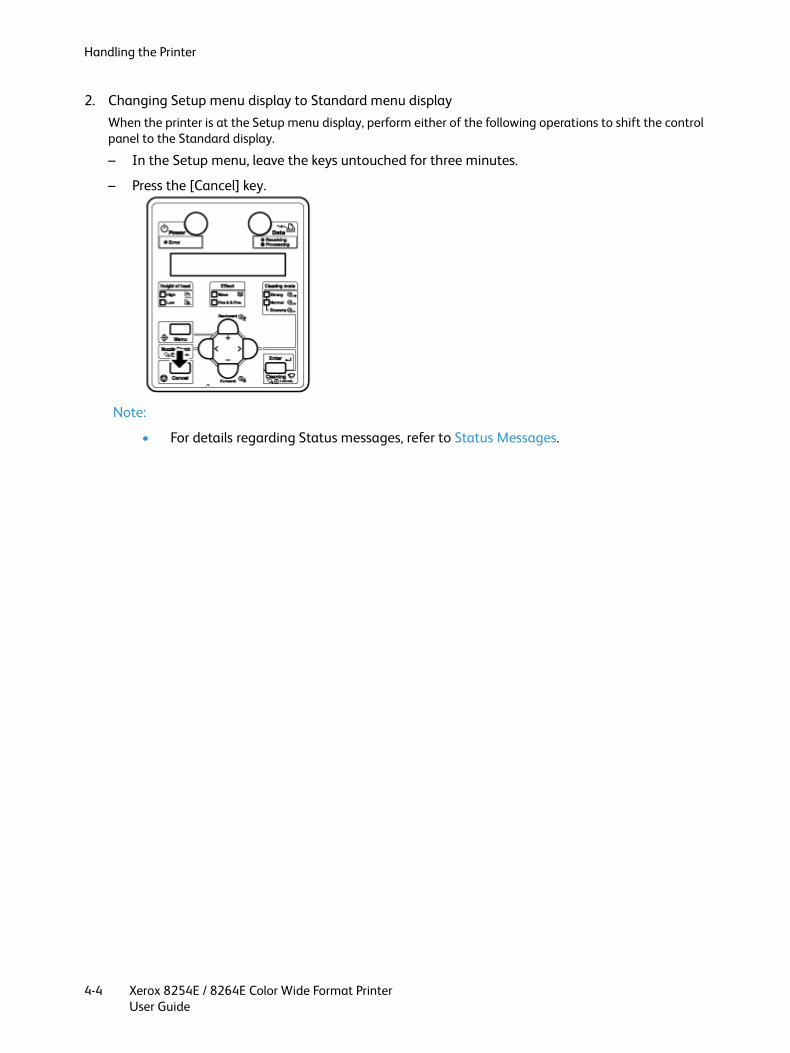
Handling the Printer
Xerox 8254E / 8264E Color Wide Format PrinterUser Guide
4-4
2. Changing Setup menu display to Standard menu displayWhen the printer is at the Setup menu display, perform either of the following operations to shift the control panel to the Standard display.
– In the Setup menu, leave the keys untouched for three minutes.
– Press the [Cancel] key.
Note:
• For details regarding Status messages, refer to Status Messages.
Handling the Printer
Xerox 8254E / 8264E Color Wide Format PrinterUser Guide
4-5
Using Media
This section explains details of available media for this printer.
Media Type
The type and quality of media greatly influence the print result. Use media that matches the application, taking the following information into account.
Various recommended media are prepared for this printer. Select the appropriate media according to the usage.
Notes:• For details on recommended media, contact your local Xerox dealer.• If failures or malfunctions of the printer occur through the use of non-recommended
media:• The printer will not be covered by the warranty and repair expenses will be paid by the
customer.• For details, refer to the following sections.
Maintenance and Troubleshooting• To request a repair, contact your local Xerox dealer.• When printing on non-recommended media:• Refer to the manual that may have been provided with the media or ask about
appropriate printer settings for the media at the retail location where the media was purchased.
• Set the print quality according to Media Type Menu.
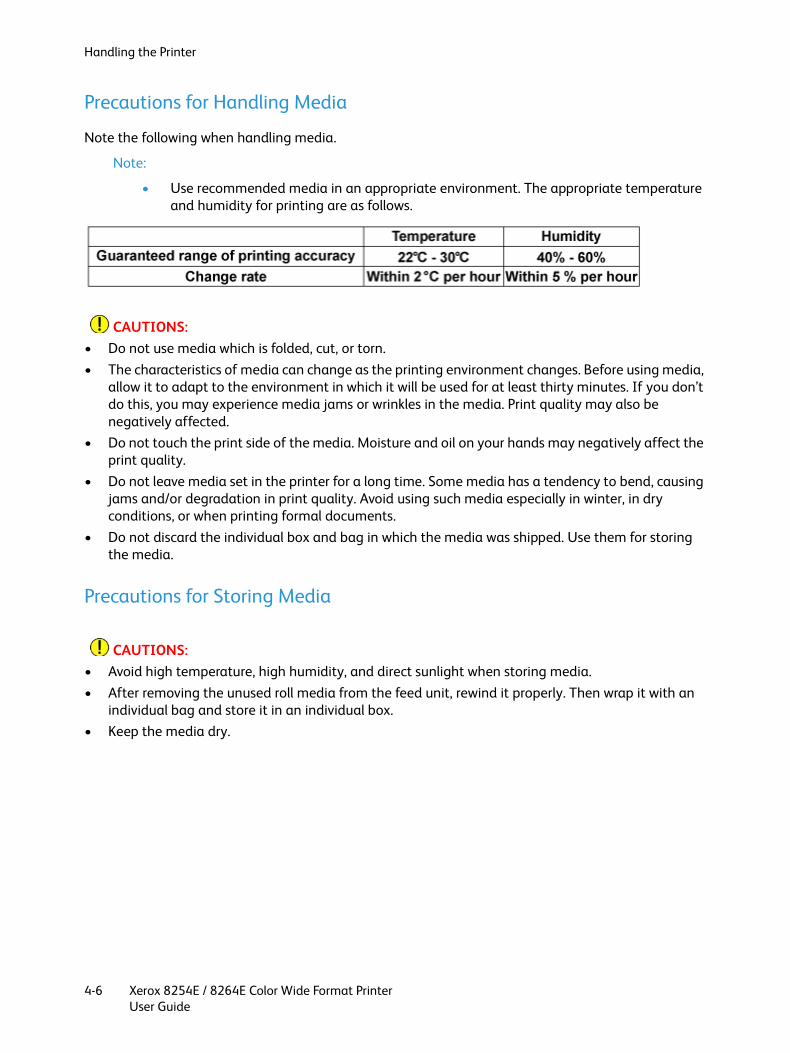
Handling the Printer
Xerox 8254E / 8264E Color Wide Format PrinterUser Guide
4-6
Precautions for Handling Media
Note the following when handling media.
Note:
• Use recommended media in an appropriate environment. The appropriate temperature and humidity for printing are as follows.
CAUTIONS:• Do not use media which is folded, cut, or torn.• The characteristics of media can change as the printing environment changes. Before using media,
allow it to adapt to the environment in which it will be used for at least thirty minutes. If you don’t do this, you may experience media jams or wrinkles in the media. Print quality may also be negatively affected.
• Do not touch the print side of the media. Moisture and oil on your hands may negatively affect the print quality.
• Do not leave media set in the printer for a long time. Some media has a tendency to bend, causing jams and/or degradation in print quality. Avoid using such media especially in winter, in dry conditions, or when printing formal documents.
• Do not discard the individual box and bag in which the media was shipped. Use them for storing the media.
Precautions for Storing Media
CAUTIONS:• Avoid high temperature, high humidity, and direct sunlight when storing media.• After removing the unused roll media from the feed unit, rewind it properly. Then wrap it with an
individual bag and store it in an individual box.• Keep the media dry.

Handling the Printer
Xerox 8254E / 8264E Color Wide Format PrinterUser Guide
4-7
Printing area
8264E Printing area
The printable area of the 8264E printer is as follows.
8254E Printing area
The printable area of the 8254E printer is as follows.
Handling the Printer
Xerox 8254E / 8264E Color Wide Format PrinterUser Guide
4-8
Head Height Adjustment
Using a high printing rate or using strongly-curved media can cause the print head to rub on the media. Changing the head height may allow you to avoid this problem.
Follow the procedure below to change the head height.
When raising the print head
CAUTION:
• If the head height adjustment lever is raised, high print quality is not guaranteed.• Do not open the front cover or change the head height during printing. If the head height is
changed, the alignment will be changed and high print quality will not be guaranteed.

Handling the Printer
Xerox 8254E / 8264E Color Wide Format PrinterUser Guide
4-9
1. Open the front cover.
8264E
8254E
2. After reading the caution below, change the head height by moving the orange head height adjustment lever upward, as shown in the following illustration.
CAUTION:
• Do not raise the head height adjustment lever higher than the 90° position shown below. Doing so may damage the printer.
No. Name
1 Front cover

Handling the Printer
Xerox 8254E / 8264E Color Wide Format PrinterUser Guide
4-10
8264E
8254E
The High lamp on the control panel lights up in green.
3. Close the front cover.
No. Name
1 Head height adjustment lever

Handling the Printer
Xerox 8254E / 8264E Color Wide Format PrinterUser Guide
4-11
8264E
8254E
When returning the print head to the original position
CAUTION:
• Do not open the front cover or change the head height during printing. If the head height is changed, the alignment will be changed and high print quality will not be guaranteed.
No. Name
1 Front cover

Handling the Printer
Xerox 8254E / 8264E Color Wide Format PrinterUser Guide
4-12
1. Open the front cover.
8264E
8254E
No. Name
1 Front cover

Handling the Printer
Xerox 8254E / 8264E Color Wide Format PrinterUser Guide
4-13
2. Change the head height by moving the orange head height adjustment lever downward.
8264E
8254E
• The Low lamp on the control panel lights up in green.
No. Name
1 Head height adjustment lever
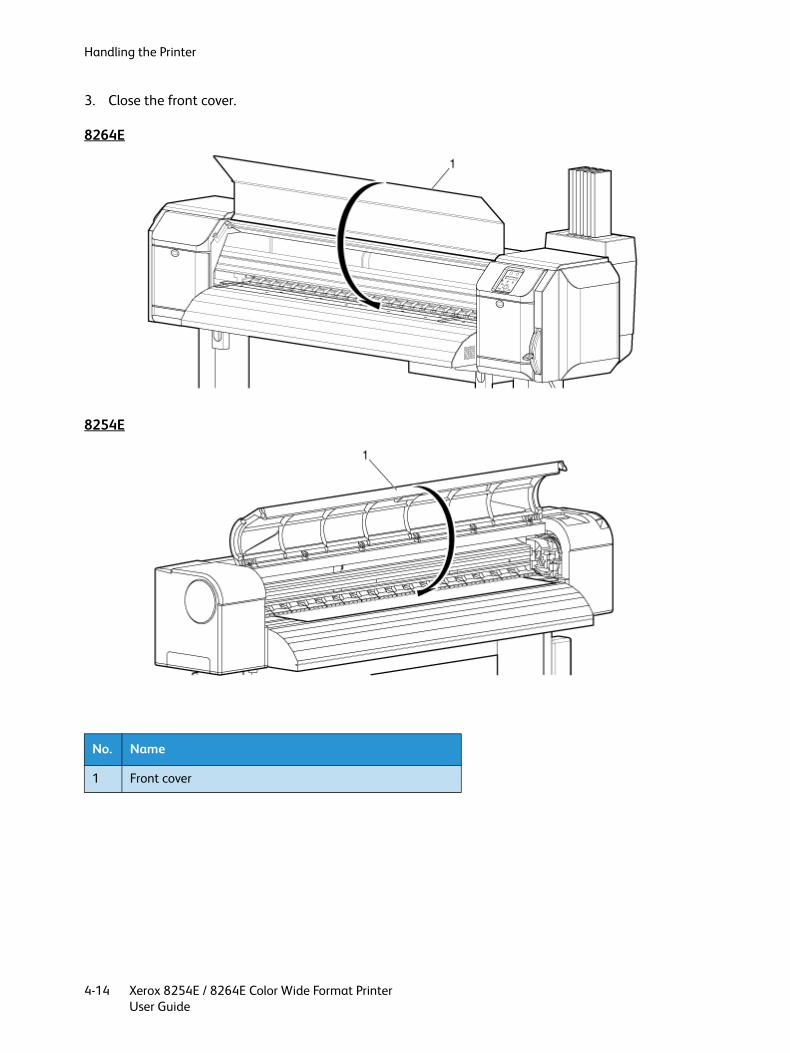
Handling the Printer
Xerox 8254E / 8264E Color Wide Format PrinterUser Guide
4-14
3. Close the front cover.
8264E
8254E
No. Name
1 Front cover

Handling the Printer
Xerox 8254E / 8264E Color Wide Format PrinterUser Guide
4-15
Menu Overview
This section explains the printer’s many menus.
Pressing the [Menu] key causes the first of seven main menus ("Menu1: Setup>") to appear in the control panel’s display.
Pressing the [-] or [+] keys allows you to increment up or down to each of the other six main menus in the left column below. (The > character after a main menu name indicates that there are sub-menus under that main menu.)
CAUTION:
• The values displayed within the < > marks in each list are the factory default settings (i.e., the initial values)
Main Menu Description
Setup menu Allows you to configure various printer settings. Setup menu Setup item 1 of 7 total)
Test Print menu Allows you to perform Nozzle Check of the print head, Color Palette, and setup list. Test Print Menu (Setup item 2 of 7 total)
Adjust Print menu Allows you to print test patterns used for Alignment when adjusting the printer for optimum print quality. Adjust Print Menu (Setup item 3 of 7 total)
Cleaning menu Allows you to perform print Head cleaning. Cleaning Menu (Setup item 4 of 7 total)
Selection menu Allows you to control the contents of the Setup display menus. Selection Menu (Setup item 5 of 7 total)
Version menu Allows you to display the version of the firmware. Version Menu (Setup item 6 of 7 total)
Sleep Mode menu Allows you to configure Sleep Mode settings. Sleep Mode Menu (Setup item 7 of 7 total)

Handling the Printer
Xerox 8254E / 8264E Color Wide Format PrinterUser Guide
4-16
Setup menu Setup item 1 of 7 total)
Allows you to set up the various configuration settings of the printer.
From the "Menu1: Setup>" display, press the [>] key. This takes you to the first sub-menu titled "Set1: Media Type." Pressing the [-] and [+] keys allows you to increment up or down to each of the Setup items in the left column below.
Note:
• Whether a specific sub menu of the Setup menu will actually be displayed is determined by whether or not it has been selected in the Selection menu. Selection Menu (Setup item 5 of 7 total)
Setup item Description
Media Type Sets up the media type to print.•Pressing the [Enter] key shifts to the sub menu. Media Type Menu
Effect Sets up the Effect menu.•Pressing the [Enter] key shifts to the sub menu. Effect Menu
Flushing Sets up the Flushing operation while printing.•Pressing the [Enter] key shifts to the sub menu. Flushing Menu
Side Margin Specifies the right and left margins of the printed media.•Pressing the [Enter] key shifts to the sub menu. Side Margin Menu
Media Initial Specifies whether to perform media detection when initializing the media. This detects the width and front edge of the media when initializing the media.•Pressing the [Enter] key shifts to the sub menu. Media Initial Menu
Media Width If media detection is not performed during media initialization, this specifies the media width between the loading mark and the left edge of the media.If media detection is performed during media initialization, this displays the detected media width.•Pressing the [Enter] key shifts to the sub menu. Media Width Menu
Take-up Sets the operation of the optional winding unit.•Pressing the [Enter] key shifts to the sub menu. Take-up menu
Origin Sets the location at which the printing of the data begins (i.e., the origin).•Pressing the [Enter] key shifts to the sub menu. Origin Menu

Handling the Printer
Xerox 8254E / 8264E Color Wide Format PrinterUser Guide
4-17
Prev. Stick Sets up to prevent media from sticking when printing starts.•Pressing the [Enter] key shifts to the sub menu.Prev. Stick Menu
8264E only - Head Fan Sets up head fan operation.•Pressing the [Enter] key shifts to the sub m4.6.1enu. 8264E only - Head Fan Menu
CR Movement Sets up the range over which the print head moves while printing.•Pressing the [Enter] key shifts to the sub menu. CR Movement Menu
Overwrite Cnt Sets up the overwrite count per line.•Pressing the [Enter] key shifts to the sub menu. Overwrite Cnt Menu
Overwrite Wait Sets up the waiting time while overwrite printing.•Pressing the [Enter] key shifts to the sub menu. Overwrite Wait Menu
Slant Check Sets up media slant detection during media loading.•Pressing the [Enter] key shifts to the sub menu. Slant Check Menu
Auto Cleaning Sets up the time for auto cleaning during printing.•Pressing the [Enter] key shifts to the sub menu. Auto Cleaning Menu
Ink Status Displays the status of the ink cartridges installed in the ink cartridge slots.•Pressing the [Enter] key shifts to the sub menu. Ink Status Menu
Roll Length Sets up the roll media length.•Pressing the [Enter] key shifts to the sub menu. Roll Length Menu
Head Wash Performs print head washing.•Pressing the [Enter] key shifts to the sub menu. Head Wash Menu
CR Maintenance Performs maintenance.•Pressing the [Enter] key shifts to the sub menu. CR Maintenance Menu
Initialization Returns the printer to its default settings.•Pressing the [Enter] key shifts to the sub menu. Initialization Menu
Life Times Displays the operational life time of each part.•Pressing the [Enter] key shifts to the sub menu. Life Times Menu
Setup item Description

Handling the Printer
Xerox 8254E / 8264E Color Wide Format PrinterUser Guide
4-18
IP Address Sets the IP address of the printer.•Pressing the [Enter] key shifts to the sub menu. IP Address Menu
Subnet Mask Sets the subnet mask of the printer.•Pressing the [Enter] key shifts to the sub menu. Subnet Mask Menu
Gateway Sets the gateway.•Pressing the [Enter] key shifts to the sub menu.Gateway Menu
8254E only - Front Interlace
Sets the front treatment function.•Pressing the [Enter] key shifts to the sub menu. 8254E only- Front Interlace
8254E only - Media Cut Sets the media cutting operations after finishing printing.•Pressing the [Enter] key shifts to the sub menu. 8254E only - Media Cut Menu
Temporary Temporarily displays all of the settings in the Selection menu in the Setup menu.•Pressing the [Enter] key returns to the previous menu with all set up items displayed.•Pressing the [Cancel] key returns to the previous status in the Selection menu when the Setup menu is displayed. Selection Menu (Setup item 5 of 7 total)
— •Pressing the [Cancel] key shifts to the previous menu.
Setup item Description

Handling the Printer
Xerox 8254E / 8264E Color Wide Format PrinterUser Guide
4-19
Media Type Menu
Allows you to set up the media type on which to print.
User media menu
Allows you to set up the configuration of various settings for the media being used. Configurations can be set for thirty different media in the User media menu.
Notes:• If media other than a recommended one is used, the following problems may occur.
– Media detection error– Slant, snag and wrinkle of media– Media jams– Favorable print quality cannot be obtained due to blots, blurs or dirt.– End detection of roll media cannot be performed.
• The problems caused by the use of unapproved media will not be covered by the warranty and repair expenses will be paid by the customer. For details, contact your local Xerox dealer.
Setup item Setting Description
Media Type 1 Allows you to setup configuration for the media type on which to print.It is possible to set 30 different user settings as Type 1 to 30 for printing.•Pressing the [Enter] key shifts to the sub menu. User media menu
Type 2
…
Type 29
Type 30
—•Pressing the [Cancel] key saves the setting and shifts to the previous menu. Setup menu Setup item 1 of 7 total)

Handling the Printer
Xerox 8254E / 8264E Color Wide Format PrinterUser Guide
4-20
Print Mode menu
Allows you to set up the settings for print quality (print mode) according to the usage of print data or print speed.
Note:
• When "Banner 1" or "Banner 2" is set in the Print Mode menu, PalettePrint is not displayed in the Test Print menu.
Setup item Setting Description
Type 1 to Type 30 Print Mode Sets up the print mode according to the usage of print data or print speed.•Pressing the [Enter] key shifts to the sub menu.Print Mode menu
PF Adjust Allows configuration of various Media feed compensation settings.•Pressing the [>] key: shifts to the sub menu. PF Adjust menu
Pre-Heater Sets up the Pre-Heater temperature.•Pressing the [Enter] key shifts to the sub menu.Pre-Heater Menu
Platen Heater Sets up the Platen Heater temperature.•Pressing the [Enter] key shifts to the sub menu. Platen Heater menu
After Heater Sets up the After Heater temperature.•Pressing the [Enter] key shifts to the sub menu. After Heater menu
Standby Heating Sets up the length of time to preheat the heater while the printer is in standby mode.•Pressing the [Enter] key shifts to the sub menu. Standby Heating Menu
Vacuum Fan Sets up the vacuum fan operation.•Pressing the [Enter] key shifts to the sub menu. Vacuum Fan Menu
—•Pressing the [Cancel] key shifts to the previous menu. Media Type Menu

Handling the Printer
Xerox 8254E / 8264E Color Wide Format PrinterUser Guide
4-21
Test Print Menu (Setup item 2 of 7 total)
Details of Print Mode
The settings for print quality registered in each print mode are as follows.
Setup item Setting Description
Mode Quality 1 Sets up print mode.•Quality 1 to 4:Sets up to perform high quality printing.
•Graphics 1 to 2:Sets up to perform standard printing.
•Banner 1 to 4:Sets up to perform high speed printing.Displays details of each print mode while pressing the [>] key. Details of print mode (immediately below)
Quality 2
Quality 3
Quality 4
Graphics 1
<Graphics 2>
Banner 1
Banner 2
Banner 3
Banner 4
—
•Pressing the [Enter] key saves the setting and shifts to the previous menu.•Pressing the [Cancel] key cancels the setting and shifts to the previous menu. User media menu
Print Mode Resolution Print speed Passes Direction
Quality 1 1440× 1440 dpi
Q (high quality)
16 times Uni (unilateral)
Quality 2 1440× 720 dpi
Q (high quality)
8 times Uni (unilateral)
Quality 3 720× 720 dpi Q (high quality)
8 times Uni (unilateral)
Quality 4 720× 720 dpi Q (high quality)
8 times Bi (bidirectional)
Graphics 1 720× 720 dpi N (normal) 8 times Uni (unilateral)
Graphics 2 720× 720 dpi N (normal) 8 times Bi (bidirectional)
Banner 1 540× 720 dpi N (normal) 6 times Uni (unilateral)
Banner 2 540× 720 dpi N (normal) 6 times Bi (bidirectional)

Handling the Printer
Xerox 8254E / 8264E Color Wide Format PrinterUser Guide
4-22
PF Adjust menu
Allows you to configure various settings on the Media feed compensation.
Banner 3 720× 720 dpi Q (high quality)
4 times Uni (unilateral)
Banner 4 720× 720 dpi N (normal) 4 times Bi (bidirectional)
Setup item Setting Description
PF Initial Print Performs Initial Adjust Print.•Pressing the [Enter] key shifts to the sub menu. (1) Initial Print menu, immediately below
Initial Change Sets up Initial Adjust Change.•Pressing the [Enter] key shifts to the sub menu. (2) Initial Change menu, immediately below
Confirm Print Performs Confirm Print.•Pressing the [Enter] key shifts to the sub menu. (3) Confirm Print menu, immediately below
Micro Print Performs Micro Adjustment Print.•Pressing the [Enter] key shifts to the sub menu. (4) Micro Print menu, immediately below
Micro Change Active during printing operation.Sets up Micro Adjustment Change.•Pressing the [Enter] key shifts to the sub menu. (5) Micro Change menu, immediately below
—•Pressing the [Cancel] key shifts to the previous menu. User media menu
Print Mode Resolution Print speed Passes Direction

Handling the Printer
Xerox 8254E / 8264E Color Wide Format PrinterUser Guide
4-23
1. Initial Print menu
Allows you to set up Initial Adjust Print.
2. Initial Change menu
Allows you to set up Initial Adjust Change.
Setup item Setting Description
Feed Length 100mm to <250mm> to 500mm
Changes the feed length of the media for the Initial Adjust Print.•Pressing the [Enter] key determines the setting."Printing" displays in the control panel and the printing of the Initial Adjust Print begins.After printing, "Ready to Print" displays in the control panel.
—•Pressing the [Cancel] key cancels the setting and shifts to the previous menu. PF Adjust menu
Setup item Setting Description
Init. 200.0mm to <250.0mm> to 300.0mm
Sets up Initial Adjust Change.
—
•Pressing the [Enter] key saves the setting and shifts to the previous menu.•Pressing the [Cancel] key cancels the setting and shifts to the previous menu.PF Adjust menu

Handling the Printer
Xerox 8254E / 8264E Color Wide Format PrinterUser Guide
4-24
3. Confirm Print menu
Allows you to perform Confirm Print.
4. Micro Print menu
Allows you to perform Micro Adjustment Print.
5. Micro Change menu
Allows you to set up Micro Adjustment Change.
Setup item Setting Description
Feed Length 100mm to <250mm> to 500mm
Changes the feed length of the media for the Confirm Print.•Pressing the [Enter] key determines the setting."Printing" displays in the control panel and the printing of the Confirm Print begins.After printing, "Ready to Print" displays in the control panel.
—•Pressing the [Cancel] key cancels the setting and shifts to the previous menu. PF Adjust menu
Setup item Setting Description
Micro Print Printing Prints the PF pattern (micro adjustment) with a focus on the Micro Adjustment Value.•Printing interval: ±1 pulse
—
•Pressing the [Cancel] key shifts to the previous menu.Stops printing and returns to the previous menu if printing is in progress. Setup menu Setup item 1 of 7 total)
Setup item Setting Description
Micro –20pulse to <0pulse> to 20pulse
Set up Micro Adjustment Change.
—
•Pressing the [Enter] key saves the setting and shifts to the previous menu.•Pressing the [Cancel] key cancels the setting and shifts to the previous menu. Setup menu Setup item 1 of 7 total)

Handling the Printer
Xerox 8254E / 8264E Color Wide Format PrinterUser Guide
4-25
Pre-Heater Menu
Allows you to set up the Pre-Heater temperature to preheat the media before printing. This control is active during printing operation.
Note:
• The preset temperature of the Pre-Heater varies, depending on the media.For the preset temperature of the Pre-Heater, contact your local Xerox Sales Representative for a recommended media list.
Platen Heater menu
Allows you to set up the Platen Heater temperature to warm up ink and improve print quality. This control is active during printing operation.
Note:
• The preset temperature of the Platen Heater varies, depending on the media.For the preset temperature of the Platen Heater, contact your local Xerox Sales Representative for a recommended media list.
Setup item Setting Description
PreHeater Off / <30° C> to 50° C Sets up the Pre-Heater temperature.
1. Roll media2. Pre-Heater3. Print head
—
•Pressing the [Enter] key saves the setting and shifts to the previous menu.•Pressing the [Cancel] key cancels the setting and shifts to the previous menu. User media menu

Handling the Printer
Xerox 8254E / 8264E Color Wide Format PrinterUser Guide
4-26
After Heater menu
The 8254E calls this the "Drier menu" but the items and steps are identical.
Allows you to set up the After Heater temperature to dry the printed media. This control is active during printing operation.
Note:
• The preset temperature of the After Heater varies, depending on the media.For the preset temperature of the After Heater, contact your local Xerox Sales Representative for a recommended media list.
Setup item Setting Description
PlatenHeater Off / <30° C> to 50° C Sets up the Platen Heater temperature.
1.Roll media2.Platen Heater3.Print head
—
•Pressing the [Enter] key saves the setting and shifts to the previous menu.•Pressing the [Cancel] key cancels the setting and shifts to the previous menu. User media menu

Handling the Printer
Xerox 8254E / 8264E Color Wide Format PrinterUser Guide
4-27
Standby Heating Menu
Allows you to set up the length of time to preheat the heater while the printer is in standby mode.
Setup item Setting Description
AfterHeater Off / <30° C> to 50° C
Sets up the After Heater temperature.
1. Roll media2. After Heater3. Print head
—
•Pressing the [Enter] key saves the setting and shifts to the previous menu.•Pressing the [Cancel] key cancels the setting and shifts to the previous menu. User media menu
Setup item Setting Description
Standby 10 min. to <60 min.> to 240 min.
Sets the length of time to preheat the heaters. When more than the set time has passed, each heater turns off.
—
•Pressing the [Enter] key saves the setting and shifts to the previous menu.•Pressing the [Cancel] key cancels the setting and shifts to the previous menu.User media menu

Handling the Printer
Xerox 8254E / 8264E Color Wide Format PrinterUser Guide
4-28
Vacuum Fan Menu
Allows you to set up the Vacuum Fan operation.
Effect Menu
Allows you to set up the Effect menu. Set up this menu when you want to improve print quality by adjusting the set print mode.
Note:
• The menus for the 8264E and 8254E are only slightly different. Both are provided.
Setup item Setting Description
Vacuum Fan Low Set when using soft media when there is a possibility of a paper jam caused by failure in media loading.
<High> Set when using general media.
—
•Pressing the [Enter] key saves the setting and shifts to the previous menu.•Pressing the [Cancel] key cancels the setting and shifts to the previous menu. User media menu

Handling the Printer
Xerox 8254E / 8264E Color Wide Format PrinterUser Guide
4-29
8264E Effect Menu
Setup item Setting Description
Effect None 1 The Effect function is not used.If obvious white lines or uneven print density appear on printed media while set at "None 1," set to "None 2."None 2
Wave 1 The printing joint will be the wave form.It should result in improved print quality.If obvious white lines or uneven print density appear on printed media while set at "Wave 1," change the setting to "Wave 2, 3, or 4" ... whichever one produces the best result.
Wave 2
Fuzz 1 The printing joint will shade off as the wave form.If obvious white lines or uneven print density appear on printed media in "Wave," set to "Fuzz 1."If obvious white lines or uneven print density appear on printed media in "Fuzz 1", set to "Fuzz 2."
Fuzz2
Fine&Wave 1 Performs printing at a slower speed than "Wave."Set up this menu if you need to improve the print quality compared with "Wave."If obvious white lines or uneven print density appear on printed media in "Fine&Wave 1," change the setting to "Fine&Wave 2, 3, or 4" ... whichever one produces the best result.
<Fine&Wave 2>
Fine&Fuzz 1
Fine&Fuzz 2

Handling the Printer
Xerox 8254E / 8264E Color Wide Format PrinterUser Guide
4-30
Effect (cont.) A-S.Fine&Wave Performs "Wave" printing using only one side of the print head’s nozzles (designated as the A side).Since only half of the print head’s nozzles are used, the time to print is twice as long as it is when "Wave 1, 2, 3, or 4" is used.Set up this menu if you need to improve the print quality compared with "Fine&Wave 1 to 4."
B-S.Fine&Wave Same as immediately above. Performs "Wave" printing using only half of the print head’s nozzles but uses the other side nozzles (designated as the B side).Again, since only half of the print head’s nozzles are used, the time to print is twice as long as it is when "Wave 1, 2, 3, or 4" is used.Set up this menu if you need to improve the print quality compared with "Fine&Wave 1 to 4."
—
•Pressing the [Enter] key saves the setting and shifts to the previous menu.•Pressing the [Cancel] key cancels the setting and shifts to the previous menu. Setup menu Setup item 1 of 7 total)
Setup item Setting Description

Handling the Printer
Xerox 8254E / 8264E Color Wide Format PrinterUser Guide
4-31
8254 Effect Menu
Setup item Setting Description
Effect None 1 The Effect function is not used.If obvious white lines or uneven print density appear on printed media while set at "None 1," set to "None 2."None 2
Wave 1 The printing joint will be the wave form.It should result in improved print quality.If obvious white lines or uneven print density appear on printed media while set at "Wave 1," change the setting to "Wave 2."
Wave 2
Fuzz 1 The printing joint will shade off as the wave form.If obvious white lines or uneven print density appear on printed media in "Wave," set to "Fuzz 1."If obvious white lines or uneven print density appear on printed media in "Fuzz 1", set to "Fuzz 2."
Fuzz 2
<Fine&Wave 1> Performs printing at a slower speed than "Wave."Set up this menu if you need to improve the print quality compared with "Wave."If obvious white lines or uneven print density appear on printed media in "Fine&Wave 1," change the setting to "Fine&Wave 2, 3, or 4" ... whichever one produces the best result.
Fine&Wave 2
Fine&Wave 3
Fine&Wave 4
A-S.Fine&Wave Performs "Wave" printing using only one side of the print head’s nozzles (designated as the A side).Since only half of the print head’s nozzles are used, the time to print is twice as long as it is when "Wave 1, 2, 3, or 4" is used.Set up this menu if you need to improve the print quality compared with "Fine&Wave 1 to 4."
Effect (cont.) B-S.Fine&Wave Same as immediately above. Performs "Wave" printing using only half of the print head’s nozzles but uses the other side nozzles (designated as the B side).Again, since only half of the print head’s nozzles are used, the time to print is twice as long as it is when "Wave 1, 2, 3, or 4" is used.Set up this menu if you need to improve the print quality compared with "Fine&Wave 1 to 4."
—
•Pressing the [Enter] key saves the setting and shifts to the previous menu.•Pressing the [Cancel] key cancels the setting and shifts to the previous menu. Setup menu Setup item 1 of 7 total)
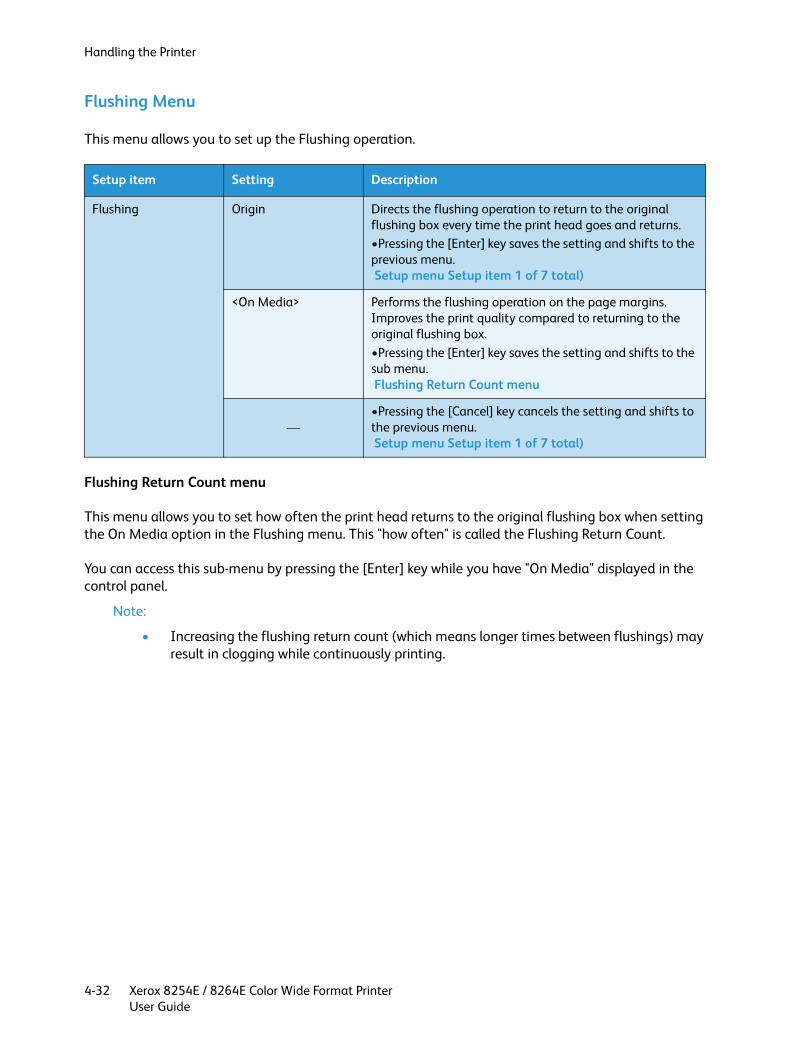
Handling the Printer
Xerox 8254E / 8264E Color Wide Format PrinterUser Guide
4-32
Flushing Menu
This menu allows you to set up the Flushing operation.
Flushing Return Count menu
This menu allows you to set how often the print head returns to the original flushing box when setting the On Media option in the Flushing menu. This "how often" is called the Flushing Return Count.
You can access this sub-menu by pressing the [Enter] key while you have "On Media" displayed in the control panel.
Note:
• Increasing the flushing return count (which means longer times between flushings) may result in clogging while continuously printing.
Setup item Setting Description
Flushing Origin Directs the flushing operation to return to the original flushing box every time the print head goes and returns.•Pressing the [Enter] key saves the setting and shifts to the previous menu. Setup menu Setup item 1 of 7 total)
<On Media> Performs the flushing operation on the page margins.Improves the print quality compared to returning to the original flushing box.•Pressing the [Enter] key saves the setting and shifts to the sub menu. Flushing Return Count menu
—•Pressing the [Cancel] key cancels the setting and shifts to the previous menu. Setup menu Setup item 1 of 7 total)

Handling the Printer
Xerox 8254E / 8264E Color Wide Format PrinterUser Guide
4-33
Side Margin Menu
Allows you to set up the right and left Side Margins while printing.
Notes:• When selecting "On Media" as the setting in the Flushing menu, the value of the Side
Margin menu is disabled and the margin on which the flushing operation will be performed is set automatically. Flushing Menu
• 8264E only - When using the media holder plates, set the side margin setting to 10mm. 8264E only - Installing Media Holder Plates
Media Initial Menu
Allows you to set up whether the printer will automatically detect the width and front edge of the media when initializing the media.
Note:
• Set the media width that is set in the Media Width menu when setting "Off" in the Media detection menu. Media Width Menu
Setup item Setting Description
ReturnCount 0cnt to <5cnt> to 999cnt
Sets the Flushing Return Count.Example•1cnt: The print head returns to the flushing box on the original side every time the print head leaves and returns.•5cnt: The print head returns to the flushing box on the original side every fifth time the print head leaves and returns.
—
•Pressing the [Enter] key saves the setting and shifts to the previous menu.•Pressing the [Cancel] key cancels the setting and shifts to the previous menu. Setup menu Setup item 1 of 7 total)
Setup item Setting Description
SideMargin 8264E - <5mm> to 25mm
Sets the side margins.•Pressing the [Enter] key saves the setting and shifts to the previous menu.•Pressing the [Cancel] key cancels the setting and shifts to the previous menu. Setup menu Setup item 1 of 7 total)
8254E - <3mm> to 25mm
—
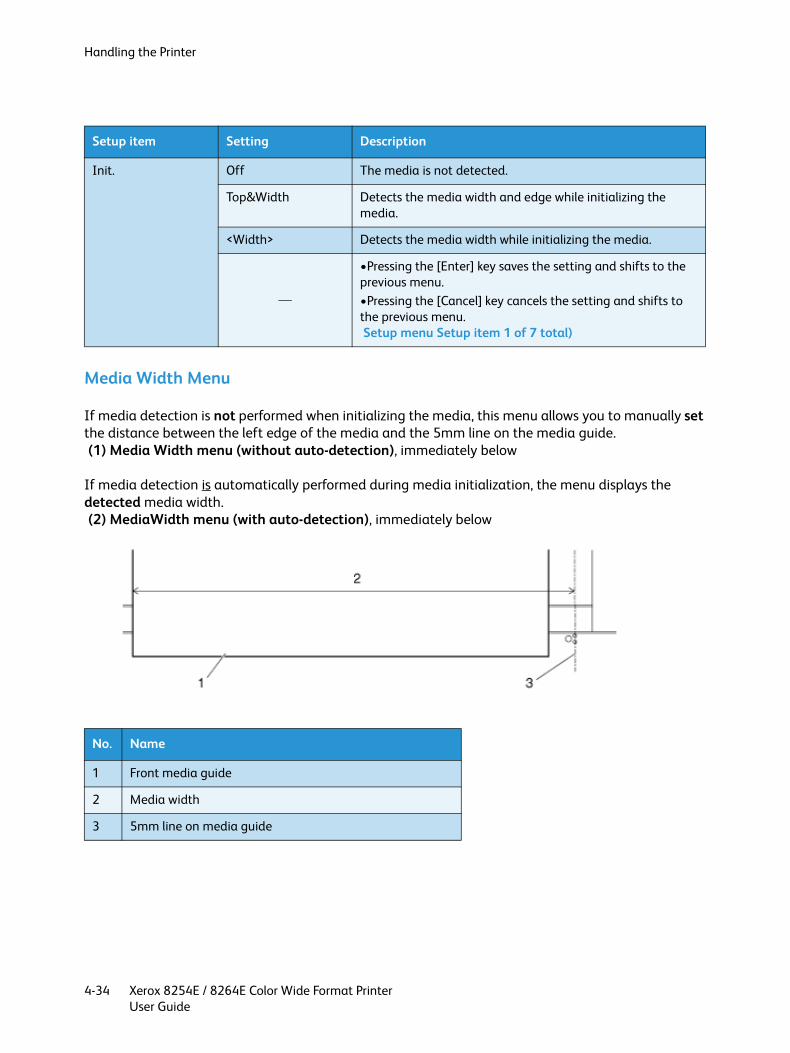
Handling the Printer
Xerox 8254E / 8264E Color Wide Format PrinterUser Guide
4-34
Media Width Menu
If media detection is not performed when initializing the media, this menu allows you to manually set the distance between the left edge of the media and the 5mm line on the media guide. (1) Media Width menu (without auto-detection), immediately below
If media detection is automatically performed during media initialization, the menu displays the detected media width. (2) MediaWidth menu (with auto-detection), immediately below
Setup item Setting Description
Init. Off The media is not detected.
Top&Width Detects the media width and edge while initializing the media.
<Width> Detects the media width while initializing the media.
—
•Pressing the [Enter] key saves the setting and shifts to the previous menu.•Pressing the [Cancel] key cancels the setting and shifts to the previous menu. Setup menu Setup item 1 of 7 total)
No. Name
1 Front media guide
2 Media width
3 5mm line on media guide
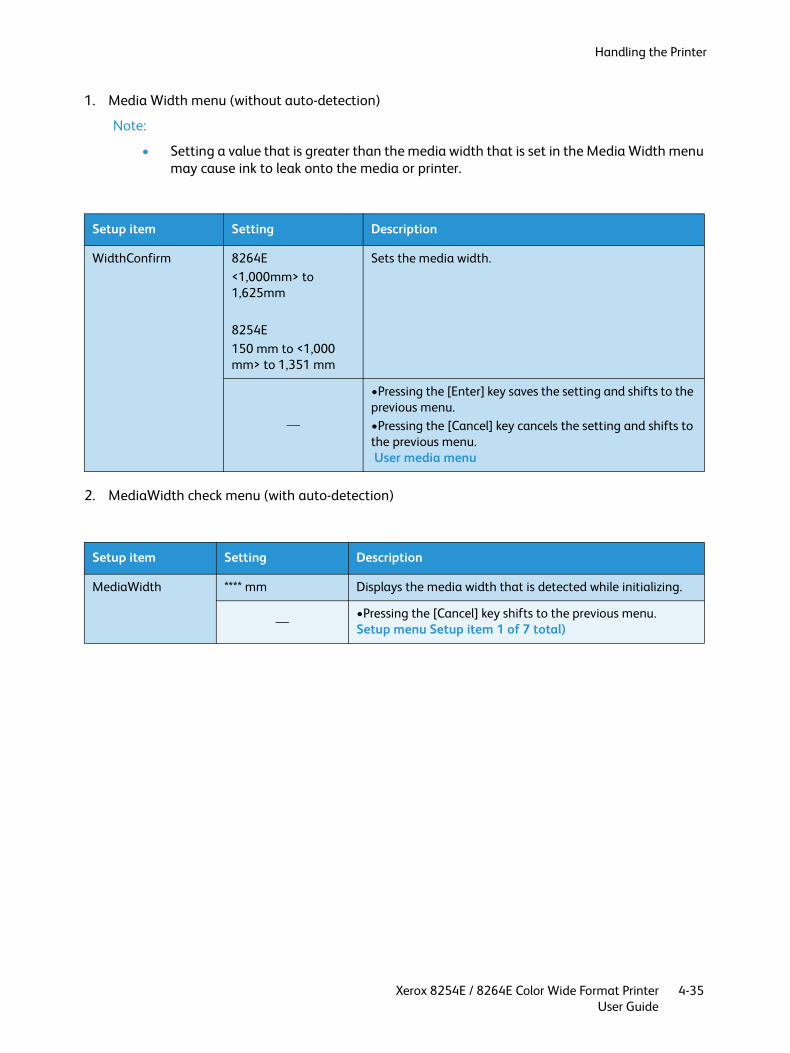
Handling the Printer
Xerox 8254E / 8264E Color Wide Format PrinterUser Guide
4-35
1. Media Width menu (without auto-detection)
Note:
• Setting a value that is greater than the media width that is set in the Media Width menu may cause ink to leak onto the media or printer.
2. MediaWidth check menu (with auto-detection)
Setup item Setting Description
WidthConfirm 8264E<1,000mm> to 1,625mm
8254E150 mm to <1,000 mm> to 1,351 mm
Sets the media width.
—
•Pressing the [Enter] key saves the setting and shifts to the previous menu.•Pressing the [Cancel] key cancels the setting and shifts to the previous menu. User media menu
Setup item Setting Description
MediaWidth **** mm Displays the media width that is detected while initializing.
—•Pressing the [Cancel] key shifts to the previous menu.Setup menu Setup item 1 of 7 total)

Handling the Printer
Xerox 8254E / 8264E Color Wide Format PrinterUser Guide
4-36
Take-up menu
Allows you to set up the operation of the optional winding unit.
Notes:• For details about the optional winding unit, contact your local Xerox dealer.• When the winding unit is not installed, please do not set to "Type 1."
Doing so will cause the printer to not function properly.• When the Winding unit menu is set to "Type 1," the setting for the Prev. Stick menu is
disabled. Prev. Stick Menu
Setup item Setting Description
Take-up <Off> The winding unit is not used.
Type 1 Set to Type 1 to use the winding unit.
—
•Pressing the [Enter] key saves the setting and shifts to the previous menu.•Pressing the [Cancel] key cancels the setting and shifts to the previous menu. Setup menu Setup item 1 of 7 total)
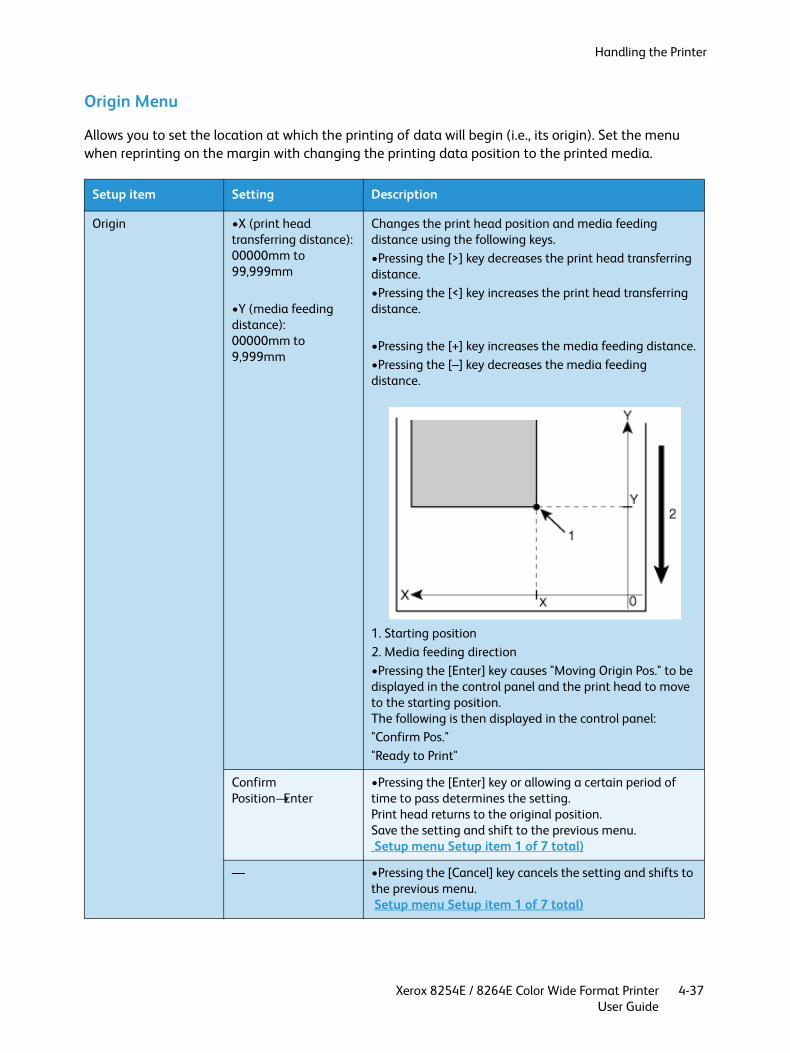
Handling the Printer
Xerox 8254E / 8264E Color Wide Format PrinterUser Guide
4-37
Origin Menu
Allows you to set the location at which the printing of data will begin (i.e., its origin). Set the menu when reprinting on the margin with changing the printing data position to the printed media.
Setup item Setting Description
Origin •X (print head transferring distance):00000mm to 99,999mm
•Y (media feeding distance):00000mm to 9,999mm
Changes the print head position and media feeding distance using the following keys.•Pressing the [>] key decreases the print head transferring distance.•Pressing the [<] key increases the print head transferring distance.
•Pressing the [+] key increases the media feeding distance.•Pressing the [–] key decreases the media feeding distance.
1. Starting position2. Media feeding direction•Pressing the [Enter] key causes "Moving Origin Pos." to be displayed in the control panel and the print head to move to the starting position.The following is then displayed in the control panel:"Confirm Pos.""Ready to Print"
Confirm Position→Enter
•Pressing the [Enter] key or allowing a certain period of time to pass determines the setting.Print head returns to the original position.Save the setting and shift to the previous menu. Setup menu Setup item 1 of 7 total)
— •Pressing the [Cancel] key cancels the setting and shifts to the previous menu. Setup menu Setup item 1 of 7 total)

Handling the Printer
Xerox 8254E / 8264E Color Wide Format PrinterUser Guide
4-38
Prev. Stick Menu
Allows you to set up to prevent the media from sticking when printing starts.
Note:
• When the Take-up menu is set to “Type 1,” the setting for the Prev. Stick menu is disabled. Take-up menu
8264E only - Head Fan Menu
Allows you to set up Head Fan operation. If print blurring or dot losses occur, activate the head fan.
Setup item Setting Description
Prev. Stick Off The prevent sticking operation is not performed.
<On> The prevent sticking operation is performed.This feeds the media back and forth a little to prevent it from sticking.
—
•Pressing the [Enter] key saves the setting and shifts to the previous menu.•Pressing the [Cancel] key cancels the setting and shifts to the previous menu.Setup menu Setup item 1 of 7 total)
Setup item Setting Description
HeadFan <Off> The fan is not activated.
On The fan is activated.
—
•Pressing the [Enter] key saves the setting and shifts to the previous menu.•Pressing the [Cancel] key cancels the setting and shifts to the previous menu. Setup menu Setup item 1 of 7 total)

Handling the Printer
Xerox 8254E / 8264E Color Wide Format PrinterUser Guide
4-39
CR Movement Menu
Allows you to set up the range over which the print head moves while printing.
Overwrite Cnt Menu
Allows you to set up the overwrite count per line.
Overwrite Wait Menu
Allows you to set up the waiting time while overwrite printing.
Note:
• Narrow media may not be warmed enough by the heater, causing lower print quality.In this case, set the Overwrite Wait time and warm up the media.
Setup item Setting Description
CRMovement <Data> The print head changes the range of the print data width.This improves the print speed since this option decreases the transferring range of the print head.
Machine The print head moves from the origin to the maximum paper width.
—
•Pressing the [Enter] key saves the setting and shifts to the previous menu.•Pressing the [Cancel] key cancels the setting and shifts to the previous menu. Setup menu Setup item 1 of 7 total)
Setup item Setting Description
OverwriteCnt <1cnt> to 9cnt Sets the overwrite count.
—
•Pressing the [Enter] key saves the setting and shifts to the previous menu.•Pressing the [Cancel] key cancels the setting and shifts to the previous menu. Setup menu Setup item 1 of 7 total)
Handling the Printer
Xerox 8254E / 8264E Color Wide Format PrinterUser Guide
4-40
Slant Check Menu
Allows you to set up the detection of slanted (crooked) media during media loading.
Setup item Setting Description
OverwriteWait <0.0sec.> to 0.1sec. to 5.0sec.
Sets the Overwrite Wait time.
—
•Pressing the [Enter] key saves the setting and shifts to the previous menu.•Pressing the [Cancel] key cancels the setting and shifts to the previous menu. Setup menu Setup item 1 of 7 total)
Setup item Setting Description
Slant Check Off Slant Check is not performed.
<On> Slant Check is performed.
—
•Pressing the [Enter] key saves the setting and shifts to the previous menu.•Pressing the [Cancel] key cancels the setting and shifts to the previous menu. Setup menu Setup item 1 of 7 total)

Handling the Printer
Xerox 8254E / 8264E Color Wide Format PrinterUser Guide
4-41
Auto Cleaning Menu
Allows you to set up the auto cleaning interval. If the period of time since the last print job exceeds this setting, the print head is cleaned automatically before the next print job begins. This is to prevent the print head from clogging.
Ink Status Menu
Displays the status of ink cartridges installed in the ink cartridge slot.
Note:
• Always use genuine, recommended ink cartridges. If you use non-recommended ink cartridges, ink status is not displayed correctly in the Ink Status menu.
Setup item Setting Description
Auto Cleaning Off Auto Cleaning is not performed.
1 hours If more than the set time has passed, the print head is cleaned automatically before printing starts.
2 hours
3 hours
4 hours
5 hours
<6 hours>
9 hours
12 hours
18 hours
24 hours
—
•Pressing the [Enter] key saves the setting and shifts to the previous menu.•Pressing the [Cancel] key cancels the setting and shifts to the previous menu. Setup menu Setup item 1 of 7 total)
Setup item Setting Description
KCMY 0 to 100 (Unit:%)Example = 64/ 64/ 63/ 64
Displays the amount of ink remaining in the K, C, M and Y cartridges, expressed as%.
—•Pressing the [Cancel] key shifts to the previous menu.Setup menu Setup item 1 of 7 total)

Handling the Printer
Xerox 8254E / 8264E Color Wide Format PrinterUser Guide
4-42
Roll Length Menu
Allows you to set up the roll media length.
Roll Media Length Menu
Allows you to set up the roll media length. If you press the [Enter] key while one of the "RollX" settings is displayed, you get the following sub-menu.
Note:
• Adjust the roll media length whenever you replace the roll media. If you don’t, the remaining quantity of roll media is not displayed correctly.
Setup item Setting Description
RollKind <Off> Roll Length is not used.•Pressing the [Enter] key saves the setting and shifts to the previous menu.Setup menu Setup item 1 of 7 total)
Roll1 Sets up the roll media length.The Roll Length setting is set for three types as "Roll1" to "Roll3."•Pressing the [Enter] key saves the setting and shifts to the sub menu.Roll Media Length Menu
Roll2
Roll3
—•Pressing the [Cancel] key cancels the setting and shifts to the previous menu. Setup menu Setup item 1 of 7 total)
Setup Item Setting Description
Length 1m to <30m> to 99m Sets the Roll Media Length.
—
•Pressing the [Enter] key saves the setting and shifts to the previous menu.•Pressing the [Cancel] key cancels the setting and shifts to the previous menu. Setup menu Setup item 1 of 7 total)

Handling the Printer
Xerox 8254E / 8264E Color Wide Format PrinterUser Guide
4-43
Head Wash Menu
Allows you to perform the HeadWash procedure.
Note:
• Make sure to use a dedicated cleaning fluid (Xerox P/N 108R00735).
CR Maintenance Menu
Allows you to perform maintenance. Use this to clean the cleaning wiper and the outside of the print head. Cleaning the Cleaning Wiper and Cleaning Around the Cap
Setup Item Setting Description
HeadWash Start Performs Head washing.•Pressing the [Enter] key causes the Head washing operation to begin.
Note:
• This flushes the system and can use large quantities of ink (i.e., whatever is in the bladders or dampers).
•The following content displays in the control panel.
Remove Cartridges Instructs you to remove the ink cartridges, and install the cleaning cartridges. Replacing Ink Cartridges
—•Pressing the [Cancel] key shifts to the previous menu without Head washing. Setup menu Setup item 1 of 7 total)
Setup item Setting Description
CR Maint. Start Begins maintenance.•Pressing the [Enter] key causes the print head to move to the left and the cleaning wiper to move forward.
End Completes maintenance.•Pressing the [Enter] key causes the print head to return to its original position and the cleaning wiper to return to its original position.
—•Pressing the [Cancel] key shifts to the previous menu without maintenance.Setup menu Setup item 1 of 7 total)

Handling the Printer
Xerox 8254E / 8264E Color Wide Format PrinterUser Guide
4-44
Initialization Menu
Allows you to returns the setting of the printer’s menus to their defaults.
Life Times Menu
Allows you to display the remaining operational life span of each part.
Notes:• When replacing a part whose operational life span has ended:
– There is no charge for replacing a part within the warranty period or under the contract.
– You are liable for the cost of repairs under conditions other than mentioned above.• Do not keep using a part whose operational life span has ended (i.e., when there are no
asterisks remaining). Problems caused by doing so will not be covered by the warranty.
Setup item Setting Description
Initialization ALL Returns all settings to their factory defaults.
MediaType Returns the settings of the MediaType menu to their factory defaults.
ExceptMediaType Returns the settings of menus other than the MediaType menu to their factory defaults.
—
•Pressing the [Enter] key causes "Initialing" to be displayed in the control panel and the printer to begin the initialization.•Pressing the [Cancel] key shifts to the previous menu without initialization. Setup menu Setup item 1 of 7 total)
Setup item Setting Description
Life Times Head Displays the remaining operational life span expected for each part.•The full operational life span of a part is represented by five asterisks (100%).•As the part deteriorates, the number of asterisks decreases one by one. (Each asterisk represents 20% of life span.)•The part should be changed when all of the asterisks have disappeared, and "Change" is displayed.Contact your local Xerox dealer for replacement parts.
Pump
CR Motor
PF Motor
—•Pressing the [Cancel] key shifts to the previous menu. Setup menu Setup item 1 of 7 total)

Handling the Printer
Xerox 8254E / 8264E Color Wide Format PrinterUser Guide
4-45
IP Address Menu
Allows you to set up the IP Address of the printer.
Note:
• Be sure to set the IP Address after consulting your network administrator.
Subnet Mask Menu
Allows you to set up the Subnet Mask of the printer.
Note:
• Be sure to set the Subnet Mask after consulting your network administrator.
Setup item Setting Description
IP Address 000.000.000.000to<192.168.001.253> to255.255.255.255
Changes the IP Address through the following keys.•Pressing the [+] key increases the setting value.•Pressing the [–] key decreases the setting value.•Pressing the [Enter] key changes the setting for the next segment.
—•Pressing the [Cancel] key saves the setting and shifts to the previous menu.Setup menu Setup item 1 of 7 total)
Setup Item Setting Description
Subnet Mask 000.000.000.000to<255.255.255.000> to255.255.255.255
Changes the Subnet Mask through the following keys.•[Pressing the +] key increases the setting value.•Pressing the [–] key decreases the setting value.•Pressing the [Enter] key changes the setting for the next segment.
—•Pressing the [Cancel] key saves the setting and shifts to the previous menu. Setup menu Setup item 1 of 7 total)

Handling the Printer
Xerox 8254E / 8264E Color Wide Format PrinterUser Guide
4-46
Gateway Menu
Allows you to set the Gateway.
Note:
• Be sure to set the Gateway after consulting your network administrator.
8254E only- Front Interlace
Allows you to set the front treatment function. This function is applied when the banding appears at the beginning of a print.
Setup item Setting Description
Gateway 000.000.000.000 to<192.168.001.254> to255.255.255.255
Changes the Gateway through the following keys.•Pressing the [+] key increases the setting value.•Pressing the [–] key decreases the setting value.•Pressing the [Enter] key changes the setting for the next segment.
—•Pressing the [Cancel] key saves the setting and shifts to the previous menu.Setup menu Setup item 1 of 7 total)
Setup item Setting Description
Front Interlace Off The front treatment function is not used.
<On> The front treatment function is used.
—
•Pressing the [Enter] key saves the setting and shifts to the previous menu.•Pressing the [Cancel] key cancels the setting and shifts to the previous menu.Setup menu Setup item 1 of 7 total)

Handling the Printer
Xerox 8254E / 8264E Color Wide Format PrinterUser Guide
4-47
8254E only - Media Cut Menu
Allows you to set up media cutting
Temporary Menu
Temporarily displays all of the possible selections in the Setup submenus.
Setup item Setting Description
MediaCut <Off> The media feed is not performed after printing.
Manual Feeds media to the Media Cut position after printing.Use a regular razor blade available from hardware stores. 8254E Cutting media when the Media Cut menu is set to “Manual”
—
•Pressing the [Enter] key saves the setting and shifts to the previous menu.•Pressing the [Cancel] key cancels the setting and shifts to the previous menu. Setup menu Setup item 1 of 7 total)
Setup item Setting Description
Temporary ALL On Displays all of the selections in the Setup submenus.•Pressing the [Enter] key after "Temporary" is displayed turns on all selections for the setup submenus as long as you remain in the setup sub menus. (An asterisk * next to a selection indicates it is turned on.)•Pressing the [Cancel] key returns the Setup submenus to their previous settings.Selection Menu (Setup item 5 of 7 total)
Note:
• The following item is never displayed even when ALL On is selected.– Feed

Handling the Printer
Xerox 8254E / 8264E Color Wide Format PrinterUser Guide
4-48
Test Print Menu (Setup item 2 of 7 total)
Allows you to perform Nozzle Check of the print head, Mode Print, Palette Print and to print the Setup list.
Access this menu by pressing the [Menu] key which causes "Menu1: Setup>" to appear in the control panel’s display. Pressing the [-] key once causes "Menu2: Test Print>" to display. (The > character after a menu name indicates that there are sub-menus under that menu.)
From the "Menu2: Test Print>" display, press the [>] key. This takes you to the first sub-menu titled "Test1: Nozzle Check." Pressing the [-] and [+] keys allows you to increment up or down to each of the Setup items in the left column below.
Note:
• Refer to the following for the operation procedure of TestPrint. Test Printing
Setup Item Description
Nozzle Check Performs the Nozzle Check printing.Used to check whether there are any clogged heads, or missing or blurred prints. Nozzle Check
Mode Print Allows Mode Print to be performed.Used to confirm the following printing conditions.•Print quality•Effect•Pre-Heater temperature•Platen Heater temperature•After Heater temperature•Adjustment value Mode Print
Set List Allows Setup List printing to be performed.Used for checking the printer’s setup items. Set Up List
ALL Set List Allows Setup List printing to be performed.Used for checking the printer’s setup items, user media and print mode. Set Up List

Handling the Printer
Xerox 8254E / 8264E Color Wide Format PrinterUser Guide
4-49
Adjust Print Menu (Setup item 3 of 7 total)
Allows you to adjust the printer for optimum print quality (Alignment).
Access this menu by pressing the [Menu] key which causes "Menu1: Setup>" to appear in the control panel’s display. Pressing the [-] key twice causes "Menu3: Adjust Print>" to display. (The > character after a menu name indicates that there are sub-menus under that menu.)
From the "Menu3: Adjust Print>" display, press the [>] key. This takes you to the first sub-menu titled "Adj.1: Confirm." Pressing the [-] and [+] keys allows you to increment up or down to each of the Setup items in the left column below.
Alignment must be set for each printing mode. Adjust Print
After selecting the desired printing mode, perform an alignment. Print Mode menu
Palette Allows Palette Printing to be performed.Used to compare actual colors of the printer to colors on the computer. Color Palette
Note:
• When "Banner 1" or "Banner 2" is set in the Print Mode menu, PalettePrint is not displayed.Print Mode menu
—•Pressing the [Enter] key causes "Printing" to be displayed in the control panel and the test printing to start.•Pressing the [Cancel] key shifts to the previous menu.
Setup Item Description
Confirm Prints the test pattern for Alignment.
Bi-D Quality Sets up the set value when performing two-way printing in the quality priority mode.
Bi-D Normal Sets up the set value when performing two-way printing in the normal mode.
8264E only - Bi-D Speed Sets up the set value when performing two-way printing in the speed mode.
Pressing the [Enter] key causes "Printing" to be displayed in the control panel and the test pattern printing to start.Pressing the [Cancel] key shifts to the previous menu.
Setup Item Description
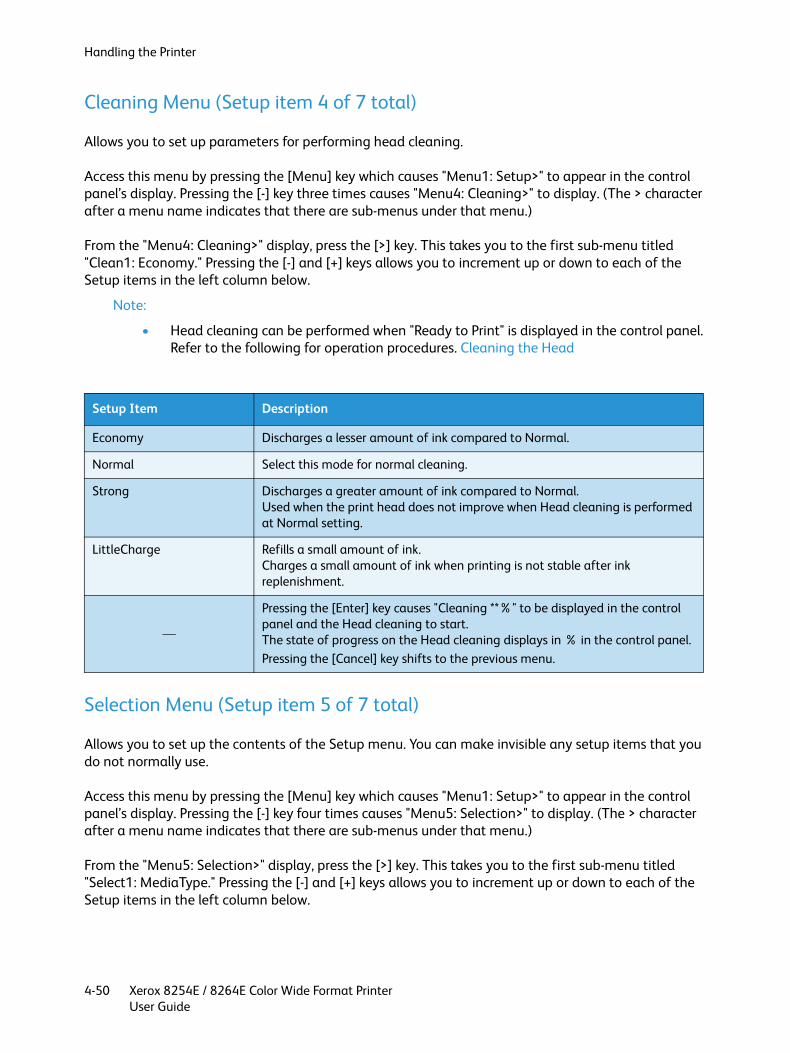
Handling the Printer
Xerox 8254E / 8264E Color Wide Format PrinterUser Guide
4-50
Cleaning Menu (Setup item 4 of 7 total)
Allows you to set up parameters for performing head cleaning.
Access this menu by pressing the [Menu] key which causes "Menu1: Setup>" to appear in the control panel’s display. Pressing the [-] key three times causes "Menu4: Cleaning>" to display. (The > character after a menu name indicates that there are sub-menus under that menu.)
From the "Menu4: Cleaning>" display, press the [>] key. This takes you to the first sub-menu titled "Clean1: Economy." Pressing the [-] and [+] keys allows you to increment up or down to each of the Setup items in the left column below.
Note:
• Head cleaning can be performed when "Ready to Print" is displayed in the control panel. Refer to the following for operation procedures. Cleaning the Head
Selection Menu (Setup item 5 of 7 total)
Allows you to set up the contents of the Setup menu. You can make invisible any setup items that you do not normally use.
Access this menu by pressing the [Menu] key which causes "Menu1: Setup>" to appear in the control panel’s display. Pressing the [-] key four times causes "Menu5: Selection>" to display. (The > character after a menu name indicates that there are sub-menus under that menu.)
From the "Menu5: Selection>" display, press the [>] key. This takes you to the first sub-menu titled "Select1: MediaType." Pressing the [-] and [+] keys allows you to increment up or down to each of the Setup items in the left column below.
Setup Item Description
Economy Discharges a lesser amount of ink compared to Normal.
Normal Select this mode for normal cleaning.
Strong Discharges a greater amount of ink compared to Normal.Used when the print head does not improve when Head cleaning is performed at Normal setting.
LittleCharge Refills a small amount of ink.Charges a small amount of ink when printing is not stable after ink replenishment.
—
Pressing the [Enter] key causes "Cleaning **%" to be displayed in the control panel and the Head cleaning to start.The state of progress on the Head cleaning displays in % in the control panel.Pressing the [Cancel] key shifts to the previous menu.
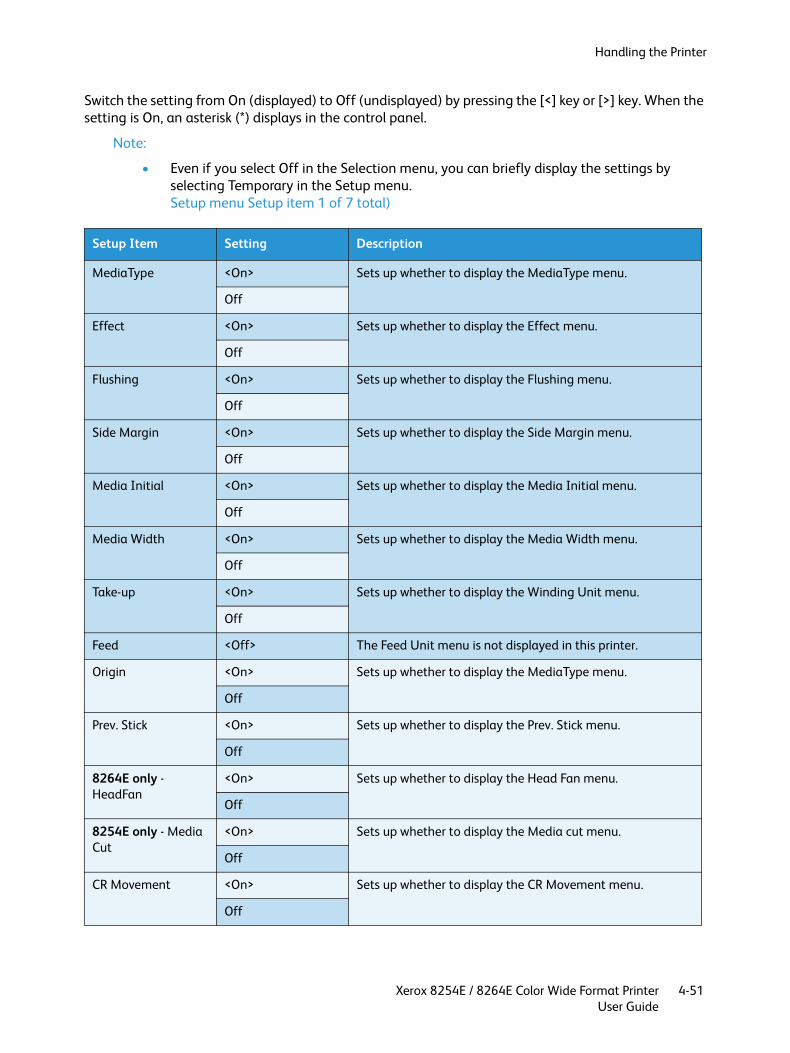
Handling the Printer
Xerox 8254E / 8264E Color Wide Format PrinterUser Guide
4-51
Switch the setting from On (displayed) to Off (undisplayed) by pressing the [<] key or [>] key. When the setting is On, an asterisk (*) displays in the control panel.
Note:
• Even if you select Off in the Selection menu, you can briefly display the settings by selecting Temporary in the Setup menu.Setup menu Setup item 1 of 7 total)
Setup Item Setting Description
MediaType <On> Sets up whether to display the MediaType menu.
Off
Effect <On> Sets up whether to display the Effect menu.
Off
Flushing <On> Sets up whether to display the Flushing menu.
Off
Side Margin <On> Sets up whether to display the Side Margin menu.
Off
Media Initial <On> Sets up whether to display the Media Initial menu.
Off
Media Width <On> Sets up whether to display the Media Width menu.
Off
Take-up <On> Sets up whether to display the Winding Unit menu.
Off
Feed <Off> The Feed Unit menu is not displayed in this printer.
Origin <On> Sets up whether to display the MediaType menu.
Off
Prev. Stick <On> Sets up whether to display the Prev. Stick menu.
Off
8264E only - HeadFan
<On> Sets up whether to display the Head Fan menu.
Off
8254E only - Media Cut
<On> Sets up whether to display the Media cut menu.
Off
CR Movement <On> Sets up whether to display the CR Movement menu.
Off

Handling the Printer
Xerox 8254E / 8264E Color Wide Format PrinterUser Guide
4-52
Overwrite Cnt <On> Sets up whether to display the Overwrite Cnt menu.
Off
Overwrite Wait <On> Sets up whether to display the Overwrite Wait menu.
Off
Slant Check <On> Sets up whether to display the Slant Check menu.
Off
Auto Cleaning <On> Sets up whether to display the Auto Cleaning menu.
Off
Ink Status <On> Sets up whether to display the Ink Status menu.
Off
Roll Length <On> Sets up whether to display the Roll Length menu.
Off
Head Wash <On> Sets up whether to display the Head Wash menu.
Off
CR Maint. <On> Sets up whether to display the CR Maintenance menu.
Off
Initialization <On> Sets up whether to display the Initialization menu.
Off
Life Times <On> Sets up whether to display the Life Times menu.
Off
IP Address <On> Sets up whether to display the IP Address menu.
Off
Subnet Mask <On> Sets up whether to display the Subnet Mask menu.
Off
Gateway <On> Sets up whether to display the Gateway menu.
Off
8254E only - Front Interlace
<On> Sets up whether to display the Front Interlace menu.
Off
Setup Item Setting Description

Handling the Printer
Xerox 8254E / 8264E Color Wide Format PrinterUser Guide
4-53
Version Menu (Setup item 6 of 7 total)
Allows you to display the versions of the printer’s firmware.
Access this menu by pressing the [Menu] key which causes "Menu1: Setup>" to appear in the control panel’s display. Pressing the [-] key five times causes "Menu6: Version" to display. Press the [Enter] key to display the current version of firmware.
Sleep Mode Menu (Setup item 7 of 7 total)
Allows you to configure Sleep Mode settings.
Access this menu by pressing the [Menu] key which causes "Menu1: Setup>" to appear in the control panel’s display. Pressing the [-] key six times causes "Menu7: Sleep Mode" to display.
From the "Menu7: Sleep Mode>" display, press the [Enter] key. Pressing the [-] and [+] keys allows you to choose whether to set the auto cleaning interval or activate Sleep Mode immediately.
ALL On Displays all of the items in the Setup menu.•Pressing the [Enter] key displays * for all items in the Selection menu.
Note:
• The following item is never displayed even when ALL On is selected.– Feed
ALL Off No items in the Setup menu are displayed.•Pressing the [Enter] key deletes * for all items in the Selection menu.•Even if you select ALL Off, you can display the items briefly by selecting Temporary in the Setup menu.
—•Pressing the [Cancel] key saves the setting and shifts to the previous menu.
Setup Item Setting Description
Ver.M/C *.**(Main)/*.**(Controller)
Displays the versions of the firmware on the main side (M) and controller side (C).
— •Pressing the [Cancel] key shifts to the previous menu.
Setup Item Setting Description

Handling the Printer
Xerox 8254E / 8264E Color Wide Format PrinterUser Guide
4-54
When you activate Sleep Mode, the printer operates as follows.
• The exhaust fan stops.• The vacuum fan stops• All heaters turn off.• All lamps turn off except for the Power lamp• Automatic head cleaning is performed after the time set in the Time Setting menu has expired.
Timer Setting Menu
Allows you to set the head cleaning interval of this printer for Sleep Mode. When more than the set time has passed, the print head is cleaned automatically.
Access this menu by pressing the [Enter] key while "Set Timer" is displayed.
Notes:• During Sleep Mode, even if the set amount of time has passed, print-head cleaning is not
performed under the following circumstances.– The front cover is open. – The media loading lever was switched to the back side.– The waste fluid tank is full. – The ink cartridge is empty. – The ink cartridge has been removed.– object other than an appropriate ink cartridge is inserted in the cartridge slot, etc.
• When the printer returns to "Ready to Print" mode, head cleaning is restarted, and Sleep Mode continues. Error Messages
Setup Item Setting Description
Sleep Mode Set Timer Set the auto cleaning interval.Timer Setting Menu
StartActivate Sleep ModeSleep Mode Start Menu
—•Pressing the [Cancel] key shifts to the previous menu. Setup menu Setup item 1 of 7 total)

Handling the Printer
Xerox 8254E / 8264E Color Wide Format PrinterUser Guide
4-55
If one of the above conditions occurs during head cleaning, cleaning is stopped.When the printer returns to "Ready to Print" mode, head cleaning is restarted.
Error Messages
Sleep Mode Start Menu
Allows you to activate Sleep Mode
During Sleep Mode, "Press Enter to Restart" is displayed in the control panel.
During Sleep Mode, pressing the [Enter] key returns the printer to "Ready to Print" mode. "Ready to Print" displays in the control panel.
Notes:• If you try to switch to Sleep Mode under the following circumstances, "Start Sleep
Mode?" displays and the printer will not change to Sleep Mode.• The front cover is open.• The media loading lever was switched to the back side.• The waste fluid tank is full. • The ink cartridge is empty. • The ink cartridge has been removed.• An object other than an appropriate ink cartridge is inserted in the cartridge slot, etc.
Setup Item Setting Description
Set Timer 1hour When the selected time has passed, head cleaning is performed automatically.
2 hours
3 hours
4 hours
5 hours
<6> hours
9 hours
12 hours
18 hours
24 hours
-Pressing the [Cancel] key shifts to the previous menu.Sleep Mode Menu (Setup item 7 of 7 total)
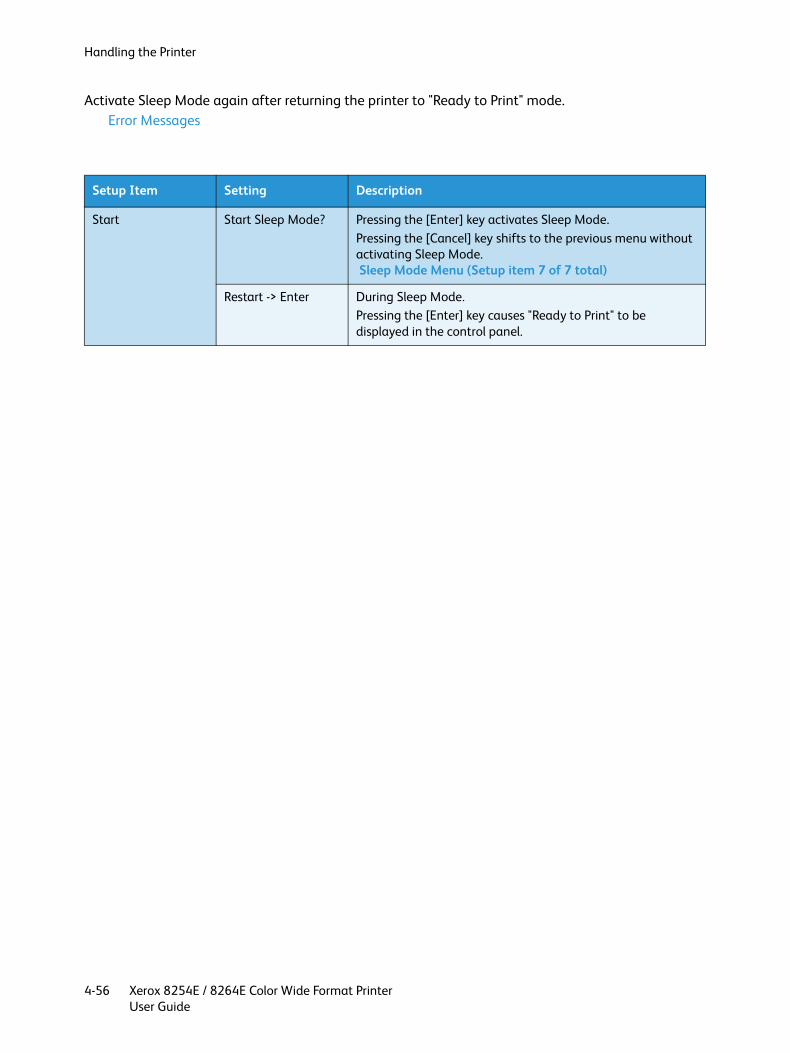
Handling the Printer
Xerox 8254E / 8264E Color Wide Format PrinterUser Guide
4-56
Activate Sleep Mode again after returning the printer to "Ready to Print" mode.Error Messages
Setup Item Setting Description
Start Start Sleep Mode? Pressing the [Enter] key activates Sleep Mode.Pressing the [Cancel] key shifts to the previous menu without activating Sleep Mode. Sleep Mode Menu (Setup item 7 of 7 total)
Restart -> Enter During Sleep Mode.Pressing the [Enter] key causes "Ready to Print" to be displayed in the control panel.

Handling the Printer
Xerox 8254E / 8264E Color Wide Format PrinterUser Guide
4-57
Menu Setups on the Control Panel
Menu Set Up Procedure
Follow the procedure below to configure each setup menu.
1. Confirm that "Ready to Print" is displayed in the control panel.2. Press the [Menu] key. "Menu 1: Setup>" displays in the control panel.
3. Press the [+] key or [–] key to select a setup item and press the [Enter] key.
• The settings will be confirmed. When setup items have a submenu, the display shifts to the next menu.
Notes:• When a setup item has a submenu, ">" is displayed on the right side of the control
panel’s LCD monitor.• For the general outline of each setup item, refer to Panel Set Up Menu Overview

Handling the Printer
Xerox 8254E / 8264E Color Wide Format PrinterUser Guide
4-58
4. The setting in the blinking part of the control panel’s LCD monitor can be changed.Press the [+] key or [–] key to change the setting.
5. To save the changed setting, press the [Enter] key.
• The setting is saved and the next setup item displays.
Note:
• If you press the [Cancel] key, [+] key, or [–] key without pressing the [Enter] key after changing a setting, the change will not be saved.

Handling the Printer
Xerox 8254E / 8264E Color Wide Format PrinterUser Guide
4-59
6. Press the [Cancel] key to exit from the setup.
• The previous setup menu displays.• When the main menu is displayed, "Ready to Print" displays in the control panel.
Panel Set Up Menu Overview
This section explains the Panel set up menu of the printer. The Panel set up menu contains the following items.
Note:
• For details of each setup item, refer to Menu Overview.
Setup Item Description
Setup menu Allows configuration of various printer settings.
Test Print menu Performs Nozzle Check of the print head and setup list.
Adjust Print menu Prints test patterns used for Alignment when adjusting the printer for optimum print quality.
Cleaning menu Performs print head cleaning.Allows you to set the cleaning mode.
Selection menu Allows you to determine which Setup items will be displayed in the Setup menu.
Version menu Displays the version of the firmware.
Sleep Mode menu Allows Sleep Mode settings to be configured.

Handling the Printer
Xerox 8254E / 8264E Color Wide Format PrinterUser Guide
4-60
Operating from the Control Panel
This section explains various functions that can be performed from the control panel.
Note:
• For names and functions of each key, refer to Printer Control Panel.
Feeding Media
You can feed roll media to the position that you want. Follow the procedure below to feed media.
1. Confirm that "Ready to Print" is displayed in the control panel.2. Check that the media loading lever is lowered.3. Press and hold the [Forward↓] key or the [Backward↑ ] key.
• Media is fed forward or backward.4. Release the [Backward↑ ] key or [Forward↓] key after feeding media to the desired position.
Media Feed Compensation
This section explains the Media feed compensation feature of the printer.
The feeding length depends on the media type. The following or similar problems may be seen in prints.
• Printed images overlap.• White lines are printed on images.• Banding is visible within images.
The accuracy of media feeding may be improved with the following methods.
1. Adjust the media feed compensation value.Setting the Media feed compensation
2. 8264E only - Fix the media firmly.8264E only - How to fix the media firmly

Handling the Printer
Xerox 8254E / 8264E Color Wide Format PrinterUser Guide
4-61
8264E only - How to fix the media firmly1. Load the roll media to the printer.
Setting Roll Media2. Lower the media loading lever.
3. Adjust the Media feed compensation value again.Setting the Media feed compensation
Setting the Media feed compensation
This control is active during printing operation.
1. Display the Media feed compensation menu in the control panel.a. Press the [Menu] key. "Menu 1: Setup>" displays in the control panel.
No. Name
1 Media loading lever

Handling the Printer
Xerox 8254E / 8264E Color Wide Format PrinterUser Guide
4-62
b. Press the [>] key. "Set1: MediaType" displays in the control panel.
c. Press the [Enter] key. "Media: Type 1" displays in the control panel.
d. Press the [+] key or [–] key to select the media type you are using.

Handling the Printer
Xerox 8254E / 8264E Color Wide Format PrinterUser Guide
4-63
e. Press the [Enter] key. "**>1: Print Mode" displays in the control panel.
Note:
• The selected media (Type 1 to 30) is displayed in "**." Media Type Menuf. Press the [+] key or [–] key to select "**2: PF Adjust."
g. Press the [>] key. "PF1: Initial Print" displays in the control panel.
• Proceed to Media feed compensation menu.PF Adjust menu
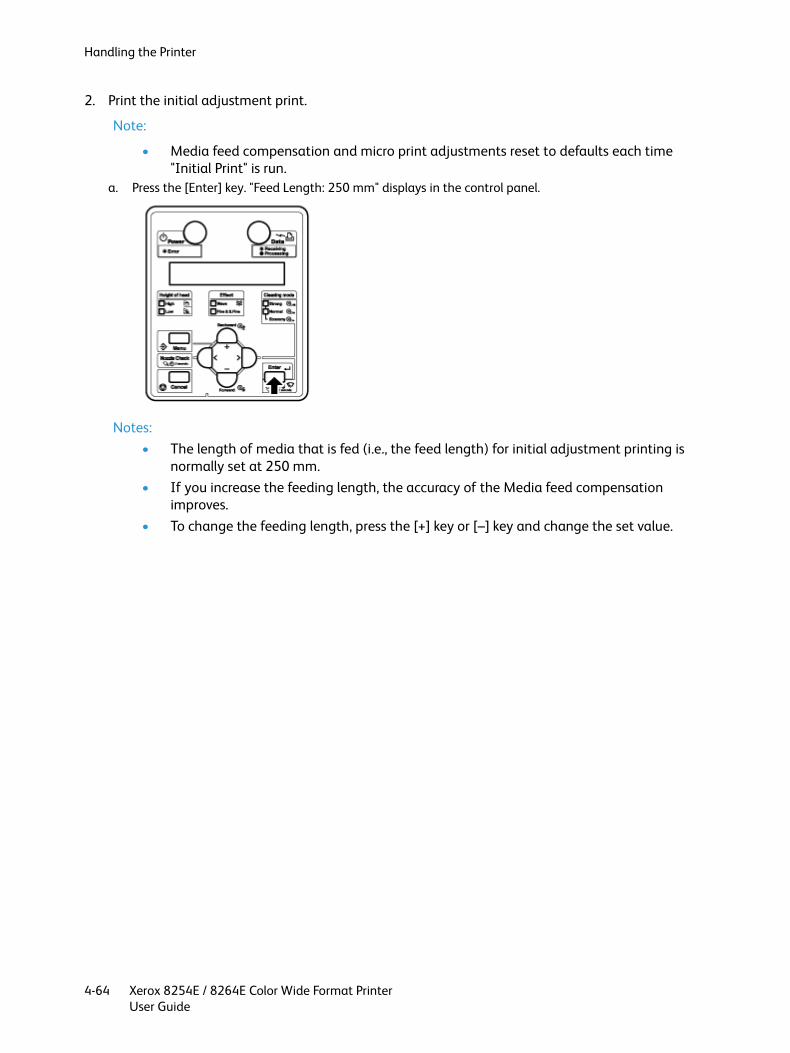
Handling the Printer
Xerox 8254E / 8264E Color Wide Format PrinterUser Guide
4-64
2. Print the initial adjustment print.
Note:
• Media feed compensation and micro print adjustments reset to defaults each time "Initial Print" is run.
a. Press the [Enter] key. "Feed Length: 250 mm" displays in the control panel.
Notes:• The length of media that is fed (i.e., the feed length) for initial adjustment printing is
normally set at 250 mm.• If you increase the feeding length, the accuracy of the Media feed compensation
improves.• To change the feeding length, press the [+] key or [–] key and change the set value.
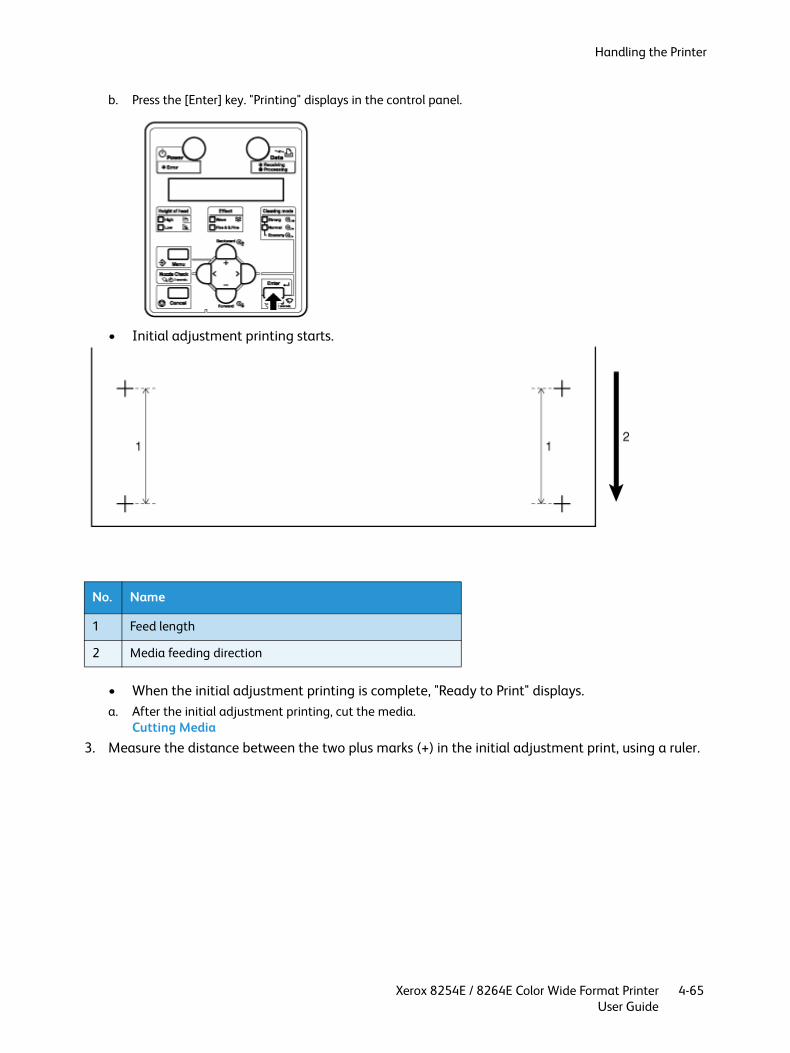
Handling the Printer
Xerox 8254E / 8264E Color Wide Format PrinterUser Guide
4-65
b. Press the [Enter] key. "Printing" displays in the control panel.
• Initial adjustment printing starts.
• When the initial adjustment printing is complete, "Ready to Print" displays.a. After the initial adjustment printing, cut the media.
Cutting Media3. Measure the distance between the two plus marks (+) in the initial adjustment print, using a ruler.
No. Name
1 Feed length
2 Media feeding direction
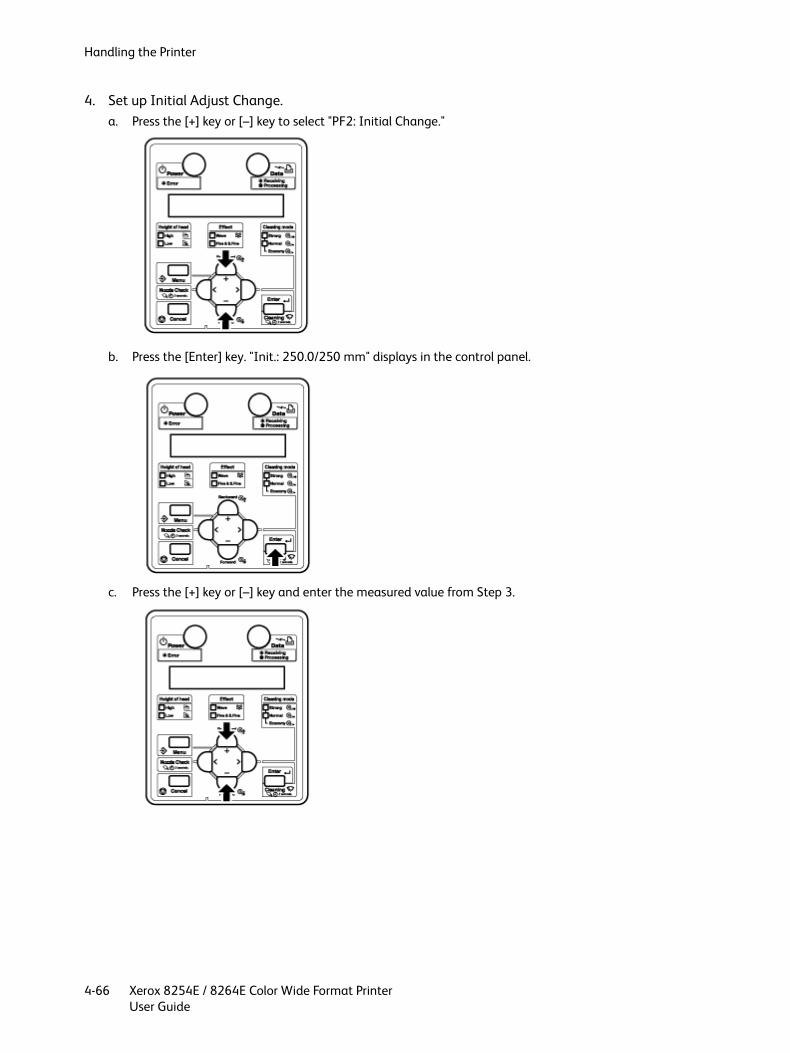
Handling the Printer
Xerox 8254E / 8264E Color Wide Format PrinterUser Guide
4-66
4. Set up Initial Adjust Change.a. Press the [+] key or [–] key to select "PF2: Initial Change."
b. Press the [Enter] key. "Init.: 250.0/250 mm" displays in the control panel.
c. Press the [+] key or [–] key and enter the measured value from Step 3.

Handling the Printer
Xerox 8254E / 8264E Color Wide Format PrinterUser Guide
4-67
d. Press the [Enter] key. "PF2: Initial Change" displays in the control panel.
• The initial adjustment value is saved.5. Perform Confirm Print.
a. Press the [+] key or [–] key to select "PF3: Confirm Print.".
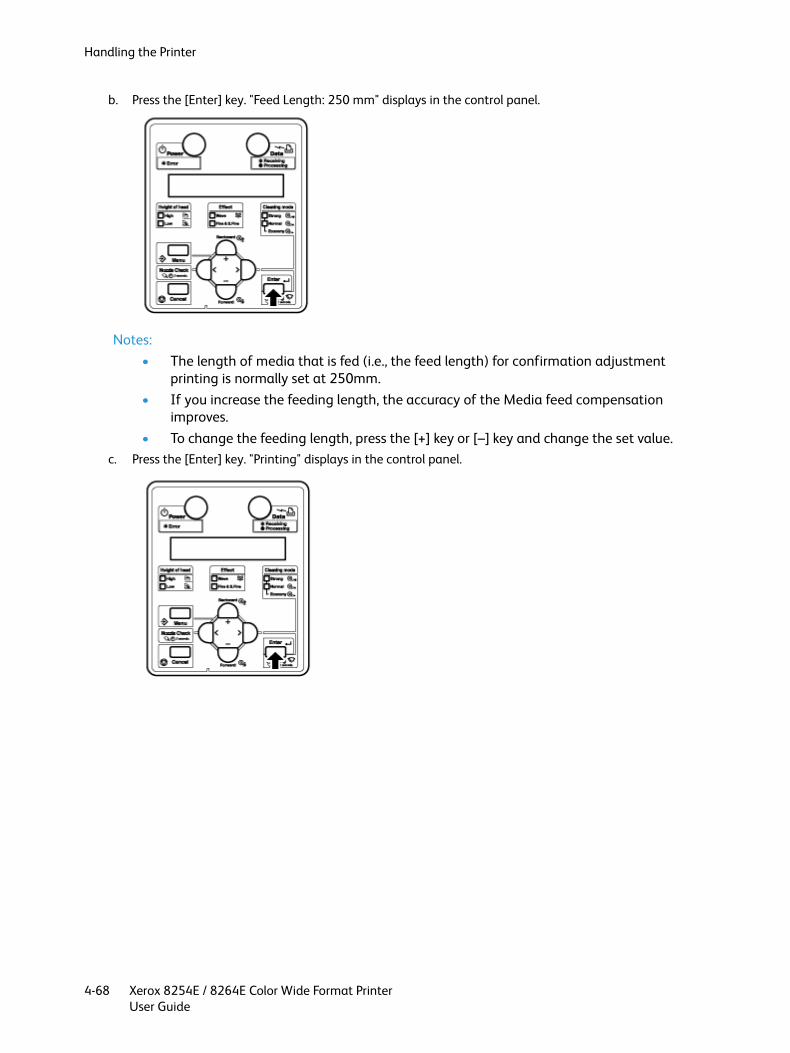
Handling the Printer
Xerox 8254E / 8264E Color Wide Format PrinterUser Guide
4-68
b. Press the [Enter] key. "Feed Length: 250 mm" displays in the control panel.
Notes:• The length of media that is fed (i.e., the feed length) for confirmation adjustment
printing is normally set at 250mm.• If you increase the feeding length, the accuracy of the Media feed compensation
improves.• To change the feeding length, press the [+] key or [–] key and change the set value.
c. Press the [Enter] key. "Printing" displays in the control panel.
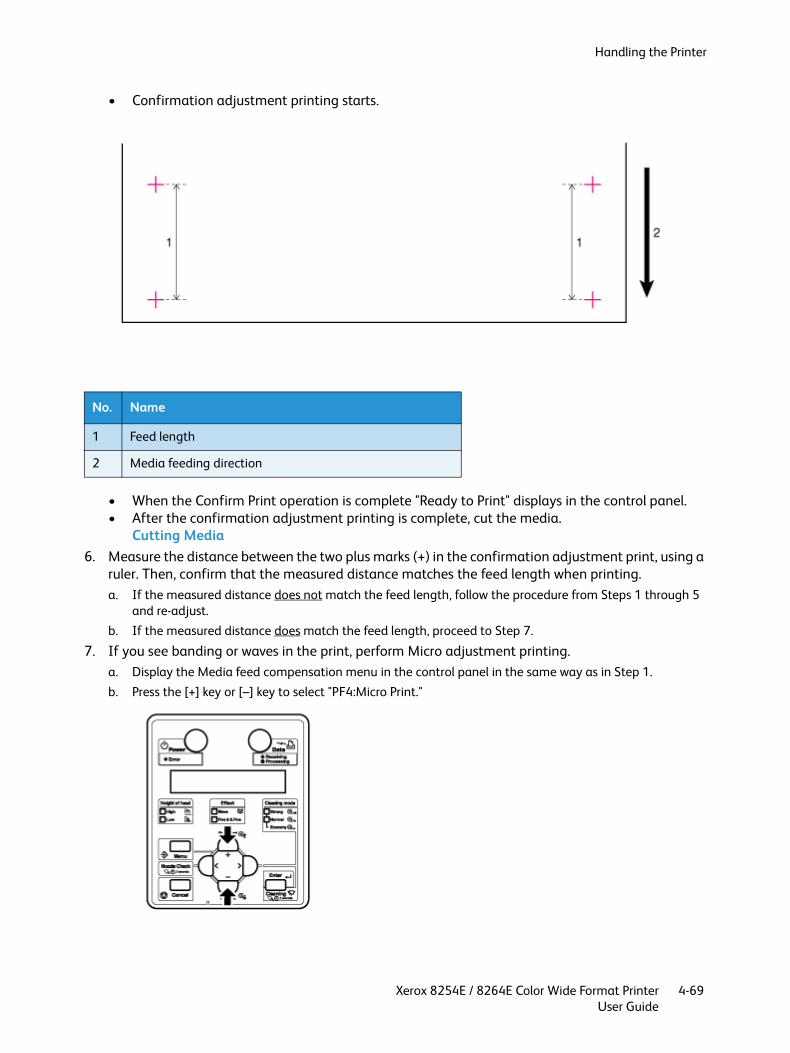
Handling the Printer
Xerox 8254E / 8264E Color Wide Format PrinterUser Guide
4-69
• Confirmation adjustment printing starts.
• When the Confirm Print operation is complete "Ready to Print" displays in the control panel.• After the confirmation adjustment printing is complete, cut the media.
Cutting Media6. Measure the distance between the two plus marks (+) in the confirmation adjustment print, using a
ruler. Then, confirm that the measured distance matches the feed length when printing.a. If the measured distance does not match the feed length, follow the procedure from Steps 1 through 5
and re-adjust.b. If the measured distance does match the feed length, proceed to Step 7.
7. If you see banding or waves in the print, perform Micro adjustment printing.a. Display the Media feed compensation menu in the control panel in the same way as in Step 1.b. Press the [+] key or [–] key to select "PF4:Micro Print."
No. Name
1 Feed length
2 Media feeding direction

Handling the Printer
Xerox 8254E / 8264E Color Wide Format PrinterUser Guide
4-70
c. Press the [Enter] key. "Printing" displays in the control panel.
• Micro adjustment printing starts.
Notes:• If, after viewing the first band, you feel that the adjustment might not have been large
enough, you do not have to wait for all five bands of the image to finish printing. You can speed things up by doing the following:– Press the [Cancel] key.– Make another adjustment.– Run again.
• When you feel you are in the correct region, run again and view all five bands to confirm that the adjustment is correct.
d. Press the [Enter] key.
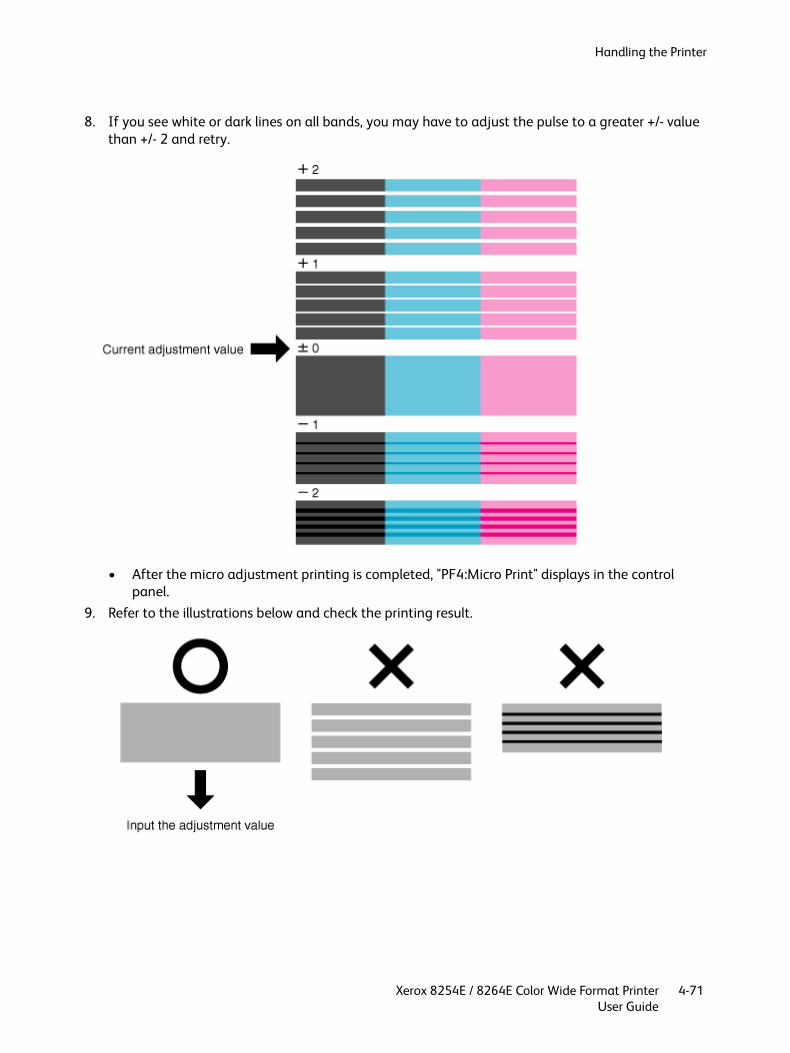
Handling the Printer
Xerox 8254E / 8264E Color Wide Format PrinterUser Guide
4-71
8. If you see white or dark lines on all bands, you may have to adjust the pulse to a greater +/- value than +/- 2 and retry.
• After the micro adjustment printing is completed, "PF4:Micro Print" displays in the control panel.
9. Refer to the illustrations below and check the printing result.
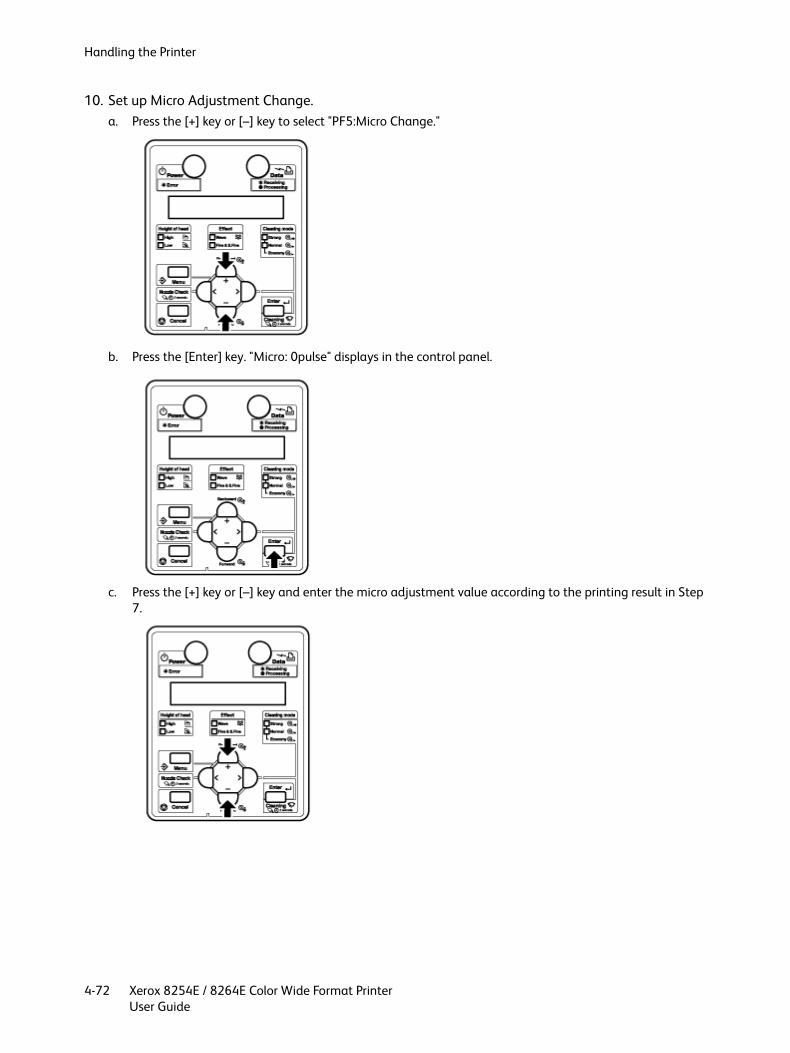
Handling the Printer
Xerox 8254E / 8264E Color Wide Format PrinterUser Guide
4-72
10. Set up Micro Adjustment Change.a. Press the [+] key or [–] key to select "PF5:Micro Change."
b. Press the [Enter] key. "Micro: 0pulse" displays in the control panel.
c. Press the [+] key or [–] key and enter the micro adjustment value according to the printing result in Step 7.
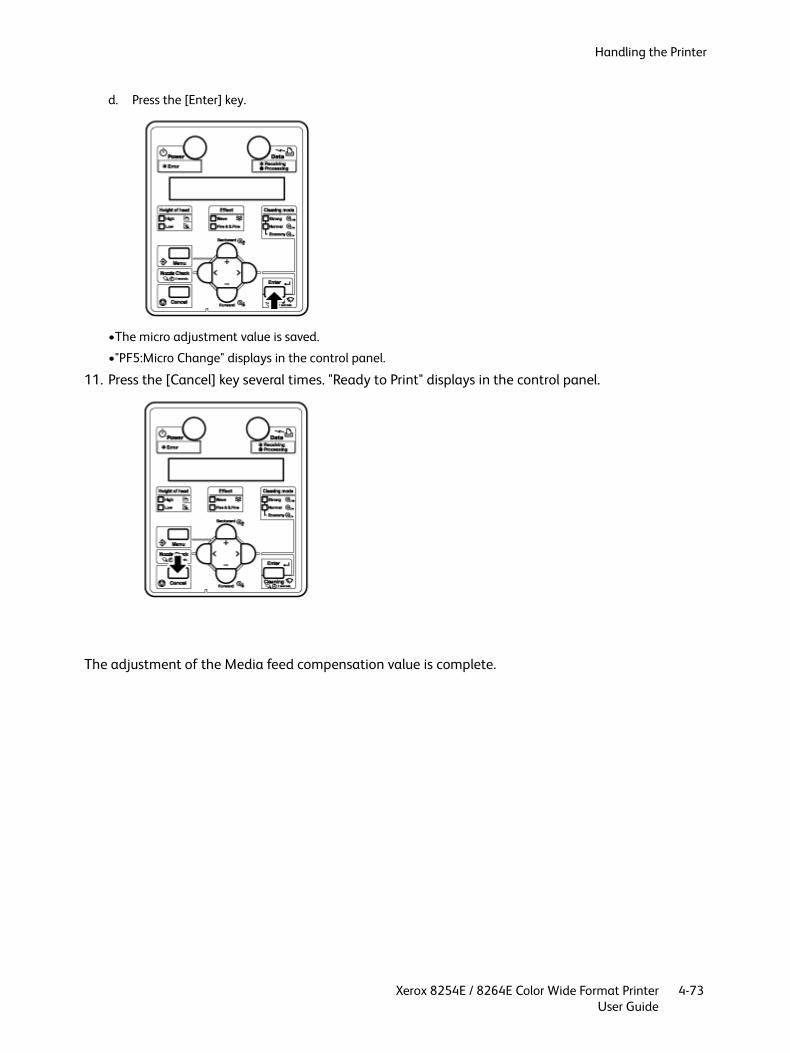
Handling the Printer
Xerox 8254E / 8264E Color Wide Format PrinterUser Guide
4-73
d. Press the [Enter] key.
•The micro adjustment value is saved.
•"PF5:Micro Change" displays in the control panel.
11. Press the [Cancel] key several times. "Ready to Print" displays in the control panel.
The adjustment of the Media feed compensation value is complete.

Handling the Printer
Xerox 8254E / 8264E Color Wide Format PrinterUser Guide
4-74
8264E only - Installing Media Holder Plates
Variations in quality and use conditions can cause the edges of the media to curl, resulting in damage to the media by the print head surface. To prevent this, use the media holder plates to reduce the amount of curling in the media.
Follow the procedure below to install the media holder plates.
1. Display the Side margin menu in the control panel.a. Press the [Menu] key. "Menu 1: Setup>" displays in the control panel.
b. Press the [>] key. "Set1: MediaType" displays in the control panel.

Handling the Printer
Xerox 8254E / 8264E Color Wide Format PrinterUser Guide
4-75
c. Press the [+] key or [–] key to select "Set4: Side Margin."
d. Press the [Enter] key. "Side Margin: ** mm" displays in the control panel.
Side Margin Menu
Note:
• The current setting value is displayed in the "**" of the Side Margin menu.2. Set up the margins (side margins) to 10mm while printing.
a. Press the [+] key or [–] key to select "Side Margin: 10 mm."
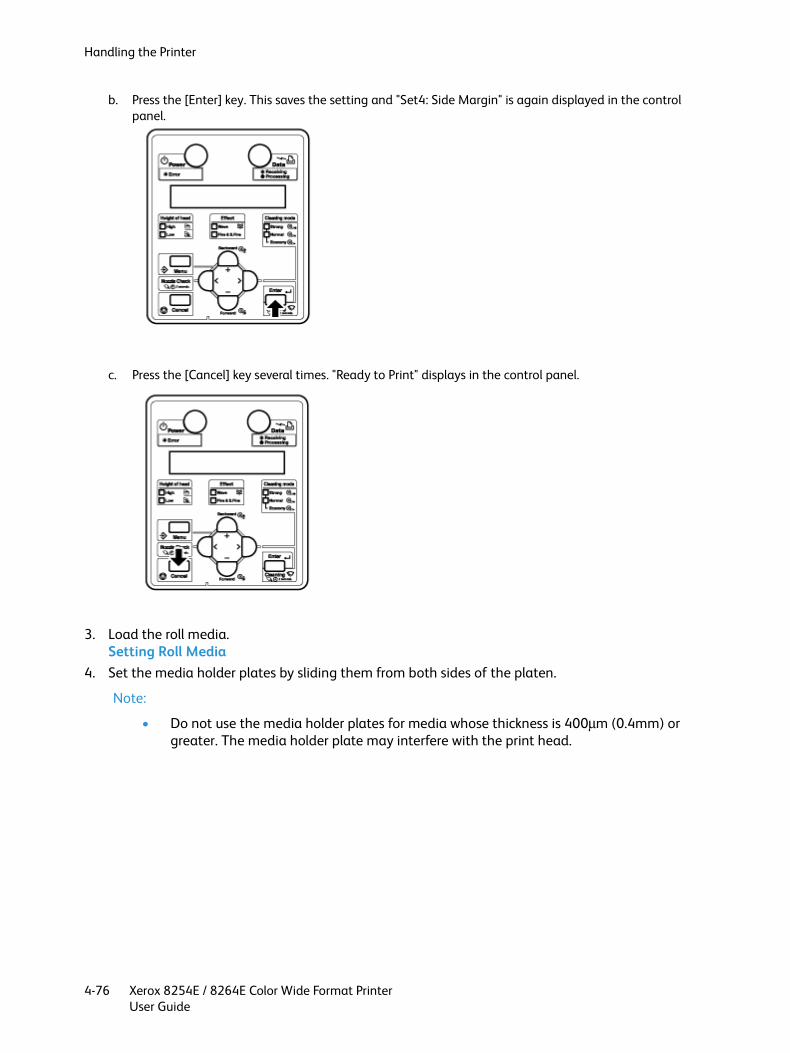
Handling the Printer
Xerox 8254E / 8264E Color Wide Format PrinterUser Guide
4-76
b. Press the [Enter] key. This saves the setting and "Set4: Side Margin" is again displayed in the control panel.
c. Press the [Cancel] key several times. "Ready to Print" displays in the control panel.
3. Load the roll media.Setting Roll Media
4. Set the media holder plates by sliding them from both sides of the platen.
Note:
• Do not use the media holder plates for media whose thickness is 400μm (0.4mm) or greater. The media holder plate may interfere with the print head.
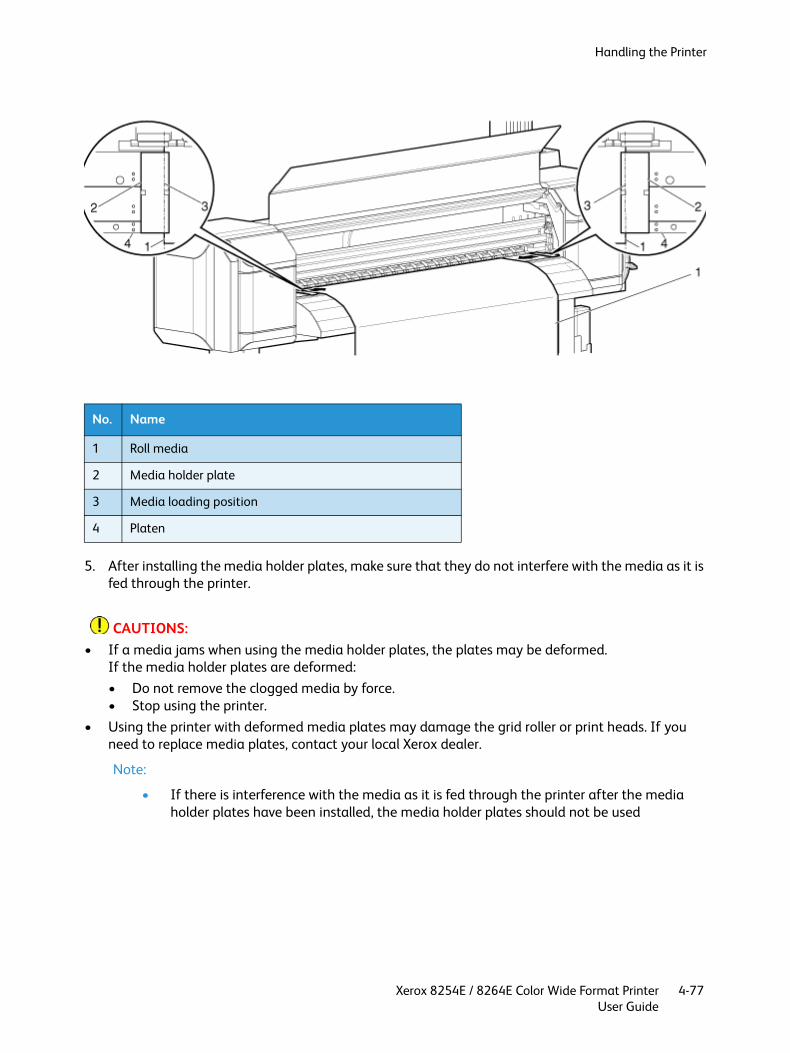
Handling the Printer
Xerox 8254E / 8264E Color Wide Format PrinterUser Guide
4-77
5. After installing the media holder plates, make sure that they do not interfere with the media as it is fed through the printer.
CAUTIONS:• If a media jams when using the media holder plates, the plates may be deformed.
If the media holder plates are deformed:• Do not remove the clogged media by force.• Stop using the printer.
• Using the printer with deformed media plates may damage the grid roller or print heads. If you need to replace media plates, contact your local Xerox dealer.
Note:
• If there is interference with the media as it is fed through the printer after the media holder plates have been installed, the media holder plates should not be used
No. Name
1 Roll media
2 Media holder plate
3 Media loading position
4 Platen
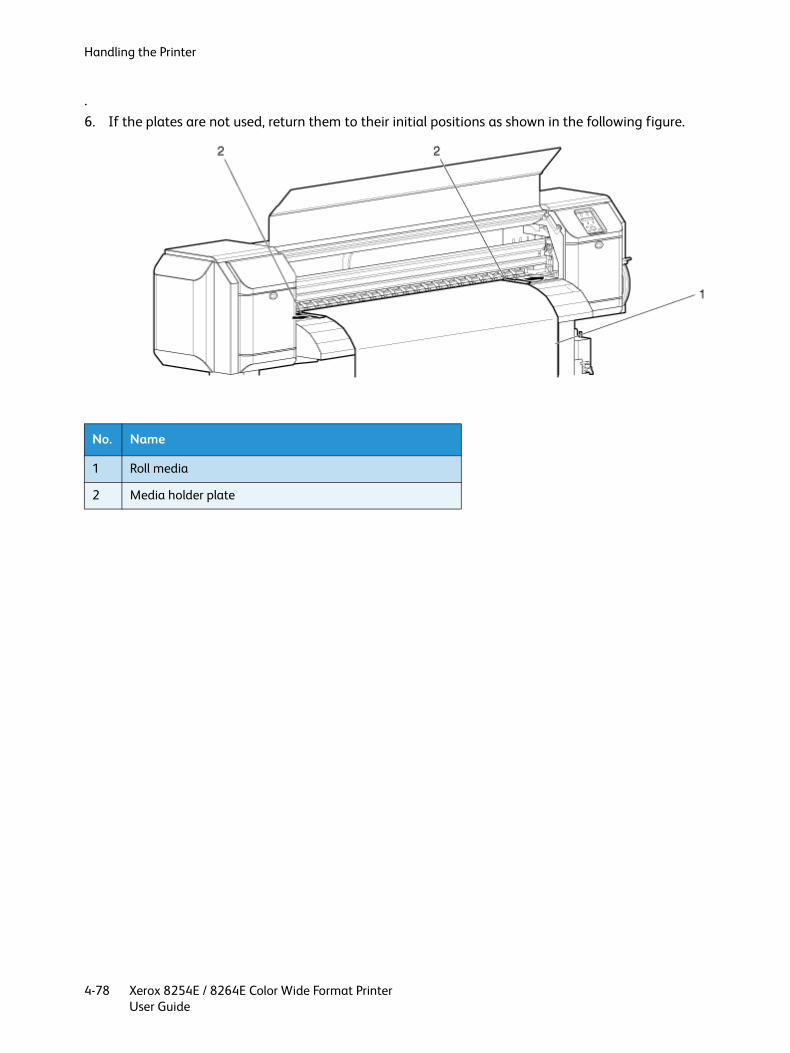
Handling the Printer
Xerox 8254E / 8264E Color Wide Format PrinterUser Guide
4-78
.6. If the plates are not used, return them to their initial positions as shown in the following figure.
No. Name
1 Roll media
2 Media holder plate
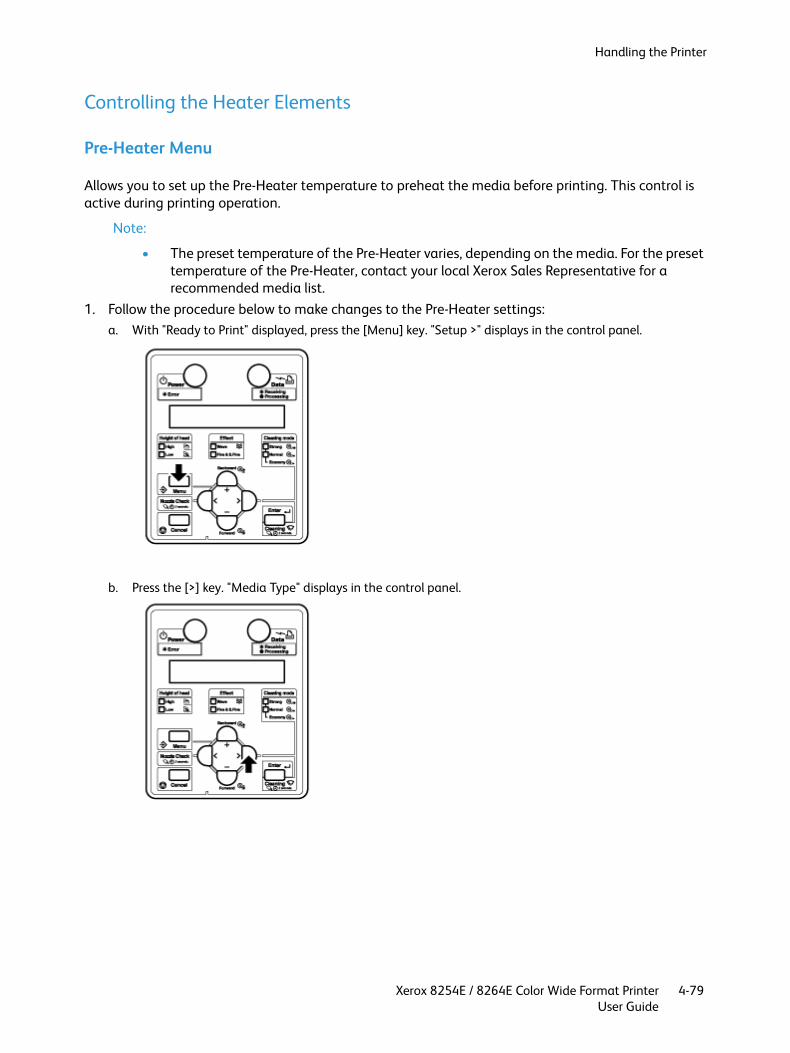
Handling the Printer
Xerox 8254E / 8264E Color Wide Format PrinterUser Guide
4-79
Controlling the Heater Elements
Pre-Heater Menu
Allows you to set up the Pre-Heater temperature to preheat the media before printing. This control is active during printing operation.
Note:
• The preset temperature of the Pre-Heater varies, depending on the media. For the preset temperature of the Pre-Heater, contact your local Xerox Sales Representative for a recommended media list.
1. Follow the procedure below to make changes to the Pre-Heater settings: a. With "Ready to Print" displayed, press the [Menu] key. "Setup >" displays in the control panel.
b. Press the [>] key. "Media Type" displays in the control panel.

Handling the Printer
Xerox 8254E / 8264E Color Wide Format PrinterUser Guide
4-80
c. Press the [Enter] key. "Type *" displays in the control panel (where * is the currently-selected Media Type).
d. Press the [Enter] key. "Print mode" displays in the control panel.
e. Press either the [+] key or the [-] key until "PreHeater" displays in the control panel.

Handling the Printer
Xerox 8254E / 8264E Color Wide Format PrinterUser Guide
4-81
f. Press the [Enter] key. "PreHeater **c" displays in the control panel (where ** is the current Pre-heater temperature setting).
g. Press the [-] key to lower the temperature or Press the [+] key to raise it.
•The minimum temperature is 30C and the maximum temperature is 50C.

8254E / 8264E User Guide 4-82
Platen Heater Menu
Allows you to set up the Platen Heater temperature to warm up ink and improve print quality. This control is active during printing operation.
Note:
• The preset temperature of the Platen Heater varies, depending on the media. For the preset temperature of the Platen Heater, contact your local Xerox Sales Representative for a recommended media list.
1. Follow the procedure below to make changes to the Platen Heater settings: a. With "Ready to Print" displayed, press the [Menu] key. "Setup >" displays in the control panel.
Setup Item Setting Description
Pre-Heater Off / <30° C> to 50° C Sets up the Pre-Heater temperature.
1. Roll media2. Pre-Heater3. Print head
—
Pressing the [Enter] key saves the setting and shifts to the previous menu.Pressing the [Cancel] key cancels the setting and shifts to the previous menu. User media menu
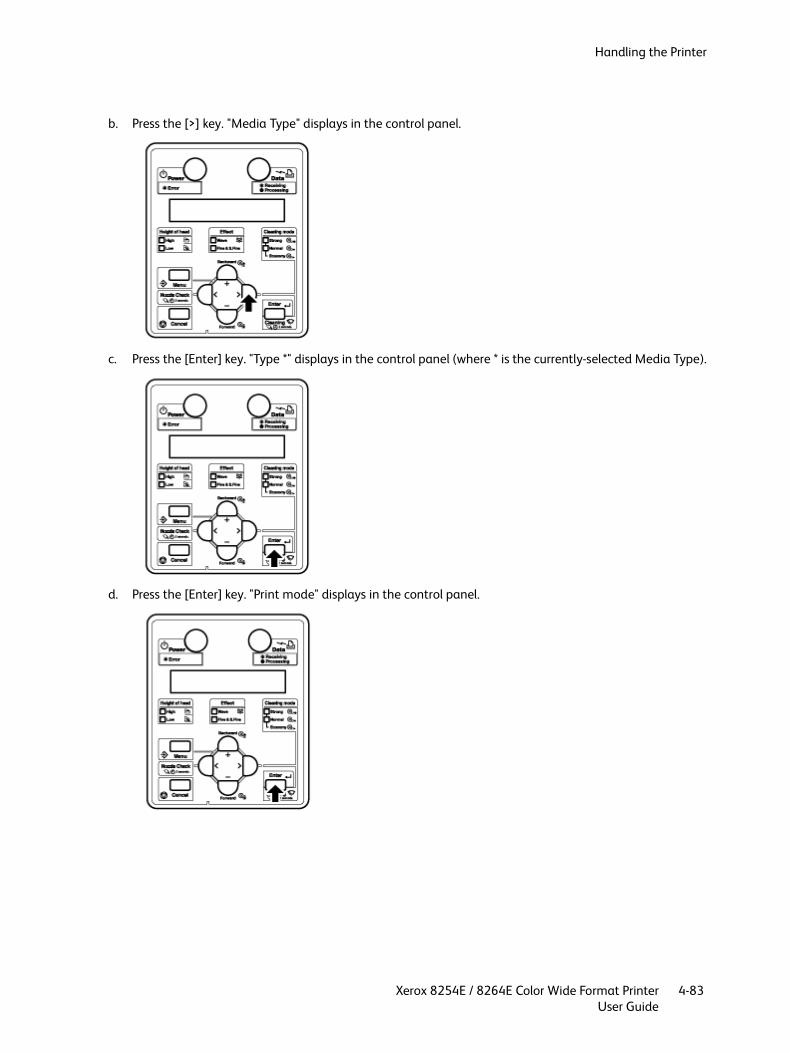
Handling the Printer
Xerox 8254E / 8264E Color Wide Format PrinterUser Guide
4-83
b. Press the [>] key. "Media Type" displays in the control panel.
c. Press the [Enter] key. "Type *" displays in the control panel (where * is the currently-selected Media Type).
d. Press the [Enter] key. "Print mode" displays in the control panel.
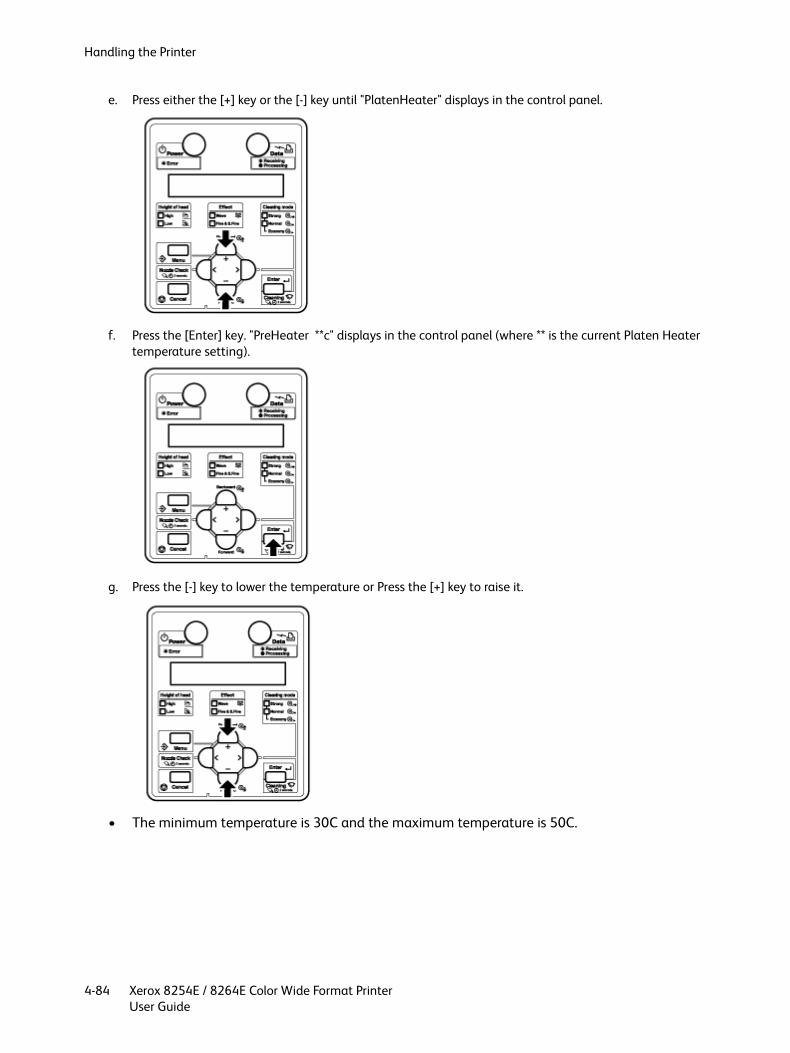
Handling the Printer
Xerox 8254E / 8264E Color Wide Format PrinterUser Guide
4-84
e. Press either the [+] key or the [-] key until "PlatenHeater" displays in the control panel.
f. Press the [Enter] key. "PreHeater **c" displays in the control panel (where ** is the current Platen Heater temperature setting).
g. Press the [-] key to lower the temperature or Press the [+] key to raise it.
• The minimum temperature is 30C and the maximum temperature is 50C.
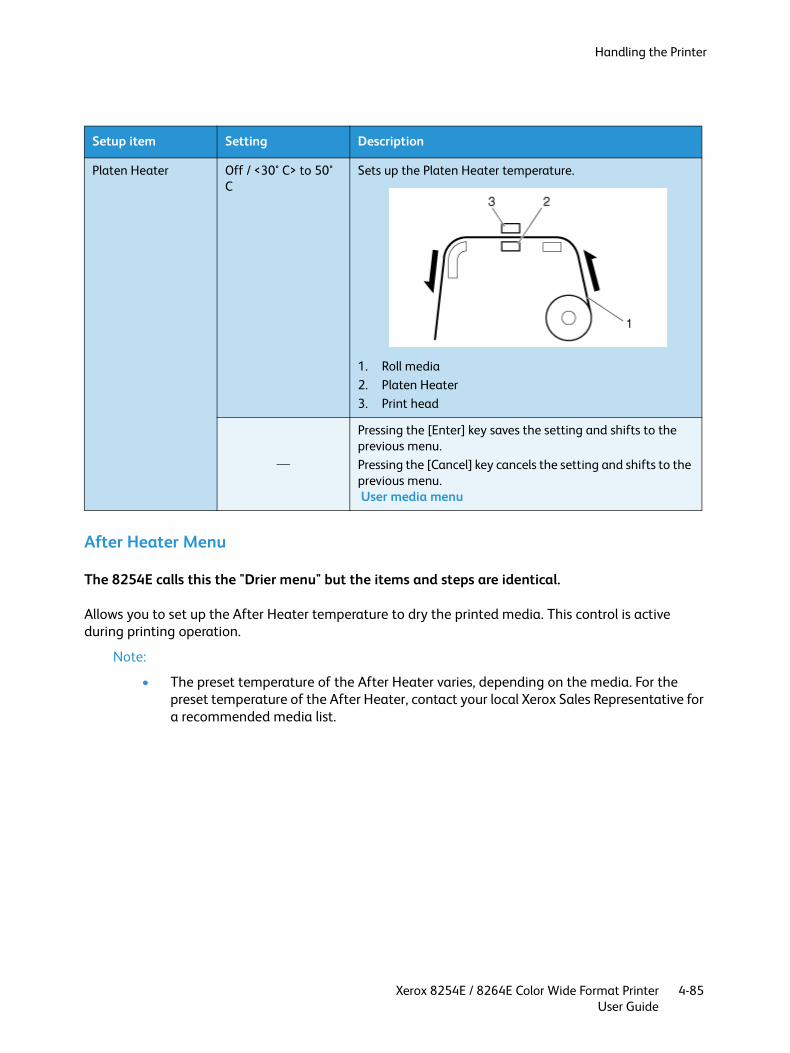
Handling the Printer
Xerox 8254E / 8264E Color Wide Format PrinterUser Guide
4-85
After Heater Menu
The 8254E calls this the "Drier menu" but the items and steps are identical.
Allows you to set up the After Heater temperature to dry the printed media. This control is active during printing operation.
Note:
• The preset temperature of the After Heater varies, depending on the media. For the preset temperature of the After Heater, contact your local Xerox Sales Representative for a recommended media list.
Setup item Setting Description
Platen Heater Off / <30° C> to 50° C
Sets up the Platen Heater temperature.
1. Roll media2. Platen Heater3. Print head
—
Pressing the [Enter] key saves the setting and shifts to the previous menu.Pressing the [Cancel] key cancels the setting and shifts to the previous menu. User media menu

Handling the Printer
Xerox 8254E / 8264E Color Wide Format PrinterUser Guide
4-86
1. Follow the procedure below to make changes to the After Heater settings: a. With "Ready to Print" displayed, press the [Menu] key. "Setup >" displays in the control panel.
b. Press the [>] key. "Media Type" displays in the control panel.
c. Press the [Enter] key. "Type *" displays in the control panel (where * is the currently-selected Media Type).

Handling the Printer
Xerox 8254E / 8264E Color Wide Format PrinterUser Guide
4-87
d. Press the [Enter] key. "Print mode" displays in the control panel.
e. Press either the [+] key or the [-] key until "AfterHeater" displays in the control panel.
f. Press the [Enter] key. "PreHeater **c" displays in the control panel (where ** is the current After Heater temperature setting).

Handling the Printer
Xerox 8254E / 8264E Color Wide Format PrinterUser Guide
4-88
g. Press the [-] key to lower the temperature or Press the [+] key to raise it.
• The minimum temperature is 30C and the maximum temperature is 50C.
Setup item Setting Description
After Heater Off / <30° C> to 50° C Sets up the After Heater temperature.
4. Roll media5. After Heater6. Print head
—
Pressing the [Enter] key saves the setting and shifts to the previous menu.Pressing the [Cancel] key cancels the setting and shifts to the previous menu. User media menu

Handling the Printer
Xerox 8254E / 8264E Color Wide Format PrinterUser Guide
4-89
Standby Heating Menu
Allows you to set up the length of time to preheat the heater while the printer is in standby mode.
1. Follow the procedure below to make changes to the StandbyHeating settings: a. With "Ready to Print" displayed, press the [Menu] key. "Setup >" displays in the control panel.
b. Press the [>] key. "Media Type" displays in the control panel.
c. Press the [Enter] key. "Type *" displays in the control panel (where * is the currently-selected Media Type).

Handling the Printer
Xerox 8254E / 8264E Color Wide Format PrinterUser Guide
4-90
d. Press the [Enter] key. "Print mode" displays in the control panel.
e. Press either the [+] key or the [-] key until "Standby" displays in the control panel.
f. Press the [Enter] key. "PreHeater **c" displays in the control panel (where ** is the current Standby Heating setting).

Handling the Printer
Xerox 8254E / 8264E Color Wide Format PrinterUser Guide
4-91
g. Press the [-] key to decrease the setting or Press the [+] key to increase it.
• The minimum setting is 10 minutes and the maximum setting is 240 minutes.
Setup item Setting Description
StandbyHeating 10 min. to <60 min.> to 240 min.
Sets the length of time to preheat the heaters. When more than the set time has passed, each heater turns off.
—
•Pressing the [Enter] key saves the setting and shifts to the previous menu.•Pressing the [Cancel] key cancels the setting and shifts to the previous menu. User media menu
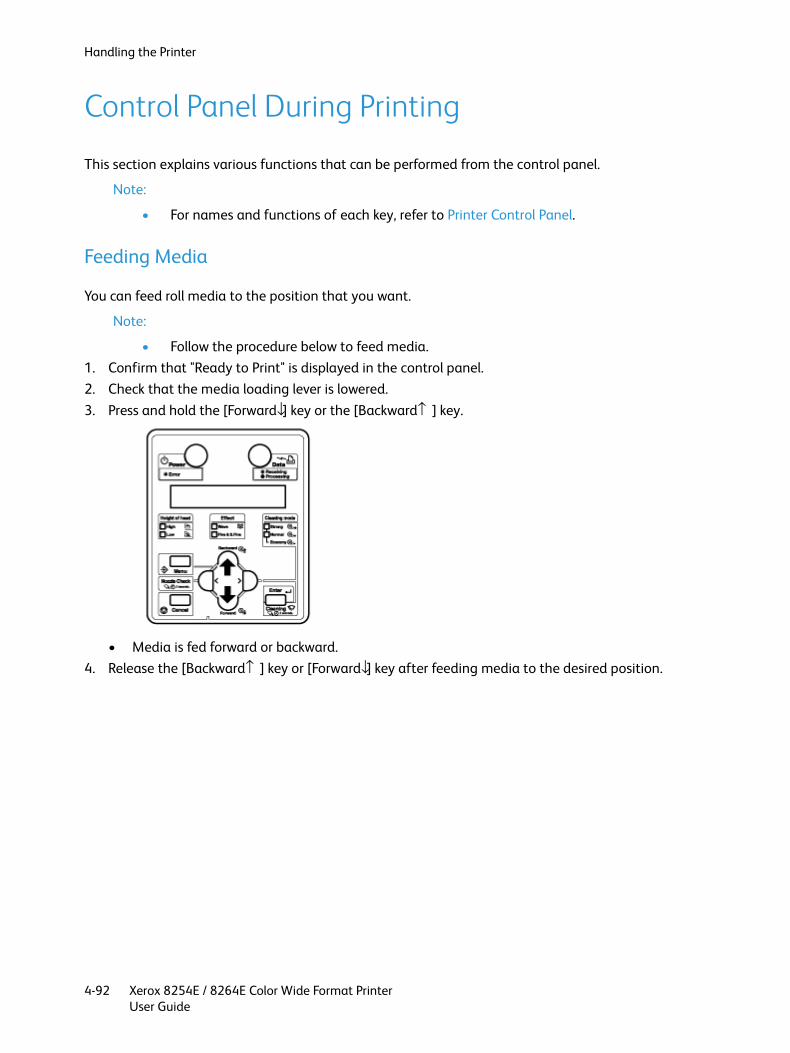
Handling the Printer
Xerox 8254E / 8264E Color Wide Format PrinterUser Guide
4-92
Control Panel During Printing
This section explains various functions that can be performed from the control panel.
Note:
• For names and functions of each key, refer to Printer Control Panel.
Feeding Media
You can feed roll media to the position that you want.
Note:
• Follow the procedure below to feed media.1. Confirm that "Ready to Print" is displayed in the control panel.2. Check that the media loading lever is lowered.3. Press and hold the [Forward↓] key or the [Backward↑ ] key.
• Media is fed forward or backward.4. Release the [Backward↑ ] key or [Forward↓] key after feeding media to the desired position.

Handling the Printer
Xerox 8254E / 8264E Color Wide Format PrinterUser Guide
4-93
Stopping Printing Operation
If you want to stop printing for any reason, do the following.
1. Stop sending printing data from the computer to the printer.2. Press the [Cancel] key.
• Pressing [Cancel] causes the printer to do the following.
Note:
• If a large amount of data is saved on the printer, the control panel may not display "Ready to Print" by pressing the [Cancel] key once. In such cases, wait for a few seconds and press the [Cancel] key again.
Printer Status Operation with the [Cancel] Key Pressed
During printing Terminates printing and deletes the remaining data in the printer.
Receiving/converting Deletes the received/analyzed data and the subsequent file of data.
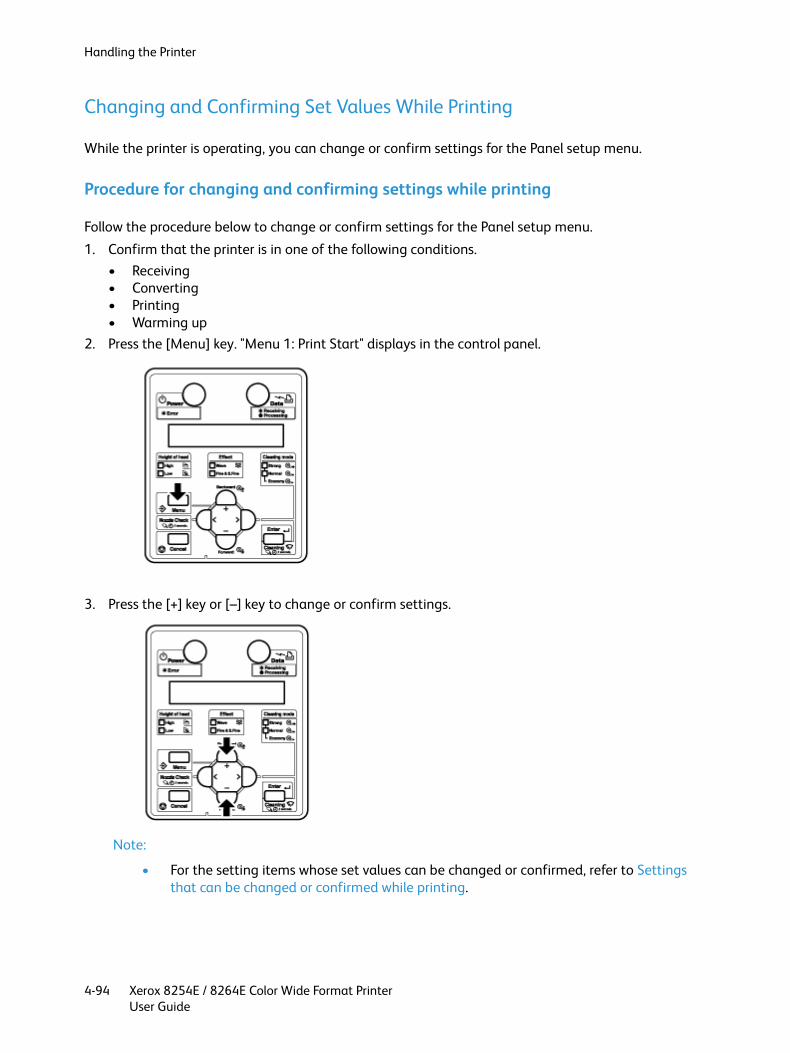
Handling the Printer
Xerox 8254E / 8264E Color Wide Format PrinterUser Guide
4-94
Changing and Confirming Set Values While Printing
While the printer is operating, you can change or confirm settings for the Panel setup menu.
Procedure for changing and confirming settings while printing
Follow the procedure below to change or confirm settings for the Panel setup menu.
1. Confirm that the printer is in one of the following conditions.• Receiving• Converting• Printing• Warming up
2. Press the [Menu] key. "Menu 1: Print Start" displays in the control panel.
3. Press the [+] key or [–] key to change or confirm settings.
Note:
• For the setting items whose set values can be changed or confirmed, refer to Settings that can be changed or confirmed while printing.

Handling the Printer
Xerox 8254E / 8264E Color Wide Format PrinterUser Guide
4-95
Settings that can be changed or confirmed while printingNotes:
• The Print start menu is displayed only when the printer is warming up.• When you change a setting during operation, be sure to select "Backup" to save the
setting that you changed.• If the printer returns to "Ready to Print" mode without "Backup" being selected, the
changed setting is not saved.
Setup item Setting Description
Print Start—
•[Enter] key: If the heater temperature does not reach the set value during warming-up, printing starts.
Temperature Pre Check the current Pre-Heater temperature.
Platen Check the current Platen Heater temperature.
After Check the current After Heater temperature.
Pre-Heater Off / 30 °C to 50 °C Change the Pre-Heater temperature.
Platen Heater Off / 30 °C to 50 °C Change the Platen Heater temperature.
After Heater Off / 30 °C to 50 °C Change the After Heater temperature.
PF Adjust –20 pulse to 0 to 20 pulse
Change the feed adjustment value.
Backup — •[Enter] key: Save the changed setting.
— •[Cancel] key: "Ready to Print" displays in the control panel.

Handling the Printer
Xerox 8254E / 8264E Color Wide Format PrinterUser Guide
4-96
Pausing printing
It is possible to pause the printer during printing. Follow the procedure below to pause or restart printing.
Note:
• If you pause the printing, the print quality will not be guaranteed.1. While the printer is printing, press the [–] key.
• The printer pauses its printing.• "PrintRestart -> ENTER" displays in the control panel.
2. To restart printing, press the [Enter] key.
• The printer resumes its printing.

Handling the Printer
Xerox 8254E / 8264E Color Wide Format PrinterUser Guide
4-97
Operations After Printing
This section describes the media cutting procedures.
Cutting Media
This section explains how to cut roll media.
8264E Cutting Media
CAUTION:
• When printing is finished, the media guide is hot. Wait until the media guide cools off.
Follow the procedure below to cut roll media.
1. Verify the following regarding the operational condition of the printer.• Printing or other operations are not in progress.• "Ready to Print" is displayed in the control panel.
2. If the roll media cut position is changed, refer to Feeding Media and advance the roll media to the desired cut position.
3. Open the front cover.
No. Name
1 Front cover

Handling the Printer
Xerox 8254E / 8264E Color Wide Format PrinterUser Guide
4-98
WARNINGS:• Pay attention to the following points when you cut roll media. Mishandling the razor blade may
cause a cut on your finger or hand.• When you hold media, do not place your finger on the media cut groove.• Move the razor blade along the media cut groove. Move the razor blade along the media cut
groove.4. Place a razor blade on the media cut groove on the media guide, and cut the roll media.
The cutting roll media operation is complete.
Note:
• When loading the new roll media, cut the front edge of the media if it is not straight.
No. Name
1 Media guide
2 Media cut groove
3 Razor blade
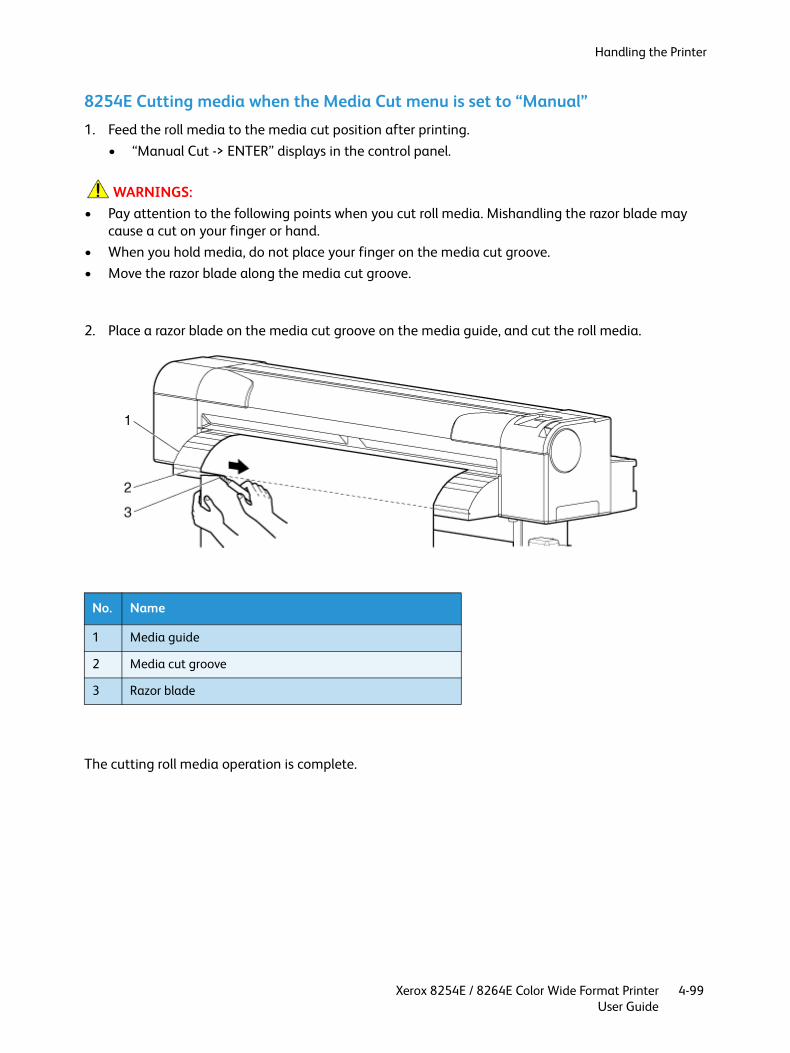
Handling the Printer
Xerox 8254E / 8264E Color Wide Format PrinterUser Guide
4-99
8254E Cutting media when the Media Cut menu is set to “Manual”1. Feed the roll media to the media cut position after printing.
• “Manual Cut -> ENTER” displays in the control panel.
WARNINGS:• Pay attention to the following points when you cut roll media. Mishandling the razor blade may
cause a cut on your finger or hand.• When you hold media, do not place your finger on the media cut groove. • Move the razor blade along the media cut groove.
2. Place a razor blade on the media cut groove on the media guide, and cut the roll media.
The cutting roll media operation is complete.
No. Name
1 Media guide
2 Media cut groove
3 Razor blade
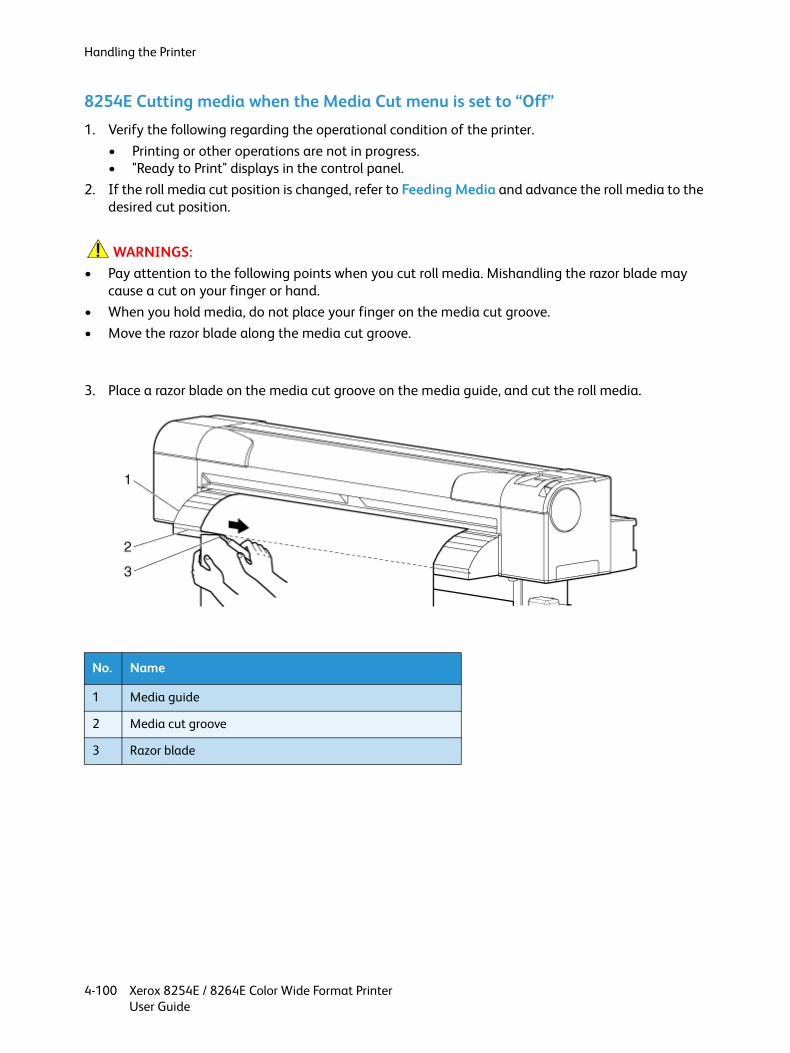
Handling the Printer
Xerox 8254E / 8264E Color Wide Format PrinterUser Guide
4-100
8254E Cutting media when the Media Cut menu is set to “Off”1. Verify the following regarding the operational condition of the printer.
• Printing or other operations are not in progress.• "Ready to Print" displays in the control panel.
2. If the roll media cut position is changed, refer to Feeding Media and advance the roll media to the desired cut position.
WARNINGS:• Pay attention to the following points when you cut roll media. Mishandling the razor blade may
cause a cut on your finger or hand.• When you hold media, do not place your finger on the media cut groove.• Move the razor blade along the media cut groove.
3. Place a razor blade on the media cut groove on the media guide, and cut the roll media.
No. Name
1 Media guide
2 Media cut groove
3 Razor blade

Xerox 8254E / 8264E Color Wide Format PrinterUser Guide
5-1
5Troubleshooting
Introduction
This chapter describes possible problems you may encounter while using this printer and how to resolve them. If an error occurs that is not mentioned in this section, contact your local Xerox dealer.
Note:
To receive your warranty for this printer, you must prepare the warranty certificate. If the warranty certificate is not presented, the repair will not be covered by the warranty even if it occurs within the warranty period.If you have signed a maintenance service contract, prepare that or a similar document.
Failures and Malfunctions of the Printer
This section describes malfunctions and failures of the printer that do not appear in the display in the control panel, their possible causes and their remedies.
Problems in Installation and Introduction1. Cannot perform ink replenishment
No. Possible cause Remedy Reference
1 Is the front cover open or media loading lever raised?
Close the front cover, or lower the media loading lever.
Media Handling
2 8264E only - Is a maintenance cover open?
Close the maintenance cover. Cleaning the Cleaning WiperCleaning Around the Cap
3 Are the four ink cartridges fully inserted?
Fully insert the four ink cartridges. Replacing Ink Cartridges

Xerox 8254E / 8264E Color Wide Format PrinterUser Guide
5-2
2. Ink does not come out after ink replenishment
Cannot Print at all1. Does not work at all after power activation
No. Possible cause Remedy Reference
1 Is the ink cartridge cold or frozen?
Leave the cartridge at room temperature for at least three hours, and perform head cleaning several times.
Cleaning the Head
2 Is the power turned OFF during ink replenishment?
Turn the power ON and continue ink replenishment.
Replacing Ink Cartridges
3 Occasionally, normal printing cannot be performed after ink replenishment.
Perform head cleaning several times, and check it each time.
Cleaning the Head
No. Possible cause Remedy Reference
1 Is the power cable connected to the electrical outlet?
Connect the power cable(s) to an electrical outlet.
Loading Roll Media
2 Does the building’s electrical outlet provide the specified voltage?
Connect the power cable to a different electrical outlet.
Loading Roll Media
3 Is the front cover open or media loading lever raised?
Close the front cover.Lower the media loading lever.
Media Handling
4 8264E only - Is a maintenance cover open?
Close the maintenance cover. Cleaning the Cleaning WiperCleaning Around the Cap
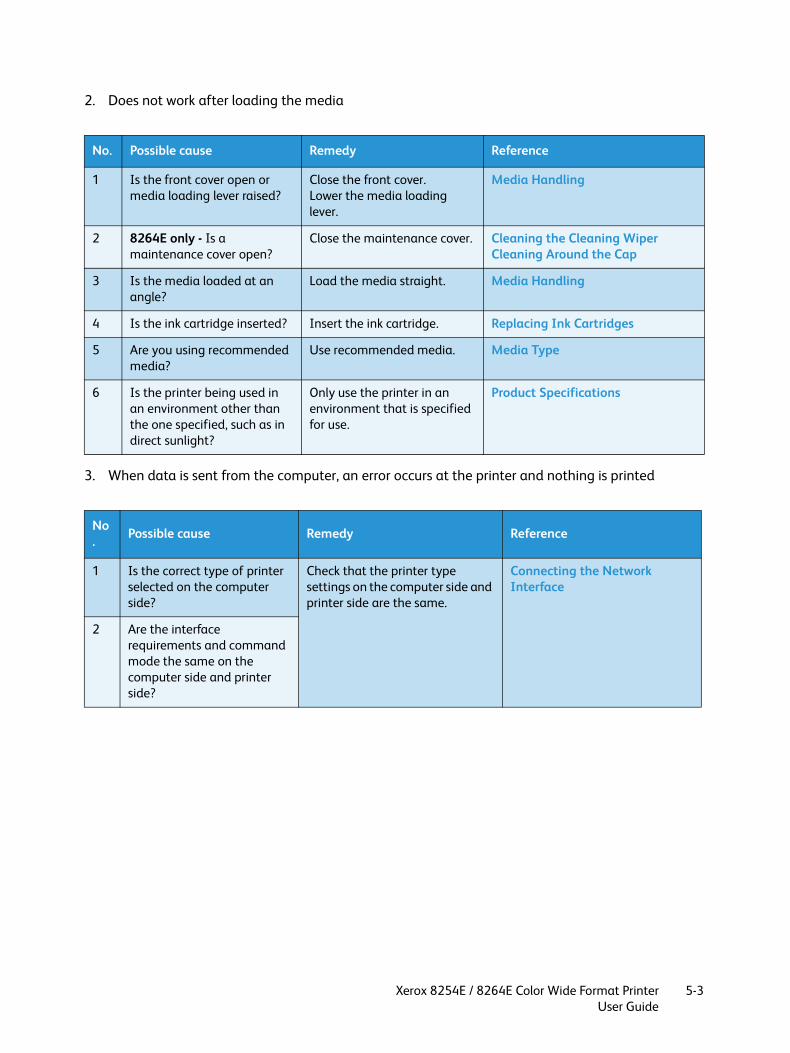
Xerox 8254E / 8264E Color Wide Format PrinterUser Guide
5-3
2. Does not work after loading the media
3. When data is sent from the computer, an error occurs at the printer and nothing is printed
No. Possible cause Remedy Reference
1 Is the front cover open or media loading lever raised?
Close the front cover.Lower the media loading lever.
Media Handling
2 8264E only - Is a maintenance cover open?
Close the maintenance cover. Cleaning the Cleaning WiperCleaning Around the Cap
3 Is the media loaded at an angle?
Load the media straight. Media Handling
4 Is the ink cartridge inserted? Insert the ink cartridge. Replacing Ink Cartridges
5 Are you using recommended media?
Use recommended media. Media Type
6 Is the printer being used in an environment other than the one specified, such as in direct sunlight?
Only use the printer in an environment that is specified for use.
Product Specifications
No. Possible cause Remedy Reference
1 Is the correct type of printer selected on the computer side?
Check that the printer type settings on the computer side and printer side are the same.
Connecting the Network Interface
2 Are the interface requirements and command mode the same on the computer side and printer side?

Xerox 8254E / 8264E Color Wide Format PrinterUser Guide
5-4
4. Cannot use the computer online using LAN
No. Possible cause Remedy Reference
1 Is the network interface cable connected correctly?
Confirm the types of the cross and straight cables, and connect the network interface cable correctly.
Connecting a Network Interface Cable
2 Are the network settings configured correctly?
Configure the network settings correctly.
IP Address Menu through Gateway Menu
3 Do the printer’s network settings match the computer side environment?
Match this printer’s network settings with the computer side environment.
System Requirements
4 Does the Data lamp on the operation turn on after sending printing data from the computer?
If the Data lamp does not turn on, contact the computer manufacturer.
Confirm that the printer is connected to the network and that the IP, Subnet Mask, and Gateway are set properly.

Xerox 8254E / 8264E Color Wide Format PrinterUser Guide
5-5
Media-related Troubleshooting1. The media slips or is torn during initialization.
Note:
If the media is jammed or torn, remove it according to When Media Jams Occur
No. Possible cause Remedy Reference
1 Are you using recommended media?
Use recommended media. Media Type
2 Is the loading position of the media correct?
Set the media correctly. Setting Roll Media
3 8264E only - Is the roll media set correctly?
Feeding media correctly.
Loading Roll Media
4 8254E only -Is the scroller set correctly?
Set the scroller correctly. Loading Roll Media
5 Are there any foreign materials such as paper attached to the pressurizing roller?
Clean the pressurizing roller. Cleaning the Inside of the Printer
6 Is the printer being used in an environment other than the one specified, such as in direct sunlight?
Only use the printer in an environment that is specified for use.
Product Specifications
7 Are you using folded, torn or rolled media?
Replace the media. Precautions for Handling Media
8 Does the media bend? Use recommended media.When using media other than the dedicated one, set the Vacuum Fan menu.
Media TypeVacuum Fan Menu

Xerox 8254E / 8264E Color Wide Format PrinterUser Guide
5-6
2. The media is crumpled during initialization.
Note:
If the media is jammed or torn, remove it according to When Media Jams Occur.
3. The wrong media size is set during initialization
No. Possible cause Remedy Reference
1 Are you using recommended media?
Use recommended media. Media Type
2 Is the loading position of the media correct?
Set the media correctly. Setting Roll Media
3 Is the media loaded at an angle?
Set the media straight. Setting Roll Media
4 Are there any foreign materials such as paper attached to the pressurizing roller?
Clean the pressurizing roller. Cleaning the Inside of the Printer
5 Is the printer used in an environment other than the one specified, such as near an air conditioner?
Only use the printer in an environment that is specified for use.
Product Specifications
6 Are you using folded, torn or rolled media?
Replace the media. Precautions for Handling Media
No. Possible cause Remedy Reference
1 Are you using recommended media?
Use recommended media. Media Type
2 Is the media loaded at an angle?
Set the media straight. Setting Roll Media
3 When the media is set, does it curl upward?
Straighten the media or set a new media.
Setting Roll Media
4 Is the printer used in an environment other than the one specified, such as near an air conditioner?
Only use the printer in an environment that is specified for use.
Product Specifications
5 Are you using media that has been printed on already?
Use new media. Media Type
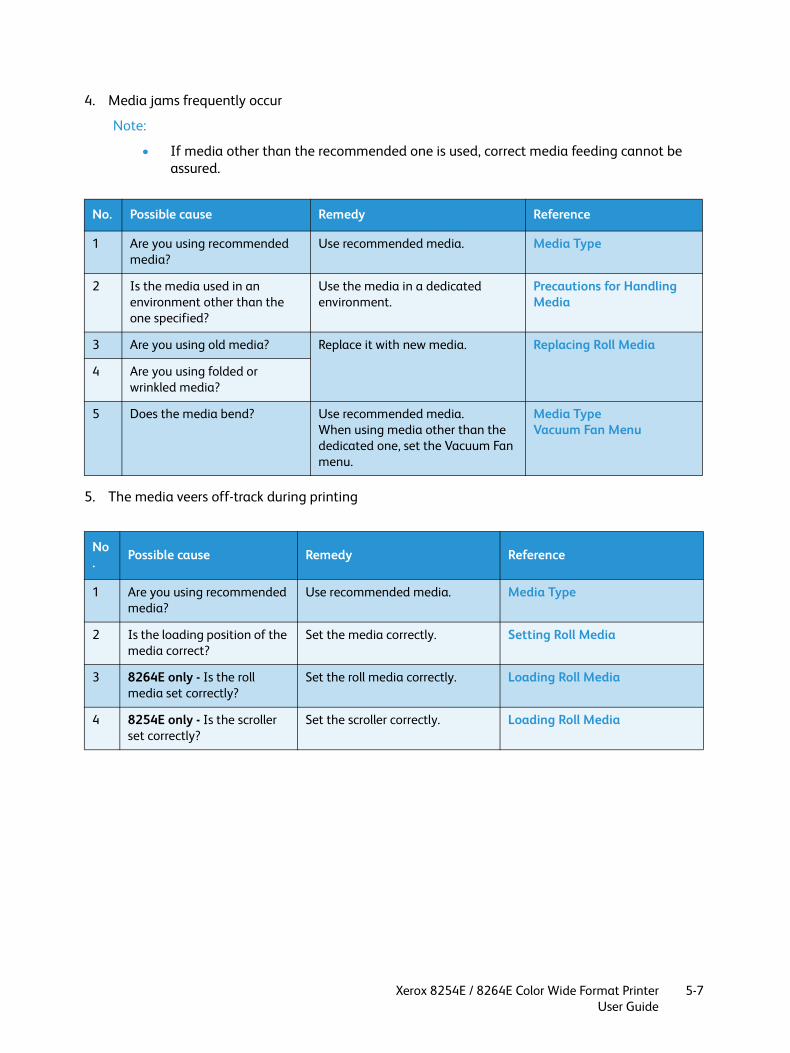
Xerox 8254E / 8264E Color Wide Format PrinterUser Guide
5-7
4. Media jams frequently occur
Note:
• If media other than the recommended one is used, correct media feeding cannot be assured.
5. The media veers off-track during printing
No. Possible cause Remedy Reference
1 Are you using recommended media?
Use recommended media. Media Type
2 Is the media used in an environment other than the one specified?
Use the media in a dedicated environment.
Precautions for Handling Media
3 Are you using old media? Replace it with new media. Replacing Roll Media
4 Are you using folded or wrinkled media?
5 Does the media bend? Use recommended media.When using media other than the dedicated one, set the Vacuum Fan menu.
Media TypeVacuum Fan Menu
No. Possible cause Remedy Reference
1 Are you using recommended media?
Use recommended media. Media Type
2 Is the loading position of the media correct?
Set the media correctly. Setting Roll Media
3 8264E only - Is the roll media set correctly?
Set the roll media correctly. Loading Roll Media
4 8254E only - Is the scroller set correctly?
Set the scroller correctly. Loading Roll Media

Xerox 8254E / 8264E Color Wide Format PrinterUser Guide
5-8
Printing-related Troubleshooting1. Printing is partially stained or incomplete.
Note:
Proper print quality may not be obtained with media other than recommended ones.
2. The printing position is incorrect (areas of the media cannot be printed)
3. Printing is blurred
No. Possible cause Remedy Reference
1 Has the media absorbed moisture?
Replace it with new media. Replacing Roll Media
2 Are you using folded or wrinkled media?
3 Does the media bend? Use recommended media.When using media other than the dedicated one, set the Vacuum Fan menu.
Media TypeVacuum Fan Menu
No. Possible cause Remedy Reference
1 Is the loading position of the media correct?
Set the media correctly. Setting Roll Media
2 Did you set up the origin and print position?
Cancel or reset the settings of the origin and print position.
Menu Overview
No. Possible cause Remedy Reference
1 Are you using recommended media?
Use recommended media. Media Type
2 Are you using thick or thin media?
Use recommended media. Media Type
3 Is the media printed on the printing surface?
Confirm the printing surface of the media and set it correctly.
Media Handling
4 Did you perform Alignment? Perform Alignment. Adjust Print
5 Did you perform Media feed compensation?
Perform Media feed compensation.
Media Feed Compensation
6 Is each heater set to the appropriate temperature?
Set each heater to the appropriate temperature.
Pre-Heater Menu through After Heater menu
7 Is the head height set to "High?" Return the head height to "Normal (Low)".
Head Height Adjustment
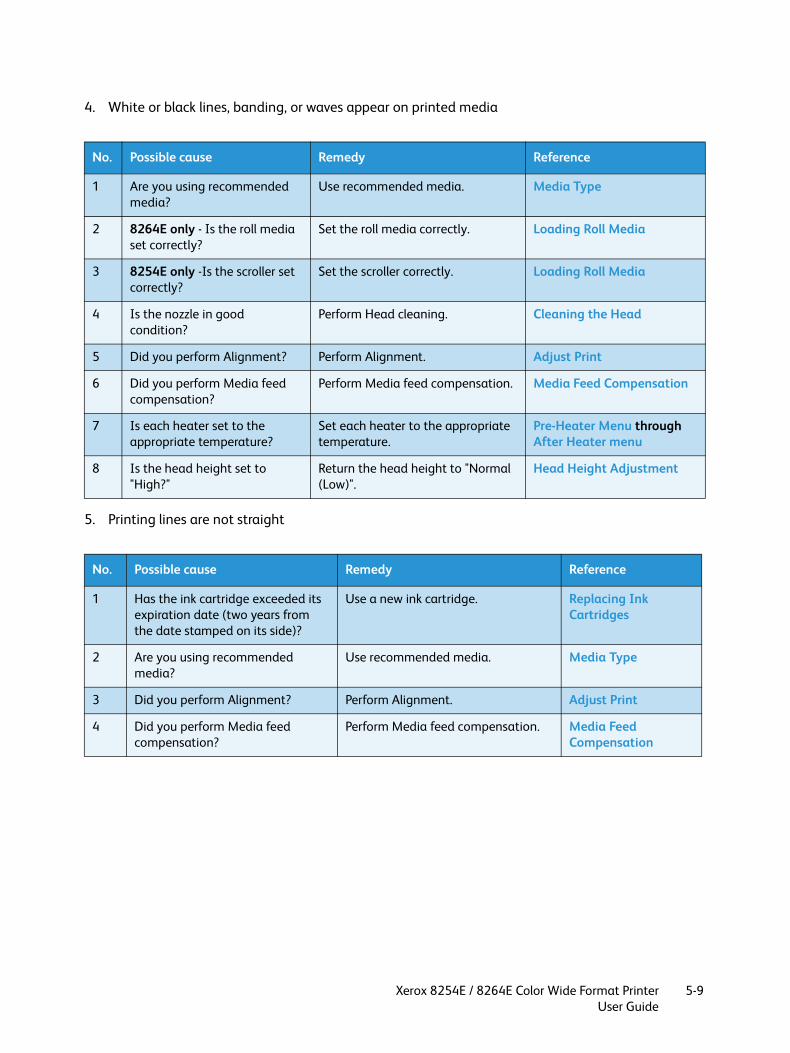
Xerox 8254E / 8264E Color Wide Format PrinterUser Guide
5-9
4. White or black lines, banding, or waves appear on printed media
5. Printing lines are not straight
No. Possible cause Remedy Reference
1 Are you using recommended media?
Use recommended media. Media Type
2 8264E only - Is the roll media set correctly?
Set the roll media correctly. Loading Roll Media
3 8254E only -Is the scroller set correctly?
Set the scroller correctly. Loading Roll Media
4 Is the nozzle in good condition?
Perform Head cleaning. Cleaning the Head
5 Did you perform Alignment? Perform Alignment. Adjust Print
6 Did you perform Media feed compensation?
Perform Media feed compensation. Media Feed Compensation
7 Is each heater set to the appropriate temperature?
Set each heater to the appropriate temperature.
Pre-Heater Menu through After Heater menu
8 Is the head height set to "High?"
Return the head height to "Normal (Low)".
Head Height Adjustment
No. Possible cause Remedy Reference
1 Has the ink cartridge exceeded its expiration date (two years from the date stamped on its side)?
Use a new ink cartridge. Replacing Ink Cartridges
2 Are you using recommended media?
Use recommended media. Media Type
3 Did you perform Alignment? Perform Alignment. Adjust Print
4 Did you perform Media feed compensation?
Perform Media feed compensation. Media Feed Compensation

Xerox 8254E / 8264E Color Wide Format PrinterUser Guide
5-10
6. Printing lines are duplicated or patchy
7. Head strikes on good media
8. Images are cut off on the left side
No. Possible cause Remedy Reference
1 Is the nozzle in good condition?
Perform head cleaning. Cleaning the Head
2 Is the head height set to "High?"
Return the head height to "Normal (Low)".
Head Height Adjustment
No. Possible cause Remedy Reference
1 Media can become deformed by the heat from the Pre-Heater or the Platen Heater if it sets on the printer too long in the "Ready to Print" mode.This can also cause blurry printing and shorten the life of the print head.
Raise the pressure rollers and pull about 12" of media through manually just before printing. Lowering the heater temperatures might help, but this can negatively affect the image quality.
No. Possible cause Remedy Reference
1 Improper image size sent to the printer.If the "Set to Media" option is being used in the RIP, the printer will try to print an image with a width the same as the width of the media specified in the "Media size" form. It will be unable to do so because of the required minimum margins on the left and right sides of the media.
Check the size of the image being sent to the printer and allow for the default margins. Or, specify a smaller media width in the RIP, compensating for the margins.

Xerox 8254E / 8264E Color Wide Format PrinterUser Guide
5-11
9. Parts of images are missing
No. Possible cause Remedy Reference
1 Missing part of an image can also be caused by not factoring in the size of the side margins when the image size is set. Although the Media may physically be wide enough, the actual print area may not be.The condition of the media plays a large part also.
Check the size of the image being sent to the printer and allow for the default margins. Or, specify a smaller media width in the RIP, compensating for the margins.
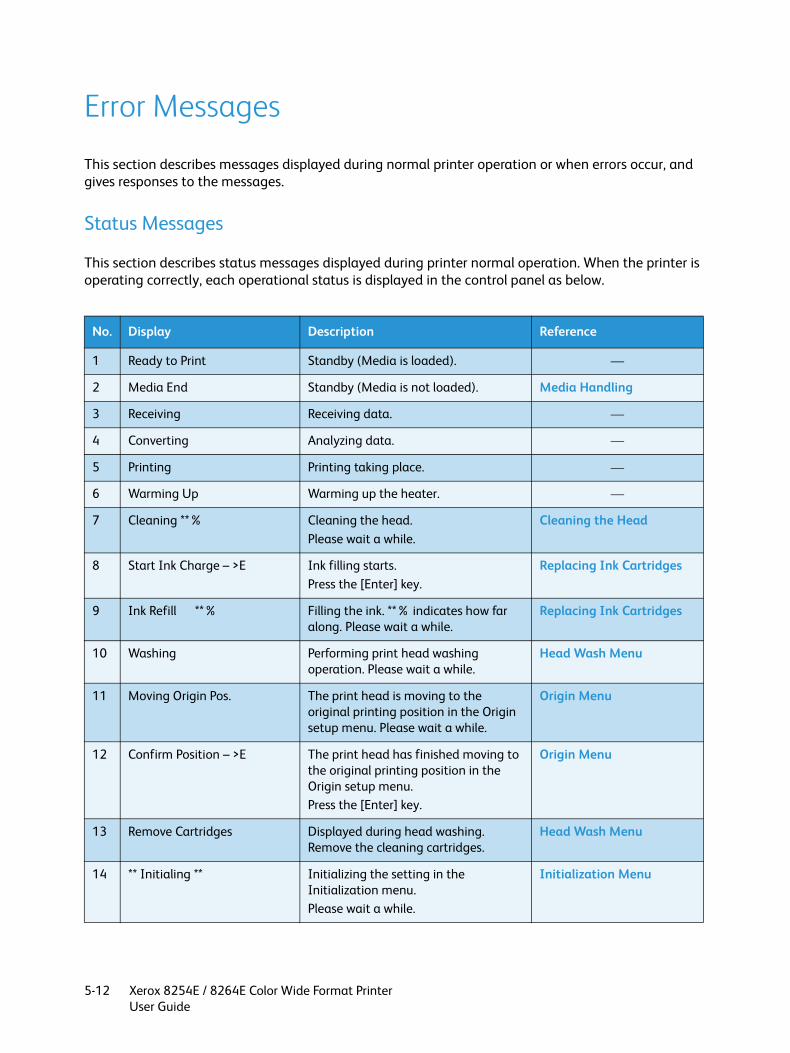
Xerox 8254E / 8264E Color Wide Format PrinterUser Guide
5-12
Error Messages
This section describes messages displayed during normal printer operation or when errors occur, and gives responses to the messages.
Status Messages
This section describes status messages displayed during printer normal operation. When the printer is operating correctly, each operational status is displayed in the control panel as below.
No. Display Description Reference
1 Ready to Print Standby (Media is loaded). —
2 Media End Standby (Media is not loaded). Media Handling
3 Receiving Receiving data. —
4 Converting Analyzing data. —
5 Printing Printing taking place. —
6 Warming Up Warming up the heater. —
7 Cleaning **% Cleaning the head. Please wait a while.
Cleaning the Head
8 Start Ink Charge – >E Ink filling starts. Press the [Enter] key.
Replacing Ink Cartridges
9 Ink Refill **% Filling the ink. **% indicates how far along. Please wait a while.
Replacing Ink Cartridges
10 Washing Performing print head washing operation. Please wait a while.
Head Wash Menu
11 Moving Origin Pos. The print head is moving to the original printing position in the Origin setup menu. Please wait a while.
Origin Menu
12 Confirm Position – >E The print head has finished moving to the original printing position in the Origin setup menu. Press the [Enter] key.
Origin Menu
13 Remove Cartridges Displayed during head washing.Remove the cleaning cartridges.
Head Wash Menu
14 ** Initialing ** Initializing the setting in the Initialization menu. Please wait a while.
Initialization Menu
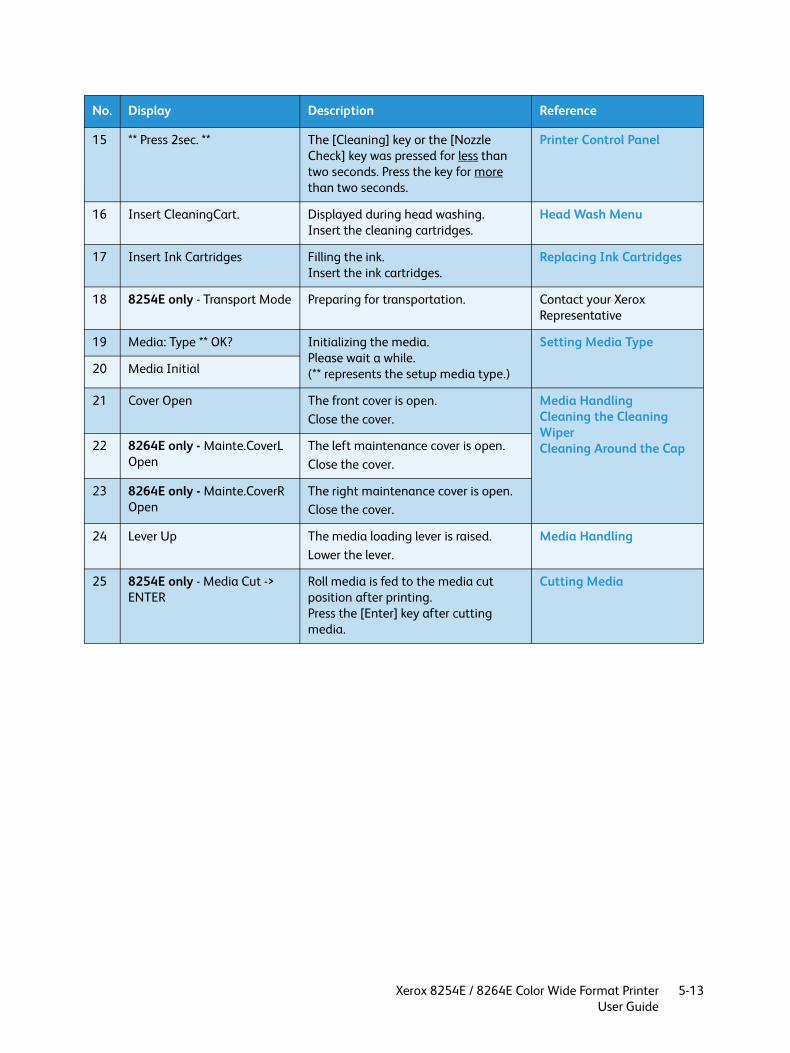
Xerox 8254E / 8264E Color Wide Format PrinterUser Guide
5-13
15 ** Press 2sec. ** The [Cleaning] key or the [Nozzle Check] key was pressed for less than two seconds. Press the key for more than two seconds.
Printer Control Panel
16 Insert CleaningCart. Displayed during head washing.Insert the cleaning cartridges.
Head Wash Menu
17 Insert Ink Cartridges Filling the ink.Insert the ink cartridges.
Replacing Ink Cartridges
18 8254E only - Transport Mode Preparing for transportation. Contact your Xerox Representative
19 Media: Type ** OK? Initializing the media.Please wait a while.(** represents the setup media type.)
Setting Media Type
20 Media Initial
21 Cover Open The front cover is open.Close the cover.
Media HandlingCleaning the Cleaning WiperCleaning Around the Cap22 8264E only - Mainte.CoverL
OpenThe left maintenance cover is open.Close the cover.
23 8264E only - Mainte.CoverR Open
The right maintenance cover is open.Close the cover.
24 Lever Up The media loading lever is raised. Lower the lever.
Media Handling
25 8254E only - Media Cut -> ENTER
Roll media is fed to the media cut position after printing.Press the [Enter] key after cutting media.
Cutting Media
No. Display Description Reference

Xerox 8254E / 8264E Color Wide Format PrinterUser Guide
5-14
Error Message Display and Remedies
This section describes error messages and their remedies. Error messages are displayed when certain failures occur during printer operation.
If an error that can be displayed occurs, the printer may display the following error messages in the control panel and stop operation.
If the printer stops operating, perform the recommended remedy so that the printer restarts.
No. Display Description Remedy Reference
1 Undefined Media Failed in identifying the media.(Stops operation)
First, try raising and lowering the pressure roller lever and see if the media is identified.
Reload the media.
Media Handling
2 Media Slant The media was not fed straight.(Stops operation)
Reload the media. Media Handling
3 End Of Roll The roll media has run out.(Stops operation)
Load a new roll of media.
Also, too much slack in the media at the rear of the printer can raise the media sufficiently to cause the media sensor to incorrectly signal that the media has run out.
Replacing Roll Media
4 [****] InkNearEnd Ink is running out.(Continues operation)
Prepare a new ink cartridge. Replacing Ink Cartridges
5 [****] Ink End Ink has run out.(Stops operation)
Replace with the new ink cartridge.
Replacing Ink Cartridges
6 [****] No Cartridge Cartridge is not inserted.(Stops operation)
Insert an ink cartridge. Replacing Ink Cartridges
7 [****] Not Original A non-genuine ink cartridge has been inserted.(Stops operation)
Insert a genuine ink cartridge. Replacing Ink Cartridges
8 Full WasteInkTank The waste fluid tank is full.(Stops operation)
Dispose of waste fluid. Important Safety Instructions

8254E / 8264E User Guide 5-15
Notes:• The color inside [****] in the error display represents the ink color with a problem.• If the "Ink End" and "No Cartridge" errors occur simultaneously, "No Cartridge" displays.
9 Life Times[Head]
The operational life span of the print head has almost expired.(Continues operation)
Contact your local Xerox dealer.
—
10 Life Times[Pump]
The operational life span of the pump motor has almost expired.(Continues operation)
Contact your local Xerox dealer.
—
11 Life Times[CR Motor]
The operational life span of the CR motor has almost expired.(Continues operation)
Contact your local Xerox dealer.
—
12 Life Times[PF Motor]
The operational life span of the PF motor has almost expired.(Continues operation)
Contact your local Xerox dealer.
—
13 Change Head Gap Low
The head height is set to "High" during the procedure to turn the power OFF.(Stops operation)
Return the head height to "Low." Turning the Power
Off
No. Display Description Remedy Reference

Xerox 8254E / 8264E Color Wide Format PrinterUser Guide
5-16
Data Error Display and Remedies
This section describes data error messages and their remedies. A data error appears if there is a failure in data communication between your PC and the printer.
If a data error occurs, the following error message appears in the control panel of the printer and operation stops.
When the cause of the error is solved, the printer starts operating again.
Note:
The "***" in the error message is the code number that indicates what type of error occurred.
Command Error Display and Remedies
This section describes command errors and their remedies. A command error is displayed if a certain failure occurs during analysis of the command data sent from your PC to the printer.
If a command error occurs, the following error message appears in the control panel of the printer and operation stops.
When the error is solved, the printer starts operating again.
Notes:• The "***" in the error message is the code number that indicates what type of error
occurred.• The command code representing the error that occurred may be indicated within [ ].• For the settings on your PC side, refer to the Operating Manual included with your PC.
No. Display Description Remedy Reference
1 I** Error [ ]
An error occurred while receiving data.
Check the communication requirements between the printer and your PC.
Menu Setups on the Control Panel
No. Display Description Remedy Reference
1 MH** Error [ ]
An invalid command has been sent from the computer.
Check that the settings on your PC and the printer are the same.
Menu Setups on the Control Panel
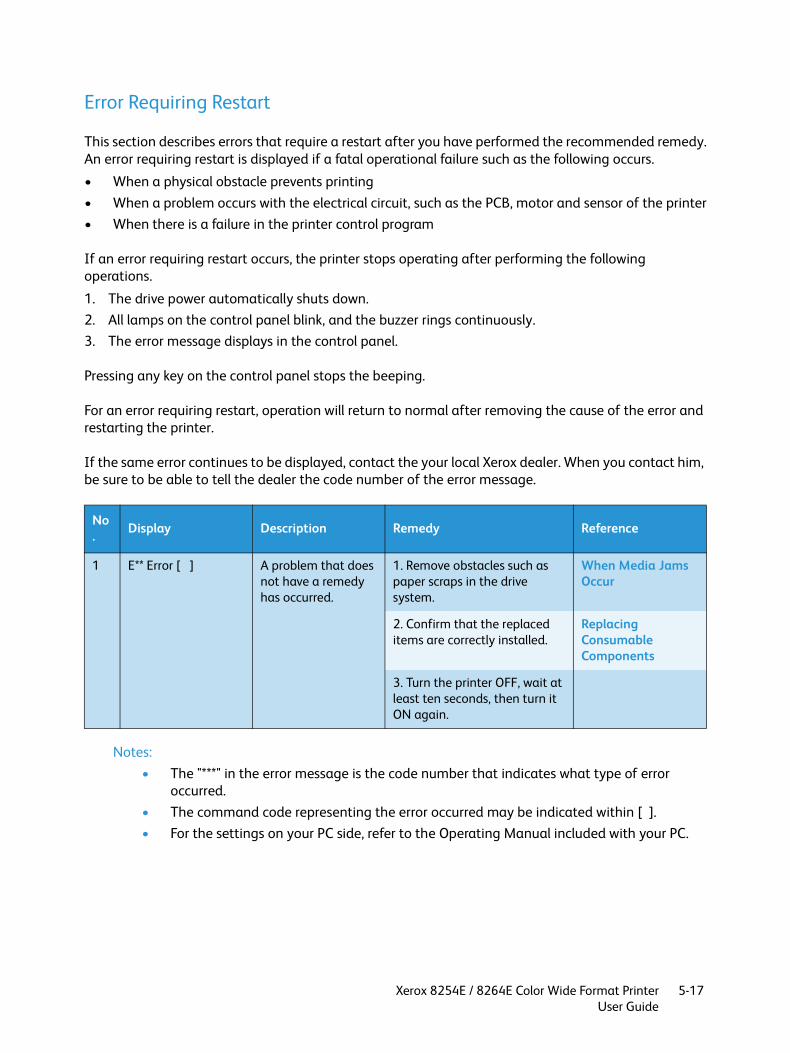
Xerox 8254E / 8264E Color Wide Format PrinterUser Guide
5-17
Error Requiring Restart
This section describes errors that require a restart after you have performed the recommended remedy.An error requiring restart is displayed if a fatal operational failure such as the following occurs.
• When a physical obstacle prevents printing• When a problem occurs with the electrical circuit, such as the PCB, motor and sensor of the printer• When there is a failure in the printer control program
If an error requiring restart occurs, the printer stops operating after performing the following operations.
1. The drive power automatically shuts down.2. All lamps on the control panel blink, and the buzzer rings continuously.3. The error message displays in the control panel.
Pressing any key on the control panel stops the beeping.
For an error requiring restart, operation will return to normal after removing the cause of the error and restarting the printer.
If the same error continues to be displayed, contact the your local Xerox dealer. When you contact him, be sure to be able to tell the dealer the code number of the error message.
Notes:• The "***" in the error message is the code number that indicates what type of error
occurred.• The command code representing the error occurred may be indicated within [ ].• For the settings on your PC side, refer to the Operating Manual included with your PC.
No. Display Description Remedy Reference
1 E** Error [ ] A problem that does not have a remedy has occurred.
1. Remove obstacles such as paper scraps in the drive system.
When Media Jams Occur
2. Confirm that the replaced items are correctly installed.
Replacing Consumable Components
3. Turn the printer OFF, wait at least ten seconds, then turn it ON again.

Xerox 8254E / 8264E Color Wide Format PrinterUser Guide
5-18
When Media Jams Occur
When the media is jammed, follow the procedure below.
1. Press the [Power] key to turn the printer’s power OFF.Turning the Power Off
2. Open the front cover.
8264E
8254E
3. Move the print head section all the way to the right.
No. Name
1 Front cover

Xerox 8254E / 8264E Color Wide Format PrinterUser Guide
5-19
8264E
8254E
No. Name
1 Print head section
2 Roll media

Xerox 8254E / 8264E Color Wide Format PrinterUser Guide
5-20
4. Raise the media loading lever.
8264E
8254E
CAUTIONS:• Pay attention to the following points when you cut roll media. Mishandling the razor blade may
cause a cut on your finger or hand.• When you hold media, do not place your finger on the media cut groove.• Move the razor blade along the media cut groove.
No. Name
1 Media loading lever

Xerox 8254E / 8264E Color Wide Format PrinterUser Guide
5-21
5. Pull the media toward the front of the printer, and cut the torn part with a cutting tool such as a razor blade.
8264E
8254E
No. Name
1 Razor blade
2 Roll media
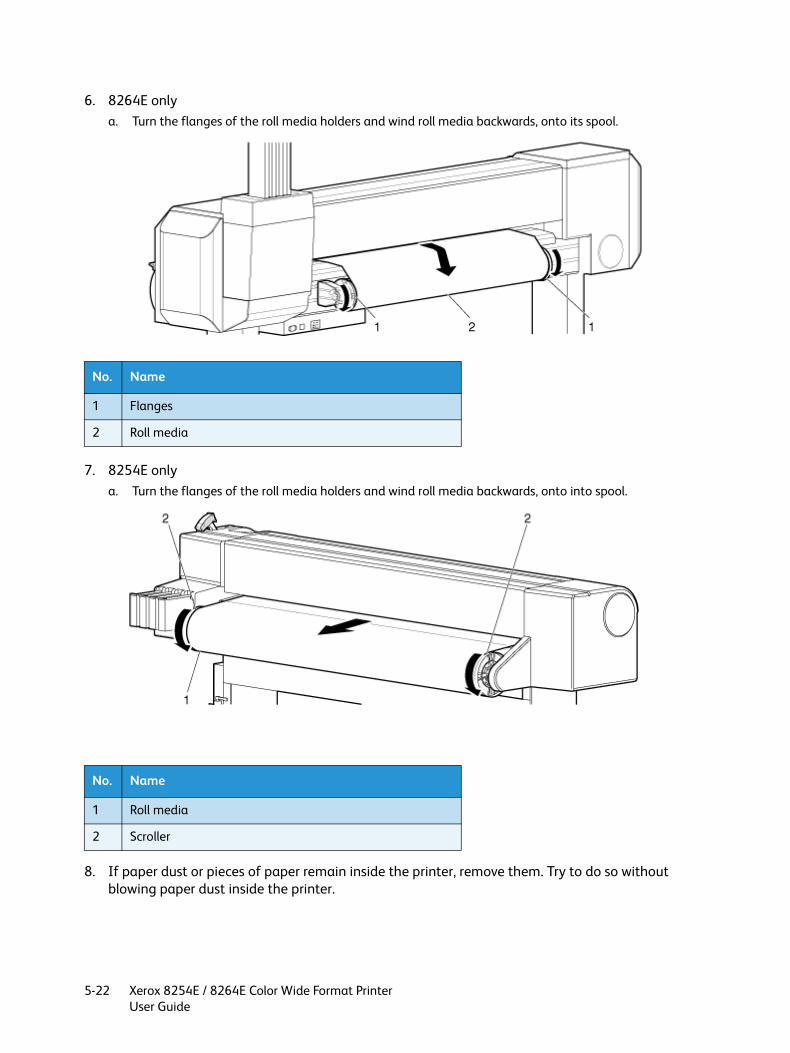
Xerox 8254E / 8264E Color Wide Format PrinterUser Guide
5-22
6. 8264E onlya. Turn the flanges of the roll media holders and wind roll media backwards, onto its spool.
7. 8254E only a. Turn the flanges of the roll media holders and wind roll media backwards, onto into spool.
8. If paper dust or pieces of paper remain inside the printer, remove them. Try to do so without blowing paper dust inside the printer.
No. Name
1 Flanges
2 Roll media
No. Name
1 Roll media
2 Scroller

Xerox 8254E / 8264E Color Wide Format PrinterUser Guide
6-1
6Maintenance
Introduction
This chapter describes the maintenance of the printer.
Replacing Consumable Components
This section describes how and when to replace the ink cartridges, roll media and flushing-box sponges.
Replacing Ink Cartridges
This section describes how and when to replace the ink cartridges.
1. Replacement frequency
An ink cartridge should be replaced when either of the following happens:a. "[****] InkNearEnd" displays in the control panel– This message displays when there is a small amount of ink remaining in the ink cartridge.
– The alarm buzzer sounds. To stop the buzzer, press the [Enter] key.
– Replace the near-empty ink cartridge with a new ink cartridge.
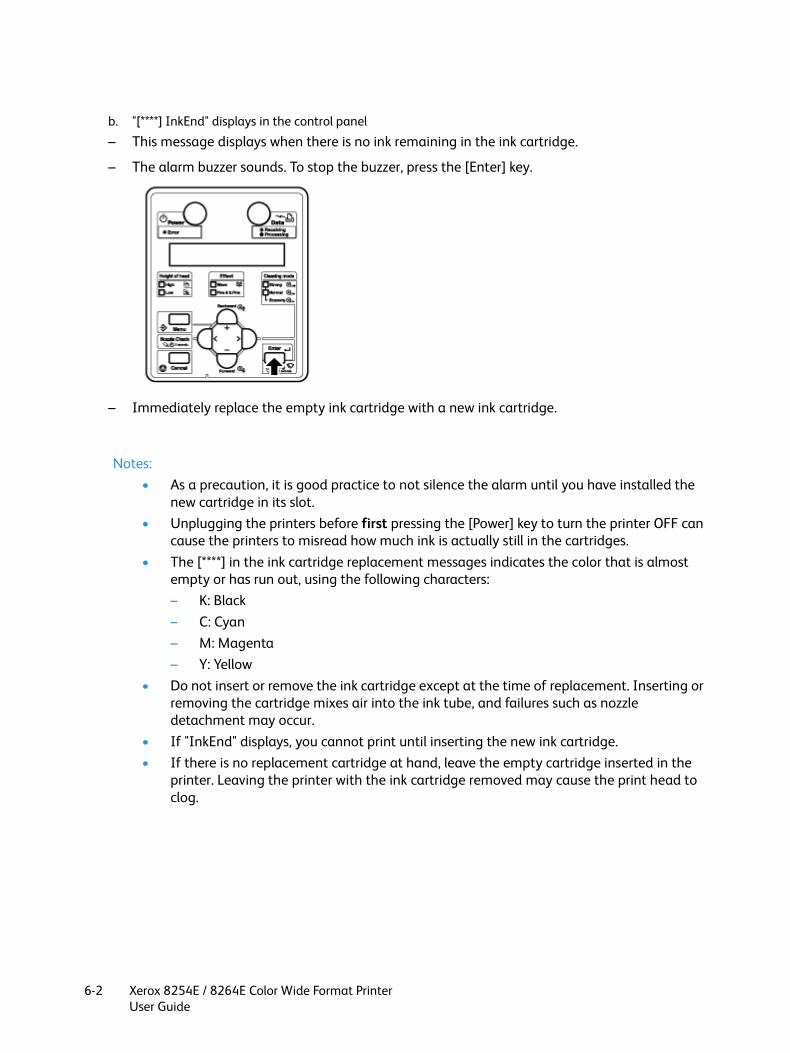
Xerox 8254E / 8264E Color Wide Format PrinterUser Guide
6-2
b. "[****] InkEnd" displays in the control panel
– This message displays when there is no ink remaining in the ink cartridge.
– The alarm buzzer sounds. To stop the buzzer, press the [Enter] key.
– Immediately replace the empty ink cartridge with a new ink cartridge.
Notes:• As a precaution, it is good practice to not silence the alarm until you have installed the
new cartridge in its slot. • Unplugging the printers before first pressing the [Power] key to turn the printer OFF can
cause the printers to misread how much ink is actually still in the cartridges. • The [****] in the ink cartridge replacement messages indicates the color that is almost
empty or has run out, using the following characters:– K: Black– C: Cyan– M: Magenta– Y: Yellow
• Do not insert or remove the ink cartridge except at the time of replacement. Inserting or removing the cartridge mixes air into the ink tube, and failures such as nozzle detachment may occur.
• If "InkEnd" displays, you cannot print until inserting the new ink cartridge.• If there is no replacement cartridge at hand, leave the empty cartridge inserted in the
printer. Leaving the printer with the ink cartridge removed may cause the print head to clog.
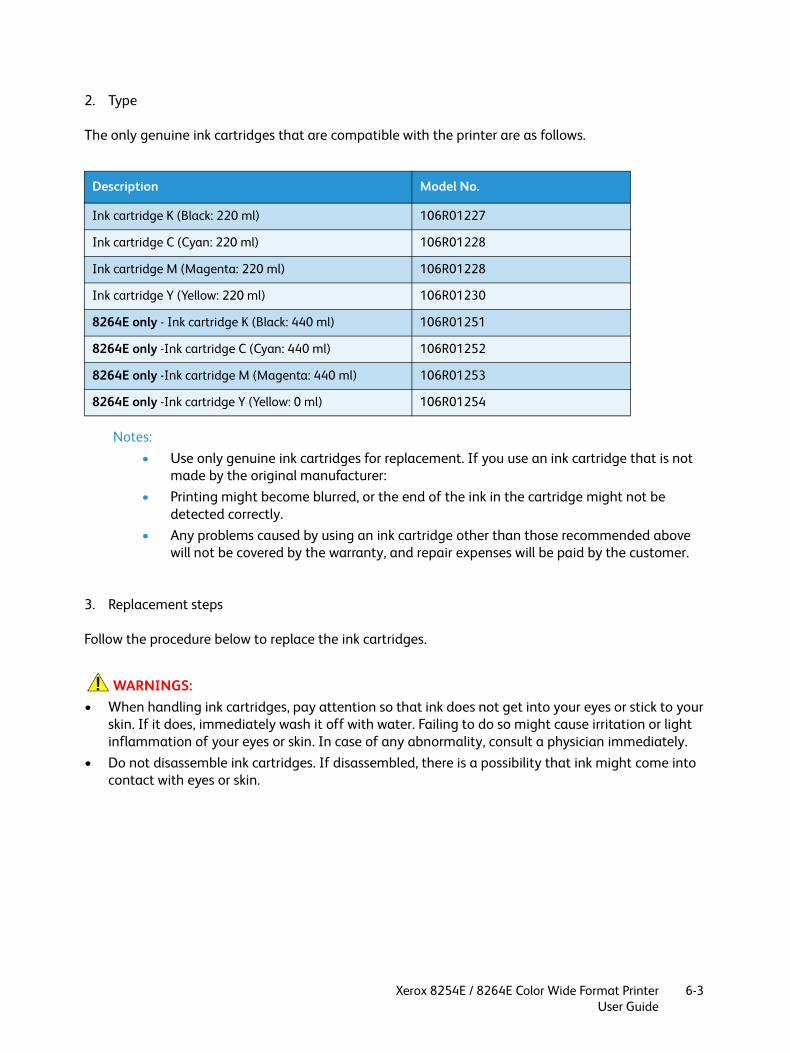
Xerox 8254E / 8264E Color Wide Format PrinterUser Guide
6-3
2. Type
The only genuine ink cartridges that are compatible with the printer are as follows.
Notes:• Use only genuine ink cartridges for replacement. If you use an ink cartridge that is not
made by the original manufacturer:• Printing might become blurred, or the end of the ink in the cartridge might not be
detected correctly.• Any problems caused by using an ink cartridge other than those recommended above
will not be covered by the warranty, and repair expenses will be paid by the customer.
3. Replacement steps
Follow the procedure below to replace the ink cartridges.
WARNINGS:• When handling ink cartridges, pay attention so that ink does not get into your eyes or stick to your
skin. If it does, immediately wash it off with water. Failing to do so might cause irritation or light inflammation of your eyes or skin. In case of any abnormality, consult a physician immediately.
• Do not disassemble ink cartridges. If disassembled, there is a possibility that ink might come into contact with eyes or skin.
Description Model No.
Ink cartridge K (Black: 220 ml) 106R01227
Ink cartridge C (Cyan: 220 ml) 106R01228
Ink cartridge M (Magenta: 220 ml) 106R01228
Ink cartridge Y (Yellow: 220 ml) 106R01230
8264E only - Ink cartridge K (Black: 440 ml) 106R01251
8264E only -Ink cartridge C (Cyan: 440 ml) 106R01252
8264E only -Ink cartridge M (Magenta: 440 ml) 106R01253
8264E only -Ink cartridge Y (Yellow: 0 ml) 106R01254
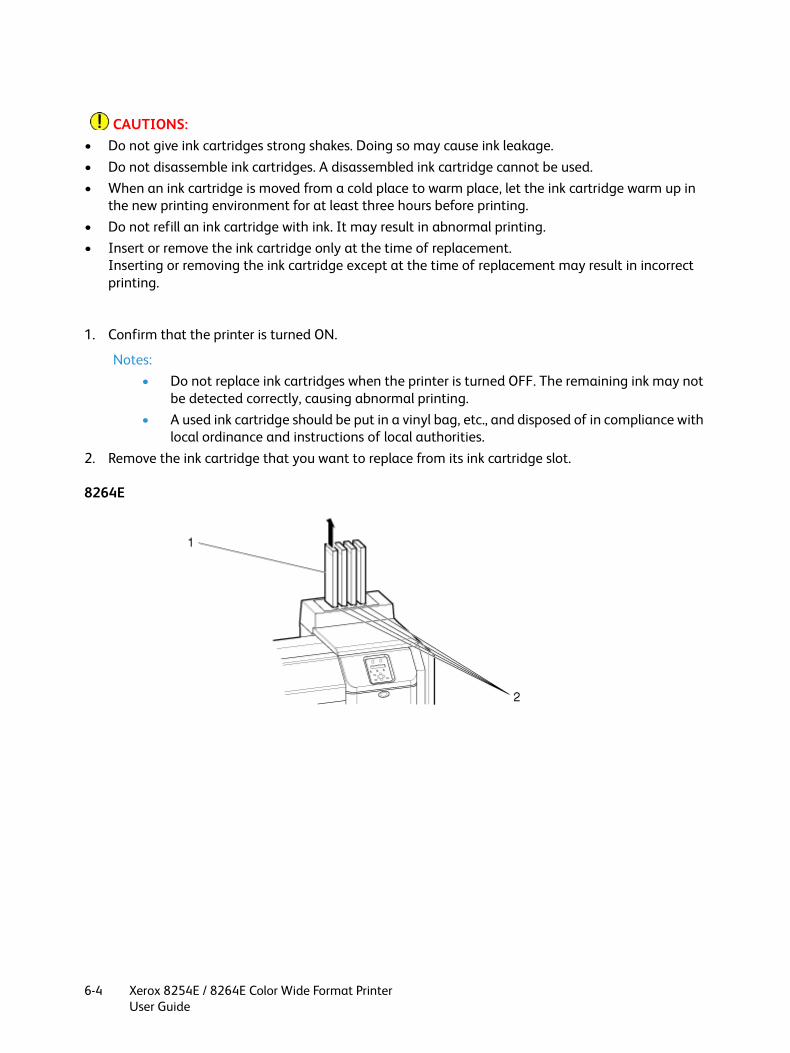
Xerox 8254E / 8264E Color Wide Format PrinterUser Guide
6-4
CAUTIONS:• Do not give ink cartridges strong shakes. Doing so may cause ink leakage.• Do not disassemble ink cartridges. A disassembled ink cartridge cannot be used.• When an ink cartridge is moved from a cold place to warm place, let the ink cartridge warm up in
the new printing environment for at least three hours before printing.• Do not refill an ink cartridge with ink. It may result in abnormal printing.• Insert or remove the ink cartridge only at the time of replacement.
Inserting or removing the ink cartridge except at the time of replacement may result in incorrect printing.
1. Confirm that the printer is turned ON.
Notes:• Do not replace ink cartridges when the printer is turned OFF. The remaining ink may not
be detected correctly, causing abnormal printing.• A used ink cartridge should be put in a vinyl bag, etc., and disposed of in compliance with
local ordinance and instructions of local authorities.2. Remove the ink cartridge that you want to replace from its ink cartridge slot.
8264E
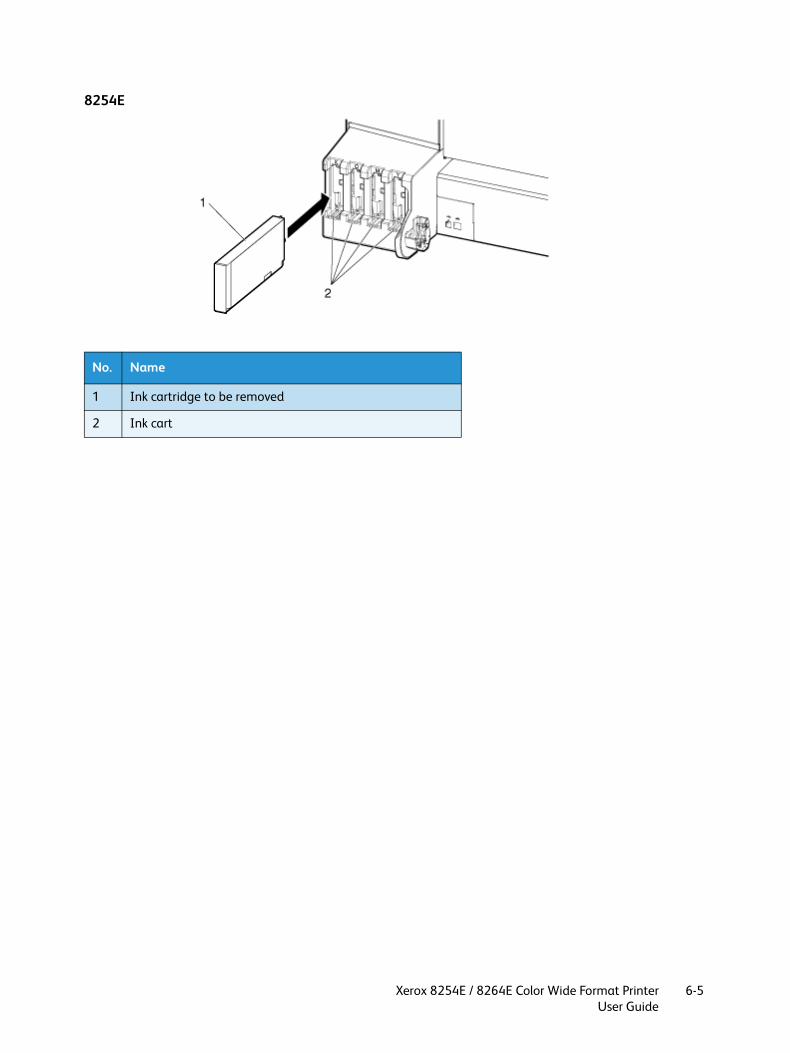
Xerox 8254E / 8264E Color Wide Format PrinterUser Guide
6-5
8254E
No. Name
1 Ink cartridge to be removed
2 Ink cart

Xerox 8254E / 8264E Color Wide Format PrinterUser Guide
6-6
3. Take out the new ink cartridge from its bag.
Notes:• Open the bag just before inserting the ink cartridge into the cartridge slot. Leaving the
ink cartridge with the bag open for a long time may result in abnormal printing.• Use the ink cartridge within two years from the date printed on the package.
Using an ink cartridge after this period may affect print quality.• Replace the ink cartridge six months after installing it in the printer.• Do not insert or remove an ink cartridge more than nine times.
If the ink cartridge is inserted or removed more than nine times, it cannot be used even if there is some remaining ink inside.
• Ink usage can be severely affected if the printer looses power before it is turned off correctly, by pressing the [Power] key. This can occur because of a power outage or by unplugging the printer before it is turned off. When the printer is turned back on it may register much less ink in the cartridges than there actually is. It may indicate a cartridge is empty when it is not. if this happens, there is no option but to replace the cartridge.
4. Install the new ink cartridge.5. Confirm that "Ready to Print" is displayed in the control panel.
Note:
If the ink cartridge is replaced during printing, printing restarts.
Ink cartridge replacement is complete.

Xerox 8254E / 8264E Color Wide Format PrinterUser Guide
6-7
Replacing Roll Media
This section describes when and how to replace roll media.
1. Replacement frequency– Replace roll media in the following situations.
a. When the roll media loaded in the printer runs out– "End Of Roll" displays in the control panel.
– If media runs out during printing, the printer stops printing.
b. When you want to change the media type to use
2. Type
Note:
For types and details of roll media, refer to Options/Supply List.
8264E only - Roll media replacement steps
Follow the procedure below to replace roll media.
1. If the printer is turned ON, confirm that no operation such as printing is in progress.
WARNING:
• Be careful to not trap your fingers when opening and closing the media cover
2. Raise the media loading lever.
No. Name
1 Media loading lever

Xerox 8254E / 8264E Color Wide Format PrinterUser Guide
6-8
3. Wind the roll media back onto its spool by turning the flanges of the roll media holders.
4. Loosen the fixing lever of the right roll media holder and move the holder toward the right, removing it from the roll media’s core.
No. Name
1 Roll media holders
2 Roll media
No. Name
1 Roll media holder (Right)
2 Fixing lever
3 Roll media

Xerox 8254E / 8264E Color Wide Format PrinterUser Guide
6-9
5. If necessary, use the same procedure as in Step 4 to remove the left roll media holder from the roll media’s core. (In most cases, you will only need to move the right roll media holder.)
6. To load another roll media, refer to the following.
Notes:• For loading roll media, refer to Loading Roll Media.• For storing roll media not in use, refer to Precautions for Storing Media.
The roll media replacement procedure for the 8264E is complete.
No. Name
1 Roll media holder (Left)
2 Fixing lever
3 Roll media

Xerox 8254E / 8264E Color Wide Format PrinterUser Guide
6-10
8254E only - Roll media replacement steps
Follow the procedure below to replace roll media.
1. If the printer is turned ON, confirm that no operation such as printing is in progress.
WARNING:
• Be careful to not trap your fingers when opening and closing the media cover.2. Raise the media loading lever.
3. Use the flanges at both ends of the scroller to manually rewind the roll media.
No. Name
1 Media loading lever
No. Name
1 Roll media
2 Scroller
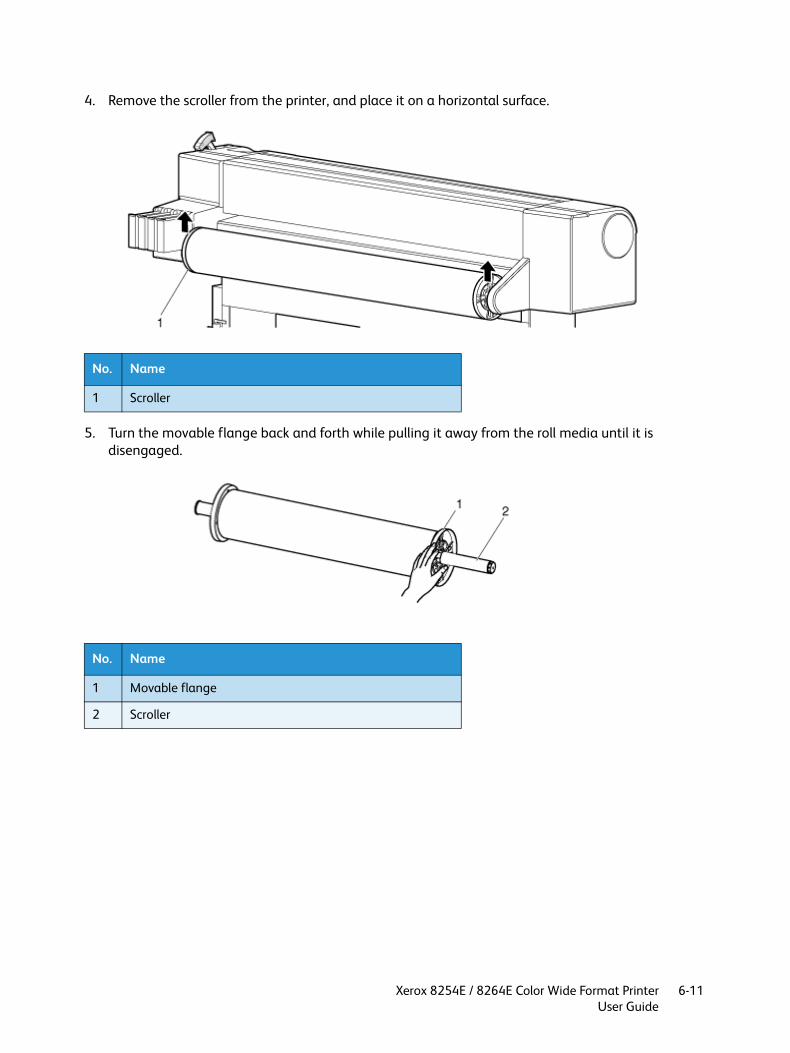
Xerox 8254E / 8264E Color Wide Format PrinterUser Guide
6-11
4. Remove the scroller from the printer, and place it on a horizontal surface.
5. Turn the movable flange back and forth while pulling it away from the roll media until it is disengaged.
No. Name
1 Scroller
No. Name
1 Movable flange
2 Scroller

Xerox 8254E / 8264E Color Wide Format PrinterUser Guide
6-12
6. Remove the roll media from the scroller.
7. To load another roll media, refer to the following.
Notes:• For loading roll media, refer to Loading Roll Media.• For storing roll media not in use, refer to Precautions for Storing Media.
8. When you have no need to set roll media, attach the movable flange to the scroller and store the scroller in the printer’s scroller receivers.
The roll media replacement procedure for the 8254E is complete.
No. Name
1 Roll media
2 Scroller
No. Name
1 Movable flange
2 Scroller

Xerox 8254E / 8264E Color Wide Format PrinterUser Guide
6-13
8264E only - Replacing the Flushing-box Sponges
This section explains how to replace the flushing-box sponges.
1. Replacement frequency
Replace the flushing-box sponges in the following situations.a. When the flushing-box sponge becomes deformedb. When smears of ink appear on the mediac. One month after the last replacement
2. Type
Note:
For types and details of the flushing-box sponge, refer to Options/Supply List.
3. Replacing steps
Follow the steps below to replace the flushing-box sponges.
1. If the printer is turned ON, make sure of the following.– Printing or other operations are not in progress.
– "Ready to Print" is displayed in the control panel.
2. Open the front cover.
No. Name
1 Front cover

Xerox 8254E / 8264E Color Wide Format PrinterUser Guide
6-14
3. Remove the flushing-box sponge from each flushing-box using a pair of tweezers.
Note:
Replace the sponge on the left hand side of the printer as needed. If the left side flushing-box is not used often and the sponge appears clean, it does not need to be changed.
CAUTION:
• Do not drop waste fluid when replacing the flushing-box sponges. If waste fluid comes into contact with the grid roller, the surface of the grid roller will be damaged and the media feed function may be affected.
4. Install a new flushing-box sponge into each flushing-box.
No. Name
1 Flushing-boxes (two)
2 Flushing-box sponges
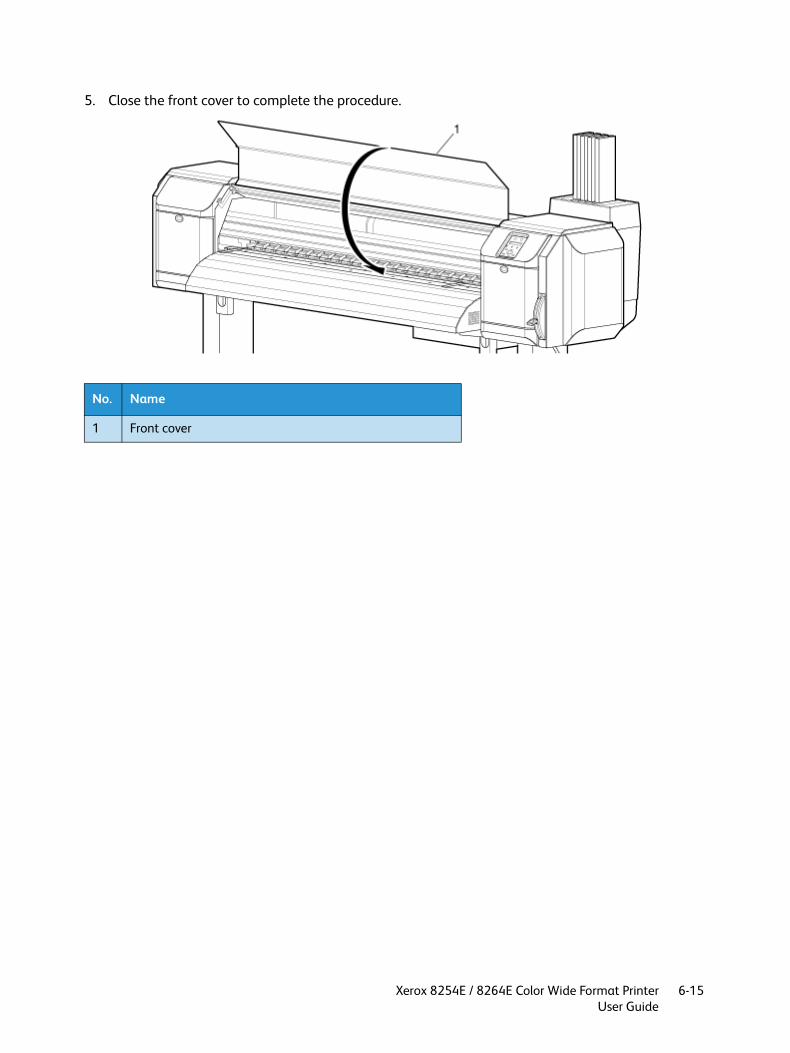
Xerox 8254E / 8264E Color Wide Format PrinterUser Guide
6-15
5. Close the front cover to complete the procedure.
No. Name
1 Front cover

Xerox 8254E / 8264E Color Wide Format PrinterUser Guide
6-16
Cleaning
Monthly cleaning is necessary to keep the printer in good condition. This section describes how to clean each part of the printer.
CAUTION:
• Never disconnect the printer’s power cable(s) from the building’s electrical outlet without first pressing the [Power] key to turn the printer OFF. Doing so can cause the printer to misread how much ink is still in the cartridges. It may indicate a cartridge is empty when it is not. If this happens, there is no option but to replace the cartridge. This can lead to dramatic waste of ink.
WARNINGS:• Do not insert or drop metal or flammable objects into the printer through openings such as a fresh
air inlet. Doing so could lead to an electric shock or fire.• If foreign substances or liquids such as water enter the printer, do not use the printer. It could lead
to an electric shock or fire. Immediately press the [Power] key to turn the printer OFF, disconnect the power cables from the electric outlet, and contact your local Xerox dealer.
CAUTIONS:• When cleaning the printer, be sure to first press the [Power] key to turn the printer OFF and then
disconnect the power cable from the electrical outlet.• Do not use volatile solvents such as thinner, benzene, or alcohol. These solvents could cause
damage to the paint.• Be careful that no moisture enters the printer. There is a possibility that the electric circuit inside
the printer could cause a short circuit.
WARNING:
• Do not, under any circumstances, open covers attached using screws. This may cause an electric shock or a malfunction.
Cleaning the Outer Case
To clean the outer case of the printer, wipe off dust and dirt by using a soft cloth.

Xerox 8254E / 8264E Color Wide Format PrinterUser Guide
6-17
Cleaning the Inside of the Printer
This section describes how to clean the inside of the printer.
Follow the procedure below.
1. Open the front cover.
8264E
8254E
Note:
Do not blow paper powder inside the printer using tools such as an air duster. It may cause an abnormal noise from the inside of the printer.
No. Name
1 Front cover

Xerox 8254E / 8264E Color Wide Format PrinterUser Guide
6-18
2. Use a soft brush to remove paper powder and dust attached to the pressurizing rollers.
8264E
8254E
No. Name
1 Pressurizing rollers
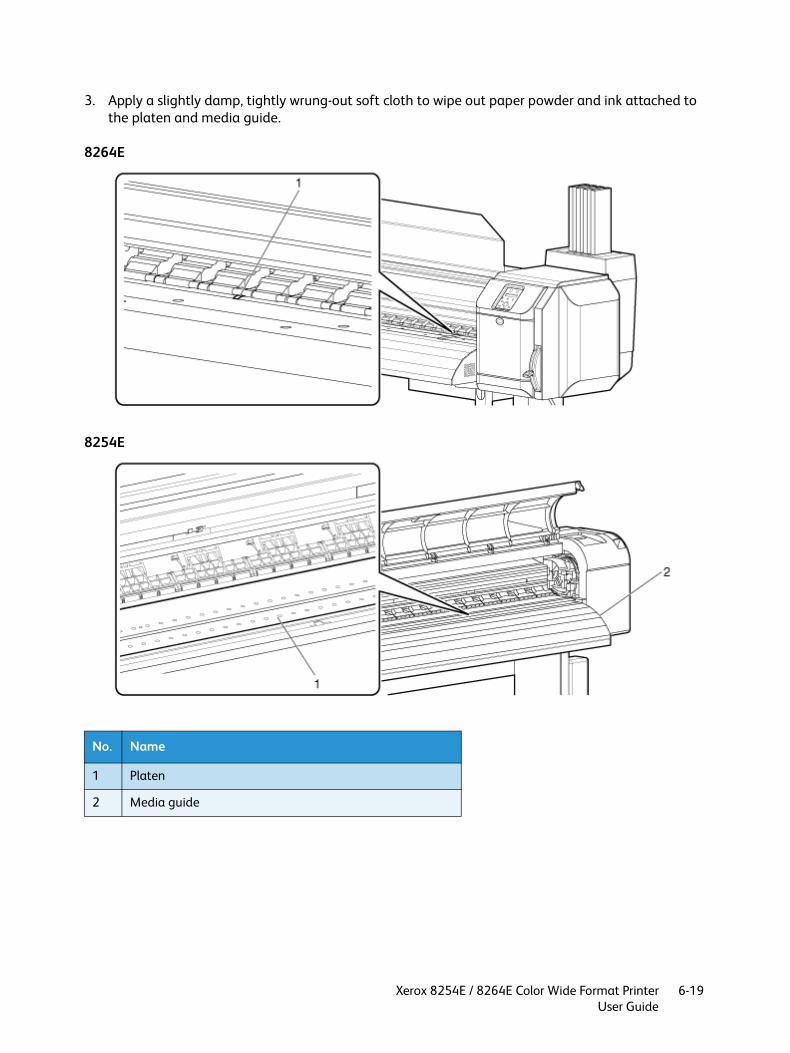
Xerox 8254E / 8264E Color Wide Format PrinterUser Guide
6-19
3. Apply a slightly damp, tightly wrung-out soft cloth to wipe out paper powder and ink attached to the platen and media guide.
8264E
8254E
No. Name
1 Platen
2 Media guide

Xerox 8254E / 8264E Color Wide Format PrinterUser Guide
6-20
4. Use a slightly damp, tightly wrung-out soft cloth to wipe off any dirt that may be on the unpainted (silver color) areas in the center of the grid roller.
8264E
8254E
No. Name
1 Grid roller

Xerox 8254E / 8264E Color Wide Format PrinterUser Guide
6-21
Cleaning the Head
If printed data is blurred or partly missing, clean the print head surface and nozzle. (This is referred to as head cleaning.)
Follow the procedure below to perform head cleaning.
Notes:• If the printer is not to be used for a week or more, perform head cleaning once a week.
If you do not perform head cleaning, the print head will become clogged. Cleaning the print head will preserve print quality.
• Remove the media when cleaning.Cleaning with the media loaded may lead to contact between the print head and media.
1. Confirm that "Ready to Print" is displayed in the control panel.2. Check that the media loading lever is lowered.3. Press the [>] key to select the cleaning mode.
4. Press and hold the [Cleaning] key for at least two seconds.
• Head cleaning.begins.• "Cleaning **%" displays in the control panel.

Xerox 8254E / 8264E Color Wide Format PrinterUser Guide
6-22
• After head cleaning is complete, "Ready to Print" displays in the control panel.
Notes:• If blurring or incomplete printing continues after one head cleaning, repeat the process,
using the Strong cleaning setting.• If blurring or incomplete printing do not disappear after several head cleanings, refer to
Troubleshooting, and take appropriate measures.
Cleaning the Cleaning Wiper
This section describes when and how to clean the cleaning wiper.
1. Cleaning frequency
The cleaning wiper should be cleaned once or twice a week or when blurs or incomplete printing appear on printed media after head cleaning.
2. Cleaning method
Follow the procedure below to clean the cleaning wiper.
Note:
• Use a new foam swab or lint free cloth to clean the cleaning wiper. Use Eco-cleaning solution or Isopropyl Alcohol with the swab or cloth.
For details on the foam swab and the lint free cloth, refer to Options/Supply List.1. With the printer turned ON, make sure of the following.
• Printing or other operations are not in progress.• "Ready to Print" displays in the control panel.
2. Display the CR Maintenance menu in the control panel.a. Press the [Menu] key. "Menu 1: Setup>" displays in the control panel.

Xerox 8254E / 8264E Color Wide Format PrinterUser Guide
6-23
b. Press the [>] key. "Set1: MediaType" displays in the control panel.
c. Press the [+] key or [–] key to select "Set20: CR Maintenance."
d. Press the [Enter] key. "CR Mainte.: Start" displays in the control panel.CR Maintenance Menu

Xerox 8254E / 8264E Color Wide Format PrinterUser Guide
6-24
3. Press the [Enter] key.
• Maintenance starts.• The print head moves to the left.• 8264E only - The cleaning wiper moves forward.• "CR Maintenance: End" displays in the control panel.
CAUTION:
• Use gloves included in the cleaning kit to prevent ink and cleaning solvent from getting on hands. Do not touch the wiper without gloves. Oil from your hands may prevent the wiper from cleaning the head properly.
4. 8264E - Open the maintenance cover on the right front of the printer.8254E - Open the front cover.
8264E
No. Name
1 Maintenance cover (Right)
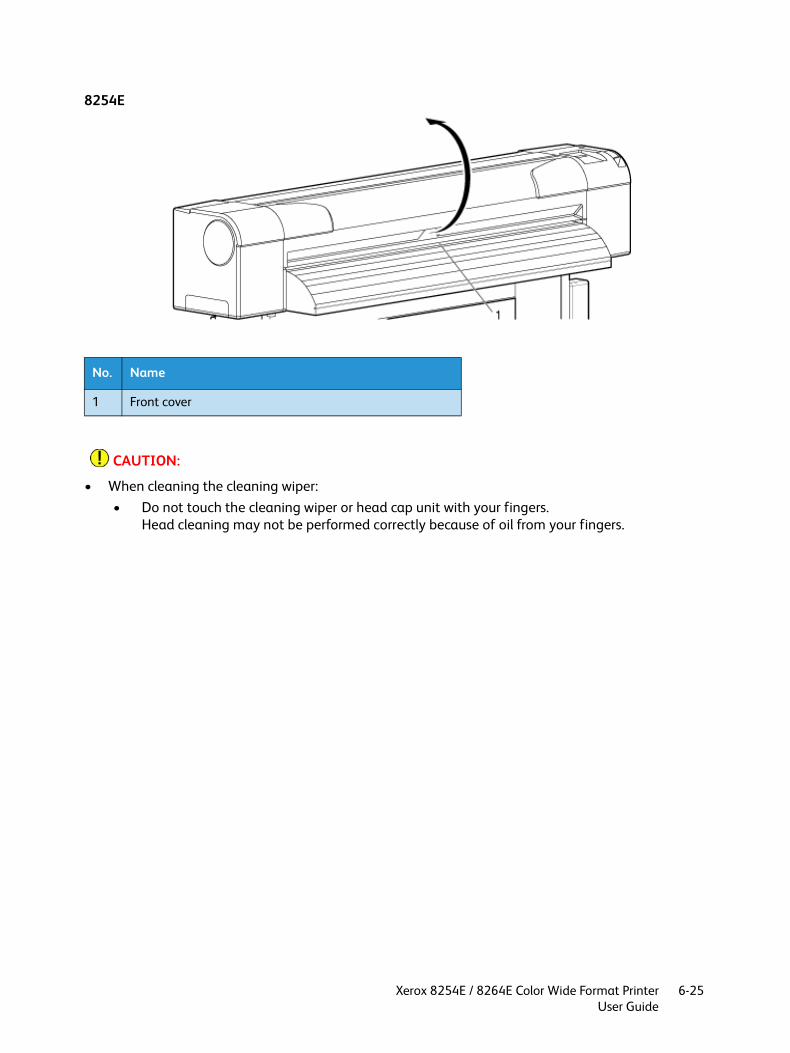
Xerox 8254E / 8264E Color Wide Format PrinterUser Guide
6-25
8254E
CAUTION:
• When cleaning the cleaning wiper:• Do not touch the cleaning wiper or head cap unit with your fingers.
Head cleaning may not be performed correctly because of oil from your fingers.
No. Name
1 Front cover
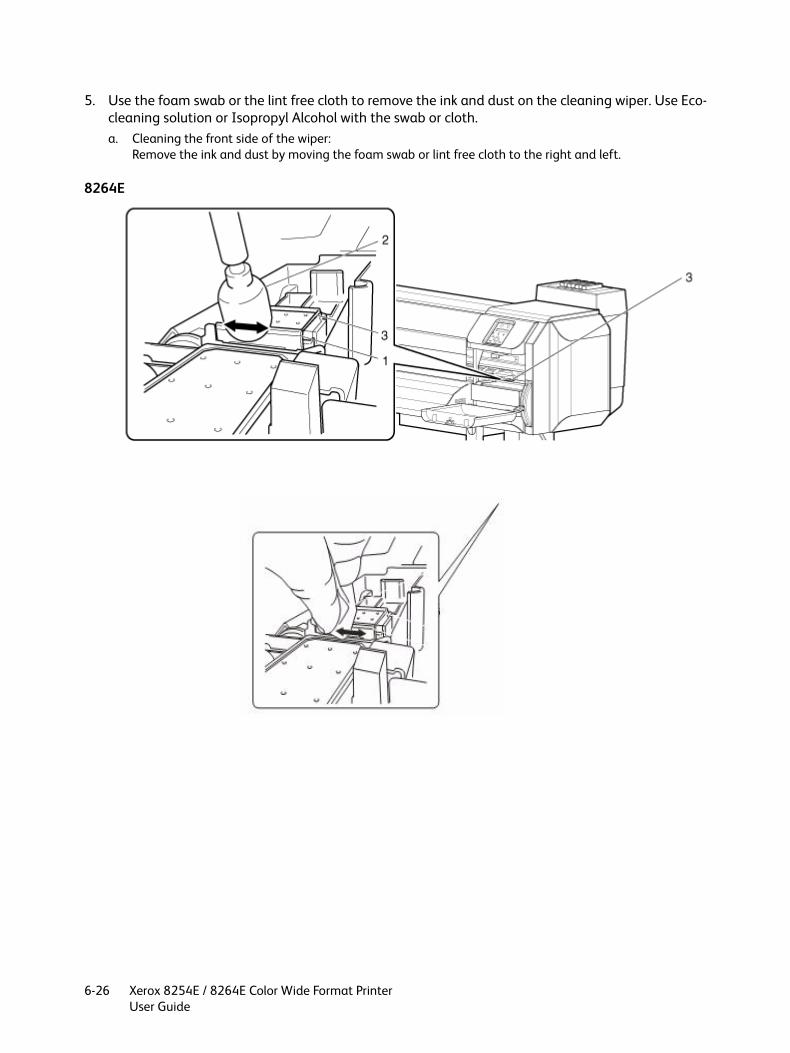
Xerox 8254E / 8264E Color Wide Format PrinterUser Guide
6-26
5. Use the foam swab or the lint free cloth to remove the ink and dust on the cleaning wiper. Use Eco-cleaning solution or Isopropyl Alcohol with the swab or cloth.a. Cleaning the front side of the wiper:
Remove the ink and dust by moving the foam swab or lint free cloth to the right and left.
8264E

Xerox 8254E / 8264E Color Wide Format PrinterUser Guide
6-27
8254E
a. Cleaning the back side of the wiper:Remove the ink and dust by moving the foam swab or the lint free cloth from bottom to top.
No. Name
1 Cleaning wiper
2 Foam swab or lint free cloth
3 Head cap unit

Xerox 8254E / 8264E Color Wide Format PrinterUser Guide
6-28
8264E

Xerox 8254E / 8264E Color Wide Format PrinterUser Guide
6-29
8254E
6. 8264E - Close the maintenance cover on the right front of the printer firmly until it is locked.8254E - Close the front cover.
8264E
No. Name
1 Cleaning wiper
2 Foam swab or Lint free cloth
3 Head cap unit
No. Name
1 Maintenance cover (Right)

Xerox 8254E / 8264E Color Wide Format PrinterUser Guide
6-30
8254E
7. Press the [Enter] key.
a. The print head returns to its original position.b. 8264E only - The cleaning wiper returns to its original position.c. "CR Mainte.: Start" displays in the control panel.
No. Name
1 Front cover

Xerox 8254E / 8264E Color Wide Format PrinterUser Guide
6-31
8. Press the [Cancel] key several times. "Ready to Print" displays in the control panel.
Cleaning of the cleaning wiper is complete.
Cleaning Around the Cap
This section describes how to clean around the cap.
CAUTION:
• Use the gloves included in the cleaning kit to prevent ink and cleaning solvent from getting on your hands. Do not touch the rubber cap without gloves. Oil from your hands may prevent the cap from sealing properly.
1. Using either a foam swab or a lint free cloth soaked in Eco-cleaning solution or Isopropyl Alcohol, wipe around the edges of the rubber cap. This ensures a good seal is maintained during the head cleaning process.

Xerox 8254E / 8264E Color Wide Format PrinterUser Guide
6-32
2. If cap should become clogged with dried ink, flood the top of the cap using an eye dropper filled with Eco-cleaning solvent. Allow time for solvent to dissolve dried ink until solvent can be seen flowing into the waste bottle.
3. 8264E - Close the maintenance cover on the right front of the printer firmly until it is locked.8254E - Close the front cover of the printer.
4. Press the [Enter] key.a. The print head returns to its original position.b. The cleaning wiper returns to its original position.c. "CR Mainte.: Start" displays in the control panel.

Xerox 8254E / 8264E Color Wide Format PrinterUser Guide
6-33
8264E - Cleaning around the print head
This section describes how to clean around the print head.
1. Cleaning frequency
The area around the print head should be cleaned once per week, or whenever foreign objects, such as dust or ink, cause omitted dots, or whenever ink drops are attached around the print head.
2. Cleaning method
Follow the procedure below to clean around the print head.
Notes:• Before starting to clean around the print head, read and understand this procedure, then
clean promptly and accurately.• When cleaning around the print head, the print head cap must be removed and cleaning
must be complete before the head dries. The recommended time for cleaning is about fifteen minutes.If cleaning exceeds fifteen minutes, discontinue it by following Steps 7 and 8. Perform a head cleaning, and then start cleaning around the print head again.Cleaning the Head
• Use the cleaning stick to clean around the print head. For information on the cleaning stick, refer to Options/Supply List.
1. If the printer is turned ON, make sure of the following.• Printing or other operations are not in progress.• "Ready to Print" is displayed in the control panel.
2. Display the CR Maintenance menu in the control panel.a. Press the [Menu] key. "Menu 1: Setup>" displays in the control panel.

Xerox 8254E / 8264E Color Wide Format PrinterUser Guide
6-34
b. Press the [>] key. "Set1: MediaType" displays in the control panel.
c. Press the [+] key or [–] key to select "Set20: CR Maintenance".
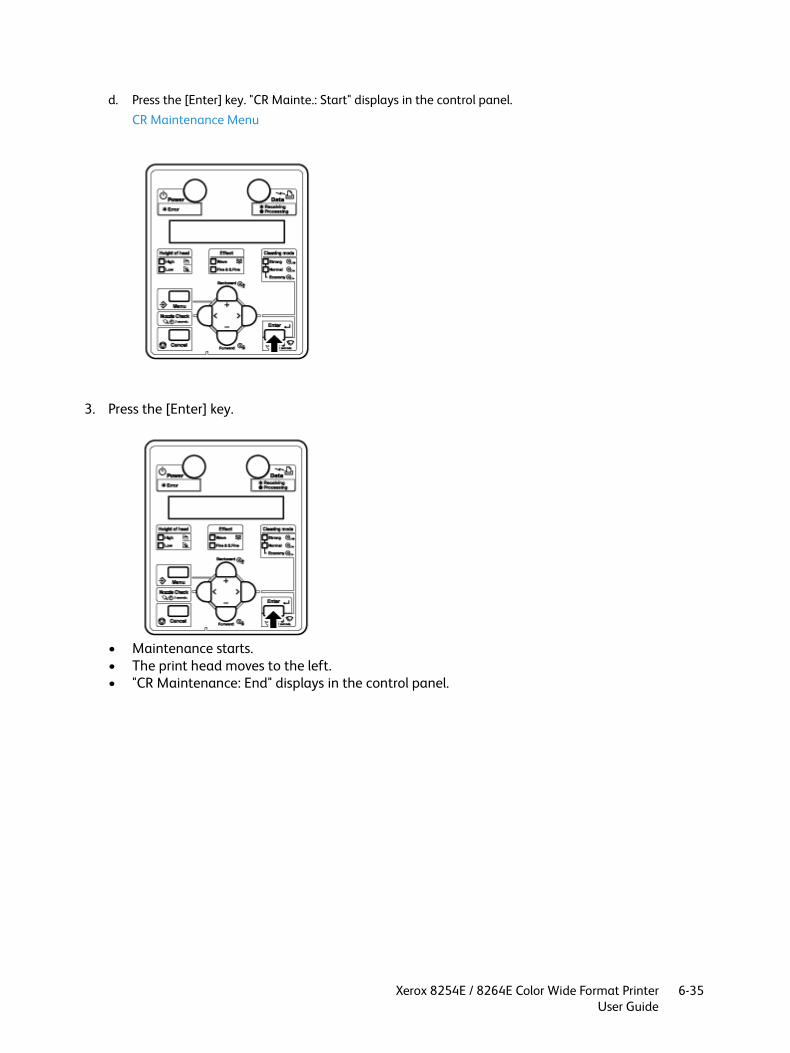
Xerox 8254E / 8264E Color Wide Format PrinterUser Guide
6-35
d. Press the [Enter] key. "CR Mainte.: Start" displays in the control panel.CR Maintenance Menu
3. Press the [Enter] key.
• Maintenance starts.• The print head moves to the left.• "CR Maintenance: End" displays in the control panel.

Xerox 8254E / 8264E Color Wide Format PrinterUser Guide
6-36
4. Open the left maintenance cover.
5. Using a light such as a penlight, confirm that there are no foreign objects, such as dust or ink attached to the following parts:– Around the print head
– Head guide area
– Nozzle
No. Name
1 Maintenance cover (Left)
No. Name
1 Around the print head
2 Head guide area
3 Nozzle
4 Dust, ink mass

Xerox 8254E / 8264E Color Wide Format PrinterUser Guide
6-37
CAUTION:
When cleaning around the print head:
• Do not touch the nozzle of the print head. Doing so may damage the print head.• Do not touch the head of the foam swab with your fingers. Oil on your fingers may attach to the
foam swab, causing damage to the print head.• Do not immerse the head of the foam swab in water. Doing so may damage the print head.• Do not re-use the foam swab. Dust attached to the stick may damage the print head.
6. Using Eco-cleaning solvent with a foam swab or lint free cloth, clean the following areas under the carriage:• Stainless steel ring around the head• Space between the print head and the guide ramps• Bottom sides of the guide ramps• Any other areas under the print head carriage that appears to have ink or dirt build-up
No. Name
1 Around the print head
2 Head guide area
3 Nozzle
4 Dust, ink mass
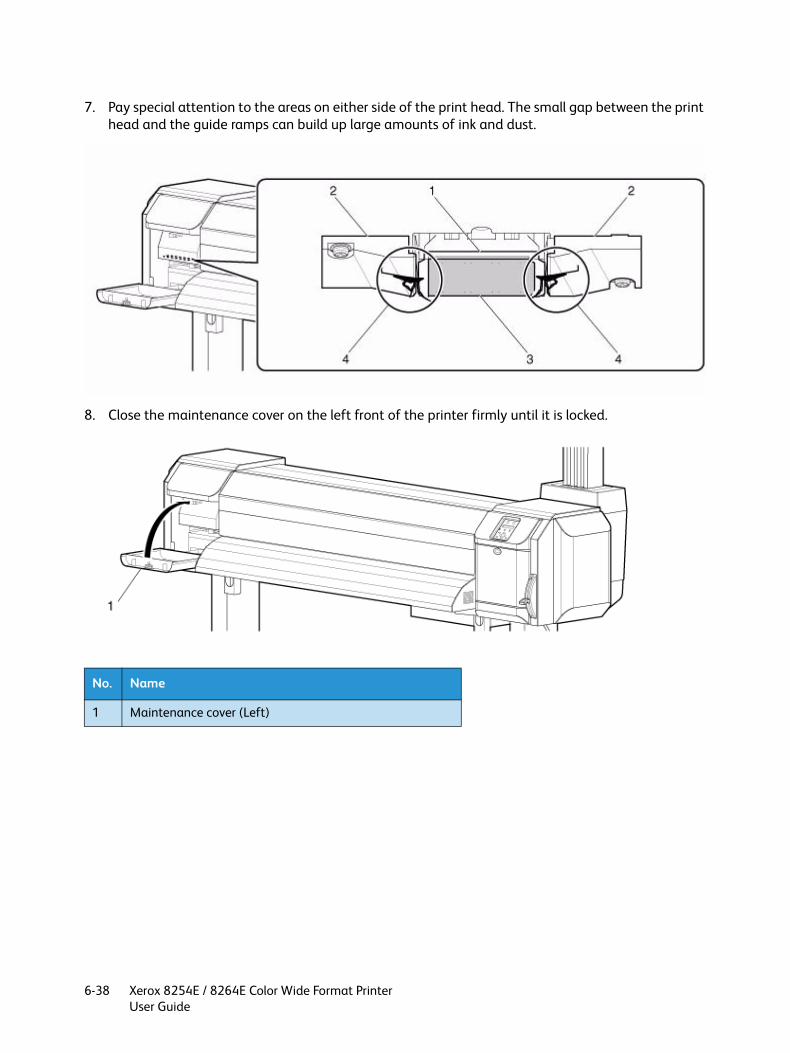
Xerox 8254E / 8264E Color Wide Format PrinterUser Guide
6-38
7. Pay special attention to the areas on either side of the print head. The small gap between the print head and the guide ramps can build up large amounts of ink and dust.
8. Close the maintenance cover on the left front of the printer firmly until it is locked.
No. Name
1 Maintenance cover (Left)

Xerox 8254E / 8264E Color Wide Format PrinterUser Guide
6-39
9. Press the [Enter] key.
• The print head returns to its original position.• The print cleaning wiper returns to its original position.• "CR Mainte.: Start" displays in the control panel.
10. Press the [Cancel] key several times. "Ready to Print" displays in the control panel.
Cleaning around the print head is complete.

8254E / 8264E User Guide 6-40
8254E - Cleaning Around the Print Head
This section describes how to clean around the print head.
1. Cleaning frequency
The area around the print head should be cleaned once per week, or whenever foreign objects, such as dust or ink, cause omitted dots, or whenever ink drops are attached around the print head.
2. Cleaning method
Follow the procedure below to clean around the print head.
CAUTION:
• Use the gloves included in the cleaning kit to prevent ink and cleaning solvent from getting on your hands. Do not touch the rubber cap without gloves. Oil from your hands may prevent the cap from sealing properly.
Follow the procedure below to clean around the print head.
Notes:• Before starting to clean around the print head, read and understand this procedure, then
clean promptly and accurately.• When cleaning around the print head, the print head cap must be removed and cleaning
must be complete before the head dries. The recommended time for cleaning is about fifteen minutes.If cleaning exceeds fifteen minutes, discontinue it by following Steps 7 and 8. Perform a head cleaning, and then start cleaning around the print head again.Cleaning the Head
• Use the foam swab to clean around the print head. For information on the foam swab, refer to Options/Supply List.
1. If the printer is turned ON, make sure of the following.• Printing or other operations are not in progress.• "Ready to Print" is displayed in the control panel.

Xerox 8254E / 8264E Color Wide Format PrinterUser Guide
6-41
2. Display the CR Maintenance menu in the control panel.a. Press the [Menu] key. "Menu 1: Setup>" displays in the control panel.
b. Press the [>] key. "Set1: MediaType" displays in the control panel.
c. Press the [+] key or [–] key to select "Set20: CR Maintenance".

Xerox 8254E / 8264E Color Wide Format PrinterUser Guide
6-42
d. Press the [Enter] key. "CR Mainte.: Start" displays in the control panel.
CR Maintenance Menu
3. Press the [Enter] key.
• Maintenance starts.• The print head moves to the left.• "CR Maintenance: End" displays in the control panel.
4. Open the front cover.5. Using a foam swab or lint free cloth, clean the following areas under the carriage.
• Stainless steel ring around the head• Space between the print head and the guide ramps• Bottom sides of the guide ramps• Any other areas under the print head carriage that appears to have ink or dirt build-up.
Note:
Place a piece of media on the platen when performing cleaning procedures to prevent ink and cleaning solvent from getting on the printing surface.

Xerox 8254E / 8264E Color Wide Format PrinterUser Guide
6-43
6. To clean behind the print head, position the foam swab parallel to the pressure roller and slide the swab behind the carriage. To clean either move the swab in a horizontal motion or move the carriage back and forth.
7. Clean the front of the head in a horizontal motion.
CAUTION:
• Be careful not to touch the nozzle surface while cleaning. Doing so may damage the print head.

Xerox 8254E / 8264E Color Wide Format PrinterUser Guide
6-44
8. To clean the area between the head and the guide ramps, position the carriage such that it is just off the right side of the platen. Work the swab using Eco-cleaning solvent under the head, being especially careful not to touch the nozzle surface area.
9. Clean the space between the head and the guide ramps on both sides of the head.10. Repeat the procedure on the left side of the head by positioning the carriage such that it is just off
the left side of the platen.11. When finished performing head cleaning, close the front cover on the printer.12. Press the [Enter] key.
a. The print head returns to its original position.b. “CR Mainte.: Start" displays in the control panel.
Print Head
Guide Ramp
Space

Xerox 8254E / 8264E Color Wide Format PrinterUser Guide
6-45
Maintenance Performed by Authorized Technician
This section describes the periodic replacement of parts and inspections required for the printer. These services ensure that the printer will provide stable printing quality.
Periodic Replacement of Parts
The following parts should be replaced by an authorized technician according to the schedule below.
8264E Replacement of parts
8254E Replacement of parts
Part Timing
Maintenance station Once per year
Wiper Once per year
Damper Once per year
Part Timing
Maintenance station Once per year
Wiper Once per year
Damper Once per year
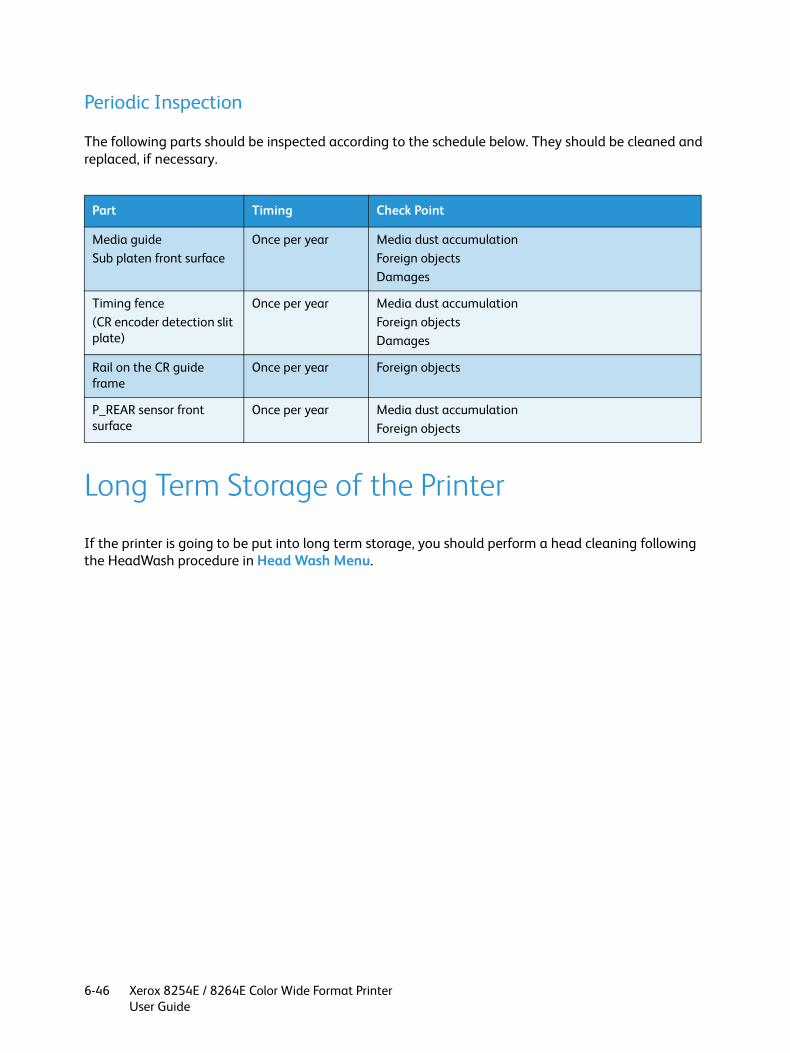
Xerox 8254E / 8264E Color Wide Format PrinterUser Guide
6-46
Periodic Inspection
The following parts should be inspected according to the schedule below. They should be cleaned and replaced, if necessary.
Long Term Storage of the Printer
If the printer is going to be put into long term storage, you should perform a head cleaning following the HeadWash procedure in Head Wash Menu.
Part Timing Check Point
Media guideSub platen front surface
Once per year Media dust accumulationForeign objectsDamages
Timing fence(CR encoder detection slit plate)
Once per year Media dust accumulationForeign objectsDamages
Rail on the CR guide frame
Once per year Foreign objects
P_REAR sensor front surface
Once per year Media dust accumulationForeign objects

Xerox 8254E / 8264E Color Wide Format PrinterUser Guide
7-1
7Appendix
This chapter describes specifications, options and components included with this printer.
Product Specifications
8264E Printer Specifications
Item Specification
Model name Xerox 8264E Color Wide Format Printer
Printing method On-demand piezo drive system
Drive system Firmware servo/DC motor drive
Media feed system Multipoint pressurizing grid roller system
Media fixing system Pressurization roller down system by manual lever
Media feed/ejection Rear feed/Front ejection
Outer diameter of the roll media 150mm (6") or less
Weight of roll media 30kg (66lbs.) or less
Maximum media length 50m (164ft.)
Maximum media width 1,625mm (65")
Maximum media thickness 0.3mm (.012")
Maximum print length 18m (59ft.)
Maximum print width 1,615mm (64")
Print margins Front: Up to 15mm (.6")Back: 5mm (.6")Left: 5mm to 25mm (.6" to 1")Right: 5mm to 25mm (.6" to 1")
Media cut system Horizontal manual cut system
Head height adjustment Normal (Low)/High (two-step adjustment)

Xerox 8254E / 8264E Color Wide Format PrinterUser Guide
7-2
CPU 64-bit RISC CPU
Memory 128MB
Command MH-RTL (RTL-PASS)
Interface Network interface (Ethernet IEEE 802.3)
Ink Supply system Supplied through tubes from each of four color cartridges
Cartridge Black, Cyan, Magenta, Yellow: 220ml ± 5ml (6.6oz. ± 0.15oz.)
Black, Cyan, Magenta, Yellow: 440ml
Environmental conditions Operating environment Temperature: 20°C to 32°C (68°F to 90°F)Humidity: 40% to 60%, No condensation
Printing accuracy coverage
Temperature: 22°C to 30°C (72°F to 86°F)Humidity: 40% to 60%, No condensation
Rate of change Temperature: within 2°C (3.6°F) per one hour Humidity: within 5% per one hour
Archiving environment(Ink unfilled)
Temperature: –20°C to 60°C (-4°F to 140°F)Humidity: 20% to 80%, No condensationStorage life: six months
Archiving environment(Ink filled)
Temperature: –10°C to 40°C (14°F to 104°F)Humidity: 20% to 80%, No condensationStorage life: four days at 32°C (90°F) or higher
Power Power voltage AC 90V to AC 132V / AC 198V to AC 264V
Frequency 50Hz/60Hz ± 1Hz
Power consumption Printing 1200W (Heater ON)
Standby 40W or less (when the idle heat is turned OFF)
Outer dimensions Height 1,262mm (51") (including the stand)
Width 2,698mm (108")
Depth 845mm (34")
Weight 173kg (382lbs.) (including the stand)
Item Specification

Xerox 8254E / 8264E Color Wide Format PrinterUser Guide
7-3
8254E Printer Specifications
Item Specification
Model name Xerox 8254E Color Wide Format Printer
Printing method On-demand piezo drive system
Drive system Firmware servo/DC motor drive
Media feed system Multipoint pressurizing grid roller system
Media fixing system Pressurization roller down system by manual lever
Media feed/ejection Rear feed/Front ejection
Outer diameter of the roll media 150mm (6") or less
Weight of roll media 19kg (4.7lbs.) or less
Maximum media length 50m (164ft.)
Maximum media width 1,371.5mm (54.9")
Maximum media thickness 0.3mm (.012")
Maximum print width Printing Uni-D 1,355.5mm (54.2")
Printing Bi-D 1,336.5mm (53.5")
Print margins Front:3mm (.012")Back: 3mm (.012")Left: 3mm (.012")Right: 3mm (.012")
Media cut system Horizontal manual cut system
Head height adjustment Normal (Low)/High (two-step adjustment)
CPU 64-bit RISC CPU
Memory 128MB
Command MH-RTL (RTL-PASS)
Interface Network interface (Ethernet IEEE 802.3)
Ink Supply system Supplied through tubes from each of four color cartridges
Cartridge Black, Cyan, Magenta, Yellow: 220ml ± 5ml (6.6oz. ± 0.15oz.)
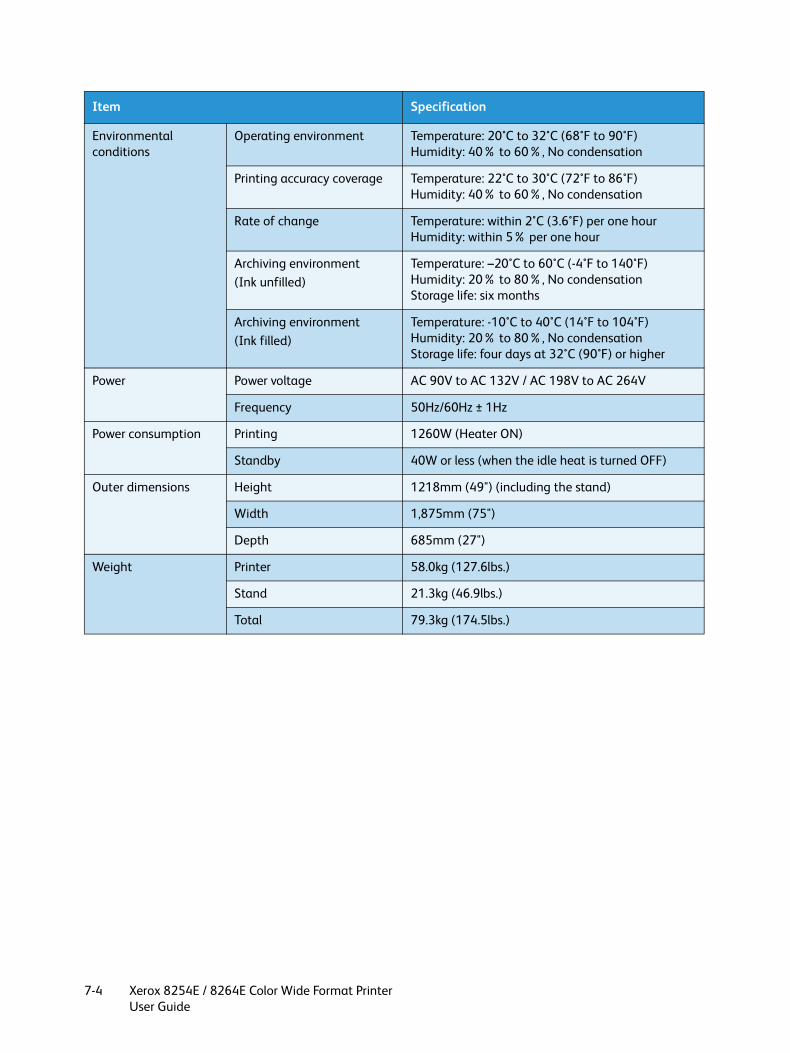
Xerox 8254E / 8264E Color Wide Format PrinterUser Guide
7-4
Environmental conditions
Operating environment Temperature: 20°C to 32°C (68°F to 90°F)Humidity: 40% to 60%, No condensation
Printing accuracy coverage Temperature: 22°C to 30°C (72°F to 86°F)Humidity: 40% to 60%, No condensation
Rate of change Temperature: within 2°C (3.6°F) per one hour Humidity: within 5% per one hour
Archiving environment(Ink unfilled)
Temperature: –20°C to 60°C (-4°F to 140°F)Humidity: 20% to 80%, No condensationStorage life: six months
Archiving environment(Ink filled)
Temperature: -10°C to 40°C (14°F to 104°F)Humidity: 20% to 80%, No condensationStorage life: four days at 32°C (90°F) or higher
Power Power voltage AC 90V to AC 132V / AC 198V to AC 264V
Frequency 50Hz/60Hz ± 1Hz
Power consumption Printing 1260W (Heater ON)
Standby 40W or less (when the idle heat is turned OFF)
Outer dimensions Height 1218mm (49") (including the stand)
Width 1,875mm (75")
Depth 685mm (27")
Weight Printer 58.0kg (127.6lbs.)
Stand 21.3kg (46.9lbs.)
Total 79.3kg (174.5lbs.)
Item Specification

Xerox 8254E / 8264E Color Wide Format PrinterUser Guide
7-5
Interface Specification
This section describes each type of interface specification supported by this product.
Network interface specification
Item Specification
Network type Ethernet IEEE802.3
Network I/F 10BASE-T/100BASE-TX Automatic transfer type(RJ-45 Connector twist pair cable)MDI/MDI-X Automatic transfer
Corresponding protocol
TCP/IP

Xerox 8254E / 8264E Color Wide Format PrinterUser Guide
7-6
Options/Supply List
For more information about options and supply items, contact your local Xerox dealer.
Consumables
Item Printer Model Part No. Remarks
Media Both
Ink cartridges Both 106R01227 Black 220ML
106R01228 Cyan 220ML
106R01229 Magenta 220ML
106R01230 Yellow220ML
8264E only 106R01251 Black 440ML
106R01252 Cyan 440ML
106R01253 Magenta 440ML
106R01254 Yellow 440ML
Cleaning cartridge Both 108R00735
Flushing-box sponge 8264E only 108R00859 Used during head flushing.Included with printer.
Tweezers 8264E only Generic. Used to remove flushing-box sponges. Mentioned in User Guide, but not included with printer.
Cleaning stick 8264E only 108R00858 Used to clean heads and wipers.Included with printer.
Poly-knit wiper 8254E only 108R00857 Used to clean heads and wipers.Included with printer.
Cleaning solution Both
Waste bottle 053n00293