Embed Size (px)
Citation preview

88
CREATING AND EDITING SYMBOLS
Lesson Overview
• Import Adobe Illustrator and Adobe Photoshopartwork
• Create new symbols
• Understand the diff erence between symbol types
• Understand the diff erence between symbols andinstances
• Positioning objects on the Stage
• Adjust transparency and color, and turn visibilityon or off
• Apply blending eff ects
• Apply special eff ects with fi lters
• Position objects in 3D space
Th is lesson will take about 90 minutes to complete. Download the project fi les for this lesson from the Registered Products tab on your Account page at www.peachpit.com (click the Access Bonus Content link) and store them on your computer in a convenient location, as described in the Getting Started section of this book. Your Account page is also where you’ll fi nd any updates to the lessons or to the lesson fi les.
3
9780134665238_c03_marketing.indd 889780134665238_c03_marketing.indd 88 10/28/16 2:23 PM10/28/16 2:23 PM
© 2017 Pearson Education, Inc., and Adobe Systems Incorporated and its licensors. All rights reserved.
89
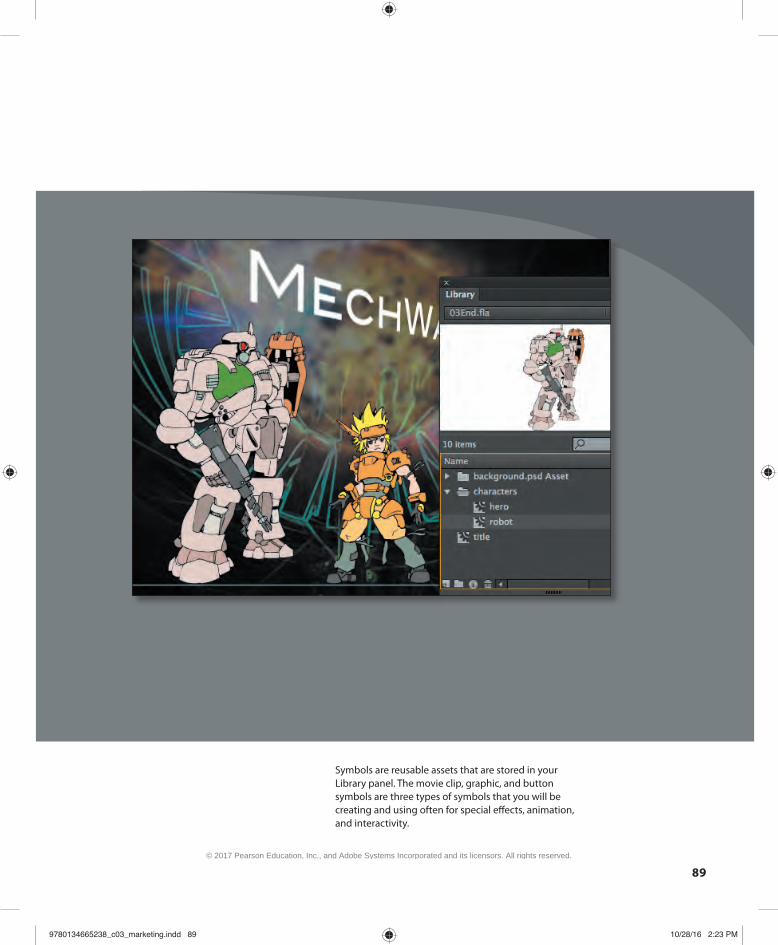
Symbols are reusable assets that are stored in your Library panel. The movie clip, graphic, and button symbols are three types of symbols that you will be creating and using often for special eff ects, animation, and interactivity.
9780134665238_c03_marketing.indd 899780134665238_c03_marketing.indd 89 10/28/16 2:23 PM10/28/16 2:23 PM
© 2017 Pearson Education, Inc., and Adobe Systems Incorporated and its licensors. All rights reserved.
90 LESSON 3 Creating and Editing Symbols
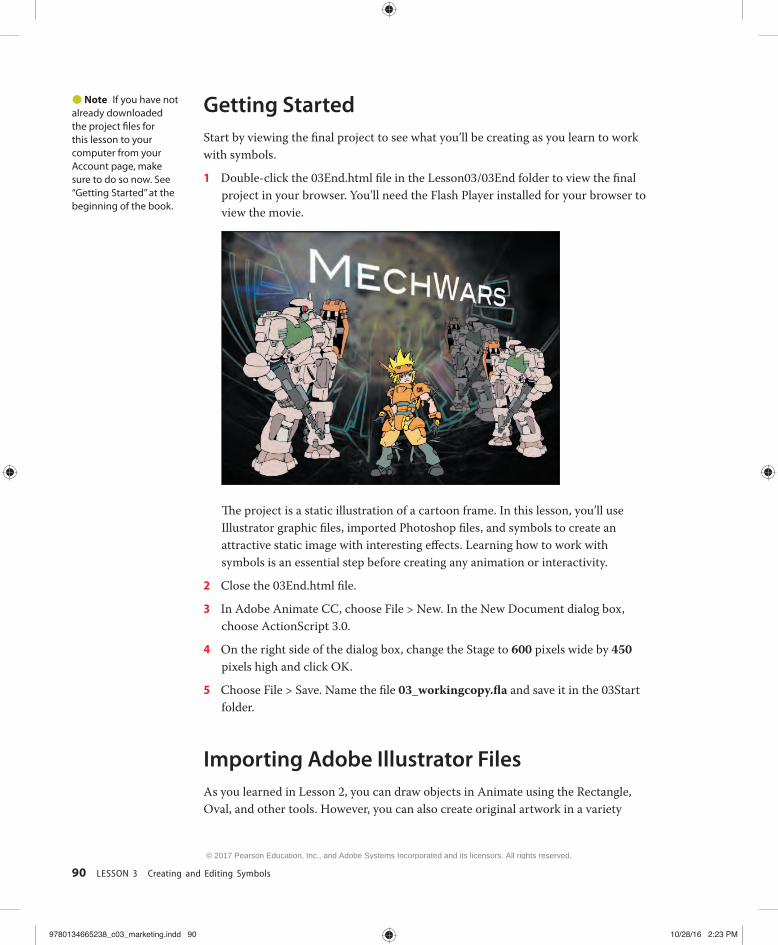
Getting Started Start by viewing the fi nal project to see what you’ll be creating as you learn to work with symbols.
1 Double-click the 03End.html fi le in the Lesson03/03End folder to view the fi nal project in your browser. You’ll need the Flash Player installed for your browser to view the movie.
Th e project is a static illustration of a cartoon frame. In this lesson, you’ll use Illustrator graphic fi les, imported Photoshop fi les, and symbols to create an attractive static image with interesting eff ects. Learning how to work with symbols is an essential step before creating any animation or interactivity.
2 Close the 03End.html fi le.
3 In Adobe Animate CC, choose File > New. In the New Document dialog box, choose ActionScript 3.0.
4 On the right side of the dialog box, change the Stage to 600 pixels wide by 450 pixels high and click OK.
5 Choose File > Save. Name the fi le 03_workingcopy.fl a and save it in the 03Start folder.
Importing Adobe Illustrator Files As you learned in Lesson 2, you can draw objects in Animate using the Rectangle, Oval, and other tools. However, you can also create original artwork in a variety
� Note If you have not already downloaded the project fi les forthis lesson to your computer from your Account page, make sure to do so now. See “Getting Started” at the beginning of the book.
9780134665238_c03_marketing.indd 909780134665238_c03_marketing.indd 90 10/28/16 2:23 PM10/28/16 2:23 PM
© 2017 Pearson Education, Inc., and Adobe Systems Incorporated and its licensors. All rights reserved.
ANIMATE CC CLASSROOM IN A BOOK 2017 RELEASE 91
of applications and import it into Animate. If you’re more familiar with Adobe Illustrator, for example, you may fi nd it easier to design layouts in Illustrator, and then import them into Animate to add animation and interactivity.
When you import an Illustrator fi le saved in AI format, Animate will automatically recognize layers, frames, and symbols. You can choose how Animate should import the diff erent layers of the original fi le and how to import text (see the section “Using simple import options”).
In this exercise, you’ll import an Illustrator fi le that contains all the characters for the cartoon frame.
1 Choose File > Import > Import To Stage.
2 Navigate to the Lesson03/03Start folder and select characters.ai.
3 Click Open.
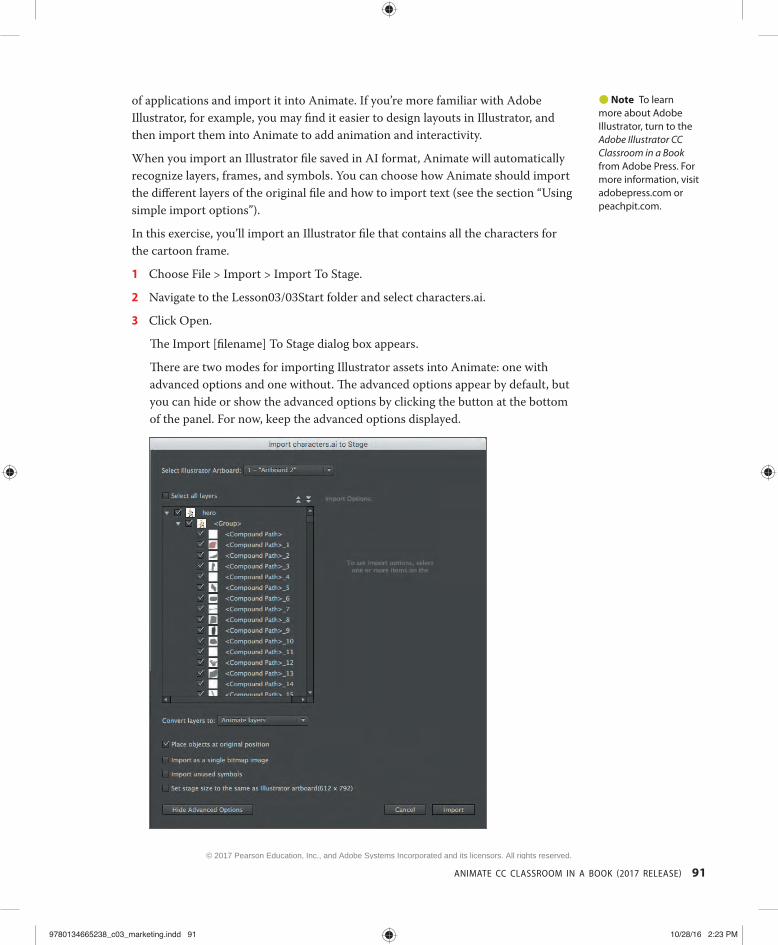
Th e Import [fi lename] To Stage dialog box appears.
Th ere are two modes for importing Illustrator assets into Animate: one with advanced options and one without. Th e advanced options appear by default, but you can hide or show the advanced options by clicking the button at the bottom of the panel. For now, keep the advanced options displayed.
� Note To learnmore about Adobe Illustrator, turn to the Adobe Illustrator CC Classroom in a Book from Adobe Press. For more information, visit adobepress.com or peachpit.com.
9780134665238_c03_marketing.indd 919780134665238_c03_marketing.indd 91 10/28/16 2:23 PM10/28/16 2:23 PM
© 2017 Pearson Education, Inc., and Adobe Systems Incorporated and its licensors. All rights reserved.
92 LESSON 3 Creating and Editing Symbols
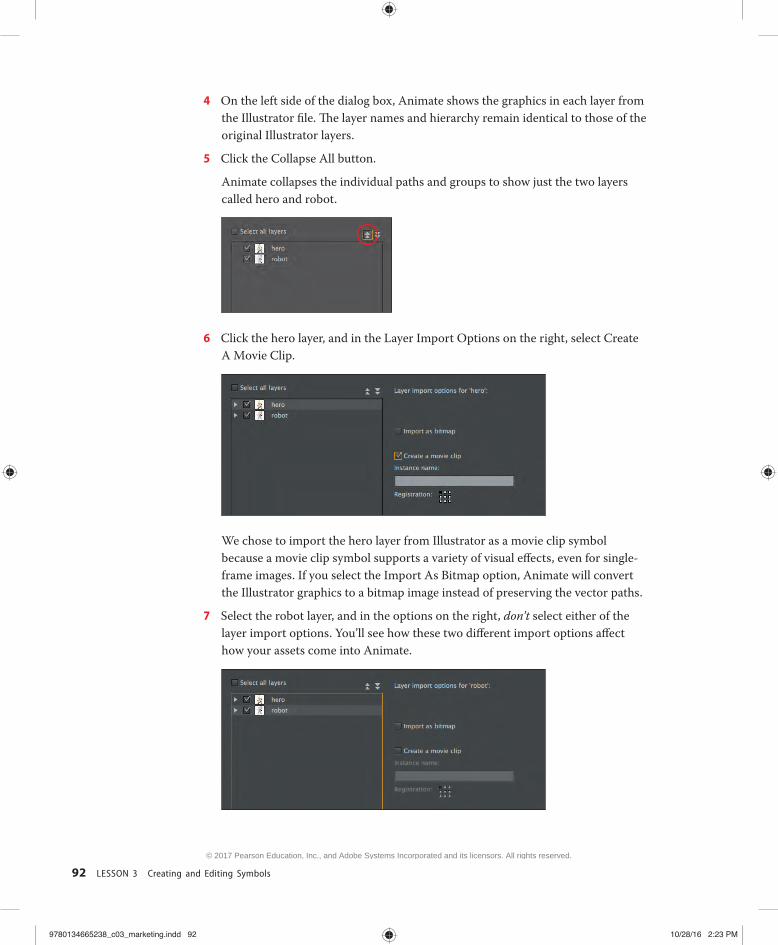
4 On the left side of the dialog box, Animate shows the graphics in each layer from the Illustrator fi le. Th e layer names and hierarchy remain identical to those of the original Illustrator layers.
5 Click the Collapse All button.
Animate collapses the individual paths and groups to show just the two layers called hero and robot.
6 Click the hero layer, and in the Layer Import Options on the right, select Create A Movie Clip.
We chose to import the hero layer from Illustrator as a movie clip symbol because a movie clip symbol supports a variety of visual eff ects, even for single-frame images. If you select the Import As Bitmap option, Animate will convert the Illustrator graphics to a bitmap image instead of preserving the vector paths.
7 Select the robot layer, and in the options on the right, don’t select either of the layer import options. You’ll see how these two diff erent import options aff ect how your assets come into Animate.
9780134665238_c03_marketing.indd 929780134665238_c03_marketing.indd 92 10/28/16 2:23 PM10/28/16 2:23 PM
© 2017 Pearson Education, Inc., and Adobe Systems Incorporated and its licensors. All rights reserved.

ANIMATE CC CLASSROOM IN A BOOK 2017 RELEASE 93
8 Click Import.
Th e hero and robot layers from the original Illustrator fi le are imported and placed on layers with the same names in Animate. Th e hero is converted to a movie clip symbol, which is saved to the Library panel. Th e robot is not yet a movie clip symbol (you’ll learn about how to create a movie clip symbol within Animate later in this lesson).
Using simple import options Often, you don’t need the fi ne control to select individual layers or individual graphics within a layer to import into Animate. For a simple, quick, and easy import process, click Hide Advanced Options in the lower-left corner of the dialog box and use the following options:
• Layer C onversion
Selecting Maintain Editable Paths And Eff ects lets you continue to edit the vector drawing in Animate. Th e other option, Single Flattened Bitmap, imports the Illustrator artwork as a bitmap image.
9780134665238_c03_marketing.indd 939780134665238_c03_marketing.indd 93 10/28/16 2:23 PM10/28/16 2:23 PM
© 2017 Pearson Education, Inc., and Adobe Systems Incorporated and its licensors. All rights reserved.
94 LESSON 3 Creating and Editing Symbols
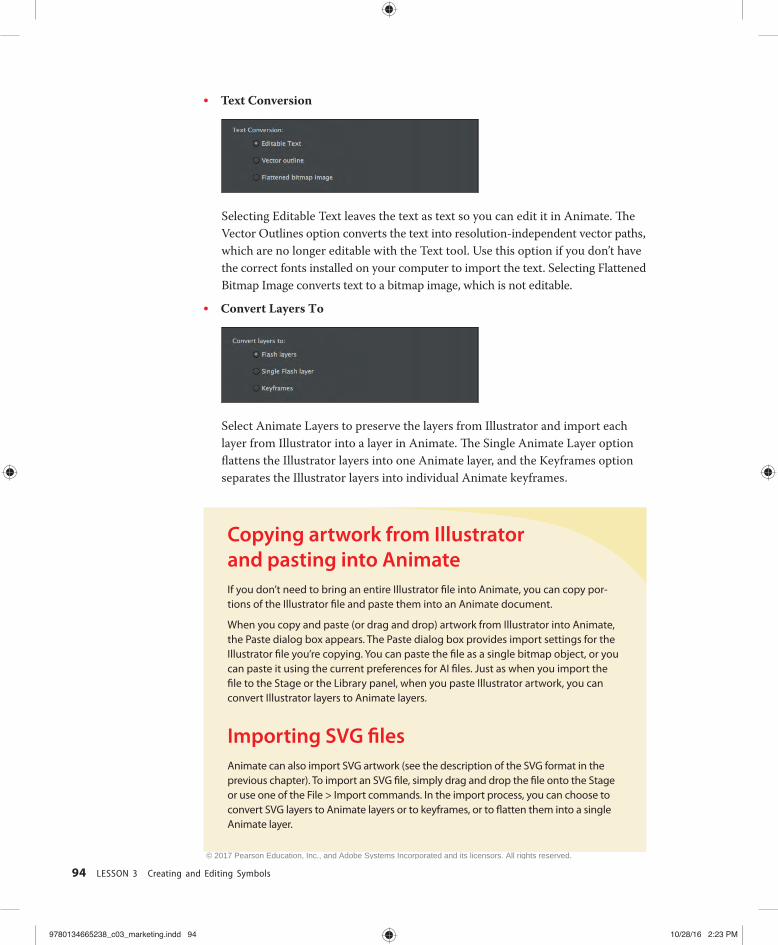
• Text C onversion
Selecting Editable Text leaves the text as text so you can edit it in Animate. Th e Vector Outlines option converts the text into resolution-independent vector paths, which are no longer editable with the Text tool. Use this option if you don’t have the correct fonts installed on your computer to import the text. Selecting Flattened Bitmap Image converts text to a bitmap image, which is not editable.
• Convert L ayers T o
Select Animate Layers to preserve the layers from Illustrator and import each layer from Illustrator into a layer in Animate. Th e Single Animate Layer option fl attens the Illustrator layers into one Animate layer, and the Keyframes option separates the Illustrator layers into individual Animate keyframes.
Copying artwork from Illustrator and pasting into Animate If you don’t need to bring an entire Illustrator fi le into Animate, you can copy por-tions of the Illustrator fi le and paste them into an Animate document.
When you copy and paste (or drag and drop) artwork from Illustrator into Animate, the Paste dialog box appears. The Paste dialog box provides import settings for the Illustrator fi le you’re copying. You can paste the fi le as a single bitmap object, or you can paste it using the current preferences for AI fi les. Just as when you import the fi le to the Stage or the Library panel, when you paste Illustrator artwork, you can convert Illustrator layers to Animate layers.
Importing SVG fi les Animate can also import SVG artwork (see the description of the SVG format in the previous chapter). To import an SVG fi le, simply drag and drop the fi le onto the Stage or use one of the File > Import commands. In the import process, you can choose to convert SVG layers to Animate layers or to keyframes, or to fl atten them into a single Animate layer.
9780134665238_c03_marketing.indd 949780134665238_c03_marketing.indd 94 10/28/16 2:23 PM10/28/16 2:23 PM
© 2017 Pearson Education, Inc., and Adobe Systems Incorporated and its licensors. All rights reserved.

ANIMATE CC CLASSROOM IN A BOOK 2017 RELEASE 95
About Symbols A symbol is a reusable asset that you can use for special eff ects, animation, or interactivity. Th ere are three kinds of symbols that you can create: the graphic, but-ton, and movie clip. Symbols can reduce the fi le size and download time for many animations because they can be reused. You can use a symbol countless times in a project, but Animate includes its data only once.
Symbols are stored in the Library panel. When you drag a symbol to the Stage, Animate creates an instance of the symbol, leaving the original in the library. An instance is a copy of a symbol located on the Stage. You can think of the symbol as an original photographic negative, and the instances on the Stage as prints of the negative. With just a single negative, you can create multiple prints.
It’s also helpful to think of symbols as containers. Symbols are simply containers for your content. A symbol can contain a JPEG image, an imported Illustrator draw-ing, or a drawing that you created in Animate. At any time, you can go inside your symbol and edit it, which means editing or replacing its contents.
Each of the three kinds of symbols in Animate is used for a specifi c purpose. You can tell whether a symbol is a graphic ( ), button ( ), or movie clip ( ) by looking at the icon next to it in the Library panel.
Movie clip symbols Th e movie clip is one of the most powerful and versatile types of symbol. When you create animation, you will typically use movie clip symbols. You can apply fi lters, color settings, and blending modes to a movie clip instance to enhance its appear-ance with special eff ects.
A movie clip symbol also contains its own independent timeline. You can have an animation inside a movie clip symbol just as easily as you can have an animation on the main Timeline. Th is makes very complex animations possible; for example, a butterfl y fl ying across the Stage can move from left to right as well as have its wings fl apping independently of its movement.
Most importantly, you can control movie clips with ActionScript to make them respond to the user. For example, you can control a movie clip’s position or rota-tion to create arcade-style games. Or a movie clip can have drag-and-drop behavior, which comes in handy when building a jigsaw puzzle.
Button symbols Button symbols are used for interactivity. Th ey contain four unique keyframes that describe how they appear when the mouse is interacting with them. However, but-tons need code to make them do something.
� Note In spite of its name, a movie clip symbol isn’t necessarily animated.
9780134665238_c03_marketing.indd 959780134665238_c03_marketing.indd 95 10/28/16 2:23 PM10/28/16 2:23 PM
© 2017 Pearson Education, Inc., and Adobe Systems Incorporated and its licensors. All rights reserved.
96 LESSON 3 Creating and Editing Symbols
You can also apply fi lters, blending modes, and color settings to buttons. You’ll learn more about buttons in Lesson 8 when you create a nonlinear navigation scheme to allow the user to choose what to see.
Graphic symbols Graphic symbols are the most basic kind of symbol. Often you use graphic symbols to build more complex movie clip symbols. Th ey do not support ActionScript and you can’t apply fi lters or blending modes to a graphic symbol.
However, graphic symbols are useful when you have multiple versions of a drawing that you want to easily switch between—for example, when synchronizing lips to sound, keeping all the diff erent mouth positions in individual keyframes of a graphic symbol makes voice syncing easy. Graphic symbols also are used to synchronize an animation inside a graphic symbol to the main Timeline.
Importing symbols Working with symbols in Adobe Illustrator is similar to working with them in Animate. In fact, you can use many of the same keyboard shortcuts in both Illustrator and Animate: press F8 in either application to create a symbol. When you create a symbol in Illustrator, the Symbol Options dialog box lets you name the sym-bol and set options specifi c to Animate, including the symbol type (such as movie clip) and registration point location.
If you want to edit a symbol in Illustrator without disturbing anything else, double-click the symbol to edit it in isolation mode. Illustrator dims all other objects on the artboard. When you exit isolation mode, the symbol in the Symbols panel—and all instances of the symbol—are updated accordingly.
Use the Symbols panel or the Control panel in Illustrator to assign names to symbol instances, break links between symbols and instances, swap a symbol instance with another symbol, or create a copy of the symbol.
Creating Symbols You learned how to create a movie clip symbol while importing assets from Illustrator. You can also create symbols within Animate. Th ere are two main ways of creating a symbol. Both methods are valid; the one you use depends on your preferred way of working.
Th e fi rst method is to start with nothing selected on the Stage, and then to choose Insert > New Symbol. Animate will put you in symbol-editing mode where you can begin drawing or importing graphics for your symbol.
9780134665238_c03_marketing.indd 969780134665238_c03_marketing.indd 96 10/28/16 2:23 PM10/28/16 2:23 PM
© 2017 Pearson Education, Inc., and Adobe Systems Incorporated and its licensors. All rights reserved.
ANIMATE CC CLASSROOM IN A BOOK 2017 RELEASE 97
Th e second method is to select existing graphics on the Stage and then convert them to symbols. Whatever is selected will automatically be placed inside your new symbol.
Most designers prefer to use this second method because they can create all their graphics on the Stage and see them together before making the individual compo-nents into symbols.
For this lesson, you’ll select the diff erent parts of the imported Illustrator graphic, and then convert the various pieces to symbols.
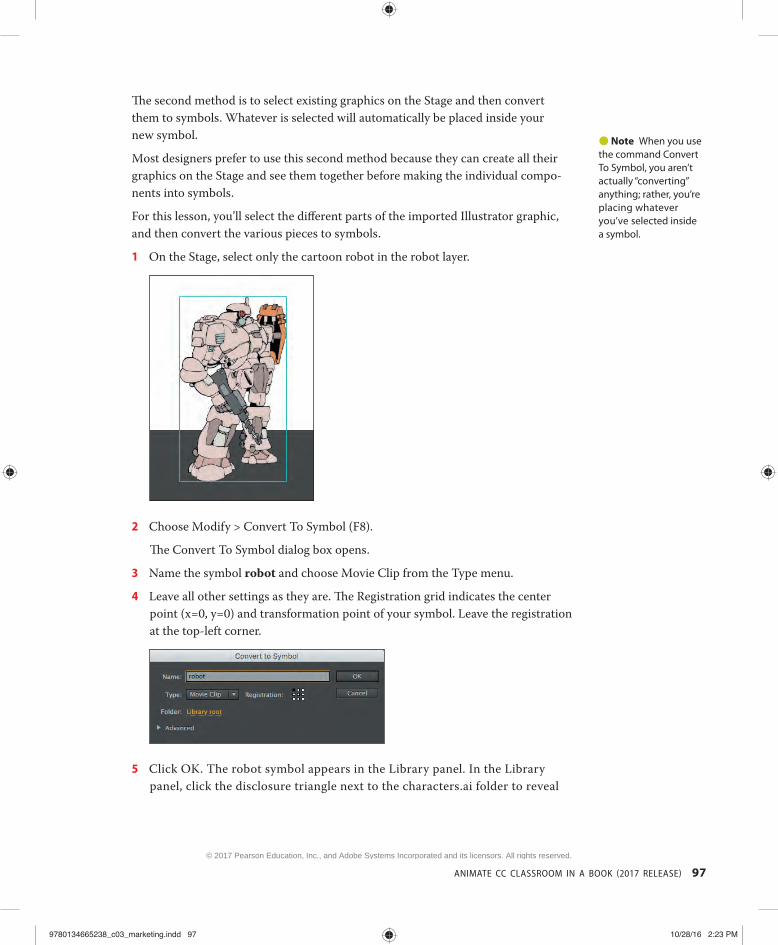
1 On the Stage, select only the cartoon robot in the robot layer.
2 Choose Modify > Convert To Symbol (F8).
Th e Convert To Symbol dialog box opens.
3 Name the symbol robot and choose Movie Clip from the Type menu.
4 Leave all other settings as they are. Th e Registration grid indicates the center point (x=0, y=0) and transformation point of your symbol. Leave the registration at the top-left corner.
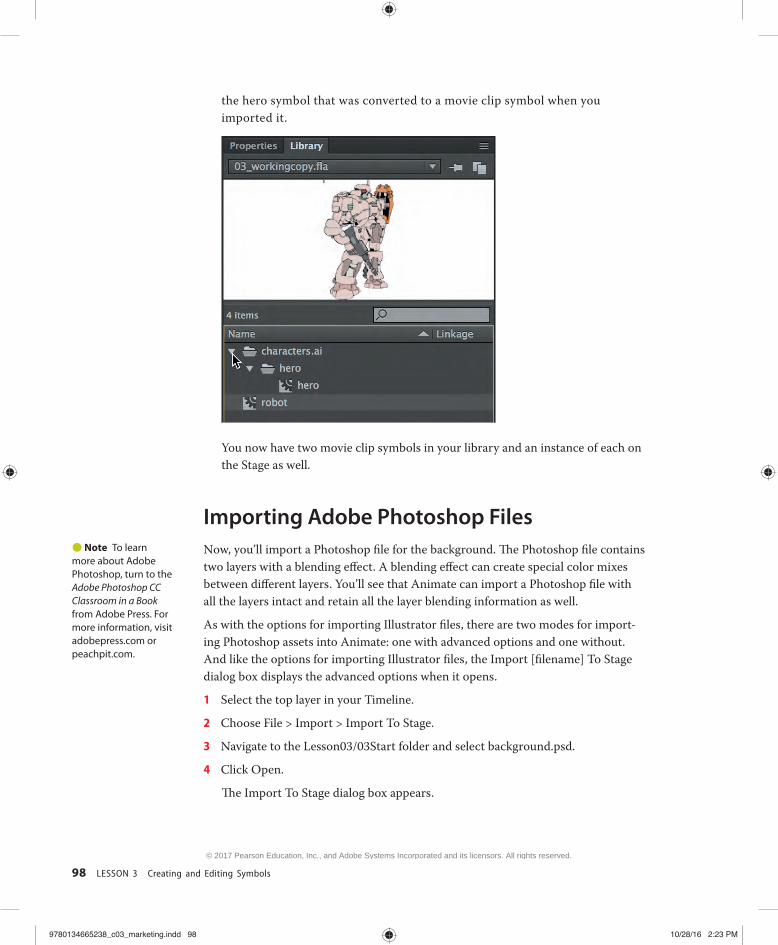
5 Click OK. The robot symbol appears in the Library panel. In the Library panel, click the disclosure triangle next to the characters.ai folder to reveal
� Note When you use the command Convert To Symbol, you aren’t actually “converting” anything; rather, you’re placing whatever you’ve selected inside a symbol.
9780134665238_c03_marketing.indd 979780134665238_c03_marketing.indd 97 10/28/16 2:23 PM10/28/16 2:23 PM
© 2017 Pearson Education, Inc., and Adobe Systems Incorporated and its licensors. All rights reserved.
98 LESSON 3 Creating and Editing Symbols
the hero symbol that was converted to a movie clip symbol when you imported it.
You now have two movie clip symbols in your library and an instance of each on the Stage as well.
Importing Adobe Photoshop Files Now, you’ll import a Photoshop fi le for the background. Th e Photoshop fi le contains two layers with a blending eff ect. A blending eff ect can create special color mixes between diff erent layers. You’ll see that Animate can import a Photoshop fi le with all the layers intact and retain all the layer blending information as well.
As with the options for importing Illustrator fi les, there are two modes for import-ing Photoshop assets into Animate: one with advanced options and one without. And like the options for importing Illustrator fi les, the Import [fi lename] To Stage dialog box displays the advanced options when it opens.
1 Select the top layer in your Timeline.
2 Choose File > Import > Import To Stage.
3 Navigate to the Lesson03/03Start folder and select background.psd.
4 Click Open.
Th e Import To Stage dialog box appears.
� Note To learn more about Adobe Photoshop, turn to the Adobe Photoshop CC Classroom in a Book from Adobe Press. For more information, visit adobepress.com or peachpit.com.
9780134665238_c03_marketing.indd 989780134665238_c03_marketing.indd 98 10/28/16 2:23 PM10/28/16 2:23 PM
© 2017 Pearson Education, Inc., and Adobe Systems Incorporated and its licensors. All rights reserved.

ANIMATE CC CLASSROOM IN A BOOK 2017 RELEASE 99
5 Click Show Advanced Options at the bottom of the dialog box if the advanced options are hidden.
Animate shows two diff erent layers from the Photoshop fi le, one named fl are and the other named Background .
6 Make sure both layers have a check mark in front of them indicating that they’re selected. If not, you can click the Select All Layers option.
7 Click the fl are layer to highlight it, and from the options to the right, select Bitmap Image With Editable Layer Styles.
� Tip If you can’t select the PSD fi le, choose All Files from the Enable menu. If the Enable menu isn’t visible, click Options.
9780134665238_c03_marketing.indd 999780134665238_c03_marketing.indd 99 10/28/16 2:23 PM10/28/16 2:23 PM
© 2017 Pearson Education, Inc., and Adobe Systems Incorporated and its licensors. All rights reserved.
100 LESSON 3 Creating and Editing Symbols
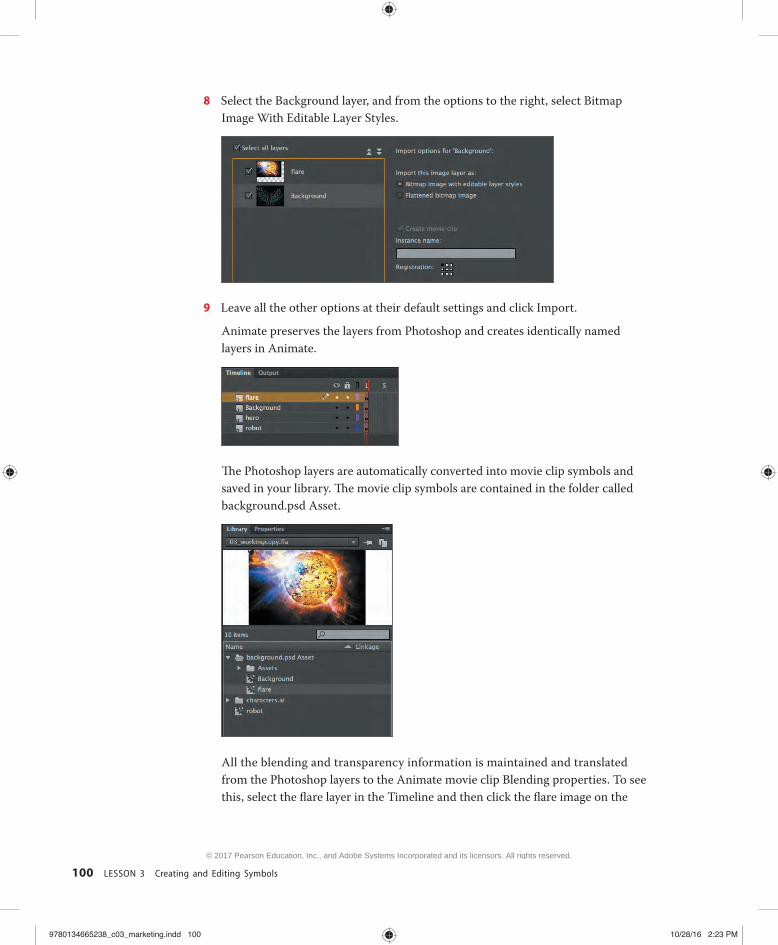
8 Select the Background layer, and from the options to the right, select Bitmap Image With Editable Layer Styles.
9 Leave all the other options at their default settings and click Import.
Animate preserves the layers from Photoshop and creates identically named layers in Animate.
Th e Photoshop layers are automatically converted into movie clip symbols and saved in your library. Th e movie clip symbols are contained in the folder called background.psd Asset.
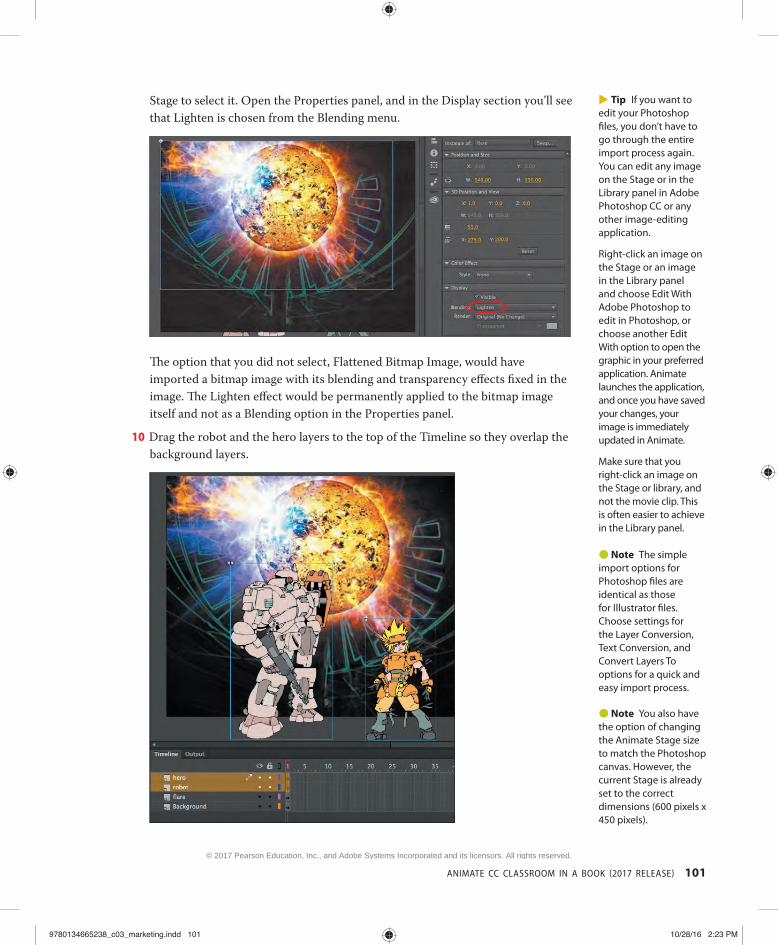
All the blending and transparency information is maintained and translated from the Photoshop layers to the Animate movie clip Blending properties. To see this, select the fl are layer in the Timeline and then click the fl are image on the
9780134665238_c03_marketing.indd 1009780134665238_c03_marketing.indd 100 10/28/16 2:23 PM10/28/16 2:23 PM
© 2017 Pearson Education, Inc., and Adobe Systems Incorporated and its licensors. All rights reserved.
ANIMATE CC CLASSROOM IN A BOOK 2017 RELEASE 101
Stage to select it. Open the Properties panel, and in the Display section you’ll see that Lighten is chosen from the Blending menu.
Th e option that you did not select, Flattened Bitmap Image, would have imported a bitmap image with its blending and transparency eff ects fi xed in the image. Th e Lighten eff ect would be permanently applied to the bitmap image itself and not as a Blending option in the Properties panel.
10 Drag the robot and the hero layers to the top of the Timeline so they overlap the background layers.
� Tip If you want to edit your Photoshop fi les, you don’t have to go through the entire import process again. You can edit any image on the Stage or in the Library panel in Adobe Photoshop CC or any other image-editing application.
Right-click an image on the Stage or an image in the Library panel and choose Edit With Adobe Photoshop to edit in Photoshop, or choose another Edit With option to open the graphic in your preferred application. Animate launches the application, and once you have saved your changes, your image is immediately updated in Animate.
Make sure that you right-click an image on the Stage or library, and not the movie clip. This is often easier to achieve in the Library panel.
� Note You also have the option of changing the Animate Stage size to match the Photoshop canvas. However, the current Stage is already set to the correct dimensions (600 pixels x 450 pixels).
� Note The simple import options for Photoshop fi les are identical as those for Illustrator fi les. Choose settings for the Layer Conversion, Text Conversion, and Convert Layers To options for a quick and easy import process.
9780134665238_c03_marketing.indd 1019780134665238_c03_marketing.indd 101 10/28/16 2:23 PM10/28/16 2:23 PM
© 2017 Pearson Education, Inc., and Adobe Systems Incorporated and its licensors. All rights reserved.

102 LESSON 3 Creating and Editing Symbols
About image formats Animate supports multiple bitmap image formats for import. Animate can handle JPEG, GIF, PNG, and PSD (Photoshop) fi les. Use JPEG fi les for images that include gradients and subtle variations, such as those that occur in photographs. GIF fi les are used for images with large solid blocks of color or black-and-white line draw-ings. Use PNG fi les for images that include transparency. Use PSD fi les if you want to retain all the layer, transparency, and blending information from a Photoshop fi le.
Converting a b itmap i mage to a v ector g raphic
Sometimes you’ll want to convert a bitmap image to a vector graphic. Animate handles bitmap images as a series of colored dots (or pixels); vector graphics are handled as a series of lines and curves. This vector information is rendered on the fl y, so that the resolution of vector graphics is not fi xed like a bitmap image. That means you can zoom in on a vector graphic and your computer will always display it sharply and smoothly. Converting a bitmap image to a vector often has the eff ect of making it look “posterized” because subtle gradations are converted to editable, discrete blocks of color, which can be an interesting eff ect.
To convert a bitmap to a vector, import the bitmap image into Animate. Select the bitmap and choose Modify > Bitmap > Trace Bitmap. The options determine how faithful the vector image will be to the original bitmap.
In the following fi gure, the left image is an original bitmap and the right image is a vector graphic.
Exercise caution when using the Trace Bitmap command, because a complicated vector graphic is often more memory- and processor-intensive than the original bitmap image.
9780134665238_c03_marketing.indd 1029780134665238_c03_marketing.indd 102 10/28/16 2:23 PM10/28/16 2:23 PM
© 2017 Pearson Education, Inc., and Adobe Systems Incorporated and its licensors. All rights reserved.
ANIMATE CC CLASSROOM IN A BOOK 2017 RELEASE 103
Editing and Managing Symbols You now have multiple movie clip symbols in your library and several instances on the Stage. You can better manage the symbols in your library by organizing them in folders. You can also edit any symbol at any time. If you decide you want to change the color of one of the robot’s arms, for example, you can easily go into symbol-editing mode and make that change.
Adding folders and organizing the library Th e Library panel provides handy tools for streamlining the organization of your collection of symbols.
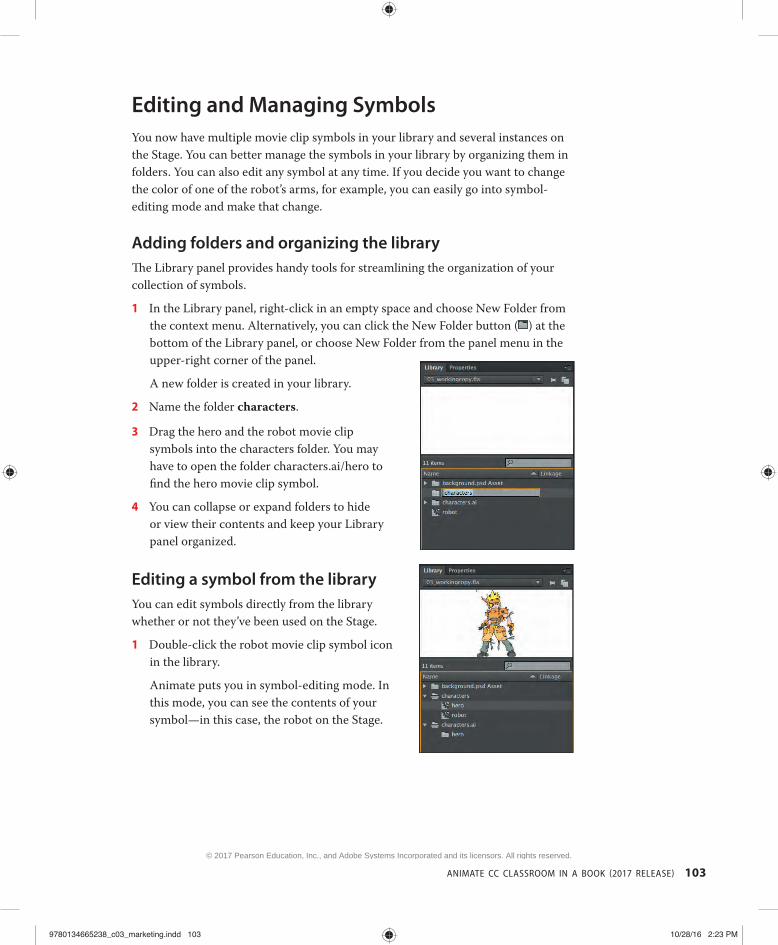
1 In the Library panel, right-click in an empty space and choose New Folder from the context menu. Alternatively, you can click the New Folder button ( ) at the bottom of the Library panel, or choose New Folder from the panel menu in the upper-right corner of the panel.
A new folder is created in your library.
2 Name the folder characters .
3 Drag the hero and the robot movie clip symbols into the characters folder. You may have to open the folder characters.ai/hero to fi nd the hero movie clip symbol.
4 You can collapse or expand folders to hide or view their contents and keep your Library panel organized.
Editing a symbol from the library You can edit symbols directly from the library whether or not they’ve been used on the Stage.
1 Double-click the robot movie clip symbol icon in the library.
Animate puts you in symbol-editing mode. In this mode, you can see the contents of your symbol—in this case, the robot on the Stage.
9780134665238_c03_marketing.indd 1039780134665238_c03_marketing.indd 103 10/28/16 2:23 PM10/28/16 2:23 PM
© 2017 Pearson Education, Inc., and Adobe Systems Incorporated and its licensors. All rights reserved.

104 LESSON 3 Creating and Editing Symbols
Notice that the Edit bar at the top of the Stage tells you that you are no longer in Scene 1 but are inside the symbol called robot.
2 With the Selection tool active, double-click the drawing to edit it.
Animate drills down one group deeper to show all the vector drawing objects that make up the group.
3 Click an empty part of the Stage to deselect everything.
4 Select the Paint Bucket tool. Select a new fi ll color and apply it to a drawing group on the robot, for example, a particular panel on its shoulder.
9780134665238_c03_marketing.indd 1049780134665238_c03_marketing.indd 104 10/28/16 2:23 PM10/28/16 2:23 PM
© 2017 Pearson Education, Inc., and Adobe Systems Incorporated and its licensors. All rights reserved.

ANIMATE CC CLASSROOM IN A BOOK 2017 RELEASE 105
5 Click Scene 1 on the Edit bar above the Stage to return to the main Timeline.
Th e movie clip symbol in the library refl ects the changes you made. Th e instance on the Stage also refl ects the changes you made to the symbol. All instances of the symbol will change if you edit the symbol.
Editing a symbol in place You may want to edit a symbol in context with the other objects on the Stage. You can do so by double-clicking an instance on the Stage. You’ll enter symbol-editing
� Tip You can quickly and easily duplicate symbols in the library. Select the Library symbol, right-click, and choose Duplicate. Or choose Duplicate from the Library panel menu (in the upper-right corner of the panel). Animate creates an exact copy of the selected symbol in your library.
9780134665238_c03_marketing.indd 1059780134665238_c03_marketing.indd 105 10/28/16 2:23 PM10/28/16 2:23 PM
© 2017 Pearson Education, Inc., and Adobe Systems Incorporated and its licensors. All rights reserved.
106 LESSON 3 Creating and Editing Symbols
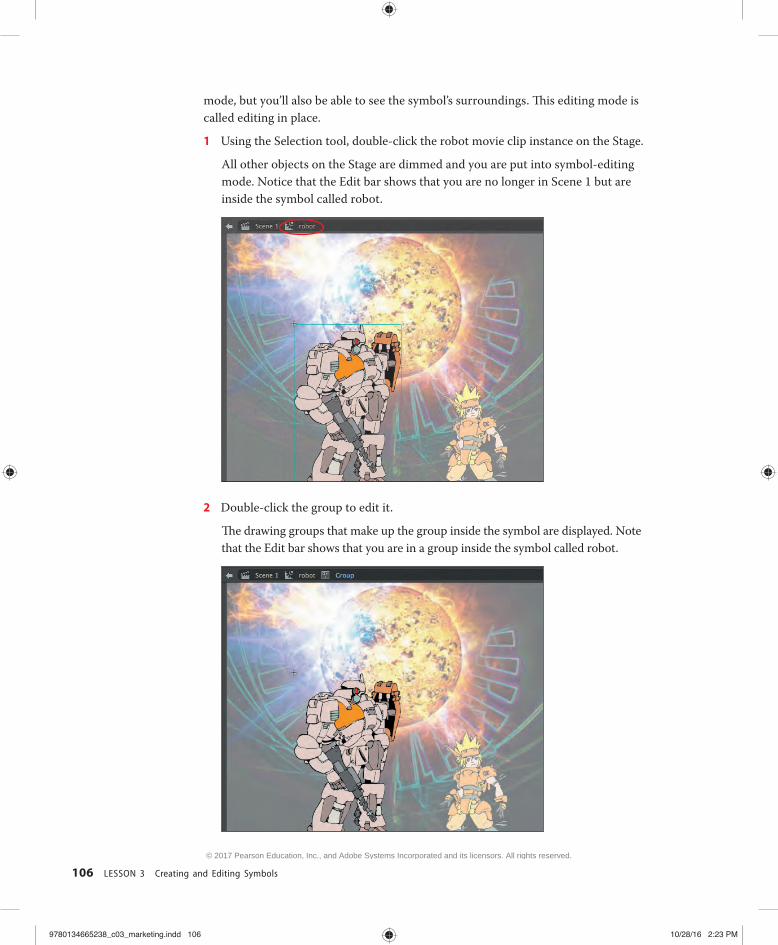
mode, but you’ll also be able to see the symbol’s surroundings. Th is editing mode is called editing in place.
1 Using the Selection tool, double-click the robot movie clip instance on the Stage.
All other objects on the Stage are dimmed and you are put into symbol-editing mode. Notice that the Edit bar shows that you are no longer in Scene 1 but are inside the symbol called robot.
2 Double-click the group to edit it.
Th e drawing groups that make up the group inside the symbol are displayed. Note that the Edit bar shows that you are in a group inside the symbol called robot.
9780134665238_c03_marketing.indd 1069780134665238_c03_marketing.indd 106 10/28/16 2:23 PM10/28/16 2:23 PM
© 2017 Pearson Education, Inc., and Adobe Systems Incorporated and its licensors. All rights reserved.
ANIMATE CC CLASSROOM IN A BOOK 2017 RELEASE 107
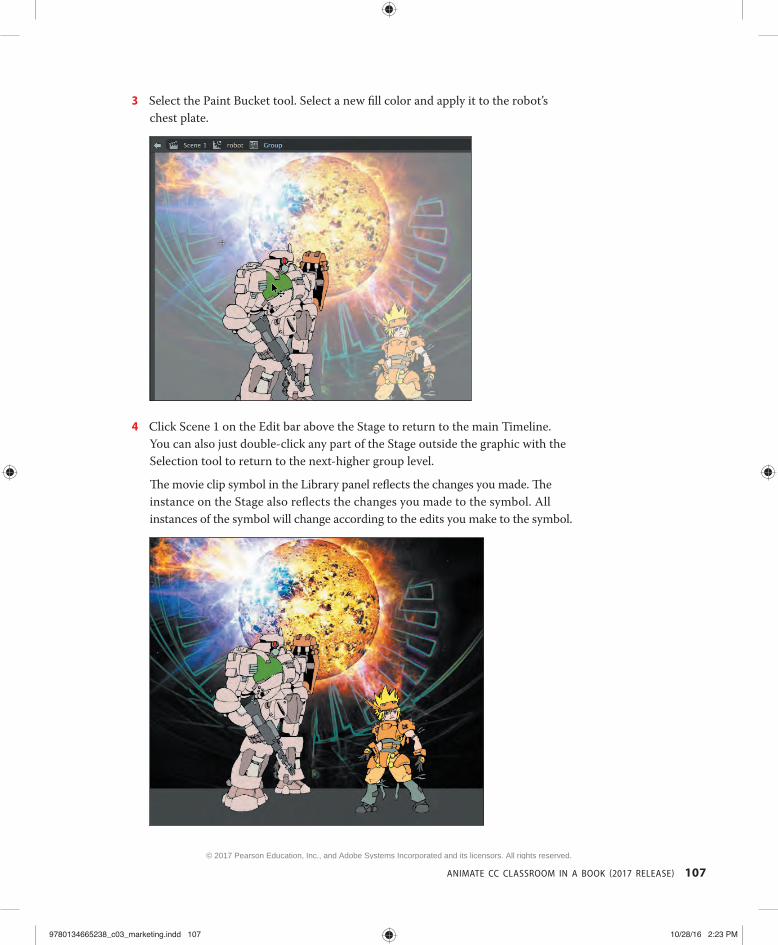
3 Select the Paint Bucket tool. Select a new fi ll color and apply it to the robot’s chest plate.
4 Click Scene 1 on the Edit bar above the Stage to return to the main Timeline. You can also just double-click any part of the Stage outside the graphic with the Selection tool to return to the next-higher group level.
Th e movie clip symbol in the Library panel refl ects the changes you made. Th e instance on the Stage also refl ects the changes you made to the symbol. All instances of the symbol will change according to the edits you make to the symbol.
9780134665238_c03_marketing.indd 1079780134665238_c03_marketing.indd 107 10/28/16 2:23 PM10/28/16 2:23 PM
© 2017 Pearson Education, Inc., and Adobe Systems Incorporated and its licensors. All rights reserved.

108 LESSON 3 Creating and Editing Symbols
Breaking apart a symbol instance If you no longer want an object on the Stage to be a symbol instance, you can use the Break Apart command to return it to its original form.
1 Use the Selection tool to select the robot instance on the Stage.
2 Choose Modify > Break Apart.
Animate breaks apart the robot movie clip instance. What’s left on the Stage is a group, which looks the same as the symbol instance. You can break apart the group even further to edit it.
3 Choose Modify > Break Apart again.
Animate breaks apart the group into its individual components, which are the vector drawing objects. You could even break apart one more time and your drawing objects will convert to shapes.
Drawing objectsSymbol instance Group
4 Choose Edit > Undo several times to return your robot to a symbol instance.
Changing the Size and Position of Instances You can have multiple instances of the same symbol on the Stage. Now you’ll add a few more robots to create a small robot army. You’ll learn how to change the size and position (and even rotation) of each instance individually.
1 Select the robot layer in the Timeline.
2 Drag another robot symbol from the Library panel onto the Stage.
A new instance appears.
9780134665238_c03_marketing.indd 1089780134665238_c03_marketing.indd 108 10/28/16 2:23 PM10/28/16 2:23 PM
© 2017 Pearson Education, Inc., and Adobe Systems Incorporated and its licensors. All rights reserved.
ANIMATE CC CLASSROOM IN A BOOK 2017 RELEASE 109
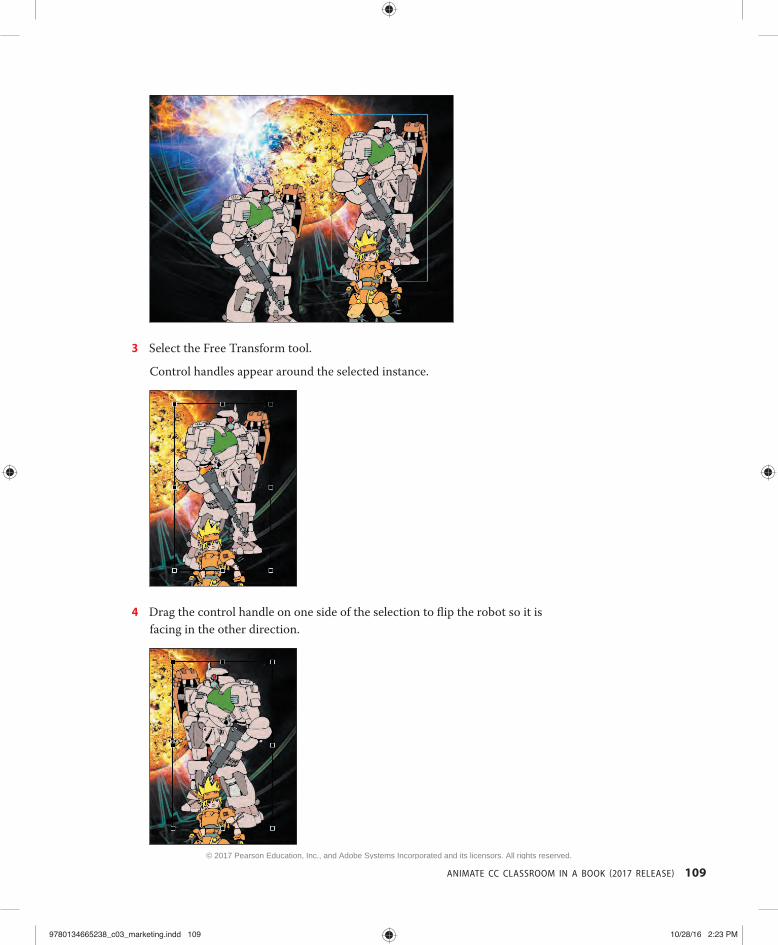
3 Select the Free Transform tool.
Control handles appear around the selected instance.
4 Drag the control handle on one side of the selection to fl ip the robot so it is facing in the other direction.
9780134665238_c03_marketing.indd 1099780134665238_c03_marketing.indd 109 10/28/16 2:23 PM10/28/16 2:23 PM
© 2017 Pearson Education, Inc., and Adobe Systems Incorporated and its licensors. All rights reserved.

110 LESSON 3 Creating and Editing Symbols
5 Drag the control handle on one corner of the selection while holding down the Shift key to reduce the size of the robot. Th e Shift key constrains the transformation so the width and height change proportionally.
6 Drag a third robot from the Library panel onto the Stage. With the Free Transform tool, fl ip the robot, resize it, and make it overlap the second robot. Move the characters into an attractive arrangement.
Th e robot army is growing! Notice how transformations to an instance do not change the library symbol, and do not change other instances. On the other hand, edits to the library symbol change all of its instances.
9780134665238_c03_marketing.indd 1109780134665238_c03_marketing.indd 110 10/28/16 2:23 PM10/28/16 2:23 PM
© 2017 Pearson Education, Inc., and Adobe Systems Incorporated and its licensors. All rights reserved.
ANIMATE CC CLASSROOM IN A BOOK 2017 RELEASE 111
Using rulers and guides You may want to be more precise in your placement of your symbol instances. In Lesson 1, you learned how to use the x and y coordinates in the Properties panel to position individual objects. In Lesson 2, you learned to use the Align panel to align several objects to each other.
Another way to position objects on the Stage is to use rulers and guides. Rulers appear on the top and left edge of the Pasteboard to provide measurement along the horizontal and vertical axes. Guides are vertical or horizontal lines that appear on the Stage but do not appear in the fi nal published movie.
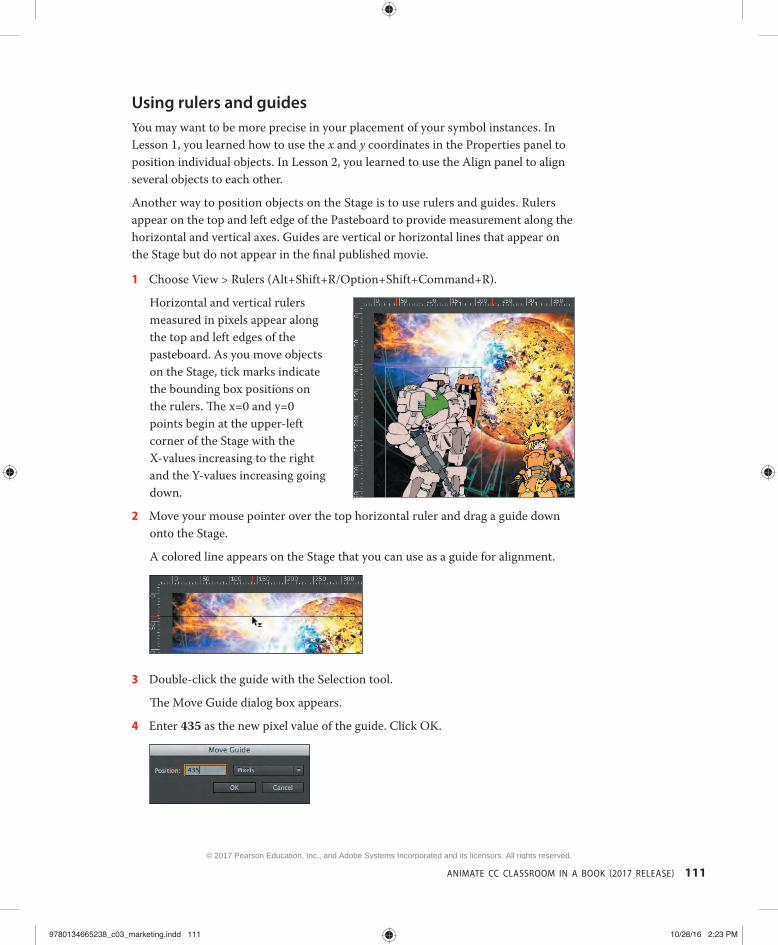
1 Choose View > Rulers (Alt+Shift+R/Option+Shift+Command+R).
Horizontal and vertical rulers measured in pixels appear along the top and left edges of the pasteboard. As you move objects on the Stage, tick marks indicate the bounding box positions on the rulers. Th e x=0 and y=0 points begin at the upper-left corner of the Stage with the X-values increasing to the right and the Y-values increasing going down.
2 Move your mouse pointer over the top horizontal ruler and drag a guide down onto the Stage.
A colored line appears on the Stage that you can use as a guide for alignment.
3 Double-click the guide with the Selection tool.
Th e Move Guide dialog box appears.
4 Enter 435 as the new pixel value of the guide. Click OK.
9780134665238_c03_marketing.indd 1119780134665238_c03_marketing.indd 111 10/28/16 2:23 PM10/28/16 2:23 PM
© 2017 Pearson Education, Inc., and Adobe Systems Incorporated and its licensors. All rights reserved.

112 LESSON 3 Creating and Editing Symbols
Th e guide is repositioned 435 pixels from the top edge of the Stage.
5 Choose View > Snapping > Snap To Guides and make sure Snap To Guides is selected.
Objects will now snap to any guides on the Stage.
6 Drag the large robot instance and the hero instance so their bottom edges align with the guide.
Changing the Color Eff ect of an Instance Th e Color Eff ect option in the Properties panel allows you to change several proper-ties of any instance. Th ese properties include brightness, tint (the overall coloring), and alpha.
Changing the brightness Brightness controls how dark or light the instance appears on the Stage.
1 Using the Selection tool, click the smallest robot on the Stage.
2 In the Properties panel, in the Color Eff ect section choose Brightness from the Style menu.
3 Drag the Bright slider to −40% .
Th e robot instance on the Stage becomes darker and appears to recede into the distance.
� Tip Choose View > Guides > Lock Guides to lock your guides. This prevents you from accidentally moving them. Clear all guides by choosing View > Guides > Clear Guides. Change the color of the guides and the snapping accuracy by choosing View > Guides > Edit Guides.
9780134665238_c03_marketing.indd 1129780134665238_c03_marketing.indd 112 10/28/16 2:23 PM10/28/16 2:23 PM
© 2017 Pearson Education, Inc., and Adobe Systems Incorporated and its licensors. All rights reserved.
ANIMATE CC CLASSROOM IN A BOOK 2017 RELEASE 113
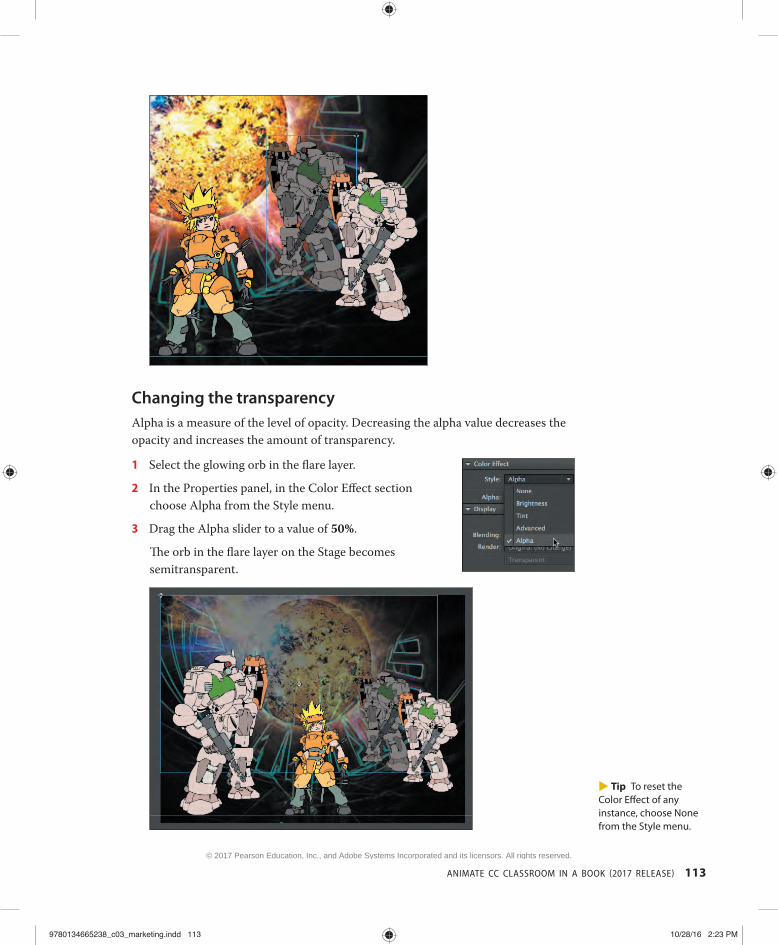
Changing the transparency Alpha is a measure of the level of opacity. Decreasing the alpha value decreases the opacity and increases the amount of transparency.
1 Select the glowing orb in the fl are layer.
2 In the Properties panel, in the Color Eff ect section choose Alpha from the Style menu.
3 Drag the Alpha slider to a value of 50% .
Th e orb in the fl are layer on the Stage becomes semitransparent.
� Tip To reset the Color Eff ect of any instance, choose None from the Style menu.
9780134665238_c03_marketing.indd 1139780134665238_c03_marketing.indd 113 10/28/16 2:23 PM10/28/16 2:23 PM
© 2017 Pearson Education, Inc., and Adobe Systems Incorporated and its licensors. All rights reserved.
114 LESSON 3 Creating and Editing Symbols
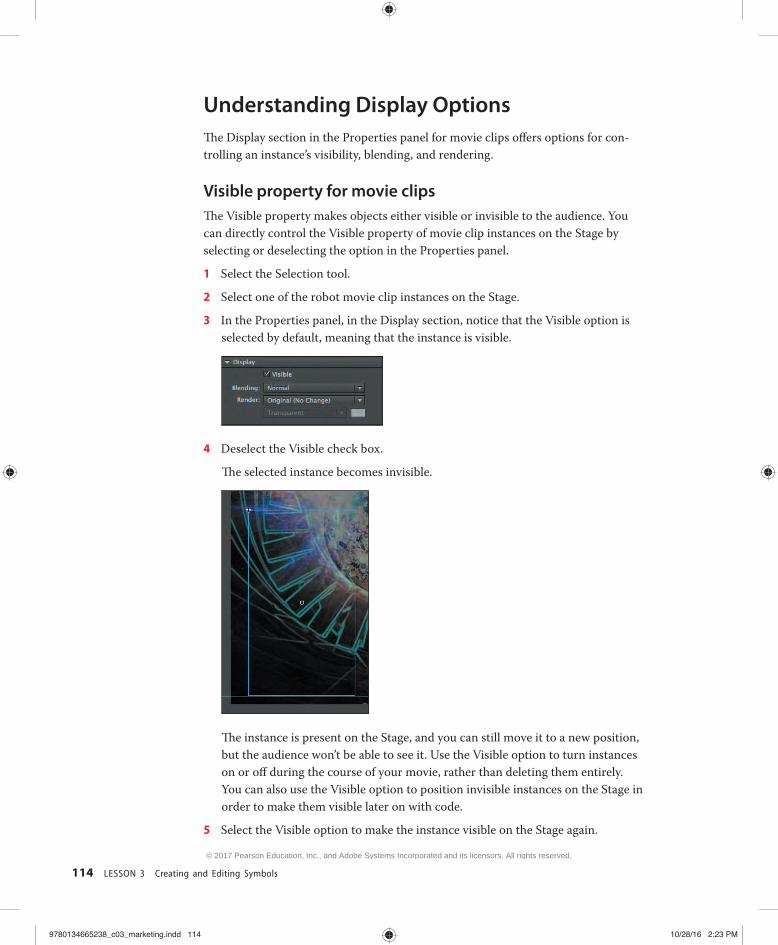
Understanding Display Options Th e Display section in the Properties panel for movie clips off ers options for con-trolling an instance’s visibility, blending, and rendering.
Visible property for movie clips Th e Visible property makes objects either visible or invisible to the audience. You can directly control the Visible property of movie clip instances on the Stage by selecting or deselecting the option in the Properties panel.
1 Select the Selection tool.
2 Select one of the robot movie clip instances on the Stage.
3 In the Properties panel, in the Display section, notice that the Visible option is selected by default, meaning that the instance is visible.
4 Deselect the Visible check box.
Th e selected instance becomes invisible.
Th e instance is present on the Stage, and you can still move it to a new position, but the audience won’t be able to see it. Use the Visible option to turn instances on or off during the course of your movie, rather than deleting them entirely. You can also use the Visible option to position invisible instances on the Stage in order to make them visible later on with code.
5 Select the Visible option to make the instance visible on the Stage again.
9780134665238_c03_marketing.indd 1149780134665238_c03_marketing.indd 114 10/28/16 2:23 PM10/28/16 2:23 PM
© 2017 Pearson Education, Inc., and Adobe Systems Incorporated and its licensors. All rights reserved.
ANIMATE CC CLASSROOM IN A BOOK 2017 RELEASE 115
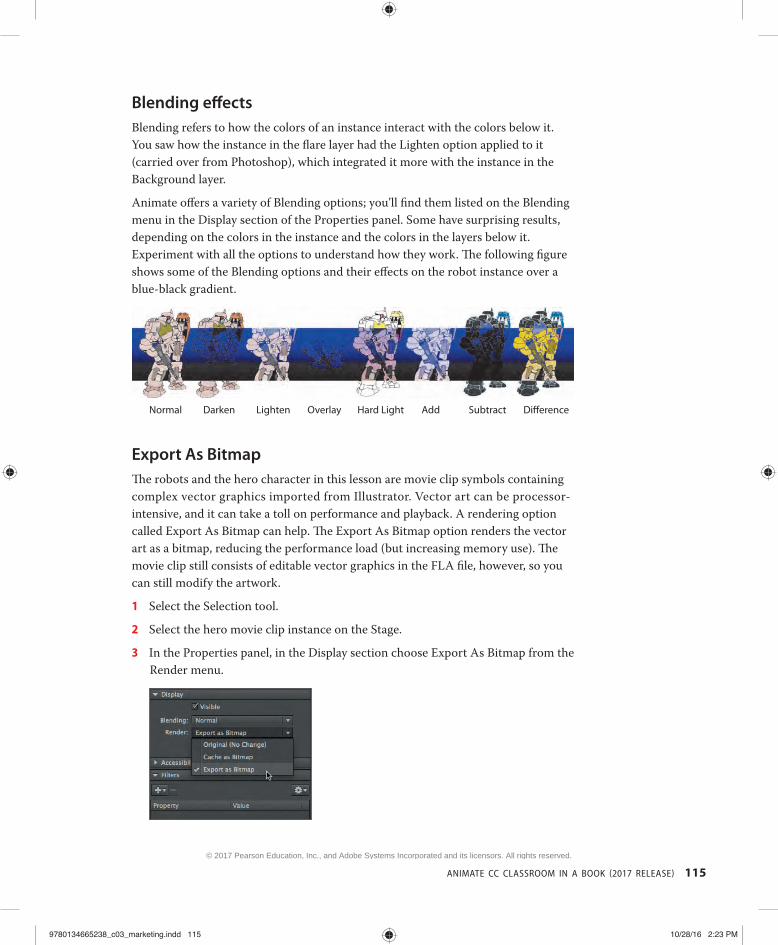
Blending eff ects Blending refers to how the colors of an instance interact with the colors below it. You saw how the instance in the fl are layer had the Lighten option applied to it (carried over from Photoshop), which integrated it more with the instance in the Background layer.
Animate off ers a variety of Blending options; you’ll fi nd them listed on the Blending menu in the Display section of the Properties panel. Some have surprising results, depending on the colors in the instance and the colors in the layers below it. Experiment with all the options to understand how they work. Th e following fi gure shows some of the Blending options and their eff ects on the robot instance over a blue-black gradient.
Normal Darken Lighten Overlay Hard Light Add Subtract Difference
Export As Bitmap Th e robots and the hero character in this lesson are movie clip symbols containing complex vector graphics imported from Illustrator. Vector art can be processor-intensive, and it can take a toll on performance and playback. A rendering option called Export As Bitmap can help. Th e Export As Bitmap option renders the vector art as a bitmap, reducing the performance load (but increasing memory use). Th e movie clip still consists of editable vector graphics in the FLA fi le, however, so you can still modify the artwork.
1 Select the Selection tool.
2 Select the hero movie clip instance on the Stage.
3 In the Properties panel, in the Display section choose Export As Bitmap from the Render menu.
9780134665238_c03_marketing.indd 1159780134665238_c03_marketing.indd 115 10/28/16 2:23 PM10/28/16 2:23 PM
© 2017 Pearson Education, Inc., and Adobe Systems Incorporated and its licensors. All rights reserved.
116 LESSON 3 Creating and Editing Symbols
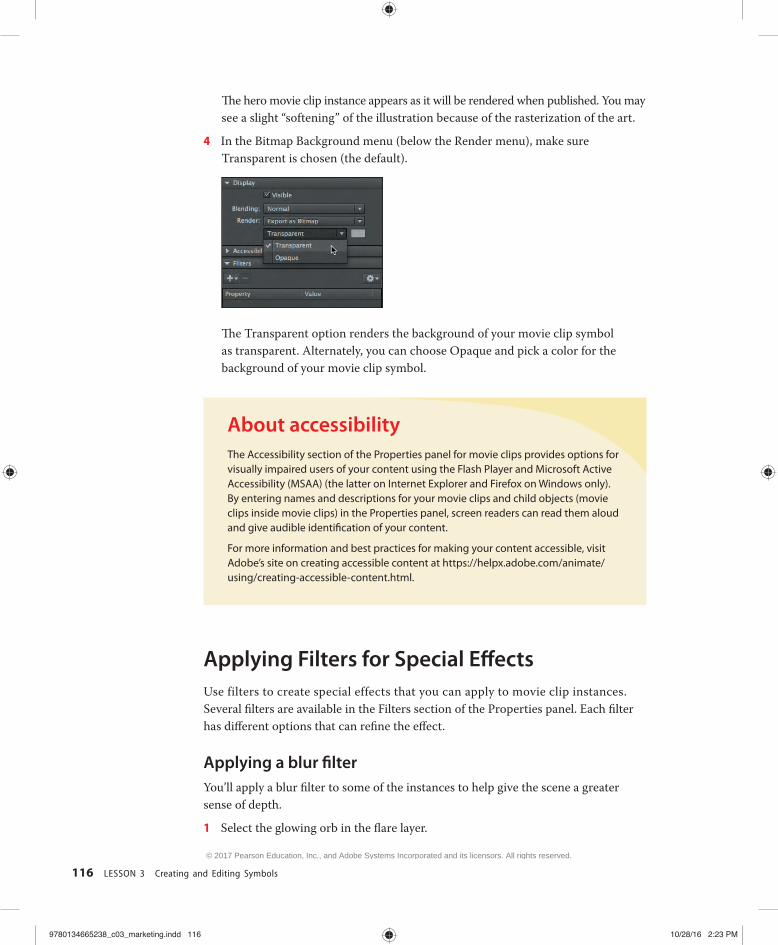
Th e hero movie clip instance appears as it will be rendered when published. You may see a slight “softening” of the illustration because of the rasterization of the art.
4 In the Bitmap Background menu (below the Render menu), make sure Transparent is chosen (the default).
Th e Transparent option renders the background of your movie clip symbol as transparent. Alternately, you can choose Opaque and pick a color for the background of your movie clip symbol.
About accessibility The Accessibility section of the Properties panel for movie clips provides options for visually impaired users of your content using the Flash Player and Microsoft Active Accessibility (MSAA) (the latter on Internet Explorer and Firefox on Windows only). By entering names and descriptions for your movie clips and child objects (movie clips inside movie clips) in the Properties panel, screen readers can read them aloud and give audible identifi cation of your content.
For more information and best practices for making your content accessible, visit Adobe’s site on creating accessible content at https://helpx.adobe.com/animate/using/creating-accessible-content.html.
Applying Filters for Special Eff ects Use filters to create special effects that you can apply to movie clip instances. Several fi lters are available in the Filters section of the Properties panel. Each fi lter has diff erent options that can refi ne the eff ect.
Applying a blur fi lter You’ll apply a blur fi lter to some of the instances to help give the scene a greater sense of depth.
1 Select the glowing orb in the fl are layer.
9780134665238_c03_marketing.indd 1169780134665238_c03_marketing.indd 116 10/28/16 2:23 PM10/28/16 2:23 PM
© 2017 Pearson Education, Inc., and Adobe Systems Incorporated and its licensors. All rights reserved.
ANIMATE CC CLASSROOM IN A BOOK 2017 RELEASE 117
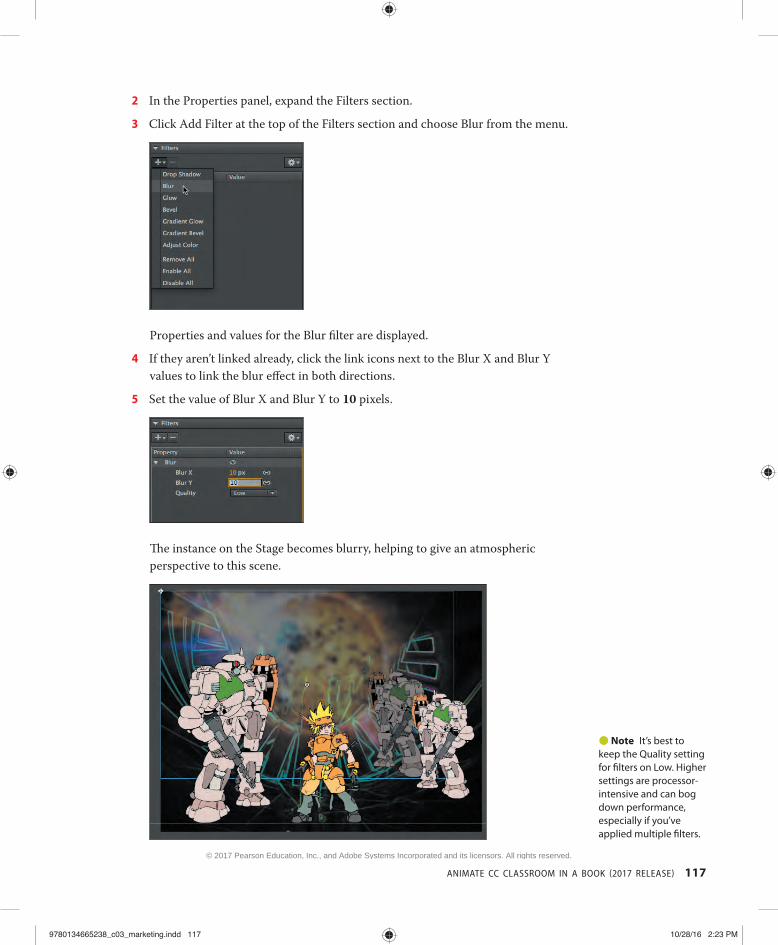
2 In the Properties panel, expand the Filters section.
3 Click Add Filter at the top of the Filters section and choose Blur from the menu.
Properties and values for the Blur fi lter are displayed.
4 If they aren’t linked already, click the link icons next to the Blur X and Blur Y values to link the blur eff ect in both directions.
5 Set the value of Blur X and Blur Y to 10 pixels.
Th e instance on the Stage becomes blurry, helping to give an atmospheric perspective to this scene.
� Note It’s best to keep the Quality setting for fi lters on Low. Higher settings are processor-intensive and can bog down performance, especially if you’ve applied multiple fi lters.
9780134665238_c03_marketing.indd 1179780134665238_c03_marketing.indd 117 10/28/16 2:23 PM10/28/16 2:23 PM
© 2017 Pearson Education, Inc., and Adobe Systems Incorporated and its licensors. All rights reserved.

118 LESSON 3 Creating and Editing Symbols
More fi lter options At the top-right corner of the Filters section is a menu of commands that help you manage and apply multiple fi lters.
Save As Preset lets you save a particular fi lter and its settings so you can apply it to another instance. Copy and Paste let you copy and paste a selected fi lter or all the fi l-ters and apply them to other instances. The Reset Filter command resets the values for the selected fi lter to the defaults. The Enable or Disable Filter button (the eyeball icon next to the Filter name) lets you see your instance with or without the fi lter applied.
Positioning in 3D Space You also have the ability to position and animate objects in real three-dimensional space. However, objects need to be movie clip symbols to be moved in 3D. Two tools allow you to position objects in 3D: the 3D Rotation tool and the 3D Translation tool. Th e Transform panel also provides information for position and rotation.
Understanding the 3D coordinate space is essential for successful 3D placement of objects. Animate divides space using three axes: the x-, y-, and z-axes. Th e x-axis runs horizontally across the Stage with x=0 at the left edge. Th e y-axis runs verti-cally with y=0 at the top edge. Th e z-axis runs into and out of the plane of the Stage (toward and away from the viewer) with z=0 at the plane of the Stage.
Changing the 3D rotation of an object You’ll add some text to your image, but to add a little more interest, you’ll tilt it to put it in perspective. Th ink about the beginning text introduction to the Star Wars movies, and see if you can achieve a similar eff ect.
1 Insert a new layer at the top of the layers stack and rename it text .
2 Select the Text tool from the Tools panel.
3 In the Properties panel, choose Static Text from the Text Type menu. Choose a striking font and set it to a large size with an interesting color that will add some pizzazz. Your font might look diff erent from what’s shown in this lesson, depending on the fonts available on your computer.
� Note The 3D Rotation and 3D Translation tool are only supported in Animate ActionScript 3.0 and AIR documents. In HTML5 Canvas and WebGL documents, the 3D tools are disabled.
9780134665238_c03_marketing.indd 1189780134665238_c03_marketing.indd 118 10/28/16 2:23 PM10/28/16 2:23 PM
© 2017 Pearson Education, Inc., and Adobe Systems Incorporated and its licensors. All rights reserved.
ANIMATE CC CLASSROOM IN A BOOK 2017 RELEASE 119
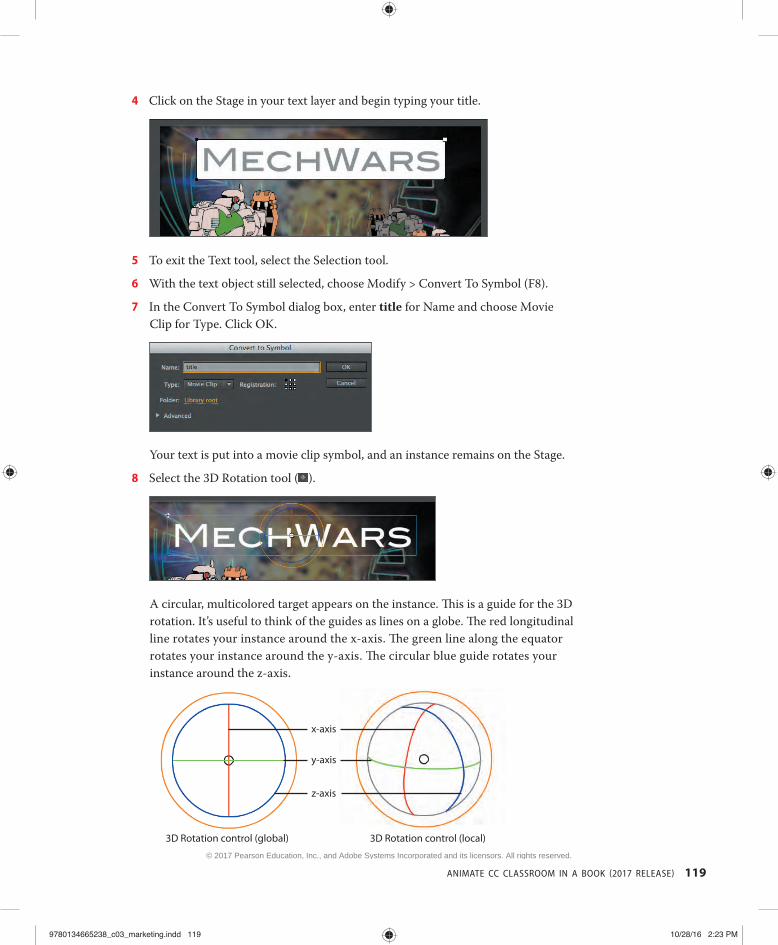
4 Click on the Stage in your text layer and begin typing your title.
5 To exit the Text tool, select the Selection tool.
6 With the text object still selected, choose Modify > Convert To Symbol (F8).
7 In the Convert To Symbol dialog box, enter title for Name and choose Movie Clip for Type. Click OK.
Your text is put into a movie clip symbol, and an instance remains on the Stage.
8 Select the 3D Rotation tool ( ).
A circular, multicolored target appears on the instance. Th is is a guide for the 3D rotation. It’s useful to think of the guides as lines on a globe. Th e red longitudinal line rotates your instance around the x-axis. Th e green line along the equator rotates your instance around the y-axis. Th e circular blue guide rotates your instance around the z-axis.
x-axis
3D Rotation control (global) 3D Rotation control (local)
z-axis
y-axis
9780134665238_c03_marketing.indd 1199780134665238_c03_marketing.indd 119 10/28/16 2:23 PM10/28/16 2:23 PM
© 2017 Pearson Education, Inc., and Adobe Systems Incorporated and its licensors. All rights reserved.

120 LESSON 3 Creating and Editing Symbols
9 Drag any one of the guides to rotate your instance in 3D space. A label will be added to your mouse pointer to show which axis you’re manipulating.
• Drag left or right on the red guide to rotate around the x-axis.
• Drag up or down on the green guide to rotate around the y-axis.
• Drag around the circle on the blue guide to rotate around the z-axis.
You can also drag the outer orange circular guide to freely rotate the instance in all three directions.
Changing the 3D position of an object In addition to changing an object’s rotation in 3D space, you can move it to a spe-cifi c point in 3D space. Use the 3D Translation tool, which is hidden under the 3D Rotation tool.
1 Select the 3D Translation tool ( ).
2 Click your text to select it.
A guide appears on the instance. Th is is a guide for the 3D translation. Th e red guide represents the x-axis, the green is the y-axis, and the blue is the z-axis.
y-axis
3D Translation control (global) 3D Translation control (local)
z-axis
x-axis
9780134665238_c03_marketing.indd 1209780134665238_c03_marketing.indd 120 10/28/16 2:23 PM10/28/16 2:23 PM
© 2017 Pearson Education, Inc., and Adobe Systems Incorporated and its licensors. All rights reserved.

ANIMATE CC CLASSROOM IN A BOOK 2017 RELEASE 121
3 Drag any one of the guides to move your instance in 3D space. Notice that your text stays in perspective as you move it around the Stage.
• Drag left or right on the red guide to move along the x-axis.
• Drag up or down on the green guide to move along the y-axis.
• Drag up or down on the blue guide to move along the z-axis. Dragging up moves away from you, deeper into the scene, and dragging down moves toward you.
Global vs. local transformations When you select the 3D Rotation or 3D Translation tool, be aware of the Global
Transform option ( ), found at the bottom of the Tools panel when one of the 3D tools is selected. When Global Transform is selected, the rotation and positioning of 3D objects are relative to the global, or Stage, coordinate system. The 3D display over the object that you’re moving shows the three axes in constant position, no matter how the object is rotated or moved. Notice in the following image how the 3D display is always perpendicular to the Stage.
However, when the Global option is turned off (the button is raised), rotation and posi-tioning are relative to the object. The 3D display shows the three axes oriented relative to the object, not the Stage. For example, in the following image, notice that the 3D Translation tool shows the z-axis pointing out from the rectangle, not from the Stage.
Resetting the transformation If you’ve made a mistake in your 3D transformations and want to reset the rotation of your instance, you can use the Transform panel.
1 Select the Selection tool and select the instance that you want to reset.
9780134665238_c03_marketing.indd 1219780134665238_c03_marketing.indd 121 10/28/16 2:23 PM10/28/16 2:23 PM
© 2017 Pearson Education, Inc., and Adobe Systems Incorporated and its licensors. All rights reserved.

122 LESSON 3 Creating and Editing Symbols
2 Choose Window > Transform to open the Transform panel.
Th e Transform panel shows all the values for the x, y, and z rotations and positions in 3D space.
3 Click Remove Transform in the lower-right corner of the Transform panel.
Th e selected instance returns to its original rotation.
Understanding the vanishing point and the perspective angle Objects in 3D space represented on a 2D surface (such as the computer screen) are rendered with perspective to make them appear as they do in real life. Correct per-spective depends on many factors, including the vanishing point and the perspective angle, both of which can be changed in Animate.
Th e vanishing point determines where on the horizon parallel lines of a perspective drawing converge. Th ink of railroad tracks and how the parallel tracks converge to a single point as they recede into the distance. Th e vanishing point is usually at eye level in the center of your fi eld of view, so the default settings are exactly in the middle of the Stage. You can, however, change the vanishing point setting so it appears above or below eye level, or to the right or left.
Th e perspective angle determines how quickly parallel lines converge to the vanish-ing point. Th e greater the angle, the quicker the convergence, and therefore, the more severe and distorted the illustration appears.
1 Select an object on the Stage that has been moved or rotated in 3D space.
2 In the Properties panel, expand the 3D Position and View section.
Vanishing Point
Perspective Angle
9780134665238_c03_marketing.indd 1229780134665238_c03_marketing.indd 122 10/28/16 2:23 PM10/28/16 2:23 PM
© 2017 Pearson Education, Inc., and Adobe Systems Incorporated and its licensors. All rights reserved.

ANIMATE CC CLASSROOM IN A BOOK 2017 RELEASE 123
3 Drag on the X- and Y-values for Vanishing Point Position at the bottom of the 3D Position And View section to change the vanishing point, which is indicated on the Stage by intersecting gray lines.
4 To reset the Vanishing Point to the default values (to the center of the Stage), click Reset.
5 Drag on the Perspective Angle value to change the amount of distortion. Th e greater the angle, the more the distortion.
9780134665238_c03_marketing.indd 1239780134665238_c03_marketing.indd 123 10/28/16 2:23 PM10/28/16 2:23 PM
© 2017 Pearson Education, Inc., and Adobe Systems Incorporated and its licensors. All rights reserved.
124 LESSON 3 Creating and Editing Symbols
Creating an Adobe Creative Cloud Library to share assets Creative Cloud Libraries make your favorite assets available to you anywhere. You can use CC Libraries to create and share your graphics and more, including colors, brushes, symbols, and even entire documents. Share and access them across other Creative Cloud apps whenever you need them. You can also share libraries with anyone who has a Creative Cloud account, so it’s easy to collaborate, keep designs consistent, and even create style guides to use across projects. Your shared library assets are always up to date and ready to use. CC Libraries work much like the Animate Library panel you used in this lesson.
To create a new CC Library to share assets, follow these steps:
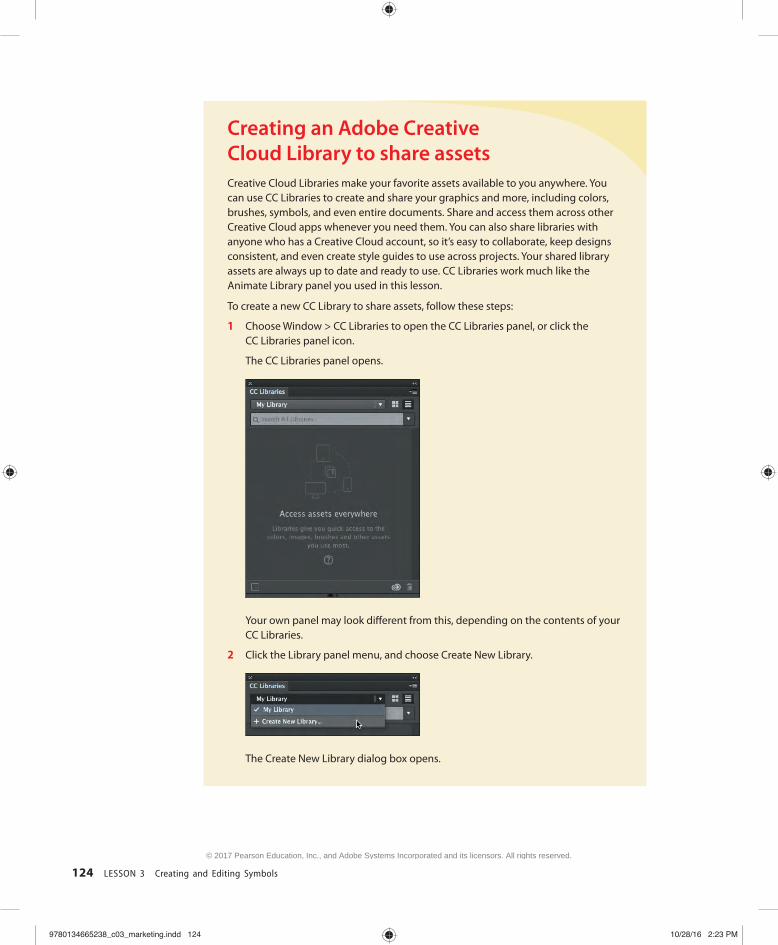
1 Choose Window > CC Libraries to open the CC Libraries panel, or click the CC Libraries panel icon.
The CC Libraries panel opens.
Your own panel may look diff erent from this, depending on the contents of your CC Libraries.
2 Click the Library panel menu, and choose Create New Library.
The Create New Library dialog box opens.
9780134665238_c03_marketing.indd 1249780134665238_c03_marketing.indd 124 10/28/16 2:23 PM10/28/16 2:23 PM
© 2017 Pearson Education, Inc., and Adobe Systems Incorporated and its licensors. All rights reserved.

ANIMATE CC CLASSROOM IN A BOOK 2017 RELEASE 125
3 Enter a new name for your library, and then click Create.
Your new CC Library is created and you can now share assets.
To share your CC Library to collaborate with other designers and animators, do the following:
1 Open the Libraries Options menu and choose Collaborate or Share Link.
If you choose Collaborate, your browser will open and you can invite others to view or edit your CC Library. If you choose Share Link, a public link is created for others to download the assets from your CC Library.
9780134665238_c03_marketing.indd 1259780134665238_c03_marketing.indd 125 10/28/16 2:23 PM10/28/16 2:23 PM
© 2017 Pearson Education, Inc., and Adobe Systems Incorporated and its licensors. All rights reserved.

126 LESSON 3 Creating and Editing Symbols
Review Questions 1 What is a symbol, and how does it diff er from an instance?
2 Name three ways you can create a symbol.
3 When you import an Illustrator fi le using the simple import options, what happens if you choose to convert layers to Animate layers? To keyframes?
4 How can you change the transparency of an instance in Animate?
5 What are the two ways to edit symbols?
9780134665238_c03_marketing.indd 1269780134665238_c03_marketing.indd 126 10/28/16 2:23 PM10/28/16 2:23 PM
© 2017 Pearson Education, Inc., and Adobe Systems Incorporated and its licensors. All rights reserved.
ANIMATE CC CLASSROOM IN A BOOK 2017 RELEASE 127
Review Answers 1 A symbol is a graphic, button, or movie clip that you create once in Animate and can then reuse
throughout your document or in other documents. All symbols are stored in your Library panel. An instance is a copy of a symbol located on the Stage.
2 You can create a symbol by choosing Insert > New Symbol, or you can select existing objects on the Stage and choose Modify > Convert To Symbol. A third way to create a symbol is to import graphics from Illustrator or Photoshop and create a symbol during the import process.
3 When you convert layers of an Illustrator fi le to Animate layers, Animate recognizes the layers in the Illustrator document and adds them as separate layers in the Timeline. When you import layers as keyframes, Animate adds each Illustrator layer to a separate frame in the Timeline and creates keyframes for them.
4 The transparency of an instance is determined by its alpha value. To change the transparency, select Alpha from the Color Eff ect menu in the Properties panel, and then change the alpha percentage.
5 To edit a symbol, either double-click the symbol in the library to enter symbol-editing mode, or double-click the instance on the Stage to edit it in place. Editing a symbol in place lets you see the other objects around the instance. Au/ED, check the URL in sidebar as late as possible
9780134665238_c03_marketing.indd 1279780134665238_c03_marketing.indd 127 10/28/16 2:23 PM10/28/16 2:23 PM
© 2017 Pearson Education, Inc., and Adobe Systems Incorporated and its licensors. All rights reserved.


![Naruto v02 c03 [animakong]](https://img.pdfslide.tips/doc/110x75/55d116ffbb61eb453b8b46c4/naruto-v02-c03-animakong.jpg)