Embed Size (px)
Citation preview

Copyright © 2016 Advanced IT Consortium to Evaluate, Apply and Drive All Rights Reserved.
AITCシニア技術者勉強会第4回 Raspberry Pi応用編
2019年5月11日
先端IT活用推進コンソーシアムシニア技術者勉強会
近藤繁延
Copyright © 2016 Advanced IT Consortium to Evaluate, Apply and Drive All Rights Reserved.
はじめに
2
● 3〜5月の3ヵ月でRaspberry Piを用いた「センサーの扱い方」「画像認識/音声認識」「インターネットと連携した仕組み」の作り方を学びます。
● 今回はIoT機器と各種サーバ/サービス連携で使用される「MQTT」を用いて、データ連携の仕組みを作ります。
Copyright © 2016 Advanced IT Consortium to Evaluate, Apply and Drive All Rights Reserved.
アジェンダ1. MQTTとは
1. 全体像2. MQTT Brokerの種類
2. MQTT Broker「Mosquitto」とは
3. Mosquittoのセットアップ
4. 実践MQTT
1. RaspberryPi編
2. スマホ編3. センサー編4. 画像認識編5. 音声認識編
3
Copyright © 2016 Advanced IT Consortium to Evaluate, Apply and Drive All Rights Reserved.
アジェンダ
4
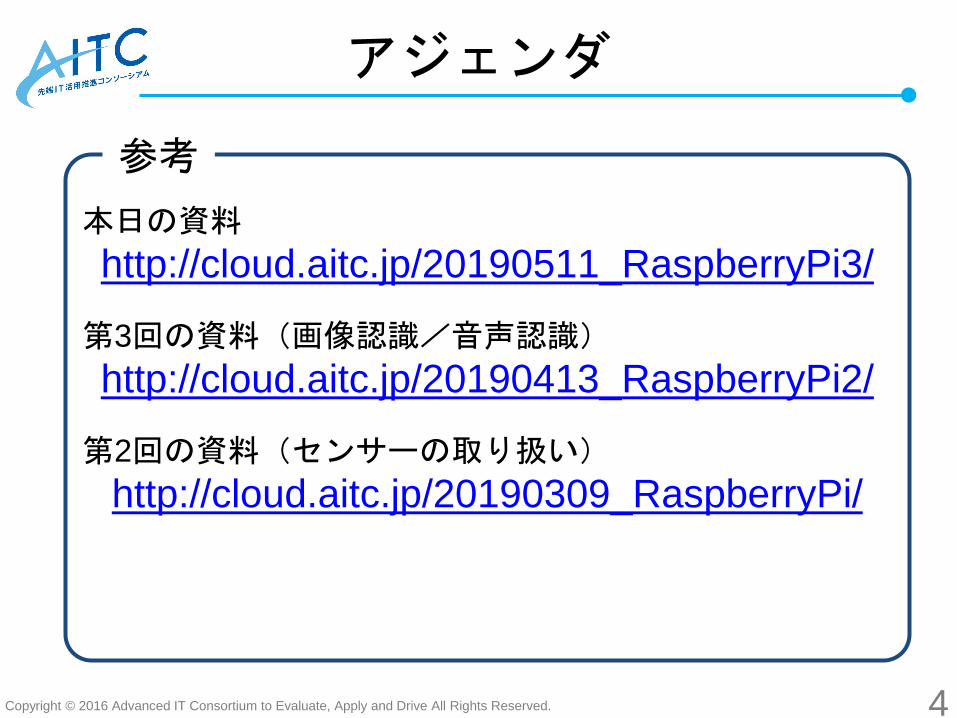
本日の資料
http://cloud.aitc.jp/20190511_RaspberryPi3/
第3回の資料(画像認識/音声認識)
http://cloud.aitc.jp/20190413_RaspberryPi2/
第2回の資料(センサーの取り扱い)
http://cloud.aitc.jp/20190309_RaspberryPi/
参考
Copyright © 2016 Advanced IT Consortium to Evaluate, Apply and Drive All Rights Reserved.
MQTTとは
5
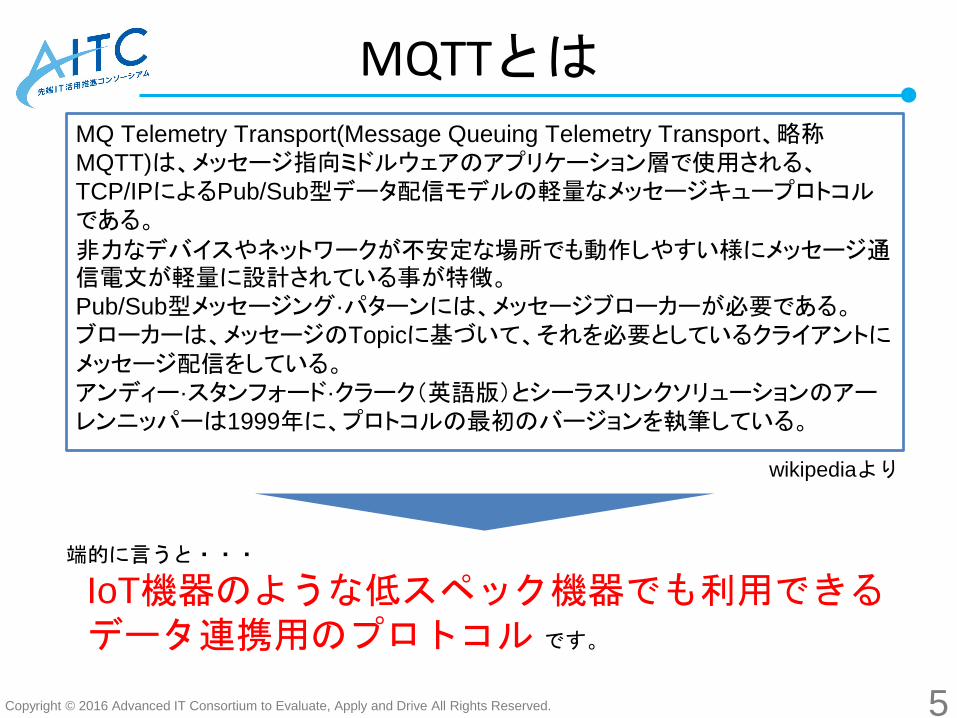
MQ Telemetry Transport(Message Queuing Telemetry Transport、略称MQTT)は、メッセージ指向ミドルウェアのアプリケーション層で使用される、TCP/IPによるPub/Sub型データ配信モデルの軽量なメッセージキュープロトコルである。
非力なデバイスやネットワークが不安定な場所でも動作しやすい様にメッセージ通信電文が軽量に設計されている事が特徴。Pub/Sub型メッセージング·パターンには、メッセージブローカーが必要である。ブローカーは、メッセージのTopicに基づいて、それを必要としているクライアントにメッセージ配信をしている。アンディー·スタンフォード·クラーク(英語版)とシーラスリンクソリューションのアーレンニッパーは1999年に、プロトコルの最初のバージョンを執筆している。
端的に言うと・・・
IoT機器のような低スペック機器でも利用できるデータ連携用のプロトコル です。
wikipediaより
Copyright © 2016 Advanced IT Consortium to Evaluate, Apply and Drive All Rights Reserved.
MQTTの全体像
6
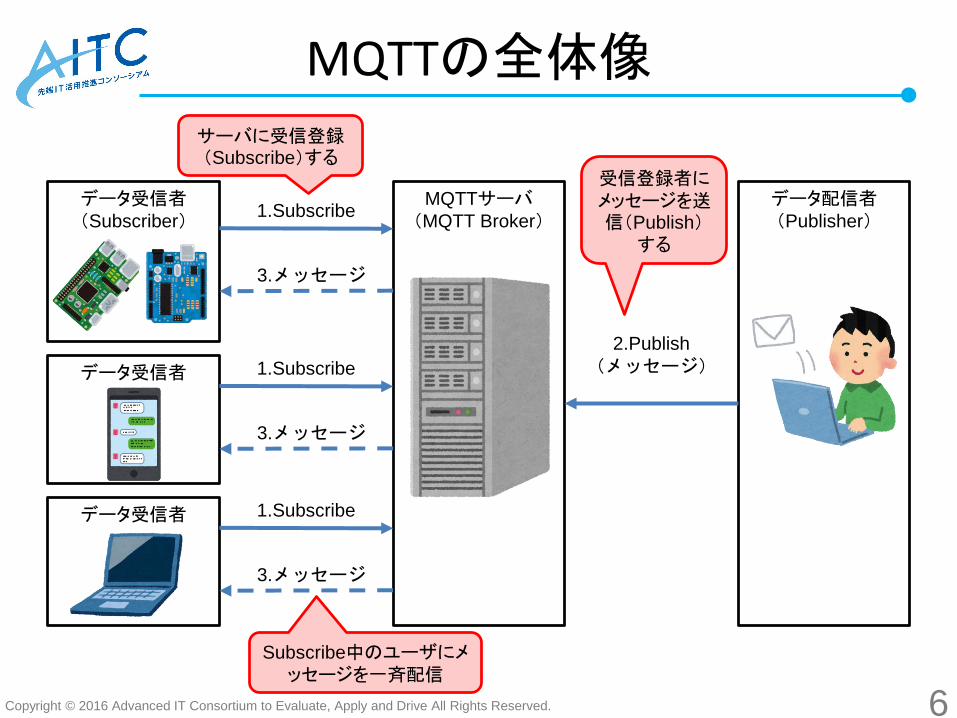
MQTTサーバ(MQTT Broker)
データ受信者(Subscriber)
データ配信者(Publisher)
1.Subscribe
3.メッセージ
データ受信者 1.Subscribe
3.メッセージ
データ受信者 1.Subscribe
3.メッセージ
2.Publish
(メッセージ)
Subscribe中のユーザにメッセージを一斉配信
サーバに受信登録(Subscribe)する
受信登録者にメッセージを送信(Publish)
する
Copyright © 2016 Advanced IT Consortium to Evaluate, Apply and Drive All Rights Reserved.
MQTT Brokerの種類
7
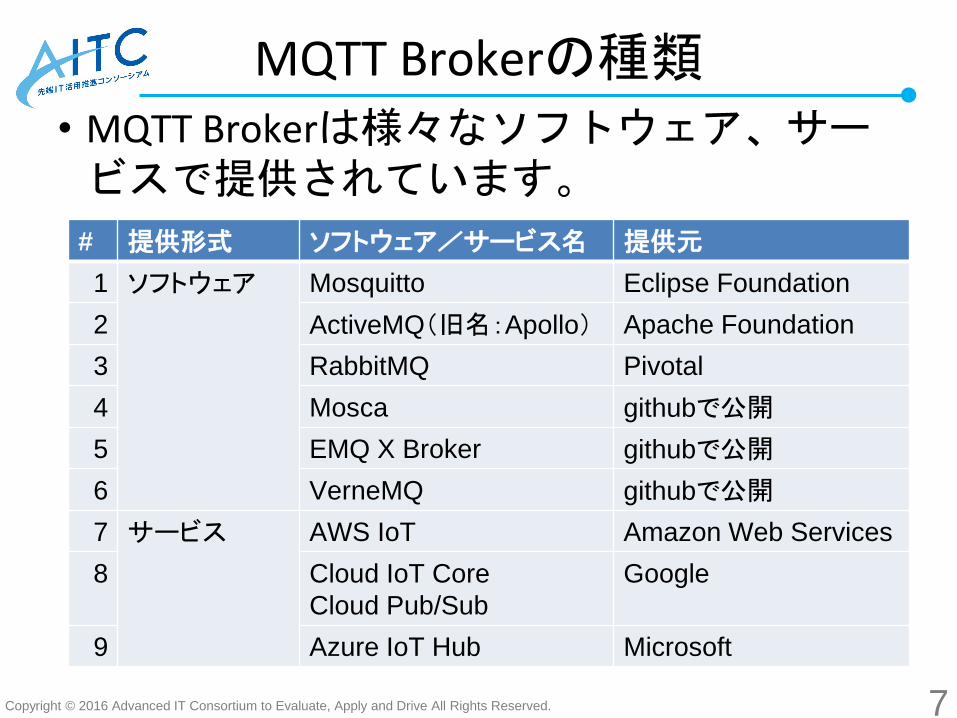
• MQTT Brokerは様々なソフトウェア、サービスで提供されています。
# 提供形式 ソフトウェア/サービス名 提供元
1 ソフトウェア Mosquitto Eclipse Foundation
2 ActiveMQ(旧名:Apollo) Apache Foundation
3 RabbitMQ Pivotal
4 Mosca githubで公開
5 EMQ X Broker githubで公開
6 VerneMQ githubで公開
7 サービス AWS IoT Amazon Web Services
8 Cloud IoT Core
Cloud Pub/Sub
9 Azure IoT Hub Microsoft
Copyright © 2016 Advanced IT Consortium to Evaluate, Apply and Drive All Rights Reserved.
Mosquittoとは
8
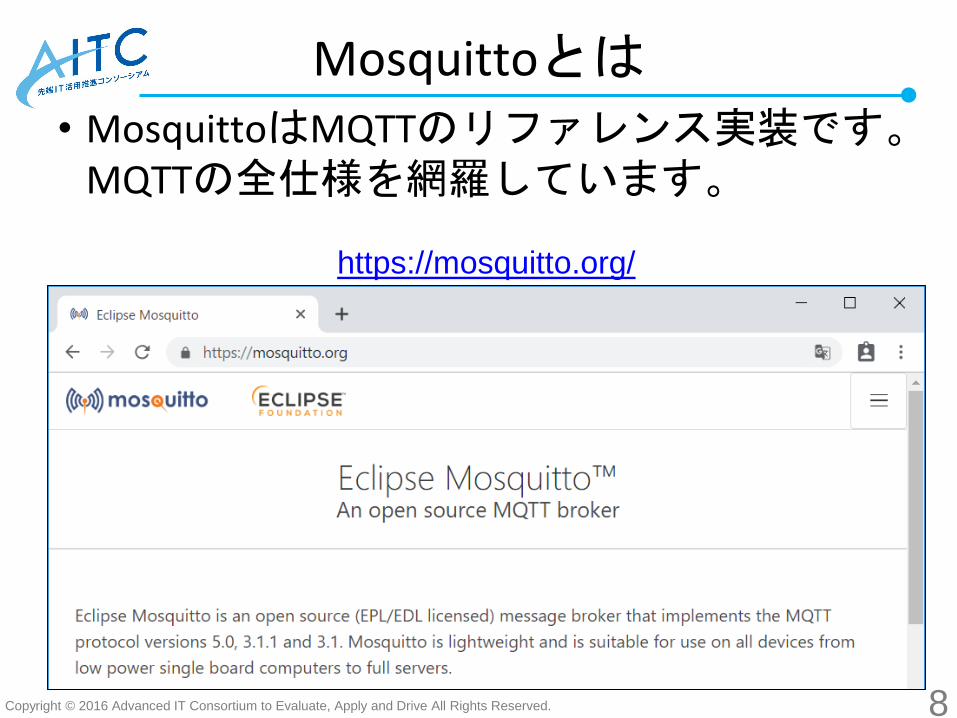
• MosquittoはMQTTのリファレンス実装です。MQTTの全仕様を網羅しています。
https://mosquitto.org/
Copyright © 2016 Advanced IT Consortium to Evaluate, Apply and Drive All Rights Reserved.
Mosquittoをセットアップ
9
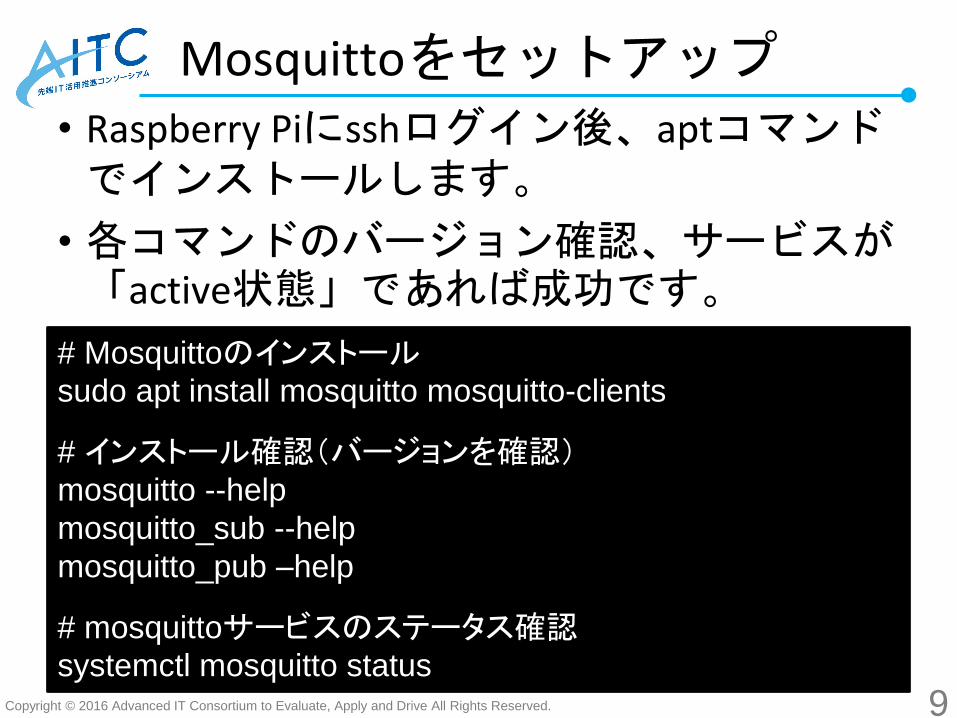
• Raspberry Piにsshログイン後、aptコマンドでインストールします。
• 各コマンドのバージョン確認、サービスが「active状態」であれば成功です。
# Mosquittoのインストールsudo apt install mosquitto mosquitto-clients
# インストール確認(バージョンを確認)mosquitto --help
mosquitto_sub --help
mosquitto_pub –help
# mosquittoサービスのステータス確認systemctl mosquitto status
Copyright © 2016 Advanced IT Consortium to Evaluate, Apply and Drive All Rights Reserved.
Mosquittoのコマンド
10
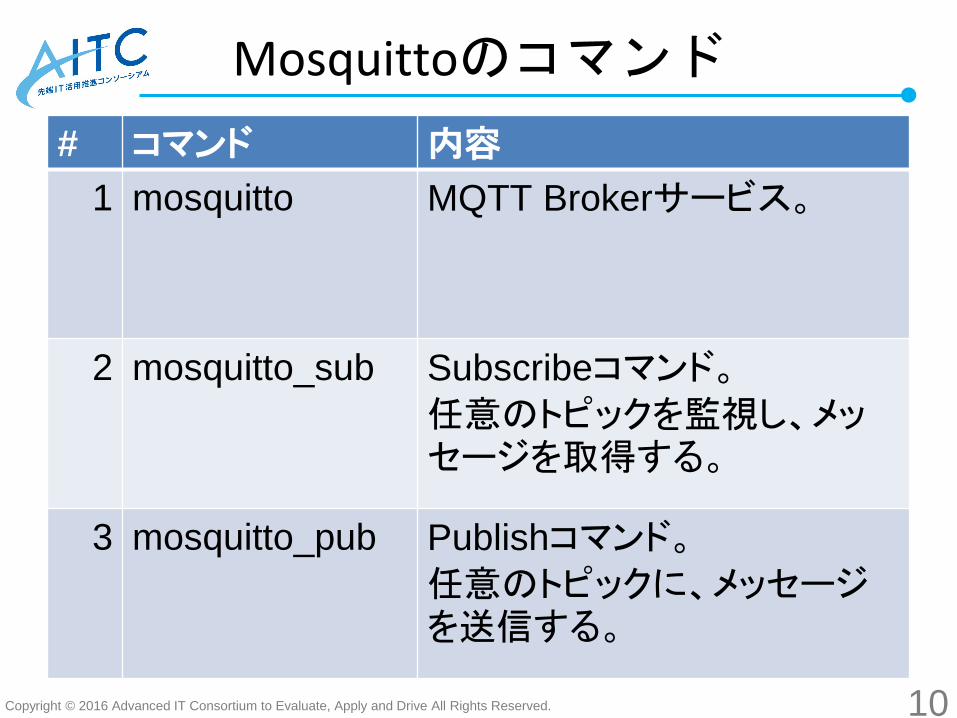
# コマンド 内容
1 mosquitto MQTT Brokerサービス。
2 mosquitto_sub Subscribeコマンド。
任意のトピックを監視し、メッセージを取得する。
3 mosquitto_pub Publishコマンド。
任意のトピックに、メッセージを送信する。
Copyright © 2016 Advanced IT Consortium to Evaluate, Apply and Drive All Rights Reserved.
実践MQTT(RaspberryPi編)
11
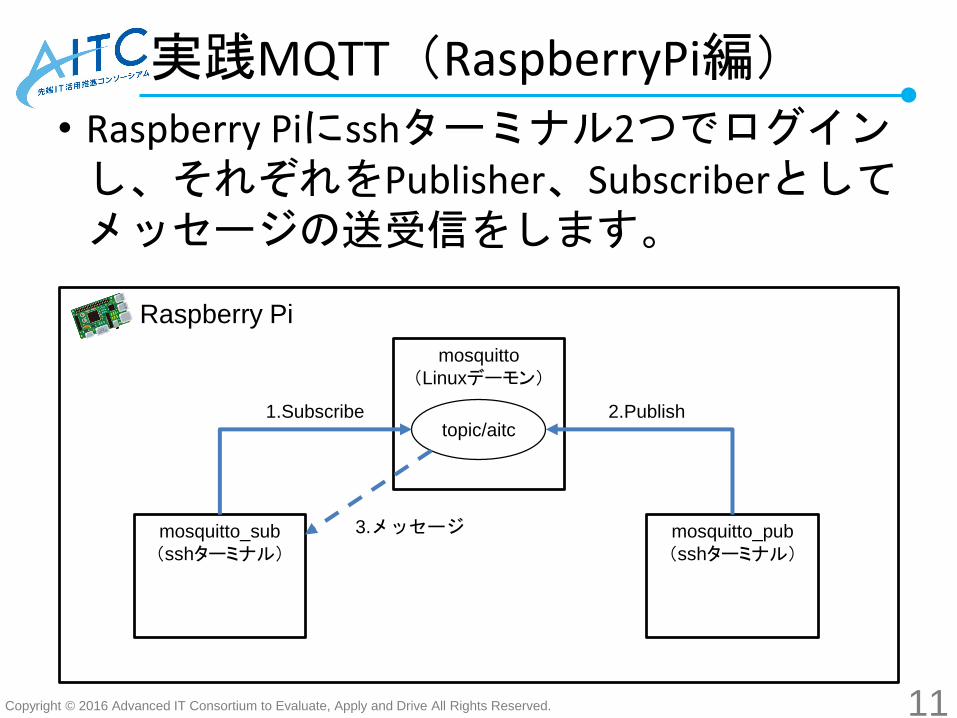
• Raspberry Piにsshターミナル2つでログインし、それぞれをPublisher、Subscriberとしてメッセージの送受信をします。
Raspberry Pi
mosquitto
(Linuxデーモン)
topic/aitc
mosquitto_sub
(sshターミナル)mosquitto_pub
(sshターミナル)
3.メッセージ
2.Publish1.Subscribe
Copyright © 2016 Advanced IT Consortium to Evaluate, Apply and Drive All Rights Reserved.
実践MQTT(RaspberryPi編)
12
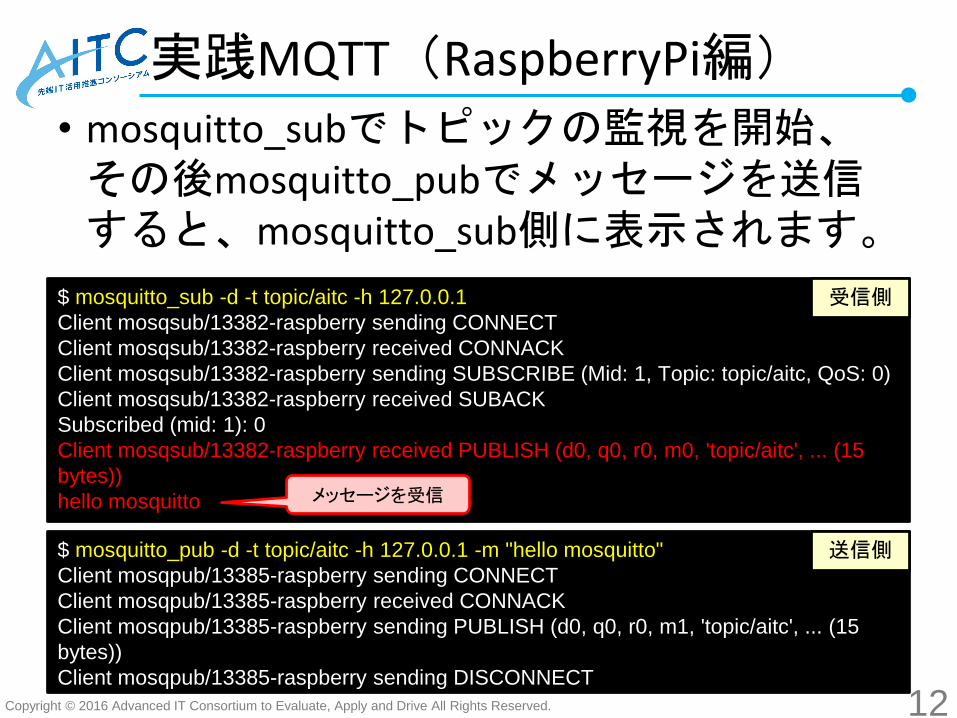
• mosquitto_subでトピックの監視を開始、その後mosquitto_pubでメッセージを送信すると、mosquitto_sub側に表示されます。
$ mosquitto_pub -d -t topic/aitc -h 127.0.0.1 -m "hello mosquitto"
Client mosqpub/13385-raspberry sending CONNECT
Client mosqpub/13385-raspberry received CONNACK
Client mosqpub/13385-raspberry sending PUBLISH (d0, q0, r0, m1, 'topic/aitc', ... (15
bytes))
Client mosqpub/13385-raspberry sending DISCONNECT
$ mosquitto_sub -d -t topic/aitc -h 127.0.0.1
Client mosqsub/13382-raspberry sending CONNECT
Client mosqsub/13382-raspberry received CONNACK
Client mosqsub/13382-raspberry sending SUBSCRIBE (Mid: 1, Topic: topic/aitc, QoS: 0)
Client mosqsub/13382-raspberry received SUBACK
Subscribed (mid: 1): 0
Client mosqsub/13382-raspberry received PUBLISH (d0, q0, r0, m0, 'topic/aitc', ... (15
bytes))
hello mosquitto
受信側
送信側
メッセージを受信

Copyright © 2016 Advanced IT Consortium to Evaluate, Apply and Drive All Rights Reserved.
補足:トピック
13
• メッセージをやり取りするにあたって、エンドポイントとなるものがトピックです。
• 任意のトピックを決めることで、混線することなくメッセージの送受信ができます。
mosquitto
(Linuxデーモン)
topic/aitc
mosquitto_sub
(sshターミナル)mosquitto_pub
(sshターミナル)
3.メッセージ
2.Publish1.Subscribe
トピック
Copyright © 2016 Advanced IT Consortium to Evaluate, Apply and Drive All Rights Reserved.
実践MQTT(スマホ編)
14
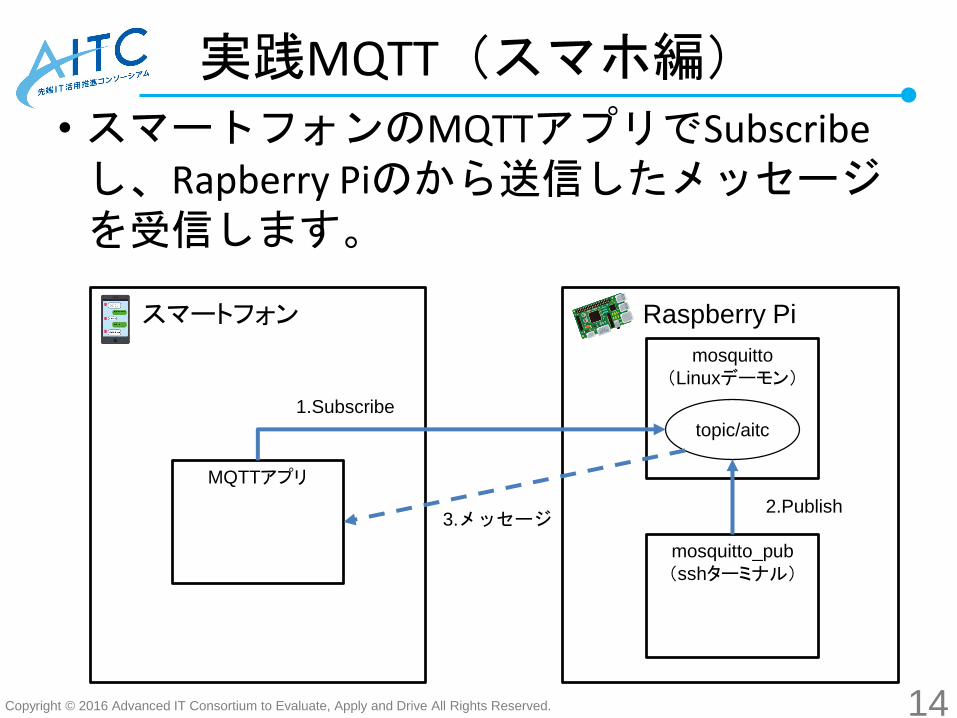
• スマートフォンのMQTTアプリでSubscribeし、Rapberry Piのから送信したメッセージを受信します。
Raspberry Pi
mosquitto
(Linuxデーモン)
topic/aitc
mosquitto_pub
(sshターミナル)
2.Publish
スマートフォン
MQTTアプリ
3.メッセージ
1.Subscribe
Copyright © 2016 Advanced IT Consortium to Evaluate, Apply and Drive All Rights Reserved.
実践MQTT(スマホ編)
15
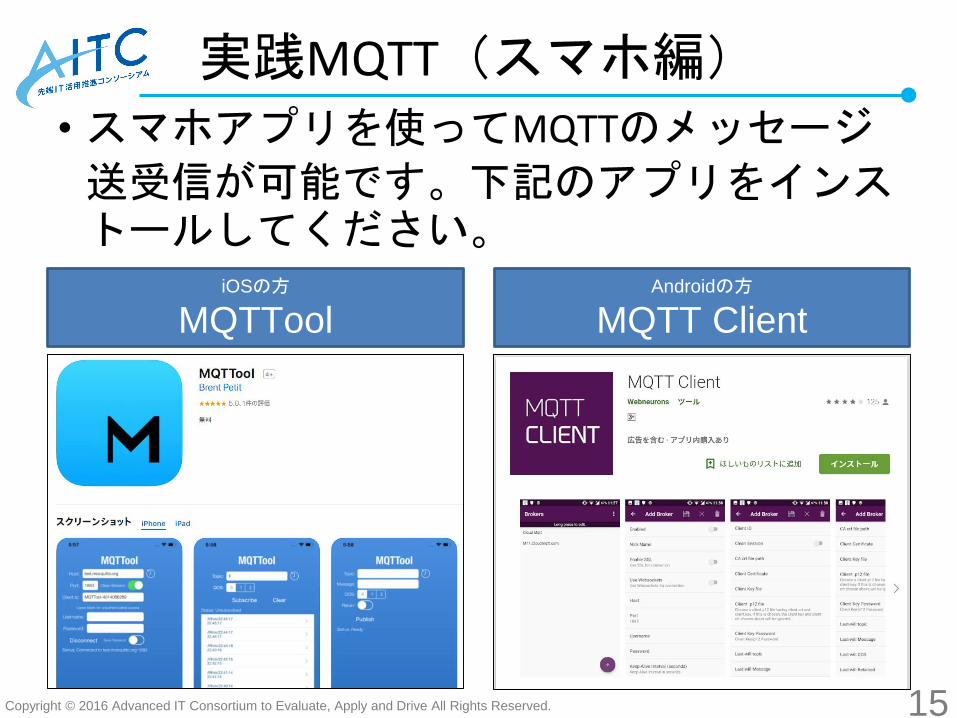
• スマホアプリを使ってMQTTのメッセージ
送受信が可能です。下記のアプリをインストールしてください。
iOSの方
MQTToolAndroidの方
MQTT Client
Copyright © 2016 Advanced IT Consortium to Evaluate, Apply and Drive All Rights Reserved.
実践MQTT(iOS編)
16
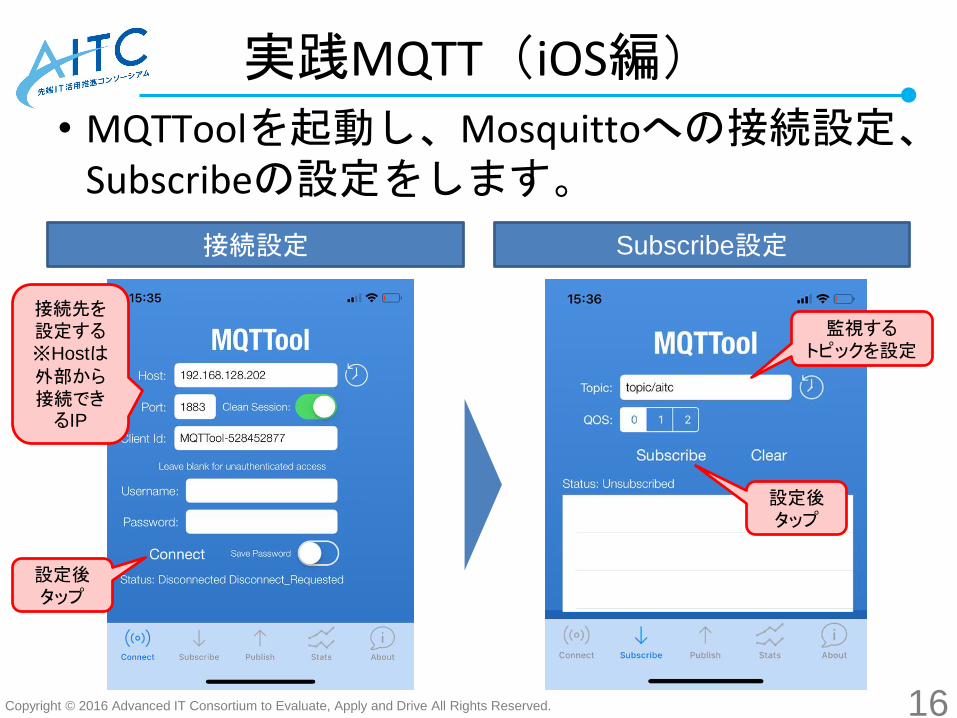
• MQTToolを起動し、Mosquittoへの接続設定、Subscribeの設定をします。
設定後タップ
接続先を設定する※Hostは外部から接続できるIP
監視するトピックを設定
接続設定 Subscribe設定
設定後タップ
Copyright © 2016 Advanced IT Consortium to Evaluate, Apply and Drive All Rights Reserved.
実践MQTT(iOS編)
17
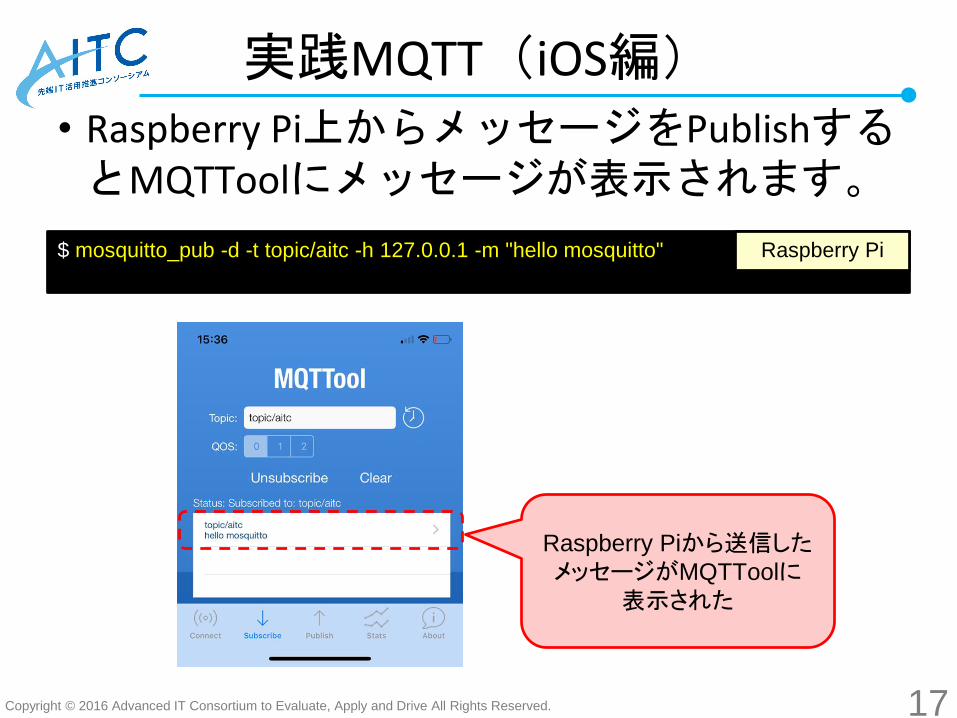
• Raspberry Pi上からメッセージをPublishするとMQTToolにメッセージが表示されます。
$ mosquitto_pub -d -t topic/aitc -h 127.0.0.1 -m "hello mosquitto" Raspberry Pi
Raspberry Piから送信したメッセージがMQTToolに
表示された
Copyright © 2016 Advanced IT Consortium to Evaluate, Apply and Drive All Rights Reserved.
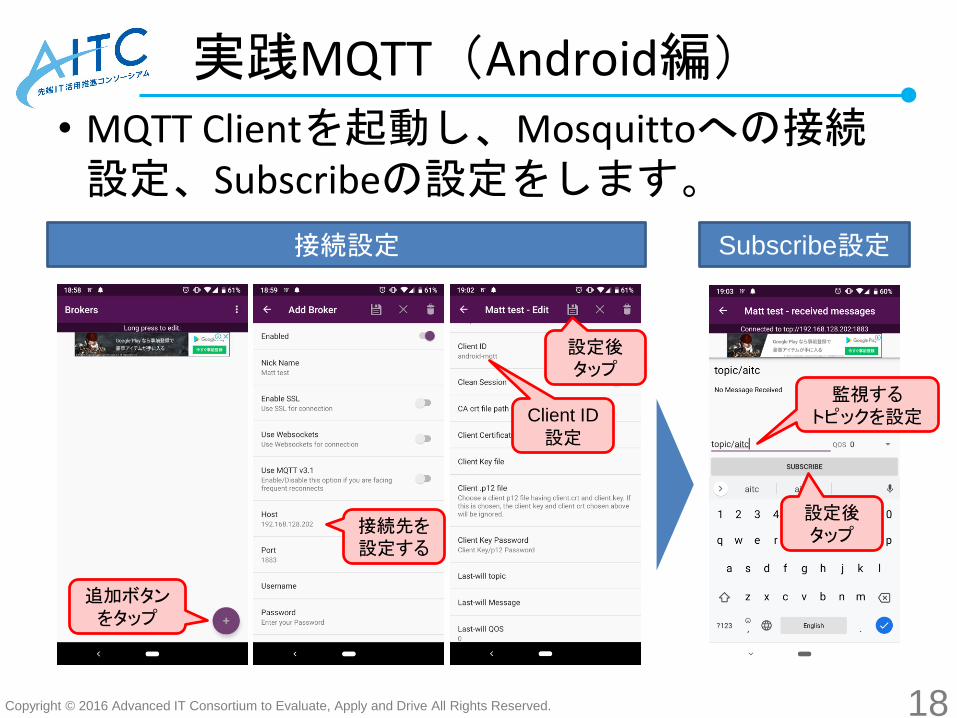
実践MQTT(Android編)
18
• MQTT Clientを起動し、Mosquittoへの接続設定、Subscribeの設定をします。
接続設定 Subscribe設定
接続先を設定する
追加ボタンをタップ
監視するトピックを設定
設定後タップ
設定後タップ
Client ID
設定
Copyright © 2016 Advanced IT Consortium to Evaluate, Apply and Drive All Rights Reserved.
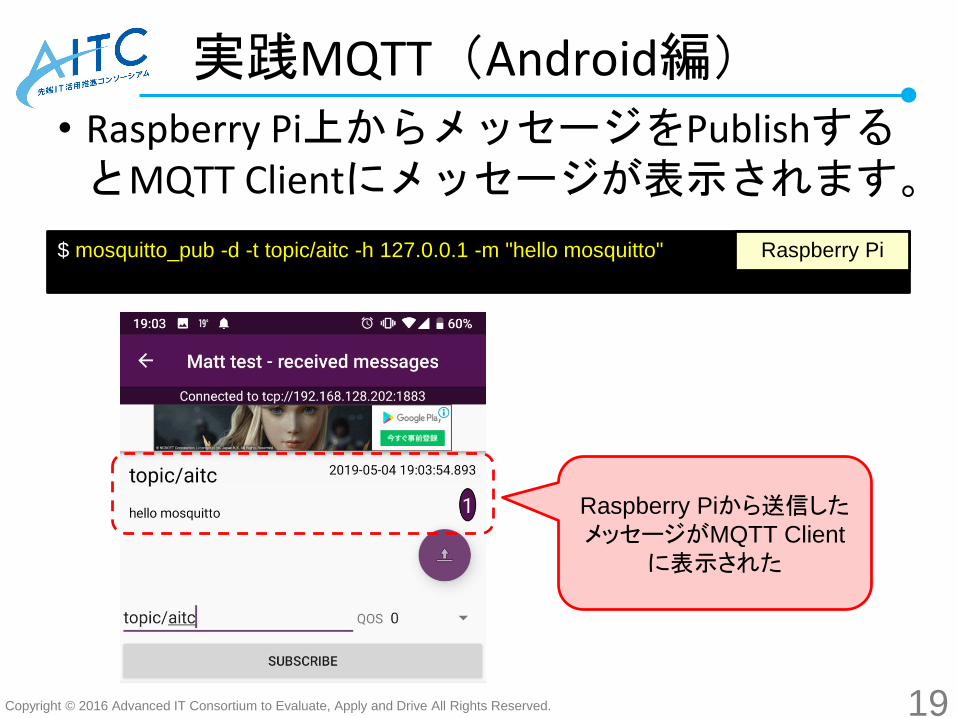
実践MQTT(Android編)
19
• Raspberry Pi上からメッセージをPublishするとMQTT Clientにメッセージが表示されます。
$ mosquitto_pub -d -t topic/aitc -h 127.0.0.1 -m "hello mosquitto" Raspberry Pi
Raspberry Piから送信したメッセージがMQTT Client
に表示された
Copyright © 2016 Advanced IT Consortium to Evaluate, Apply and Drive All Rights Reserved.
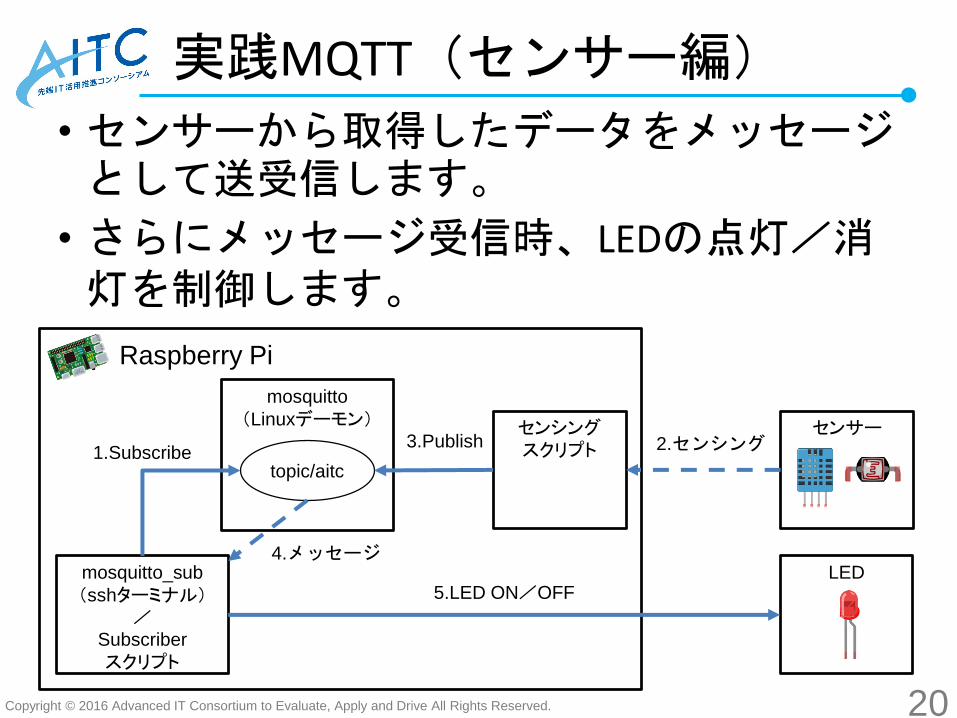
実践MQTT(センサー編)
20
• センサーから取得したデータをメッセージとして送受信します。
• さらにメッセージ受信時、LEDの点灯/消灯を制御します。
Raspberry Pi
mosquitto
(Linuxデーモン)
topic/aitc
mosquitto_sub
(sshターミナル)/
Subscriber
スクリプト
センシングスクリプト
4.メッセージ
3.Publish1.Subscribe
2.センシングセンサー
LED5.LED ON/OFF

Copyright © 2016 Advanced IT Consortium to Evaluate, Apply and Drive All Rights Reserved.
実践MQTT(温度センサー)
21
• 温度センサー(DHT11)から温湿度を取得します。
参考:※第2回勉強会資料
Copyright © 2016 Advanced IT Consortium to Evaluate, Apply and Drive All Rights Reserved.
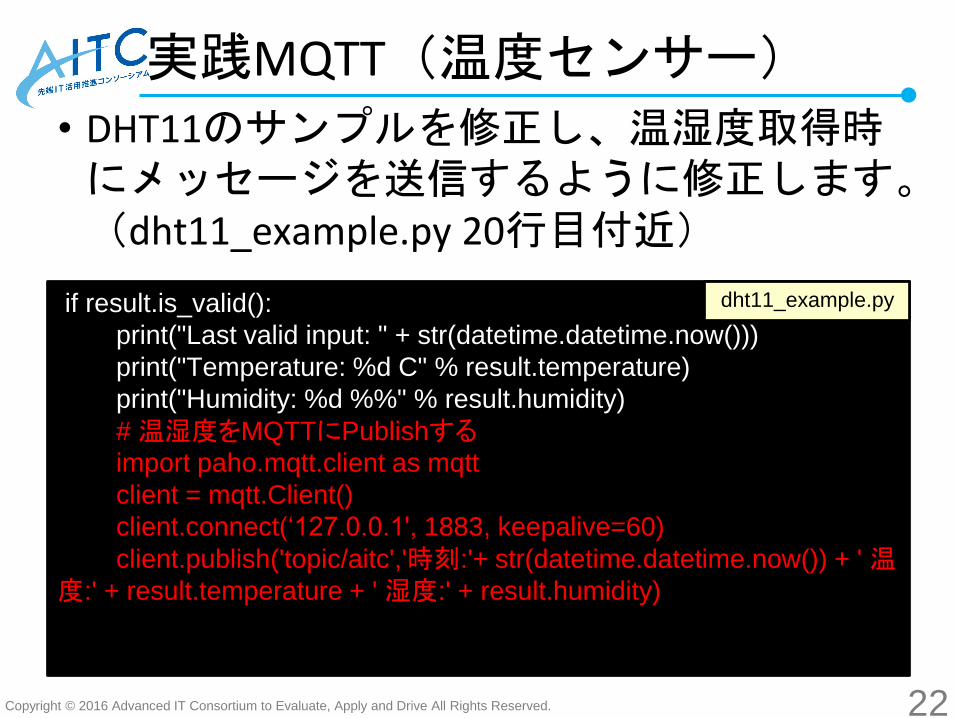
実践MQTT(温度センサー)
22
• DHT11のサンプルを修正し、温湿度取得時にメッセージを送信するように修正します。(dht11_example.py 20行目付近)
if result.is_valid():
print("Last valid input: " + str(datetime.datetime.now()))
print("Temperature: %d C" % result.temperature)
print("Humidity: %d %%" % result.humidity)
# 温湿度をMQTTにPublishするimport paho.mqtt.client as mqtt
client = mqtt.Client()
client.connect(‘127.0.0.1', 1883, keepalive=60)
client.publish('topic/aitc','時刻:'+ str(datetime.datetime.now()) + ' 温度:' + result.temperature + ' 湿度:' + result.humidity)
dht11_example.py
Copyright © 2016 Advanced IT Consortium to Evaluate, Apply and Drive All Rights Reserved.
実践MQTT(温度センサー)
23
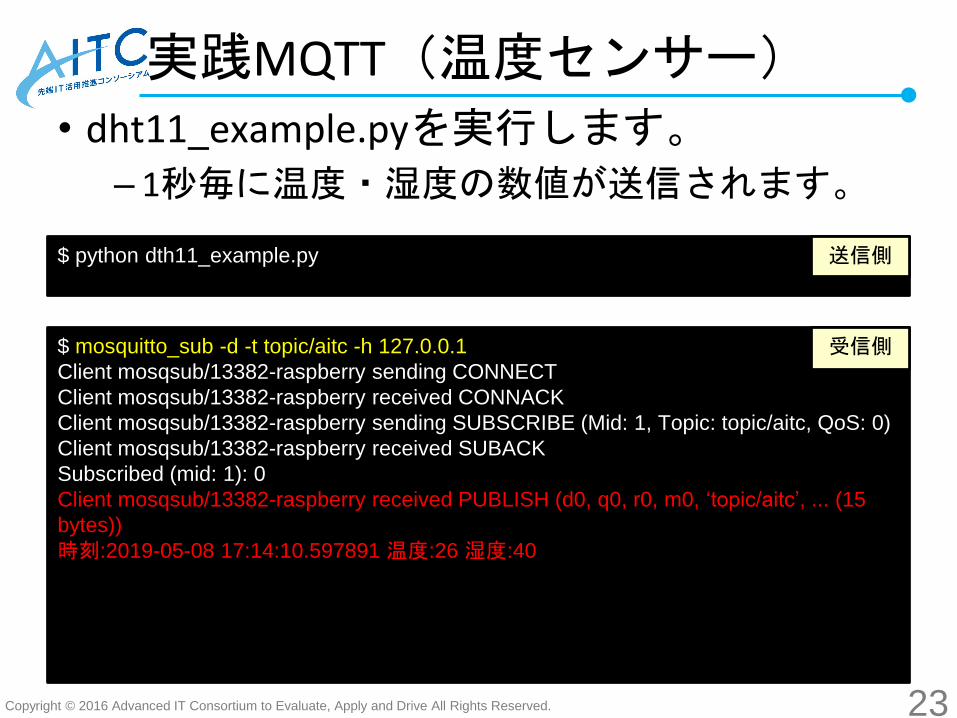
• dht11_example.pyを実行します。
– 1秒毎に温度・湿度の数値が送信されます。
$ python dth11_example.py
$ mosquitto_sub -d -t topic/aitc -h 127.0.0.1
Client mosqsub/13382-raspberry sending CONNECT
Client mosqsub/13382-raspberry received CONNACK
Client mosqsub/13382-raspberry sending SUBSCRIBE (Mid: 1, Topic: topic/aitc, QoS: 0)
Client mosqsub/13382-raspberry received SUBACK
Subscribed (mid: 1): 0
Client mosqsub/13382-raspberry received PUBLISH (d0, q0, r0, m0, ‘topic/aitc’, ... (15
bytes))
時刻:2019-05-08 17:14:10.597891 温度:26 湿度:40
受信側
送信側
Copyright © 2016 Advanced IT Consortium to Evaluate, Apply and Drive All Rights Reserved.
実践MQTT(照度センサー)
24
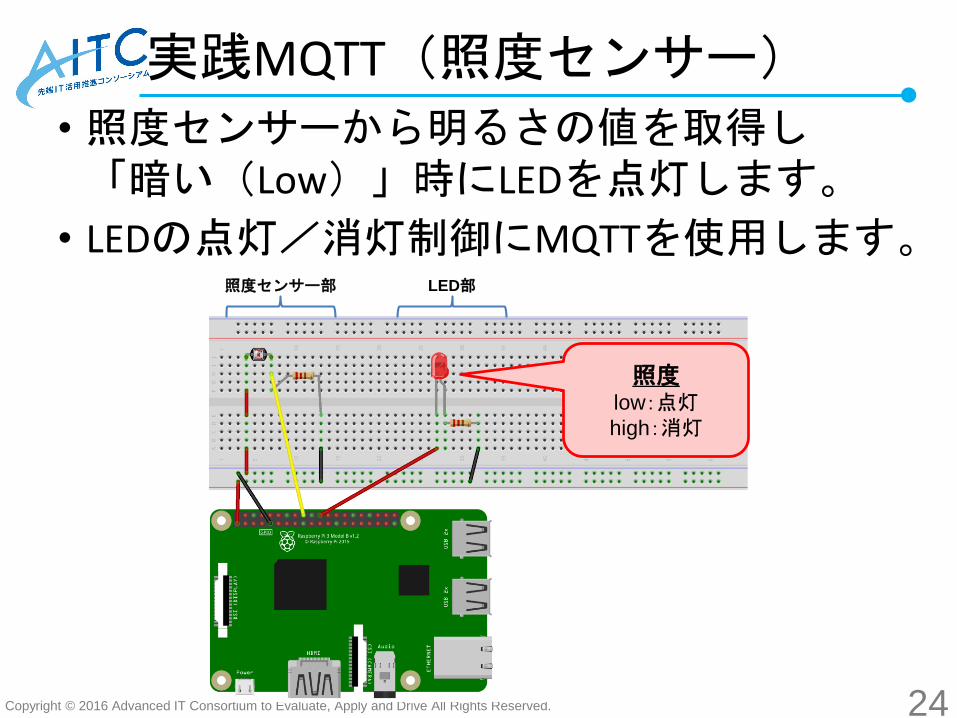
• 照度センサーから明るさの値を取得し「暗い(Low)」時にLEDを点灯します。
• LEDの点灯/消灯制御にMQTTを使用します。照度センサー部 LED部
照度low:点灯high:消灯
Copyright © 2016 Advanced IT Consortium to Evaluate, Apply and Drive All Rights Reserved.
実践MQTT(照度センサー)
25
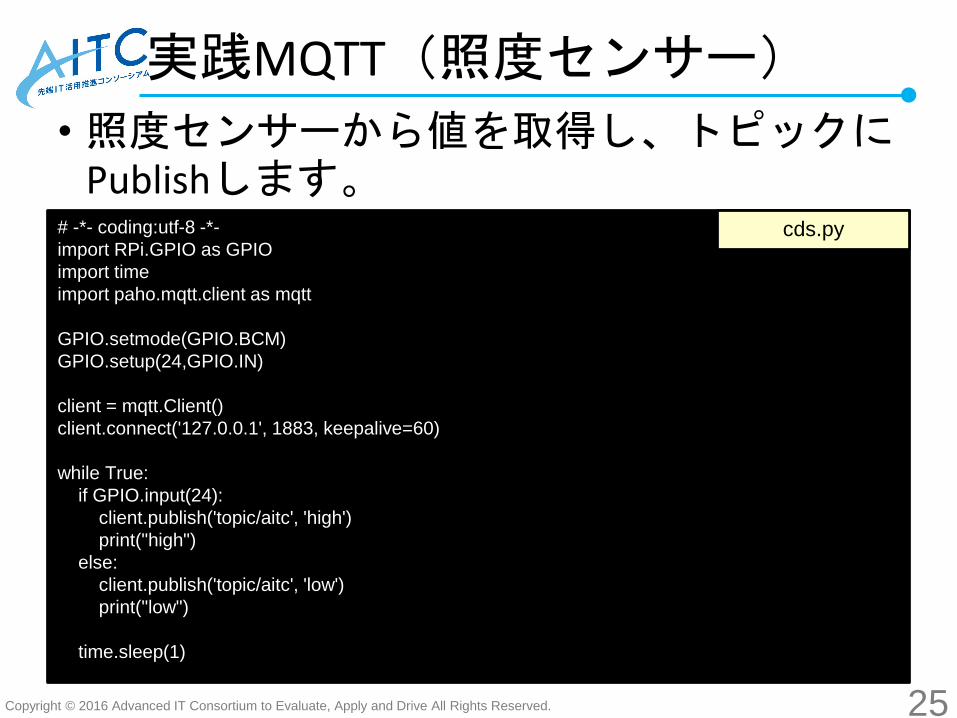
• 照度センサーから値を取得し、トピックにPublishします。
# -*- coding:utf-8 -*-
import RPi.GPIO as GPIO
import time
import paho.mqtt.client as mqtt
GPIO.setmode(GPIO.BCM)
GPIO.setup(24,GPIO.IN)
client = mqtt.Client()
client.connect('127.0.0.1', 1883, keepalive=60)
while True:
if GPIO.input(24):
client.publish('topic/aitc', 'high')
print("high")
else:
client.publish('topic/aitc', 'low')
print("low")
time.sleep(1)
cds.py
Copyright © 2016 Advanced IT Consortium to Evaluate, Apply and Drive All Rights Reserved.
実践MQTT(照度センサー)
26
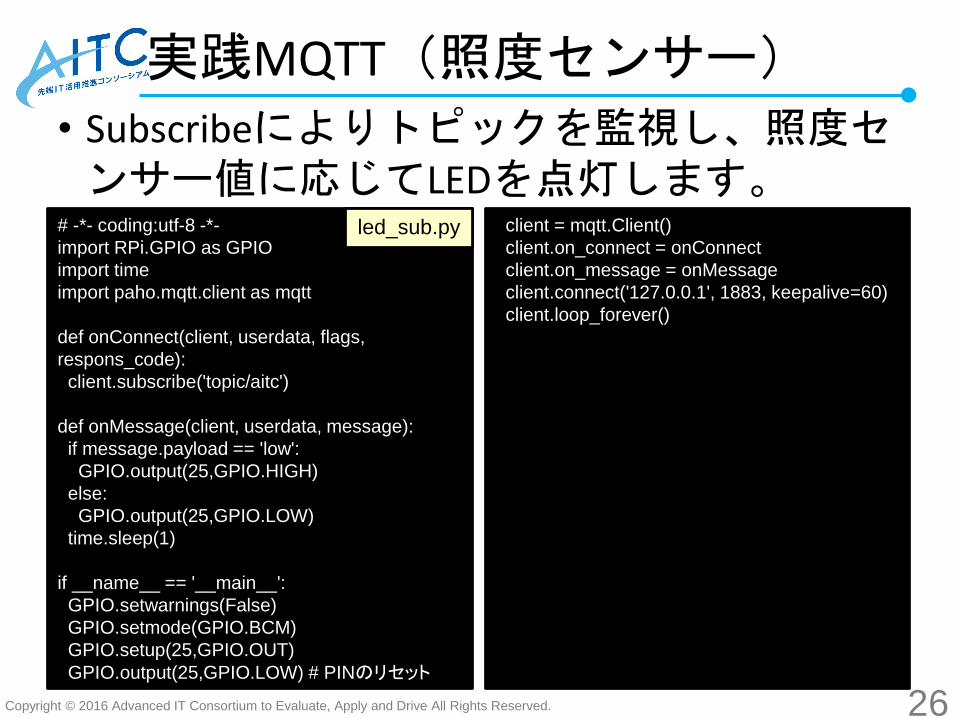
• Subscribeによりトピックを監視し、照度センサー値に応じてLEDを点灯します。
# -*- coding:utf-8 -*-
import RPi.GPIO as GPIO
import time
import paho.mqtt.client as mqtt
def onConnect(client, userdata, flags,
respons_code):
client.subscribe('topic/aitc')
def onMessage(client, userdata, message):
if message.payload == 'low':
GPIO.output(25,GPIO.HIGH)
else:
GPIO.output(25,GPIO.LOW)
time.sleep(1)
if __name__ == '__main__':
GPIO.setwarnings(False)
GPIO.setmode(GPIO.BCM)
GPIO.setup(25,GPIO.OUT)
GPIO.output(25,GPIO.LOW) # PINのリセット
client = mqtt.Client()
client.on_connect = onConnect
client.on_message = onMessage
client.connect('127.0.0.1', 1883, keepalive=60)
client.loop_forever()
led_sub.py
Copyright © 2016 Advanced IT Consortium to Evaluate, Apply and Drive All Rights Reserved.
実践MQTT(照度センサー)
27
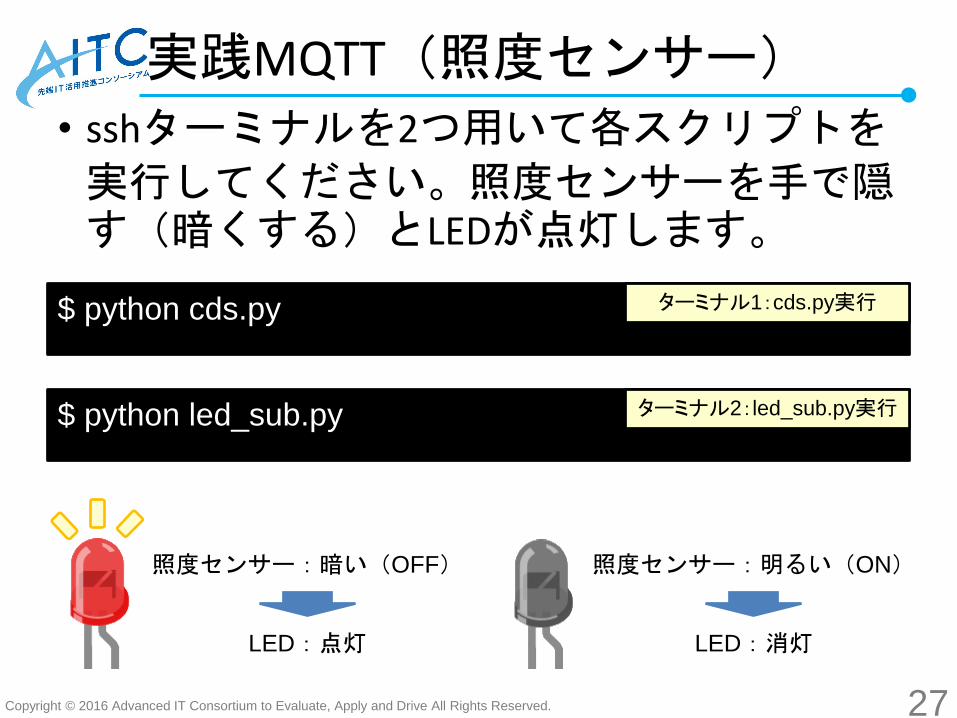
• sshターミナルを2つ用いて各スクリプトを
実行してください。照度センサーを手で隠す(暗くする)とLEDが点灯します。
$ python cds.py ターミナル1:cds.py実行
$ python led_sub.py ターミナル2:led_sub.py実行
照度センサー:暗い(OFF) 照度センサー:明るい(ON)
LED:点灯 LED:消灯
Copyright © 2016 Advanced IT Consortium to Evaluate, Apply and Drive All Rights Reserved.
実践MQTT(画像認識編)
28
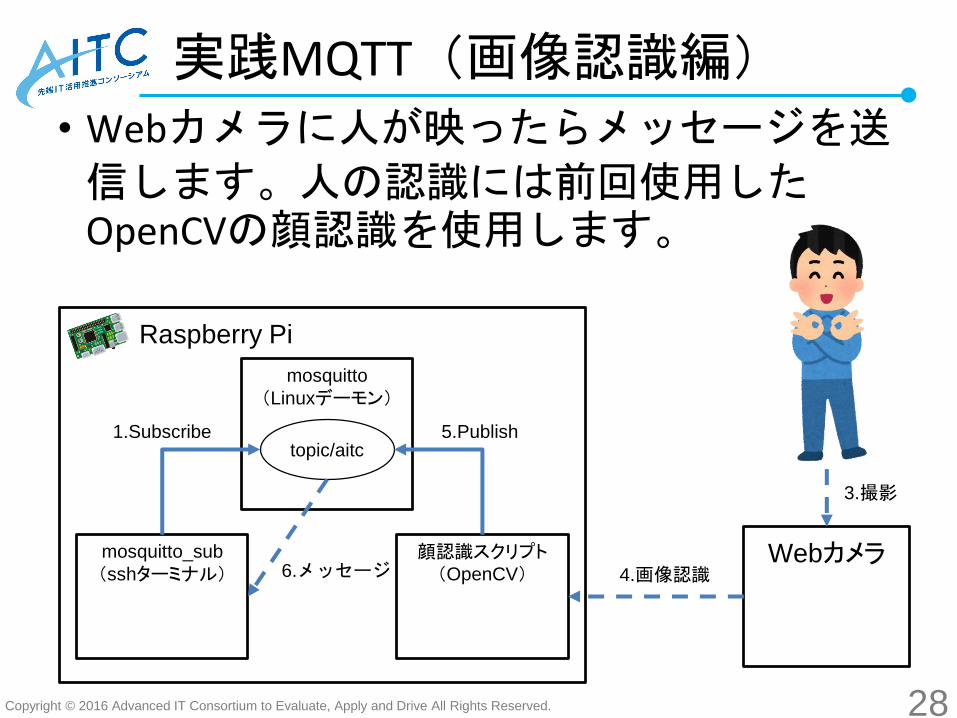
• Webカメラに人が映ったらメッセージを送
信します。人の認識には前回使用したOpenCVの顔認識を使用します。
Raspberry Pi
mosquitto
(Linuxデーモン)
topic/aitc
mosquitto_sub
(sshターミナル)顔認識スクリプト(OpenCV)6.メッセージ
5.Publish1.Subscribe
Webカメラ
3.撮影
4.画像認識
Copyright © 2016 Advanced IT Consortium to Evaluate, Apply and Drive All Rights Reserved.
実践MQTT(画像認識編)
29
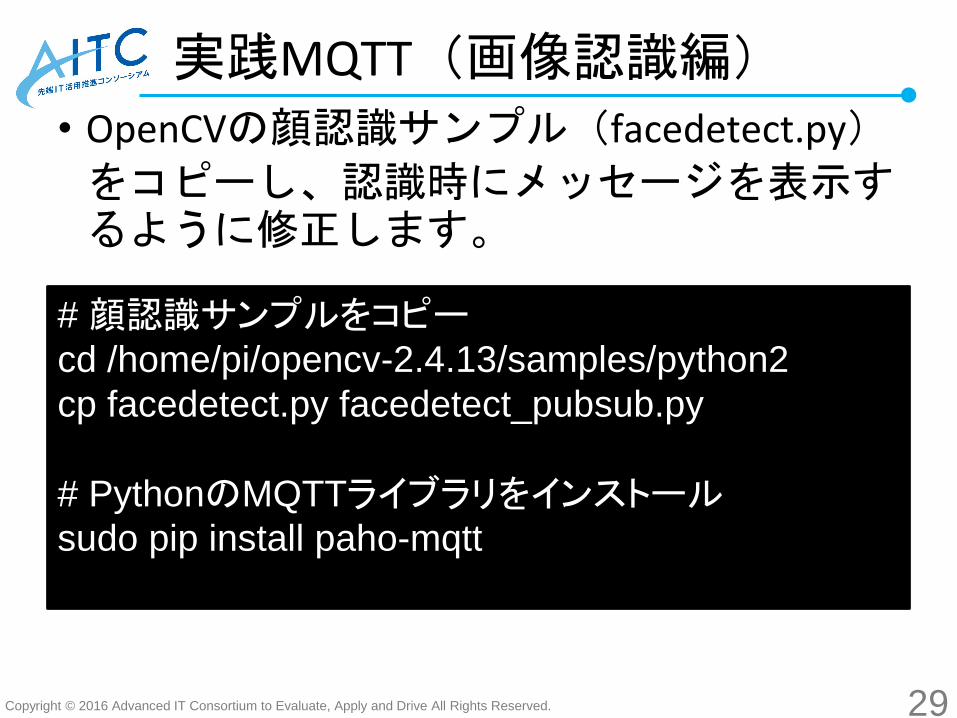
• OpenCVの顔認識サンプル(facedetect.py)
をコピーし、認識時にメッセージを表示するように修正します。
# 顔認識サンプルをコピーcd /home/pi/opencv-2.4.13/samples/python2
cp facedetect.py facedetect_pubsub.py
# PythonのMQTTライブラリをインストールsudo pip install paho-mqtt
Copyright © 2016 Advanced IT Consortium to Evaluate, Apply and Drive All Rights Reserved.
実践MQTT(画像認識編)
30
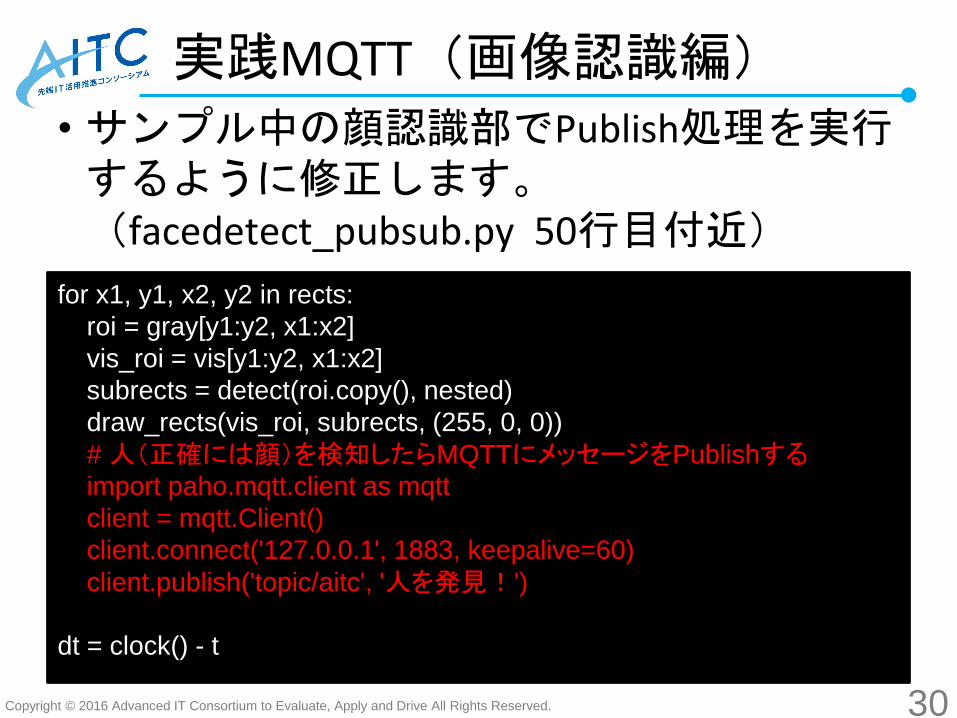
• サンプル中の顔認識部でPublish処理を実行するように修正します。(facedetect_pubsub.py 50行目付近)
for x1, y1, x2, y2 in rects:
roi = gray[y1:y2, x1:x2]
vis_roi = vis[y1:y2, x1:x2]
subrects = detect(roi.copy(), nested)
draw_rects(vis_roi, subrects, (255, 0, 0))
# 人(正確には顔)を検知したらMQTTにメッセージをPublishするimport paho.mqtt.client as mqtt
client = mqtt.Client()
client.connect('127.0.0.1', 1883, keepalive=60)
client.publish('topic/aitc', '人を発見!')
dt = clock() - t
Copyright © 2016 Advanced IT Consortium to Evaluate, Apply and Drive All Rights Reserved.
実践MQTT(画像認識編)
31
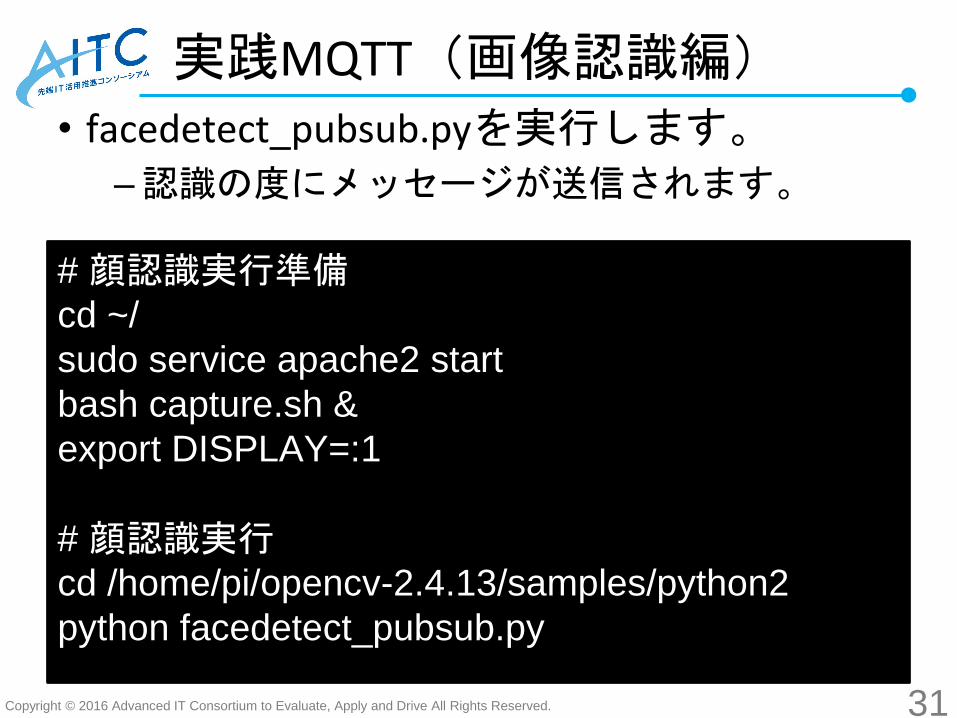
• facedetect_pubsub.pyを実行します。
–認識の度にメッセージが送信されます。
# 顔認識実行準備cd ~/
sudo service apache2 start
bash capture.sh &
export DISPLAY=:1
# 顔認識実行cd /home/pi/opencv-2.4.13/samples/python2
python facedetect_pubsub.py
Copyright © 2016 Advanced IT Consortium to Evaluate, Apply and Drive All Rights Reserved.
実践MQTT(音声認識編)
32
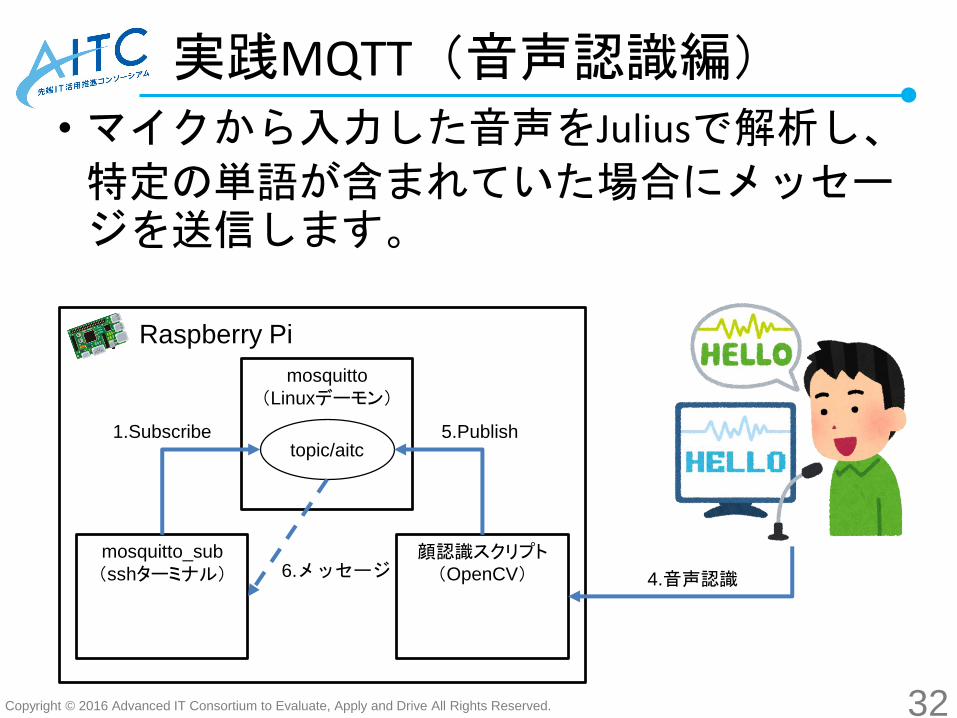
• マイクから入力した音声をJuliusで解析し、
特定の単語が含まれていた場合にメッセージを送信します。
Raspberry Pi
mosquitto
(Linuxデーモン)
topic/aitc
mosquitto_sub
(sshターミナル)顔認識スクリプト(OpenCV)6.メッセージ
5.Publish1.Subscribe
4.音声認識
Copyright © 2016 Advanced IT Consortium to Evaluate, Apply and Drive All Rights Reserved.
補足:動作が不安定な方へ
33
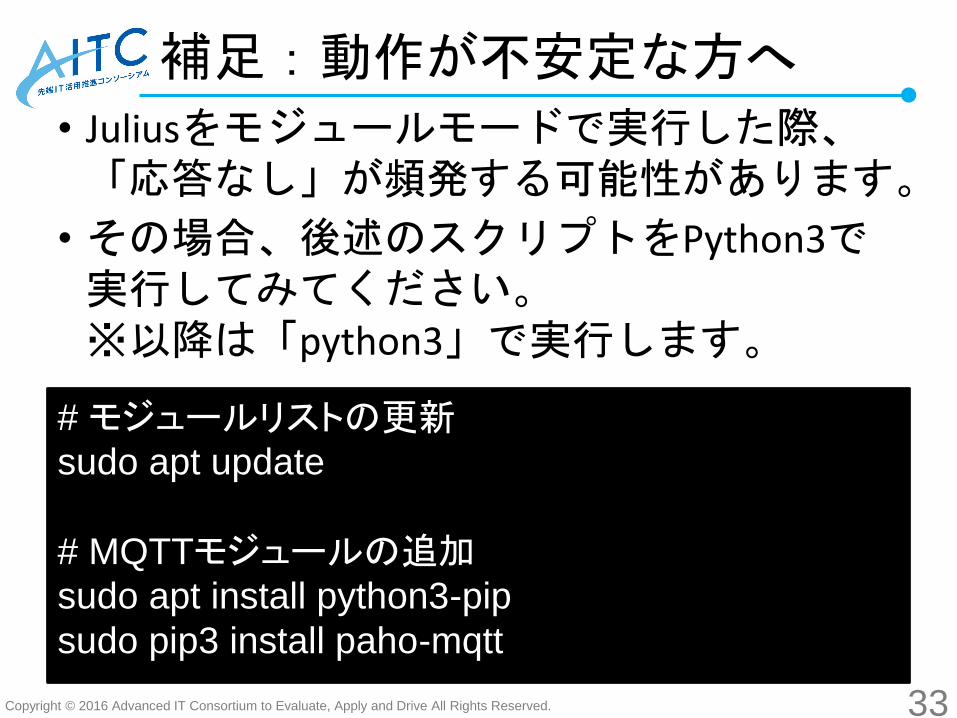
• Juliusをモジュールモードで実行した際、「応答なし」が頻発する可能性があります。
• その場合、後述のスクリプトをPython3で実行してみてください。※以降は「python3」で実行します。
# モジュールリストの更新sudo apt update
# MQTTモジュールの追加sudo apt install python3-pip
sudo pip3 install paho-mqtt
Copyright © 2016 Advanced IT Consortium to Evaluate, Apply and Drive All Rights Reserved.
実践MQTT(音声認識編)
34
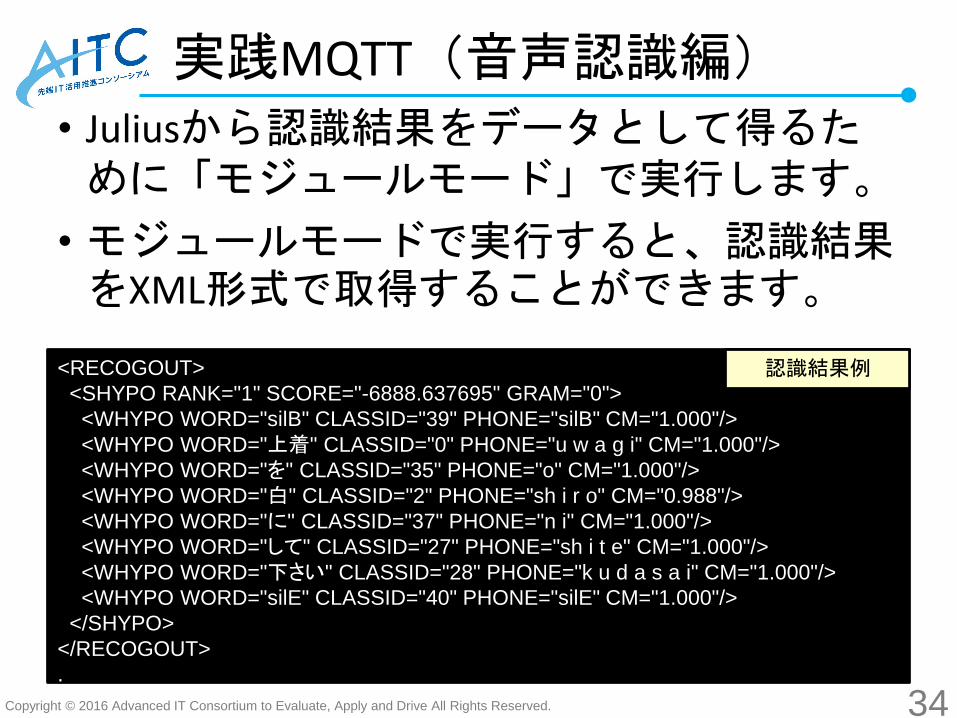
• Juliusから認識結果をデータとして得るために「モジュールモード」で実行します。
• モジュールモードで実行すると、認識結果をXML形式で取得することができます。
<RECOGOUT>
<SHYPO RANK="1" SCORE="-6888.637695" GRAM="0">
<WHYPO WORD="silB" CLASSID="39" PHONE="silB" CM="1.000"/>
<WHYPO WORD="上着" CLASSID="0" PHONE="u w a g i" CM="1.000"/>
<WHYPO WORD="を" CLASSID="35" PHONE="o" CM="1.000"/>
<WHYPO WORD="白" CLASSID="2" PHONE="sh i r o" CM="0.988"/>
<WHYPO WORD="に" CLASSID="37" PHONE="n i" CM="1.000"/>
<WHYPO WORD="して" CLASSID="27" PHONE="sh i t e" CM="1.000"/>
<WHYPO WORD="下さい" CLASSID="28" PHONE="k u d a s a i" CM="1.000"/>
<WHYPO WORD="silE" CLASSID="40" PHONE="silE" CM="1.000"/>
</SHYPO>
</RECOGOUT>
.
認識結果例
Copyright © 2016 Advanced IT Consortium to Evaluate, Apply and Drive All Rights Reserved.
実践MQTT(音声認識編)
35
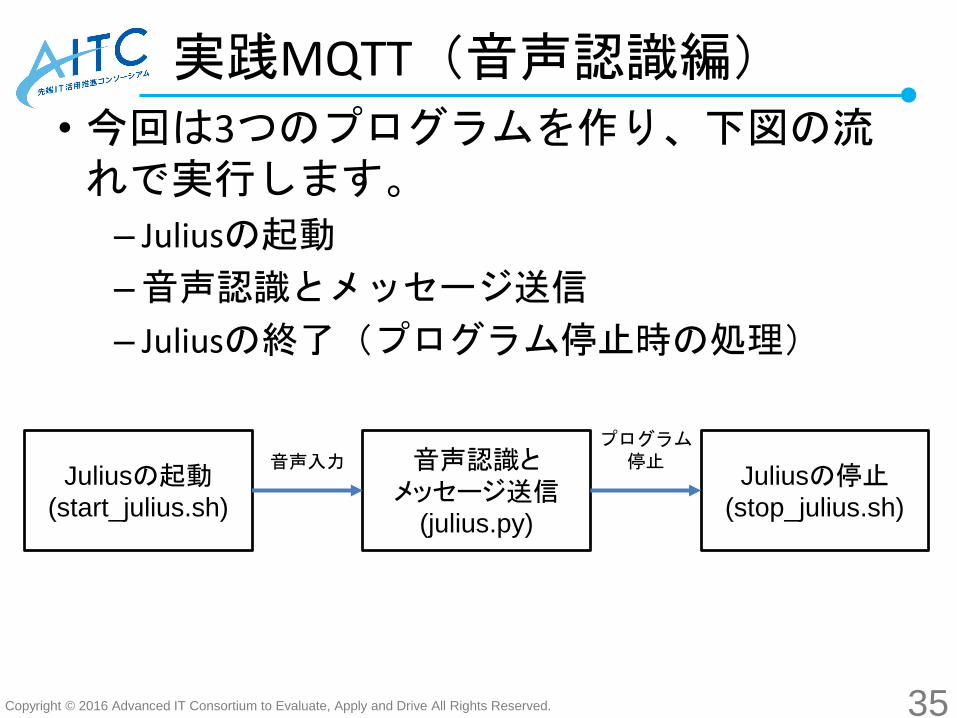
• 今回は3つのプログラムを作り、下図の流れで実行します。
– Juliusの起動
–音声認識とメッセージ送信
– Juliusの終了(プログラム停止時の処理)
Juliusの起動(start_julius.sh)
音声認識とメッセージ送信
(julius.py)
Juliusの停止(stop_julius.sh)
音声入力プログラム停止
Copyright © 2016 Advanced IT Consortium to Evaluate, Apply and Drive All Rights Reserved.
実践MQTT(音声認識編)
36
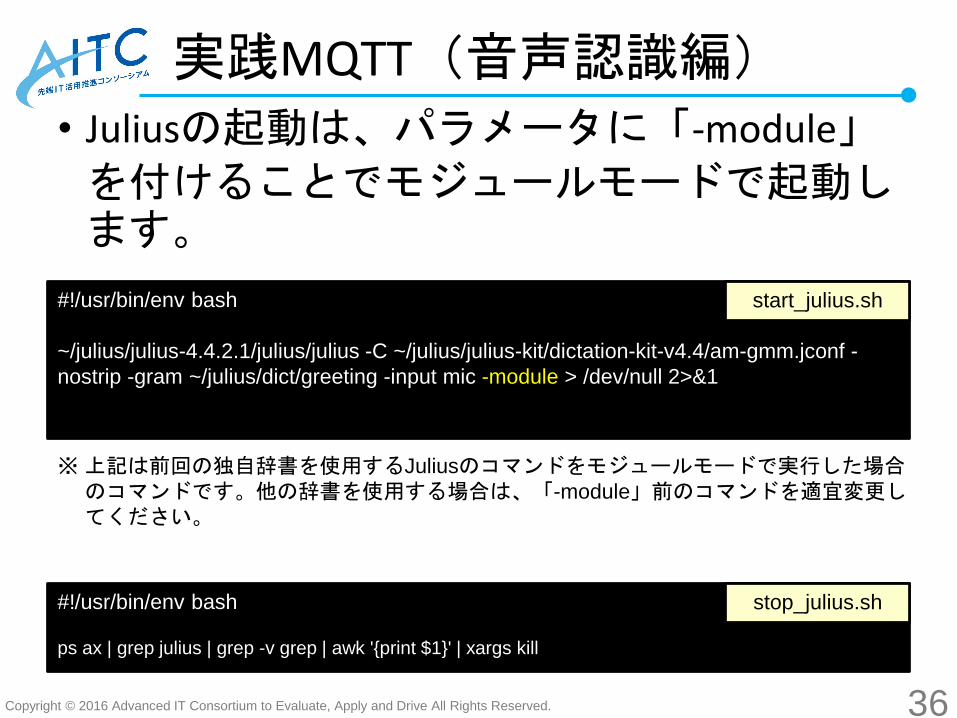
• Juliusの起動は、パラメータに「-module」
を付けることでモジュールモードで起動します。
#!/usr/bin/env bash
~/julius/julius-4.4.2.1/julius/julius -C ~/julius/julius-kit/dictation-kit-v4.4/am-gmm.jconf -
nostrip -gram ~/julius/dict/greeting -input mic -module > /dev/null 2>&1
start_julius.sh
※上記は前回の独自辞書を使用するJuliusのコマンドをモジュールモードで実行した場合のコマンドです。他の辞書を使用する場合は、「-module」前のコマンドを適宜変更してください。
#!/usr/bin/env bash
ps ax | grep julius | grep -v grep | awk '{print $1}' | xargs kill
stop_julius.sh
Copyright © 2016 Advanced IT Consortium to Evaluate, Apply and Drive All Rights Reserved.
実践MQTT(音声認識編)
37
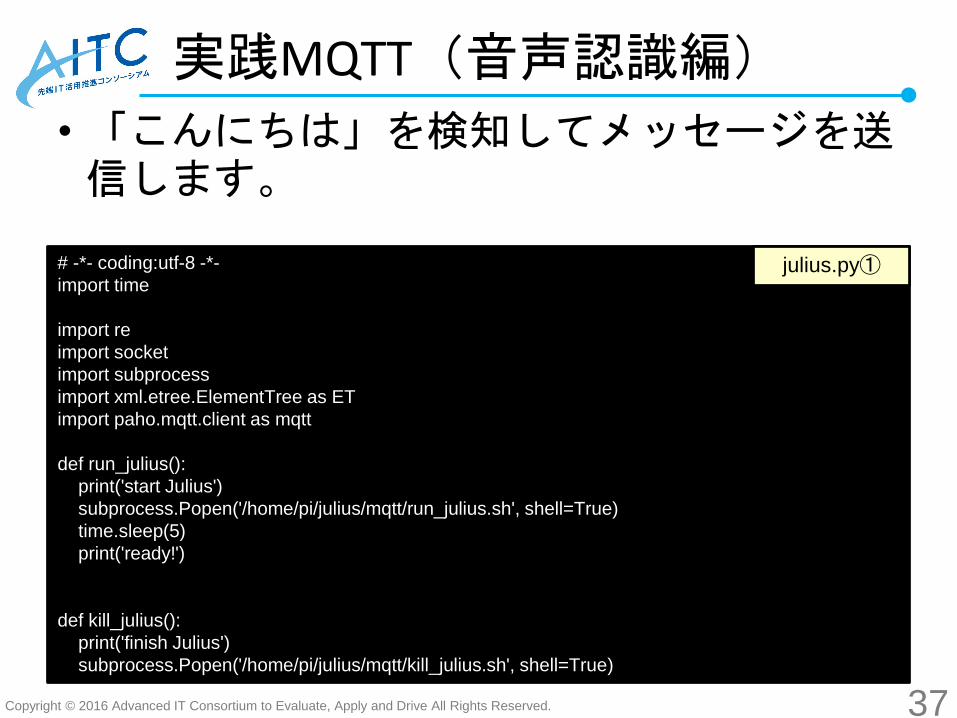
• 「こんにちは」を検知してメッセージを送信します。
# -*- coding:utf-8 -*-
import time
import re
import socket
import subprocess
import xml.etree.ElementTree as ET
import paho.mqtt.client as mqtt
def run_julius():
print('start Julius')
subprocess.Popen('/home/pi/julius/mqtt/run_julius.sh', shell=True)
time.sleep(5)
print('ready!')
def kill_julius():
print('finish Julius')
subprocess.Popen('/home/pi/julius/mqtt/kill_julius.sh', shell=True)
julius.py①
Copyright © 2016 Advanced IT Consortium to Evaluate, Apply and Drive All Rights Reserved.
実践MQTT(音声認識編)
38
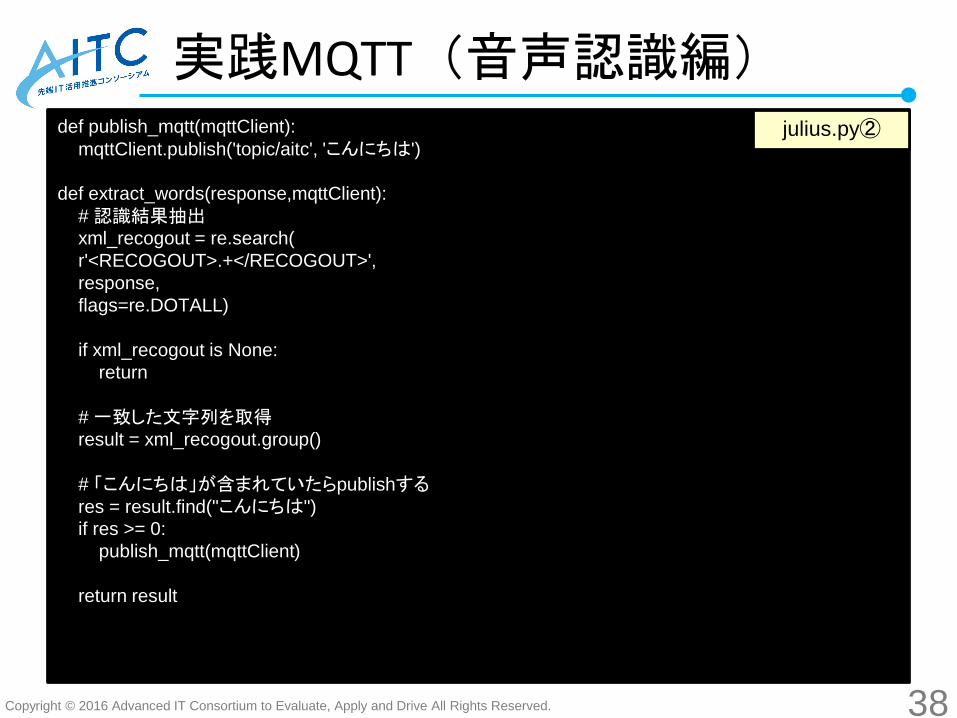
def publish_mqtt(mqttClient):
mqttClient.publish('topic/aitc', 'こんにちは')
def extract_words(response,mqttClient):
# 認識結果抽出xml_recogout = re.search(
r'<RECOGOUT>.+</RECOGOUT>',
response,
flags=re.DOTALL)
if xml_recogout is None:
return
# 一致した文字列を取得result = xml_recogout.group()
# 「こんにちは」が含まれていたらpublishするres = result.find("こんにちは")
if res >= 0:
publish_mqtt(mqttClient)
return result
julius.py②
Copyright © 2016 Advanced IT Consortium to Evaluate, Apply and Drive All Rights Reserved.
実践MQTT(音声認識編)
39
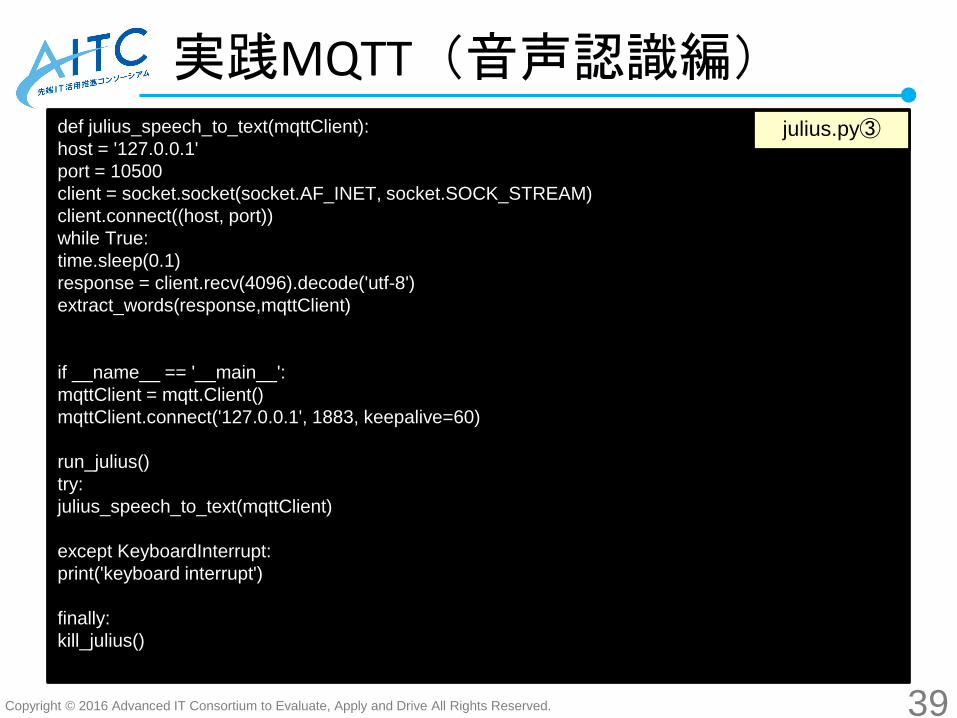
def julius_speech_to_text(mqttClient):
host = '127.0.0.1'
port = 10500
client = socket.socket(socket.AF_INET, socket.SOCK_STREAM)
client.connect((host, port))
while True:
time.sleep(0.1)
response = client.recv(4096).decode('utf-8')
extract_words(response,mqttClient)
if __name__ == '__main__':
mqttClient = mqtt.Client()
mqttClient.connect('127.0.0.1', 1883, keepalive=60)
run_julius()
try:
julius_speech_to_text(mqttClient)
except KeyboardInterrupt:
print('keyboard interrupt')
finally:
kill_julius()
julius.py③
Copyright © 2016 Advanced IT Consortium to Evaluate, Apply and Drive All Rights Reserved.
実践MQTT(音声認識編)
40
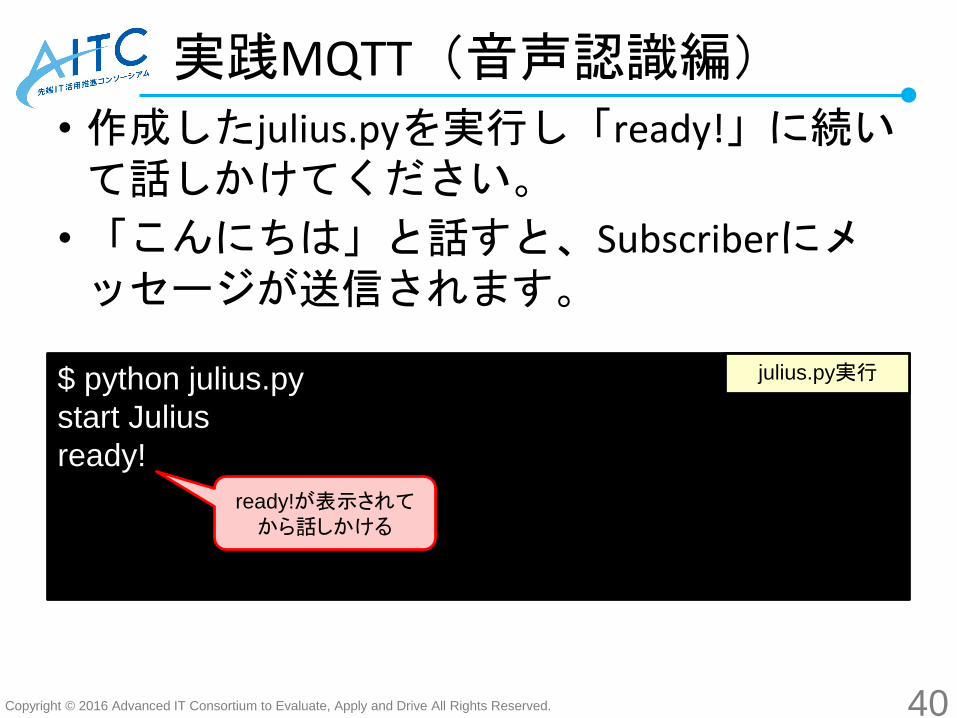
• 作成したjulius.pyを実行し「ready!」に続いて話しかけてください。
• 「こんにちは」と話すと、Subscriberにメッセージが送信されます。
$ python julius.py
start Julius
ready!
julius.py実行
ready!が表示されてから話しかける
Copyright © 2016 Advanced IT Consortium to Evaluate, Apply and Drive All Rights Reserved.
実践MQTT(サーバ連携編)
41
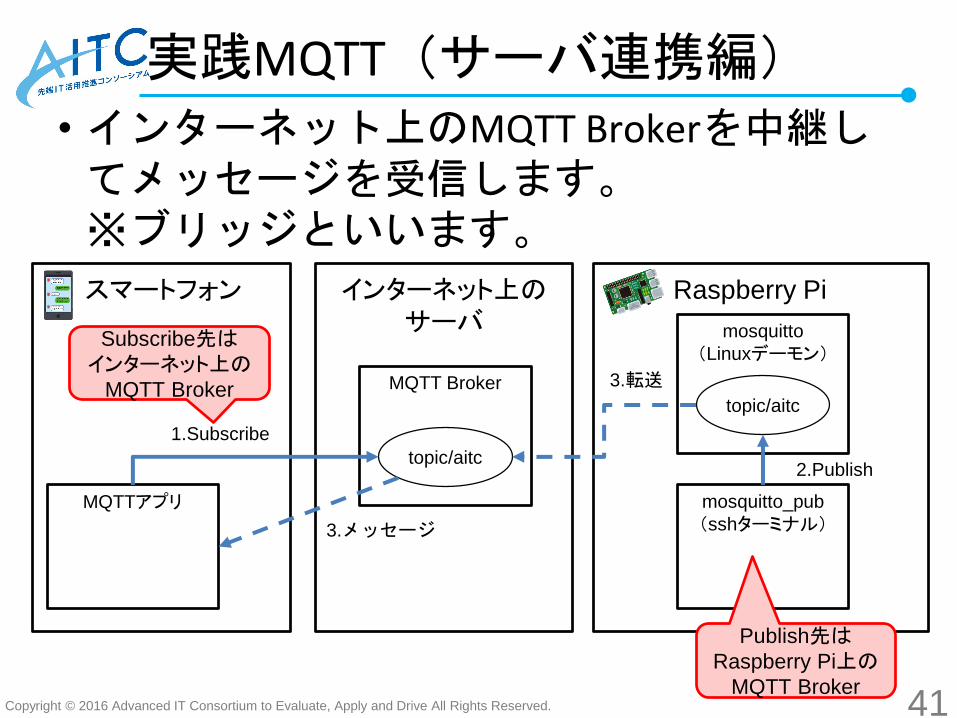
• インターネット上のMQTT Brokerを中継してメッセージを受信します。※ブリッジといいます。
Raspberry Pi
mosquitto
(Linuxデーモン)
topic/aitc
mosquitto_pub
(sshターミナル)
2.Publish
インターネット上のサーバ
MQTT Broker
topic/aitc
スマートフォン
MQTTアプリ
3.メッセージ
1.Subscribe
3.転送
Publish先はRaspberry Pi上の
MQTT Broker
Subscribe先はインターネット上の
MQTT Broker
Copyright © 2016 Advanced IT Consortium to Evaluate, Apply and Drive All Rights Reserved.
実践MQTT(サーバ連携編)
42
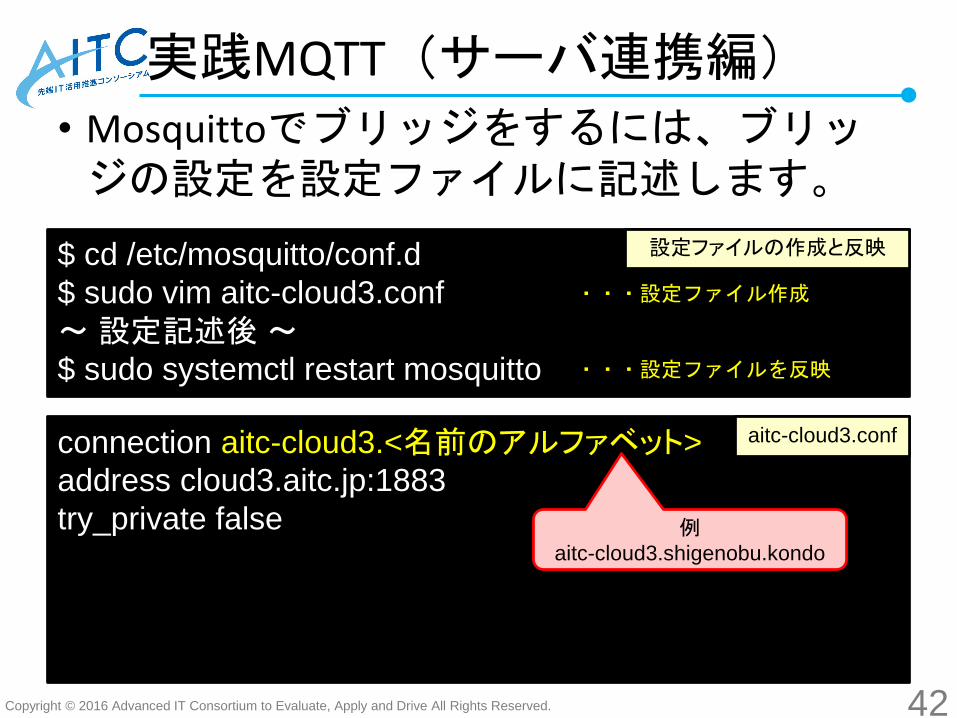
• Mosquittoでブリッジをするには、ブリッジの設定を設定ファイルに記述します。
$ cd /etc/mosquitto/conf.d
$ sudo vim aitc-cloud3.conf
~設定記述後~$ sudo systemctl restart mosquitto
設定ファイルの作成と反映
connection aitc-cloud3.<名前のアルファベット>
address cloud3.aitc.jp:1883
try_private false
aitc-cloud3.conf
例aitc-cloud3.shigenobu.kondo
・・・設定ファイル作成
・・・設定ファイルを反映
Copyright © 2016 Advanced IT Consortium to Evaluate, Apply and Drive All Rights Reserved.
実践MQTT(サーバ連携編)
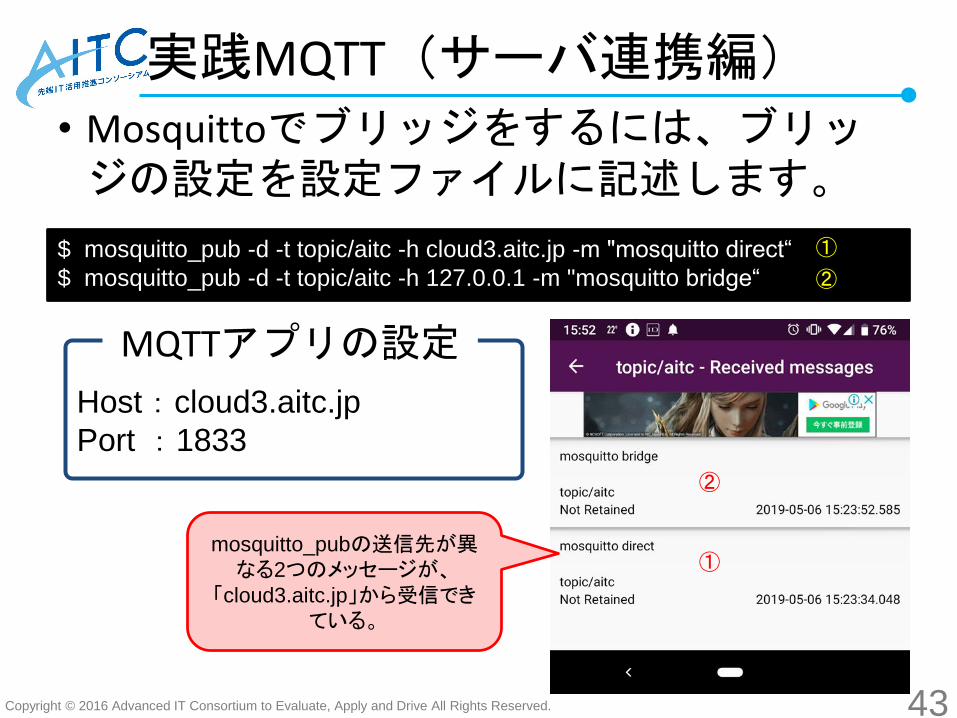
43
• Mosquittoでブリッジをするには、ブリッジの設定を設定ファイルに記述します。
$ mosquitto_pub -d -t topic/aitc -h cloud3.aitc.jp -m "mosquitto direct“
$ mosquitto_pub -d -t topic/aitc -h 127.0.0.1 -m "mosquitto bridge“
①
②
Host:cloud3.aitc.jp
Port:1833
MQTTアプリの設定
②
①mosquitto_pubの送信先が異なる2つのメッセージが、
「cloud3.aitc.jp」から受信できている。


![[Raspberry Pi]Wireless_SSH](https://img.pdfslide.tips/doc/110x75/55b56dbbbb61ebe5328b45ec/raspberry-piwirelessssh.jpg)