Embed Size (px)
Citation preview

5
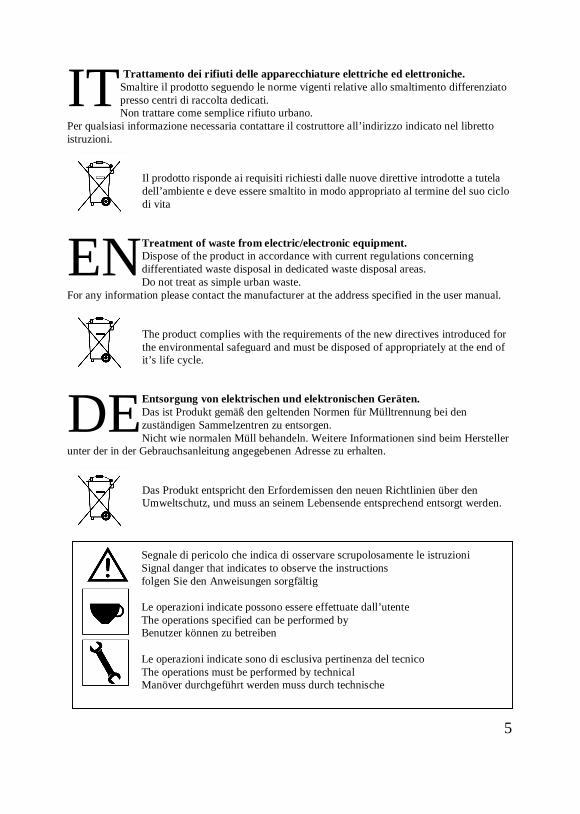
Trattamento dei rifiuti delle apparecchiature elettriche ed elettroniche. Smaltire il prodotto seguendo le norme vigenti relative allo smaltimento differenziato presso centri di raccolta dedicati. Non trattare come semplice rifiuto urbano.
Per qualsiasi informazione necessaria contattare il costruttore all’indirizzo indicato nel libretto istruzioni.
Il prodotto risponde ai requisiti richiesti dalle nuove direttive introdotte a tutela dell’ambiente e deve essere smaltito in modo appropriato al termine del suo ciclo di vita
Treatment of waste from electric/electronic equipment. Dispose of the product in accordance with current regulations concerning differentiated waste disposal in dedicated waste disposal areas. Do not treat as simple urban waste.
For any information please contact the manufacturer at the address specified in the user manual.
The product complies with the requirements of the new directives introduced for the environmental safeguard and must be disposed of appropriately at the end of it’s life cycle.
Entsorgung von elektrischen und elektronischen Geräten. Das ist Produkt gemäß den geltenden Normen für Mülltrennung bei den zuständigen Sammelzentren zu entsorgen. Nicht wie normalen Müll behandeln. Weitere Informationen sind beim Hersteller
unter der in der Gebrauchsanleitung angegebenen Adresse zu erhalten.
Das Produkt entspricht den Erfordemissen den neuen Richtlinien über den Umweltschutz, und muss an seinem Lebensende entsprechend entsorgt werden.
Segnale di pericolo che indica di osservare scrupolosamente le istruzioni Signal danger that indicates to observe the instructions folgen Sie den Anweisungen sorgfältig
Le operazioni indicate possono essere effettuate dall’utente The operations specified can be performed by Benutzer können zu betreiben
Le operazioni indicate sono di esclusiva pertinenza del tecnico The operations must be performed by technical Manöver durchgeführt werden muss durch technische
IT
EN
DE
6
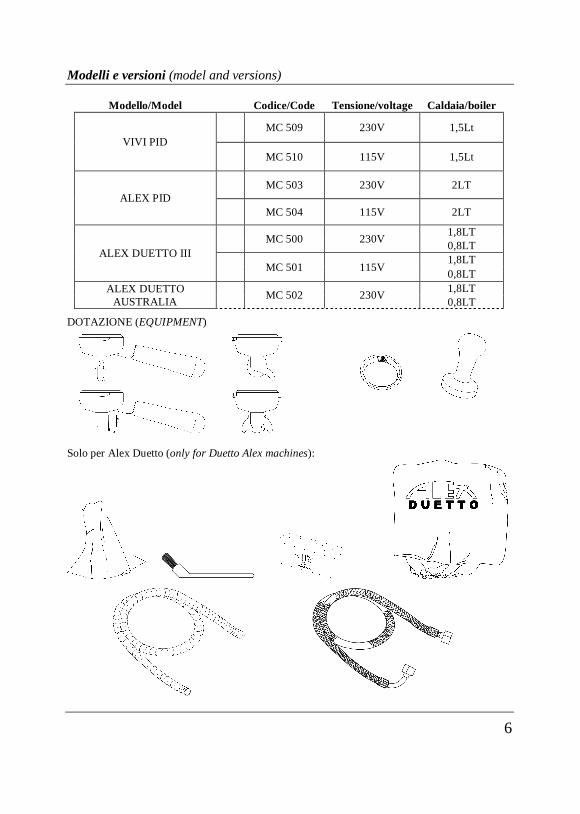
Modelli e versioni (model and versions)
DOTAZIONE (EQUIPMENT)
Solo per Alex Duetto (only for Duetto Alex machines):
Modello/Model Codice/Code Tensione/voltage Caldaia/boiler
VIVI PID MC 509 230V 1,5Lt
MC 510 115V 1,5Lt
ALEX PID MC 503 230V 2LT
MC 504 115V 2LT
ALEX DUETTO III MC 500 230V 1,8LT
0,8LT
MC 501 115V 1,8LT 0,8LT
ALEX DUETTO AUSTRALIA MC 502 230V 1,8LT
0,8LT
7

8
Descrizione (description)
9
Descrizione (description)
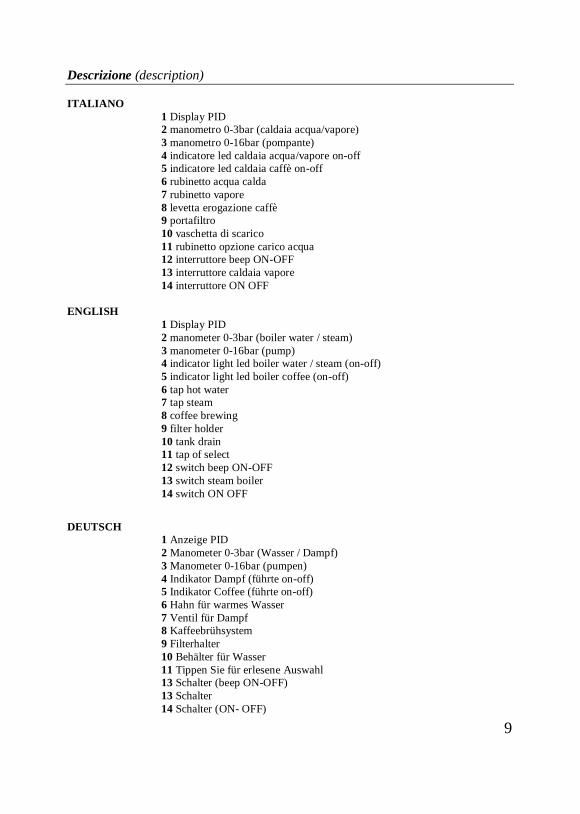
ITALIANO 1 Display PID 2 manometro 0-3bar (caldaia acqua/vapore) 3 manometro 0-16bar (pompante) 4 indicatore led caldaia acqua/vapore on-off 5 indicatore led caldaia caffè on-off 6 rubinetto acqua calda 7 rubinetto vapore 8 levetta erogazione caffè 9 portafiltro 10 vaschetta di scarico 11 rubinetto opzione carico acqua 12 interruttore beep ON-OFF 13 interruttore caldaia vapore 14 interruttore ON OFF
ENGLISH 1 Display PID 2 manometer 0-3bar (boiler water / steam) 3 manometer 0-16bar (pump) 4 indicator light led boiler water / steam (on-off) 5 indicator light led boiler coffee (on-off) 6 tap hot water 7 tap steam 8 coffee brewing 9 filter holder 10 tank drain 11 tap of select 12 switch beep ON-OFF 13 switch steam boiler 14 switch ON OFF
DEUTSCH 1 Anzeige PID 2 Manometer 0-3bar (Wasser / Dampf) 3 Manometer 0-16bar (pumpen) 4 Indikator Dampf (führte on-off) 5 Indikator Coffee (führte on-off) 6 Hahn für warmes Wasser 7 Ventil für Dampf 8 Kaffeebrühsystem 9 Filterhalter 10 Behälter für Wasser 11 Tippen Sie für erlesene Auswahl 13 Schalter (beep ON-OFF) 13 Schalter 14 Schalter (ON- OFF)
10
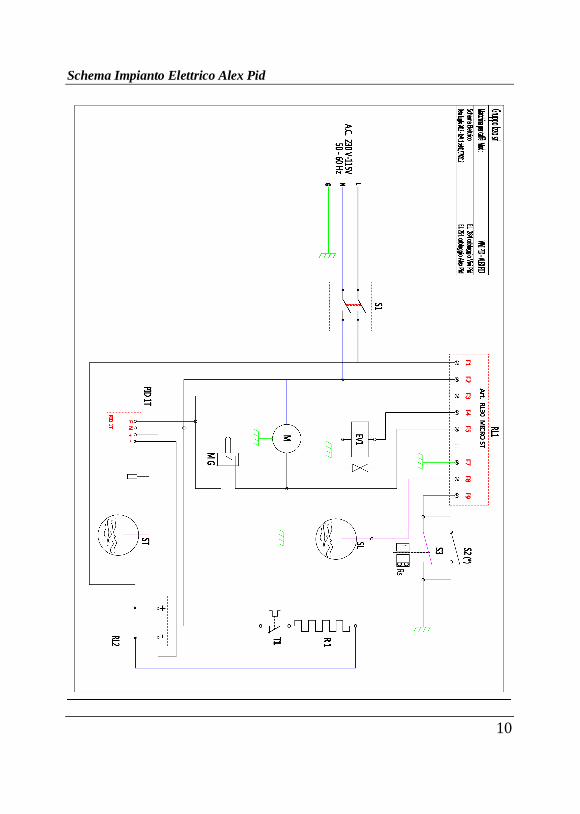
Schema Impianto Elettrico Alex Pid
11
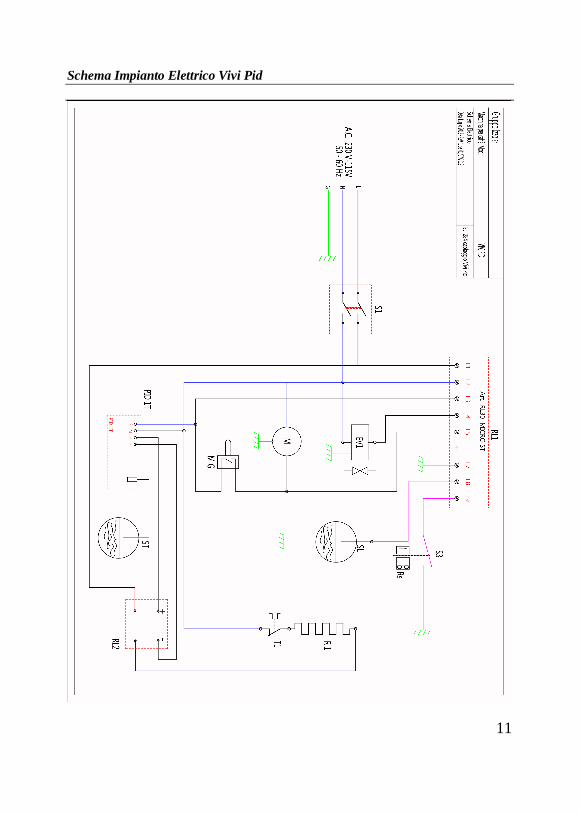
Schema Impianto Elettrico Vivi Pid

12
Elenco codici e descrizione articoli x imp. elettrico Vivi Pid - Alex Pid
RIF CODICE DESCRIZIONE
ST EL 237 Sonda temperatura/ temperature probe/ Temperaturfühler
MG EL 1 Microinterruttore gruppo/ micro switch/ Mikroschalter
M
PM 313 VIVI
Motore (pompa)/ engine/ Pumpenmotor 230V
PM 325 Motore (pompa)/ engine/ Pumpenmotor 115V
PM301 + PM 302 ALEX
Motore (pompa)/ engine/ Pumpenmotor 230V
PM 84 + PM 302 Motore (pompa)/ engine/ Pumpenmotor 115V
RL1 EL 180 Regolatore di livello/ level regulator/ Niveauregler 115V
EL 65 Regolatore di livello/ level regulator/ Niveauregler 230V
S1 EL 200 Interruttore ON-OF/ switch ON-OFF/ Schalter ON-OFF
S2 EL 335 Interruttore ON-OF beep alarm/ switch ON-OFF beep alarm / Schalter ON-OFF beep alarm (* only for professional Alex machines)
S3 EL 345 (Rs) Contatto reed tanica acqua/ reed switch tank /Schalter Tank
T1 EL 87 Termostato di sicurezza 145°/ safety thermostat/ Sicherheitsthermostat
PID 1T
EL 256 TermoPid 115V
EL 239 TermoPid 230V
RL2 EL 236 Relè statico interruttore R1/ static relay switch R1/ SSR Schalter R1
EV1 PM 413 Elettrovalvola caricamento caldaia 230V/ solenoid/ Magnetspule
PM 414 Elettrovalvola caricamento caldaia 115V/ solenoid/ Magnetspule
R1 EL 27 Resistenza corazzata 230V – 1400W/ resistance/ widerstand
EL 34 Resistenza corazzata 115V – 1350W/ resistance/ widerstand
SL FE 969 Sonda di Livello Caldaia/ boiler level probe/ Pegelsonde

13
Schema Impianto Elettrico Alex Duetto
14
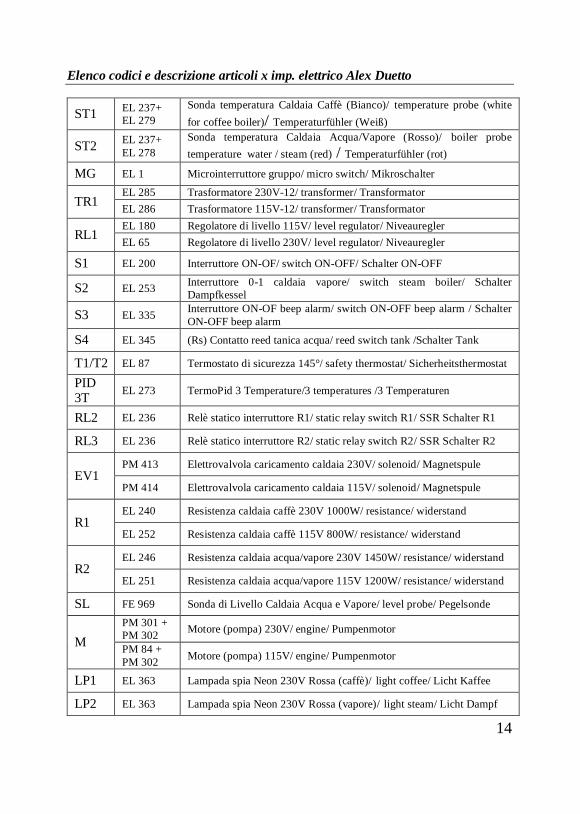
Elenco codici e descrizione articoli x imp. elettrico Alex Duetto
ST1 EL 237+ EL 279
Sonda temperatura Caldaia Caffè (Bianco)/ temperature probe (white for coffee boiler)/ Temperaturfühler (Weiß)
ST2 EL 237+ EL 278
Sonda temperatura Caldaia Acqua/Vapore (Rosso)/ boiler probe temperature water / steam (red) / Temperaturfühler (rot)
MG EL 1 Microinterruttore gruppo/ micro switch/ Mikroschalter
TR1 EL 285 Trasformatore 230V-12/ transformer/ Transformator EL 286 Trasformatore 115V-12/ transformer/ Transformator
RL1 EL 180 Regolatore di livello 115V/ level regulator/ Niveauregler EL 65 Regolatore di livello 230V/ level regulator/ Niveauregler
S1 EL 200 Interruttore ON-OF/ switch ON-OFF/ Schalter ON-OFF
S2 EL 253 Interruttore 0-1 caldaia vapore/ switch steam boiler/ Schalter Dampfkessel
S3 EL 335 Interruttore ON-OF beep alarm/ switch ON-OFF beep alarm / Schalter ON-OFF beep alarm
S4 EL 345 (Rs) Contatto reed tanica acqua/ reed switch tank /Schalter Tank
T1/T2 EL 87 Termostato di sicurezza 145°/ safety thermostat/ Sicherheitsthermostat
PID 3T EL 273 TermoPid 3 Temperature/3 temperatures /3 Temperaturen
RL2 EL 236 Relè statico interruttore R1/ static relay switch R1/ SSR Schalter R1
RL3 EL 236 Relè statico interruttore R2/ static relay switch R2/ SSR Schalter R2
EV1 PM 413 Elettrovalvola caricamento caldaia 230V/ solenoid/ Magnetspule
PM 414 Elettrovalvola caricamento caldaia 115V/ solenoid/ Magnetspule
R1 EL 240 Resistenza caldaia caffè 230V 1000W/ resistance/ widerstand
EL 252 Resistenza caldaia caffè 115V 800W/ resistance/ widerstand
R2 EL 246 Resistenza caldaia acqua/vapore 230V 1450W/ resistance/ widerstand
EL 251 Resistenza caldaia acqua/vapore 115V 1200W/ resistance/ widerstand
SL FE 969 Sonda di Livello Caldaia Acqua e Vapore/ level probe/ Pegelsonde
M PM 301 + PM 302 Motore (pompa) 230V/ engine/ Pumpenmotor
PM 84 + PM 302 Motore (pompa) 115V/ engine/ Pumpenmotor
LP1 EL 363 Lampada spia Neon 230V Rossa (caffè)/ light coffee/ Licht Kaffee
LP2 EL 363 Lampada spia Neon 230V Rossa (vapore)/ light steam/ Licht Dampf
15
INDICE/INDEX
1 ITALIANO ___________________________________________________________ 16 1.1 AVVERTENZE E CONSIGLI IMPORTANTI ________________________ 17 1.2 TRASPORTO ______________________________________________ 17 1.3 ISTALLAZIONE ED AVVIAMENTO ______________________________ 17 1.4 FUNZIONI DEL DISPLAY (per modello VIVI PID e ALEX PID) _________ 19 1.5 FUNZIONI DEL DISPLAY (per modello ALEX DUETTO) ______________ 20 1.6 PREPARAZIONE DEL CAFFE’ ESPRESSO _________________________ 22 1.7 PREPARAZIONE DI BEVANDE CALDE ___________________________ 22 1.8 MANUTENZIONE E PULIZIA __________________________________ 22 1.9 DATI TECNICI _____________________________________________ 23 1.10 INCONVENIENTI E POSSIBILI SOLUZIONI _______________________ 25 1.11 CONDIZIONI DI GARANZIA _________________________________ 26
2 ENGLISH ____________________________________________________________ 27 2.1 PRECAUTIONS ____________________________________________ 28 2.3 STARTING FIG. ____________________________________________ 29 2.5 FUNCTIONS OF THE DISPLAY (for VIVI PID and ALEX PID model) _____ 31 2.6 FUNCTIONS OF THE DISPLAY (for ALEX DUETTO model) ___________ 32 2.7 PREPARATION OF ESPRESSO COFFEE __________________________ 34 2.8 DELIVERY OF HOT WATER ___________________________________ 34 2.9 DELIVERY OF STEAM _______________________________________ 34 2.10 CLEANING AND MAINTENANCE _____________________________ 35 2.11 TECHNICAL SPECIFICATIONS ________________________________ 36 2.12 PROBLEMS AND TROUBLESHOOTING _________________________ 38 2.13 WARRANTY TERMS AND CONDITIONS ________________________ 39
3 DEUTSCH ___________________________________________________________ 40 3.1 ALLGEMEINE SICHERHEITSHINWEISE __________________________ 41 3.2 VERSCHIEDENE HINWEISE___________________________________ 42 3.3 INBETRIEBNAHME DER MASCHINE ____________________________ 42 3.4 DISPLAY-FUNKTIONEN (VIVI PID und ALEX PID) __________________ 45 3.5 DISPLAY-FUNKTIONEN (ALEX DUETTO) _________________________ 46 3.6 ZUBEREITUNG VON ESPRESSOKAFFEE _________________________ 48 3.7 HEISSWASSERENTNAHME___________________________________ 49 3.8 DAMPFENTNAHME ________________________________________ 49 3.9 REINIGUNG UND PFLEGE DER MASCHINE ______________________ 49 3.10 TECHNISCHE DATEN ______________________________________ 51 3.11 PROBLEME UND MÖGLICHE URSACHEN ______________________ 53 3.12 GARANTIEBESTIMMUNGEN ________________________________ 54

16
1 ITALIANO
17
1.1 AVVERTENZE E CONSIGLI IMPORTANTI
Leggere attentamente le avvertenze contenute nel seguente manuale di istruzioni prima di utilizzare la macchina. Il manuale di istruzioni è parte integrante della macchina per caffè e dovrà essere
conservato per qualsiasi futura consultazione. Nel caso di vendita o trasferimento della macchina a terzi, il presente manuale dovrà essere consegnato al nuovo utilizzatore. In caso di dubbi o per ulteriori informazioni rivolgersi direttamente al proprio rivenditore. L’uso della macchina per caffè espresso comporta l’osservanza di alcune regole fondamentali. In particolare:
- Posizionare la macchina in un luogo ben areato e su una superficie rigida e orizzontale, mai su superfici che siano eccessivamente fredde o calde.
- Prima della messa in funzione della macchina verificare che la tensione della rete elettrica locale corrisponda con quella della macchina.
- Non toccare la macchina con parti del corpo umide o bagnate. La macchina può essere usata soltanto da adulti in grado di maneggiarla. Evitare che i bambini si avvicinino con l’intento di giocarvi. Si raccomanda, in particolare, di non toccare le parti metalliche dei seguenti componenti perché sono caldissimi durante il funzionamento:
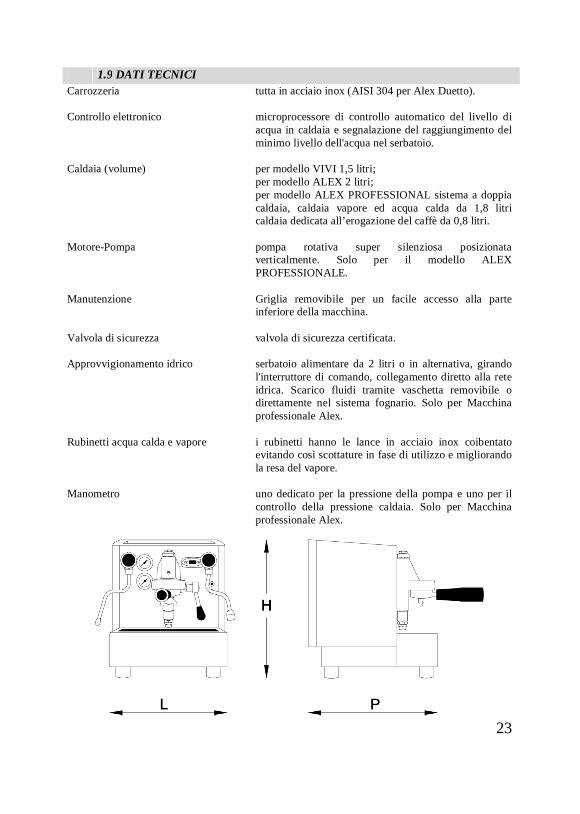
- gruppo erogatore (pagina 8) - rubinetti acqua calda e vapore (punti 6 e 7 pagina 8) - porta filtro. (punto 9 pagina 8)
1.2 TRASPORTO Effettuare il trasporto tenendo sempre il collo in posizione verticale, non capovolgere o coricare su un fianco, procedendo con cautela evitando urti ed esposizione alle intemperie. Al ricevimento del collo, controllare che la macchina sia quella indicata sui documenti di accompagnamento, compresi eventuali accessori. Controllare altresì che non abbia subito danni durante il trasporto ed in caso affermativo, avvertire con tempestività lo spedizioniere ed il nostro ufficio clienti. Non disperdere nell’ambiente gli elementi d’imballaggio, ma smaltirli affidandoli agli organi preposti a tali attività.
1.3 ISTALLAZIONE ED AVVIAMENTO Istallare la macchina su un piano di appoggio ben livellato, asciutto, liscio, e robusto. Per garantire un buon funzionamento, l’apparecchio deve essere installato in luoghi in cui la temperatura ambiente sia compresa tra una temperatura +10°C ÷ +32°C e l’umidità non superi il 70%.
Prima di utilizzare la macchina per caffè My Way mod. Alex o Vivi assicurarsi che: - la levetta erogatrice sia rivolta verso il basso;(punto 8 pagina 8), - le manopole dei rubinetti acqua e vapore siano chiuse (punto 6 e 7 pagina 8), - l’interruttore sia in posizione “0” oppure “ OFF” (punto 13 pagina 8), - la vaschetta raccogli acqua inferiore sia correttamente posizionata.(punto 10 pagina 8)
- solo per il modello Alex professionale, verificare che il rubinetto (posizionato sotto la vaschetta raccogli acqua, punto 11 pagina 8) si trovi nella posizione desiderata cioè dal lato del caricamento acqua dalla tanica oppure dal lato caricamento dalla rete idrica,
se non viene effettuato questo controllo e la manopola del rubinetto si trova nella posizione opposta al carico dell’acqua si potrebbe causare la rottura della pompa.
18
Procedere poi in questo modo:
1. Servendosi di un imbuto o di una bottiglia riempire la tanica con acquapotabile, bollita oppure minerale non gassata con poco contenuto di
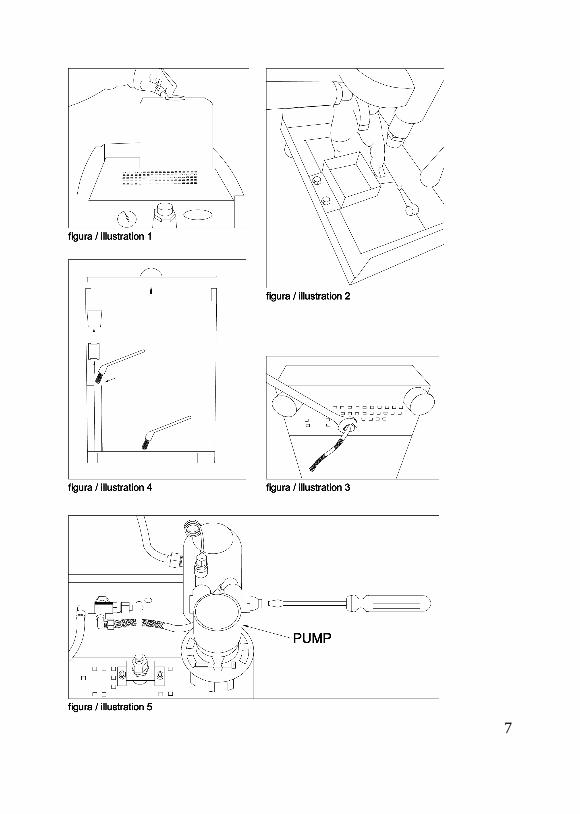
calcare, dopo aver sollevato la griglia superiore, (figura 1 pagina 7), facendo attenzione a non far cadere acqua all’interno della macchina;
2. Se si dispone della rete idrica e dello scarico nelle strette vicinanze della macchina,(solo per il modello Alex professionale) allacciare il tubo di scarico e il tubo di carico,rispettivamente alla vaschetta di plastica e al raccordo di caricamento acqua, comeevidenziato nella figura 2 e figura 3 della pagina 7, selezionare quindi con ilrubinetto l’entrata dell’acqua (punto 11 pagina 8) ricordandosi nel caso dicaricamento direttamente dalla rete, di aprire il rubinetto dell’acqua;
3. Se si usa la macchina con allaccio alla rete idrica, ricordarsi di premere l’interruttore“beep ON-OFF”, in posizione OFF (punto 12 pagina 8);
4. Inserire la spina nell’apposita presa dopo essersi accertati che i dati di targa sianorispondenti a quelli della rete di distribuzione elettrica;
5. Posizionare l’interruttore di accensione su On (punto 13-14 pagina8). Di conseguenzala pompa entrerà in funzione riempiendo la caldaia;
6. Una volta completato il riempimento la pompa si fermerà grazie all’intervento di unasonda posta nella caldaia;
7. Alzare a questo punto, la levetta del gruppo e scaricare acqua fino a che il manometro0-16bar non segna circa 10 bar (punto 8, 3 pagina 8). Ora la macchina è pronta perl’utilizzo;
8. Solo sul modello Alex Duetto se non si utilizza la macchina per la preparazione dibevande come cappuccino ma solo per l’erogazione del caffè, è possibile disattivare laresistenza della caldaia acqua e vapore diminuendo il consumo energetico (punto 13pagina 8)
*IMPORTANTE:La mancanza di acqua può causare una rottura della pompa e della resistenza, quindi, qualora si senta una variazione di rumore nel funzionamento della pompa e il contestuale abbassamento di pressione evidenziato dal manometro è necessario
SPEGNERE LA MACCHINA IMMEDIATAMENTE.
REGOLAZIONE DELLA POMPA Le macchine hanno la pompa regolata e impostata su un valore di circa 10 bar per la versione con allaccio alla rete idrica e tra 9-9,5 bar per versione con la tanica. E’ possibile modificare tale valore alzando la levetta del gruppo, leggendo il valore
della pressione sul manometro 0-16bar (o meglio se si dispone di un manometro da inserire direttamente sotto al gruppo) e agendo nel modo seguente:
- in aumento, ruotando con un cacciavite in senso orario; - in diminuzione, girando la vite in senso antiorario (figura 5 pagina 7).
Quest’operazione deve però essere eseguita solo da un tecnico qualificato.
19
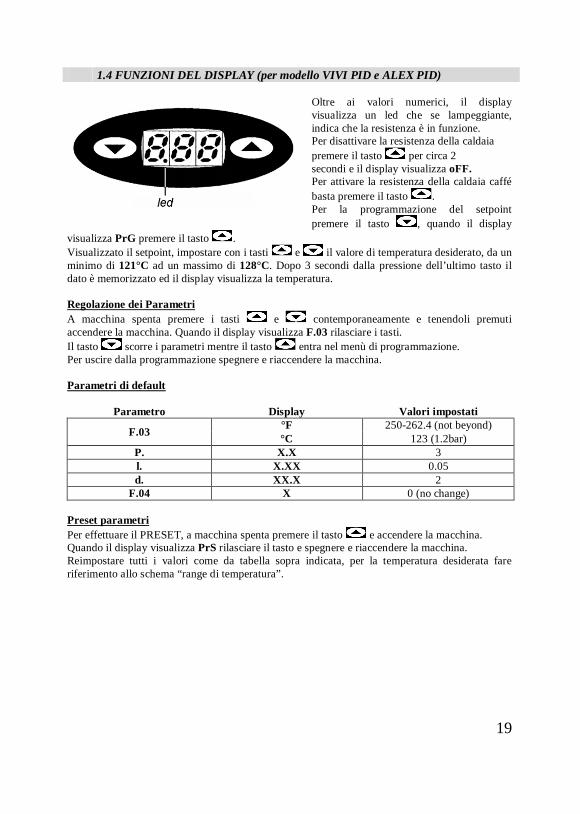
1.4 FUNZIONI DEL DISPLAY (per modello VIVI PID e ALEX PID)
Oltre ai valori numerici, il display visualizza un led che se lampeggiante, indica che la resistenza è in funzione. Per disattivare la resistenza della caldaia premere il tasto per circa 2 secondi e il display visualizza oFF. Per attivare la resistenza della caldaia caffé basta premere il tasto . Per la programmazione del setpoint premere il tasto , quando il display
visualizza PrG premere il tasto . Visualizzato il setpoint, impostare con i tasti e il valore di temperatura desiderato, da un minimo di 121°C ad un massimo di 128°C. Dopo 3 secondi dalla pressione dell’ultimo tasto il dato è memorizzato ed il display visualizza la temperatura.
Regolazione dei Parametri A macchina spenta premere i tasti e contemporaneamente e tenendoli premuti accendere la macchina. Quando il display visualizza F.03 rilasciare i tasti. Il tasto scorre i parametri mentre il tasto entra nel menù di programmazione. Per uscire dalla programmazione spegnere e riaccendere la macchina.
Parametri di default
Parametro Display Valori impostati
F.03 °F 250-262.4 (not beyond) °C 123 (1.2bar)
P. X.X 3 l. X.XX 0.05 d. XX.X 2
F.04 X 0 (no change)
Preset parametri Per effettuare il PRESET, a macchina spenta premere il tasto e accendere la macchina. Quando il display visualizza PrS rilasciare il tasto e spegnere e riaccendere la macchina. Reimpostare tutti i valori come da tabella sopra indicata, per la temperatura desiderata fare riferimento allo schema “range di temperatura”.
20
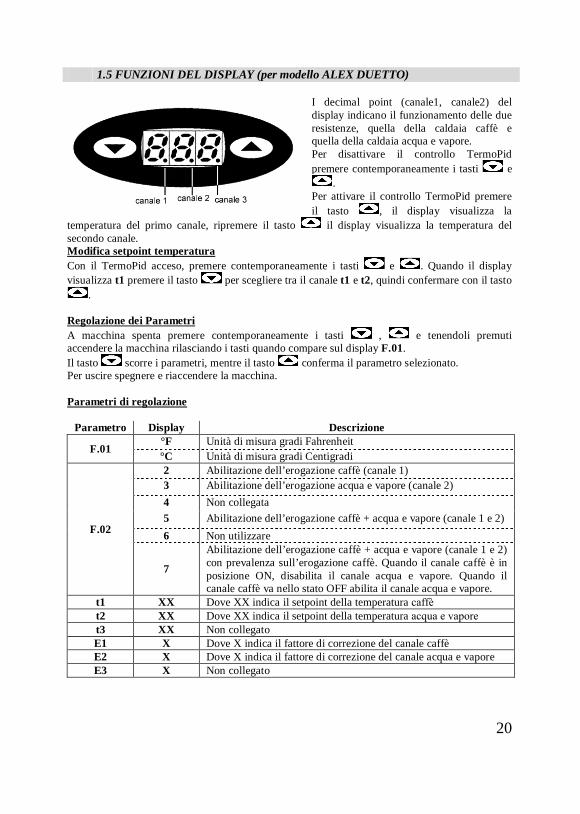
1.5 FUNZIONI DEL DISPLAY (per modello ALEX DUETTO)
I decimal point (canale1, canale2) del display indicano il funzionamento delle due resistenze, quella della caldaia caffè e quella della caldaia acqua e vapore. Per disattivare il controllo TermoPid premere contemporaneamente i tasti e
. Per attivare il controllo TermoPid premere il tasto , il display visualizza la
temperatura del primo canale, ripremere il tasto il display visualizza la temperatura del secondo canale. Modifica setpoint temperatura Con il TermoPid acceso, premere contemporaneamente i tasti e . Quando il display visualizza t1 premere il tasto per scegliere tra il canale t1 e t2, quindi confermare con il tasto
.
Regolazione dei Parametri A macchina spenta premere contemporaneamente i tasti , e tenendoli premuti accendere la macchina rilasciando i tasti quando compare sul display F.01. Il tasto scorre i parametri, mentre il tasto conferma il parametro selezionato. Per uscire spegnere e riaccendere la macchina.
Parametri di regolazione
Parametro Display Descrizione
F.01 °F Unità di misura gradi Fahrenheit °C Unità di misura gradi Centigradi
F.02
2 Abilitazione dell’erogazione caffè (canale 1) 3 Abilitazione dell’erogazione acqua e vapore (canale 2) 4 Non collegata 5 Abilitazione dell’erogazione caffè + acqua e vapore (canale 1 e 2) 6 Non utilizzare
7
Abilitazione dell’erogazione caffè + acqua e vapore (canale 1 e 2) con prevalenza sull’erogazione caffè. Quando il canale caffè è in posizione ON, disabilita il canale acqua e vapore. Quando il canale caffè va nello stato OFF abilita il canale acqua e vapore.
t1 XX Dove XX indica il setpoint della temperatura caffèt2 XX Dove XX indica il setpoint della temperatura acqua e vapore t3 XX Non collegato E1 X Dove X indica il fattore di correzione del canale caffè E2 X Dove X indica il fattore di correzione del canale acqua e vapore E3 X Non collegato
21
Preset parametri
Tramite l’operazione di PRESET è possibile riconfigurare il TermoPid con i parametri di default. A macchina spenta premere e tenere premuto il tasto , accendere la macchina e rilasciare il tasto quando il display visualizza PrS. Spegnere e riaccendere la macchina.
Default settings TermoPid
EUROPA AMERICA Parametri Display Parametri Display F.01 °C F.01 °F F.02 5-7 F.02 7 P 1.3 P 1.3 I 006 I 006 D 1.5 D 1.5 T1 93 T1 200 T2 123 (min 121- max 128) T2 255 (min 248- max 262) T3 80 T3 176 E1 10 E1 18 E2 0 E2 0 E3 0 E3 0
Range di temperatura della caldaia acqua e vapore
CELSIUS FAHRENHEIT BAR INFORMATION 120 248 1 alla prima accensione della macchina, è necessario
attendere circa 14-15 minuti per portare la temperatura da 0 a 120 gradi (valore impostato T2)
121 249.8 1.1 122 251.6 1.15 T1 = caldaia caffè 123 253.4 1.2 T2 = caldaia acqua e vapore 124 255.2 1.3 125 257 1.35 126 258.8 1.4 127 260.6 1.45 128 262.4 1.5 Limite massimo
Allarmi Nel caso di malfunzionamento, il display visualizza i seguenti messaggi di allarme: A1 canale 1 scollegato; A2 canale 1 in corto circuito; A3 canale 2 scollegato; A4 canale 2 in corto circuito.
22
1.6 PREPARAZIONE DEL CAFFE’ ESPRESSO Per ogni tazza di caffè, versare nel porta filtro 6-8 grammi di macinato pressandolo lievemente. Inserire sotto il gruppo il porta filtro contenente il caffè macinato ruotandolo verso destra fino a sentirlo bloccato.
Poggiare una o due tazze sotto il beccuccio del porta filtro ed alzare la levetta ( i buongustai preferiscono riscaldare le tazze prima di collocarle sotto il porta filtro). Inizia ora l’erogazione del caffè. Il caffè dovrà scorrere prima a gocce e poi denso come cioccolata calda. Quando nella tazza il caffè ha raggiunto la quantità desiderata, abbassare la levetta.
1.7 PREPARAZIONE DI BEVANDE CALDE Con il rubinetto vapore e il rubinetto acqua si possono preparare bevande calde( the, camomilla, latte). Posizionare un recipiente sotto la lancia vapore (punto 7 pagina 8) immergendola nel liquido da scaldare.
Azionare in senso antiorario la manopola vapore del rubinetto, il vapore inizierà ad uscire scaldando il liquido. A raggiungimento dell’operazione, azionare in senso orario la manopola vapore chiudendo il rubinetto. Per ottenere un cappuccino con molta schiuma, consigliamo di utilizzare un recipiente alto e stretto riempito per metà di latte. Dopodiché immergere la lancia vapore per circa 2/3 cm nel latte. Se si vuole solo riscaldare il latte, immergere la lancia vapore fino in fondo al recipiente. ATTENZIONE! Dopo aver utilizzato il vapore, non dimenticare di ruotare la manopola in senso orario per chiuderlo.
1.8 MANUTENZIONE E PULIZIA Tutte le operazioni di manutenzione e pulizia, in modo particolare della tanica, devono essere effettuate dopo aver tolto l’alimentazione elettrica. E’ necessaria una pulizia giornaliera della tanica onde evitare che il calcare che si deposita nel fondo della tanica venga aspirato all’interno della caldaia,
causando ostruzioni all’interno dei circuiti. Tale situazione può bloccare il funzionamento dell’elettrovalvola, così come può ridurre il flusso dell’acqua nei tubi e dunque nel gruppo incidendo sul risultato in tazza del caffè. Per la pulizia utilizzare un comune detersivo o una soluzione di acqua e aceto. Si sconsiglia l’utilizzo di detergenti non aggressivi. Il porta filtro e i filtri vanno puliti tenendoli a mollo in una soluzione di acqua e bicarbonato di sodio per 8 ore. Dopo bisogna sciacquarli con acqua corrente. Controllare se il filtro installato sotto il gruppo erogatore è incrostato di caffè. In tal caso prendere il braccetto porta filtro, rimuovere il filtro e sostituirlo, temporaneamente, con quello cieco in dotazione alla macchina. Deporre sul filtro cieco un cucchiaio di comune detersivo da cucina e inserire il porta filtro sotto il gruppo erogatore. A macchina pronta per l’uso, alzare la levetta erogatrice, per circa 10 secondi, e poi abbassarla. Attendere 30 minuti in modo da consentire il dissolvimento delle impurità. Subito dopo, togliere il filtro cieco dal porta filtro. Scaricare soltanto acqua calda tramite la levetta quel tanto da eliminare tutte le impurità discioltesi.
Pulire il fondo della tanica e l’alloggio del galleggiante almeno due volte al mese (figura 4 pagina 7). Rimuovere tutti i residui calcarei onde evitate malfunzionamenti improvvisi.
23
1.9 DATI TECNICI Carrozzeria tutta in acciaio inox (AISI 304 per Alex Duetto).
Controllo elettronico microprocessore di controllo automatico del livello di acqua in caldaia e segnalazione del raggiungimento del minimo livello dell'acqua nel serbatoio.
Caldaia (volume) per modello VIVI 1,5 litri; per modello ALEX 2 litri; per modello ALEX PROFESSIONAL sistema a doppia caldaia, caldaia vapore ed acqua calda da 1,8 litri caldaia dedicata all’erogazione del caffè da 0,8 litri.
Motore-Pompa pompa rotativa super silenziosa posizionata verticalmente. Solo per il modello ALEX PROFESSIONALE.
Manutenzione Griglia removibile per un facile accesso alla parte inferiore della macchina.
Valvola di sicurezza valvola di sicurezza certificata.
Approvvigionamento idrico serbatoio alimentare da 2 litri o in alternativa, girando l'interruttore di comando, collegamento diretto alla rete idrica. Scarico fluidi tramite vaschetta removibile o direttamente nel sistema fognario. Solo per Macchina professionale Alex.
Rubinetti acqua calda e vapore i rubinetti hanno le lance in acciaio inox coibentato evitando così scottature in fase di utilizzo e migliorando la resa del vapore.
Manometro uno dedicato per la pressione della pompa e uno per il controllo della pressione caldaia. Solo per Macchina professionale Alex.
24
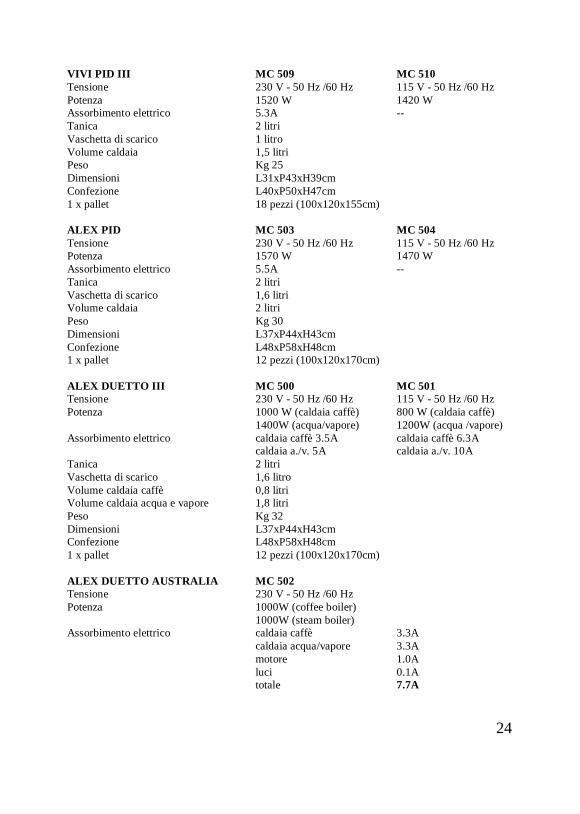
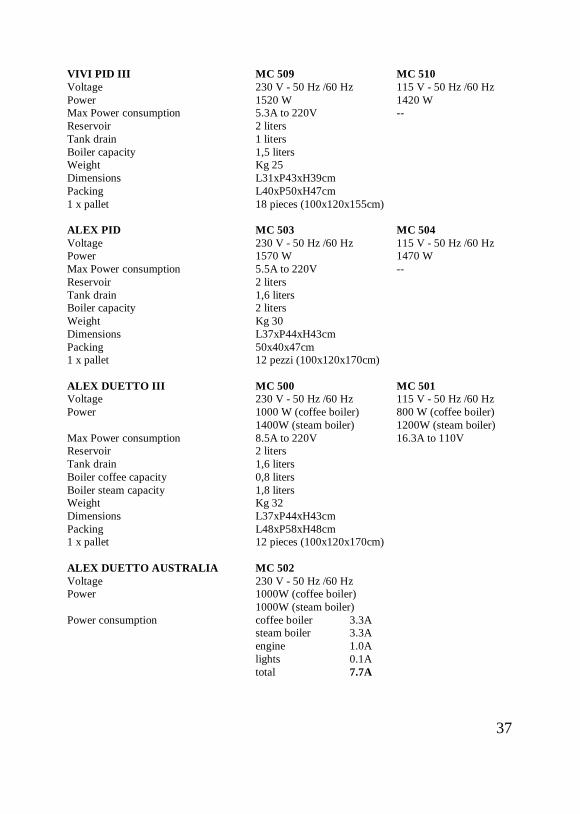
VIVI PID III MC 509 MC 510 Tensione 230 V - 50 Hz /60 Hz 115 V - 50 Hz /60 Hz Potenza 1520 W 1420 W Assorbimento elettrico 5.3A -- Tanica 2 litri Vaschetta di scarico 1 litro Volume caldaia 1,5 litri Peso Kg 25 Dimensioni L31xP43xH39cm Confezione L40xP50xH47cm 1 x pallet 18 pezzi (100x120x155cm)
ALEX PID MC 503 MC 504 Tensione 230 V - 50 Hz /60 Hz 115 V - 50 Hz /60 Hz Potenza 1570 W 1470 W Assorbimento elettrico 5.5A -- Tanica 2 litri Vaschetta di scarico 1,6 litri Volume caldaia 2 litri Peso Kg 30 Dimensioni L37xP44xH43cm Confezione L48xP58xH48cm 1 x pallet 12 pezzi (100x120x170cm)
ALEX DUETTO III MC 500 MC 501 Tensione 230 V - 50 Hz /60 Hz 115 V - 50 Hz /60 Hz Potenza 1000 W (caldaia caffè) 800 W (caldaia caffè)
1400W (acqua/vapore) 1200W (acqua /vapore) Assorbimento elettrico caldaia caffè 3.5A caldaia caffè 6.3A
caldaia a./v. 5A caldaia a./v. 10A Tanica 2 litri Vaschetta di scarico 1,6 litro Volume caldaia caffè 0,8 litri Volume caldaia acqua e vapore 1,8 litri Peso Kg 32 Dimensioni L37xP44xH43cm Confezione L48xP58xH48cm 1 x pallet 12 pezzi (100x120x170cm)
ALEX DUETTO AUSTRALIA MC 502 Tensione 230 V - 50 Hz /60 Hz Potenza 1000W (coffee boiler)
1000W (steam boiler) Assorbimento elettrico caldaia caffè 3.3A
caldaia acqua/vapore 3.3A motore 1.0A luci 0.1A totale 7.7A
25
1.10 INCONVENIENTI E POSSIBILI SOLUZIONI
In caso di avaria durante l’uso dell’apparecchio, prima di mettersi in contatto con il centro assistenza, si consiglia di leggere attentamente i seguenti punti.
INCONVENIENTI SOLUZIONI
L’apparecchio all’atto dell’accensione non funziona.
Controllare che il cavo di alimentazione sia ben inserito nella presa di corrente, controllare che l’interruttore generale sia in posizione ON
All’atto dell’accensione, dopo alcuni secondi la macchina emette un segnale acustico
Controllare se c’è acqua nella tanica, o qualora sia collegata alla rete idrica, se il rubinetto dell’acqua è aperto.
Non esce acqua dal gruppo erogatore. Controllare il livello dell’acqua nella tanica. Controllare il filtro sotto al gruppo
Il caffè durante l’erogazione esce troppo velocemente.
Controllare se il caffè è macinato troppo grossolanamente.
Durante l’infusione non c’è erogazione di caffè oppure c’è una erogazione lenta.
Il caffè è macinato troppo finemente o troppo pressato nel porta filtro.
Non esce acqua calda e/o vapore dalle lance dei rispettivi rubinetti.
Verificare che i fori o la lancia non siano otturati. In tal caso pulirla.
La macchina non segnala la mancanza di acqua nella tanica.
Controllare che l’interruttore “beep ON-OFF” sia sulla posizione ON. Verificare se l’alloggio del galleggiante è sporco di calcare (fig. 4 pagina 7).
La pompa fa troppo rumore. Controllare se entra l’acqua dalla rete idrica e che il percorso dell’acqua non sia interrotto.
Non esce acqua calda ma solo vapore dalla lancia del rubinetto acqua
Spegnere la macchina e farla controllare da un tecnico specializzato.
Consigli per personale tecnico qualificato
Perdite d’acqua e/o vapore dalle lance dei rispettivi rubinetti.
Controlla se bisogna sostituire il rubinetto.
La resistenza della caldaia non funziona. Controllare se il termostato di sicurezza si è azionato e dopo aver verificato il motivo del blocco, premere il pulsante rosso per resettarlo.
Il livello dell’acqua in caldaia è troppo alto. Pulire e/o sostituire la sonda dell’auto-livello.
Il display visualizza uno di questi simboli: A1, A2, A3, A4.
A1 sonda temperatura caldaia caffè scollegata, A2 sonda temperatura caldaia caffè da sostituire, A3 sonda temperat. caldaia vapore scollegata, A4 sonda temperat. caldaia vapore da sostituire.
26
1.11 CONDIZIONI DI GARANZIA
Questa macchina per caffè è garantita per un anno dalla data di acquisto, comprovato da un documento valido agli effetti fiscali rilasciato dal rivenditore autorizzato riportante la data in cui è stata effettuata la vendita. Per garanzia si intende la sostituzione o la riparazione gratuita delle parti componenti l’apparecchio che risultassero difettose all’origine per difetti di fabbricazione. Non sono coperte dalla garanzia tutte le parti che dovessero risultare difettose a causa di negligenze o trascuratezza nell’uso (mancata osservanza delle istruzioni per il funzionamento), errata installazione o manutenzione operate da personale non professionalmente qualificato, danni di trasporto, ovvero di circostanze che, comunque, non possono farsi risalire a difetti di fabbricazione dell’apparecchio, nonché tutte le parti elettriche ed elettroniche. Sono altresì esclusi dalle prestazioni di garanzia gli interventi inerenti l’installazione e l’allacciamento a impianti di alimentazione, nonché le manutenzioni citate nel presente manuale di istruzioni. La garanzia è inoltre esclusa in tutti i casi di uso improprio dell’apparecchio. La casa costruttrice declina ogni responsabilità per eventuali danni che possono, direttamente o indirettamente, derivare a persone, cose ed animali in conseguenza della mancata osservanza di tutte le prescrizioni indicate nel presente manuale , e concernenti, specialmente, le avvertenze in tema di installazione, uso e manutenzione dell’apparecchio. Allorquando l’apparecchio viene riparato presso uno dei centri di assistenza autorizzati indicati dalla casa costruttrice, i rischi e le spese di trasporto relativi saranno a carico dell’utente. E’ in ogni caso escluso il prolungamento della garanzia a seguito di intervenuto guasto.

27
2 ENGLISH
28
Dear Customer, by choosing this commercial espresso machine, you have just purchased an Italian high quality product. We wish to congratulate you on your machine choice, because thanks to this purchase another espresso machine culture’s classic has been awakened back to life.
Carefully read the warnings contained in this instruction manual before using the machine. The instruction manual is part of the coffee machine and must be retained for future reference.
In case of sale or transfer of the machine to a third party, this manual should be delivered to the new user. In case of doubt or for further information, please contact your dealer. The use of the espresso machine involves the observance of some basic rules. in particular:
General instructions on safety: Place the machine in a well ventilated area and on a hard and horizontal surface, never on surfaces that are too cold or hot. - Before starting up the machine check that the mains voltage local power corresponds with that of the machine. - Do not touch the machine when parts of your body are wet. The machine can be used only by adults. Do not allow children to approach it. It is recommended, in particular, do not touch the metal parts of the following components because they are very hot during operation:
The following machine parts are hot during operation and thus there is great risk of scald:
- The coffee brewing group (page 8) - Steam and hot water taps (illustration 6 and 7, page 8) - Filter holder parts (illustration 9, page 8).
Varius and useful hints This machine is meant for the preparation of coffee, hot-water and steam. It cannot be used or modified for any other purpose. Never use the machine without water. Please keep the original packaging in case you should transport the machine once again.
Please use a water softener by all means, even if there are water softening facilities already installed in the home. Damages caused by scale accumulation are not under warranty.
2.1 PRECAUTIONS
29
2.3 STARTING FIG.
Please follow the valid national safety rules and turn to authorised personnel. Install the machine on a shelf perfectly level, dry, smooth and robust. To ensure smooth operation, the device must be installed in places where the ambient temperature is between a temperature of +10 ° C ~ +32 ° C and humidity
not exceed 70%
Please check the following points before going through the start up procedure:
- the manual lever is set in the lower position (section 8, page 8); - the steam diffuser and hot-water giver handgrip are turned off (section 6 and
7 page 8); - the main switch is set on pos. “0”, or rather “OFF” (section 13 and 14 page
8); - the plug is pulled out. - the drip tray is placed properly.
Before operating the espresso machine ALEX model equipped with professional motor and water means connection make sure that:
- The drip tray is placed properly (if draining occurs in the drip tray and thus manually); or the drain pipe is placed properly: that is there are no chokes along the whole tube and that it has a slope of at least 15%;
- verify that the valve that is located behind the drain tank (section 11, page 8) is in the desired position, ie on the load water from the tank or side load from the mains,
- If this check is not carried out and the tap's handgrip is found in the opposite position to water supply, the pump might be seriously damaged.
It is now that you can start with machine operation by observing the following points step by step:
- remove cover and pull the rubber tubes out of the water-tank (illustration. 1, page 7);
- fill the reservoir with filtered drinking-water now and put it in again; - make sure that both tubes have reached the water-tank’s bottom to guarantee
correct water suction; - If you have mains water and drain pipe in the immediate vicinity of the
machine (only for Professional Model Alex) connect the hose to the plastic tray and the inlet hose as shown in illustration 2 and 3 of page 7. Then select the tap on the network's position (section 11 on page 8) and open the water tap;
- connect the plug to a proper wall socket. - press the main switch, whose built-in control indicator lights up; - Immediately after leading the switch to ON, press the button for about
2 seconds (or press the buttons and on the professional model) to disconnect the heating elements whilst filling the boiler.

30
- Only for professional Alex model you can disable the resistance of the boiler steam by reducing energy consumption (section 13 page 8);
- turn on the steam diffuser by moving the handgrip in the counter-clockwise direction;
- you have now primed the pump which begins to fill both the boiler and heat exchanger; this first fill up process speeds up a little when the steam diffuser stays turned on; this procedure is only recommended during operation, as the machine is fitted with a vacuum valve unit which ventilates the machine during normal heating.
- the pump is deactivated as soon as the water fill up process of both boilers is finished.
- turn off the steam diffuser again; the appliance’s heating phase starts - during first fill up almost the whole water content has been drawn out of the
reservoir, so we recommend that you refill it immediately. - set the manual lever to the upper position and exit about a coffee-cup of
water. Then set the manual lever to the lower position again.
* IMPORTANT: the lack of water might cause serious damage to the pumpand/or heating element and any warranty claim is to be rejected.
Therefore, in case a change in sound should be audible during the pump's operation and pressure simultaneously falls as shown by the gauge, it is necessary to IMMEDIATELY TURN OFF THE ESPRESSO MACHINE.
Restart This appliance has already been used and is cold now. Proceed as follows to switch on the machine in the morning or when necessary:
- check there is enough water inside the reservoir. - press the main switch, whose built-in control indicator lights up; the heat
control led lights up. - please wait until the required operating pressure of around 1,5 BAR has been
reached, which can be read on the pressure gauge; the machine has reached its operating temperature and the heat control led also lights up.
- exit a small quantity of water from the brewing group now.
31
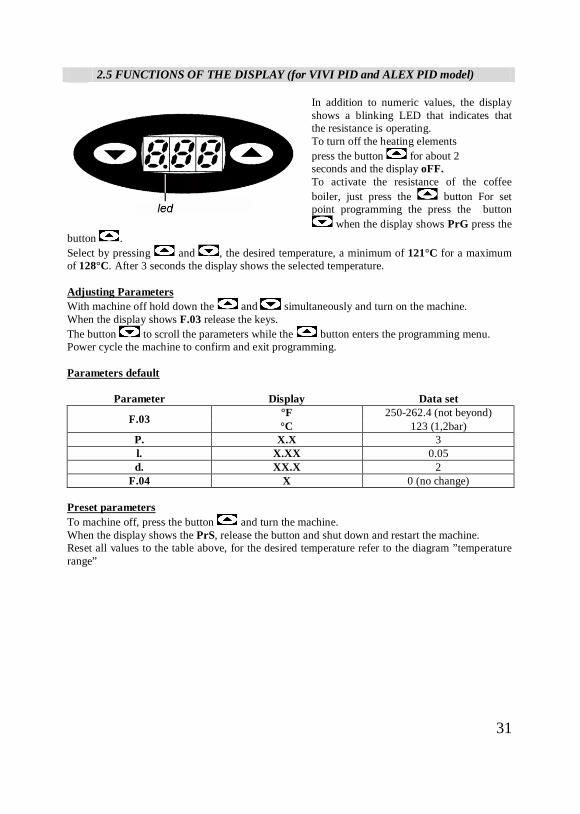
2.5 FUNCTIONS OF THE DISPLAY (for VIVI PID and ALEX PID model)
In addition to numeric values, the display shows a blinking LED that indicates that the resistance is operating. To turn off the heating elements press the button for about 2 seconds and the display oFF. To activate the resistance of the coffee boiler, just press the button For set point programming the press the button
when the display shows PrG press the button . Select by pressing and , the desired temperature, a minimum of 121°C for a maximum of 128°C. After 3 seconds the display shows the selected temperature.
Adjusting Parameters With machine off hold down the and simultaneously and turn on the machine. When the display shows F.03 release the keys. The button to scroll the parameters while the button enters the programming menu. Power cycle the machine to confirm and exit programming.
Parameters default
Parameter Display Data set
F.03 °F 250-262.4 (not beyond) °C 123 (1,2bar)
P. X.X 3 l. X.XX 0.05 d. XX.X 2
F.04 X 0 (no change)
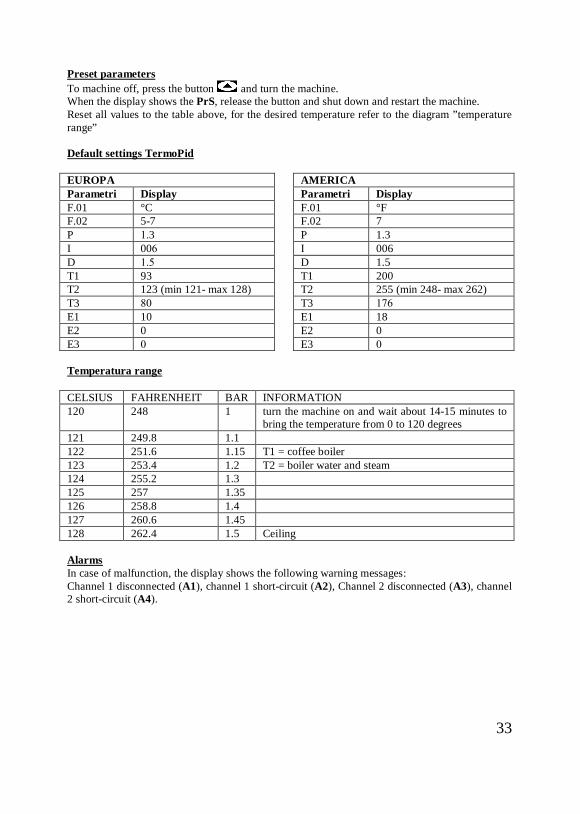
Preset parameters To machine off, press the button and turn the machine. When the display shows the PrS, release the button and shut down and restart the machine. Reset all values to the table above, for the desired temperature refer to the diagram ”temperature range”
32
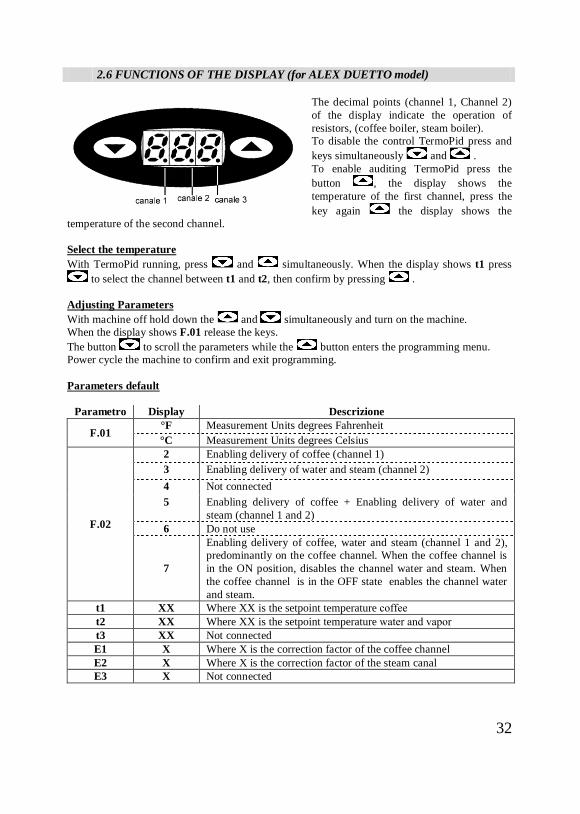
2.6 FUNCTIONS OF THE DISPLAY (for ALEX DUETTO model)
The decimal points (channel 1, Channel 2) of the display indicate the operation of resistors, (coffee boiler, steam boiler). To disable the control TermoPid press and keys simultaneously and . To enable auditing TermoPid press the button , the display shows the temperature of the first channel, press the key again the display shows the
temperature of the second channel.
Select the temperature With TermoPid running, press and simultaneously. When the display shows t1 press
to select the channel between t1 and t2, then confirm by pressing .
Adjusting Parameters With machine off hold down the and simultaneously and turn on the machine. When the display shows F.01 release the keys. The button to scroll the parameters while the button enters the programming menu. Power cycle the machine to confirm and exit programming.
Parameters default
Parametro Display Descrizione
F.01 °F Measurement Units degrees Fahrenheit °C Measurement Units degrees Celsius
F.02
2 Enabling delivery of coffee (channel 1) 3 Enabling delivery of water and steam (channel 2) 4 Not connected 5 Enabling delivery of coffee + Enabling delivery of water and
steam (channel 1 and 2) 6 Do not use
7
Enabling delivery of coffee, water and steam (channel 1 and 2), predominantly on the coffee channel. When the coffee channel is in the ON position, disables the channel water and steam. When the coffee channel is in the OFF state enables the channel water and steam.
t1 XX Where XX is the setpoint temperature coffeet2 XX Where XX is the setpoint temperature water and vapor t3 XX Not connected E1 X Where X is the correction factor of the coffee channel E2 X Where X is the correction factor of the steam canal E3 X Not connected
33
Preset parameters To machine off, press the button and turn the machine. When the display shows the PrS, release the button and shut down and restart the machine. Reset all values to the table above, for the desired temperature refer to the diagram ”temperature range”
Default settings TermoPid
EUROPA AMERICA Parametri Display Parametri Display F.01 °C F.01 °F F.02 5-7 F.02 7 P 1.3 P 1.3 I 006 I 006 D 1.5 D 1.5 T1 93 T1 200 T2 123 (min 121- max 128) T2 255 (min 248- max 262) T3 80 T3 176 E1 10 E1 18 E2 0 E2 0 E3 0 E3 0
Temperatura range
CELSIUS FAHRENHEIT BAR INFORMATION 120 248 1 turn the machine on and wait about 14-15 minutes to
bring the temperature from 0 to 120 degrees 121 249.8 1.1 122 251.6 1.15 T1 = coffee boiler 123 253.4 1.2 T2 = boiler water and steam 124 255.2 1.3 125 257 1.35 126 258.8 1.4 127 260.6 1.45 128 262.4 1.5 Ceiling
Alarms In case of malfunction, the display shows the following warning messages: Channel 1 disconnected (A1), channel 1 short-circuit (A2), Channel 2 disconnected (A3), channel 2 short-circuit (A4).
34
2.7 PREPARATION OF ESPRESSO COFFEE Insert either an one-cup or a two-cup filter into the filter-holder, unless you should not have two separate filter-holders, and fill it with ground coffee directly from your coffee grinder, or with a measuring spoon. Press down the ground coffee a bit firmly using a tamper and put the filter-holder into the brew head again.
Place one or two cups under the filter-holder’s outlet now and set the manual lever to the uppermost position; water is forced through the coffee powder and espresso just begins to run into the cups. True espresso should flow through first by drops and then thick like hot chocolate. At this point, please also note that the cups with possibly thick rims are well-heated. We therefore suggest that you always keep them on the cup-warmer plate. When the cup(s) has (have) reached the desired amount of coffee, you can then turn off water feed by means of manual lever operation. Furthermore, please note that the maximum brewing time of an espresso should not exceed 25 seconds. After that moment the acids present in coffee dissolve and deeply affect both the espresso’s taste and digestibility.
The overpressure and residual water originated during the brewing process escape from the group escape-valve’s outlet and are led into the drip tray. This process is signalled by a hissing sound. It is necessary that the manual lever is set in the lowest position, in order to guarantee perfect pressure drop after the brewing process. Not dropped overpressure may cause the ground coffee to splash while you are taking the filter-holder out of the brew head. For this reason be careful not to scald yourself!
Warning: the brewing group becomes very hot during its use and there is great risk of scald.
2.8 DELIVERY OF HOT WATER Place or hold a proper container endowed with a thermally insulating handle under the hot-water nozzle. Turn on the hot-water giver by moving the handgrip in the counter-clockwise direction, until you have filled the container with the desired quantity of water.
Turn off the hot-water giver again by moving the handgrip in the clockwise direction. Warning: the hot-water pipe becomes very hot during its and there is great risk of scald.
2.9 DELIVERY OF STEAM The steam delivery function can be used for heating liquids like milk, chocolate or mulled claret etc.. Please use a proper, possibly high stainless steel container to froth milk, as milk gradually rises while frothing.
Use condensed milk with a 3,5% fat content at room temperature in order to achieve the best possible froth results. Dip the steam diffuser nozzle fitted to the end of the steam pipe into milk now and turn on the steam tap. After a few seconds, during which milk has been heated, try to hold the steam diffuser nozzle short under the “milk level”, so that milk and steam together form a whirl inside the container. You will notice that milk froth begins to rise to the container’s top. Avoid in any case that milk is superheated, since the protein molecules found in milk dissolve starting from a temperature of 77°C and froth may consequently break up. After frothing turn off the steam tap and immediately clean the steam pipe thoroughly with a damp cloth or sponge to remove milk residues.
35
2.10 CLEANING AND MAINTENANCE A daily cleaning of the reservoir is necessary to avoid scale deposits at the reservoir's bottom that could will be sucked up into the boiler, causing the circuits' block up. This situation may block the solenoid valve's functioning, as well as the water that flows in the pipes, and consequently in the groups, may be reduced, affecting the correct espresso coffee extraction. Clean the bottom of the tank and the housing of the float at least twice a month (illustration 4, page 7). Remove lime deposits in order to avoid any sudden malfunctions.
As follows, we distinguish the cleaning procedures that should be carried out every day and week.
Daily cleaning - clean the steam pipe with a damp cloth after frothing. - let about two coffee-cups of water run out from the brewing group after last
coffee preparation, in order to remove used coffee from the brewing group’s shower head.
- take the one-cup or two-cup filter out of the filter-holder and clean it with a sponge.
- rinse the drip tray with tap-water using a soft sponge. - switch off the machine now.
Weekly cleaning - first of all, carry out and complete the daily cleaning procedure as described
above (section 10.1). - insert the blank filter into the filter-holder. - fill it with about 1 coffee-spoon of specific detergent and put the filter-
holder into the brew head. - proceed as if you would brew coffee and set the manual lever to the
uppermost position; wait ca. 5-7 seconds and switch off the coffee brewing process again.
- both the complete overpressure and white foaming water are discharged into the drip tray.
- go through this procedure 10-15 times; you will notice that the initially white foam becomes darker and darker, through this procedure the brewing group becomes thoroughly clean.
- take out the filter-holder along with the blank filter now and exit water from the brewing group for about 10-15 seconds to remove residual detergent; finally clean both the filter-holder and blank filter again.
36
2.11 TECHNICAL SPECIFICATIONS Bodywork all stainless steel (AISI 304 for Alex Duetto machines).
Electronically controlled microprocessor controlled automatic level control of boiler and fresh water reservoir, with low water level indication system.
Boiler for VIVI model boiler 1,5 liters; for ALEX model boiler 2 liters; for ALEX PROFESSIONAL model, dual boilers system, steam and hot water boiler 1,8 liters, brew (group) boiler 0,8 liters.
Pump Type vertically positioned super silent rotary pump. Only for Professional Alex machine.
Maintenance Removable grid for easy access to underside of machine.
Safety valve fully certified commercially rated safety valve.
Water supply 2 liters fresh water reservoir or alternatively by turning the control switch, steel braided direct water connection with full drip tray drainage system. Only for Professional Alex machine.
Diffusers of steam and hot water in stainless steel easy cleaning milk doesn't bake
on wand; more efficient steam, as heat is not dissipated around the wand.
Pressure gauge one dedicated gauge for pump pressure and one for boiler pressure control.
37
VIVI PID III MC 509 MC 510 Voltage 230 V - 50 Hz /60 Hz 115 V - 50 Hz /60 Hz Power 1520 W 1420 W Max Power consumption 5.3A to 220V -- Reservoir 2 liters Tank drain 1 liters Boiler capacity 1,5 liters Weight Kg 25 Dimensions L31xP43xH39cm Packing L40xP50xH47cm 1 x pallet 18 pieces (100x120x155cm)
ALEX PID MC 503 MC 504 Voltage 230 V - 50 Hz /60 Hz 115 V - 50 Hz /60 Hz Power 1570 W 1470 W Max Power consumption 5.5A to 220V -- Reservoir 2 liters Tank drain 1,6 liters Boiler capacity 2 liters Weight Kg 30 Dimensions L37xP44xH43cm Packing 50x40x47cm 1 x pallet 12 pezzi (100x120x170cm)
ALEX DUETTO III MC 500 MC 501 Voltage 230 V - 50 Hz /60 Hz 115 V - 50 Hz /60 Hz Power 1000 W (coffee boiler) 800 W (coffee boiler)
1400W (steam boiler) 1200W (steam boiler) Max Power consumption 8.5A to 220V 16.3A to 110V Reservoir 2 liters Tank drain 1,6 liters Boiler coffee capacity 0,8 liters Boiler steam capacity 1,8 liters Weight Kg 32 Dimensions L37xP44xH43cm Packing L48xP58xH48cm 1 x pallet 12 pieces (100x120x170cm)
ALEX DUETTO AUSTRALIA MC 502 Voltage 230 V - 50 Hz /60 Hz Power 1000W (coffee boiler)
1000W (steam boiler) Power consumption coffee boiler 3.3A
steam boiler 3.3A engine 1.0A lights 0.1A total 7.7A

38
2.12 PROBLEMS AND TROUBLESHOOTING In case of failure during the use of the appliance, before contact with the center assistance, please read carefully the following points. Symptom: There is no espresso coffee coming out (extraction) from brewing group during coffee preparation.
Diagnosis Troubleshooting
The machine is switched on but does not work Ensure the machine is correctly connected to a wall socket
The machine is switched, after a few seconds the machine will beep. Check if there is water in the tank.
No water comes from brewing group. Check water level in the tank. Check the filter in the group.
The coffee powder used is ground too finely Adjust the degree of fineness (on your coffee grinder) setting it a bit “coarser”
You are using too much ground coffee or coffee flows through too slowly
Check the ground coffee dispense on your coffee grinder
It is impossible to deliver steam. The steam pipe nozzle is clogged with milk residues
Prick the nozzle holes with a needle and residues turn on the steam diffuser handgrip again
It is impossible to deliver steam. The appliance has not reached its operating temperature.
Wait until the boiler pressure has risen up to around 1,5 BAR
The machine does not signal a lack of water in the tank.
Check that the switch "beep ON-OFF" is in the ON position. Check if the accommodation of the float is soiled limestone (illustration 4 page 7).
The pump makes too much noise. Check there is enough water inside the water-tank and ensure the suction tube is correctly in contact with water.
For qualified technical
Losses of water and steam from the respective taps. Check if you have to replace the faucet.
The resistance of the boiler does not work. Check if the safety thermostat was operated and after verifying the reason for the block, press the red button to reset it.
The water level in the boiler is too high. Clean and / or replace the probe of level.
The display shows one of these symbols: A1, A2, A3, A4.
A1 temperature probe (coffee boiler) disconnected, A2 temperature probe (coffee boiler) short circuit, A3 temperature probe (steam boiler) disconnected A4 temperature probe (steam boiler) short circuit.
39
2.13 WARRANTY TERMS AND CONDITIONS This espresso machine carries a 12 month warranty which begins from the date of purchase and has to be proven by dated sales invoice. Both the dealer and purchaser of the machine must be mentioned in the delivery receipt. This warranty covers machine damage resulting from defects in materials and workmanship; the manufacturer guarantees that all defective parts will be replaced and repaired free of charge, with the exception of electrical or electronic building material. All damage or functional defects caused by improper appliance connexion, neglect of the instruction manual, dirt, misuse, calcification, or negligence by customer are not under warranty. This warranty also excludes damage caused during machine transport. Damage resulting from improper and inadequate installation of the machine, as well as servicing and maintenance (as given herein) are not covered by warranty. The manufacturer shall not be liable for damage which might directly or indirectly be attributed to persons, things or animals when constituting a violation of the advice given in this instruction manual. In the event of repair performed by one of the authorised service representatives, the customer will be solely responsible for both risks and costs incurred by transport. In any case, extended warranty is to be excluded after warranty performances.

40
3 DEUTSCH
41
3.1 ALLGEMEINE SICHERHEITSHINWEISE
Liebe Kundin, mit dieser professionellen Haushaltsmaschine haben Sie soeben ein hochwertiges italienisches Produkt erworben.
Wir gratulieren Ihnen zu Ihrer Gerätewahl, denn mit dem Erwerb dieser Espressomaschine lassen Sie einen Klassiker der Espressomaschinenkultur zu neuem Leben erwecken.
Wir bitten Sie, diese Bedienungsanleitung vor dem Gebrauch der Maschine sorgfältig durchzulesen und zu beachten. Bei eventuellen Problemen oder Unklarheiten wenden Sie sich bitte an Ihren Händler, der mit Ihnen zusammen die erforderlichen Schritte gehen wird.
Bewahren Sie die vorliegende Anleitung an einem geeigneten Platz immer griffbereit auf.
Vor der Inbetriebnahme des Gerätes die Bedienungsanleitung gründlich durchlesen. Sollten Unklarheiten bestehen oder weitere Informationen erforderlich sein, bitten wir Sie, Verbindung mit Ihrem Händler aufzunehmen.
Das Gerät darf nur von handlungsfähigen Erwachsenen bedient werden
Das Gerät darf nie mit einem beschädigten Anschlusskabel in Betrieb genommen werden
Im Schadensfall darf das Gerät ausschließlich von autorisiertem und fachlich qualifiziertem Personal geöffnet und repariert werden; dies gilt auch bei defektem Anschlusskabel
Die Maschine nie ins Wasser tauchen und nicht mit nassen Händen oder barfuß bedienen, die Maschine darf keinen äußeren Witterungseinflüssen ausgesetzt werden.
Das Gerät sollte nicht unbeaufsichtigt eingeschaltet bleiben
Die Maschine nur an einer mit einem Schutzleiter ausgestatteten Anschlussdose betreiben
Das Gerät muss auf einer stabilen und waagerechten Fläche stehen; keinesfalls auf heißen oder warmen Flächen
Bitte wählen Sie einen für Kinder und Haustiere unzugänglichen Standort für Ihre Maschine aus
Bitte kontrollieren Sie vor der Inbetriebnahme, ob die vor Ort anliegende Netzspannung mit derjenigen der Maschine übereinstimmt
Bitte verwenden Sie ausschließlich gefiltertes Trinkwasser Folgende Geräteteile sind beim Betrieb des Gerätes heiß und es besteht Verbrühungsgefahr:
- die Kaffee Brühgruppe (Seite 8) - das Heißwasser- und das Dampfrohr (Fig. 6,7 Seite 8) - die metallischen Teile des Filterträgers (Fig. 9 Seite 8)
42
3.2 VERSCHIEDENE HINWEISE
Diese Maschine dient der Zubereitung von Kaffee, Heißwasser und Dampf. Sie darf zu keinem anderen Zweck genutzt oder modifiziert werden
Das Gerät darf niemals ohne Wasser benutzt werden
Bitte bewahren Sie die Originalverpackung auf, falls Sie das Gerät erneut transportieren müssen
Bitte verwenden Sie unbedingt einen Wasserfilter auch bei bereits installierten Entkalkungsanlagen im Haus. Schäden, die durch Kalkablagerungen entstehen, fallen nicht unter die Garantie.
ENTSORGUNG DER MASCHINE Bitte beachten Sie die vor Ort geltenden Vorschriften und wenden Sie sich an autorisiertes Fachpersonal.
3.3 INBETRIEBNAHME DER MASCHINE Bitte folgen Sie den gültigen nationalen Sicherheitsvorschriften und biegen Sie Autorisiertes Personal. Installieren Sie die Maschine auf einem Regal vollkommen eben, trocken, glatt und robust. Für einen reibungslosen Betrieb müssen die Geräte an Orten installiert werden,
wenn die Umgebungstemperatur zwischen Temperaturen von +10 ° C ~ +32 ° C und die Luftfeuchtigkeit nicht mehr als 70.%
Vor der Inbetriebnahme bitte folgende Punkte kontrollieren: - der Steuerhebel befindet sich in der unteren Position (Abbildung 8, Seite 8); - das Dampf- sowie das Heißwasserventil sind geschlossen (Abbildung 6,7, Seite 8); - der Netzschalter steht auf Pos. „0“, bzw. „AUS“ (Abbildung 13, Seite 8); - der Netzstecker ist gezogen; - die Wasserauffangschale ist richtig eingesetzt (Abbildung 13, Seite 8).
Vor der Inbetriebnahme der Espressomaschine Typ ALEX ausgestattet mit professionellen Motor und Festwasseranschluss beachten dass:
- Die Wasserauffangschale richtig eingesetzt ist (wenn der Abfluss in der Auffangschale erfolgt und somit manuell); oder das Abflussrohr befindet sich in der richtigen Position: d.h. es sind keine Drosselungen am ganzen Rohr entlang vorhanden und es hat ein Gefälle von mindestens 15%;
nur Modell Alex professionelle - Vor der Installation der Espressomaschine überprüfen, dass der (unter der
Auffangschale befindliche, (Abschnitt 11 auf Seite 8). Hahn in der gewünschten Stellung steht; d.h. auf Wasserzufuhr aus dem Tank oder Festwassernetz.
- Wenn diese Kontrolle nicht ausgeführt wird und Hahngriff sich in der entgegengesetzten Stellung zur Wasserversorgung befindet, kann die Pumpe ernsthaft beschädigt werden.
43
- Wenn die Wasserversorgung ist nah an der Maschine (nur für den Profi-Model Alex) Stellen Sie die Anschlüsse wie in Abbildung 2 und Abbildung 3, Seite 7, wählen Sie dann die Wasserversorgung (Abschnitt 11 auf Seite 8). Denken Sie daran, in diesem Fall öffnen Sie den Wasserhahn
Sie können nun mit der Inbetriebnahme des Gerätes beginnen, indem Sie die folgende Punkte Schritt für Schritt erledigen:
- entfernen Sie den Deckel und ziehen Sie die Schläuche aus dem Wassertank heraus.
- befüllen Sie den Wassertank nun mit gefiltertem Trinkwasser und setzen Sie diesen erneut ein.
- vergewissern Sie sich, dass beide Schläuche nun so tief wie möglich in den Wassertank ragen, damit das Ansaugen des Wasser gewährleistet ist.
- stecken Sie nun den Netzstecker in eine geeignete Steckdose. - drücken Sie den Netzschalter; die im Schalter eingebaute Kontroll-Lampe leuchtet. - die Heizkontroll-Lampe leuchtet. - Unmittelbar nach dem führenden Schalter auf ON, drücken Sie die Taste für ca. 2
Sekunden (oder drücken Sie die Tasten und auf der Profi-Modell) der Widerstand der Kessel ist abgeschaltet;
- öffnen Sie nun das Dampfventil, indem Sie den Knopf gegen den Uhrzeigersinn drehen.
- die Wasserpumpe läuft an und befüllt den Betriebswasserkessel, sowie den Wärmetauscherkessel; durch das geöffnete Dampfventil wird diese Erstbefüllung etwas beschleunigt; diesen Vorgang empfehlen wir nur bei der Inbetriebnahme, da die Maschine mit einem Kaltluftventil ausgestattet ist, welches beim normalen Aufheizen das Gerät selbst entlüftet.
- sobald die Wasserbefüllung der Kessel beendet ist, schaltet sich die Pumpe aus. - schließen Sie das Dampfventil erneut; die Aufheizphase des Gerätes beginnt. - bei der Erstbefüllung wurde fast der komplette Wassertankinhalt entnommen, daher
empfehlen wir Ihnen, den Wassertank sofort wieder vollständig zu befüllen. - die Espressomaschine ist bereit, wenn die grüne Kontroll-Lampe leuchtet und der
Manometer den erforderlichen Druck erreicht hat. - bringen Sie nun den Steuerhebel in die oberste Stellung und entnehmen Sie etwa eine
Kaffeetasse Wasser (ca. 100 cl.); danach bringen Sie den Steuerhebel erneut in die unterste Position.
- Die Espressomaschine ist betriebsbereit, wenn das Licht erlischt.
Neueinschaltung der maschine Die Maschine wurde bereits benutzt und ist nun kalt. Um das Gerät nun morgens oder bei Bedarf einzuschalten, gehen Sie wie folgt vor:
- überprüfen Sie, ob sich genügend Wasser im Wasserbehälter befindet. - drücken Sie den Netzschalter; die im Schalter eingebaute Kontroll-Lampe leuchtet; die
Heizkontroll-Lampe leuchtet. - warten Sie nun, bis der erforderliche Betriebsdruck von ca. 1,5 BAR erreicht ist.;
diesen können Sie auf dem Kesseldruckmanometer ablesen; bei Erreichen der Betriebstemperatur leuchtet auch die Kontroll-Lampe.
- entnehmen Sie auch jetzt eine kleine Menge Wasser aus der Brühgruppe.

44
*WICHTIG: Wassermangel kann zu ernsthaften Schäden an Pumpe und/oderHeizkörper führen. Achtung: bei Betrieb ohne Wasser kann das Gerät ernsthaft beschädigt werden und jeglicher Garantieanspruch erlischt.
Deshalb ist es nötig, die ESPRESSOMASCHINE SOFORT AUSZUSCHALTEN, falls ein verschiedenes Geräusch während des Pumpenbetriebs hörbar sein sollte und der Druck zugleich abfällt, der auf dem Manometer abzulesen ist.
45
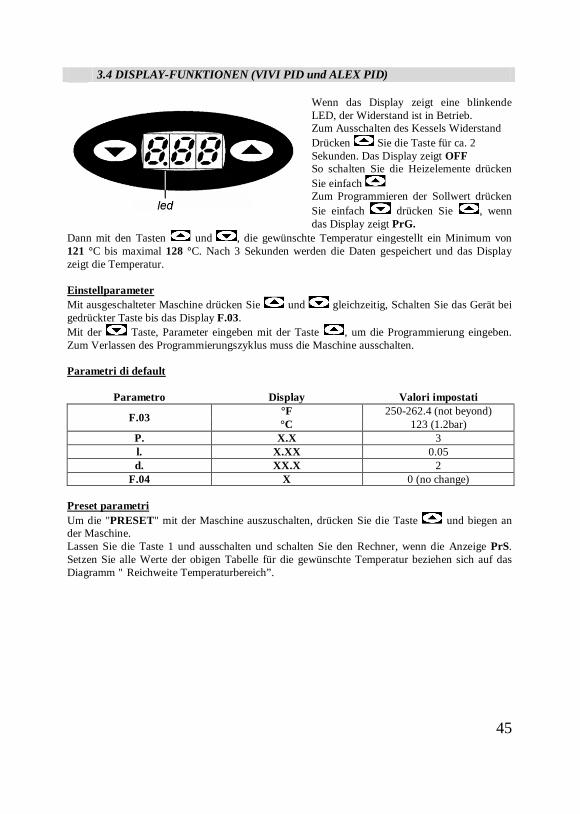
3.4 DISPLAY-FUNKTIONEN (VIVI PID und ALEX PID)
Wenn das Display zeigt eine blinkende LED, der Widerstand ist in Betrieb. Zum Ausschalten des Kessels Widerstand Drücken Sie die Taste für ca. 2 Sekunden. Das Display zeigt OFF So schalten Sie die Heizelemente drücken Sie einfach Zum Programmieren der Sollwert drücken Sie einfach drücken Sie , wenn das Display zeigt PrG.
Dann mit den Tasten und , die gewünschte Temperatur eingestellt ein Minimum von 121 °C bis maximal 128 °C. Nach 3 Sekunden werden die Daten gespeichert und das Display zeigt die Temperatur.
Einstellparameter Mit ausgeschalteter Maschine drücken Sie und gleichzeitig, Schalten Sie das Gerät bei gedrückter Taste bis das Display F.03. Mit der Taste, Parameter eingeben mit der Taste , um die Programmierung eingeben. Zum Verlassen des Programmierungszyklus muss die Maschine ausschalten.
Parametri di default
Parametro Display Valori impostati
F.03 °F 250-262.4 (not beyond) °C 123 (1.2bar)
P. X.X 3 l. X.XX 0.05 d. XX.X 2
F.04 X 0 (no change)
Preset parametri Um die "PRESET" mit der Maschine auszuschalten, drücken Sie die Taste und biegen an der Maschine. Lassen Sie die Taste 1 und ausschalten und schalten Sie den Rechner, wenn die Anzeige PrS. Setzen Sie alle Werte der obigen Tabelle für die gewünschte Temperatur beziehen sich auf das Diagramm " Reichweite Temperaturbereich”.

46
3.5 DISPLAY-FUNKTIONEN (ALEX DUETTO)
Die Dezimalpunkte (Kanal 1, Kanal 2) auf dem Display zeigt den Betrieb von zwei Widerständen. Der erste Punkt entspricht dem Kessel des Kaffees. Der zweite Punkt entspricht dem Kessel Dampf. So schalten Sie das Display, drücken Sie
und gleichzeitig Taste drücken, zeigt das Display die Temperatur des ersten Kanals. Drücken Sie zum zweiten Mal zeigt
das Display die Temperatur des zweiten Kanals.
Change Temperatur-Sollwerte Drücken Sie und gleichzeitig. Das Display zeigt t1. Mit der Taste, um zwischen Kanal t1 und t2 zu wählen, zu bestätigen, drücken Sie .
Parametrierung Mit Maschine auszuschalten, drücken Sie und gleichzeitig, die Tasten gedrückt halten und drehen auf der Maschine. Die Tasten loslassen, wenn es auf dem Display erscheint F.01. Button scrollt durch die Parameter, während die -Taste bestätigt die gewählten Parameter. So speichern Sie die Programmierung muss ausgeschaltet sein und biegen an der Maschine.
Parameter-Tabelle.
Parameter Display Beschreibung
F.01 °F Measurement Units Fahrenheit °C Measurement Units Grad Celsius
F.02
2 Aktivieren Lieferung von Kaffee (Kanal 1) 3 Aktivieren Lieferung von Wasser und Dampf (Kanal 2) 4 Nicht angeschlossen 5 Aktivieren Lieferung von Kaffee, Wasser und Dampf (Kanal 1
und 2) 6 Verwenden Sie keine
7
Aktivieren Lieferung von Kaffee, Wasser und Dampf (Kanal 1 und Kana 2) hauptsächlich auf die Versorgung mit Kaffee. Wenn Kanal 1 aktiviert ist, wird der Kanal 2 ist deaktiviert. Wenn der Kanal 1 ausgeschaltet ist, wird Kanal 2 aktiviert.
t1 XX Wo XX ist die Soll-Temperatur Kaffee t2 XX Wo XX ist die Soll-Temperatur Wasser und Dampf t3 XX Nicht angeschlossen E1 X Wo X ist der Korrekturfaktor der Kanal Kaffee E2 X Wo X ist der Korrekturfaktor des Kanals Wasser und DampfE3 X Nicht angeschlossen

47
Preset Parameter Durch die "PRESET" können Sie rekonfigurieren TermoPid mit den voreingestellten Parametern. Mit Maschine auszuschalten, drücken und halten Sie , Schalten Sie das Gerät. Wenn das Display "PrS", lassen Sie die Taste . Herunterfahren und neu starten die Maschine.
Default settings TermoPid
EUROPA AMERICA Parametri Display Parametri Display F.01 °C F.01 °F F.02 5-7 F.02 7 P 1.3 P 1.3 I 006 I 006 D 1.3 D 1.5 T1 93 T1 200 T2 123(Mindest-121 Maximum128) T2 255(Mindest-248, Maximum262) T3 80 T3 176 E1 10 E1 18 E2 0 E2 0 E3 0 E3 0
Reichweite Temperaturbereich
CELSIUS FAHRENHEIT BAR INFORMATIONEN 120 248 1 dem ersten Einschalten der Maschine, warten 14 bis
15 Minuten, um die Temperatur von 0 bis 120 Grad (Sollwert T2)
121 249.8 1.1 122 251.6 1.15 T1 = Kaffeeboiler 123 253.4 1.2 T2 = Dampfkessel 124 255.2 1.3 125 257 1.35 126 258.8 1.4 127 260.6 1.45 128 262.4 1.5 Maximalwert
Alarm Im Falle einer Fehlfunktion, zeigt das Display die folgende Warnmeldung angezeigt: A1 Kanal 1 ist nicht angeschlossen; A2 Kanal 1 kurzgeschlossen; A3 Kanal 2 ist nicht angeschlossen; A4 Kanal 2 kurzgeschlossen.

48
3.6 ZUBEREITUNG VON ESPRESSOKAFFEE
Setzen Sie nun je nach Bedarf das Ein- oder Zweitassensieb in den Filterträger ein, sofern Sie nicht zwei Filterträger besitzen, und befüllen Sie diesen mit gemahlenem Kaffeemehl aus Ihrer Kaffeemühle, bzw. mit dem Messlöffel aus einer Vorratsdose.
Drücken Sie nun das Kaffeemehl mit einem Kaffeestampfer etwas fest und setzen Sie den Filterträger in die Brühgruppe ein.
Stellen Sie nun eine oder zwei Tassen unter den Auslauf des Filterträgers und bringen Sie den Steuerhebel in die oberste Position. Der Kaffee beginnt nun in die Tassen zu laufen. Der richtige Espresso sollte zuerst tropfenweise, danach dickflüssig wie zerlaufene Schokolade in die Tasse fließen. Zu beachten an dieser Stelle ist ebenfalls, dass die möglichst dickwandigen Tassen eine hohe Temperatur haben. Wir empfehlen Ihnen daher, die Tassen ständig auf dem Tassenwärmer des Gerätes aufzubewahren. Wenn die Tasse die gewünschte Füllmenge erreicht hat, dann schalten Sie die Wasserzufuhr durch Betätigung des Steuerhebels erneut ab. Beachten Sie bitte hierzu, dass die maximale Brühzeit eines Espresso 25 Sekunden nicht überschreiten sollte. Nach diesem Zeitpunkt werden die im Kaffee enthaltenen Säurestoffe gelöst und beeinträchtigen den Geschmack, sowie die Verträglichkeit des Espressos. Aus der unteren Öffnung des Vorbrühzylinders entweichen nun der beim Brühvorgang entstandene Überdruck und Restwasser in die Auffangschale. Dieser Vorgang macht sich durch ein Zischen bemerkbar.
Damit der komplette Druckabbau nach dem Brühvorgang erfolgen kann, ist es wichtig, dass sich der Steuerhebel in der untersten Position befindet. Nicht abgebauter Überdruck kann bei der Entnahme des Siebträgers aus der Brühgruppe zu
Spritzen des Kaffeemehls führen und Verbrühungen zur Folge haben.
Achtung: die Brühgruppe wird bei der Benutzung sehr heiß und es entsteht Verbrühungsgefahr.
49
3.7 HEISSWASSERENTNAHME Stellen oder halten Sie ein geeignetes Gefäß mit wärmeisolierendem Haltegriff unter die Heißwasserdüse. Öffnen Sie nun das Heißwasserventil, indem Sie den Knopf gegen den Uhrzeigersinn drehen, bis sich die gewünschte Wassermenge im Gefäß befindet.
Schließen Sie nun das Heißwasserventil erneut, indem Sie den Knopf im Uhrzeigersinn drehen. Achtung: das Heißwasserrohr wird bei der Benutzung sehr heiß und es entsteht Verbrühungsgefahr. 3.8 DAMPFENTNAHME
Die Dampfentnahmefunktion kann genutzt werden, um lebensmittelechte Flüssigkeiten wie z.B. Milch, Kakao, Glühwein, etc. zu erhitzen. Nehmen Sie zum Aufschäumen der Milch ein geeignetes, möglichst hohes Edelstahlgefäß, da die Milch nach kurzer Zeit beim Aufschäumvorgang nach oben
steigt. Benutzen Sie zum Aufschäumen H-Milch mit einem Fettgehalt von 3,5% bei Raumtemperatur, um das bestmögliche Schäumergebnis zu erhalten. Tauchen Sie nun die Dampfdüse am Ende des Dampfrohres in die Milch und öffnen Sie das Dampfventil. Lassen Sie nun einige Sekunden vergehen, in denen die Milch erhitzt wird. Danach versuchen Sie, die Dampfdüse ganz knapp unter den „Milchspiegel“ zu halten, so dass die Milch mit dem Dampf im Gefäß einen Wirbel bildet. Sie werden nun feststellen, dass der Milchschaum im Gefäß zu steigen beginnt. Vermeiden Sie unbedingt, dass die Milch zu stark erhitzt wird, da die Eiweißmoleküle in der Milch ab 77°C auseinanderbrechen, und der Schaum zusammenfallen kann. Nach dem Aufschäumen schließen Sie das Dampfventil und wischen das Dampfrohr mit einem feuchten Tuch oder Schwamm sofort ab, um das Verkleben durch Milchreste zu vermeiden. 3.9 REINIGUNG UND PFLEGE DER MASCHINE
Eine tägliche Reinigung des Tanks ist notwendig, um zu vermeiden, dass Kalkablagerungen am Tankboden in den Kessel angesaugt werden, wodurch die Kreisläufe verstopft werden können. Diese Situation kann die Funktionsfähigkeit des Elektroventils blockieren, wodurch der Wasserfluss in den Röhren und folglich in
den Gruppen vermindert werden kann, und somit den Kaffeeauslauf beeinträchtigen. Reinigen Sie die Unterseite des Tanks und das Gehäuse der Schwimmer mindestens zweimal im Monat (Abbildung 4, Seite 7). Entfernen von Kalkablagerungen, um eventuelle plötzliche Störungen zu vermeiden.
50
Wir unterscheiden hier die Reinigungsvorgänge, die täglich und die Reinigungsvorgänge, die wöchentlich ausgeführt werden sollten. Tägliche Reinigung
- wischen Sie nach dem Aufschäumen das Dampfrohr mit einem feuchten Tuch ab. - lassen Sie nach der letzten Kaffeebrühung ca. 2 Kaffeetassen Wasser aus der
Brühgruppe laufen, um das in der Brühgruppe befindliche Brühsieb von Kaffeeresten zu befreien.
- entnehmen Sie das Ein- oder Zweitassensieb aus dem Filterträger und reinigen Sie dieses mit einem Schwamm.
- Auffangschale und Abtropfblech unter Leitungswasser mit einem weichen Schwamm abwischen.
- schalten Sie nun die Maschine aus. Wöchentliche Reinigung
- erledigen Sie zunächst die bei der täglichen Reinigung angegebenen Schritte. - setzen nun das Reinigungssieb in den Filterträger ein. - füllen Sie nun ca. 1 Kaffeelöffel spezifischen Kaffeereiniger in das Reinigungssieb und
setzen Sie den Filterträger in die Brühgruppe ein. - gehen Sie nun vor wie bei einer Kaffeebrühung und bringen Sie den Steuerhebel in die
oberste Stellung, warten Sie nun ca. 5-7 Sekunden und schalten Sie die Kaffeebrühung wieder aus.
- der komplette Überdruck sowie weiß schäumendes Wasser werden nun in die Auffangschale geleitet.
- diesen Vorgang wiederholen Sie nun 10-15 mal; dabei werden Sie feststellen, dass der anfängliche weiße Schaum immer dunkler wird; durch diesen Vorgang wird die Brühgruppe gründlich gereinigt.
- entnehmen Sie nun den Filterträger mit dem Reinigungssieb und lassen Sie erneut ca. 10-15 Sekunden Wasser aus der Brühgruppe laufen, um restlichen Kaffeereiniger zu entfernen; reinigen Sie auch den Filterträger und das Reinigungssieb erneut.
51
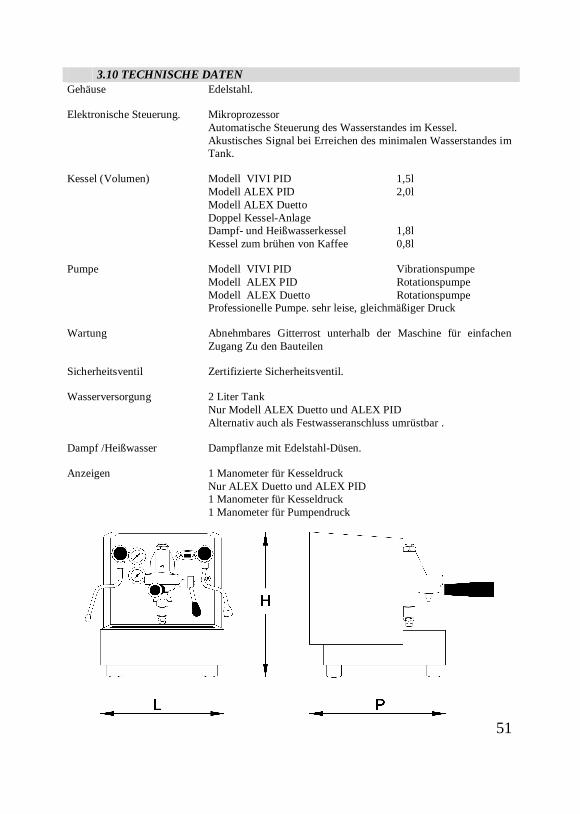
3.10 TECHNISCHE DATEN Gehäuse Edelstahl. Elektronische Steuerung. Mikroprozessor
Automatische Steuerung des Wasserstandes im Kessel. Akustisches Signal bei Erreichen des minimalen Wasserstandes im Tank.
Kessel (Volumen) Modell VIVI PID 1,5l
Modell ALEX PID 2,0l Modell ALEX Duetto Doppel Kessel-Anlage Dampf- und Heißwasserkessel 1,8l Kessel zum brühen von Kaffee 0,8l
Pumpe Modell VIVI PID Vibrationspumpe
Modell ALEX PID Rotationspumpe Modell ALEX Duetto Rotationspumpe Professionelle Pumpe. sehr leise, gleichmäßiger Druck
Wartung Abnehmbares Gitterrost unterhalb der Maschine für einfachen
Zugang Zu den Bauteilen Sicherheitsventil Zertifizierte Sicherheitsventil. Wasserversorgung 2 Liter Tank
Nur Modell ALEX Duetto und ALEX PID Alternativ auch als Festwasseranschluss umrüstbar .
Dampf /Heißwasser Dampflanze mit Edelstahl-Düsen.
Anzeigen 1 Manometer für Kesseldruck Nur ALEX Duetto und ALEX PID 1 Manometer für Kesseldruck 1 Manometer für Pumpendruck
52
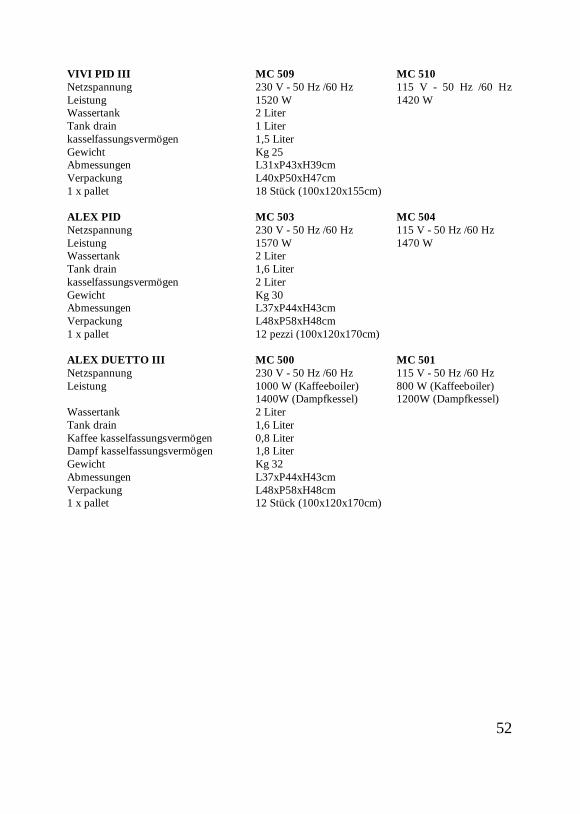
VIVI PID III MC 509 MC 510 Netzspannung 230 V - 50 Hz /60 Hz 115 V - 50 Hz /60 Hz Leistung 1520 W 1420 W Wassertank 2 Liter Tank drain 1 Liter kasselfassungsvermögen 1,5 Liter Gewicht Kg 25 Abmessungen L31xP43xH39cm Verpackung L40xP50xH47cm 1 x pallet 18 Stück (100x120x155cm) ALEX PID MC 503 MC 504 Netzspannung 230 V - 50 Hz /60 Hz 115 V - 50 Hz /60 Hz Leistung 1570 W 1470 W Wassertank 2 Liter Tank drain 1,6 Liter kasselfassungsvermögen 2 Liter Gewicht Kg 30 Abmessungen L37xP44xH43cm Verpackung L48xP58xH48cm 1 x pallet 12 pezzi (100x120x170cm) ALEX DUETTO III MC 500 MC 501 Netzspannung 230 V - 50 Hz /60 Hz 115 V - 50 Hz /60 Hz Leistung 1000 W (Kaffeeboiler) 800 W (Kaffeeboiler)
1400W (Dampfkessel) 1200W (Dampfkessel) Wassertank 2 Liter Tank drain 1,6 Liter Kaffee kasselfassungsvermögen 0,8 Liter Dampf kasselfassungsvermögen 1,8 Liter Gewicht Kg 32 Abmessungen L37xP44xH43cm Verpackung L48xP58xH48cm 1 x pallet 12 Stück (100x120x170cm)

53
3.11 PROBLEME UND MÖGLICHE URSACHEN
Falls bei der Bedienung des Gerätes eine Funktionsstörung auftreten sollte, muss nicht zwangsläufig ein technischer Defekt gegeben sein. Bevor Sie deshalb mit Ihrem Händler in Verbindung treten, sollten Sie diese folgenden Punkte studieren, denn möglicherweise kann dieses Problem von Ihnen selbst behoben werden.
Fehler – beim Brühvorgang läuft kein Kaffee aus der Brühgruppe Mögliche Ursache Fehlerbehebung Das Gerät ist eingeschaltet, aber funktioniert nicht
Überprüfen, dass die Maschine richtig an einer Steckdose angeschlossen ist
Das verwendete Kaffeemehl ist zu fein Den Mahlgrad an Ihrer Kaffeemühle ein bisschen grober stellen
Sie verwenden zuviel Kaffeemehl Überprüfen Sie die Kaffeemenge an Ihrer Kaffeemühle
Die Pumpe ist sehr laut Überprüfen Sie, ob genügend Wasser im Wassertank ist und ob der Ansaugschlauch richtig im Wasser sitzt
Trotz Wasser im Wassertank und ohne Filterträger
Lassen Sie die Maschine ungefähr ¾ kommt kein Wasser aus der BrühgruppeStunde abkühlen und schalten Sie das Gerät erneut ein; versuchen Sie nun Wasser aus der Brühgruppe ohne Kaffe zu entnehmen
Fehler – Dampfentnahme ist nicht möglich Mögliche Ursache Fehlerbehebung Die Dampfdüse ist durch Milchreste verstopft Stechen Sie mit einer Nadel in die Löcher der
Düse und öffnen Sie das Dampfventil erneut Das Gerät hat die Betriebstemperatur noch nicht erreicht
Stechen Sie mit einer Nadel in die Löcher der Düse und öffnen Sie das Dampfventil erneut
Beziehen sich auf die englische Version auf Seite 37

54
3.12 GARANTIEBESTIMMUNGEN
Der Garantiezeitraum für diese Espressomaschine beträgt 12 Monate und beginnt mit dem Tag des Kaufes. Dieser ist durch Rechnung nachzuweisen. Auf dem Kaufbeleg müssen sowohl der Verkäufer als auch der Käufer des Gerätes aufgeführt werden. Durch die Garantie werden Schäden an der Maschine abgedeckt, die auf bautechnische Mängel oder werkseitig defekte Teile zurückzuführen sind. Die Garantie beinhaltet den Austausch oder die kostenlose Reparatur dieser Teile. Sämtliche Schäden an Teilen sowie Funktionsstörungen, die auf fehlerhaften Anschluss des Gerätes, Nichtbeachtung der Bedienungsanleitung, Fall, Stoss, Verschmutzung, Verkalkung oder Nachlässigkeit des Benutzers zurückzuführen sind, sind von der Garantie ausgeschlossen. Von der Garantie ausgenommen sind elektrische oder elektronische Bauteile. Schäden, die beim Transport des Gerätes entstanden sind, sind ebenfalls von der Garantie ausgenommen. Schäden, die bei unsachgemäßer Montage der Maschine auftreten, sowie Service- und Wartungsarbeiten (wie in der Bedienungsanleitung beschrieben) sind nicht im Garantieumfang enthalten. Der Hersteller weist jegliche Haftung für Schäden, die direkt oder indirekt zum Schaden oder Tod von Personen, Tieren oder Sachen führen können, bei Verstoß gegen einen in der Bedienungsanleitung aufgeführten Punkte zurück. Bei Reparatur des Gerätes in einem vom Hersteller autorisierten Service-Zentrum gehen eventuelle Transportkosten sowie das Transportrisiko zu Lasten des Kunden. Garantieleistungen bewirken weder eine Verlängerung der Garantiefrist, noch setzten sie eine neue Garantiefrist in Lauf.


![Duetto concertante per chitarre e flauto [Op. 23] · Title: Duetto concertante per chitarre e flauto... [Op. 23] Author: Legnani, Luigi Subject: Public domain Created Date: 3/15/2012](https://img.pdfslide.tips/doc/110x75/6112a2556700803d4774d182/duetto-concertante-per-chitarre-e-flauto-op-23-title-duetto-concertante-per.jpg)