Embed Size (px)
Citation preview
B
INCUBATRICE ANALOGICA / ANALOGUE INCUBATOR / BRUTAPPARAT ANALOG / COUVEUSE ANALOGIQUE / INCUBADORA ANALOGICA / CHOCADEIRA ANALÓGICA / ΕΚΚΟΛΑΠΤΗΡΙΟ
POSTER ISTRUZIONI D’USO / USER INSTRUCTION POSTER / BEDIENUNGSANLEITUNG / POSTER CONSEILS D’UTILISATION /INSTRUCCIONES DE USO / POSTER DE INSTRUÇÕES DE USO / ΠΟΣΤΕΡ ΜΕ ΟΔΗΓΙΕΣ ΧΡΗΣΕΙΣ
Analogica
NOVITAL
NOVITAL
NOVITAL
cm 35 cm 33cm 58
cm 41 cm 36,5cm 41
cm 37,5 cm 34 cm 37,5
Termometro
Thermometer
Thermomètre
Termómetro
Θερμόμετρο
Spia luminosa
Warning light
Kontrollleuchte
Voyant lumineux
Piloto luminoso
Aviso luminoso
Φωτεινή λυχνία
Vano portauova
Egg compartment
Eierhalterfach
Compartiment porte-œufs
Fondo portahuevos
Vão porta-ovos
Συρτάρι αυγών
Tirante girauova
Egg turning rod
Eierdreherzugstange
Support tourne-œufs
Tirador volteo
Tirante vira-ovos
Εντατήρας περιστροφής αυγών
Componenti / Components / Bauteile / Composants / Componentes / Componentes / Εξαρτήματα
FaraonaGuinea-fowlPerlhuhnPintade Galinha-da-ÍndiPintadaΦραγκόκοτα
45-50 gr
QuagliaQuailWachtelCailleCodornizCodornizΟρτύκι
11 gr
30 m
m
40 m
m
GallinaChickenHuhnPouleGalinhaGallinaΚότα
45-53 gr
OcaGooseGansOcaGansoOieΧήνα
120-140 gr
PernicePartridgeRebhuhnPerdizPerdizPerdrixΠέρδικα
12-14 gr
25 mm
100 / 10
6 mm
65 / 68 mm
30 mm
50 mm
40 / 43 mm
49 mm
35 / 38 mm
TacchinaTurkey-henTruthahnPavoPeru DindeΓαλοπούλα
70-85 gr
66 / 70 m
m
46 / 50 mm
Anatra GermanaWild duckWildentePatoPato bravoCane de BarbarieΠάπια
70-75 gr
46 mm
60 / 65 m
m
FagianaHen-pheasantFasanFaisanFaisãoFaisanΦασιανός
30-35 gr
46 m
m
35 mm
Tipologie uova / Egg types / Eierart / Type d’œufs / Tipos de huevos / Tipologías dos ovos / Είδος αυγών - Capacità indicative* / Indicative capacity* /
Unghefäre Leistung* / Capacité indicative* / Capacidad indicativa* / Capacidade indicativa* / Ενδεικτικό ικανότητα*
Covatutto 24eco: 70* Covatutto 54: 140*
Covatutto 24eco: 30* Covatutto 54: 60*
Covatutto 24eco: 42* Covatutto 54: 84*
Covatutto 24eco: 16* Covatutto 54: 32*
Covatutto 24eco: 24* Covatutto 54: 54*
Covatutto 24eco: 20* Covatutto 54: 40*
Covatutto 24eco: 30* Covatutto 54: 60*
Covatutto 24eco: 6* Covatutto 54: 15*
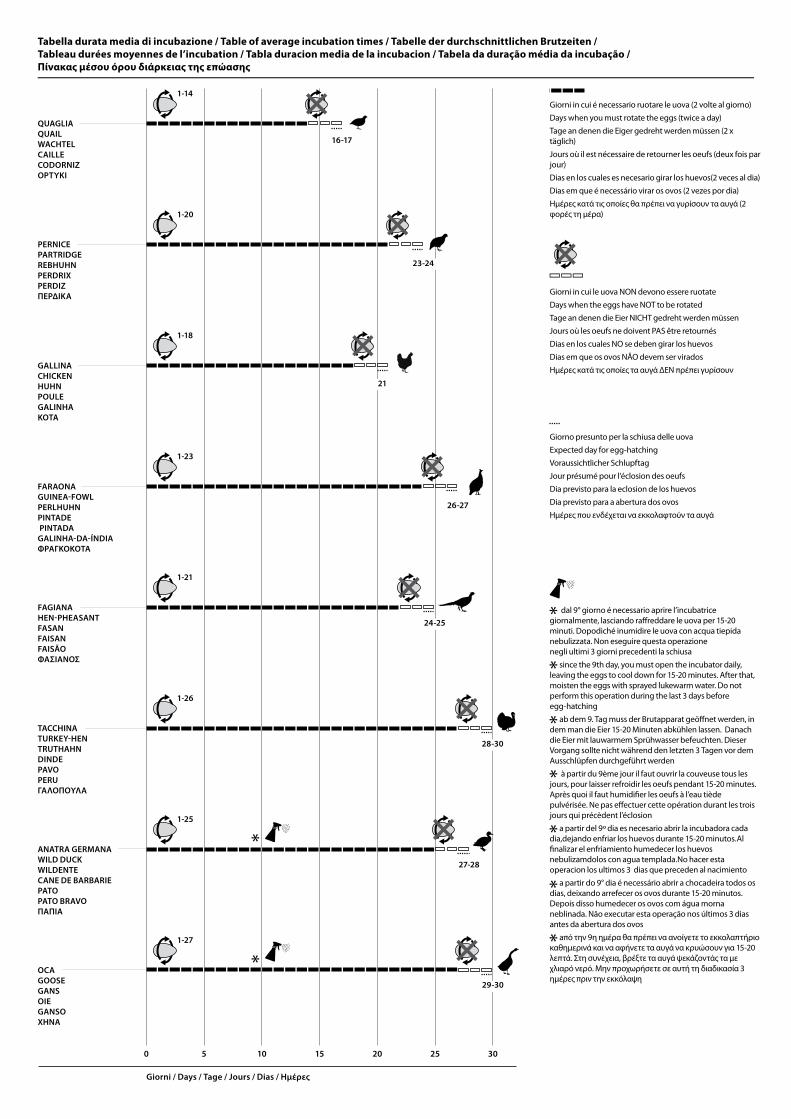
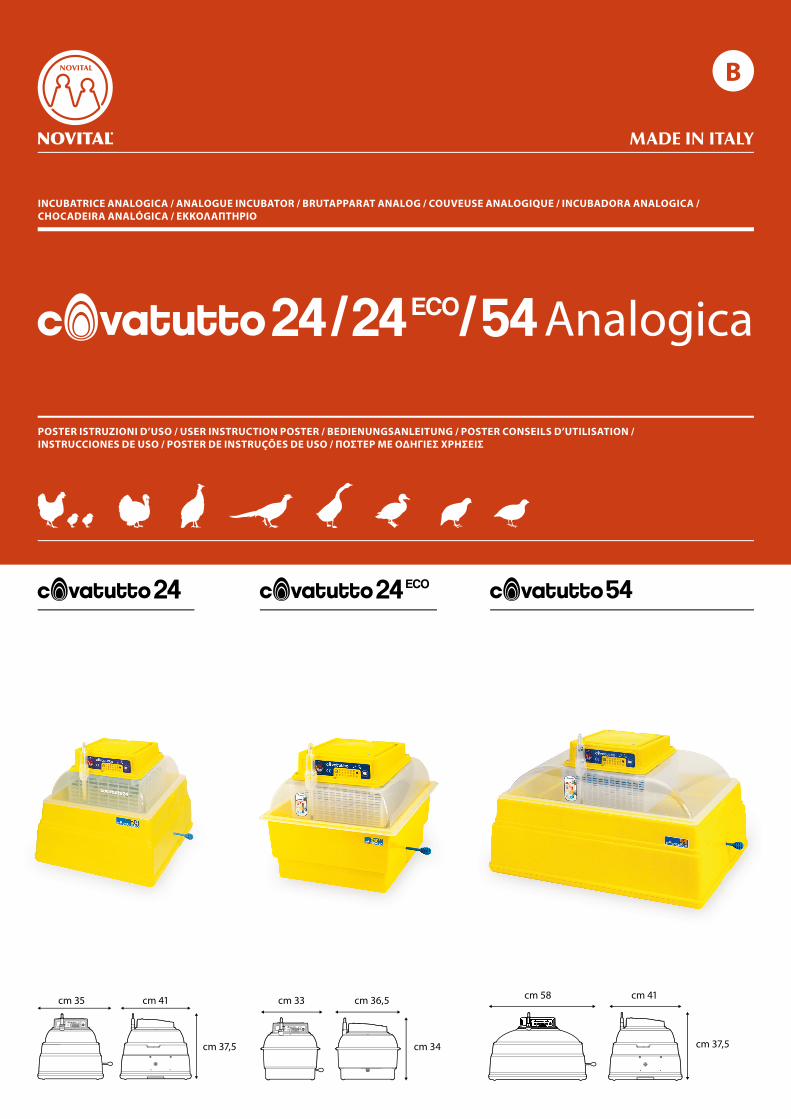
0 5 10 15 20 25 30
Giorni / Days / Tage / Jours / Dias / Ημέρες
23-24
PERNICEPARTRIDGE REBHUHNPERDRIXPERDIZΠΕΡΔΙΚΑ
1-20
21
GALLINACHICKENHUHNPOULEGALINHAΚΟΤΑ
1-18
26-27
FARAONAGUINEA-FOWL PERLHUHNPINTADE PINTADAGALINHA-DA-ÍNDIAΦΡΑΓΚΟΚΟΤΑ
1-23
24-25
FAGIANAHEN-PHEASANTFASANFAISANFAISÃOΦΑΣΙΑΝΟΣ
1-21
28-30
TACCHINATURKEY-HEN TRUTHAHNDINDEPAVOPERUΓΑΛΟΠΟΥΛΑ
1-26
dal 9° giorno é necessario aprire l’incubatrice giornalmente, lasciando ra�reddare le uova per 15-20 minuti. Dopodiché inumidire le uova con acqua tiepida nebulizzata. Non eseguire questa operazionenegli ultimi 3 giorni precedenti la schiusa
since the 9th day, you must open the incubator daily, leaving the eggs to cool down for 15-20 minutes. After that, moisten the eggs with sprayed lukewarm water. Do not perform this operation during the last 3 days before egg-hatching
ab dem 9. Tag muss der Brutapparat geö�net werden, in dem man die Eier 15-20 Minuten abkühlen lassen. Danach die Eier mit lauwarmem Sprühwasser befeuchten. Dieser Vorgang sollte nicht während den letzten 3 Tagen vor dem Ausschlüpfen durchgeführt werden
à partir du 9ème jour il faut ouvrir la couveuse tous les jours, pour laisser refroidir les oeufs pendant 15-20 minutes. Après quoi il faut humidi�er les oeufs à l’eau tiède pulvérisée. Ne pas e�ectuer cette opération durant les trois jours qui précèdent l’éclosion
a partir del 9º dia es necesario abrir la incubadora cada dia,dejando enfriar los huevos durante 15-20 minutos.Al �nalizar el enfriamiento humedecer los huevos nebulizamdolos con agua templada.No hacer esta operacion los ultimos 3 dias que preceden al nacimiento
a partir do 9° dia é necessário abrir a chocadeira todos os dias, deixando arrefecer os ovos durante 15-20 minutos. Depois disso humedecer os ovos com água morna neblinada. Não executar esta operação nos últimos 3 dias antes da abertura dos ovos
aπό την 9η ημέρα θα πρέπει να ανοίγετε το εκκολαπτήριο καθημερινά και να αφήνετε τα αυγά να κρυώσουν για 15-20 λεπτά. Στη συνέχεια, βρέξτε τα αυγά ψεκάζοντάς τα με χλιαρό νερό. Μην προχωρήσετε σε αυτή τη διαδικασία 3 ημέρες πριν την εκκόλαψη
29-30
OCAGOOSEGANS OIEGANSOΧΗΝΑ
1-27
ANATRA GERMANAWILD DUCKWILDENTECANE DE BARBARIEPATOPATO BRAVOΠΑΠΙΑ
27-28
1-25
16-17
1-14
QUAGLIA QUAILWACHTELCAILLECODORNIZΟΡΤΥΚΙ
Giorni in cui é necessario ruotare le uova (2 volte al giorno)
Days when you must rotate the eggs (twice a day)
Tage an denen die Eiger gedreht werden müssen (2 x täglich)
Jours où il est nécessaire de retourner les oeufs (deux fois par jour)
Dias en los cuales es necesario girar los huevos(2 veces al dia)
Dias em que é necessário virar os ovos (2 vezes por dia)
Ημέρες κατά τις οποίες θα πρέπει να γυρίσουν τα αυγά (2 φορές τη μέρα)
Giorni in cui le uova NON devono essere ruotate
Days when the eggs have NOT to be rotated
Tage an denen die Eier NICHT gedreht werden müssen
Jours où les oeufs ne doivent PAS être retournés
Dias en los cuales NO se deben girar los huevos
Dias em que os ovos NÃO devem ser virados
Ημέρες κατά τις οποίες τα αυγά ΔΕΝ πρέπει γυρίσουν
Giorno presunto per la schiusa delle uova
Expected day for egg-hatching
Voraussichtlicher Schlupftag
Jour présumé pour l’éclosion des oeufs
Dia previsto para la eclosion de los huevos
Dia previsto para a abertura dos ovos
Ημέρες που ενδέχεται να εκκολαφτούν τα αυγά
Tabella durata media di incubazione / Table of average incubation times / Tabelle der durchschnittlichen Brutzeiten /Tableau durées moyennes de l’incubation / Tabla duracion media de la incubacion / Tabela da duração média da incubação /
Πίνακας μέσου όρου διάρκειας της επώασης
NOVITAL
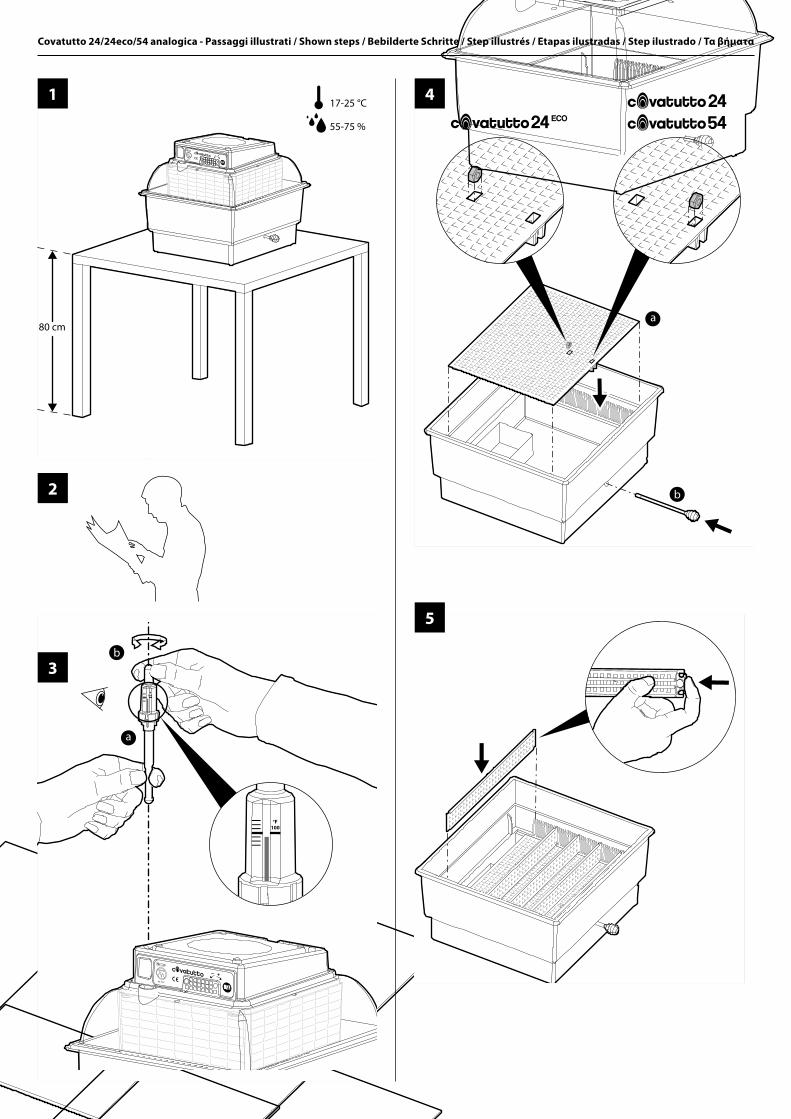
17-25 °C
55-75 %
80 cm
NOVITAL
100
°F
100
°F
b
a
1
3
b
a
4
5
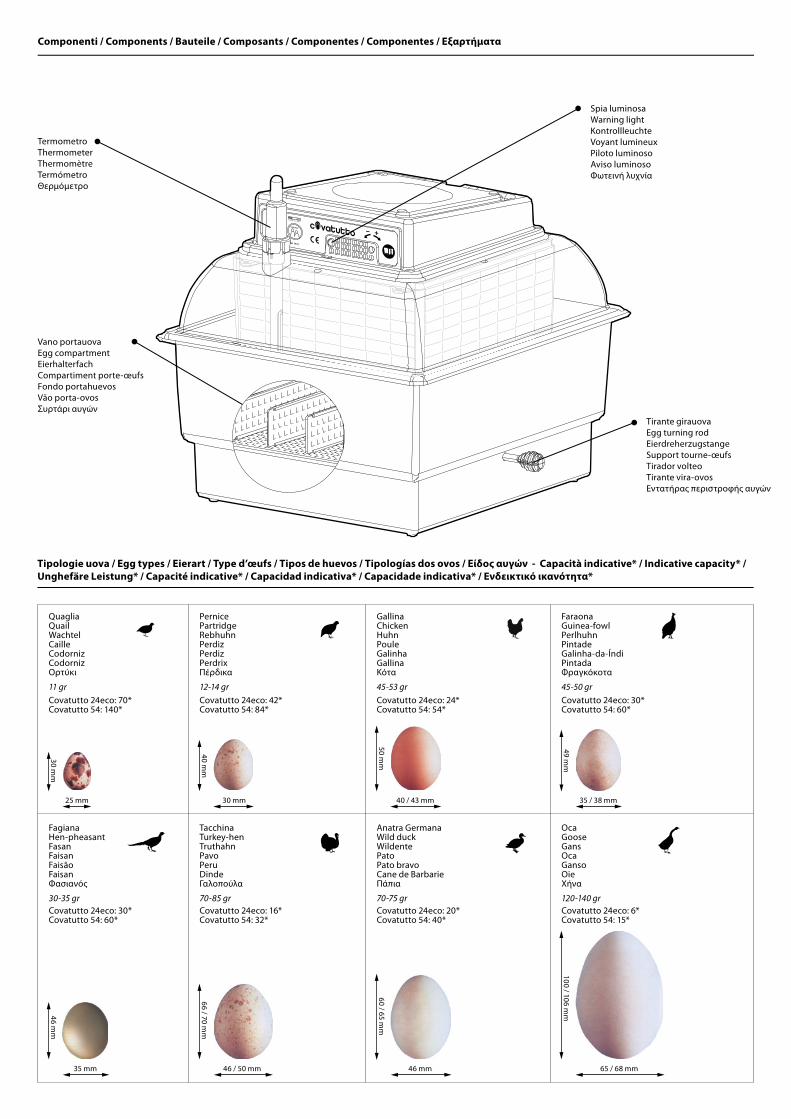
Covatutto 24/24eco/54 analogica - Passaggi illustrati / Shown steps / Bebilderte Schritte / Step illustrés / Etapas ilustradas / Step ilustrado / Τα βήματα
2
NOVITAL
NOVITAL
7
6
NOVITAL
100
°F
100
°F
ab
8
a9
10
NOVITAL
a b
c d
11
Covatutto 24eco/54 analogica - Descrizione passaggi illustrati / Description of the shown steps
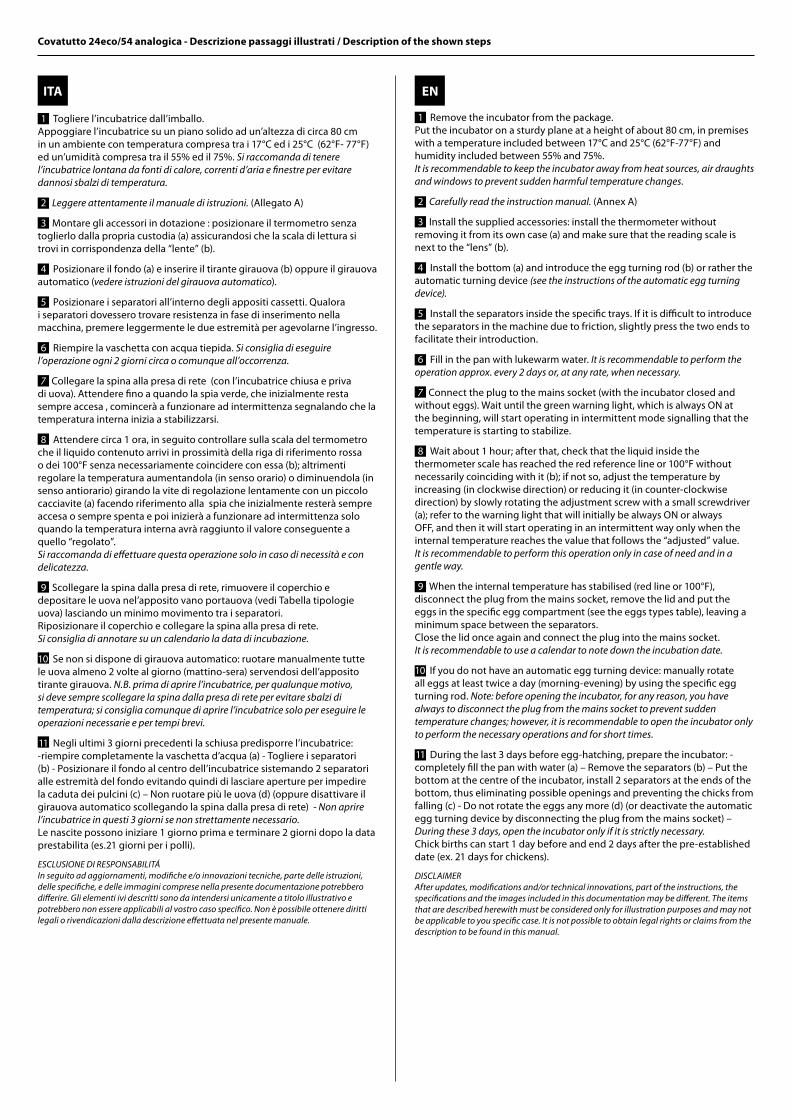
1 Togliere l’incubatrice dall’imballo.
Appoggiare l’incubatrice su un piano solido ad un’altezza di circa 80 cm
in un ambiente con temperatura compresa tra i 17°C ed i 25°C (62°F- 77°F)
ed un’umidità compresa tra il 55% ed il 75%. Si raccomanda di tenere l’incubatrice lontana da fonti di calore, correnti d’aria e � nestre per evitare dannosi sbalzi di temperatura.
2 Leggere attentamente il manuale di istruzioni. (Allegato A)
3 Montare gli accessori in dotazione : posizionare il termometro senza
toglierlo dalla propria custodia (a) assicurandosi che la scala di lettura si
trovi in corrispondenza della “lente” (b).
4 Posizionare il fondo (a) e inserire il tirante girauova (b) oppure il girauova
automatico (vedere istruzioni del girauova automatico).
5 Posizionare i separatori all’interno degli appositi cassetti. Qualora
i separatori dovessero trovare resistenza in fase di inserimento nella
macchina, premere leggermente le due estremità per agevolarne l’ingresso.
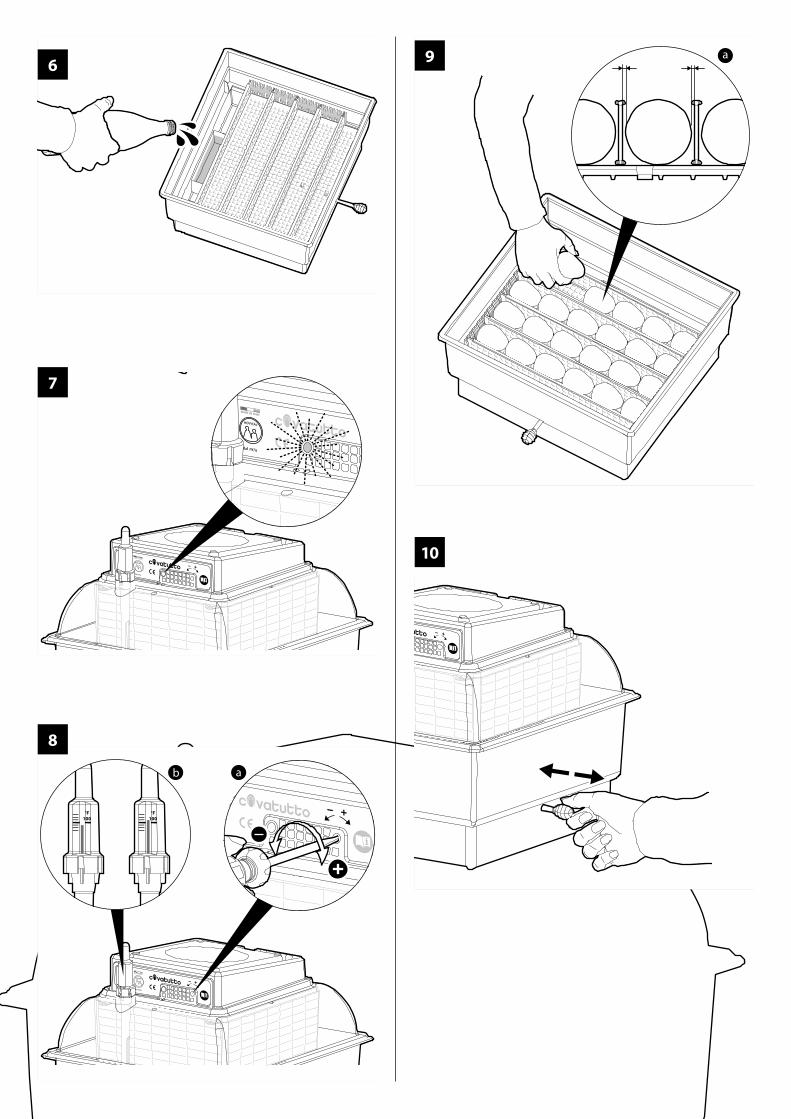
6 Riempire la vaschetta con acqua tiepida. Si consiglia di eseguire l’operazione ogni 2 giorni circa o comunque all’occorrenza.
7 Collegare la spina alla presa di rete (con l’incubatrice chiusa e priva
di uova). Attendere # no a quando la spia verde, che inizialmente resta
sempre accesa , comincerà a funzionare ad intermittenza segnalando che la
temperatura interna inizia a stabilizzarsi.
8 Attendere circa 1 ora, in seguito controllare sulla scala del termometro
che il liquido contenuto arrivi in prossimità della riga di riferimento rossa
o dei 100°F senza necessariamente coincidere con essa (b); altrimenti
regolare la temperatura aumentandola (in senso orario) o diminuendola (in
senso antiorario) girando la vite di regolazione lentamente con un piccolo
cacciavite (a) facendo riferimento alla spia che inizialmente resterà sempre
accesa o sempre spenta e poi inizierà a funzionare ad intermittenza solo
quando la temperatura interna avrà raggiunto il valore conseguente a
quello “regolato”.
Si raccomanda di e! ettuare questa operazione solo in caso di necessità e con delicatezza.
9 Scollegare la spina dalla presa di rete, rimuovere il coperchio e
depositare le uova nel’apposito vano portauova (vedi Tabella tipologie
uova) lasciando un minimo movimento tra i separatori.
Riposizionare il coperchio e collegare la spina alla presa di rete.
Si consiglia di annotare su un calendario la data di incubazione.
10 Se non si dispone di girauova automatico: ruotare manualmente tutte
le uova almeno 2 volte al giorno (mattino-sera) servendosi dell’apposito
tirante girauova. N.B. prima di aprire l’incubatrice, per qualunque motivo, si deve sempre scollegare la spina dalla presa di rete per evitare sbalzi di temperatura; si consiglia comunque di aprire l’incubatrice solo per eseguire le operazioni necessarie e per tempi brevi.
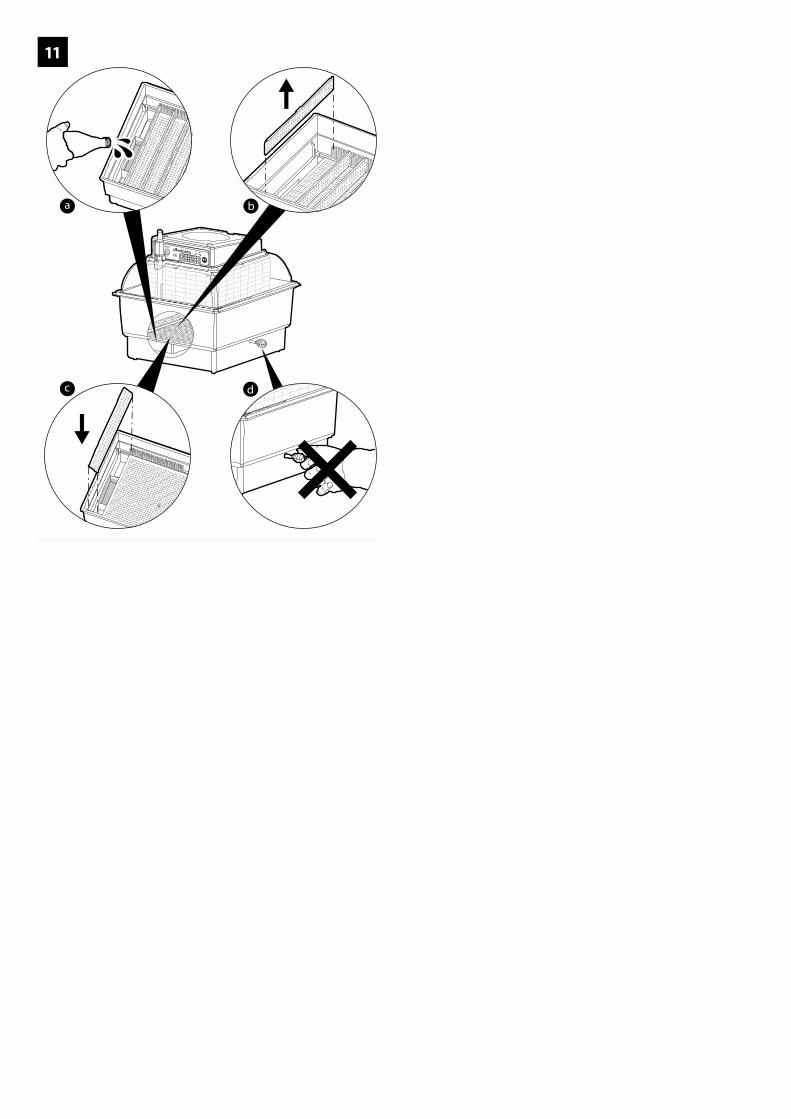
11 Negli ultimi 3 giorni precedenti la schiusa predisporre l’incubatrice:
-riempire completamente la vaschetta d’acqua (a) - Togliere i separatori
(b) - Posizionare il fondo al centro dell’incubatrice sistemando 2 separatori
alle estremità del fondo evitando quindi di lasciare aperture per impedire
la caduta dei pulcini (c) – Non ruotare più le uova (d) (oppure disattivare il
girauova automatico scollegando la spina dalla presa di rete) - Non aprire l’incubatrice in questi 3 giorni se non strettamente necessario.Le nascite possono iniziare 1 giorno prima e terminare 2 giorni dopo la data
prestabilita (es.21 giorni per i polli).
ESCLUSIONE DI RESPONSABILITÁIn seguito ad aggiornamenti, modi� che e/o innovazioni tecniche, parte delle istruzioni, delle speci� che, e delle immagini comprese nella presente documentazione potrebbero di! erire. Gli elementi ivi descritti sono da intendersi unicamente a titolo illustrativo e potrebbero non essere applicabili al vostro caso speci� co. Non è possibile ottenere diritti legali o rivendicazioni dalla descrizione e! ettuata nel presente manuale.
ITA
1 Remove the incubator from the package.
Put the incubator on a sturdy plane at a height of about 80 cm, in premises
with a temperature included between 17°C and 25°C (62°F-77°F) and
humidity included between 55% and 75%.
It is recommendable to keep the incubator away from heat sources, air draughts and windows to prevent sudden harmful temperature changes.
2 Carefully read the instruction manual. (Annex A)
3 Install the supplied accessories: install the thermometer without
removing it from its own case (a) and make sure that the reading scale is
next to the “lens” (b).
4 Install the bottom (a) and introduce the egg turning rod (b) or rather the
automatic turning device (see the instructions of the automatic egg turning device).
5 Install the separators inside the speci# c trays. If it is di& cult to introduce
the separators in the machine due to friction, slightly press the two ends to
facilitate their introduction.
6 Fill in the pan with lukewarm water. It is recommendable to perform the operation approx. every 2 days or, at any rate, when necessary.
7 Connect the plug to the mains socket (with the incubator closed and
without eggs). Wait until the green warning light, which is always ON at
the beginning, will start operating in intermittent mode signalling that the
temperature is starting to stabilize.
8 Wait about 1 hour; after that, check that the liquid inside the
thermometer scale has reached the red reference line or 100°F without
necessarily coinciding with it (b); if not so, adjust the temperature by
increasing (in clockwise direction) or reducing it (in counter-clockwise
direction) by slowly rotating the adjustment screw with a small screwdriver
(a); refer to the warning light that will initially be always ON or always
OFF, and then it will start operating in an intermittent way only when the
internal temperature reaches the value that follows the “adjusted” value.
It is recommendable to perform this operation only in case of need and in a gentle way.
9 When the internal temperature has stabilised (red line or 100°F),
disconnect the plug from the mains socket, remove the lid and put the
eggs in the speci# c egg compartment (see the eggs types table), leaving a
minimum space between the separators.
Close the lid once again and connect the plug into the mains socket.
It is recommendable to use a calendar to note down the incubation date.
10 If you do not have an automatic egg turning device: manually rotate
all eggs at least twice a day (morning-evening) by using the speci# c egg
turning rod. Note: before opening the incubator, for any reason, you have always to disconnect the plug from the mains socket to prevent sudden temperature changes; however, it is recommendable to open the incubator only to perform the necessary operations and for short times.
11 During the last 3 days before egg-hatching, prepare the incubator: -
completely # ll the pan with water (a) – Remove the separators (b) – Put the
bottom at the centre of the incubator, install 2 separators at the ends of the
bottom, thus eliminating possible openings and preventing the chicks from
falling (c) - Do not rotate the eggs any more (d) (or deactivate the automatic
egg turning device by disconnecting the plug from the mains socket) –
During these 3 days, open the incubator only if it is strictly necessary.Chick births can start 1 day before and end 2 days after the pre-established
date (ex. 21 days for chickens).
DISCLAIMERAfter updates, modi� cations and/or technical innovations, part of the instructions, the speci� cations and the images included in this documentation may be di! erent. The items that are described herewith must be considered only for illustration purposes and may not be applicable to you speci� c case. It is not possible to obtain legal rights or claims from the description to be found in this manual.
EN