Embed Size (px)
Citation preview
MvvmControlChange StepbyStep v1.docx 1 of 15 10/26/2012
Application Description This MVVM WPF application includes a WPF Window with a contentControl and multiple UserControls the user can navigate between with button controls. The contentControls will have data bound text blocks and screen changes driven by RelayCommands and Messages. High‐level Procedure Overview A high‐level procedure to achieve the application solution utilizes a MvvmLight WPF4 template in VS 2010.
1. Start a. First we will test that the Mvvm Light Tool Kit sample kit runs.
i. Select New Project, Select MvvmLight (WPF4) Visual C#. Name the Application MvvmControlChange. Place it in the location of your Choice.
2. Folders and Files a. Next we will add a new main page and usercontrol pages and their viewmodels. b. We’ll clean up the application by deleting unnecessary items that came w/ the toolkit
sample. 3. Overhead
a. We’ll update the ‘overhead’ files app.xaml and ViewModelLocator.cs. 4. View & ViewModel Interaction
a. We’ll add content and bind the content to the ViewModel (i.e. properties) b. Add Code Behind c. Messaging
i. Add messaging and code behind interaction. 5. RUN!
STEP BY STEP to Build the Application
1. Start a. Open a MvvmLight (WPF4) application and name it MvvmControlChange.
MvvmControlChange StepbyStep v1.docx 2 of 15 10/26/2012
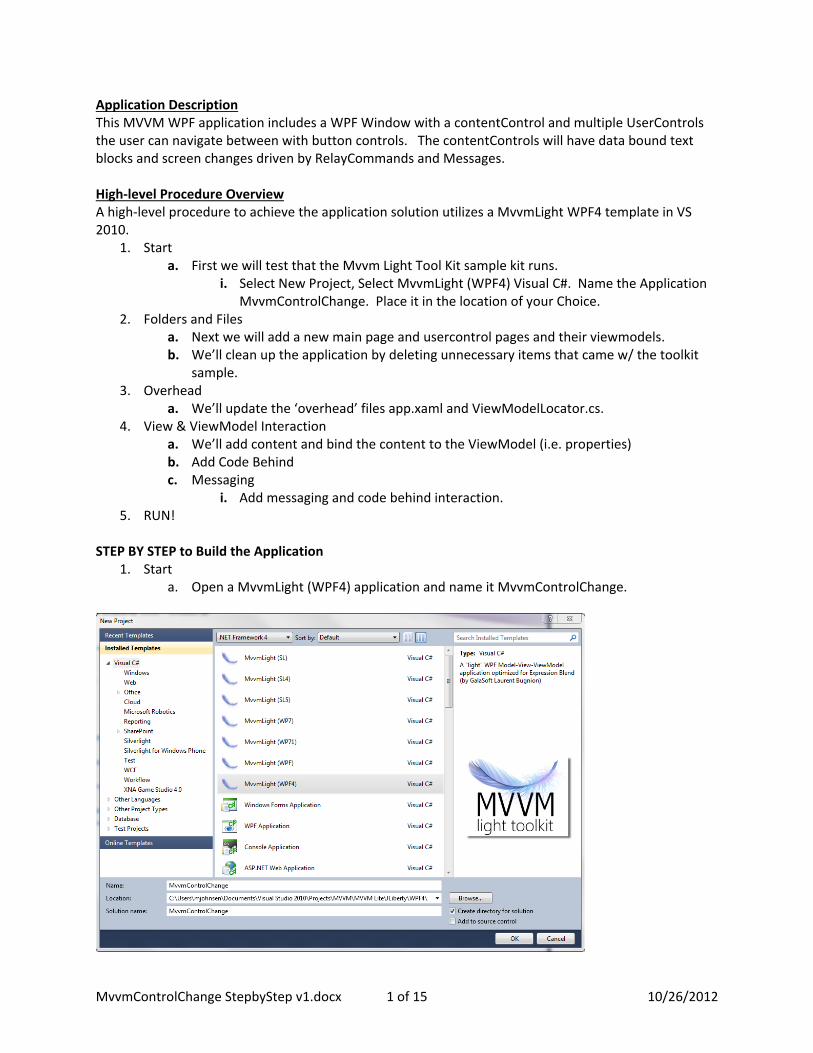
b. F5 to test that the “Welcome to MVVM Light” WPF Window opens properly.
c. Stop debugging (close the window) to start modifying! 2. Create Folders and Files
a. Add Folders i. Add a folder named ‘Content’ to the Root VS Solution by right clicking on the
MvvmControlChange Solution.
MvvmControlChange StepbyStep v1.docx 3 of 15 10/26/2012
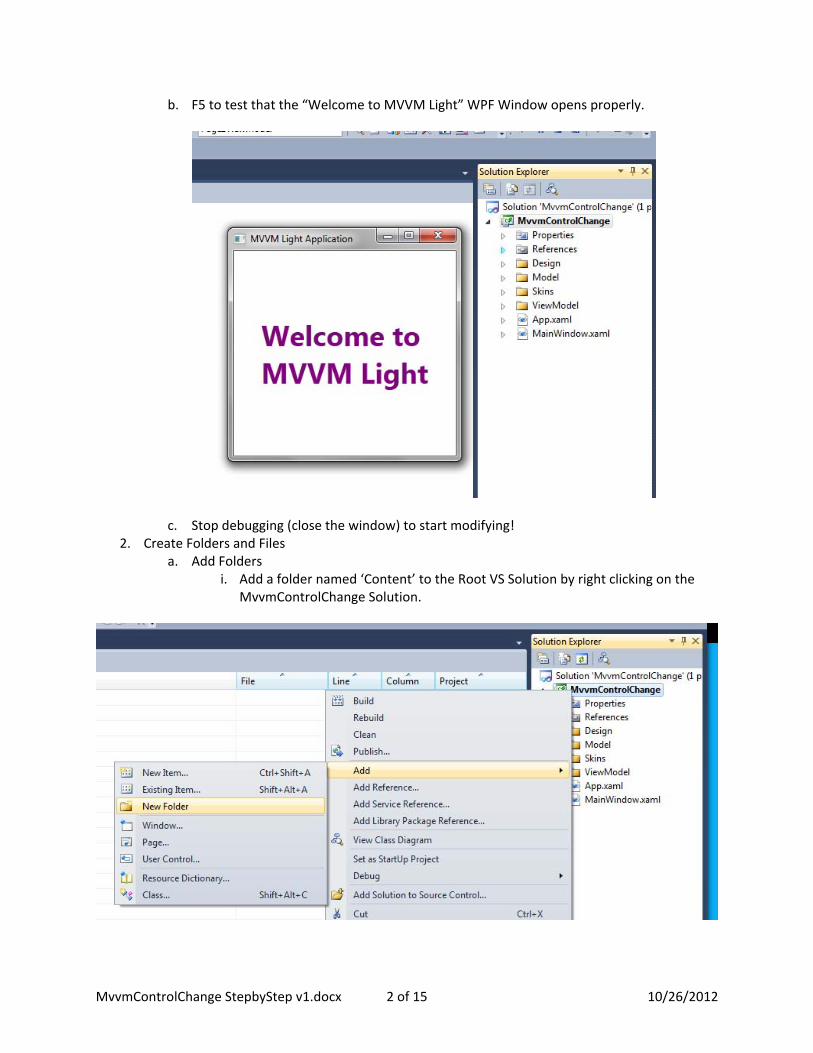
ii. Add three page folders to the Content Folder named MainPage, Page2, and Page3.
iii. Add the sub‐folders ‘View’ and ‘ViewModel’ to each of the Page folders. The finished folder structure will look like:
b. Add Files to Folders i. Each View folder will receive a MvvmView (WPF) template. Add Item to View
folder: Right Click on target View Folder, Add, New Item, MvvmView (WPF). Add the suffix ‘View’ to the Page folder name to create the xaml filename. You will have the following three view names: MainPageView, Page2View, and Page3View.
ii. Each ViewModel folder will receive a MvvmViewModel (WPF) template. Add Item to ViewModel Folder: Right Click on target ViewModel Folder, Add, New Item, MvvmViewModel (WPF). You will have the following three ViewModel names: MainPageViewModel, Page2ViewModel, and Page3ViewModel.
iii. The completed folders and files will look like:

MvvmControlChange StepbyStep v1.docx 4 of 15 10/26/2012
iv. Do not change anything yet, we’ll come back and modify the files later. c. Remove Unused Items in project
i. Delete the MainWindow.xaml in the root directory and in the ViewModel directory delete MainViewModel.cs. You could also delete skins, Design, and Model files, but we’ll leave them in for now. You should leave the folders, but the files can be deleted when you start your ‘real’ application.
3. Overhead ‐ Modify Files MVVM Style a. App.xaml
i. Double Click on App.xaml. Change the StartupUri to following: StartupUri="Content/MainPage/View/MainPageView.xaml" Recall that the MainView.xaml file was deleted and the MainPageView.xaml file was added and is now the startup window.
ii. Save the file. b. ViewModelLocator.cs
i. Double click the ViewModelLocator.cs file. ii. First, point to the locations of the ViewModels in the using statements by
adding:

MvvmControlChange StepbyStep v1.docx 5 of 15 10/26/2012
using MvvmControlChange.Content.MainPage.ViewModel; using MvvmControlChange.Content.Page2.ViewModel; using MvvmControlChange.Content.Page3.ViewModel;
iii. Now, register the ViewModels w/ the SimpleIoc in the static ViewModelLocator(). Delete the line SimpleIoc.Default. Register<MainViewModel>(); and add the following:
SimpleIoc.Default.Register<MainPageViewModel>(); SimpleIoc.Default.Register<Page2ViewModel>(); SimpleIoc.Default.Register<Page3ViewModel>();
iv. ViewModel Properties. Ensure you have snippets installed. Tools/Code Snippets Manager. Ensure you have the CSharp Snippets:
v. If the code snippets are not shown, select Add and navigate to the folder ‘like this’: C:\Program Files (x86)\Laurent Bugnion (GalaSoft)\Mvvm Light Toolkit\Snippets\CSharp
vi. Type in the snippet ‘mvvmlocatorproperty’ and hit Tab.

MvvmControlChange StepbyStep v1.docx 6 of 15 10/26/2012
vii. Too much code is thrown in, remove the static ViewModleLocator:
static ViewModelLocator() { ServiceLocator.SetLocatorProvider(() => SimpleIoc.Default); SimpleIoc.Default.Register<ViewModelType>(); }
viii. Change the property snippet to the following:
public MainPageViewModel MainPageViewModel { get { return ServiceLocator.Current.GetInstance<MainPageViewModel>(); } }
Do that for Page2ViewModel and Page3ViewModel as well.
ix. You should have some squigglies under the MainViewModel property. Delete that property as you replaced the MainView with MainPageView.
x. You are COMPLETE with your ViewModleLocator.cs to this point. Good job. xi. You need one more component for later and I consider it part of the overhead.
You need to add a c# class named GoToPageMessage.cs. The code in it is VERY simple. It is a property to be placed in the class:
public string PageName { get; set; }
4. View and ViewModel Interaction
You have your xaml view pages in the project and updated the ViewModelLocator.cs and App.xaml files. But, there is no content on your views. You can actually debug (F5) the program now and it will run. What does it show? A blank screen!! Ugh…
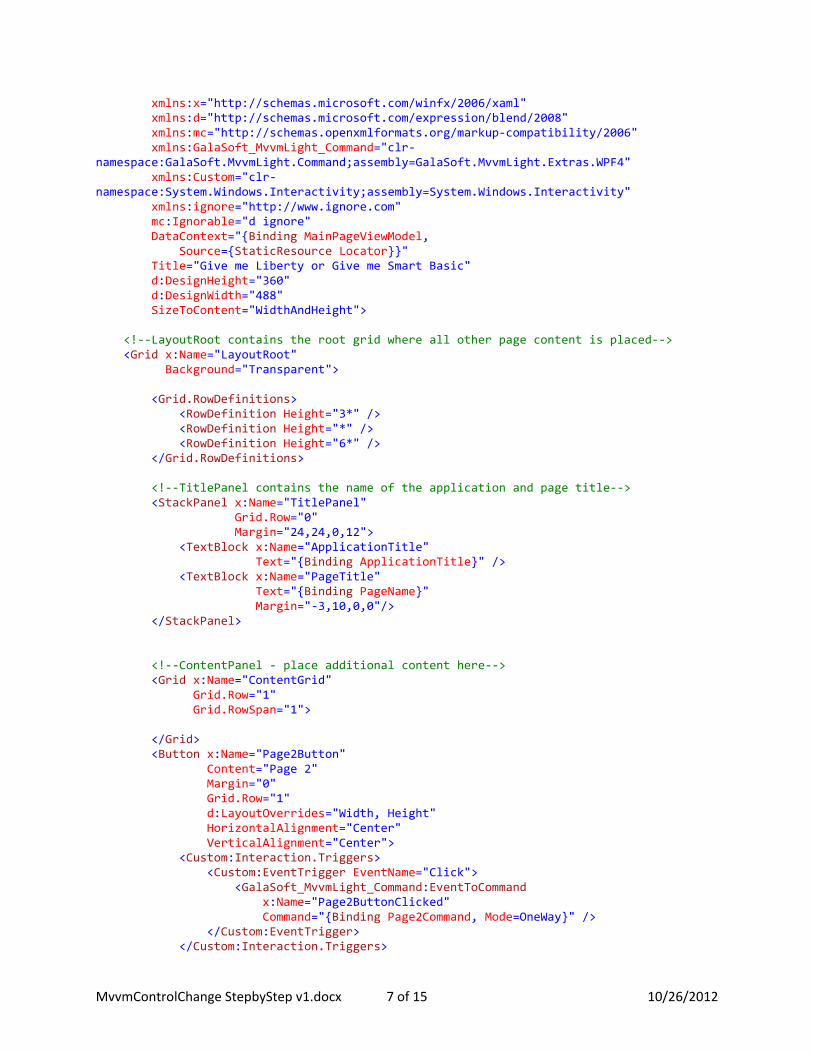
a. Let’s Add Content to the Views. For simplicity’s sake, double click on MainPageView.xaml and copy over the existing code with the following (We’ll go over the details later (in class)):
<Window x:Class="MvvmControlChange.Content.MainPage.View.MainPageView" xmlns="http://schemas.microsoft.com/winfx/2006/xaml/presentation"
MvvmControlChange StepbyStep v1.docx 7 of 15 10/26/2012
xmlns:x="http://schemas.microsoft.com/winfx/2006/xaml" xmlns:d="http://schemas.microsoft.com/expression/blend/2008" xmlns:mc="http://schemas.openxmlformats.org/markup‐compatibility/2006" xmlns:GalaSoft_MvvmLight_Command="clr‐namespace:GalaSoft.MvvmLight.Command;assembly=GalaSoft.MvvmLight.Extras.WPF4" xmlns:Custom="clr‐namespace:System.Windows.Interactivity;assembly=System.Windows.Interactivity" xmlns:ignore="http://www.ignore.com" mc:Ignorable="d ignore" DataContext="{Binding MainPageViewModel, Source={StaticResource Locator}}" Title="Give me Liberty or Give me Smart Basic" d:DesignHeight="360" d:DesignWidth="488" SizeToContent="WidthAndHeight"> <!‐‐LayoutRoot contains the root grid where all other page content is placed‐‐> <Grid x:Name="LayoutRoot" Background="Transparent"> <Grid.RowDefinitions> <RowDefinition Height="3*" /> <RowDefinition Height="*" /> <RowDefinition Height="6*" /> </Grid.RowDefinitions> <!‐‐TitlePanel contains the name of the application and page title‐‐> <StackPanel x:Name="TitlePanel" Grid.Row="0" Margin="24,24,0,12"> <TextBlock x:Name="ApplicationTitle" Text="{Binding ApplicationTitle}" /> <TextBlock x:Name="PageTitle" Text="{Binding PageName}" Margin="‐3,10,0,0"/> </StackPanel> <!‐‐ContentPanel ‐ place additional content here‐‐> <Grid x:Name="ContentGrid" Grid.Row="1" Grid.RowSpan="1"> </Grid> <Button x:Name="Page2Button" Content="Page 2" Margin="0" Grid.Row="1" d:LayoutOverrides="Width, Height" HorizontalAlignment="Center" VerticalAlignment="Center"> <Custom:Interaction.Triggers> <Custom:EventTrigger EventName="Click"> <GalaSoft_MvvmLight_Command:EventToCommand x:Name="Page2ButtonClicked" Command="{Binding Page2Command, Mode=OneWay}" /> </Custom:EventTrigger> </Custom:Interaction.Triggers>

MvvmControlChange StepbyStep v1.docx 8 of 15 10/26/2012
</Button> <ContentControl Grid.Row="2" Height="204" HorizontalAlignment="Left" Name="contentControl1" VerticalAlignment="Top" Width="466" /> </Grid> </Window>
a. If the View will be a UserControl, changes to the *.xaml and *.xaml.cs need to be made
a. *.xaml: i. Change <Window to <UserControl and </Window> to </UserControl>.
b. *.xaml.cs: i. Add: using System.Windows.Controls; ii. Change public partial class MainPageView : Window to public
partial class MvvmView1 : UserControl iii. Rebuild F6 to remove squigglies, if necessary.
b. Copy over the code for the Page2View.xaml with the following:
<UserControl x:Class="MvvmControlChange.Content.Page2.View.Page2View" xmlns="http://schemas.microsoft.com/winfx/2006/xaml/presentation" xmlns:x="http://schemas.microsoft.com/winfx/2006/xaml" xmlns:d="http://schemas.microsoft.com/expression/blend/2008" xmlns:mc="http://schemas.openxmlformats.org/markup‐compatibility/2006" xmlns:GalaSoft_MvvmLight_Command="clr‐namespace:GalaSoft.MvvmLight.Command;assembly=GalaSoft.MvvmLight.Extras.WPF4" xmlns:Custom="clr‐namespace:System.Windows.Interactivity;assembly=System.Windows.Interactivity" xmlns:ignore="http://www.ignore.com" mc:Ignorable="d ignore" DataContext="{Binding Page2ViewModel, Source={StaticResource Locator}}" d:DesignHeight="194" d:DesignWidth="256"> <Grid> <Grid.RowDefinitions> <RowDefinition Height="Auto" /> <RowDefinition Height="43*" /> <RowDefinition Height="65*" /> </Grid.RowDefinitions> <StackPanel x:Name="TitlePanel" Grid.Row="0" Margin="24,24,0,12"> <TextBlock x:Name="ApplicationTitle" Text="{Binding ApplicationTitle}" /> <TextBlock x:Name="PageTitle" Text="{Binding PageName}" Margin="‐3,10,0,0" /> </StackPanel>

MvvmControlChange StepbyStep v1.docx 9 of 15 10/26/2012
<Button x:Name="Page3Button" Content="Page 3" Grid.Row="1" Height="30" HorizontalAlignment="Left" Margin="27,9,0,0" VerticalAlignment="Top" Width="72" d:LayoutOverrides="Width, Height"> <Custom:Interaction.Triggers> <Custom:EventTrigger EventName="Click"> <GalaSoft_MvvmLight_Command:EventToCommand x:Name="Page3ButtonClicked" Command="{Binding Page3Command, Mode=OneWay}" /> </Custom:EventTrigger> </Custom:Interaction.Triggers> </Button> </Grid> </UserControl>
c. And, lastly copy over the code for Page3View.xaml.
<UserControl x:Class="MvvmControlChange.Content.Page3.View.Page3View" xmlns="http://schemas.microsoft.com/winfx/2006/xaml/presentation" xmlns:x="http://schemas.microsoft.com/winfx/2006/xaml" xmlns:d="http://schemas.microsoft.com/expression/blend/2008" xmlns:mc="http://schemas.openxmlformats.org/markup‐compatibility/2006" xmlns:ignore="http://www.ignore.com" mc:Ignorable="d ignore" DataContext="{Binding Page3ViewModel, Source={StaticResource Locator}}" d:DesignHeight="169" d:DesignWidth="255"> <Grid> <Grid.RowDefinitions> <RowDefinition Height="Auto" /> <RowDefinition Height="43*" /> <RowDefinition Height="65*" /> </Grid.RowDefinitions> <StackPanel x:Name="TitlePanel" Grid.Row="0" Margin="24,24,0,12"> <TextBlock x:Name="InfoTitlePage3" Text="{Binding InfoTitlePage3}" /> <TextBlock x:Name="PageTitle" Text="{Binding PageTitle}" Margin="‐3,10,0,0" /> </StackPanel> </Grid> </UserControl>
d. Bind to ViewModel
a. When you copied over the code, you may not have noticed, but you included bindings for your textblocks, among other goodies… Now, you need to connect

MvvmControlChange StepbyStep v1.docx 10 of 15 10/26/2012
the bindings in xaml to the properties in the ViewModels. Copy the following code into the view models:
b. MainPageViewModel public string ApplicationTitle { get { return "MVVM LIGHT 1 more Edwin"; } } public string PageName { get { return "Page 1. Please message away from me"; } } public string Welcome { get { return "Welcome to Page 1"; } }
c. Before you copy Pag2ViewModel, test it. Press F6 and open MainPageView.xaml, do the bindings work?
d. Page2ViewModel
public string ApplicationTitle { get { return "MVVM LIGHT p2"; } } public string PageName { get { return "Page 2"; } } public string Welcome { get { return "Welcome to Page 2"; } }
e. Page3ViewModel

MvvmControlChange StepbyStep v1.docx 11 of 15 10/26/2012
public string InfoTitlePage3 { get { return "MVVM LIGHT p3"; } } public string PageTitle { get { return "Page 3"; } }
f. Now you have your properties for the textblocks in and you can see the results.
If you run the code now, it is a little underwhelming. There is no interaction between the views. Don’t’ fret, Last steps coming up!
e. Commands and Messaging
a. You need to add the code change between the views. That is accomplished via commands and messaging. In the Mvvm toolkit, the commands are handled by RelayCommands that Laurent put together.
b. Xaml i. Now would be a good time to go look at the xaml in
MainPageView.xaml and Page2View.xaml to see the command code in the xaml. Looks like this in MainPageView.xaml.
<Button x:Name="Page2Button" Content="Page 2" Margin="0" Grid.Row="1" d:LayoutOverrides="Width, Height" HorizontalAlignment="Center" VerticalAlignment="Center"> <Custom:Interaction.Triggers> <Custom:EventTrigger EventName="Click"> <GalaSoft_MvvmLight_Command:EventToCommand x:Name="Page2ButtonClicked" Command="{Binding Page2Command, Mode=OneWay}" /> </Custom:EventTrigger> </Custom:Interaction.Triggers> </Button>
There’s also some code in the window definition that is req’d: xmlns:GalaSoft_MvvmLight_Command="clr‐namespace:GalaSoft.MvvmLight.Command;assembly=GalaSoft.MvvmLight.Extras.WPF4" xmlns:Custom="clr‐namespace:System.Windows.Interactivity;assembly=System.Windows.Interactivity"
ii. Let’s add code. Back to the MainPageViewModel.cs and add the following code:

MvvmControlChange StepbyStep v1.docx 12 of 15 10/26/2012
using GalaSoft.MvvmLight.Command; using GalaSoft.MvvmLight.Messaging;
Later add: public RelayCommand Page2Command { get; private set; }
Add this in the public MainPageViewModel() Constructor: Page2Command = new RelayCommand(() => GoToPage2());
But GoToPage2() is not in the code, so add that as well: private object GoToPage2() { var msg = new GoToPageMessage() { PageName = "Page2View" }; Messenger.Default.Send<GoToPageMessage>(msg); //System.Windows.MessageBox.Show("Navigate to Page 2!"); return null; }
iii. Page2ViewModel.cs should look like this:
using GalaSoft.MvvmLight; using GalaSoft.MvvmLight.Command; using GalaSoft.MvvmLight.Messaging; namespace MvvmControlChange.Content.Page2.ViewModel { /// <summary> /// This class contains properties that a View can data bind to. /// <para> /// See http://www.galasoft.ch/mvvm /// </para> /// </summary> public class Page2ViewModel : ViewModelBase { /// <summary> /// Initializes a new instance of the Page2ViewModel class. /// </summary> public Page2ViewModel() { Page3Command = new RelayCommand(() => GoToPage3()); } public string ApplicationTitle { get { return "MVVM LIGHT p2"; } }

MvvmControlChange StepbyStep v1.docx 13 of 15 10/26/2012
public string PageName { get { return "Page 2"; } } public string Welcome { get { return "Welcome to Page 2"; } } public RelayCommand Page3Command { get; private set; } private object GoToPage3() { var msg = new GoToPageMessage() { PageName = "Page3View" }; Messenger.Default.Send<GoToPageMessage>(msg); //System.Windows.MessageBox.Show("Navigate to Page 2!"); return null; } } }
c. You still will NOT have page changing. You need to add the code behind!! d. Add Code Behind. Open MainPageView.xaml.cs and copy the following code
into place… using System.Windows; using MvvmControlChange.ViewModel; using GalaSoft.MvvmLight.Messaging; using MvvmControlChange.Content.Page2.View; using MvvmControlChange.Content.Page3.View; namespace MvvmControlChange.Content.MainPage.View { /// <summary> /// Description for MainPageView. /// </summary> public partial class MainPageView : Window { /// <summary> /// Initializes a new instance of the MainPageView class. /// </summary> public MainPageView()

MvvmControlChange StepbyStep v1.docx 14 of 15 10/26/2012
{ InitializeComponent(); Closing += (s, e) => ViewModelLocator.Cleanup(); Messenger.Default.Register<GoToPageMessage> ( this, (action) => ReceiveMessage(action) ); } private Page2View _page2View; private Page2View Page2View { get { if (_page2View == null) _page2View = new Page2View(); return _page2View; } } private Page3View _page3View; private Page3View Page3View { get { if (_page3View == null) _page3View = new Page3View(); return _page3View; } } private object ReceiveMessage(GoToPageMessage action) { // this.contentControl1.Content = this.Page2View; //this shows what pagename property is!! switch (action.PageName) { case "Page2View": if (this.contentControl1.Content != this.Page2View) this.contentControl1.Content = this.Page2View; break; case "Page3View": if (this.contentControl1.Content != this.Page3View) this.contentControl1.Content = this.Page3View; break; default: break; } // string testII = action.PageName.ToString(); // System.Windows.MessageBox.Show("You were successful switching to " + testII + "."); return null; } }

MvvmControlChange StepbyStep v1.docx 15 of 15 10/26/2012
}
e. You’re DONE!!! Save, F5.