Embed Size (px)
Citation preview

8/13/2019 Arduino Class 1
http://slidepdf.com/reader/full/arduino-class-1 1/67
LAB 120
Introduction to Arduino and Electronics
Class 1
23 June 2009 - AS220 Labs - John Duksta
8/13/2019 Arduino Class 1
http://slidepdf.com/reader/full/arduino-class-1 2/67
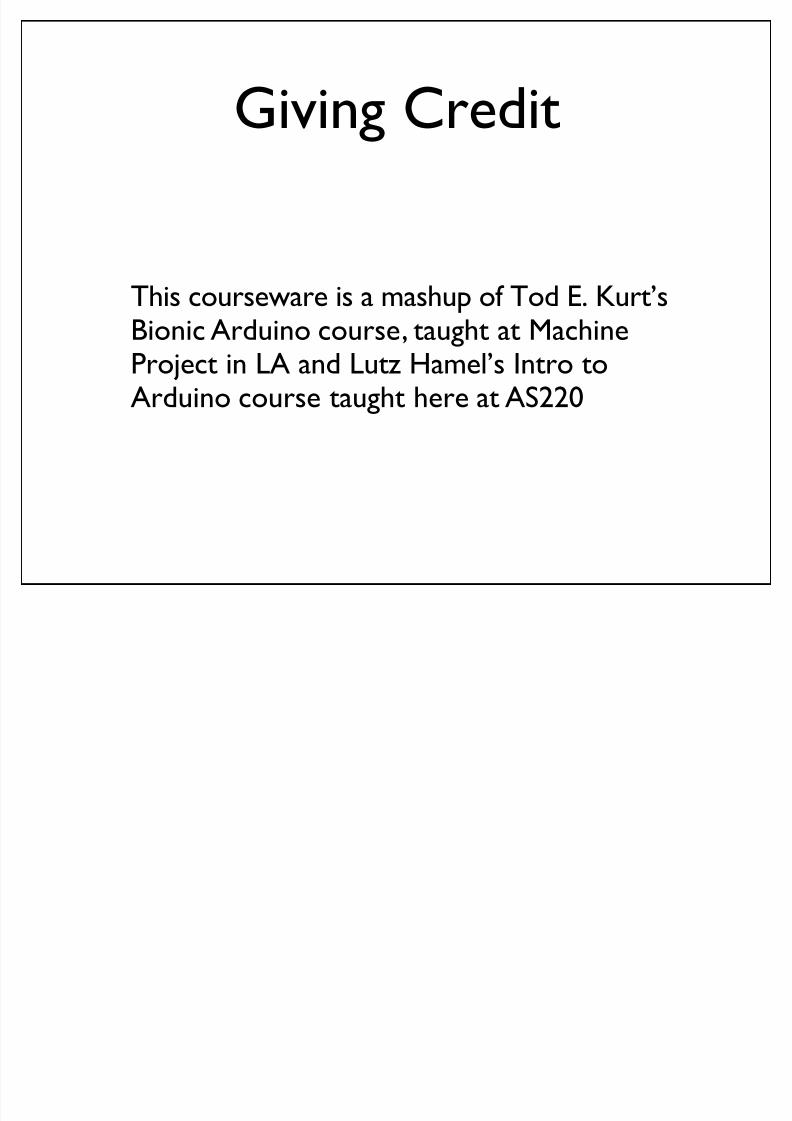
Giving Credit
This courseware is a mashup of Tod E. Kurt’sBionic Arduino course, taught at MachineProject in LA and Lutz Hamel’s Intro toArduino course taught here at AS220
8/13/2019 Arduino Class 1
http://slidepdf.com/reader/full/arduino-class-1 3/67

8/13/2019 Arduino Class 1
http://slidepdf.com/reader/full/arduino-class-1 4/67
What’s for Today• Introduction to Arduino
•Setting up your Arduino Environment
• Your first Arduino sketch
• Basic digital input and output
• Basic digital sensor inputs
• Making LEDs glow and blink on command
• How to read buttons & switches
8/13/2019 Arduino Class 1
http://slidepdf.com/reader/full/arduino-class-1 5/67
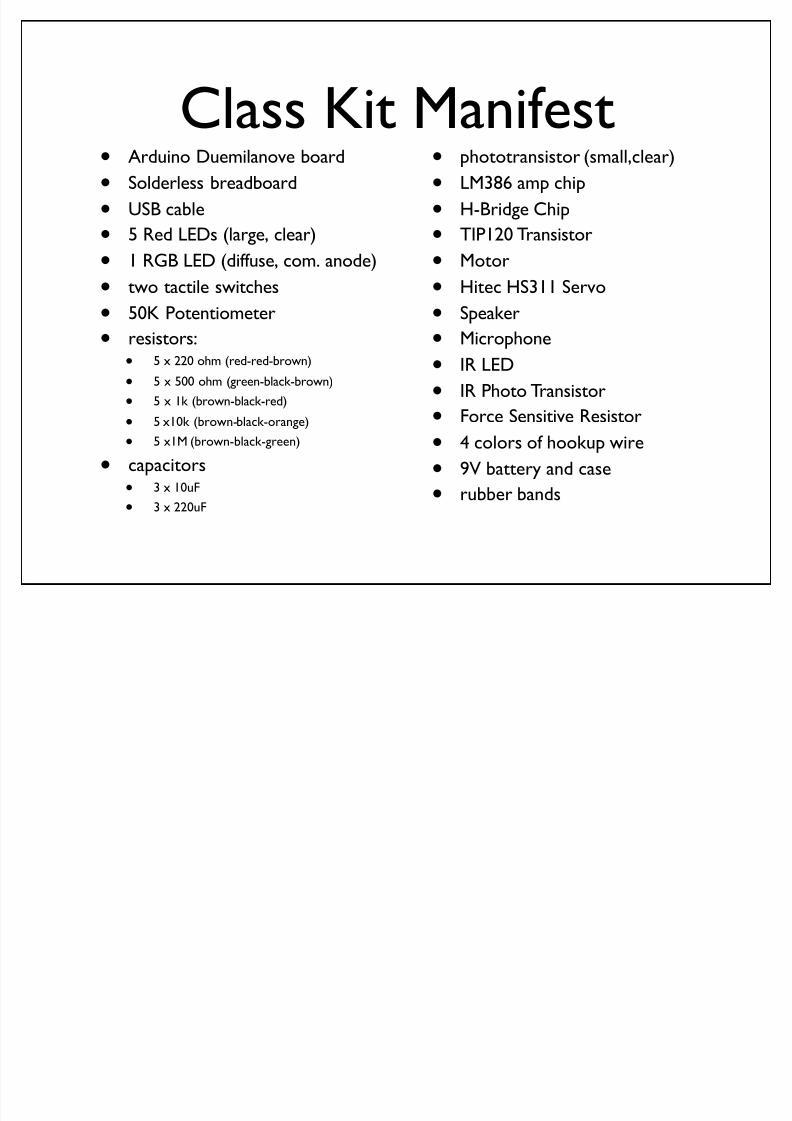
Class Kit Manifest• Arduino Duemilanove board
• Solderless breadboard
• USB cable
• 5 Red LEDs (large, clear)
•1 RGB LED (diffuse, com. anode)
• two tactile switches
• 50K Potentiometer
• resistors:
• 5 x 220 ohm (red-red-brown)
• 5 x 500 ohm (green-black-brown)
• 5 x 1k (brown-black-red)
• 5 x10k (brown-black-orange)
• 5 x1M (brown-black-green)
• capacitors
• 3 x 10uF
• 3 x 220uF
• phototransistor (small,clear)
• LM386 amp chip
• H-Bridge Chip
• TIP120 Transistor
•Motor
• Hitec HS311 Servo
• Speaker
• Microphone
• IR LED
• IR Photo Transistor
• Force Sensitive Resistor
• 4 colors of hookup wire
• 9V battery and case
• rubber bands
8/13/2019 Arduino Class 1
http://slidepdf.com/reader/full/arduino-class-1 6/67
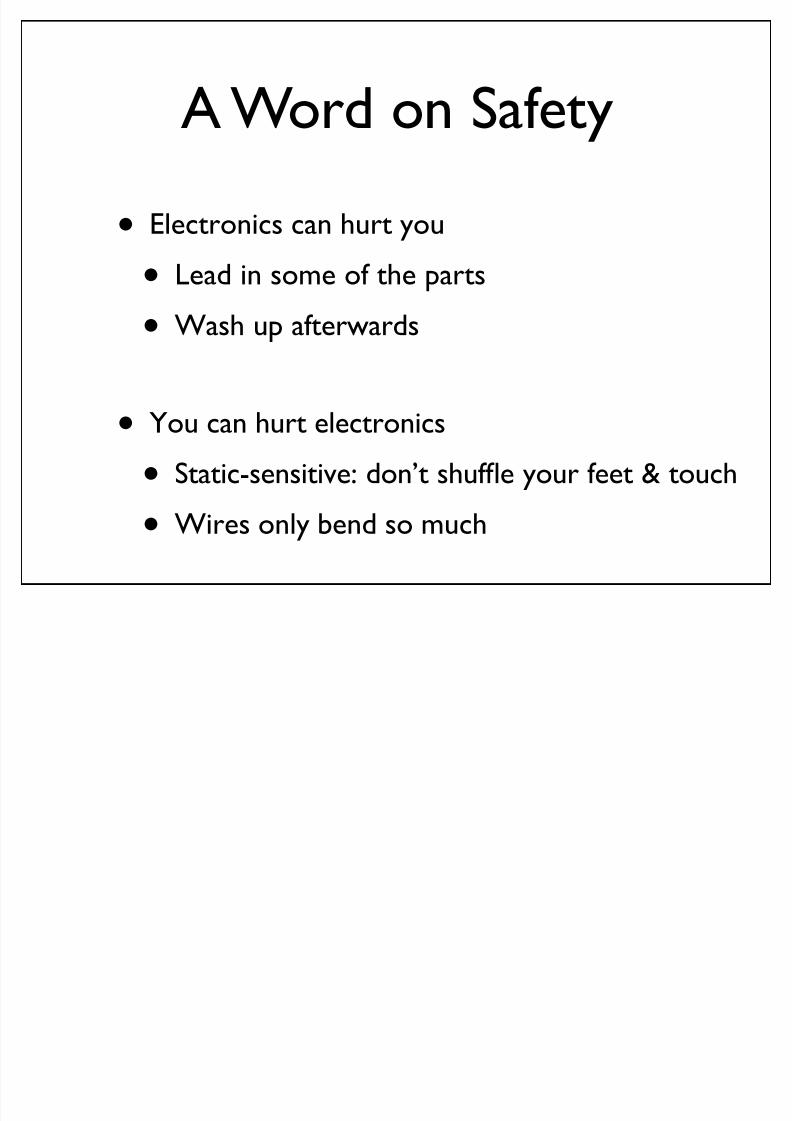
A Word on Safety• Electronics can hurt you
• Lead in some of the parts
• Wash up afterwards
• You can hurt electronics
• Static-sensitive: don’t shuffle your feet & touch
•Wires only bend so much

8/13/2019 Arduino Class 1
http://slidepdf.com/reader/full/arduino-class-1 7/67
What is Arduino?The word “Arduino” can mean 3 things
A physical pieceof hardware
A programmingenvironment
A community& philosophy

8/13/2019 Arduino Class 1
http://slidepdf.com/reader/full/arduino-class-1 8/67
Arduino
Philosophy & Community
• Open Source Physical Computing Platform
• “open source hardware”
• open source: free to inspect & modify
• physical computing. er, what? ubiquitous computing, pervasive computing,
ambient intelligence, calm computing, everyware, spimes, blogjects, smart objects...
• Community-built
• Examples wiki (the “playground”) editable by anyone
• Forums with lots of helpful people
8/13/2019 Arduino Class 1
http://slidepdf.com/reader/full/arduino-class-1 9/67
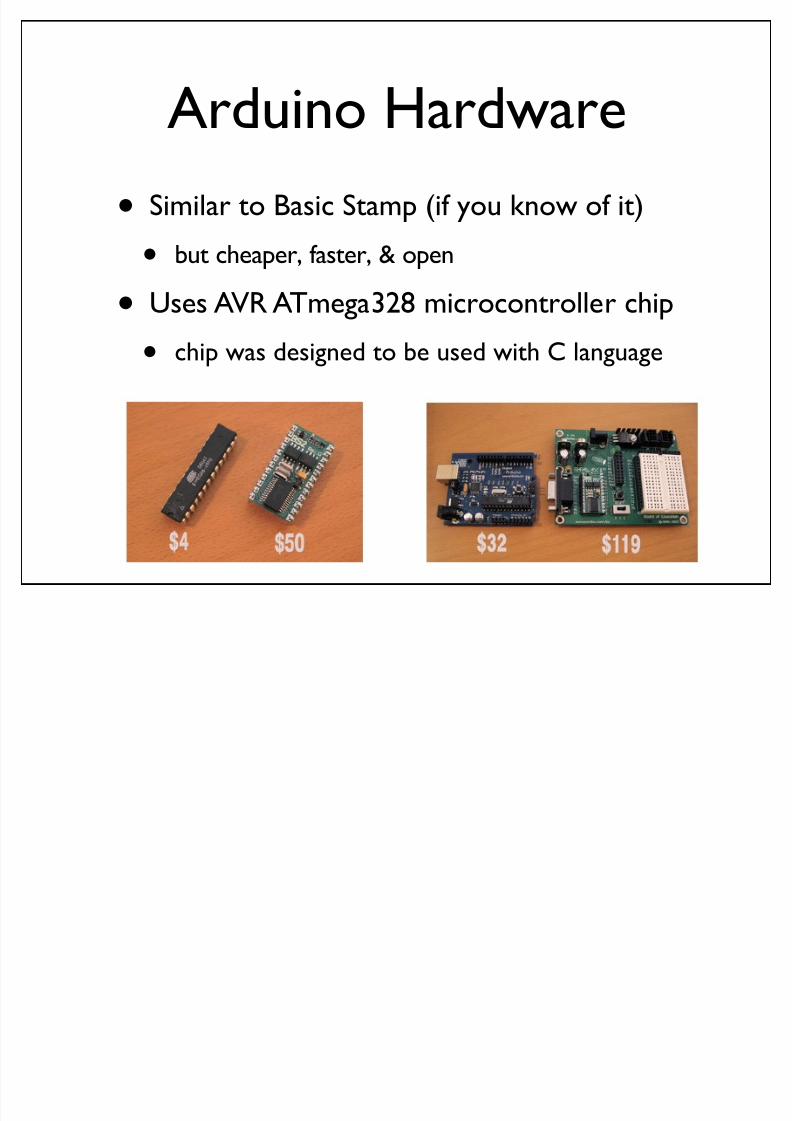
Arduino Hardware• Similar to Basic Stamp (if you know of it)
•but cheaper, faster, & open
• Uses AVR ATmega328 microcontroller chip
• chip was designed to be used with C language

8/13/2019 Arduino Class 1
http://slidepdf.com/reader/full/arduino-class-1 10/67
Arduino Duemilanove Board
2.7”
2”

8/13/2019 Arduino Class 1
http://slidepdf.com/reader/full/arduino-class-1 11/67
Arduino Capabilities• 32 kBytes of Flash program memory
• 2 kByte of RAM
• 16 MHz (Apple II: 1 MHz)
• Inputs and Outputs
• 13 digital input/output pins
• 5 analog input pins
• 6 analog output pins*
• Completely stand-alone: doesn’t need a
computer once programmed

8/13/2019 Arduino Class 1
http://slidepdf.com/reader/full/arduino-class-1 12/67
Arduino Hardware Variety
USB
“Stamp”-sized
Bluetooth
LilyPad(for clothing)
DIY
many different variations to suite your needs
Boarduino Kit

8/13/2019 Arduino Class 1
http://slidepdf.com/reader/full/arduino-class-1 13/67
Arduino Terminology“sketch” – a program you write to run on an Arduino board
“pin” – an input or output connected to something.
e.g. output to an LED, input from a knob.
“digital ” – value is either HIGH or LOW.
(aka on/off, one/zero) e.g. switch state
“analog ” – value ranges, usually from 0-255.
e.g. LED brightness, motor speed, etc.

8/13/2019 Arduino Class 1
http://slidepdf.com/reader/full/arduino-class-1 14/67
Arduino Software• Like a text editor
• View/write/edit sketches
• But then you programthem into hardware

8/13/2019 Arduino Class 1
http://slidepdf.com/reader/full/arduino-class-1 15/67
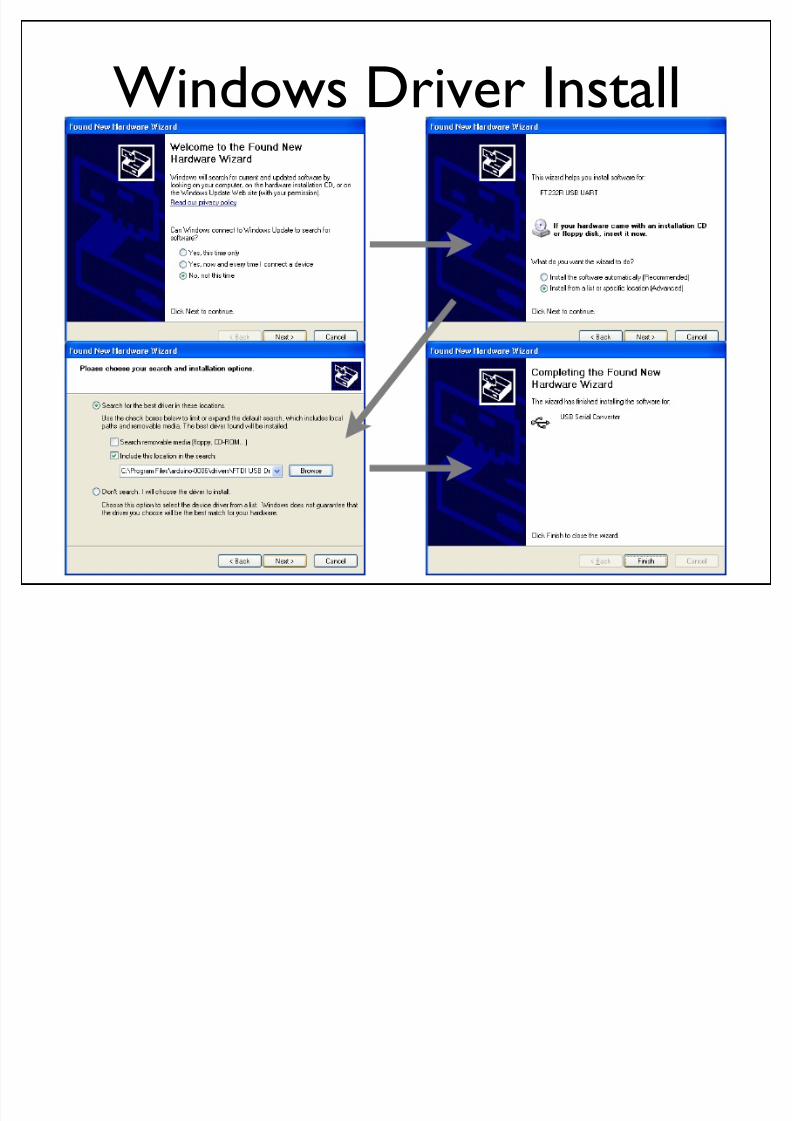
Installing Arduino
1. Get the Arduino software & unzip it2. Plug in Arduino board
3. Install the driver
4. Reboot
5. Run the Arduino program
6. Tell Arduino (program) about Arduino (board)
The Steps

8/13/2019 Arduino Class 1
http://slidepdf.com/reader/full/arduino-class-1 16/67
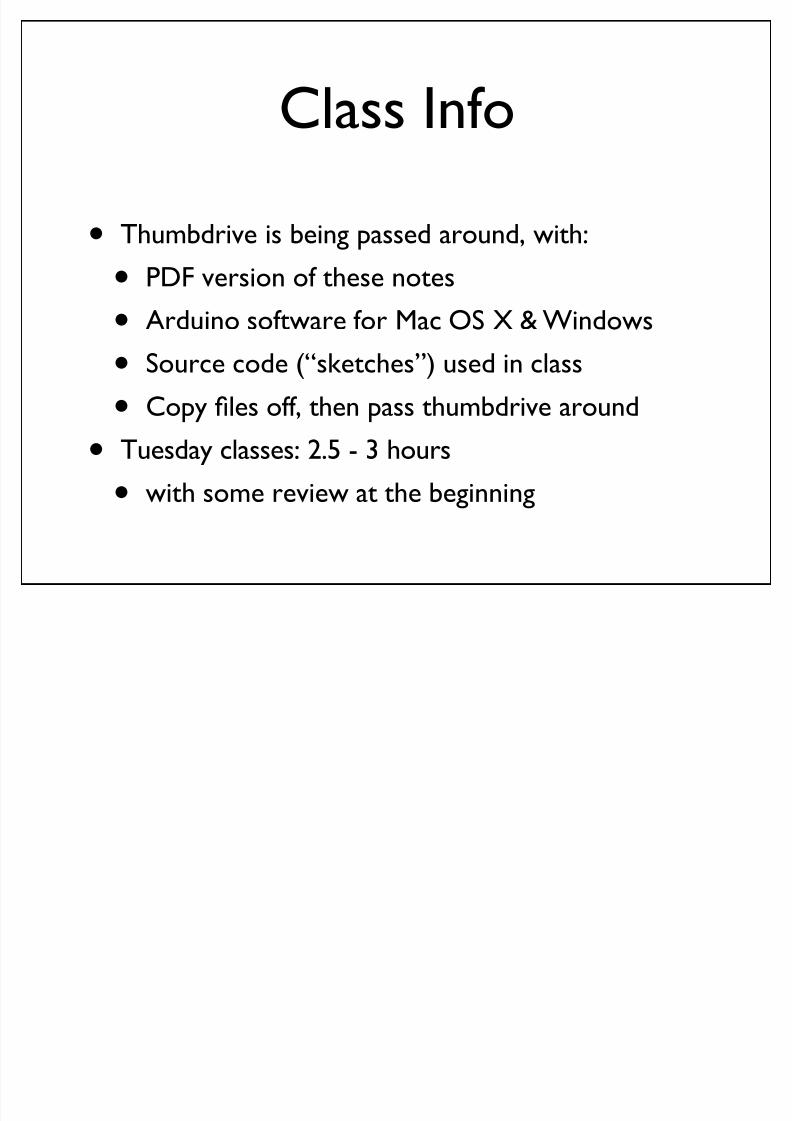
Getting and Unpacking• On the thumbdrives
• “arduino-0016-win.zip” for Windows
• “arduino-0016-mac.zip” for Mac OS X• Unzip the zip file. Double-click on Mac
On Windows, right-click
•Find the “drivers” directory inside
8/13/2019 Arduino Class 1
http://slidepdf.com/reader/full/arduino-class-1 17/67
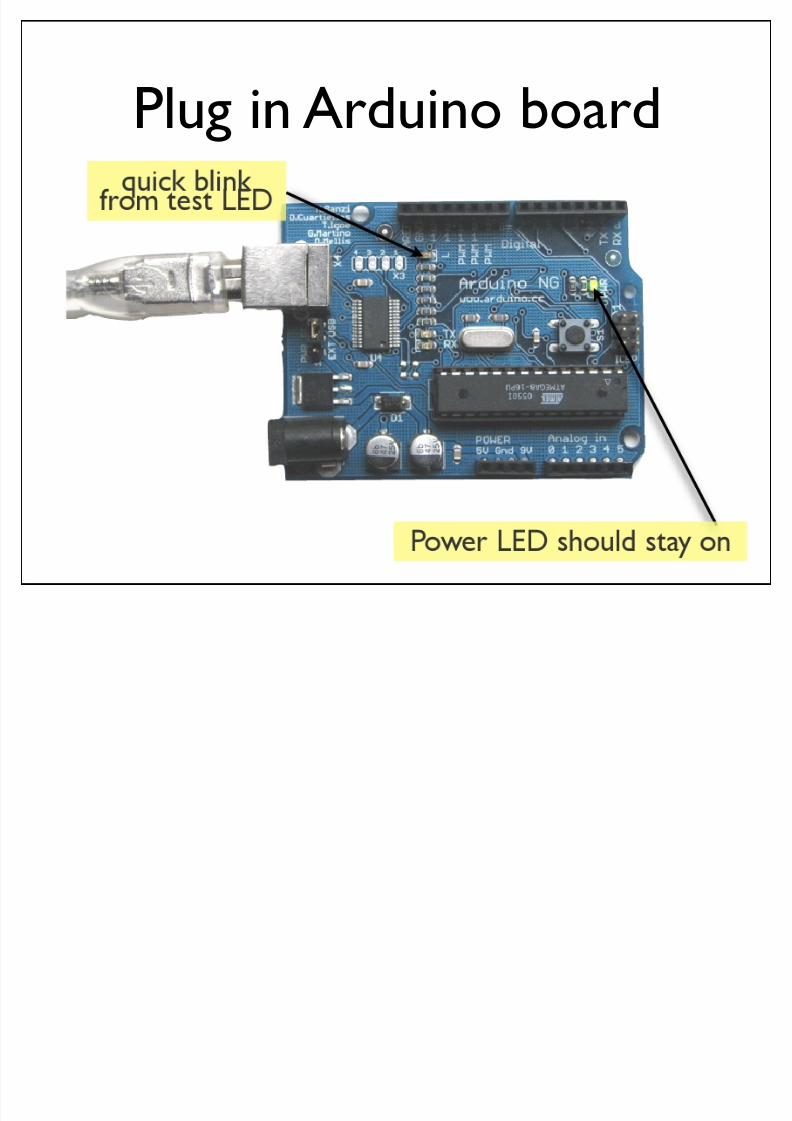
Plug in Arduino board

8/13/2019 Arduino Class 1
http://slidepdf.com/reader/full/arduino-class-1 18/67
Mac Driver Install
• v2_1_9 for PPC Macs
• v2_2_9 for Intel Macs
Double-click on .dmg Installer
8/13/2019 Arduino Class 1
http://slidepdf.com/reader/full/arduino-class-1 19/67
Windows Driver Install
8/13/2019 Arduino Class 1
http://slidepdf.com/reader/full/arduino-class-1 20/67
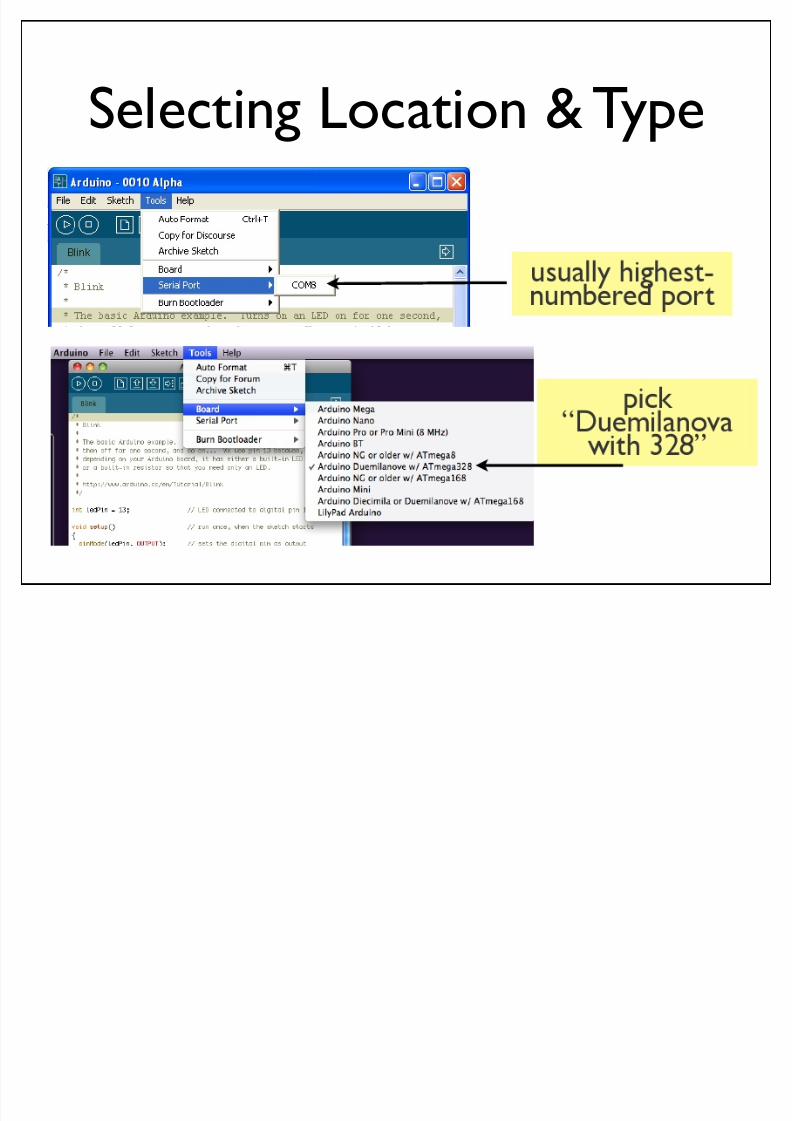
Selecting Location & Type
8/13/2019 Arduino Class 1
http://slidepdf.com/reader/full/arduino-class-1 21/67
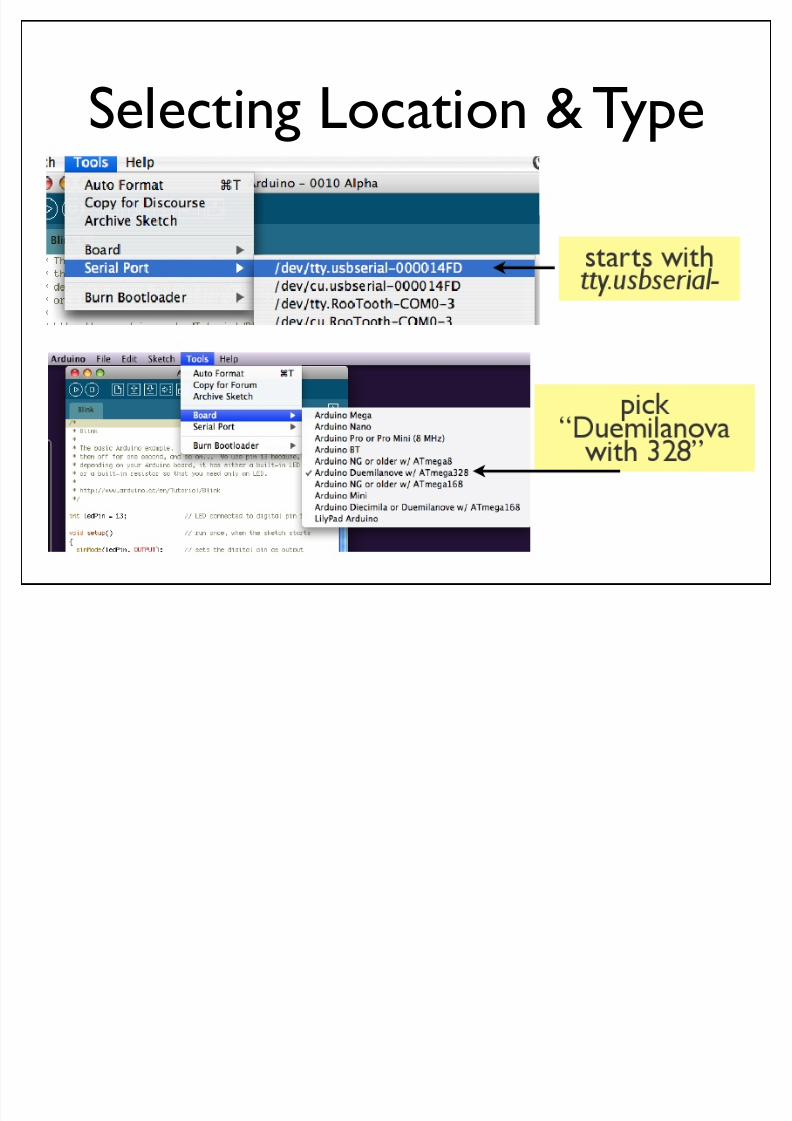
Selecting Location & Type
8/13/2019 Arduino Class 1
http://slidepdf.com/reader/full/arduino-class-1 22/67
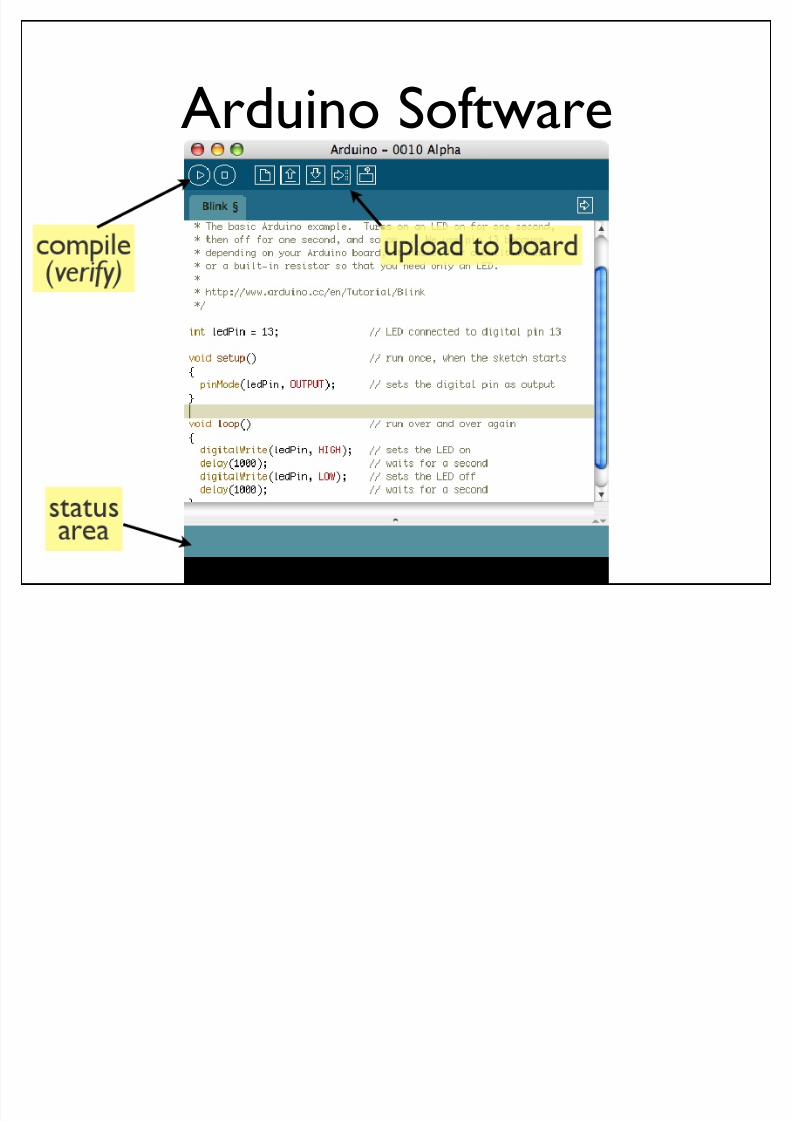
Arduino Software
8/13/2019 Arduino Class 1
http://slidepdf.com/reader/full/arduino-class-1 23/67
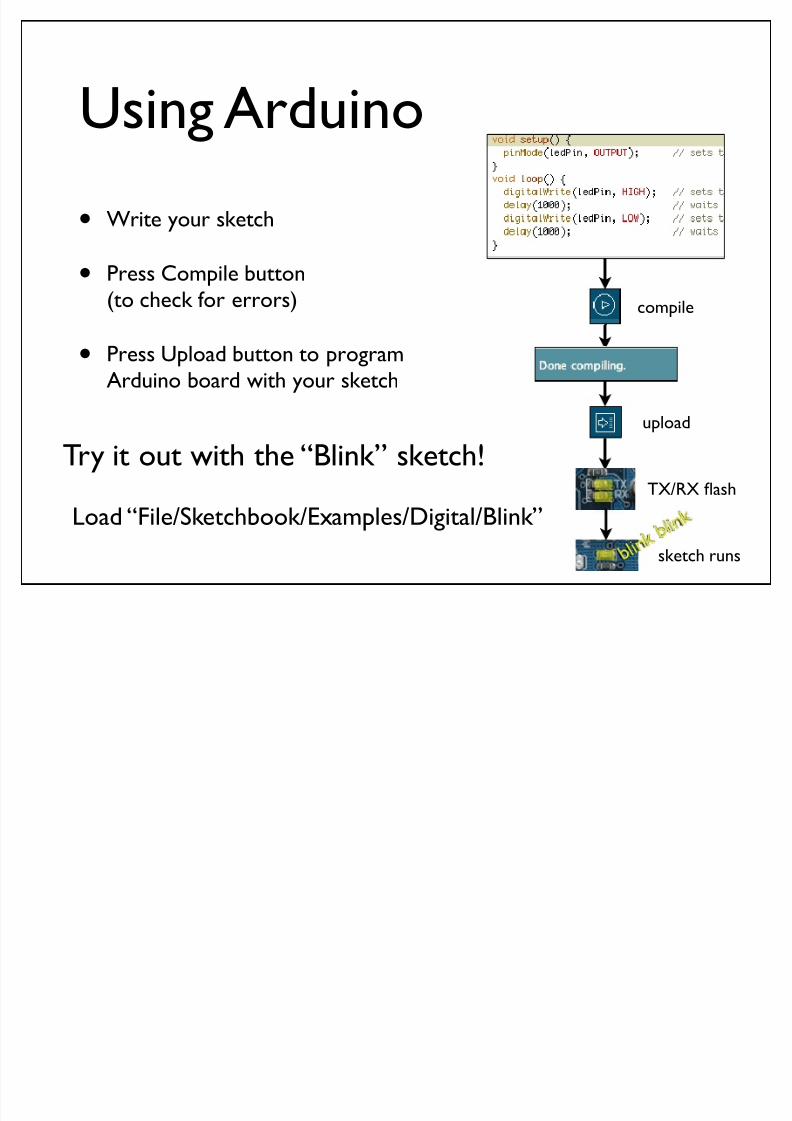
Using Arduino• Write your sketch
• Press Compile button(to check for errors)
• Press Upload button to programArduino board with your sketch
Try it out with the “Blink” sketch!
compile
upload
sketch runs
TX/RX flash
Load “File/Sketchbook/Examples/Digital/Blink”
8/13/2019 Arduino Class 1
http://slidepdf.com/reader/full/arduino-class-1 24/67
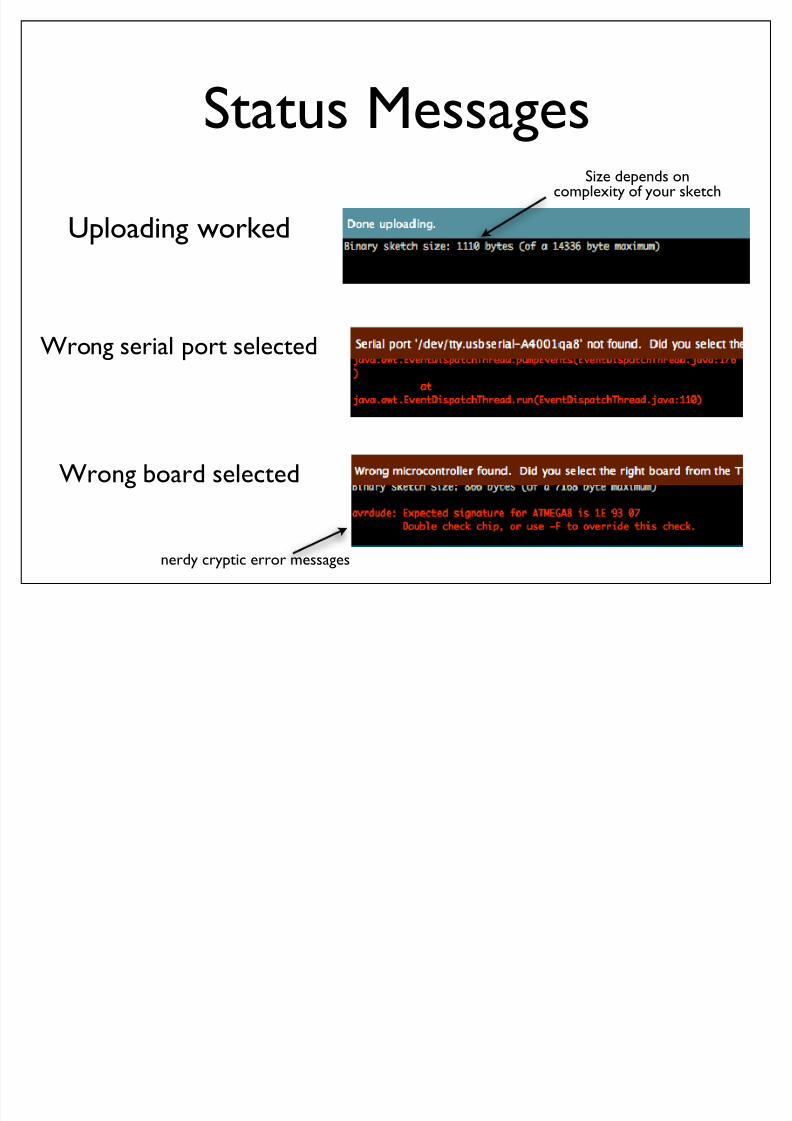
Status MessagesUploading worked
Wrong serial port selected
Wrong board selected
Size depends oncomplexity of your sketch
nerdy cryptic error messages

8/13/2019 Arduino Class 1
http://slidepdf.com/reader/full/arduino-class-1 25/67
Troubleshooting
• Most common problem is incorrect serialport setting
• If you ever have any “weird” errors from theArduino environment, just try again.
•The red text at the bottom is debugging
output in case there may be a problem
• Status area shows summary of what’s wrong
8/13/2019 Arduino Class 1
http://slidepdf.com/reader/full/arduino-class-1 26/67
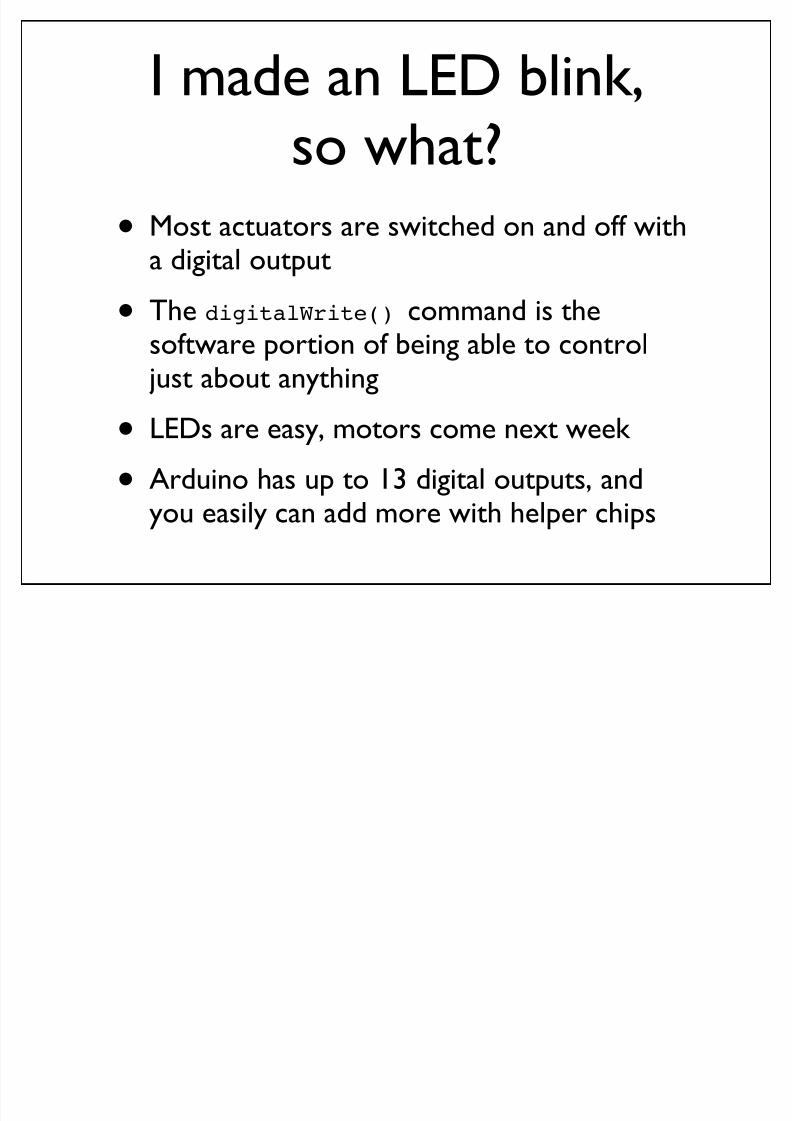
I made an LED blink,
so what?• Most actuators are switched on and off with
a digital output
• The digitalWrite() command is thesoftware portion of being able to control
just about anything
• LEDs are easy, motors come next week
• Arduino has up to 13 digital outputs, andyou easily can add more with helper chips
8/13/2019 Arduino Class 1
http://slidepdf.com/reader/full/arduino-class-1 27/67
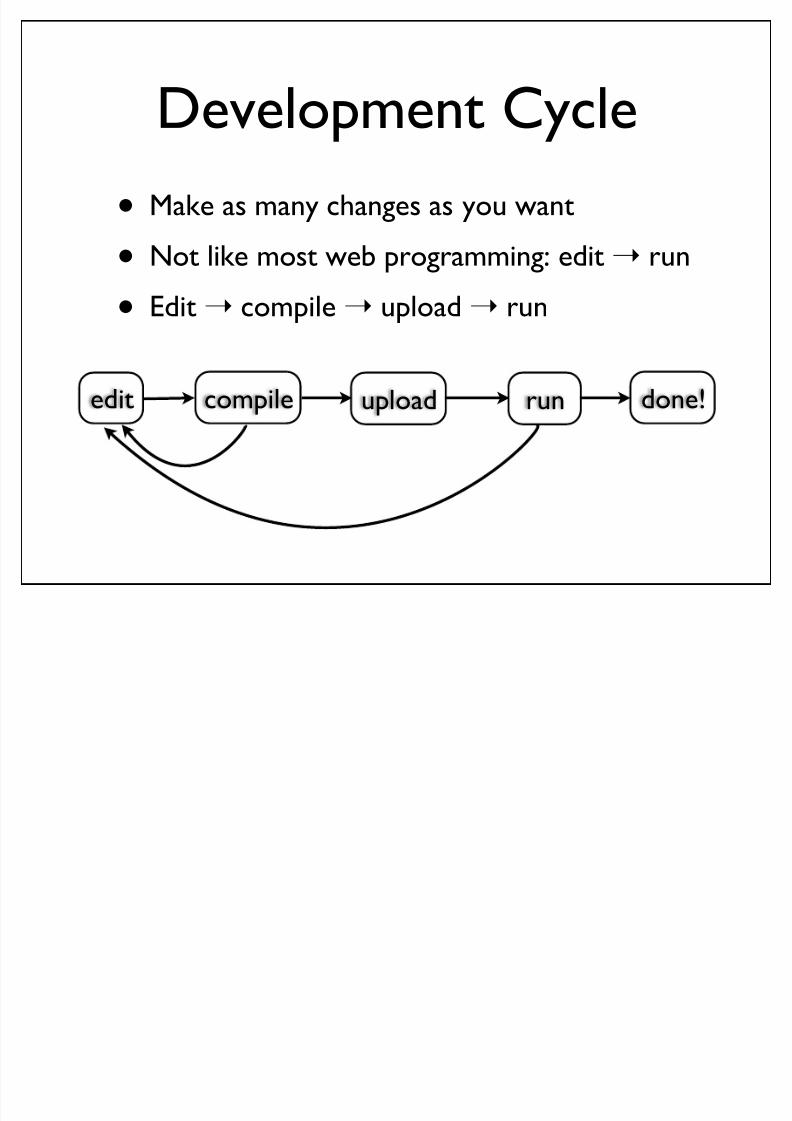
Development Cycle
• Make as many changes as you want
•Not like most web programming: edit! run
• Edit! compile! upload! run
compile upload runedit done!
8/13/2019 Arduino Class 1
http://slidepdf.com/reader/full/arduino-class-1 28/67
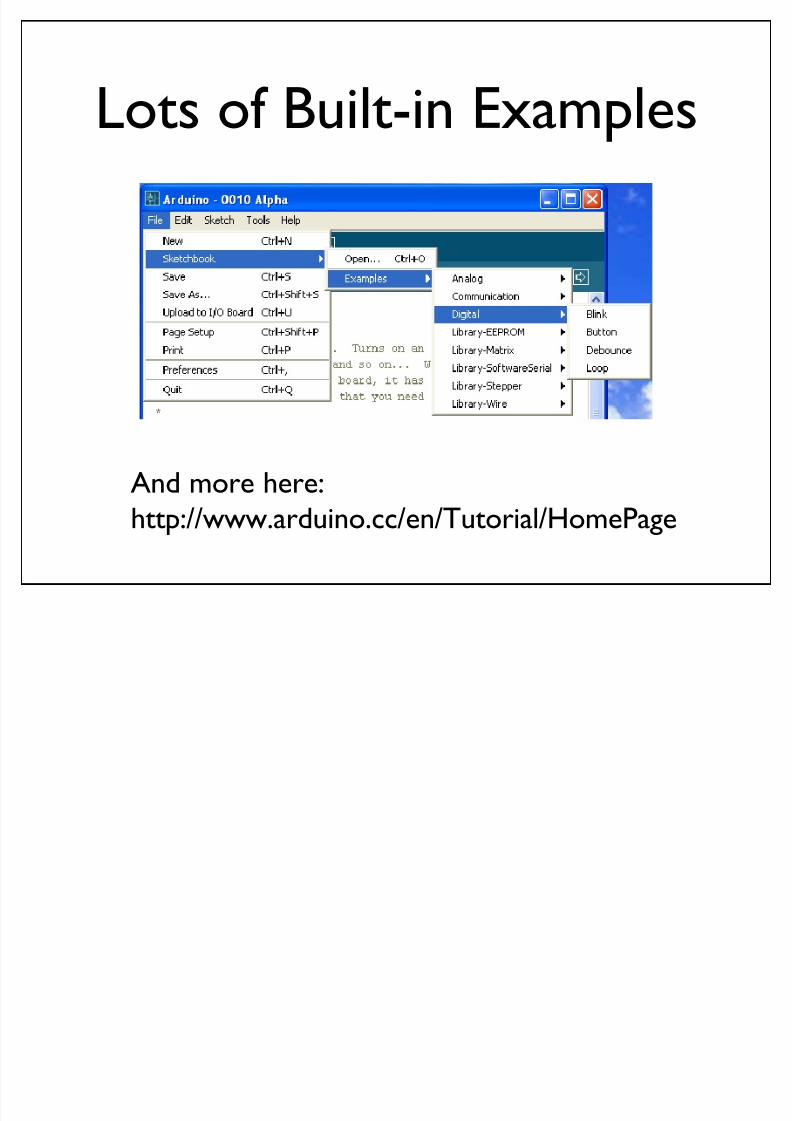
Lots of Built-in Examples
And more here:http://www.arduino.cc/en/Tutorial/HomePage

8/13/2019 Arduino Class 1
http://slidepdf.com/reader/full/arduino-class-1 29/67
Solderless Breadboards

8/13/2019 Arduino Class 1
http://slidepdf.com/reader/full/arduino-class-1 30/67
Useful ToolsWire cutters
Needle-nosepliers
Wire stripper

8/13/2019 Arduino Class 1
http://slidepdf.com/reader/full/arduino-class-1 31/67
Making Jumper Wireswire stripperpliers & cutter
~1/4”
8/13/2019 Arduino Class 1
http://slidepdf.com/reader/full/arduino-class-1 32/67
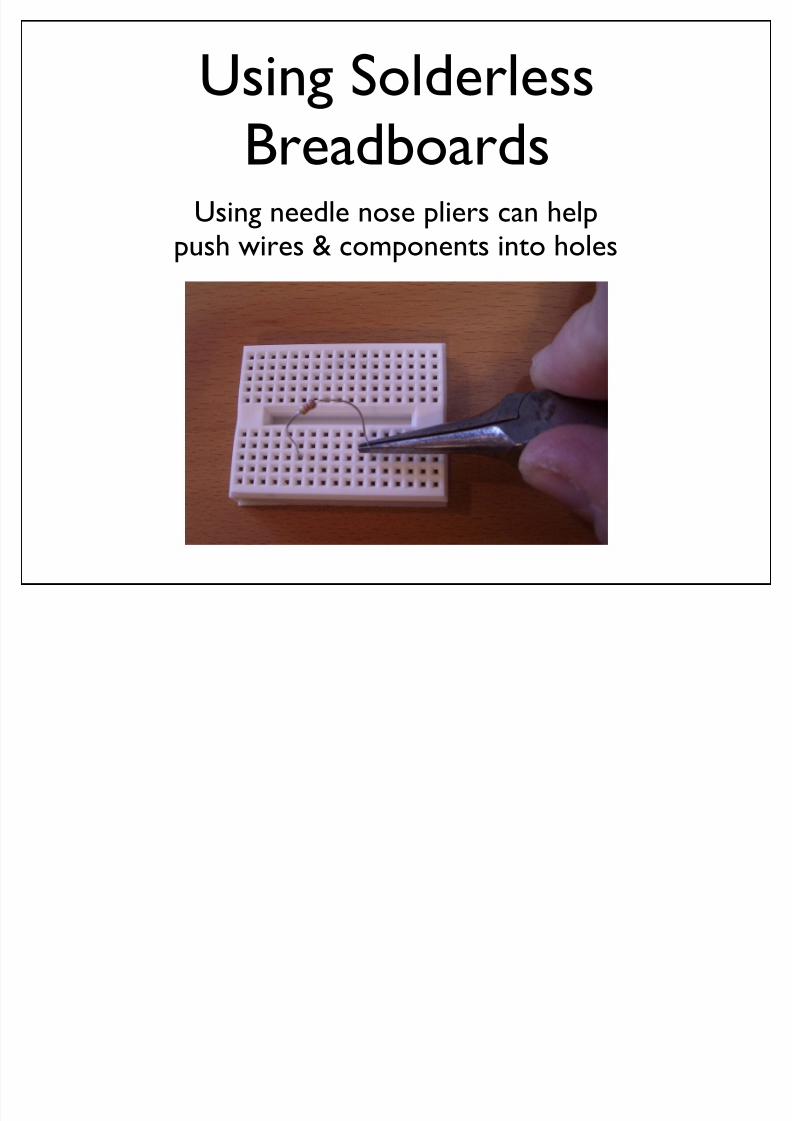
Using Solderless
BreadboardsUsing needle nose pliers can help
push wires & components into holes
8/13/2019 Arduino Class 1
http://slidepdf.com/reader/full/arduino-class-1 33/67
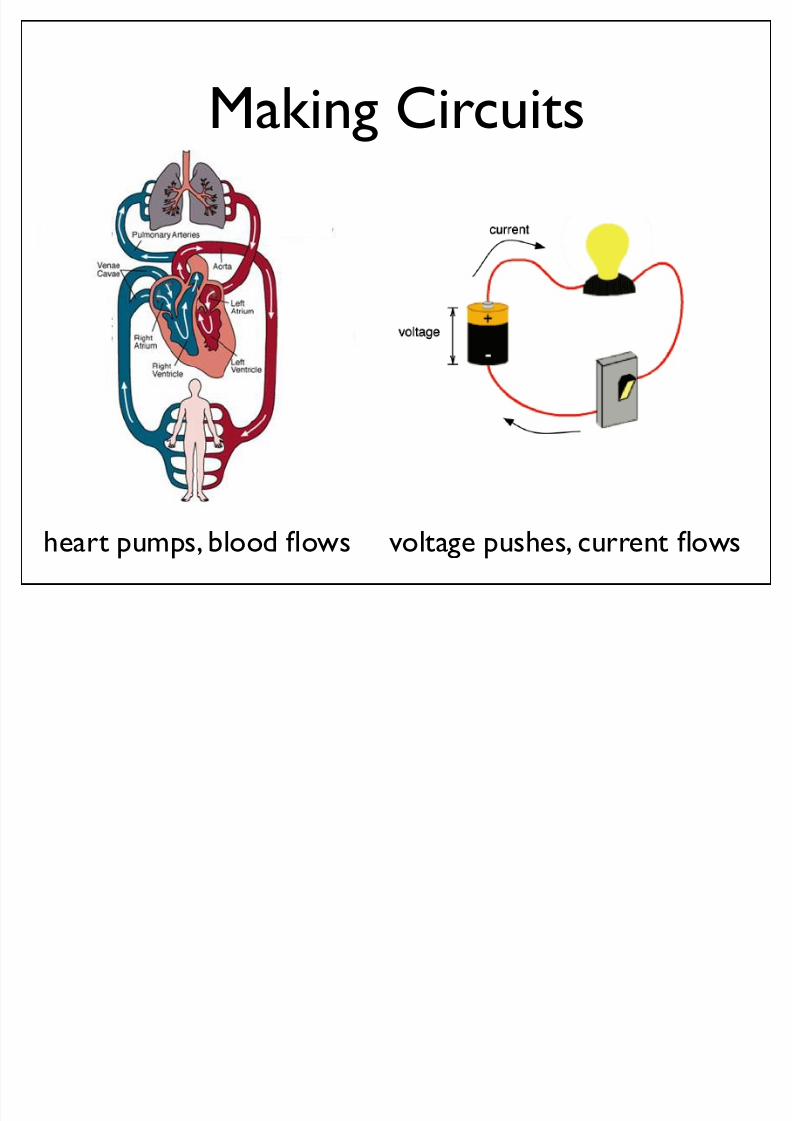
Making Circuits
heart pumps, blood flows voltage pushes, current flows
8/13/2019 Arduino Class 1
http://slidepdf.com/reader/full/arduino-class-1 34/67
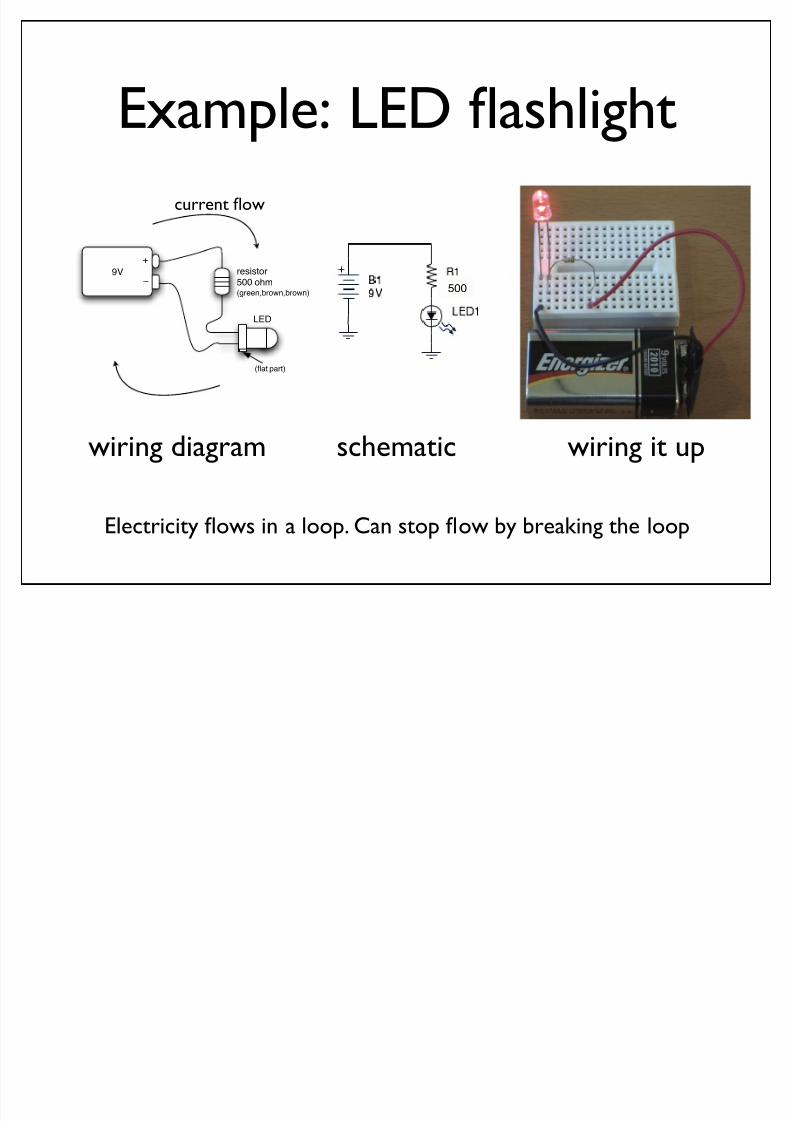
Example: LED flashlight
wiring diagram schematic wiring it up
Electricity flows in a loop. Can stop flow by breaking the loop
current flow
9V
+
–
LED
resistor
500 ohm(green,brown,brown)
(flat part)
500
8/13/2019 Arduino Class 1
http://slidepdf.com/reader/full/arduino-class-1 35/67
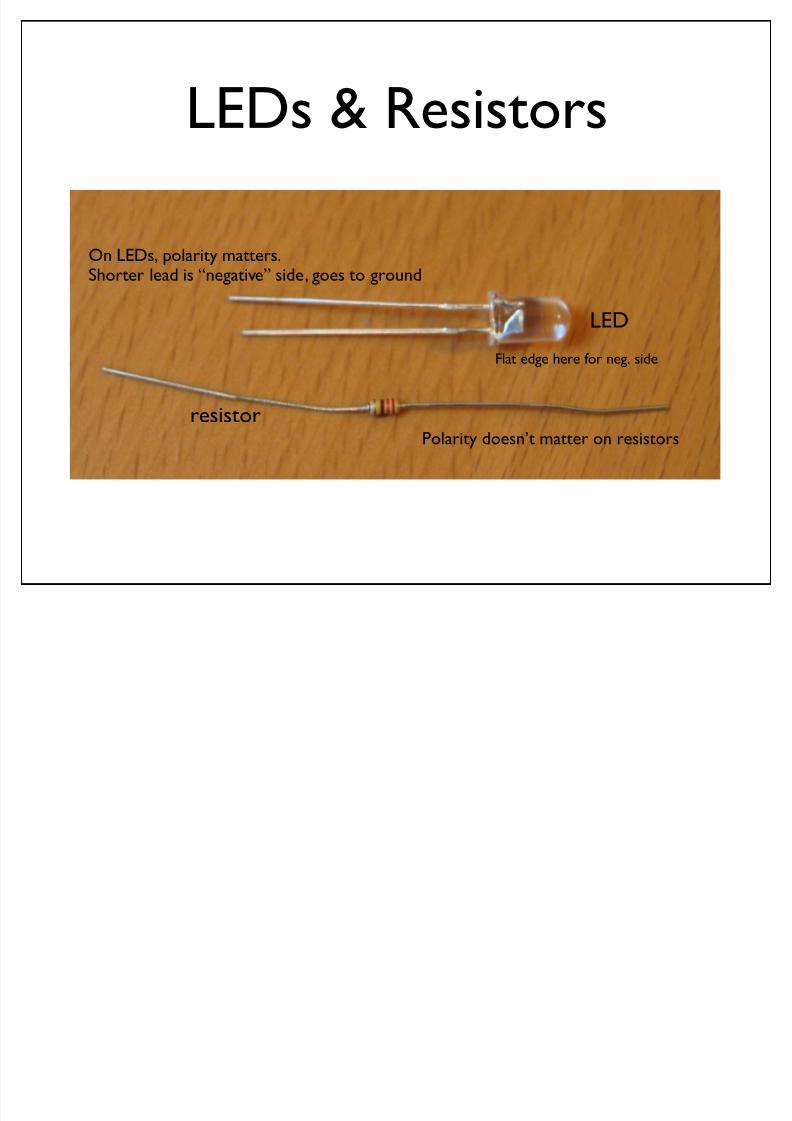
LEDs & Resistors
LED
resistor
On LEDs, polarity matters.
Shorter lead is “negative” side, goes to ground
Polarity doesn’t matter on resistors
Flat edge here for neg. side

8/13/2019 Arduino Class 1
http://slidepdf.com/reader/full/arduino-class-1 36/67
Arduino “Language”• Language is standard C (but made easy)
• Lots of useful functions
• pinMode() – set a pin as input or output• digitalWrite() – set a digital pin high/low
• digitalRead() – read a digital pin’s state
• analogRead() – read an analog pin
• analogWrite() – write an “analog” value
• delay() – wait an amount of time
• millis() – get the current time
•And many others. And libraries add more.
8/13/2019 Arduino Class 1
http://slidepdf.com/reader/full/arduino-class-1 37/67
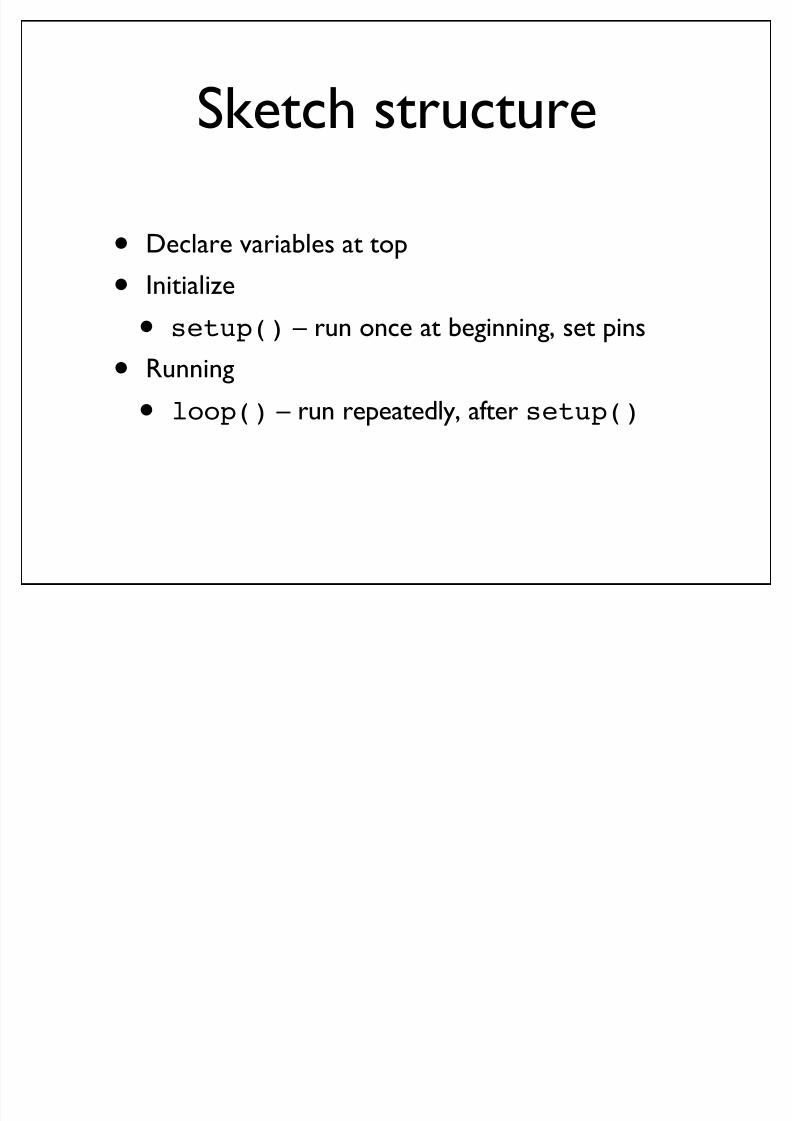
Sketch structure
• Declare variables at top
• Initialize
• setup() – run once at beginning, set pins
• Running
• loop() – run repeatedly, after setup()

8/13/2019 Arduino Class 1
http://slidepdf.com/reader/full/arduino-class-1 38/67
The Circuit for LED Blink
LED
resistor220 ohm(red,red,brown)
fl a t p a r t
wiring diagram
Arduinoboard
gnd
pin 13
gnd
resistor
LED
schematic
“hello world” of microcontrollers
Arduino Duemilanove board has this circuit built-in
To turn on LED use digitalWrite(13,HIGH)

8/13/2019 Arduino Class 1
http://slidepdf.com/reader/full/arduino-class-1 39/67
PWM Signals
• Pulse Width Modulated (PWM) Signals
• !Cs cannot generate analog output, but wecan fake it by creating digital signals withdifferent “duty cycles” - signals with differentpulse widths.
• To the analog world the different duty cyclescreate different effective voltages

8/13/2019 Arduino Class 1
http://slidepdf.com/reader/full/arduino-class-1 40/67
PWM Signals
50% Duty CycleEffectiveVoltage
25% Duty CycleEffective
Voltage
75% Duty CycleEffectiveVoltage

8/13/2019 Arduino Class 1
http://slidepdf.com/reader/full/arduino-class-1 41/67
Varying LED Brightness
wiring diagramschematic wired up
The PWM pins work with the “analogWrite(value)” command
To turn LED to half-bright, use analogWrite(9,128)
Same circuit as Blink circuit but pin 9 instead of pin 13
resistor
220 ohm(red,red,brown)
fl a t p a r t
Arduinoboard
gnd
pin 9
gnd
resistor
LED
where “value” ranges between 0 and 255.
8/13/2019 Arduino Class 1
http://slidepdf.com/reader/full/arduino-class-1 42/67
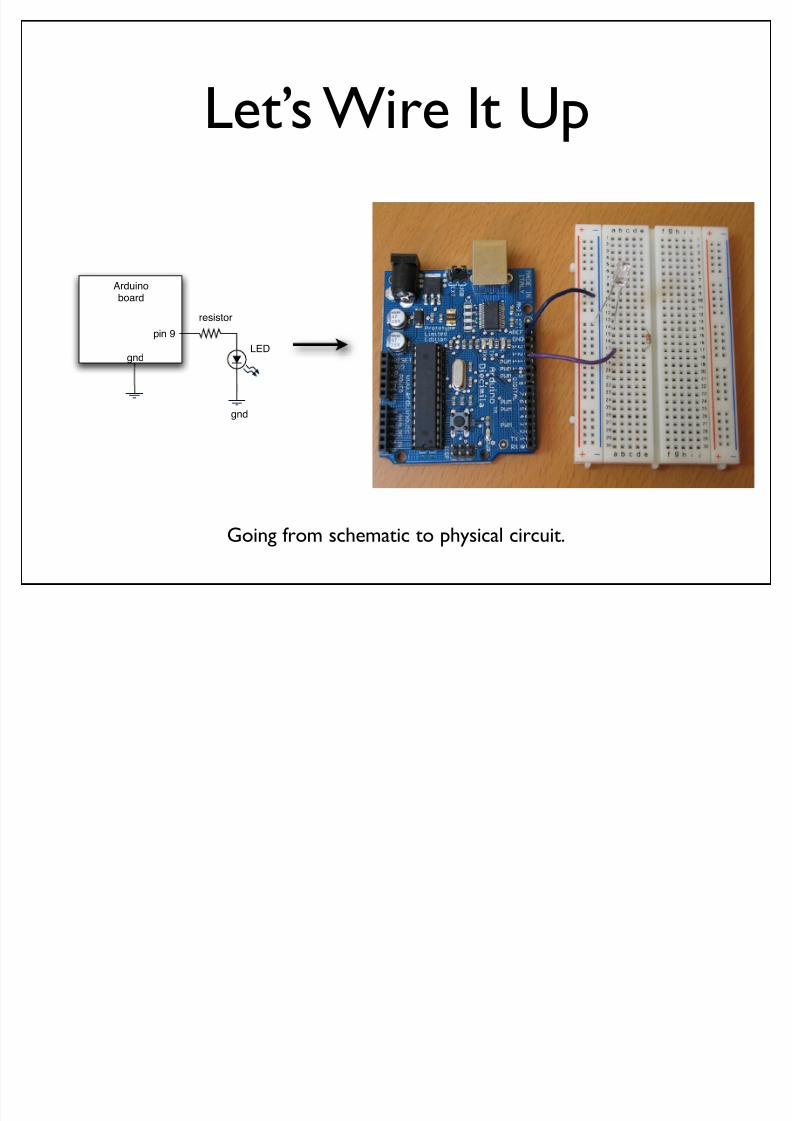
Let’s Wire It Up
Arduinoboard
gnd
pin 9
gnd
resistor
LED
Going from schematic to physical circuit.

8/13/2019 Arduino Class 1
http://slidepdf.com/reader/full/arduino-class-1 43/67
All Wired Up
plugged into “ground” bus

8/13/2019 Arduino Class 1
http://slidepdf.com/reader/full/arduino-class-1 44/67
Alternate Way
1. rubber band
Or, adding a breadboard to Arduino for 1¢
2. power & gnd wires3. plug into “bus” terminals
4. jumper overto other side
now circuit has power & ground

8/13/2019 Arduino Class 1
http://slidepdf.com/reader/full/arduino-class-1 45/67
Basic ElectronicsFlash Light
Our Blink Circuit
LoadVoltageSource

8/13/2019 Arduino Class 1
http://slidepdf.com/reader/full/arduino-class-1 46/67
Basic Electronics• The dreaded short circuit:
• this is a circuit with a load equal tozero
• this allows “infinite” current to flowfrom the positive terminal of thevoltage source to the negativeterminal
• it will break stuff!
•Always check your circuits carefullybefore applying power
• Never connect an Arduino output pindirectly to ground, always use a loadresistor
Load = 0VoltageSource
Current = "

8/13/2019 Arduino Class 1
http://slidepdf.com/reader/full/arduino-class-1 47/67
Basic Electronics
Image source: Engineer's Mini Notebook, Mims III, Master Publishining, 2007.
Some Electronic Symbols
8/13/2019 Arduino Class 1
http://slidepdf.com/reader/full/arduino-class-1 48/67
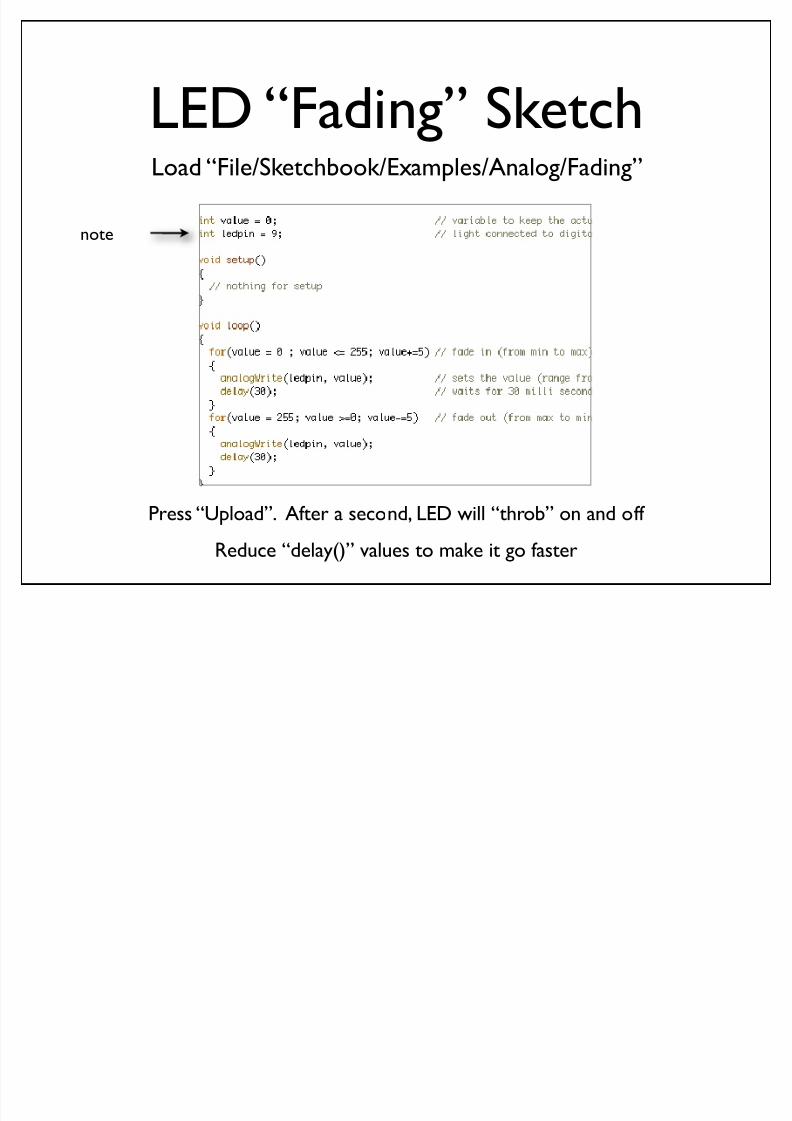
LED “Fading” SketchLoad “File/Sketchbook/Examples/Analog/Fading”
Press “Upload”. After a second, LED will “throb” on and off
Reduce “delay()” values to make it go faster
note
8/13/2019 Arduino Class 1
http://slidepdf.com/reader/full/arduino-class-1 49/67
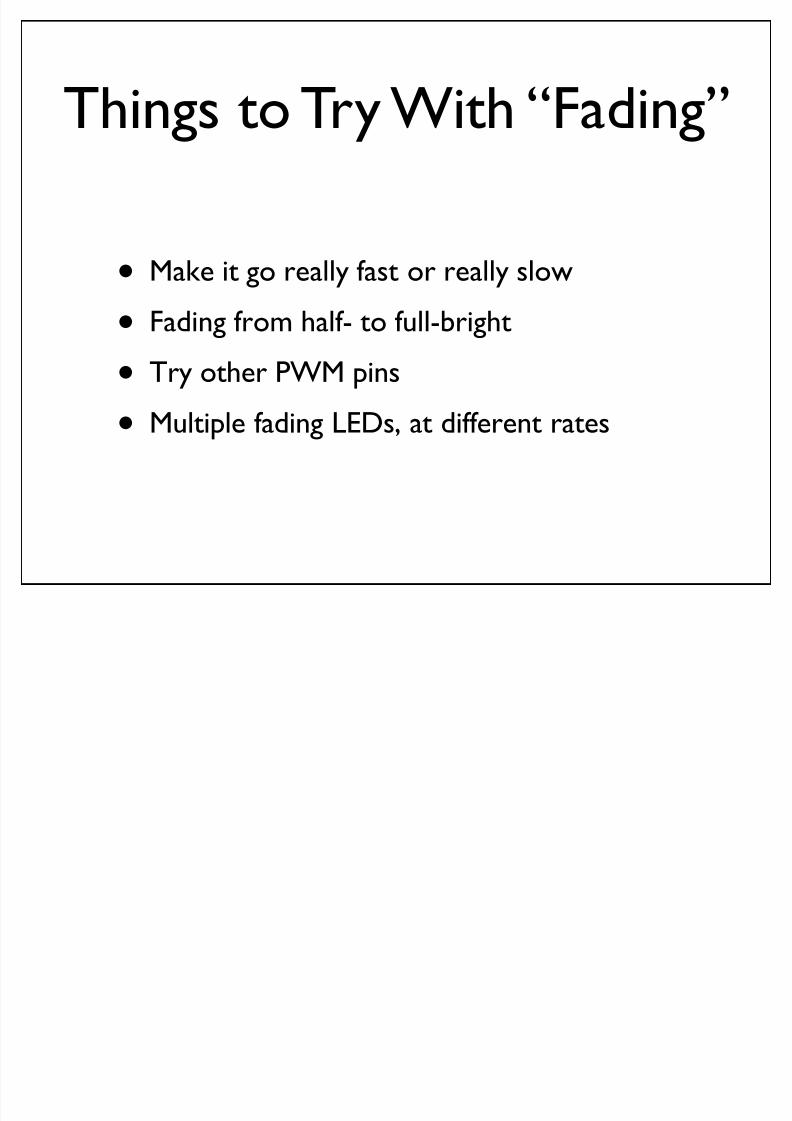
Things to Try With “Fading”
• Make it go really fast or really slow• Fading from half- to full-bright
• Try other PWM pins
• Multiple fading LEDs, at different rates
8/13/2019 Arduino Class 1
http://slidepdf.com/reader/full/arduino-class-1 50/67
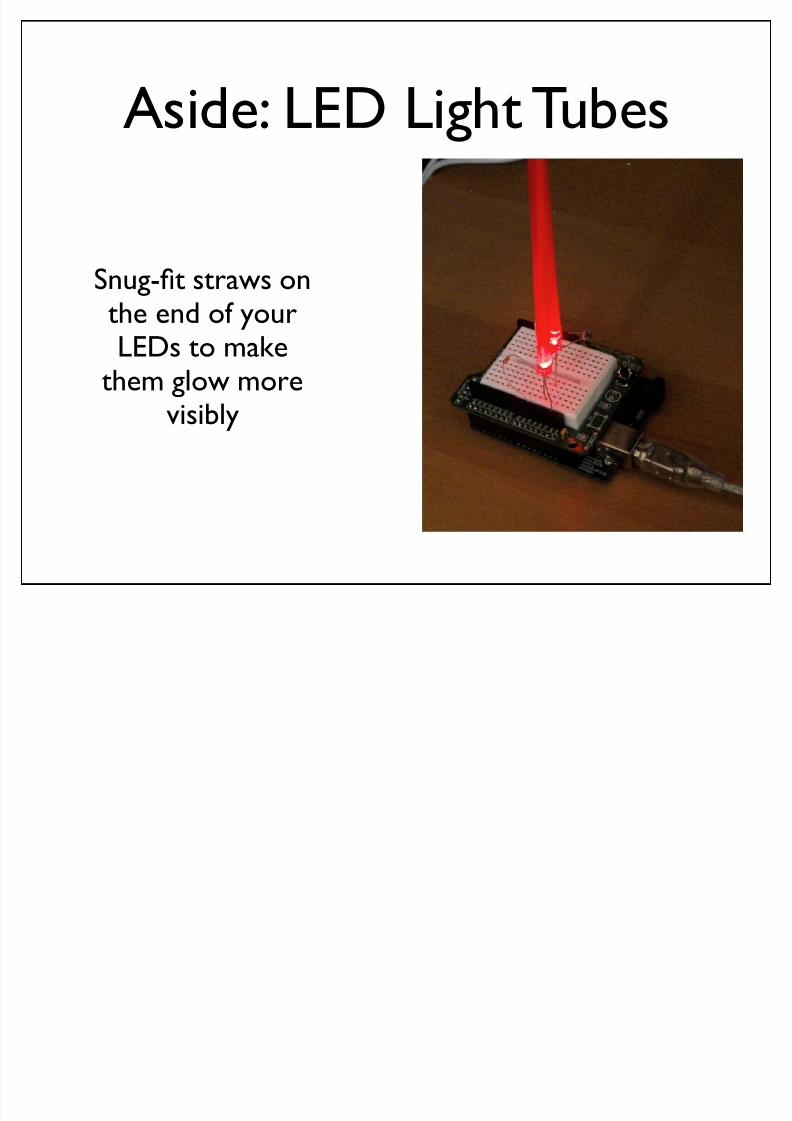
Aside: LED Light Tubes
Snug-fit straws onthe end of yourLEDs to make
them glow more
visibly
8/13/2019 Arduino Class 1
http://slidepdf.com/reader/full/arduino-class-1 51/67
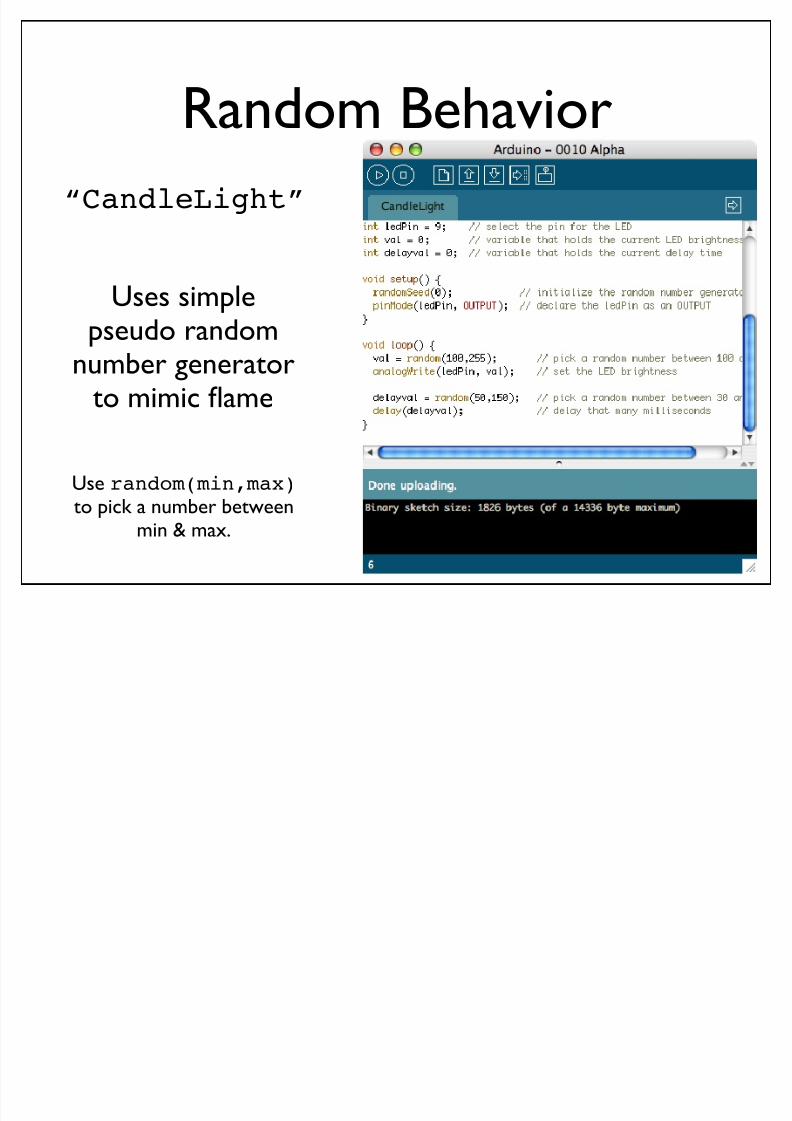
Random Behavior
“CandleLight”
Uses simplepseudo random
number generatorto mimic flame
Use random(min,max) to pick a number between
min & max.

8/13/2019 Arduino Class 1
http://slidepdf.com/reader/full/arduino-class-1 52/67
Take a Break

8/13/2019 Arduino Class 1
http://slidepdf.com/reader/full/arduino-class-1 53/67
Sensors & Inputs
knife switch toggle switch(SPST) (SPDT)
Switches make or break a connection
Many sensors are variations on switches

8/13/2019 Arduino Class 1
http://slidepdf.com/reader/full/arduino-class-1 54/67
Many Kinds of Switches
magnetic tilt leverhexidecimal
8/13/2019 Arduino Class 1
http://slidepdf.com/reader/full/arduino-class-1 55/67
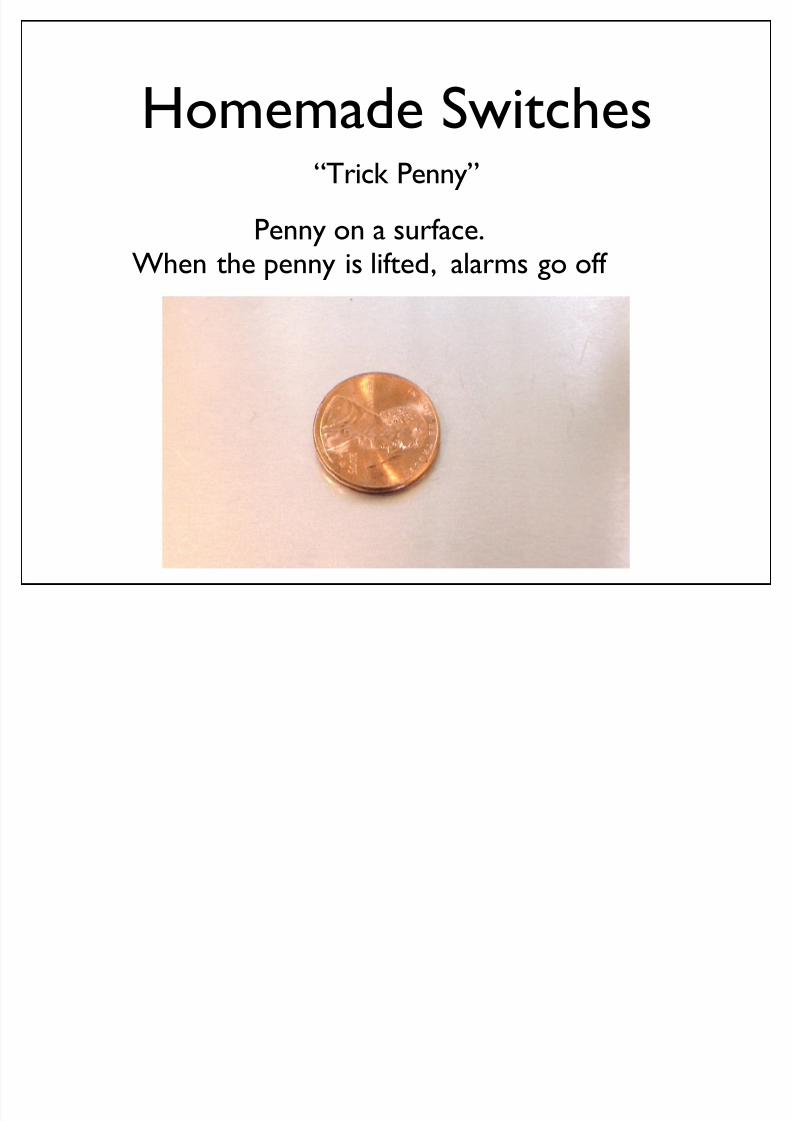
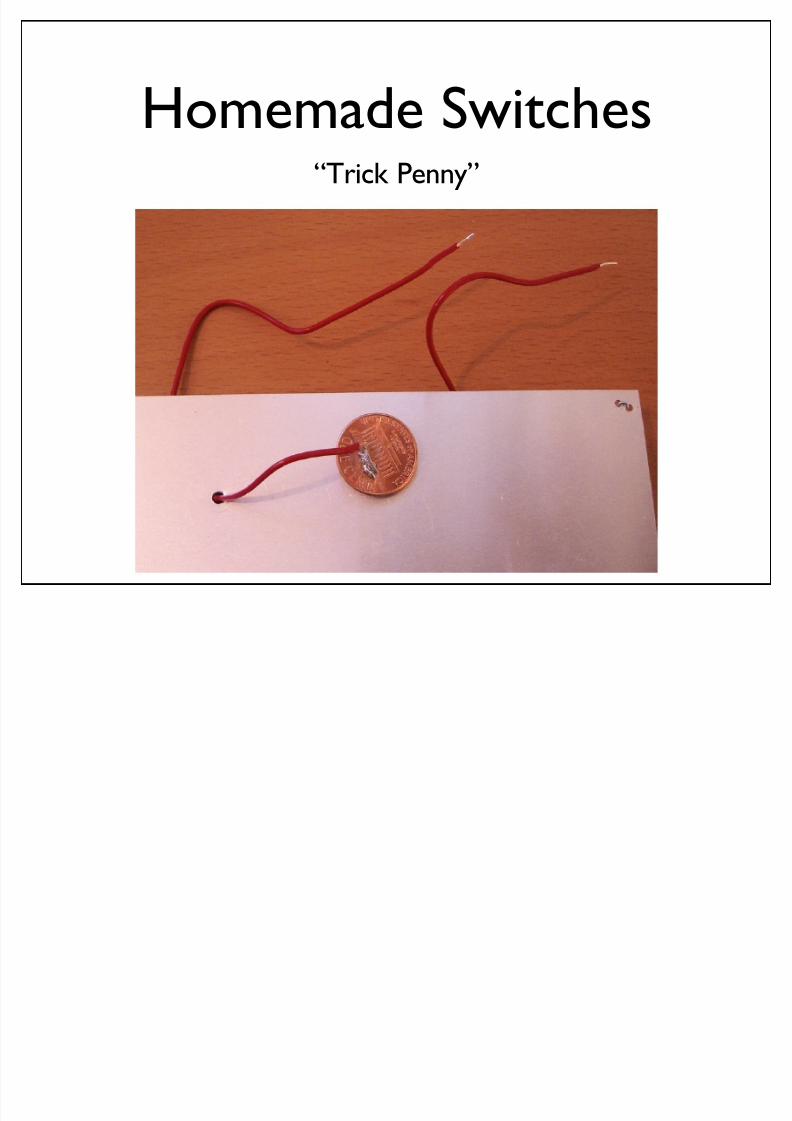
Homemade Switches“Trick Penny”
Penny on a surface.When the penny is lifted, alarms go off
8/13/2019 Arduino Class 1
http://slidepdf.com/reader/full/arduino-class-1 56/67
Homemade Switches“Trick Penny”

8/13/2019 Arduino Class 1
http://slidepdf.com/reader/full/arduino-class-1 57/67
Homemade Switches“Smart Wind Chimes”
When the wind blows hard enough,you’re sent email

8/13/2019 Arduino Class 1
http://slidepdf.com/reader/full/arduino-class-1 58/67
Digital Input
• Switches make or break a connection
• But Arduino wants to see a voltage
• Specifically, a “HIGH” (5 volts)
• or a “LOW” (0 volts)
How do you go from make/break to HIGH/LOW?
HIGH
LOW

8/13/2019 Arduino Class 1
http://slidepdf.com/reader/full/arduino-class-1 59/67
From Switch to HIGH / LOW
• With no connection,digital inputs “float”
between 0 & 5 volts(LOW & HIGH)
• Resistor “pulls” input toground (0 volts)
• Pressing switch “pushes”input to 5 volts
• Press is HIGHNot pressed is LOW

8/13/2019 Arduino Class 1
http://slidepdf.com/reader/full/arduino-class-1 60/67
Wiring it up
Let’s plug it into pin 2
8/13/2019 Arduino Class 1
http://slidepdf.com/reader/full/arduino-class-1 61/67
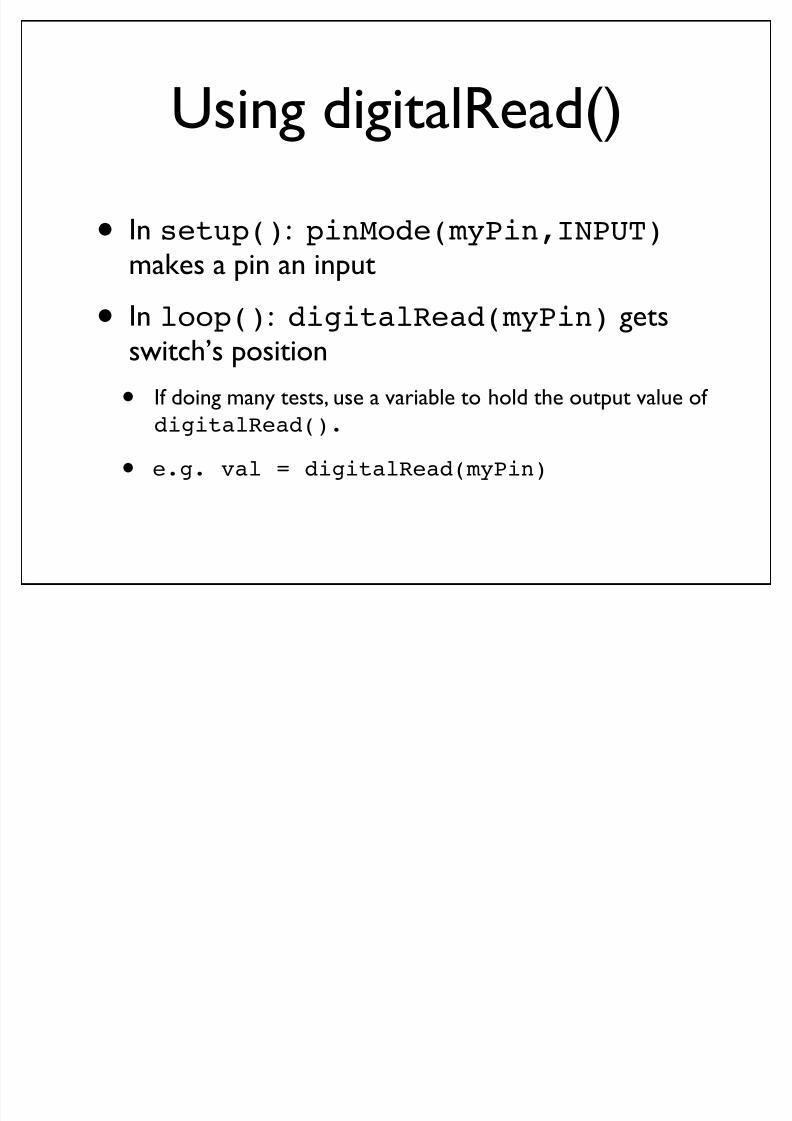
Using digitalRead()
• In setup(): pinMode(myPin,INPUT) makes a pin an input
• In loop(): digitalRead(myPin) getsswitch’s position
• If doing many tests, use a variable to hold the output value of
digitalRead().
• e.g. val = digitalRead(myPin)
8/13/2019 Arduino Class 1
http://slidepdf.com/reader/full/arduino-class-1 62/67
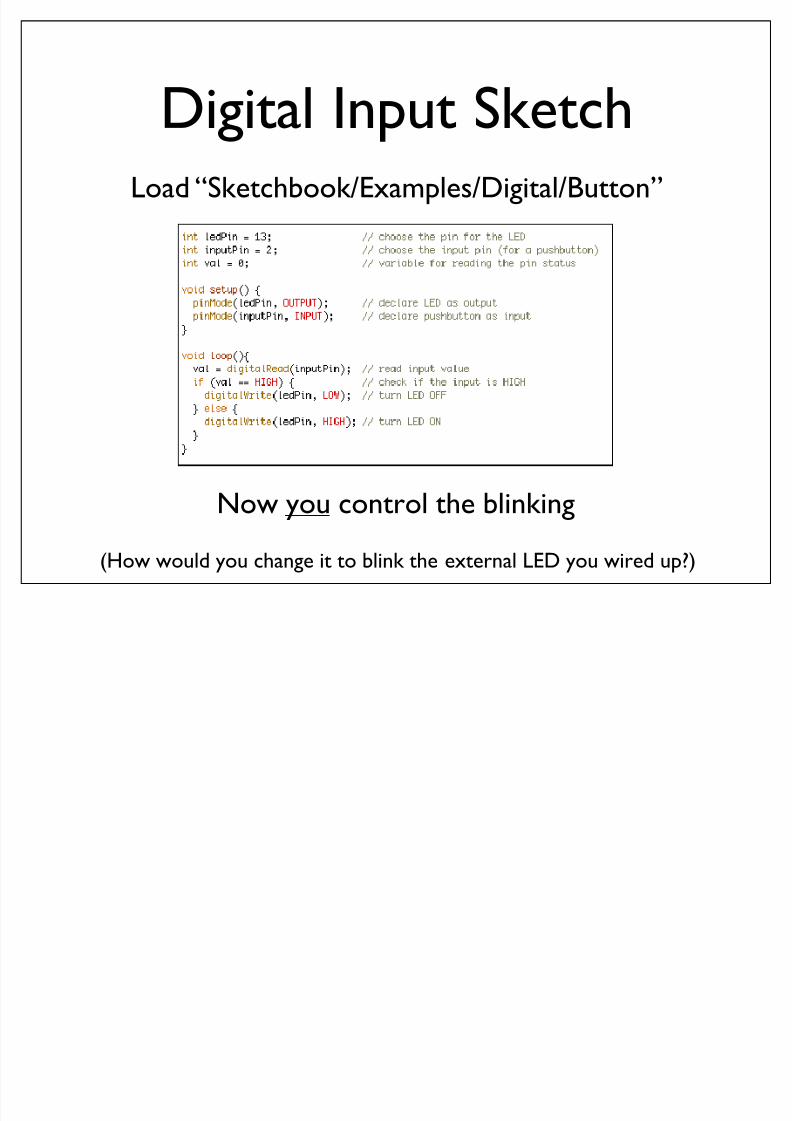
Digital Input Sketch
Now you control the blinking
Load “Sketchbook/Examples/Digital/Button”
(How would you change it to blink the external LED you wired up?)

8/13/2019 Arduino Class 1
http://slidepdf.com/reader/full/arduino-class-1 63/67
Using Switches to
Make Decisions• Often you’ll want to choose between actions,
based on how a switch-like sensor
• E.g. “If person is detected, fire super soaker”
• E.g. “If flower pot soil is dry, turn on sprinklers”
• Define actions, choose them from sensor inputs
• Let’s try that with the actions we currentlyknow
8/13/2019 Arduino Class 1
http://slidepdf.com/reader/full/arduino-class-1 64/67
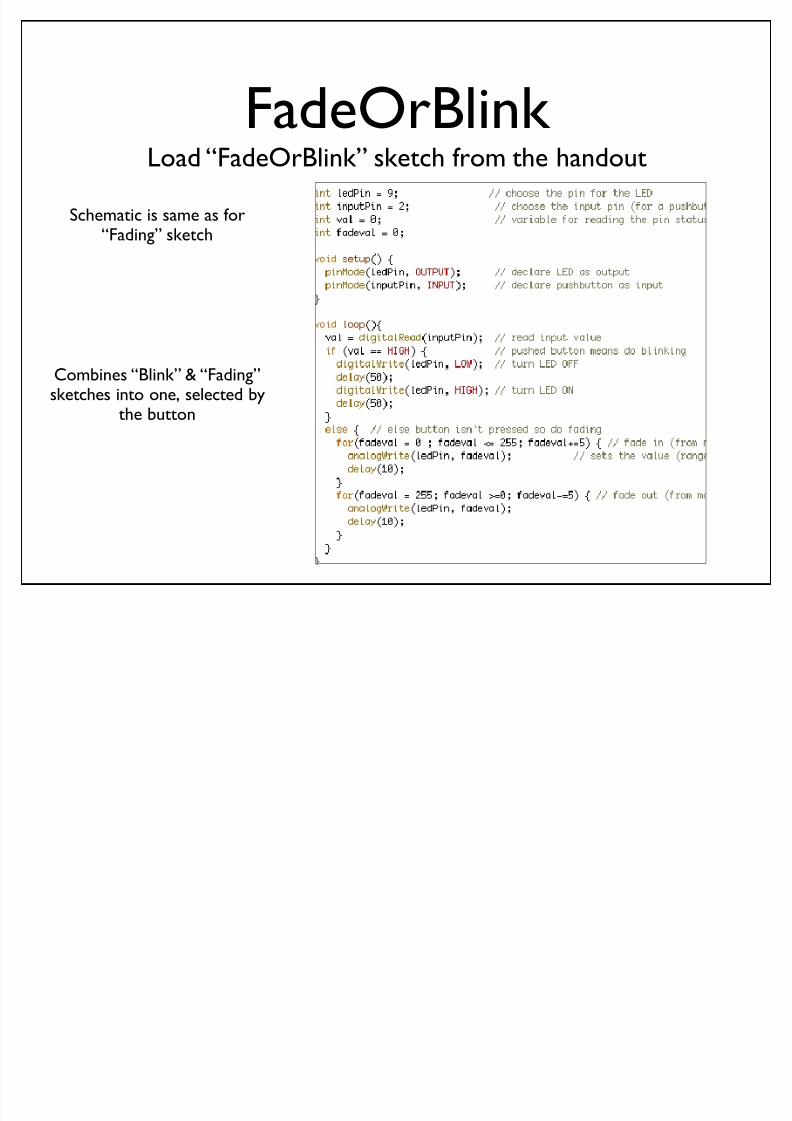
FadeOrBlink Load “FadeOrBlink” sketch from the handout
Combines “Blink” & “Fading”sketches into one, selected by
the button
Schematic is same as for“Fading” sketch
8/13/2019 Arduino Class 1
http://slidepdf.com/reader/full/arduino-class-1 65/67
Things to do for next
week • Design a concept for an interactive object
for inspiration check out:
http://www.arduino.cc/playground/Projects/ArduinoUsers
• individual or group projects
• Read “Getting Started with Arduino”, Chapters 1through 4, and the Appendices

8/13/2019 Arduino Class 1
http://slidepdf.com/reader/full/arduino-class-1 66/67
John Duksta
END Class 1
http://duksta.org/electronics/arduinoclass

8/13/2019 Arduino Class 1
http://slidepdf.com/reader/full/arduino-class-1 67/67
Resourceshttp://arduino.cc/
Official homepage. Also check out the Playground & forums
http://ladyada.net/learn/arduino/Great Arduino tutorials
http://todbot.com/blog/category/arduino/Various movies, hacks, tutorials on Arduino
http://freeduino.org/Index of Arduino knowledge
http://adafruit.com/Arduino starter kits, Boarduino Arduino clone, lots of cool kits
http://sparkfun.com/Sells Arduino boards and lots of neat sensors & stuff
Books:“Physical Computing”, Dan O’Sullivan & Tom Igoe“Making Things Talk”, Tom Igoe

![1. プログラムの入力 (1) Arduino IDE の起動 デ …dohi/ext-arduino/setup...1 1. プログラムの入力 (1) Arduino IDE の起動 デスクトップの[Arduino]をダブルクリックします.](https://img.pdfslide.tips/doc/110x75/5e3571aadc4f020e8b44e8e2/1i-ffff-i1i-arduino-ide-e-f-dohiext-arduinosetup.jpg)