Embed Size (px)
Citation preview
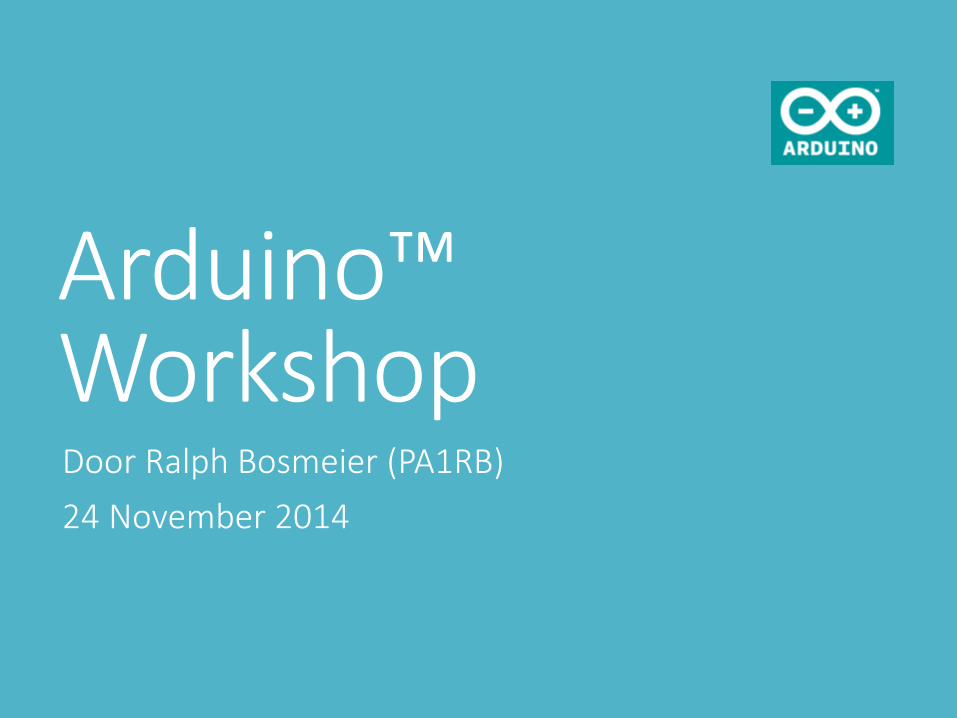
Arduino™ WorkshopDoor Ralph Bosmeier (PA1RB)
24 November 2014
Doelstelling van deze workshop
Kennismaken met het Arduino™ “eco-system”
Een aantal toepassingen voor zendamateurs
Zelf aan de slag met de basis I/O functies
Gebruik van libraries
De werking van de LC-meter
Tips en bronnen voor verdere verdieping
De bedenkers van Arduino
http://spectrum.ieee.org/geek-life/hands-on/the-making-of-arduino
Het Arduino eco-systeem•De Arduino ™ microcontroller hardware en beschikbare“shields”
•De Interactive Development Environment (IDE) en de bootloader
•De http://arduino.cc/ website
•Afgeleide “-duino” microcontroller hardware
•De enorme hoeveelheid aan periferie hardware
•Beschikbaarheid van talloze code libraries
•Zeer ruime beschikbaarheid van documentatie
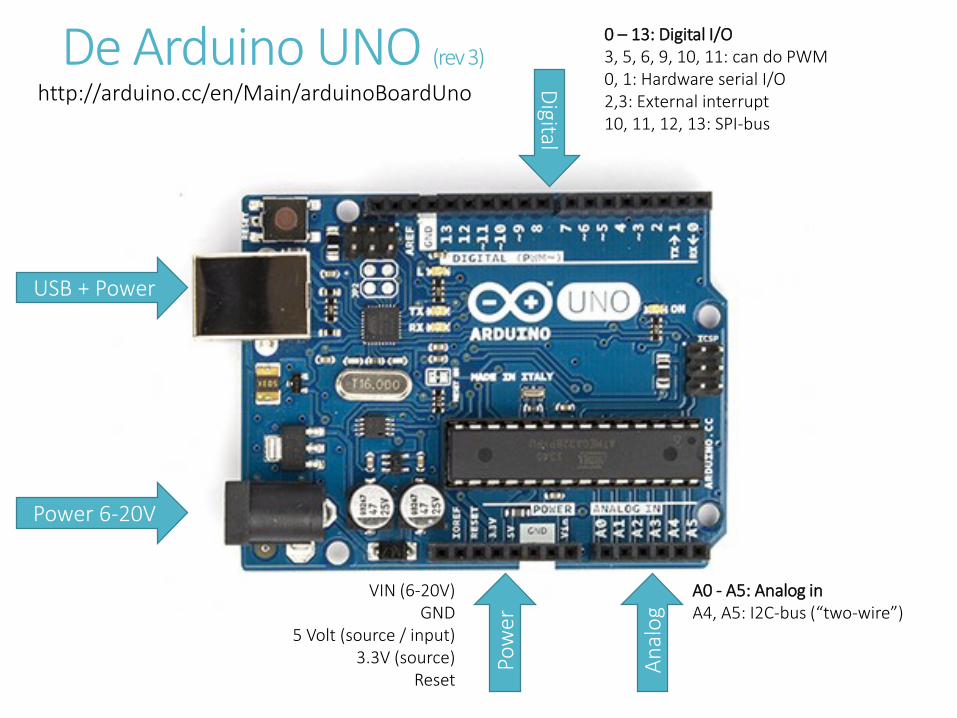
De Arduino UNO (rev 3)
USB + Power
Power 6-20VPo
wer
VIN (6-20V)GND
5 Volt (source / input)3.3V (source)
Reset
An
alo
g
A0 - A5: Analog inA4, A5: I2C-bus (“two-wire”)
Digital
0 – 13: Digital I/O3, 5, 6, 9, 10, 11: can do PWM0, 1: Hardware serial I/O2,3: External interrupt10, 11, 12, 13: SPI-bus
http://arduino.cc/en/Main/arduinoBoardUno
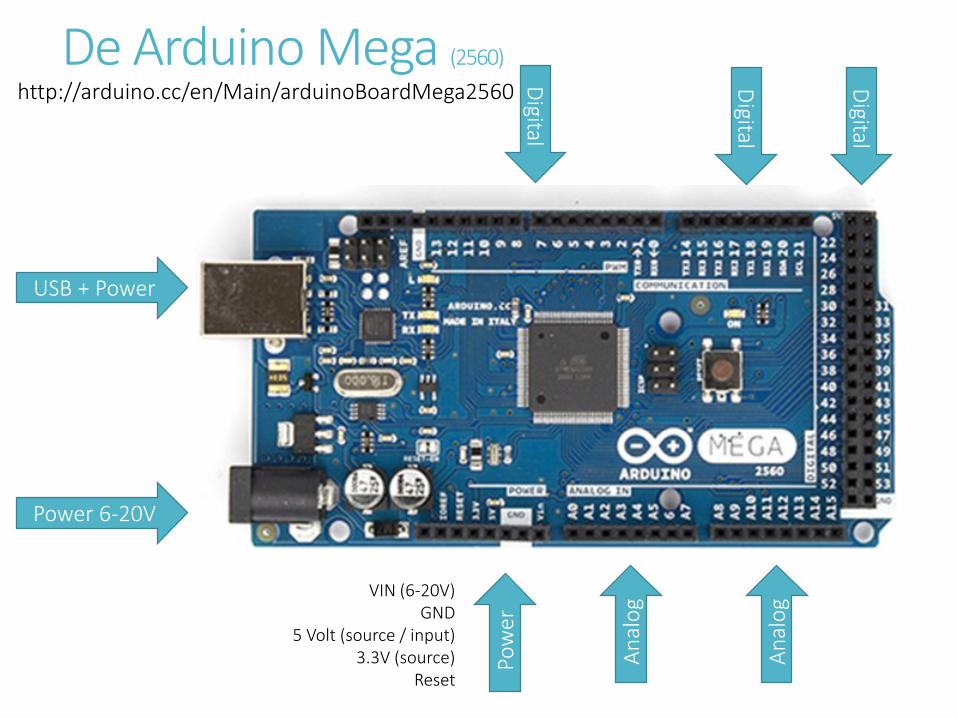
De Arduino Mega (2560)
USB + Power
Power 6-20VPo
wer
VIN (6-20V)GND
5 Volt (source / input)3.3V (source)
Reset
An
alo
g
Digital
http://arduino.cc/en/Main/arduinoBoardMega2560 Digital
Digital
An
alo
g
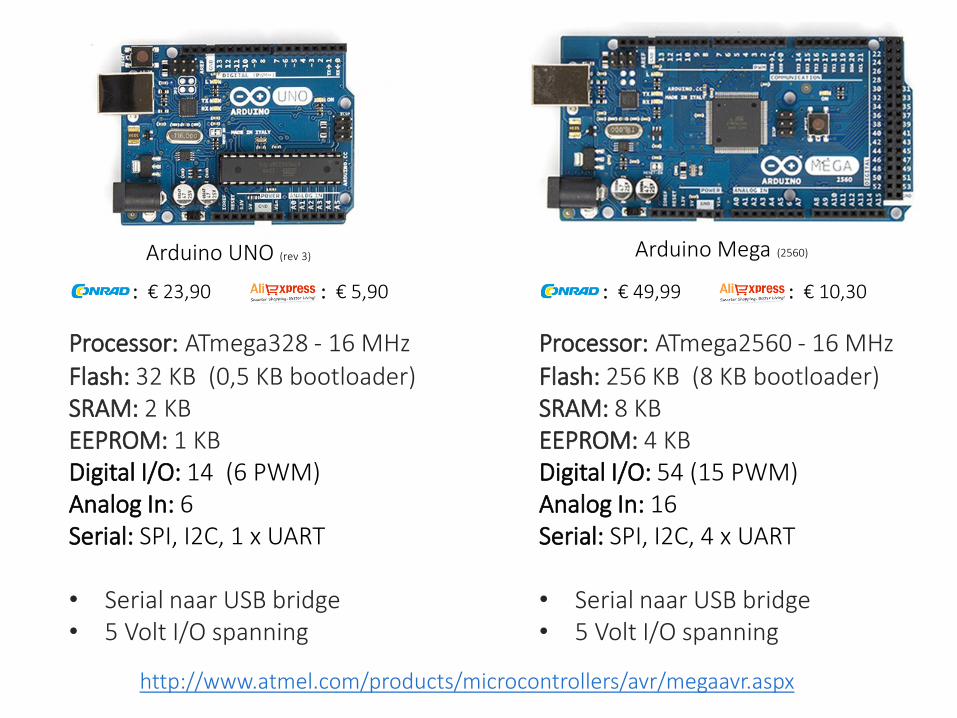
Processor: ATmega328 - 16 MHz
Flash: 32 KB (0,5 KB bootloader)SRAM: 2 KB EEPROM: 1 KBDigital I/O: 14 (6 PWM)Analog In: 6Serial: SPI, I2C, 1 x UART
• Serial naar USB bridge• 5 Volt I/O spanning
Processor: ATmega2560 - 16 MHz
Flash: 256 KB (8 KB bootloader)SRAM: 8 KB EEPROM: 4 KBDigital I/O: 54 (15 PWM)Analog In: 16Serial: SPI, I2C, 4 x UART
• Serial naar USB bridge• 5 Volt I/O spanning
Arduino UNO (rev 3) Arduino Mega (2560)
: € 23,90 : € 5,90 : € 49,99 : € 10,30
http://www.atmel.com/products/microcontrollers/avr/megaavr.aspx
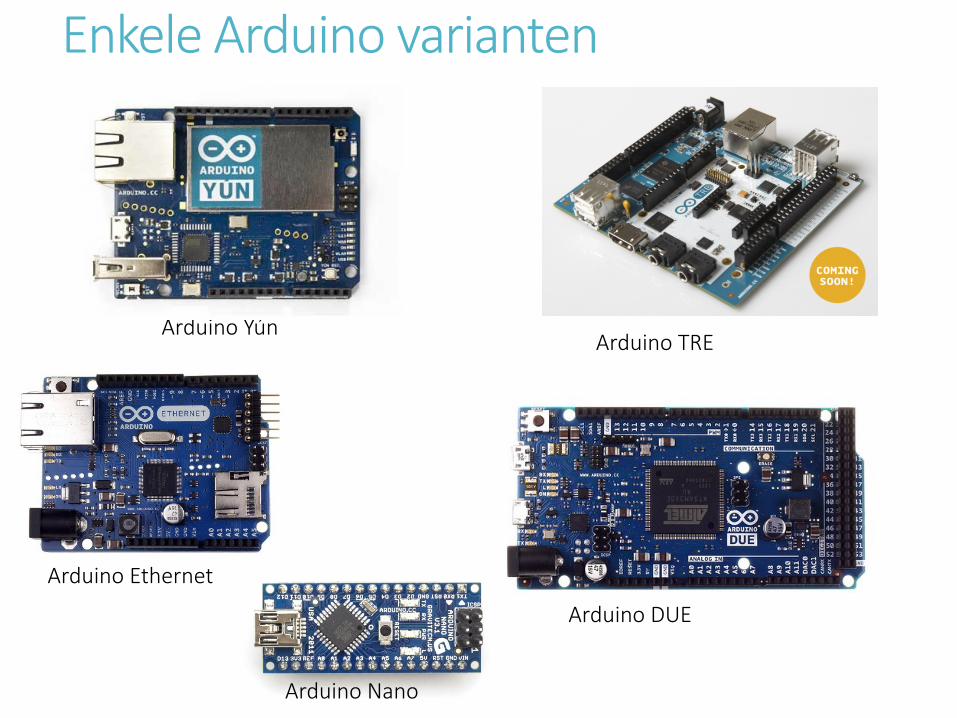
Enkele Arduino varianten
Arduino Nano
Arduino Ethernet
Arduino YúnArduino TRE
Arduino DUE
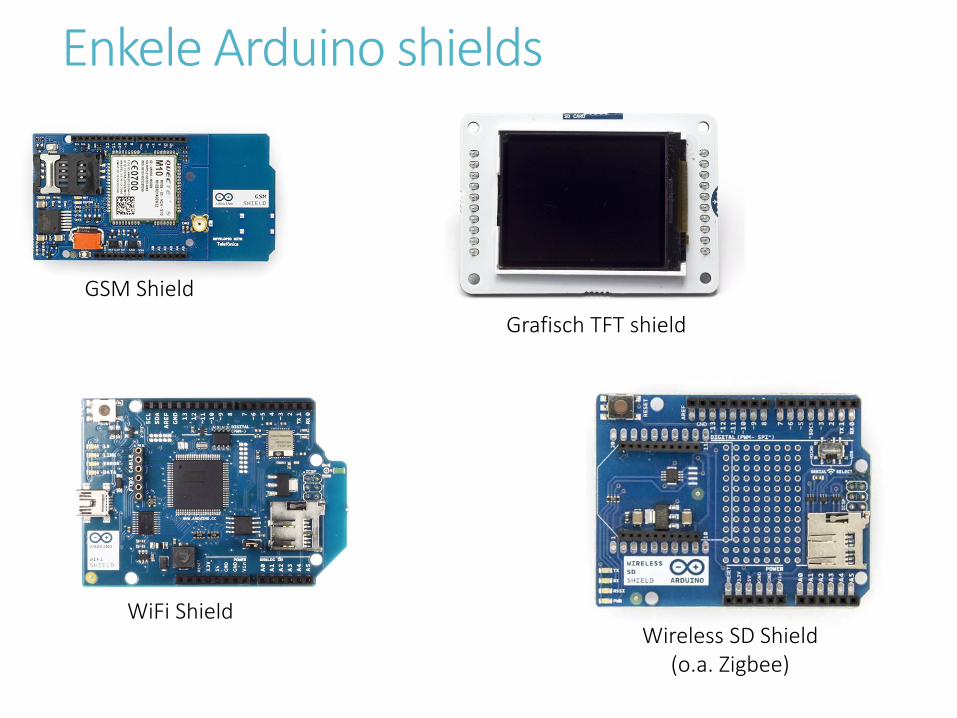
Enkele Arduino shields
WiFi Shield
GSM Shield
Grafisch TFT shield
Wireless SD Shield (o.a. Zigbee)

Prototyping levert mooie dingen op!
https://www.kickstarter.com/projects/2080282237/phoenard-the-arduino-compatible-prototyping-gadgethttp://www.electronics-lab.com/blog/?p=31605
https://www.kickstarter.com/projects/mopusworks/tweeq-micro-sized-arduino-compatible-platform-and
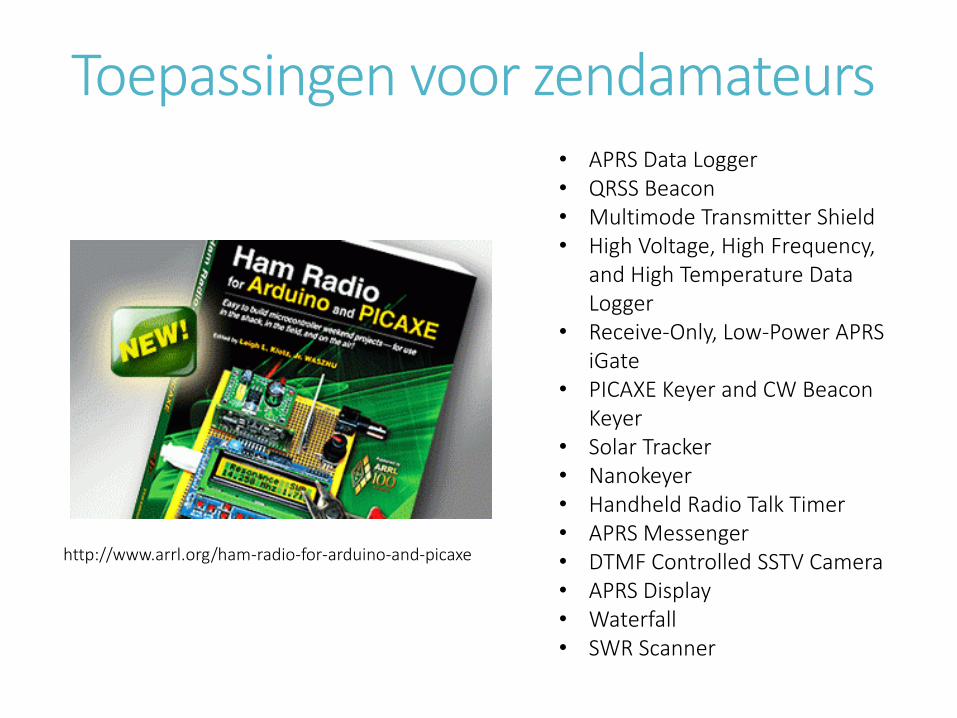
Toepassingen voor zendamateurs
http://www.arrl.org/ham-radio-for-arduino-and-picaxe
• APRS Data Logger• QRSS Beacon• Multimode Transmitter Shield• High Voltage, High Frequency,
and High Temperature Data Logger
• Receive-Only, Low-Power APRS iGate
• PICAXE Keyer and CW BeaconKeyer
• Solar Tracker• Nanokeyer• Handheld Radio Talk Timer• APRS Messenger• DTMF Controlled SSTV Camera• APRS Display• Waterfall• SWR Scanner
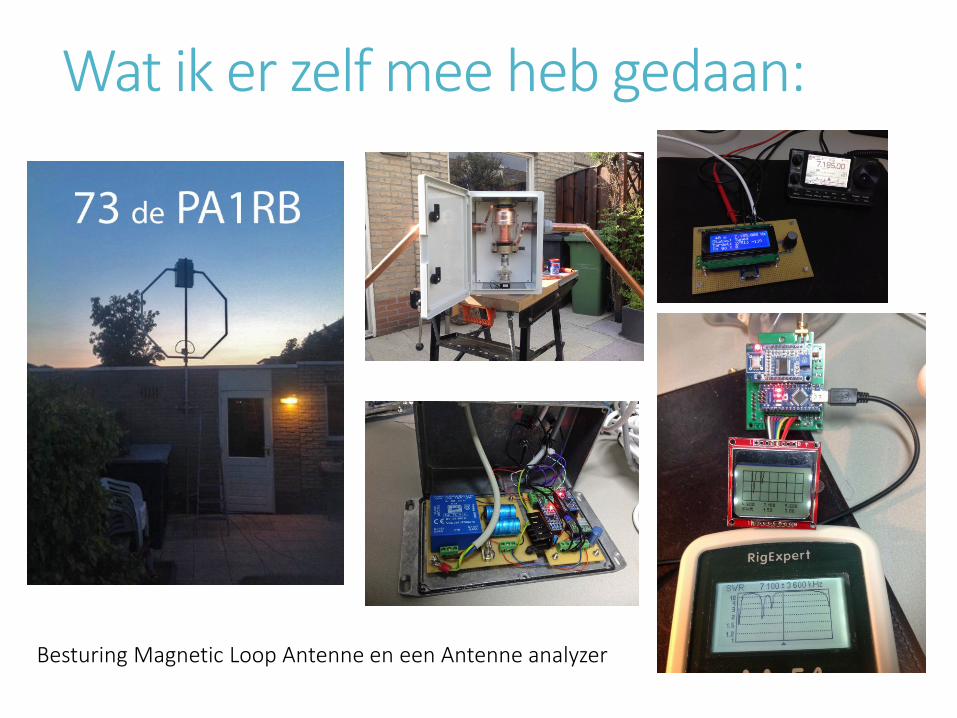
Wat ik er zelf mee heb gedaan:
Besturing Magnetic Loop Antenne en een Antenne analyzer

Aan de slag !
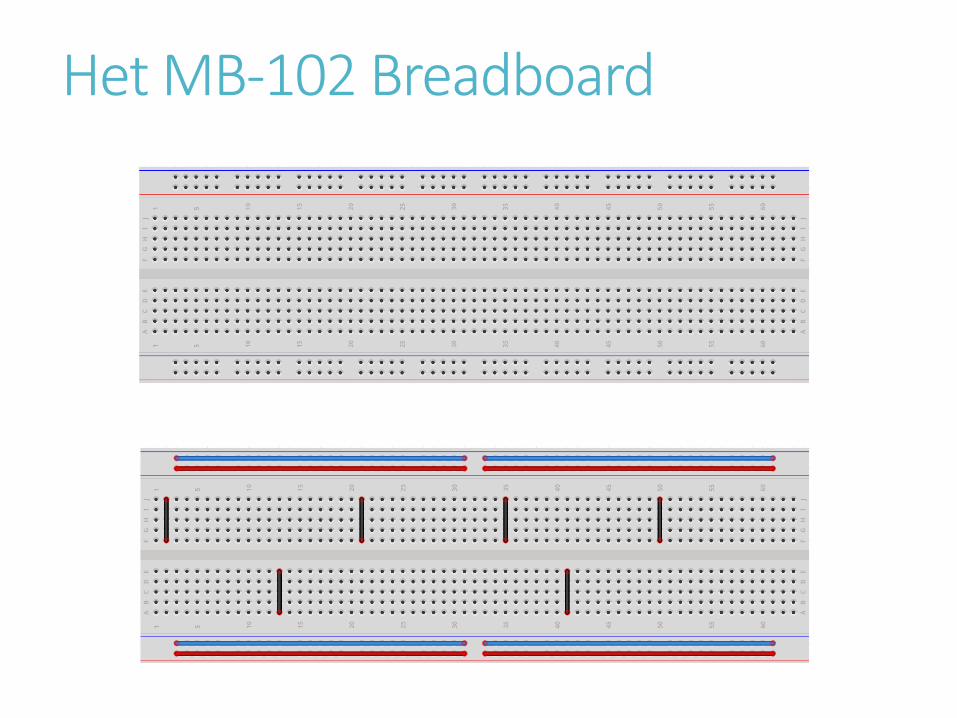
Het MB-102 Breadboard
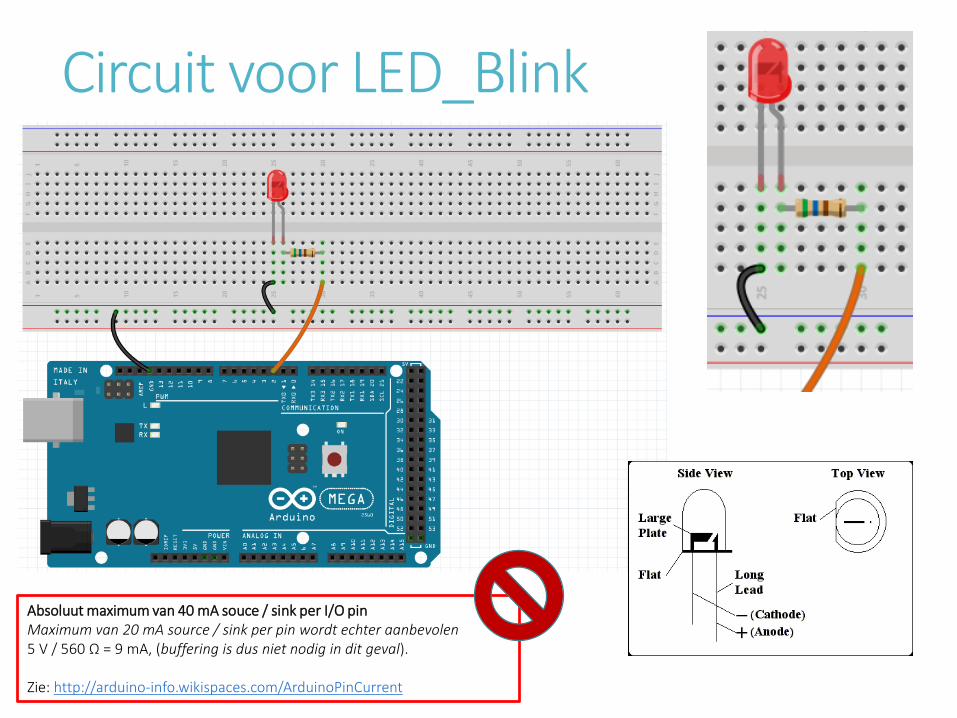
Circuit voor LED_Blink
Absoluut maximum van 40 mA souce / sink per I/O pinMaximum van 20 mA source / sink per pin wordt echter aanbevolen5 V / 560 Ω = 9 mA, (buffering is dus niet nodig in dit geval).
Zie: http://arduino-info.wikispaces.com/ArduinoPinCurrent
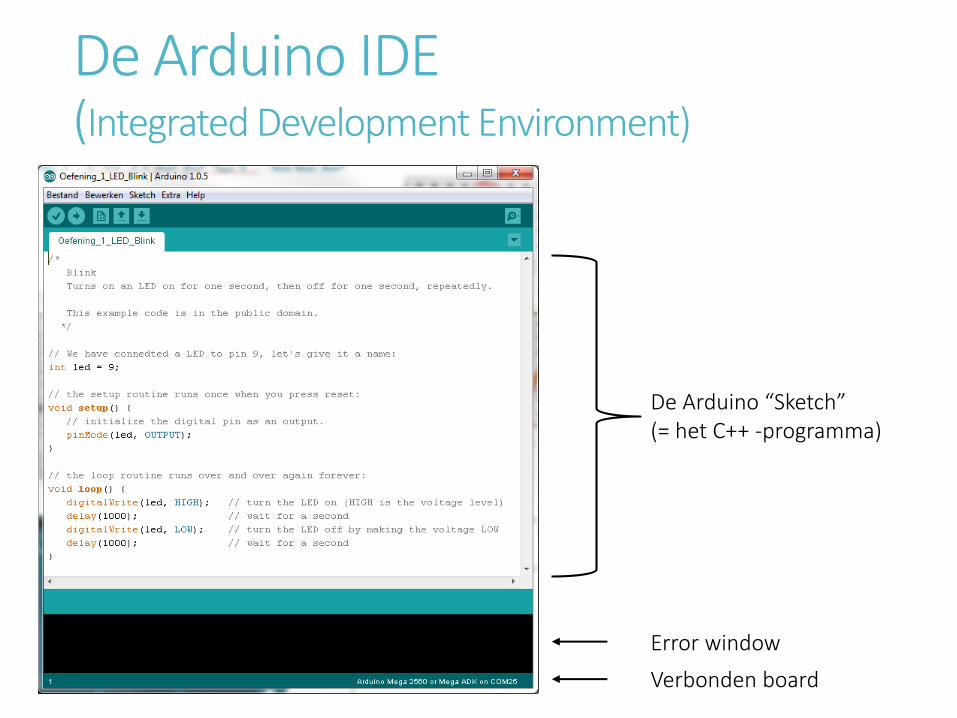
De Arduino IDE(Integrated Development Environment)
De Arduino “Sketch”(= het C++ -programma)
Error window
Verbonden board
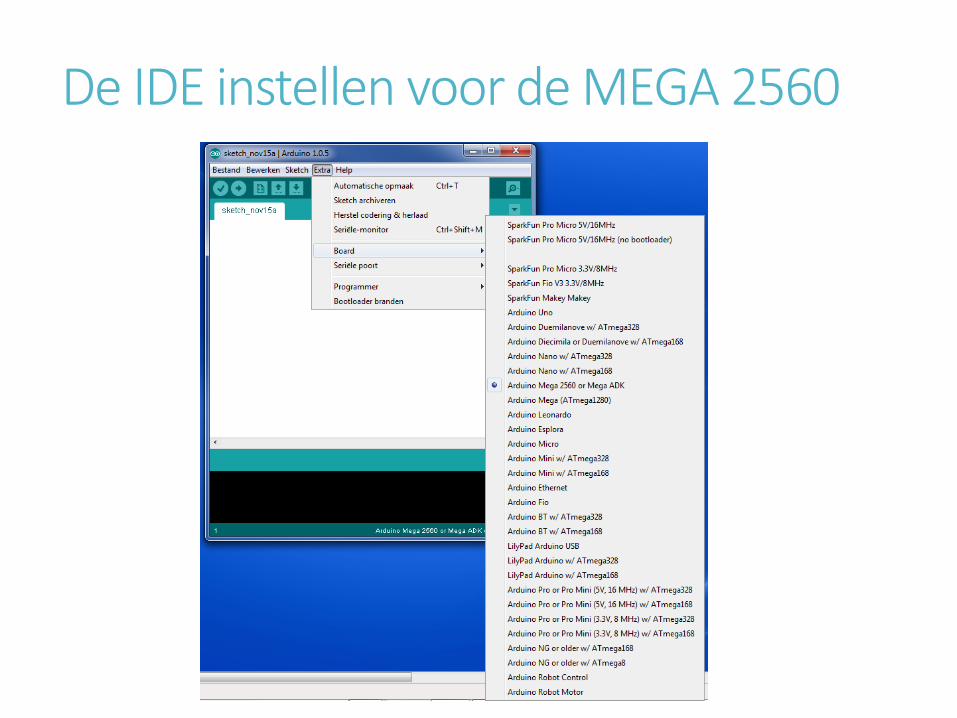
De IDE instellen voor de MEGA 2560
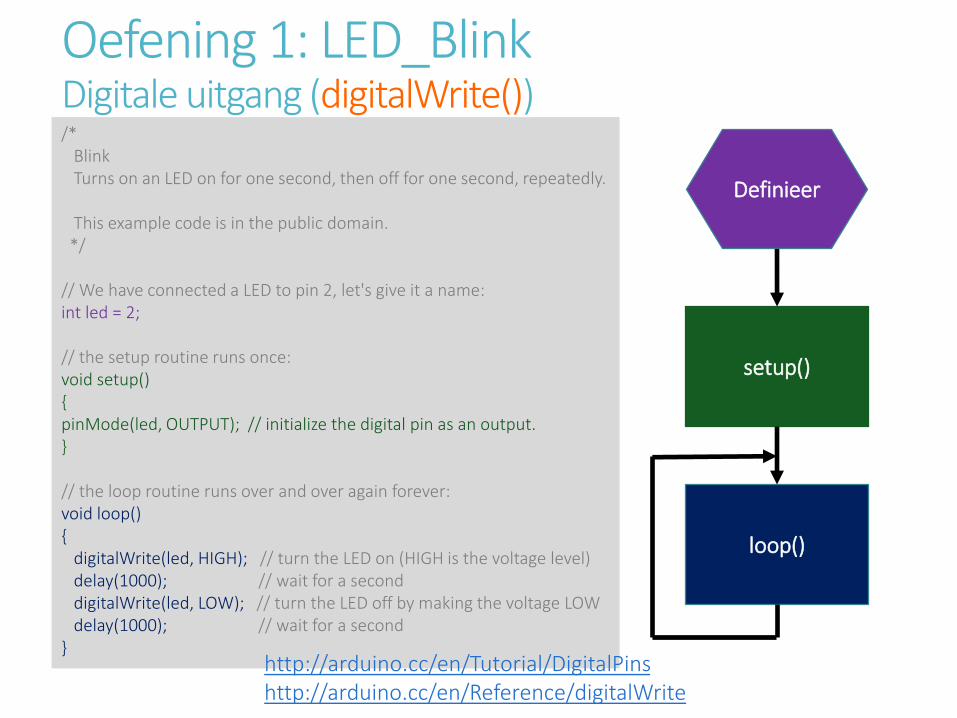
Oefening 1: LED_BlinkDigitale uitgang (digitalWrite())/*
BlinkTurns on an LED on for one second, then off for one second, repeatedly.
This example code is in the public domain.*/
// We have connected a LED to pin 2, let's give it a name:int led = 2;
// the setup routine runs once:void setup() pinMode(led, OUTPUT); // initialize the digital pin as an output.
// the loop routine runs over and over again forever:void loop()
digitalWrite(led, HIGH); // turn the LED on (HIGH is the voltage level)delay(1000); // wait for a seconddigitalWrite(led, LOW); // turn the LED off by making the voltage LOWdelay(1000); // wait for a second
Definieer
setup()
loop()
http://arduino.cc/en/Tutorial/DigitalPinshttp://arduino.cc/en/Reference/digitalWrite
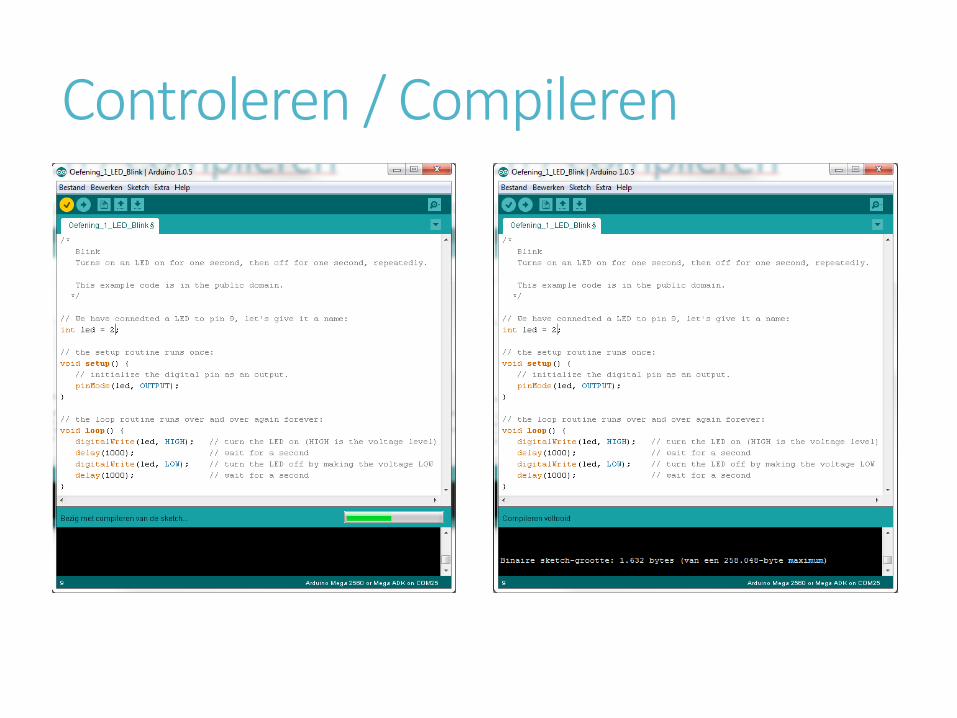
Controleren / Compileren

Eventuele foutmeldingen
Uploaden van een sketch
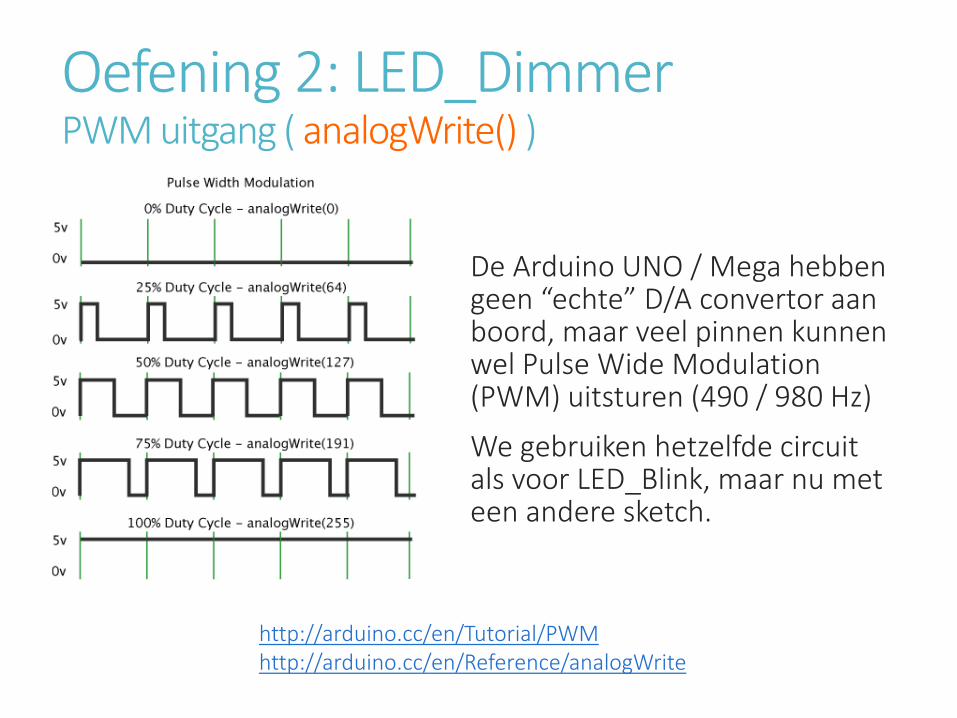
Oefening 2: LED_DimmerPWM uitgang ( analogWrite() )
De Arduino UNO / Mega hebbengeen “echte” D/A convertor aanboord, maar veel pinnen kunnenwel Pulse Wide Modulation (PWM) uitsturen (490 / 980 Hz)
We gebruiken hetzelfde circuit als voor LED_Blink, maar nu met een andere sketch.
http://arduino.cc/en/Tutorial/PWMhttp://arduino.cc/en/Reference/analogWrite

Definitie van pinnen en variabelen
Zet pin in output mode
Zet de PWM duty–cycle met analogWrite()
Oefening 2: LED_DimmerPWM uitgang ( analogWrite() )
int ledPin = 2; // LED connected to digital pin 2int counter = 0; // counter valueboolean countingUp = true; // Track the direction
void setup()pinMode(ledPin, OUTPUT); // sets the pin as output
void loop()if (countingUp == true && counter < 255)counter++; // counter = counter + 1analogWrite(ledPin, counter); // analogWrite values from 0 to 255delay(10); // delay in ms
…

Circuit voor Digital_Input
A
A B
B
SwitchNO
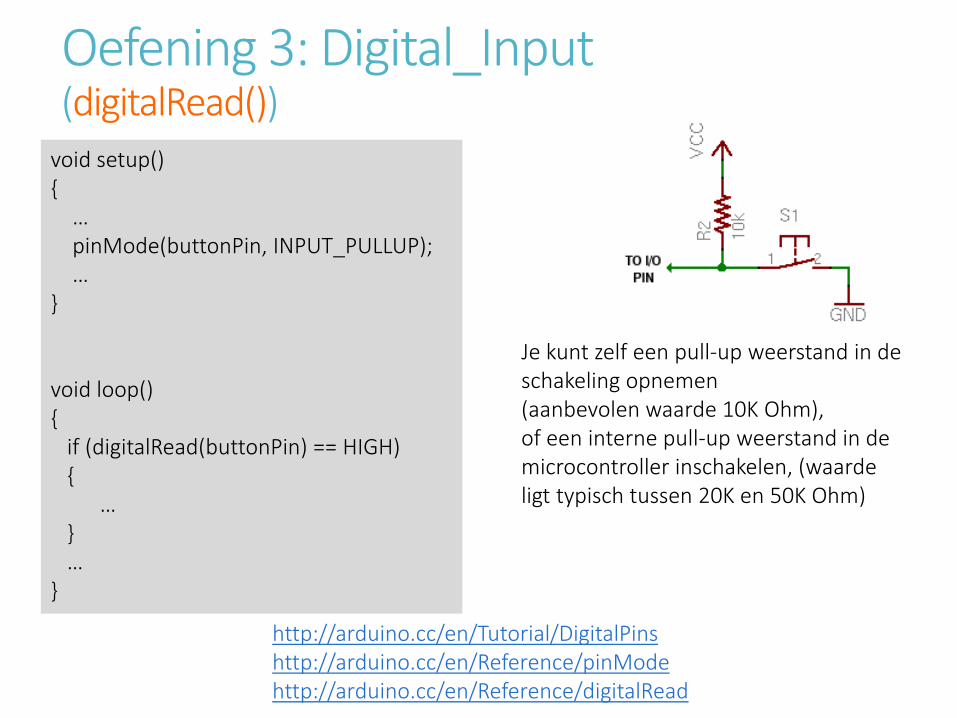
Oefening 3: Digital_Input(digitalRead())
void setup()
…pinMode(buttonPin, INPUT_PULLUP); …
void loop()
if (digitalRead(buttonPin) == HIGH)
… …
http://arduino.cc/en/Tutorial/DigitalPinshttp://arduino.cc/en/Reference/pinModehttp://arduino.cc/en/Reference/digitalRead
Je kunt zelf een pull-up weerstand in de schakeling opnemen(aanbevolen waarde 10K Ohm),of een interne pull-up weerstand in de microcontroller inschakelen, (waardeligt typisch tussen 20K en 50K Ohm)

Intermezzo 1: Seriële-monitor
int counter = 0;
void setup()
// initialize serial communication// at 9600 bits per secondSerial.begin(9600);
void loop()
Serial.println(counter);counter++;delay(1000);
http://www.ladyada.net/learn/arduino/lesson4.html
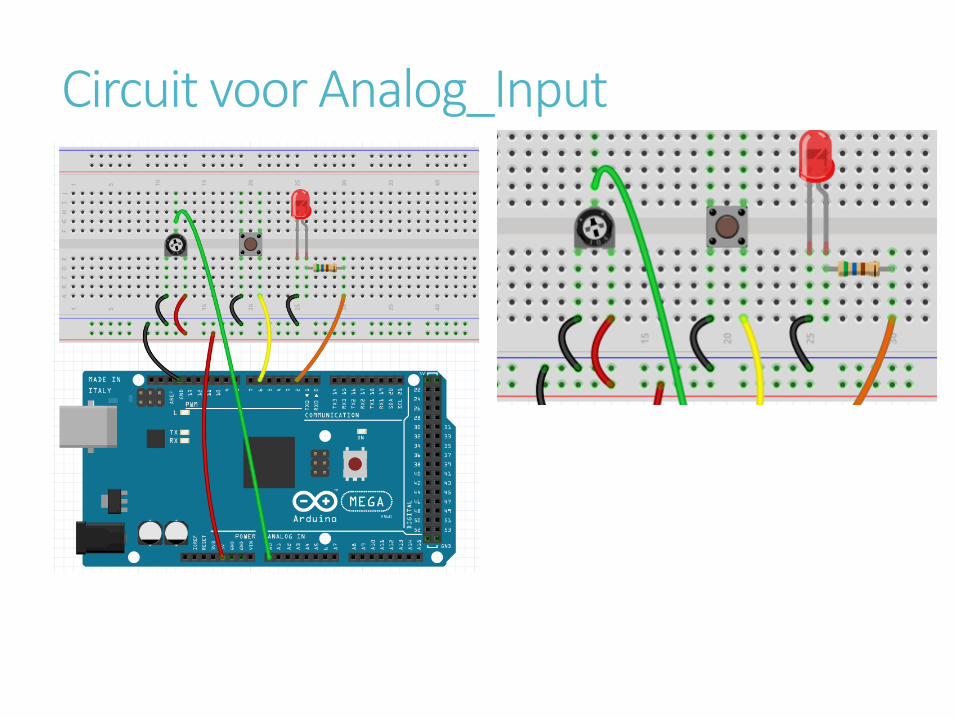
Circuit voor Analog_Input
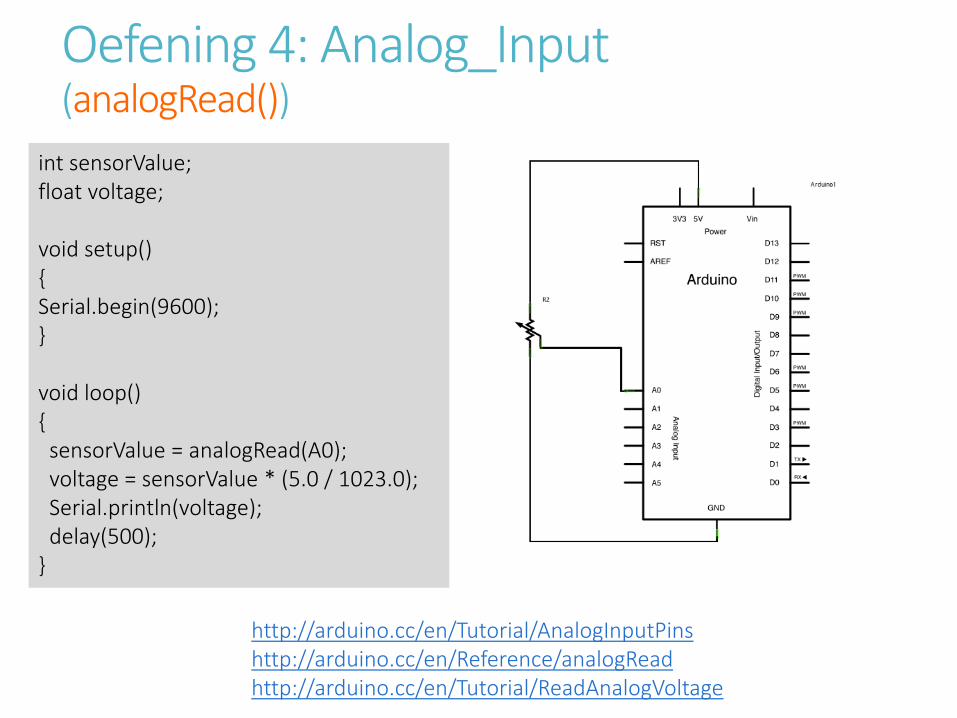
Oefening 4: Analog_Input(analogRead())
http://arduino.cc/en/Tutorial/AnalogInputPinshttp://arduino.cc/en/Reference/analogReadhttp://arduino.cc/en/Tutorial/ReadAnalogVoltage
int sensorValue;float voltage;
void setup() Serial.begin(9600);
void loop()
sensorValue = analogRead(A0);voltage = sensorValue * (5.0 / 1023.0);Serial.println(voltage);delay(500);
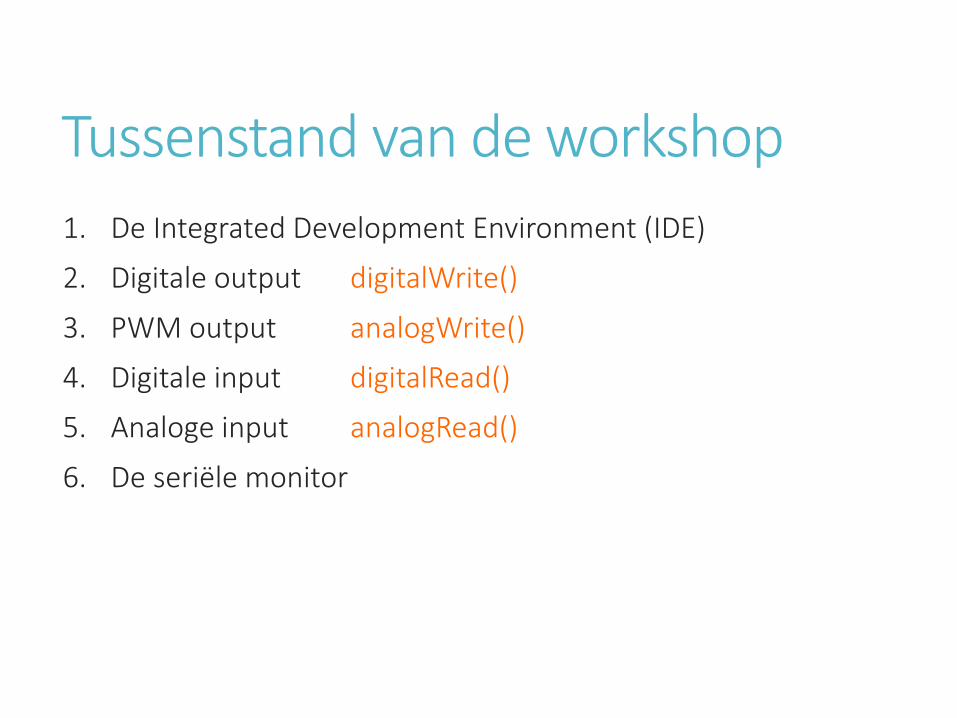
Tussenstand van de workshop
1. De Integrated Development Environment (IDE)
2. Digitale output digitalWrite()
3. PWM output analogWrite()
4. Digitale input digitalRead()
5. Analoge input analogRead()
6. De seriële monitor
Even pauze !10 minuten welverdiende bio-break

Intermezzo 2: LibrariesLibraries bevattenherbruikbare code waardoorhet gebruik van allerleihardwarecomponenten eenheel stuk eenvoudiger wordt.
De Arduino IDE komtstandard met een aantalveelgebruikte libraries, ondermeer LiquidCrystalvoor alfanumierieke LCD’s.
Andere libraries zijneenvoudig toe te voegen.
Wij voegen de Button en FreqCounter libraries toe.
http://arduino.cc/en/Reference/Libraries

Circuit voor LCD 1602 (16x2)
1 16
https://www.sparkfun.com/datasheets/LCD/HD44780.pdf
Aansluitschema op L/C shield
2 regels * 16 karakters alfanumeriek displayAan te sturen via 4-bit of 8-bit databusMet backlight
Gebaseerd op Hitachi HD44780 controller(of compatible).
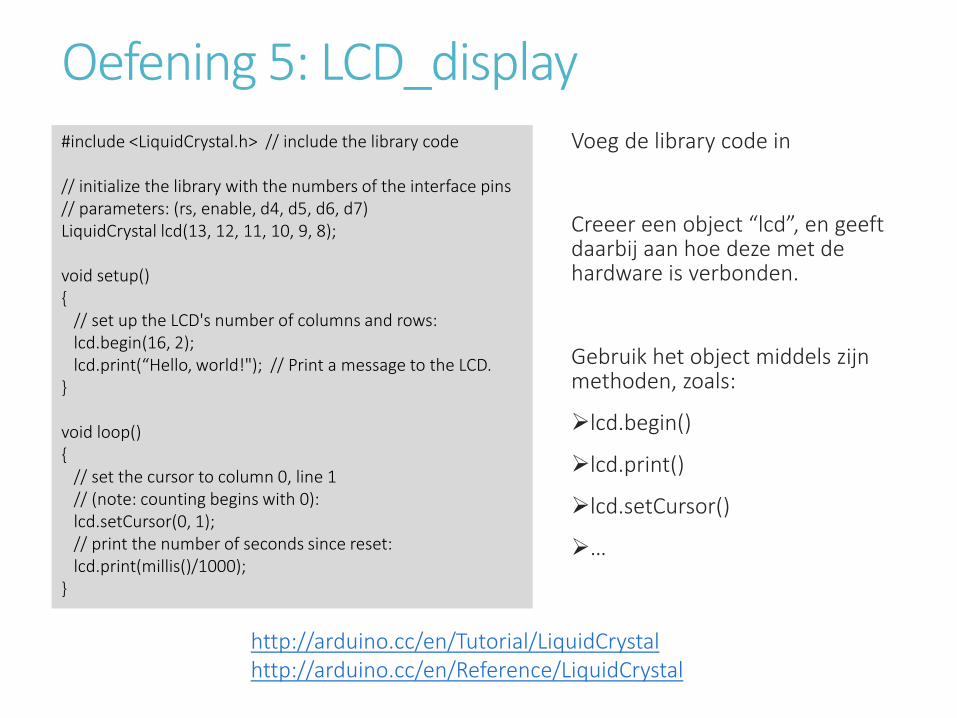
Oefening 5: LCD_displayVoeg de library code in
Creeer een object “lcd”, en geeftdaarbij aan hoe deze met de hardware is verbonden.
Gebruik het object middels zijnmethoden, zoals:
lcd.begin()
lcd.print()
lcd.setCursor()
…
http://arduino.cc/en/Tutorial/LiquidCrystalhttp://arduino.cc/en/Reference/LiquidCrystal
#include <LiquidCrystal.h> // include the library code
// initialize the library with the numbers of the interface pins// parameters: (rs, enable, d4, d5, d6, d7) LiquidCrystal lcd(13, 12, 11, 10, 9, 8);
void setup()
// set up the LCD's number of columns and rows:lcd.begin(16, 2); lcd.print(“Hello, world!"); // Print a message to the LCD.
void loop()
// set the cursor to column 0, line 1// (note: counting begins with 0):lcd.setCursor(0, 1);// print the number of seconds since reset:lcd.print(millis()/1000);
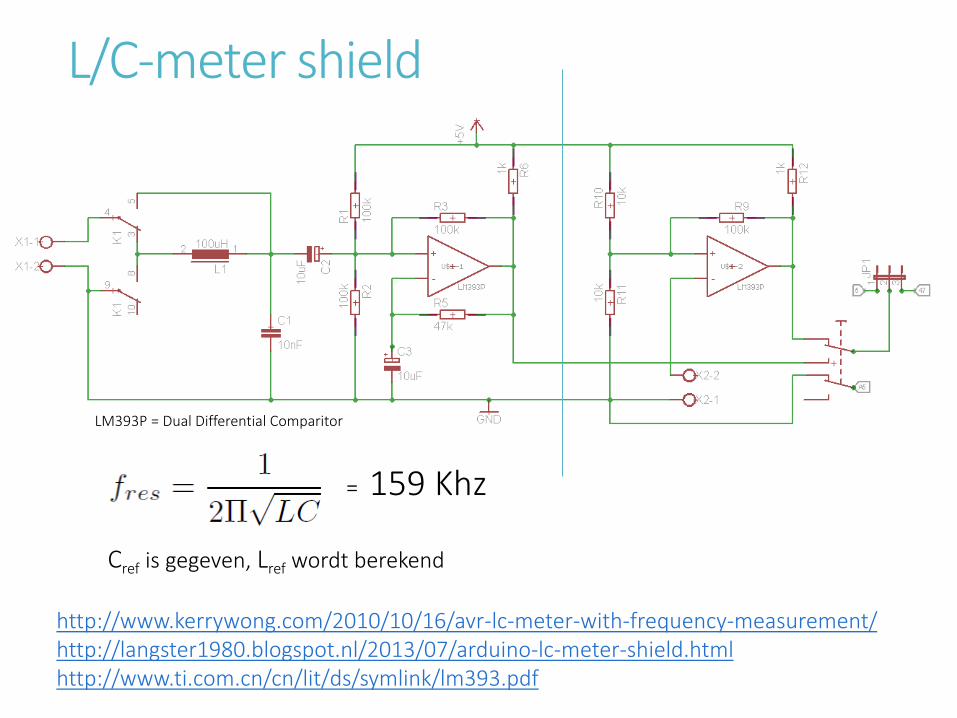
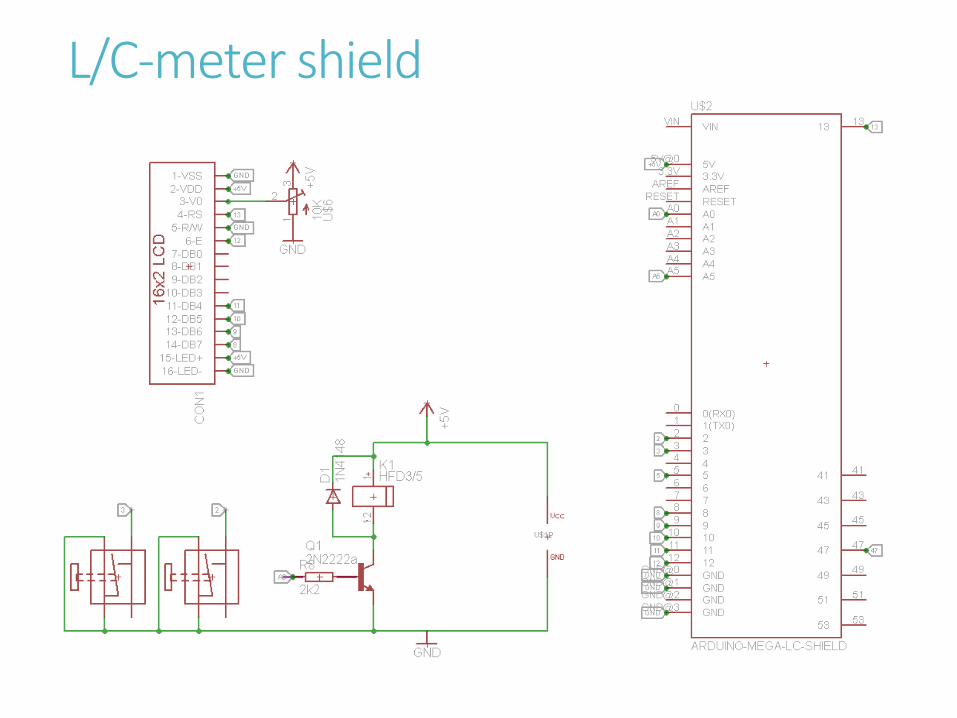
L/C-meter shield
http://www.kerrywong.com/2010/10/16/avr-lc-meter-with-frequency-measurement/http://langster1980.blogspot.nl/2013/07/arduino-lc-meter-shield.htmlhttp://www.ti.com.cn/cn/lit/ds/symlink/lm393.pdf
LM393P = Dual Differential Comparitor
= 159 Khz
Cref is gegeven, Lref wordt berekend
L/C-meter shield

De FreqCounter LibraryLet op, deze library maakt gebruik van eenvast gedefinieerdehardware counter pin.
Arduino UNO: pin 5Arduino Mega: pin 47
http://interface.khm.de/index.php/lab/experiments/arduino-frequency-counter-library/http://forum.arduino.cc/index.php?topic=38126.10;wap2 (Mega 2560 patch)
//Measure the frequency
FreqCounter::f_comp=10; // Calibrate Value FreqCounter::start(1000); // 1000 ms Gate Time
while (FreqCounter::f_ready == 0);
frq=FreqCounter::f_freq;
lcd.setCursor(0, 0);lcd.print("Frequency ");lcd.setCursor(0, 1);lcd.print(frq);
Wat hebben we vanavond gedaan:
Overzicht van het Arduino eco-system
Toepassingen voor zendamateurs
De Arduino IDE (Integrated Development Environment)
Gebruik van de basis I/O functies
De serieële monitorpauze
Het gebruik van libraries en de relatie met hardware
Alfanumierieke LCD aansturen (liquidCrystal library)
De werking van het L/C shield

Ik wil meer !
Verder aan de slag
http://www.ladyada.net/learn/arduino/index.html

Hardware uitzoeken / kopen
http://www.ladyada.net/learn/arduino/index.html
http://www.pighixxx.com/
https://www.sparkfun.com/
http://www.adafruit.com/
http://www.aliexpress.com/
http://www.banggood.com/
http://www.vanallesenmeer.nl/
http://floris.cc/shop/nl/
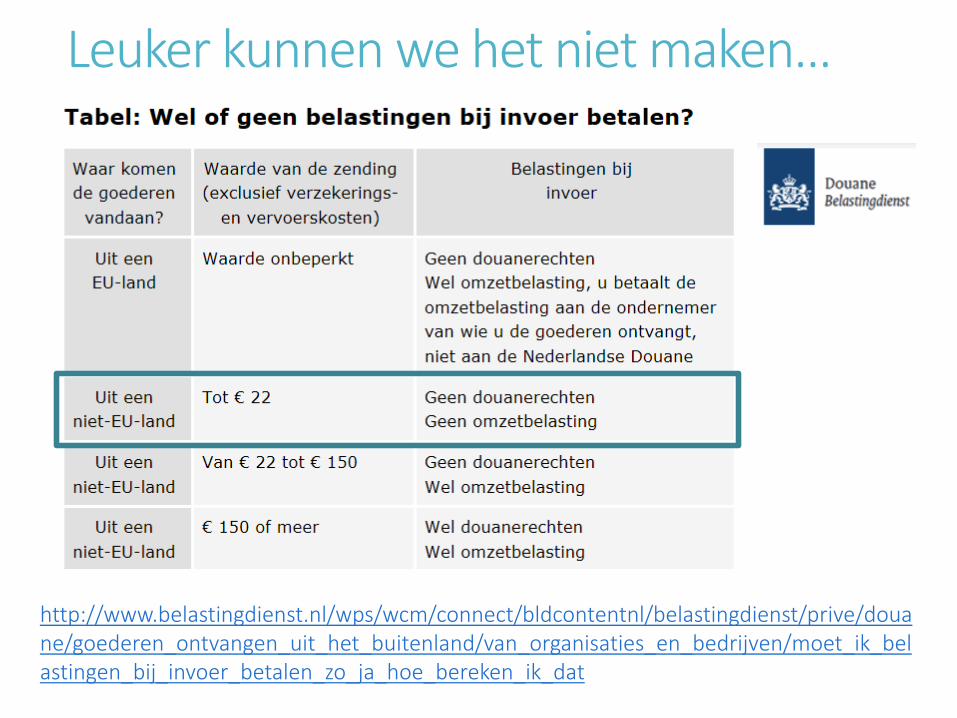
Leuker kunnen we het niet maken…
http://www.belastingdienst.nl/wps/wcm/connect/bldcontentnl/belastingdienst/prive/douane/goederen_ontvangen_uit_het_buitenland/van_organisaties_en_bedrijven/moet_ik_belastingen_bij_invoer_betalen_zo_ja_hoe_bereken_ik_dat