Embed Size (px)
Citation preview

8/10/2019 Aspnet Menu
http://slidepdf.com/reader/full/aspnet-menu 1/91
ComponentOne
Menu for ASP.NET AJAX

8/10/2019 Aspnet Menu
http://slidepdf.com/reader/full/aspnet-menu 2/91
Copyright 1987-2010 ComponentOne LLC. All rights reserved.
Corporate HeadquartersComponentOne LLC201 South Highland Avenue3rd Floor
Pittsburgh, PA 15206 ∙ USA
Internet: [email protected] site: http://www.componentone.com
SalesE-mail: [email protected]
Telephone: 1.800.858.2739 or 1.412.681.4343 (Pittsburgh, PA USA Office)
Trademarks
The ComponentOne product name is a trademark and ComponentOne is a registered trademark of ComponentOne LLC. Allother trademarks used herein are the properties of their respective owners.
Warranty
ComponentOne warrants that the original CD (or diskettes) are free from defects in material and workmanship, assumingnormal use, for a period of 90 days from the date of purchase. If a defect occurs during this time, you may return the defectiveCD (or disk) to ComponentOne, along with a dated proof of purchase, and ComponentOne will replace it at no charge. After90 days, you can obtain a replacement for a defective CD (or disk) by sending it and a check for $25 (to cover postage andhandling) to ComponentOne.
Except for the express warranty of the original CD (or disks) set forth here, ComponentOne makes no other warranties, expressor implied. Every attempt has been made to ensure that the information contained in this manual is correct as of the time it waswritten. We are not responsible for any errors or omissions. ComponentOne’s liability is limited to the amount you paid for theproduct. ComponentOne is not liable for any special, consequential, or other damages for any reason.
Copying and Distribution
While you are welcome to make backup copies of the software for your own use and protection, you are not permitted to makecopies for the use of anyone else. We put a lot of time and effort into creating this product, and we appreciate your support in
seeing that it is used by licensed users only.
This manual was produced using ComponentOne Doc-To-Help™.

8/10/2019 Aspnet Menu
http://slidepdf.com/reader/full/aspnet-menu 3/91
iii
Table of ContentsComponentOne Menu for ASP.NET AJAX Overview ..................................................................1
What's New in ComponentOne Menu for ASP.NET AJAX .....................................................................1Installing Menu for ASP.NET AJAX .......................................................................................................1Menu for ASP.NET AJAX Setup Files.....................................................................................................1System Requirements ...............................................................................................................................2Uninstalling Menu for ASP.NET AJAX...................................................................................................2Deploying your Application in a Medium Trust Environment ..................................................................3End-User License Agreement ...................................................................................................................6Licensing FAQs .......................................................................................................................................6What is Licensing? ...................................................................................................................................6How does Licensing Work? ......................................................................................................................6Common Scenarios ..................................................................................................................................7Common Scenarios in Mobile Applications ..............................................................................................9Troubleshooting .....................................................................................................................................10Technical Support ..................................................................................................................................12Redistributable Files ...............................................................................................................................12About This Documentation ....................................................................................................................13Namespaces ...........................................................................................................................................13Creating an AJAX-Enabled ASP.NET Project........................................................................................14Adding the C1Menu Component to a Project .........................................................................................16
Key Features.......................................................................................................................17
Menu for ASP.NET AJAX Quick Start .....................................................................................21Adding C1Menu to the Page ..................................................................................................................21Applying Different Data Binding Methods .............................................................................................21Working with the C1Menu Designer Form.............................................................................................28Changing the Menu Item's Position in the C1Menu Designer Form........................................................29Changing Menu and Sub-menu Orientation............................................................................................30
Adding Keyboard Support to C1Menu ...................................................................................................31
Menu for ASP.NET AJAX Top Tips ........................................................................................32
Design-Time Support............................................................................................................33C1Menu Smart Tag ................................................................................................................................33C1Menu Designer Form.........................................................................................................................35C1Menu Designer Form Menu Bar ........................................................................................................36C1Menu Designer Form Toolbar............................................................................................................38C1Menu Designer Form Context Menu .................................................................................................39C1Menu Bindings Collection Editor .......................................................................................................39
Menu Types........................................................................................................................40Top-level menu ......................................................................................................................................41
Drop-down Menu...................................................................................................................................41Group Menu ..........................................................................................................................................41Context Menu ........................................................................................................................................42
Menu Item Types.................................................................................................................43Link Items..............................................................................................................................................43Header Items..........................................................................................................................................44Group Items ........................................................................................................................................... 47Separator Items ......................................................................................................................................47
Menu Creation....................................................................................................................48

8/10/2019 Aspnet Menu
http://slidepdf.com/reader/full/aspnet-menu 4/91
iv
Static Menu Creation..............................................................................................................................48Dynamic Menu Creation........................................................................................................................48Data Source Menu Creation ...................................................................................................................49
Menu Appearance ................................................................................................................49Menu Styles ...........................................................................................................................................49Visual Styles ........................................................................................................................................... 49
Templates...............................................................................................................................................50Top-Level Menu Template .....................................................................................................................50Items Template.......................................................................................................................................51Child Items Template .............................................................................................................................52Individual Menu Items Template............................................................................................................53Menu Item Images .................................................................................................................................55Menu Layout .........................................................................................................................................55
Menu Behavior....................................................................................................................57Animation..............................................................................................................................................57Expand and Collapse Animation Effects.................................................................................................57Expand and Collapse Transitions ...........................................................................................................59Expand and Collapse Duration...............................................................................................................61Menu Scrolling.......................................................................................................................................61Scroll Menu Types .................................................................................................................................61Scroll Mode Options ..............................................................................................................................62Scroll Button Styles ................................................................................................................................64Menu Navigation and Shortcuts .............................................................................................................65
Working with the Client-Side Menu ........................................................................................66Client-Side Properties .............................................................................................................................66Client-Side Methods...............................................................................................................................66Client-Side Events ..................................................................................................................................66
Menu for ASP.NET Samples ..................................................................................................71
Menu for ASP.NET Task-Based Help .......................................................................................71Adding Collapse and Expand Animation Effects ....................................................................................71
Creating Different Menu Types ..............................................................................................................74Create Submenus....................................................................................................................................74Create a Group Menu.............................................................................................................................77Create a Context Menu and Attach it to a Control ..................................................................................79Saving and Loading C1Menu as an XML File ........................................................................................79Save C1Menu as an XML File................................................................................................................80Load C1Menu from an XML File...........................................................................................................80Adding Scrolling to Menus .....................................................................................................................81Add Scrolling to Vertical Top Level Menu..............................................................................................81Add Scrolling to Horizontal Top Level Menu.........................................................................................81Add Scrolling to Vertical Sub Menu........................................................................................................82Add Scrolling to Vertical Group .............................................................................................................83Creating a Click Event for a Menu Item..................................................................................................84Creating a Custom Visual Style ..............................................................................................................85

8/10/2019 Aspnet Menu
http://slidepdf.com/reader/full/aspnet-menu 5/91
1
ComponentOne Menu for ASP.NETAJAX Overview
Create highly sophisticated menu systems in your ASP.NET applications withComponentOne Menu for ASP.NET AJAX (C1Menu). C1Menu’s easy touse designers, support for Cascading Style Sheets (CSS) and templates, and
built-in animation effects give you a customizable and flexible menu controlthat is very easy to use. The rich client-side object model enables you to useclient-side events for more client-side interactivity.
Menu for ASP.NET AJAX is part of ComponentOne Studio for ASP.NET
AJAX, the next breed of ASP.NET controls developed on a new client andserver side framework. This new ASP.NET control suite fully exploits theAJAX framework to enable you to create highly interactive and sophisticatedWeb applications with Studio for ASP.NET.
Getting Started
Get started with the
following topics:
- Menu for
ASP.NET AJAXQuick Start (page21)
- Menu Types(page 40)
- Menu Behavior (page 57)
What's New in ComponentOne Menu for ASP.NET AJAXThis documentation was last revised on June 14, 2010. There were no new features added to ComponentOne
Menu for ASP.NET AJAX.
Tip: A version history containing a list of new features, improvements, fixes, and changes for each product isavailable in HelpCentral at http://helpcentral.componentone.com/VersionHistory.aspx .
Installing Menu for ASP.NET AJAXThe following sections provide helpful information on installing ComponentOne Studio for ASP.NET
AJAX:
Menu for ASP.NET AJAX Setup FilesThe ComponentOne Studio for ASP.NET installation program will create the following directory:C:\Program Files\ComponentOne\Studio for ASP.NET. This directory contains the followingsubdirectories:
bin Contains copies of all binaries (DLLs, Exes) in the ComponentOneVisual Studio ASP.NET package.

8/10/2019 Aspnet Menu
http://slidepdf.com/reader/full/aspnet-menu 6/91
2
C1.Web.UI Contains files (at least a readme.txt) related to the C1WebUI product.
H2Help Contains online documentation for the Studio for ASP.NET controls.
C1WebUi\VisualStyles Contains all external file themes.
SamplesSamples for the product are installed in the ComponentOne Samples folder by default. The path of theComponentOne Samples directory is slightly different on Windows XP and Windows 7/Vista machines:
Windows XP path: C:\Documents and Settings\<username>\My Documents\ComponentOne Samples
Windows 7/Vista path: C:\Users\<username>\Documents\ComponentOne Samples
The ComponentOne Samples folder contains the following subdirectories:
Common Contains support and data files that are used by many of the demoprograms.
C1WebUI\CS\ControlExplorer Contains a Samples folder for the Visual Studio sample project and areadme.txt file.
Samples can be accessed from the ComponentOne Sample Explorer . On your desktop, click the Start button
and then click ComponentOne | Studio for ASP.NET | Samples | Palomino Samples.
System Requirements
System requirements for ComponentOne Studio for ASP.NET AJAXcomponents include the following:
Operating Systems: Windows 7
Windows® 2000
Windows Server® 2003
Windows Server 2008
Windows XP SP2
Windows Vista™
Web Server: Microsoft Internet Information Services (IIS) 5.0 or later
Environments: .NET Framework 2.0 or later
Visual Studio 2005 or Visual Studio 2008
Internet Explorer 6.0 or later
Firefox® 2.0 or later
Safari® 2.0 or later
Uninstalling Menu for ASP.NET AJAX
To uninstall Menu for ASP.NET AJAX:
1. Open the Control Panel and select the Add or Remove Programs (Programs and Features in Windows7/Vista).
2. Select ComponentOne Studio for ASP.NET and click the Remove button.

8/10/2019 Aspnet Menu
http://slidepdf.com/reader/full/aspnet-menu 7/91
3
3. Click Yes to remove the program.
Deploying your Application in a Medium Trust Environment
Depending on your hosting choice, you may need to deploy your Web site or application in a medium trustenvironment. Often in a shared hosting environment, medium trust is required. In a medium trustenvironment several permissions are unavailable or limited, including OleDbPermission,
ReflectionPermission, and FileIOPermission. You can configure your Web.config file to enable thesepermissions.
Note: ComponentOne controls will not work in an environment where reflection is not allowed.
ComponentOne ASP.NET controls include the AllowPartiallyTrustedCallers() assembly attribute and willwork under the medium trust level with some changes to the Web.config file. Since this requires some controlover the Web.config file, please check with your particular host to determine if they can provide the rights tooverride these security settings.
Modifying or Editing the Config File
In order to add permissions, you can edit the exiting web_mediumtrust.config file or create a custom policy file based on the medium trust policy. If you modify the existing web_mediumtrust.config file, all Webapplications will have the same permissions with the permissions you have added. If you want applications tohave different permissions, you can instead create a custom policy based on medium trust.
Edit the Config File
In order to add permissions, you can edit the exiting web_mediumtrust.config file. To edit the exitingweb_mediumtrust.config file, complete the following steps:
1. Locate the medium trust policy file web_mediumtrust.config located by default in the%windir%\Microsoft.NET\Framework\{Version}\CONFIG directory.
2. Open the web_mediumtrust.config file.
3. Add the permissions that you want to grant. For examples, see Adding Permissions (page 4).
Create a Custom Policy Based on Medium Trust
In order to add permissions, you can create a custom policy file based on the medium trust policy. To create acustom policy file, complete the following steps:
1. Locate the medium trust policy file web_mediumtrust.config located by default in the%windir%\Microsoft.NET\Framework\{Version}\CONFIG directory.
2. Copy the web_mediumtrust.config file and create a new policy file in the same directory.
Give the new a name that indicates that it is your variation of medium trust; for example,AllowReflection_Web_MediumTrust.config.
3. Add the permissions that you want to grant. For examples, see Adding Permissions (page 4).
4. Enable the custom policy file on your application by modifying the following lines in your web.config file
under the <system.web> node:<system.web><trust level="CustomMedium" originUrl=""/>
<securityPolicy><trustLevel name="CustomMedium"
policyFile="AllowReflection_Web_MediumTrust.config"/></securityPolicy>...
</system.web>

8/10/2019 Aspnet Menu
http://slidepdf.com/reader/full/aspnet-menu 8/91
4
Note: Your host may not allow trust level overrides. Please check with your host to see if you have these rights.
Allowing Deserialization
To allow the deserialization of the license added to App_Licenses.dll by the Microsoft IDE, you should add
the SerializationFormatter flag to security permission to the Web.config file. Complete the steps in theModifying or Editing the Config File (page 3) topic to create or modify a policy file before completing thefollowing.
Add the SerializationFormatter flag to the <IPermission class="SecurityPermission">
tag so that it appears similar to the following:<NamedPermissionSets> <PermissionSet class="NamedPermissionSet" version="1" Name="ASP.Net"> <IPermission class="SecurityPermission" version="1"
Flags="Assertion, Execution, ControlThread,ControlPrincipal, RemotingConfiguration, SerializationFormatter"/> ... </PermissionSet></NamedPermissionSets>
Adding Permissions
You can add permission, including ReflectionPermission, OleDbPermission, and FileIOPermission, to theweb.config file. Note that ComponentOne controls will not work in an environment where reflection is notallowed. Complete the steps in the Modifying or Editing the Config File (page 3) topic to create or modify apolicy file before completing the following.
ReflectionPermission
By default ReflectionPermission is not available in a medium trust environment. ComponentOne ASP.NETcontrols require reflection permission because LicenseManager.Validate() causes a link demand for full trust.
To add reflection permission, complete the following:
1. Open the web_mediumtrust.config file or a file created based on the web_mediumtrust.config file.
2. Add the following <SecurityClass> tag after the <SecurityClasses> tag so that it appears similar
to the following:<SecurityClasses> <SecurityClass Name="ReflectionPermission"Description="System.Security.Permissions.ReflectionPermission, mscorlib,Version=2.0.0.0, Culture=neutral, PublicKeyToken=b77a5c561934e089"/>...</SecurityClasses>
3. Add the following <IPermission> tag after the <NamedPermissionSets> tag so it appears similar
to the following:<NamedPermissionSets> <PermissionSet class="NamedPermissionSet" version="1"Name="ASP.Net"> <IPermission class="ReflectionPermission" version="1" Flags="ReflectionEmit,MemberAccess" />

8/10/2019 Aspnet Menu
http://slidepdf.com/reader/full/aspnet-menu 9/91
5
... </PermissionSet></NamedPermissionSets>
4. Save and close the web_mediumtrust.config file.
OleDbPermission
By default OleDbPermission is not available in a medium trust environment. This means you cannot use theADO.NET managed OLE DB data provider to access databases. If you wish to use the ADO.NET managedOLE DB data provider to access databases, you must modify the web_mediumtrust.config file.
To add OleDbPermission, complete the following steps:
1. Open the web_mediumtrust.config file or a file created based on the web_mediumtrust.config file.
2. Add the following <SecurityClass> tag after the <SecurityClasses> tag so that it appears similar
to the following:<SecurityClasses> <SecurityClass Name="OleDbPermission"Description="System.Data.OleDb.OleDbPermission, System.Data,Version=2.0.0.0, Culture=neutral, PublicKeyToken=b77a5c561934e089"/>...
</SecurityClasses>
3. Add the following <IPermission> tag after the <NamedPermissionSets> tag so it appears similar
to the following:<NamedPermissionSets> <PermissionSet class="NamedPermissionSet" version="1"Name="ASP.Net"> <IPermission class="OleDbPermission" version="1"Unrestricted="true"/> ... </PermissionSet></NamedPermissionSets>
4. Save and close the web_mediumtrust.config file.
FileIOPermission
By default, FileIOPermission is not available in a medium trust environment. This means no file access ispermitted outside of the application's virtual directory hierarchy. If you wish to allow additional filepermissions, you must modify the web_mediumtrust.config file.
To modify FileIOPermission to allow read access to a specific directory outside of the application's virtualdirectory hierarchy, complete the following steps:
1. Open the web_mediumtrust.config file or a file created based on the web_mediumtrust.config file.
2. Add the following <SecurityClass> tag after the <SecurityClasses> tag so that it appears
similar to the following:<SecurityClasses> <SecurityClass Name="FileIOPermission"
Description="System.Security.Permissions.FileIOPermission, mscorlib,Version=2.0.0.0, Culture=neutral, PublicKeyToken=b77a5c561934e089"/>...</SecurityClasses>
3. Add the following <IPermission> tag after the <NamedPermissionSets> tag so it appears similar
to the following:<NamedPermissionSets> <PermissionSet class="NamedPermissionSet" version="1"Name="ASP.Net">

8/10/2019 Aspnet Menu
http://slidepdf.com/reader/full/aspnet-menu 10/91
6
... <IPermission class="FileIOPermission" version="1"Read="C:\SomeDir;$AppDir$" Write="$AppDir$" Append="$AppDir$"PathDiscovery="$AppDir$" /> ...</PermissionSet></NamedPermissionSets>
4. Save and close the web_mediumtrust.config file.
End-User License AgreementAll of the ComponentOne licensing information, including the ComponentOne end-user license agreements,the ComponentOne licensing model, and frequently asked licensing questions, is available online athttp://www.componentone.com/SuperPages/Licensing/.
Licensing FAQsThis section describes the main technical aspects of licensing. It may help the user to understand and resolvelicensing problems he may experience when using ComponentOne .NET and ASP.NET products.
What is Licensing?
Licensing is a mechanism used to protect intellectual property by ensuring that users are authorized to usesoftware products.
Licensing is not only used to prevent illegal distribution of software products. Many software vendors,including ComponentOne, use licensing to allow potential users to test products before they decide to purchasethem.
Without licensing, this type of distribution would not be practical for the vendor or convenient for the user.Vendors would either have to distribute evaluation software with limited functionality, or shift the burden ofmanaging software licenses to customers, who could easily forget that the software being used is an evaluationversion and has not been purchased.
How does Licensing Work?
ComponentOne uses a licensing model based on the standard set by Microsoft, which works with all types ofcomponents.
Note: The Compact Framework components use a slightly different mechanism for run-time licensing than theother ComponentOne components due to platform differences.
When a user decides to purchase a product, he receives an installation program and a Serial Number. Duringthe installation process, the user is prompted for the serial number that is saved on the system. (Users can alsoenter the serial number by clicking the License button on the About Box of any ComponentOne product, ifavailable, or by rerunning the installation and entering the serial number in the licensing dialog.)
When a licensed component is added to a form or web page, Visual Studio obtains version and licensinginformation from the newly created component. When queried by Visual Studio, the component looks forlicensing information stored in the system and generates a run-time license and version information, whichVisual Studio saves in the following two files:
An assembly resource file which contains the actual run-time license
A "licenses.licx" file that contains the licensed component strong name and version information
These files are automatically added to the project by Microsoft Visual Studio.

8/10/2019 Aspnet Menu
http://slidepdf.com/reader/full/aspnet-menu 11/91
7
In WinForms and ASP.NET 1.x applications, the run-time license is stored as an embedded resource in theassembly hosting the component or control by Visual Studio. In ASP.NET 2.x applications, the run-timelicense may also be stored as an embedded resource in the App_Licenses.dll assembly, which is used to store
all run-time licenses for all components directly hosted by WebForms in the application. Thus, the
App_licenses.dll must always be deployed with the application.
The licenses.licx file is a simple text file that contains strong names and version information for each of the
licensed components used in the application. Whenever Visual Studio is called upon to rebuild the applicationresources, this file is read and used as a list of components to query for run-time licenses to be embedded in theappropriate assembly resource. Note that editing or adding an appropriate line to this file can force VisualStudio to add run-time licenses of other controls as well.
Note that the licenses.licx file is usually not shown in the Solution Explorer; it appears if you press the ShowAll Files button in the Solution Explorer's toolbox, or from Visual Studio's main menu, select Show All Files
on the Project menu.
Later, when the component is created at run time, it obtains the run-time license from the appropriateassembly resource that was created at design time and can decide whether to simply accept the run-timelicense, to throw an exception and fail altogether, or to display some information reminding the user that thesoftware has not been licensed.
All ComponentOne products are designed to display licensing information if the product is not licensed. Nonewill throw licensing exceptions and prevent applications from running.
Common Scenarios
The following topics describe some of the licensing scenarios you may encounter.
Creating components at design time
This is the most common scenario and also the simplest: the user adds one or more controls to the form, thelicensing information is stored in the licenses.licx file, and the component works.
Note that the mechanism is exactly the same for Windows Forms and Web Forms (ASP.NET) projects.
Creating components at run time
This is also a fairly common scenario. You do not need an instance of the component on the form, but wouldlike to create one or more instances at run time.
In this case, the project will not contain a licenses.licx file (or the file will not contain an appropriate run-timelicense for the component) and therefore licensing will fail.
To fix this problem, add an instance of the component to a form in the project. This will create the licenses.licxfile and things will then work as expected. (The component can be removed from the form after thelicenses.licx file has been created).
Adding an instance of the component to a form, then removing that component, is just a simple way of addinga line with the component strong name to the licenses.licx file. If desired, you can do this manually usingnotepad or Visual Studio itself by opening the file and adding the text. When Visual Studio recreates theapplication resources, the component will be queried and its run-time license added to the appropriate
assembly resource.
Inheriting from licensed components
If a component that inherits from a licensed component is created, the licensing information to be stored in theform is still needed. This can be done in two ways:
Add a LicenseProvider attribute to the component.

8/10/2019 Aspnet Menu
http://slidepdf.com/reader/full/aspnet-menu 12/91
8
This will mark the derived component class as licensed. When the component is added to a form, VisualStudio will create and manage the licenses.licx file, and the base class will handle the licensing process asusual. No additional work is needed. For example: [LicenseProvider(typeof(LicenseProvider))] class MyGrid: C1.Win.C1FlexGrid.C1FlexGrid {
// ... }
Add an instance of the base component to the form.
This will embed the licensing information into the licenses.licx file as in the previous scenario, and the base component will find it and use it. As before, the extra instance can be deleted after the licenses.licxfile has been created.
Please note, that C1 licensing will not accept a run time license for a derived control if the run time license isembedded in the same assembly as the derived class definition, and the assembly is a DLL. This restriction isnecessary to prevent a derived control class assembly from being used in other applications without a designtime license. If you create such an assembly, you will need to take one of the actions previously describedcreate a component at run time.
Using licensed components in console applicationsWhen building console applications, there are no forms to add components to, and therefore Visual Studiowon't create a licenses.licx file.
In these cases, create a temporary Windows Forms application and add all the desired licensed components toa form. Then close the Windows Forms application and copy the licenses.licx file into the console applicationproject.
Make sure the licenses.licx file is configured as an embedded resource. To do this, right-click the licenses.licxfile in the Solution Explorer window and select Properties. In the Properties window, set the Build Action
property to Embedded Resource.
Using licensed components in Visual C++ applications
There is an issue in VC++ 2003 where the licenses.licx is ignored during the build process; therefore, thelicensing information is not included in VC++ applications.
To fix this problem, extra steps must be taken to compile the licensing resources and link them to the project.Note the following:
1. Build the C++ project as usual. This should create an exe file and also a licenses.licx file with licensinginformation in it.
2. Copy the licenses.licx file from the app directory to the target folder (Debug or Release).
3. Copy the C1Lc.exe utility and the licensed dlls to the target folder. (Don't use the standard lc.exe, it has bugs.)
4. Use C1Lc.exe to compile the licenses.licx file. The command line should look like this:c1lc /target:MyApp.exe /complist:licenses.licx /i:C1.Win.C1FlexGrid.dll
5. Link the licenses into the project. To do this, go back to Visual Studio, right-click the project, selectproperties, and go to the Linker/Command Line option. Enter the following:/ASSEMBLYRESOURCE:Debug\MyApp.exe.licenses
6. Rebuild the executable to include the licensing information in the application.

8/10/2019 Aspnet Menu
http://slidepdf.com/reader/full/aspnet-menu 13/91
9
Using licensed components with automated testing products
Automated testing products that load assemblies dynamically may cause them to display license dialogs. Thisis the expected behavior since the test application typically does not contain the necessary licensinginformation, and there is no easy way to add it.
This can be avoided by adding the string "C1CheckForDesignLicenseAtRuntime" to the
AssemblyConfiguration attribute of the assembly that contains or derives from ComponentOne controls. Thisattribute value directs the ComponentOne controls to use design time licenses at run time.
For example:#if AUTOMATED_TESTING
[AssemblyConfiguration("C1CheckForDesignLicenseAtRuntime")]#endif
public class MyDerivedControl : C1LicensedControl{
// ...}
Note that the AssemblyConfiguration string may contain additional text before or after the given string, so theAssemblyConfiguration attribute can be used for other purposes as well. For example:
[AssemblyConfiguration("C1CheckForDesignLicenseAtRuntime,BetaVersion")]
THIS METHOD SHOULD ONLY BE USED UNDER THE SCENARIO DESCRIBED. It requires a designtime license to be installed on the testing machine. Distributing or installing the license on other computers is aviolation of the EULA.
Common Scenarios in Mobile Applications
The following topics describe some of the licensing scenarios you may encounter when working with Mobilecomponents.
Updating or renewing a license
If you renew your subscription, the new license must be installed.
If the Mobile controls are licensed through a Studio subscription, then open the About Box of either anASP.NET control or a .NET Windows forms control and update the license by clicking the License buttonand entering your serial number.
If the Mobile controls are licensed through a Studio for Mobile Devices subscription, then open the About Box
of the 1.x version of a Mobile control or run the setup again to enter your serial number. Presently, the 2.xversions of the Mobile controls do not have the option to license or register from the About Box; therefore, it isnecessary to license through another component or the setup.
Licensing 2.x Mobile Controls through the Setup
To enter the serial number (license) through the Studio for Mobile Devices 2.0 setup, follow these steps:
1. Run the ComponentOne Studio for Mobile Devices 2.0 setup.
2. Follow the instructions in the setup, and enter the serial number when prompted.
There are cases where the setup may not prompt you. If you have a valid license installed already, or if you areinstalling a version of the controls that has already been installed (Maintenance Mode), you will not beprompted to enter your serial number. If you need to enter your serial number for an install, and the install isrunning in Maintenance Mode, you will need to uninstall first. Once you uninstall, run the install again.
If you are still not prompted for a serial number by the time you get to the install screen, you must have a validlicense in the registry on your machine. If you still need to install a new serial number, remove the old licenseand then run the setup again. There is a utility available that will remove the old license for you, which can befound below.

8/10/2019 Aspnet Menu
http://slidepdf.com/reader/full/aspnet-menu 14/91
10
License Remover
The license remover will search for the following licenses on your system: Studio Enterprise, Studio for MobileDevices, and individual Studio Mobile product licenses. Any licenses that are found will be populated into alist so that you can select the ones that you would like to remove. To remove a Studio for Mobile Deviceslicense with the license remover, follow these steps:
1. Unzip and run the C1LicBomb.exe.2. You will see an app with a list of the installed licenses on your machine. If you see both Studio Enterprise
and Studio for Mobile devices listed, select both for removal, otherwise select the one that you see. If thenew serial number that you wish to enter for Studio for Mobile Devices is not a Studio Enterprise serialnumber, you will need to enter your Studio Enterprise serial number again, but this can be done throughany of the About Boxes for C1 controls with the exception of the Mobile Studio About Boxes.
3. Select any other licenses you wish to remove, then click the Remove Selected Licenses button.
4. You will be asked if you are sure that you want to delete each key; click OK when you get the dialog box.
5. There will also be a dialog box to let you know that a particular key was removed successfully; click OK for that one also.
6. Now you can close the program and run your Studio for Mobile Devices setup again to enter your new
serial number.Follow through with the setup, enter your serial number when prompted, and ComponentOne Studio forMobile Devices will be licensed on your machine.
Updating a project after renewing a license
Once you have installed a new license, each project must be updated in order to use the new control;rebuilding the control is not sufficient. It is necessary for the control to regenerate the license embedded in itsSupportInfo property. To do this, it is necessary to force Visual Studio to update the control properties storedin the form. The easiest way to do this is to simply modify a property. The simplest choice is to toggle aBoolean property such as the Visible property, and then toggle it back to its original value. This results in no
changes or side effects in the control configuration, but it forces the IDE to update SupportInfo and embed thenew run-time license.
Instantiating a Mobile control at run time
The Mobile controls behave the same way as other ComponentOne controls when they are created at run timeand not placed on the form at design time. Because the IDE does not have an opportunity to obtain a run-timelicense on its own in this case, it is necessary to force the IDE to include a run-time license. To accomplishthis, include at least one instance of the control on a form in the assembly that is instantiated BEFORE thedynamically created instance is created. Once a control of the same type is licensed, all others on the form areaccepted as licensed.
Troubleshooting
We try very hard to make the licensing mechanism as unobtrusive as possible, but problems may occur for anumber of reasons.
Below is a description of the most common problems and their solutions.
I have a licensed version of a ComponentOne product but I still get the splash screen when I run my project.
If this happens, there may be a problem with the licenses.licx file in the project. It either doesn't exist, containswrong information, or is not configured correctly.

8/10/2019 Aspnet Menu
http://slidepdf.com/reader/full/aspnet-menu 15/91
11
First, try a full rebuild (Rebuild All from the Visual Studio Build menu). This will usually rebuild the correctlicensing resources.
If that fails follow these steps:
1. Open the project and go to the Solution Explorer window.
2. Click the Show All Files button on the top of the window.
3. Find the licenses.licx file and open it. If prompted, continue to open the file.
4. Change the version number of each component to the appropriate value. If the component does notappear in the file, obtain the appropriate data from another licenses.licx file or follow the alternateprocedure following.
5. Save the file, then close the licenses.licx tab.
6. Rebuild the project using the Rebuild All option (not just Rebuild).
Alternatively, follow these steps:
1. Open the project and go to the Solution Explorer window.
2. Click the Show All Files button on the top of the window.
3. Find the licenses.licx file and delete it.
4. Close the project and reopen it.
5. Open the main form and add an instance of each licensed control.
6. Check the Solution Explorer window, there should be a licenses.licx file there.
7. Rebuild the project using the Rebuild All option (not just Rebuild).
For ASP.NET 2.x applications, follow these steps:
1. Open the project and go to the Solution Explorer window.
2. Find the licenses.licx file and right-click it.
3. Select the Rebuild Licenses option (this will rebuild the App_Licenses.licx file).
4. Rebuild the project using the Rebuild All option (not just Rebuild).
I have a licensed version of a ComponentOne product on my web server but the components stillbehave as unlicensed.
There is no need to install any licenses on machines used as servers and not used for development.
The components must be licensed on the development machine, therefore the licensing information will besaved into the executable (.exe or .dll) when the project is built. After that, the application can be deployed onany machine, including web servers.
For ASP.NET 2.x applications, be sure that the App_Licenses.dll assembly created during development of theapplication is deployed to the bin application bin directory on the web server.
If your ASP.NET application uses WinForms user controls with constituent licensed controls, the runtimelicense is embedded in the WinForms user control assembly. In this case, you must be sure to rebuild andupdate the user control whenever the licensed embedded controls are updated.
I downloaded a new build of a component that I have purchased, and now I'm getting the splash screenwhen I build my projects.
Make sure that the serial number is still valid. If you licensed the component over a year ago, yoursubscription may have expired. In this case, you have two options:
Option 1 - Renew your subscription to get a new serial number.

8/10/2019 Aspnet Menu
http://slidepdf.com/reader/full/aspnet-menu 16/91
12
If you choose this option, you will receive a new serial number that you can use to license the newcomponents (from the installation utility or directly from the About Box).
The new subscription will entitle you to a full year of upgrades and to download the latest maintenance buildsdirectly from http://prerelease.componentone.com/.
Option 2 – Continue to use the components you have.
Subscriptions expire, products do not. You can continue to use the components you received or downloadedwhile your subscription was valid.
Technical SupportComponentOne offers various support options. For a complete list and a description of each, visit theComponentOne Web site at http://www.componentone.com/Support.
Some methods for obtaining technical support include:
Online Support via Hel pCentralComponentOne HelpCentral provides customers with a comprehensive set of technical resources in theform of FAQs, samples, Ver sion Release History, Ar ticles, searchable Knowledge Base, searchable OnlineHelp and more. We recommend this as the first place to look for answers to your technical questions.
Online Support via our Incident Submission FormThis online support service provides you with direct access to our Technical Support staff via an onlineincident submission form. When you submit an incident, you'll immediately receive a response via e-mailconfirming that you've successfully created an incident. This email will provide you with an IssueReference ID and will provide you with a set of possible answers to your question from ourKnowledgebase. You will receive a response from one of the ComponentOne staff members via e-mail in2 business days or less.
Peer-to-Peer Product Forums and NewsgroupsComponentOne peer-to-peer product forums and newsgroups are available to exchange information, tips,and techniques regarding ComponentOne products. ComponentOne sponsors these areas as a forum forusers to share information. While ComponentOne does not provide direct support in the forums andnewsgroups, we periodically monitor them to ensure accuracy of information and provide comments
when appropriate. Please note that a ComponentOne User Account is required to participate in theComponentOne Product Forums.
Installation IssuesRegistered users can obtain help with problems installing ComponentOne products. Contact technicalsupport by using the online incident submission form or by phone (412.681.4738). Please note that thisdoes not include issues related to distributing a product to end-users in an application.
DocumentationComponentOne documentation is installed with each of our products and is also available online atHelpCentral. If you have suggestions on how we can improve our documentation, please email theDocumentation team. Please note that e-mail sent to the Documentation team is for documentationfeedback only. Technical Support and Sales issues should be sent directly to their respective departments.
Note: You must create a ComponentOne Account and register your product with a valid serial number to obtainsupport using some of the above methods.
Redistributable FilesComponentOne Studio for ASP.NET is developed and published by ComponentOne LLC. You may use it todevelop applications in conjunction with Microsoft Visual Studio or any other programming environment thatenables the user to use and integrate the control(s). You may also distribute, free of royalties, the following

8/10/2019 Aspnet Menu
http://slidepdf.com/reader/full/aspnet-menu 17/91
13
Redistributable Files with any such application you develop to the extent that they are used separately on asingle CPU on the client/workstation side of the network:
C1.Web.UI.2.dll
C1.Web.UI.Controls.2.dll
C1.Web.UI.3.dll
C1.Web.UI.Controls.3.dll
C1.Web.UI.4.dll
C1.Web.UI.Controls.4.dll
Site licenses are available for groups of multiple developers. Please contact [email protected] for details.
About This DocumentationAcknowledgements
Microsoft, Windows, Windows 7/Vista, and Visual Studio are either registered trademarks or trademarks of Microsoft
Corporation in the United States and/or other countries.
Firefox is a registered trademark of the Mozilla Foundation.Safari is a registered trademark of Apple Inc.
ComponentOne
If you have any suggestions or ideas for new features or controls, please call us or write:
Corporate Headquarters
ComponentOne LLC201 South Highland Avenue3rd Floor Pittsburgh, PA 15206 • USA
412.681.4343412.681.4384 (Fax)
http://www.componentone.com
ComponentOne Doc-To-Help
This documentation was produced using ComponentOne Doc-To-Help® Enterprise.
NamespacesNamespaces organize the objects defined in an assembly. Assemblies can contain multiple namespaces, whichcan in turn contain other namespaces. Namespaces prevent ambiguity and simplify references when usinglarge groups of objects such as class libraries.
The general namespace for ComponentOne Web products is C1.Web.UI.Controls. The following codefragment shows how to declare a C1Menu (which is one of the core Studio for ASP.NET classes) using thefully qualified name for this class:
Visual BasicDim menu As C1.Web.UI.Controls.C1Menu
C#C1.Web.UI.Controls.C1Menu menu;

8/10/2019 Aspnet Menu
http://slidepdf.com/reader/full/aspnet-menu 18/91
14
Namespaces address a problem sometimes known as namespace pollution, in which the developer of a classlibrary is hampered by the use of similar names in another library. These conflicts with existing componentsare sometimes called name collisions .
Fully qualified names are object references that are prefixed with the name of the namespace where the objectis defined. You can use objects defined in other projects if you create a reference to the class (by choosing AddReference from the Project menu) and then use the fully qualified name for the object in your code.
Fully qualified names prevent naming conflicts because the compiler can always determine which object is being used. However, the names themselves can get long and cumbersome. To get around this, you can usethe Imports statement ( using in C#) to define an alias — an abbreviated name you can use in place of a fullyqualified name. For example, the following code snippet creates aliases for two fully qualified names, and usesthese aliases to define two objects:
Visual BasicImports C1Menu = C1.Web.UI.Controls.C1MenuImports MyMenu = MyProject.Objects.C1Menu
Dim wm1 As C1MenuDim wm2 As MyMenu
C#using C1Menu = C1.Web.UI.Controls.C1Menu;using MyMenu= MyProject.Objects.C1Menu;
C1Menu wm1;MyMenu wm2;
If you use the Imports statement without an alias, you can use all the names in that namespace withoutqualification provided they are unique to the project.
Creating an AJAX-Enabled ASP.NET Project
ComponentOne Menu for ASP.NET AJAX requires you to create an ASP.NET AJAX-Enabled project sothat Microsoft ASP.NET AJAX Extensions and a ScriptManager control are included in your project beforethe C1Menu control is placed on the page. This allows you to take advantage of ASP.NET AJAX and certainfeatures such as partial-page rendering and client-script functionality of the Microsoft AJAX Library.
When creating AJAX-Enabled ASP.NET projects, Visual Studios 2008 and 2005 both give you the option ofcreating a Web site project or a Web application project. MSDN provides detailed information on why youwould choose one option over the other.
If you are using Visual Studio 2008 with .NET Framework 2.0 or .NET Framework 3.0 or if you are usingVisual Studio 2005, you must install the ASP.NET AJAX Extensions 1.0, which can be found athttp://ajax.asp.net/. Additionally for Visual Studio 2005 users, creating a Web application project requiresinstallation of a Visual Studio 2005 update and add-in, which can be found at http://msdn.microsoft.com/;however, if you have Visual Studio 2005 SP1, Web application project support is included and a separate
download is not required.If you are using Visual Studio 2008 and .NET Framework 3.5, you can easily create an AJAX-enabledASP.NET project without installing separate add-ins because the framework has a built-in AJAX library andcontrols.
Note: If you are using Visual Studio 2010, see http://www.asp.net/ajax/ for more information on creating an AJAX-
Enabled ASP.NET Project.
The following table summarizes the installations needed:

8/10/2019 Aspnet Menu
http://slidepdf.com/reader/full/aspnet-menu 19/91
15
Visual Studio Version Additional Installation Requirements
Visual Studio 2008, .NET Framework 3.5 None
Visual Studio 2008 and .NET Framework 2.0 or 3.0
Visual Studio 2005 Service Pack 1
ASP.NET AJAX Extensions 1.0
http://www.asp.net/ajax/downloads/archive/
Visual Studio 2005 ASP.NET AJAX Extensions 1.0
Visual Studio update and add-in (2 installs forWeb application project support)
The following topics explain how to create both types of projects in Visual Studio 2008 and 2005.
Creating an AJAX-Enabled Web Site Project in Visual Studio 2008
To create a Web site project in Visual Studio 2008, complete the following steps:
1. From the File menu, select New | Web Site. The New Web Site dialog box opens.
2. Select .NET Framework 3.5 or the desired framework in the upper right corner. Note that if youchoose .NET Framework 2.0 or 3.0, you must install the extensions first.
3. In the list of templates, select AJAX 1.0-Enabled ASP.NET 2.0 Web Site.
4. Click Browse to specify a location and then click OK .
Note: The Web server must have IIS version 6 or later and the .NET Framework installed on it. If
you have IIS on your computer, you can specify http://localhost for the server.
A new AJAX-Enabled Web Site is created at the root of the Web server you specified. In addition, anew Web Forms page called Default.aspx is displayed and a ScriptManager control is placed on theform. The ScriptManger is needed to enable certain features of ASP.NET AJAX such as partial-pagerendering, client-script functionality of the Microsoft AJAX Library, and Web-service calls.
Creating an AJAX-Enabled Web Application Project in Visual Studio 2008
To create a new Web application project in Visual Studio 2008, complete the following steps.
1. From the File menu, select New | Project. The New Project dialog box opens.
2. Select .NET Framework 3.5 or the desired framework in the upper right corner. Note that if youchoose .NET Framework 2.0 or 3.0, you must install the extensions first.
3. Under Project Types, choose either Visual Basic or Visual C# and then select Web. Note that one of
these options may be located under Other Languages.
4. Select AJAX 1.0-Enabled ASP.NET 2.0 Web Application from the list of Templates in the rightpane.
5. Enter a URL for your application in the Location field and click OK .
Note: The Web server must have IIS version 6 or later and the .NET Framework installed on it. Ifyou have IIS on your computer, you can specify http://localhost for the server.

8/10/2019 Aspnet Menu
http://slidepdf.com/reader/full/aspnet-menu 20/91
16
A new Web Forms project is created at the root of the Web server you specified. In addition, a newWeb Forms page called Default.aspx is displayed and a ScriptManager control is placed on the form.
The ScriptManger is needed to enable certain features of ASP.NET AJAX such as partial-pagerendering, client-script functionality of the Microsoft AJAX Library, and Web-service calls.
Creating an AJAX-Enabled Web Site Project in Visual Studio 2005
To create a Web site project in Visual Studio 2005, complete the following steps:
1. From the File menu in Microsoft Visual Studio .NET, select New Web Site. The New Web Sitedialog box opens.
2. Select ASP.NET AJAX-Enabled Web Site from the list of Templates.
3. Enter a URL for your site in the Location field and click OK .
Note: The Web server must have IIS version 6 or later and the .NET Framework installed on it. Ifyou have IIS on your computer, you can specify http://localhost for the server.
A new Web Forms project is created at the root of the Web server you specified. In addition, a newWeb Forms page called Default.aspx is displayed and a ScriptManager control is placed on the form.The ScriptManger is needed to enable certain features of ASP.NET AJAX such as partial-pagerendering, client-script functionality of the Microsoft AJAX Library, and Web-service calls.
Creating an AJAX-Enabled Web Application Project in Visual Studio 2005
To create a new Web application project in Visual Studio 2005, complete the following steps.
1. From the File menu in Microsoft Visual Studio 2005, select New Project. The New Project dialog box opens.
2. Under Project Types, choose either Visual Basic Projects or Visual C# Projects. Note that one of
these options may be located under Other Languages.
3. Select ASP.NET AJAX-Enabled Web Application from the list of Templates in the right pane.
4. Enter a URL for your application in the Location field and click OK .
Note: The Web server must have IIS version 6 or later and the .NET Framework installed on it. If
you have IIS on your computer, you can specify http://localhost for the server.
A new Web Forms project is created at the root of the Web server you specified. In addition, a newWeb Forms page called Default.aspx is displayed and a ScriptManager control is placed on the form.The ScriptManger is needed to enable certain features of ASP.NET AJAX such as partial-pagerendering, client-script functionality of the Microsoft AJAX Library, and Web-service calls.
Adding the C1Menu Component to a ProjectWhen you install ComponentOne Studio for ASP.NET AJAX, the Create a ComponentOne Visual Studio
Toolbox Tab check box is checked, by default, in the installation wizard. When you open Visual Studio 2005,you will notice a ComponentOne Studio for ASP.NET Projects tab containing the ComponentOne controlsthat have automatically been added to the Toolbox.

8/10/2019 Aspnet Menu
http://slidepdf.com/reader/full/aspnet-menu 21/91
17
If you decide to uncheck the Create a ComponentOne Visual Studio 2005 Toolbox Tab check box duringinstallation, you can manually add ComponentOne controls to the Toolbox at a later time.
To use C1Menu, add the C1Menu control to the form or add a reference to the C1.Web.UI.Controls.C1Menuassembly in your project.
Manually Adding the Studio for ASP.NET AJAX controls to the Toolbox
When you install ComponentOne Studio for ASP.NET AJAX, the following C1Menu component willappear in the Visual Studio Toolbox customization dialog box:
C1Menu
To manually add the Menu for ASP.NET AJAX control to the Visual Studio Toolbox:
1. Open the Visual Studio IDE (Microsoft Development Environment). Make sure the Toolbox is visible(select Toolbox in the View menu if necessary) and right-click it to open the context menu.
2. To make the C1Menu component appear on its own tab in the Toolbox, select Add Tab from the contextmenu and type in the tab name, C1Menu, for example.
3. Right-click the tab where the component is to appear and select Choose Items from the context menu.The Choose Toolbox Items dialog box opens.
4. In the dialog box, select the .NET Framework Components tab. Sort the list by Namespace (click theNamespace column header) and check the check boxes for the C1Menu component belonging tonamespace C1.Web.UI.Controls.C1Menu.
5. Click OK to close the dialog box.
The C1Menu control is added Visual Studio Toolbox.
Adding C1Menu to the Form
To add C1Menu to a form:
1. Add it to the Visual Studio toolbox.
2. Double-click each control or drag it onto your form.
Adding a Reference to the Assembly
To add a reference to the C1.Web.UI.Controls.C1Menu assembly:
1. Select the Add Reference option from the Website menu of your Web Site project or from the Projectmenu of your Web Application project.
2. Select the most recent version of the ComponentOne Studio for ASP.NET assembly from the list on theNET tab or browse to find the C1.Web.UI.Controls.2.dll file and click OK .
3. Select the Form1.vb tab or go to View|Code to open the Code Editor. At the top of the file, add thefollowing Imports directive ( using in C#):Imports C1.Web.UI.Controls
Note: This makes the objects defined in the C1.Web.UI.Controls.2 assembly visible to the project. SeeNamespaces (page 13) for more information.
Key FeaturesThe C1Menu control includes several unique features, including the following:

8/10/2019 Aspnet Menu
http://slidepdf.com/reader/full/aspnet-menu 22/91
18
CSS Styling
C1Menu includes CSS supported styling so that you can use cascading style sheets to easily style theC1Menu control to match the design of your current Web site.
Visual Styles
C1Menu provides several built-in themes, known as visual styles, that can be easily applied through the
C1Menu Tasks menu or they can be modified to create a new visual style. For more information on thevisual styles, see Visual Styles (page 49).
Built-In Animation Effects
C1Menu includes several different built-in animations that can be set when the menu items are expandedor collapsed. Easily change animation effects by setting the ExpandAnimation and CollapseAnimationproperties.
Templates
Use the built-in template editing to change how the C1Menu control appears. Templates allow you toeasily add your own elements – including text, images, and controls such as buttons – to various menuitems. See Templates (page 50) for more information.
Design-time Support
C1Menu includes extensive design-time support, such as built-in designers and editors, so that you cancreate and customize menus with little or no code. See C1Menu Smart Tag (page 33) and C1MenuDesigner Form (page 35) for more information.
Data Binding
Bind the C1Menu control to a data source – you can bind to an XMLDataSource or SiteMapDataSource,or you can even read data from AccessDataSource and create the C1Menu hierarchy dynamically. SeeApplying Different Data Binding Methods (page 21) for more information.
Keyboard Support
Add access key support to give the C1Menu control focus with a chosen key combination. At run timeusers can use the keyboard arrow keys to navigate through the menu and menu items and the ENTER key
to open a link in a menu item. For more information, see Adding Keyboard Support to C1Menu (page31).
AJAX Support
Built-in AJAX support lets users interact with C1Menu without the control performing a postbackoperation back to the server.
Set Postbacks
8/10/2019 Aspnet Menu
http://slidepdf.com/reader/full/aspnet-menu 23/91
19
Use the AutoPostBack property to determine whether C1Menu should perform a postback to the servereach time the end user interacts with the control.
Browser Support
C1Menu includes support for the Internet Explorer (6.0 or later), Firefox (2 or later), and Safari Web browsers.
XHTML Compliant
C1Menu provides complete XHTML compliance. The output that is generated is fully XHTML 1.1compliant.
Client-Side Object Model
The C1Menu control's client-side object model is exposed so that you can easily customize the controlwith client-side script.
Navigate to a Web Site
The C1Menu control's NavigateUrl property model lets you easily add Web site links to menu items.
Flexible Layout
Menus and its submenus can be rendered either horizontally or vertically and other layout options. SeeMenu Layout (page 55) for more information.
Overlay Flash, ActiveX, and Windowed Objects
Unlike other menu controls, C1Menu can overlay any windowed objects, Flash, ActiveX and otherstandard and 3rd party components – so you're not limited in your Web site design (Internet Explorer 6 orlater and Firefox 2 or later).
Search Engine Optimization
Optimized for search engines, C1Menu uses semantic lists and <a> tags which are recognized and
indexed by web crawlers.

8/10/2019 Aspnet Menu
http://slidepdf.com/reader/full/aspnet-menu 24/91

8/10/2019 Aspnet Menu
http://slidepdf.com/reader/full/aspnet-menu 25/91

8/10/2019 Aspnet Menu
http://slidepdf.com/reader/full/aspnet-menu 26/91
22
3. Select the XML File and rename it Menu.xml.
4. Click on the Add button in the Add New Item dialog box.
5. Switch to the XML view and add the following data to the Menu.xml:<?xml version="1.0" encoding="utf-8" ?><root> <menuitem Text="Home" IsHeader=”true”> </menuitem> <menuitem Text="Products"> <menuitem Text="Hardware"> </menuitem> <menuitem Text="Software"> </menuitem> </menuitem> <menuitem Text="Services" IsGroup=”true”> <menuitem Text="Training"> </menuitem> <menuitem Text="Consulting" IsSeparator=”true”> </menuitem> <menuitem Text="Support">
</menuitem> </menuitem></root>
Note: Notice how the <menuitem> tags are indented for the sub-menu items.
6. Switch back to the .aspx page and select the Design tab to switch to Design view.
7. Expand the Data node in the Visual Studio Toolbox and double-click on the XmlDataSource componentto add it to the Web page.
8. Select the XmlDataSource1 on the Web Page and navigate to its Properties window.
9. Click on the ellipsis button next to the DataFile property to open the Select XML File dialog box. Select
the App_Data and click on the Menu.xml file. Click OK to add it to the XmlDataSource1.DataFileproperty.
10. Set the XmlDataSource1.Xpath property to” root/menuitem”.
11. Double-click on the C1Menu control from the Visual Studio Toolbox to add it to your page.
12. Open the C1Menu control's Tasks menu and select XmlDataSource1 from the Choose Data Source drop-down listbox
13. Click on the Source tab to switch to your source page and add the following DataBinding tags within theC1Menu tags.

8/10/2019 Aspnet Menu
http://slidepdf.com/reader/full/aspnet-menu 27/91
23
<DataBindings> <cc1:C1MenuItemBinding DataMember="menuitem" TextField="Text"GroupField=”IsGroup” HeaderField=”IsHeader” SeparatorField=”IsSeparator”/></DataBindings>
Note: Two key properties are the DataMember and TextField. The DataMember sets the data memberfrom the xml file to bind to the C1Menu. The TextField gets the value of the Text property of a
C1MenuItem object to which the C1MenuItemBinding object is applied.
14. Toggle back to the Design view and select Edit Menu Bindings from the C1Menu Tasks menu.
Notice the DataMember , menuitem, is added to the C1MenuItemBindingCollection and theC1MenuItemBinding properties appear in the property grid so you can easily modify the settings for themenuitem object.
15. Save and build your project. Observe the following at run time:
The data from the menu.xml file is reflected in the C1Menu control.
Bind C1Menu to a SiteMapDataSource
This lesson shows you how to create a Site Map through the Visual Studio 2005 installed templates, add theSiteMapDataSource component to the Web page and assign it to C1Menu, then set the binding for theC1Menu.
The SiteMapDataSource control enables you to view navigation information in your Web application. Youcan use the C1Menu control with the SiteMapDataSource.
The final application will appear like the following at run time:
To create the Site Map and bind it to the C1Menu control, complete the following:1. Create a new ASP.NET AJAX-Enabled Web Site.
2. Right-click on your project's name in the solution explorer and select Add New Item. The Add New Item
dialog box appears. Select Site Map from the list of templates, and then click Add to add the newWeb.sitemap item to the project.
The following default source code appears for the Web.sitemap file:<?xml version="1.0" encoding="utf-8" ?><siteMap xmlns="http://schemas.microsoft.com/AspNet/SiteMap-File-1.0" >

8/10/2019 Aspnet Menu
http://slidepdf.com/reader/full/aspnet-menu 28/91
24
<siteMapNode url="" title="" description=""> <siteMapNode url="" title="" description="" /> <siteMapNode url="" title="" description="" /> </siteMapNode></siteMap>
3. Replace the default data with the following data for the Web.sitemap file:
<siteMap> <siteMapNode title="Home" description="Home" url="~/default.aspx"> <siteMapNode title="Products" description="Our products"
url="~/Products.aspx"> <siteMapNode title="Hardware" description="Hardware choices" url="~/Hardware.aspx" /> <siteMapNode title="Software" description="Software choices"
url="~/Software.aspx" /> </siteMapNode> <siteMapNode title="Services" description="Services we offer"
url="~/Services.aspx"> <siteMapNode title="Training" description="Training classes"
url="~/Training.aspx" /> <siteMapNode title="Consulting" description="Consulting services"
url="~/Consulting.aspx" /> <siteMapNode title="Support" description="Supports plans"
url="~/Support.aspx" /> </siteMapNode> </siteMapNode></siteMap>
4. Toggle back to the design view for the .aspx page. Select the Data tab in the Visual Studio Toolbox andadd the SiteMapDataSource component to the Web page using a drag-and-drop operation.
5. Double-click on the C1Menu control from the Visual Studio Toolbox to add it to your page.
6. Open the C1Menu control's Tasks menu and select New Data Source from the Choose Data Source
drop-down listbox. The Data Source Configuration Wizard dialog box appears.
7. Select the Site Map and keep the ID as SiteMapDataSource1. Click OK .
C1Menu automatically updates at design time with the data from the Web.sitemap file.
8. Save and build your project. Observe the following at run time:
The data from the Web.sitemap file is reflected in the C1Menu control.
Bind C1Menu to an AccessDataSource
This lesson shows you how to bind C1Menu to a DataView by using the AccessDataSource to connect theMicrosoft Access DataBase file to the C1Menu control and then using code to create the hierarchy for theC1Menu control. The hierarchy is created by using ID->ParentID relation.

8/10/2019 Aspnet Menu
http://slidepdf.com/reader/full/aspnet-menu 29/91
25
Once the C1Menu control is bound, the hierarchy is determined, you can set the Text, NavigateUrl, andToolTip properties.
Note: The menu uses data from the sample Access database, menu_structure.mdb, included in theControlExplorer Visual Studio 2005 sample project.
The final application will appear like the following at run time:
To bind the C1Menu control to the DataView, complete the following:
1. Create a new ASP.NET AJAX-Enabled Web Site.
2. Copy the menu_structure.mdb database file from the App_Data folder from the ControlExplorer sampleproject to the App_Data folder in your project.
3. Save and close the project then reopen it so you'll see that the menu_structure.mdb file appears in yourApp_Data folder.
4. Expand the Data node in the Visual Studio Toolbox and add the AccessDataSource component to theWeb page using a drag-and-drop operation.
5. Select the AccessSource1 from the drop-down listbox in the Properties window.
6. Click on the ellipsis button next to the DataFile property to open the Select Microsoft Access Database
dialog box. Select the App_Data and click on the menu_structure.mdb file. Click OK to add it to theAccessSource1.DataFile property.
7. Toggle to Source view and add the SelectCommand to retrieve the data from the Menu_Items table.<asp:AccessDataSource ID="AccessDataSource1" runat="server"DataFile="~/App_Data/menu_structure.mdb"

8/10/2019 Aspnet Menu
http://slidepdf.com/reader/full/aspnet-menu 30/91
26
SelectCommand="SELECT * FROM[MENU_ITEMS]"></asp:AccessDataSource>
8. Add the C1Menu control to your page.
9. To specify the namespaces used in this example, add the following statements before any declarations inthe Code Editor:
Visual BasicImports System.DataImports C1.Web.UI.Controls.C1Menu
C#using C1.Web.UI.Controls.C1Menu;
10. Add the following code in your code behind page to connect the C1Menu control to theAccessDataSource, select the DataView, establish hierarchy and set the Text, NavigateUrl, and ToolTip
properties:
Visual BasicProtected Sub Page_Load(ByVal sender As Object, ByVal e As EventArgs)
CreateMenuItemsFromAccessDataSourceExample(C1Menu1,Me.AccessDataSource1)End SubProtected Sub CreateMenuItemsFromAccessDataSourceExample(ByVal menu AsC1Menu, ByVal dataSource As SqlDataSource)
' Select DataView:Dim dsArgs As New DataSourceSelectArguments()Dim dataView As DataView = TryCast(dataSource.[Select](dsArgs),
DataView)' sort by parent ID:dataView.Sort = "ParentMenuItemID"' Clear old menu items:menu.Items.Clear()' Create Menu Items according MenuItemID/ParentMenuItemID
relationship.
Dim menuItemsDict As New Dictionary(Of String, C1MenuItem)()For i As Integer = 0 To dataView.Count - 1
Dim row As DataRow = dataView(i).RowDim item As C1MenuItem = CreateMenuItem(row)Dim itemID As String = row("MenuItemID").ToString()Dim parentID As String = row("ParentMenuItemID").ToString()menuItemsDict.Add(itemID, item)If parentID = "" Then
' this is root menu item, add it to menu:menu.Items.Add(item)
ElseIf menuItemsDict.ContainsKey(parentID) Then
' this is child menu item, add it to parent menu item:menuItemsDict(parentID).Items.Add(item)
End IfEnd If
NextEnd SubPrivate Function CreateMenuItem(ByVal row As DataRow) As C1MenuItem
Dim c1MenuItem As New C1MenuItem()c1MenuItem.Text = row("MenuItemText").ToString()c1MenuItem.NavigateUrl = row("MenuItemUrl").ToString()c1MenuItem.ToolTip = row("MenuItemToolTip").ToString()

8/10/2019 Aspnet Menu
http://slidepdf.com/reader/full/aspnet-menu 31/91
27
Return c1MenuItemEnd Function
C#protected void Page_Load(object sender, EventArgs e) { CreateMenuItemsFromAccessDataSourceExample(C1Menu1,
this.AccessDataSource1); } protected void CreateMenuItemsFromAccessDataSourceExample(C1Menumenu, SqlDataSource dataSource) { // Select DataView: DataSourceSelectArguments dsArgs = newDataSourceSelectArguments(); DataView dataView = dataSource.Select(dsArgs) as DataView; // sort by parent ID: dataView.Sort = "ParentMenuItemID"; // Clear old menu items: menu.Items.Clear(); // Create Menu Items according MenuItemID/ParentMenuItemIDrelationship. Dictionary<string, C1MenuItem> menuItemsDict = newDictionary<string, C1MenuItem>(); for (int i = 0; i < dataView.Count; i++) { DataRow row = dataView[i].Row; C1MenuItem item = CreateMenuItem(row); string itemID = row["MenuItemID"].ToString(); string parentID = row["ParentMenuItemID"].ToString(); menuItemsDict.Add(itemID, item); if (parentID == "") { // this is root menu item, add it to menu:
menu.Items.Add(item); } else { if (menuItemsDict.ContainsKey(parentID)) { // this is child menu item, add it to parentmenu item: menuItemsDict[parentID].Items.Add(item); } } } } private C1MenuItem CreateMenuItem(DataRow row) { C1MenuItem c1MenuItem = new C1MenuItem(); c1MenuItem.Text = row["MenuItemText"].ToString(); c1MenuItem.NavigateUrl = row["MenuItemUrl"].ToString(); c1MenuItem.ToolTip = row["MenuItemToolTip"].ToString(); return c1MenuItem; }
11. Run and save your project. Observe the following at run-time:

8/10/2019 Aspnet Menu
http://slidepdf.com/reader/full/aspnet-menu 32/91
28
The data is bound to the C1Menu control.
Working with the C1Menu Designer FormIn this lesson you will learn how to use the C1Menu Designer Form editor to access the C1Menu Designer
Form, add menu items and sub-menu items, and set the Text, NavigateUrl, and Target properties for the menuitems.
1. Add C1Menu to your page.
2. Select the right arrow to open the C1Menu Tasks menu, click Edit Menu to open the C1Menu Designer
Form.
3. Right-click on C1Menu1, select Add Child and then Link Item.
4. Select LinkItem01 and select the Text property and enter "Menu Item 1".
5. Right click on Menu Item 1 and select Insert Item and then Link Item. Repeat this twice to add newmenu items. Each menu item will be added above the current one.
6. Select LinkItem01 and click on the down arrow button to move the item down once. Select LinkItem02and click on the down arrow twice to move it down two positions.
7. Select LinkItem01 and select the Text property and enter "Menu Item 2".
8. Select LinkItem02 and select the Text property and enter "Menu Item 3".
9. Click OK to close and save the menus.
The C1Menu control updates with three new static menu items.
Next, we'll add dynamic menus to our C1Menu control.
Adding Sub Menu Items
1. Open the C1Menu Designer Form.
2. Right-click on Menu Item 1 and select Add Child then select Link Item.
A link item appears as a sub-menu of Menu Item 1.3. Right-click on LinkItem01, select Add Child then select Link Item.
Another link item appears above LinkItem01 as a sub-menu of Menu Item 1.
To add more sub-menus to a specific menu item select the menu item where you want to place the sub-menu and select Add Child.
4. Click OK to save and close the menus we added in the C1Menu Designer Form.
5. Press F5 to run the project.

8/10/2019 Aspnet Menu
http://slidepdf.com/reader/full/aspnet-menu 33/91
29
6. Mouse over Menu Item 1 to expose the sub-menu items we added in the previous steps.
Notice how the menu items backcolor changes to blue and its forecolor to white when we mouse overthem. This is because the property, UseEmbeddedVisualStyles is set to True. If we set this property toFalse, the style is removed from the C1Menu control.
Adding a URL to the Link Item
1. Select Menu Item 1 in the C1Menu Designer Form and locate the NavigateUrl property and enter thetext, "http://www.componentone.com".
2. Click OK to save and close the C1Menu Designer Form.
3. Build the project.
4. Click on Menu Item 1 and the Web Site for ComponentOne appears.
Specifying a target for the link items navigation
1. Select Menu Item 1 in the C1Menu Designer Form and enter, main, next to the Target property in theproperty grid.
2. Click on the Source tab in your index.aspx Web page and add the iframe code in the body before the formtag:
<iframe name="main" width="85%" height="50%"></iframe>
3. Click on the Design tab and drag the Iframe below the C1Menu control.
4. Build the project.
5. Click on Menu Item 1 and the Web Site for ComponentOne appears below in the Iframe.
Changing the Menu Item's Position in the C1Menu Designer Form
In the previous lesson, Working with the C1Menu Designer Form (page 28), you learned how to add menuitems and sub-menu items using commands from the context menu in the editor and how to set the Text,NavigateUrl, and LinkItem properties. In this lesson we'll work with the C1Menu Designer Form again, butthis time we'll show you the different methods you can use to move the menu items and sub-menu item's
position in the C1Menu Designer Form.
Drag and Drop Items
In the C1Menu Designer Form you can move items to a new location in the menu by dragging and droppingthe item from the treeview in the C1Menu Designer Form to the new location or by using the arrow buttonsshow below.
To move an item using the arrow buttons
To move an item in the C1Menu Designer Form upward, click the up arrow button.
To move a sub-item outside the group of sub-items, click the left arrow button.
To move an item inside the group of sub-items, click the right arrow button.
To move an item in the C1Menu Designer Form downward, click the down button.
To move an item using the drag-and-drop method
Select the item you wish to move in the C1Menu Designer Form and drag it to the new location.

8/10/2019 Aspnet Menu
http://slidepdf.com/reader/full/aspnet-menu 34/91
30
Changing Menu and Sub-menu OrientationIn this lesson you'll learn how easy it's to change the menu items and its sub-menu items orientation simply bysetting the Orientation and NestedGroupOrientation.
The default orientation for the C1Menu control is horizontal for the menu items and vertical for the sub-menuitems.
In this example we will use the same menu that we created in the preceding lesson, Working with the C1MenuDesigner Form (page 28).

8/10/2019 Aspnet Menu
http://slidepdf.com/reader/full/aspnet-menu 35/91
31
To change the orientation for the sub-menus items to horizontal
1. Set the NestedGroupOrientation property to "Horizontal" for Menu Item 1.
2. Build the project.
3. Select Menu Item 1 and notice its submenu items appear horizontally.
To change the orientation for the menu items to vertical
Set the Orientation property to "Vertical".To change the orienation for the sub-menu items to vertical
Set the NestedGroupOrientation property to "Vertical".
Adding Keyboard Support to C1MenuIn this lesson you will learn how easy it is to add an access key to the C1Menu. Access keys are used fornavigating the entire user interface and typically use the ALT key plus the specified access key.
Adding keyboard support to your menu
To add keyboard support to C1Menu, complete the following:
1. Select C1Menu1 in the C1Menu Designer Form and enter, "m", for the AccessKey property.
2. Build the project.
3. Press "alt+m" keys on your keyboard to bring the menu to focus. Use the arrow keys to navigate throughthe menu and menu items. Press the ENTER key to open a link in the menu item. For example, pressingENTER for Menu Item 1 opens the Web Site.

8/10/2019 Aspnet Menu
http://slidepdf.com/reader/full/aspnet-menu 36/91
32
Menu for ASP.NET AJAX Top TipsThe following top tips for Menu for ASP.NET will help you when you use the C1Menu control.
Tip 1: Use the ClickToOpen property to open submenu by mouse click event instead of mouse over.
Tip 2: You can use C1Menu as a context menu by setting the ContextMenu property.
The context menu can appear when the associated element is right-clicked or hovered.
To make the context menu appear when you right-click its associated element:
Set the ContextMenu property to True and specify the ContextElementID property. The menu will be shownas a context menu when the associated element is right-clicked.
To make the context menu appear when you hover over its associated element:
Set the ContextMenu property to True and specify the HoverElementID property. The menu will be shown asa context menu when the mouse is over the associated element.
Tip 3: Use the NestedGroupCheckable property to enable checkable child menu items.
To enable checkable child menu items set the NestedGroupCheckable property to True.
To disable checkable child menu items set the NestedGroupCheckable property to False.
To set the NestedGroupCheckable property at design time:
1. Open the C1Menu Tasks menu and select Edit Menu. The C1Menu Designer Form appears.
2. Select the Group item in the treeview and locate its NestedGroupCheckable property in the property grid.
3. Set the NestedGroupCheckable property to True.
Tip 4: Use WindowCollisionDetection property to allow the submenu to adjust its position to fit in the
window bounds.
Tip 5: Use the DisplayVisible property to set the C1Menu or C1MenuItem invisible.
When the control’s Visible property is set to False, it will not render html code to the page. C1Menu supportsthe client side object model (CSOM), it depends on the dom elements, so we don’t suggest the user to set the

8/10/2019 Aspnet Menu
http://slidepdf.com/reader/full/aspnet-menu 37/91
33
Visible property to hide the C1Menu or its items, we strongly recommend the user to use the DisplayVisibleproperty for showing/hiding the C1Menu or its items. If so, the entire DOM will be rendered and just set the"display:none" to those items with DisplayVisible = False.
Design-Time SupportC1Menu provides smart tags, designer, and a bindings collection editor that offers rich design-time supportand simplifies working with the object model.
The following topics describe how to use C1Menu’s design-time environment to configure the C1Menucontrol.
C1Menu Smart TagThe C1Menu control includes a smart tag in Visual Studio. A smart tag represents a shortcut tasks menu thatprovides the most commonly used properties in C1Menu.
To access the C1Menu Tasks menu, click on the smart tag in the upper-right corner of the C1Menu control.
This will open the C1Menu Tasks menu.
The C1Menu Tasks menu operates as follows:
Choose Data Source
Clicking on the Choose Data Source item opens a drop-down list where you can choose an existing datasource or select a new data source to bind to. See Applying Different Data Binding Methods (page 21) for more information about data binding.
Configure Data Source
The Configure Data Source item only appears when C1Menu is bound to an XML data source. Clicking
on Configure Data Source opens a dialog box where you can indicate the XML data file and transformfile to use and specify an XPath expression.
Refresh Schema
The Refresh Schema item only appears when C1Menu is bound to a data source. Clicking on Refresh
Schema item refreshes the designer schema applied by the data source.

8/10/2019 Aspnet Menu
http://slidepdf.com/reader/full/aspnet-menu 38/91
34
Edit Menu
Clicking on the Edit Menu item opens the C1Menu Designer Form where you can quickly configureC1Menu's elements without having to scroll through its Properties window. You can load and save thecontrol's content and can add LinkItem, Header, Group, and Separator elements. For more informationon the C1 Menu Designer Form, see C1Menu Designer Form (page 35).
Edit Menu DataBindingsClicking on the Edit Databindings item opens the Bindings Collection Editor dialog box where you canadd and remove bindings and edit properties.
VisualStylePath
Displays the default path for the visual style.
UseEmbeddedVisualStyles
When the UseEmbeddedVisualStyles property is selected it enables you to use the embedded visual styles.
VisualStyle
Clicking the VisualStyle drop-down arrow enables you to select from different built-in visual styles. SeeVisual Styles (page 49) for more information.
About
Clicking on the About item displays the About dialog box, which is helpful in finding the version numberof Menu for ASP.NET and online resources.
Edit Templates
Clicking on the Edit Templates item switches the C1Menu control to Template Editing Mode:
In Template Editing Mode, the C1Menu Tasks menu appears with different options:
Display
Selecting the Display drop-down arrow will open a list of template areas that can be customized:

8/10/2019 Aspnet Menu
http://slidepdf.com/reader/full/aspnet-menu 39/91
35
Select a template from this list to open that template to be edited.
End Template Editing
Clicking the End Template Editing item will end Template Editing Mode and return you to the mainC1Menu Tasks menu.
C1Menu Designer FormThe C1Menu Designer Form dialog box lets you quickly configure C1Menu's elements without having toscroll through the control's Properties window. Using the C1Menu Designer Form you can add, manipulate,and delete LinkItem, Header, Group, and Separator elements in the C1Menu control and load and save thecontrol's content.
To access the C1Menu Designer Form dialog box select the Edit Menu item from the C1Menu Tasks menu(see C1Menu Smart Tag (page 33) for details) or right-click on the C1Menu control at design time and selectEdit Menu. The designer, with items added, looks similar to the following:
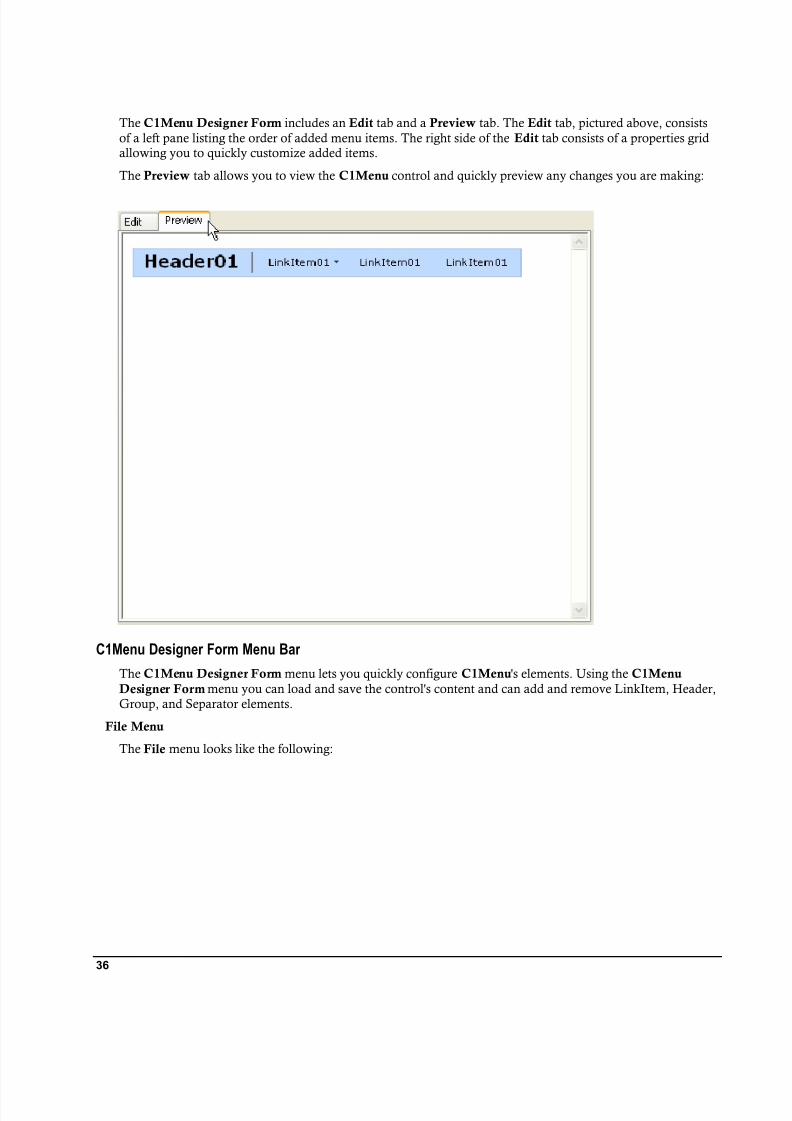
8/10/2019 Aspnet Menu
http://slidepdf.com/reader/full/aspnet-menu 40/91
36
The C1Menu Designer Form includes an Edit tab and a Preview tab. The Edit tab, pictured above, consistsof a left pane listing the order of added menu items. The right side of the Edit tab consists of a properties gridallowing you to quickly customize added items.
The Preview tab allows you to view the C1Menu control and quickly preview any changes you are making:
C1Menu Designer Form Menu Bar
The C1Menu Designer Form menu lets you quickly configure C1Menu's elements. Using the C1Menu
Designer Form menu you can load and save the control's content and can add and remove LinkItem, Header,Group, and Separator elements.
File Menu
The File menu looks like the following:

8/10/2019 Aspnet Menu
http://slidepdf.com/reader/full/aspnet-menu 41/91
37
The File menu consists of the following options:
Button Name Description
Load from XML Opens an existing saved C1Menu layout XML file.
Save as XML Saves the current menu layout as an XML file.
Exit Closes the C1Menu Designer Form dialog box.
Edit Menu
The Edit menu looks similar to the following:
The Edit menu consists of the following options:
Button Name Description
Insert Item Inserts a new item in the menu. Choices include the LinkItem ( ), Header
( ), Group ( ), and Separator ( ) elements.
Add Child Inserts a child item under the current item. Choices include the LinkItem

8/10/2019 Aspnet Menu
http://slidepdf.com/reader/full/aspnet-menu 42/91
38
( ), Header ( ), Group ( ), and Separator ( ) elements.
Cut Cuts the currently selected item.
Copy Copies the currently selected item.
Paste Pastes a cut or copied item to the selected location.
Delete Deletes the currently selected item.
Rename Renames the currently selected item. Select this option and type in a new
name for the selected item.
Change to Type Changes the current item to an item of a different type. Choices include
the LinkItem ( ), Header ( ), Group ( ), and Separator ( ) elements.
C1Menu Designer Form Toolbar
Using the C1Menu Designer Form you can add and manipulate LinkItem, Header, Group, and Separatorelements. The C1Menu Designer Form toolbar looks the following image:
Note that if an option is not available for the particular item selected in the left Edit pane, that option willappear grayed out. The following table describes the function of each item in the C1Menu Designer Form
toolbar.
Button Name Description
Move Item Up Moves the current item up in the item order (so the second first-level item,would become the first first-level item).
Move Item Down Moves the current item down (so the first first-level item, would become
the second first-level item).
Move Item Left Moves the current item up a level (so a second-level child item would
move up to become a first-level item).
Move Item Right Moves the current item down a level (so a first-level item would movedown to become a second-level child item).
Insert Child Item Inserts a child item under the current item. Choices include the LinkItem
( ), Header ( ), Group ( ), and Separator ( ) elements.
Insert Item Inserts a new item in the menu. Choices include the LinkItem ( ), Header
( ), Group ( ), and Separator ( ) elements.
Cut Cuts the currently selected item.
Copy Copies the currently selected item.
Paste Pastes a cut or copied item to the selected location.
Delete Deletes the currently selected item.
Change to Type Changes the current item to an item of a different type. Choices include

8/10/2019 Aspnet Menu
http://slidepdf.com/reader/full/aspnet-menu 43/91
39
the LinkItem ( ), Header ( ), Group ( ), and Separator ( ) elements.
C1Menu Designer Form Context Menu
The C1Menu Designer Form context menu lets you quickly configure C1Menu's elements. Using theC1Menu Designer Form you can load and save the control's content and can add and remove LinkItem,
Header, Group, and Separator elements.Access the C1Menu Designer Form context menu by right-clicking in the left pane of the Edit tab. Thecontext menu will look similar to the following:
The following table describes the function of each item in the C1Menu Designer Form context menu.
Button Name Description
Insert Item Inserts a new item in the menu. Choices include the LinkItem ( ), Header
( ), Group ( ), and Separator ( ) elements.
Add Child Inserts a child item under the current item. Choices include the LinkItem
( ), Header ( ), Group ( ), and Separator ( ) elements.
Cut Cuts the currently selected item.
Copy Copies the currently selected item.
Paste Pastes a cut or copied item to the selected location.
Delete Deletes the currently selected item.
Rename Renames the currently selected item. Select this option and type in a new
name for the selected item.
Change to Type Changes the current item to an item of a different type. Choices includethe LinkItem ( ), Header ( ), Group ( ), and Separator ( ) elements.
C1Menu Bindings Collection Editor The Bindings Collection Editor dialog box lets you easily define the relationship between a data item and themenu item it is bound to. You can access the Bindings Collection Editor dialog box by selecting the ellipses
button next to the DataBindings property in the Properties window, or by selecting the Edit Databindings
item from the C1Menu Tasks menu.

8/10/2019 Aspnet Menu
http://slidepdf.com/reader/full/aspnet-menu 44/91
40
The Bindings Collection Editor dialog box will appear similar to the following:
The Bindings Collection Editor consists of a drop-down box where you can choose an existing item to add, aleft-side list box listing added items, and a right-side properties grid where you can change the data anddatabinding properties for that item.
Note that any changes you make in the Bindings Collection Editor will be reflected in the <DataBindings>tag in the Source view, for example:<cc1:c1menu id="C1Menu1" runat="server" datasourceid="SiteMapDataSource1"visualstyle="Default" visualstylepath="~/C1WebControls/C1Menu/VisualStyles"> <DataBindings> <cc1:C1MenuItemBinding DataMember="SiteMapNode" Depth="5"NestedGroupHeight="" NestedGroupWidth="" /> </DataBindings></cc1:c1menu>
For more information about data binding, see Applying Different Data Binding Methods (page 21).
Menu TypesTypically top-level or submenus are used to create a navigation system, but the C1Menu control extends themenu functionality to create menus with groups so items can be organized into categories
This section details the common types of menus you can create using the C1Menu control.

8/10/2019 Aspnet Menu
http://slidepdf.com/reader/full/aspnet-menu 45/91
41
Top-level menuThe top level menu is the main menu. It consists of menu items which are arranged on a horizontal or verticalmenu bar. Each menu item may or may not contain a list of submenu items. A top-level menu is always visibleon the form. Typically top-level menus have 15 menu items or less.
A typical top-level menu looks like the following:
Drop-down MenuThe menu bar contains all of the drop-down menus and submenus in your application. Each menu in themenu bar is represented by its menu title.
Submenus or drop-down menus are additional menu items that appear within a menu item. Submenu itemsappear when you hover or click on the menu item on the top-level menu or submenu level. Depending on thestyle of the menu, an arrow or some other graphic is used to indicate when the menu item opens the submenu
items. A submenu can have a submenu and so on.
To see how to create submenus see, Create Submenus (page 74).
Group MenuGrouped menus are multiple sets of menu items organized into one or more categories. The menu items in agroup share a common function. Each group may include a heading item type that represents the categoryname for the group. For more information on the different kinds of heading items see, Header Items (page 44). Typically group menus appear as drop-down menus with at least one heading item to label the grouped menuitems. Groupings can be separated by heading items or separator items.
A typical grouped menu looks like the following.

8/10/2019 Aspnet Menu
http://slidepdf.com/reader/full/aspnet-menu 46/91
42
In the preceding grouped menu, it includes two header items; one for each group.
To see how to create a group menu, see Create a Group Menu (page 77).
Context Menu
The C1Menu control can be used to create a context menu by setting two simple properties:ContextElementID and ContextMenu properties. When the ContextMenu property is set to true it has theC1Menu control behave as a context menu (also known as shortcut menus).
Context menus appear on the screen in response to a right-click of the mouse. They commonly hold usedcommands (menu items) for a specific area of an application.
Usage of the Context Menu Control
C1Menu’s context menu can be associated with any HTML or Web control by assigning the ID of the controlyou wish to associate it with to the ContextElementID property.
Context Menu Layout
The default orientation for a context menu is vertical.
Context Menu Example

8/10/2019 Aspnet Menu
http://slidepdf.com/reader/full/aspnet-menu 47/91
43
To see how to create a context menu and associate it with a control see, Create a Context Menu and Attach itto a Control (page 79).
Menu Item TypesC1Menu control is made up of a tree of menu items represented by C1MenuItemBase and C1MenuItemobjects. The C1MenuItemBase object represents all menu item types: link items, header items, separator items,and group items. The C1MenuItem object represents link type items and provides the following threeproperties specific to link items: NavigateUrl property, Target property, and Text property.
Menu items at the top level hierarchy (level 0) are called menu items. A menu item that has a parent menuitem is called a child menu item. All menu items and child menu items are stored in the Items collection.C1Menu’s items can be a link item, header item, group item, or separator item. The default menu item is a linkitem. To create a group item, header item or separator item, the Group, Header, or Separator is set to true.
Link ItemsLink items are menu items that contain links to help users move to other pages, within a document or within a
site, or to other pages on the web. When the link item is activated by a user action, it can navigate to anotherWeb page indicated by the NavigateUrl property or it can open a new window if the Target property isspecified. Elements such as Text, graphic/multimedia buttons or image maps can be associated with the linkitems.
Use the NavigateUrl property to link menu item to a URL. You can assign the URL to the NavigateUrlproperty in one of the following ways:
If the URL is within the same ASP.NET application use the "~" before the URL like the following:
NavigateUrl = "~/Default2.aspx"
If the URL is an external URL, then use the protocol, for example:
NavigateUrl = "http://www.componentone.com"
The Target property takes precedence over the NavigateUrl property so if both properties are specified, thecontent of the specified URL page with be displayed in the specified window or frame when the user clicks onthe item. If the user only specifies the URL for the NavigateUrl property then when the user clicks on the itemthe current page will transfer to the specified URL page.
Link items can be combined with heading items, group items, and separator items to create a well designednavigational menu system. A link item can have submenu items. A link item type can have four states for thelink items: active, disabled, focus, and hover. Each state is defined by applying the appropriate CSS styles andspecifying whether or not the link item is enabled.
Link Item States and Styles
Link Item State CSS Selector Description
Active .C1Menu_VisualStyleNamea:active
The link item is in active state when it’s enabledand the mouse pointer or other device isn’t restingon it.
Disabled .C1Menu_VisualStyleName.disabled-item span.C1TextNode
The link item is in disabled state when enabled isset to false.
Focus .C1Menu_VisualStyle a:focus, The link item is in focus state when the mousepointer is hovering over the C1Menu.

8/10/2019 Aspnet Menu
http://slidepdf.com/reader/full/aspnet-menu 48/91
44
Hover .C1Menu_VisualStyleNamea:hover,
The link item is in focus state when the mousepointer is hovering over the C1MenuItem.
Link SubItem States and Styles
Link Item State CSS Selector Description
Active .C1Menu_VisualStyleName.C1SubMenu .c1-h-flow a:hover,
The link item is in active state when it’s enabledand the mouse pointer or other device isn’t resting
on it.
Disabled .C1Menu_VisualStyleName.C1SubMenu .c1-h-flow .disabled-item span.C1TextNode
The link item is in disabled state when enabled isset to false.
Focus .C1Menu_VisualStyle .C1SubMenu.c1-h-flow a:focus
The link item is in focus state when the mousepointer is hovering over the C1Menu.
Hover .C1Menu_VisualStyleName
.C1SubMenu .c1-h-flow a:hover,
The link item is in hovering state when the mouse
pointer is hovering over the C1MenuItem.
Header ItemsA header item helps define menu items into categories so it is easier to retrieve information from the menu. Aheader item is typically used in grouped menus as a group title like the following example.
The header item’s heading tags h1-h6, ranging from large to small font size, can be specified using theHeaderType property. The following image illustrates the different type of heading tags, h1-h6.

8/10/2019 Aspnet Menu
http://slidepdf.com/reader/full/aspnet-menu 49/91
45
Each heading tag for header items can be styled by modifying its CSS style. The following table lists the CSSselector style for each heading tag.
Header Item Style CSS Selector Description
h1 .C1Menu_VisualStyleName .c1-h-
flow h1.C1Heading
{
display: block;
margin: 0;
padding: 0;
line-height:1em;
font-size:1.5em;
width:auto;
background:#999url(Images/arcticfox_header_bg.gif)repeat-x top left;
}
Defines the display, margin, padding, line-
height, font-size, width, and background forthe heading 1 tag in a horizontal menu.
h2 .C1Menu_VisualStyleName .c1-h-flow h2.C1Heading
{
display: block;
margin: 0;
padding: 0;
line-height:1em;
font-size:1.2em;
width:auto;
background:#999
url(Images/arcticfox_header_bg.gif)
repeat-x top left;
}
Defines the display, margin, padding, line-height, font-size, width, and background forthe heading 2 tag in a horizontal menu.
h3 .C1Menu_VisualStyleName .c1-h-
flow h3.C1Heading
{
display: block;
margin: 0;
Defines the display, margin, padding, line-
height, font-size, width, and background forthe heading 3 tag in a horizontal menu.

8/10/2019 Aspnet Menu
http://slidepdf.com/reader/full/aspnet-menu 50/91
46
padding: 0;
line-height:1em;
font-size:1.1em;
width:auto;
background:#999
url(Images/arcticfox_header_bg.gif)repeat-x top left;
}
h4 .C1Menu_VisualStyleName .c1-h-
flow h4.C1Heading
{
display: block;
margin: 0;
padding: 0;
line-height:1em;
font-size:1.0em;
width:auto;
background:#999url(Images/arcticfox_header_bg.gif)repeat-x top left;
}
Defines the display, margin, padding, line-
height, font-size, width, and background forthe heading 4 tag in a horizontal menu.
h5 .C1Menu_VisualStyleName .c1-h-flow h5.C1Heading
{
display: block;
margin: 0;
padding: 0;
line-height:1em;
font-size:0.9em;
width:auto;
background:#999
url(Images/arcticfox_header_bg.gif)repeat-x top left;
}
Defines the display, margin, padding, line-height, font-size, width, and background forthe heading 5 tag in a horizontal menu.
h6 .C1Menu_VisualStyleName .c1-h-
flow h6.C1Heading
{
display: block;
margin: 0;
padding: 0;
line-height:1em;
font-size:0.8em;
width:auto;
Defines the display, margin, padding, line-
height, font-size, width, and background forthe heading 6 tag in a horizontal menu.

8/10/2019 Aspnet Menu
http://slidepdf.com/reader/full/aspnet-menu 51/91
47
background:#999url(Images/arcticfox_header_bg.gif)repeat-x top left;
}
Horizontal header .C1Menu_VisualStyleName.disabled-item span.C1TextNode
Defines the display, margin, padding, line-height, font-size, width, and background forthe heading 1 tag in a horizontal menu.
text .C1Menu_ArcticFoxNew .C1Headingspan.C1TextNode
{
padding:.5em .2em;
display:block;
font-weight:900;
color:#fff;
line-height:1em;
font-size:1em;
}
Defines the styles for the text in the headingitems.
Group ItemsGroup items are used for larger menus that include multiple lists of items with distinct categories. A groupitem is defined when Group property is set to true. A group item acts like a container to hold related menuitems in a group. Unlike link items, the text doesn’t appear on the group menu item. There are no styles orstates for group items.
A group item can contain group, link, separator, and header child items. Link items and header items are the
two common items used within a group item. Good usage of group items can help facilitate scanning andmemory.
The following table lists the elements that can be styled for the horizontal or vertical subgroup menu:
Separator Item Style CSS Selector Description
Vertical Subgroup .C1Menu_VisualStyleName .c1-v-flow
.C1SubGroup
Common styles such as height, width,
padding, background, and margin canbe applied to the vertical subgroup byassigning its selector.
Horizontal Subgroup .C1Menu_VisualStyleName .c1-h-flow.C1SubGroup
Common styles such as height, width,padding, background, and margin can
be applied to the horizontal subgroupby assigning its selector.
Separator ItemsSeparator items are the horizontal or vertical dividing lines that visually separate groups of related items on adrop-down menu, submenu, grouped menu, or context menu. A horizontal line is used on horizontal menusand a vertical line is used on vertical menus. Separators are also known as delimiters. Proper use of separators

8/10/2019 Aspnet Menu
http://slidepdf.com/reader/full/aspnet-menu 52/91
48
can help chunk the information on a menu and make it easier to memorize. Styling such as the height, width,padding, etc, can be applied to horizontal or vertical separators through CSS styles.
To add a separator item between menu items, set the Separator property to True.
The following table lists the elements that can be styled for the horizontal or vertical separator:
Separator Item Style CSS Selector Description
Vertical Separator .C1Menu_VisualStyleName .c1-v-flowspan.C1Separator
Common styles such as height, width,padding, background, and margin canbe applied to the vertical separator byassigning the .C1Menu_VisualStyle.c1-v-flow span.C1Separator selector.
Horizontal Separator .C1Menu_VisualStyleName .c1-h-flowspan.C1Separator
Common styles such as height, width,padding, background, and margin canbe applied to the horizontal separatorby assigning the .C1Menu_VisualStyle.c1-h-flow span.C1Separator selector.
Menu CreationA menu system can be created using one of the following methods:
Static creation using declarative syntax
Dynamic creation using a constructor to create new instances of the C1MenuItem class.
Data source creation through binding C1Menu to a SiteMapDataSource, XMLDataSource, or anAccessDataSource.
Static Menu CreationA static menu is the simplest way to create the menu structure.
You can use the C1Menu Designer Form designer to build the menu system or you can use declarative syntaxin the .aspx file to specify the menu items. To display static menu items using declarative syntax, first nestopening and closing <Item> tags between opening and closing tags of the Menu control. Next, create themenu structure by nesting <asp:MenuItem> elements between opeing and closing <Items> tags. Each
<asp:MenuItem> element represents a menu item in the control and maps to a MenuItem object. For moreinformation about the menu designer, see Working with the C1Menu Designer Form (page 28). For moreinformation on how to create a static menu using the designer or using declarative syntax, see CreateSubmenus (page 74).
Dynamic Menu Creation
Dynamic menus can be created on the server side or client side. When creating dynamic menus on the serverside, use a constructor to dynamically create a new instance of the C1MenuItem class. For client-side, theCreateInstance constructor can be used to dynamically create a new instance of the C1Menu control. Forexample the follow script creates a new menu control on the client side:
var aMenu = C1.Web.C1Menu.createInstance ();document.body.appendChild(aMenu.element);

8/10/2019 Aspnet Menu
http://slidepdf.com/reader/full/aspnet-menu 53/91
49
Data Source Menu CreationMenu items can be created from a hierarchal data source control such as an XMLDataSource orSiteMapDataSource. This allows you to update the menu items without having to edit code. Menu items canalso be bound to a non-hierarchal control such as an AccessDataSource component. To see how to use
different data binding methods with C1Menu, see Applying Different Data Binding Methods (page 21).
Menu AppearanceC1Menu is designed to make customization easy for you. Without writing any code, you can control themenu’s appearance, layout, and content. C1Menu provides five different .css files and images that you can useto modify to create a custom theme or you can customize each menu element through CSS styles. C1Menu
has one CSS class property, CssClass which is used to control the appearance of the item in all states.
Menu StylesDifferent styles can be applied to the menu items to create a customized appearance. Any element in the
C1Menu control can be styled as well as the menu item states. C1Menu provides five different .css files thatyou can use to help you quickly create a unique look for your menu. It is recommended to use either a separate.css file or in line CSS styles, but not both. C1Menu has a CSSClass property that enables you to assign a stylesheet class to the C1Menu control.
Visual StylesYou can create your own custom theme or choose from one of the five built-in themes: ArcticFox, Vista,Office2007Black, Office2007Blue, and Office2007Silver. The names of the themes are recognized by alogical/readable visual style name. Each theme includes one .css file and a set of images used by the CSSclasses, for example, arrows, icons, buttons, etc. The theme name can be set by applying the appropriate themename to the VisualStyle property. When creating your own theme it’s recommended to use one of the fiveexisting styles and modify that. To see how to create a custom theme by modifying an existing theme see,
Creating a Custom Visual Style (page 85).
Note: Additional styles are installed with the product, but they must be added as custom visual styles at this time.
These styles include: BureauBlack, Evergreen, ExpressionDark, RanierOrange, RanierPurple, ShinyBlue,and Windows7. See Creating a Custom Visual Style (page 85) for more information.
The themes can be defined as a resource theme or a file theme. The theme with the .CSS file in resource isnamed Resource Theme. The theme with CSS in external file is named File Theme. All external file themesare installed in C:\Program Files\ComponentOne\Studio for ASP.NET\C1WebUI\VisualStyles.
Custom external themes can be created using an existing theme and modifying its styles and images in theappropriate .css file. The default location path for creating custom external themes is\VisualStyles\CustomThemeName\C1Menu .
C1Menu includes a listbox of available visual styles in the C1Menu Tasks menu to quickly change C1Menu’s
theme. The C1Menu Tasks menu enables you to choose from one of the five themes to apply to the C1Menucontrol. The visual styles can also be applied to the C1Menu control by setting its VisualStyle property in theProperties window.
Accessing the Visual Styles at design time
The visual styles are accessible in one of two ways at design time:
Select Visual Styles drop-down listbox from C1Menu Tasks menu.

8/10/2019 Aspnet Menu
http://slidepdf.com/reader/full/aspnet-menu 54/91
50
Select Visual Styles drop-down listbox from C1Menu’s Properties Window.
Available Visual Styles
The following visual styles are available for C1Menu:
Visual Style Preview
ArcticFox
Office2007Black
Office2007Blue
Office2007Silver
Vista
VistaBlack
TemplatesTemplates can be used to embed other HTML controls in a menu item or you can create custom tags. Thefollowing C1Menu displays embedded HTML controls in the menu items:
C1Menu supports common and individual types of templates. It includes special template designers forcustomizing the top level menu items, child menu items, and all menu items that do not include definedtemplates. Creating templates of different types allows you to customize the appearance or layout of a menucontrol or each element inside it.
Top-Level Menu Template
C1Menu includes a special designer for customizing the menu items in the top-level menu.
To add a template for the top-level menu items, complete the following:
1. Add menu items to C1Menu using the C1Menu Designer Form editor. Remove the default text for thefirst menu item so your menu appears similar to the following:

8/10/2019 Aspnet Menu
http://slidepdf.com/reader/full/aspnet-menu 55/91
51
2. Click OK to save and close the C1Menu Designer Form dialog box.
3. Switch to source view and add the following HTML markup right above the <Items> tag:<TopItemsTemplate><%#Eval("Text") == "" ? ("<font color=\"green\">empty text</font>") :("<i><b>" + Eval("Text") + "</b></i>")%></TopItemsTemplate>
4. Select the Design tab to switch to design view and notice the Databound items appear on the C1Menucontrol.
5. Run you project and notice the new text and font style for the menu items.
Items Template
To add a template for all menu items that don’t include other defined templates, complete the following:
1. Add menu items to C1Menu using the C1Menu Designer Form editor Remove the default text for thefirst menu item so your menu appears similar to the following:

8/10/2019 Aspnet Menu
http://slidepdf.com/reader/full/aspnet-menu 56/91
52
2. Click OK to save and close the C1Menu Designer Form dialog box.
3. Switch to source view and add the following HTML markup right above the <Items> tag:<ItemsTemplate><%#Eval("Text") == "" ? ("<font color=\"green\">empty text</font>") :("<i><b>" + Eval("Text") + "</b></i>")%></ItemsTemplate>
4. Select the Design tab to switch to design view and notice the Databound items appear on the C1Menucontrol.
5. Run you project and notice the new text and font style for the menu items.
Child Items Template
To add a template for all child menu items, complete the following:
1. Add a child item to the C1Menu control.
2. Open the C1Menu Tasks menu from the smart tag and select Edit Templates. The C1Menu Tasks menuchanges to Template Editing Mode.
3. Select ChildItemsTemplate from the Display drop-down list box.

8/10/2019 Aspnet Menu
http://slidepdf.com/reader/full/aspnet-menu 57/91
53
4. Drag and drop two DropDownList controls into the ChildItemsTemplate box. If necessary adjust the
size of the DropDownList controls.
5. Select End Template Editing from C1Menu Tasks menu.
6. Run the project and select the child item.
The two embedded DropDownList controls appear in C1Menu’s sub menu item.
Individual Menu Items Template
If you would like to define a unique template for individual menu items you can assign the Template propertyto the item you wish to customize. If a global template such as the ItemsTemplate is assigned to the C1Menucontrol the per-item template overrides it.
The following image shows the same menus with the first one showing the unique templates used for the childitem in the first menu item and the second menu item.

8/10/2019 Aspnet Menu
http://slidepdf.com/reader/full/aspnet-menu 58/91
54
To add a unique template for individual menu items, complete the following steps:
1. Open the C1Menu Designer Form and add a few link items with child link items so it appears similar tothe following:
2. Click OK to save and close the C1Menu Designer Form dialog box.
3. Switch to source view and locate the child link item for LinkItem, add the <Template></Template>
tags and the HTML markup within the <Template></Template> so it appears like the following:<cc1:C1Menu ID="C1Menu1" runat="server"
VisualStylePath="~/C1WebControls/VisualStyles"> <Items> <cc1:C1MenuItem runat="server" Text="LinkItem1"> <Items>
<cc1:C1MenuItem runat="server" Text="LinkItem1"> <Template>
<fieldset> <legend>Suppliers:</legend> Supplier ID: <input type="text" size="20" /><br /> Company Name: <input type="text" size="17" /><br /> Contact Name: <input type="text" size="18" /><br /> Contact Title: <input type="text" size="20" /><br /> Address: <input type="text" size="20" /><br /> City: <input type="text" size="20" /><br />

8/10/2019 Aspnet Menu
http://slidepdf.com/reader/full/aspnet-menu 59/91
55
Region: <input type="text" size="20" /><br /> Postal Code: <input type="text" size="20" /><br /> Country: <input type="text" size="20" /><br /> Phone: <input type="text" size="20" /><br /> Fax: <input type="text" size="20" /> </fieldset> </Template>
</cc1:C1MenuItem>
This will assign the template to the first child item in LinkItem1.
4. In source view locate the child link item for LinkItem2 and add the <Template></Template> tags andthe HTML markup within the <Template></Template> so it appears like the following::<cc1:C1MenuItem runat="server" Text="LinkItem2"> <Items> <cc1:C1MenuItem runat="server" Text="LinkItem1"> <Template>
<fieldset> <legend>Shippers:</legend> Shipper ID: <input type="text" size="20" /><br /> Company Name: <input type="text" size="15" /><br
/> Phone: <input type="text" size="15" /> </fieldset> </Template>
</cc1:C1MenuItem> </Items> </cc1:C1MenuItem>
5. Run the project and notice the field sets that appear for the first child item in the first menu item and thefirst child item in the second menu item.
Menu Item ImagesYou can add images to the normal, hover, and disabled menu item states using the following properties:ImageUrl, DisabledImageUrl, and MouseOverImageUrl.
To determine how the image is rendered, to the left or right of the menu item use the ImagePosition property.
Menu LayoutThe C1Menu control can be rendered horizontally or vertically by setting its Orientation property. The layoutfor the Submenu items can also be controlled using the NestedGroupOrientation property. For moreinformation on setting menu layout see, Changing Menu and Sub-menu Orientation (page 30).
Horizontal Menu Layout
In the following menu, the Orientation property is set to "Horizontal".

8/10/2019 Aspnet Menu
http://slidepdf.com/reader/full/aspnet-menu 60/91
56
Vertical Menu Layout
In the following menu, the Orientation property is set to "Vertical".
Horizontal Menu and Horizontal Submenu Layout
In the following menu, the Orientation property is set to "Horizontal" and the NestedGroupOrientationproperty is set to "Horizontal".
Horizontal Menu and Vertical Submenu Layout
In the following menu, the Orientation property is set to "Horizontal" and the NestedGroupOrientationproperty is set to "Vertical".
Vertical Menu and Vertical Submenu Layout
In the following menu, the Orientation property is set to "Vertical" and the NestedGroupOrientation propertyis set to "Vertical".

8/10/2019 Aspnet Menu
http://slidepdf.com/reader/full/aspnet-menu 61/91
57
Vertical Menu and Horizontal Submenu Layout
In the following menu, the Orientation property is set to "Vertical" and the NestedGroupOrientation propertyis set to "Horizontal".
Menu Behavior The following topics discuss how you can change the way C1Menu behaves such as its animation, scrolling,and navigation.
AnimationThe following topics detail C1Menu’s animation and transition effects for collapsing and expanding menuitems.
Expand and Collapse Animation Effects
You can change how drop-down menus or submenu items expand or collapse by using one of the 25 built-inanimation effects. These animation effects are available through the CollapseAnimation andExpandAnimation properties. Expand and collapse animation effects are special visual effects that occur whilethe menu items expand or collapse. For each expand or collapse effect you can specify how long the animationlasts by specifying an integer value for the ExpandDuration and CollapseDuration properties. The duration ismeasure in milliseconds. By default, the menu items expand and collapse without an animation effect.
Different animation effects can be applied to each drop-down menu, but it is recommended to use only twoanimation effects: one for the collapsed menu items and one for the expanded menu items. Typically theanimations that scroll in, fade in, fold in, open, or drop in are used on expanding menu items and theanimations that scroll out, fade out, fold out, close, or drop out, are used on collapsing menu items. To disablean animation effect for the collapsed menu items or expanded menu items, set the CollapseAnimation orExpandAnimation property to "None".
The following table lists and defines each animation effect:
Animation Name Animation Description
None(Default) Disables animation behavior for the expanding
or collapsing menu items.
FadeIn Performs a fade in from the current opacity tothe maximum opacity.
FadeOut Performs a fade out from the current opacityto the maximum opacity.
ScrollInFromTop Scrolls down from the top to bottom.
ScrollInFromRight Scrolls in from the right end to the left end.
ScrollInFromBottom Scrolls in from bottom to top.

8/10/2019 Aspnet Menu
http://slidepdf.com/reader/full/aspnet-menu 62/91
58
ScrollInFromLeft Scrolls in from the left end of the menu itemto the right end of the menu item.
ScrollOutToTop Scrolls out of view from the bottom to the top
of the menu.
ScrollOutToRight Scrolls out of view from left to right.
ScrollOutToBottom Its scrolls out of view from the top down tothe bottom.
ScrollOutToLeft Scrolls from the right side toward the left sideof the menu.
Fold Folds the menu.
UnFold Unfolds the menu.
OpenVertically Opens the menu vertically from the center ofthe menu.
CloseVertically Closes the menu vertically from the center of
the menu.
OpenHorizontally Opens the menu horizontally from left to
right.
CloseHorizontally Closes the menu horizonally from right to left.
Shake Moves the menu back and fourth from left to
right.
Bounce Moves the menu items up and down.
DropInFromTop The menu items start moving upward from itsdefault location to near the top of the page.The menu item’s opacity decreases as itmoves further upward away from its default
location.
DropInFromRight The menu items appear to the far left side ofthe menu bar and move toward the right andstop once it reaches its default location(thelocation of its associated parent menu item).The moving menu item’s opacity increases asit moves closer to its default location.
DropInFromBottom Drops downward with the bottom of the menuitems appearing first. The menu’s opacityincreases as it moves down to meet with itsassociated parent menu item.
DropInFromLeft For a horizontal menu bar, the vertical drop-
down menu drops in from the far right andmoves to the left of the screen to meet theparent menu item.
DropOutToTop Moves upward from bottom to the top of themenu bar and gradually fades out as it’smoving upward.
DropOutToRight Moves to the right of the parent menu andgradually fades as it’s moving to the right.

8/10/2019 Aspnet Menu
http://slidepdf.com/reader/full/aspnet-menu 63/91
59
DropOutToBottom Drops downward and the opacity of the menugradually decreases as its moving furtherdown the page.
DropOutToLeft Drops out toward the left of the parent menuand moves toward the left page. The menu’sopacity gradually lessens as it moves further
to the left of the page.
Expand and Collapse Transitions
You can enhance your menu’s appeal by adding transition effects between expand or collapse animated statesto create a seamless flow between these states. C1Menu includes thirty-one transition effects that enable you tomake the transitions in the collapse or expand animations more visually compelling. Instead of expandingmenu items unfolding and collapsing menu items folding, the expanding menu items or collapsing menu itemsmight bounce in as they are unfolding and bounce out as they are folding. These transitions are special effectsthat occur when a menu expands or collapses or stops expanding and collapsing, whereas the animation effectsoccur while the menu is expanding and collapsing. To use a transition effect, the CollapseAnimation orExpandAnimation property must be set to an animation type before you set the CollapseEasing orExpandEasing properties. By default the CollapseEasing or ExpandEasing properties are set to EaseLinear
and the menu expands or collapses with a smooth linear transition effect.The following transitions effects are available for you to animate the transition between states so it lookssmooth to help keep the user oriented while menus are expanding or collapsing:
Transition Name Transition Description
EaseLinear(default) Linear easing. Moves smoothly from start toend without acceleration or deceleration
EaseOutElastic Elastic easing out. Begins quickly and then
decelerates.
EaseInElastic Elastic easing in. Begins slowly and then
accelerates.
EaseInOutElastic Elastic easing in and out. Begins slowly,accelerates halfway, and then decelerates.
EastOutBounce Bouncing easing out. Begins quickly and then
decelerates. The number of bounces is relatedto the duration: longer durations producemore bounces.
EaseInBounce Bouncing easing in. Begins slowly and thenaccelerates. The number of bounces is relatedto the duration: longer durations producemore bounces.
EaseInOutBounce Bouncing easing in and out. Begins slowly,
accelerates until halfway, and thendecelerates.
EaseOutExpo Exponential easing out. Begins quickly and
then decelerates.
EaseInExpo Exponential easing in. Begins slowly and thenaccelerates.
EaseInOutExpo Exponential easing in and out. Begins slowly,
accelerates until halfway, and then
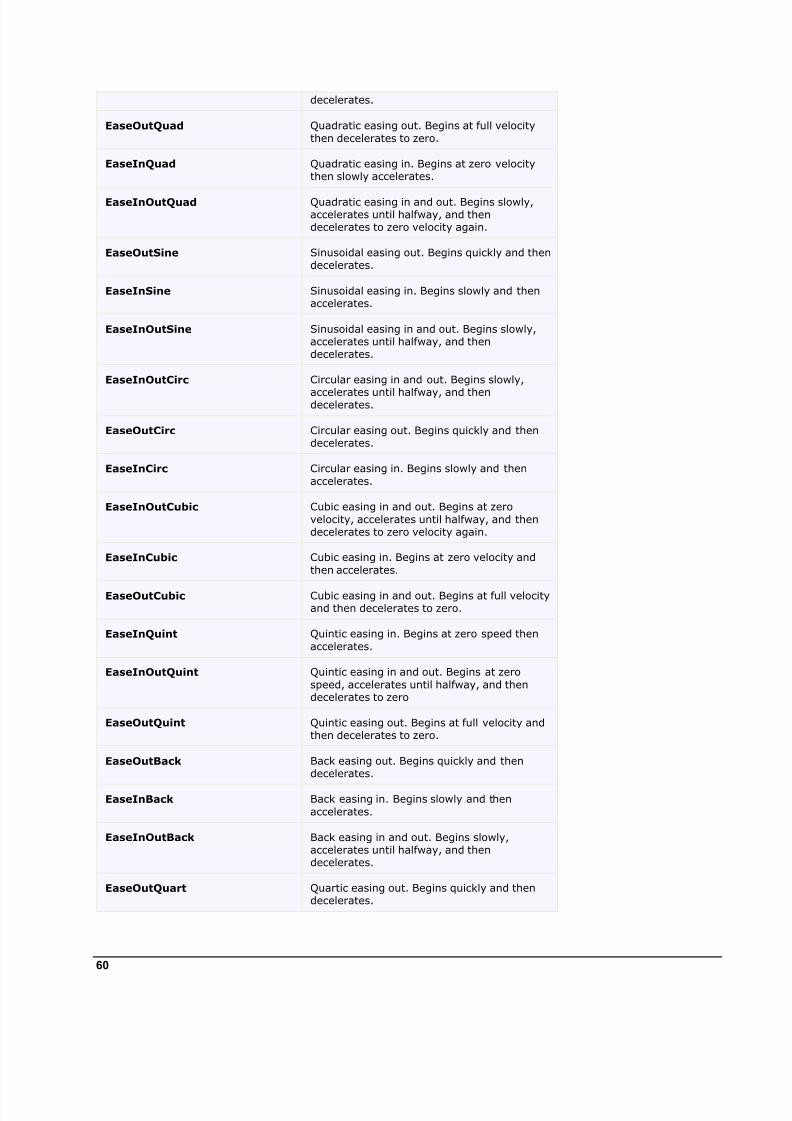
8/10/2019 Aspnet Menu
http://slidepdf.com/reader/full/aspnet-menu 64/91
60
decelerates.
EaseOutQuad Quadratic easing out. Begins at full velocity
then decelerates to zero.
EaseInQuad Quadratic easing in. Begins at zero velocitythen slowly accelerates.
EaseInOutQuad Quadratic easing in and out. Begins slowly,accelerates until halfway, and thendecelerates to zero velocity again.
EaseOutSine Sinusoidal easing out. Begins quickly and thendecelerates.
EaseInSine Sinusoidal easing in. Begins slowly and thenaccelerates.
EaseInOutSine Sinusoidal easing in and out. Begins slowly,accelerates until halfway, and thendecelerates.
EaseInOutCirc Circular easing in and out. Begins slowly,
accelerates until halfway, and thendecelerates.
EaseOutCirc Circular easing out. Begins quickly and thendecelerates.
EaseInCirc Circular easing in. Begins slowly and then
accelerates.
EaseInOutCubic Cubic easing in and out. Begins at zero
velocity, accelerates until halfway, and thendecelerates to zero velocity again.
EaseInCubic Cubic easing in. Begins at zero velocity and
then accelerates.
EaseOutCubic Cubic easing in and out. Begins at full velocityand then decelerates to zero.
EaseInQuint Quintic easing in. Begins at zero speed then
accelerates.
EaseInOutQuint Quintic easing in and out. Begins at zero
speed, accelerates until halfway, and thendecelerates to zero
EaseOutQuint Quintic easing out. Begins at full velocity andthen decelerates to zero.
EaseOutBack Back easing out. Begins quickly and thendecelerates.
EaseInBack Back easing in. Begins slowly and then
accelerates.
EaseInOutBack Back easing in and out. Begins slowly,accelerates until halfway, and thendecelerates.
EaseOutQuart Quartic easing out. Begins quickly and thendecelerates.

8/10/2019 Aspnet Menu
http://slidepdf.com/reader/full/aspnet-menu 65/91
61
EaseInQuart Quartic easing in. Begins slowly and thenaccelerates.
EaseInOutQuart Quartic easing in and out. Begins at zero
velocity, accelerates until halfway, and thendecelerates to zero velocity again.
Expand and Collapse Duration
Timing plays an important role for animation effects. You need to know when to start the animation and howlong the animation lasts. C1Menu provides duration and delay properties so you can specify the timing foryour menu animation effects. Both the duration and delay properties are set to measure in milliseconds.
You can control when the expand effect or collapse effect starts by specifying a delay time value for theExpandDelay and CollapseDelay properties. The default setting for both the ExpandDelay and CollapseDelayproperties is 100 milliseconds which is .1 seconds.
Once the expand or collapse process starts, the animation effect begins if the ExpandAnimation orCollapseAnimationproperty is set to an animation type. You can control how long the animation andtransition effects last by specifying an integer value for the CollapseDuration and ExpandDuration. Thedefault delay time value for both properties is 500 milliseconds which is half of a second.
Menu ScrollingScrolling menus add stylish, animated scrolling behavior to overlong menus so they can contain more linksthan would otherwise be possible.
C1Menu can scroll top level menus, sub menus, and sub groups. You can set the scroll mode option to buttonclick scrolling, button hover scrolling, edge hover scrolling, or scroll bars.
Scroll Menu Types
C1Menu can scroll top level menu, sub menu and sub group.
Top Level Horizontal Scrolling
Top-level horizontal scrolling can be applied to horizontal menus when the following properties are set for theScrollSettings property: ScrollMode property is set to a button type and a width is specified for theScrollContentWidth property.
The following menu illustrates top-level horizontal scrollbars.
Sub Menu Vertical Scrolling
Vertical scrolling can be applied to vertical menu items when the following properties are set for the
ScrollSettings property: ScrollMode property is set to button, buttonhover, hover, or scrollbar, and a height isspecified for the ScrollContentHeightproperty.
The following menu illustrates vertical submenu scrolling:

8/10/2019 Aspnet Menu
http://slidepdf.com/reader/full/aspnet-menu 66/91
62
Sub Group Scrolling
You can add scrolling to groups if there are many submenu items to prevent the submenu items from taking upcontent space in the page. Scrolling menus ensure all links in the menu remain accessible to mouse even invery small windows. For more information on how to apply sub group scrolling see, Add Scrolling to VerticalGroup (page 83).
Scroll Mode Options
You can use the ScrollSettings property to specify the following settings for the menu scrollbars:
Scroll Button Types
You can use the ScrollMode property to specify the type of scroll button. The following scroll button typesare available:
None
The None setting disables the scroll behavior.
Buttons
The Buttons setting has two arrow buttons, one for the left and one for the right side of the menu baror menu item. An arrow button appears in focus when you click on the button.
Buttons Hover
The Buttons Hover setting has the same appearance as the Buttons setting. When you hover over thearrow button the button appears in focus.

8/10/2019 Aspnet Menu
http://slidepdf.com/reader/full/aspnet-menu 67/91
63
Hover
The Hover setting has no buttons. To make the menu scroll, hover on one of the end sides of themenu bar or menu item.
ScrollBar
The ScrollBar setting includes a horizontal and vertical scrollbar by default.
Scroll Button Position
You can use the ScrollButtonAlignproperty to specify whether the buttons appear on both sides, the startside, or the end side.
Both Sides
Start Side
End Side

8/10/2019 Aspnet Menu
http://slidepdf.com/reader/full/aspnet-menu 68/91
64
Scroll Content Height and Width
You can use the ScrollContentHeightand ScrollContentWidth to specify the height for verticalscrollbars and the width for horizontal scrollbars. To see how to use the ScrollContentHeightproperty,
see Add Scrolling to Vertical Top Level Menu (page 81). To see how to use the ScrollContentWidthproperty, see Add Scrolling to Vertical Sub Menu (page 82).
Scroll Button Orientation
You can use the ScrollOrientation to specify whether the scrolling is horizontal or vertical. For a
horizontal menu you would set the ScrollOrientation property to "Horizontal" and for a vertical menuyou would set the ScrollOrientation property to "Vertical".
Scroll Step
The ScrollStep property controls how each menu item moves while scrolling. The lower the step theslower the menu items move. The default scroll step is 4 which means four pixels move in sync while youare scrolling. To make one menu item move at a time, set the ScrollStep to "1".
Scroll Button Styles
You can apply unique styles for each type of scroll button. Additionally, you can apply styles to the differentstates of the scrollbar buttons.
The following table lists the available styles for each scrollbar button:
Scroll Button Style Description Example
BottomButtonActiveCssClass Gets the Css class for the
active scroll button.
.C1Menu_VisualStyleName_ScrollButtonActiveBot
tom
}
}
BottomButtonCssClass Gets the Css class for thebottom scroll button.
.C1Menu_VisualStyleName_ScrollButtonBottom
{
margin:0 0 0 0;
background:#c7c7c7
url(images/arrow_scroll_bottom.gif) centercenter no-repeat;
border-top:solid 1px #999999;
}
BottomButtonDisabledCssClass Gets the Css clss for the
bottom disabled scrollbutton.
.C1Menu_VisualStyleName_ScrollButtonDisabled
Bottom
}

8/10/2019 Aspnet Menu
http://slidepdf.com/reader/full/aspnet-menu 69/91
65
}
LeftButtonActiveCssClass Gets the Css class for theleft active scroll button.
.C1Menu_VisualStyleName_ScrollButtonActiveLef t
}
}
LeftButtonCssClass Gets the Css class for the
left scroll button..C1Menu_VisualStyleName_ScrollButtonLeft
}
}
LeftButtonDisabledCssClass Gets the Css class for the
left disabled scroll button.
.C1Menu_VisualStyleName_ScrollButtonDisabledL
eft
}
}
RightButtonActiveCssClass Gets the Css class for the
right active scroll button.
.C1Menu_VisualStyleName_ScrollButtonActiveRig
ht
}
}
RightButtonCssClass Gets the Css class for theright scroll button cssclass.
.C1Menu_VisualStyleName_ScrollButtonLeft
}
}
RightButtonDisabledCssClass Gets the Css class for thedisabled scroll button.
.C1Menu_VisualStyleName_ScrollButtonDisabledLeft
}
}
TopButtonActiveCssClass Gets the Css class for the
active scroll button..C1Menu_VisualStyleName_ScrollButtonActiveTop
}
}
TopButtonCssClass Gets the Css class for thetop scroll button.
.C1Menu_VisualStyleName_ScrollButtonTop
}
}
TopButtonDisabledCssClass Gets the Css class for thedisabled scroll button.
.C1Menu_VisualStyleName_ScrollButtonDisabledTop
}
}
Menu Navigation and ShortcutsThe two common approaches for navigating menu systems are:
Point and click using the mouse

8/10/2019 Aspnet Menu
http://slidepdf.com/reader/full/aspnet-menu 70/91
66
Arrow keys using the keyboard
Mouse Navigation
When the user clicks a menu item, the Menu control can either navigate to a linked Web page or simply post back to the server. If the NavigateUrl property of a menu item is set, the Menu control navigates to the linkedpage; otherwise, it posts the page back to the server for processing. By default, a linked page is displayed in the
same window or frame as the Menu control. To display the linked content in a different window or frame, usethe Target property of the Menu control.
Keyboard Navigation
C1Menu supports access keys to enhance the user’s navigation of your menu items. Access keys are used fornavigating through the menu and typically use the ALT key plus the specified key.
You can add access keys to any of the menu items and submenu items using the AccessKey property. Onecharacter should be used when you assign access keys to menu items.
Working with the Client-Side MenuC1Menu client side has a very rich client-side object mode since most of its members are identical to themembers in the server-side control.
When a C1Menu control is rendered, an instance of the client-side menu will be created automatically. Thismeans that you can enjoy the convenience of accessing properties and methods of the C1Menu controlwithout having to postback to the server.
For example, suppose a C1Menu control with the name, C1Menu1 is hosted on the Web page, when the pageis rendered, a corresponding client menu object with the name C1Menu1_Client will be created.
You can get the reference for a C1Menu using the following client-side code:var menu = $find("<%= C1Menu1.ClientID %>");
Using C1Menu’s client-side code, you can implement many features in your Web page without the need tosend information to the Web server which takes time. Thus, using C1Menu’s client-side object model can
increase the efficiency of your Web site.The following topics describe the available client-side properties, methods, and events.
Client-Side PropertiesThe following conventions are used when accessing the client object properties:
Server properties on the client are implemented as a pair of Get- and Set- methods.
Method names must start with "get_" (Get-method) and "set_" (Set-method) followed with the serverproperty name. The first letter of the server property name must be lowercase (camel case).
Client-Side MethodsC1Menu includes a rich client-side object model in which several properties can be set on the client side. Forinformation about these client-side methods and what properties can be set on the client side, see theC1Menu1 Reference.
Client-Side EventsC1Menu includes several client-side events that allow you to manipulate the menu items in the C1Menu
control when an action such as clicking the item, hovering over or out of the menu item occurs. You canaccess these client-side events from the Properties window. To create a new client-side event using the

8/10/2019 Aspnet Menu
http://slidepdf.com/reader/full/aspnet-menu 71/91
67
Properties window, select the drop-down arrow next to a client-side event and select Add new client side
handler .
Once you've added the client-side handler, Visual Studio will add a script to the Source view. That script will
resemble the following:<script id="ComponentOneClientScript" type="text/javascript">function C1Menu1_OnClientItemMouseDown(item, domEvent){ // // Put your code here. //};</script>
Each of the client-side events requires two parameters: the ID that identifies the sender C1Menu, in thisexample, C1Menu1, and an eventArgs that contains the data of the event.
You can use the sever-side properties, listed in the Client Side Event table, to specify the name of theJavaScript function that will respond to a particular client-side event. For example, to assign a JavaScriptfunction called "ItemClick" to respond to the clicked item, you would set the OnClientItemClick property to"ItemClick".

8/10/2019 Aspnet Menu
http://slidepdf.com/reader/full/aspnet-menu 72/91
68
The following table lists the events that you can use in your client scripts. These properties are defined on theserver side, but the actual events or the name you declare for each JavaScript function are defined on the clientside.
Client Side Event table
Event Server-Side Property Name Event Name Description
OnClientItemBlur ItemBlur Fires on client side when menu itemlooses focus.
OnClientItemChecked ItemChecked Fires on client side when menu itemis checked.
OnClientItemClick ItemClick Fires on client side when menu item
is clicked.
OnClientItemFocus ItemFocus Fires on client side when menu itemis focused.
OnClientItemMouseDown ItemMouseDown Fires on client side when mouse is
down on menu item.
OnClientItemMouseOut ItemMouseOut Fires on client side when mousebecomes out of a menu item.
OnClientItemMouseOver ItemMouseOver Fires on client side when mouse isover menu item.
OnClientItemUnChecked ItemUnChecked Fires on client side when menu item
is unchecked.

8/10/2019 Aspnet Menu
http://slidepdf.com/reader/full/aspnet-menu 73/91
69
These events are useful for providing client-side interactivity. With these events you can provide more controlover C1Menu by controlling how the users interact with C1Menu. For example you can use theItemMouseOver event to prevent submenu items from expanding when the user mouses over menu items orthe ItemClick event to add, remove, or disable menu items when the user clicks on an existing menu item.

8/10/2019 Aspnet Menu
http://slidepdf.com/reader/full/aspnet-menu 74/91

8/10/2019 Aspnet Menu
http://slidepdf.com/reader/full/aspnet-menu 75/91
71
Menu for ASP.NET SamplesPlease be advised that this ComponentOne software tool is accompanied by various sample projects and/or
demos which may make use of other development tools included with the ComponentOne Studios.Samples can be accessed from the ComponentOne Sample Explorer . On your desktop, click the Start buttonand then click ComponentOne | Studio for ASP.NET | Palomino Samples.
C# Sample
The following pages within the ControlExplorer sample installed with ComponentOne Studio for ASP.NET
AJAX detail the C1Menu control's functionality:
Sample Description
Animation Showcases the different collapse and expand animation effects for
the C1Menu control.
Databinding Shows how to databind C1Menu to a SiteMapDataSource orXMLDataSource.
Orientation Demonstrates how to change the menu and submenu orientationfor the C1Menu control on the client-side.
Scrolling Shows how to scroll top-level menus, submenu, and sub group.
Templates Demonstrates how to use templates with the C1Menu control.
VisualStyles Displays the built-in C1Menu control Visual Styles includingArcticFox, Office2007Black, Office2007Blue, Office2007Silver, andVista.
Menu for ASP.NET Task-Based HelpThe task-based help section assumes that you are familiar with programming in the Visual Studio ASP.NET
environment, and know how to use the C1Menu control in general. Each topic provides a solution for specific tasks
using the C1Menu control. Each task-based help topic also assumes that you have created a new ASP.NET project.
Adding Collapse and Expand Animation EffectsC1Menu contains 27 animation and thirty-one transition effects that allow you to customize interaction withthe control. In this topic, you will set the CollapseAnimation, ExpandAnimation, CollapseEasing,ExpandEasing, CollapseDuration, and ExpandDuration properties to create an animation effect whileexpanding or collapsing menu items.
Setting Animation Effects Using the Designer
Complete the following steps to set animation effects:1. Click C1Menu's smart tag to open the C1MenuTasks menu and select Edit Menu. The C1Menu
Designer Form appears.
2. Use the Add Child Item ( ) button to add two link items to your C1Menu.
3. In treeview, select LinkItem01 and click on the Add Child Item button to add two link items toLinkItem01.
4. In treeview, select LinkItem01 and navigate to the ExpandAnimation property and set it to "Unfold".

8/10/2019 Aspnet Menu
http://slidepdf.com/reader/full/aspnet-menu 76/91
72
5. Set the ExpandEasing property to "EaseOutBounce". This property determines the animation transitioneffect while the menu items are expanding.
6. Locate the ExpandDuration property and enter "1500" into its textbox. This will lengthen the duration ofthe animation effect, guaranteeing that you will notice the effect when you build the project.
7. Set the CollapseAnimation property and set it to "Fold".
8. Set the CollapseEasing property to "EaseInBounce". This property determines the animation transitioneffect while the menu items are collapsing.
9. Locate the CollapseDuration property and enter "1500" into its textbox.
10. Click OK to save and close the C1Menu Designer Form.
11. Build the project and observe that the expanding child link items unfold and bounce in before settling intoits natural state and the collapsing child link items fold and then bounce in before settling into its naturalstate.
Setting Animation Effects in Source View
In Source view add ExpandAnimation="Unfold", ExpandDuration="1500",ExpandEasing="EaseOutBounce", CollapseAnimation="Fold", CollapseDuration="1500", andCollapseEasing="EaseInBounce" into the <cc1:C1MenuItem> tag so that it appears similar to the following:<cc1:C1MenuItem runat="server" CollapseAnimation="Fold"CollapseDuration="1500" CollapseEasing="EaseInBounce" ExpandAnimation="UnFold" ExpandDuration="1500"ExpandEasing="EaseOutBounce" Text="LinkItem01"> <Items> <cc1:C1MenuItem runat="server" Text="LinkItem01"> </cc1:C1MenuItem> <cc1:C1MenuItem runat="server" Text="LinkItem02"> </cc1:C1MenuItem> </Items> </cc1:C1MenuItem>
Setting Animation Effects Programmatically
Complete the following steps to set animation effects programmatically:
1. Import the following namespace into your project:
Visual BasicImports C1.Web.UI.Controls.C1Menu
C#using C1.Web.UI.Controls.C1Menu;
2. Add the following code to the Page_Load event to set the animation effects for the expanding andcollapsing menu items:
Visual BasicIf Not Page.IsPostBack Then
'create menu item
Dim item1 As New C1MenuItem()item1.Text = "LinkItem01"'add item 1 to the main menu barC1Menu1.Items.Add(item1)
'Set the expand animation effectitem1.ExpandAnimation = C1.Web.UI.AnimationEffect.UnFold'Set the transition for the expand animation effectitem1.ExpandEasing = C1.Web.UI.Easing.EaseOutBounce

8/10/2019 Aspnet Menu
http://slidepdf.com/reader/full/aspnet-menu 77/91
73
'Set the duration for the expand animation effectitem1.ExpandDuration = 2500
'Set the collapse animation effectitem1.CollapseAnimation = C1.Web.UI.AnimationEffect.Fold'Set the transition for the collapse animationitem1.CollapseEasing = C1.Web.UI.Easing.EaseInBounce'Set the duration for the collapse animation effectitem1.CollapseDuration = 2500
'set item 1 submenu widthitem1.NestedGroupWidth = 120
'create submenu itemDim item1child1 As New C1MenuItem()item1child1.Text = "LinkItem01"Dim item1child2 As New C1MenuItem()item1child2.Text = "LinkItem02"
'add submenu item to menu Item 1
item1.Items.Add(item1child1)
item1.Items.Add(item1child2)End If
C#if (!Page.IsPostBack) { //create menu item
C1MenuItem item1 = new C1MenuItem(); item1.Text = "LinkItem01"; //add item 1 to the main menu bar C1Menu1.Items.Add(item1);
//Set the expand animation effect item1.ExpandAnimation = C1.Web.UI.AnimationEffect.UnFold; //Set the transition for the expand animation effect item1.ExpandEasing = C1.Web.UI.Easing.EaseOutBounce; //Set the duration for the expand animation effect item1.ExpandDuration = 2500;
//Set the collapse animation effect item1.CollapseAnimation = C1.Web.UI.AnimationEffect.Fold; //Set the transition for the collapse animation item1.CollapseEasing = C1.Web.UI.Easing.EaseInBounce; //Set the duration for the collapse animation effect item1.CollapseDuration = 2500;
//set item 1 submenu width item1.NestedGroupWidth = 120;
//create submenu item C1MenuItem item1child1 = new C1MenuItem(); item1child1.Text = "LinkItem01"; C1MenuItem item1child2 = new C1MenuItem(); item1child2.Text = "LinkItem02";

8/10/2019 Aspnet Menu
http://slidepdf.com/reader/full/aspnet-menu 78/91
74
//add submenu item to menu Item 1
item1.Items.Add(item1child1); item1.Items.Add(item1child2);
}
3. Run the program and observe that the expanding child link items unfold and bounce in before settling intoits natural state and the collapsing child link items fold and then bounce in before settling into its naturalstate.
Creating Different Menu TypesThe following topics show how to create a submenu, group menu, and context menu.
Create Submenus
A menu system with menu items and submenu items can be created at design time using the designer,declaratively in the.aspx/ascx file, programmatically using the server-side API, or dynamically using theclient-side object model. Click on either of the following links to expand the steps for the designer, HTML
Markup, or code.
Add Menu Items and Submenu Items to C1Menu Using the Designer
1. Create an ASP.NET AJAX enabled website.
2. Add C1Menu to your page.
3. Right-click on the control and select Edit Menu.
The C1Menu Designer Form appears. For conceptual information about the elements in the C1Menu
Designer Form see, C1Menu Designer Form (page 35).
4. Right-click on C1Menu1 and select Add Child | Link Item to add a root item to the menu bar.
5. Select LinkItem01 and press the F3 key and enter "Item 1" inside the box.
6. Right-click on Item 1 and select Add Child | Link Item to add a child item to Item 1.
7. Right-click on LinkItem01 and select Rename. Rename it to "Submenu Item 1".
8. Right-click on Submenu Item 1 and select Insert Item. A new submenu item is inserted before Submenu
Item 1.
9. Select LinkItem01 and click the down arrow button to move it one item down.

8/10/2019 Aspnet Menu
http://slidepdf.com/reader/full/aspnet-menu 79/91
75
10. Rename LinkItem01 to "Submenu Item 2".
11. Right-click on C1Menu1 and select Add Child | Link Item to add a new root item to the menu bar thatwill appear next to Item 1.
12. Rename LinkItem01 to "Item 2".13. Right-click on C1Menu1 and select Add Child | Link Item to add a new root item to the menu bar that
will appear next to Item 2.
14. Rename LinkItem01 to "Item 3".
15. Click the OK button to save and close the changes you made to the C1Menu control.
16. Run the project and notice the new menu items and submenu items appear on the C1Menu control.
Add Menu Items and Submenu Items to C1Menu Declaratively
Select the source tab to switch to source view and add the following HTML markup within the <body> tags.<form id="form1" runat="server"> <cc1:C1Menu ID="C1Menu1" runat="server"VisualStylePath="~/C1WebControls/VisualStyles"> <Items> <cc1:C1MenuItem runat="server" Text="Item 1"NestedGroupWidth="120px">
<Items> <cc1:C1MenuItem runat="server" Text="Submenu Item 1"> </cc1:C1MenuItem> <cc1:C1MenuItem runat="server" Text="Submenu Item 2"> </cc1:C1MenuItem> </Items> </cc1:C1MenuItem> <cc1:C1MenuItem runat="server" Text="Item 2"> </cc1:C1MenuItem> <cc1:C1MenuItem runat="server" Text="Item 3">

8/10/2019 Aspnet Menu
http://slidepdf.com/reader/full/aspnet-menu 80/91
76
</cc1:C1MenuItem> </Items> </cc1:C1Menu> <asp:ScriptManager ID="ScriptManager1" runat="server" /> <div> </div> </form>
Add Menu Items and Submenu Items to C1Menu Programmatically
To add menu items and submenu items to C1Menu programmatically in the code behind, complete thefollowing:
1. Add C1Menu to your page.
2. Declare the C1.Web.UI.Controls.C1Menu namespace at the top of your code behind file:
Visual BasicImports C1.Web.UI.Controls.C1Menu
C#Using C1.Web.UI.Controls.C1Menu;
3. Enter the following code in the Page_Load event handler:
Visual BasicProtected Sub Page_Load(ByVal sender As Object, ByVal e As EventArgs)
If Not Page.IsPostBack Then'create menu itemDim item1 As New C1MenuItem()item1.Text = "Item 1"'add item 1 to the main menu barC1Menu1.Items.Add(item1)
'set item 1 submenu widthitem1.NestedGroupWidth = 120
'create submenu itemDim item1child1 As New C1MenuItem()item1child1.Text = "Submenu Item 1"'add submenu item to menu Item 1item1.Items.Add(item1child1)
Dim item1child2 As New C1MenuItem()item1child2.Text = "Submenu Item 2"
item1.Items.Add(item1child2)
Dim item2 As New C1MenuItem()item2.Text = "Item 2"C1Menu1.Items.Add(item2)
Dim item3 As New C1MenuItem()item3.Text = "Item 3"C1Menu1.Items.Add(item3)
End IfEnd Sub
C#protected void Page_Load(object sender, EventArgs e) {

8/10/2019 Aspnet Menu
http://slidepdf.com/reader/full/aspnet-menu 81/91
77
if (!Page.IsPostBack) { //create menu item
C1MenuItem item1 = new C1MenuItem(); item1.Text = "Item 1"; //add item 1 to the main menu bar C1Menu1.Items.Add(item1);
//set item 1 submenu width item1.NestedGroupWidth = 120;
//create submenu item C1MenuItem item1child1 = new C1MenuItem();
item1child1.Text = "Submenu Item 1"; //add submenu item to menu Item 1 item1.Items.Add(item1child1);
C1MenuItem item1child2 = new C1MenuItem(); item1child2.Text = "Submenu Item 2"; item1.Items.Add(item1child2);
C1MenuItem item2 = new C1MenuItem(); item2.Text = "Item 2"; C1Menu1.Items.Add(item2);
C1MenuItem item3 = new C1MenuItem(); item3.Text = "Item 3";
C1Menu1.Items.Add(item3);
} }
Create a Group Menu
To create a grouped menu, complete the following:
1. Select Edit Menu from C1Menu’s Tasks menu to open the C1Menu Designer Form.
2. Select the menu item where you want to add a group menu. Click the Add Child button and select Group.

8/10/2019 Aspnet Menu
http://slidepdf.com/reader/full/aspnet-menu 82/91
78
3. Select Group and click the Add Child button. Select Header to add a child Header item to the group. Set
the Text property for the Header item to a meaningful name that categorizes the group items, for example"Developer Tools".
4. Select Group01 and click the Add Child button. Select Link Item. Repeat this 5 times so you have 5 linkitems in Group01.
5. Click OK to save and close the C1Menu Designer Form.To create link items within the submenu, but outside the group you just created complete the following:
1. Select the link item that is not in the group and click on the Add Child button.
2. Select Link Item from the Add Child button.
3. Run your project.
The link item appears outside of the group.

8/10/2019 Aspnet Menu
http://slidepdf.com/reader/full/aspnet-menu 83/91
79
4. Add a new group within the same menu item, Products. Select Produts and click Add Child| Group.Group02 is added below the first group we added.
5. Select the new group, Group02, and add a child header item. Set the Text property to "ContentAuthoring".
6. Select Group02 and insert child link items so they appear within the group.
7. Click OK to save and close the C1Menu Designer Form.
Create a Context Menu and Attach it to a Control
To create context menu and associate it with a control at design time
1. Add C1Menu control to your page.
2. Add a Textbox control to your page.
3. Right-click on C1Menu and select Edit Menu. The C1Menu Designer Form appears.
4. Add three link menu items and name them cut, copy, and paste.
5. Select C1Menu1 in the menu tree and set the ContextMenu property to True and the ContextElementIDto TextBox1.
Setting the ContextElementID to TextBox1 associates the C1Menu control with the TextBox control.
6. Run your project. Right-click on the TextBox control. The context menu appears.
Saving and Loading C1Menu as an XML FileYou can save your C1Menu control as an .xml file and then load it to another project or an existing one usingthe C1Menu Designer Form. The following topics show you how to first save and load the C1Menu control.

8/10/2019 Aspnet Menu
http://slidepdf.com/reader/full/aspnet-menu 84/91
80
Save C1Menu as an XML File
To save C1Menu as an XML using the designer, complete the following:
1. Create a C1Menu system using the C1Menu Designer Form.
2. Open the C1Menu Designer Form and select File | Save as XML.
The Save As dialog box appears.
3. Click the down arrow button in the Save in drop-down box to browse to a location where you would liketo save your C1Menu.
4. Click OK .
Your C1Menu is saved as an XML file so you can use it to load the menu into other Web sites.
Load C1Menu from an XML File
You can load menu items from an XML source using the designer or programmatically through theLoadLayout method.
To populate a C1Menu object from an XML source using the designer:
1. Create an ASP.NET AJAX-Enabled Web Site.
2. Add the C1Menu control to the page.
3. Right-click the C1Menu control and select MenuDesignerForm.
The MenuDesignerForm appears.
4. Select File | Load from XML.
5. Browse to the location of the save XML menu file.
6. Click Open and the C1Menu content items appear in the C1Menu Designer Form pane.
To load a C1Menu object from an XML source programmatically using the LoadLayout (string):

8/10/2019 Aspnet Menu
http://slidepdf.com/reader/full/aspnet-menu 85/91
81
1. Add C1Menu to the page.
2. Create an XML file for the C1Menu structure.
3. Call the LoadLayout method to load the items, passing in the path to the file:
Visual BasicC1Menu1.LoadLayout("c:\\Visual Studio
2005\\WebSites\\LoadLayoutEX\\App_Data\\C1Menu.xml")
C#C1Menu1.LoadLayout("c:\\Visual Studio2005\\WebSites\\LoadLayoutEX\\App_Data\\C1Menu.xml");
You can also populate C1MenuItems using an XMLDataSource component. For an example of how to bindC1Menu to an XMLDataSource see, Applying Different Data Binding Methods (page 21).
Adding Scrolling to MenusThe following tasks show you how to apply scrolling to various types of C1Menus.
Add Scrolling to Vertical Top Level Menu
To create a scrollable vertical top level menu at design time, complete the following:
1. Add the C1Menu control to your page.
2. Add 9 menu items to the C1Menu control.
3. Open the C1Menu Designer Form and expand the ScrollSettings located in the properties window.
4. Set the ScrollMode to buttons, ScrollContentHeight to 100 pixels, and ScrollOrientation to vertical.
5. Set the Orientation to "Vertical".
6. Click OK to close the designer.
7. Run your project and click on the down arrow button to scroll down the menu items.
Add Scrolling to Horizontal Top Level Menu
To create a scrollable horizontal top level menu at design time, complete the following:
1. Add the C1Menu control to your page.
2. Add 9 menu items to the C1Menu control
3. Open the C1Menu Designer Form and expand the ScrollSettings located in the properties window.
4. Set the ScrollMode to buttons, ScrollContentWidth to 500 pixels, and ScrollOrientation to horizontal.
5. Click OK to close the designer.

8/10/2019 Aspnet Menu
http://slidepdf.com/reader/full/aspnet-menu 86/91
82
6. Run your project and click on the down arrow button to scroll down the menu items.
Add Scrolling to Vertical Sub Menu
To add scrolling to sub menu items at design time, complete the following:
1. Add the C1Menu control to your page.
2. Add several sub menu items to the C1Menu control.
3. Select Edit Menu from the C1Menu Tasks menu to open the C1Menu Designer Form.
4. Select the submenu item in the treeview of the designer.
5. Expand the ScrollSettings in the properties window of the C1Menu Designer Form.
6. Set the ScrollMode to buttons, ScrollContentWidth to 100 pixels, and ScrollOrientation to vertical.
7. Click OK to close the designer.
8. Run your project and click on the down arrow button to scroll down the menu items.

8/10/2019 Aspnet Menu
http://slidepdf.com/reader/full/aspnet-menu 87/91
83
Add Scrolling to Vertical Group
1. Add the C1Menu control to your page.
2. Create a Group menu. For more information see, Create a Group Menu (page 77).
3. In the C1Menu Designer Form, select the Group you wish to add the scrolling to.
4. Scroll down to the ScrollSettings in the Properties pane.
5. Expand the ScrollSettingsand set its ScrollMode property to "ButtonsHover".
This will add one or two buttons depending on the setting for the ScrollButtonAlign property.

8/10/2019 Aspnet Menu
http://slidepdf.com/reader/full/aspnet-menu 88/91
84
6. Set the ScrollOrientation to "Vertical" since in this example we have a vertical group so we will bescrolling vertically.
7. Set the ScrollContentHeight to "100px".
8. Click OK to save the changes you made in the C1Menu control and to close the C1Menu Designer Form.
9. Run your project.
Click on the up arrow button to scroll up the menu items or the down arrow button to scroll down themenu items.
Creating a Click Event for a Menu ItemTo create a click event for a menu item, complete the following:
1. Add C1Menu control to your page.
2. Add two menu link items using the C1Menu Designer Form. For more information on adding menuitems using the C1Menu Designer Form see, Working with the C1Menu Designer Form (page 28).
3. Add a Label control to your page.
4. Add the following code to the Page_Load event:
Visual BasicProtected Sub C1Menu1_ItemClick(ByVal sender As Object, ByVal e AsC1.Web.UI.Controls.C1Menu.C1MenuEventArgs) Handles C1Menu1.ItemClick C1.Web.UI.Controls.C1Menu.C1MenuItem itemclicked = e.Item
Label1.Text = "You selected " + itemclicked.TextEnd Sub
C#
protected void C1Menu1_ItemClick(object sender,C1.Web.UI.Controls.C1Menu.C1MenuEventArgs e) { C1.Web.UI.Controls.C1Menu.C1MenuItem itemclicked = e.Item;
Label1.Text = "You selected " + itemclicked.Text; }
5. Run the project and the menu item looks like the following:

8/10/2019 Aspnet Menu
http://slidepdf.com/reader/full/aspnet-menu 89/91
85
6. Click on the first link item.
The C1Menu1_ItemClick event fires and adds the text to the label.
Creating a Custom Visual StyleTo create a custom visual style for the C1Menu control based on the Arctic visual style, complete thefollowing:
1. Copy the theme folder C:\Program Files\ComponentOne\Studio for
ASP.NET\C1WebUI\VisualStyles to a new folder in your Visual Studio project.~/VisualStyles/ArcticFoxNew/C1Menu
2. Open the styles.css file inside the new folder, rename all the classes name to make sure they end with thenew visual style name "ArcticFoxNew".
3. Replace all instances of _ArcticFox with _ArcticFoxNew.
Suppose the original class name is .C1Menu_ArcticFox, then rename it to .C1Menu_ArcticFoxNew.
4. Save the modified .css file.
Note: Make sure the read-only attribute is unchecked for the styles.css file.
5. Save and close your Visual Studio project.
6. Reopen your Visual Studio project.
7. Set the VisualStylePath to" ~/VisualStyles".

8/10/2019 Aspnet Menu
http://slidepdf.com/reader/full/aspnet-menu 90/91
86
8. Set UseEmbeddedVisualStyles to "False".
9. Set the VisualStyle to the new external custom theme, "ArcticFoxNew".
10. Now you can open the new styles.css file and edit the correspondent CSS classes. In this example, wemodify the background colors for the main menu and submenu items.
11. Open the new styles.css file and locate the selector name, .C1Menu_ArcticFoxNew .C1Link
.C1TextNode for the text in the link menu item types. Replace the color: #333333 with thecolor:#330066. This will change the menu item’s text..C1Menu_ArcticFoxNew .C1Link .C1TextNode{color:#330066;}
12. Locate the .C1Menu_ArcticFoxNew-C1Horizontal selector and set the background color to #CCCCFFfor the C1Menu control. This will change the container’s background color for the C1Menu control..C1Menu_ArcticFoxNew-C1Horizontal {display: block;padding: 0;
margin: 0;background: #C7C7C7 url(Images/menu-horizontal.png) repeat-x 0 -120px;border:solid 1px #999999;width:100%;/* min-height:32px; */ background: #CCCCFF;}
13. Set the background color for the hover state of the link item in the C1Menu control to #CC99FF This willchange the background color when you hover over a link item in the C1Menu control..C1Menu_ArcticFoxNew .C1Active,.C1Menu_ArcticFoxNew .C1Hover,.C1Menu_ArcticFoxNew .C1Focus,.C1Menu_ArcticFoxNew .C1Opened
{display: block;background:#FDFDFD url(Images/menu-horizontal.png) repeat-x 0 -210px;text-decoration: none;background:#CC99FF;
}
14. Save and run your project.

8/10/2019 Aspnet Menu
http://slidepdf.com/reader/full/aspnet-menu 91/91