Embed Size (px)
DESCRIPTION
work meds
Citation preview

Export Manual - ASYCUDA version 4.2.1
ASYCUDA EXPORT MANUAL FOR DECLARATION
PROCESS
Version 4.2.1
EXPORTER MANUAL

e-SAD ASYCUDA Ver. 4.2.1 EXPORTERS MANUAL
Created By: IMU Department. Page 2
TABLE OF CONTENT
1. OVERVIEW ………………………………………………………………………. 3
1.1 THE BUSINESS PROBLEMS IT SOLVES ………………………………………………………………………. 3
1.2 THE BENEFITS OFFERED ………………………………………………………………………. 3
1.3 USER ACCESS LEVELS ………………………………………………………………………. 3
APPENDIX 1 –SAD ………………………………………………………………………. 4
APPENDIX 2 – C87 ENTRY ………………………………………………………………………. 7
2. GETTING STARTED ………………………………………………………………………. 8
3. HOME PAGE ……………………………………………………………………… 9
4 DOMUMENT LIBRARY ……………………………………………………………………… 12
5 GENERATION OF SAD DOCUMENT FOR EXPORT
……………………………………………………………………….
14
5.1 GETTING FAMILIAR WITH THE DROP DOWN MENUS AND ICONS
……………………………………………………...................
17
5.2 IMPORTANT FEATURES OF THE SAD ………………………………………………………………………. 20
5.3 ADDITIONAL FEATURES ……………………………………………………………………… 25
6 SUBMISSION OF SAD TO CUSTOMS ……………………………………………………………………… 30
7 CHANGES TO OBSERVE WHEN SAD IS SUBMITTED TO JCA
………………………………………………………………………..
34
8 MAKING AMENDMENT OR RE - POST ENTRY
.............................................................................
35
9 CHECK LIST FOR COMPLETING SAD
……………………………………………………………………… 36
10 APPENDIX 37
e-SAD ASYCUDA Ver. 4.2.1 EXPORTERS MANUAL
Created By: IMU Department. Page 3
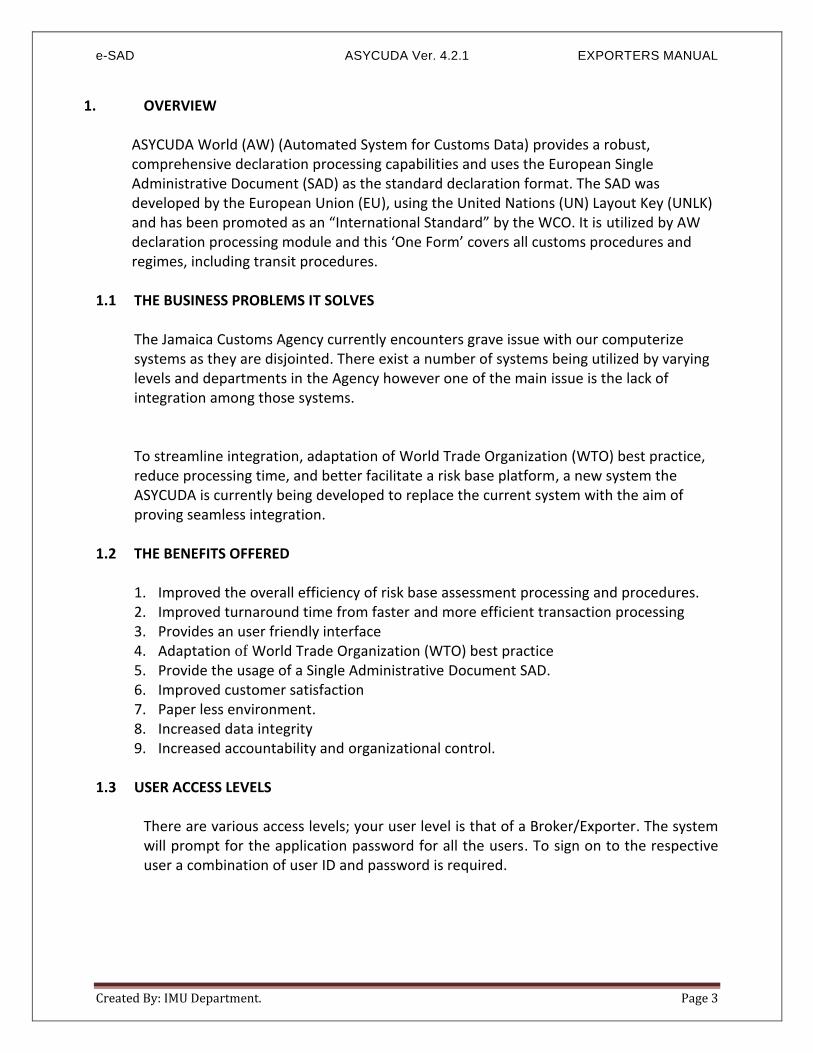
1. OVERVIEW
ASYCUDA World (AW) (Automated System for Customs Data) provides a robust, comprehensive declaration processing capabilities and uses the European Single Administrative Document (SAD) as the standard declaration format. The SAD was developed by the European Union (EU), using the United Nations (UN) Layout Key (UNLK) and has been promoted as an “International Standard” by the WCO. It is utilized by AW declaration processing module and this ‘One Form’ covers all customs procedures and regimes, including transit procedures.
1.1 THE BUSINESS PROBLEMS IT SOLVES
The Jamaica Customs Agency currently encounters grave issue with our computerize systems as they are disjointed. There exist a number of systems being utilized by varying levels and departments in the Agency however one of the main issue is the lack of integration among those systems.
To streamline integration, adaptation of World Trade Organization (WTO) best practice, reduce processing time, and better facilitate a risk base platform, a new system the ASYCUDA is currently being developed to replace the current system with the aim of proving seamless integration.
1.2 THE BENEFITS OFFERED
1. Improved the overall efficiency of risk base assessment processing and procedures. 2. Improved turnaround time from faster and more efficient transaction processing 3. Provides an user friendly interface 4. Adaptation of World Trade Organization (WTO) best practice 5. Provide the usage of a Single Administrative Document SAD. 6. Improved customer satisfaction 7. Paper less environment. 8. Increased data integrity 9. Increased accountability and organizational control.
1.3 USER ACCESS LEVELS
There are various access levels; your user level is that of a Broker/Exporter. The system will prompt for the application password for all the users. To sign on to the respective user a combination of user ID and password is required.
e-SAD ASYCUDA Ver. 4.2.1 EXPORTERS MANUAL
Created By: IMU Department. Page 4
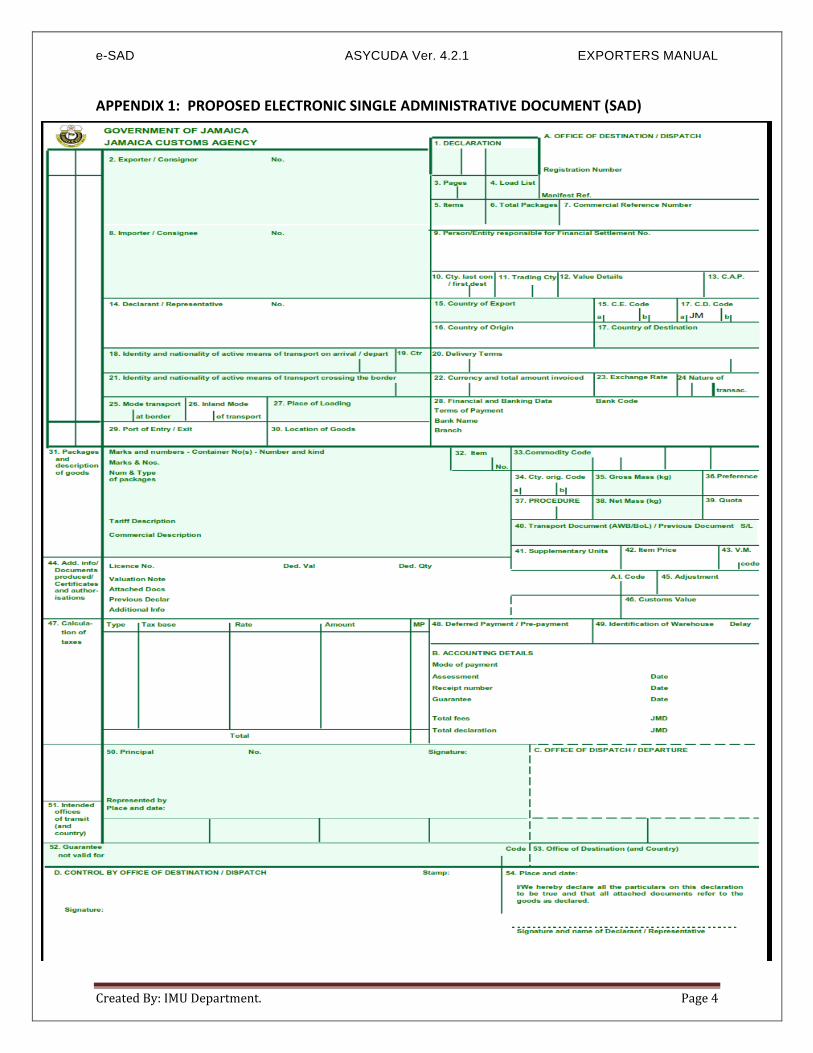
APPENDIX 1: PROPOSED ELECTRONIC SINGLE ADMINISTRATIVE DOCUMENT (SAD)

e-SAD ASYCUDA Ver. 4.2.1 EXPORTERS MANUAL
Created By: IMU Department. Page 5

e-SAD ASYCUDA Ver. 4.2.1 EXPORTERS MANUAL
Created By: IMU Department. Page 6
APPENDIX 2: JAMAICA CUSTOMS AGENCY - DECLARATION C87 FORM

e-SAD ASYCUDA Ver. 4.2.1 EXPORTERS MANUAL
Created By: IMU Department. Page 7

e-SAD ASYCUDA Ver. 4.2.1 EXPORTERS MANUAL
Created By: IMU Department. Page 8
2. GETTING STARTED
1. Open a web browser and type http://jets.jacustoms.gov.jm:8080/ to access the website
via the (Internet).
2. The ASYCUDA World web page will be shown below.
3. Click “Customs Environment” to enter user name and password.
4. The user will be prompt with a Security Warning Box. Select and tick “ I accept the risk
and want to run the application”
5. Click on Run

e-SAD ASYCUDA Ver. 4.2.1 EXPORTERS MANUAL
Created By: IMU Department. Page 9
6. Enter user “Login name and Password”, and then click on the icon to access the system.
7. To exit the system click on
3. HOME PAGE
8. After login to the system is completed, to exit the application click on “File” then select
“Exit” from the drop down menu or simply click the “X” on the top right hand corner of
the page.

e-SAD ASYCUDA Ver. 4.2.1 EXPORTERS MANUAL
Created By: IMU Department. Page 10
9. Document Library also allows for updating your user profiles. Access privilege depends on the user level given by the system Administrator. Here under “My Profile” you can change your password to encourage IT security.
Enter New and
Re-enter New
Password here

e-SAD ASYCUDA Ver. 4.2.1 EXPORTERS MANUAL
Created By: IMU Department. Page 11
10. From the File drop now menu you can access your ASYCUDA system mail box.

e-SAD ASYCUDA Ver. 4.2.1 EXPORTERS MANUAL
Created By: IMU Department. Page 12
4. DOCUMENT LIBRARY
11. The Document Library privileges are set based on the user’s access level on the system.
This is where most interactions will take place with the various documents used by different users.

e-SAD ASYCUDA Ver. 4.2.1 EXPORTERS MANUAL
Created By: IMU Department. Page 13
12. Exporters Document Library will contain the below because of your user access privileges

e-SAD ASYCUDA Ver. 4.2.1 EXPORTERS MANUAL
Created By: IMU Department. Page 14
5. GENERATION OF SAD DOCUMENT FOR EXPORT
13. To generate the SAD for Export go to Document Library. Click on icon beside the
Jamaica Flag icon
14. The system then displays the Goods Clearance Folder. In order to open the folder click
on the icon the system will then display the Declaration Folder.

e-SAD ASYCUDA Ver. 4.2.1 EXPORTERS MANUAL
Created By: IMU Department. Page 15
15. The Declaration Folder contains the Detailed Declaration and Previous Declaration
Folders and a Value Declaration document. Click on the icon beside the Detailed Declaration Folder to view the Detailed Declaration Document.
16. The Detailed Declaration is the SAD Document. In order to view same right click on Detailed Declaration Document. Click NEW from the menu.
Detailed
Declaration
document

e-SAD ASYCUDA Ver. 4.2.1 EXPORTERS MANUAL
Created By: IMU Department. Page 16
17. The SAD will be displayed (see Appendix 1).

e-SAD ASYCUDA Ver. 4.2.1 EXPORTERS MANUAL
Created By: IMU Department. Page 17
5.1 GETTING FAMILIAR WITH THE DROP DOWN MENUS AND ICONS
18. The File drop down menu displays the same icon as on the SAD document screen. The icons on the SAD document screen shows what each icons are for when a mouse over is done.
File dropdown
menu
Icons on SAD
document
screen

e-SAD ASYCUDA Ver. 4.2.1 EXPORTERS MANUAL
Created By: IMU Department. Page 18
19. See below for description of the purpose of the most frequently used icons. No ICON DESCRIPTION
a. Verify – allows for a system check of information entered on the
SAD. If there are any error the system will display the error(s)
b. Validate and Assess – This icon allows for submission to
Jamaica Customs Agency where validation and assessment of
the SAD takes place before it is received. If there are any
issue(s) the system will provide an error message.
c. Store – Allow for storage of the SAD to allow for further
modification if Exporters are not ready to submit declaration to
JCA
d. Delete – Allows for deletion of a SAD.
e Hard Copy- Prints the SAD
f Finder – Allows for searching.
g Add item – Use to adding multiple items to an Export
declaration.
20. The Finder provides for Exporters to select a criteria and enter a value for a search
then click the search icon.

e-SAD ASYCUDA Ver. 4.2.1 EXPORTERS MANUAL
Created By: IMU Department. Page 19
21. The Add Item when selected provide for additional pages on the Declaration. Each page
provides for maximum of three(3) items.
Second
page added
to the
Declaration

e-SAD ASYCUDA Ver. 4.2.1 EXPORTERS MANUAL
Created By: IMU Department. Page 20
5.2. GENERATION OF ESAD CONTINUES – IMPORTANT FEATURES OF THE ESAD
22. Box 1 – Declaration
Provides for various Customs regime for which Exporters select the applicable one to proceed.
Regime providing various
provisions for Exportation

e-SAD ASYCUDA Ver. 4.2.1 EXPORTERS MANUAL
Created By: IMU Department. Page 21
23. Box 18 – Identity and nationality of means of transport at departure
Exporters are required to enter the Exporting Vessel Name and Estimate Time of Departure
(ETD) to be found on the Dock Receipt in Box 18.
24. Box 37 - Procedure
Allow for selection of further Export procedures and additional Customs regime (such as the
provision for freecode). The dropdown menu is determined based on selectivity made in
Box 1 – Declaration.

e-SAD ASYCUDA Ver. 4.2.1 EXPORTERS MANUAL
Created By: IMU Department. Page 22
25. Box 33 – Commodity Code
Provision for entering the desired tariff code for an item, the box also provide for tariff look up.
a. Right click in the Commodity Code field.
b. Click on Find.
e-SAD ASYCUDA Ver. 4.2.1 EXPORTERS MANUAL
Created By: IMU Department. Page 23
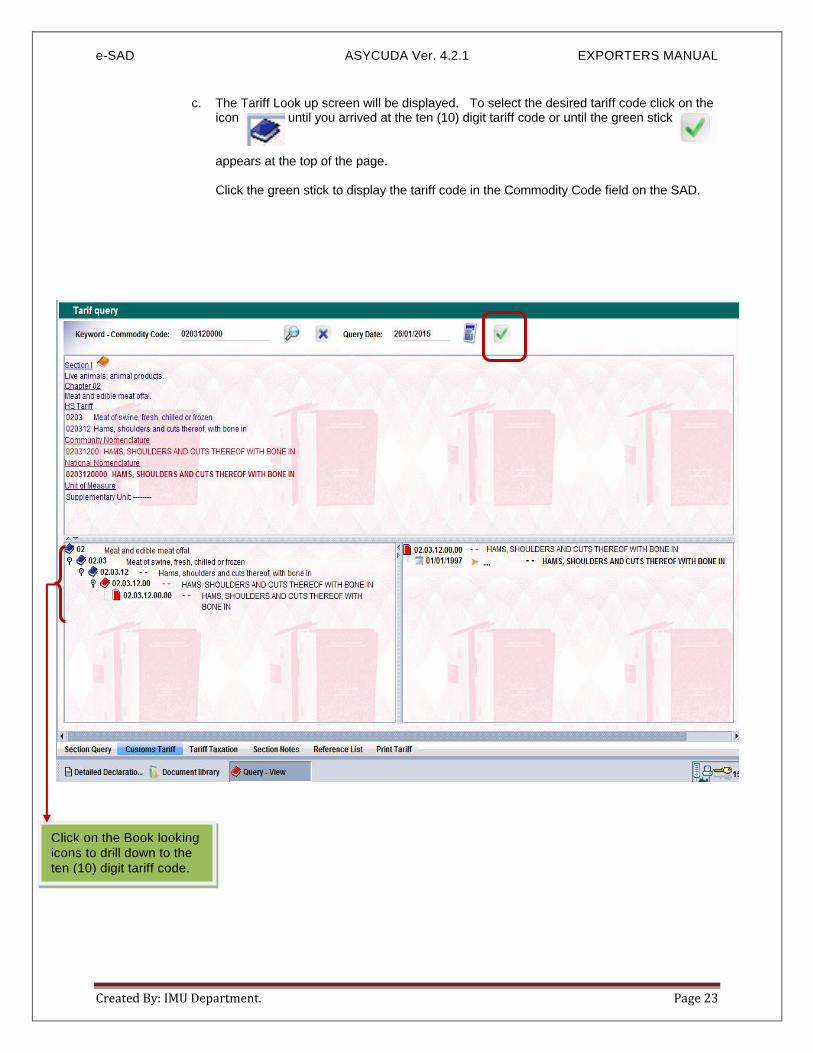
c. The Tariff Look up screen will be displayed. To select the desired tariff code click on the icon until you arrived at the ten (10) digit tariff code or until the green stick appears at the top of the page. Click the green stick to display the tariff code in the Commodity Code field on the SAD.
Click on the Book looking
icons to drill down to the
ten (10) digit tariff code.

e-SAD ASYCUDA Ver. 4.2.1 EXPORTERS MANUAL
Created By: IMU Department. Page 24
26. Box 22 – Currency & Total Amount Invoice
This field is populated by CIF amount entered on the Valuation Note (See 26.a below).

e-SAD ASYCUDA Ver. 4.2.1 EXPORTERS MANUAL
Created By: IMU Department. Page 25
5.3. GENERATION OF ESAD CONTINUES – ADDITIONAL FEATURES
27. The SAD provide for additional features such as :-
a. Valuation Note
b. Assessment Notice
c. Information Page
d. Attached Documents
e. Scan Documents
f. Containers
a. Valuation Note : i. Collects information related to the value of goods and the computation of the customs
value.
ii. This section is divided in two areas, one related to the entire invoice and another for each item segment declared.
iii. The Valuation Note provides a full breakdown of the value components such as external and internal freight, insurance, other costs, and deductions

e-SAD ASYCUDA Ver. 4.2.1 EXPORTERS MANUAL
Created By: IMU Department. Page 26
b. Assessment Notice:
i. Contains summary information about the duties, taxes and charges calculated and
assessed on the declaration.
ii. The assessment notice is compiled after all mandatory data is entered in the declaration.
iii. It shows the total amount of each tax that must be paid and the total sum that must
be paid for the declaration.
c. Information Page:
This is a blank page that may be used by the declarant to capture additional details, special requests, notes or any other information pertaining to the shipment. It may be used to give additional information or explanation concerning the declaration if there is insufficient space on the SAD for the desired details to be captured.

e-SAD ASYCUDA Ver. 4.2.1 EXPORTERS MANUAL
Created By: IMU Department. Page 27
d. Attached Documents:
i. This area lists all supporting documentation that must be presented with the
declaration and other ancillary documents which the declarant may wish to add.
All Exporters MUST attached a Commercial Invoice and a Dock Receipt to the
Export Declaration.
ii. Attach can be done for as many documents as required.
iii. Details of the documents attached are described including reference number, date of issuance and authority when necessary.
iv. Documents such as certificates, permits and licenses may be required for products
regulated by governmental trade agencies.
v. The documentary evidence of such commodity codes being approved for the importation or exportation of goods will be referenced in this section.
e-SAD ASYCUDA Ver. 4.2.1 EXPORTERS MANUAL
Created By: IMU Department. Page 28
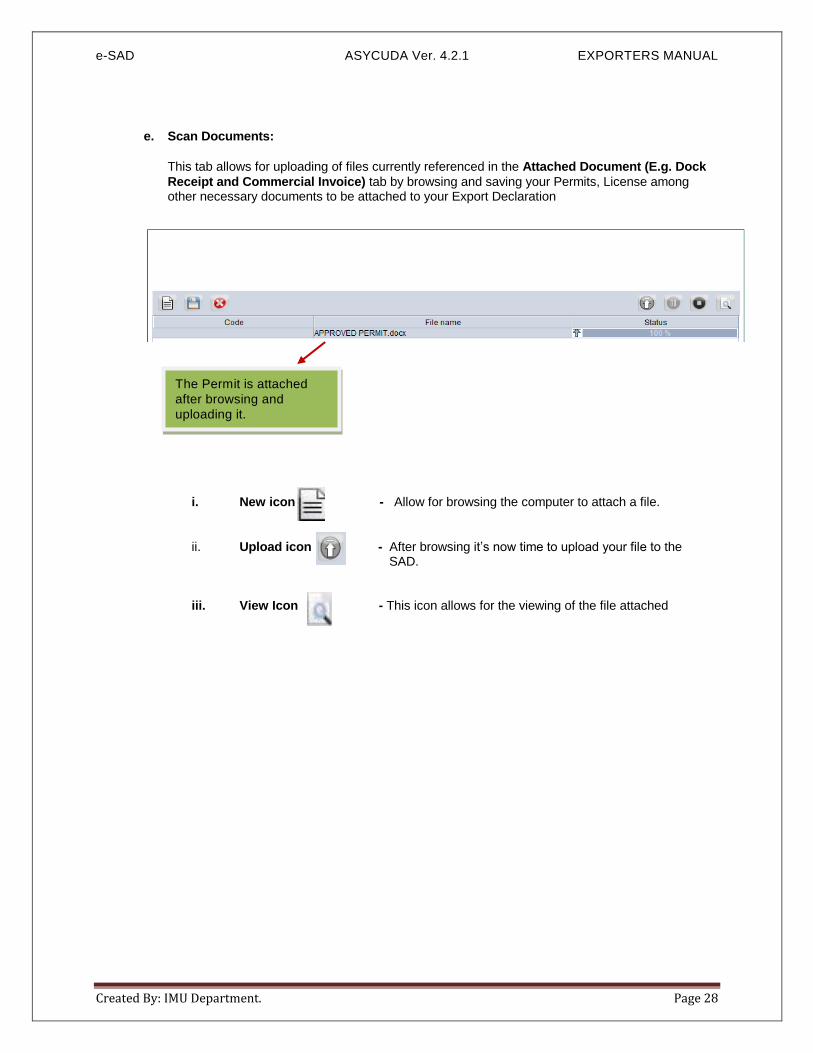
e. Scan Documents:
This tab allows for uploading of files currently referenced in the Attached Document (E.g. Dock
Receipt and Commercial Invoice) tab by browsing and saving your Permits, License among other necessary documents to be attached to your Export Declaration
i. New icon - Allow for browsing the computer to attach a file.
ii. Upload icon - After browsing it’s now time to upload your file to the SAD.
iii. View Icon - This icon allows for the viewing of the file attached
The Permit is attached
after browsing and
uploading it.

e-SAD ASYCUDA Ver. 4.2.1 EXPORTERS MANUAL
Created By: IMU Department. Page 29
f. Containers:
i. For containerised shipment, this is declared in Box 19 of the SAD by ticking the
check box. The container information can be completed on the “Containers” tab that appears at the bottom of the page.
ii. Containers can be added two ways see below.
iii. The layout allows for declaring all necessary details related to the boxes and the
goods inside the containers.
iv. The data required entails: container size-type, identification number, number of packages (piece count), gross mass, goods description, etc.
v. This section will hold as many containers as those manifested in the transport
document (bill of lading, airway bill).
Add Container Manually
– Allows for adding the
container details after
entering the container
information.
OPTION 1

e-SAD ASYCUDA Ver. 4.2.1 EXPORTERS MANUAL
Created By: IMU Department. Page 30
a. Right Click in the Item field
b. Click on Find or F3
OPTION 2
Right Click on Item
Field

e-SAD ASYCUDA Ver. 4.2.1 EXPORTERS MANUAL
Created By: IMU Department. Page 31
a. The below window will appear. Click on the icon to view list of container(s). if containers were
added before.
b. To add containers if none was added before right Click on the icon
Right Click on “
Please Add at
least one
container”
e-SAD ASYCUDA Ver. 4.2.1 EXPORTERS MANUAL
Created By: IMU Department. Page 32
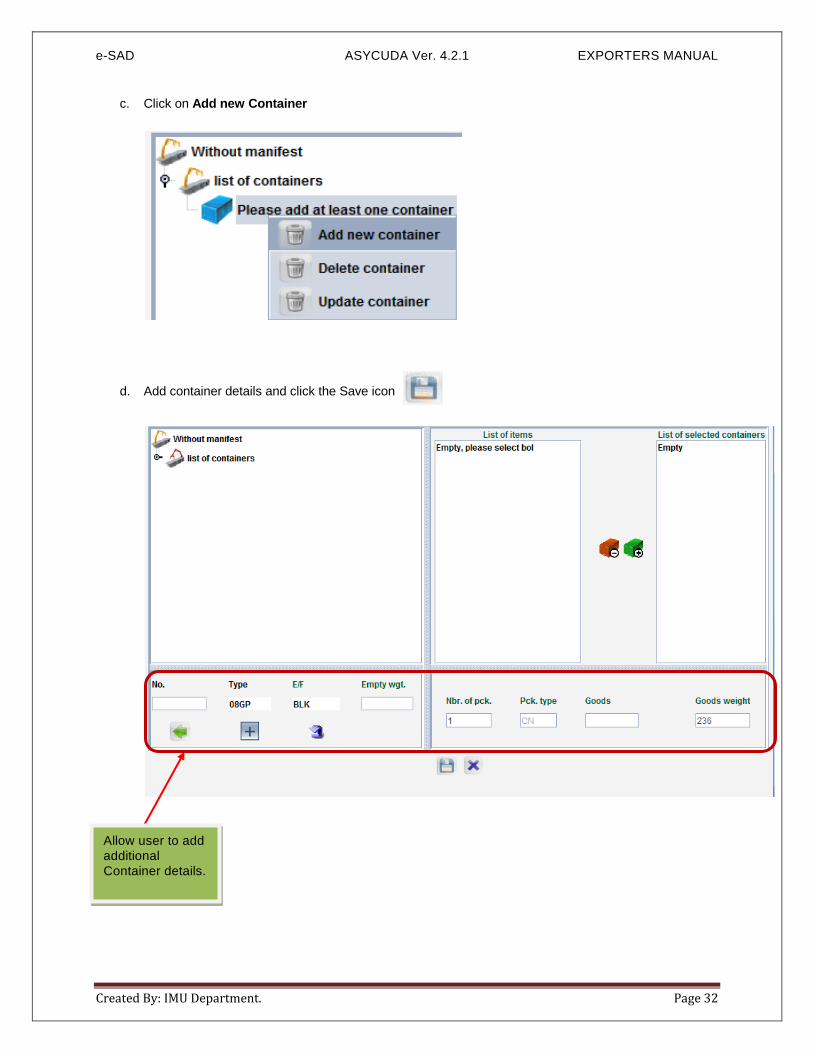
c. Click on Add new Container
d. Add container details and click the Save icon
Allow user to add
additional
Container details.

e-SAD ASYCUDA Ver. 4.2.1 EXPORTERS MANUAL
Created By: IMU Department. Page 33
e. After container is added click on the container number and the Item will be listed in the List of Items
Column.
f. Link Containers to Items - To link the containers to each item, click on the container number, select
the item in the List of Items and click on the icon . Click on the Save icon to save
g. Remove Containers from Items - To remove the container from an item, click on the container, then
click on the item in the List of Items, after which click on the container number in the List of selected
containers and click on the icon . Click on the Save icon to save
h. Container when added and linked to each items will be displayed on the container screen after clicking
the Save icon.
Click on
container
number.

e-SAD ASYCUDA Ver. 4.2.1 EXPORTERS MANUAL
Created By: IMU Department. Page 34
6. SUBMISSION OF ESAD TO CUSTOMS
28. Upon completion of:-
a. SAD
b. Valuation Notice
c. Attachment Documents
d. Scanned Documents
e. Containers (if necessary)
It is now time to submit SAD to JCA.
29. Click on the icon to verify that all data entered are accurate. If data entered are accurate the System will display the below message. Click on the blue stick to accept verification.
30. Submission to Customs should be done after all checks are made to ensure information entered
accurate. For submission to JCA:-
a. Click on the icon to validate and assess SAD.
b. The system will prompt you whether you want to assess declaration

e-SAD ASYCUDA Ver. 4.2.1 EXPORTERS MANUAL
Created By: IMU Department. Page 35
c. If the Blue stick is selected you have successfully submit your SAD to JCA. You can now
perform one of the below options:-
i. Print Information page
ii. Print SAD Assessment Notice
iii. Print SAD Attached Document
iv. Print SAD Document
v. E-Mail to (Enter email address)
d. If none of the above options are selected and the blue stick is selected the
system will send an email to your AW inbox. If you want to check it clicks the blue stick.
Upon validation and
assessment system
generate important
numbers:-
Declarant Reference no.
Customs Reference no.
Assessment Reference
no.

e-SAD ASYCUDA Ver. 4.2.1 EXPORTERS MANUAL
Created By: IMU Department. Page 36
e. To view the SAD from your inbox:-
i. Click on the Attachment Tab.
ii. Right click in the body of the email.
iii. Click on View from the drop down menu.
31. Viewing the SAD using another option.
a. Click on beside Jamaica flag on your Document Library.
b. Click on Goods Clearance Folder.
c. Click on Declaration Folder.
d. Click on Detailed Declaration Folder.
e. Right Click on Detailed Declaration document
f. Click on Find.

e-SAD ASYCUDA Ver. 4.2.1 EXPORTERS MANUAL
Created By: IMU Department. Page 37
32. The Detailed Declaration Finder will appear. It allows for different search options and a variety of
search criteria to be used (e.g. equal). To search using Registration Date:-
a. Click in the criteria field.
b. Select equal.
c. Click in the Value#1 field.
d. Select a Date.
e. Click on the Search icon
f. The below screen will appear, Right click of your desired declaration.
g. Click View.

e-SAD ASYCUDA Ver. 4.2.1 EXPORTERS MANUAL
Created By: IMU Department. Page 38
7. CHANGES TO OBSERVE WHEN SAD IS SUBMITTED TO JCA
33. The SAD now is assigned a Customs Reference Number (Equivalent to Export Entry Number )
34. The Items Administrations Selectivity tab is activated upon submission after the risk assessment process has taken place.
This section is designed to facilitate the intervention of all trade-related Government Agencies (OGA) with the respect to the goods being declared. This section will be used to indicated the level of intervention by the OGA, whether a shipment should be subject to documentary examination and/or physical inspection, in order to verify the lawful importation or exportation of goods. Additional, this section will allow OGAs to provide their decisions and results after they conduct their examination.

e-SAD ASYCUDA Ver. 4.2.1 EXPORTERS MANUAL
Created By: IMU Department. Page 39
35. The Detailed Declaration Finder display the Selectivity mode of the declaration whether it is:
a. Red Lane – Officer conducts physical examination and documentary review
b. Yellow-Lane- Officer conducts documentary review
c. Green Lane- Goods are OK to be Released
d. Blue Lane- Post Audit
8. MAKING AMENDMENT OR RE - POST ENTRY
36. After submitting declaration to JCA, if there are changes to be done to the declaration before customs
action Export documents, the below steps outlines the procedure.
a. Follow STEP 31 above.
b. Click on Retrieve
c. The Declaration will appear in an editable format, make the necessary change.
d. Click verify icon to check accuracy of declaration.
e. To Post Entry after corrections are made click on the icon
f. The system will ask “Do you really want to modify this assessed declaration”
g. Click the Blue stick

e-SAD ASYCUDA Ver. 4.2.1 EXPORTERS MANUAL
Created By: IMU Department. Page 40
9. CHECK LIST FOR COMPLETING ESAD
a. Place an (x) for completion of steps:-
Steps Activities Check
Step 1 Select from dropdown the location your declaration will be processed.
Step 2 Tab into Box 1 Select Declaration type. E.g. Exportation
Step 3 Tab and enter/select all the necessary data in order to fill out the Export details.
Step 4 When you reach Box 19 Container if shipment is containerized stick the check box
Step 5 The Container Tab will appear at the bottom of the screen. Click the tab and enter container details.
Step 6 Tab and enter details until you reach
Box 22 Total Amt. To fill in box 22 click on Val. Note Tab at the bottom of the screen.
Step 7 Tab and enter other relevant field until
you reach Box 33 Commodity Code. Right and Find if you do not know the desired tariff code.
Step 8 Tab and enter other relevant details. In
Box 37 Procedure Select the applicable Export Regime necessary.
Step 9 Select Other Attached Document Tab and reference your Documents to be attached
Step 10 Select Other Scan Documents Tab and upload the relevant Permits or License.
Step 11 When finish click on the Verify icon to ensure every data entered are accurate.
Step 12 If you just want to store your declaration
to make changes later Click on the Store icon.
Step 13 To submit to JCA after checks were completed click the Validate and Assess icon
Step 14 Check your email to view Declaration.

e-SAD ASYCUDA Ver. 4.2.1 EXPORTERS MANUAL
Created By: IMU Department. Page 41
APPENDIX
1. SAD Fields Description in Comparison to the C87 Fields