Embed Size (px)
Citation preview
www.fountain-tools.com [email protected]
1
Authorship .............................................................................................................................................................. 2
FTool.script overview............................................................................................................................................. 2
Installation: ............................................................................................................................................................. 2
Registration............................................................................................................................................................. 5
License .................................................................................................................................................................... 7
Fountain Builder (FB) Module ............................................................................................................................... 7
Main purposes .................................................................................................................................................... 7
Gravity & Deflectors Rollout ............................................................................................................................. 7
Fountain Builder Rollout .................................................................................................................................... 8
Rollout Floater Group....................................................................................................................................... 12
Editor Module ....................................................................................................................................................... 12
Reset Parameters (RP) Rollout ......................................................................................................................... 13
Parameters .................................................................................................................................................... 13
Flamingo ....................................................................................................................................................... 13
Particle Formation ........................................................................................................................................ 13
Particle Quantity ........................................................................................................................................... 13
Viewport Display.......................................................................................................................................... 13
Particle Motion ............................................................................................................................................. 13
Particle Timing ............................................................................................................................................. 14
Particle Size .................................................................................................................................................. 14
Standard Particles ......................................................................................................................................... 14
Other ............................................................................................................................................................. 14
Save/Load ..................................................................................................................................................... 14
Control Editor (CE) Rollout ............................................................................................................................. 14
Copy/Paste .................................................................................................................................................... 14
Emitter Start/Stop ......................................................................................................................................... 15
BirthRate/Speed/Obj_ID .............................................................................................................................. 15
Birth_Rate Editor.......................................................................................................................................... 16
Speed Editor ................................................................................................................................................. 16
Runner PRO Rollout......................................................................................................................................... 16
Parameters .................................................................................................................................................... 16
Additional info.............................................................................................................................................. 17
Fly Text (old version) ....................................................................................................................................... 18
Mass Color........................................................................................................................................................ 20
Rollout Floater .................................................................................................................................................. 20
Navigator .............................................................................................................................................................. 20
ObjectID Modifier ................................................................................................................................................ 21
How does the lighting animation works in FTools.script? ............................................................................... 21
Lighting animation principle ............................................................................................................................ 21
For a start... ................................................................................................................................................... 21
G-Buffer Group ............................................................................................................................................ 22
Illumination Group ....................................................................................................................................... 22
Material Group ............................................................................................................................................. 22

www.fountain-tools.com [email protected]
2
Authorship
FTool.script overview
FTools.script is a complex of scripts that can be used by 3D designers to facilitate animation and 3D imaging
of fountains.
FTools.script is intended for reducing the routine while providing more space and time for a creative work.
Integrated algorithms can be used to parametrically generate water scenes, to create animation for them, to
control valves and regulators of virtual nozzles, to animate lighting and for many other useful features.
Follow this link to view some work samples made with FTools.scripts:
http://www.fountain-tools.com/gallery
This utility can be used to animate music (musically synchronized), dynamic (unsynchronized) and static (all
jets are always on) fountains.
Besides, it is often used to create fast and easy rendering (just not animated image) thanks to the module for
parametric generation of water scenes.
Installation:
First, you need to download a demo version of the utility from the page:
http://www.fountain-tools.com/service/service-ftools-script-utility
You should be logged in as administrator in order to properly install, start and use the scripts. Moreover, 3DS
Max must be started under the administrator account.
There are two ways to install the tools: automatically or manually.
Automatic installation.
1. Download FTools.script on your PC by using the link above.
2. I've made a .zip package with setup file to avoid problems when downloading. Unzip the contents to any
folder of your choice. There will be a .mzp file inside – that is the installer for FTools.script.
3. Make sure you have full rights to write down to the <3dsmax_root>\scripts folder.
Author Druzhinin Ivan Alekseyevich
Location Krasnodar, Russia
Personal page www.dia-doca.ru
E-mail [email protected]
www.fountain-tools.com [email protected]
3
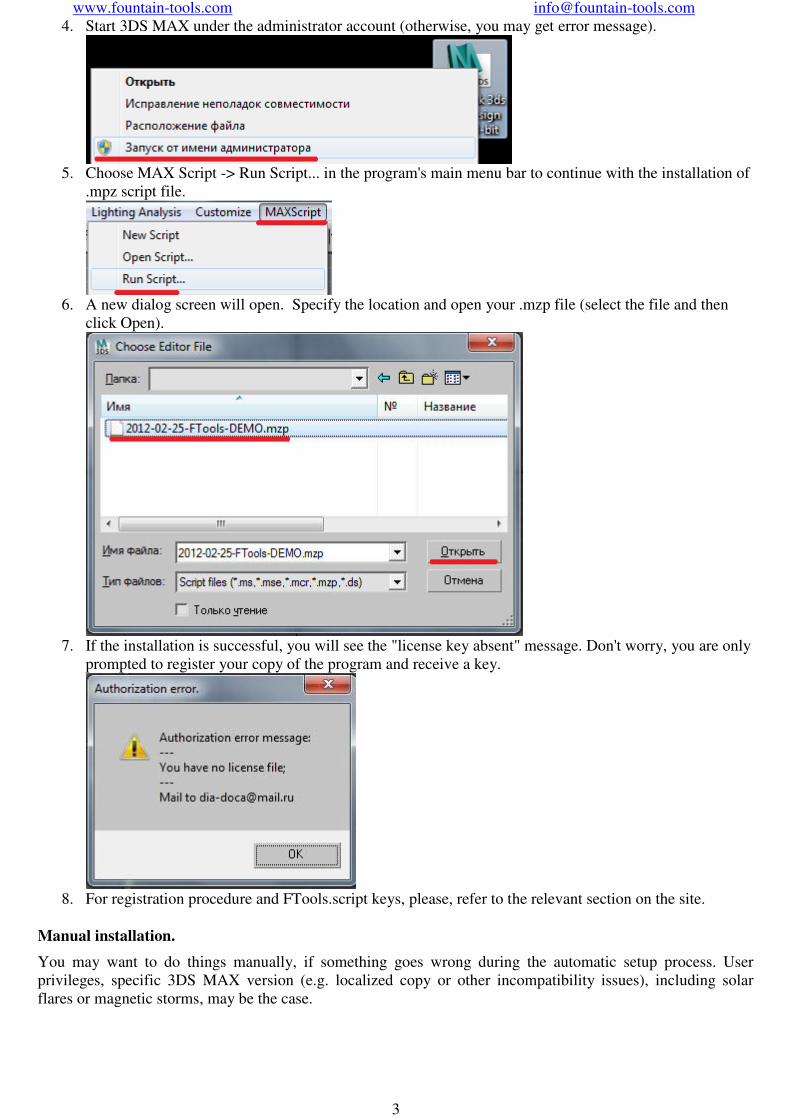
4. Start 3DS MAX under the administrator account (otherwise, you may get error message).
5. Choose MAX Script -> Run Script... in the program's main menu bar to continue with the installation of
.mpz script file.
6. A new dialog screen will open. Specify the location and open your .mzp file (select the file and then
click Open).
7. If the installation is successful, you will see the "license key absent" message. Don't worry, you are only
prompted to register your copy of the program and receive a key.
8. For registration procedure and FTools.script keys, please, refer to the relevant section on the site.
Manual installation.
You may want to do things manually, if something goes wrong during the automatic setup process. User
privileges, specific 3DS MAX version (e.g. localized copy or other incompatibility issues), including solar
flares or magnetic storms, may be the case.
www.fountain-tools.com [email protected]
4
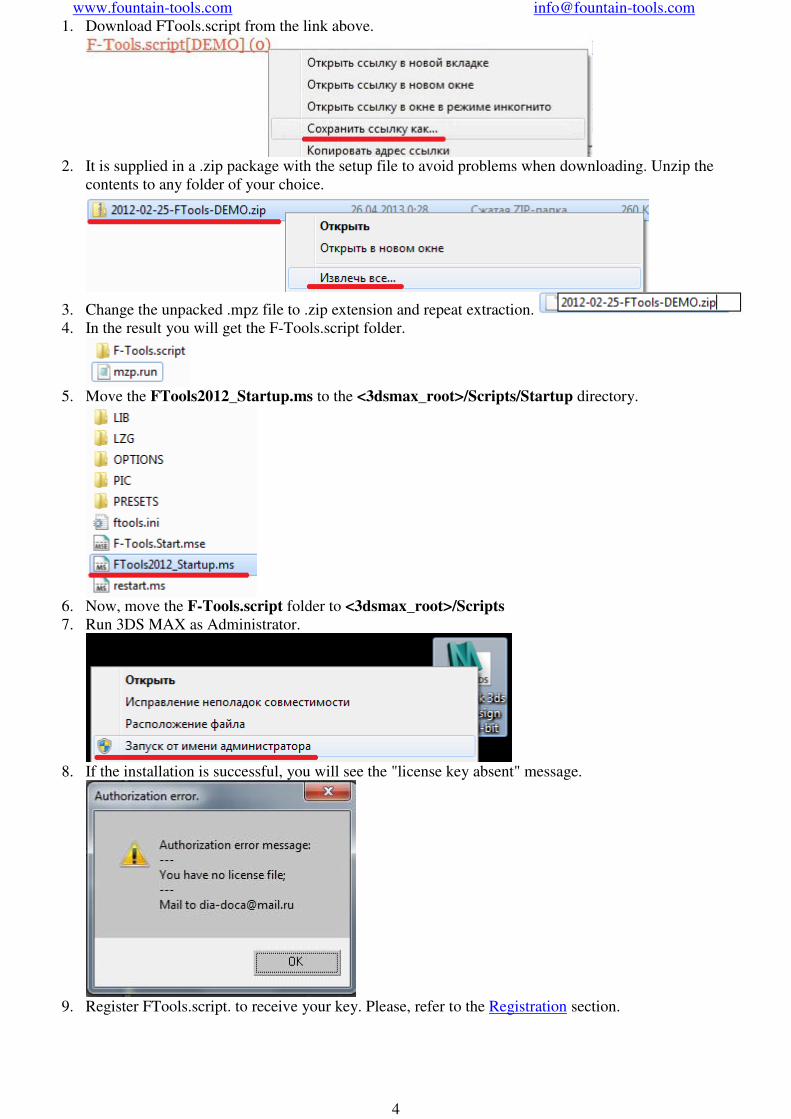
1. Download FTools.script from the link above.
2. It is supplied in a .zip package with the setup file to avoid problems when downloading. Unzip the
contents to any folder of your choice.
3. Change the unpacked .mpz file to .zip extension and repeat extraction.
4. In the result you will get the F-Tools.script folder.
5. Move the FTools2012_Startup.ms to the <3dsmax_root>/Scripts/Startup directory.
6. Now, move the F-Tools.script folder to <3dsmax_root>/Scripts
7. Run 3DS MAX as Administrator.
8. If the installation is successful, you will see the "license key absent" message.
9. Register FTools.script. to receive your key. Please, refer to the Registration section.
www.fountain-tools.com [email protected]
5
Registration
After you have downloaded and setup the program, you will need to obtain a key by registering your copy of
FTools.script.
Key is an encoded file which contains the data about your computer, start and end dates of your key.
Each key is unique and will work only on the specifically assigned computer (i.e. where the key was
registered).
Windows or 3DS MAX versions do not matter. So don't worry, if you need to re-install them later. Moreover, it
also means that you can use the same key on the separate computer but on several operation systems or 3DS
MAX applications at once.
Warning! PC system date must be correct or there may be problems with the key registration procedure.
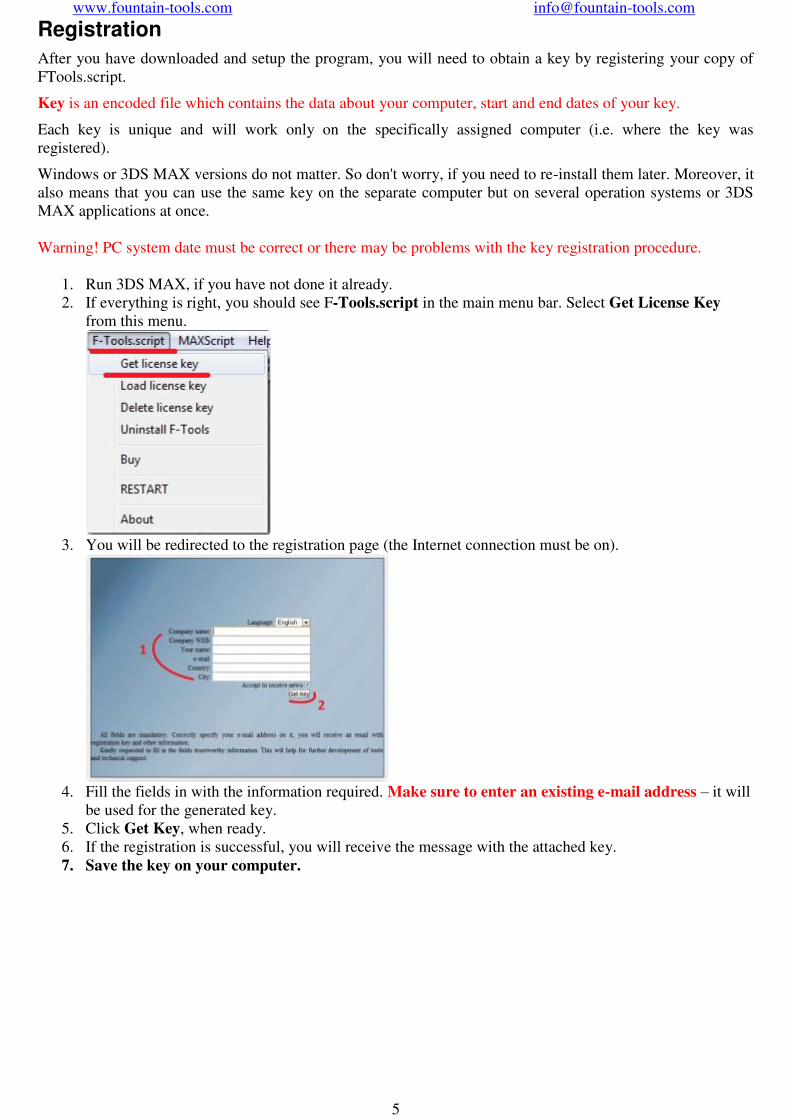
1. Run 3DS MAX, if you have not done it already.
2. If everything is right, you should see F-Tools.script in the main menu bar. Select Get License Key
from this menu.
3. You will be redirected to the registration page (the Internet connection must be on).
4. Fill the fields in with the information required. Make sure to enter an existing e-mail address – it will
be used for the generated key.
5. Click Get Key, when ready.
6. If the registration is successful, you will receive the message with the attached key.
7. Save the key on your computer.
www.fountain-tools.com [email protected]
6
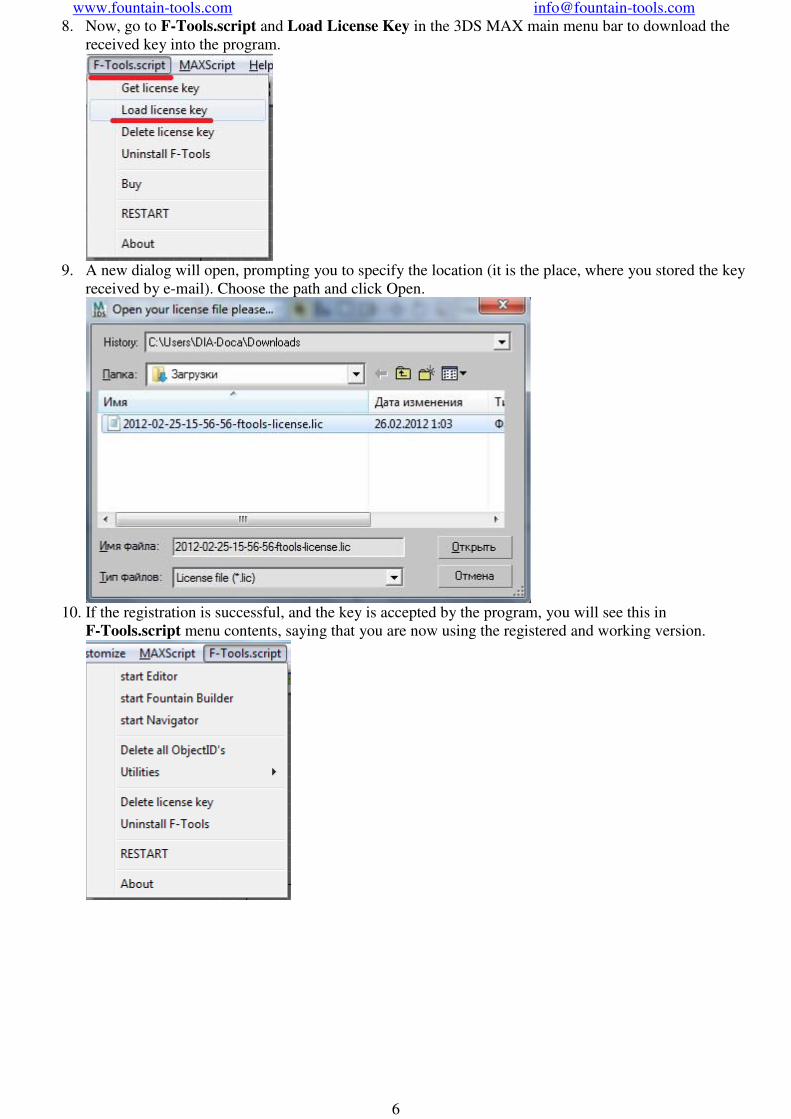
8. Now, go to F-Tools.script and Load License Key in the 3DS MAX main menu bar to download the
received key into the program.
9. A new dialog will open, prompting you to specify the location (it is the place, where you stored the key
received by e-mail). Choose the path and click Open.
10. If the registration is successful, and the key is accepted by the program, you will see this in
F-Tools.script menu contents, saying that you are now using the registered and working version.
www.fountain-tools.com [email protected]
7
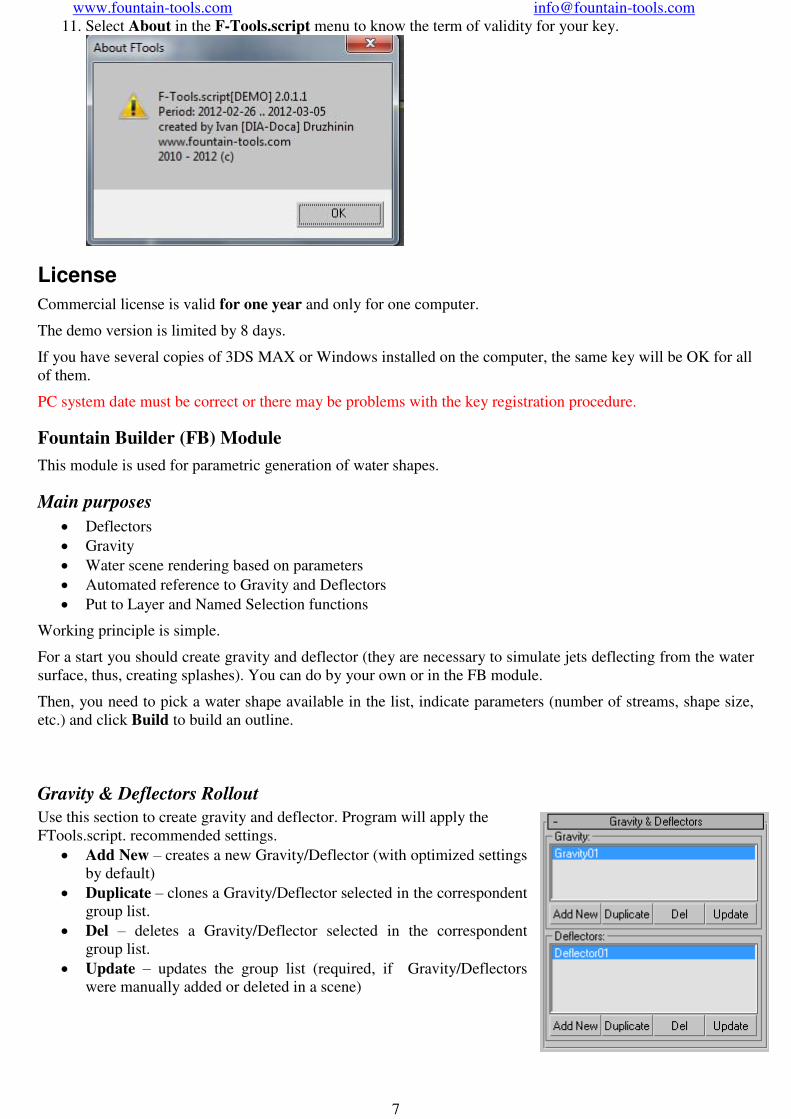
11. Select About in the F-Tools.script menu to know the term of validity for your key.
License
Commercial license is valid for one year and only for one computer.
The demo version is limited by 8 days.
If you have several copies of 3DS MAX or Windows installed on the computer, the same key will be OK for all
of them.
PC system date must be correct or there may be problems with the key registration procedure.
Fountain Builder (FB) Module
This module is used for parametric generation of water shapes.
Main purposes
Deflectors Gravity Water scene rendering based on parameters Automated reference to Gravity and Deflectors Put to Layer and Named Selection functions
Working principle is simple.
For a start you should create gravity and deflector (they are necessary to simulate jets deflecting from the water
surface, thus, creating splashes). You can do by your own or in the FB module.
Then, you need to pick a water shape available in the list, indicate parameters (number of streams, shape size,
etc.) and click Build to build an outline.
Gravity & Deflectors Rollout
Use this section to create gravity and deflector. Program will apply the
FTools.script. recommended settings. Add New – creates a new Gravity/Deflector (with optimized settings
by default) Duplicate – clones a Gravity/Deflector selected in the correspondent
group list. Del – deletes a Gravity/Deflector selected in the correspondent
group list. Update – updates the group list (required, if Gravity/Deflectors
were manually added or deleted in a scene)
www.fountain-tools.com [email protected]
8
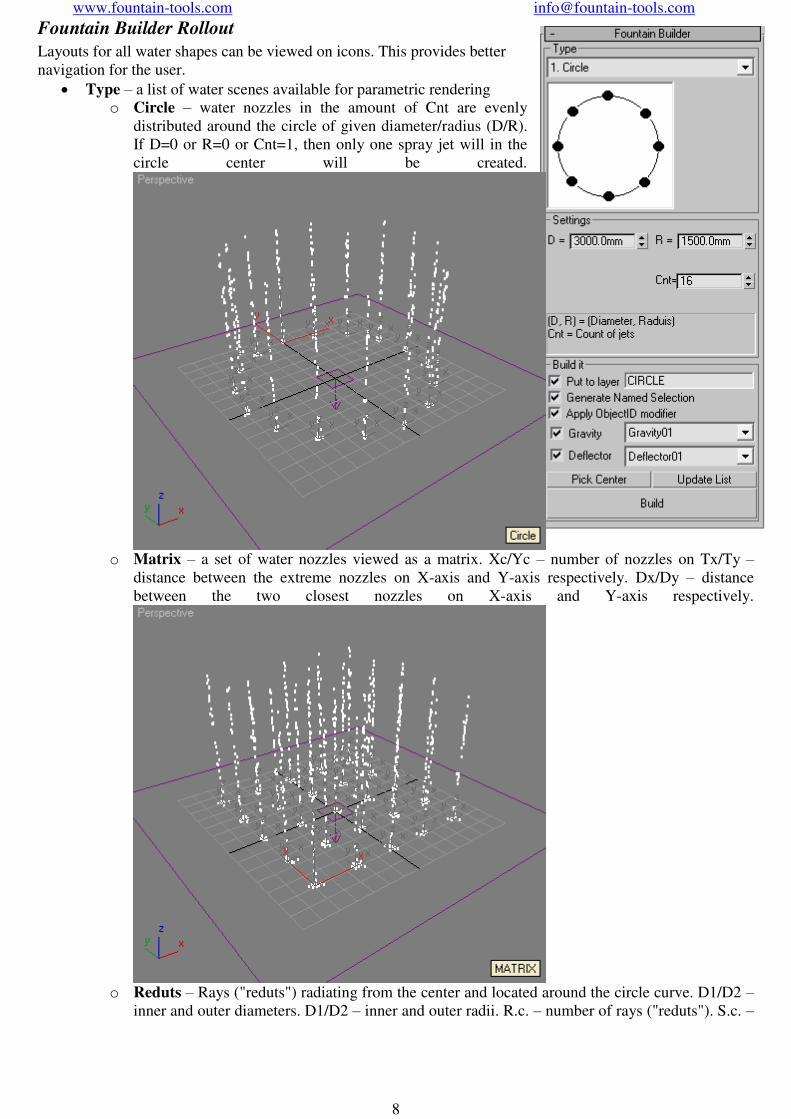
Fountain Builder Rollout
Layouts for all water shapes can be viewed on icons. This provides better
navigation for the user. Type – a list of water scenes available for parametric rendering
o Circle – water nozzles in the amount of Cnt are evenly
distributed around the circle of given diameter/radius (D/R).
If D=0 or R=0 or Cnt=1, then only one spray jet will in the
circle center will be created.
o Matrix – a set of water nozzles viewed as a matrix. Xc/Yc – number of nozzles on Tx/Ty –
distance between the extreme nozzles on X-axis and Y-axis respectively. Dx/Dy – distance
between the two closest nozzles on X-axis and Y-axis respectively.
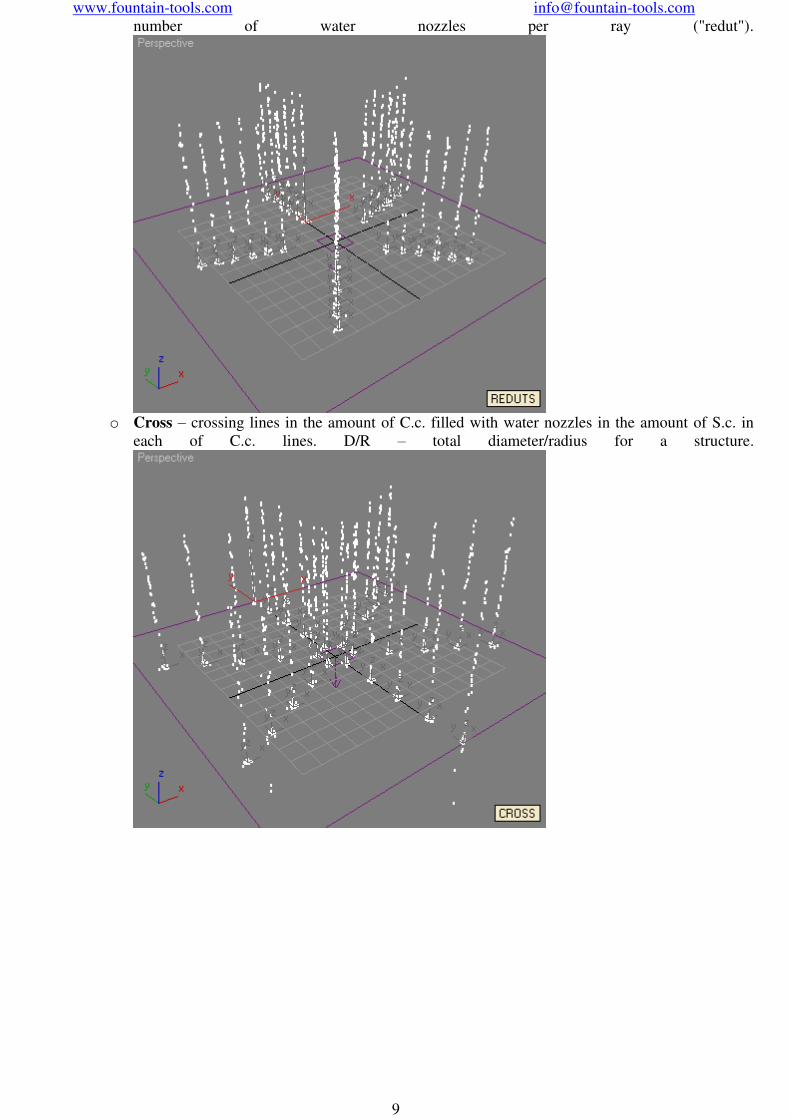
o Reduts – Rays ("reduts") radiating from the center and located around the circle curve. D1/D2 –
inner and outer diameters. D1/D2 – inner and outer radii. R.c. – number of rays ("reduts"). S.c. –
www.fountain-tools.com [email protected]
9
number of water nozzles per ray ("redut").
o Cross – crossing lines in the amount of C.c. filled with water nozzles in the amount of S.c. in
each of C.c. lines. D/R – total diameter/radius for a structure.
www.fountain-tools.com [email protected]
10
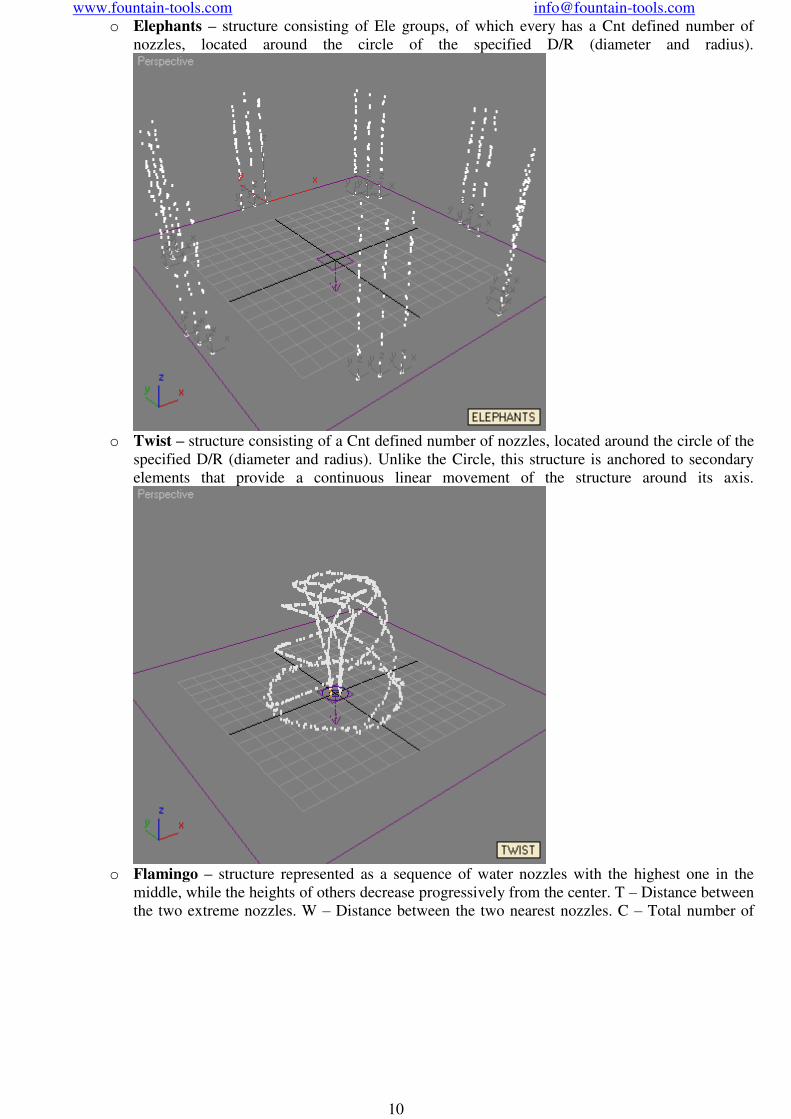
o Elephants – structure consisting of Ele groups, of which every has a Cnt defined number of
nozzles, located around the circle of the specified D/R (diameter and radius).
o Twist – structure consisting of a Cnt defined number of nozzles, located around the circle of the
specified D/R (diameter and radius). Unlike the Circle, this structure is anchored to secondary
elements that provide a continuous linear movement of the structure around its axis.
o Flamingo – structure represented as a sequence of water nozzles with the highest one in the
middle, while the heights of others decrease progressively from the center. T – Distance between
the two extreme nozzles. W – Distance between the two nearest nozzles. C – Total number of

www.fountain-tools.com [email protected]
11
nozzles in a structure.
Settings – individual parameters for each water scene type (Type). Parameters are described above. Build it – additional parameters that are common for all scene types.
o Put to layer – every new water scene will be saved to the list under the given name, if checked.
o Generate Named Selection – Named Selection will be generated under the name set in Put to
layer, if checked.
o Apply ObjectID modifier – applies a modifier of the same name as a scene that is needed for
lighting animation, if checked.
www.fountain-tools.com [email protected]
12
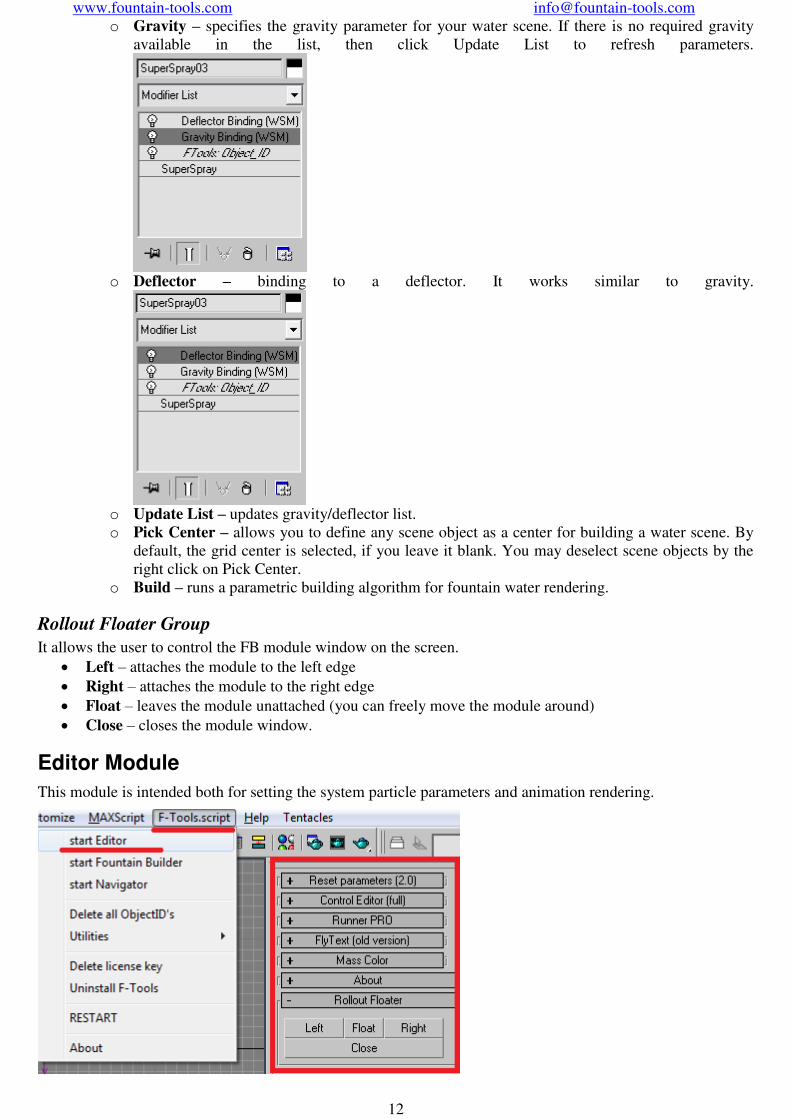
o Gravity – specifies the gravity parameter for your water scene. If there is no required gravity
available in the list, then click Update List to refresh parameters.
o Deflector – binding to a deflector. It works similar to gravity.
o Update List – updates gravity/deflector list.
o Pick Center – allows you to define any scene object as a center for building a water scene. By
default, the grid center is selected, if you leave it blank. You may deselect scene objects by the
right click on Pick Center.
o Build – runs a parametric building algorithm for fountain water rendering.
Rollout Floater Group
It allows the user to control the FB module window on the screen. Left – attaches the module to the left edge Right – attaches the module to the right edge Float – leaves the module unattached (you can freely move the module around) Close – closes the module window.
Editor Module
This module is intended both for setting the system particle parameters and animation rendering.
www.fountain-tools.com [email protected]
13
Reset Parameters (RP) Rollout
By default, 3DS MAX has a severe restriction – You cannot edit simultaneously the parameters of the multiply
selected SuperSpray particle systems. Reset Parameters rollout serves to remove these restrictions.
RP is required for changing the parameters of selected SuperSpray particle systems. Most of them just copy all
settings from standard SuperSpray particle systems. For more information, please refer to 3DS MAX help.
The utility works only with standard particle systems. We will use particle system meaning SuperSpray ones
hereafter.
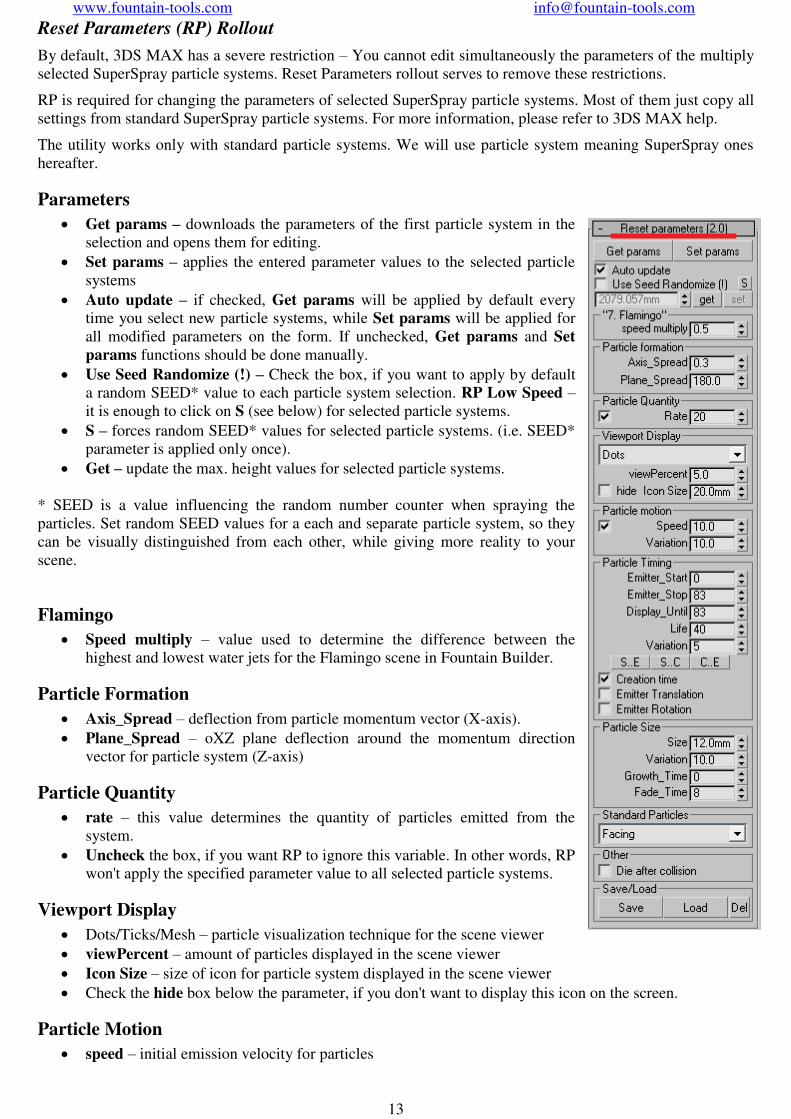
Parameters
Get params – downloads the parameters of the first particle system in the
selection and opens them for editing. Set params – applies the entered parameter values to the selected particle
systems Auto update – if checked, Get params will be applied by default every
time you select new particle systems, while Set params will be applied for
all modified parameters on the form. If unchecked, Get params and Set
params functions should be done manually. Use Seed Randomize (!) – Check the box, if you want to apply by default
a random SEED* value to each particle system selection. RP Low Speed – it is enough to click on S (see below) for selected particle systems. S – forces random SEED* values for selected particle systems. (i.e. SEED*
parameter is applied only once). Get – update the max. height values for selected particle systems.
* SEED is a value influencing the random number counter when spraying the
particles. Set random SEED values for a each and separate particle system, so they
can be visually distinguished from each other, while giving more reality to your
scene.
Flamingo
Speed multiply – value used to determine the difference between the
highest and lowest water jets for the Flamingo scene in Fountain Builder.
Particle Formation
Axis_Spread – deflection from particle momentum vector (X-axis). Plane_Spread – oXZ plane deflection around the momentum direction
vector for particle system (Z-axis)
Particle Quantity
rate – this value determines the quantity of particles emitted from the
system. Uncheck the box, if you want RP to ignore this variable. In other words, RP
won't apply the specified parameter value to all selected particle systems.
Viewport Display
Dots/Ticks/Mesh – particle visualization technique for the scene viewer viewPercent – amount of particles displayed in the scene viewer Icon Size – size of icon for particle system displayed in the scene viewer Check the hide box below the parameter, if you don't want to display this icon on the screen.
Particle Motion
speed – initial emission velocity for particles

www.fountain-tools.com [email protected]
14
Uncheck the box, if you want RP to ignore this variable. In other words, RP won't apply the specified
parameter value to all selected particle systems. Variation – a random value affecting the initial emission velocity for each separate particle.
Particle Timing
Emitter_Start – life start time for a particle system Emitter_Start – life end time for a particle system Display_Until – particle visualization end frame Life – a lifespan of the particles being generated Variation – limit of frames, which can be used to vary the set life parameter for each particle. [S..E] [S..C] [C..E] – sets start and end frames of particle lifespan. Respectively: [from the start to the
end animation frame] [form the start to the current animation frame] [from the current to the end
animation frame] Creation time – activates intermediate frames for particle generation Emitter translation – makes the particle motion smooth by adding more frames. Emitter Rotation – makes the particle rotation smoother
Particle Size
Size – specifies the particle size Variation – particle size and size value deviation ratio Grow_time – number of frames during which the particle will grow from 0 to the specified size. Fade_time – number of frames during which the particle will decrease from the specified size to 0
value.
Standard Particles
Use a drop-down list to select a visualization method at rendering.
Other
Die after collision – if checked, the particle will fade away after hitting the deflector to which it is
attached.
Save/Load
Save – saves parameters to your file Load – uploads parameters from your file. Del – deletes all previously saved files with parameters
Control Editor (CE) Rollout
It should be understood than animation, being generated in FTools.script, is based
on key frames. Key frames, in their turn, are used both to animate jet dynamics
and lighting.
There are two standard and most important SuperSpray parameters that are filled
with key frames for dynamics animation. This Birth_Rate and Speed parameters
are used to model the working valves of the real water nozzle and of the fountain
speed controller respectively.
It is essential to understand this difference.
For example, Birth_Rate should be always set to 1 for a smooth animation of the
dynamic fountain. Speed is the only value to vary here, i.e. we use just the speed
controller.
Music fountain is another example. Music fountains widely use the valves. Speed
controllers are not available with them. So the valves are use alone to generate a
"running wave" pattern (Birth_Rate alternates from 1 to 0). while the pumps are
operating statically (i.e. Speed is always 1).
Copy/Paste

www.fountain-tools.com [email protected]
15
Copy/Paste function allows to copy and then paste the animation keys for birth rate (B), particle speed (S) and
object id (O), which is used to create an animated lighting of fountain streams.
B – Copy_Birth_Rate_Keys on/off S – Copy_Speed_Keys on/off O – Copy_Object_ID_Keys on/off [COPY] – copy the keys according to the settings [PASTE] – insert the keys according to the settings […] – copy/paste settings
o Copy only first in selection – if it is known
that all selected particle systems have a
similar set of key frames, then you should
better check the box in order to simplify
(optimize) algorithm calculation.
o Copy only selected keys in selection – if
checked, you will copy just the key frames
within the selection as indicated. Otherwise,
all key frames will be copied.
o Copy/paste informer – if checked, you will
see a dialog with key frame statistics every
time you use COPY/PAST command.
o Absolute Pasting – check this box, if you
want the key frames to be pasted exactly on
the same points of the timescale.
o Relative Pasting (from current frame) – use this property to insert the key frames with some
shift, where the current frame will be the first in a row.
o Delete all old keys when pasting (override overwise) – indicates that all key frames must be
deleted before pasting.
o Deselect old keys (after pasting) – deselects the keys after PASTE is done.
o Select new keys (after pasting) – indicates that new key frames must be selected after PASTE
is done.
o Test key range (before pasting) – if checked, the program will inform the user about the new
frames overlapping the old ones.
o Show at the next – if checked, a dialog box with settings will pop up every time before
executing Copy/Paste.
Emitter Start/Stop
Use these settings to change particle system rendering in your scene. If properly used, you will benefit from
saving your machine resources for the computer will calculate the animation only in set range, neither will it
render the scene in the viewport. (parameters influence the way that particles are seen both in the viewport and
the renderer) < - copy the current frame number to the "start" field > - copy the current frame number to the "end" field S..E – "start" field = start frame, "end" field = end frame S..C – "start" field = start frame, "end" field = current frame S..E – "start" field = current frame, "end" field = end frame Reset – resets the start and end frame values for rendering of selected particle systems to those values as
they are specified in the "start" and "end" fields.
BirthRate/Speed/Obj_ID
BirthRate – if pressed, the action will be applied to birth rate keys (valve animation). Speed - if pressed, the action will be applied to speed kyes (i.e. speed controller animation). Obj_ID - if pressed, the action will be applied to Object_ID modifier keys (i.e. lighting animation). ClearAll – deletes all animation keys (for birth rate and/or speed and/or lighting animation) Cl.Range – deletes all animation keys within a specified range (for birth rate and/or speed and/or
lighting animation). Start and end range frames are taken correspondingly from the left and right
numeric field in "Emitter Start/Stop" group.
www.fountain-tools.com [email protected]
16
Reset – can be applied just to birth rate and/or speed. It deletes all key frames. If BirthRate is pressed
and held down, then a zero value birth rate key will be created before the scene initial frame. If Speed is
pressed and held down, then the scene initial frame will be preceded by a birth rate key of 1. Initially,
the idea was to reset all selected particle animations and set the initial state of the valve to OFF position.
There is sense to use it when both BirthRate and Speed are pressed and held down.
Birth_Rate Editor
It can be used to control birth rates for particles. Which is to say, it imitates the valve performance on the real
fountain. St – is an abbreviated form of "Step". In this mode the birth rate switches immediately in the key frame.
You should use this particular mode. Ln – is an abbreviated form of "Line". In this mode the birth rate changes smoothly from the previous
key frame value to a new one in the next frame. Which is to say, we have an example of linear
interpolation for values between the two frames. This mode is not commonly used. [0] – sets the value to zero [1] – sets the value to 1
Speed Editor
It can be used to monitor the speed controller of your fountain. In other words, it regulates the power of
fountain pumps.
You can create animation of fine switching between water scenes of your fountain.
This is a simple but very powerful tool for creating fountain animations. 0.2 – 20% of power 0.4 – 40% of power 0.6 – 60% of power 0.8 – 80% of power 0.9 – 90% of power Min – sets the power relatively to the left numeric input field Max – sets the power relatively to the right numeric input field Auto Birth_Rate – if checked, the program will set both speed and birth rate keys. If checked, the
buttons for key setup are placed in brackets >>>>[0]<<<< and >>>>[1]<<<<. This mode is
recommended to be turned off, if not used. Thus, you will save both your time and computer resources.
For example, if the pumps are off, we not only set the particle speed to 0 but also set birth rate for
particles to 0. In other words, the computer needs not to spend resources for crating particles with a zero
speed, because you will never see them on the screen. It is important to understand this moment. [0] – sets the key value to 0 [1] – sets the key value to 1
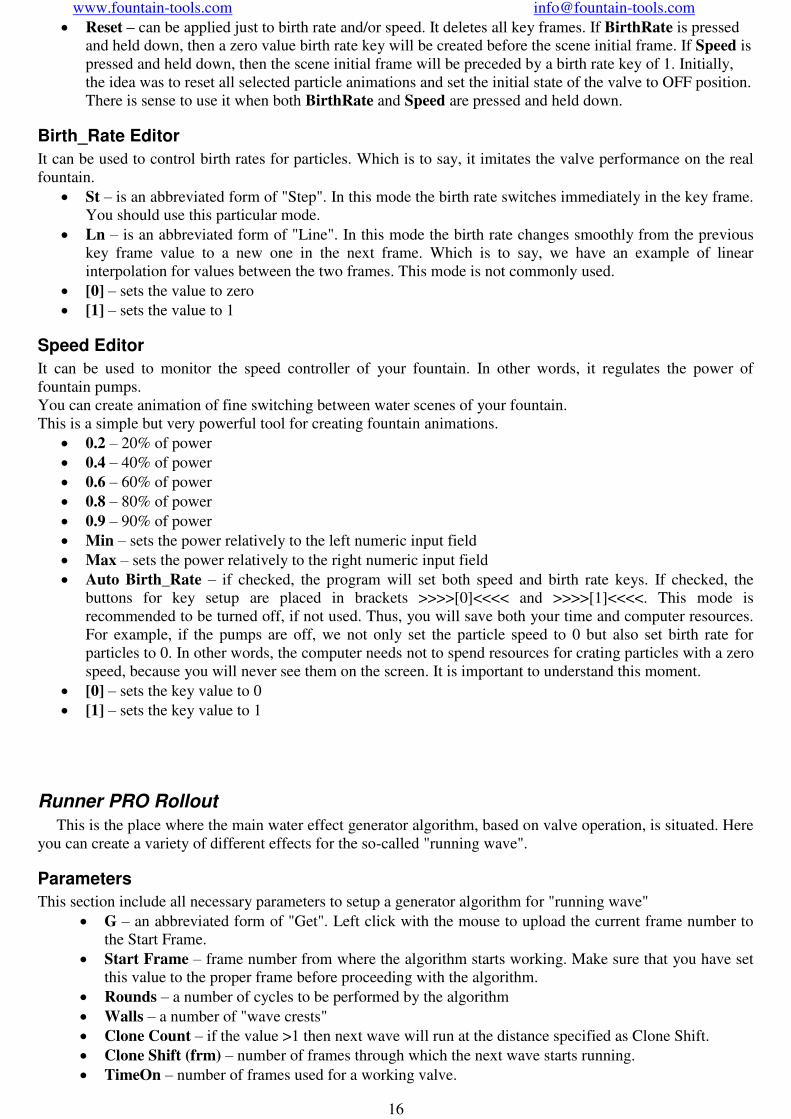
Runner PRO Rollout
This is the place where the main water effect generator algorithm, based on valve operation, is situated. Here
you can create a variety of different effects for the so-called "running wave".
Parameters
This section include all necessary parameters to setup a generator algorithm for "running wave" G – an abbreviated form of "Get". Left click with the mouse to upload the current frame number to
the Start Frame. Start Frame – frame number from where the algorithm starts working. Make sure that you have set
this value to the proper frame before proceeding with the algorithm. Rounds – a number of cycles to be performed by the algorithm Walls – a number of "wave crests" Clone Count – if the value >1 then next wave will run at the distance specified as Clone Shift. Clone Shift (frm) – number of frames through which the next wave starts running. TimeOn – number of frames used for a working valve.
www.fountain-tools.com [email protected]
17
TimeOff – number of frames used for valve closing (if low setting is used, the valve will close
immediately; otherwise the turn-off animation will be gradual). Uncheck the box, if you want the valves stay open. Runner Width – a wave step width. Which is to say, a number of
valves in a group (wave) to be opened simultaneously at every
following step. Active – number of "working" valves. It is used in pair with Passive
to achieve the effect when, first, a number of active nozzles are
working and then a number of passive nozzles. Passive – number of "turned-off" valves. Reverse – allows to reverse the algorithm in opposite direction Swap Mode – a mode of animation in which the even and odd
nozzles switch on and off alternatively.
o Swaps – number of full repetitions. Work of odd nozzles
followed by even ones is called a repetition.
o TimeOn – active time for a nozzle group
o TimeOff –passive time for a nozzle group (simply totaled
with TimeOn, without fading, if Use Speed Multiplier is
OFF)
o CrossFrame – number of frames in which the operation of
positive and negative nozzle groups is combined. Which is to
say, a number of frames, where they work simultaneously.
The value can be positive, zero or negative.
o Runner Width – a width (i.e. quantity) of nozzles in a group.
o Passive – a number of passive nozzles after each group of
nozzles.
o Use Safe Mode – reset the state of each nozzle group before
the first start (birth rate 0, start speed 1)
o Use Speed Multiplier – if checked, initial particle animation
speed keys will be activated. (for gradual animation) Use Safe Mode – for new users. If checked, the program will always create a zero frame (nozzle in
passive state) before any step of the algorithm. Use Speed Multiply – for advanced users. If checked, the program will use both the birth rate and
start speed frames for particles. It allows to achieve a more gradual and smooth animation. SpeedMltStart – start pressure in circuit pumps (the algorithm first frame) SpeedMltEnd – end pressure in circuit pumps (the algorithm final frame) Undo – press this button to discard the last change (repeats the standard Undo button) Run – start the algorithm Redo – returns the last undo action (repeats the standard Redo button) Run From Current Frame – starts the algorithm from the current frame (i.e Start Frame value will
be ignored) Delete All Keys And Reset – deletes all start speed animation and birth rate frames and sets a zero
frame in passive state. i.e. birth rate = 0, start speed = 1.
Additional info
The first and last frame numbers are displayed in these fields. First frame - the first frame number that was used during algorithm execution. Lst frame - the last frame number that was used during algorithm execution. GC – stands for "Go and Copy". Left click with the mouse to move the current frame to the selected
place (Go). Right click with the mouse to copy the selected frame to the clipboard (Copy).
www.fountain-tools.com [email protected]
18
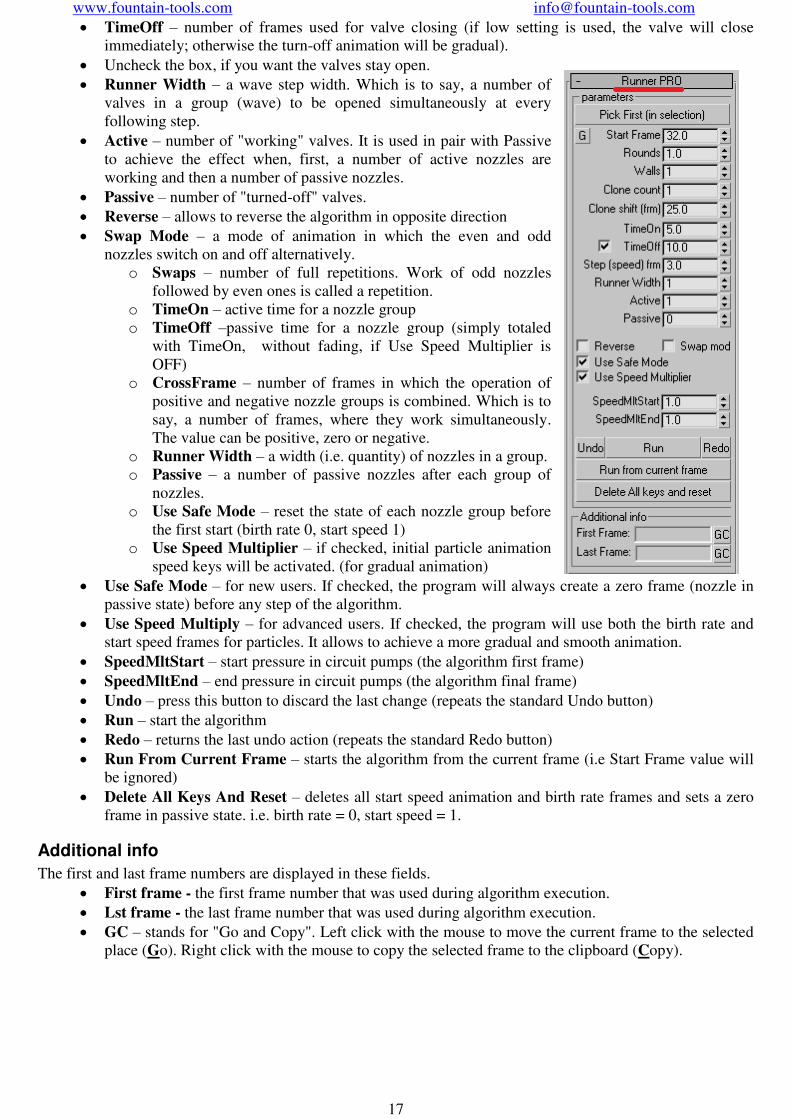
Fly Text (old version)
This algorithm is intended to generate a water scene of your fountain with an
individual control of each separate water spray nozzle. i.e. a separate adjustable
pump.
Such animation is usually characterized by a greater smoothness.
We don't need to go deep in details with this algorithm because it is just for testing
and will be replaced in later versions. However, it can help you achieve certain
results.
Switch to mode and then to .This is the first thing you
should do. Otherwise, the algorithm won't work (unfortunately, this is a known
error, which will be patched in next version).
Select a chain of nozzles to work with before you start animation rendering. Each
water spray nozzle is processed in the order it was added to your selection.
I give a few examples for basic parameters below. Let's review just the first two
modes. They are used to imitate a wave running by moving the nozzles up and
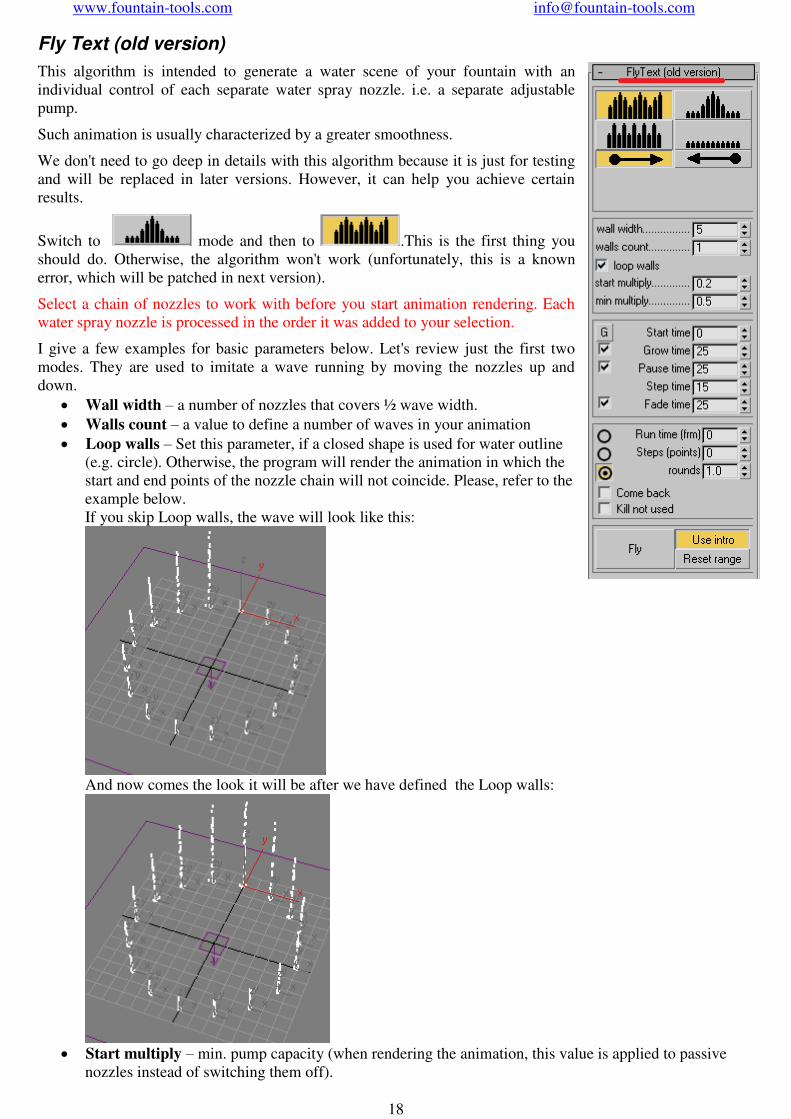
down. Wall width – a number of nozzles that covers ½ wave width. Walls count – a value to define a number of waves in your animation Loop walls – Set this parameter, if a closed shape is used for water outline
(e.g. circle). Otherwise, the program will render the animation in which the
start and end points of the nozzle chain will not coincide. Please, refer to the
example below.
If you skip Loop walls, the wave will look like this:
And now comes the look it will be after we have defined the Loop walls:
Start multiply – min. pump capacity (when rendering the animation, this value is applied to passive
nozzles instead of switching them off).

www.fountain-tools.com [email protected]
19
Min multiply – pump capacity at the moment of imitating the wave trough. G – uploads the current frame number in Start Time field Start time – start frame for animation rendering Grow time – time interval (in animation frames) during which the water scene is starting to grow
(appear). Pause time – time interval (in animation frames) during which the water scene becomes "frozen" before
it starts moving (animation). Step time – time interval (in animation frames) during which the movement shifts from one nozzle to
another. That is, the bigger is the value, the smoother/longer animation being generated will be. On the
contrary, the smaller it is, the faster animation should appear. Fade time – time interval (in animation fames) during which the water scene is fading away (all water
jets will decrease till the ground level) after the animation is complete. Rounds – number of full circles per wave in the rendered animation. Came back – if checked, the wave, after reaching the end of chain, will go back in opposite direction. Fly – starts the algorithm to generate the animation.
www.fountain-tools.com [email protected]
20
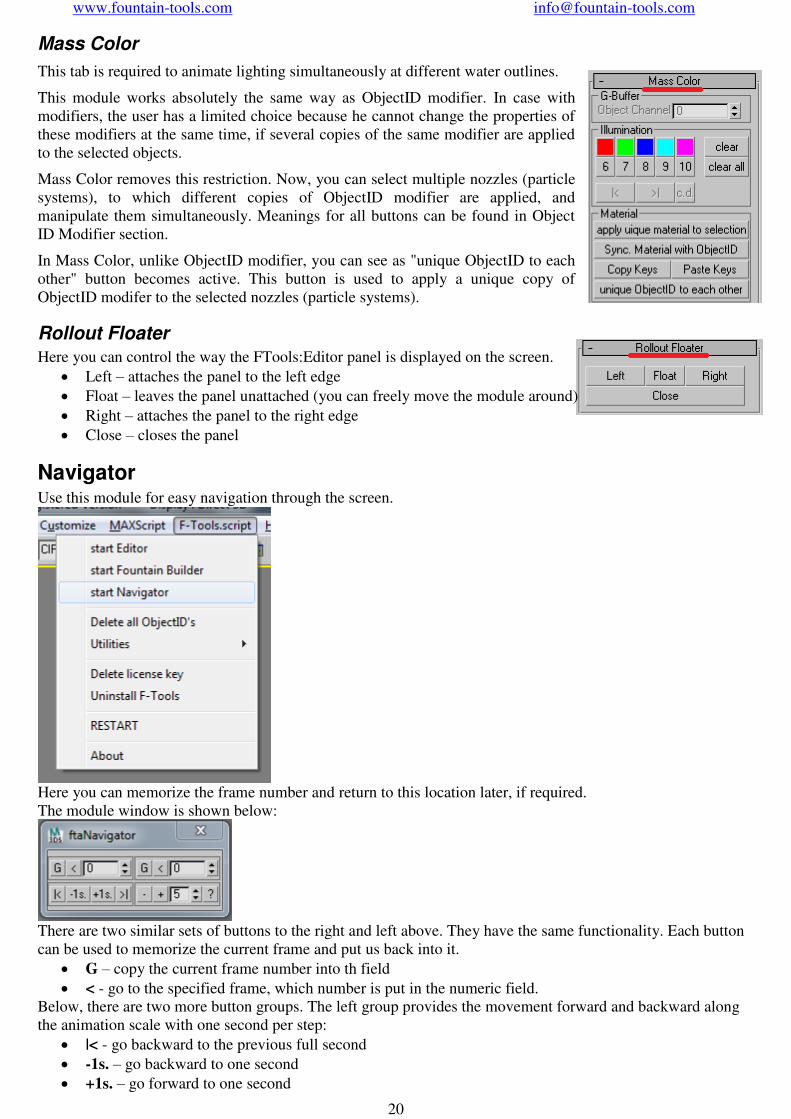
Mass Color
This tab is required to animate lighting simultaneously at different water outlines.
This module works absolutely the same way as ObjectID modifier. In case with
modifiers, the user has a limited choice because he cannot change the properties of
these modifiers at the same time, if several copies of the same modifier are applied
to the selected objects.
Mass Color removes this restriction. Now, you can select multiple nozzles (particle
systems), to which different copies of ObjectID modifier are applied, and
manipulate them simultaneously. Meanings for all buttons can be found in Object
ID Modifier section.
In Mass Color, unlike ObjectID modifier, you can see as "unique ObjectID to each
other" button becomes active. This button is used to apply a unique copy of
ObjectID modifer to the selected nozzles (particle systems).
Rollout Floater
Here you can control the way the FTools:Editor panel is displayed on the screen. Left – attaches the panel to the left edge Float – leaves the panel unattached (you can freely move the module around) Right – attaches the panel to the right edge Close – closes the panel
Navigator Use this module for easy navigation through the screen.
Here you can memorize the frame number and return to this location later, if required.
The module window is shown below:
There are two similar sets of buttons to the right and left above. They have the same functionality. Each button
can be used to memorize the current frame and put us back into it. G – copy the current frame number into th field < - go to the specified frame, which number is put in the numeric field.
Below, there are two more button groups. The left group provides the movement forward and backward along
the animation scale with one second per step: |< - go backward to the previous full second -1s. – go backward to one second +1s. – go forward to one second
www.fountain-tools.com [email protected]
21
>| - go forward to the next full second
The button group to the right also helps navigating through the timescale. You should indicate the number of
frames to go through in the text field. - - go backward through the indicated number of frames + - go forward through the indicated number of frames ? – copies the current frame number to the clipboard
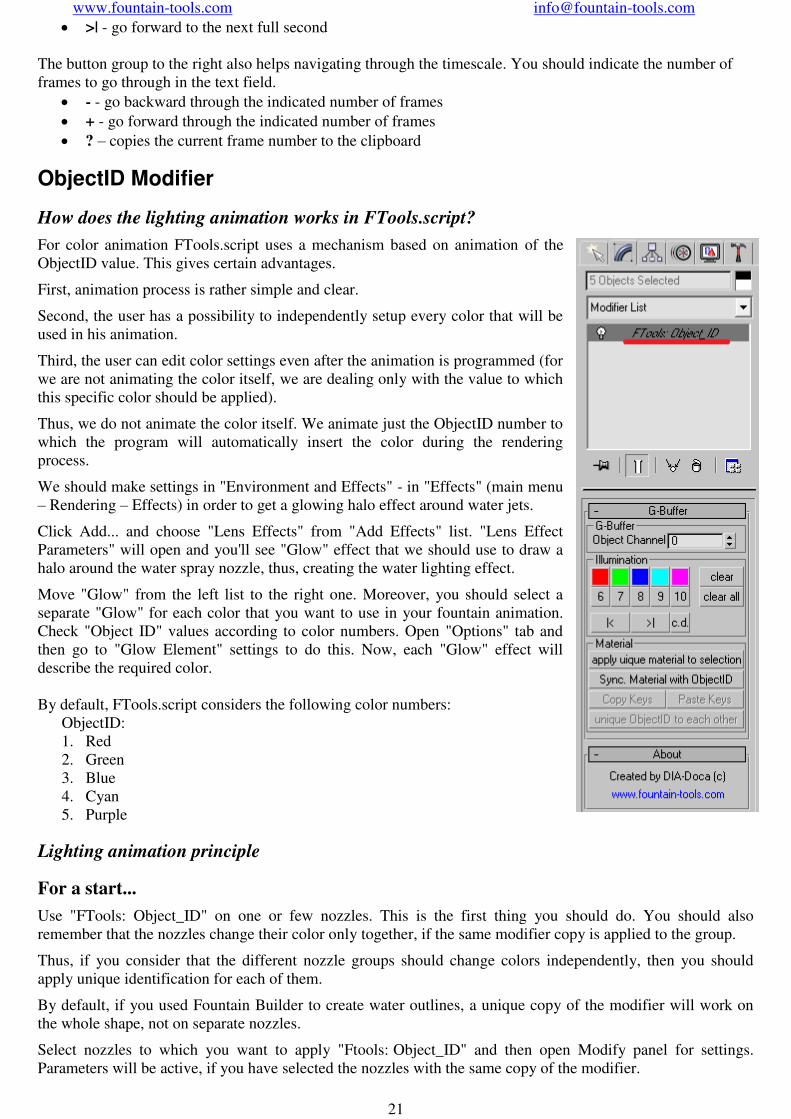
ObjectID Modifier
How does the lighting animation works in FTools.script?
For color animation FTools.script uses a mechanism based on animation of the
ObjectID value. This gives certain advantages.
First, animation process is rather simple and clear.
Second, the user has a possibility to independently setup every color that will be
used in his animation.
Third, the user can edit color settings even after the animation is programmed (for
we are not animating the color itself, we are dealing only with the value to which
this specific color should be applied).
Thus, we do not animate the color itself. We animate just the ObjectID number to
which the program will automatically insert the color during the rendering
process.
We should make settings in "Environment and Effects" - in "Effects" (main menu
– Rendering – Effects) in order to get a glowing halo effect around water jets.
Click Add... and choose "Lens Effects" from "Add Effects" list. "Lens Effect
Parameters" will open and you'll see "Glow" effect that we should use to draw a
halo around the water spray nozzle, thus, creating the water lighting effect.
Move "Glow" from the left list to the right one. Moreover, you should select a
separate "Glow" for each color that you want to use in your fountain animation.
Check "Object ID" values according to color numbers. Open "Options" tab and
then go to "Glow Element" settings to do this. Now, each "Glow" effect will
describe the required color.
By default, FTools.script considers the following color numbers:
ObjectID:
1. Red
2. Green
3. Blue
4. Cyan
5. Purple
Lighting animation principle
For a start...
Use "FTools: Object_ID" on one or few nozzles. This is the first thing you should do. You should also
remember that the nozzles change their color only together, if the same modifier copy is applied to the group.
Thus, if you consider that the different nozzle groups should change colors independently, then you should
apply unique identification for each of them.
By default, if you used Fountain Builder to create water outlines, a unique copy of the modifier will work on
the whole shape, not on separate nozzles.
Select nozzles to which you want to apply "Ftools: Object_ID" and then open Modify panel for settings.
Parameters will be active, if you have selected the nozzles with the same copy of the modifier.

www.fountain-tools.com [email protected]
22
G-Buffer Group
In G-Buffer group you can see Object Channel value for the current frame. This value will be processed by the
renderer in the current frame, and this value will be used to search for Glow Effect during the visualization
(right Glow list, which we have already discussed above).
This parameter can be animated alone as any other numeric parameter in 3DS MAX. However, there is an
easier way.
Illumination Group
Illumination group has ten square buttons that correspond to the range of ObjectID values from 0 to 10, from
left to right.
Right click with the mouse on the button to open color selection window. This color is set as a basic color for a
nozzle. It is recommended to use very faint colors. For example, if you want to make a red lighting, then choose
a red but almost wight color here< while in Glow settings you can set a pure red color.
Warning! It is important that you have full access rights to FTools.Script folder to save selected values to files
(for they are saved to external files, which may be write-protected for common users).
Other buttons in Illumination group: Clear – deletes the current key frame for lighting (you should be on this frame to delete) Clear All – deletes all key frames for lighting (in selected modifier) I< - go to next key frame I< - go to previous key frame C.d. – call for a dialog with key frame values of lighting.
Material Group
FTools Modifier: Object_ID works only combined with
a special material that can be applied to the selected
particle system together with the application of the
modifier itself to this group. All lighting animation
keys available in the modifier are copied to this
material. The difference is that the modifier contains
ObjectID value, while the material saves a nozzle color
in key frames. Color is taken from settings that are
called with a right click on color animation button, as
we know form above.
It may happen that the two nozzle group will have one
copy of the material but the different copies of
modifiers during operation. Press "Apply unique
material to selection" to make a correction. However,
there is nothing to worry about, if you missed this thing. Nobody will notice it, really, at the end of animation
rendering.
If it did happen that you use FTools materials on the nozzle group and yet have not defined the animation keys
for lighting (for example, you have applied a new material to the selection by accident), then, by pressing Sync.
Material with ObjectID, you will copy all keys from the modifier to the material.
There are no other settings needed for animated lighting of your fountain at work.