Embed Size (px)
Citation preview

203℃DL且OC-ua@但
它叮主的。E
叮
叮』口、冉的mwZ3DUD
-orE
The board and batten siding on the second level offers vertical, parallell ines that are juxtaposed against the horizontal siding on the lower level. The effect is a contrasting exterior that uses multiple colors
Installing Board & Batten Siding Nai ling di rectly to you r sheathing , even if it 's ply wood , wi ll not provide sufficient hold. Because the nailing str ips add thickness to your walls , you ' 川 need to extend the jambs and sills around your doors and windows .
Board and batten is a vertical ly installed siding that offers a rustic look and makes houses appear tal ler. The application consists of in-stalling wide boards vert ically on the wal ls, then placing narrow boards, called battens , over the seams
Another way to achieve the board-on-board look is to use board and batten panels (page Î 45) These panels feature a reverse batten style, in which the batten is placed behind the simulated boards. The panels are typ ically available in 4 x 8 or 4 x 9-foot sheets to span the length of the wall. Be sure to purchase panels that are rated for exterior use
Although there are no set board and batten widths , a popular combination is Î x Î 0" boards with Î x 3" battens , which is what we 're using for th is project. Our lumber is knotty cedar, which is often used for board and batten applications
Everything You Need Too/s: tape measure , c ircular saw, hamm凹 , chalk line , line level , pry bar , tin snips, level , jig saw , T-bevel , caulk gun , 4-ft. level , paint brush
Regardless of the type and size of lumber you choose , the battens need to overlap the boards by at least Y:;". To maintain a uniform look, mea-sure the length of the wall , the width of the boards,
and determine the appropriate spacing between boards so you can instal l a full board at the end of the wall. Ripping the last board to fit wil l ruin the symmetry you 've established
Materials: 1 x 10 and 1 x 3 cedar lumber, 1 x 3 nai ling strips , 2 x 4 , 8d and 10d corrosion-resistant box nai ls, drip caps, 6d galvanized box nails,
sealer. caulk
Before installing the siding , you 'll need to install horizontal blocking lines or fu rring str ips on the walls . This gives you a firm naili ng base for the siding . Nails must be driven Î Y:;" into solid wood
140

How to Install Board & Batten Siding
3 ·、
1 CM阳 wallswi川usew刚问es 114 to 115) , Starti门9 at the bottom of the wall , fasten hor
izontal nailing strips every 16" to 24", Nail the strips to studs , using 8d nails , Install nailing strips arou门d all doors and windows , 00 this for each wal l.
- ‘ -
3 ~川 extender川 over a window , Nail it in place , using 门ails that penetrate the jamb by at
least 1 ", Cut a门d install jambs along the sides of the window, then do the same for the sill , Apply sealer to all cut edges ,
-ko
-
-'。
e
F
-hu
-
-?hbd
-
l
hu川剧也一
cl
m
dlhM
uhs Ogpu门
由抽川川一
swm
一
切由时
mLωU
efr
E
Wed
ab
到
一
bωd
mhg
一
也
QUO
-
uub
E
b肌mm
一
引
e
扩
一
--8 .,
/ /
2 ~叫Ily remo削h怕e叫and doors , using a pry bar , Rip jamb extenders to
the same width as the jambs
4 ~, 归 p四阿i厄ece川dow, using tin snips , Set the drip cap in place so
the bottom lip is over the jamb extension , Nail the drip cap in the upper corners , using 6d galvanized nails , Repeat Steps 2 to 4 for each window and door
(continued next page) 141

How to Install Board & Batten Siding (continued) .、a
TIP: Oon 't cut a!l boards to size at the start of a wa!l The distance from the ledger to the soffits can change, which can impact the length of the boards
5 st川9 归 cor毗 snap a I创刊alk line at 阳bottom of the wall where you want to start the sid-
ing. Make sure it' s below the nailing strips. Install a straight 2 x 4 flush with the chalk line to use as a temporary ledger
也
TIP: To maintain even spacing be-
悔 tween boards, cut wood spacers the size of your gaps and use them when insta!ling each board.
7 ~川e next 阳叫 to size and set i州ace川eledger. Keep your predetermined gap between
boards , but make sure the batten will overlap each board by at least 后" . Nail in place at each nailing strip . Install remaining boards the same way. Check every few boards with a level to make sure they're plumb. If they ' re 门时, adjust sl ightly until plumb .
142
飞
6 MeaS叫t廿「旧act 兑" . Cut a s创i ding board to this length . Set the
bottom of the boar叫do门 the I怡edge凹r , and align the side with the edge of the wall . For boards 6" and narrower , drive one 8d 门 ail in the center at each nailing strip . For boards wider than 6", drive two nails 3" apart
8 Atwln灿 locati ons , s归 board ne对川eWI门dow, keeping the bottom on the ledger. Mark the
board ~" above and below the outside of the top and bottom jambs
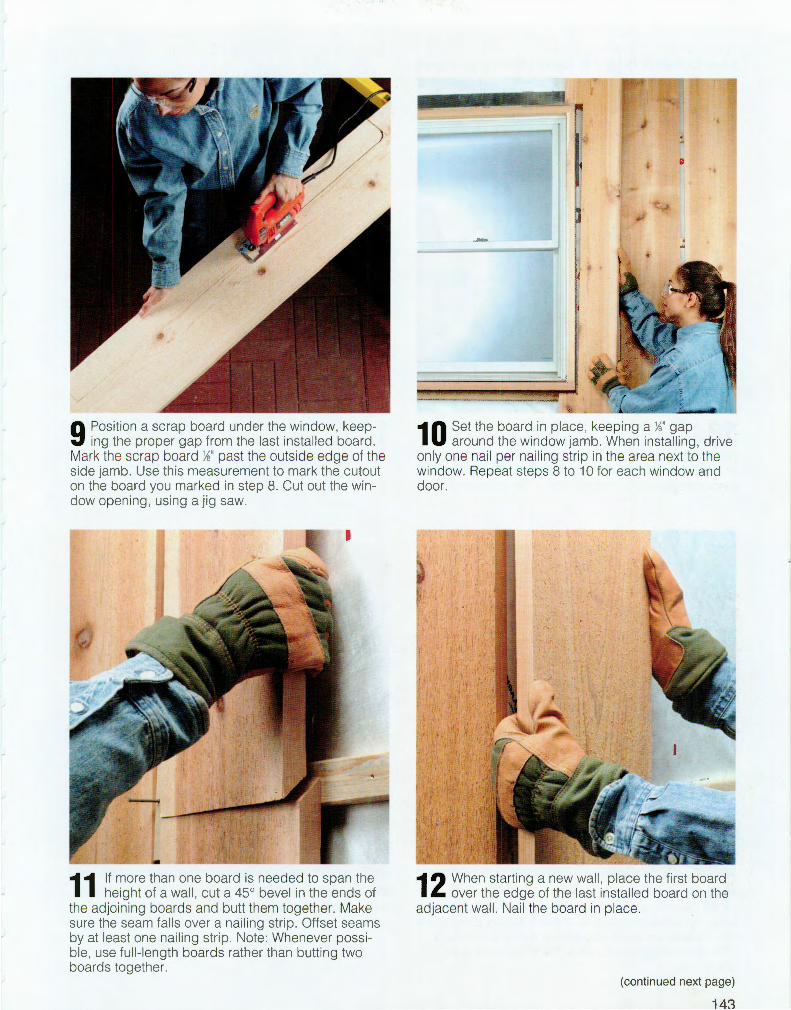
9 M o n a s 叫 board 川川d圳ing the pr盯ope凹r gap from the 1旧as创t i川门S创ta创11怡ed boar叫d.i
Mark the scrap board )1í" past the outside edge of the side jamb. Use this measurement to mark the cutout O门 the board you marked in step 8. Cut out the window opening , using a jig saw
11 |fMm叫height of a wal川1 , cut a 45 0 bevel in the ends of
the adjoin ing boards and butt them together. Make sure the seam falls over a nailing strip . Offset seams by at least one naili 门9 strip . Note: Whenever possi ble , use full-Ie门g th boards rather than butting two boards together
…幽睦唰1"""""""'"一一一 一一丁
--J
-4
'
10 ;~创t川O川|川n 川阳吭 k怆e臼叩earound the window j阳amb. When ins剖ta创|川li阳|川ng , drive
on ly one nail per na刽ili 门9 str川ip in the area next to the window. Repeat steps 8 to 10 for each window and door.
12 when 削ing a new wall , 内ce the first board over the edge of the last installed board on the
adjacent wal l. Nai l the board in place
(continued next page)
143

How to Install Board & Batten Siding (co ntinued)
/ /
/
13 ~!叫able e川mωe, use a T- b叫 to'" determine the pitch of the roof , Transfer the an
gle to the boards , cut to size , and install. The length of each board needs to be measured individually since the distance changes along the gable e门d ,
15 Measu川nd叫attens to size , Center a batten over each gap between boards , Drive
one 10d nail in the battens at each nailing strip , Once the battens are i 门 stalled , remove the ledger board Paint the siding (see Exterior Painting , starting on page 198)
144
14 R||ga川etwe川e 阳rds a川offits , and between the boards and jambs with flexible ,
paintable caulk
' Variation: To create a deep cha门门el look, install the battens first, then place the boards over the battens ,

How to Install Board & Batten Paneling
1 CMthewa||SW|川use-wrap (pages 114 to 116) ι Snap
a level line at the base of the wall where the sidi 门9 wi 11 start. 1 nstall a straight ledger board flush with the line, following step 5 on page 142
2 SMmtacommeasure from the ledger to the soffi怡 ,
subtract jjí", and cut the panel to size. Place the panel on the ledger , flush with the corner , and install , using corrosion-resistant nails that penetrate studs by 1 ~"
3 |fthep叫s have川n ship-laps , overlap the panels as
specified by the manufacturer. If the pa门els don't have laps, leave jjí" gaps between panels
4 P|aceapm|nexttoawmdowa川ake a mark 始" above and below the outside of the jambs. Set
a scrap piece in place under the window and make a mark jjí" past the side jambs. T旧门sfer the measurements to the panel , then cut out the window opening , using a jig saw. 00 the same for each door, window, and protrusion
5 FO川teps 13 and 14 on 问e 144 to叫an由to fit the gable e 门d of the house , a门d to caulk be
tween panels and soffits. To create a more finished look, install 1 x 3 or 1 x 4 trim around doors , win-dows, and corners , and under soffits. Paint the siding (see Exterior Painting , starti 门9 on page 198)
145