Embed Size (px)
Citation preview
Big Data in Hadoop Part 1: ETL
TTHADV5: Student Workbook
Course Material for the GK-JPMC TTHADV5 Big Data w/Hadoop, Pig, Hive & HBase course. Not for any other use or distribution.

All written content, source code, and formatting are the property of Trivera Technologies LLC. No portion of this material may be duplicated or reused in any way without the express written consent of Trivera Technologies LLC. For information please contact [email protected] or visit www.triveratech.com.
All software or hardware products referenced herein are trademarks of their respective holders. Products and company names are the trademarks and registered trademarks of their respective owners. Trivera Technologies has used its best efforts to distinguish proprietary trademarks from descriptive names by following the capitalization style used by the manufacturer.
Copyright © 2017 Trivera Technologies LLC. All rights reserved.
Course Material for the GK-JPMC TTHADV5 Big Data w/Hadoop, Pig, Hive & HBase course. Not for any other use or distribution.
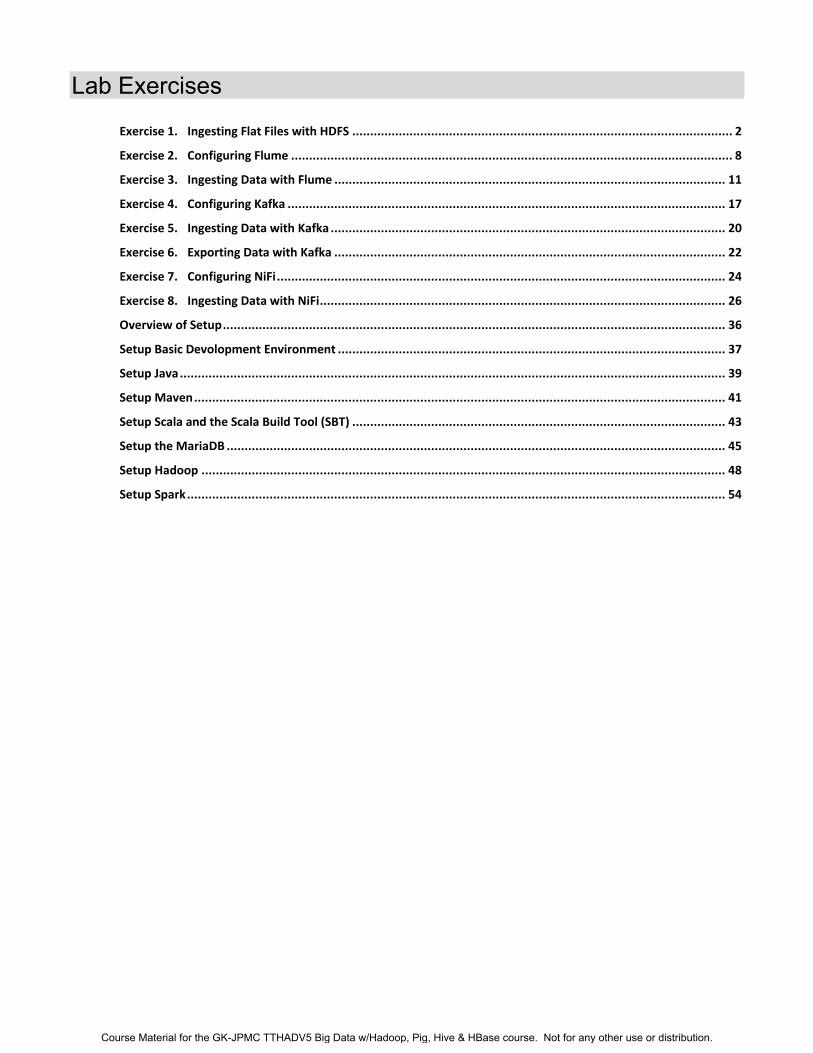
Lab Exercises
Exercise 1. Ingesting Flat Files with HDFS .......................................................................................................... 2
Exercise 2. Configuring Flume ........................................................................................................................... 8
Exercise 3. Ingesting Data with Flume ............................................................................................................. 11
Exercise 4. Configuring Kafka .......................................................................................................................... 17
Exercise 5. Ingesting Data with Kafka .............................................................................................................. 20
Exercise 6. Exporting Data with Kafka ............................................................................................................. 22
Exercise 7. Configuring NiFi ............................................................................................................................. 24
Exercise 8. Ingesting Data with NiFi ................................................................................................................. 26
Overview of Setup ............................................................................................................................................ 36
Setup Basic Devolopment Environment ............................................................................................................ 37
Setup Java ........................................................................................................................................................ 39
Setup Maven .................................................................................................................................................... 41
Setup Scala and the Scala Build Tool (SBT) ........................................................................................................ 43
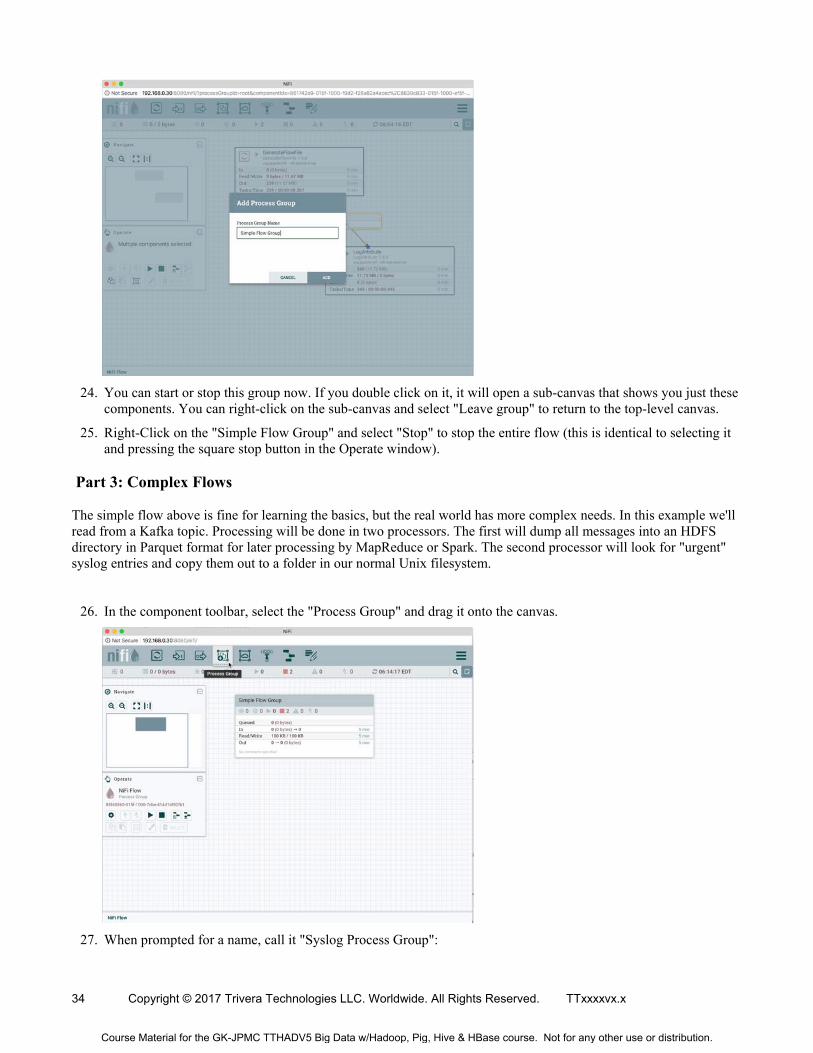
Setup the MariaDB ........................................................................................................................................... 45
Setup Hadoop .................................................................................................................................................. 48
Setup Spark ...................................................................................................................................................... 54
Course Material for the GK-JPMC TTHADV5 Big Data w/Hadoop, Pig, Hive & HBase course. Not for any other use or distribution.

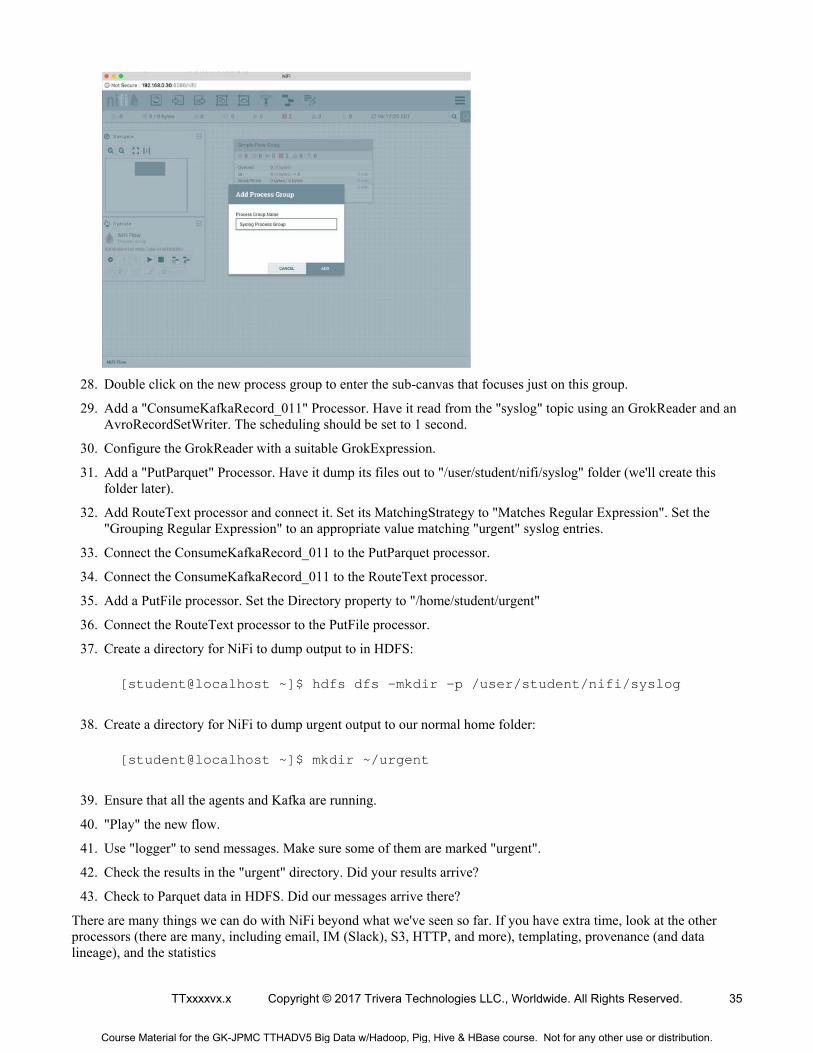
2 Copyright © 2017 Trivera Technologies LLC. Worldwide. All Rights Reserved. TTxxxxvx.x
Exercise 1. INGESTING FLAT FILES WITH HDFS
Overview
Learn how to work with HDFS, importing and exporting files, run a basic Hadoop example program
Objective Create our HDFS home directory
Copy files to and from HDFS
Run the built-in WordCount example
Builds on Previous Labs Setup
Time to Complete 30 minutes
We've already done a little HDFS file ingestion already as part of the setup test. Let's explore it in a bit more detail.
1. Make sure the HDFS and YARN daemons are running with "jps":
[student@localhost ~]$ jps 2821 ResourceManager 2439 DataNode 3257 Jps 2298 NameNode 2619 SecondaryNameNode 3052 NodeManager
2. If not, start the daemons again then verify again with jps:
[student@localhost ~]$ start-dfs.sh [student@localhost ~]$ start-yarn.sh [student@localhost ~]$ jps
3. First, let's use the basic "hdfs dfs" command to get usage:
$ hdfs dfs Usage: hadoop fs [generic options] [-appendToFile <localsrc> ... <dst>] [-cat [-ignoreCrc] <src> ...] [-checksum <src> ...] [-chgrp [-R] GROUP PATH...] [-chmod [-R] <MODE[,MODE]... | OCTALMODE> PATH...] [-chown [-R] [OWNER][:[GROUP]] PATH...] [-copyFromLocal [-f] [-p] [-l] [-d] <localsrc> ... <dst>] [-copyToLocal [-f] [-p] [-ignoreCrc] [-crc] <src> ... <localdst>] [-count [-q] [-h] [-v] [-t [<storage type>]] [-u] [-x] <path> ...] [-cp [-f] [-p | -p[topax]] [-d] <src> ... <dst>] [-createSnapshot <snapshotDir> [<snapshotName>]] [-deleteSnapshot <snapshotDir> <snapshotName>] [-df [-h] [<path> ...]] [-du [-s] [-h] [-x] <path> ...] [-expunge]
Course Material for the GK-JPMC TTHADV5 Big Data w/Hadoop, Pig, Hive & HBase course. Not for any other use or distribution.

TTxxxxvx.x Copyright © 2017 Trivera Technologies LLC., Worldwide. All Rights Reserved. 3
[-find <path> ... <expression> ...] [-get [-f] [-p] [-ignoreCrc] [-crc] <src> ... <localdst>] [-getfacl [-R] <path>] [-getfattr [-R] {-n name | -d} [-e en] <path>] [-getmerge [-nl] [-skip-empty-file] <src> <localdst>] [-help [cmd ...]] [-ls [-C] [-d] [-h] [-q] [-R] [-t] [-S] [-r] [-u] [<path> ...]] [-mkdir [-p] <path> ...] [-moveFromLocal <localsrc> ... <dst>] [-moveToLocal <src> <localdst>] [-mv <src> ... <dst>] [-put [-f] [-p] [-l] [-d] <localsrc> ... <dst>] [-renameSnapshot <snapshotDir> <oldName> <newName>] [-rm [-f] [-r|-R] [-skipTrash] [-safely] <src> ...] [-rmdir [--ignore-fail-on-non-empty] <dir> ...] [-setfacl [-R] [{-b|-k} {-m|-x <acl_spec>} <path>]|[--set <acl_spec> <path>]] [-setfattr {-n name [-v value] | -x name} <path>] [-setrep [-R] [-w] <rep> <path> ...] [-stat [format] <path> ...] [-tail [-f] <file>] [-test -[defsz] <path>] [-text [-ignoreCrc] <src> ...] [-touchz <path> ...] [-truncate [-w] <length> <path> ...] [-usage [cmd ...]] Generic options supported are -conf <configuration file> specify an application configuration file -D <property=value> use value for given property -fs <file:///|hdfs://namenode:port> specify default filesystem URL to use, overrides 'fs.defaultFS' property from configurations. -jt <local|resourcemanager:port> specify a ResourceManager -files <comma separated list of files> specify comma separated files to be copied to the map reduce cluster -libjars <comma separated list of jars> specify comma separated jar files to include in the classpath. -archives <comma separated list of archives> specify comma separated archives to be unarchived on the compute machines. The general command line syntax is command [genericOptions] [commandOptions]
4. Notice than many familiar Unix commands are available (ls, cat, tail, mv, cp, rm) prefixed with "hdfs dfs -". So "cp" would be "hdfs dfs -cp file1 file2".
5. Create a "/user/student" directory in HDFS. This is where we'll put our input and output files. Other users should do the same. Many utilities and libraries will assume this directory exists (where "student" is based on your Unix login id).
[student@localhost ~]$ hdfs dfs -mkdir -p /user/student
6. Check the downloads folder for our data file:
[student@localhost downloads]$ ls -la t8.shakespeare.txt -rw-rw-r--. 1 student student 5458199 Mar 10 2009 t8.shakespeare.txt
Course Material for the GK-JPMC TTHADV5 Big Data w/Hadoop, Pig, Hive & HBase course. Not for any other use or distribution.
4 Copyright © 2017 Trivera Technologies LLC. Worldwide. All Rights Reserved. TTxxxxvx.x
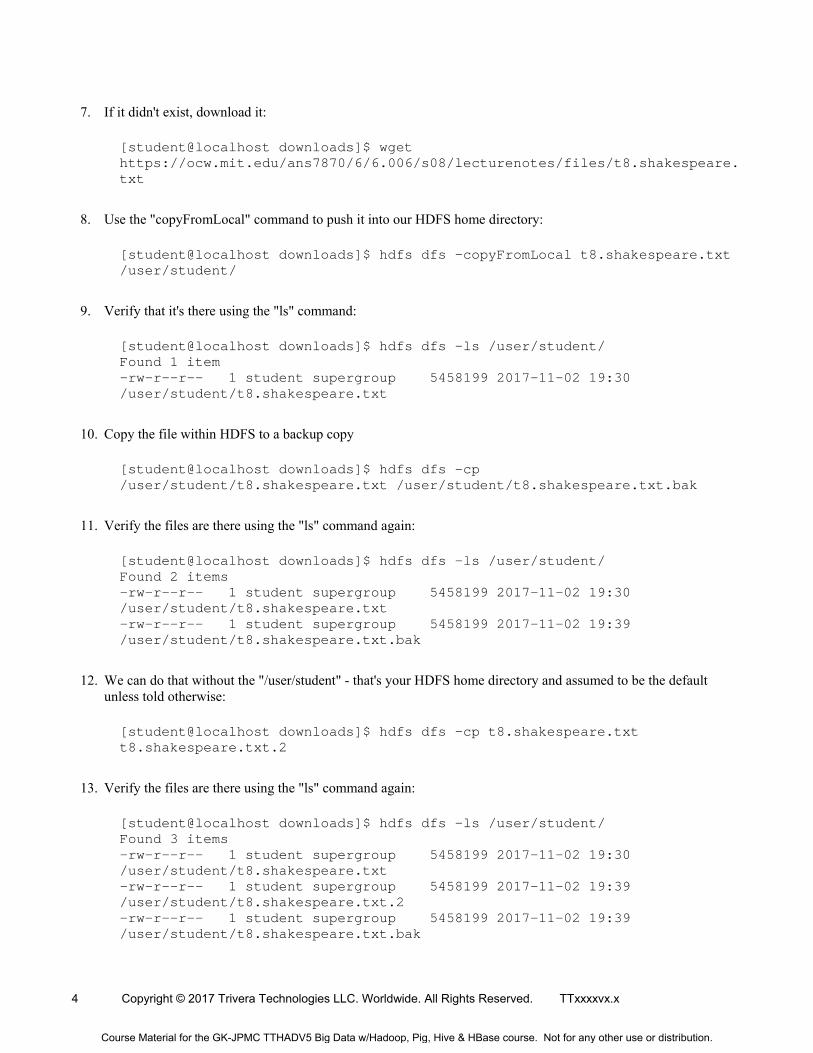
7. If it didn't exist, download it:
[student@localhost downloads]$ wget https://ocw.mit.edu/ans7870/6/6.006/s08/lecturenotes/files/t8.shakespeare.txt
8. Use the "copyFromLocal" command to push it into our HDFS home directory:
[student@localhost downloads]$ hdfs dfs -copyFromLocal t8.shakespeare.txt /user/student/
9. Verify that it's there using the "ls" command:
[student@localhost downloads]$ hdfs dfs -ls /user/student/ Found 1 item -rw-r--r-- 1 student supergroup 5458199 2017-11-02 19:30 /user/student/t8.shakespeare.txt
10. Copy the file within HDFS to a backup copy
[student@localhost downloads]$ hdfs dfs -cp /user/student/t8.shakespeare.txt /user/student/t8.shakespeare.txt.bak
11. Verify the files are there using the "ls" command again:
[student@localhost downloads]$ hdfs dfs -ls /user/student/ Found 2 items -rw-r--r-- 1 student supergroup 5458199 2017-11-02 19:30 /user/student/t8.shakespeare.txt -rw-r--r-- 1 student supergroup 5458199 2017-11-02 19:39 /user/student/t8.shakespeare.txt.bak
12. We can do that without the "/user/student" - that's your HDFS home directory and assumed to be the default unless told otherwise:
[student@localhost downloads]$ hdfs dfs -cp t8.shakespeare.txt t8.shakespeare.txt.2
13. Verify the files are there using the "ls" command again:
[student@localhost downloads]$ hdfs dfs -ls /user/student/ Found 3 items -rw-r--r-- 1 student supergroup 5458199 2017-11-02 19:30 /user/student/t8.shakespeare.txt -rw-r--r-- 1 student supergroup 5458199 2017-11-02 19:39 /user/student/t8.shakespeare.txt.2 -rw-r--r-- 1 student supergroup 5458199 2017-11-02 19:39 /user/student/t8.shakespeare.txt.bak
Course Material for the GK-JPMC TTHADV5 Big Data w/Hadoop, Pig, Hive & HBase course. Not for any other use or distribution.
TTxxxxvx.x Copyright © 2017 Trivera Technologies LLC., Worldwide. All Rights Reserved. 5
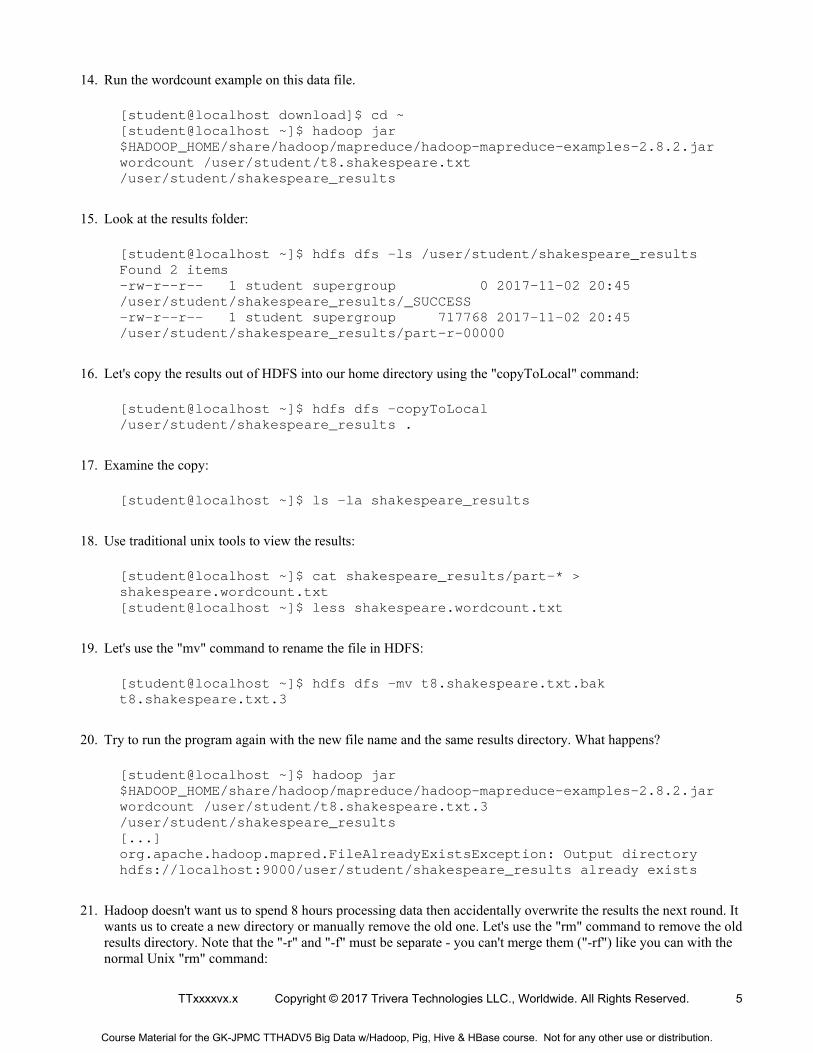
14. Run the wordcount example on this data file.
[student@localhost download]$ cd ~ [student@localhost ~]$ hadoop jar $HADOOP_HOME/share/hadoop/mapreduce/hadoop-mapreduce-examples-2.8.2.jar wordcount /user/student/t8.shakespeare.txt /user/student/shakespeare_results
15. Look at the results folder:
[student@localhost ~]$ hdfs dfs -ls /user/student/shakespeare_results Found 2 items -rw-r--r-- 1 student supergroup 0 2017-11-02 20:45 /user/student/shakespeare_results/_SUCCESS -rw-r--r-- 1 student supergroup 717768 2017-11-02 20:45 /user/student/shakespeare_results/part-r-00000
16. Let's copy the results out of HDFS into our home directory using the "copyToLocal" command:
[student@localhost ~]$ hdfs dfs -copyToLocal /user/student/shakespeare_results .
17. Examine the copy:
[student@localhost ~]$ ls -la shakespeare_results
18. Use traditional unix tools to view the results:
[student@localhost ~]$ cat shakespeare_results/part-* > shakespeare.wordcount.txt [student@localhost ~]$ less shakespeare.wordcount.txt
19. Let's use the "mv" command to rename the file in HDFS:
[student@localhost ~]$ hdfs dfs -mv t8.shakespeare.txt.bak t8.shakespeare.txt.3
20. Try to run the program again with the new file name and the same results directory. What happens?
[student@localhost ~]$ hadoop jar $HADOOP_HOME/share/hadoop/mapreduce/hadoop-mapreduce-examples-2.8.2.jar wordcount /user/student/t8.shakespeare.txt.3 /user/student/shakespeare_results [...] org.apache.hadoop.mapred.FileAlreadyExistsException: Output directory hdfs://localhost:9000/user/student/shakespeare_results already exists
21. Hadoop doesn't want us to spend 8 hours processing data then accidentally overwrite the results the next round. It wants us to create a new directory or manually remove the old one. Let's use the "rm" command to remove the old results directory. Note that the "-r" and "-f" must be separate - you can't merge them ("-rf") like you can with the normal Unix "rm" command:
Course Material for the GK-JPMC TTHADV5 Big Data w/Hadoop, Pig, Hive & HBase course. Not for any other use or distribution.
6 Copyright © 2017 Trivera Technologies LLC. Worldwide. All Rights Reserved. TTxxxxvx.x
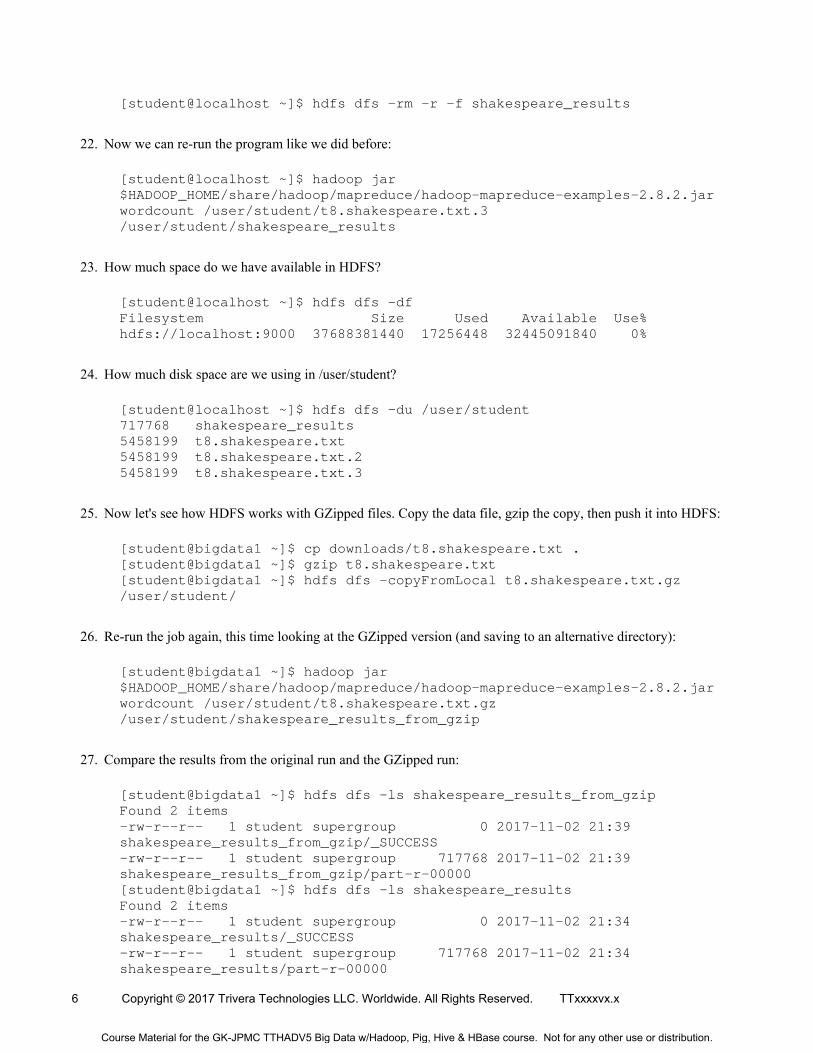
[student@localhost ~]$ hdfs dfs -rm -r -f shakespeare_results
22. Now we can re-run the program like we did before:
[student@localhost ~]$ hadoop jar $HADOOP_HOME/share/hadoop/mapreduce/hadoop-mapreduce-examples-2.8.2.jar wordcount /user/student/t8.shakespeare.txt.3 /user/student/shakespeare_results
23. How much space do we have available in HDFS?
[student@localhost ~]$ hdfs dfs -df Filesystem Size Used Available Use% hdfs://localhost:9000 37688381440 17256448 32445091840 0%
24. How much disk space are we using in /user/student?
[student@localhost ~]$ hdfs dfs -du /user/student 717768 shakespeare_results 5458199 t8.shakespeare.txt 5458199 t8.shakespeare.txt.2 5458199 t8.shakespeare.txt.3
25. Now let's see how HDFS works with GZipped files. Copy the data file, gzip the copy, then push it into HDFS:
[student@bigdata1 ~]$ cp downloads/t8.shakespeare.txt . [student@bigdata1 ~]$ gzip t8.shakespeare.txt [student@bigdata1 ~]$ hdfs dfs -copyFromLocal t8.shakespeare.txt.gz /user/student/
26. Re-run the job again, this time looking at the GZipped version (and saving to an alternative directory):
[student@bigdata1 ~]$ hadoop jar $HADOOP_HOME/share/hadoop/mapreduce/hadoop-mapreduce-examples-2.8.2.jar wordcount /user/student/t8.shakespeare.txt.gz /user/student/shakespeare_results_from_gzip
27. Compare the results from the original run and the GZipped run:
[student@bigdata1 ~]$ hdfs dfs -ls shakespeare_results_from_gzip Found 2 items -rw-r--r-- 1 student supergroup 0 2017-11-02 21:39 shakespeare_results_from_gzip/_SUCCESS -rw-r--r-- 1 student supergroup 717768 2017-11-02 21:39 shakespeare_results_from_gzip/part-r-00000 [student@bigdata1 ~]$ hdfs dfs -ls shakespeare_results Found 2 items -rw-r--r-- 1 student supergroup 0 2017-11-02 21:34 shakespeare_results/_SUCCESS -rw-r--r-- 1 student supergroup 717768 2017-11-02 21:34 shakespeare_results/part-r-00000
Course Material for the GK-JPMC TTHADV5 Big Data w/Hadoop, Pig, Hive & HBase course. Not for any other use or distribution.

TTxxxxvx.x Copyright © 2017 Trivera Technologies LLC., Worldwide. All Rights Reserved. 7
We’ve successfully worked with Hadoop to move files into and out of HDFS. These files were just simple text files, but you'll find that a good majority of data science work is text, whether it's prose or tab-delimited or comma-separated data. The files could have just as easily have been binary data - Excel spreadsheets, Parquet, Avro, or ORC files or zipped up collections of them. This is a basic skill we'll need for further work with Hadoop.
Course Material for the GK-JPMC TTHADV5 Big Data w/Hadoop, Pig, Hive & HBase course. Not for any other use or distribution.
8 Copyright © 2017 Trivera Technologies LLC. Worldwide. All Rights Reserved. TTxxxxvx.x
Exercise 2. CONFIGURING FLUME
Overview
Installing Apache Flume and verify it's running properly
Objective Install Apache Flume
Set up environment variables
Configure a simple agent and test with netcat (nc)
Builds on Previous Labs Setup Java
Time to Complete 15-25 minutes
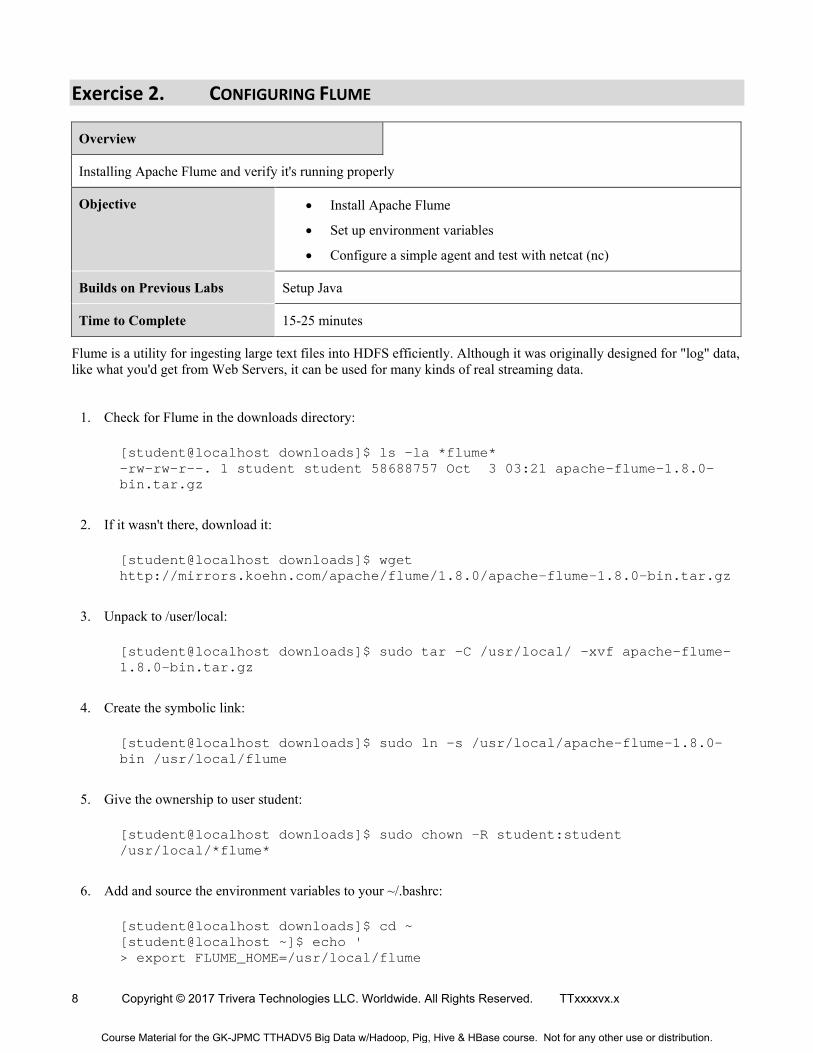
Flume is a utility for ingesting large text files into HDFS efficiently. Although it was originally designed for "log" data, like what you'd get from Web Servers, it can be used for many kinds of real streaming data.
1. Check for Flume in the downloads directory:
[student@localhost downloads]$ ls -la *flume* -rw-rw-r--. 1 student student 58688757 Oct 3 03:21 apache-flume-1.8.0-bin.tar.gz
2. If it wasn't there, download it:
[student@localhost downloads]$ wget http://mirrors.koehn.com/apache/flume/1.8.0/apache-flume-1.8.0-bin.tar.gz
3. Unpack to /user/local:
[student@localhost downloads]$ sudo tar -C /usr/local/ -xvf apache-flume-1.8.0-bin.tar.gz
4. Create the symbolic link:
[student@localhost downloads]$ sudo ln -s /usr/local/apache-flume-1.8.0-bin /usr/local/flume
5. Give the ownership to user student:
[student@localhost downloads]$ sudo chown -R student:student /usr/local/*flume*
6. Add and source the environment variables to your ~/.bashrc:
[student@localhost downloads]$ cd ~ [student@localhost ~]$ echo ' > export FLUME_HOME=/usr/local/flume
Course Material for the GK-JPMC TTHADV5 Big Data w/Hadoop, Pig, Hive & HBase course. Not for any other use or distribution.
TTxxxxvx.x Copyright © 2017 Trivera Technologies LLC., Worldwide. All Rights Reserved. 9
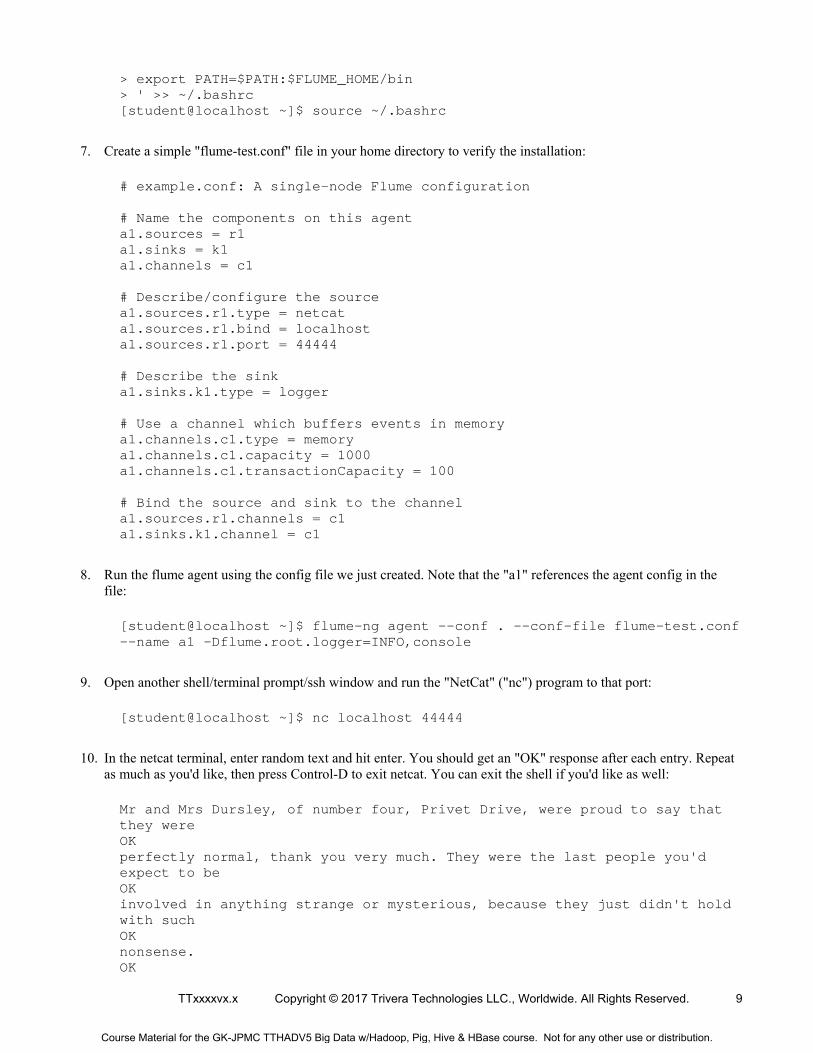
> export PATH=$PATH:$FLUME_HOME/bin > ' >> ~/.bashrc [student@localhost ~]$ source ~/.bashrc
7. Create a simple "flume-test.conf" file in your home directory to verify the installation:
# example.conf: A single-node Flume configuration # Name the components on this agent a1.sources = r1 a1.sinks = k1 a1.channels = c1 # Describe/configure the source a1.sources.r1.type = netcat a1.sources.r1.bind = localhost a1.sources.r1.port = 44444 # Describe the sink a1.sinks.k1.type = logger # Use a channel which buffers events in memory a1.channels.c1.type = memory a1.channels.c1.capacity = 1000 a1.channels.c1.transactionCapacity = 100 # Bind the source and sink to the channel a1.sources.r1.channels = c1 a1.sinks.k1.channel = c1
8. Run the flume agent using the config file we just created. Note that the "a1" references the agent config in the file:
[student@localhost ~]$ flume-ng agent --conf . --conf-file flume-test.conf --name a1 -Dflume.root.logger=INFO,console
9. Open another shell/terminal prompt/ssh window and run the "NetCat" ("nc") program to that port:
[student@localhost ~]$ nc localhost 44444
10. In the netcat terminal, enter random text and hit enter. You should get an "OK" response after each entry. Repeat as much as you'd like, then press Control-D to exit netcat. You can exit the shell if you'd like as well:
Mr and Mrs Dursley, of number four, Privet Drive, were proud to say that they were OK perfectly normal, thank you very much. They were the last people you'd expect to be OK involved in anything strange or mysterious, because they just didn't hold with such OK nonsense. OK
Course Material for the GK-JPMC TTHADV5 Big Data w/Hadoop, Pig, Hive & HBase course. Not for any other use or distribution.
10 Copyright © 2017 Trivera Technologies LLC. Worldwide. All Rights Reserved. TTxxxxvx.x
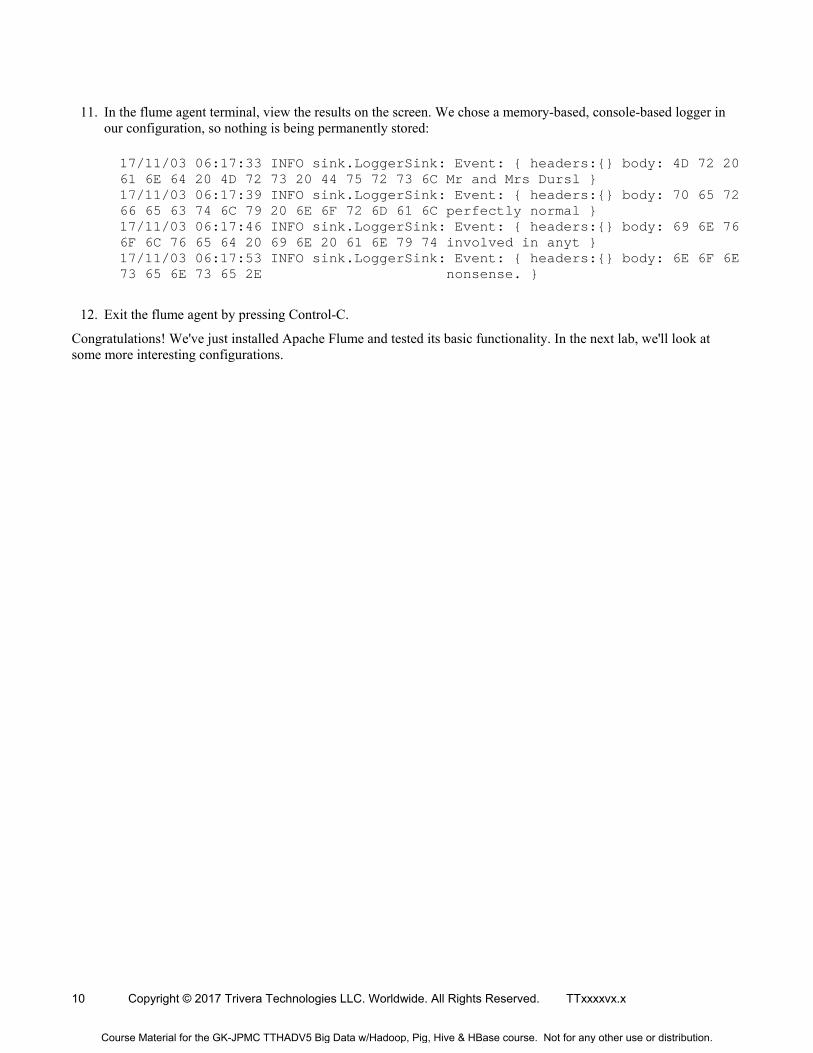
11. In the flume agent terminal, view the results on the screen. We chose a memory-based, console-based logger in our configuration, so nothing is being permanently stored:
17/11/03 06:17:33 INFO sink.LoggerSink: Event: { headers:{} body: 4D 72 20 61 6E 64 20 4D 72 73 20 44 75 72 73 6C Mr and Mrs Dursl } 17/11/03 06:17:39 INFO sink.LoggerSink: Event: { headers:{} body: 70 65 72 66 65 63 74 6C 79 20 6E 6F 72 6D 61 6C perfectly normal } 17/11/03 06:17:46 INFO sink.LoggerSink: Event: { headers:{} body: 69 6E 76 6F 6C 76 65 64 20 69 6E 20 61 6E 79 74 involved in anyt } 17/11/03 06:17:53 INFO sink.LoggerSink: Event: { headers:{} body: 6E 6F 6E 73 65 6E 73 65 2E nonsense. }
12. Exit the flume agent by pressing Control-C.
Congratulations! We've just installed Apache Flume and tested its basic functionality. In the next lab, we'll look at some more interesting configurations.
Course Material for the GK-JPMC TTHADV5 Big Data w/Hadoop, Pig, Hive & HBase course. Not for any other use or distribution.
TTxxxxvx.x Copyright © 2017 Trivera Technologies LLC., Worldwide. All Rights Reserved. 11
Exercise 3. INGESTING DATA WITH FLUME
Overview
Work with multiple agent configurations in Flume
Objective Create and test a Syslog source agent with a memory channel and logger sink
Create and test an Exec source agent with a file channel and logger sink
Create and test a Syslog source agent with a memory channel and HDFS sink
Builds on Previous Labs Installing Flume
Time to Complete 45 minutes
Flume's focus is on ingesting large amounts of streaming data. They can be closed log files, streaming log files, IoT data coming from a web socket, Order data coming from an MQ, and many more.
An "agent" is a combination of one or more sources, channels, and sinks, optionally with Interceptors, ChannelSelectors, EventSerializers, and SinkProcessors. There are many built-in components for each of these and many variations of pipelines can be configured with just the built-in components. There are also third-party components that can be integrated. You can also build your own if you have need for customization.
In this lab we'll configure several commonly used agents.
Part 1: Syslog Agent
Hadoop is used to process many things, and mature installations often have a need for Hadoop to process the various log files that Hadoop itself and many of its underlying foundation components run on, essentially monitoring itself. A complete infrastructure will often first model behavior and eventually respond to events happening in the infrastructure. To support that we'll need to be able to read in logs like syslog.
1. First, let's verify that the "rsyslog" daemon is running. It's typically already running in CentOS/RHEL even with the minimal install.
[student@localhost ~]$ ps xgau | grep -i rsyslogd root 658 0.0 0.1 212120 6600 ? Ssl Nov02 0:01 /usr/sbin/rsyslogd -n student 16012 0.0 0.0 112664 988 pts/0 S+ 08:41 0:00 grep --color=auto -i rsyslogd
2. If it wasn't running, then it may not have been installed. Install it, start it, and enable it (for future reboots):
[student@localhost ~]$ sudo yum install -y rsyslog [student@localhost ~]$ sudo systemctl start rsyslog [student@localhost ~]$ sudo systemctl enable rsyslog
Course Material for the GK-JPMC TTHADV5 Big Data w/Hadoop, Pig, Hive & HBase course. Not for any other use or distribution.
12 Copyright © 2017 Trivera Technologies LLC. Worldwide. All Rights Reserved. TTxxxxvx.x
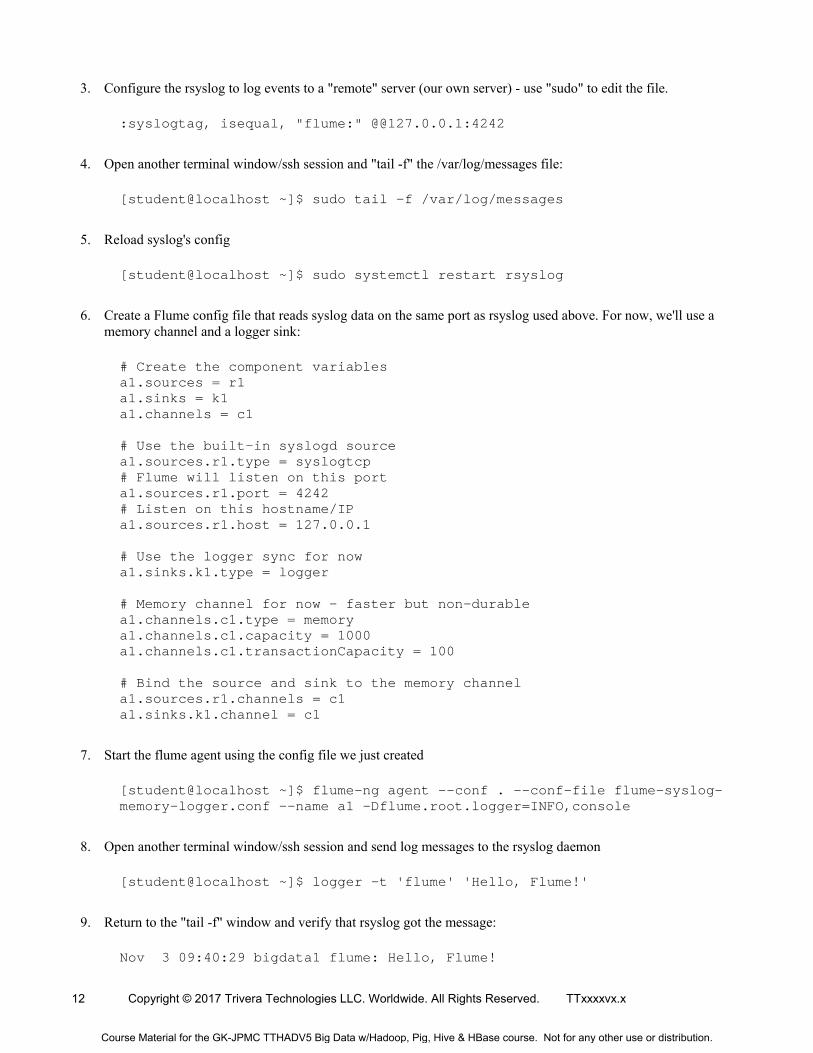
3. Configure the rsyslog to log events to a "remote" server (our own server) - use "sudo" to edit the file.
:syslogtag, isequal, "flume:" @@127.0.0.1:4242
4. Open another terminal window/ssh session and "tail -f" the /var/log/messages file:
[student@localhost ~]$ sudo tail -f /var/log/messages
5. Reload syslog's config
[student@localhost ~]$ sudo systemctl restart rsyslog
6. Create a Flume config file that reads syslog data on the same port as rsyslog used above. For now, we'll use a memory channel and a logger sink:
# Create the component variables a1.sources = r1 a1.sinks = k1 a1.channels = c1 # Use the built-in syslogd source a1.sources.r1.type = syslogtcp # Flume will listen on this port a1.sources.r1.port = 4242 # Listen on this hostname/IP a1.sources.r1.host = 127.0.0.1 # Use the logger sync for now a1.sinks.k1.type = logger # Memory channel for now - faster but non-durable a1.channels.c1.type = memory a1.channels.c1.capacity = 1000 a1.channels.c1.transactionCapacity = 100 # Bind the source and sink to the memory channel a1.sources.r1.channels = c1 a1.sinks.k1.channel = c1
7. Start the flume agent using the config file we just created
[student@localhost ~]$ flume-ng agent --conf . --conf-file flume-syslog-memory-logger.conf --name a1 -Dflume.root.logger=INFO,console
8. Open another terminal window/ssh session and send log messages to the rsyslog daemon
[student@localhost ~]$ logger -t 'flume' 'Hello, Flume!'
9. Return to the "tail -f" window and verify that rsyslog got the message:
Nov 3 09:40:29 bigdata1 flume: Hello, Flume!
Course Material for the GK-JPMC TTHADV5 Big Data w/Hadoop, Pig, Hive & HBase course. Not for any other use or distribution.

TTxxxxvx.x Copyright © 2017 Trivera Technologies LLC., Worldwide. All Rights Reserved. 13
10. Return to the flume agent window and verify the messages were received.
17/11/03 09:40:32 INFO sink.LoggerSink: Event: { headers:{host=bigdata1, Severity=5, Facility=1, priority=13, timestamp=1509716429000} body: 66 6C 75 6D 65 3A 20 48 65 6C 6C 6F 2C 20 46 6C flume: Hello, Fl }
11. We can control the actual data that rsyslogd sends to us with the conf file. Leaving the "tail -f" and "Flume Agent" shells open, use your third shell to edit the flume.conf file (again, with "sudo")
*.* @@127.0.0.1:4242
12. Restart rsyslogd
[student@localhost ~]$ sudo systemctl restart rsyslog
13. Return to the flume agent window and verify that we're receiving all syslog messages.
17/11/03 12:33:20 INFO sink.LoggerSink: Event: { headers:{host=bigdata1, Severity=5, Facility=10, priority=85, timestamp=1509726798000} body: 73 75 64 6F 3A 20 73 74 75 64 65 6E 74 20 3A 20 sudo: student : } 17/11/03 12:33:20 INFO sink.LoggerSink: Event: { headers:{host=bigdata1, Severity=5, Facility=10, priority=85, timestamp=1509726798000} body: 70 6F 6C 6B 69 74 64 5B 36 35 34 5D 3A 20 52 65 polkitd[654]: Re } 17/11/03 12:33:20 INFO sink.LoggerSink: Event: { headers:{host=bigdata1, Severity=6, Facility=3, priority=30, timestamp=1509726798000} body: 73 79 73 74 65 6D 64 3A 20 53 74 61 72 74 69 6E systemd: Startin } 17/11/03 12:33:20 INFO sink.LoggerSink: Event: { headers:{host=bigdata1, Severity=6, Facility=5, priority=46, timestamp=1509726798000} body: 72 73 79 73 6C 6F 67 64 3A 20 5B 6F 72 69 67 69 rsyslogd: [origi } 17/11/03 12:33:20 INFO sink.LoggerSink: Event: { headers:{host=bigdata1, Severity=6, Facility=3, priority=30, timestamp=1509726798000} body: 73 79 73 74 65 6D 64 3A 20 53 74 61 72 74 65 64 systemd: Started } [...]
14. Press control-C in the Flume Agent window to quit the process.
15. Press control-C in the "tail -f" window to quit the process.
Part 2: Exec Agent
Getting the output of a process that dumps its output to screen is another common usage. While these entries can be dumped to log files, rotated, and then simply copied using HDFS, Flume presents a more elegant solution to this common problem, bypassing the extra middle steps and ensuring durability (when we choose a durable backing store like filing system or local database).
In this section we'll configure a "tail -f" exec source with a file-based channel. The file-based channel is one of the more reliable configurations, but it comes at a performance penalty.
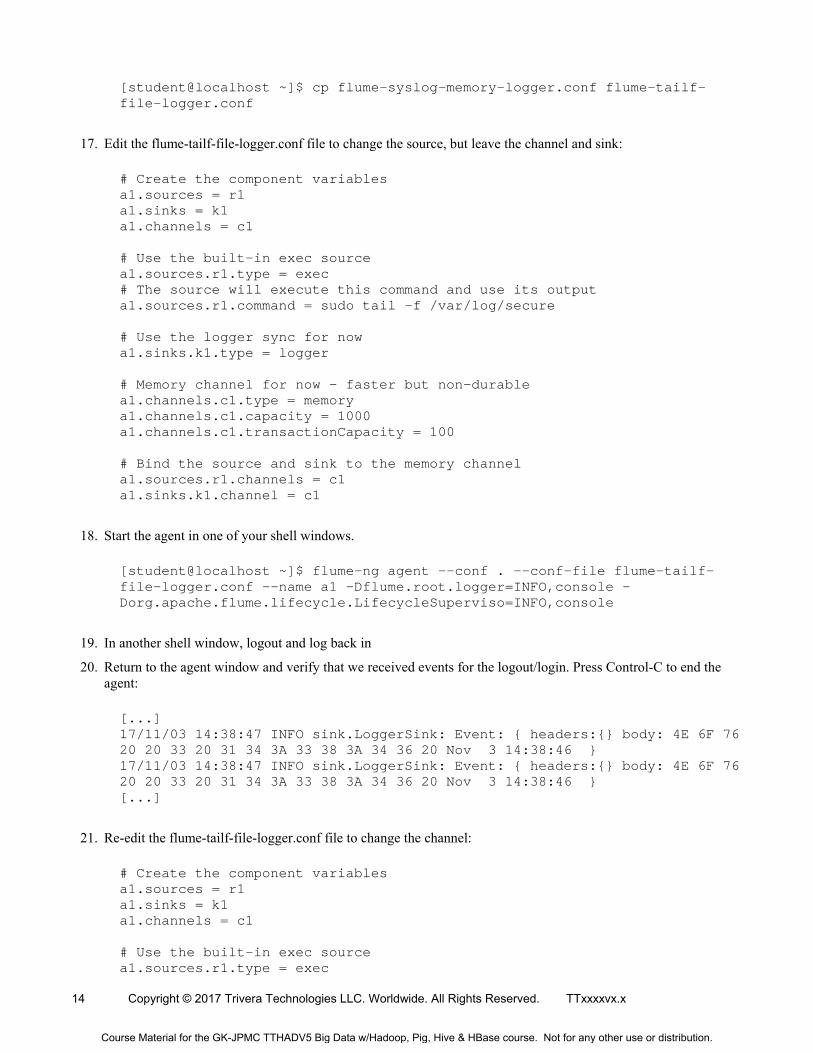
16. Copy the flume-syslog-memory-logger.conf file to flume-tailf-file-logger.conf
Course Material for the GK-JPMC TTHADV5 Big Data w/Hadoop, Pig, Hive & HBase course. Not for any other use or distribution.
14 Copyright © 2017 Trivera Technologies LLC. Worldwide. All Rights Reserved. TTxxxxvx.x
[student@localhost ~]$ cp flume-syslog-memory-logger.conf flume-tailf-file-logger.conf
17. Edit the flume-tailf-file-logger.conf file to change the source, but leave the channel and sink:
# Create the component variables a1.sources = r1 a1.sinks = k1 a1.channels = c1 # Use the built-in exec source a1.sources.r1.type = exec # The source will execute this command and use its output a1.sources.r1.command = sudo tail -f /var/log/secure # Use the logger sync for now a1.sinks.k1.type = logger # Memory channel for now - faster but non-durable a1.channels.c1.type = memory a1.channels.c1.capacity = 1000 a1.channels.c1.transactionCapacity = 100 # Bind the source and sink to the memory channel a1.sources.r1.channels = c1 a1.sinks.k1.channel = c1
18. Start the agent in one of your shell windows.
[student@localhost ~]$ flume-ng agent --conf . --conf-file flume-tailf-file-logger.conf --name a1 -Dflume.root.logger=INFO,console -Dorg.apache.flume.lifecycle.LifecycleSuperviso=INFO,console
19. In another shell window, logout and log back in
20. Return to the agent window and verify that we received events for the logout/login. Press Control-C to end the agent:
[...] 17/11/03 14:38:47 INFO sink.LoggerSink: Event: { headers:{} body: 4E 6F 76 20 20 33 20 31 34 3A 33 38 3A 34 36 20 Nov 3 14:38:46 } 17/11/03 14:38:47 INFO sink.LoggerSink: Event: { headers:{} body: 4E 6F 76 20 20 33 20 31 34 3A 33 38 3A 34 36 20 Nov 3 14:38:46 } [...]
21. Re-edit the flume-tailf-file-logger.conf file to change the channel:
# Create the component variables a1.sources = r1 a1.sinks = k1 a1.channels = c1 # Use the built-in exec source a1.sources.r1.type = exec
Course Material for the GK-JPMC TTHADV5 Big Data w/Hadoop, Pig, Hive & HBase course. Not for any other use or distribution.
TTxxxxvx.x Copyright © 2017 Trivera Technologies LLC., Worldwide. All Rights Reserved. 15
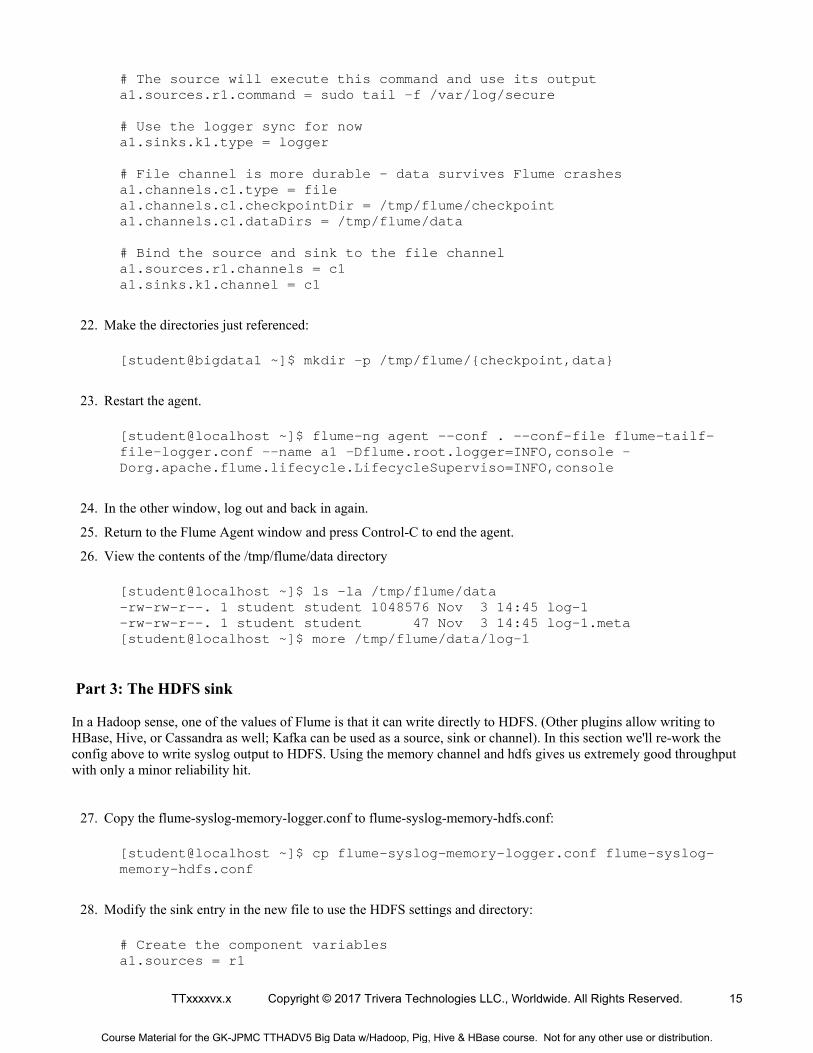
# The source will execute this command and use its output a1.sources.r1.command = sudo tail -f /var/log/secure # Use the logger sync for now a1.sinks.k1.type = logger # File channel is more durable - data survives Flume crashes a1.channels.c1.type = file a1.channels.c1.checkpointDir = /tmp/flume/checkpoint a1.channels.c1.dataDirs = /tmp/flume/data # Bind the source and sink to the file channel a1.sources.r1.channels = c1 a1.sinks.k1.channel = c1
22. Make the directories just referenced:
[student@bigdata1 ~]$ mkdir -p /tmp/flume/{checkpoint,data}
23. Restart the agent.
[student@localhost ~]$ flume-ng agent --conf . --conf-file flume-tailf-file-logger.conf --name a1 -Dflume.root.logger=INFO,console -Dorg.apache.flume.lifecycle.LifecycleSuperviso=INFO,console
24. In the other window, log out and back in again.
25. Return to the Flume Agent window and press Control-C to end the agent.
26. View the contents of the /tmp/flume/data directory
[student@localhost ~]$ ls -la /tmp/flume/data -rw-rw-r--. 1 student student 1048576 Nov 3 14:45 log-1 -rw-rw-r--. 1 student student 47 Nov 3 14:45 log-1.meta [student@localhost ~]$ more /tmp/flume/data/log-1
Part 3: The HDFS sink
In a Hadoop sense, one of the values of Flume is that it can write directly to HDFS. (Other plugins allow writing to HBase, Hive, or Cassandra as well; Kafka can be used as a source, sink or channel). In this section we'll re-work the config above to write syslog output to HDFS. Using the memory channel and hdfs gives us extremely good throughput with only a minor reliability hit.
27. Copy the flume-syslog-memory-logger.conf to flume-syslog-memory-hdfs.conf:
[student@localhost ~]$ cp flume-syslog-memory-logger.conf flume-syslog-memory-hdfs.conf
28. Modify the sink entry in the new file to use the HDFS settings and directory:
# Create the component variables a1.sources = r1
Course Material for the GK-JPMC TTHADV5 Big Data w/Hadoop, Pig, Hive & HBase course. Not for any other use or distribution.
16 Copyright © 2017 Trivera Technologies LLC. Worldwide. All Rights Reserved. TTxxxxvx.x
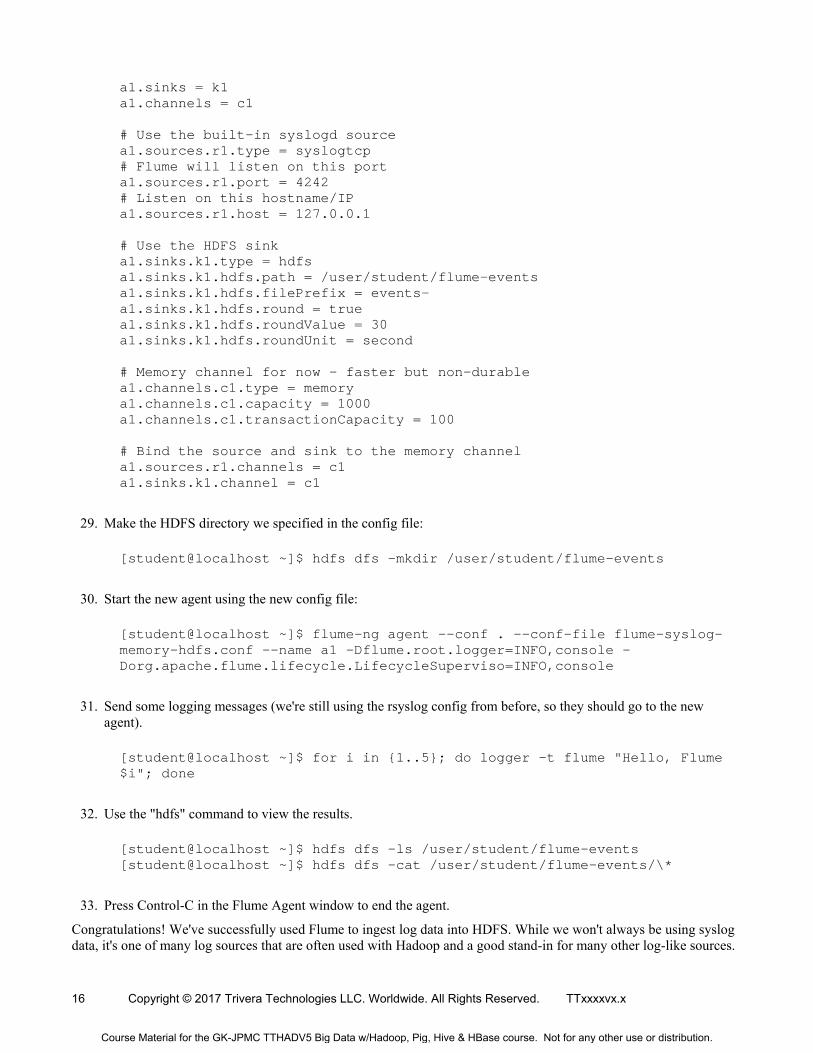
a1.sinks = k1 a1.channels = c1 # Use the built-in syslogd source a1.sources.r1.type = syslogtcp # Flume will listen on this port a1.sources.r1.port = 4242 # Listen on this hostname/IP a1.sources.r1.host = 127.0.0.1 # Use the HDFS sink a1.sinks.k1.type = hdfs a1.sinks.k1.hdfs.path = /user/student/flume-events a1.sinks.k1.hdfs.filePrefix = events- a1.sinks.k1.hdfs.round = true a1.sinks.k1.hdfs.roundValue = 30 a1.sinks.k1.hdfs.roundUnit = second # Memory channel for now - faster but non-durable a1.channels.c1.type = memory a1.channels.c1.capacity = 1000 a1.channels.c1.transactionCapacity = 100 # Bind the source and sink to the memory channel a1.sources.r1.channels = c1 a1.sinks.k1.channel = c1
29. Make the HDFS directory we specified in the config file:
[student@localhost ~]$ hdfs dfs -mkdir /user/student/flume-events
30. Start the new agent using the new config file:
[student@localhost ~]$ flume-ng agent --conf . --conf-file flume-syslog-memory-hdfs.conf --name a1 -Dflume.root.logger=INFO,console -Dorg.apache.flume.lifecycle.LifecycleSuperviso=INFO,console
31. Send some logging messages (we're still using the rsyslog config from before, so they should go to the new agent).
[student@localhost ~]$ for i in {1..5}; do logger -t flume "Hello, Flume $i"; done
32. Use the "hdfs" command to view the results.
[student@localhost ~]$ hdfs dfs -ls /user/student/flume-events [student@localhost ~]$ hdfs dfs -cat /user/student/flume-events/\*
33. Press Control-C in the Flume Agent window to end the agent.
Congratulations! We've successfully used Flume to ingest log data into HDFS. While we won't always be using syslog data, it's one of many log sources that are often used with Hadoop and a good stand-in for many other log-like sources.
Course Material for the GK-JPMC TTHADV5 Big Data w/Hadoop, Pig, Hive & HBase course. Not for any other use or distribution.
TTxxxxvx.x Copyright © 2017 Trivera Technologies LLC., Worldwide. All Rights Reserved. 17
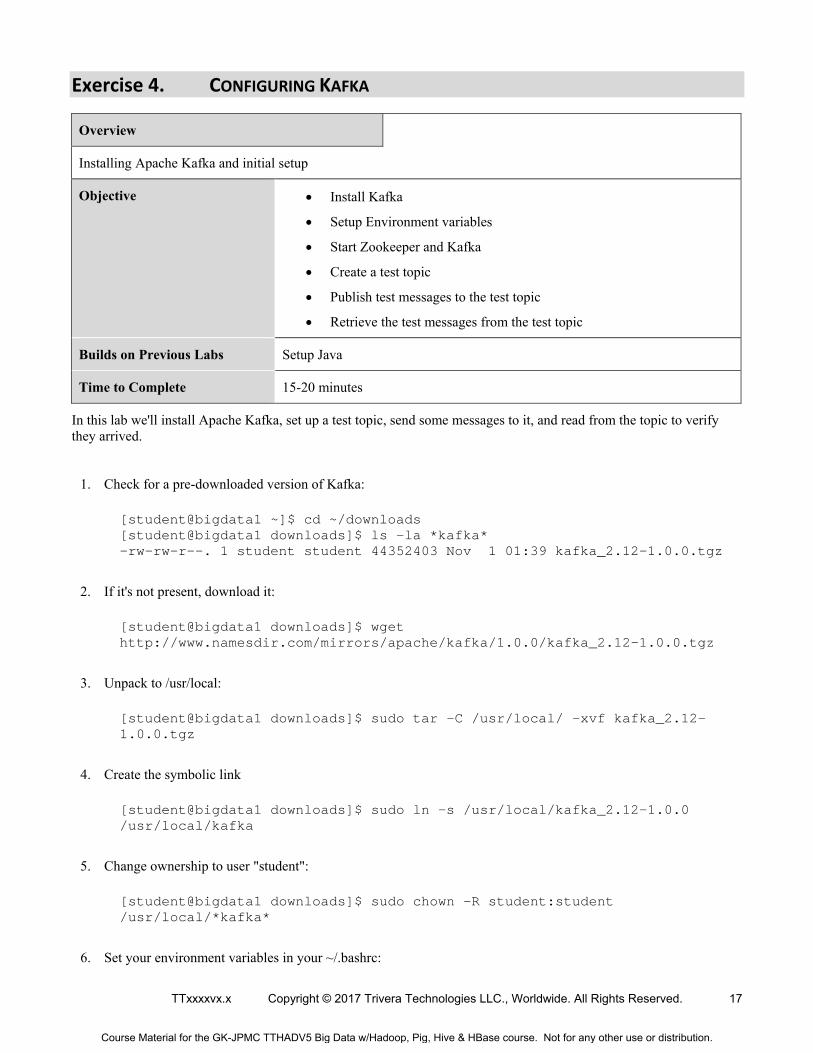
Exercise 4. CONFIGURING KAFKA
Overview
Installing Apache Kafka and initial setup
Objective Install Kafka
Setup Environment variables
Start Zookeeper and Kafka
Create a test topic
Publish test messages to the test topic
Retrieve the test messages from the test topic
Builds on Previous Labs Setup Java
Time to Complete 15-20 minutes
In this lab we'll install Apache Kafka, set up a test topic, send some messages to it, and read from the topic to verify they arrived.
1. Check for a pre-downloaded version of Kafka:
[student@bigdata1 ~]$ cd ~/downloads [student@bigdata1 downloads]$ ls -la *kafka* -rw-rw-r--. 1 student student 44352403 Nov 1 01:39 kafka_2.12-1.0.0.tgz
2. If it's not present, download it:
[student@bigdata1 downloads]$ wget http://www.namesdir.com/mirrors/apache/kafka/1.0.0/kafka_2.12-1.0.0.tgz
3. Unpack to /usr/local:
[student@bigdata1 downloads]$ sudo tar -C /usr/local/ -xvf kafka_2.12-1.0.0.tgz
4. Create the symbolic link
[student@bigdata1 downloads]$ sudo ln -s /usr/local/kafka_2.12-1.0.0 /usr/local/kafka
5. Change ownership to user "student":
[student@bigdata1 downloads]$ sudo chown -R student:student /usr/local/*kafka*
6. Set your environment variables in your ~/.bashrc:
Course Material for the GK-JPMC TTHADV5 Big Data w/Hadoop, Pig, Hive & HBase course. Not for any other use or distribution.
18 Copyright © 2017 Trivera Technologies LLC. Worldwide. All Rights Reserved. TTxxxxvx.x
[student@bigdata1 downloads]$ cd ~ [student@bigdata1 ~]$ echo ' > export KAFKA_HOME=/usr/local/kafka > export PATH=$PATH:$KAFKA_HOME/bin > ' >> ~/.bashrc
7. Source your ~/.bashrc so the variables take place for this session:
[student@bigdata1 ~]$ source ~/.bashrc
8. Start Zookeeper and Kafka
[student@bigdata1 downloads]$ zookeeper-server-start.sh $KAFKA_HOME/config/zookeeper.properties & [...] [student@bigdata1 downloads]$ kafka-server-start.sh $KAFKA_HOME/config/server.properties & [...]
9. Run JPS to verify we have a "Kafka" and "QuorumPeerMain" process:
[student@bigdata1 ~]$ jps 15249 Jps 14146 Kafka 12964 NodeManager 12391 DataNode 12567 SecondaryNameNode 12809 ResourceManager 12287 NameNode 13231 QuorumPeerMain
10. Create a test topic:
[student@bigdata1 downloads]$ kafka-topics.sh --create --zookeeper localhost:2181 --replication-factor 1 --partitions 1 --topic test [...] Created topic "test". [...]
11. List the available topics:
[student@bigdata1 ~]$ kafka-topics.sh --list --zookeeper localhost:2181 [...] test [...]
12. Submit a test message to the test topic. Each line is its own message, so hit enter after each.
[student@bigdata1 downloads]$ kafka-console-producer.sh --broker-list localhost:9092 --topic test Mr and Mrs Dursley, of number four, Privet Drive, were proud to say
Course Material for the GK-JPMC TTHADV5 Big Data w/Hadoop, Pig, Hive & HBase course. Not for any other use or distribution.
TTxxxxvx.x Copyright © 2017 Trivera Technologies LLC., Worldwide. All Rights Reserved. 19
that they were perfectly normal, thank you very much. They were the last people you'd expect to be involved in anything strange or mysterious, because they just didn't hold with such nonsense.
13. Read from the topic to verify the test message was received. Press Control-C to exit out of the topic consumer.
[student@bigdata1 ~]$ kafka-console-consumer.sh --bootstrap-server localhost:9092 --topic test --from-beginning [...] Mr and Mrs Dursley, of number four, Privet Drive, were proud to say that they were perfectly normal, thank you very much. They were the last people you'd expect to be involved in anything strange or mysterious, because they just didn't hold with such nonsense.
14. When necessary, you can stop the Kafka server by stopping the server and Zookeeper:
[student@bigdata1 ~ zookeeper-server-stop.sh [...] [student@bigdata1 ~]$ kafka-server-stop.sh [...]
15. If Kafka fails to stop (check again with "jps"), use the kill -KILL command:
[student@bigdata1 ~]$ jps 29202 Jps 12964 NodeManager 22726 QuorumPeerMain 12391 DataNode 12567 SecondaryNameNode 12809 ResourceManager 26410 Kafka 12287 NameNode [student@bigdata1 ~]$ kill -KILL 26410
Congratulations. We've successfully installed Kafka! We can use it as a source, sink, or channel for Flume, as a source and sink for NiFi, or for any kind of topic-oriented data flow.
Course Material for the GK-JPMC TTHADV5 Big Data w/Hadoop, Pig, Hive & HBase course. Not for any other use or distribution.
20 Copyright © 2017 Trivera Technologies LLC. Worldwide. All Rights Reserved. TTxxxxvx.x
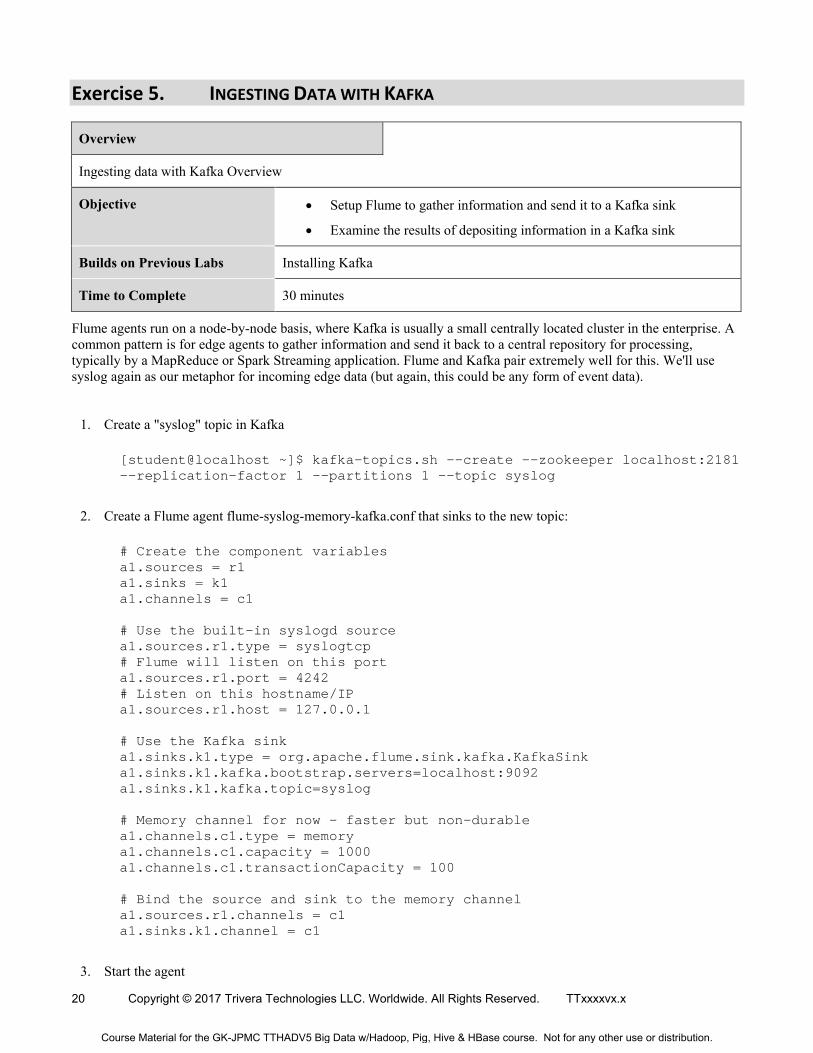
Exercise 5. INGESTING DATA WITH KAFKA
Overview
Ingesting data with Kafka Overview
Objective Setup Flume to gather information and send it to a Kafka sink
Examine the results of depositing information in a Kafka sink
Builds on Previous Labs Installing Kafka
Time to Complete 30 minutes
Flume agents run on a node-by-node basis, where Kafka is usually a small centrally located cluster in the enterprise. A common pattern is for edge agents to gather information and send it back to a central repository for processing, typically by a MapReduce or Spark Streaming application. Flume and Kafka pair extremely well for this. We'll use syslog again as our metaphor for incoming edge data (but again, this could be any form of event data).
1. Create a "syslog" topic in Kafka
[student@localhost ~]$ kafka-topics.sh --create --zookeeper localhost:2181 --replication-factor 1 --partitions 1 --topic syslog
2. Create a Flume agent flume-syslog-memory-kafka.conf that sinks to the new topic:
# Create the component variables a1.sources = r1 a1.sinks = k1 a1.channels = c1 # Use the built-in syslogd source a1.sources.r1.type = syslogtcp # Flume will listen on this port a1.sources.r1.port = 4242 # Listen on this hostname/IP a1.sources.r1.host = 127.0.0.1 # Use the Kafka sink a1.sinks.k1.type = org.apache.flume.sink.kafka.KafkaSink a1.sinks.k1.kafka.bootstrap.servers=localhost:9092 a1.sinks.k1.kafka.topic=syslog # Memory channel for now - faster but non-durable a1.channels.c1.type = memory a1.channels.c1.capacity = 1000 a1.channels.c1.transactionCapacity = 100 # Bind the source and sink to the memory channel a1.sources.r1.channels = c1 a1.sinks.k1.channel = c1
3. Start the agent
Course Material for the GK-JPMC TTHADV5 Big Data w/Hadoop, Pig, Hive & HBase course. Not for any other use or distribution.
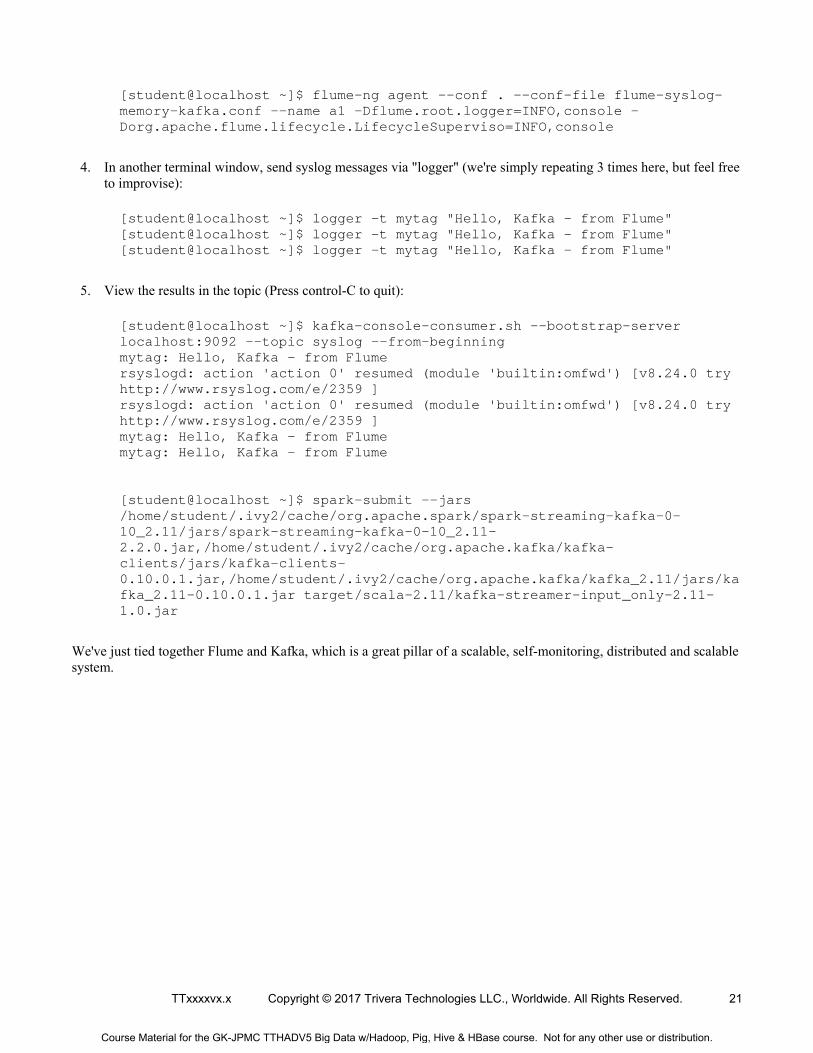
TTxxxxvx.x Copyright © 2017 Trivera Technologies LLC., Worldwide. All Rights Reserved. 21
[student@localhost ~]$ flume-ng agent --conf . --conf-file flume-syslog-memory-kafka.conf --name a1 -Dflume.root.logger=INFO,console -Dorg.apache.flume.lifecycle.LifecycleSuperviso=INFO,console
4. In another terminal window, send syslog messages via "logger" (we're simply repeating 3 times here, but feel free to improvise):
[student@localhost ~]$ logger -t mytag "Hello, Kafka - from Flume" [student@localhost ~]$ logger -t mytag "Hello, Kafka - from Flume" [student@localhost ~]$ logger -t mytag "Hello, Kafka - from Flume"
5. View the results in the topic (Press control-C to quit):
[student@localhost ~]$ kafka-console-consumer.sh --bootstrap-server localhost:9092 --topic syslog --from-beginning mytag: Hello, Kafka - from Flume rsyslogd: action 'action 0' resumed (module 'builtin:omfwd') [v8.24.0 try http://www.rsyslog.com/e/2359 ] rsyslogd: action 'action 0' resumed (module 'builtin:omfwd') [v8.24.0 try http://www.rsyslog.com/e/2359 ] mytag: Hello, Kafka - from Flume mytag: Hello, Kafka - from Flume
[student@localhost ~]$ spark-submit --jars /home/student/.ivy2/cache/org.apache.spark/spark-streaming-kafka-0-10_2.11/jars/spark-streaming-kafka-0-10_2.11-2.2.0.jar,/home/student/.ivy2/cache/org.apache.kafka/kafka-clients/jars/kafka-clients-0.10.0.1.jar,/home/student/.ivy2/cache/org.apache.kafka/kafka_2.11/jars/kafka_2.11-0.10.0.1.jar target/scala-2.11/kafka-streamer-input_only-2.11-1.0.jar
We've just tied together Flume and Kafka, which is a great pillar of a scalable, self-monitoring, distributed and scalable system.
Course Material for the GK-JPMC TTHADV5 Big Data w/Hadoop, Pig, Hive & HBase course. Not for any other use or distribution.

22 Copyright © 2017 Trivera Technologies LLC. Worldwide. All Rights Reserved. TTxxxxvx.x
Exercise 6. EXPORTING DATA WITH KAFKA
Overview
Exporting data with Kafka Overview
Objective Set up Kafka to provide information to Flume
Setup an HDFS sink
Utilize Flume to act as the intermediary between the Kafka source and HDFS sink
Work with the combination to support bi-directional communications
Builds on Previous Labs Installing Kafka
Time to Complete 30 minutes
In the previous lab, we piped syslog data into Kafka to be eventually processed by a Map Reduce or Spark Streaming application. In this exercise, we'll create the reverse queue so that the results of that processing can be received from another topic into flume, which will dump them into HDFS.
1. Create a "processed" queue in Kafka
[student@localhost ~]$ kafka-topics.sh --create --zookeeper localhost:2181 --replication-factor 1 --partitions 1 --topic processed
2. Create a Flume flume-kafka-memory-hdfs.conf with a Kafka source and sinking to HDFS
# Create the component variables a1.sources = r1 a1.sinks = k1 a1.channels = c1 # Use the Kafka Source a1.sources.r1.type = org.apache.flume.source.kafka.KafkaSource a1.sources.r1.kafka.bootstrap.servers = localhost:9092 a1.sources.r1.kafka.topics = processed # Use the HDFS sink a1.sinks.k1.type = hdfs a1.sinks.k1.hdfs.path = /user/student/spark/processed/ a1.sinks.k1.hdfs.filePrefix = syslog- a1.sinks.k1.hdfs.round = true a1.sinks.k1.hdfs.roundValue = 30 a1.sinks.k1.hdfs.roundUnit = second # Memory channel for now - faster but non-durable a1.channels.c1.type = memory a1.channels.c1.capacity = 1000 a1.channels.c1.transactionCapacity = 100 # Bind the source and sink to the memory channel
Course Material for the GK-JPMC TTHADV5 Big Data w/Hadoop, Pig, Hive & HBase course. Not for any other use or distribution.
TTxxxxvx.x Copyright © 2017 Trivera Technologies LLC., Worldwide. All Rights Reserved. 23
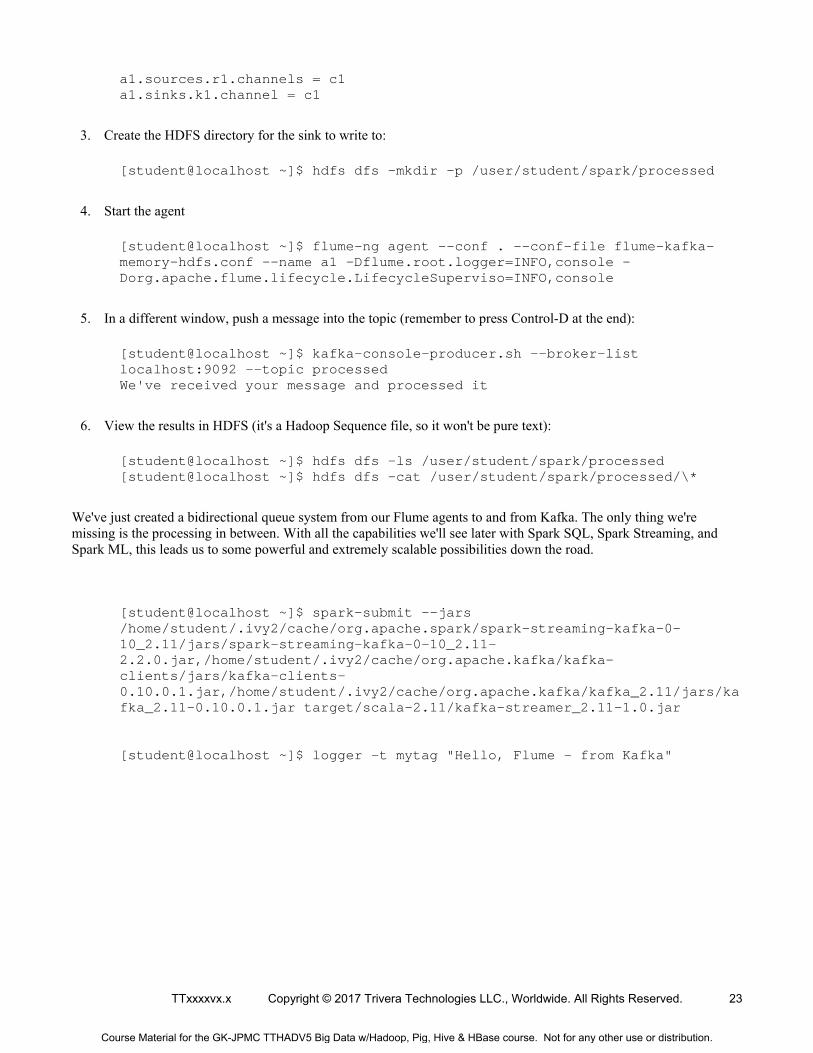
a1.sources.r1.channels = c1 a1.sinks.k1.channel = c1
3. Create the HDFS directory for the sink to write to:
[student@localhost ~]$ hdfs dfs -mkdir -p /user/student/spark/processed
4. Start the agent
[student@localhost ~]$ flume-ng agent --conf . --conf-file flume-kafka-memory-hdfs.conf --name a1 -Dflume.root.logger=INFO,console -Dorg.apache.flume.lifecycle.LifecycleSuperviso=INFO,console
5. In a different window, push a message into the topic (remember to press Control-D at the end):
[student@localhost ~]$ kafka-console-producer.sh --broker-list localhost:9092 --topic processed We've received your message and processed it
6. View the results in HDFS (it's a Hadoop Sequence file, so it won't be pure text):
[student@localhost ~]$ hdfs dfs -ls /user/student/spark/processed [student@localhost ~]$ hdfs dfs -cat /user/student/spark/processed/\*
We've just created a bidirectional queue system from our Flume agents to and from Kafka. The only thing we're missing is the processing in between. With all the capabilities we'll see later with Spark SQL, Spark Streaming, and Spark ML, this leads us to some powerful and extremely scalable possibilities down the road.
[student@localhost ~]$ spark-submit --jars /home/student/.ivy2/cache/org.apache.spark/spark-streaming-kafka-0-10_2.11/jars/spark-streaming-kafka-0-10_2.11-2.2.0.jar,/home/student/.ivy2/cache/org.apache.kafka/kafka-clients/jars/kafka-clients-0.10.0.1.jar,/home/student/.ivy2/cache/org.apache.kafka/kafka_2.11/jars/kafka_2.11-0.10.0.1.jar target/scala-2.11/kafka-streamer_2.11-1.0.jar
[student@localhost ~]$ logger -t mytag "Hello, Flume - from Kafka"
Course Material for the GK-JPMC TTHADV5 Big Data w/Hadoop, Pig, Hive & HBase course. Not for any other use or distribution.
24 Copyright © 2017 Trivera Technologies LLC. Worldwide. All Rights Reserved. TTxxxxvx.x
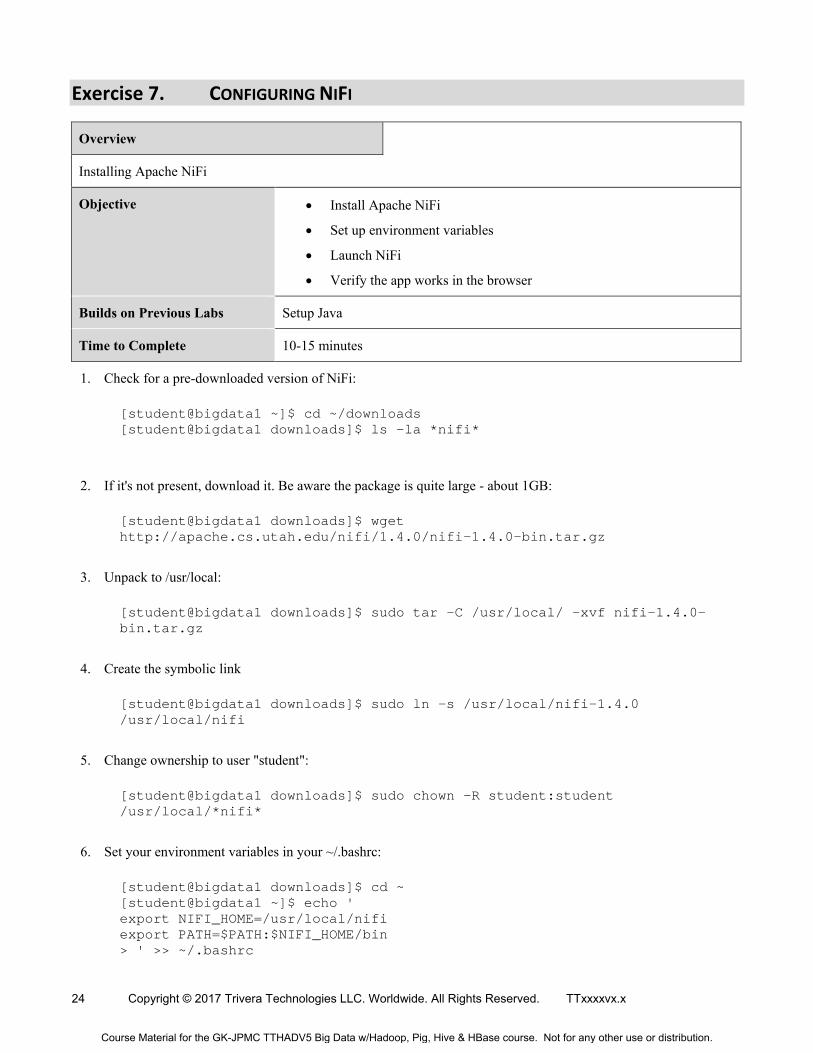
Exercise 7. CONFIGURING NIFI
Overview
Installing Apache NiFi
Objective Install Apache NiFi
Set up environment variables
Launch NiFi
Verify the app works in the browser
Builds on Previous Labs Setup Java
Time to Complete 10-15 minutes
1. Check for a pre-downloaded version of NiFi:
[student@bigdata1 ~]$ cd ~/downloads [student@bigdata1 downloads]$ ls -la *nifi*
2. If it's not present, download it. Be aware the package is quite large - about 1GB:
[student@bigdata1 downloads]$ wget http://apache.cs.utah.edu/nifi/1.4.0/nifi-1.4.0-bin.tar.gz
3. Unpack to /usr/local:
[student@bigdata1 downloads]$ sudo tar -C /usr/local/ -xvf nifi-1.4.0-bin.tar.gz
4. Create the symbolic link
[student@bigdata1 downloads]$ sudo ln -s /usr/local/nifi-1.4.0 /usr/local/nifi
5. Change ownership to user "student":
[student@bigdata1 downloads]$ sudo chown -R student:student /usr/local/*nifi*
6. Set your environment variables in your ~/.bashrc:
[student@bigdata1 downloads]$ cd ~ [student@bigdata1 ~]$ echo ' export NIFI_HOME=/usr/local/nifi export PATH=$PATH:$NIFI_HOME/bin > ' >> ~/.bashrc
Course Material for the GK-JPMC TTHADV5 Big Data w/Hadoop, Pig, Hive & HBase course. Not for any other use or distribution.

TTxxxxvx.x Copyright © 2017 Trivera Technologies LLC., Worldwide. All Rights Reserved. 25
7. Source your ~/.bashrc so the variables take place for this session:
[student@bigdata1 ~]$ source ~/.bashrc
8. Launch Nifi:
[student@bigdata1 downloads]$ nifi.sh run
9. Open your browser to http://your_external_ip:8080/nifi[http://your_external_ip:8080/nifi, window="_blank"] (you may need to check with your instructor for your external IP address - it's likely different than what "ip a" or "ifconfig -a" shows).
Course Material for the GK-JPMC TTHADV5 Big Data w/Hadoop, Pig, Hive & HBase course. Not for any other use or distribution.
26 Copyright © 2017 Trivera Technologies LLC. Worldwide. All Rights Reserved. TTxxxxvx.x
Exercise 8. INGESTING DATA WITH NIFI
Overview
Creating and executing a simple ETL flow with Apache NiFi
Objective Create a simple flow with NiFi
Execute the flow
Explore the NiFi interface
Builds on Previous Labs Installing NiFi
Time to Complete 30 minutes
NiFi is an extremely powerful and versatile tool that can perform ETL among many other things. We'll focus on its use as an ETL tool in this lab.
Part 1 - Creating a simple flow
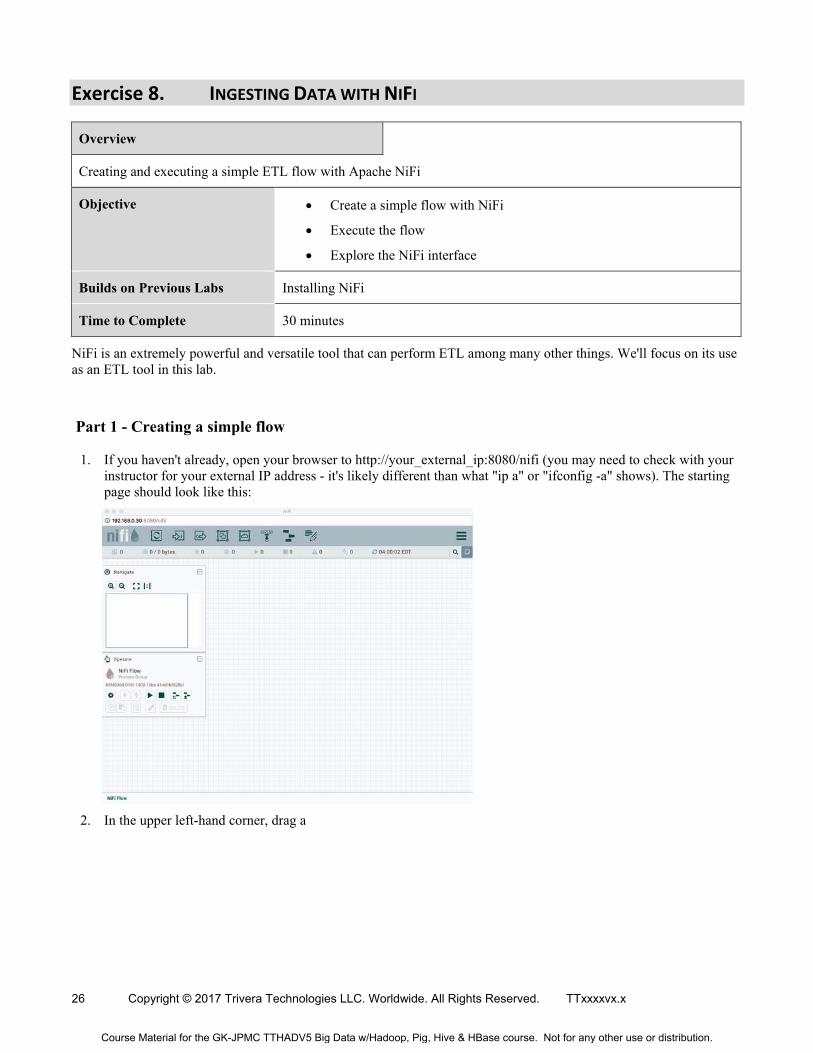
1. If you haven't already, open your browser to http://your_external_ip:8080/nifi (you may need to check with your instructor for your external IP address - it's likely different than what "ip a" or "ifconfig -a" shows). The starting page should look like this:
2. In the upper left-hand corner, drag a
Course Material for the GK-JPMC TTHADV5 Big Data w/Hadoop, Pig, Hive & HBase course. Not for any other use or distribution.
TTxxxxvx.x Copyright © 2017 Trivera Technologies LLC., Worldwide. All Rights Reserved. 27
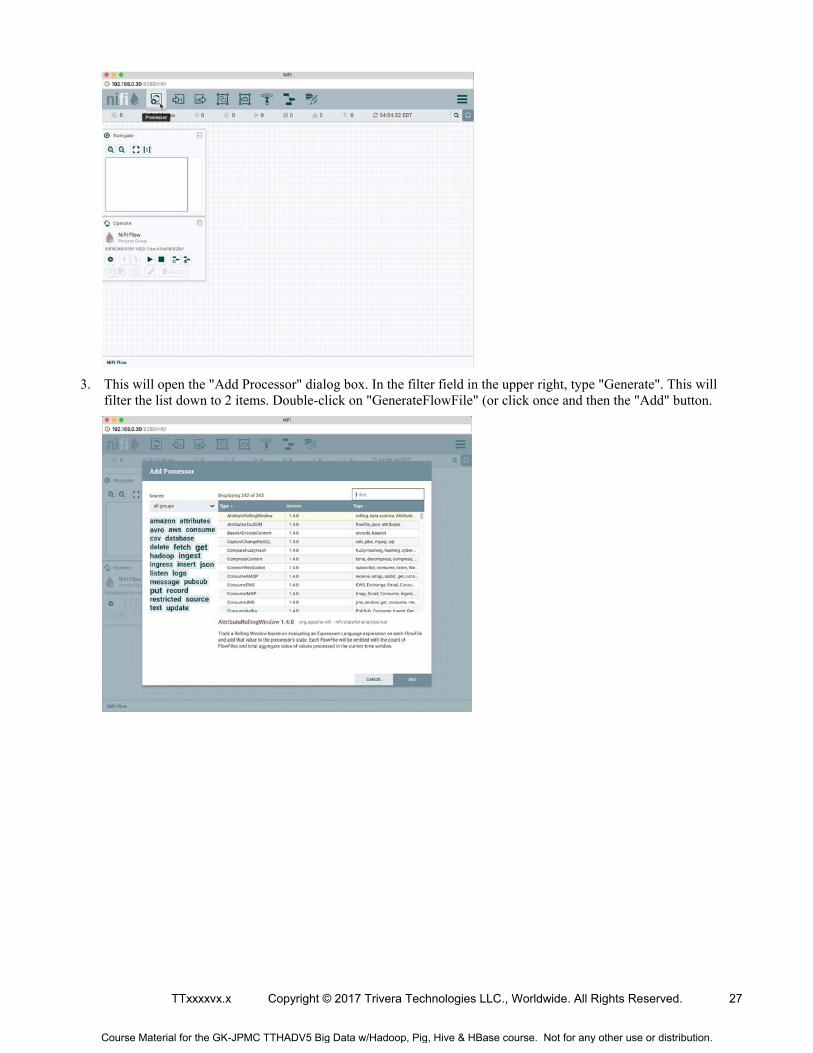
3. This will open the "Add Processor" dialog box. In the filter field in the upper right, type "Generate". This will filter the list down to 2 items. Double-click on "GenerateFlowFile" (or click once and then the "Add" button.
Course Material for the GK-JPMC TTHADV5 Big Data w/Hadoop, Pig, Hive & HBase course. Not for any other use or distribution.
28 Copyright © 2017 Trivera Technologies LLC. Worldwide. All Rights Reserved. TTxxxxvx.x
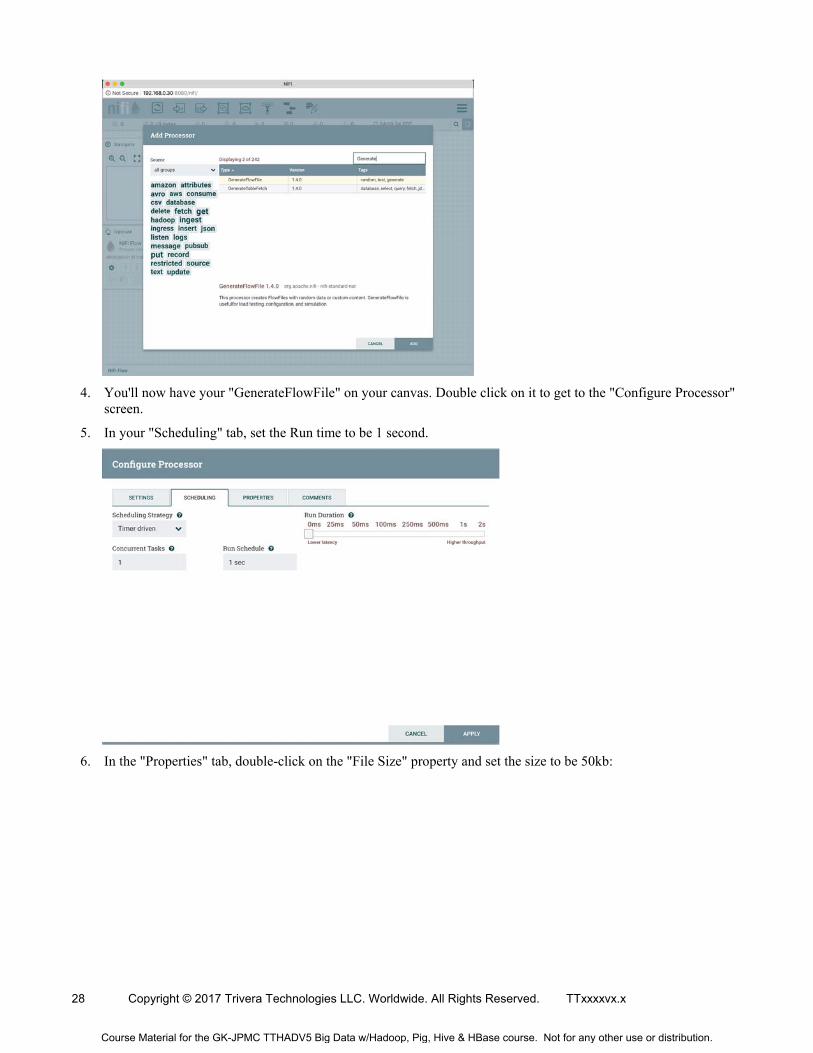
4. You'll now have your "GenerateFlowFile" on your canvas. Double click on it to get to the "Configure Processor" screen.
5. In your "Scheduling" tab, set the Run time to be 1 second.
6. In the "Properties" tab, double-click on the "File Size" property and set the size to be 50kb:
Course Material for the GK-JPMC TTHADV5 Big Data w/Hadoop, Pig, Hive & HBase course. Not for any other use or distribution.
TTxxxxvx.x Copyright © 2017 Trivera Technologies LLC., Worldwide. All Rights Reserved. 29
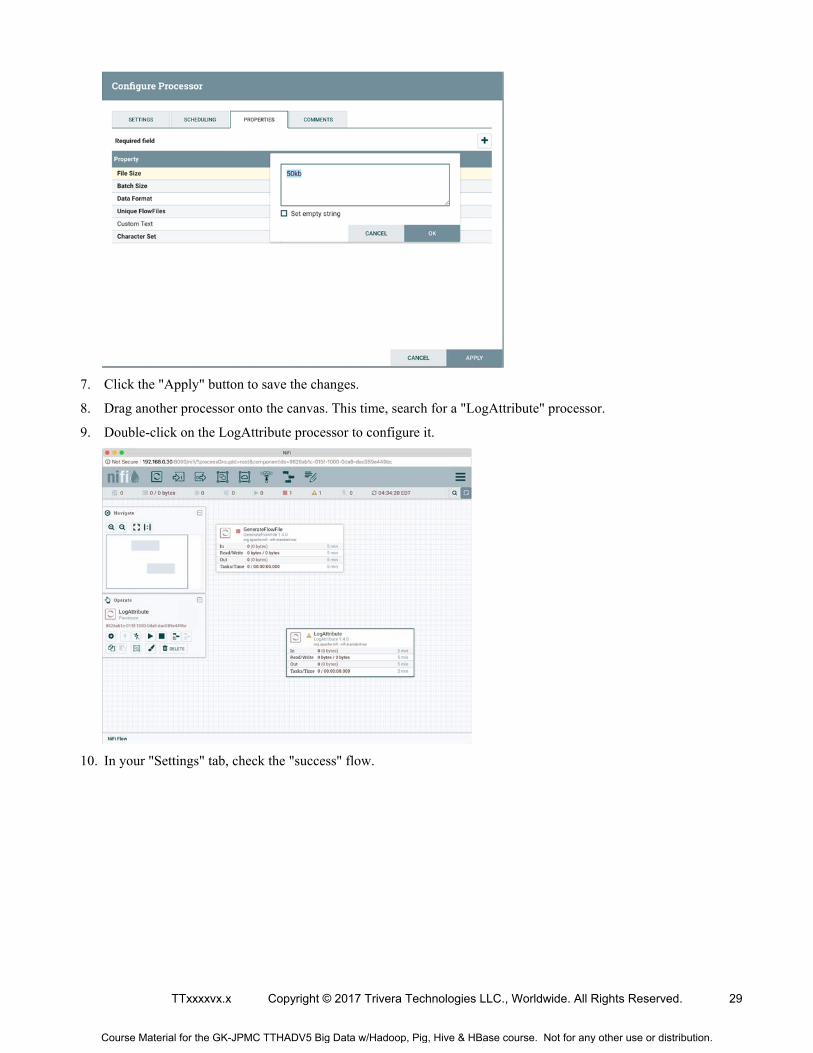
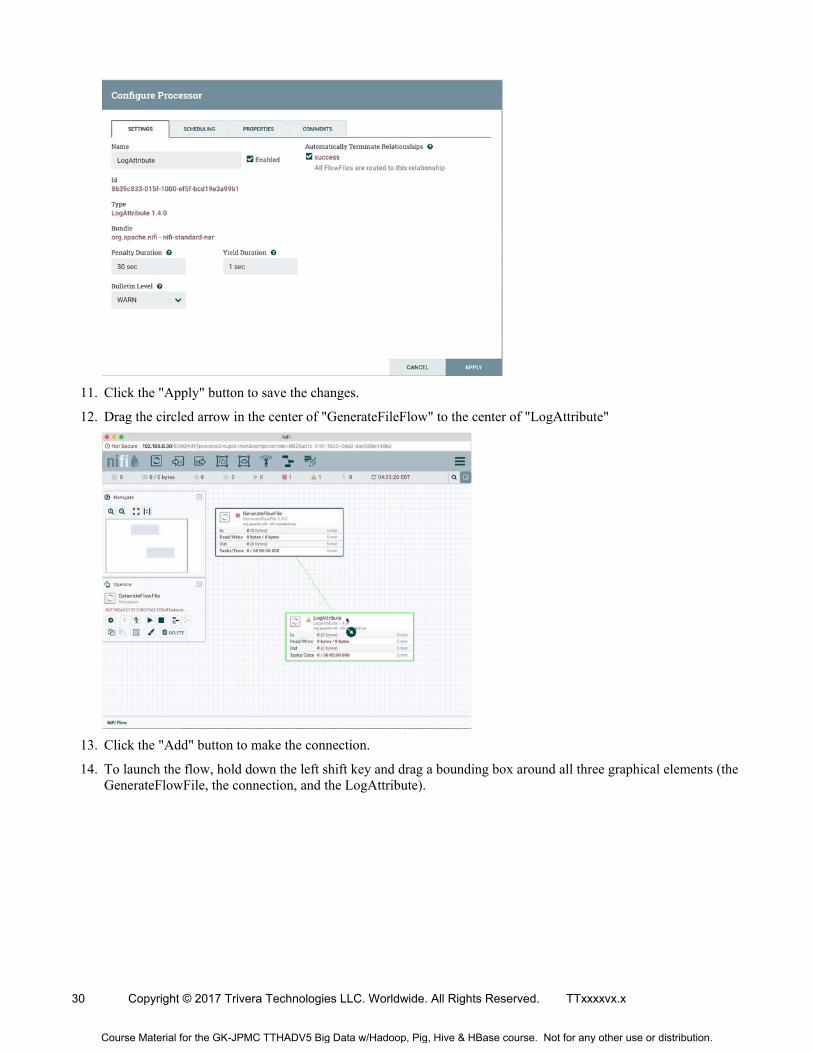
7. Click the "Apply" button to save the changes.
8. Drag another processor onto the canvas. This time, search for a "LogAttribute" processor.
9. Double-click on the LogAttribute processor to configure it.
10. In your "Settings" tab, check the "success" flow.
Course Material for the GK-JPMC TTHADV5 Big Data w/Hadoop, Pig, Hive & HBase course. Not for any other use or distribution.
30 Copyright © 2017 Trivera Technologies LLC. Worldwide. All Rights Reserved. TTxxxxvx.x
11. Click the "Apply" button to save the changes.
12. Drag the circled arrow in the center of "GenerateFileFlow" to the center of "LogAttribute"
13. Click the "Add" button to make the connection.
14. To launch the flow, hold down the left shift key and drag a bounding box around all three graphical elements (the GenerateFlowFile, the connection, and the LogAttribute).
Course Material for the GK-JPMC TTHADV5 Big Data w/Hadoop, Pig, Hive & HBase course. Not for any other use or distribution.
TTxxxxvx.x Copyright © 2017 Trivera Technologies LLC., Worldwide. All Rights Reserved. 31
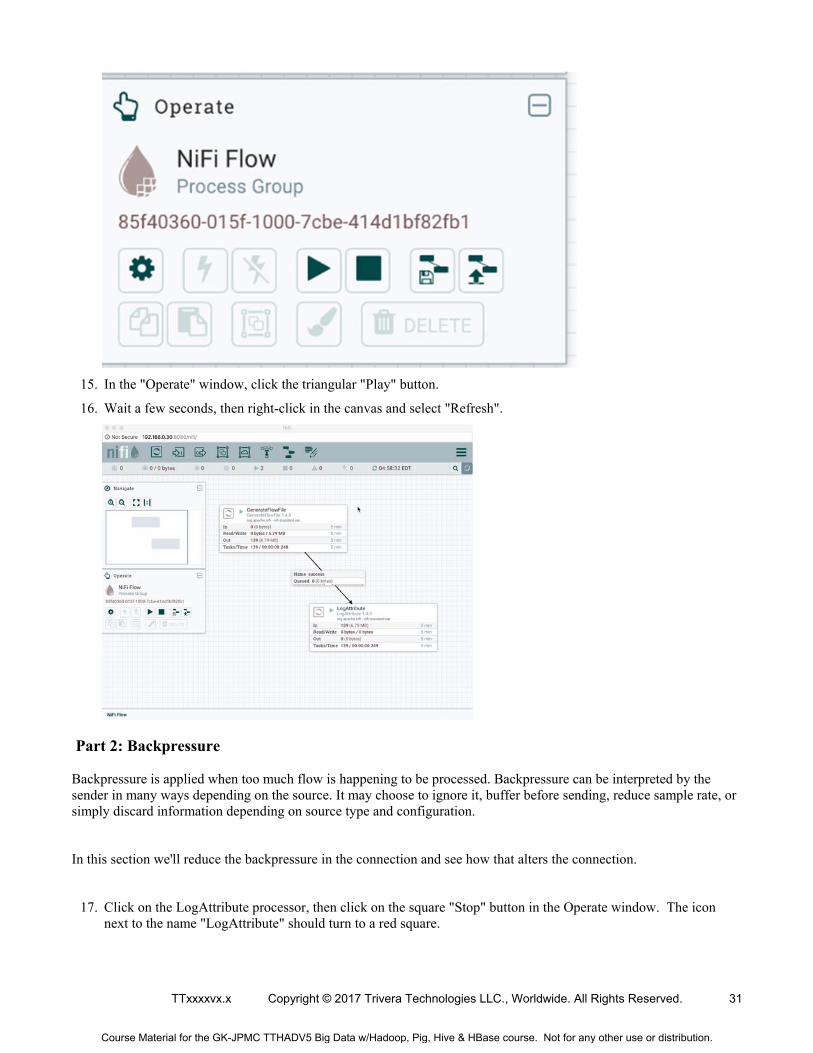
15. In the "Operate" window, click the triangular "Play" button.
16. Wait a few seconds, then right-click in the canvas and select "Refresh".
Part 2: Backpressure
Backpressure is applied when too much flow is happening to be processed. Backpressure can be interpreted by the sender in many ways depending on the source. It may choose to ignore it, buffer before sending, reduce sample rate, or simply discard information depending on source type and configuration.
In this section we'll reduce the backpressure in the connection and see how that alters the connection.
17. Click on the LogAttribute processor, then click on the square "Stop" button in the Operate window. The icon next to the name "LogAttribute" should turn to a red square.
Course Material for the GK-JPMC TTHADV5 Big Data w/Hadoop, Pig, Hive & HBase course. Not for any other use or distribution.
32 Copyright © 2017 Trivera Technologies LLC. Worldwide. All Rights Reserved. TTxxxxvx.x
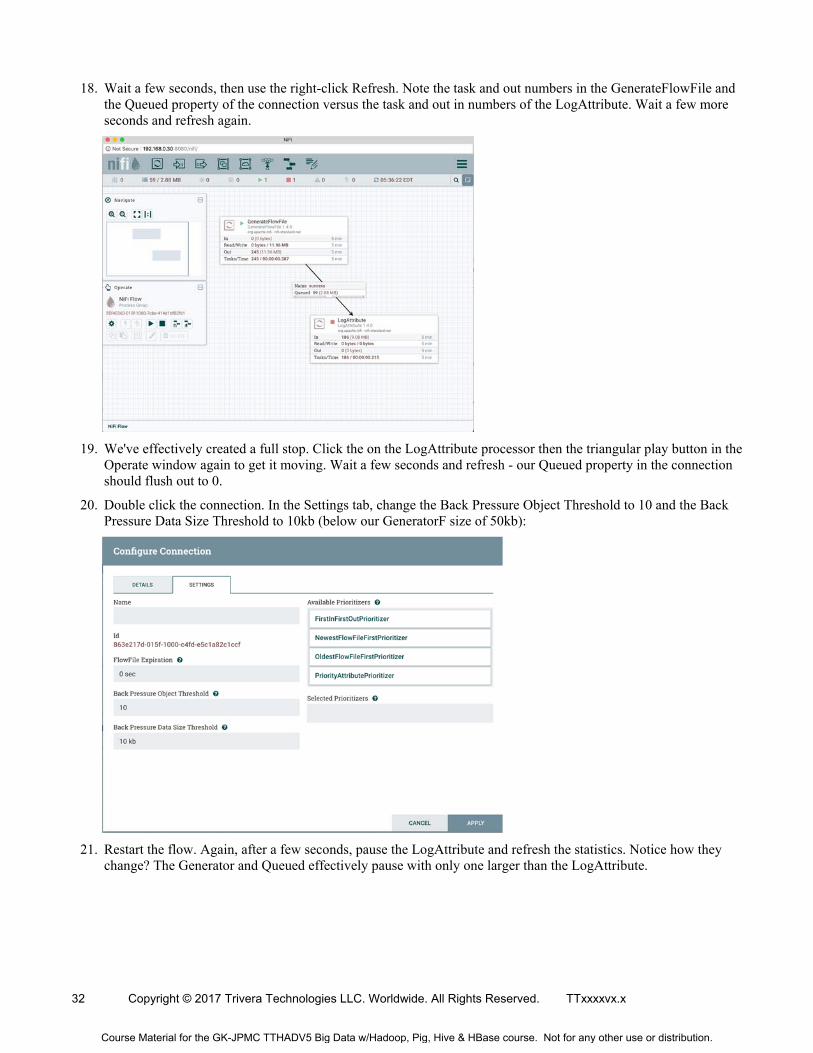
18. Wait a few seconds, then use the right-click Refresh. Note the task and out numbers in the GenerateFlowFile and the Queued property of the connection versus the task and out in numbers of the LogAttribute. Wait a few more seconds and refresh again.
19. We've effectively created a full stop. Click the on the LogAttribute processor then the triangular play button in the Operate window again to get it moving. Wait a few seconds and refresh - our Queued property in the connection should flush out to 0.
20. Double click the connection. In the Settings tab, change the Back Pressure Object Threshold to 10 and the Back Pressure Data Size Threshold to 10kb (below our GeneratorF size of 50kb):
21. Restart the flow. Again, after a few seconds, pause the LogAttribute and refresh the statistics. Notice how they change? The Generator and Queued effectively pause with only one larger than the LogAttribute.
Course Material for the GK-JPMC TTHADV5 Big Data w/Hadoop, Pig, Hive & HBase course. Not for any other use or distribution.
TTxxxxvx.x Copyright © 2017 Trivera Technologies LLC., Worldwide. All Rights Reserved. 33
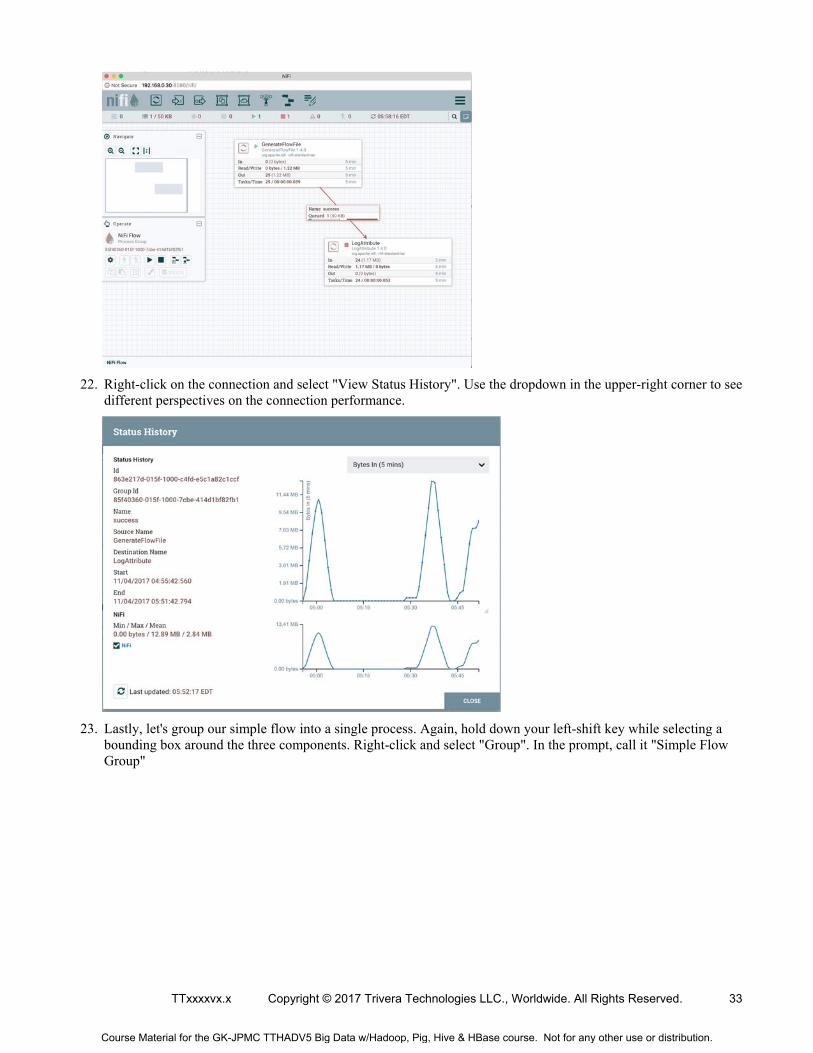
22. Right-click on the connection and select "View Status History". Use the dropdown in the upper-right corner to see different perspectives on the connection performance.
23. Lastly, let's group our simple flow into a single process. Again, hold down your left-shift key while selecting a bounding box around the three components. Right-click and select "Group". In the prompt, call it "Simple Flow Group"
Course Material for the GK-JPMC TTHADV5 Big Data w/Hadoop, Pig, Hive & HBase course. Not for any other use or distribution.
34 Copyright © 2017 Trivera Technologies LLC. Worldwide. All Rights Reserved. TTxxxxvx.x
24. You can start or stop this group now. If you double click on it, it will open a sub-canvas that shows you just these components. You can right-click on the sub-canvas and select "Leave group" to return to the top-level canvas.
25. Right-Click on the "Simple Flow Group" and select "Stop" to stop the entire flow (this is identical to selecting it and pressing the square stop button in the Operate window).
Part 3: Complex Flows
The simple flow above is fine for learning the basics, but the real world has more complex needs. In this example we'll read from a Kafka topic. Processing will be done in two processors. The first will dump all messages into an HDFS directory in Parquet format for later processing by MapReduce or Spark. The second processor will look for "urgent" syslog entries and copy them out to a folder in our normal Unix filesystem.
26. In the component toolbar, select the "Process Group" and drag it onto the canvas.
27. When prompted for a name, call it "Syslog Process Group":
Course Material for the GK-JPMC TTHADV5 Big Data w/Hadoop, Pig, Hive & HBase course. Not for any other use or distribution.
TTxxxxvx.x Copyright © 2017 Trivera Technologies LLC., Worldwide. All Rights Reserved. 35
28. Double click on the new process group to enter the sub-canvas that focuses just on this group.
29. Add a "ConsumeKafkaRecord_011" Processor. Have it read from the "syslog" topic using an GrokReader and an AvroRecordSetWriter. The scheduling should be set to 1 second.
30. Configure the GrokReader with a suitable GrokExpression.
31. Add a "PutParquet" Processor. Have it dump its files out to "/user/student/nifi/syslog" folder (we'll create this folder later).
32. Add RouteText processor and connect it. Set its MatchingStrategy to "Matches Regular Expression". Set the "Grouping Regular Expression" to an appropriate value matching "urgent" syslog entries.
33. Connect the ConsumeKafkaRecord_011 to the PutParquet processor.
34. Connect the ConsumeKafkaRecord_011 to the RouteText processor.
35. Add a PutFile processor. Set the Directory property to "/home/student/urgent"
36. Connect the RouteText processor to the PutFile processor.
37. Create a directory for NiFi to dump output to in HDFS:
[student@localhost ~]$ hdfs dfs -mkdir -p /user/student/nifi/syslog
38. Create a directory for NiFi to dump urgent output to our normal home folder:
[student@localhost ~]$ mkdir ~/urgent
39. Ensure that all the agents and Kafka are running.
40. "Play" the new flow.
41. Use "logger" to send messages. Make sure some of them are marked "urgent".
42. Check the results in the "urgent" directory. Did your results arrive?
43. Check to Parquet data in HDFS. Did our messages arrive there?
There are many things we can do with NiFi beyond what we've seen so far. If you have extra time, look at the other processors (there are many, including email, IM (Slack), S3, HTTP, and more), templating, provenance (and data lineage), and the statistics
Course Material for the GK-JPMC TTHADV5 Big Data w/Hadoop, Pig, Hive & HBase course. Not for any other use or distribution.
36 Copyright © 2017 Trivera Technologies LLC. Worldwide. All Rights Reserved. TTxxxxvx.x
OVERVIEW OF SETUP
Overview
Setup our environment for Hadoop/Spark
Objective Setup basic development and diagnostic tools
Setup JDK 8
Setup Maven
Setup Scala and the SBT
Setup MariaDB
Setup Hadoop
Builds on Previous Labs CentOS/RHEL 7 Install
Time to Complete 45-60 minutes
In this lab, we'll set up the environment for development. Depending on class configuration, some or all of this may have been set up ahead of time. Check with your Instructor or your environment to be sure.
Setup is broken up into discrete parts:
Setup basic development and diagnostic tools
Setup JDK 8
Setup Maven
Setup Scala and the SBT
Setup MariaDB
Setup Hadoop
Setup Spark
Course Material for the GK-JPMC TTHADV5 Big Data w/Hadoop, Pig, Hive & HBase course. Not for any other use or distribution.

TTxxxxvx.x Copyright © 2017 Trivera Technologies LLC., Worldwide. All Rights Reserved. 37
SETUP BASIC DEVOLOPMENT ENVIRONMENT
Overview
Set up a basic development environment
Objective Install key tools and libraries like GCC, Make, epel, netcat and more
Verify that the compiler works
Verify our hostname can be resolved
Disable FirewallD and change SELinux to Permissive Mode
Builds on Previous Labs CentOS/RHEL 7 Install
Time to Complete 10 minutes
Installing the basic development environment
44. If you're working with a vanilla CentOS/RHEL installation, install some basics first. (Check or ask your instructor if it's safe to skip this step. If unsure, re-run it - it shouldn't hurt to re-run this command even if it already has been run before):
[student@localhost ~]$ sudo yum install -y wget nano gcc gcc-c++ make binutils libtool autoconf automake kernel-devel epel-release telnet nc rsync openssl-devel zlib-devel lz4-devel bzip2-devel xz-devel snappy-devel
45. Verify the gcc compiler is installed (we're just checking that it will execute - the "fatal error" is expected).
[student@localhost ~]$ gcc gcc: fatal error: no input files compilation terminated.
46. Make sure we can ping our own host by name - some utilities avoid using "localhost" and try to connect back using the hostname instead.
[student@localhost ~]$ ping -c 1 `hostname` PING bigdata1 (192.168.0.30) 56(84) bytes of data. 64 bytes from bigdata1 (192.168.0.30): icmp_seq=1 ttl=64 time=0.034 ms --- bigdata1 ping statistics --- 1 packets transmitted, 1 received, 0% packet loss, time 0ms rtt min/avg/max/mdev = 0.034/0.034/0.034/0.000 ms
47. If ping doesn't return, modify the /etc/hosts to include the ip and hostname.
48. Modify the /etc/sysconfig/selinux to put SELinux into "permissive" mode:
# This file controls the state of SELinux on the system. # SELINUX= can take one of these three values: # enforcing - SELinux security policy is enforced. # permissive - SELinux prints warnings instead of enforcing. # disabled - No SELinux policy is loaded.
Course Material for the GK-JPMC TTHADV5 Big Data w/Hadoop, Pig, Hive & HBase course. Not for any other use or distribution.
38 Copyright © 2017 Trivera Technologies LLC. Worldwide. All Rights Reserved. TTxxxxvx.x
#SELINUX=enforcing SELINUX=permissive # SELINUXTYPE= can take one of three two values: # targeted - Targeted processes are protected, # minimum - Modification of targeted policy. Only selected processes are protected. # mls - Multi Level Security protection. SELINUXTYPE=targeted
49. Disable the firewall:
[student@localhost downloads]$ sudo systemctl stop firewalld [student@localhost downloads]$ sudo systemctl disable firewalld Removed symlink /etc/systemd/system/multi-user.target.wants/firewalld.service. Removed symlink /etc/systemd/system/dbus-org.fedoraproject.FirewallD1.service.
A note about security
We're put SELinux into "permissive mode". You may experience problems with the labs as written if you're in "enforcing mode".
Similarly, you may want to disable "firewalld".
These actions are not recommended in production mode.
Course Material for the GK-JPMC TTHADV5 Big Data w/Hadoop, Pig, Hive & HBase course. Not for any other use or distribution.
TTxxxxvx.x Copyright © 2017 Trivera Technologies LLC., Worldwide. All Rights Reserved. 39
SETUP JAVA
Overview
Setup Java Development Kit and Environment variables
Objective Install the JDK
Create JAVA_HOME and update PATH
Verify that both JRE and JDK execute from our path
Builds on Previous Labs Setup Dev
Time to Complete 10 minutes
Installing the JDK
1. Depending on setup, you may or may not have the JDK already installed. Cassandra only needs a JRE, but we'll need the full JDK for later use.
[student@localhost ~]$ java -version java version "1.8.0_151" Java(TM) SE Runtime Environment (build 1.8.0_151-b12) Java HotSpot(TM) 64-Bit Server VM (build 25.151-b12, mixed mode) [student@localhost ~]$ javac -version javac 1.8.0_151
2. If you got Java 8 (as 1.8) versions (any JDK8 version number should be fine), skip to the next step.
3. If you got a "command not found" for either "java" or "javac", then you'll need to install the JDK.
4. Check your ~/downloads folder to see if the file has already been downloaded.
[student@localhost ~]$ ls -la ~/downloads/ total 384200 drwxrwxr-x. 2 student student 113 Oct 12 12:05 . drwx------. 6 student student 171 Oct 14 08:54 .. -rw-rw-r--. 1 student student 174163338 Oct 9 18:30 jdk-8u151-linux-x64.rpm
5. If necessary, download the Oracle JDK using the wget or curl command. Note using the link below is agreeing to the Terms and Conditions in the Oracle Java EULA.
[student@localhost ~]$ cd ~/downloads [student@localhost ~/downloads]$ wget -c --header "Cookie: oraclelicense=accept-securebackup-cookie" http://download.oracle.com/otn-pub/java/jdk/8u151-b12/e758a0de34e24606bca991d704f6dcbf/jdk-8u151-linux-x64.rpm
6. If necessary, install the JDK with "rpm":
[student@localhost ~/downloads]$ sudo rpm -i jdk-8u151-linux-x64.rpm
Course Material for the GK-JPMC TTHADV5 Big Data w/Hadoop, Pig, Hive & HBase course. Not for any other use or distribution.
40 Copyright © 2017 Trivera Technologies LLC. Worldwide. All Rights Reserved. TTxxxxvx.x
7. Add or verify the environment variables into your ~/.bashrc:
# User specific aliases and functions export JAVA_HOME=/usr/java/default export PATH=$PATH:$JAVA_HOME/bin
8. Use the "source" command to load the contents of your ~/.bashrc into the current session.
[student@localhost ~/downloads]$ cd ~ [student@localhost ~]$ source ~/.bashrc
9. Now re-run the java version commands to verify installation.
[student@localhost ~]$ java -version java version "1.8.0_151" Java(TM) SE Runtime Environment (build 1.8.0_151-b12) Java HotSpot(TM) 64-Bit Server VM (build 25.151-b12, mixed mode) [student@localhost ~]$ javac -version javac 1.8.0_151
Course Material for the GK-JPMC TTHADV5 Big Data w/Hadoop, Pig, Hive & HBase course. Not for any other use or distribution.
TTxxxxvx.x Copyright © 2017 Trivera Technologies LLC., Worldwide. All Rights Reserved. 41
SETUP MAVEN
Overview
Install Maven for future use
Objective Install a maven-aware Yum repo
Install Maven
Verify installation
Builds on Previous Labs Setup Java
Time to Complete 10 minutes
Installing Maven
1. Check for Maven pre-installed. If it is, you can skip the rest of these installation steps:
[student@localhost ~]$ mvn --version Apache Maven 3.3.9 (bb52d8502b132ec0a5a3f4c09453c07478323dc5; 2015-11-10T11:41:47-05:00) Maven home: /usr/share/maven Java version: 1.8.0_151, vendor: Oracle Corporation Java home: /usr/java/jdk1.8.0_151/jre Default locale: en_US, platform encoding: UTF-8 OS name: "linux", version: "3.10.0-693.el7.x86_64", arch: "amd64", family: "unix"
2. If it didn't exist, we'll start by downloading the Maven Yum repo and altering it for our version of CentOS/RHEL (we're assuming "7" here - change accordingly) then do a "yum install":
[student@localhost ~]$ sudo wget http://repos.fedorapeople.org/repos/dchen/apache-maven/epel-apache-maven.repo -O /etc/yum.repos.d/epel-apache-maven.repo [student@localhost ~]$ sudo sed -i s/\$releasever/7/g /etc/yum.repos.d/epel-apache-maven.repo [student@localhost ~]$ sudo yum install -y apache-maven
3. Check again for maven's version (we'd expect 3.3.9 or above)
[student@localhost ~]$ mvn --version Apache Maven 3.3.9 (bb52d8502b132ec0a5a3f4c09453c07478323dc5; 2015-11-10T11:41:47-05:00) Maven home: /usr/share/maven Java version: 1.8.0_151, vendor: Oracle Corporation Java home: /usr/java/jdk1.8.0_151/jre Default locale: en_US, platform encoding: UTF-8 OS name: "linux", version: "3.10.0-693.el7.x86_64", arch: "amd64", family: "unix"
[student@localhost ~]$ cat >> ~/.bashrc < EOT
Course Material for the GK-JPMC TTHADV5 Big Data w/Hadoop, Pig, Hive & HBase course. Not for any other use or distribution.
42 Copyright © 2017 Trivera Technologies LLC. Worldwide. All Rights Reserved. TTxxxxvx.x
export MAVEN_HOME=/usr/bin EOT
[student@localhost ~]$ source ~/.bashrc
Course Material for the GK-JPMC TTHADV5 Big Data w/Hadoop, Pig, Hive & HBase course. Not for any other use or distribution.
TTxxxxvx.x Copyright © 2017 Trivera Technologies LLC., Worldwide. All Rights Reserved. 43
SETUP SCALA AND THE SCALA BUILD TOOL (SBT)
Overview
Setup Scala and SBT
Objective Install Scala and the SBT
Set Environment variables
Verify installation
Builds on Previous Labs Setup Java
Time to Complete 10 minutes
Scala is a language popular in Data Science and used a lot in Spark- and Akka- programming.
SBT is the Scala Build Tool, which builds on Maven but uses simpler Scala-esque config files (build.sbt).
We'll want to have both Scala and SBT later for Spark.
Installing Scala and the SBT
1. Check for a working Scala compiler (any version 2.11 or higher should work):
[student@localhost ~]$ scalac -version Scala compiler version 2.12.4 -- Copyright 2002-2017, LAMP/EPFL and Lightbend, Inc.
2. Check for a working SBT. The last line tells us the version number (any version 1.0 or higher should work) - this means that it's installed (the warning is that we don't have a current project set up with a build.sbt file in the current or parent directories - that's fine). The first time this command runs it may download many dependencies.
[student@localhost ~]$ sbt sbtVersion [warn] No sbt.version set in project/build.properties, base directory: /home/student/downloads [info] Set current project to downloads (in build file:/home/student/downloads/) [info] 1.0.2
3. If you have both the Scala compiler and SBT reporting good version numbers, skip to the next step.
4. If "scalac" is not installed, check your downloads folder for the Scala RPM.
[student@localhost ~]$ cd ~/downloads/ [student@localhost ~/downloads]$ ls -la *scala* -rw-rw-r--. 1 student student 131916329 Oct 11 04:05 scala-2.12.4.rpm
5. If it doesn't exist, download it.
Course Material for the GK-JPMC TTHADV5 Big Data w/Hadoop, Pig, Hive & HBase course. Not for any other use or distribution.
44 Copyright © 2017 Trivera Technologies LLC. Worldwide. All Rights Reserved. TTxxxxvx.x
[student@localhost ~/downloads]$ wget https://downloads.lightbend.com/scala/2.12.4/scala-2.12.4.rpm
6. Once you have the downloaded file, install it and verify the version again:
[student@localhost ~/downloads]$ sudo rpm -i scala-2.12.4.rpm [student@localhost ~/downloads]$ scalac -version Scala compiler version 2.12.4 -- Copyright 2002-2017, LAMP/EPFL and Lightbend, Inc.
7. If SBT wasn't installed, check your downloads folder for SBT.
[student@localhost ~]$ cd ~/downloads/ [student@localhost ~/downloads]$ ls -la *sbt* -rw-rw-r--. 1 student student 59752308 Sep 19 13:43 sbt-1.0.2.tgz
8. If it doesn't exist, download it.
[student@localhost ~/downloads]$ wget https://github.com/sbt/sbt/releases/download/v1.0.2/sbt-1.0.2.tgz
9. Once you have the downloaded file, extract SBT to /usr/local
[student@localhost ~/downloads]$ sudo tar -C /usr/local/ -xvf sbt-1.0.2.tgz
10. Set environment variables
[student@localhost ~/downloads]$ echo ' export SBT_HOME=/usr/local/sbt export PATH=$PATH:$SBT_HOME/bin' >> ~/.bashrc
11. Source your ~/.bashrc to use these environment variables for the current session.
[student@localhost ~/downloads]$ source ~/.bashrc
12. Try to verify the version again:
[student@localhost ~/downloads]$ sbt sbtVersion [warn] No sbt.version set in project/build.properties, base directory: /home/student/downloads [info] Set current project to downloads (in build file:/home/student/downloads/) [info] 1.0.2
Course Material for the GK-JPMC TTHADV5 Big Data w/Hadoop, Pig, Hive & HBase course. Not for any other use or distribution.
TTxxxxvx.x Copyright © 2017 Trivera Technologies LLC., Worldwide. All Rights Reserved. 45
SETUP THE MARIADB
Overview
Install and Setup MariaDB
Objective Install a MariaDB Yum Repo
Install MariaDB
Run the Secure Installation
Create the classroom database and student user
Create a ~/.my.cnf file for easy logins
Builds on Previous Labs Setup the Basic Development Environment
Time to Complete 10 minutes
Installing the MariaDB
1. Check for the MariaDB.repo file in your ~/downloads folder. If it's not there, create it:
# MariaDB 10.2 CentOS repository list - created 2017-10-27 21:00 UTC # http://downloads.mariadb.org/mariadb/repositories/ [mariadb] name = MariaDB baseurl = http://yum.mariadb.org/10.2/centos7-amd64 gpgkey=https://yum.mariadb.org/RPM-GPG-KEY-MariaDB gpgcheck=1
# MariaDB 10.2 CentOS repository list # http://downloads.mariadb.org/mariadb/repositories/ [mariadb] name = MariaDB baseurl = http://yum.mariadb.org/10.2/centos6-amd64 gpgkey=https://yum.mariadb.org/RPM-GPG-KEY-MariaDB gpgcheck=1
2. Copy the repo file to the repos directory
[student@localhost downloads]$ sudo cp MariaDB.repo /etc/yum.repos.d/
3. Install MariaDB server
[student@localhost ~]$ sudo yum install -y MariaDB-server MariaDB-client
4. Set the server to launch at startup
[student@localhost ~]$ sudo systemctl enable mariadb
Course Material for the GK-JPMC TTHADV5 Big Data w/Hadoop, Pig, Hive & HBase course. Not for any other use or distribution.
46 Copyright © 2017 Trivera Technologies LLC. Worldwide. All Rights Reserved. TTxxxxvx.x
5. Start the service for the current OS instance
[student@localhost ~]$ sudo systemctl start mariadb
6. Run the secure setup utility. When asked for the "root" password the first time, just press enter (there is no password at first). Then set the root password to something reasonably secure (and confirm it). Press enter for all the remaining default choices, disabling remote root access, removing anonymous users, removing the test database, and reloading the privilege table:
[student@localhost ~]$ mysql_secure_installation NOTE: RUNNING ALL PARTS OF THIS SCRIPT IS RECOMMENDED FOR ALL MariaDB [...] Enter current password for root (enter for none): [...] Set root password? [Y/n] New password: Re-enter new password: Password updated successfully! Reloading privilege tables.. ... Success! [...] Remove anonymous users? [Y/n] ... Success! [...] Disallow root login remotely? [Y/n] ... Success! [...] Remove test database and access to it? [Y/n] [...] ... Success! [...] Reload privilege tables now? [Y/n] ... Success! [...] Thanks for using MariaDB!
7. Use the MySQL command line tool to connect to the database (use the password you supplied in the Secure Installation step when prompted):
[student@bigdata1 ~]$ mysql -u root -p
8. Create a "student" user:
MariaDB [(none)]> create user 'student'@'localhost' identified by 'p@$$w0rd';
Course Material for the GK-JPMC TTHADV5 Big Data w/Hadoop, Pig, Hive & HBase course. Not for any other use or distribution.
TTxxxxvx.x Copyright © 2017 Trivera Technologies LLC., Worldwide. All Rights Reserved. 47
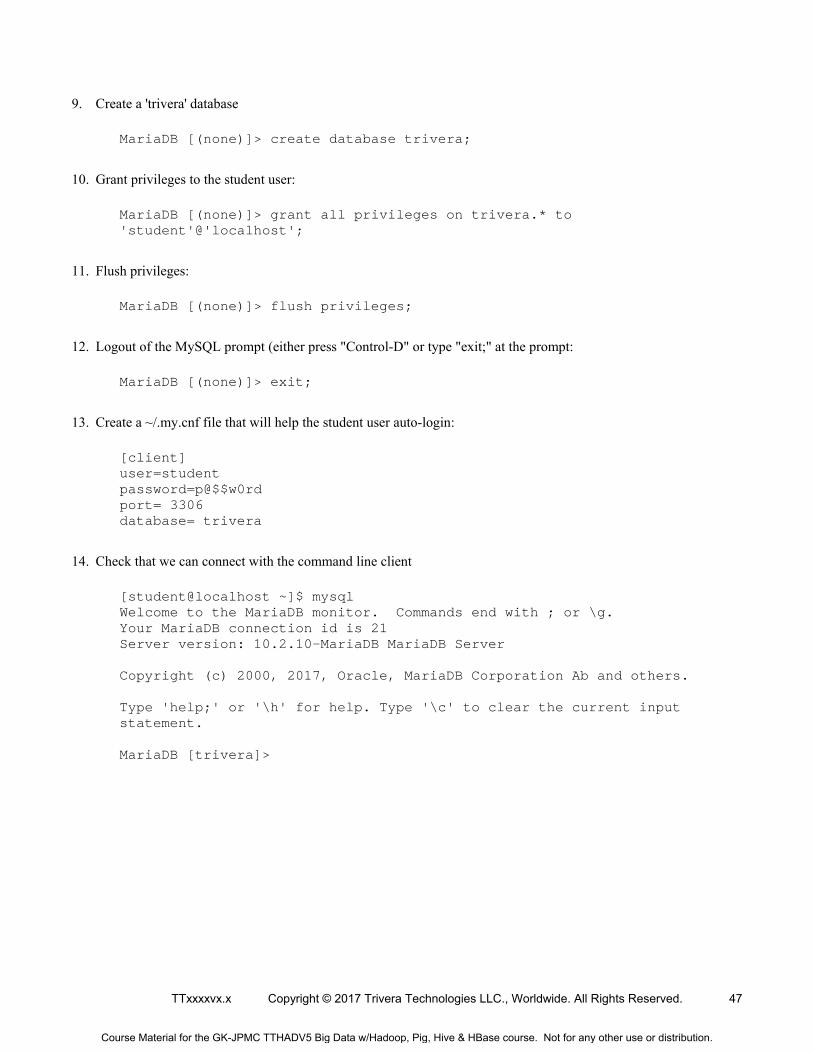
9. Create a 'trivera' database
MariaDB [(none)]> create database trivera;
10. Grant privileges to the student user:
MariaDB [(none)]> grant all privileges on trivera.* to 'student'@'localhost';
11. Flush privileges:
MariaDB [(none)]> flush privileges;
12. Logout of the MySQL prompt (either press "Control-D" or type "exit;" at the prompt:
MariaDB [(none)]> exit;
13. Create a ~/.my.cnf file that will help the student user auto-login:
[client] user=student password=p@$$w0rd port= 3306 database= trivera
14. Check that we can connect with the command line client
[student@localhost ~]$ mysql Welcome to the MariaDB monitor. Commands end with ; or \g. Your MariaDB connection id is 21 Server version: 10.2.10-MariaDB MariaDB Server Copyright (c) 2000, 2017, Oracle, MariaDB Corporation Ab and others. Type 'help;' or '\h' for help. Type '\c' to clear the current input statement. MariaDB [trivera]>
Course Material for the GK-JPMC TTHADV5 Big Data w/Hadoop, Pig, Hive & HBase course. Not for any other use or distribution.
48 Copyright © 2017 Trivera Technologies LLC. Worldwide. All Rights Reserved. TTxxxxvx.x
SETUP HADOOP
Overview
Setup Hadoop for a cluster of 1
Objective Enable passphrase-less SSH logins
Install Hadoop
Set Environment Variables
Configure key Hadoop config files
Prime HDFS
Start and stop the DFS and YARN daemons
Test basic HDFS functionality
Builds on Previous Labs Setup Java
Time to Complete 15-20 minutes
Installing Hadoop
Installing Hadoop (and many related utilities) is very straight-forward for a basic install.
We'll download it (or check our downloads folder for a pre-existing download), extract it, and set some environment variables. In Hadoop's case, we'll also need to make some minor config file changes, set up passphrase-less SSH, then start the respective daemons.
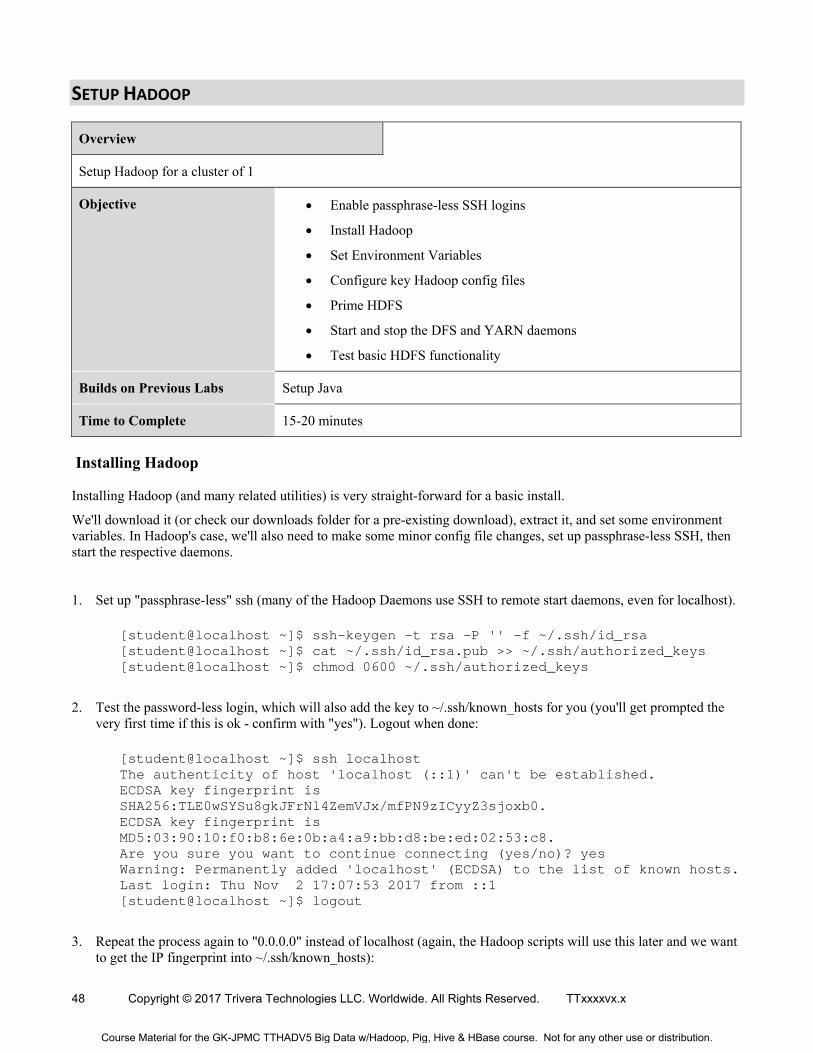
1. Set up "passphrase-less" ssh (many of the Hadoop Daemons use SSH to remote start daemons, even for localhost).
[student@localhost ~]$ ssh-keygen -t rsa -P '' -f ~/.ssh/id_rsa [student@localhost ~]$ cat ~/.ssh/id_rsa.pub >> ~/.ssh/authorized_keys [student@localhost ~]$ chmod 0600 ~/.ssh/authorized_keys
2. Test the password-less login, which will also add the key to ~/.ssh/known_hosts for you (you'll get prompted the very first time if this is ok - confirm with "yes"). Logout when done:
[student@localhost ~]$ ssh localhost The authenticity of host 'localhost (::1)' can't be established. ECDSA key fingerprint is SHA256:TLE0wSYSu8gkJFrNl4ZemVJx/mfPN9zICyyZ3sjoxb0. ECDSA key fingerprint is MD5:03:90:10:f0:b8:6e:0b:a4:a9:bb:d8:be:ed:02:53:c8. Are you sure you want to continue connecting (yes/no)? yes Warning: Permanently added 'localhost' (ECDSA) to the list of known hosts. Last login: Thu Nov 2 17:07:53 2017 from ::1 [student@localhost ~]$ logout
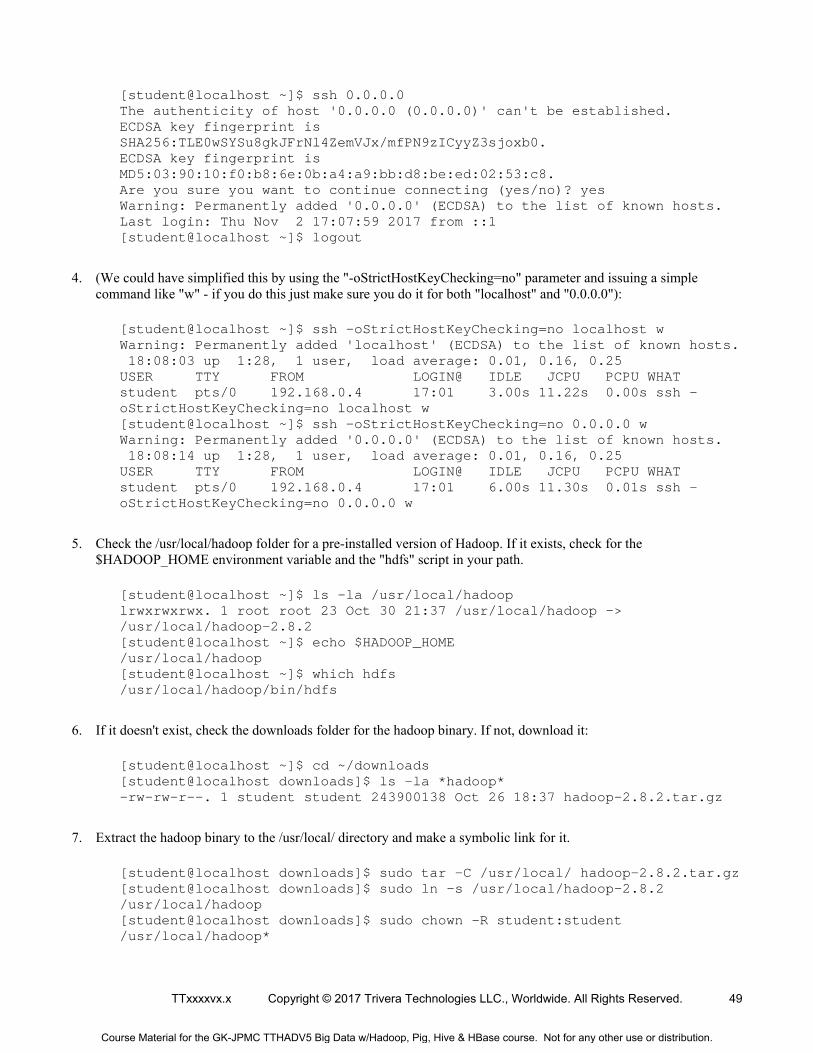
3. Repeat the process again to "0.0.0.0" instead of localhost (again, the Hadoop scripts will use this later and we want to get the IP fingerprint into ~/.ssh/known_hosts):
Course Material for the GK-JPMC TTHADV5 Big Data w/Hadoop, Pig, Hive & HBase course. Not for any other use or distribution.
TTxxxxvx.x Copyright © 2017 Trivera Technologies LLC., Worldwide. All Rights Reserved. 49
[student@localhost ~]$ ssh 0.0.0.0 The authenticity of host '0.0.0.0 (0.0.0.0)' can't be established. ECDSA key fingerprint is SHA256:TLE0wSYSu8gkJFrNl4ZemVJx/mfPN9zICyyZ3sjoxb0. ECDSA key fingerprint is MD5:03:90:10:f0:b8:6e:0b:a4:a9:bb:d8:be:ed:02:53:c8. Are you sure you want to continue connecting (yes/no)? yes Warning: Permanently added '0.0.0.0' (ECDSA) to the list of known hosts. Last login: Thu Nov 2 17:07:59 2017 from ::1 [student@localhost ~]$ logout
4. (We could have simplified this by using the "-oStrictHostKeyChecking=no" parameter and issuing a simple command like "w" - if you do this just make sure you do it for both "localhost" and "0.0.0.0"):
[student@localhost ~]$ ssh -oStrictHostKeyChecking=no localhost w Warning: Permanently added 'localhost' (ECDSA) to the list of known hosts. 18:08:03 up 1:28, 1 user, load average: 0.01, 0.16, 0.25 USER TTY FROM LOGIN@ IDLE JCPU PCPU WHAT student pts/0 192.168.0.4 17:01 3.00s 11.22s 0.00s ssh -oStrictHostKeyChecking=no localhost w [student@localhost ~]$ ssh -oStrictHostKeyChecking=no 0.0.0.0 w Warning: Permanently added '0.0.0.0' (ECDSA) to the list of known hosts. 18:08:14 up 1:28, 1 user, load average: 0.01, 0.16, 0.25 USER TTY FROM LOGIN@ IDLE JCPU PCPU WHAT student pts/0 192.168.0.4 17:01 6.00s 11.30s 0.01s ssh -oStrictHostKeyChecking=no 0.0.0.0 w
5. Check the /usr/local/hadoop folder for a pre-installed version of Hadoop. If it exists, check for the $HADOOP_HOME environment variable and the "hdfs" script in your path.
[student@localhost ~]$ ls -la /usr/local/hadoop lrwxrwxrwx. 1 root root 23 Oct 30 21:37 /usr/local/hadoop -> /usr/local/hadoop-2.8.2 [student@localhost ~]$ echo $HADOOP_HOME /usr/local/hadoop [student@localhost ~]$ which hdfs /usr/local/hadoop/bin/hdfs
6. If it doesn't exist, check the downloads folder for the hadoop binary. If not, download it:
[student@localhost ~]$ cd ~/downloads [student@localhost downloads]$ ls -la *hadoop* -rw-rw-r--. 1 student student 243900138 Oct 26 18:37 hadoop-2.8.2.tar.gz
7. Extract the hadoop binary to the /usr/local/ directory and make a symbolic link for it.
[student@localhost downloads]$ sudo tar -C /usr/local/ hadoop-2.8.2.tar.gz [student@localhost downloads]$ sudo ln -s /usr/local/hadoop-2.8.2 /usr/local/hadoop [student@localhost downloads]$ sudo chown -R student:student /usr/local/hadoop*
Course Material for the GK-JPMC TTHADV5 Big Data w/Hadoop, Pig, Hive & HBase course. Not for any other use or distribution.
50 Copyright © 2017 Trivera Technologies LLC. Worldwide. All Rights Reserved. TTxxxxvx.x
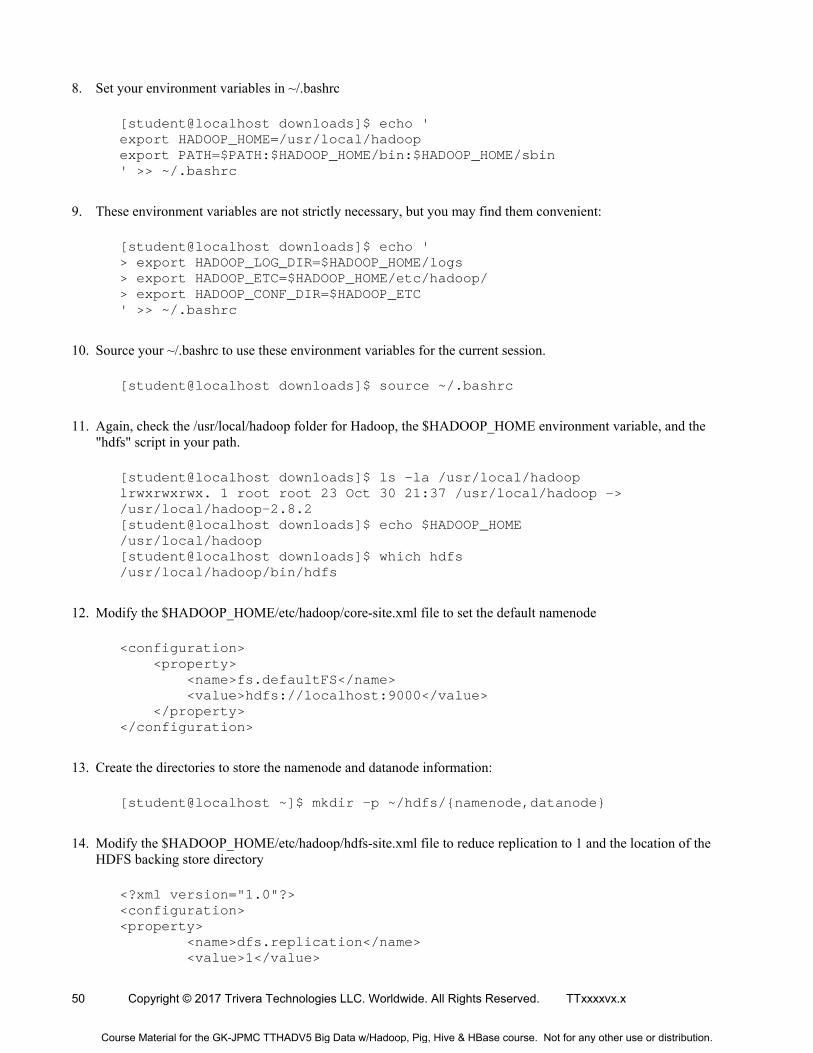
8. Set your environment variables in ~/.bashrc
[student@localhost downloads]$ echo ' export HADOOP_HOME=/usr/local/hadoop export PATH=$PATH:$HADOOP_HOME/bin:$HADOOP_HOME/sbin ' >> ~/.bashrc
9. These environment variables are not strictly necessary, but you may find them convenient:
[student@localhost downloads]$ echo ' > export HADOOP_LOG_DIR=$HADOOP_HOME/logs > export HADOOP_ETC=$HADOOP_HOME/etc/hadoop/ > export HADOOP_CONF_DIR=$HADOOP_ETC ' >> ~/.bashrc
10. Source your ~/.bashrc to use these environment variables for the current session.
[student@localhost downloads]$ source ~/.bashrc
11. Again, check the /usr/local/hadoop folder for Hadoop, the $HADOOP_HOME environment variable, and the "hdfs" script in your path.
[student@localhost downloads]$ ls -la /usr/local/hadoop lrwxrwxrwx. 1 root root 23 Oct 30 21:37 /usr/local/hadoop -> /usr/local/hadoop-2.8.2 [student@localhost downloads]$ echo $HADOOP_HOME /usr/local/hadoop [student@localhost downloads]$ which hdfs /usr/local/hadoop/bin/hdfs
12. Modify the $HADOOP_HOME/etc/hadoop/core-site.xml file to set the default namenode
<configuration> <property> <name>fs.defaultFS</name> <value>hdfs://localhost:9000</value> </property> </configuration>
13. Create the directories to store the namenode and datanode information:
[student@localhost ~]$ mkdir -p ~/hdfs/{namenode,datanode}
14. Modify the $HADOOP_HOME/etc/hadoop/hdfs-site.xml file to reduce replication to 1 and the location of the HDFS backing store directory
<?xml version="1.0"?> <configuration> <property> <name>dfs.replication</name> <value>1</value>
Course Material for the GK-JPMC TTHADV5 Big Data w/Hadoop, Pig, Hive & HBase course. Not for any other use or distribution.
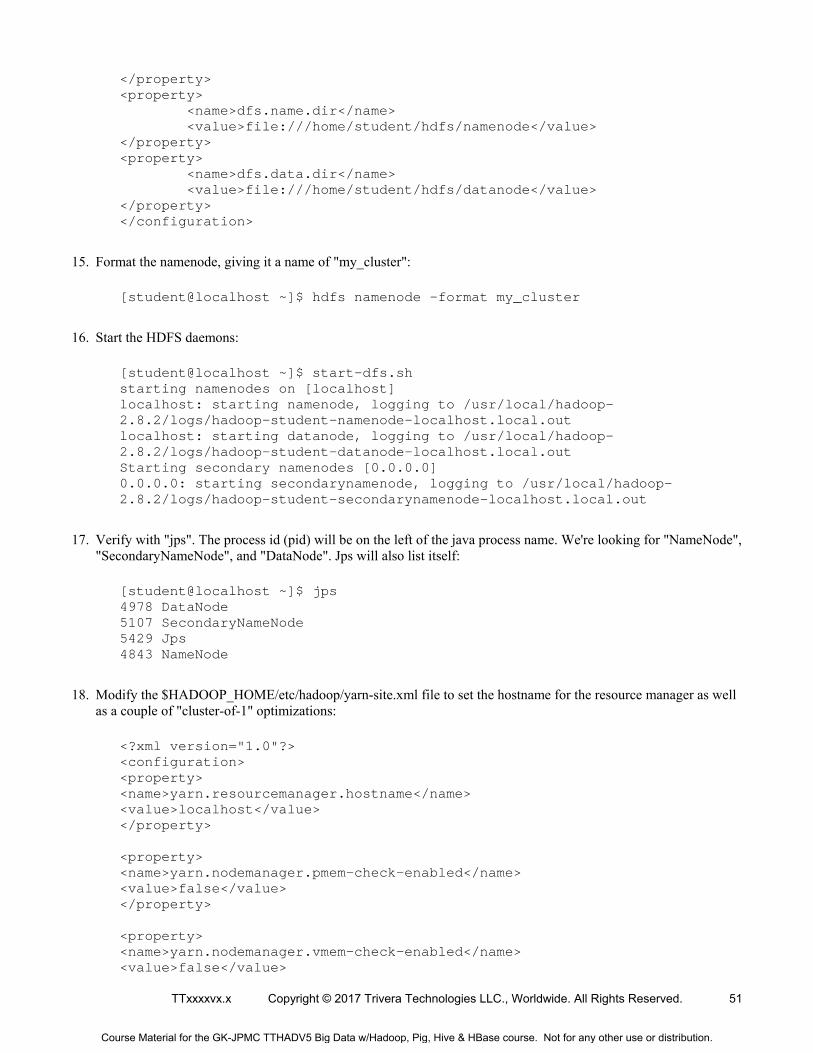
TTxxxxvx.x Copyright © 2017 Trivera Technologies LLC., Worldwide. All Rights Reserved. 51
</property> <property> <name>dfs.name.dir</name> <value>file:///home/student/hdfs/namenode</value> </property> <property> <name>dfs.data.dir</name> <value>file:///home/student/hdfs/datanode</value> </property> </configuration>
15. Format the namenode, giving it a name of "my_cluster":
[student@localhost ~]$ hdfs namenode -format my_cluster
16. Start the HDFS daemons:
[student@localhost ~]$ start-dfs.sh starting namenodes on [localhost] localhost: starting namenode, logging to /usr/local/hadoop-2.8.2/logs/hadoop-student-namenode-localhost.local.out localhost: starting datanode, logging to /usr/local/hadoop-2.8.2/logs/hadoop-student-datanode-localhost.local.out Starting secondary namenodes [0.0.0.0] 0.0.0.0: starting secondarynamenode, logging to /usr/local/hadoop-2.8.2/logs/hadoop-student-secondarynamenode-localhost.local.out
17. Verify with "jps". The process id (pid) will be on the left of the java process name. We're looking for "NameNode", "SecondaryNameNode", and "DataNode". Jps will also list itself:
[student@localhost ~]$ jps 4978 DataNode 5107 SecondaryNameNode 5429 Jps 4843 NameNode
18. Modify the $HADOOP_HOME/etc/hadoop/yarn-site.xml file to set the hostname for the resource manager as well as a couple of "cluster-of-1" optimizations:
<?xml version="1.0"?> <configuration> <property> <name>yarn.resourcemanager.hostname</name> <value>localhost</value> </property> <property> <name>yarn.nodemanager.pmem-check-enabled</name> <value>false</value> </property> <property> <name>yarn.nodemanager.vmem-check-enabled</name> <value>false</value>
Course Material for the GK-JPMC TTHADV5 Big Data w/Hadoop, Pig, Hive & HBase course. Not for any other use or distribution.
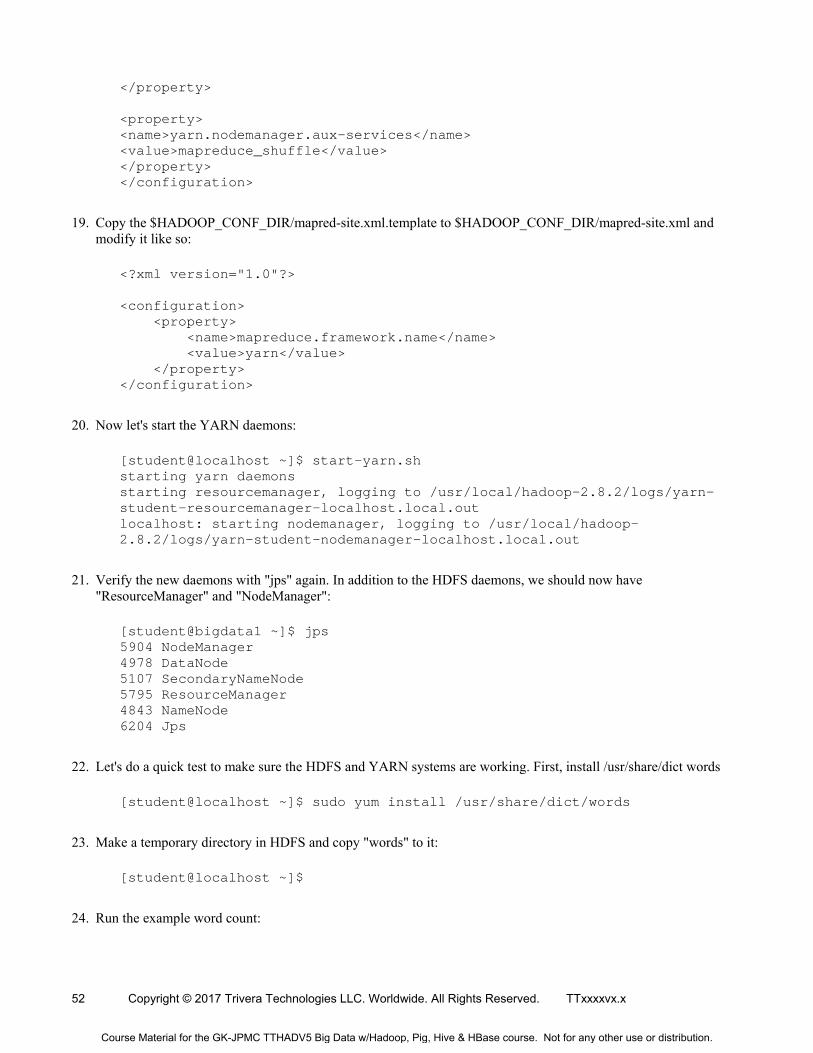
52 Copyright © 2017 Trivera Technologies LLC. Worldwide. All Rights Reserved. TTxxxxvx.x
</property> <property> <name>yarn.nodemanager.aux-services</name> <value>mapreduce_shuffle</value> </property> </configuration>
19. Copy the $HADOOP_CONF_DIR/mapred-site.xml.template to $HADOOP_CONF_DIR/mapred-site.xml and modify it like so:
<?xml version="1.0"?> <configuration> <property> <name>mapreduce.framework.name</name> <value>yarn</value> </property> </configuration>
20. Now let's start the YARN daemons:
[student@localhost ~]$ start-yarn.sh starting yarn daemons starting resourcemanager, logging to /usr/local/hadoop-2.8.2/logs/yarn-student-resourcemanager-localhost.local.out localhost: starting nodemanager, logging to /usr/local/hadoop-2.8.2/logs/yarn-student-nodemanager-localhost.local.out
21. Verify the new daemons with "jps" again. In addition to the HDFS daemons, we should now have "ResourceManager" and "NodeManager":
[student@bigdata1 ~]$ jps 5904 NodeManager 4978 DataNode 5107 SecondaryNameNode 5795 ResourceManager 4843 NameNode 6204 Jps
22. Let's do a quick test to make sure the HDFS and YARN systems are working. First, install /usr/share/dict words
[student@localhost ~]$ sudo yum install /usr/share/dict/words
23. Make a temporary directory in HDFS and copy "words" to it:
[student@localhost ~]$
24. Run the example word count:
Course Material for the GK-JPMC TTHADV5 Big Data w/Hadoop, Pig, Hive & HBase course. Not for any other use or distribution.
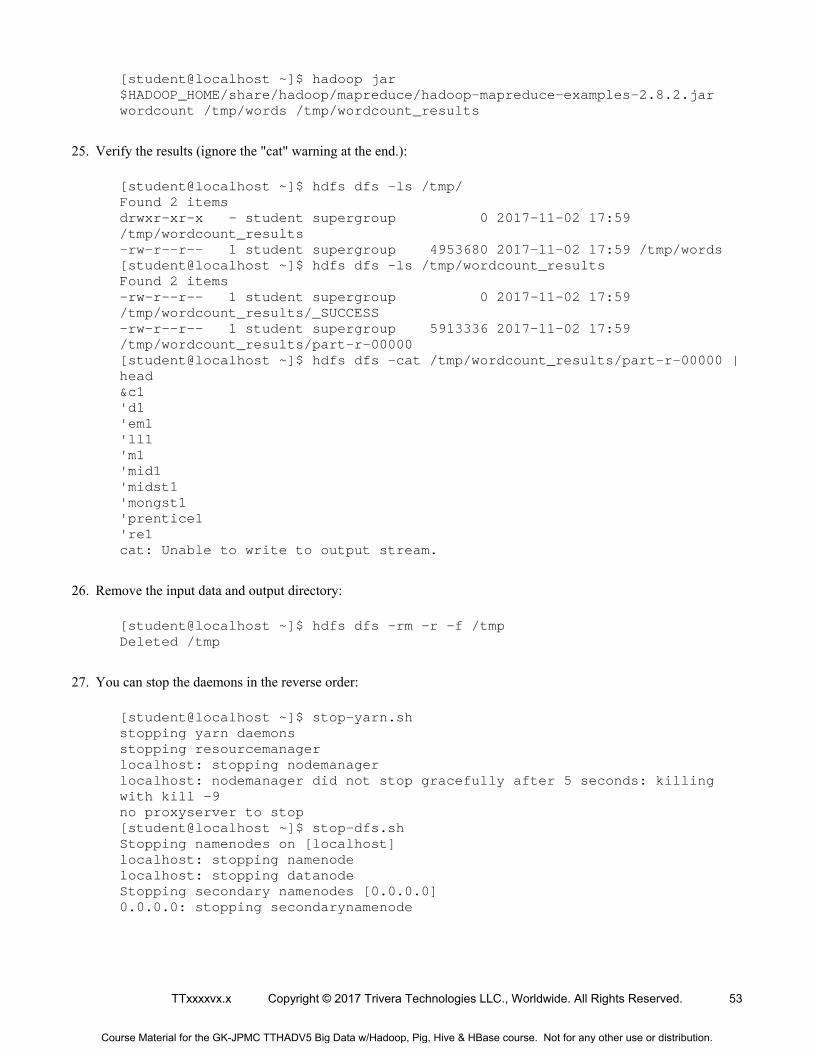
TTxxxxvx.x Copyright © 2017 Trivera Technologies LLC., Worldwide. All Rights Reserved. 53
[student@localhost ~]$ hadoop jar $HADOOP_HOME/share/hadoop/mapreduce/hadoop-mapreduce-examples-2.8.2.jar wordcount /tmp/words /tmp/wordcount_results
25. Verify the results (ignore the "cat" warning at the end.):
[student@localhost ~]$ hdfs dfs -ls /tmp/ Found 2 items drwxr-xr-x - student supergroup 0 2017-11-02 17:59 /tmp/wordcount_results -rw-r--r-- 1 student supergroup 4953680 2017-11-02 17:59 /tmp/words [student@localhost ~]$ hdfs dfs -ls /tmp/wordcount_results Found 2 items -rw-r--r-- 1 student supergroup 0 2017-11-02 17:59 /tmp/wordcount_results/_SUCCESS -rw-r--r-- 1 student supergroup 5913336 2017-11-02 17:59 /tmp/wordcount_results/part-r-00000 [student@localhost ~]$ hdfs dfs -cat /tmp/wordcount_results/part-r-00000 | head &c1 'd1 'em1 'll1 'm1 'mid1 'midst1 'mongst1 'prentice1 're1 cat: Unable to write to output stream.
26. Remove the input data and output directory:
[student@localhost ~]$ hdfs dfs -rm -r -f /tmp Deleted /tmp
27. You can stop the daemons in the reverse order:
[student@localhost ~]$ stop-yarn.sh stopping yarn daemons stopping resourcemanager localhost: stopping nodemanager localhost: nodemanager did not stop gracefully after 5 seconds: killing with kill -9 no proxyserver to stop [student@localhost ~]$ stop-dfs.sh Stopping namenodes on [localhost] localhost: stopping namenode localhost: stopping datanode Stopping secondary namenodes [0.0.0.0] 0.0.0.0: stopping secondarynamenode
Course Material for the GK-JPMC TTHADV5 Big Data w/Hadoop, Pig, Hive & HBase course. Not for any other use or distribution.
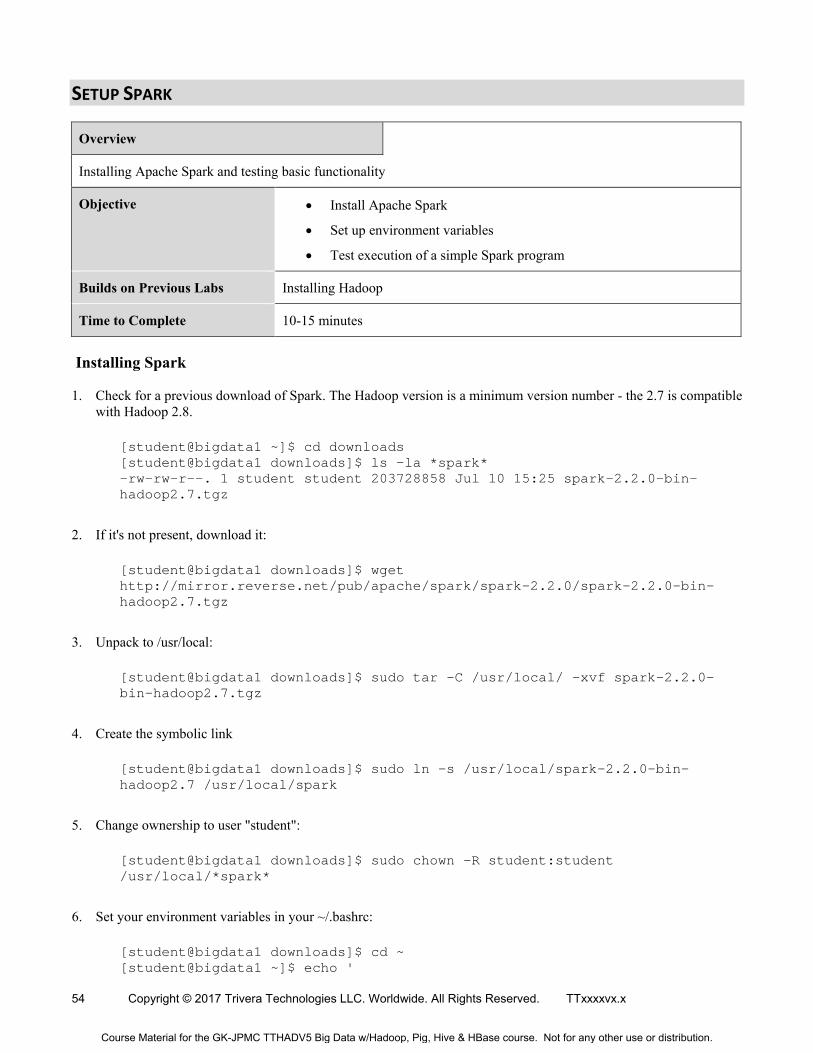
54 Copyright © 2017 Trivera Technologies LLC. Worldwide. All Rights Reserved. TTxxxxvx.x
SETUP SPARK
Overview
Installing Apache Spark and testing basic functionality
Objective Install Apache Spark
Set up environment variables
Test execution of a simple Spark program
Builds on Previous Labs Installing Hadoop
Time to Complete 10-15 minutes
Installing Spark
1. Check for a previous download of Spark. The Hadoop version is a minimum version number - the 2.7 is compatible with Hadoop 2.8.
[student@bigdata1 ~]$ cd downloads [student@bigdata1 downloads]$ ls -la *spark* -rw-rw-r--. 1 student student 203728858 Jul 10 15:25 spark-2.2.0-bin-hadoop2.7.tgz
2. If it's not present, download it:
[student@bigdata1 downloads]$ wget http://mirror.reverse.net/pub/apache/spark/spark-2.2.0/spark-2.2.0-bin-hadoop2.7.tgz
3. Unpack to /usr/local:
[student@bigdata1 downloads]$ sudo tar -C /usr/local/ -xvf spark-2.2.0-bin-hadoop2.7.tgz
4. Create the symbolic link
[student@bigdata1 downloads]$ sudo ln -s /usr/local/spark-2.2.0-bin-hadoop2.7 /usr/local/spark
5. Change ownership to user "student":
[student@bigdata1 downloads]$ sudo chown -R student:student /usr/local/*spark*
6. Set your environment variables in your ~/.bashrc:
[student@bigdata1 downloads]$ cd ~ [student@bigdata1 ~]$ echo '
Course Material for the GK-JPMC TTHADV5 Big Data w/Hadoop, Pig, Hive & HBase course. Not for any other use or distribution.
TTxxxxvx.x Copyright © 2017 Trivera Technologies LLC., Worldwide. All Rights Reserved. 55
> export SPARK_HOME=/usr/local/spark > export PATH=$PATH:$SPARK_HOME/bin > ' >> ~/.bashrc
7. Source your ~/.bashrc so the variables take place for this session:
[student@bigdata1 ~]$ source ~/.bashrc
8. Try a quick "Hello, World" through the Spark Shell to verify it works:
[student@bigdata1 ~]$ echo 'println("Hello, World!")' | spark-shell
We now have Spark installed on top of Hadoop, enabling many new opportunities.
Course Material for the GK-JPMC TTHADV5 Big Data w/Hadoop, Pig, Hive & HBase course. Not for any other use or distribution.

NOTES
Course Material for the GK-JPMC TTHADV5 Big Data w/Hadoop, Pig, Hive & HBase course. Not for any other use or distribution.

NOTES
Course Material for the GK-JPMC TTHADV5 Big Data w/Hadoop, Pig, Hive & HBase course. Not for any other use or distribution.

NOTES
Course Material for the GK-JPMC TTHADV5 Big Data w/Hadoop, Pig, Hive & HBase course. Not for any other use or distribution.

Trivera Technologies LLC - Worldwide | Educate. Collaborate. Accelerate!Global Developer Education, Courseware & Consulting Services
JAVA | JEE | OOAD | UML | XML | Web Services | SOA | Struts | JSF | Hibernate | Spring | Admin
IBM WebSphere | Rational | Oracle WebLogic | JBoss | TomCat | Apache | Linux | Perl
609.953.1515 direct | [email protected] | www.triveratech.com
Course Material for the GK-JPMC TTHADV5 Big Data w/Hadoop, Pig, Hive & HBase course. Not for any other use or distribution.