Embed Size (px)
Citation preview

GB Cordless 4 Mode Impact Driver Instruction manual
ID Obeng Ketok Listrik 4 Mode Tanpa Petunjuk penggunaan
VI Máy bắt vít chạy pin Tài liệu hướng dẫn
TH สวานไขควงกระแทก 4 โหมดแบบไรสาย คูมอืการใชงาน
BTP131BTP141

2
1 012233 2 012128
3 012237 4 012231
5 012249 6 012238
7 012240 8 012239
1
2
3
4
56
7
89
A B
10 11 12
13

3
9 012244
11 004521 12 012234
13 012235 14 012236
14
15
16
17
18
19
10 012241
20
21
2022
21
23
2425

4
15 012242

5
ENGLISHExplanation of general view
SPECIFICATIONS
• Due to our continuing programme of research and development, the specifications herein are subject to change without notice.
• Specifications and battery cartridge may differ from country to country.• Weight, with battery cartridge, according to EPTA-Procedure 01/2003
END004-2SymbolsThe following show the symbols used for the equipment. Be sure that you understand their meaning before use.
............... Read instruction manual.
ENE033-1Intended useThe tool is intended for screw driving in wood, metal and plastic.
GEA006-2
General Power Tool Safety Warnings
WARNING! Read all safety warnings and all instructions. Failure to follow the warnings and instructions may result in electric shock, fire and/or serious injury.
1. Red indicator2. Button3. Battery cartridge4. Star marking5. Switch trigger6. Lamp7. LED display8. Lamp button9. Reversing switch lever
10. Speed change lever11. Mode mark12. Action mode changing ring13. Arrow14. Changed in three steps15. Hard16. Medium17. Soft18. Control button
19. Battery capacity20. Bit21. Sleeve22. Bit-piece23. Groove24. Hook25. Screw
Model BTP131 BTP141
Impact driver mode
Fastening CapacitiesMachine screw 4 mm - 8 mmStandard bolt 5 mm - 14 mm
High tensile bolt 5 mm - 12 mm
No load speed (min-1) (Soft / Medium / Hard) 0 - 1,400 / 0 - 2,200 / 0 - 2,800
0 - 1,300 / 0 - 2,200 / 0 - 2,700
Impacts per minute (Soft / Medium / Hard) 0 - 1,200 / 0 - 2,400 / 0 - 3,200Low (1) / High (2)
Hammer drill modeNo load speed (min-1) 0 - 700 / 0 - 2,800 0 - 700 / 0 - 2,700
Blows per minute (min-1) 0 - 8,400 / 0 - 32,400Drilling Capacities / Concrete 8 mm
Drill mode Drilling CapacitiesSteel 10 mm / 6.5 mmWood 21 mm / 12 mm
No load speed (min-1) 0 - 700 / 0 - 2,800 0 - 700 / 0 - 2,700
Screwdriver mode Fastening Capacities
Machine screw 3.5 mm - 6 mm / 4 mm - 6 mmSelf drilling screw 4 mm, 5 mm / 4 mm (Thickness 3.2 mm max.)
No load speed (min-1) 0 - 300 / 0 - 1,100 (depends on torque setting)0 - 600 / 0 - 2,300 (P mode)
Net weight (with battery cartridge)
1.5 kg (with battery BL1415)
1.7 kg (with battery BL1430)
1.6 kg (with battery BL1815)
1.8 kg (with battery BL1830)
Rated voltage D.C.14.4 V D.C.18 V

6
Save all warnings and instructions for future reference.The term “power tool” in the warnings refers to your mains-operated (corded) power tool or battery-operated (cordless) power tool.
Work area safety1. Keep work area clean and well lit. Cluttered or dark
areas invite accidents.2. Do not operate power tools in explosive
atmospheres, such as in the presence of flammable liquids, gases or dust. Power tools create sparks which may ignite the dust or fumes.
3. Keep children and bystanders away while operating a power tool. Distractions can cause you to lose control.
Electrical safety4. Power tool plugs must match the outlet. Never
modify the plug in any way. Do not use any adapter plugs with earthed (grounded) power tools. Unmodified plugs and matching outlets will reduce risk of electric shock.
5. Avoid body contact with earthed or grounded surfaces such as pipes, radiators, ranges and refrigerators. There is an increased risk of electric shock if your body is earthed or grounded.
6. Do not expose power tools to rain or wet conditions. Water entering a power tool will increase the risk of electric shock.
7. Do not abuse the cord. Never use the cord for carrying, pulling or unplugging the power tool. Keep cord away from heat, oil, sharp edges or moving parts. Damaged or entangled cords increase the risk of electric shock.
8. When operating a power tool outdoors, use an extension cord suitable for outdoor use. Use of a cord suitable for outdoor use reduces the risk of electric shock.
9. If operating a power tool in a damp location is unavoidable, use a ground fault circuit interrupter (GFCI) protected supply. Use of an GFCI reduces the risk of electric shock.
Personal safety10. Stay alert, watch what you are doing and use
common sense when operating a power tool. Do not use a power tool while you are tired or under the influence of drugs, alcohol or medication. A moment of inattention while operating power tools may result in serious personal injury.
11. Use personal protective equipment. Always wear eye protection. Protective equipment such as dust mask, non-skid safety shoes, hard hat, or hearing protection used for appropriate conditions will reduce personal injuries.
12. Prevent unintentional starting. Ensure the switch is in the off-position before connecting to power source and/or battery pack, picking up or carrying the tool. Carrying power tools with your finger on the switch or energising power tools that have the switch on invites accidents.
13. Remove any adjusting key or wrench before turning the power tool on. A wrench or a key left attached to a rotating part of the power tool may result in personal injury.
14. Do not overreach. Keep proper footing and balance at all times. This enables better control of the power tool in unexpected situations.
15. Dress properly. Do not wear loose clothing or jewellery. Keep your hair, clothing, and gloves away from moving parts. Loose clothes, jewellery or long hair can be caught in moving parts.
16. If devices are provided for the connection of dust extraction and collection facilities, ensure these are connected and properly used. Use of dust collection can reduce dust-related hazards.
Power tool use and care17. Do not force the power tool. Use the correct power
tool for your application. The correct power tool will do the job better and safer at the rate for which it was designed.
18. Do not use the power tool if the switch does not turn it on and off. Any power tool that cannot be controlled with the switch is dangerous and must be repaired.
19. Disconnect the plug from the power source and/or the battery pack from the power tool before making any adjustments, changing accessories, or storing power tools. Such preventive safety measures reduce the risk of starting the power tool accidentally.
20. Store idle power tools out of the reach of children and do not allow persons unfamiliar with the power tool or these instructions to operate the power tool. Power tools are dangerous in the hands of untrained users.
21. Maintain power tools. Check for misalignment or binding of moving parts, breakage of parts and any other condition that may affect the power tool’s operation. If damaged, have the power tool repaired before use. Many accidents are caused by poorly maintained power tools.
22. Keep cutting tools sharp and clean. Properly maintained cutting tools with sharp cutting edges are less likely to bind and are easier to control.
23. Use the power tool, accessories and tool bits etc. in accordance with these instructions, taking into account the working conditions and the work to be performed. Use of the power tool for operations different from those intended could result in a hazardous situation.
Battery tool use and care24. Recharge only with the charger specified by the
manufacturer. A charger that is suitable for one type of battery pack may create a risk of fire when used with another battery pack.
25. Use power tools only with specifically designated battery packs. Use of any other battery packs may create a risk of injury and fire.
26. When battery pack is not in use, keep it away from other metal objects, like paper clips, coins, keys, nails, screws or other small metal objects, that can make a connection from one terminal to another.

7
Shorting the battery terminals together may cause burns or a fire.
27. Under abusive conditions, liquid may be ejected from the battery; avoid contact. If contact accidentally occurs, flush with water. If liquid contacts eyes, additionally seek medical help. Liquid ejected from the battery may cause irritation or burns.
Service28. Have your power tool serviced by a qualified
repair person using only identical replacement parts. This will ensure that the safety of the power tool is maintained.
29. Follow instruction for lubricating and changing accessories.
30. Keep handles dry, clean and free from oil and grease.
GEB078-2
CORDLESS 4 MODE IMPACT DRIVER SAFETY WARNINGS1. Wear ear protectors when impact drilling.
Exposure to noise can cause hearing loss.2. Use auxiliary handle(s), if supplied with the tool.
Loss of control can cause personal injury.3. Hold power tool by insulated gripping surfaces,
when performing an operation where the fastener may contact hidden wiring. Fasteners contacting a “live” wire may make exposed metal parts of the power tool “live” and could give the operator an electric shock.
4. Hold power tool by insulated gripping surfaces, when performing an operation where the cutting accessory may contact hidden wiring. Cutting accessory contacting a “live” wire may make exposed metal parts of the power tool “live” and could give the operator an electric shock.
5. Always be sure you have a firm footing. Be sure no one is below when using the tool in high locations.
6. Hold the tool firmly.7. Keep hands away from rotating parts.8. Do not leave the tool running. Operate the tool
only when hand-held.9. Do not touch the bit or the workpiece immediately
after operation; they may be extremely hot and could burn your skin.
10. Some material contains chemicals which may be toxic. Take caution to prevent dust inhalation and skin contact. Follow material supplier safety data.
SAVE THESE INSTRUCTIONS.WARNING:
DO NOT let comfort or familiarity with product (gained from repeated use) replace strict adherence to safety rules for the subject product. MISUSE or failure to follow the safety rules stated in this instruction manual may cause serious personal injury.
ENC007-7
IMPORTANT SAFETY INSTRUCTIONS
FOR BATTERY CARTRIDGE1. Before using battery cartridge, read all
instructions and cautionary markings on (1) battery charger, (2) battery, and (3) product using battery.
2. Do not disassemble battery cartridge.3. If operating time has become excessively shorter,
stop operating immediately. It may result in a risk of overheating, possible burns and even an explosion.
4. If electrolyte gets into your eyes, rinse them out with clear water and seek medical attention right away. It may result in loss of your eyesight.
5. Do not short the battery cartridge:(1) Do not touch the terminals with any
conductive material.(2) Avoid storing battery cartridge in a container
with other metal objects such as nails, coins, etc.
(3) Do not expose battery cartridge to water or rain.
A battery short can cause a large current flow, overheating, possible burns and even a breakdown.
6. Do not store the tool and battery cartridge in locations where the temperature may reach or exceed 50°C (122°F).
7. Do not incinerate the battery cartridge even if it is severely damaged or is completely worn out. The battery cartridge can explode in a fire.
8. Be careful not to drop or strike battery. 9. Do not use a damaged battery.
SAVE THESE INSTRUCTIONS.Tips for maintaining maximum battery life1. Charge the battery cartridge before completely
discharged.Always stop tool operation and charge the battery cartridge when you notice less tool power.
2. Never recharge a fully charged battery cartridge.Overcharging shortens the battery service life.
3. Charge the battery cartridge with room temperature at 10°C - 40°C (50°F - 104°F). Let a hot battery cartridge cool down before charging it.
4. Charge the battery cartridge once in every six months if you do not use it for a long period of time.

8
FUNCTIONAL DESCRIPTIONCAUTION:
• Always be sure that the tool is switched off and the battery cartridge is removed before adjusting or checking function on the tool.
Installing or removing battery cartridge (Fig. 1)• Always switch off the tool before installing or removing
of the battery cartridge.• To remove the battery cartridge, slide it from the tool
while sliding the button on the front of the cartridge.• To install the battery cartridge, align the tongue on the
battery cartridge with the groove in the housing and slip it into place. Always insert it all the way until it locks in place with a little click. If you can see the red indicator on the upper side of the button, it is not locked completely. Install it fully until the red indicator cannot be seen. If not, it may accidentally fall out of the tool, causing injury to you or someone around you.
Do not use force when installing the battery cartridge. If the cartridge does not slide in easily, it is not being inserted correctly.
Battery protection system (Lithium-ion battery with star marking) (Fig. 2)Lithium-ion batteries with a star marking are equipped with a protection system. This system automatically cuts off power to the tool to extend battery life.The tool will automatically stop during operation if the tool and/or battery are placed under one of the following conditions:• Overloaded:
The tool is operated in a manner that causes it to draw an abnormally high current.In this situation, release the trigger switch on the tool and stop the application that caused the tool to become overloaded. Then pull the trigger switch again to restart.If the tool does not start, the battery is overheated. In this situation, let the battery cool before pulling the trigger switch again.
• Low battery voltage:The remaining battery capacity is too low and the tool will not operate. In this situation, remove and recharge the battery.
Switch action (Fig. 3)CAUTION:
• Before installing the battery cartridge into the tool, always check to see that the switch trigger actuates properly and returns to the “OFF” position when released.
To start the tool, simply pull the switch trigger. The tool speed is increased by increasing pressure on the switch trigger. Release the switch trigger to stop.
NOTE:• The tool will stop three minutes after pulling the switch
trigger.
Lighting up the front lamp (Fig. 4 & Fig. 5)CAUTION:
• Do not look in the lamp or see the source of lamp directly.
Every time the lamp button on the LED display is pressed, the lamp status is alternatively changed from the ON to the OFF and from the OFF to the ON.With the lamp button in the ON status, pull the switch trigger to turn on the lamp. To turn off, release it and the lamp goes out approximately 10 seconds after releasing.With the lamp button in the OFF status, even if the trigger is pulled, the lamp will not light on.
NOTE:• To make sure the status of lamp, pull the trigger. When
the lamp lights up by pulling the switch trigger, the lamp switch is in the ON status. When the lamp does not come on, the lamp switch is in the OFF status.
• During the operation of switch trigger, the lamp status cannot be changed.
• For approximately 10 seconds after releasing the switch trigger, the lamp status can be switched.
Reversing switch action (Fig. 6)This tool has a reversing switch to change the direction of rotation. Depress the reversing switch lever from the A side for clockwise rotation or from the B side for counterclockwise rotation.When the reversing switch lever is in the neutral position, the switch trigger cannot be pulled.
CAUTION:• Always check the direction of rotation before operation.• Use the reversing switch only after the tool comes to a
complete stop. Changing the direction of rotation before the tool stops may damage the tool.
• When not operating the tool, always set the reversing switch lever to the neutral position.
Speed change (Fig. 7)NOTICE:• Always set the speed change lever fully to the correct
position. If you operate the tool with the speed change lever positioned halfway between the “1” side and “2” side, the tool may be damaged.
• Do not use the speed change lever while the tool is running. The tool may be damaged.
• Do not force the lever to “1” side with impact driver mode. The tool may be damaged.
To change the speed, first switch off the tool and then slide the speed change lever to the “2” side for high speed or “1” side for low speed. Be sure that the speed change lever is set to the correct position before operation. Use the right speed for your job.When turning the action mode changing ring to impact driver mode, set the speed change lever to the “2” side.
Selecting the action mode (Fig. 8)This tool employs an action mode changing ring. Select one of the 4 modes suitable for your work need by turning this ring.When driving wood screws or bolts, point the arrow at the
mark for impact driver mode. The impact force can be adjusted on the LED display.

9
When drilling into concrete or tiles, point the arrow at the mark for hammer drill mode.
When drilling into wood or metal, point the arrow at the mark for drill mode.When driving small wood screws or machine screws, point the arrow at the mark for screwdriver mode. The fastening torque can be adjusted on the LED display.
CAUTION:• Always set the arrow correctly to either mode mark. If
you operate the tool with the action mode changing ring
positioned halfway between the mode marks, the tool may be damaged.
• When turning the action mode changing ring, make sure that the tool stops. If the ring does not easily move, pull the switch trigger slightly to rotate the spindle and then move the ring.
• In the hammer drill mode or drill mode, the blowing force or torque is not adjustable. In those modes, the number on the LED display will be off.
Changing the impact force (impact driver mode “ ”) (Fig. 9)
012243The impact force can be changed in three steps: hard, medium and soft.This allows a tightening suitable to the work.Every time the button is pressed, the impact force grade changes in three steps.For approximately one minute after releasing the switch trigger, the impact force can be changed.
NOTE:• During the operation of switch trigger, the impact force
grade cannot be changed.
Changing the torque setting (screwdriver mode “ ”)The fastening torque can be adjusted by pressing the button in screwdriver mode.The numbers on the LED display shows torque setting. The fastening torque is minimum at the number 1 and maximum at the number 9. The indication “P” is a special mode for fastening self drilling screws.Every time the button is pressed, the torque setting changes from 1 to 9 and P, and then returns to 1.The torque setting changes fast by keeping pressing the button.P mode is suitable for fastening self drilling screws into steel plates in the following conditions.• With speed change lever at “2” side, fastening max. 4
mm screw into total max. 3.2 mm steel plates.
• With speed change lever at “1” side, fastening max. 5 mm screw.
Before an actual operation, drive a trial screw into your material or a piece of duplicate material to determine which torque level is required for a particular application.First, try to fasten the screw at “1”. Then increase the number to continue fastening. Hold the tool firmly during operation.
CAUTION:• Don't fasten the machine screw on P mode. It may twist
your wrist suddenly and result in personal injury.
NOTE:• Make sure to check the number on LED display before
operation. If the number is not indicated, contact your nearest Makita service center.
• When the remaining battery capacity gets low in the screwdriver mode, the light flashes a few times when fastening the screw completely. In this case, recharge the battery. If you keep operating, you may not obtain the desired torque.
• During pulling the switch trigger, the torque setting cannot be changed.
• For approximately one minute after releasing the switch trigger, the torque setting can be changed. if you want to change the torque setting after that, pull the switch trigger again.
• The number of torque setting does not mean specific torque rate.
Impact force grade displayed on panel
Maximum blowsApplication Work
BTP131 BTP141Hard
3,200 (min-1) 3,200 (min-1) Tightening when force and speed are desired.
Tightening in underword material / Tightening long screws / Tightening bolts.
Medium
2,400 (min-1) 2,400 (min-1) Tightening when a good finishing is needed.
Tightening in the finishing board, plaster board.
Soft
1,200 (min-1) 1,200 (min-1)
Tightening when excessive tightening need to be avoided because of potentially clogged female screw and broken or damaged screw head.
Tightening sash screw / Tightening small screws such as M6.

10
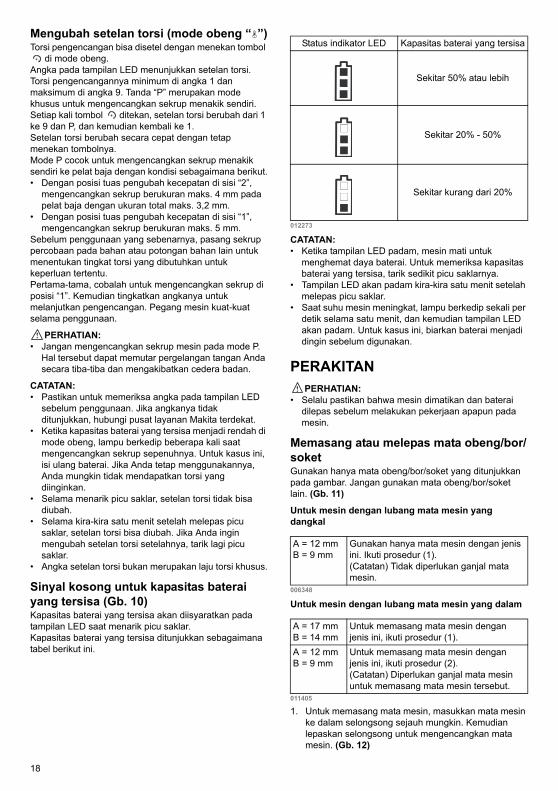
Empty signal for remaining battery capacity (Fig. 10)The remaining battery capacity will be signaled on the LED display when pulling the switch trigger. The remaining battery capacity is shown as the following table.
012273
NOTE:• When the LED display goes off, the tool is turned off to
save the battery power. To check the remaining battery capacity, slightly pull the switch trigger.
• The LED display goes off approximately one minute after releasing the switch trigger.
• When the temperature of the tool gets high, the light flashes once per second for one minute, and then the LED display goes off. In this case, cool down the tool before operation.
ASSEMBLYCAUTION:
• Always be sure that the tool is switched off and the battery cartridge is removed before carrying out any work on the tool.
Installing or removing driver/drill/socket bitUse only the driver/drill/socket bit shown in the figure. Do not use any other driver/drill/socket bit. (Fig. 11)
For tool with shallow bit hole
006348
For tool with deep bit hole
011405
1. To install the bit, pull the sleeve and insert the bit into the sleeve as far as it will go. Then release the sleeve to secure the bit. (Fig. 12)
2. To install the bit, insert the bit-piece and bit into the sleeve as far as it will go. The bit-piece should be inserted into the sleeve with its pointed end facing in. Then release the sleeve to secure the bit. (Fig. 13)
To remove the bit, pull the sleeve in the direction of the arrow and pull the bit out firmly.
CAUTION:• Do not touch the drill bit shortly after operating as it
gets hot. Replace the drill bit after cooling it down.
NOTE:• If the bit is not inserted deep enough into the sleeve,
the sleeve will not return to its original position and the bit will not be secured. In this case, try re-inserting the bit according to the instructions above.
• After inserting the bit, make sure that it is firmly secured. If it comes out, do not use it.
Hook (optional accessory) (Fig. 14)CAUTION:
• When installing the hook, tighten the screw firmly. Failure to do so may cause the breakage of the tool or personal injury.
The hook is convenient for temporarily hanging the tool. This can be installed on either side of the tool.To install the hook, insert it into a groove in the tool housing on either side and then secure it with a screw. To remove, loosen the screw and then take it out.
OPERATION (Fig. 15)CAUTION:
• Always insert the battery cartridge all the way until it locks in place with a little click. If you can see the red indicator on the upper side of the button, it is not locked completely. Install it fully until the red indicator cannot be seen. If not, it may accidentally fall out of the tool, causing injury to you or someone around you.
• If the tool is operated continuously until the battery cartridge has discharged, allow the tool to rest for 15 minutes before proceeding with a fresh battery.
Impact driver mode “ ”ScrewdrivingHold the tool firmly and place the point of the driver bit in the screw head. Apply forward pressure to the tool to the extent that the bit will not slip off the screw and turn the tool on to start operation.
Tightening boltsThe proper fastening torque may differ depending upon the kind or size of the screw/bolt, the material of the workpiece to be fastened, etc. The relation between fastening torque and fastening time is shown in the figures.
LED indicator status Remaining battery capacity
About 50% or more
About 20% - 50%
About less than 20%
A = 12 mmB = 9 mm
Use only these type of bit. Follow the procedure (1).(Note) Bit-piece is not necessary.
A = 17 mmB = 14 mm
To install these types of bits, follow the procedure (1).
A = 12 mmB = 9 mm
To install these types of bits, follow the procedure (2).(Note) Bit-piece is necessary for installing the bit.

11
012423
012425
NOTE:• When the action mode is set to impact driver mode,
make sure that the tool impacts properly by fastening a wood screw before operation. If the tool does not work properly, contact your nearest Makira service center.
• Hold the tool pointed straight at the screw.
• Use the proper bit for the head of the screw/bolt that you wish to use.
• When fastening screw M8 or smaller, carefully adjust pressure on the switch trigger so that the screw is not damaged.
• If you tighten the screw for a time longer than shown in the figures, the screw or the point of the driver bit may be overstressed, stripped, damaged, etc. Before starting your job, always perform a test operation to determine the proper fastening time for your screw.
The fastening torque is affected by a wide variety of factors including the following. After fastening, always check the torque with a torque wrench.1. When the battery cartridge is discharged almost
completely, voltage will drop and the fastening torque will be reduced.
2. Driver bit or socket bitFailure to use the correct size driver bit or socket bit will cause a reduction in the fastening torque.
3. Bolt• Even though the torque coefficient and the class of
bolt are the same, the proper fastening torque will differ according to the diameter of bolt.
• Even though the diameters of bolts are the same, the proper fastening torque will differ according to the torque coefficient, the class of bolt and the bolt length.
4. The manner of holding the tool or the material of driving position to be fastened will affect the torque.
5. Operating the tool at low speed will cause a reduction in the fastening torque.
Hammer drill mode “ ”CAUTION:
• Always hold the tool firmly during operation. There is a tremendous and sudden twisting force exerted on the tool/bit at the time of hole break-through, when the hole becomes clogged with chips and particles, or when striking reinforcing rods embedded in the concrete.
Be sure to use a tungsten-carbide tipped bit.Position the bit at the desired location for the hole, then pull the switch trigger. Do not force the tool. Light pressure gives best results. Keep the tool in position and prevent it from slipping away from the hole.Do not apply more pressure when the hole becomes clogged with chips or particles. Instead, run the tool at an idle, then remove the bit partially from the hole. By repeating this several times, the hole will be cleaned out and normal drilling may be resumed.
Drilling mode “ ”CAUTION:
• Pressing excessively on the tool will not speed up the drilling. In fact, this excessive pressure will only serve to damage the tip of your bit, decrease the tool performance and shorten the service life of the tool.
• There is a tremendous force exerted on the tool/bit at the time of hole break through. Hold the tool firmly and exert care when the bit begins to break through the workpiece.
• A stuck bit can be removed simply by setting the reversing switch to reverse rotation in order to back
120
100
80
60
40
20
N m(kgf cm)
(1224)
(1020)
(816)
(612)
(408)
(204)
0 1.0 2.0 3.0
(M14)
(M12)
(M10)
(M8)
0
M14
M12
M10
M8P
rope
r fas
teni
ng to
rque
Fastening time (S)
Standard bolt
Fast
enin
g to
rque
120
100
80
60
40
20
N m(kgf cm)
(1224)
(1020)
(816)
(612)
(408)
(204)
0 1.0 2.0 3.0
(M12)
(M10)
(M8)
0
M12
M10
M8
Pro
per f
aste
ning
torq
ue
Fastening time (S)
Fast
enin
g to
rque
High tensile bolt
12
out. However, the tool may back out abruptly if you do not hold it firmly.
• Always secure small workpieces in a vise or similar hold-down device.
• Do not pull the switch trigger repeatedly when the motor is locked. It may damage the tool.
For drilling in wood, the best results are obtained with wood drills equipped with a guide screw. The guide screw makes drilling easier by pulling the bit into the workpiece.For drilling in metal, to prevent the bit from slipping when starting a hole, make an indentation with a center-punch and hammer at the point to be drilled. Place the point of the bit in the indentation and start drilling.Use a cutting lubricant when drilling metals. The exceptions are iron and brass which should be drilled dry.
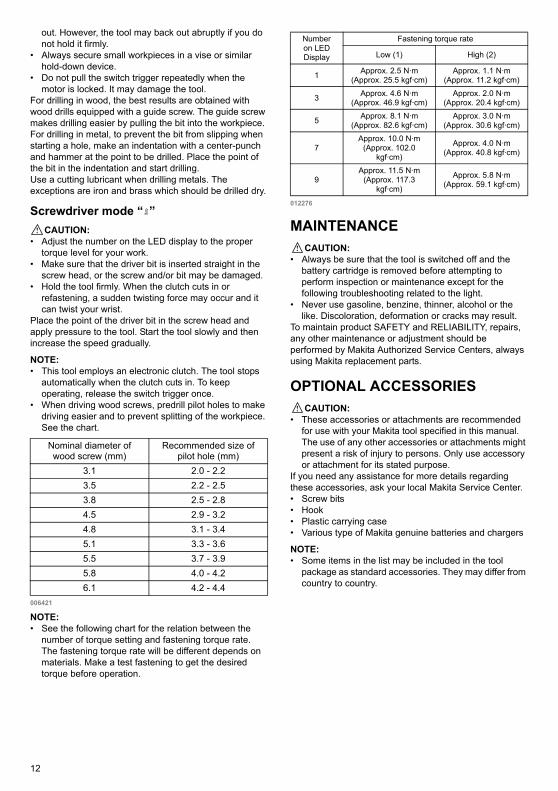
Screwdriver mode “ ”CAUTION:
• Adjust the number on the LED display to the proper torque level for your work.
• Make sure that the driver bit is inserted straight in the screw head, or the screw and/or bit may be damaged.
• Hold the tool firmly. When the clutch cuts in or refastening, a sudden twisting force may occur and it can twist your wrist.
Place the point of the driver bit in the screw head and apply pressure to the tool. Start the tool slowly and then increase the speed gradually.
NOTE:• This tool employs an electronic clutch. The tool stops
automatically when the clutch cuts in. To keep operating, release the switch trigger once.
• When driving wood screws, predrill pilot holes to make driving easier and to prevent splitting of the workpiece. See the chart.
006421
NOTE:• See the following chart for the relation between the
number of torque setting and fastening torque rate.The fastening torque rate will be different depends on materials. Make a test fastening to get the desired torque before operation.
012276
MAINTENANCECAUTION:
• Always be sure that the tool is switched off and the battery cartridge is removed before attempting to perform inspection or maintenance except for the following troubleshooting related to the light.
• Never use gasoline, benzine, thinner, alcohol or the like. Discoloration, deformation or cracks may result.
To maintain product SAFETY and RELIABILITY, repairs, any other maintenance or adjustment should be performed by Makita Authorized Service Centers, always using Makita replacement parts.
OPTIONAL ACCESSORIESCAUTION:
• These accessories or attachments are recommended for use with your Makita tool specified in this manual. The use of any other accessories or attachments might present a risk of injury to persons. Only use accessory or attachment for its stated purpose.
If you need any assistance for more details regarding these accessories, ask your local Makita Service Center.• Screw bits• Hook• Plastic carrying case• Various type of Makita genuine batteries and chargers
NOTE:• Some items in the list may be included in the tool
package as standard accessories. They may differ from country to country.
Nominal diameter of wood screw (mm)
Recommended size of pilot hole (mm)
3.1 2.0 - 2.23.5 2.2 - 2.53.8 2.5 - 2.84.5 2.9 - 3.24.8 3.1 - 3.45.1 3.3 - 3.65.5 3.7 - 3.95.8 4.0 - 4.26.1 4.2 - 4.4
Number on LED Display
Fastening torque rate
Low (1) High (2)
1 Approx. 2.5 N·m(Approx. 25.5 kgf·cm)
Approx. 1.1 N·m(Approx. 11.2 kgf·cm)
3 Approx. 4.6 N·m(Approx. 46.9 kgf·cm)
Approx. 2.0 N·m(Approx. 20.4 kgf·cm)
5 Approx. 8.1 N·m(Approx. 82.6 kgf·cm)
Approx. 3.0 N·m(Approx. 30.6 kgf·cm)
7Approx. 10.0 N·m
(Approx. 102.0 kgf·cm)
Approx. 4.0 N·m(Approx. 40.8 kgf·cm)
9Approx. 11.5 N·m
(Approx. 117.3 kgf·cm)
Approx. 5.8 N·m(Approx. 59.1 kgf·cm)

13
BAHASA INDONESIAPenjelasan tampilan keseluruhan
SPESIFIKASI
• Karena kesinambungan program penelitian dan pengembangan kami, spesifikasi yang disebutkan di sini dapat berubah tanpa pemberitahuan.
• Spesifikasi dan baterai dapat berbeda dari satu negara ke negara lainnya.• Berat, dengan baterai, menurut Prosedur EPTA 01/2003
END004-2SimbolBerikut ini adalah simbol-simbol yang digunakan pada peralatan ini. Pastikan Anda mengerti makna masing-masing simbol sebelum menggunakan alat.
............... Baca petunjuk penggunaan.
ENE033-1PenggunaanMesin ini digunakan untuk memasang sekrup pada kayu, logam dan plastik.
GEA006-2
Peringatan Keselamatan Umum Mesin Listrik
PERINGATAN! Bacalah semua peringatan keselamatan dan semua petunjuk. Kelalaian mematuhi peringatan dan petunjuk dapat menyebabkan sengatan listrik, kebakaran dan/atau cedera serius.
1. Indikator berwarna merah2. Tombol3. Baterai4. Tanda bintang5. Saklar pemicu6. Lampu7. Tampilan LED8. Tombol lampu9. Tuas saklar pembalik arah
10. Tuas pengubah kecepatan11. Tanda mode12. Tombol pengubah mode kerja13. Tanda panah14. Diubah dalam tiga tahap15. Keras16. Sedang17. Lunak18. Tombol kontrol
19. Kapasitas baterai20. Mata mesin21. Selongsong22. Ganjal mata mesin23. Alur24. Kait25. Sekrup
Model BTP131 BTP141
Mode obeng ketok
Kapasitas Pengencangan
Sekrup mesin 4 mm - 8 mmBaut standar 5 mm - 14 mm
Baut mutu tinggi 5 mm - 12 mmKecepatan tanpa beban (min-1)
(Lunak / Sedang / Keras)0 - 1.400 / 0 - 2.200 /
0 - 2.8000 - 1.300 / 0 - 2.200 /
0 - 2.700Hentakan per menit (Lunak / Sedang / Keras) 0 - 1.200 / 0 - 2.400 / 0 - 3.200
Rendah (1) / Tinggi (2)
Mode bor getarKecepatan tanpa beban (min-1) 0 - 700 / 0 - 2.800 0 - 700 / 0 - 2.700
Hembusan per menit (min-1) 0 - 8.400 / 0 - 32.400Kapasitas Pengeboran / Beton 8 mm
Mode bor Kapasitas Pengeboran
Baja 10 mm / 6,5 mmKayu 21 mm / 12 mm
Kecepatan tanpa beban (min-1) 0 - 700 / 0 - 2.800 0 - 700 / 0 - 2.700
Mode obeng Kapasitas Pengencangan
Sekrup mesin 3,5 mm - 6 mm / 4 mm - 6 mm
Sekrup menakik sendiri 4 mm, 5 mm / 4 mm (Ketebalan maks. 3,2 mm)
Kecepatan tanpa beban (min-1)
0 - 300 / 0 - 1.100 (tergantung setelan torsi)0 - 600 / 0 - 2.300 (mode P)
Berat bersih (dengan baterai)
1,5 kg (dengan baterai BL1415)
1,7 kg (dengan baterai BL1430)
1,6 kg (dengan baterai BL1815)
1,8 kg (dengan baterai BL1830)
Tegangan terukur D.C.14,4 V D.C.18 V
14
Simpanlah semua peringatan dan petunjuk untuk acuan di masa depan.Istilah “mesin listrik” dalam semua peringatan mengacu pada mesin listrik yang dijalankan dengan sumber listrik jala-jala (berkabel) atau baterai (tanpa kabel).
Keselamatan tempat kerja1. Jaga tempat kerja selalu bersih dan
berpenerangan cukup. Tempat kerja yang berantakan dan gelap mengundang kecelakaan.
2. Jangan gunakan mesin listrik dalam lingkungan yang mudah meledak, misalnya jika ada cairan, gas, atau debu yang mudah menyala. Mesin listrik menimbulkan bunga api yang dapat menyalakan debu atau uap tersebut.
3. Jauhkan anak-anak dan orang lain saat menggunakan mesin listrik. Bila perhatian terpecah, anda dapat kehilangan kendali.
Keamanan kelistrikan4. Steker mesin listrik harus cocok dengan
stopkontak. Jangan sekali-kali mengubah steker dengan cara apa pun. Jangan menggunakan steker adaptor dengan mesin listrik berarde (dibumikan). Steker yang tidak diubah dan stopkontak yang cocok akan mengurangi risiko sengatan listrik.
5. Hindari sentuhan tubuh dengan permukaan berarde atau yang dibumikan seperti pipa, radiator, kompor, dan kulkas. Risiko sengatan listrik bertambah jika tubuh Anda terbumikan atau terarde.
6. Jangan membiarkan mesin listrik kehujanan atau kebasahan. Air yang masuk ke dalam mesin listrik akan meningkatkan risiko sengatan listrik.
7. Jangan menyalahgunakan kabel. Jangan sekali-kali menggunakan kabel untuk membawa, menarik, atau mencabut mesin listrik dari stopkontak. Jauhkan kabel dari panas, minyak, tepian tajam, atau bagian yang bergerak. Kabel yang rusak atau kusut memperbesar risiko sengatan listrik.
8. Bila menggunakan mesin listrik di luar ruangan, gunakan kabel ekstensi yang sesuai untuk penggunaan di luar ruangan. Penggunaan kabel yang sesuai untuk penggunaan luar ruangan mengurangi risiko sengatan listrik.
9. Jika mengoperasikan mesin listrik di lokasi lembap tidak terhindarkan, gunakan pasokan daya yang dilindungi pemutus rangkaian salah arde (ground fault circuit interrupter - GFCI). Penggunaan GFCI mengurangi risiko sengatan listrik.
Keselamatan diri10. Jaga kewaspadaan, perhatikan pekerjaan Anda
dan gunakan akal sehat bila menggunakan mesin listrik. Jangan menggunakan mesin listrik saat Anda lelah atau di bawah pengaruh obat bius, alkohol, atau obat. Sekejap saja lalai saat menggunakan mesin listrik dapat menyebabkan cedera diri yang serius.
11. Gunakan alat pelindung diri. Selalu gunakan pelindung mata. Peralatan pelindung seperti masker debu, sepatu pengaman anti-selip, helm pengaman, atau pelindung telinga yang digunakan untuk kondisi yang sesuai akan mengurangi risiko cedera diri.
12. Cegah penyalaan yang tidak disengaja. Pastikan bahwa sakelar berada dalam posisi mati (off) sebelum menghubungkan mesin ke sumber daya dan/atau baterai, mengangkat atau membawanya. Membawa mesin listrik dengan jari Anda pada sakelarnya atau mengalirkan listrik pada mesin listrik yang sakelarnya hidup (on) akan mengundang kecelakaan.
13. Lepaskan kunci-kunci penyetel sebelum menghidupkan mesin listrik. Kunci-kunci yang masih terpasang pada bagian mesin listrik yang berputar dapat menyebabkan cedera.
14. Jangan meraih terlalu jauh. Jagalah pijakan dan keseimbangan sepanjang waktu. Hal ini memungkinkan kendali yang lebih baik atas mesin listrik dalam situasi yang tidak diharapkan.
15. Kenakan pakaian dengan baik. Jangan memakai pakaian yang kedodoran atau perhiasan. Jaga jarak antara rambut, pakaian, dan sarung tangan Anda dengan bagian mesin yang bergerak. Pakaian kedodoran, perhiasan, atau rambut panjang dapat tersangkut pada bagian yang bergerak.
16. Jika tersedia fasilitas untuk menghisap dan mengumpulkan debu, pastikan fasilitas tersebut terhubung listrik dan digunakan dengan baik. Penggunaan pembersih debu dapat mengurangi bahaya yang terkait dengan debu.
Penggunaan dan pemeliharaan mesin listrik17. Jangan memaksa mesin listrik. Gunakan mesin
listrik yang tepat untuk keperluan Anda. Mesin listrik yang tepat akan menuntaskan pekerjaan dengan lebih baik dan aman pada kecepatan sesuai rancangannya.
18. Jangan gunakan mesin listrik jika sakelar tidak dapat menyalakan dan mematikannya. Mesin listrik yang tidak dapat dikendalikan dengan sakelarnya adalah berbahaya dan harus diperbaiki.
19. Cabut steker dari sumber listrik dan/atau baterai dari mesin listrik sebelum melakukan penyetelan, penggantian aksesori, atau menyimpan mesin listrik. Langkah keselamatan preventif tersebut mengurangi risiko hidupnya mesin secara tak sengaja.
20. Simpan mesin listrik jauh dari jangkauan anak-anak dan jangan biarkan orang yang tidak paham mengenai mesin listrik tersebut atau petunjuk ini menggunakan mesin listrik. Mesin listrik sangat berbahaya di tangan pengguna yang tak terlatih.
21. Rawatlah mesin listrik. Periksa apakah ada bagian bergerak yang tidak lurus atau macet, bagian yang pecah dan kondisi lain yang dapat mempengaruhi penggunaan mesin listrik. Jika rusak, perbaiki dahulu mesin listrik sebelum digunakan. Banyak kecelakaan disebabkan oleh kurangnya pemeliharaan mesin listrik.

15
22. Jaga agar mesin pemotong tetap tajam dan bersih. Mesin pemotong yang terawat baik dengan mata pemotong yang tajam tidak mudah macet dan lebih mudah dikendalikan.
23. Gunakan mesin listrik, aksesori, dan mata mesin, dll. sesuai dengan petunjuk ini, dengan memperhitungkan kondisi kerja dan jenis pekerjaan yang dilakukan. Penggunaan mesin listrik untuk penggunaan yang lain dari peruntukan dapat menimbulkan situasi berbahaya.
Penggunaan dan pemeliharaan mesin bertenaga baterai24. Isi ulang baterai hanya dengan pengisi daya yang
ditentukan oleh pabrikan. Pengisi daya yang cocok untuk satu jenis baterai dapat menimbulkan risiko kebakaran ketika digunakan untuk paket baterai yang lain.
25. Gunakan mesin listrik hanya dengan baterai yang telah ditentukan secara khusus. Penggunaan baterai lain dapat menimbulkan risiko cedera dan kebakaran.
26. Ketika baterai tidak digunakan, jauhkan dari benda logam lain, seperti penjepit kertas, uang logam, kunci, paku, sekrup atau benda logam kecil lainnya, yang dapat menghubungkan satu terminal ke terminal lain. Hubungan singkat terminal baterai dapat menyebabkan luka bakar atau kebakaran.
27. Pemakaian yang salah, dapat menyebabkan keluarnya cairan dari baterai; hindari kontak. Jika terjadi kontak secara tidak sengaja, bilas dengan air. Jika cairan mengenai mata, cari bantuan medis. Cairan yang keluar dari baterai bisa menyebabkan iritasi atau luka bakar.
Servis28. Berikan mesin listrik untuk diperbaiki hanya
kepada oleh teknisi yang berkualifikasi dengan menggunakan hanya suku cadang pengganti yang serupa. Hal ini akan menjamin terjaganya keamanan mesin listrik.
29. Patuhi petunjuk pelumasan dan penggantian aksesori.
30. Jagalah agar gagang kering, bersih, dan bebas dari minyak dan gemuk.
GEB078-2
PERINGATAN KESELAMATAN OBENG KETOK LISTRIK TANPA KABEL1. Kenakan pelindung telinga saat melakukan
pengeboran tumbuk (impact drilling). Terpaan kebisingan dapat menyebabkan hilangnya pendengaran.
2. Gunakan gagang tambahan, jika disertakan bersama mesin ini. Kehilangan kendali dapat menyebabkan cedera.
3. Pegang mesin listrik pada permukaan genggam yang terisolasi saat melakukan pekerjaan bila pengencang mungkin bersentuhan dengan kawat tersembunyi. Pengencang yang menyentuh kawat “hidup” dapat menyebabkan bagian logam pada mesin teraliri arus listrik dan menyengat pengguna.
4. Pegang mesin listrik pada permukaan genggam yang terisolasi saat melakukan pekerjaan bila aksesori pemotong mungkin bersentuhan dengan kawat tersembunyi. Aksesori pemotong yang menyentuh kawat “hidup” dapat menyebabkan bagian logam pada mesin teraliri arus listrik dan menyengat pengguna.
5. Selalu pastikan Anda berada di atas alas yang kuat.Pastikan tidak ada orang di bawahnya bila Anda menggunakan mesin di tempat yang tinggi.
6. Pegang mesin kuat-kuat.7. Jauhkan tangan dari bagian yang berputar.8. Jangan tinggalkan mesin dalam keadaan hidup.
Jalankan mesin hanya ketika digenggam tangan.9. Jangan menyentuh mata mesin atau benda kerja
segera setelah pengoperasian; suhunya mungkin masih sangat panas dan dapat membakar kulit Anda.
10. Bahan tertentu mengandung zat kimia yang mungkin beracun. Hindari menghirup debu dan persentuhan dengan kulit. Ikuti data keselamatan bahan dari pemasok.
SIMPAN PETUNJUK INI.PERINGATAN:
JANGAN biarkan kenyamanan atau terbiasanya Anda dengan produk (karena penggunaan berulang) menggantikan kepatuhan yang ketat terhadap aturan keselamatan untuk produk yang terkait. PENYALAHGUNAAN atau kelalaian mematuhi kaidah keselamatan yang tertera dalam petunjuk ini dapat menyebabkan cedera badan serius.
ENC007-7
PETUNJUK KESELAMATAN PENTING
UNTUK BATERAI1. Sebelum menggunakan baterai, bacalah semua
petunjuk dan penandaan pada (1) pengisi daya baterai, (2) baterai, dan (3) produk yang menggunakan baterai.
2. Jangan membongkar baterai.3. Jika waktu beroperasinya menjadi sangat singkat,
segera hentikan penggunaan. Hal tersebut dapat menimbulkan risiko panas berlebih, kemungkinan mengalami luka bakar atau bahkan terjadi ledakan.
4. Jika elektrolit mengenai mata Anda, basuh dengan air bersih dan segera cari pertolongan medis. Hal tersebut dapat mengakibatkan hilangnya kemampuan penglihatan Anda.
5. Jangan menghubungkan terminal baterai:(1) Jangan menyentuhkan terminal dengan
bahan penghantar listrik apapun.(2) Hindari menyimpan baterai pada wadah yang
berisi benda logam lain seperti paku, uang logam, dsb.
(3) Jangan membiarkan baterai terkena air atau kehujanan.

16
Hubungan singkat baterai dapat menyebabkan aliran arus listrik yang besar, panas berlebih, kemungkinan mengalami luka bakar dan bahkan kerusakan pada baterai.
6. Jangan menyimpan mesin dan baterai pada lokasi dengan suhu yang bisa mencapai atau melebihi 50°C.
7. Jangan membuang baterai di tempat pembakaran sampah walaupun benar-benar rusak atau tidak bisa digunakan sama sekali. Baterai bisa meledak jika terbakar.
8. Hati-hati jangan sampai baterai jatuh atau terbentur.
9. Jangan menggunakan baterai yang rusak.
SIMPAN PETUNJUK INI.Tip untuk menjaga agar umur pemakaian baterai maksimum1. Ganti baterai sebelum habis sama sekali.
Selalu hentikan penggunaan mesin dan ganti baterai jika Anda melihat bahwa mesin kurang tenaga.
2. Jangan pernah mengisi ulang baterai yang sudah diisi penuh.Pengisian ulang yang berlebih memperpendek umur pemakaian baterai.
3. Isi ulang baterai pada suhu ruangan 10°C - 40°C. Biarkan baterai yang panas menjadi dingin terlebih dahulu sebelum diisi ulang.
4. Isi ulang baterai sekali dalam enam bulan jika Anda tidak menggunakannya dalam jangka waktu yang lama.
DESKRIPSI FUNGSIPERHATIAN:
• Selalu pastikan bahwa mesin dimatikan dan baterai dilepas sebelum menyetel atau memeriksa kerja mesin.
Memasang atau melepas baterai (Gb. 1)• Selalu matikan mesin sebelum memasang atau
melepas baterai.• Untuk melepas baterai, geser dari mesin sambil
menggeser tombol pada bagian depan baterai.• Untuk memasang baterai, sejajarkan lidah baterai
dengan alur pada rumah dan masukkan ke dalam tempatnya. Selalu masukkan seluruhnya sampai terkunci pada tempatnya dan terdengar bunyi klik kecil. Jika Anda bisa melihat indikator berwarna merah pada sisi atas tombol, berarti tidak terkunci sepenuhnya. Pasang sepenuhnya sampai indikator berwarna merah tidak terlihat. Jika tidak, bisa terlepas dari mesin secara tidak sengaja, menyebabkan luka pada Anda atau orang di sekitar Anda.
Jangan dipaksakan ketika memasang baterai. Jika baterai tidak bergeser dengan mudah, berarti tidak dimasukkan dengan benar.
Sistem perlindungan baterai (Baterai Litium-ion dengan tanda bintang) (Gb. 2)Baterai Litium-ion dengan tanda bintang yang dilengkapi dengan sistem perlindungan. Sistem ini memutus daya ke mesin secara otomatis untuk memperpanjang umur pemakaian baterai.Mesin akan berhenti saat penggunaan saat mesin dan/atau baterai berada dalam salah satu kondisi berikut ini:• Kelebihan beban:
Mesin dijalankan dengan cara yang menyebabkannya menarik arus tinggi yang tidak normal.Untuk situasi ini, lepas picu saklar pada mesin dan hentikan penggunaan yang menyebabkan mesin mengalami kelebihan beban. Kemudian tarik lagi picu saklarnya untuk mengoperasikannya kembali.Jika mesin tidak menyala, baterai mengalami kelebihan panas. Untuk situasi ini, biarkan baterai menjadi dingin sebelum menarik picu saklarnya lagi.
• Tegangan baterai rendah:Kapasitas baterai yang tersisa terlalu rendah dan mesin tidak akan beroperasi. Untuk situasi ini, lepas dan isi ulang baterai.
Kerja saklar (Gb. 3)PERHATIAN:
• Sebelum memasang baterai pada mesin, pastikan picu saklar berfungsi dengan baik dan kembali ke posisi “OFF” saat dilepas.
Untuk menjalankan mesin, cukup tarik picu saklarnya. Kecepatan mesin akan meningkat dengan menambah tekanan pada picu saklar. Lepaskan picu saklar untuk berhenti.
CATATAN:• Mesin akan berhenti selama tiga menit setelah menarik
picu saklar.
Menyalakan lampu depan (Gb. 4 & Gb. 5)PERHATIAN:
• Jangan melihat lampu atau sumber lampu secara langsung.
Setiap kali tombol lampu pada tampilan LED ditekan, status lampu berubah bergantian dari ON ke OFF dan dari OFF ke ON.Dengan tombol lampu dalam status ON, tarik picu saklar untuk menyalakan lampu. Untuk mematikan, lepaskan dan lampu akan padam kira-kira 10 detik setelah dilepas.Dengan tombol lampu dalam status OFF, bahkan jika picu ditarik, lampu tidak akan menyala.
CATATAN:• Untuk memastikan status lampu, tarik picu. Ketika
lampu menyala dengan menarik picu saklar, saklar lampu dalam status ON. Ketika lampu tidak menyala, saklar lampu dalam status OFF.
• Selama penggunaan picu saklar, status lampu tidak bisa diubah.
• Selama kira-kira 10 detik setelah melepas picu saklar, status lampu bisa diubah.

17
Kerja saklar pembalik arah (Gb. 6)Mesin ini memiliki saklar pembalik arah untuk mengubah arah putaran. Tekan tuas saklar pembalik arah dari sisi A untuk putaran searah jarum jam atau dari sisi B untuk putaran berlawanan arah jarum jam.Ketika tuas saklar pembalik arah pada posisi netral, picu saklar tidak bisa ditarik.
PERHATIAN:• Selalu periksa arah putaran sebelum penggunaan.• Gunakan saklar pembalik arah hanya setelah mesin
benar-benar berhenti. Mengubah arah putaran sebelum mesin berhenti dapat merusak mesin.
• Saat mesin tidak digunakan, selalu posisikan tuas saklar pembalik arah pada posisi netral.
Perubahan kecepatan (Gb. 7)PEMBERITAHUAN:• Selalu posisikan tuas pengubah kecepatan
sepenuhnya pada posisi yang tepat. Jika Anda menggunakan mesin dengan tuas pengubah kecepatan berada di posisi tengah antara sisi “1” dan sisi “2”, mesin bisa rusak.
• Jangan menggunakan tuas pengubah kecepatan ketika mesin sedang bekerja. Mesin bisa rusak.
• Jangan memaksa tuas ke sisi “1” dengan mode obeng ketok. Mesin bisa rusak.
Untuk mengubah kecepatan, pertama-tama matikan mesin dan kemudian geser tuas pengubah kecepatan ke sisi “2” untuk kecepatan tinggi atau “1” untuk kecepatan rendah. Pastikan bahwa tuas pengubah kecepatan
diposisikan pada posisi yang tepat sebelum penggunaan. Gunakan kecepatan yang tepat untuk pekerjaan Anda.Saat memutar cincin pengubah mode kerja ke mode obeng ketok, posisikan tuas pengubah kecepatan ke sisi “2”.
Memilih mode kerja (Gb. 8)Mesin ini menggunakan cincin pengubah mode kerja. Pilih salahsatu dari 4 mode yang sesuai untuk kebutuhan kerja Anda dengan memutar cincin ini.Ketika memasang sekrup kayu atau baut, arahkan tanda panah ke tanda untuk mode obeng ketok. Kekuatan hentakan bisa disetel di tampilan LED.Ketika mengebor beton atau ubin, arahkan tanda panah ke tanda untuk mode bor getar.Ketika mengebor kayu atau logam, arahkan tanda panah ke tanda untuk mode bor.Ketika memasang sekrup kayu kecil atau sekrup mesin, arahkan tanda panah ke tanda untuk mode obeng. Torsi pengencangan bisa disetel di tampilan LED.
PERHATIAN:• Selalu posisikan tanda panah dengan benar pada
salahsatu tanda mode. Jika Anda memakai mesin dengan cincin pengubah mode kerja berada di posisi tengah antara kedua tanda mode alat bisa rusak.
• Saat memutar cincin pengubah mode kerja, pastikan bahwa mesin berhenti. Jika cincin tidak bergerak dengan mudah, tarik picu saklar sedikit untuk memutar spindel dan kemudian gerakkan cincin.
• Pada mode bor getar atau mode bor, kekuatan hembusan atau torsi tidak bisa disetel. Pada mode ini, angka di tampilan LED akan nonaktif.
Mengubah kekuatan hentakan (mode obeng ketok “ ”) (Gb. 9)
012243
Kekuatan hentakan dapat diubah dalam tiga tahap: keras, sedang dan lunak.Hal ini membuat pemasangan dapat disesuaikan dengan pengerjaan.Setiap kali tombol ditekan, tingkat kekuatan hentakan berubah dalam tiga tahap.
Selama kira-kira satu menit setelah melepas picu saklar, kekuatan hentakan bisa diubah.
CATATAN:• Selama penggunaan picu saklar, tingkat kekuatan
hentakan tidak bisa diubah.
tingkat kekuatan hentakan ditampilkan
pada panel
Hembusan maksimumAplikasi Pengerjaan
BTP131 BTP141
Keras
3.200 (min-1) 3.200 (min-1) Pemasangan pada kekuatan dan kecepatan diinginkan.
Pemasangan pada bahan yang dikerjakan/Pemasangan sekrup panjang/Pemasangan baut.
Sedang
2.400 (min-1) 2.400 (min-1) Pemasangan ketika diperlukan pengerjaan akhir.
Pemasangan pada papan halus, papan gipsum.
Lunak
1.200 (min-1) 1.200 (min-1)
Pemasangan ketika perlu dihindari pemasangan yang berlebihan karena memungkinkan lubang sekrup tersumbat dan pecah atau rusaknya kepala sekrup.
Pemasangan sekrup ikat/Pemasangan sekrup kecil seperti M6.
18
Mengubah setelan torsi (mode obeng “ ”)Torsi pengencangan bisa disetel dengan menekan tombol
di mode obeng.Angka pada tampilan LED menunjukkan setelan torsi. Torsi pengencangannya minimum di angka 1 dan maksimum di angka 9. Tanda “P” merupakan mode khusus untuk mengencangkan sekrup menakik sendiri.Setiap kali tombol ditekan, setelan torsi berubah dari 1 ke 9 dan P, dan kemudian kembali ke 1.Setelan torsi berubah secara cepat dengan tetap menekan tombolnya.Mode P cocok untuk mengencangkan sekrup menakik sendiri ke pelat baja dengan kondisi sebagaimana berikut.• Dengan posisi tuas pengubah kecepatan di sisi “2”,
mengencangkan sekrup berukuran maks. 4 mm pada pelat baja dengan ukuran total maks. 3,2 mm.
• Dengan posisi tuas pengubah kecepatan di sisi “1”, mengencangkan sekrup berukuran maks. 5 mm.
Sebelum penggunaan yang sebenarnya, pasang sekrup percobaan pada bahan atau potongan bahan lain untuk menentukan tingkat torsi yang dibutuhkan untuk keperluan tertentu.Pertama-tama, cobalah untuk mengencangkan sekrup di posisi “1”. Kemudian tingkatkan angkanya untuk melanjutkan pengencangan. Pegang mesin kuat-kuat selama penggunaan.
PERHATIAN:• Jangan mengencangkan sekrup mesin pada mode P.
Hal tersebut dapat memutar pergelangan tangan Anda secara tiba-tiba dan mengakibatkan cedera badan.
CATATAN:• Pastikan untuk memeriksa angka pada tampilan LED
sebelum penggunaan. Jika angkanya tidak ditunjukkan, hubungi pusat layanan Makita terdekat.
• Ketika kapasitas baterai yang tersisa menjadi rendah di mode obeng, lampu berkedip beberapa kali saat mengencangkan sekrup sepenuhnya. Untuk kasus ini, isi ulang baterai. Jika Anda tetap menggunakannya, Anda mungkin tidak mendapatkan torsi yang diinginkan.
• Selama menarik picu saklar, setelan torsi tidak bisa diubah.
• Selama kira-kira satu menit setelah melepas picu saklar, setelan torsi bisa diubah. Jika Anda ingin mengubah setelan torsi setelahnya, tarik lagi picu saklar.
• Angka setelan torsi bukan merupakan laju torsi khusus.
Sinyal kosong untuk kapasitas baterai yang tersisa (Gb. 10)Kapasitas baterai yang tersisa akan diisyaratkan pada tampilan LED saat menarik picu saklar. Kapasitas baterai yang tersisa ditunjukkan sebagaimana tabel berikut ini.
012273
CATATAN:• Ketika tampilan LED padam, mesin mati untuk
menghemat daya baterai. Untuk memeriksa kapasitas baterai yang tersisa, tarik sedikit picu saklarnya.
• Tampilan LED akan padam kira-kira satu menit setelah melepas picu saklar.
• Saat suhu mesin meningkat, lampu berkedip sekali per detik selama satu menit, dan kemudian tampilan LED akan padam. Untuk kasus ini, biarkan baterai menjadi dingin sebelum digunakan.
PERAKITANPERHATIAN:
• Selalu pastikan bahwa mesin dimatikan dan baterai dilepas sebelum melakukan pekerjaan apapun pada mesin.
Memasang atau melepas mata obeng/bor/soketGunakan hanya mata obeng/bor/soket yang ditunjukkan pada gambar. Jangan gunakan mata obeng/bor/soket lain. (Gb. 11)
Untuk mesin dengan lubang mata mesin yang dangkal
006348
Untuk mesin dengan lubang mata mesin yang dalam
011405
1. Untuk memasang mata mesin, masukkan mata mesin ke dalam selongsong sejauh mungkin. Kemudian lepaskan selongsong untuk mengencangkan mata mesin. (Gb. 12)
Status indikator LED Kapasitas baterai yang tersisa
Sekitar 50% atau lebih
Sekitar 20% - 50%
Sekitar kurang dari 20%
A = 12 mmB = 9 mm
Gunakan hanya mata mesin dengan jenis ini. Ikuti prosedur (1).(Catatan) Tidak diperlukan ganjal mata mesin.
A = 17 mmB = 14 mm
Untuk memasang mata mesin dengan jenis ini, ikuti prosedur (1).
A = 12 mmB = 9 mm
Untuk memasang mata mesin dengan jenis ini, ikuti prosedur (2).(Catatan) Diperlukan ganjal mata mesin untuk memasang mata mesin tersebut.

19
2. Untuk memasang mata mesin, masukkan ganjal mata mesin dan mata mesin ke dalam selongsong sejauh mungkin. Ganjal mata mesin harus dimasukkan ke dalam selongsong dengan ujung lancipnya menghadap ke dalam. Kemudian lepas selongsong untuk mengencangkan mata mesin. (Gb. 13)
Untuk melepas mata mesin, tarik selongsong sesuai arah panah dan cabut mata mesin kuat-kuat.
PERHATIAN:• Jangan menyentuh mata mesin segera setelah
pengoperasian karena suhunya masih panas. Ganti mata bor setelah membiarkannya menjadi dingin.
CATATAN:• Jika mata mesin tidak dimasukkan penuh ke dalam
selongsong, selongsong tidak akan kembali pada posisi semula dan mata mesin tidak terpasang. Untuk kasus ini, coba masukkan kembali mata mesin sesuai dengan petunjuk di atas.
• Setelah memasukkan mata mesin, pastikan terpasang dengan kuat. Jika menonjol keluar, jangan digunakan.
Kait (pilihan aksesori) (Gb. 14)PERHATIAN:
• Ketika memasang kait, kencangkan sekrup kuat-kuat. Kelalaian dalam melakukannya dapat mengakibatkan kerusakan mesin atau cedera.
Kait bisa digunakan untuk menggantung mesin sementara. Bisa dipasang pada salahsatu sisi mesin.Untuk memasang kait, masukkan ke dalam alur pada rumah mesin pada salah satu sisinya dan kemudian kencangkan dengan sekrup. Untuk melepasnya, kendurkan sekrup dan kemudian tarik keluar.
PENGUNAAN (Gb. 15)PERHATIAN:
• Selalu masukkan baterai seluruhnya sampai terkunci pada tempatnya dan terdengar bunyi klik kecil. Jika Anda bisa melihat indikator berwarna merah pada sisi atas tombol, berarti tidak terkunci sepenuhnya. Pasang sepenuhnya sampai indikator berwarna merah tidak terlihat. Jika tidak, bisa terlepas dari mesin secara tidak sengaja, menyebabkan luka pada Anda atau orang di sekitar Anda.
• Jika mesin terus-menerus digunakan sampai baterai habis, istirahatkan mesin selama 15 menit sebelum melakukannya lagi dengan baterai yang penuh.
Mode obeng ketok “ ”Pemasangan sekrupPegang mesin kuat-kuat dan posisikan ujung mata obeng pada kepala sekrup. Tekan maju mesin sampai titik di mana mata obeng tidak tergelincir dan nyalakan mesin untuk memulai penggunaan.
Mengencangkan bautTorsi pengencangan yang tepat bisa berbeda tergantung pada macam atau ukuran sekrup/baut, bahan benda kerja yang akan dikencangkan, dsb. Hubungan antara torsi pengencangan dan waktu pengencangan ditunjukkan pada gambar.
012423
012425
CATATAN:• Saat mode kerja diposisikan ke mode obeng ketok,
pastikan bahwa mesin menghentak dengan baik, dengan mengencangkan sekrup kayu sebelum penggunaan. Jika mesin tidak bekerja dengan baik, hubungi pusat layanan Makita terdekat.
• Tahan mesin pada posisi tegak lurus terhadap sekrup.
120
100
80
60
40
20
N m(kgf cm)
(1224)
(1020)
(816)
(612)
(408)
(204)
0 1.0 2.0 3.0
(M14)
(M12)
(M10)
(M8)
0
M14
M12
M10
M8
Baut standar
Tors
i pen
genc
anga
n
Tors
i pen
genc
anga
n ya
ng te
pat
Waktu pengencangan (det)
120
100
80
60
40
20
N m(kgf cm)
(1224)
(1020)
(816)
(612)
(408)
(204)
0 1.0 2.0 3.0
(M12)
(M10)
(M8)
0
M12
M10
M8
Baut mutu tinggi
Tors
i pen
genc
anga
n
Tors
i pen
genc
anga
n ya
ng te
pat
Waktu pengencangan (det)

20
• Gunakan mata mesin yang sesuai untuk kepala sekrup/baut yang ingin Anda gunakan.
• Ketika mengencangkan sekrup M8 atau yang lebih kecil, sesuaikan tekanan pada picu saklar dengan seksama sehingga tidak merusak sekrup.
• Jika Anda mengencangkan sekrup untuk waktu yang lebih lama dari yang ditunjukkan pada gambar, sekrup atau ujung mata obeng bisa mengalami kelebihan tekanan, terlepas, rusak, dsb. Sebelum memulai pekerjaan Anda, selalu lakukan uji-coba untuk menentukan waktu yang sesuai bagi sekrup Anda.
Torsi pengencangan dipengaruhi oleh berbagai macam faktor termasuk hal-hal berikut ini. Setelah pengencangan, selalu periksa torsi dengan kunci torsi.1. Ketika baterai hampir benar-benar habis, tegangan
akan turun dan torsi pengencangan akan berkurang.2. Mata obeng atau mata soket
Kesalahan penggunaan mata obeng atau mata soket dengan ukuran yang tepat akan menyebabkan penurunan torsi pengencangan.
3. Baut• Walaupun koefisien torsi dan kelas bautnya sama,
torsi pengencangan yang tepat akan berbeda sesuai dengan diameter baut.
• Walaupun diameter bautnya sama, torsi pengencangan yang tepat akan berbeda sesuai dengan koefisien torsi, kelas baut dan panjang baut.
4. Sikap ketika memegang mesin atau posisi bahan yang akan dipasang sekrup akan mempengaruhi torsi.
5. Menggunakan mesin pada kecepatan rendah akan menyebabkan penurunan torsi pengencangan.
Mode bor getar “ ”PERHATIAN:
• Selalu pegang mesin kuat-kuat selama penggunaan. Akan timbul gaya yang sangat kuat dan tiba-tiba pada mesin/mata mesin saat menembus lubang, bila lubang dipenuhi geram-geram atau partikel, atau bila menabrak besi-besi tulangan yang terpasang di dalam beton.
Pastikan Anda menggunakan mata bor berujung tungsten-carbide.Posisikan mata mesin pada lokasi yang diinginkan untuk membuat lubang, kemudian tarik picu saklarnya. Jangan memaksa mesin listrik. Tekanan yang ringan akan memberi hasil yang terbaik. Jaga posisi mesin dan cegah agar tidak selip dari lubang.Jangan menambah tekanan bila lubang dipenuhi geram-geram atau partikel. Tetapi, nyalakan mesin tanpa putaran, lalu angkat mata mesin sedikit dari lubang. Dengan melakukan hal ini beberapa kali, lubang akan besih dan pengeboran normal bisa dilanjutkan kembali.
Mode bor “ ”PERHATIAN:
• Menekan mesin secara berlebihan tidak akan mempercepat pengeboran. Bahkan, tekanan yang berlebihan hanya akan merusak mata bor Anda, mengurangi kinerja mesin dan memperpendek usia mesin.
• Akan timbul gaya yang sangat kuat pada mesin/mata bor saat menembus lubang. Pegang mesin dengan
kuat dan berhati-hatilah saat mata bor menembus benda kerja.
• Mata bor yang macet dapat dicabut dengan menyetel saklar pembalik arah agar mesin berputar berlawanan arah untuk mundur. Tetapi, mesin bisa saja mundur mendadak jika Anda tidak memegangnya dengan kuat.
• Tahan benda kerja berukuran kecil dengan penjepit atau alat penahan lain.
• Jangan menarik picu saklar secara berulang-ulang saat motor terkunci. Hal tersebut bisa merusak mesin.
Saat mengebor kayu, hasil terbaik didapat dengan bor kayu yang dilengkapi sekrup pemandu. Sekrup pemandu mempermudah pengeboran dengan menarik mata bor ke dalam benda kerja.Saat pengeboran logam, untuk mencegah mata bor selip ketika mulai membuat lubang, buatlah takik dengan penitik lalu palu pada titik yang akan dilubangi. Letakkan ujung mata bor pada takik dan mulailah membor.Gunakan cairan pendingin saat mengebor logam. Pengecualian untuk besi dan kuningan yang harus dibor kering.
Mode obeng “ ”PERHATIAN:
• Setel angka pada tampilan LED ke tingkat torsi yang tepat untuk pekerjaan Anda.
• Pastikan bahwa mata obeng dimasukkan lurus terhadap kepala sekrup, atau sekrup dan/atau mata bor bisa rusak.
• Pegang mesin kuat-kuat. Saat kopeling memotong atau mengencangkan ulang, gaya putar yang muncul secara tiba-tiba bisa saja terjadi dan bisa membuat pergelangan tangan Anda terkilir.
Posisikan ujung mata obeng pada kepala sekrup dan beri tekanan pada mesin. Jalankan mesin dengan perlahan dan kemudian tingkatkan kecepatan secara bertahap.
CATATAN:• Mesin ini menggunakan kopeling elektronik. Mesin
akan berhenti secara otomatis saat kopeling memotong. Untuk tetap mengoperasikannya, lepas sekali picu saklarnya.
• Ketika memasang sekrup kayu, lakukan pengeboran awal untuk membuat lubang pengarah agar mempermudah pemasangan sekrup dan untuk mencegah pecahnya benda kerja. Lihat tabel.
006421
CATATAN:• Lihat tabel berikut ini tentang hubungan antara angka
setelan torsi dan laju torsi pengencangan.
Diameter nominal sekrup kayu (mm)
Ukuran lubang pengarah yang dianjurkan (mm)
3,1 2,0 - 2,23,5 2,2 - 2,53,8 2,5 - 2,84,5 2,9 - 3,24,8 3,1 - 3,45,1 3,3 - 3,65,5 3,7 - 3,95,8 4,0 - 4,26,1 4,2 - 4,4

21
Laju torsi pengencangan berbeda-beda tergantung bahannya. Lakukan uji-coba pengencangan untuk mendapatkan torsi yang diinginkan sebelum penggunaan.
012276
PERAWATANPERHATIAN:
• Selalu pastikan bahwa mesin dimatikan dan baterai dilepas sebelum melakukan pemeriksaan atau perawatan kecuali untuk pemecahan masalah berkenaan dengan lampu berikut ini.
• Jangan sekali-kali menggunakan bensin, tiner, alkohol, atau bahan sejenisnya. Penggunaan bahan demikian dapat menyebabkan perubahan warna, perubahan bentuk atau timbulnya retakan.
Untuk menjaga KEAMANAN dan KEANDALAN mesin, perbaikan, perawatan atau penyetelan lain harus dilakukan oleh Pusat Layanan Resmi Makita dan selalu gunakan suku cadang pengganti buatan Makita.
PILIHAN AKSESORIPERHATIAN:
• Dianjurkan untuk menggunakan aksesori atau perangkat tambahan ini dengan mesin Makita Anda yang ditentukan dalam petunjuk ini. Penggunaan aksesori atau perangkat tambahan lain bisa menyebabkan risiko cedera pada manusia. Hanya gunakan aksesori atau perangkat tambahan sesuai dengan peruntukkannya.
Jika Anda memerlukan bantuan lebih rinci berkenaan dengan aksesori ini, tanyakan pada Pusat Layanan Makita terdekat.• Mata sekrup• Kait• Tas jinjing plastik• Macam-macam jenis baterai dan pengisi daya asli
buatan Makita
CATATAN:• Beberapa item dalam daftar tersebut mungkin sudah
termasuk dalam paket mesin sebagai aksesori standar. Hal tersebut dapat berbeda dari satu negara ke negara lainnya.
Angka pada
Tampilan LED
Laju torsi pengencangan
Rendah (1) Tinggi (2)
1Kira-kira 2,5 N·m
(Kira-kira 25,5 kgf·cm)
Kira-kira 1,1 N·m(Kira-kira 11,2
kgf·cm)
3Kira-kira 4,6 N·m
(Kira-kira 46,9 kgf·cm)
Kira-kira 2,0 N·m(Kira-kira 20,4
kgf·cm)
5Kira-kira 8,1 N·m
(Kira-kira 82,6 kgf·cm)
Kira-kira 3,0 N·m(Kira-kira 30,6
kgf·cm)
7Kira-kira 10,0 N·m
(Kira-kira 102,0 kgf·cm)
Kira-kira 4,0 N·m(Kira-kira 40,8
kgf·cm)
9Kira-kira 11,5 N·m
(Kira-kira 117,3 kgf·cm)
Kira-kira 5,8 N·m(Kira-kira 59,1
kgf·cm)

22
TIẾNG VIỆTGiải thích về hình vẽ tổng thể
THÔNG SỐ KỸ THUẬT
• Do chương trình nghiên cứu và phát triển liên tục của chúng tôi nên các thông số kỹ thuật trong đây có thể thay đổi mà không cần thông báo trước.
• Các thông số kỹ thuật và hộp pin có thể thay đổi tùy theo từng quốc gia.• Trọng lượng có hộp pin tùy theo Quy trình EPTA tháng 01/2003
END004-2Ký hiệuPhần dưới đây cho biết các ký hiệu được dùng cho thiết bị. Đảm bảo rằng bạn hiểu rõ ý nghĩa của các ký hiệu này trước khi sử dụng.
............... Đọc tài liệu hướng dẫn.
ENE033-1Mục đích sử dụngDụng cụ này dùng để bắt vít vào gỗ, kim loại và nhựa.
GEA006-2
Cảnh báo An toàn Chung dành cho Dụng cụ Máy
CẢNH BÁO! Đọc tất cả các cảnh báo an toàn và hướng dẫn. Việc không tuân theo các cảnh báo và hướng dẫn có thể dẫn đến điện giật, hoả hoạn và/hoặc thương tích nghiêm trọng.
1. Chỉ báo màu đỏ2. Nút3. Hộp pin4. Dấu sao5. Cần khởi động công tắc6. Đèn7. Màn hình LED8. Nút đèn9. Cần công tắc đảo chiều
10. Cần thay đổi tốc độ11. Dấu chế độ12. Vòng chuyển chế độ hoạt động13. Mũi tên14. Được thay đổi trong ba bước15. Mạnh16. Vừa phải17. Nhẹ18. Nút điều khiển
19. Dung lượng pin20. Mũi vít21. Trụ ngoài22. Miếng đệm đầu mũi23. Rãnh24. Móc treo25. Vít
Kiểu BTP131 BTP141
Chế độ tạo xung đập
Khả năng vặn xiếtVít máy 4 mm - 8 mm
Bulong thường 5 mm - 14 mmBulong cường độ cao 5 mm - 12 mm
Tốc độ không tải (phút-1) (Yếu / Vừa / Mạnh) 0 - 1.400 / 0 - 2.200 / 0 - 2.800
0 - 1.300 / 0 - 2.200 / 0 - 2.700
Số lần vặn mỗi phút (Yếu / Vừa / Mạnh) 0 - 1.200 / 0 - 2.400 / 0 - 3.200Thấp (1) / Cao (2)
Chế độ khoan búaTốc độ không tải (phút-1) 0 - 700 / 0 - 2.800 0 - 700 / 0 - 2.700Số nhát mỗi phút (phút-1) 0 - 8.400 / 0 - 32.400
Khả năng Khoan / Bê-tông 8 mm
Chế độ khoan Khả năng KhoanThép 10 mm / 6,5 mmGỗ 21 mm / 12 mm
Tốc độ không tải (phút-1) 0 - 700 / 0 - 2.800 0 - 700 / 0 - 2.700
Chế độ tuốc-nơ-vít Khả năng vặn xiết
Vít máy 3,5 mm - 6 mm / 4 mm - 6 mmVít tự khoan 4 mm, 5 mm / 4 mm (Chiều dày tối đa 3,2 mm)
Tốc độ không tải (phút-1)0 - 300 / 0 - 1.100
(tùy thuộc vào cài đặt lực xoay)0 - 600 / 0 - 2.300 (chế độ P)
Trọng lượng tịnh (không có hộp pin)
1,5 kg (kèm pin BL1415)
1,7 kg (kèm pin BL1430)
1,6 kg (kèm pin BL1815)
1,8 kg (kèm pin BL1830)
Hiệu điện thế định mức D.C.14,4 V D.C.18 V

23
Lưu giữ tất cả cảnh báo và hướng dẫn để tham khảo sau này.Thuật ngữ “dụng cụ máy” trong các cảnh báo đề cập đến dụng cụ máy (có dây) được vận hành bằng nguồn điện chính hoặc dụng cụ máy (không dây) được vận hành bằng pin của bạn.
An toàn tại nơi làm việc1. Giữ nơi làm việc sạch sẽ và có đủ ánh sáng. Nơi
làm việc bừa bộn hoặc tối thường dễ gây ra tai nạn.2. Không vận hành dụng cụ máy trong môi trường
cháy nổ, ví dụ như môi trường có sự hiện diện của các chất lỏng, khí hoặc bụi dễ cháy. Các dụng cụ máy tạo tia lửa điện có thể làm bụi hoặc khí bốc cháy.
3. Giữ trẻ em và người ngoài tránh xa nơi làm việc khi đang vận hành dụng cụ máy. Sự xao lãng có thể khiến bạn mất khả năng kiểm soát.
An toàn về điện4. Phích cắm của dụng cụ máy phải khớp với ổ cắm.
Không bao giờ được sửa đổi phích cắm theo bất kỳ cách nào. Không sử dụng bất kỳ phích chuyển đổi nào với các dụng cụ máy được nối đất (tiếp đất). Các phích cắm còn nguyên vẹn và ổ cắm phù hợp sẽ giảm nguy cơ điện giật.
5. Tránh để cơ thể tiếp xúc với các bề mặt nối đất hoặc tiếp đất như đường ống, bộ tản nhiệt, bếp ga và tủ lạnh. Nguy cơ bị điện giật sẽ tăng lên nếu cơ thể bạn được nối đất hoặc tiếp đất.
6. Không để dụng cụ máy tiếp xúc với mưa hoặc trong điều kiện ẩm ướt. Nước lọt vào dụng cụ máy sẽ làm tăng nguy cơ điện giật.
7. Không lạm dụng dây. Không bao giờ sử dụng dây để mang, kéo hoặc tháo phích cắm dụng cụ máy. Giữ dây tránh xa nguồn nhiệt, dầu, các mép sắc hoặc các bộ phận chuyển động. Dây bị hỏng hoặc bị rối sẽ làm tăng nguy cơ điện giật.
8. Khi vận hành dụng cụ máy ngoài trời, hãy sử dụng dây kéo dài phù hợp cho việc sử dụng ngoài trời. Việc dùng dây phù hợp cho việc sử dụng ngoài trời sẽ giảm nguy cơ điện giật.
9. Nếu bắt buộc phải vận hành dụng cụ máy ở nơi ẩm ướt, hãy sử dụng nguồn điện có bộ ngắt mạch nối đất khi rò điện (GFCI). Việc sử dụng GFCI sẽ giảm nguy cơ điện giật.
An toàn cá nhân10. Luôn tỉnh táo, quan sát những việc bạn đang làm
và sử dụng những phán đoán theo kinh nghiệm khi vận hành dụng cụ máy. Không sử dụng dụng cụ máy khi bạn đang mệt mỏi hoặc chịu ảnh hưởng của ma túy, rượu hay thuốc. Chỉ một khoảnh khắc không tập trung khi đang vận hành dụng cụ máy cũng có thể dẫn đến thương tích cá nhân nghiêm trọng.
11. Sử dụng thiết bị bảo hộ cá nhân. Luôn đeo thiết bị bảo vệ mắt. Các thiết bị bảo hộ như mặt nạ chống bụi, giày an toàn chống trượt, mũ bảo hộ hay thiết bị bảo vệ thính giác được sử dụng trong các điều kiện thích hợp sẽ giúp giảm thương tích cá nhân.
12. Tránh vô tình khởi động dụng cụ máy. Đảm bảo công tắc ở vị trí off (tắt) trước khi nối nguồn điện và/hoặc bộ pin, cầm hoặc mang dụng cụ máy. Việc
mang dụng cụ máy khi đang đặt ngón tay ở vị trí công tắc hoặc cấp điện cho dụng cụ máy đang bật thường dễ gây ra tai nạn.
13. Tháo mọi khóa hoặc chìa vặn điều chỉnh trước khi bật dụng cụ máy. Việc chìa vặn hoặc khóa vẫn còn gắn vào bộ phận quay của dụng cụ máy có thể dẫn đến thương tích cá nhân.
14. Không với quá cao. Luôn giữ thăng bằng tốt và có chỗ để chân phù hợp. Điều này cho phép điều khiển dụng cụ máy tốt hơn trong những tình huống bất ngờ.
15. Ăn mặc phù hợp. Không mặc quần áo rộng hay đeo đồ trang sức. Giữ tóc, quần áo và găng tay tránh xa các bộ phận chuyển động. Quần áo rộng, đồ trang sức hay tóc dài có thể mắc vào các bộ phận chuyển động.
16. Nếu các thiết bị được cung cấp để kết nối các thiết bị thu gom và hút bụi, hãy đảm bảo chúng được kết nối và sử dụng hợp lý. Việc sử dụng thiết bị thu gom bụi có thể làm giảm những mối nguy hiểm liên quan đến bụi.
Sử dụng và bảo quản dụng cụ máy17. Không dùng lực đối với dụng cụ máy. Sử dụng
đúng dụng cụ máy cho công việc của bạn. Sử dụng đúng dụng cụ máy sẽ giúp thực hiện công việc tốt hơn và an toàn hơn theo giá trị định mức được thiết kế của dụng cụ máy đó.
18. Không sử dụng dụng cụ máy nếu công tắc không bật và tắt được dụng cụ máy đó. Mọi dụng cụ máy không thể điều khiển được bằng công tắc đều rất nguy hiểm và cần được sửa chữa.
19. Rút phích cắm ra khỏi nguồn điện và/hoặc ngắt kết nối bộ pin khỏi dụng cụ máy trước khi thực hiện bất kỳ công việc điều chỉnh, thay đổi phụ tùng hay cất giữ dụng cụ máy nào. Những biện pháp an toàn phòng ngừa này sẽ giảm nguy cơ vô tình khởi động dụng cụ máy.
20. Cất giữ các dụng cụ máy không sử dụng ngoài tầm với của trẻ em và không cho bất kỳ người nào không có hiểu biết về dụng cụ máy hoặc các hướng dẫn này vận hành dụng cụ máy. Dụng cụ máy sẽ rất nguy hiểm nếu được sử dụng bởi những người dùng chưa qua đào tạo.
21. Bảo quản dụng cụ máy. Kiểm tra tình trạng lệch trục hoặc bó kẹp của các bộ phận chuyển động, hiện tượng nứt vỡ của các bộ phận và mọi tình trạng khác mà có thể ảnh hưởng đến hoạt động của dụng cụ máy. Nếu có hỏng hóc, hãy sửa chữa dụng cụ máy trước khi sử dụng. Nhiều tai nạn xảy ra là do không bảo quản tốt dụng cụ máy.
22. Luôn giữ cho dụng cụ cắt được sắc bén và sạch sẽ. Những dụng cụ cắt được bảo quản tốt có mép cắt sắc sẽ ít bị kẹt hơn và dễ điều khiển hơn.
23. Sử dụng dụng cụ máy, phụ tùng và đầu dụng cụ cắt, v.v... theo các hướng dẫn này, có tính đến điều kiện làm việc và công việc được thực hiện. Việc sử dụng dụng cụ máy cho các công việc khác với công việc dự định có thể gây nguy hiểm.
Sử dụng và bảo quản dụng cụ dùng pin24. Chỉ sạc pin lại với bộ sạc do nhà sản xuất quy
định. Bộ sạc phù hợp với một loại bộ pin này có thể gây ra nguy cơ hỏa hoạn khi được dùng cho một bộ pin khác.

24
25. Chỉ sử dụng các dụng cụ máy với các bộ pin được quy định cụ thể. Việc sử dụng bất cứ bộ pin nào khác có thể gây ra thương tích và hỏa hoạn.
26. Khi không sử dụng bộ pin, hãy giữ tránh xa các đồ vật khác bằng kim loại, chẳng hạn như kẹp giấy, tiền xu, chìa khóa, đinh, ốc vít hoặc các vật nhỏ bằng kim loại mà có thể làm nối tắt các đầu cực pin. Các đầu cực pin bị đoản mạch có thể gây cháy hoặc hỏa hoạn.
27. Trong điều kiện sử dụng quá mức, pin có thể bị chảy nước; hãy tránh tiếp xúc. Nếu vô tình tiếp xúc với pin bị chảy nước, hãy rửa sạch bằng nước. Nếu dung dịch từ pin tiếp xúc với mắt, cần đi khám bác sĩ thêm. Dung dịch chảy ra từ pin có thể gây rát da hoặc bỏng.
Bảo dưỡng28. Để nhân viên sửa chữa đủ trình độ bảo dưỡng
dụng cụ máy của bạn và chỉ sử dụng các bộ phận thay thế đồng nhất. Việc này sẽ đảm bảo duy trì được độ an toàn của dụng cụ máy.
29. Tuân theo hướng dẫn dành cho việc bôi trơn và thay phụ tùng.
30. Giữ tay cầm khô, sạch, không dính dầu và mỡ.
GEB078-2
CẢNH BÁO AN TOÀN ĐỐI VỚI MÁY BẮT VÍT DÙNG PIN 4 CHẾ ĐỘ1. Đeo thiết bị bảo vệ tai khi khoan. Việc để tai tiếp xúc
với tiếng ồn có thể gây giảm thính lực.2. Sử dụng các tay cầm phụ nếu được cung cấp kèm
theo dụng cụ. Không điều khiển được dụng cụ sẽ gây ra thương tích cho con người.
3. Cầm dụng cụ máy bằng bề mặt kẹp cách điện khi thực hiện một thao tác trong đó bộ phận kẹp có thể tiếp xúc với dây dẫn điện kín bên dưới. Bộ phận kẹp tiếp xúc với dây dẫn “có điện” có thể khiến các bộ phận kim loại bị hở của dụng cụ máy “có điện” và làm cho người vận hành bị điện giật.
4. Cầm dụng cụ máy bằng bề mặt kẹp cách điện khi thực hiện một thao tác trong đó phụ kiện cắt có thể tiếp xúc với dây dẫn kín. Bộ phận cắt tiếp xúc với dây dẫn "có điện" có thể khiến các bộ phận kim loại bị hở của dụng cụ máy "có điện" và làm cho người vận hành bị điện giật.
5. Luôn chắc chắn rằng bạn có chỗ tựa chân vững chắc.Đảm bảo rằng không có ai ở dưới khi dùng dụng cụ ở những vị trí trên cao.
6. Cầm chắc dụng cụ.7. Giữ tay tránh xa các bộ phận quay.8. Không để mặc dụng cụ hoạt động. Chỉ vận hành
dụng cụ khi cầm trên tay.9. Không chạm vào mũi khoan hay vật gia công ngay
sau khi vận hành; chúng có thể rất nóng và có thể gây bỏng da.
10. Một số vật liệu có chứa các hóa chất có thể rất độc hại. Phải cẩn trọng tránh hít phải bụi và để tiếp xúc với da. Tuân theo các thông tin về an toàn của nhà cung cấp đối với mỗi loại vật liệu.
LƯU GIỮ CÁC HƯỚNG DẪN NÀY.CẢNH BÁO:
KHÔNG được để sự thoải mái hay quen thuộc với sản phẩm (có được do sử dụng nhiều lần) thay thế việc tuân thủ nghiêm ngặt các quy định về an toàn dành cho sản phẩm này. VIỆC DÙNG SAI hoặc không tuân theo các quy định về an toàn được nêu trong tài liệu hướng dẫn này có thể dẫn đến thương tích cá nhân nghiêm trọng.
ENC007-7
CÁC HƯỚNG DẪN AN TOÀN QUAN TRỌNG
ĐỐI VỚI HỘP PIN1. Trước khi sử dụng hộp pin, hãy đọc kỹ tất cả các
hướng dẫn và dấu hiệu cảnh báo trên (1) bộ sạc pin, (2) pin và (3) sản phẩm sử dụng pin.
2. Không tháo rời hộp pin.3. Nếu thời gian vận hành ngắn hơn nhiều, dừng
việc vận hành ngay lập tức. Điều này có thể gây nguy cơ quá nhiệt, gây cháy hoặc thậm chí gây nổ.
4. Nếu chất điện phân dính vào mắt bạn, hãy rửa sạch bằng nước sạch và đi khám bác sĩ ngay lập tức. Việc này có thể làm giảm thị lực của mắt bạn.
5. Không được đoản mạch hộp pin:(1) Không được chạm vào các đầu cực bằng vật
liệu dẫn điện.(2) Tránh cất giữ hộp pin trong chỗ chứa có các
vật kim loại khác như đinh, tiền xu, v.v...(3) Không được để hộp pin tiếp xúc với nước
hoặc mưa. Pin bị đoản mạch có thể gây ra dòng điện lớn, gây quá nhiệt, cháy và thậm chí gây phóng điện.
6. Không được cất giữ dụng cụ và hộp pin ở những nơi nhiệt độ có thể vượt quá 50°C.
7. Không được thiêu hủy hộp pin ngay cả khi nó đã bị hư hỏng nghiêm trọng hoặc hoàn toàn không sử dụng được. Hộp pin có thể nổ khi bị đốt cháy.
8. Cẩn thận không được làm rơi hoặc va đập mạnh vào pin.
9. Không sử dụng pin đã hư hỏng.
LƯU GIỮ CÁC HƯỚNG DẪN NÀY.Lời khuyên để duy trì tối đa tuổi thọ pin1. Sạc hộp pin trước khi pin được xả điện hoàn toàn.
Luôn dừng việc vận hành dụng cụ và sạc pin khi bạn nhận thấy công suất dụng cụ bị giảm.
2. Không bao giờ sạc lại một hộp pin đã được sạc đầy.Việc sạc điện thêm nữa sẽ làm giảm tuổi thọ pin.
3. Sạc pin ở nhiệt độ phòng từ 10°C - 40°C. Để pin đang nóng nguội lại dần trước khi sạc pin.
4. Sạc hộp pin một lần mỗi sáu tháng nếu bạn không sử dụng nó trong một thời gian dài.

25
MÔ TẢ CHỨC NĂNGCẨN TRỌNG:
• Luôn đảm bảo rằng đã tắt dụng cụ và tháo hộp pin ra trước khi thực hiện việc điều chỉnh hoặc kiểm tra chức năng trên dụng cụ.
Lắp hoặc tháo gỡ hộp pin (Hình 1)• Luôn tắt dụng cụ trước khi lắp hoặc tháo hộp pin.• Để tháo hộp pin, hãy trượt nó ra từ dụng cụ trong lúc
trượt nút ở phía trước hộp pin.• Để lắp hộp pin vào, hãy canh chỉnh phần chốt của hộp
pin vào phần rãnh nằm trên vỏ và trượt chốt vào vị trí. Luôn trượt hết mức đến khi nào chốt khóa đúng vào vị trí với một tiếng click nhẹ. Nếu bạn vẫn còn nhìn thấy chỉ thị màu đỏ phía trên nút bấm, chốt vẫn chưa được khóa hoàn toàn. Lắp chốt hoàn toàn vào vị trí cho đến khi không thể nhìn thấy chỉ thị màu đỏ. Nếu không, chốt có thể vô tình rơi ra khỏi dụng cụ, gây thương tích cho bạn hoặc người khác xung quanh.
Không được ấn mạnh khi lắp hộp pin. Nếu hộp pin không nhẹ nhàng trượt vào vị trí, có nghĩa là pin vẫn chưa được lắp đúng.
Hệ thống bảo vệ pin (Hộp pin Lithium-ion có dấu sao) (Hình 2)Các pin Lithium-ion có dấu sao được trang bị cùng với một hệ thống bảo vệ. Hệ thống này sẽ tự động cắt nguồn điện đến dụng cụ để kéo dài tuổi thọ pin.Dụng cụ sẽ tự động dừng trong vận hành nếu dụng cụ và/hoặc pin được đặt trong các tình trạng sau đây:• Quá tải:
Dụng cụ được vận hành theo cách gây ra dòng điện cao bất thường.Trong trường hợp này, hãy nhả cần khởi động công tắc trên dụng cụ và ngừng việc sử dụng đã làm cho dụng cụ trở nên quá tải. Sau đó kéo cần khởi động công tắc một lần nữa để khởi động lại.Nếu dụng cụ không khởi động, pin sẽ bị quá nhiệt. Trong tình huống này, hãy để pin nguội trở lại trước khi kéo lại cần khởi động công tắc.
• Điện thế pin thấp:Dung lượng pin còn lại quá thấp và dụng cụ sẽ không hoạt động. Trong tình huống này, hãy tháo và sạc pin lại.
Hoạt động công tắc (Hình 3)CẨN TRỌNG:
• Trước khi lắp hộp pin vào dụng cụ, luôn luôn kiểm tra xem cần khởi động công tắc có hoạt động bình thường hay không và trả về vị trí “OFF” (TẮT) khi nhả ra.
Để khởi động dụng cụ, chỉ cần kéo cần khởi động công tắc. Tốc độ dụng cụ được giảm xuống bằng cách tăng lực ép lên cần khởi động công tắc. Nhả cần khởi động công tắc ra để dừng.
LƯU Ý:• Dụng cụ sẽ dừng ba phút sau khi kéo cần khởi động
công tắc.
Bật sáng đèn phía trước (Hình 4 & Hình 5)CẨN TRỌNG:
• Đừng nhìn thẳng trực tiếp vào đèn hoặc nguồn sáng.
Mỗi lần nhấn nút bấm đèn trên màn hình LED, tình trạng đèn sẽ thay đổi qua lại từ ON (BẬT) sang OFF (TẮT) và từ OFF (TẮT) sang ON (BẬT).Khi nút bấm đèn ở tình trạng ON (BẬT), kéo cần khởi động công tắc để bật đèn. Để tắt đèn, nhả cần ra và đèn sẽ tắt sau khi nhả khoảng 10 giây.Khi nút bấm đèn ở tình trạng OFF (TẮT), ngay cả khi kéo cần khởi động đèn cũng sẽ không sáng.
LƯU Ý:• Để chắc chắn về tình trạng của đèn, hãy kéo cần khởi
động. Nếu đèn sáng lên khi kéo cần khởi động công tắc, công tắc đèn đang ở tình trạng ON (BẬT). Khi đèn không sáng, công tắc đèn đang ở tình trạng OFF (TẮT).
• Trong khi vận hành cần khởi động công tắc không thể thay đổi tình trạng đèn.
• Khoảng 10 giây sau khi nhả cần mới có thể thay đổi tình trạng đèn.
Hoạt động công tắc đảo chiều (Hình 6)Dụng cụ này có một công tắc đảo chiều để thay đổi chiều xoay. Nhấn nút công tắc đảo chiều từ mặt A để xoay theo chiều kim đồng hồ hoặc từ mặt B để xoay ngược chiều kim đồng hồ.Khi nút công tắc đảo chiều ở vị trí chính giữa, không thể kéo cần khởi động công tắc được.
CẨN TRỌNG:• Luôn luôn kiểm tra hướng xoay trước khi vận hành.• Chỉ sử dụng công tắc đảo chiều sau khi dụng cụ đã
dừng hoàn toàn. Việc thay đổi hướng xoay trước khi dụng cụ dừng có thể làm hỏng dụng cụ.
• Khi vận hành dụng cụ, luôn đặt nút công tắc đảo chiều ở vị trí chính giữa.
Thay đổi tốc độ (Hình 7)CHÚ Ý:• Luôn để cần thay đổi tốc độ vào thật đúng vị trí. Nếu
bạn vận hành dụng cụ với cần thay đổi tốc độ đặt ở một nửa giữa vị trí “1” và “2”, dụng cụ có thể bị hư hỏng.
• Không được sử dụng cần thay đổi tốc độ trong lúc dụng cụ đang chạy. Dụng cụ có thể bị hư hỏng.
• Không được dùng lực đẩy cần sang mặt “1” với chế độ bắt vít. Dụng cụ có thể bị hư hỏng.
Để thay đổi tốc độ, đầu tiên hãy tắt dụng cụ và trượt cần thay đổi tốc độ sang vị trí “2” để có tốc độ cao hoặc vị trí “1” để có tốc độ thấp. Đảm bảo rằng cần thay đổi tốc độ được đặt ở đúng vị trí trước khi vận hành. Sử dụng đúng tốc độ cho công việc của bạn.Khi xoay vòng chuyển chế độ hoạt động sang chế độ bắt vít, hãy cài cần thay đổi tốc độ sang mặt “2”.
Chọn chế độ hoạt động (Hình 8)Dụng cụ này có thể tận dụng vòng chuyển chế độ hoạt động. Chọn một trong 4 chế độ phù hợp với nhu cầu công việc của bạn bằng cách xoay vòng này.Khi bắt các vít gỗ hoặc bu-lông, hãy để mũi tên chỉ vào dấu hiệu đối với chế độ bắt vít. Lực bắt vít có thể được điều chỉnh trên màn hình LED.Khi khoan vào bê-tông hoặc gạch ngói, hãy để mũi tên chỉ vào dấu hiệu cho chế độ khoan búa.Khi khoan vào gỗ hoặc kim loại, hãy để mũi tên chỉ vào dấu hiệu cho chế độ khoan.

26
Khi bắt các vít gỗ loại nhỏ hoặc bu-lông máy, hãy để mũi tên chỉ vào dấu hiệu đối với chế độ tuốc-nơ-vít. Lực vặn xiết có thể được điều chỉnh trên màn hình LED.
CẨN TRỌNG:• Luôn luôn chỉnh mũi tên này vào đúng dấu hiệu của
chế độ đó. Nếu bạn vận hành dụng cụ này với vòng chuyển chế độ hoạt động được đặt ở giữa các dấu hiệu chế độ, dụng cụ có thể bị hư hỏng.
• Khi xoay vòng chuyển chế độ hoạt động, hãy đảm bảo rằng dụng cụ đã ngừng lại. Nếu vòng không di chuyển dễ dàng được, hãy kéo nhẹ cần khởi động công tắc để xoay trụ quay rồi sau đó mới di chuyển vòng.
• Trong chế độ khoan búa hoặc chế độ khoan, lực đóng hoặc lực vặn sẽ không điều chỉnh được. Trong các chế độ này, số trên màn hình LED sẽ tắt.
Thay đổi lực bắt vít (chế độ bắt vít “ ”) (Hình 9)
012243
Lực bắt vít có thể được thay đổi theo ba bước: mạnh, vừa phải và nhẹ.Điều này cho phép vặn vít phù hợp với công tác thực hiện.Mỗi lần nhấn nút , cấp độ lực bắt vít sẽ thay đổi theo ba bước.Khoảng một phút sau khi nhả cần khởi động công tắc mới có thể thay đổi lực bắt vít.
LƯU Ý:• Trong khi vận hành cần khởi động công tắc không thể
thay đổi cấp độ lực bắt vít.
Thay đổi cài đặt lực vặn xiết (chế độ tuốc-nơ-vít “ ”)Lực vặn xiết có thể được điều chỉnh bằng cách nhấn nút
trong chế độ tuốc-nơ-vít.Các con số trên màn hình LED thể hiện các cài đặt lực vặn xiết. Lực vặn xiết đạt tối thiểu tại số 1 và tối đa tại số 9. Chỉ báo “P” là một chế độ đặc biết để vặn các vít tự khoan.Mỗi lần nhấn nút , cài đặt lực vặn xiết thay đổi từ 1 đến 9 và P, rồi sau đó trở về 1.Thay đổi nhanh lực vặn xiết bằng cách bấm giữ nút này.Chế độ P phù hợp cho việc vặn xiết các vít tự khoan vào các tấm thép trong các điều kiện sau đây.• Với cần thay đổi tốc độ đặt ở mặt “2”, vặn loại vít tối đa
4 mm vào các tấm thép tổng cộng tối đa 3,2 mm.• Với cần thay đổi tốc độ đặt ở mặt “1”, vặn loại vít tối đa
5 mm.
Trước khi vận hành thực tế, hãy bắt thử một ốc vít vào vật liệu hoặc mẩu vật liệu tương tự để xác định mức lực xoay nào cần cho ứng dụng cụ thể đó.Đầu tiên, hãy thử vặn vít ở số “1”. Sau đó tăng con số lên để tiếp tục vặn xiết. Cầm chắc dụng cụ trong lúc vận hành.
CẨN TRỌNG:• Không được vặn vít máy ở chế độ P. Việc này có thể
làm vặn cổ tay bạn bất ngờ và dẫn đến thương tích cá nhân.
LƯU Ý:• Đảm bảo rằng đã kiểm tra con số trên màn hình LED
trước khi vận hành. Nếu con số không được hiển thị, hãy liên hệ trung tâm dịch vụ Makita gần bạn nhất.
• Khi dung lượng pin còn lại xuống thấp trong chế độ tuốc-nơ-vít, đèn sẽ nhấp nháy một vài lần khi hoàn tất việc vặn vít. Trong trường hợp này, hãy sạc lại pin. Nếu tiếp tục vận hành, bạn không được giữ lực vặn xiết mong muốn.
• Trong lúc kéo cần khởi động công tắc, cài đặt lực vặn xiết không thể thay đổi.
• Khoảng một phút sau khi nhả cần khởi động công tắc, có thể thay đổi cài đặt lực vặn xiết. Nếu bạn muốn thay đổi cài đặt vặn xiết sau đó, hãy kéo cần khởi động công tắc một lần nữa.
• Con số cài đặt lực vặn xiết không có nghĩa là giá trị lực vặn xiết cụ thể.
Cấp độ lực bắt vít được hiển thị trên
bảng.
Số nhát đóng tối đaỨng dụng Công tác
BTP131 BTP141
Mạnh
3.200 (phút-1) 3.200 (phút-1) Dùng để vặn vít với lực và tốc độ theo ý muốn.
Dùng để vặn vít cho loại vật liệu không quan trọng/Vặn chặt các vít dài/Vặn chặt bu-lông.
Vừa phải
2.400 (phút-1) 2.400 (phút-1) Dùng để vặn vít khi cần hoàn thiện đúng cách.
Dùng để vặn vít cho tấm hoàn thiện, tấm thạch cao.
Nhẹ
1.200 (phút-1) 1.200 (phút-1)
Dùng để vặn vít khi cần phải tránh vặn quá mức do có thể làm kẹt ốc và vỡ hoặc hư hỏng đầu vít.
Dùng để vặn vít khung trượt/Vặn vít nhỏ tương tự loại M6.

27
Dấu hiệu báo hết dung lượng pin còn lại (Hình 10)Dung lượng pin còn lại sẽ được báo hiệu trên màn hình LED khi kéo cần khởi động công tắc. Dung lượng pin còn lại được trình bày trong bảng sau đây.
012273
LƯU Ý:• Khi màn hình LED tắt, dụng cụ được tắt để tiết kiệm
năng lượng pin. Để kiểm tra dung lượng pin còn lại, hãy kéo nhẹ cần khởi động công tắc.
• Màn hình LED sẽ tắt sau khoảng một phút sau khi nhả cần khởi động.
• Khi nhiệt độ dụng cụ lên cao, đèn sẽ nhấp nháy mỗi giây trong vòng một phút, sau đó màn hình LED sẽ tắt. Trong trường hợp này, hãy để nguội dụng cụ trước khi vận hành.
LẮP RÁPCẨN TRỌNG:
• Luôn đảm bảo rằng đã tắt dụng cụ và tháo hộp pin ra trước khi thực hiện bất cứ thao tác nào trên dụng cụ.
Lắp hoặc tháo gỡ mũi bắt vít/mũi khoan/mũi đầu tuýpChỉ sử dụng mũi bắt vít/mũi khoan/mũi đầu tuýp như được thể hiện trong hình. Không được sử dụng bất cứ loại mũi bắt vít/mũi khoan/mũi đầu tuýp nào khác. (Hình 11)
Đối với dụng cụ có lỗ mũi vít nông
006348
Đối với dụng cụ có lỗ mũi vít sâu
011405
1. Để lắp đầu mũi, kéo trụ ngoài ra và đưa đầu mũi vào trong trụ ngoài hết mức có thể. Sau đó nhả trụ ngoài ra để giữ chặt lại đầu mũi. (Hình 12)
2. Để lắp đầu mũi, đẩy miếng đệm đầu mũi và đầu mũi vào trong trụ ngoài hết mức có thể. Miếng đệm mũi vít cần được lắp vào trụ ngoài với đầu mũi quay vào trong. Sau đó nhả trụ ngoài ra để giữ chặt mũi vít. (Hình 13)
Để tháo mũi vít, kéo trụ ngoài theo hướng mũi tên và kéo mạnh mũi vít ra.
CẨN TRỌNG:• Không được chạm vào đầu mũi khoan ngay sau khi
vận hành xong bởi nó đang nóng. Thay thế đầu mũi khoan sau khi để nó nguội dần.
LƯU Ý:• Nếu mũi vít không được đẩy đủ sâu vào trụ ngoài, trụ
ngoài sẽ không trở lại vị trí ban đầu và không giữ chặt được mũi vít. Trong trường hợp này, cố lắp lại mũi vít theo các hướng dẫn ở trên.
• Sau khi đẩy mũi vít vào, đảm bảo rằng mũi vít được giữ chặt. Nếu mũi vít rời ra, đừng sử dụng nó nữa.
Móc treo (phụ kiện tùy chọn) (Hình 14)CẨN TRỌNG:
• Khi lắp đặt móc treo, hãy vặn vít thật chặt. Không làm như vậy có thể gây nứt vỡ dụng cụ hoặc gây thương tích cá nhân.
Móc treo rất thuận tiện cho việc treo tạm dụng cụ. Móc treo có thể được lắp ở cả hai bên của dụng cụ.Để lắp đặt móc treo, lắp nó vào rãnh trên vỏ dụng cụ trên bất cứ mặt nào và sau đó xiết chặt lại bằng vít. Để tháo ra, vặn lỏng vít rồi lấy móc treo ra.
VẬN HÀNH (Hình 15)CẨN TRỌNG:
• Luôn đưa hộp pin vào hết mức đến khi nào chốt khóa đúng vào vị trí với một tiếng click nhẹ. Nếu bạn vẫn còn nhìn thấy chỉ thị màu đỏ phía trên nút bấm, chốt vẫn chưa được khóa hoàn toàn. Lắp chốt hoàn toàn vào vị trí cho đến khi không thể nhìn thấy chỉ thị màu đỏ. Nếu không, chốt có thể vô tình rơi ra khỏi dụng cụ, gây thương tích cho bạn hoặc người khác xung quanh.
• Nếu dụng cụ được vận hành liên tục cho đến khi hộp pin đã bị xả kiệt, hãy để dụng cụ nghỉ 15 phút trước khi thực hiện tiếp bằng pin mới.
Chế độ bắt vít “ ”Bắt tuốc-nơ-vítGiữ chặt dụng cụ và đặt điểm đầu mũi vít vào đầu vít. Nhấn dụng cụ về phía trước tới mức sao cho mũi vít không trượt ra khỏi vít và xoay dụng cụ để bắt đầu bắt vít.
Tình trạng đèn LED chỉ thị
Dung lượng pin còn lại
Khoảng 50% hoặc hơn
Khoảng 20% - 50%
Khoảng ít hơn 20%
A = 12 mmB = 9 mm
Chỉ sử dụng các loại đầu mũi này. Hãy làm theo quy trình (1).(Lưu ý) Miếng đệm đầu mũi là không cần thiết.
A = 17 mmB = 14 mm
Để lắp các loại đầu mũi này, hãy làm theo quy trình (1).
A = 12 mmB = 9 mm
Để lắp các loại đầu mũi này, hãy làm theo quy trình (2).(Lưu ý) Miếng đệm đầu mũi là cần thiết để lắp mũi vít.

28
Vặn chặt bu-lôngMô-men xoay đúng quy định có thể khác nhau tùy thuộc vào loại hoặc kích thước của vít/bulong, vật liệu gia công cần được xiết vặn, v.v... Mối liên hệ giữa mô-men xoay và thời gian xoay được thể hiện theo các số liệu sau.
012423
012425
LƯU Ý:• Khi chế độ hoạt động được cài sang chế độ bắt vít,
đảm bảo rằng dụng cụ sẽ bắt vít một cách bình thường bằng cách vặn thử một vít bắt gỗ trước khi vận hành. Nếu dụng cụ không hoạt động bình thường, hãy liên hệ trung tâm dịch vụ Makita gần bạn nhất.
• Giữ dụng cụ chĩa thẳng vào vít.• Sử dụng đúng loại mũi vít dành cho đầu vít/đầu bulong
mà bạn muốn dùng.• Khi xiết vít cỡ M8 hoặc nhỏ hơn, hãy điều chỉnh áp lực
cẩn thận lên cần khởi động công tắc sao cho vít không bị hư hỏng.
• Nếu bạn cần xiết chặt vít lâu hơn thời gian thể hiện trong hình, vít hoặc điểm đầu mũi vít có thể chịu ứng suất vượt tải, bị trờn răng hoặc hư hỏng, v.v... Trước khi thực hiện công việc của mình, luôn vận hành thử để xác định thời gian xoay phù hợp cho loại vít của bạn.
Mô-men xoay bị ảnh hưởng bởi rất nhiều yếu tố như sau đây. Sau khi xiết, luôn kiểm tra mô-men xoay bằng một cờ-lê cộng lực.1. Khi hộp pin đã xả điện hoàn toàn, hiệu điện thế sẽ tụt
xuống và mô-men xoay sẽ bị giảm.2. Đầu mũi vít hoặc mũi đầu tuýp
Việc không sử dụng đầu mũi vít hoặc mũi đầu tuýp đúng kích thước có thể làm giảm lực vặn xiết.
3. Bulong• Ngay cả khi hệ số mô-men xoay và loại bulong là
giống nhau, mô-men xoay đúng quy định sẽ khác tùy theo đường kính của bulong.
• Ngay cả khi đường kính các bulong là giống nhau, mô-men xoay đúng quy định sẽ khác tùy theo hệ số mô-men xoay, loại bulong và chiều dài bulong.
4. Cách cầm dụng cụ hoặc vật liệu tại vị trí bắt vít cần được xoay cũng sẽ ảnh hưởng đến mô-men xoay.
5. Vận hành dụng cụ ở tốc độ thấp cũng sẽ làm giảm mô-men xoay.
Chế độ khoan búa “ ”CẨN TRỌNG:
• Luôn cầm chắc dụng cụ trong lúc vận hành. Sẽ có lực xoắn rất lớn và bất ngờ trên dụng cụ/mũi khoan lúc lỗ khoan được xuyên thủng, khi lỗ khoan bắt đầu bị kẹt bởi các mạt vụn và hạt hoặc khi đụng vào các thép gia cường có trong bê-tông.
Đảm bảo rằng bạn sử dụng mũi khoan có đầu bịt tungsten-cacbua.Định vị đầu mũi vào vị trí mong muốn cho lỗ khoan, sau đó kéo cần khởi động công tắc. Không dùng lực đối với dụng cụ máy. Ấn nhẹ sẽ mang lại kết quả tốt nhất. Giữ cho dụng cụ ở đúng vị trí và ngăn không bị trượt khỏi lỗ khoan.Không được ấn mạnh khi lỗ khoan bắt đầu bị nghẽn bởi các mạt vụn và các hạt. Thay vào đó, hãy chạy dụng cụ ở chế độ chờ, sau đó tháo riêng mũi khoan khỏi lỗ. Bằng cách lặp lại thao tác này vài lần, lỗ khoan sẽ được sạch sẽ và có thể tiếp tục khoan bình thường.
Chế độ khoan “ ”CẨN TRỌNG:
• Nhấn dụng cụ quá mức sẽ không tăng tốc độ khoan lên được. Trên thực tế, việc nhấn mạnh thêm này sẽ chỉ làm gây hỏng đầu mũi của bạn, giảm hiệu năng và tuổi thọ hoạt động của dụng cụ.
120
100
80
60
40
20
N m(kgf cm)
(1224)
(1020)
(816)
(612)
(408)
(204)
0 1.0 2.0 3.0
(M14)
(M12)
(M10)
(M8)
0
M14
M12
M10
M8
Bulong thường
Lực
vặn
xiết
Mô-
men
xoa
y đú
ng q
uy địn
h
Thời gian xoay (Giây)
120
100
80
60
40
20
N m(kgf cm)
(1224)
(1020)
(816)
(612)
(408)
(204)
0 1.0 2.0 3.0
(M12)
(M10)
(M8)
0
M12
M10
M8
Bulong cường độ cao
Lực
vặn
xiết
Mô-
men
xoa
y đú
ng q
uy địn
h
Thời gian xoay (Giây)

29
• Sẽ có lực quán tính rất lớn trên dụng cụ/mũi khoan lúc lỗ khoan được xuyên thủng. Giữ chặt dụng cụ và chuẩn bị ghìm lực quán tính lại khi mũi khoan xuyên thủng vật gia công.
• Mũi khoan bị kẹt có thể được tháo ra đơn giản bằng cách đặt công tắc đảo chiều sang chế độ xoay ngược lại để rút mũi khoan ra. Tuy nhiên, dụng cụ có thể quay ngược ra bất ngờ nếu bạn không giữ chặt.
• Luôn luôn giữ chặt các vật gia công có kích thước nhỏ bằng kìm hoặc dụng cụ kẹp tương tự.
• Không được kéo cần khởi động công tắc liên tục khi đang khóa motor. Điều này có thể làm hư hỏng thiết bị.
Khi khoan vào gỗ, để có kết quả tốt nhất cần sử dụng các mũi khoan dùng để khoan gỗ và vít dẫn. Vít dẫn giúp khoan dễ dàng hơn bằng cách kéo đầu mũi vào trong vật gia công.Khi khoan vào kim loại, để phòng ngừa đầu mũi bị trượt ra lúc bắt đầu khoan lỗ, hãy tạo một vết lõm bằng cách dùng dùi đục tâm và đóng vào điểm cần khoan. Đặt đầu mũi khoan vào chỗ lõm này và bắt đầu khoan.Sử dụng dầu nhờn để cắt khi khoan kim loại. Trừ các trường hợp dùng sắt và đồng thau cần phải được khoan khô.
Chế độ tuốc-nơ-vít “ ”CẨN TRỌNG:
• Điều chỉnh con số trên màn hình LED đến mức lực vặn xiết phù hợp với công việc của bạn.
• Đảm bảo rằng mũi vặn được lắp thẳng đứng vào đầu vít, nếu không vít và/hoặc mũi vặn có thể bị hư hỏng.
• Cầm chắc dụng cụ. Khi bộ ly hợp vừa ngắt hoặc vặn xiết lại, có thể xảy ra lực vặn xiết bất ngờ và nó có thể làm vặn cổ tay bạn.
Đặt đỉnh mũi vặn vào trong đầu vít và nhấn dụng cụ. Khởi động dụng cụ từ từ, sau đó tăng tốc độ dần dần.
LƯU Ý:• Dụng cụ này sử dụng bộ ly hợp điện tử. Dụng cụ sẽ tự
động dừng khi ngắt ly hợp. Để tiếp tục vận hành, hãy nhả cần khởi động công tắc chỉ một lần.
• Khi vặn các vít bắt gỗ, hãy khoan trước các lỗ định hướng để giúp bắt vít dễ dàng hơn và ngăn vật gia công bị chia tách. Xem sơ đồ.
006421
LƯU Ý:• Xem sơ đồ dưới đây để biết mối quan hệ giữa con số
cài đặt lực vặn xiết và giá trị lực vặn xiết.Giá trị lực vặn xiết sẽ khác nhau tùy thuộc vào vật liệu. Hãy thử vặn xiết để có được lực vặn xiết mong muốn trước khi vận hành.
012276
BẢO TRÌCẨN TRỌNG:
• Luôn đảm bảo rằng đã tắt dụng cụ và tháo hộp pin ra trước khi thực hiện việc kiểm tra hoặc bảo trì trừ những trường hợp trục trặc sau đây liên quan đến đèn.
• Không bao giờ dùng xăng, ét xăng, dung môi, cồn hoặc hóa chất tương tự. Có thể xảy ra hiện tượng mất màu, biến dạng hoặc nứt vỡ.
Để đảm bảo AN TOÀN và TIN CẬY của sản phẩm, việc sửa chữa hoặc bất cứ thao tác bảo trì, điều chỉnh nào đều phải được thực hiện bởi các Trung tâm Dịch vụ Được Ủy quyền của Makita (Makita Authorized Service Center), luôn sử dụng các phụ tùng thiết bị thay thế của Makita.
PHỤ KIỆN TÙY CHỌNCẨN TRỌNG:
• Các phụ kiện hoặc phụ tùng gắn thêm này được khuyến cáo sử dụng với dụng cụ Makita của bạn theo như quy định trong hướng dẫn này. Việc sử dụng bất cứ phụ kiện hoặc phụ tùng gắn thêm nào khác đều có thể gây ra rủi ro thương tích cho người. Chỉ sử dụng phụ kiện hoặc phụ tùng gắn thêm cho mục đích đã quy định sẵn của chúng.
Nếu bạn cần hỗ trợ để biết thêm chi tiết về những phụ kiện này, hãy liên hệ với Trung tâm Dịch vụ của Makita tại địa phương của bạn.• Các đầu mũi vít• Móc treo• Hộp nhựa chứa dụng cụ• Các loại pin và bộ sạc chính hãng của Makita
LƯU Ý:• Một vài mục trong danh sách có thể được bao gồm
trong gói dụng cụ làm phụ kiện tiêu chuẩn. Các thông số kỹ thuật có thể thay đổi tùy theo từng quốc gia.
Đường kính danh định của vít bắt gỗ (mm)
Kích thước khuyến cáo của lỗ khoan dẫn (mm)
3,1 2,0 - 2,23,5 2,2 - 2,53,8 2,5 - 2,84,5 2,9 - 3,24,8 3,1 - 3,45,1 3,3 - 3,65,5 3,7 - 3,95,8 4,0 - 4,26,1 4,2 - 4,4
Số trên Màn hình
LED
Giá trị lực vặn xiết
Thấp (1) Cao (2)
1 Khoảng 2,5 N·m(Khoảng 25,5 kgf·cm)
Khoảng 1,1 N·m(Khoảng 11,2 kgf·cm)
3 Khoảng 4,6 N·m(Khoảng 46,9 kgf·cm)
Khoảng 2,0 N·m(Khoảng 20,4 kgf·cm)
5 Khoảng 8,1 N·m(Khoảng 82,6 kgf·cm)
Khoảng 3,0 N·m(Khoảng 30,6 kgf·cm)
7Khoảng 10,0 N·m
(Khoảng 102,0 kgf·cm)
Khoảng 4,0 N·m(Khoảng 40,8 kgf·cm)
9Khoảng 11,5 N·m
(Khoảng 117,3 kgf·cm)
Khoảng 5,8 N·m(Khoảng 59,1 kgf·cm)

30
����������� ���������������
���������
� ��������� ��� ���������������� ��������� � ����������������!�!�"#�� �$�"����$��%& '&�%��� ���� ��( )�!����(� � � ���������������!�!�����"����������%$�������$���)*� �#�(��������!�!�����"���� �!����!��� EPTA 01/2003
1. %+��&��,���"�&�2. $-.�3. ���!�!�����"�4. �������(��&�5. ����/0������6. &��%+7. ����&�1� LED
8. $-.��$2&%+9. �����/0�$�"���)�*)�
10. ��$�"��������3�11. �������(��'(�&�)���12. �(���$�"���'(�&�)���13. ��*�14. �$�"����$4�����#�15. ���16. $���17. �!18. $-.���!�-�
19. ����-�!�����"�20. &�����21. $��22. ������&�%����23. ����24. ���"���25. ���
�-�� BTP131 BTP141
'(�&%�������)
������,����������
����5&'�(� 4 ��. - 8 ��.
�����"�����6� 5 ��. - 14 ��.
�����"��)����&5���� 5 ��. - 12 ��.
�����3��7�(�-��$�� (��!����)") (�! / �� / ���)0 - 1,400 / 0 - 2,200 /
0 - 2,800
0 - 1,300 / 0 - 2,200 /
0 - 2,700
����)����)" (�! / �� /���) 0 - 1,200 / 0 - 2,400 / 0 - 3,200
�! (1) / ��� (2)
'(�&�������)
�����3��7�(�-��$�� (��!����)") 0 - 700 / 0 - 2,800 0 - 700 / 0 - 2,700
��������) (��!����)") 0 - 8,400 / 0 - 32,400
������,������ / ����"� 8 ��.
'(�&���� �������������� ��
'�(� 10 ��. / 6.5 ��.
%� 21 ��. / 12 ��.
�����3��7�(�-��$�� (��!����)") 0 - 700 / 0 - 2,800 0 - 700 / 0 - 2,700
'(�&%���� �����������������
����5&'�(� 3.5 ��. - 6 ��. / 4 ��. - 6 ��.
���(��$���� 4 ��., 5 ��. / 4 ��. (���(�����-& 3.2 ��.)
�����3��7�(�-��$�� (��!����)")
0 - 300 / 0 - 1,100 (�5#������!���#������!�&)
0 - 600 / 0 - 2,300 ('(�& P)
�#�(���-)8� (������!�!�����"�)
1.5 . (�� ��& ���!�����"� BL1415)
1.7 . (�� ��& ���!�����"� BL1430)
1.6 . (�� ��& ���!�����"� BL1815)
1.8 . (�� ��& ���!�����"� BL1830)
���&��%++9 ������� 14.4 '���0 ������� 18 '���0

31
END004-2
�����������%$�"#�����:��;70)"��/ ��(��!�-$�70 '$�&*5;���(�������:��;70�( �� �������/ ��
.................�����������/ ��ENE033-1
��������� ���� �� �����������"#�/ ��(��!����������%� '�(� ��������
GEA006-2
������������ ���������
������� �������������
�������! ������������� ������������������������� ��������� ������ ��������������������������������������!!"�#$� �!���� ���/��������������� $��%������%���
���������������� ��� ������������ !�����������"�#����������� ������ ������� ������������� ���������� ������ ( ����)
��������������!�"#�������������� ������ (������) �����������
���#$������
����� ����� ������������1. ��������� �������������������������������� �������
����� ���������������������������� �� �����2. ���� !������ �� "##$���������� ���%&�%�����'&�
� �� ���)����������� �*�� %+�, *�� -�.�/������0��'�1&"�"# ����������%++9���� �$���%+������-&/���< -��1�(���=>&�����
3. ��������������!" �#��$%�����&����$#'� (� �&!������)���#�&������**+� ����&�'���������(���)������*+�,-��&%�������*�
����� �����!��"##$�4. ���2%� ���� �� "##$�1! � ��%�'�1!���' � �����3��
���2%"�����%�0���4 ���� !���2% �3�5��1 ��%�' ���� �� "##$����1� ����&� $��?)"�%��,�&�&�$������� ��!%+)"��� ����&"��/����&�����"���������&%++9/3��
5. ���� ����*!���%�����/��%�'����/&����1� ����&� � �� �� ���� �������! � �1�*�1!� 3��16!��5� �"�����"���)"�����&%++9/3������5#� (��������-7���1�� �!��#�
6. ����*!���� �� "##$�)6%����*�� �6���������7�% ��� �#�)"�%(��� %$������������%++9������������" ���������&%++9/3��
7. ���� !���"# ���"���*����� ���� !���"#���� �% �8 *�� ) ����2%���� �� "##$� �%5'���"#�*!*����%����! � ������� � ��� *�� &������������� ���� ��)"�/��-&(��������������������"���������&%++9/ 3��
8. �0����� !������ �� "##$�� % ��� ��� !���1� �������*�����%�'������ % ��� ��/ ��)"��(�����!��@���������&�����"���������&%++9/3��
9. ������������ �������������������������� ��� �����������!"#�$����������%&�������!�#'�"(� (GFCI) ������
GFCI ��� ���������������������������
����� ��������'��10. �*!���������3�����%1��� ����0%��������&��� �6�
3��� !����9����8%���0�� !������ �� "##$� ���� !������ �� "##$����0�����0%�����*��� � *�� ����������8������%�����1&� ���� ���� 3 �% : �� *�� %��� !�� /����7�)"��&�������&���������������/ ������������%++9��)��( �-7%& ��!!&��3!�����-����
11. � ! ��%�0��$ %������'�� ���3���1��$ %�����
�-$�70$9���� �/�� (� ��<-.� ����) ���@�������� (�����@�� (����������$9�����%& ���)"��/ ���@�)"��(������/����&�!&��3!
12. �$ %��"���*!��;�� !��<��"��1���� 1���� '� ����&1 � �6���1��3*���;�%� �� �� �1� %�'3*������"# 3��/*�� ��3'1�1 ��� *�� %� �%���%*�� )� ���� �� ���&��#����!����7����/0�����,������������%++9 (����/�0�%+����������%++9���7�)"��$2&����/0��������%$������&�-!����(�-
13. ���%�93����'31�*�� ���3� %%� ��������;��� �� �� "##$� $����(���-:��)"���"�!� �������/�#�����)"�(�-�%& �������������%++9��)��( �-7%& ��!!&��3!
14. ��������������������� �� � ������%�����3��%����1���*!�*�����1� ����� ������)��( ��!�-�����������%++9%& &"�5#����,��70)"�%���&��&
15. 31�%���*!�*����� ���������� 31�%�����*����%&�"� *�� ������� �����' �63�"���*!��!�/� ���� /!� 3��)��� �6��%�! &������������� ���� ���#�1 �-����� �������$��&�! (���1�)"��"��������� %$��&��/�#�����)"��������)"�
16. *�%��%����� ��%�0����*��'�6�3������%5'-�.�"� !���)����� �*!1���� '���"�!� �� �1� 3��� !�� ��%�0����� ����*����� ��/ �������&�&�����&�3!<-.���/����&������)"���&�<-.�1�%&
32
%��� !3���63����� �� "##$�17. ���-=�� !���� �� "##$� � !���� �� "##$�����*�����
%�'%��� !��� �0 ����������%++9)"��(������)��( %& ��)"��"$����)8�@����$��&@�������"&������,����������)"�%& ��!����!!�
18. ���� !���� �� "##$� *�%��&1 �"�������)��;��;�"�! ����������%++9)"���!�-�& ������/0%��%& �$4��������������� ��%& ��!�>����>�
19. ) ����2%��%3*������"# 3��/*�� ��3'1�1 ��� %��%���� �� "##$�%� ����%�����'31� ������� ��%�0����&� *�� ����%5'���� �� "##$� ��8"�$9����& ����$��&@��&�������/����&�����"��������$2&�/ ������������%++9'&�%����#���
20. ����%5'���� �� "##$����"��"�!� !���*!*����%�� ��5% 3�� ��� ��9�1�*!'�����"���!���%�'���� �� "##$�*�� ��3������*������� !������ �� "##$� ����������%++9���$4������������������������1� )"�%� �%& ��!�<A�!��
21. %���63���%>����� �� "##$� 1���� '%�����% '���"��)6%1! *�� %��� �� �1� � &����������� �� � ��� %��31%*�%� &������ *�� ���� ���4 ��� ����/�%���'1� %�������� ���� �� "##$� *�%���������*�� �*!������� �� "##$�"�,� �3,�%� �%��� !�� �-!����(�-��������&��&�����;����������%++9����%��,�� ��
22. ��'����3���������� ������ �� %��1�� �6����
�������������&)"��"�&�������,�� ������"��!���&�������"$B:(��&��&� �������!�-�%& �����
23. � !���� �� "##$� ��%�0����&� 3��������&������ ?�? 1����3�������%���� �&���0�����%�������3������������ ��� ��/ ����������%++9�����)����������(����)"��(�&%� ��)��( ��&������
%��� !3���63����� �� 3'1�1 ���24. ����"#�*���!������ ���������'�<��/6!/�&1��������
�������/�0�)"��(����(��!/-&�!�����"�$���@)(�5�����"�����"���)"�����&%+%(� �������%$�/ �!/-&�!�����"��"$���@) (�5��
25. � !���� �� "##$�%�' ��3'1�1 ������%��*����<���@����������� ��/ /-&�!�����"�$���@)�������"�����"���)"���%& ��!!&��3!���%+%(�
26. ���� "��� !�� ��3'1�1 ��� �*!�%5'*����%��1)������A�<�*� ���4 � �� �&�*��'%����> �*���9 %�93� %��"%�1����5' �%�6 *�� ��1)������A�<�*�������5% ���4 ��������)� �� �1� ����*�8�%�' �%����*�8�"�! ���&������#��!�����"���)��( � ����&(�����&%+%(�
27. ��%�0����� !��"��)6%1! ����� �*��"*� %��%3'1�1 ��� �*!*��%�����%�����/�� *�%���/��<��� �*��<��"��1���� �*!�!� %�!������ *�%� �*��%����5���!�1� �*!��'"��'3���� ����(��)"�%(�����!�����"���)��( 1��(������������(���%(�
%��'�&%��28. ������� �� "##$���!���''�&%����% ��,� � ���/���%��
��'� <��� ! �"*��3''�����%���������� ������)��( ��/ ����������%++9�"���$��&@��
29. �,'$��'�����������!�#�����&���!�#����&��%�!#(-�.#'�
30. �63��� ��'�*!3*! �� �� 3��"�����������3������'���=B �
GEB078-2
������������ ���$�%���&�'�������� ��� 4 )���������&%1. ������ ��%�0��$ %���������� ���%������%��3�% ��"��
)"�&�������&��)��( ��:��"��%& ���2. � !�� ��'���&� )!�����%�'���� ���:��"������!�-�
��)��( ��&�!&��3!3. )� ���� �� "##$�'�&��0�� ��'�����A�@����0���������
������ �����/��%�'���"#���,� � �6� ����&)"����1���!��%+)"� ��"����%++9%(�1��� ��)��( ����) "��$4�'�(��������������%++9)"�%���"����(- � ��"����%++9%(�1���
���)��( 1� $C�!�����,�%++9/3��%& 4. )� ���� �� "##$�'�&��0�� ��'�����A�@����0���������
���� �� 1�� �����/��%�'���"#���,� � �6� ������������&)"����1���!��%+)"� ��"����%++9%(�1��� ��)D�( ����)"��$4�'�(��������������%++9)"�%���"����(- � ��"����%++9%(�1��� ���)��( 1� $C�!�����,�%++9/3��%&
5. 1���� ''�&��0�������*!������������ *�%� !������ �� ����������6 ���� ����*!��� �6�� !�����
6. ��'���� �� �*!3���7. ���� ����*!�� ���/��%�' &���������*���"�!8. ������ ��*!���� �� �����!�"�! � !���� �� �� ��
�0����)� �6���������9. *!�����/��%�'� %"��*�� &��������������������5�
���� ��%� %"��*�� &���� ��������! ��63����%/&�*��� �0"�!
10. �����'� ��� ���������������A��&> ���� ����6���-�.�*�� �*!����*����������/��%�'���%�� �C&'�1&1���! �6��!������� ����� /6!/�&1�����

33
����*���� ����'�+����1� �:
����*!���"�����������*�� ����!���%�'/�&1��0D� (��%%��� !��,���*������) �6��*�� %���C&'�1 &1��%E�%0D��!������� ������%��� !��/�&1��0D� ��������� %��� !�� ���"���*�����*�� %��"���C&'�1&1��%E�%0D��!������� ������6��� � !����� ��% � �*!�%&�%��'����5' ������3�
ENC007-7
��� ������� ���$�%�+,&��-
&���������������+,1. %� �� !��1��'3'1�1 ��� �*! �����3�����3���� ��
*����1� ����*��'� (1) ���� ����3'1�1 ��� (2) 3'1�1 ���3�� (3) 1��/�&1��0D����� !3'1�1 ���
2. *!��) �3�%����1��'3'1�1 ���3. *�%����������%��� !�������%&�"� �*!*���� !�������
���� ��% ������������������! ���� "*�!*�� ���'&�"�!4. *�%�������� &��5%<��"�1�%����5���!�1� �*!�!� %
�!�����������3����'"��'3��������� ���� ��% ������*!1�' �
5. *!��������1��'3'1�1 ���:(1) *!��31�����%�'��1)������A���� ���"##$���4(2) *��%�����%���%5'1��'3'1�1 ���"�!���� ������
%�'��1)������A�<�*� � �� %��"%�1����5' �*���9 ?�?
(3) ����*!1��'3'1�1 ���)6%����*�� -�3'1�1 ��������� ������*!�%&�%��"*�� %��3�"##$� �! ���� "*�!*�� ����*��"�!
6. *!���%5'���� �� 3��1��'3'1�1 ���"�!���)������� �0*�6�&�6)8*�� �%&� 50°C
7. *!���/��&�1��'3'1�1 ��� 3�!���3'1�1 �����*��*�� ����*����� !%��"��"�! �% 1��'3'1�1 ��� �����'&���% "#
8. ���� ������3'1�1 ���1%*���*�� %���'%��3�% 9. *!��� !3'1�1 ����������*��
����*���� ����'�+�
���������� ���������� ������������� ��������������1. ����"#1��'3'1�1 ���%� ����"#��*��*���� !������
�� 3�� ����"#1��'3'1�1 ������� ���� �� ��%����"# � �
2. *!�� ����"#1��'3'1�1 ������ ����"#�15�3�!� ,��� �%%�� ����"#��%�%&�"����� ���%��� !��� 3'1�1 � ��
3. ����"#1��'3'1�1 �����*! ����� �0*�6�& 10°C - 40°C
��� ��*!1��'3'1�1 �����5��%� ������ ����"#4. ����3'1�1 ���*�8��������%4 *%��� �*�%�0"��"�!� !
������ �� �����A��������
��."�%������! ������:
� ������!�( �����������/0�������������������(���$2&������� ���,�&���!�!�����"������$��!��#�(���������!�)����������������
�� �������� �!������������ �� (#�$��� 1)
� $2&����/0�������������)�����(���,�&���!�!�����"�)-���#�� ������ ���,�&���!�!�����"� �( ������$-.�)" �& �(� ������!
�� �&5��������������� ������ ���������!�!�����"� �( ��&������!����!�!�����"��(
����!����!�������������� �� ����������!�!�����"��� )"� �( �������������!�!�����"��� ���-&����)���%& �����"������3���� )"� (�-7����(3������"�&�)"�& �!����$-.� ��&������!�!�����"����%���3���� )"� �( &�����!�!�����"��� ���-&��%���(3������"�&��" %���/����#� ���!�!�����" ���(�-&�������������)��( �-7(�������!� �%& ��!!&��3!
����/ �������%$�����������!�!�����"� (���!�!�����"�%���������� %$'&���� ��&������%��,�� ��
%��&'������������� �� (������ ���������(�� )(��� ����(�����) (#�$��� 2)
�!�����"����)"���%����)"��"�������(��&����"��!!�$9���� ��!!�"#��)����&�������������������'&����'�����������"&��-�!�����"�������������(�-&)�����(�����/ ��'&����'�����������������������/(����!�����"�����@��� �,��70���%$�"#:� )���(�����%$:
����������)�������;7�)"�� ���/ ������%++ ���1�&$�����,��70�"# �( $��������/0����������������������(�-&��/ ������$�!!)"�����)��( ����������)���(�����%$%& �� �����&5�����/0�������"���#�����������)������(����������%�������� �)�����&����!����� "�� �����%$ ���,��70�"# �( $�����!�����"��( ��3������)"���&5�����/0�������"���#�
� ���������!�����"����:
���������!�����"��(���� �����%$���������������%��)��� ���,��7�"# �( ,�&�!�����"����� �/�0��!�����"��(��

34
�� �*�����������+ (#�$��� 3)
�! ������:� ���������!�!�����"��������������� �( ������!������/0
���������,)���%& ����,�� �� �����!%$� �����(��� �OFF� �����$����
�$2&�/ ����������'&�&5�����/0������ �����3����������������������5#�����������&)"�����/0������ $��������/ 0�����������(�-&)���
*����*1�:� ������������(�-&@������)"(����)"�&5��� ��/0������
�� �&,����-.������ (#�$��� 4 ��%#�$��� 5)
�! ������:� �������� %$��&��%+(���� ��&��(�������&���'&����)-���#�)"�&$-.��$2&$2&%+ !�(� �� LED �,���)������&��%+���$�"���� ON �$4� OFF ���� OFF �$4� ON
���!��%$�����$-.��$2&$2&%+�������,�� ON �( &5�����/0� �����������$2&%+ ������ ���$2&%+ �( $��������/0������ �� �#�%+��&�!���(����$��������/0$���7 10 ���)"�����$-.��$2&$2&%+�������,�� OFF &��%+��%���$ �&�����5#������&5�����/0������
*����*1�:� ������ ���������!�,���)������&��%+ �( ���&5�
����/0������ (&��%+�$2&�����5#������&5�����/0������ ��&�������/0�$2&$2&%+�����,�� ON (&��%+%���$2&�����5#� ��&�������/0�$2&$2&%+�����,�� OFF
� ����(����)����������/0������ ��%�����,�$�"����,���)������&��%+%&
� (����$��������/0������$���7 10 ���)" �����,�$�"����,���)������&��%+%&
�� �*�����������+�&������/��� (#�$��� 6)
�����������"#�"����/0�$�"���)�*)� ������/ �$�"���)�*)��(�-� &�� �����/0�$�"���)�*)��& � A ������( (�-�����3��E� (����& � B ������( (�-�)����3��E������ �����/0�$�"���)�*)����������(���$�� ����/0��������%�����,&5�%&
�! ������:� ������!)�*)��(�-������/ ������� �/ ����/0�$�"���)�*)�(�������������(�-&���)�)���#� �
�$�"���)�*)��(�-��������������(�-&���)��)��( ������������"�(�%&
� �����%��%& �/ ������������ ������!�( ������ � �����/0�$�"���)�*)����������(���$��
�� �&���� %������(� �� (#�$��� 7)
���1� �:
� ������! ��$�"�����&�!�����3��( ���������(���)"�,�� ������ (�-7�/ ������������'&�)"� ��$�"�����&�!�����3�����5������(��� �1� ��� �2� �������������� "�(�%&
� ( ��/ ��$�"�����&�!�����3����7�)"����� ����������)������� ��������������"�(�%&
� �������&�� ��$�"�����&�!�����3�%$����D�(��� �1�
�����������'(�&%�������) ��������������"�(�%& ������ ����$�"�����&�!�����3� �( $2&����/ 0��������������� ��5������� ��$�"�����&�!�����3�%$)"� �2� ��(��!�����3���� (��� �1� ��(��!�����3���� ������!�( ������� ��$�"�����&�!�����3����������(���)"�,�� �������/ �� �/ �����3�)"��(�����!������-7�����(�-��(���$�"���'(�&�)���%$�$4�'(�&%�����( ��#���$�"��������3�%$���& � �2�
�� �� ��0�(��� �*��� (#�$��� 8)
�����������"#�"�(��(�-���(��!�$�"���'(�&�)��� ����'(�&�&'(�&(�5��� 4 '(�&)"��(���!�)���)"��-7� ���'&��/ �(��(�-������)��������(��������"���� ���#�%� �( (�-���*�%$/"#)"��������(�� ������/ ����'(�&%�������) ���,$��!������)%& �(� �� LED
�����)������� �������"�(������!�#�� �( (�-���*�%$/"#)"��������(�� ������/ ����'(�&������)�����)������� ���%� (���'�(� �( (�-���*�%$/"#)"��������(�� ������/ ����'(�&��������)���������� ���#�%� (����������� "���5&'�(� �( (�-���*�%$/"#)"��������(�� ������/ ����'(�&%���� ���,$��!���!�&�������%& �(� �� LED
�! ������:� (�-��(��%$����������(�����'(�&�&'(�&(�5�����-&����
(�-7�/ ������������'&�)"��(������5������(�����:��;70'(�& ��������������"�(�%&
� �������(�-��(��������$�"���'(�&�)��� '$�&���( ����������(�-&��� (%�����,(�-��(��%& '&���� �( &5� �����/0��3� �������(�-���(�-��� �����(�-��(���"���#�
� ��'(�&���(���'(�&������) ��%�����,$��!������)(������!�&%& ��'(�&&����� ��%���"���&�(�������(� �� LED

35
�� �&����� �� %��� (0�(�-����� %��� � �) (#�$��� 9)
012243
���,$��!������)%& ����&�!&���"# ��� $��� ����!>5��)��( �������%& �(���!��)-���#�)"�&$-.� ������)���$�"���%$������F ����!����&�!(����$��������/0������$���7(�5���)" �����,�$�"�����&�!������)%&
*����*1�:� ����(����)����������/0������ ��%�����,�$�"���
��&�!������)%&
�� �&������ �����)�� ���� (0�(�-���� � �)
���,$��!���!�&�������%& '&�&$-.� ��'(�&%����(�����!�(� �� LED ����&����#������!�& ���! �&�����������-&���(����� 1 ������!�&�����������-&���(����� 9 �����;� �P� (��,5�'(�&���*;��(��!���������� �(��$����)-F ���#�)"�&$-.� ���#������!�&����������$�"���%$������F � 1 ,5� 9 ��� P �� ��5�����!�)"� 1 �"���#����,�$�"������#������!�&%& ������&��3�'&��&$-.�>#�F'(�& P ��#��(����(��!�����������(��$������ ����1��'�(���������%�&�����%$�"#� ��$�"�����&�!�����3�����)"����(��� �2� ������������)"�
�-& 4 ��. �� ����1��'�(�(�)"��-& 3.2 ��.
� ��$�"�����&�!�����3�����)"����(��� �1� ������������)"��-& 5 ��.
���)"���)������� �( ���)&��!�������������&-(���/�#����&-)"��(������������(�&����&�!���!�&�)��&)"�� �����(��!��/ ����#�F��#��� �( ���������& ����������&�! �1� �� ����������(���������������� ��!�����������( ��������(����&������
�! ������:� ����������5&'�(�& ��'(�& P ���������)��( � �������
�-7��!�&�����&�!&��3!%&
*����*1�:� ������!(�����!�����&�1� LED ����/ �� (%��� "
(�������&� '$�&��&���*���0!������ Makita )"��� )"��-&� ��������������!�����"��(���� ����'(�&%���� &��%+��
�����!��������#������������������ � ���7 "�"# �( /�0��!�����"��(�� (�-7������/ ������������%$ �-7����%��%& ���!�&���������� ���
� ����(����&5� �����/0 ��%�����,�$�"������#������!�&%&
� (����)"�$���� �����/0�� �$���7(�5���) "�5������,�$�"������#���%& (�-7� ����$�"������#������!�&(����/������&����� �( &5�& �����/0�"���#�
� (��������#������!�&��#�%��%& (��,5��������!�&���F
��&�!������))"�$�C!��1�����/0
��������)����-&��/ �� ��(��!��
BTP131 BTP141
���
3,200
(��!����)")3,200
(��!����)") �������'&��/ �����������3� ������������&-�� ��#�1��/������������/������������"��
$���
2,400
(��!����)")2,400
(��!����)") ������������� �����#�1����)"�&" ����������1��$2&��#�1�����$������0!��0&
�!
1,200
(��!����)")1,200
(��!����)")
�������'&��/ ���� �������%��)��( ��������"��-&������(�����(�(�����"�(�
������������!/������������&��3 �/�� M6

36
��1����2+����$����������� �������� ���3) (#�$��� 10)
�����&5� �����/0 (� �� LED ����&���:��;70������!�����"�)"��(��� ������!�����"�)"��(�����#�����&�����$�!!��������%$�"#
012273
*����*1�:� �����(� �� LED &�! ������������$2&�����$��(��&������
�!�����"� ��8"�������!�������!�����"�)"��(��� �( &5� �����/0��3� ��
� (� �� LED ��&�!��(����$���� �����/0$���7(�5���)"
� ����������������"�-7(@������ &��%+�������!(�5�����#�������)"�$4����(�5���)" (������#�&��%+ LED ��&�!�� ���7"�"# �( ����������������3�������� ������/ �����
�� � ����! ������:
� ������!�( �����������/0�������������������(���$2&������� ���,�&���!�!�����"������&�������&F �!����������
�� �������� �!�����-����/�����)�/�������4+�/ ����&�%����/&�����/(��!3�>0)"���&���@��)���#� ( ��/ &�%����/&�����/(��!3�>0�!!���� (������ 11)
���*��'���� �� ������6����'1���
006348
���*��'���� �� ������6����'�8%
011405
1. ������ �����&��#�&�%���� &5�$���� ��( �� �&�%��������$�����-& ���#�$����$���( �5&&�%���� (������ 12)
2. ������ �����&��#�&�%���� �( ������������&�%��������$�����-& ����������������$��'&�(��$���(���� ���#�$����$��������5&&�%���� (������ 13)
������ ���,�&&�%���� �( &5�$����)�*)�� �*����&5�&�%���������F
�! ������:� ������1���!&�����(�����/ �����3��(��F �������
&����������� ������ �$�"���&�����(����)"�$�����( ��3����� �
*����*1�:� (���&�%��������$���5%����"���� $����%� �
��!���������(����&�� ���&�%������%��,��5&���� ���7"�"# �( ������&�%������%$�"���#����������& �!�
� (����)"����&�%������ � ������!�( �������&�%�����5&����&"�� � (&�%����(�-&��� ( ���%$�/ ��
�������� (��&� 2+�� �() (#�$��� 14)
�! ������:� �����)����&��#����"��� �( �������( ���� �������%������
���$4���(�-�( �-$�70��"�(�(������( ��&�!&��3!%& ���"����( �����&���(��!���������������%� /������ >5�����,��&��#�%� )"�& ��&& �(�5��������������������� �����&��#����"��� �( ������"�����������!��������������)"�& ��&& �(�5�� �� ��5&��&%� & ����� ������ ���,�&�� �( �������� �&5����
��#/��� ($��+, 15)
�! ������:� '$�&������!�( �������������!�!�����"��� ���-&
����)���%& �����"������3���� )"� (�-7����(3������"�&�)"�& �!����$-.� ��&������!�!�����"����%���3���� )"� �( &�����!�!�����"��� ���-&��%���(3������"�&��" %���/����#� ���!�!�����"���(�-&�������������)��( �-7(�������!� �%& ��!!&��3!
�,�����%+ LED �������!�����"�)"��(�������
$���7 50% (������
$���7 20% - 50%
$���7� ���� 20%
A = 12 ��.
B = 9 ��.
�/ ����&�%����/��&�"# '&�)�����#���� (1)
((���(�-) %��� ���/ ������
A = 17 ��.
B = 14 ��.
��&��#�&�%����/��&�"#'&�)�����#���� (1)
A = 12 ��.
B = 9 ��.
��&��#�&�%����/��&�"#'&�)�����#���� (2)
((���(�-) � ���/ �������������&��#�&�%����

37
� (�/ �����������������������������)������!�!�����"�(�&%+ �( ������������%� $���7 15 �)"�������!�����"�)"�/�0�%+�(��
0�(�-����� %��� � �
%��� !"����!�����������( ���� �����$��&�%����)"�(����� �����&�����������������%���( &�%����%,������� ����$2&����/0���������������������/ ��
%��������%�%�������!�&�������)"��(��������������5#���� ��!/��&(�����&������/�����"�� ���&-���/�#���)"�������� �� G�G ���������80��(������!�&������������������������&�������@�& ����
012423
012425
*����*1�:� �������#��(���$�"���'(�&�)���%$�$4�'(�&%����
������!�( �������������������#��"���)"��(����'&��������%� �����/ �� (����������)���%��$�� '$�&��&���*���0!������ Makita )"��� )"��-&
� ��!�����������( ����!���� �/ &�%����)"��(�����!���/�����"��)"��-7� ����/ � ��������������� M8 (�����3�� �( ����F &���� ��/0�����������
%���( �����"�(�� (�/ ���!�&�����������%$(����/ ��������������)"�
��&���@� ���(���$��&�%��������!����� ��%$)��( ��"����&(�����"�(� ���)"���������� �( )���)&��!������(�&����������)"��(������(��!���
���!�&����������$�"����$��%$�5#������!$B�������F &�����%$�"# (����������� �( ������!���!�&& ��$������&���!�&1. ����������������!�!�����"��� (�& ���&��%++ ���&��>5��
)��( ���!�&��������&��2. &�%����(���(��!3�>0
��/ (��!3�>0��&%��,�� ����)��( ���!�&� �������&��
120
100
80
60
40
20
N m(kgf cm)
(1224)
(1020)
(816)
(612)
(408)
(204)
0 1.0 2.0 3.0
(M14)
(M12)
(M10)
(M8)
0
M14
M12
M10
M8
�����"�����6�
���
� ��
�
�
�
���
� ��
�
�
��
����
���
�
���������� (���)")
120
100
80
60
40
20
N m(kgf cm)
(1224)
(1020)
(816)
(612)
(408)
(204)
0 1.0 2.0 3.0
(M12)
(M10)
(M8)
0
M12
M10
M8
�����"��)����&5����
���
� ��
�
�
�
���
� ��
�
�
��
����
���
�
���������� (���)")

38
3. �����"��� �� �������$����)8�H���!�&�����&�!��������"����
�)��� ���!�&�������)"��(����������������� �1��*���0����������"��
� �� ���� �1��*���0����������"�����)� �� ���!�&�������)"��(��������������������$����)8�H���!�& ��&�!��������"�� ����������������"��
4. ��;7����!����������(������#����&-�����(� ��)"�������������"1�������!�&
5. ��/ ������������)"������3������)��( ���!�&��������&��
0�(��� �5�%� %��� � �
�! ������:� ��!�����������( ����������������(�����/ �� ���"���!�&
!�����������/&����������)��)"�7������)��- ������"�*;���&-�-&���)"��� (��������$�)��!�(�3�����������"�
�/ &�����$��)��������0%!&0�����(���&�����)"����(���)"�� ������� � ���#�&����/0������ ���<I��/ ���������� ��/ ���&�!F ���( 1�&")"��-& ��!�����������( ���������(���%� �����%���( ��������������(�-&������)"����( ��/ ���&��5#�������"�*;'�(� (������&-� -&���)"��� �( �/ ������������)"���!�&���!�)� ���#�&5�&�����!����������� �)��!!�"#>#�(��F ���#���)��( �����& ������,)�����%& ��$��
0�(��� �5�% � �
�! ������:� ������&!�����������%��/����( ������3��5#� ��
� ��)3������� � ���&)"�����%$��)��( $��&�������"�(� �&$����)8�@������-��/ ������������� ��
� ���"���&!�����������/&�����������7������ ��!�����������( ���� �������&����������&�������������)��-/�#���
� &�����)"���&����)"�/�#������,�����%& ���'&���/ ������/0�$�"���)�*)�������$�"���)�*)��(�-����&������( ,�����/�#��� ����%�3�� ��������������,����)��)"'&�)"��-7%��)����#���� �-7�5����� �!����������%� �( ����
� �5&/�#�����&��3& ��$��!�� (����-$�7 0��!�5&)"��� ���5�������
� ���&5� �����/0>#�F �����������0�3�� ���������)��( ������������"�(�%&
������( %& 1�&"������%� ����/ �������%� ��!����!����� �������/����( ��������5#� '&��&5�&���������/�#���
��(��!����'�(� �����$9����&�������������������������� �( )�������& ���(�3�����*���0���� �����-&)" ������ ��$��&�����)"������& ������������/ ��(���������(��!���&��������'�(� ��� ������(�3���)���(���� >5���������!!�( �
0�(�-���� � �
�! ������:� $��!(�����!�(� �� LED �( ��&���&�!���!�&�������)"�
�(�����!������-7� ������!�( ���������&�%��������!(����� %���/����#�
������/(���&�%��������"�(�%& � ��!�����������( ���� ��������/)0$����(�����!�(�� ���"
�����!�&��&�5#���)��)">5����)��( � ��������-7��!�&%& ��$��&�%����)"�(�������������&������������ ������/ ������������)"������3���� �� �����F ����������3�
*����*1�:� �����������"#�"��!!���/)0%++9 ������������(�-&)���'&�
���'�������������)/0%����! (� ����/ ��� �� �( $���� �����/0(�5�����#�
� ������������5&%� �( �������%� ���������( ���%& ����5#���������$9����%���( /�#���������� '$�&&�)"����
006421
*����*1�:� '$�&&�������%$�"#�����&����������80��(���(������
��#������!�&����������!�&��������������!�&����������������%$��/��&���� ��&- '$�&)��)&��!������������)���������( %& ���!�&)"��(����
�� �1��*���0��$�C�������5&%� (��.)
��&����)"������ (��.)
3.1 2.0 - 2.2
3.5 2.2 - 2.5
3.8 2.5 - 2.8
4.5 2.9 - 3.2
4.8 3.1 - 3.4
5.1 3.3 - 3.6
5.5 3.7 - 3.9
5.8 4.0 - 4.2
6.1 4.2 - 4.4

39
012276
����0������! ������:
� ������!�( �����������/0�������������������(���$2&������� ���,�&���!�!�����"������)��������!(���!D�-���; ��� ��� %�$B:(�"����!&��%+
� ����/ �#�����/�#������ �!�>�� )������0 ����J��0 (������&-$���@)�&"���� ������)��( �����������"�">"&�� 1�&��$)�� (�����(�%&
��������$��&@�����������/���,�����1���@�7K0 ����( *���0!���)"�1�����!���� Makita �$4�1� &������>����>� !��-���; ���)��$��!��#�����F ����"#�( �/ ��%(������) � Makita ����
�0 ��12�&�"��! ������:
� ��������( �/ �����-$�70�����(����-$�70��������(���"#�!���������� Makita )"���!-�������� ��/ �-$�7 0�����(����-$�70�����������F ���"�����"���)"���%& � �!!&��3! �/ �-$�70�����(����-$�70������������,-$�����0)"���!-%� �)���#�
(�-7� ���)�!������"�&�"����!�-$�70������(���"# '$�&��!,�*���0!��� Makita �� ! ��-7� &�%����
� ���"���� ���$L,�������� �!�����"�����������/�0�����) �!!���F ��� Makita
*����*1�:� �-$�70!�����������������/-&�-$�70��#�6����
1���@�7K0 >5�����������%$�������$���)*
(�����!�(� �� LED
�������!�&�������
��� (1) ��� (2)
1
$���7 2.5 N·m
($���7 25.5
kgf·cm)
$���7 1.1 N·m
($���7 11.2
kgf·cm)
3
$���7 4.6 N·m
($���7 46.9
kgf·cm)
$���7 2.0 N·m
($���7 20.4
kgf·cm)
5
$���7 8.1 N·m
($���7 82.6
kgf·cm)
$���7 3.0 N·m
($���7 30.6
kgf·cm)
7
$���7 10.0 N·m
($���7 102.0
kgf·cm)
$���7 4.0 N·m
($���7 40.8
kgf·cm)
9
$���7 11.5 N·m
($���7 117.3
kgf·cm)
$���7 5.8 N·m
($���7 59.1
kgf·cm)

Makita CorporationAnjo, Aichi, Japan
885074-377 www.makita.com
TRD