Embed Size (px)
Citation preview

PassMark™
S o f t w a r e
BurnInTest in a production line environment Page 1
Copyright © 2003 - 2014
White paper
Using BurnInTest in a production line environment
Abstract:
This white paper describes how BurnInTest 8 can be used in a production line environment. This paper is targeted at companies that manufacture, integrate or repair a large number of PC’s on a daily basis. Companies or individuals that run smaller operations may also benefit from some of the information in this document however.
Document Edition: 8.0
Date: 16 June 2014
BurnInTest is a trademark of PassMark software
PassMark™
S o f t w a r e
BurnInTest in a production line environment Page 2
Copyright © 2003 - 2014
Contents
Contents ......................................................................................................................................... 2
Overview ......................................................................................................................................... 3
Configuration files ........................................................................................................................... 4
What are configuration files ......................................................................................................... 4
How are configuration files created .............................................................................................. 4
How are configuration files used .................................................................................................. 4
Selecting a test configuration .......................................................................................................... 6
Carrying out tasks before the test run ............................................................................................. 7
Carrying out tasks after the test run ................................................................................................ 8
Example Autostop actions ........................................................................................................... 8
Report information - (Machine identification) ................................................................................. 10
General report information ......................................................................................................... 10
Certificate report information ..................................................................................................... 10
Test reporting - logging to disk ...................................................................................................... 11
Installation and execution options ................................................................................................. 13
Standard Install ......................................................................................................................... 13
Run from a removable drive or network drive ............................................................................ 13
Externally controlling BurnInTest ................................................................................................... 17
Running BurnInTest on a System without an operating system ..................................................... 18
Restricting a user from changing the tests selected ...................................................................... 19
Rebooter ....................................................................................................................................... 20
Reboot cycling .............................................................................................................................. 21
Sleeper ......................................................................................................................................... 23
Test hardware - loopback plugs .................................................................................................... 24
Plugin tests: extending BurnInTest tests ....................................................................................... 25
Un-installer command line arguments ........................................................................................... 26
Feedback ...................................................................................................................................... 27
Contacting PassMark Software ..................................................................................................... 27
Appendix 1: Command line arguments ......................................................................................... 28
Appendix 2: Scripting .................................................................................................................... 28
Appendix 3 – Example reports ...................................................................................................... 28
PassMark™
S o f t w a r e
BurnInTest in a production line environment Page 3
Copyright © 2003 - 2014
Overview
This white paper describes how BurnInTest can be used in a production line environment. The main aim in this environment is to devise a system to increase the level of automation and maintain adequate records of the testing carried out.
This paper is applicable to both the Standard and Professional Windows editions of BurnInTest. More testing will be possible with the Professional edition however. This document does not cover the Linux version of BurnInTest.
PassMark™
S o f t w a r e
BurnInTest in a production line environment Page 4
Copyright © 2003 - 2014
Configuration files
What are configuration files
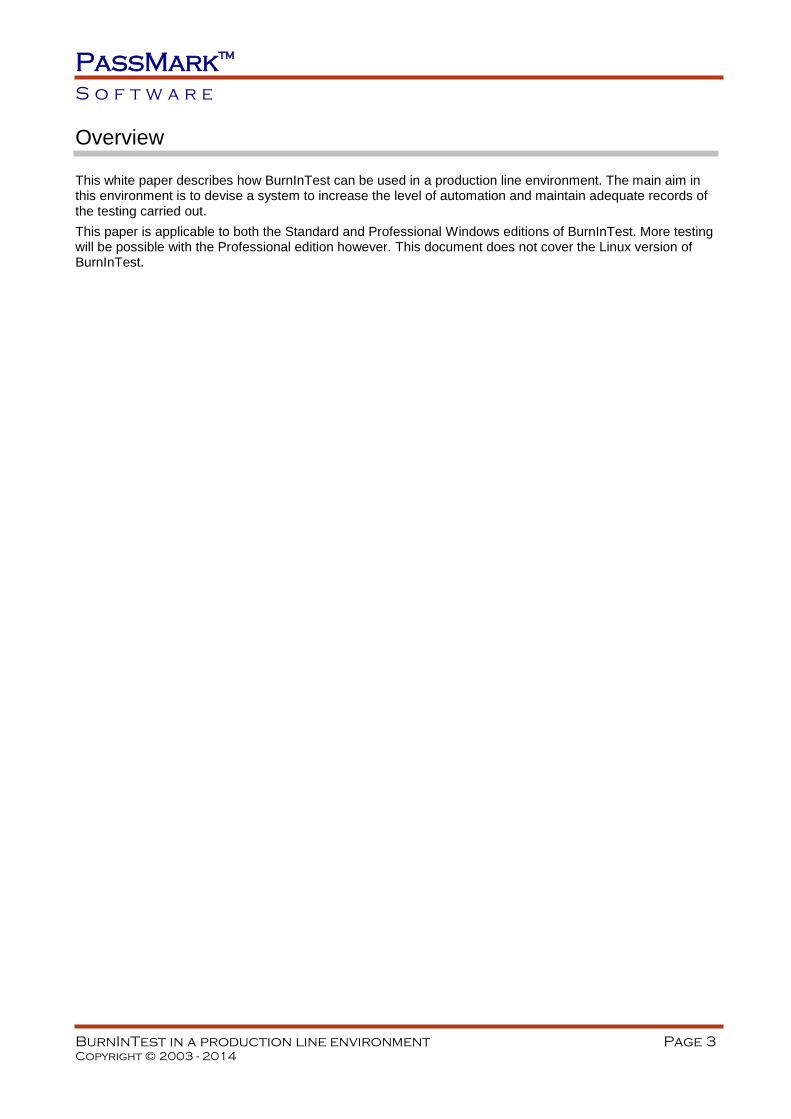
A configuration file contains all the parameters available in the test duty cycles and test preferences windows. That is to say it contains information about which tests to perform, the duty cycle setting for each test and other preferences, such as drive letters and device names.
Configuration files end in the extension ‘bitcfg. For example the current configuration is stored automatically in the file ‘LastUsed.bitcfg’, which is located in the BurnInTest installation directory.
Configuration files aid with the automation of the testing process and also allow the maintenance of several different test configurations. For example a configuration file could be created for each different model of computer to be tested.
By saving a particular configuration to a file, you can avoid resetting all the parameters each time BurnInTest is used.
How are configuration files created
A configuration file can be created by first selecting all the required settings in the test duty cycles and test preferences windows, then use the menu option, ‘Save Test Configuration As’. This will create a new configuration file in the location selected by the user.
After the configuration files have been created they can be transferred between computers where BurnInTest is installed.
How are configuration files used
Files can be used in three ways
1. They can be loaded from the command line.
Figure 1 – Duty cycle window. These settings along with other preferences are saved in configuration files
PassMark™
S o f t w a r e
BurnInTest in a production line environment Page 5
Copyright © 2003 - 2014
2. They can be loaded by using the menu option, ‘Load Test Configuration’.
3. They can be loaded by a BurnInTest script file. A script file can load multiple test configurations during the one test run.
For the purpose of test automation options 2 and 3 are of most interest. (see ‘Command line arguments’ and ‘Scripting’ sections below).
PassMark™
S o f t w a r e
BurnInTest in a production line environment Page 6
Copyright © 2003 - 2014
Selecting a test configuration
It is possible to adjust a wide range of values from the ‘test duty cycles’ and ‘test preferences’ windows. The following general tips can be used to help select the right combination of tests to perform and their intensity level.
Only turn on tests for which there is some corresponding hardware. For example, there is obviously no point in turning on the tape drive test if there is no tape drive installed.
If the disk drive has a fairly large capacity, you will probably need to set the duty cycle for the disk test to 100% in order to make sure the maximum amount of disk surface is tested over several cycles.
Monitor the CPU utilization during the 1st couple of test runs. If the CPU is not running at 100% all
the time, raise the duty cycle of one or more tests. Conversely, if the CPU consistently runs at 100%, lower the duty cycle of one or more tests.
If the machine has booted to Windows there is a reasonable chance that the CPU is working reasonably reliably. Give preference to the RAM test over the CPU test when setting the duty cycle. RAM tends to fail more often than a CPU.
Don’t be scared of pushing the machine too hard. It’s better that it fails on the production line than after you have shipped it to your customer.
You should test for at least a few hours. An absolute minimum is one complete cycle of the disk test. Leaving BurnInTest to run on the PC overnight should give the machine a good work out.
PassMark™
S o f t w a r e
BurnInTest in a production line environment Page 7
Copyright © 2003 - 2014
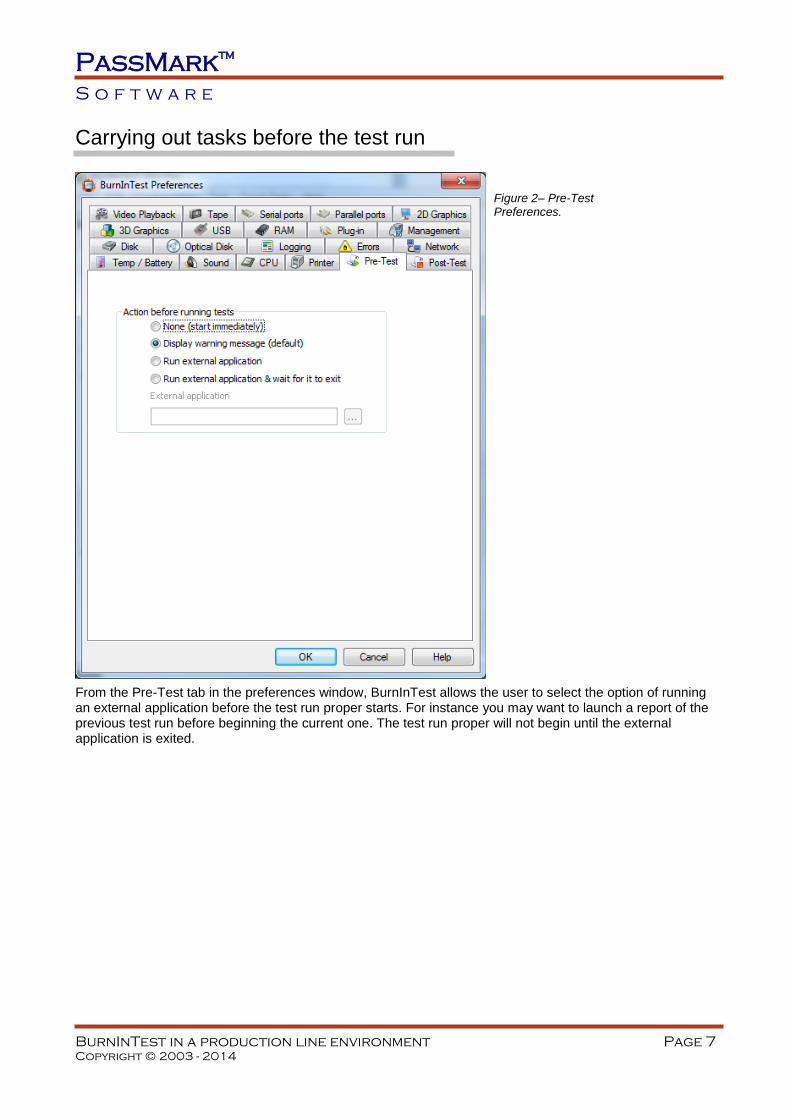
Carrying out tasks before the test run
From the Pre-Test tab in the preferences window, BurnInTest allows the user to select the option of running an external application before the test run proper starts. For instance you may want to launch a report of the previous test run before beginning the current one. The test run proper will not begin until the external application is exited.
Figure 2– Pre-Test Preferences.
PassMark™
S o f t w a r e
BurnInTest in a production line environment Page 8
Copyright © 2003 - 2014
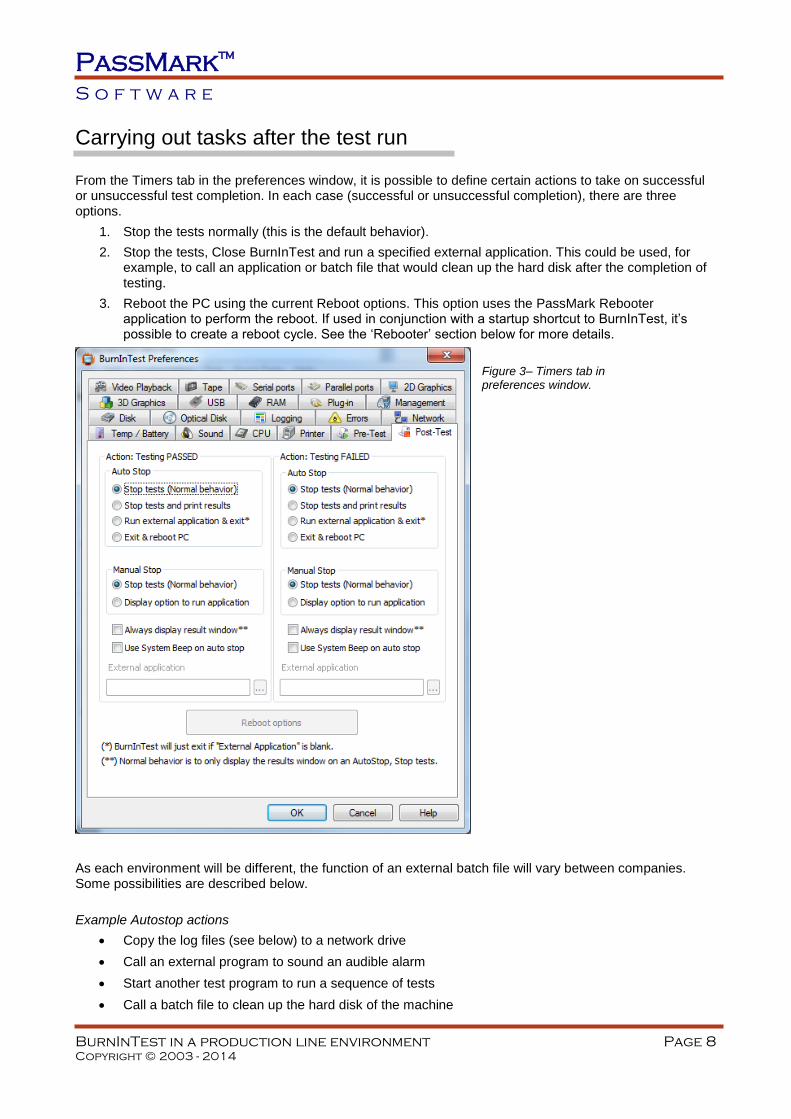
Carrying out tasks after the test run
From the Timers tab in the preferences window, it is possible to define certain actions to take on successful or unsuccessful test completion. In each case (successful or unsuccessful completion), there are three options.
1. Stop the tests normally (this is the default behavior).
2. Stop the tests, Close BurnInTest and run a specified external application. This could be used, for example, to call an application or batch file that would clean up the hard disk after the completion of testing.
3. Reboot the PC using the current Reboot options. This option uses the PassMark Rebooter application to perform the reboot. If used in conjunction with a startup shortcut to BurnInTest, it’s possible to create a reboot cycle. See the ‘Rebooter’ section below for more details.
As each environment will be different, the function of an external batch file will vary between companies. Some possibilities are described below.
Example Autostop actions
Copy the log files (see below) to a network drive
Call an external program to sound an audible alarm
Start another test program to run a sequence of tests
Call a batch file to clean up the hard disk of the machine
Figure 3– Timers tab in preferences window.
PassMark™
S o f t w a r e
BurnInTest in a production line environment Page 9
Copyright © 2003 - 2014
PassMark™
S o f t w a r e
BurnInTest in a production line environment Page 10
Copyright © 2003 - 2014
Report information - (Machine identification)
General report information
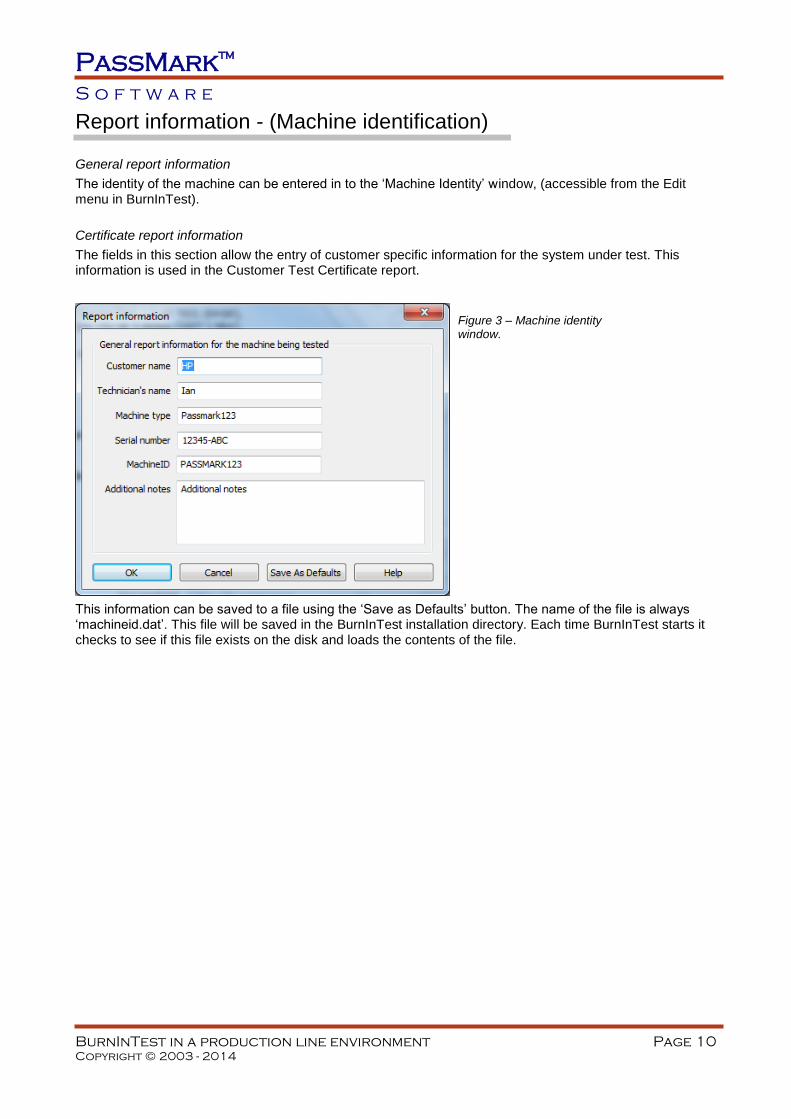
The identity of the machine can be entered in to the ‘Machine Identity’ window, (accessible from the Edit menu in BurnInTest).
Certificate report information
The fields in this section allow the entry of customer specific information for the system under test. This information is used in the Customer Test Certificate report.
This information can be saved to a file using the ‘Save as Defaults’ button. The name of the file is always ‘machineid.dat’. This file will be saved in the BurnInTest installation directory. Each time BurnInTest starts it checks to see if this file exists on the disk and loads the contents of the file.
Figure 3 – Machine identity window.
PassMark™
S o f t w a r e
BurnInTest in a production line environment Page 11
Copyright © 2003 - 2014
Test reporting - logging to disk
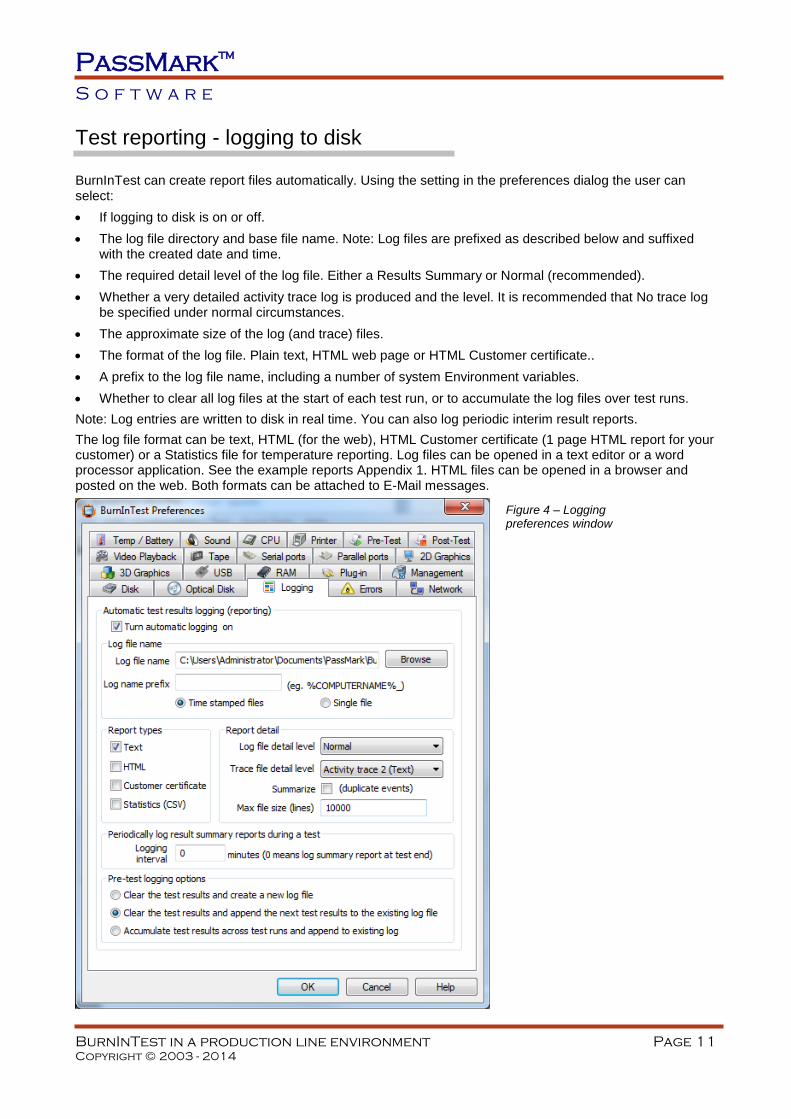
BurnInTest can create report files automatically. Using the setting in the preferences dialog the user can select:
If logging to disk is on or off.
The log file directory and base file name. Note: Log files are prefixed as described below and suffixed with the created date and time.
The required detail level of the log file. Either a Results Summary or Normal (recommended).
Whether a very detailed activity trace log is produced and the level. It is recommended that No trace log be specified under normal circumstances.
The approximate size of the log (and trace) files.
The format of the log file. Plain text, HTML web page or HTML Customer certificate..
A prefix to the log file name, including a number of system Environment variables.
Whether to clear all log files at the start of each test run, or to accumulate the log files over test runs.
Note: Log entries are written to disk in real time. You can also log periodic interim result reports.
The log file format can be text, HTML (for the web), HTML Customer certificate (1 page HTML report for your customer) or a Statistics file for temperature reporting. Log files can be opened in a text editor or a word processor application. See the example reports Appendix 1. HTML files can be opened in a browser and posted on the web. Both formats can be attached to E-Mail messages.
Figure 4 – Logging preferences window
PassMark™
S o f t w a r e
BurnInTest in a production line environment Page 12
Copyright © 2003 - 2014
New log/trace files will be created when BurnInTest is started and logging is turned on, or any logging options are changed (eg. Turned on, Log directory changed, format changed). If BurnInTest is restarted with scripting commands of REBOOT or REBOOTEND, entries will be concatenated to the previous log file (ie. That relate to the same script being run).
BurnInTest will automatically modify the file name selected to include the current date and time, e.g. If you use the file c:\temp\logfile.txt as your log directory then BurnInTest will create files like,
c:\temp\logfile_081209_113751.log
or
c:\temp\logfile_081209_113751.trace (for a trace file)
051209 is the date (in Year Month Day format), the 9th of December 2008 in this case.
113751 is the time (in Hour Minute Second format)
Logging to disk may be useful if your system is unstable. You could create a log, and then even if the computer crashed, you would have a record of how much testing was completed before the crash. Logging can also be used as a method of keeping quality assurance records in a manufacturing environment.
PassMark™
S o f t w a r e
BurnInTest in a production line environment Page 13
Copyright © 2003 - 2014
Installation and execution options
There are several different ways to install and run BurnInTest. Some of them are more suited to a mass production environment.
Standard Install This is what happens when the standard package is installed. The files are expanded from the compressed archive and the install program is run to prompt the user for various information, like the installation directory. Files are then copied from the archive to the installation directory and some information is written to the registry to support the security software used to protect BurnInTest and the uninstallation of the package. After a standard install, uninstallation should be done from the Add / Remove programs icon in the Windows control panel. In a mass production environment this option can be time consuming.
Run from a removable drive or network drive The installation step can be avoided entirely by running BurnInTest directly from a CD, USB drive or Network drive. There are some issues with each method that bear consideration.
Running from a CD
Normally BurnInTest uses the BurnInTest installation directory to store log files and configuration settings. Running BurnInTest from a read only CD will mean that it will not be possible to create / update these files. To run BurnInTest from a CD when no Operating System is installed, please see the section on “Running BurnInTest from a bootable CD”
Running from a USB Key drive
This method is recommended over running BurnInTest from CD as configuration and log files can be saved.
Running from a Network drive
This can be a viable option but if multiple instances of BurnInTest are started from the same network directory at the same time, there is a risk that configuration and log files will be overwritten by the various different instances. BurnInTest also uses a custom driver for certain purposes, such as accessing Parallel ports. BurnInTest will not have sufficient privileges to install the driver from a network.
Running from a Floppy disk
From V5.0, BurnInTest is too large to run be from a floppy.
Examples Example 1: Use the following process to run BurnInTest from a CD or USB key drive.
It is possible to install BurnInTest Professional onto a USB drive or CD/DVD/BD such that no installation is required on the test system. This can be useful in a number of scenarios, such as field staff testing PC's without installing BurnInTest on the test system.
When running BurnInTest this way, there will be no files left on the PC after BurnInTest has finished. The procedure is the same for optical disks, but as it is not writeable for log files, logging should be either turned off or specified to be on a writeable drive . You can also get more sophisticated by having multiple test configurations, there is some information about this in the help file.
When BurnInTest is run from a removable drive when installed in this way, the default directory for the users files (like reports and the configuration file) is the BurnInTest directory, rather than the normal default directory of the users Documents directory. The command line parameter "/p" required in V5.x in this scenario is now turned on automatically, and is no longer required for a USB drive installation.
Installing BurnInTest to a USB drive
PassMark™
S o f t w a r e
BurnInTest in a production line environment Page 14
Copyright © 2003 - 2014
This installation process can be performed for a USB drive installation (any writable drive) using the menu option "File"->"Install BurnInTest to a USB drive". This option was added to the normal BurnInTest Professional V6.0.1002 package.
From the "Install BurnInTest to a USB drive" Window, you need to specify: 1) The USB drive and directory you want to install BurnInTest to. For example, "F:\BurnInTest". BurnInTest will create the directory if it does not exist. 2) The type of installation. If you have a license key, then select Licensed, otherwise select Evaluation for a trial period. 3) If you selected a "Licensed" installation type, then enter the Username/Key.
When you select install, BurnInTest will create the directory on the USB drive (e.g. F:\BurnInTest), copy all of the files from the BurnInTest directory (e.g. C:\Program Files\BurnInTest) to the USB drive (e.g. F:\BurnInTest) and install the license information onto the USB drive.
Installing BurnInTest to an optical disk
To install BurnInTest on an optical disk (CD/DVD/BD) follow the process above, but specify a writable temporary directory in step 1 (e.g. C:\BurnInTest). On completing the installation to the temporary directory, burn the created directory to the optical disk.
Example 2: An alternate example of running BurnInTest from a CD is provided below.
This example assumes the following.
That log files need to be kept
That each PC to be tested has a CD drive (Drive F), a USB key drive (Drive G) and no network connection.
That the machine needs to be left in a clean state.
1. Create the required configuration files
From within BurnInTest, select the settings that suit your specific test requirements from the test duty cycle window and the test preferences window. Save this configuration, using the ‘Save Config As’ menu option. This can be repeated several times if several test configurations are required.
For this example we assume the following…
The default ‘Stop Tests’ on testing Passed and ‘Stop Tests’ on testing Failed options are selected from the Post-test tab of the preferences window.
Automatic logging is turned ON from the Logging tab of the preferences window.
The log file directory is, c:\burnintest
The name of the log file is, ‘bitlogfile.txt’
The name of the saved configuration file is, ‘heavyload.bitcfg’
2. Create the required batch file
Using Notepad or another text editor, create an installation batch file (‘startburn.bat’), eg.
mkdir c:\burnintest
copy f:\*.* c:\burnintest
c:\burnintest\bit.exe /r /p heavyload.bitcfg
copy c:\burnintest\bitlogfile*.* g:\
copy c:\burnintest\error*.* g:\
del c:\burnintest\*.*
rmdir c:\burnintest
This batch file installs BurnInTest then runs the software with the configuration file that was prepared in advance. It then saves the log files to a USB Key drive and cleans up.
PassMark™
S o f t w a r e
BurnInTest in a production line environment Page 15
Copyright © 2003 - 2014
3. Create a fast install CD
Follow the steps given above to create a CD (in section ‘Installation and execution options’), but when burning the CD include the configuration files and batch file created above. Optionally a machine identification file, ‘machineid.dat’, (see above), could also be included on the CD.
4. Run the tests
To run the tests insert the CD in a machine to be tested and run the batch file.
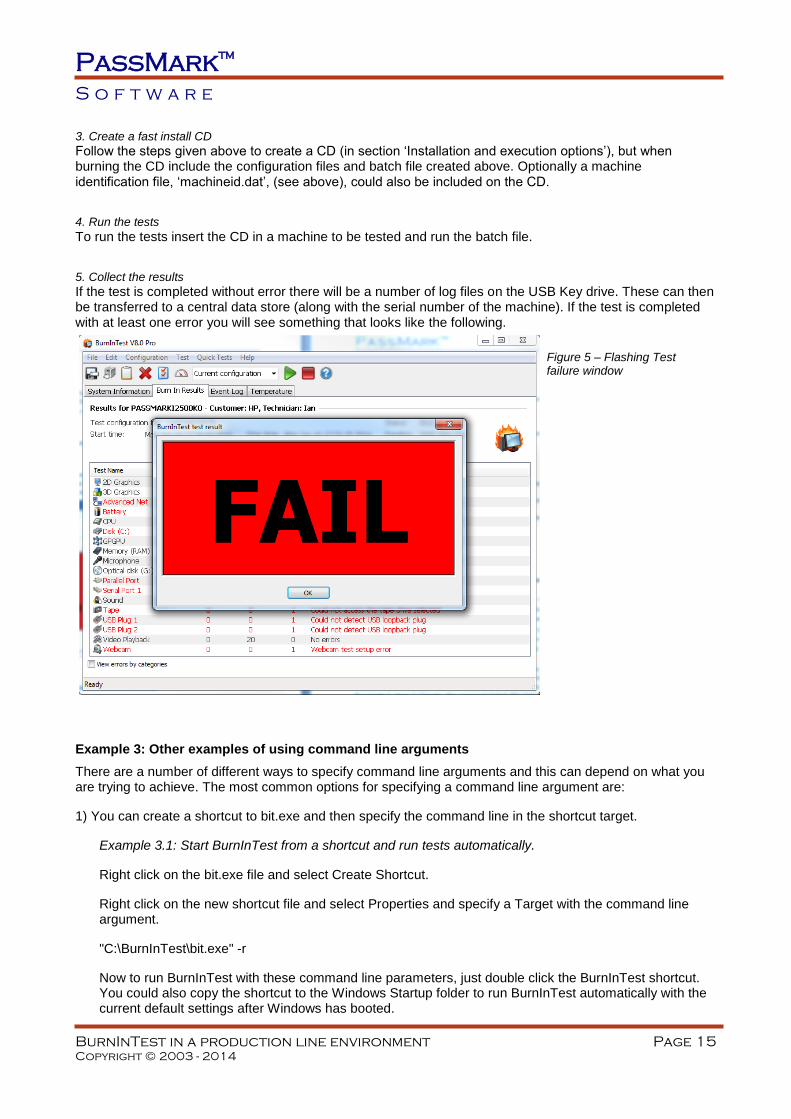
5. Collect the results
If the test is completed without error there will be a number of log files on the USB Key drive. These can then be transferred to a central data store (along with the serial number of the machine). If the test is completed with at least one error you will see something that looks like the following.
Example 3: Other examples of using command line arguments
There are a number of different ways to specify command line arguments and this can depend on what you are trying to achieve. The most common options for specifying a command line argument are:
1) You can create a shortcut to bit.exe and then specify the command line in the shortcut target.
Example 3.1: Start BurnInTest from a shortcut and run tests automatically.
Right click on the bit.exe file and select Create Shortcut.
Right click on the new shortcut file and select Properties and specify a Target with the command line argument.
"C:\BurnInTest\bit.exe" -r
Now to run BurnInTest with these command line parameters, just double click the BurnInTest shortcut. You could also copy the shortcut to the Windows Startup folder to run BurnInTest automatically with the current default settings after Windows has booted.
Figure 5 – Flashing Test failure window
PassMark™
S o f t w a r e
BurnInTest in a production line environment Page 16
Copyright © 2003 - 2014
2) You can open a command window, Start-R, "Cmd". This will open a command window where you can type commands directly, such as shown below.
Example 3.2: Start BurnInTest from a command window and run a pre-defined script of tests
Select Windows Start-R, "Cmd"
Once the Windows command window is open, type in the commands:
cd C:\Program Files\BurnInTest
bit.exe -s MyScript.bits
3) You can write a batch file to execute BurnInTest with Command line arguments.
Example 3.3: Start BurnInTest from a batch file with a pre-defined configuration file
Create a file with an text editor (like Notepad) called Test.bat and include the lines in the file
c:
cd "\program files\BurnInTest"
bit.exe –c “heavyload.bitcfg”
Example 4: Running BurnInTest from a network server
Install BurnInTest into a directory on the server using "File->Install BurnInTest to a USB drive". This will create a directory, e.g. \\My Server\BurnInTest, and this directory will include a BurnInTest installation. When BurnInTest is installed this way, it can be run from a network server in 2 ways:
1) I can be just run directly from the server , e.g. \\My Server\BurnInTest\bit.exe. In this case you won't have the privileges to install the BurnInTest device driver for the Parallel port test and to collect some system information. You can ignore this by starting BurnInTest with the "-a" command line parameter and by just not running the parallel port test.
2) A better (but more complicated) way to run from the server is to create a batch file that copies the directory e.g. \\My Server\BurnInTest to a local directory e.g. c:\burnintest, runs BurnInTest, copies the log files back to the server and then deletes the local copy of BurnInTest. A similar example to this is shown in Example 2, item 2 "Create the required batch file Using Notepad or another text editor".
The default directory for configuration files and log files is the My documents directory on the system bit.exe is running on. If you use the "-p" command line parameter then the default directory will be changed to the same directory where bit.exe is.
PassMark™
S o f t w a r e
BurnInTest in a production line environment Page 17
Copyright © 2003 - 2014
Externally controlling BurnInTest
Controlling BurnInTest from another application Users can run BurnInTest from an external controlling application using the BurnInTest command line options. This can be useful if BurnInTest testing is one of several steps in the system validation process and this process is to be controlled by another application. BurnInTest can run for a specified duration, number of cycles or run a scripted series of tests. There is an option with the licensed version of BurnInTest to allow the controlling application to stop the BurnInTest testing and BurnInTest can be configured to exit at the end of the testing. To allow an external application to signal BurnInTest testing to stop, BurnInTest must be started with the "-T" command line parameter. Once the tests are running the application controlling BurnInTest can signal BurnInTest to stop testing by creating a file called "BURNINTEST_STOP" in the BurnInTest program files directory or the '..\<UserName>\Documents\PassMark\BurnInTest\' directory, where <UserName> is the administrator account that BurnInTest is run under. The application that creates the stop file must delete this file. To configure BurnInTest to exit at the end of testing, specify Test Preferences->Post-Test 'Run external application and exit' and leave the application field blank. Controlling other applications from BurnInTest BurnInTest can run an external application (and wait for it to complete) before running tests. This can be used for a number of reasons such as changing the test environment before testing or having an external application provide test information to BurnInTest, such as the company name, tester's name, serial number etc. See Pre-Test preferences to see how an external application can pass a sub-script of commands to BurnInTest to configure test information such as the system serial number. BurnInTest can run external applications (and wait for it to complete) after running tests. This can be used for a number of reasons such as resetting the test environment after testing or passing results to another application to have it perform another step in the system validation process. To see how to run an application from BurnInTest after testing and what parameters (e.g. $RESULT) can be passed to this application please see Post-Test preferences.
PassMark™
S o f t w a r e
BurnInTest in a production line environment Page 18
Copyright © 2003 - 2014
Running BurnInTest on a System without an operating system
A bootable USB Flash Drive or optical disk can be created with Microsoft Windows 7 and BurnInTest 8 Professional using Microsoft WinPE 3, 4 or 5. Many BurnInTest users can benefit from testing PC hardware when there is no Operating system installed, or the Operating System is inoperable. This can be useful for testing PC hardware: 1. In a production line environment, 2. That is to be shipped with Linux, 3. In a known virus free environment and 4. To try to determine the cause of corruption of an Operating System.
A separate document has been produced to assist people in setting up an environment that allows PassMark BurnInTest to be used in these situations. This document is available from the PassMark Software website: Using BurnInTest on a system with no Operating System installed: Microsoft Windows Pre-install Environment..
PassMark™
S o f t w a r e
BurnInTest in a production line environment Page 19
Copyright © 2003 - 2014
Restricting a user from changing the tests selected
In a production line environment, it may be required to remove the ability of the tester to modify which tests are to be used, either to force the use of pre-defined test configurations or simply to stop tests being removed from the test setup. The option to select and de-select tests in the BurnInTest “Test setup and duty cycles” window can be disabled per test. To do this a file “BITaccess.txt” needs to be included in the BurnInTest directory to specify which checkboxes in the setup window will be disabled. Please email us to request a sample “BITaccess.txt” file.
PassMark™
S o f t w a r e
BurnInTest in a production line environment Page 20
Copyright © 2003 - 2014
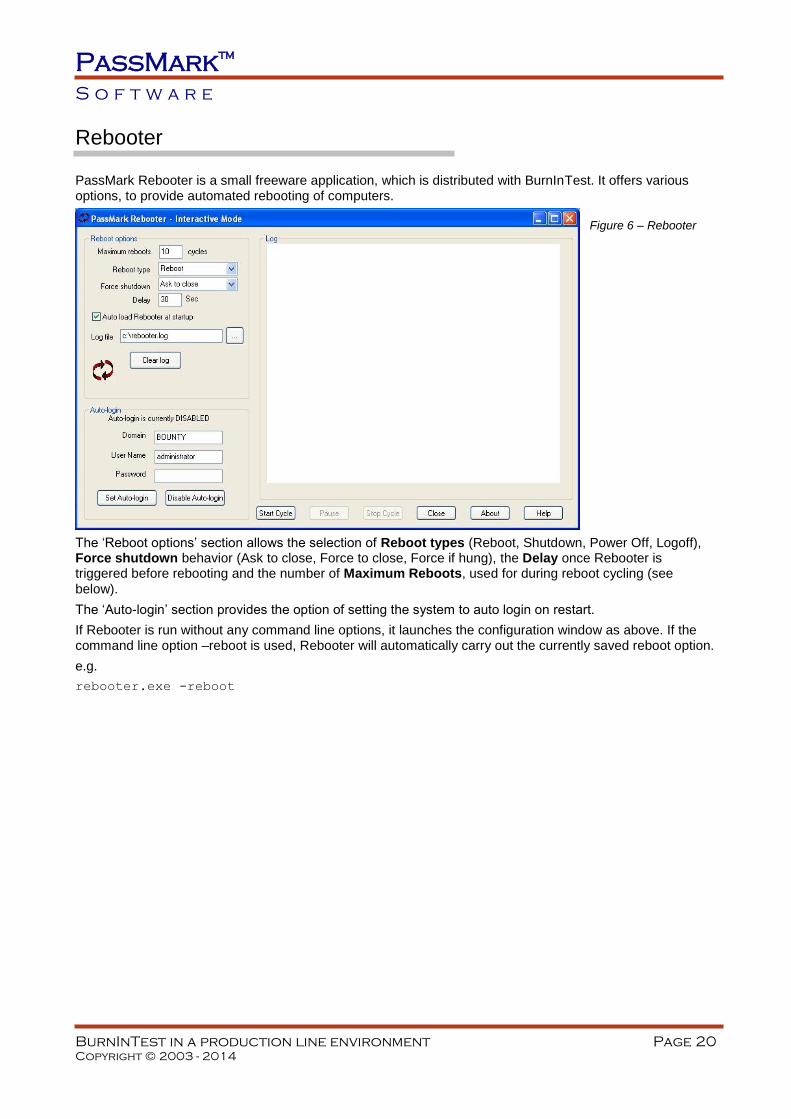
Rebooter
PassMark Rebooter is a small freeware application, which is distributed with BurnInTest. It offers various options, to provide automated rebooting of computers.
The ‘Reboot options’ section allows the selection of Reboot types (Reboot, Shutdown, Power Off, Logoff), Force shutdown behavior (Ask to close, Force to close, Force if hung), the Delay once Rebooter is triggered before rebooting and the number of Maximum Reboots, used for during reboot cycling (see
below).
The ‘Auto-login’ section provides the option of setting the system to auto login on restart.
If Rebooter is run without any command line options, it launches the configuration window as above. If the command line option –reboot is used, Rebooter will automatically carry out the currently saved reboot option.
e.g.
rebooter.exe -reboot
Figure 6 – Rebooter

PassMark™
S o f t w a r e
BurnInTest in a production line environment Page 21
Copyright © 2003 - 2014
Reboot cycling
BurnInTest can be setup so that the PC will reboot itself in a cycle, with test runs occurring between each reboot. BurnInTest uses another software utility called Rebooter to reboot / restart a PC. Rebooter can be used from within BurnInTest or it can be run by itself (look for the executable called, rebooter.exe in the BurnInTest installation directory).
To use Rebooter from within BurnInTest, go to the BurnInTest Preferences window and then select the "Post-Test" tab. Clicking on the ‘Reboot options’ button will open the Rebooter configuration window. You can get additional help about Rebooter options by clicking on the help button in the Rebooter configuration window.
Here is a brief description of how a BurnInTest can be set-up to reboot itself in a cycle.
Step1 – Select and save Rebooter settings
Set the ‘Maximum Reboots’ value to the number of cycles required.
Set the other parameters in Rebooter. (Reboot type, Delay, etc). Don’t set the delay value to be too short, as you want BurnInTest to fully stop before rebooting. 20 Seconds is a good value.
Save the settings, with the ‘Save Options’ button. Then close the Window.
Step2 – Configure the settings you want in BurnInTest
From the Preferences and Duty Cycle windows enter all the settings that you want for your test runs. When you close these windows, the settings are saved to disk and will become the new default values. Alternatively a separate configuration file could be created (using the ‘Save As Config’ menu option) and used on the command line.
Make sure you
- Set a test period with the Auto-Stop option in the preferences window.
- Select ‘Exit & reboot PC’ in the Action after Auto-Stop check boxes.
- Have the log file accumulation option set in the Logging section of the preferences window.
Step3 – Create an auto run shortcut
Create an auto run short cut that points to the BurnInTest executable. You need to do this manually in Windows. The command line in the shortcut should use the ‘/r’ option. This will start tests executing in BurnInTest automatically. The command line for the shortcut should be something like
C:\Program Files\BurnInTest\bit.exe /r
The Rebooter help file (Rebooter.hlp ) also contains more details about how to start programs automatically with Windows.
Step4 – Start the cycle
Start the 1st test run from within BurnInTest, with the "Start Tests" button. At the end of the test period you have entered the PC will reboot according to the settings in Rebooter and after the reboot, BurnInTest will automatically re-start and do another test run, then Reboot again.
Note:
When Rebooter is started from BurnInTest, the Rebooter setting of "Auto load Rebooter at startup" is not applied. This allows BurnInTest to be setup as the auto restart program, and avoids the conflict of both BurnInTest and Rebooter autostarting after a reboot. This means that only a single reboot will be performed when rebooter is run from BurnInTest. To perform multiple reboots from within BurnInTest a script should be used with multiple REBOOT commands.
More about Rebooter
PassMark™
S o f t w a r e
BurnInTest in a production line environment Page 22
Copyright © 2003 - 2014
Rebooter is a small utility program developed by PassMark Software to help automate the PC hardware testing process. It has been designed to work with PassMark BurnInTest but will also work with 3rd party application. Rebooter allows you to,
- Shutdown, Reboot or Logout of a PC.
- Reboot a PC from the command line
- Set a timer so that the PC will reboot after a certain amount of time
- Setup a reboot loop, to reboot a PC over and over again in a cycle.
- Force a shutdown or request a shutdown.
- Enable and disable the Windows auto-login feature. (Windows 2000, XP and later)
- Include reboots into your hardware stress testing plan, (when used with BurnInTest).
PassMark™
S o f t w a r e
BurnInTest in a production line environment Page 23
Copyright © 2003 - 2014
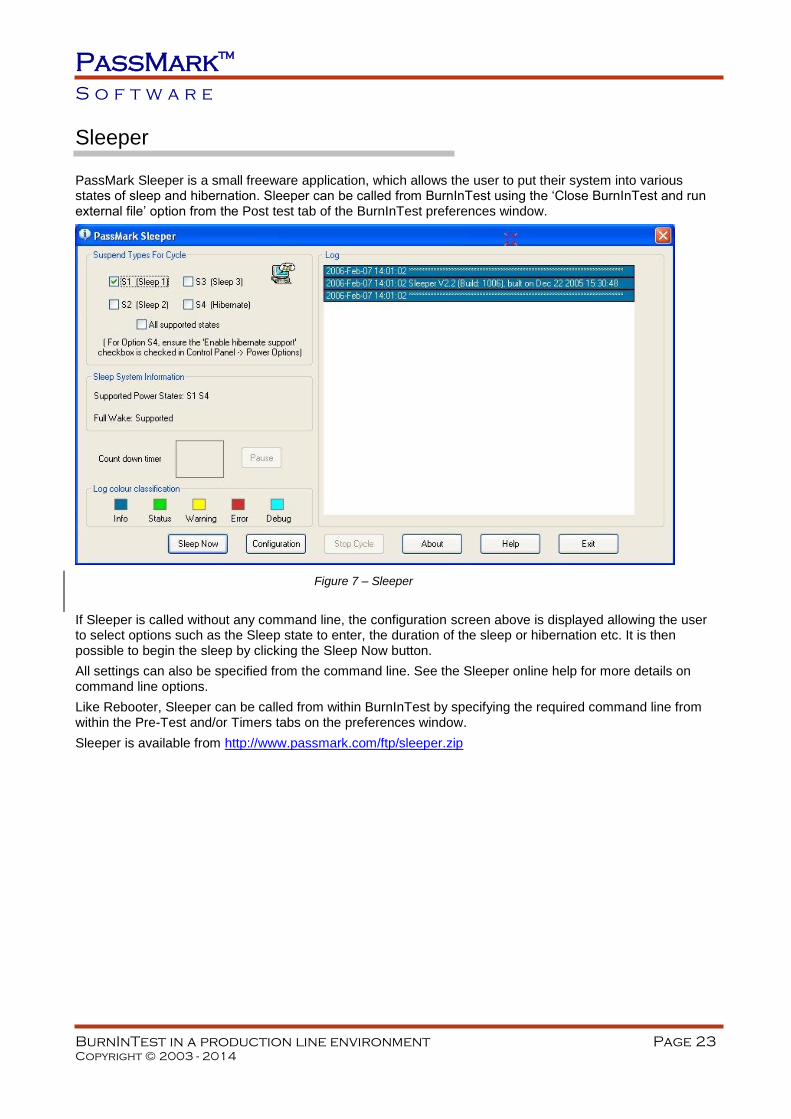
Sleeper
PassMark Sleeper is a small freeware application, which allows the user to put their system into various states of sleep and hibernation. Sleeper can be called from BurnInTest using the ‘Close BurnInTest and run external file’ option from the Post test tab of the BurnInTest preferences window.
If Sleeper is called without any command line, the configuration screen above is displayed allowing the user to select options such as the Sleep state to enter, the duration of the sleep or hibernation etc. It is then possible to begin the sleep by clicking the Sleep Now button.
All settings can also be specified from the command line. See the Sleeper online help for more details on command line options.
Like Rebooter, Sleeper can be called from within BurnInTest by specifying the required command line from within the Pre-Test and/or Timers tabs on the preferences window.
Sleeper is available from http://www.passmark.com/ftp/sleeper.zip
Figure 7 – Sleeper
PassMark™
S o f t w a r e
BurnInTest in a production line environment Page 24
Copyright © 2003 - 2014
Test hardware - loopback plugs
The BurnInTest optical drive test provides the best test when used with the PassMark CD/DVD/BD test set. This optical drive test media provides pre-defined test data selected for the specific purpose of testing optical drives and allows BurnInTest to better validate the optical drive.
The following BurnInTest tests use loopback plugs or cables.
o Serial Port test
o Parallel Port test
o Audio test
o USB test.
o PassMark USB 2.0 Loopback plug: Used to test USB 2.0 and 1.x ports. Supports testing of FullSpeed (12Mb/s) and HighSpeed (480Mb/s). USB 2.0 ports will be tested at the faster HighSpeed rate.
o PassMark USB 3.0 Loopback plug: Used to test USB 3.0 and 2.0 ports. Supports testing of FullSpeed (12Mb/s), HighSpeed (480Mb/s) and SuperSpeed (5Gb/s). USB 3.0 ports will be tested at the faster SuperSpeed rate.
It is recommended that you have one loopback plug per port on the machine under test. For example, if the computer being tested has two COM ports, then having two serial loopback plugs will halve the amount of time you must spend testing.

PassMark™
S o f t w a r e
BurnInTest in a production line environment Page 25
Copyright © 2003 - 2014
Plugin tests: extending BurnInTest tests
If you have specialized hardware that BurnInTest does not test, you can write your own test and integrate it with BurnInTest.
Up to 5 Plugins can be specified.
PassMark has developed Plugins for the following tests:
Touch screen display testing, using PassMark’s MonitorTest software.
Keyboard testing, using PassMark's KeyboardTest software,
Sample software (http://www.passmark.com/ftp/BurnInTest_sample_plugin.zip) in C and C++ is also available to assist developing a Plugin for your specific hardware.
As well as demonstrating how to develop and integrate a test Plugin, these samples also provide examples of how to run pre-test applications and post test applications, and how to pass some information, such as pre-test configuration and post-test results, between BurnInTest and other applications.
PassMark™
S o f t w a r e
BurnInTest in a production line environment Page 26
Copyright © 2003 - 2014
Un-installer command line arguments
The BurnInTest uninstaller executable can be found in the BurnInTest installation directory. It is called, “unins000.exe”. Running this file will uninstall BurnInTest. There is also a command line option for the uninstaller.
/silent
When specified, the uninstaller will not ask the user any questions or display a message stating that uninstall is complete. Shared files that are no longer in use are deleted automatically without prompting. Any critical error messages will still be shown on the screen.
PassMark™
S o f t w a r e
BurnInTest in a production line environment Page 27
Copyright © 2003 - 2014
Feedback
We appreciate your feedback on this document, so if you find any mistakes or oversights please let us know.
Contacting PassMark Software
PassMark Software Pty Ltd
Level 5, 63 Foveaux St
Surry Hills, NSW 2010
Australia
Phone: +612 9690 0444
Fax: +612 9690 0445
http://www.passmark.com
Email Sales: [email protected]
Email Support: [email protected] (send comments about this document to this address)
PassMark™
S o f t w a r e
BurnInTest in a production line environment Page 28
Copyright © 2003 - 2014
Appendix 1: Command line arguments
BurnInTest can be started from the command line prompt or from a batch file. There are some command line parameters that when combined with a configuration file can help in automating the testing process.
Command line arguments can be used to specify certain BurnInTest options and can be particularly useful when automating BurnInTest.
The command line arguments are described in the BurnInTest User guide.
Appendix 2: Scripting
Scripting tests
BurnInTest includes a simple scripting language that allows a series of tests with different configurations to be executed in a sequence.
A PASS/FAIL indication for all of the tests included in the script can be displayed at the end of the scripted test run. To achieve this you should select “Accumulate logs until manually cleared” from the Logging Preferences and results should be cleared before or at the start of the scripted test run.
Script files are text files that you can create with a text editor (e.g. notepad). The file name must end with the extension ‘.bits’. To start a script use the ‘Test / Execute script’ menu item.
Each script command must appear on its own line in the text file and the entire command must appear on a single line. (i.e. a single command cannot be split across multiple lines).
The command and its parameters must be separated by one or more spaces.
Comments can be included by starting the line with the ‘#’ character.
The scripting commands are described in the BurnInTest User guide.
Appendix 3 – Example reports
Examples of the reports are given in the BurnInTest User guide.


![OPEN SOURCE IDS/IPS IN A PRODUCTION ENVIRONMENT: …repositorio.ul.pt/bitstream/10451/35418/1/ulfc121871_tm_João_Paul… · Unit]. No entanto, (com o Suricata) a partir de determinado](https://img.pdfslide.tips/doc/110x75/6033d11711d3da64fc007784/open-source-idsips-in-a-production-environment-opaul-unit-no-entanto-com.jpg)