Embed Size (px)
Citation preview

Chapter 1: Software, Setup and Motivation
1
Game Programming in
C++ with Allegro By Eric McElrea
0.2.0 Edition

Chapter 1: Software, Setup and Motivation
2
Table of Contents Chapter 1: Software, Setup and Motivation ................................................................................................. 4
Motivation................................................................................................................................................. 4
Software .................................................................................................................................................... 4
Visual C++ 2008 Express Edition ............................................................................................................... 4
Allegro ....................................................................................................................................................... 4
Gimpshop .................................................................................................................................................. 6
Summary ................................................................................................................................................... 6
Questions/Discussions .............................................................................................................................. 6
Chapter 2: Beginning Game Programming ................................................................................................... 7
Setting Up The Pixel Project ...................................................................................................................... 7
Creating a Window ................................................................................................................................... 9
Drawing a Pixel ........................................................................................................................................ 18
Modifying The Pixel Program .................................................................................................................. 20
Random Number Generation ................................................................................................................. 20
Pixel Explosion ........................................................................................................................................ 23
Drawing Other Primitives ........................................................................................................................ 25
Summary ................................................................................................................................................. 26
Exercises and Programming Projects ...................................................................................................... 26
Chapter 3: Input .......................................................................................................................................... 29
Etcha Sketcha: The Beginning ................................................................................................................. 29
Etcha Sketcha: Adding Variables ............................................................................................................. 30
Etcha Sketcha: Understanding Directional Movement ........................................................................... 32
Etcha Sketcha: Reading Key Presses ....................................................................................................... 33
Etcha Sketcha: Cleaning It All Up ............................................................................................................ 36
Etcha Sketcha: Adding Mouse Movement .............................................................................................. 36
Exercises and Programming Projects ...................................................................................................... 37
Chapter 4: Bitmaps ..................................................................................................................................... 39
What is a Bitmap? ................................................................................................................................... 39
Creating, Loading and Displaying a Bitmap ............................................................................................ 39
Adding Movement to our Bitmap ........................................................................................................... 41

Chapter 1: Software, Setup and Motivation
3
Using a buffer .......................................................................................................................................... 42
Exercises and Programming Projects ...................................................................................................... 44
Appendix A: Crossword Puzzles .................................................................................................................. 46
Appendix B: Reading Guides ....................................................................................................................... 50

Chapter 1: Software, Setup and Motivation
4
Chapter 1: Software, Setup and Motivation
Motivation
Uh…..to make games. Seriously though, I wrote this book to be an entry level game programming book.
I have scoured the Internet and bookstores for anything approaching a good entry level game
programming book, but have found little to nothing. Most books come bundled with game creation
software, which is great, but we want to program games, not only create them. The others deal with
DirectX, a powerful graphics engine that eats noobs….literally. Needless to say I believe these books are
not good entry points to the world of game programming. In this book you will learn basic programming
concepts through game creation. My goal is that you understand basic programming concepts along
with game creation.
Software
In this chapter we are going to discuss the tools we need to create a fully functional game. We will need
everything from an Integrated Development Environment (IDE) to a graphics creation program . The
good news is that everything we will use in this book is free and open source. Open source is defined as
“of or relating to or being computer software for which the source code is freely available”1. Basically
we will be using programs that the authors give away for free. Not only can you freely download these
programs but you are also free to change and add new features to them.
Visual C++ 2008 Express Edition
OK, so the first and most important piece of software that we will need is a compiler and IDE. A
compiler is a program that takes code (that we will be writing) and checks it, reports any errors, and
creates an executable file for us. An executable file is a file that, well, executes (duh!). That’s computer
talk for a file that runs; in other words Visual C++ 2008 Express Edition is going to allow us to program
and run our game. You can think of it as a Microsoft Word for programmers. Instead of typing essays,
papers and books, we are typing C++ computer code. This program, like I have said previously, is
completely free. You can download it from http://www.microsoft.com/express/vc/#webInstall. I
recommend that you download and install his piece of software first. It can be a lengthy download and
install process (it took me about 15-20 minutes).
Allegro
Alright, with Visual C++ 2008 you can begin your journey into programming. However, if you want to do
anything with graphics you are going to need a graphics library to help you. Most games today use the
graphics library produced by Microsoft called DirectX. It is an extremely powerful library and it will work
with Visual C++ 2008. But “with great power comes great responsibility”2, and it turns out that DirectX
can be confusing for new programmers (also called noobs). For this reason we will be using the graphics
1 As defined by google.com
2 From Spiderman, duh

5
library called Allegro. It has more than enough power for our purposes.
knowledgeable enough to wrestle with DirectX, but for now….baby steps.
You can download the latest stable version of Allegro (currently at 4.2.2) from
http://www.allegro.cc/files/. You want to
C++ 9.0 (as shown below in figure 1).
Now, you downloaded a zip file. Your next question probably is, what the heck to I do with that? What a
noob, um, I mean, let me help you with that. You want to right click on the folder and select the option
“Extract All”. Follow the onscreen guide and in the end you should end up with a folder named “
msvc90-4.2.2”. Inside that folder you should have the folders “bin”, “lib”, “include” and a file named
“readme” (as shown in figure 2).
Figure 1: Download Microsoft Visual C++ 9.0 zip file
Figure 2: The contents of the allegro-msvc90
Chapter 1: Software, Setup and Motivation
library called Allegro. It has more than enough power for our purposes. Maybe someday you will be
knowledgeable enough to wrestle with DirectX, but for now….baby steps.
You can download the latest stable version of Allegro (currently at 4.2.2) from
You want to download the binary version of allegro for Microsoft Visual
C++ 9.0 (as shown below in figure 1).
Now, you downloaded a zip file. Your next question probably is, what the heck to I do with that? What a
noob, um, I mean, let me help you with that. You want to right click on the folder and select the option
act All”. Follow the onscreen guide and in the end you should end up with a folder named “
”. Inside that folder you should have the folders “bin”, “lib”, “include” and a file named
: Download Microsoft Visual C++ 9.0 zip file
msvc90-4.4.4 after unzipped
Chapter 1: Software, Setup and Motivation
Maybe someday you will be
download the binary version of allegro for Microsoft Visual
Now, you downloaded a zip file. Your next question probably is, what the heck to I do with that? What a
noob, um, I mean, let me help you with that. You want to right click on the folder and select the option
act All”. Follow the onscreen guide and in the end you should end up with a folder named “allegro-
”. Inside that folder you should have the folders “bin”, “lib”, “include” and a file named

Chapter 1: Software, Setup and Motivation
6
Now, we have to correctly place these files so that when we program, our compiler can find them.
Remember, without these files we will not be able to draw graphics, play sounds, read in input from the
keyboard/mouse and a whole slew of other things. If Visual C++ is the car, allegro is definitely the
engine. It is the library that will “power” our game.
1. Open the “lib” folder and select all the files (control+a) and copy them (control+c).
a. Go to My Computer-> C:-> Program Files ->Microsoft Visual Studio 9.0-> VC -> lib
i. Past the files here (control+v)
2. Open the “include” folder and select all the files (control+a) and copy them (control+c).
a. Go to My Computer-> C:-> Program Files ->Microsoft Visual Studio 9.0-> VC -> include
i. Past the files here (control+v)
3. Open the “bin” folder and select all the files (control+a) and copy them (control+c).
a. Go to My Computer-> C:-> WINDOWS -> system32
i. Past the files here (control+v)
4. Open the “lib” folder and select the file “alld42.pdb” and copy it (control+c).
a. Go to My Computer-> C:-> WINDOWS -> system32
i. Past the files here (control+v)
That was easy, huh? Well maybe it was difficult for some of you, especially if you are not used to
navigated the directly structure inside of Windows. The good news is, your done, and hopefully you did
everything correctly.
Gimpshop
Lastly, we need a program that we can create and modify our games graphics in. Gimpshop will do the
job and it is free. I think I should note that I use and strongly prefer Photoshop to Gimpshop. However,
Photoshop is an extremely expensive program (~700 dollars). If you program games and work with
digital images a lot (like I do), it is completely worth it; it is an amazing program. But for the purposes of
this book I thought it was important to keep the entry cost down to, well, nothing. Nothing beats
learning game programming with a free e-book with free programs. It should also be noted that even
though I may prefer other, pay products, over these free, open-source products, they are in fact very
good and more than adequate for the scope of this book. Indeed, we can create some amazingly
powerful and beautiful games with these free programs (as I hope you will see). You can get Gimpshop
from http://www.gimpshop.com/.
Summary
Now you should have Visual C++ 9.0, allegro 4.2.2 and Gimpshop all installed and ready to go. All the
potential in the world, and you have no idea what to do with it…..such a shame. Oh well, I guess you are
just going to just have to read Chapter 2.
Questions/Discussions
Incomplete section

7
Chapter 2: Beginning Game ProgrammingNow, you have everything installed and ready to go. It’s time to start our first project….drawing a pixel
onto the screen. You may be asking yourself what a pixel is. A pixel is a single point of color on the
monitor. It is the smallest unit of color that the monitor can display. Needless to say, when we finish
drawing the pixel on the screen, it is going to be a v
Setting Up The Pixel Project
First, open up Visual C++ 9.0 Express Edition. Now, go to File
like Figure 3 below.
Choose the “General” project type and the “Empty Project” template. Now, for the name type “Pixel”
and choose a location like “My Documents” or “Desktop” (anywhere really, your choice). Click “OK”.
You now have an empty project! Oh, the fun.
Figure 3: Starting a New Project
Chapter 2: Beginning Game Programming
Chapter 2: Beginning Game ProgrammingNow, you have everything installed and ready to go. It’s time to start our first project….drawing a pixel
screen. You may be asking yourself what a pixel is. A pixel is a single point of color on the
monitor. It is the smallest unit of color that the monitor can display. Needless to say, when we finish
drawing the pixel on the screen, it is going to be a very small point of color.
roject
First, open up Visual C++ 9.0 Express Edition. Now, go to File-> New-> Project. Your screen should look
Choose the “General” project type and the “Empty Project” template. Now, for the name type “Pixel”
and choose a location like “My Documents” or “Desktop” (anywhere really, your choice). Click “OK”.
You now have an empty project! Oh, the fun.
Chapter 2: Beginning Game Programming
Chapter 2: Beginning Game Programming Now, you have everything installed and ready to go. It’s time to start our first project….drawing a pixel
screen. You may be asking yourself what a pixel is. A pixel is a single point of color on the
monitor. It is the smallest unit of color that the monitor can display. Needless to say, when we finish
> Project. Your screen should look
Choose the “General” project type and the “Empty Project” template. Now, for the name type “Pixel”
and choose a location like “My Documents” or “Desktop” (anywhere really, your choice). Click “OK”.

8
Now we need to set the project properties to recognize the allegro library, so that we can use it. To do
this go to Project-> Pixel Properties. Now go to Configurat
Additional Dependencies add “alleg.lib”. It should exactly like Figure 4 below.
Now, we need to add a blank source file that we can write code on. To do
Item. Choose the “Code” category and select the “C++ File (.cpp)”. Finally, for the name enter
“main.cpp” and click the “Add” button. You should see a blank “sheet” of paper on which you can type
and edit code. Good, we can finally get down to
Figure 4: Adding the Allegro library to Additional Dependencies
Chapter 2: Beginning Game Programming
Now we need to set the project properties to recognize the allegro library, so that we can use it. To do
> Pixel Properties. Now go to Configuration Properties-> Linker-> Input. For
Additional Dependencies add “alleg.lib”. It should exactly like Figure 4 below.
Now, we need to add a blank source file that we can write code on. To do this go to Project
Item. Choose the “Code” category and select the “C++ File (.cpp)”. Finally, for the name enter
“main.cpp” and click the “Add” button. You should see a blank “sheet” of paper on which you can type
and edit code. Good, we can finally get down to writing some code.
: Adding the Allegro library to Additional Dependencies
Chapter 2: Beginning Game Programming
Now we need to set the project properties to recognize the allegro library, so that we can use it. To do
> Input. For
this go to Project-> Add New
Item. Choose the “Code” category and select the “C++ File (.cpp)”. Finally, for the name enter
“main.cpp” and click the “Add” button. You should see a blank “sheet” of paper on which you can type

9
Creating a Window
Type the program code below (We will examine what each line does and discuss how to run the
program next).
Figure 5: Opening a Window for Pixel Program
Chapter 2: Beginning Game Programming
Type the program code below (We will examine what each line does and discuss how to run the
: Opening a Window for Pixel Program
Chapter 2: Beginning Game Programming
Type the program code below (We will examine what each line does and discuss how to run the

10
Now, you must first compile the program. Compiling takes the code you wrote and translates it into
something the computer can understand and run (binary). This step may result in the computer not
creating anything at all but instead “yelling” at you for
see the results of the compile command in the output window at the bottom of the screen. See the
figures below for an example of a successful compilation and one that resulted in errors.
If you have errors you must fix them before moving on. Fixing errors, or “debugging” as it is known in
programming, is an extremely important skill. The best of programmers spend tons of time debugging
their code. In short, get used to it, a lot of your
written, rather than writing new code. Visual C++ gives you a description of the error and will take you
to it if you double click the error description. Programming is a precise art, as you will find o
small omission (like a semicolon) will result in an error message and an unsuccessful compilation. To be
a great programmer you need to be a great debugger; end of story. You can compile your program by
either going to Build-> Build Solution o
Now that you have successfully compiled your project, it is time to run it and see the results. You can
run the project by either going to Debug
see a blank window as a result of running the project like in figure 8.
Figure 6: A Successful compilation
Figure 7: Errors as a result of compilation
Chapter 2: Beginning Game Programming
Now, you must first compile the program. Compiling takes the code you wrote and translates it into
something the computer can understand and run (binary). This step may result in the computer not
but instead “yelling” at you for the errors and mistakes that you
see the results of the compile command in the output window at the bottom of the screen. See the
figures below for an example of a successful compilation and one that resulted in errors.
If you have errors you must fix them before moving on. Fixing errors, or “debugging” as it is known in
programming, is an extremely important skill. The best of programmers spend tons of time debugging
their code. In short, get used to it, a lot of your time will be spent debugging code you have already
written, rather than writing new code. Visual C++ gives you a description of the error and will take you
to it if you double click the error description. Programming is a precise art, as you will find o
small omission (like a semicolon) will result in an error message and an unsuccessful compilation. To be
you need to be a great debugger; end of story. You can compile your program by
> Build Solution or pressing F7.
Now that you have successfully compiled your project, it is time to run it and see the results. You can
run the project by either going to Debug-> Start Without Debugger or pressing control+F5. You should
running the project like in figure 8.
Chapter 2: Beginning Game Programming
Now, you must first compile the program. Compiling takes the code you wrote and translates it into
something the computer can understand and run (binary). This step may result in the computer not
he errors and mistakes that you made. You will
see the results of the compile command in the output window at the bottom of the screen. See the
figures below for an example of a successful compilation and one that resulted in errors.
If you have errors you must fix them before moving on. Fixing errors, or “debugging” as it is known in
programming, is an extremely important skill. The best of programmers spend tons of time debugging
time will be spent debugging code you have already
written, rather than writing new code. Visual C++ gives you a description of the error and will take you
to it if you double click the error description. Programming is a precise art, as you will find out, and any
small omission (like a semicolon) will result in an error message and an unsuccessful compilation. To be
you need to be a great debugger; end of story. You can compile your program by
Now that you have successfully compiled your project, it is time to run it and see the results. You can
> Start Without Debugger or pressing control+F5. You should

11
Now, let’s examine the code line by line and see what each line is responsible for.
Line 1:
//Pixel Project
This line is known as a comment, and end
two forward slashes (//) and are ignored by the compiler. That means, the computer doesn’t care about
comments at all. So, why do we use comments; to help document the p
others. We may want to put our name, date, version number or other information that may be
important to us, but not the computer.
writing notes to ourselves in our code.
Line 3:
#include <allegro.h>
Line 3 is known as a preprocessor directive. In other words, this line is processed BEFORE the program
actually begins to execute. This specific line is an include statement. Include statements allow us to
include other libraries (or code) into our programs to help us. In this case, we are including the Allegro
library which is going to help us draw images, play sounds and obtain input.
Figure 8: The blank window of our Pixel project
Chapter 2: Beginning Game Programming
Now, let’s examine the code line by line and see what each line is responsible for.
known as a comment, and end-of-line comment to be exact. Comments always start with
two forward slashes (//) and are ignored by the compiler. That means, the computer doesn’t care about
comments at all. So, why do we use comments; to help document the program for ourselves and
others. We may want to put our name, date, version number or other information that may be
important to us, but not the computer. It results in absolutely nothing, used only for the purposes of
ode.
Line 3 is known as a preprocessor directive. In other words, this line is processed BEFORE the program
actually begins to execute. This specific line is an include statement. Include statements allow us to
other libraries (or code) into our programs to help us. In this case, we are including the Allegro
library which is going to help us draw images, play sounds and obtain input.
: The blank window of our Pixel project
Chapter 2: Beginning Game Programming
line comment to be exact. Comments always start with
two forward slashes (//) and are ignored by the compiler. That means, the computer doesn’t care about
rogram for ourselves and
others. We may want to put our name, date, version number or other information that may be
It results in absolutely nothing, used only for the purposes of
Line 3 is known as a preprocessor directive. In other words, this line is processed BEFORE the program
actually begins to execute. This specific line is an include statement. Include statements allow us to
other libraries (or code) into our programs to help us. In this case, we are including the Allegro

Chapter 2: Beginning Game Programming
12
Line 5
int main()
This is a very important line of code. This is the main function declaration. This line is the start of
program execution. You can think of this line as a sort of bookmark for the computer. The computer
will seek out this line and begin execution from this point. It can conceivable be anywhere in a project,
even if it spans thousands of lines of code, or hundreds of separate files; all that matters is that it exists
somewhere in your code. The computer will run everything in the body of the main function which is
delimited (started and ended with) the open brace on line 6 and the close brace on line 26. That means
that the instructions that actual run are found between lines 7 and 25 (the body of function main).
Line 7
allegro_init();
This line of code initializes the allegro library. Recall that the allegro library is going to help us with
graphics, sounds and input. This line is required; it tells allegro to ready itself for use.
Line 9
install_keyboard();
This one is a tough one. This instruction installs the keyboard, getting it ready for use. What? You knew
that? Man, you are a quick learner. This line tells the computer that we will be using the keyboard for
input, allowing us to check what keys are being pressed and when they are being pressed.
Line 11
int ret = set_gfx_mode(GFX_AUTODETECT_WINDOWED, 800, 600, 0, 0);
This line tells the computer to open a window of size 800x600. We can change this line to produce a
smaller or larger window, as well as creating a full screen game. Each value in the parenthesis is known
as an argument and changing its value will change the resulting window. Look at the table below for a
description as to what each argument does and possible values for each.

Chapter 2: Beginning Game Programming
13
Argument number Value Description
Argument 1 GFX_AUTODETECT_WINDOWED Tells the computer to open a
window
GFX_AUTODETECT_FULLSCREEN Tells the computer to create a
full screen window (without title
bar).
Argument 2 800 The window will be 800 pixels
wide
1280 The window will be 1280 pixels
wide
Argument 3 600 The window will be 600 pixels in
height
1024 The window will be 1024 pixels
in height
Argument 4 0 Virtual Screen width (discussed
later). Just leave 0 all the time
for now.
Argument 5 0 Virtual Screen height (discussed
later). Just leave 0 all the time
for now.
Finally, there may be some problems that arise as a result of this line. For example, trying to open a
window in a resolution (the width and height combined) that is not supported. Imagine trying to open a
window on a cell phone that is in 1280x1024 resolution. Problem is, no cell phone supports that
resolution; they operate in resolutions much smaller than that. In cases like these we have a problem.
For that reason, the instruction set_gfx_mode returns an integer value after attempting to open the
window. It returns a 0 (zero) if the window was successfully created and a 1 (one) if something went
wrong when attempting to create the window. We save this integer value in a variable we named ret.
int ret = set_gfx_mode(GFX_AUTODETECT_WINDOWED, 800, 600, 0, 0);
This entire code segment results in either a 0 (zero) if
successful, or a 1 (one) if unsuccessful Whatever
set_gfx_mode
returns gets saved into
variable ret

Chapter 2: Beginning Game Programming
14
This line introduces us to variable declarations. Variables are locations in memory where we can store
values. In this line we created a variable named ret to be of type int (integer). Recall from your
elementary math classes that an integer is any whole number (no decimals, no fractions). It turns out
that in C++ we can create variables to hold all kinds of different types of data, but we must specify what
type of data each variable will hold. When we declare a variable we need to provide C++ with two pieces
of information: (1) variable type and (2) variable name.
int ret = set_gfx_mode(GFX_AUTODETECT_WINDOWED, 800, 600, 0, 0);
For now we will be working only with integer variables, but we will take a look at other variable types in
a later chapter. Now, for naming your variable there are a couple of rules. You can name you variables
anything you want as long as you follow the following rules:
• Must start with a letter
• Cannot contain any spaces
• Cannot contain any special symbols
• May contain underscores
Here are some examples of valid and invalid variable names
Invalid Valid
5num num5
max health maxHealth
hit# hit_number
Finally anytime you see an equal sign ( = ), that statement is called an assignment statement. An
assignment statement is a fancy way of saying that a variables value changed. For example, I can declare
a variable and assign it a value at the same time by writing a single statement like:
int x = 5;
Every time you see the equal sign (an assignment statement), the value of the variable has changed to
be whatever is on the right hand side. We will examine other ways to use assignment statements in an
upcoming section.
Type Name

Chapter 2: Beginning Game Programming
15
Line 12-16
if (ret != 0)
{
allegro_message("Could not set graphics mode");
allegro_exit();
}//end if
Lines 12-16 are collectively known as an if statement. If statements specify a block of code that runs
only if some condition (true/false statement) is true. The condition in this case is ret != 0, which
means variable ret not equal to 0. If variable ret is not equal to zero, then the body of the if will
execute. The body of the if is the block of code delimited by (started and ended with) the open brace on
line 13 and the close brace on line 16. Recall that variable ret is equal to whatever is returned by
set_gfx_mode. In this case it will either be a zero if the window was successfully created or a one if
there was a problem creating the window. This if starts off by saying if variable ret is not equal to zero
then run the body of the if. When would the variable ret not equal zero? When there was a problem
creating the window. If there was a problem creating the window then there is obviously no point on
going on with the program. The body of the if says to pop up a message that says “Could not set
Graphics mode” and then to exit allegro, essentially ending our game. Notice how the end brace has an
end of line comment after it. I believe it is always a good idea to comment end braces so you know
exactly what they are ending. When we get to more complicated and longer programs, it will save you
some time and grief if you know what every end brace is ending.
if (ret != 0)
{
allegro_message("Could not set graphics mode");
allegro_exit();
}//end if
The condition. If true, run the body of the if
The
body
of the
if

Chapter 2: Beginning Game Programming
16
Lines 18-20
do
{
} while (!key[KEY_ESC]);
Lines 18 through 20 are known collectively as a do-while loop. Do-while loops repeat the instructions in
the body of the loop until some condition (true/false statement) becomes false. In this case the body of
the do-while loop is empty (there are no statements between the start brace on line 19 and the end
brace on line 20), which essentially means the do-while loop repeats nothing. The purpose of these
lines is to keep the window we created up until the escape key on the keyboard is pressed. Eventually
we will add code inside the body of the do-while loop, but for now it serves its purpose by running (and
spinning its wheels, after all it does nothing!) until the escape key is pressed, thereby keeping our
program alive and our window on the screen.
This also gives us an opportunity to see the code to test for key presses. Notice the !key[KEY_ESC]
line, which tests to see if the escape key is not being pressed (because of the exclamation point, which
means “not” in programming). You can test for other key presses by substituting that code for any one
of the following:
KEY_A - KEY_Z,
KEY_0 - KEY_9,
KEY_0_PAD - KEY_9_PAD,
KEY_F1 - KEY_F12,
KEY_ESC, KEY_TILDE, KEY_MINUS, KEY_EQUALS,
KEY_BACKSPACE, KEY_TAB, KEY_OPENBRACE, KEY_CLOSEBRACE,
KEY_ENTER, KEY_COLON, KEY_QUOTE, KEY_BACKSLASH,
KEY_BACKSLASH2, KEY_COMMA, KEY_STOP, KEY_SLASH,
KEY_SPACE,
KEY_INSERT, KEY_DEL, KEY_HOME, KEY_END, KEY_PGUP,
KEY_PGDN, KEY_LEFT, KEY_RIGHT, KEY_UP, KEY_DOWN,
KEY_SLASH_PAD, KEY_ASTERISK, KEY_MINUS_PAD,
KEY_PLUS_PAD, KEY_DEL_PAD, KEY_ENTER_PAD,
KEY_PRTSCR, KEY_PAUSE,
KEY_ABNT_C1, KEY_YEN, KEY_KANA, KEY_CONVERT, KEY_NOCONVERT,
KEY_AT, KEY_CIRCUMFLEX, KEY_COLON2, KEY_KANJI,
KEY_LSHIFT, KEY_RSHIFT,
KEY_LCONTROL, KEY_RCONTROL,
KEY_ALT, KEY_ALTGR,
KEY_LWIN, KEY_RWIN, KEY_MENU,
KEY_SCRLOCK, KEY_NUMLOCK, KEY_CAPSLOCK
KEY_EQUALS_PAD, KEY_BACKQUOTE, KEY_SEMICOLON, KEY_COMMAND

Chapter 2: Beginning Game Programming
17
Take a look at the diagram below which explains how the do-while loop works.
do
{
} while (!key[KEY_ESC]);
Line 22
allegro_exit();
Our program is essentially done at this point. All that is left to do is to shutdown everything we have
been using. In this case, we need to exit allegro before a program is done.
Line 24
return 0;
Finally this statement ends our main function. Remember that our main function is the only thing that
executes, so return 0 is the programming equivalent to saying “we are done”.
Keep repeating the
body of the
do-while loop. In
this case, the body
is empty, so the
loop repeats
nothing. It does
however continue
to run and keeps
are program alive
and our window
up.
Continue to loop while the escape
key is not being pressed. In other
words, as soon as the escape key is
pressed the loop terminates (ends
repeating) and our program closes
(we lose the window).

Chapter 2: Beginning Game Programming
18
Line 26-27
}
END_OF_MAIN()
Line 26 and 27 end the body of the main function (previously discussed).
Congratulations you now have programmed and understand how to program an application that does
absolutely nothing! Good for you. On a serious note, we have the foundation upon which we can now
draw pixels.
Drawing a Pixel
Drawing a pixel it easy, once you understand how color and the screen coordinate system works.
Problem is, we need to know how color and the screen coordinate system works; bet you didn’t see that
coming. So let’s first talk about color, and how computers represent color.
Color, to the computer, is a combination of red, green and blue values. Each of these values can be
anywhere from 0 (no color) to 255 (lots of color). Remember that white light is a combination of all
colors (it’s how a rainbow works). This color system is called RGB (Red, Green, Blue) because of the
three colors it uses to produce the range of all colors. In order to make a color we need to use the
instruction makecol, and abbreviation of make color. Let’s take a look at some common colors, and
some not so common, and how we would create them in code.
int red = makecol(255,0,0); //lots of red, no green, no blue
int green = makecol(0, 255, 0); //no red, lots of green, no blue
int blue = makecol(0, 0, 255); //no red, no green, lots of blue
int white = makecol(255,255,255); //all colors combined make white
int black = makecol(0, 0, 0); //the absence of color is black
int yellow = makecol(255,255,0); //red and blue combined make yellow
int blueGrey = makecol(163,218,226); //a more complicated color combo
It turns out that using the RGB system gives us 255*255*255 possibilities; that’s nearly 16.8 million
different color combinations, which is more than the human eye can even see! Put plainly, the RGB color
system is capable of producing any color you could possibly want. Notice that in the previous examples I
saved the color I created to an integer variable.
int red = makecol(255,0,0);
Create the color
Save the
color to
variable
red

Chapter 2: Beginning Game Programming
19
It may at first seem odd so save a color in an integer variable, I know it did to me at first. After all a color
is, well a color and not a number. Upon further thought (yes, think!) it makes sense though, because a
color is just a combination of RGB intensity values which are numbers themselves. If you think about it
for long enough, it will make sense, trust me.
Now we need to understand the screen’s coordinate system. The coordinate system is pictured below.
One big problem I see with new programmers is the assumption that the screen coordinate system
works exactly like the coordinate system we all learned in math. This assumption is obviously wrong.
The screen coordinate system only has positive x and y values. The top left corner of the screen is (0,0),
the top right corner is (screen width, 0), the bottom left corner is (0, screen height), the bottom right
corner is (screen width, screen height) and the middle point is (screen width divided by 2, screen height
divided by 2). Recall that the screen width and height of our window is 800x600 right now. Essentially
that means that the x-axis works exactly like you remember from math, but the y-axis is reversed;
moving down the screen the y values get larger, while moving up the screen they get smaller.
Now, we can finally draw a pixel on the screen. Let’s take a look at the instruction and dissect it’s
arguments.
putpixel(screen, 50, 50, makecol(255,255,255));
x-axis
y-axis
0,0 SCREEN_W,0
0,SCREEN_H SCREEN_W,SCREEN_H
SCREEN_W/2,SCREEN_H/2
Where
to put
the
pixel
x
location
y
location
Color of
the pixel

20
This instruction then would put a single pixel on the screen at (50, 50) in white. By adding this code to
our do-while loop we can see the result; which is a white pixel in the top left corner of the screen.
closely, some new programmers underestimate how small a pixel actually is. Below is the complete
program listing, you just need to add the one line to your code.
Modifying The Pixel Program
As exciting as our pixel program is (sarcasm), I
add some excitement to our program we need to look at random number generation.
Random Number Generation
Random number generation is an extremely important topic to understand when it comes to g
programming. We will be using random number generation in every single project that we write, so it is
important that you take the time to understand it thoroughly, so that you have a solid foundation upon
which we can build. Random number generation
random numbers. The key to random number generation is to be able to control the range of numbers
being produced. For example if we want to create a random amount of red, green or blue we would
Chapter 2: Beginning Game Programming
This instruction then would put a single pixel on the screen at (50, 50) in white. By adding this code to
while loop we can see the result; which is a white pixel in the top left corner of the screen.
new programmers underestimate how small a pixel actually is. Below is the complete
program listing, you just need to add the one line to your code.
Modifying The Pixel Program
As exciting as our pixel program is (sarcasm), I think we need to do some things to liven it up.
add some excitement to our program we need to look at random number generation.
Random Number Generation
Random number generation is an extremely important topic to understand when it comes to g
programming. We will be using random number generation in every single project that we write, so it is
important that you take the time to understand it thoroughly, so that you have a solid foundation upon
which we can build. Random number generation does exactly what you think it would: generates
The key to random number generation is to be able to control the range of numbers
being produced. For example if we want to create a random amount of red, green or blue we would
Chapter 2: Beginning Game Programming
This instruction then would put a single pixel on the screen at (50, 50) in white. By adding this code to
while loop we can see the result; which is a white pixel in the top left corner of the screen. Look
new programmers underestimate how small a pixel actually is. Below is the complete
think we need to do some things to liven it up. In order to
Random number generation is an extremely important topic to understand when it comes to game
programming. We will be using random number generation in every single project that we write, so it is
important that you take the time to understand it thoroughly, so that you have a solid foundation upon
does exactly what you think it would: generates
The key to random number generation is to be able to control the range of numbers
being produced. For example if we want to create a random amount of red, green or blue we would
Add this

Chapter 2: Beginning Game Programming
21
want to generate random numbers between 0 (no color) and 255 (a ton of color). Let’s take a look at a
random number generation statement and dissect it.
1 + rand() % 6
The statement above will produce random number between 1 and 6. It does this because the start
value is 1 and the range is 6 (the number of possibilities). Let’s take a look at another statement:
5 + rand() % 3
What numbers will this produce? It turns out that this equation produces numbers between 5 and 7.
Why? Well starting at 5 count 3 times (the range) and you get 5, 6, 7. Therefore, this statement
produces numbers between 5 and 7. How about his one?
8 + rand() % 10
Most new programmers would answer 8 – 18; but as I’m sure you have concluded by now, they are
wrong. Let’s examine this; starting at 8 count 10 times (the range): 8, 9, 10, 11, 12, 13, 14, 15, 16, 17.
That’s your answer, this equation generates numbers between 8 and 17. Now, how would we generate
a random amount of red, green and blue and then create a random color based on those values? Well,
we need to know the start value and the range in order to write a random number generation
statement. What is the lowest value red, green and blue can be? Correct, zero. And the highest value
red, green and blue can be? Correct, 255. Now, for the tricky part. What is the range between 0-255,
that is, how many numbers are there between 0 and 255? The answer is 256 (trust me). Now,
understanding that, let’s take a look at how we would create a random color:
int red = 0 + rand() % 256;
int green = 0 + rand() % 256;
int blue = 0 + rand() % 256;
int color = makecol(red, green, blue);
Notice that I am creating variables to store the random numbers in (red, green, blue) and then using
those variables to create a new color. It may be perplexing at first (that means confusing, duh) to see
that a color can be stored inside an integer variable (color). But we must remember that computers
are really only good at one thing: numbers. Therefore, the computer prefers to assign a unique number
to every single possible color.
Now that we have a random color to use for our pixel, let’s also choose a random location to place it (x,
y). A random x location can range from 0 to the width of the window (800 in this case) and a random y
location can range from 0 to the height of the window (600 in this case). It is always good programming
The start value The range, a.k.a. the
number of possibilities

Chapter 2: Beginning Game Programming
22
practice to not use numbers when you program, because numbers change. For example, it would be a
bad idea to randomly choose an x and y value in the following way:
int x = 0 + rand() % 800;
int y = 0 + rand() % 600;
The 800 and 600 values, the width and height respectively, can change. For example, we may want to
make this game full screen later. If we do that then we would have to find every 800 and 600 value in
the code and replace them with the new values. So, instead we use to constants that allegro provides
us, by using these we can change the size of the window at any time and our code would automatically
scale correctly. The new, better, lines of code can be found below (notice also that I removed the 0 for
obvious reasons).
int x = rand() % SCREEN_W;
int y = rand() % SCREEN_H;
Now, we have randomly created a color and a location, all that is left to do is draw the pixel on the
screen at the random location in the random color (below).
putpixel(screen, x, y, color);
Notice that I used variables x, y and color, all of which are randomly chosen. I literally have no idea
where this pixel will appear or what color it will be (it is randomly chosen by the computer). Now,
where does this code actually go? Let’s take a look at the complete code listing.

23
Pixel Explosion
I like to call this program “Pixel Explosion”
result in an explosion of pixels? Let’s examine the do
Chapter 2: Beginning Game Programming
I like to call this program “Pixel Explosion” because, well, it results in an explosion of pixels. Why does it
result in an explosion of pixels? Let’s examine the do-while loop.
Chapter 2: Beginning Game Programming
because, well, it results in an explosion of pixels. Why does it

Chapter 2: Beginning Game Programming
24
do
{
int red = rand() % 256;
int green = rand() % 256;
int blue = rand() % 256;
int color = makecol(red, green, blue);
int x = rand() % SCREEN_W;
int y = rand() % SCREEN_H;
putpixel(screen, x, y, color);
} while (!key[KEY_ESC]);
Recall that the
body of the loop
repeats over and
over again. In this
case, each time
through the loop
we choose a new
amount of red,
green, blue, create
a new color and
chose new random
values for x and y.
Finally, we place a
pixel at this new
location with this
new color. The
result is that each
time through the
loop we get a new
pixel, in a new
location, in a new
color. This loop
continues to repeat
until the escape
key is pressed,
resulting in pixels
showing up on the
screen until the
program ends.
Choose random color and
random location
Draw the pixel at random location
with random color
Repeat until the escape key is pressed

Chapter 2: Beginning Game Programming
25
Drawing Other Primitives
Pixels are known as primitives because of how simple they are compared with other graphics. There are
other graphics primitives that we can draw: lines, rectangles, circles and triangles. Let’s take a quick
look at the code we would need to draw these primitives.
Lines
line(screen, 20, 50, 100, 200, makecol(255,255,255));
Rectangles
rectfill(screen, 20, 20, 100, 100, makecol(255,255,255));
rect(screen, 20, 20, 100, 100, makecol(255,255,255));
Circles
circlefill(screen, 400, 400, 50, makecol(255,255,255));
circle(screen, 400, 400, 50, makecol(255,255,255));
Triangles
triangle(screen, 40, 40, 100, 200, 60, 100, makecol(255,255,255));
For both rectangles and circles you have two options. To draw only an outline of the shape or to draw
the shape filled. I suggest you try each of these out, changing the numbers to get a feel for what each
does and how they look on the screen.
start x start y end x end y color
start x start y end x end y color
middle x middle y radius color
x1 y1 x2 color y2 x3 y3

Chapter 2: Beginning Game Programming
26
Summary
You now have a working program that puts pixels on the screen. It’s not much, but it’s a good start. The
best advice I can give you now is to try to do some of the exercises and programming projects.
Programming is really both a skill and art, and the only way to get better at it is to program.
Exercises and Programming Projects
Exercises
1. Describe what is meant by “debugging” in programming.
2. (Extra Effort) There are three types of programming errors: Compilation errors, run-time errors
and logic errors. List and describe each type of error.
3. What capabilities does the allegro.h library give our programs when we include it?
4. The allegro game library needs to be initialized before it can be used. Write the line of code that
initializes allegro.
5. We must tell the computer that we want to use the keyboard for our games. Write the line of
code that readies the keyboard for use.
6. Describe what screen resolution is. Why is it important in game programming?
7. Write the line of code that will create a full screen window in a 1280x1024 resolution.
8. Declare an integer variable named red.
9. Declare an integer variable named blue.
10. Declare an integer variable named age.
11. Declare an integer variable named grade and initialize it (using an assignment statement) to 16.
12. Declare an integer variable named count and initialize it (using an assignment statement) to 10.
13. Which of the following variable names are invalid, explain why.
a. number_5
b. sum
c. sum!
d. my number
e. 5number
f. my_num_5
g. my#5
14. Identify what color the following statements create (you may need to plug these into an actual
program to figure them out).
a. makecol(255,255,255)
b. makecol(255, 0, 0)
c. makecol(0,255,0)
d. makecol(0,0,255)
e. makecol(0,0,0)
f. makecol(255,255,0)
g. makecol(0,255,255)
h. makecol(255,0,255)

Chapter 2: Beginning Game Programming
27
15. Consider a screen which is broken up into four quadrants like below, with a screen resolution of
800x600:
Which quadrant will the following x, y values be in?
a. 0, 0
b. 800, 600
c. 800, 0
d. 0, 600
e. 200, 500
f. 100, 100
g. 500, 0
h. 500, 400
i. 50, 500
16. List and describe the arguments of function putpixel.
17. What two constants does allegro provide for the width and height of the screen?
18. What range of random numbers is produced by the following random number generation
statements?
a. 1 + rand() % 6
b. rand() + 6
c. 4 + rand() % 4
d. 3 + rand() % 2
e. 7 + rand() % 5
f. 100 + rand() % 14
g. 14 + rand() % 1
19. Write a random number generation statement to achieve the following:
a. Produce numbers between 5 – 10
b. Produce numbers between 3 – 6
c. Produce numbers between 14 – 20
d. Produce numbers between 1 – 8
e. Produce numbers between 4 and 50
f. Produce a random amount of red and store it into variable red (using an assignment
statement).
1 2
3 4

Chapter 2: Beginning Game Programming
28
g. Produce a random amount of blue and store it into variable blue (using an assignment
statement).
h. Produce a random amount of green and store it into variable green (using an
assignment statement).
i. Create an integer variable color and set it equal to a color combining the red, green
and blue values you created in questions f, g and h.
j. Produce a random x coordinate and store it in an integer variable x for a screen in an
800x600 resolution.
k. Produce a random x coordinate and store it in an integer variable x for a screen in an
1280x1024 resolution.
l. Produce a random y coordinate and store it in an integer variable y for a screen in an
800x600 resolution.
m. Produce a random y coordinate and store it in an integer variable y for a screen in an
1280x1024 resolution.
Projects
1. Create a “line explosion” program, similar to our pixel explosion program, only instead of
drawing random pixels, you will draw random lines. (Hint: lines take different information to be
drawn than pixels. Make sure you declare and randomly generate all the values a line function
requires.)
2. Create a “rectangle explosion” program, similar to our pixel explosion program, only instead of
drawing random pixels, you will draw random rectangles.
3. Create a “circle explosion” program, similar to our pixel explosion program, only instead of
drawing random pixels, you will draw random circles.
4. Create a “triangle explosion” program, similar to our pixel explosion program, only instead of
drawing random pixels, you will draw random triangles.
5. Combine all the draw function we know (pixels, lines, rectangles, circles and triangles) and
create an image on the screen. (Hint: you do not want anything to be random in this program).

29
This chapter deals with everything you need to know about keyboard and mouse input. T
discusses how to read key presses from the keyboard and track movement and button presses for the
mouse.
Etcha Sketcha: The Beginning
We will begin to look at key presses from the keyboard. I think the best way to learn about the
keyboard and mouse is to develop a project that uses them. Our starting point will be a simple program
that draws a single pixel onto the screen (shown below).
following code.
This should be a review so I am not going to discuss how the program works or what each line is
accomplishing. If you need help with this program I suggest you re
perhaps read chapter 2 of the book (for those of you who skip
you!).
Chapter 3: Input This chapter deals with everything you need to know about keyboard and mouse input. T
discusses how to read key presses from the keyboard and track movement and button presses for the
: The Beginning
We will begin to look at key presses from the keyboard. I think the best way to learn about the
mouse is to develop a project that uses them. Our starting point will be a simple program
that draws a single pixel onto the screen (shown below). You should create a new project and add the
This should be a review so I am not going to discuss how the program works or what each line is
accomplishing. If you need help with this program I suggest you re-read chapter 2 of the book, or
chapter 2 of the book (for those of you who skipped it completely, yeah, I’m talking to
Chapter 3: Input
This chapter deals with everything you need to know about keyboard and mouse input. That is, it
discusses how to read key presses from the keyboard and track movement and button presses for the
We will begin to look at key presses from the keyboard. I think the best way to learn about the
mouse is to develop a project that uses them. Our starting point will be a simple program
You should create a new project and add the
This should be a review so I am not going to discuss how the program works or what each line is
read chapter 2 of the book, or
ped it completely, yeah, I’m talking to

30
Etcha Sketcha: Adding Variables
I am calling this project “Etcha Sketcha” because it is going to make our computer screen act like an
etcha sketch (that toy you may have played with when growing up). The fi
project is to add variables for the location of the pixel. Recall that a variable is some piece of data that
changes, and we certainly want the location of our pixel to be able to change because we are going to
be moving it all over the screen. Look at the code listing below to see the changes (which I have
highlighted for your convenience, aren’t I nice? Don’t answer that.).
Now, compile and run the project. Ah, isn’t that nice, nothing has changed. I
seeing no result, don’t you? Unfortunately you need to get used to it, it is pretty common that you have
to add a lot of code to an existing project before you will “see” any changes.
lines and see what had changed, as far as the code is concerned at least.
Etcha Sketcha: Adding Variables
I am calling this project “Etcha Sketcha” because it is going to make our computer screen act like an
etcha sketch (that toy you may have played with when growing up). The first step to creating this
project is to add variables for the location of the pixel. Recall that a variable is some piece of data that
, and we certainly want the location of our pixel to be able to change because we are going to
ver the screen. Look at the code listing below to see the changes (which I have
highlighted for your convenience, aren’t I nice? Don’t answer that.).
Now, compile and run the project. Ah, isn’t that nice, nothing has changed. I love doing some work and
seeing no result, don’t you? Unfortunately you need to get used to it, it is pretty common that you have
to add a lot of code to an existing project before you will “see” any changes. Let’s take a look at the new
at had changed, as far as the code is concerned at least.
Chapter 3: Input
I am calling this project “Etcha Sketcha” because it is going to make our computer screen act like an
rst step to creating this
project is to add variables for the location of the pixel. Recall that a variable is some piece of data that
, and we certainly want the location of our pixel to be able to change because we are going to
ver the screen. Look at the code listing below to see the changes (which I have
love doing some work and
seeing no result, don’t you? Unfortunately you need to get used to it, it is pretty common that you have
Let’s take a look at the new

Chapter 3: Input
31
Lines 5 and 6
int x;
int y;
You should recognize these two lines as being variable declarations. Here I have created two variables
named x and y respectively that can each hold a single integer value. It should be noted, as it very
important, that these variables currently hold some unknown integer (usually a very large positive or
negative number). You can only use these variables after they have been initialized using an assignment
statement (a statement using the = sign). I have named these two variables x and y because they will
hold the current x and y position of my pixel on the screen.
Lines 21 and 22
x = 50;
y = 50;
These two lines initialize variables x and y to each hold the integer value of 50. Now that these variables
have been initialized (given a start value) I can use them. In other words, everywhere you see the
variable names x and y, the computer sees the value 50.
Line 25
putpixel(screen, x, y, makecol(255,255,255));
The only change in this line is the removal of the value 50 and the inclusion of variables x and y.
Remember that I set variables x and y to each hold the value 50, so in actuality I have changed nothing,
which is why you see no changes when the program runs. However, by putting variables for putpixel’s
location I am able to change where the pixel is drawn by simply changing the values of x and y. If I had
left it at 50, 50 it would always be 50, 50.

Chapter 3: Input
32
Etcha Sketcha: Understanding Directional Movement
Before we can move our pixel around on the screen we need to have a complete understanding of the
screens coordinate system. Remember this figure from chapter 2 (I sure hope so):
In chapter 2 we talked about the screen coordinate system and how important it is to remember that it
differs from the coordinate system we are so used to from our studies in math. Below is a nifty little
diagram (yea, I said nifty, don’t judge me!!) to help you learn and remember how movement will work
on the computer screen. Remember that movement will always be in terms of an x, y position.
x-axis
y-axis
0,0 SCREEN_W,0
0,SCREEN_H SCREEN_W,SCREEN_H
SCREEN_W/2,SCREEN_H/2
x-axis
y-axis
Negative y
direction
Positive y
direction
Positive x
direction
Negative x
direction

Chapter 3: Input
33
Etcha Sketcha: Reading Key Presses
We briefly discussed reading key presses in Chapter 2 but we are going to make extensive use of reading
key presses in this project. Recall that each key has the following code association with it:
KEY_A - KEY_Z,
KEY_0 - KEY_9,
KEY_0_PAD - KEY_9_PAD,
KEY_F1 - KEY_F12,
KEY_ESC, KEY_TILDE, KEY_MINUS, KEY_EQUALS,
KEY_BACKSPACE, KEY_TAB, KEY_OPENBRACE, KEY_CLOSEBRACE,
KEY_ENTER, KEY_COLON, KEY_QUOTE, KEY_BACKSLASH,
KEY_BACKSLASH2, KEY_COMMA, KEY_STOP, KEY_SLASH,
KEY_SPACE,
KEY_INSERT, KEY_DEL, KEY_HOME, KEY_END, KEY_PGUP,
KEY_PGDN, KEY_LEFT, KEY_RIGHT, KEY_UP, KEY_DOWN,
KEY_SLASH_PAD, KEY_ASTERISK, KEY_MINUS_PAD,
KEY_PLUS_PAD, KEY_DEL_PAD, KEY_ENTER_PAD,
KEY_PRTSCR, KEY_PAUSE,
KEY_ABNT_C1, KEY_YEN, KEY_KANA, KEY_CONVERT, KEY_NOCONVERT,
KEY_AT, KEY_CIRCUMFLEX, KEY_COLON2, KEY_KANJI,
KEY_LSHIFT, KEY_RSHIFT,
KEY_LCONTROL, KEY_RCONTROL,
KEY_ALT, KEY_ALTGR,
KEY_LWIN, KEY_RWIN, KEY_MENU,
KEY_SCRLOCK, KEY_NUMLOCK, KEY_CAPSLOCK
KEY_EQUALS_PAD, KEY_BACKQUOTE, KEY_SEMICOLON, KEY_COMMAND
To check for key presses all we have to do is make use of an if statement (discussed in detail in Chapter
2). Look at the code below for a template:
if(key[KEY_UP])
{
//code to run if the up arrow is pressed
}
Check to see if the
up arrow key is
being pressed
Execute the body
if the condition of
the if is true

Chapter 3: Input
34
Now, let’s take a look at what we do for our etcha sketcha program when certain keys are being
pressed. I am going to use the arrow keys to move the pixel around on the screen but you can easily
choose your own keys and type their corresponding key code (see the table of key codes above). Now,
what do we want to actually do if the up, down, left and right key are being pressed? In order to answer
this question we need to know what direction the pixel should move when certain keys are being
pressed. Looking at the figure on page 31 I have come up with the following ifs.
if (key[KEY_UP]) //if the up key is being pressed
{
y--; //remove one from the y value (upwards movement)
}
if (key[KEY_DOWN]) //if the down key is being pressed
{
y++; //add one to the y value (downwards movement)
}
if (key[KEY_LEFT]) //if the left key is being pressed
{
x--; //remove one from the x value (left movement)
}
if (key[KEY_RIGHT]) //if the right key is being pressed
{
x++; //add one to the x value (right movement)
}
The pixel is being drawn at location x, y (which are variables). The above code changes the values of x
and y when certain keys are being pressed, which in turn changes the location the pixel is being drawn
at. The result is that the pixel moves around the screen when the arrow keys are being pressed. There is
one last line that we need for this program to work. The line is:
rest(5);
This statement tells the computer to slow down and rest for 5 microseconds before continuing on with
the program. If we do not include this line the program will run so fast that we will not get the intended
results. You need to remember that computers execute thousands upon thousands of statements a
second! What does that mean to you? Well, it means that every time you hit the up arrow, for example,
the computer reads that key press hundreds of times. The result is that your pixel will “shoot” off the
screen with a single key press unless you tell the computer to slow down. Go ahead and omit this line
from your program and you will see exactly what I am talking about. It should also be noted that you can
change the number inside the parenthesis of the rest command. Larger numbers mean a longer rest but
never put this value too high or negative; you will end up with a program that doesn’t do anything for a
very long time. Below is the complete code listing for the modified etcha sketcha program.

Chapter 3: Input
35
Chapter 3: Input
36
Notice that the code to check for key presses as well as the rest statement is all put inside the while
loop. The while loop is the structure that is responsible for keeping our game window up and running.
All the code for the game must eventually find its way inside the while loop.
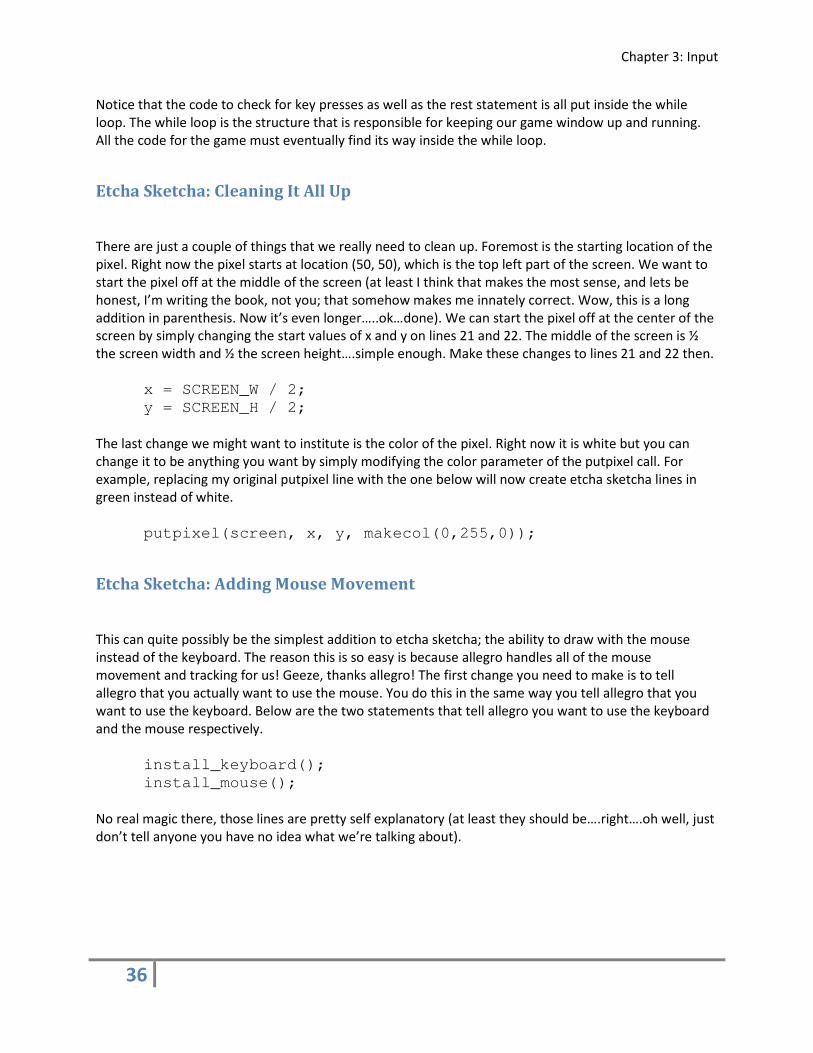
Etcha Sketcha: Cleaning It All Up
There are just a couple of things that we really need to clean up. Foremost is the starting location of the
pixel. Right now the pixel starts at location (50, 50), which is the top left part of the screen. We want to
start the pixel off at the middle of the screen (at least I think that makes the most sense, and lets be
honest, I’m writing the book, not you; that somehow makes me innately correct. Wow, this is a long
addition in parenthesis. Now it’s even longer…..ok…done). We can start the pixel off at the center of the
screen by simply changing the start values of x and y on lines 21 and 22. The middle of the screen is ½
the screen width and ½ the screen height….simple enough. Make these changes to lines 21 and 22 then.
x = SCREEN_W / 2;
y = SCREEN_H / 2;
The last change we might want to institute is the color of the pixel. Right now it is white but you can
change it to be anything you want by simply modifying the color parameter of the putpixel call. For
example, replacing my original putpixel line with the one below will now create etcha sketcha lines in
green instead of white.
putpixel(screen, x, y, makecol(0,255,0));
Etcha Sketcha: Adding Mouse Movement
This can quite possibly be the simplest addition to etcha sketcha; the ability to draw with the mouse
instead of the keyboard. The reason this is so easy is because allegro handles all of the mouse
movement and tracking for us! Geeze, thanks allegro! The first change you need to make is to tell
allegro that you actually want to use the mouse. You do this in the same way you tell allegro that you
want to use the keyboard. Below are the two statements that tell allegro you want to use the keyboard
and the mouse respectively.
install_keyboard();
install_mouse();
No real magic there, those lines are pretty self explanatory (at least they should be….right….oh well, just
don’t tell anyone you have no idea what we’re talking about).

Chapter 3: Input
37
Now that we have installed the mouse, which tells allegro we want to use it, allegro begins to track and
poll the mouse for movement and button presses. Allegro gives us two variables that conveniently tell
us where the mouse pointer is at any given time, they are:
mouse_x
mouse_y
Pretty easy, right? Now, all we have to do is draw the pixel at mouse_x and mouse_y and that little pixel
will follow our mouse wherever it goes……cool.
putpixel(screen, mouse_x, mouse_y, makecol(0,255,0));
Exercises and Programming Projects
Exercises
1. If a graphic or primitive is moving up the screen, what direction is it moving (with respect to x,y).
2. If a graphic or primitive is moving down the screen, what direction is it moving (with respect to x,y).
3. If a graphic or primitive is moving right on the screen, what direction is it moving (with respect to
x,y).
4. If a graphic or primitive is moving left on the screen, what direction is it moving (with respect to
x,y).
5. If a graphic or primitive is moving left and up on the screen, what direction is it moving (with
respect to x,y).
6. If a graphic or primitive is moving left and down on the screen, what direction is it moving (with
respect to x,y).
7. If a graphic or primitive is moving right and up on the screen, what direction is it moving (with
respect to x,y).
8. If a graphic or primitive is moving right and down on the screen, what direction is it moving (with
respect to x,y).
9. Write an if statement to check if the space bar is being pressed.
10. Write an if statement to check if the w key is being pressed.
11. Write an if statement to check if the up arrow is being pressed.
12. Write an if statement to check if the 8 on the numpad is being pressed.
13. Write the code necessary to subtract one from a variable named x.
14. Write the code necessary to add one to a variable named y.
15. Write the code necessary to subtract one from a variable named health.
16. Write the code necessary to add one to a variable named score.
17. What statement allows us to “slow” our games down? Explain how it works.
18. Write the C++ statement that readies the mouse for input.
19. What two constants does allegro provide us for the location of the mouse at all times?
20. What is the key code for the left shift key?
21. What is the key code for the spacebar?
22. What is the key code for up arrow in the numpad?
23. What is the key code for the right control key?
Projects

Chapter 3: Input
38
1. Complete the etcha sketcha program with mouse movement. Allow the user to change the color of
the pixel by pressing keys on the keyboard. If the ‘R’ key is pressed the pixel should change to red,
‘B’ to blue, ‘G’ to green and finally ‘W’ to white. (hint: create a color variable that will store the
current color being used).
2. Modify the etcha sketcha program to allow the user to change brush type and color. The following
is a set of keys that should be implemented as input:
P: change brush to a pixel
R: change brush to a rectangle
C: change brush to a circle
T: change brush to a triangle
R: change brush color to red
B: change brush color to blue
G: change brush color to green
W: change brush color to white
L: change brush color to black
You may also implement any other colors or brush types you want, be creative!

Chapter 4: Bitmaps
39
Chapter 4: Bitmaps
What is a Bitmap?
A bitmap in the simplest terms is a picture. There are many file formats that pictures can be stored in,
including the more popular file formats of JPEG, PNG and GIF. However, allegro cannot use these more
popular file formats. Instead, allegro uses the BMP (Bitmap) file format. That means anytime you want
to place an image in your game, whether it be a background or an avatar, it needs to be in the .bmp file
format. Gimpshop is able to convert any image you want into the bmp file format, so we don’t need to
be worried that we cannot use certain images, we just need to convert them to the proper file format.
Creating, Loading and Displaying a Bitmap
In order to put a bitmap on the screen we need to first declare a bitmap variable (a variable which can
hold a bitmap picture), then load the picture into that variable, and finally display that picture on our
game window. First let’s talk about how to declare a bitmap variable. Bitmap variables are declared like
any other variable, with a type and a name. The type in this case is BITMAP and the name can be any
valid identifier you want. Let’s look at an example of a bitmap variable declaration:
BITMAP *wizard;
Above, is a bitmap variable named wizard. Notice the star or asterisk that precedes the variable
name. This asterisk is required and tells C++ that this variable is a pointer to an image. Pointers are a
complex topic in programming, so for now just understand that you need the asterisk before your
variable name for all bitmap variables. After declaring a bitmap variable we can load a bitmap image
into it. It is very important to know that there is no image currently in wizard. If we attempted to use
this variable now, like if we attempted to place the wizard variable’s image on the screen, it would
crash our entire program. This is a common error with new programmers. Make sure that you ALWAYS
load a picture into a bitmap variable BEFORE you attempt to use it.
Now we are ready to load an image into the wizard variable. First thing we need is a bitmap image.
This is a book on programming, not image creation. If you want to create your own image or convert an
image to bmp format you can google search how to do that. I will be using an image you can find at
http://mrmcelrea.com/ComputerScience/Game%20Programming/Sprites/wizard.bmp. You can use this
image if you want. Finally, you MUST make sure that your bmp image you are going to load is in the
same folder as your .cpp file; it will not load if you do otherwise. Below is the code to load an image into
a bitmap variable. The code includes some lines to check to make sure the picture loaded correctly. It is
always a good idea when you load pictures, sounds, fonts or anything from outside the program to
check to make sure that it gets imported into the game correctly. In this case, if the picture is not
loaded correctly then an error message is displayed saying “could not load the wizard image” and the
game is exited.

Chapter 4: Bitmaps
40
wizard = load_bitmap(“wizard.bmp”, NULL);
if (wizard == NULL)
{
allegro_message(“could not load the wizard image”);
allegro_exit();
}
Ok, we created and loaded our bitmap. The last thing to do is tell C++ to display our bmp image on the
game window. Allegro will put the image on the screen for us, all we have to do is tell allegro where we
want to place it. Below is the line of code which will display the wizard image onto the screen at (500,
500).
draw_sprite(screen, wizard, 500, 500);
That is how you put an image on the screen from creating to loading to displaying. A complete program
that displays the wizard image follows:
#include <allegro.h> 1 2 int main() 3 { 4 BITMAP *wizard; 5 6 allegro_init(); 7 install_keyboard(); 8 9 set_color_depth(16); 10 int ret = set_gfx_mode(GFX_AUTODETECT_FULLSCREEN, 1280, 1024, 0, 0); 11 if (ret != 0) 12 { 13 allegro_message("could not set video mode"); 14 allegro_exit(); 15 return 1; 16 } 17 18 wizard = load_bitmap("wizard.bmp", NULL); 19 if (wizard == NULL) 20 { 21 allegro_message("could not load the wizard image"); 22 allegro_exit(); 23 } 24 25 while (!key[KEY_ESC]) 26 { 27 draw_sprite(screen, wizard, 500, 500); 28 } 29 30 allegro_exit(); 31 return 1; 32 } 33
The name of the file. It
must be in the same
directory as your .cpp file.
This if
checks to
make sure
the image
was loaded
correctly
Chapter 4: Bitmaps
41
END_OF_MAIN(); 34
Adding Movement to our Bitmap
Adding the abililty to move our bitmap around the screen is no different from adding the ability to move
a pixel around the screen (which we did in chapter 3). We just need to create an x and y variable for the
position of the wizard. We create these variables at the very beginning of function main, right below
our wizard bitmap variable declaration. Let’s start the position of the wizard off at (500,500).
double wizardX = 500;
double wizardY = 500;
Notice that I declared wizardX and wizardY as doubles, that is, they hold decimal values. Decimal
values result in much smoother movement. Now, we just need to change the draw_sprite
instruction to draw the wizard not at (500, 500) but at (wizardX, wizardY). This gives us the
ability to change wizardX and wizardY, which would change his location on the screen.
draw_sprite(screen, wizard, wizardX, wizardY);
If you run the program now, nothing has changed. However, we can now add the ability to change the
values of wizardX and wizardY with key presses, thereby moving the wizard around on the
screen. We will use the arrow keys to move the wizard around on the screen. This code needs to be
added inside the main while loop, that way it runs every time the game updates. You should probably
put it before the wizard is drawn to the screen. I am changing the wizards position by 0.8 per key press.
You may need to increase or decrease this value depending upon you preferences.
if (key[KEY_UP])
{
wizardY-=0.8;
}
if (key[KEY_DOWN])
{
wizardY+=0.8;
}
if (key[KEY_LEFT])
{
wizardX-=0.8;
}
if (key[KEY_RIGHT])
{
wizardX+=0.8;
}
Now if you run the program you can move the wizard around! But you will notice that the wizard leaves
a trail everytime you move him, not exactly the effect we want. The solution is called buffering and is
covered in the next section. The complete program listing for wizard movement is shown below (I also
added a rest so the wizard moves a little slower):

Chapter 4: Bitmaps
42
#include <allegro.h> 1 2 int main() 3 { 4 BITMAP *wizard; 5 int wizardX = 500; 6 int wizardY = 500; 7 8 allegro_init(); 9 install_keyboard(); 10 11 set_color_depth(16); 12 int ret = set_gfx_mode(GFX_AUTODETECT_FULLSCREEN, 1280, 1024, 0, 0); 13 if (ret != 0) 14 { 15 allegro_message("could not set video mode"); 16 allegro_exit(); 17 return 1; 18 } 19 20 wizard = load_bitmap("wizard.bmp", NULL); 21 if (wizard == NULL) 22 { 23 allegro_message("could not load the wizard image"); 24 allegro_exit(); 25 } 26 27 while (!key[KEY_ESC]) 28 { 29 if (key[KEY_UP]) 30 { 31 wizardY--; 32 } 33 if (key[KEY_DOWN]) 34 { 35 wizardY++; 36 } 37 if (key[KEY_LEFT]) 38 { 39 wizardX--; 40 } 41 if (key[KEY_RIGHT]) 42 { 43 wizardX++; 44 } 45 46 draw_sprite(screen, wizard, wizardX, wizardY); 47 rest(10); 48 } 49 50 allegro_exit(); 51 return 1; 52 } 53 END_OF_MAIN(); 54
Using a buffer
To remove the trace effect our wizard has and to improve the overall appearance of graphics on the
screen, game programmers use what is called a buffer. A buffer is a virtual screen inside the game that

Chapter 4: Bitmaps
43
everything is drawn to, which in turn is simply placed onto the screen. This means that everything we
draw, whether it is a graphic primitive or a bitmap will be drawn to the buffer, not the screen. After we
have drawn everything to the buffer we then draw the buffer to the screen. This results in a single draw
to the screen instead of multiple draws which can cause some graphic anomalies. To do this we create a
bitmap image named buffer to be the same size as the size of our screen (shown below):
BITMAP *buffer = create_bitmap(SCREEN_W, SCREEN_W);
We just have to make sure that we create this buffer AFTER we create our window, so that allegro and
C++ know the screen width (SCREEN_W) and the screen height (SCREEN_H) of our game window.
Finally, we draw everything to the buffer instead of to the screen. Then we draw the buffer to the
screen and finally erase the buffer to that it is ready to be drawn on again.
draw_sprite(buffer, wizard, wizardX, wizardY);
draw_sprite(screen, buffer, 0, 0);
clear_bitmap(buffer);
Notice that we draw the buffer to the screen at (0,0). When you draw a bitmap to the screen the (x,y)
location you provide to allegro is where you want the top left corner of you image to be (not like most
new programmers think……it is not where you want the middle of the image to be). We place our buffer
at (0,0) because we want the top left corner of our buffer to be exactly at the top left corner of our
screen.
The complete program listing for buffering the wizard movement can be seen below:
#include <allegro.h> 1 2 int main() 3 { 4 BITMAP *wizard; 5 double wizardX = 500; 6 double wizardY = 500; 7 8 allegro_init(); 9 install_keyboard(); 10 11 set_color_depth(16); 12 int ret = set_gfx_mode(GFX_AUTODETECT_FULLSCREEN, 1280, 1024, 0, 0); 13 if (ret != 0) 14 { 15 allegro_message("could not set video mode"); 16 allegro_exit(); 17
Draw the wizard to the buffer, not the
screen.
Put the buffer onto the screen. This will
always be the last draw you do, no other
draws can come after this.
Finally erase the buffer so that we can
draw to it again.

Chapter 4: Bitmaps
44
return 1; 18 } 19 20 BITMAP *buffer = create_bitmap(SCREEN_W, SCREEN_H); 21 22 wizard = load_bitmap("wizard.bmp", NULL); 23 if (wizard == NULL) 24 { 25 allegro_message("could not load the wizard image"); 26 allegro_exit(); 27 } 28 29 while (!key[KEY_ESC]) 30 { 31 if (key[KEY_UP]) 32 { 33 wizardY-=0.8; 34 } 35 if (key[KEY_DOWN]) 36 { 37 wizardY+=0.8; 38 } 39 if (key[KEY_LEFT]) 40 { 41 wizardX-=0.8; 42 } 43 if (key[KEY_RIGHT]) 44 { 45 wizardX+=0.8; 46 } 47 48 draw_sprite(buffer, wizard, wizardX, wizardY); 49 draw_sprite(screen, buffer, 0, 0); 50 clear_bitmap(buffer); 51 } 52 53 allegro_exit(); 54 return 1; 55 } 56 END_OF_MAIN(); 57
Exercises and Programming Projects
Exercises
1. The JPEG file format is what most digital cameras save picture in. However, we cannot load the
JPEG file format with allegro. What picture format does allegro support?
2. Write the line of code necessary to declare a bitmap variable named warrior.
3. Write the line of code necessary to declare a bitmap variable named car.
4. Write the line of code necessary to declare a bitmap variable named skeleton.
5. Write the block of code necessary to load a bitmap variable named warrior from the file “war.bmp”.
Write an if to make sure the bitmap loaded successfully, if not then display an error message and
exit allegro.

Chapter 4: Bitmaps
45
6. Write the block of code necessary to load a bitmap variable named car from the file “car.bmp”.
Write an if to make sure the bitmap loaded successfully, if not then display an error message and
exit allegro.
7. Write the block of code necessary to load a bitmap variable named skeleton from the file
“skelly.bmp”. Write an if to make sure the bitmap loaded successfully, if not then display an error
message and exit allegro.
8. Write the line of code necessary to draw a bitmap named warrior to the screen.
9. Write the line of code necessary to draw a bitmap named car to the screen.
10. Write the line of code necessary to draw a bitmap named skeleton to the screen.
11. Describe what buffering is. Use the Internet and define double-buffering vs. triple buffering. What
are the advantages/disadvantages to using one over the other.
12. Declare a buffer and initialize it so that it is the same size as the screen.
13. Write the line of code necessary to draw a bitmap named warrior to the buffer.
14. Write the line of code necessary to draw a bitmap named car to the buffer.
15. Write the line of code necessary to draw a bitmap named skeleton to the buffer.
16. Write the line of code necessary to draw the buffer to the screen. Why do we draw the buffer at
location (0, 0). Will we ever change where we draw the buffer, and why?
17. Write the line of code necessary to erase the buffer image.
Projects
1. Create or obtain a picture of a car in bmp file format. Create, load and draw the car to the screen
using a buffer so that it can be moved with the W,A,S,D keys.
2. Create a project that creates loads and draws two different images to the screen using a buffer.
Make one image moveable with the W,A,S,D keys and make the other moveable with the arrow
keys. What happens when the two bitmaps collide? Which one goes on top of the other and why?

Chapter 4: Bitmaps
46
Appendix A: Crossword Puzzles

Appendix A: Crossword Puzzles
47

Appendix A: Crossword Puzzles
48

Appendix A: Crossword Puzzles
49

Appendix A: Crossword Puzzles
50
Appendix B: Reading Guides

Appendix B: Reading Guides
51
Chapter 2
3-Level Reading Guide
a. Literal level: Read the Lines. This information can be found in the text.
1. What is a pixel?
2. What is debugging? Why is it so important?
3. Describe what a comment is and its uses.
4. Where does every C++ program start execution?
5. Describe what screen resolution is.
6. What are variables?
7. What two things are required for variable declarations?
8. What is an assignment statement? How does it work?
9. What is a condition?
10. What does RGB stand for?
11. What data type does the computer use to store color?
12. List the types of primitives we can draw in allegro.
b. Interpretive Level: Read Between the Lines. Not only what is said, but what it means.
1. Why do projects have to be compiled before run? What does the compilation process
result in?
2. How many main functions can a single program have? Support your answer.
3. What are arguments to functions?
4. What are some examples of data we can store as integers? (Hint: think of video games,
web pages, desktop applications. What sorts of data do these programs keep track of?).
5. What might some common mistakes be when declaring variables?
6. Conditions are used with either relational or equality operators. List all the relational and
equality operators (Hint: there should be a total of 6).
7. Explain loops in programming. What types of instructions may we want to loop (think
about game programming)?
8. Besides randomly creating a color or x,y location with random number generation. What
data may game programmers want to randomly generate?
c. Applied Level: Beyond the Lines. Not explicitly discussed or mentioned in the text.
i. There are three types of programming errors: (1)syntax, (2)logic and (3)run-time. List and
describe the characteristics of each error type.
ii. You will encounter the word “function” several times during the reading. Functions in
programming work much like functions in math. Research and describe how functions
work in programming. It may be a good idea to brush up on your what functions are in
math first.
iii. Find and list some common resolutions for the following devices: desktop displays, laptop
displays, cell phone displays, iPods.
iv. If statements can be used for simple artificial intelligence (AI) in games. List some ways an
if can be used in games to give the perception of intelligence.
v. The percent symbol (%) in programming is used to represent the modulus operator.
Research the modulus operator and explain how it works.
![C프로그래밍-chap00.ppt [호환 모드]mercury.hau.ac.kr/sjkwon/Lecture/cprogram/C프로그래밍-chap00.pdf · Perfect C 강의계획서 ¾각장과제물(단순 copy는영점처리)](https://img.pdfslide.tips/doc/110x75/5e0499d2a8c668052709697d/ceoeeee-eeoemercuryhauackrsjkwonlecturecprogramceoeeee-chap00pdf.jpg)