Embed Size (px)
Citation preview

HUAWEI SmartAX MT880a Router 1E
InternetBroadband
C
M
Y
CM
MY
CY
CMY
K

1
คําแนะนําในการติดตั้ง
ขั้นตอนการติดต้ัง ดังน้ี A การติดต้ังอุปกรณ Router (หนาท่ี 1-5) B การต้ังคาการดแลน (หนาท่ี 6-12) B.1 สําหรับผูใช Windows XP B.2 สําหรับผูใช Windows Vista C การตรวจสอบการต้ังคาเน็ตเวิรค (หนาท่ี 13-14) D การเขาสูเครือขายผานซอฟทแวร Embedded PPP Dial-Up สําหรับ MT880a (หนาท่ี 15-16)
A การติดตั้งอุปกรณ Router คุณสามารถเช่ือมตอสายไดดังรูปท่ี (1). 1. 0Bเช่ือมตอพอรต ADSL ของ Router กับพอรต MODEM ของ Splitter โดยการใชสายโทรศัพท
2. 1Bเช่ือมตอพอรต LINE ของ splitter
กับสายโทรศัพทท่ีตอมาจากชองตอโทรศัพทท่ีผนังหรือตลับแยกสาย
3. 2Bเช่ือมตอพอรต LAN ของ Router กับพอรต Ethernet/LAN ของคอมพิวเตอร โดยใชสาย LAN
4. 3Bเช่ือมตอหมอแปลงไฟฟาเขากับอุปกรณ Router
และปลายอีกดานหน่ึงของหมอแปลงตอเขากับเตาเสียบไฟ AC

2
รูปท่ี (1)
(1) แจ็คโทรศัพท (2) สายโทรศัพท RJ-11 (3) Splitter
(4) สายโทรศัพท RJ-11 (5) โทรศัพท (6) สายโทรศัพท RJ-11
(7) สาย Ethernet RJ-45 (8) คอมพิวเตอร (9) เตาเสียบไฟ AC
(10) หมอแปลงไฟฟา (11) ADSL Router MT880a

3
ลักษณะดานหลังของ Router
รูปท่ี (2)
POWER พอรต POWER; เช่ือมตอกับหมอแปลงไฟฟา
LAN LAN พอรต; เช่ือมตอกับพอรต Ethernet ในคอมพิวเตอร Ethernet hub
RESET กดปุมนี้คางไวเพื่อใหโมเด็มคืนคามาตรฐานจากโรงงาน การรีเซ็ทจะทําการลบขอมูลที่ต้ังคาทั้งหมดไปดวย
ADSL พอรต ADSL เช่ือมตอเขากับพอรตโมเด็มของ Splitter

4
ลักษณะดานบนของ Router
รูปท่ี (3)
ปุม Power; กดที่ปุมนี้เพื่อ เปด/ปดเครื่อง MT880a

5
สถานะหลอดไฟ LEDs
รูปท่ี (4)
ตารางอธิบายความหมายของหลอดไฟ LEDs
ตารางท่ี (1) ความหมายของ LEDs
ชื่อ สถานะ ความหมาย
POWER เปด The MT880a เปดเคร่ืองอยู
ปด The MT880a ปดเคร่ืองอยู
ADSL
กระพริบ The MT880a กําลังถูกเปดใชงาน
เปด The MT880a เปดใชงานอยู
ปด The MT880a ปดการใชงานอยู
LAN
กระพริบ มีการสงผานขอมูลอยูผาน Ethernet Interface
เปด Ethernet เชื่อมตอเรียบรอยแลว
ปด The Ethernet ไมไดถูกเชื่อมตออยู

6
B การตั้งคาการดแลน
B.1 สําหรับผูใช Windows XP
1. 4Bคลิก start > Settings > Control Panel
2. 5Bดับเบิ้ลคลิกท่ี Network Connections
รูปท่ี (5)
3. 6Bดับเบิ้ลคลิกท่ี Local Area Connection
รูปท่ี (6)
4. 7Bคลิกเลือกท่ี Properties
รูปท่ี (7)

7
5. เลือกไปท่ี Internet Protocol (TCP/IP) คลิกไปท่ี Properties
รูปท่ี (8)
6. 9Bท่ีแท็บ General คลิกเลือกท่ี Obtain an IP address automatically และ Obtain DNS server
address automatically แลวคลิก OK
รูปท่ี (9)

8
7. 10Bตรวจสอบการต้ังคาเน็ตเวิรคของคอมพิวเตอร โดยคลิก start > Settings > Network Connections
> Local Area Connection
8. 11Bเลือกแท็บ Support เพื่อดู IP address ของคอมพิวเตอร คา IP address
ท่ีถูกตองจะตองแสดงคาระหวางชวง 192.168.1.2 – 192.168.1.254 จึงสามารถมั่นใจไดวา
จะทําการติดต้ังซีดีรอมตอไปได
รูปท่ี (10)
B.2 สําหรับผูใช Windows Vista
1. 12Bคลิกไอคอน > Settings > Control Panel
2. 13Bดับเบิ้ลคลิกท่ี Network and Sharing Center
รูปท่ี (11)

9
3. 14Bคลิกท่ี Manage network connections
รูปท่ี (12)
4. 15Bดับเบิ้ลคลิกท่ี Local Area Connection
รูปท่ี (13)
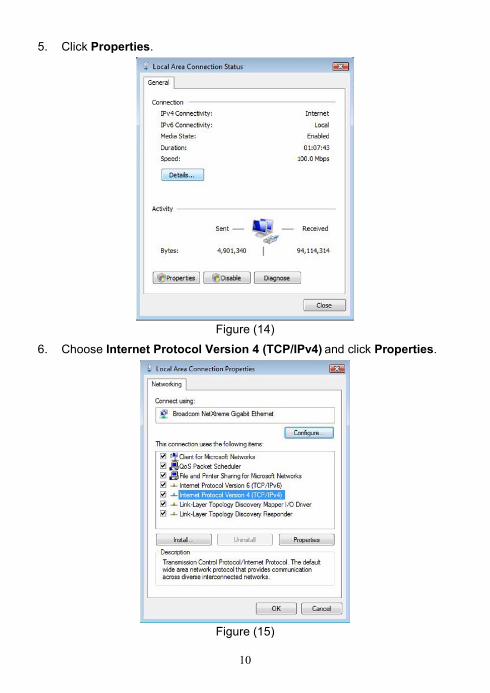
5. 16Bคลิกเลือกท่ี Properties
รูปท่ี (14)

10
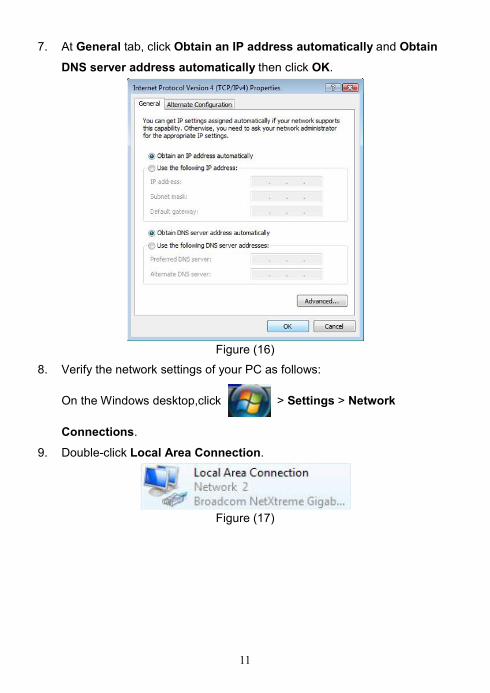
6. 17Bเลือกท่ี Internet Protocol Version 4 (TCP/IPv4) และคลิก Properties
รูปท่ี (15)
7. 18Bท่ีแท็บ General คลิกเลือกท่ี Obtain an IP address automatically และ Obtain DNS server
address automatically แลวคลิก OK
รูปท่ี (16)

11
8. 19Bตรวจสอบการต้ังคาเน็ตเวิรคของคอมพิวเตอร โดยคลิก > Settings > Network
Connections
9. 20Bดับเบิ้ลคลิกท่ี Local Area Connection
รูปท่ี (17)
10. 21Bคลิกเลือกท่ี Properties
รูปท่ี (18)

12
11. 22Bคลิกเลือกท่ี Details เพื่อดู IP address ของคอมพิวเตอร คา IP address
ท่ีถูกตองจะตองแสดงคาระหวางชวง 192.168.1.2 – 192.168.1.254 จึงสามารถมั่นใจไดวา
จะทําการติดต้ังซีดีรอมตอไปได ดังรูปท่ี (19)
รูปท่ี (19)

13
C การตรวจสอบการตั้งคาเน็ตเวิรค
วิธีการตรวจสอบการต้ังคาเน็ตเวิรคผานเว็บคอนฟก
1. 23Bใหเช่ือมตอสายเคเบิ้ลท้ังหมด และสายไฟของเครื่องแปลงไฟตามรูปท่ี (1) หนา 1
หลังจากการเช่ือมตอสายเคเบิ้ลและสายไฟเรียบรอย รอประมาณ 1-2 นาที
2. 24Bเปด Internet Explorer (IE) แลวปอนคา IP Address ของ Router คือ “192.168.1.1” ในแถบ
Address แลวกด Enter
รูปท่ี (20)
3. 25Bหนา Log on จะถูกแสดงขึ้นมา เพื่อใหใส ช่ือผูใชและรหัสผาน (Username and Password)
ช่ือผูใช (Username): admin, รหัสผาน (Password): 3bb
รูปท่ี (21)
14
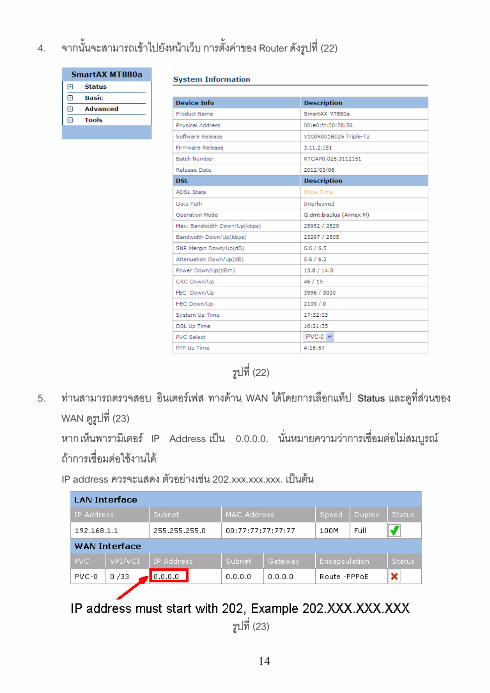
4. 27Bจากน้ันจะสามารถเขาไปยังหนาเว็บ การต้ังคาของ Router ดังรูปท่ี (22)
รูปท่ี (22)
5. ทานสามารถตรวจสอบ อินเตอรเฟส ทางดาน WAN ไดโดยการเลือกแท็ป Status และดูท่ีสวนของ
WAN ดูรูปท่ี (23)
หากเห็นพารามิเตอร IP Address เปน 0.0.0.0. น่ันหมายความวาการเช่ือมตอไมสมบูรณ
ถาการเช่ือมตอใชงานได
IP address ควรจะแสดง ตัวอยางเชน 202.xxx.xxx.xxx. เปนตน
รูปท่ี (23)
15
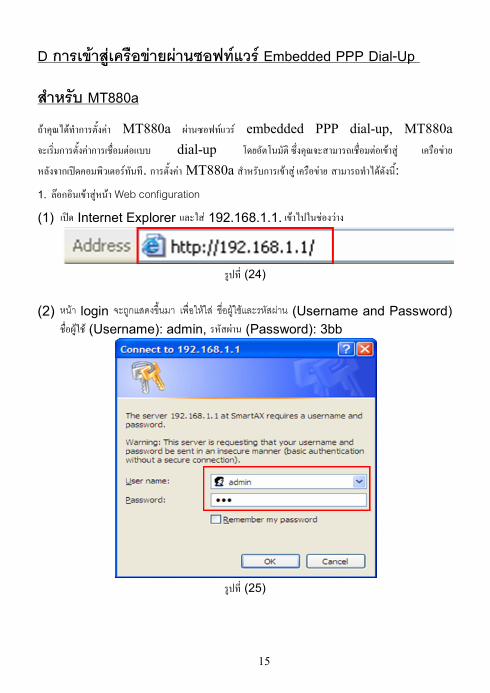
D การเขาสูเครือขายผานซอฟทแวร Embedded PPP Dial-Up
สําหรับ MT880a ถาคุณไดทําการต้ังคา MT880a ผานซอฟทแวร embedded PPP dial-up, MT880a จะเร่ิมการต้ังคาการเชื่อมตอแบบ dial-up โดยอัตโนมัติ ซึ่งคุณจะสามารถเชื่อมตอเขาสู เครือขาย หลังจากเปดคอมพิวเตอรทันที. การต้ังคา MT880a สําหรับการเขาสู เครือขาย สามารถทําไดดังน้ี:
1. ลอกอินเขาสูหนา Web configuration
(1) เปด Internet Explorer และใส 192.168.1.1. เขาไปในชองวาง
รูปท่ี (24)
(2) หนา login จะถูกแสดงข้ึนมา เพ่ือใหใส ชื่อผูใชและรหัสผาน (Username and Password)
ชื่อผูใช (Username): admin, รหัสผาน (Password): 3bb
รูปท่ี (25)
16
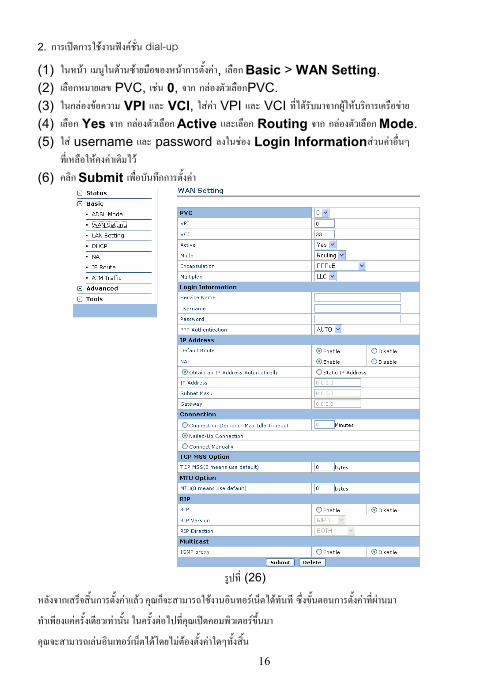
2. การเปดการใชงานฟงคชั่น dial-up
(1) ในหนา เมนูในดานซายมือของหนาการต้ังคา, เลือก Basic > WAN Setting. (2) เลือกหมายเลข PVC, เชน 0, จาก กลองตัวเลือกPVC. (3) ในกลองขอความ VPI และ VCI, ใสคา VPI และ VCI ท่ีไดรับมาจากผูใหบริการเครือขาย (4) เลือก Yes จาก กลองตัวเลือก Active และเลือก Routing จาก กลองตัวเลือก Mode. (5) ใส username และ password ลงในชอง Login Informationสวนคาอื่นๆ
ท่ีเหลือใหคงคาเดิมไว (6) คลิก Submit เพื่อบันทึกการต้ังคา
รูปท่ี (26)
หลังจากเสร็จสิ้นการต้ังคาแลว คุณก็จะสามารถใชงานอินทอรเน็ตไดทันที ซึ่งขั้นตอนการต้ังคาท่ีผานมา
ทําเพียงแคคร้ังเดียวเทาน้ัน ในคร้ังตอไปท่ีคุณเปดคอมพิวเตอรขึ้นมา
คุณจะสามารถเลนอินเทอรเน็ตไดโดยไมตองต้ังคาใดๆท้ังสิ้น

17
การแกไขปญหา (Troubleshooting) กรณีมีปญหาในการติดต้ัง ADSL Router ใหปฏิบัติดังตอไปน้ี
1. 30Bตรวจสอบการเช่ือมตอสายเคเบิ้ลและตัวแปลงไฟใหถูกตองตามรูปท่ี 1
2. 31Bตรวจสอบการต้ังคาของเครื่องคอมพิวเตอร
32B- ไดต้ังเปน “Obtain IP address automatically” จาก DNS server อางอิงการต้ังคาการดแลนในหัวขอ B
33B3. ติดตอ Call center 1530
Issue: 01 (2012-04-12)
Part Number: 96721004

1
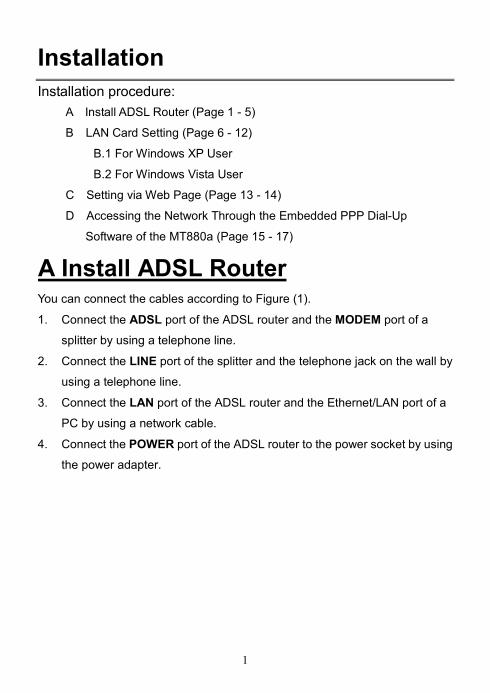
Installation Installation procedure:
A Install ADSL Router (Page 1 - 5)
B LAN Card Setting (Page 6 - 12)
B.1 For Windows XP User
B.2 For Windows Vista User
C Setting via Web Page (Page 13 - 14)
D Accessing the Network Through the Embedded PPP Dial-Up
Software of the MT880a (Page 15 - 17)
A Install ADSL Router You can connect the cables according to Figure (1).
1. Connect the ADSL port of the ADSL router and the MODEM port of a
splitter by using a telephone line.
2. Connect the LINE port of the splitter and the telephone jack on the wall by
using a telephone line.
3. Connect the LAN port of the ADSL router and the Ethernet/LAN port of a
PC by using a network cable.
4. Connect the POWER port of the ADSL router to the power socket by using
the power adapter.

2
Figure (1)
(1) Telephone jack (2) RJ-11 telephone line (3) Splitter
(4) RJ-11 telephone line (5) Telephone (6) RJ-11 telephone line
(7) RJ-45 network cable (8) PC (9) Power socket
(10) Power adapter (11) MT880a

3
Router Rear Panel
Figure (2)
POWER POWER port; connects to power adapter.
LAN LAN port; connects to the Ethernet port on your computer or an Ethernet hub.
RESET RESET button; press this button and hold to restore the Modem to its default setting. Resetting will eliminate the customized data.
ADSL ADSL port; connects to the MODEM port of the splitter.

4
Router Top Panel
Figure (3)
Power button; press this button to power on or off the MT880a.
5
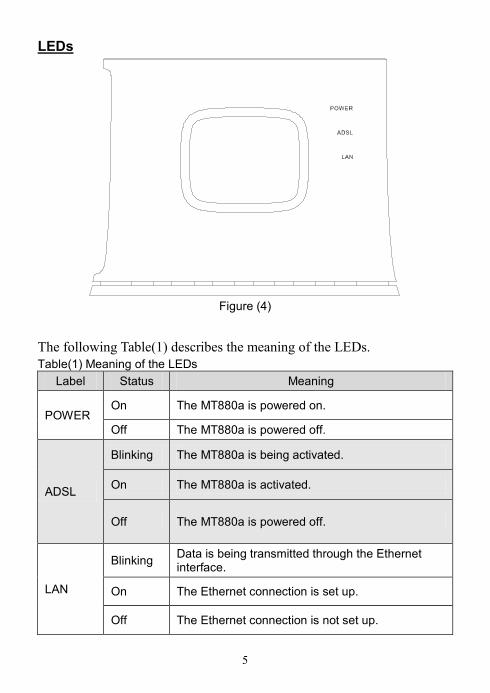
LEDs
Figure (4)
The following Table(1) describes the meaning of the LEDs. Table(1) Meaning of the LEDs
Label Status Meaning
POWER On The MT880a is powered on.
Off The MT880a is powered off.
ADSL
Blinking The MT880a is being activated.
On The MT880a is activated.
Off The MT880a is powered off.
LAN
Blinking Data is being transmitted through the Ethernet interface.
On The Ethernet connection is set up.
Off The Ethernet connection is not set up.

6
B LAN Card Setting B.1 For Windows XP User 1. Click start > Control Panel.
2. Double-click Network Connections.
Figure (5)
3. Double-click Local Area Connection.
Figure (6)
4. Click Properties.
Figure (7)
7
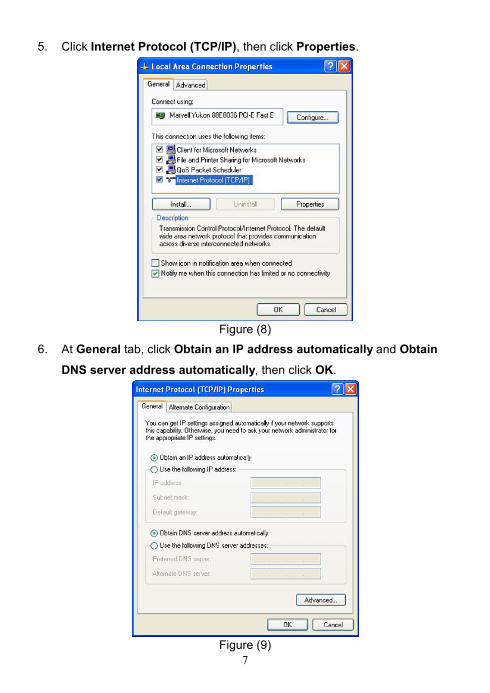
5. Click Internet Protocol (TCP/IP), then click Properties.
Figure (8)
6. At General tab, click Obtain an IP address automatically and Obtain
DNS server address automatically, then click OK.
Figure (9)

8
7. Verify the network settings of your PC as follows:
On the Windows desktop, click start > Settings > Network
Connections > Local Area Connection.
8. Choose the Support tab to view the IP address of the PC.
The correct IP address should be in the range of 192.168.1.2 –
192.168.1.254.
If the network settings are correct, you can start the installation.
Figure (10)

9
B.2 For Windows Vista User 1. Click > Settings > Control Panel.
2. Double-click Network and Sharing Center.
Figure (11)
3. Click Manage network connections.
Figure (12)
4. Double-click Local Area Connection.
Figure (13)
10
5. Click Properties.
Figure (14)
6. Choose Internet Protocol Version 4 (TCP/IPv4) and click Properties.
Figure (15)
11
7. At General tab, click Obtain an IP address automatically and Obtain
DNS server address automatically then click OK.
Figure (16)
8. Verify the network settings of your PC as follows:
On the Windows desktop,click > Settings > Network
Connections.
9. Double-click Local Area Connection.
Figure (17)

12
10. Click Properties.
Figure (18)
11. Click Details to view the IP address of the PC. The correct IP address
should be in the range of 192.168.1.2 – 192.168.1.254 as Figure (19).
Figure (19)

13
C Setting via Web Configuration
Page Web Set Up Method 1. After connecting the cables as Figure (1) page 1, run the ADSL router for
1–2 minutes.
2. Launch the Internet Explorer and enter the address 192.168.1.1.
Figure (20)
3. On the login page, enter your user name and password.
The default values are admin (user name) and 3bb (password).
Figure (21)

14
4. Then the web configuration page is displayed as shown in Figure (22).
Figure (22)
5. Verify the network settings by selecting the Status tab of the web configuration page. See Figure (23). If the IP address is 0.0.0.0, it indicates that the connection is incorrect. The correct value should be something like 202.xxx.xxx.xxx.
Figure (23)

15
D Accessing the Network Through
the Embedded PPP Dial-Up
Software of the MT880a If you configure the MT880a through the embedded PPP dial-up software, the MT880a starts to set up dial-up connection automatically after the startup. You can access the network after you power on the computer. To configure the MT880a for the network access, do as follows: 1. Log in to the Web configuration page.
(1) Launch the Internet Explorer and enter the address 192.168.1.1.
Figure (24)
(2) On the login page, enter your user name and password. The default values are admin (user name) and 3bb (password).
Figure (25)

16
2. Enable the embedded dial-up function.
(1) In the navigation tree on the left of the configuration page, choose Basic > WAN Setting.
(2) Select a PVC number, such as 0, from the PVC drop-down combo box.
(3) In the VPI and VCI text boxes, enter the VPI and VCI values that are provided by the network operator.
(4) Select Yes from the Active drop-down combo box and select Routing from the Mode drop-down combo box.
(5) Enter the username and password in the Login Information dialog box and keep the default settings of other parameters.
(6) Click Submit to save the settings.
Figure (26)

17
After you complete the preceding settings, you can surf the Internet. You need to perform the preceding operations only once. The next time when you power on the computer, you can surf the Internet without performing any configuration.
Troubleshooting If there is any problem with the ADSL router, try the following operations to fix
the problem:
1. Make sure that all the cables and the power adapter are connected properly. Refer to Figure (1).
2. Make sure that the TCP/IP settings of your PC are correct. That is, the PC is set to obtain an IP address automatically from the DNS server. Refer to topic B.
3. Contact Call center 1530.
Issue: 01 (2012-04-12)
Part Number: 96721004


![METROPOLITANA PARA SERVICIOS TESINA DE … HUAWEI SMARTAX MA5600 SERIES[17] ... DSLAM: Multiplexor Digital de Acceso a la línea digital de abonado DMT: Multitono discreto ISP:](https://img.pdfslide.tips/doc/110x75/5ae00a757f8b9a5a668d0f20/metropolitana-para-servicios-tesina-de-huawei-smartax-ma5600-series17-.jpg)


![HUAWEI HUAWEI P smart Pure Smart HUAWEI FullView …€¦ · HUAWEI HUAWEI P smart Pure Smart HUAWEI FullView Display a In MAKE IT POSSIBLE [Single-SIM version] 32GB third of the](https://img.pdfslide.tips/doc/110x75/5b6ebe037f8b9a46538b9dc7/huawei-huawei-p-smart-pure-smart-huawei-fullview-huawei-huawei-p-smart-pure.jpg)


![SmartAX MA5680T - Huawei Enterprise · PDF fileWorldwide [ 切换到中国 - 中文 ] | Home | Login for partner Routers Switches Security WDM MSTP IP Microwave Integrated Access Network](https://img.pdfslide.tips/doc/110x75/5a6faaec7f8b9ab6538b4e71/smartax-ma5680t-huawei-enterprise-businesswwwnetdatanetworkscomimgarticle66tabma5680tpdfpdf.jpg)