Embed Size (px)
Citation preview
C
Consiglio Nazionale delle Ricerche
Eurid Public Web Site Content Management System Manual ver 1.1
MM.. AAnnddrreeiinnii,, PP.. AAnnddrroonniiccoo,, AA.. DDeell SSoollddaattoo,, CC.. LLuucccchheessii
RReevviisseedd bbyy MM.. MMaarrttiinneellllii
IIT B4-04/2004
Nota Interna
Ottobre 2004
Iit
Istituto di Informatica e Telematica
EURid Public Web Site
Content Management System
Manual ver. 1.1
written byMarco Andreini, Patrizia Andronico, Arianna Del Soldato, Cristian Lucchesi
revised byMaurizio Martinelli
© Istituto di Informatica e Telematica del CNRPisa, 07 oct. 2004
Contents
1.Introduction.......................................................................................................................................42.Logging..............................................................................................................................................4
2.1.Logging In..................................................................................................................................42.2.Forgotten password....................................................................................................................42.3.Logging out................................................................................................................................4
3.Structure of the portal........................................................................................................................44.View and Contents ............................................................................................................................5
4.1.View...........................................................................................................................................54.2.Contents.....................................................................................................................................64.3.Orientation and navigation suggestion.......................................................................................7
5.Adding and editing content..............................................................................................................105.1.What is a Document?...............................................................................................................105.2.Adding a document..................................................................................................................105.3.Editing a document..................................................................................................................115.4.Other forms of content.............................................................................................................12
5.4.1.Folder...............................................................................................................................125.4.2.News (and Press Release)................................................................................................135.4.3.FAQ..................................................................................................................................165.4.4.File ..................................................................................................................................195.4.5.Image................................................................................................................................19
5.5.How to modify the home page.................................................................................................195.6.Integrated HTML editor...........................................................................................................195.7.Searching for content...............................................................................................................21
6.The Workflow System.....................................................................................................................226.1.Object States............................................................................................................................226.2.User Roles................................................................................................................................226.3.Transitions - Changing Object States......................................................................................236.4.Publishing an object.................................................................................................................246.5.Reviewing objects....................................................................................................................256.6.Editing an object after it has been published...........................................................................25
2
1. IntroductionPlone makes use of current browser standards and techniques, so using a recent version of a webbrowser is recommended. These instructions cover the setup for Plone customized to manage theEurid Web Site by means of the management interface via Web.
2. Logging
2.1. Logging InThe login interface could be found at the uri https://webeu-admin.iit.cnr.it/login, if you already havea username and password, you can log in to the site by typing them into the form and clicking thelog in button. If you haven't a username and password you will need to contact your siteadministrator. Cookies must be enabled for you to log in to the site. Your exact rights depend uponhow the site is configured.
2.2. Forgotten passwordIf you forget your password it can be sent to the email address you provided when you registered.You can request that your password be mailed to you by clicking on the click here toretrieve it link located near the password field. If you did not specify a valid email addresswhen you registered, you will need to contact your site administrator.
2.3. Logging outOnce you are logged in to the Plone site, in the upper right hand corner you will see a link to logout. It is good practice to log out of Plone when you are finished using it.
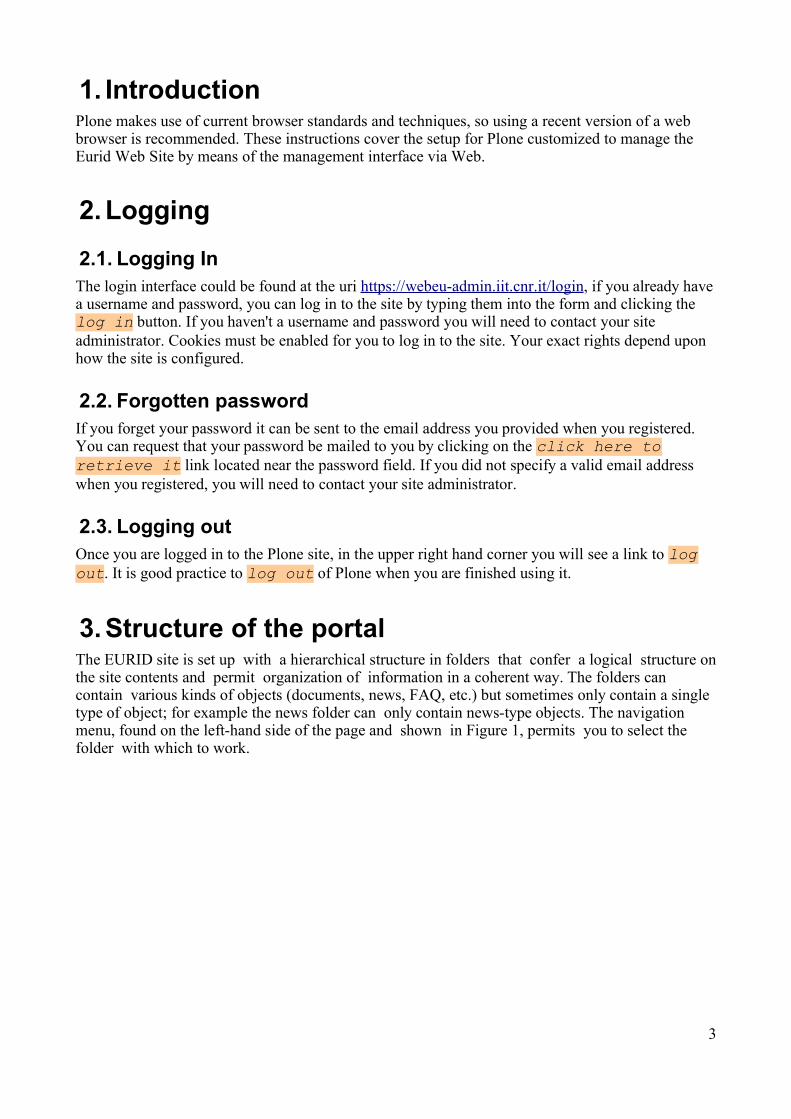
3. Structure of the portalThe EURID site is set up with a hierarchical structure in folders that confer a logical structure onthe site contents and permit organization of information in a coherent way. The folders cancontain various kinds of objects (documents, news, FAQ, etc.) but sometimes only contain a singletype of object; for example the news folder can only contain news-type objects. The navigationmenu, found on the left-hand side of the page and shown in Figure 1, permits you to select thefolder with which to work.
3
The navigation menu contains two special folders – Document and Images – that are not visualisedto anonymous users. These folders are used to organize files (Word, Pdf, Excel, etc) and imagescontained in the EURid Website. Images and files contained in these folders can be referenced by aHTML page of the site. It's worth to note that images must be inserted only into the “Images” folder,while all other files must be inserted into the “Documents” folder.
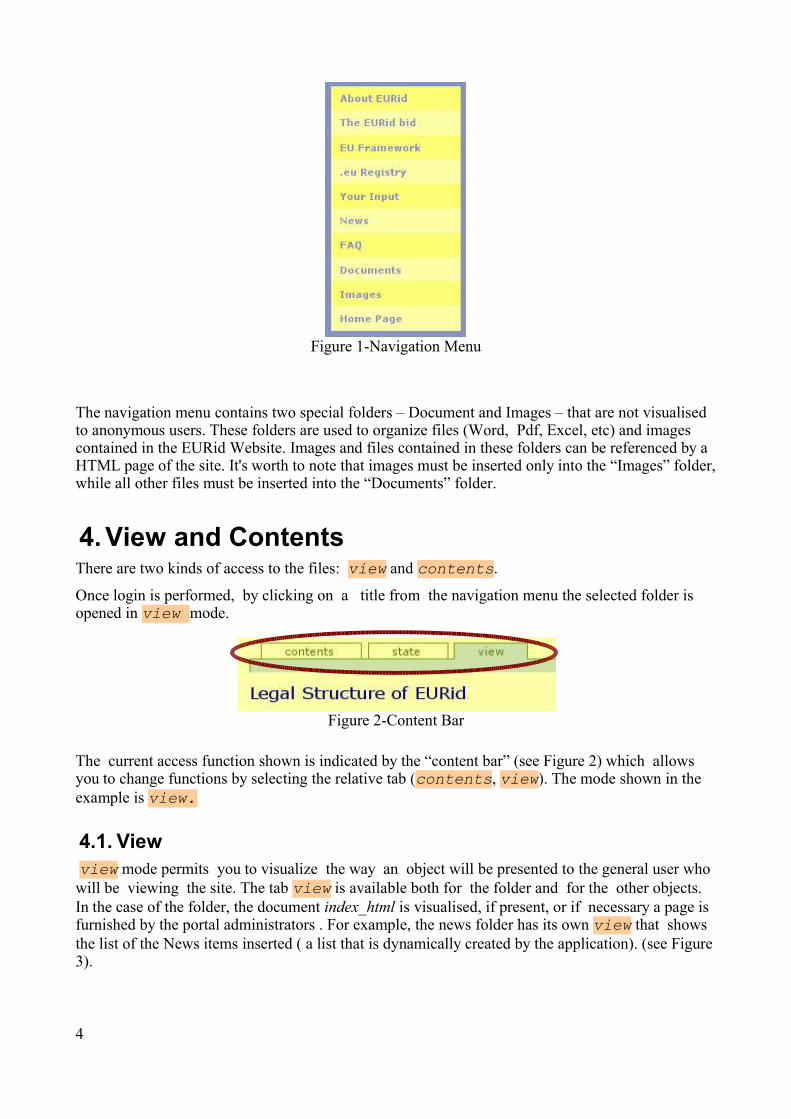
4. View and Contents There are two kinds of access to the files: view and contents.
Once login is performed, by clicking on a title from the navigation menu the selected folder isopened in view mode.
The current access function shown is indicated by the “content bar” (see Figure 2) which allowsyou to change functions by selecting the relative tab (contents, view). The mode shown in theexample is view.
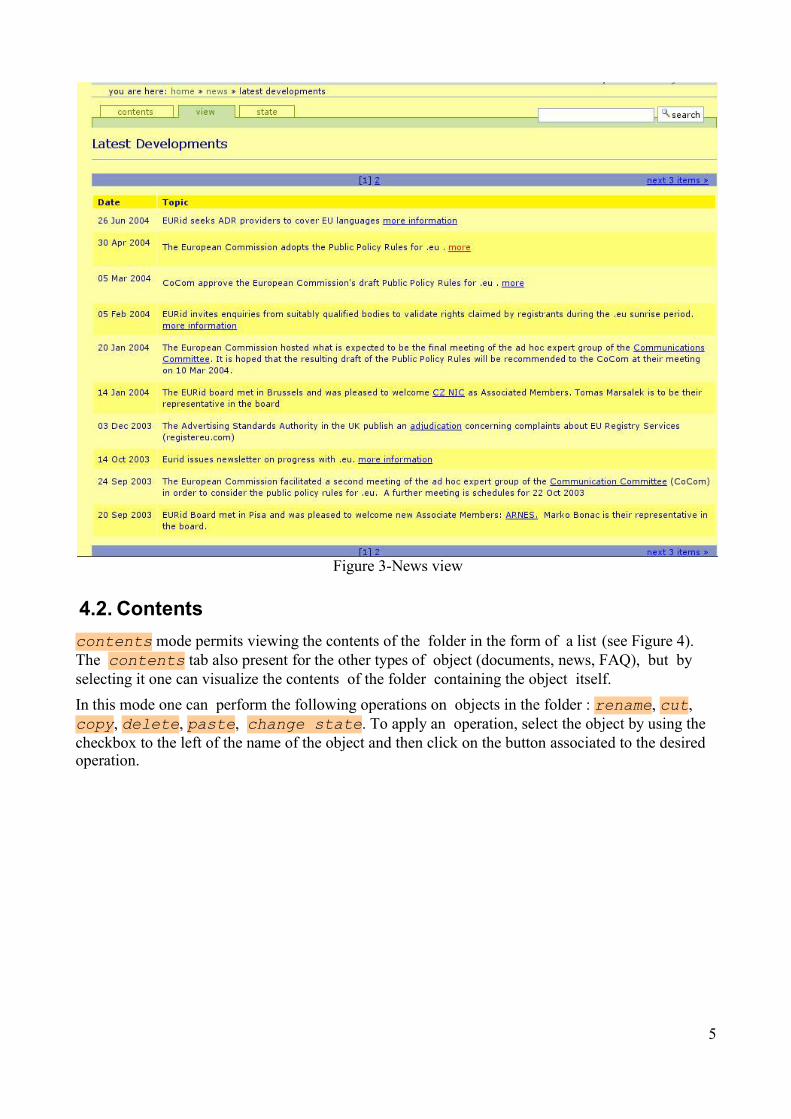
4.1. View view mode permits you to visualize the way an object will be presented to the general user whowill be viewing the site. The tab view is available both for the folder and for the other objects.In the case of the folder, the document index_html is visualised, if present, or if necessary a page isfurnished by the portal administrators . For example, the news folder has its own view that showsthe list of the News items inserted ( a list that is dynamically created by the application). (see Figure3).
4
Figure 2-Content Bar
Figure 1-Navigation Menu
4.2. Contents
contents mode permits viewing the contents of the folder in the form of a list (see Figure 4).The contents tab also present for the other types of object (documents, news, FAQ), but byselecting it one can visualize the contents of the folder containing the object itself.
In this mode one can perform the following operations on objects in the folder : rename, cut,copy, delete, paste, change state. To apply an operation, select the object by using thecheckbox to the left of the name of the object and then click on the button associated to the desiredoperation.
5
Figure 3-News view
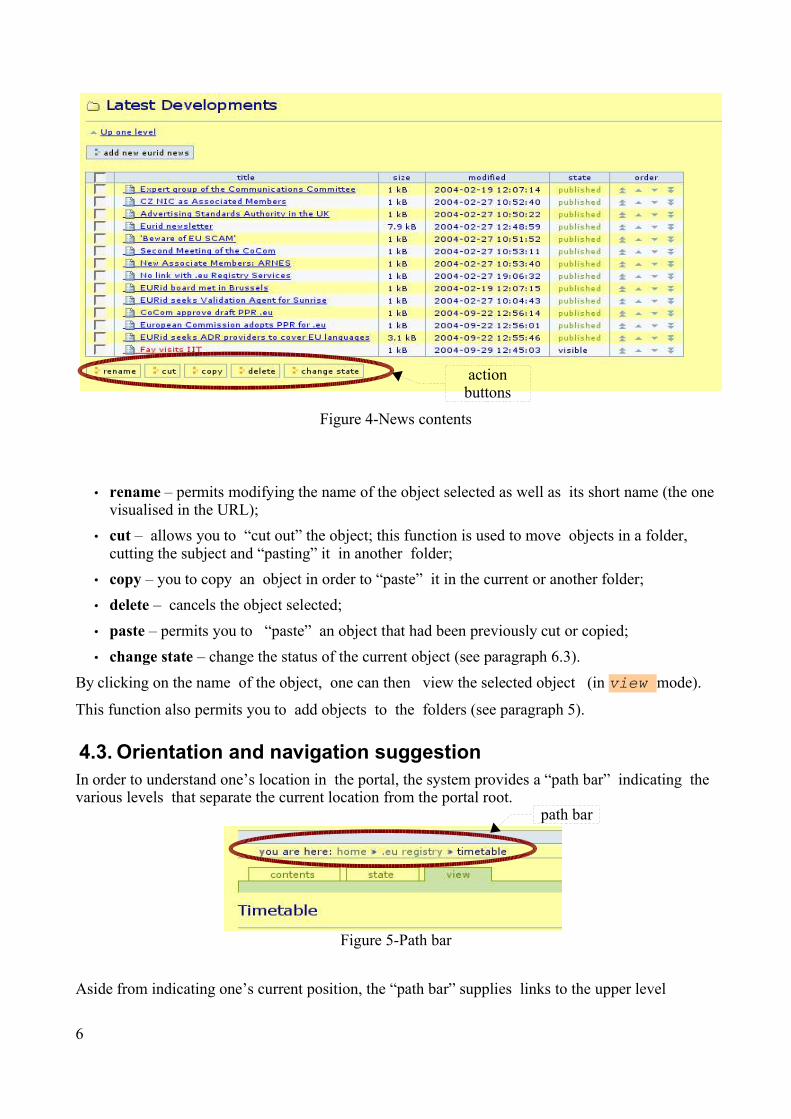
• rename – permits modifying the name of the object selected as well as its short name (the onevisualised in the URL);
• cut – allows you to “cut out” the object; this function is used to move objects in a folder,cutting the subject and “pasting” it in another folder;
• copy – you to copy an object in order to “paste” it in the current or another folder;
• delete – cancels the object selected;
• paste – permits you to “paste” an object that had been previously cut or copied;
• change state – change the status of the current object (see paragraph 6.3).
By clicking on the name of the object, one can then view the selected object (in view mode).
This function also permits you to add objects to the folders (see paragraph 5).
4.3. Orientation and navigation suggestionIn order to understand one’s location in the portal, the system provides a “path bar” indicating thevarious levels that separate the current location from the portal root.
Aside from indicating one’s current position, the “path bar” supplies links to the upper level
6
Figure 5-Path bar
path bar
Figure 4-News contents
action buttons
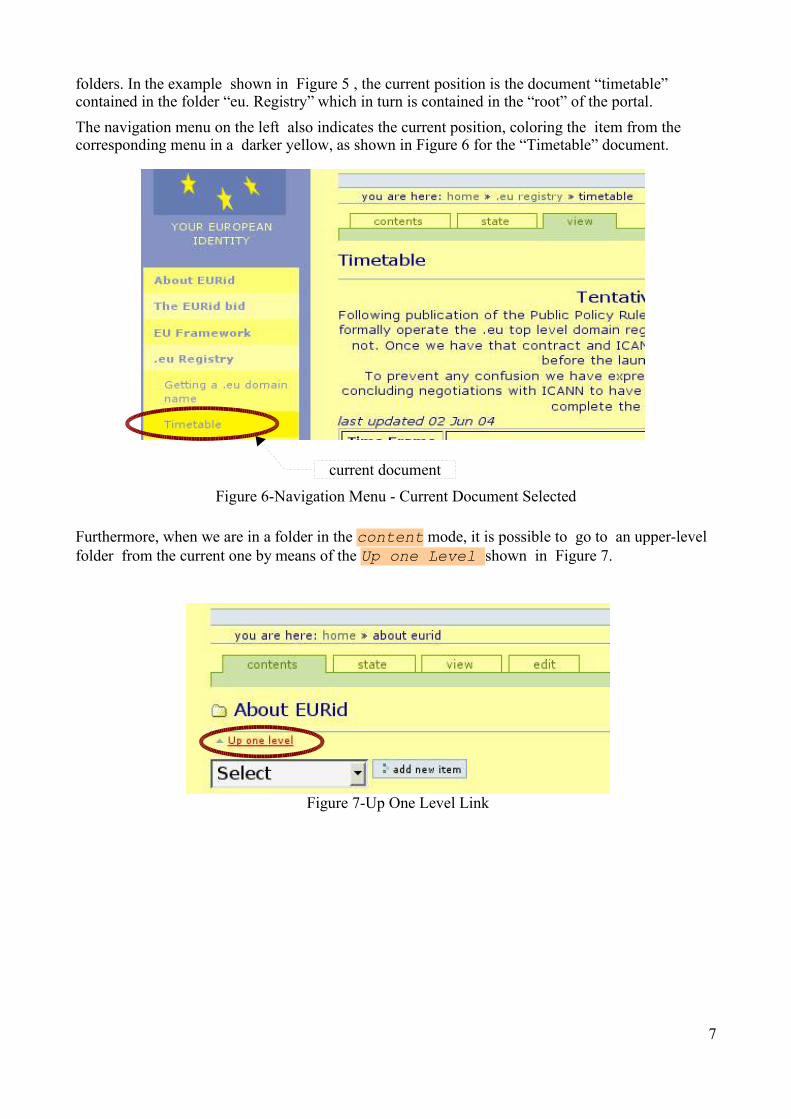
folders. In the example shown in Figure 5 , the current position is the document “timetable”contained in the folder “eu. Registry” which in turn is contained in the “root” of the portal.
The navigation menu on the left also indicates the current position, coloring the item from thecorresponding menu in a darker yellow, as shown in Figure 6 for the “Timetable” document.
Furthermore, when we are in a folder in the content mode, it is possible to go to an upper-levelfolder from the current one by means of the Up one Level shown in Figure 7.
7
Figure 6-Navigation Menu - Current Document Selected
current document
Figure 7-Up One Level Link
5. Adding and editing contentUser logged having the right permission can add content to the portal. This paragraph shows how toadd and edit a Document in detail. All content types are added and edited in a very similar manner.
5.1. What is a Document?A document is a page of content, usually a self-contained piece of text. Documents can be written inHTML using the integrated HTML editor. The home page for the Eurid Web site is one example ofa document.
5.2. Adding a document
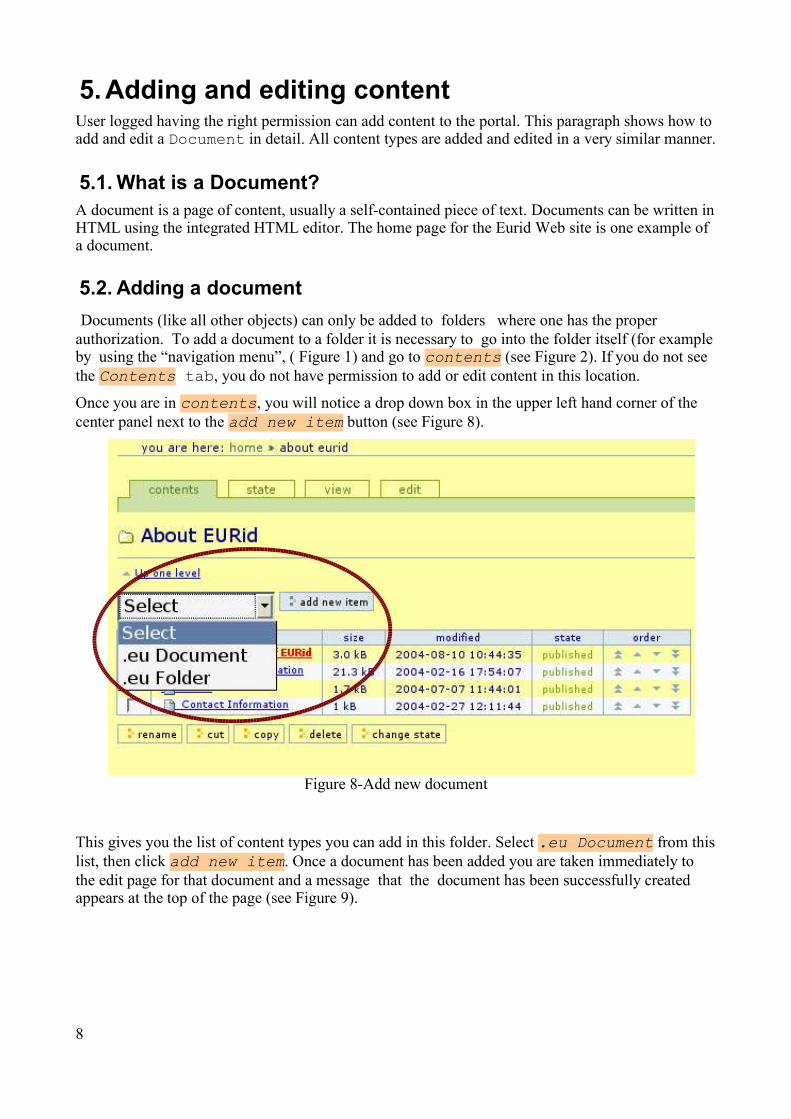
Documents (like all other objects) can only be added to folders where one has the properauthorization. To add a document to a folder it is necessary to go into the folder itself (for exampleby using the “navigation menu”, ( Figure 1) and go to contents (see Figure 2). If you do not seethe Contents tab, you do not have permission to add or edit content in this location.
Once you are in contents, you will notice a drop down box in the upper left hand corner of thecenter panel next to the add new item button (see Figure 8).
This gives you the list of content types you can add in this folder. Select .eu Document from thislist, then click add new item. Once a document has been added you are taken immediately tothe edit page for that document and a message that the document has been successfully createdappears at the top of the page (see Figure 9).
8
Figure 8-Add new document
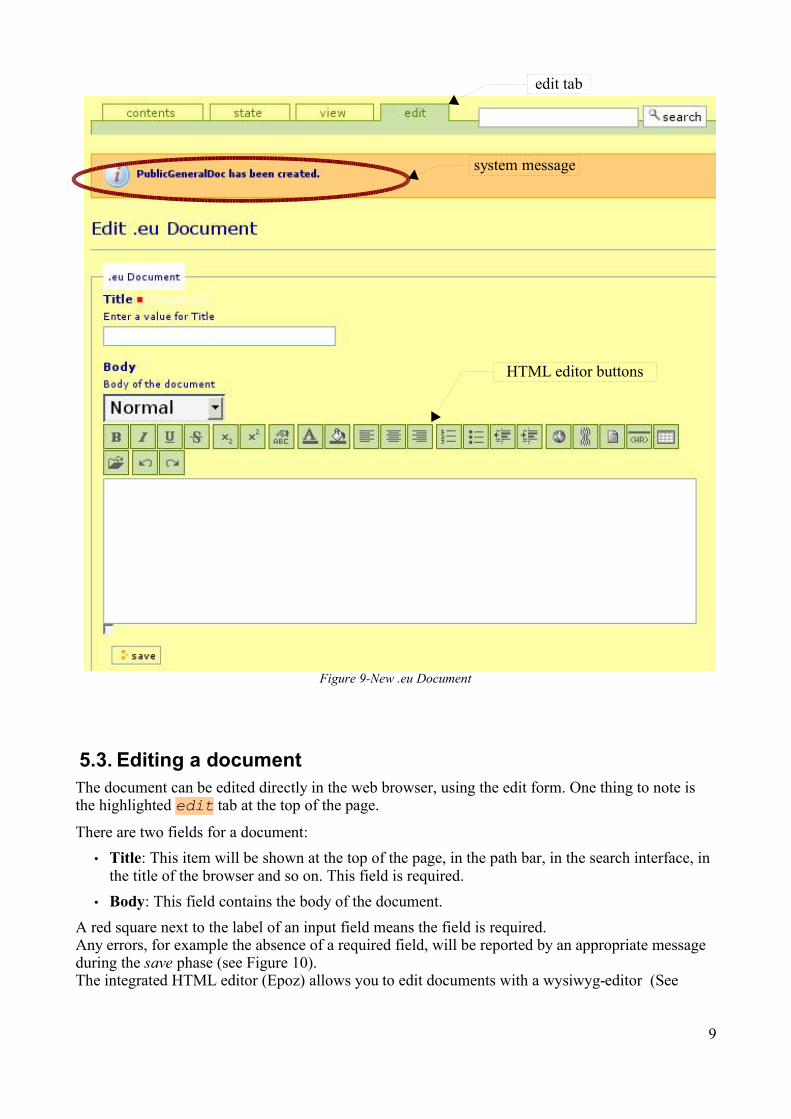
5.3. Editing a documentThe document can be edited directly in the web browser, using the edit form. One thing to note isthe highlighted edit tab at the top of the page.
There are two fields for a document:
• Title: This item will be shown at the top of the page, in the path bar, in the search interface, inthe title of the browser and so on. This field is required.
• Body: This field contains the body of the document.
A red square next to the label of an input field means the field is required.Any errors, for example the absence of a required field, will be reported by an appropriate messageduring the save phase (see Figure 10).The integrated HTML editor (Epoz) allows you to edit documents with a wysiwyg-editor (See
9
Figure 9-New .eu Document
system message
edit tab
HTML editor buttons
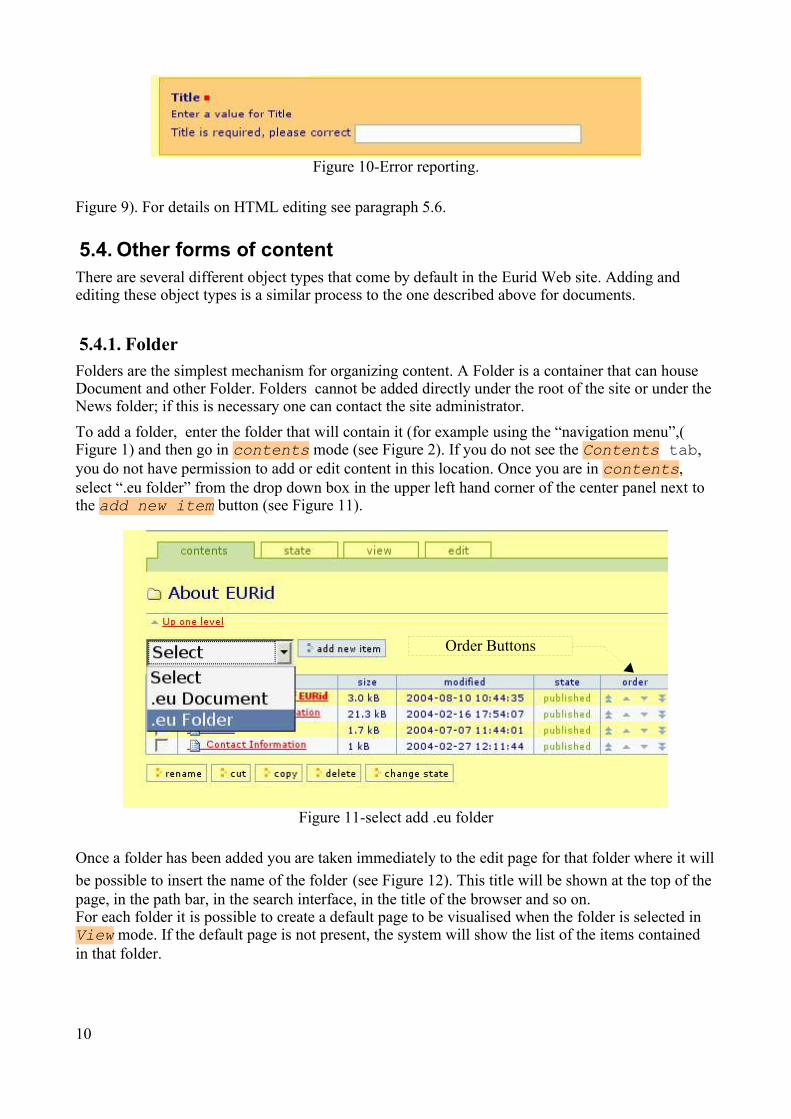
Figure 9). For details on HTML editing see paragraph 5.6.
5.4. Other forms of contentThere are several different object types that come by default in the Eurid Web site. Adding andediting these object types is a similar process to the one described above for documents.
5.4.1. FolderFolders are the simplest mechanism for organizing content. A Folder is a container that can houseDocument and other Folder. Folders cannot be added directly under the root of the site or under theNews folder; if this is necessary one can contact the site administrator.
To add a folder, enter the folder that will contain it (for example using the “navigation menu”,(Figure 1) and then go in contents mode (see Figure 2). If you do not see the Contents tab,you do not have permission to add or edit content in this location. Once you are in contents,select “.eu folder” from the drop down box in the upper left hand corner of the center panel next tothe add new item button (see Figure 11).
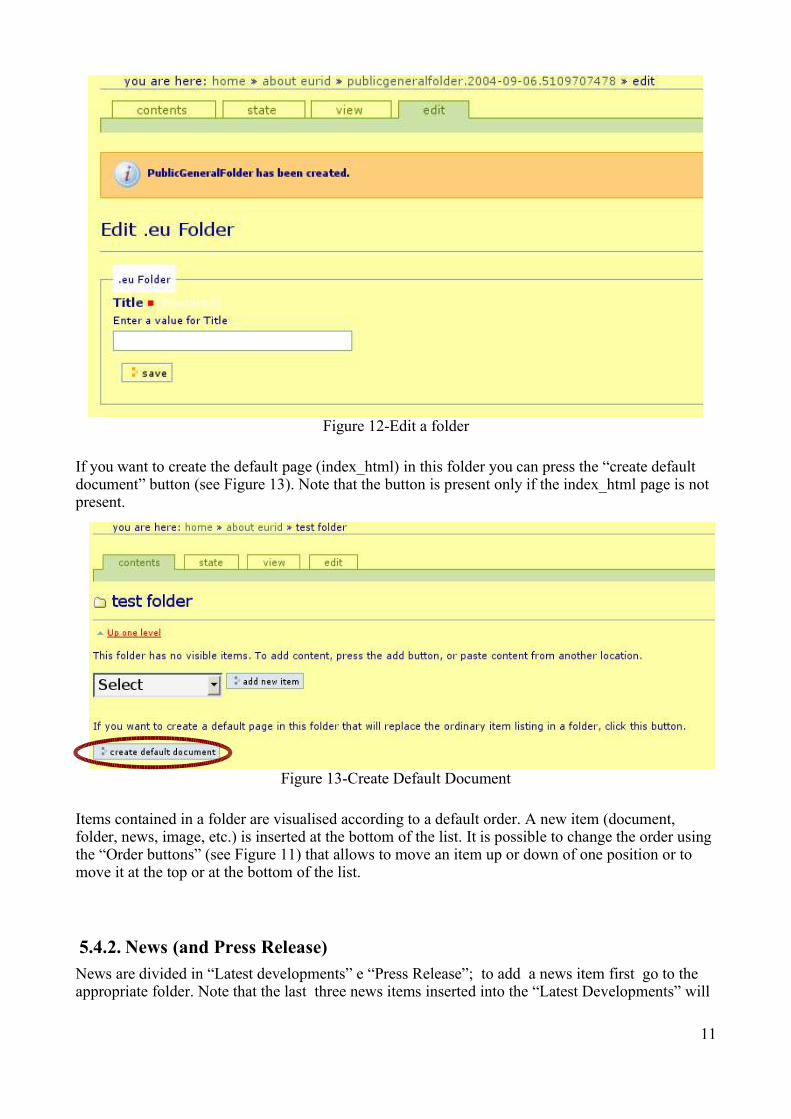
Once a folder has been added you are taken immediately to the edit page for that folder where it will
be possible to insert the name of the folder (see Figure 12). This title will be shown at the top of thepage, in the path bar, in the search interface, in the title of the browser and so on. For each folder it is possible to create a default page to be visualised when the folder is selected inView mode. If the default page is not present, the system will show the list of the items containedin that folder.
10
Figure 11-select add .eu folder
Figure 10-Error reporting.
Order Buttons
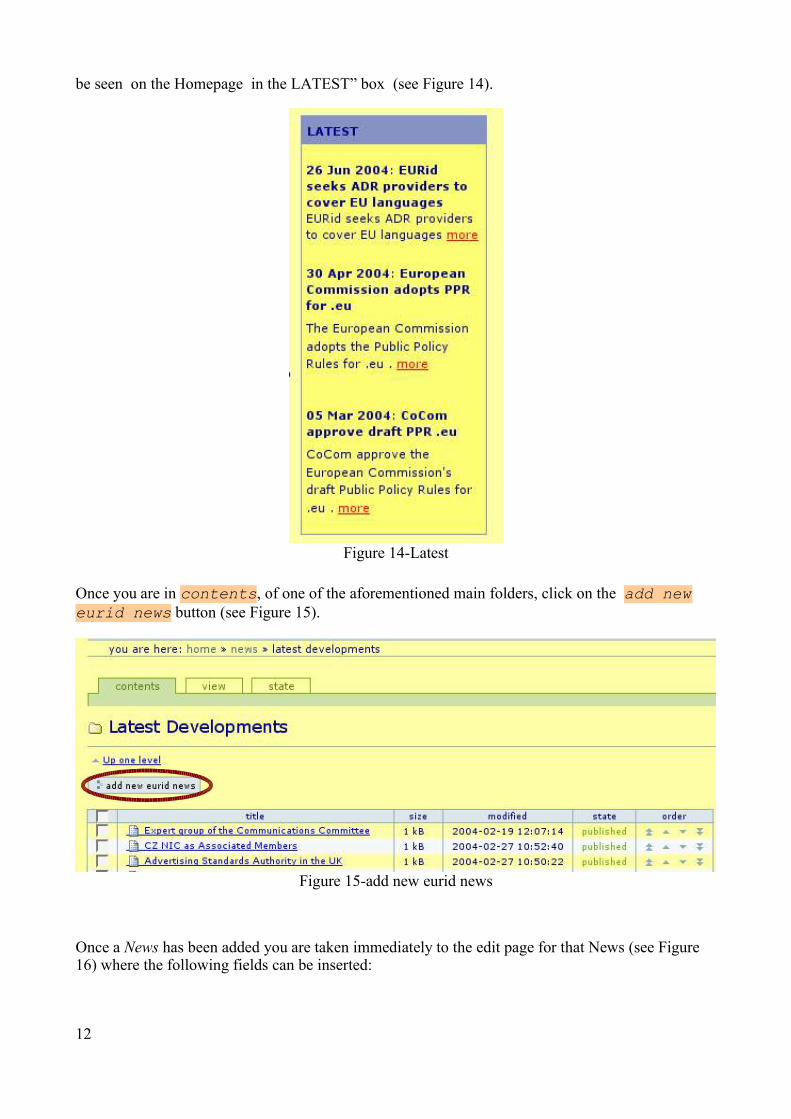
If you want to create the default page (index_html) in this folder you can press the “create defaultdocument” button (see Figure 13). Note that the button is present only if the index_html page is notpresent.
Items contained in a folder are visualised according to a default order. A new item (document,folder, news, image, etc.) is inserted at the bottom of the list. It is possible to change the order usingthe “Order buttons” (see Figure 11) that allows to move an item up or down of one position or tomove it at the top or at the bottom of the list.
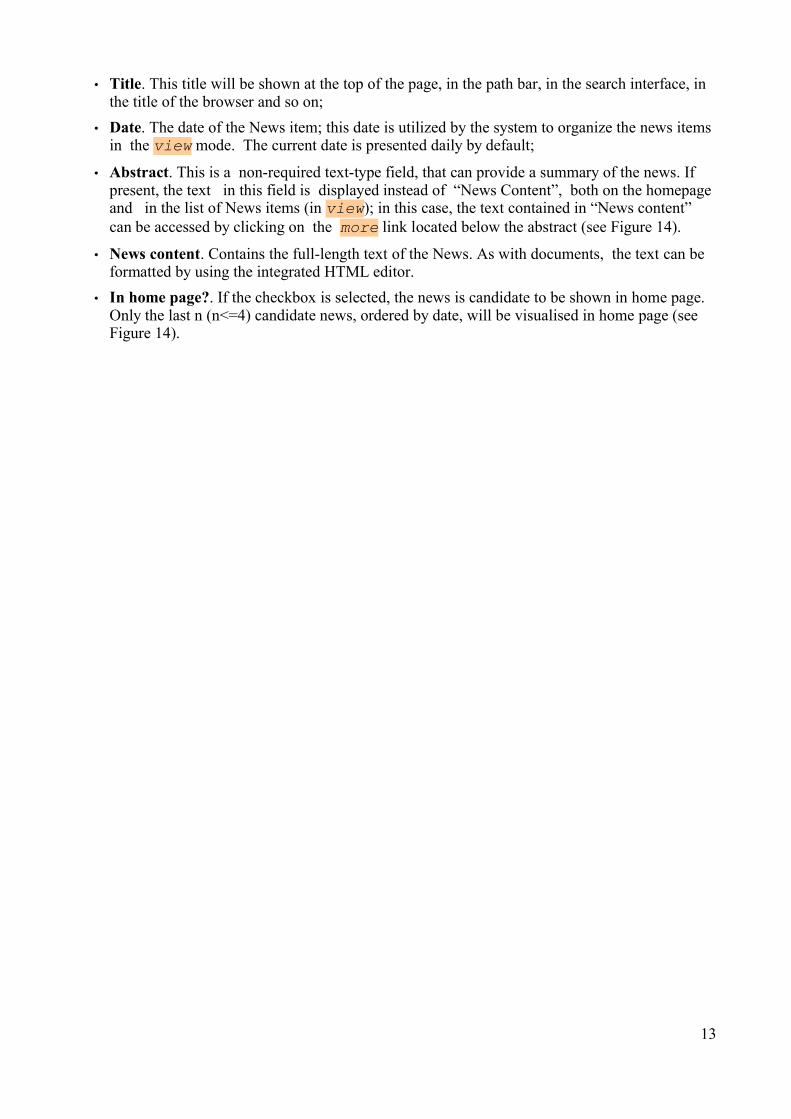
5.4.2. News (and Press Release)News are divided in “Latest developments” e “Press Release”; to add a news item first go to theappropriate folder. Note that the last three news items inserted into the “Latest Developments” will
11
Figure 12-Edit a folder
Figure 13-Create Default Document
be seen on the Homepage in the LATEST” box (see Figure 14).
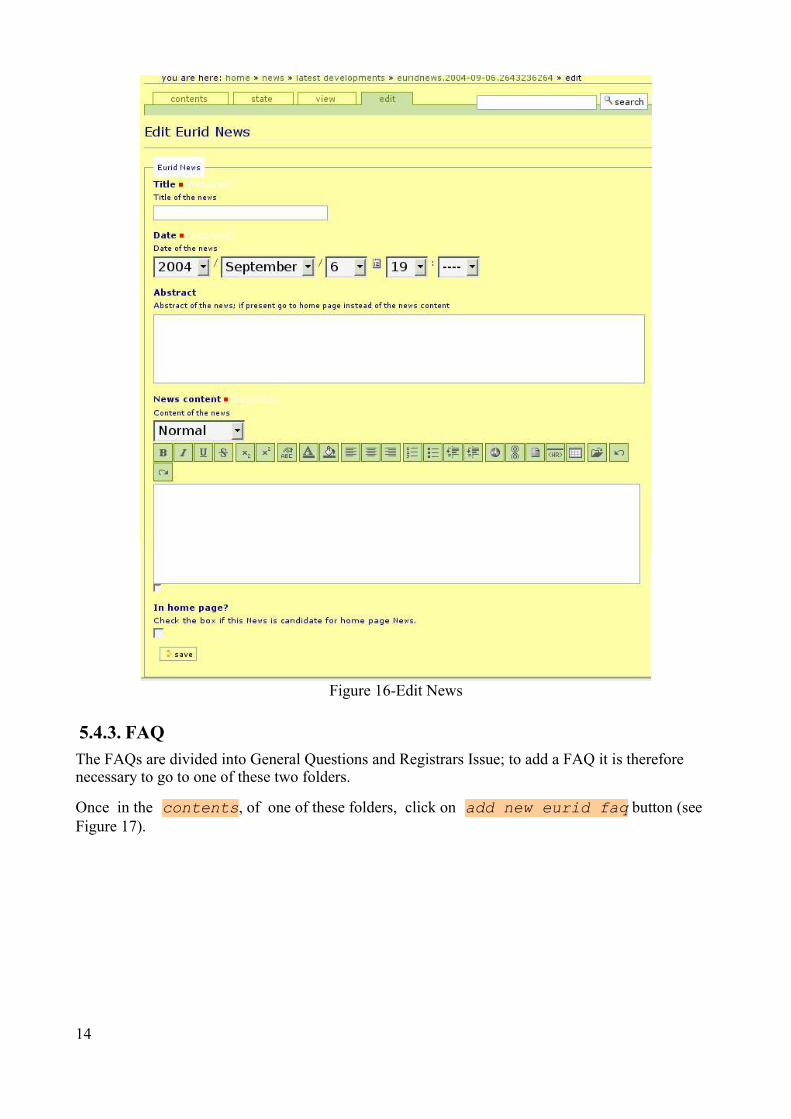
Once you are in contents, of one of the aforementioned main folders, click on the add neweurid news button (see Figure 15).
Once a News has been added you are taken immediately to the edit page for that News (see Figure16) where the following fields can be inserted:
12
Figure 14-Latest
Figure 15-add new eurid news
• Title. This title will be shown at the top of the page, in the path bar, in the search interface, inthe title of the browser and so on;
• Date. The date of the News item; this date is utilized by the system to organize the news itemsin the view mode. The current date is presented daily by default;
• Abstract. This is a non-required text-type field, that can provide a summary of the news. Ifpresent, the text in this field is displayed instead of “News Content”, both on the homepageand in the list of News items (in view); in this case, the text contained in “News content”can be accessed by clicking on the more link located below the abstract (see Figure 14).
• News content. Contains the full-length text of the News. As with documents, the text can beformatted by using the integrated HTML editor.
• In home page?. If the checkbox is selected, the news is candidate to be shown in home page.Only the last n (n<=4) candidate news, ordered by date, will be visualised in home page (seeFigure 14).
13
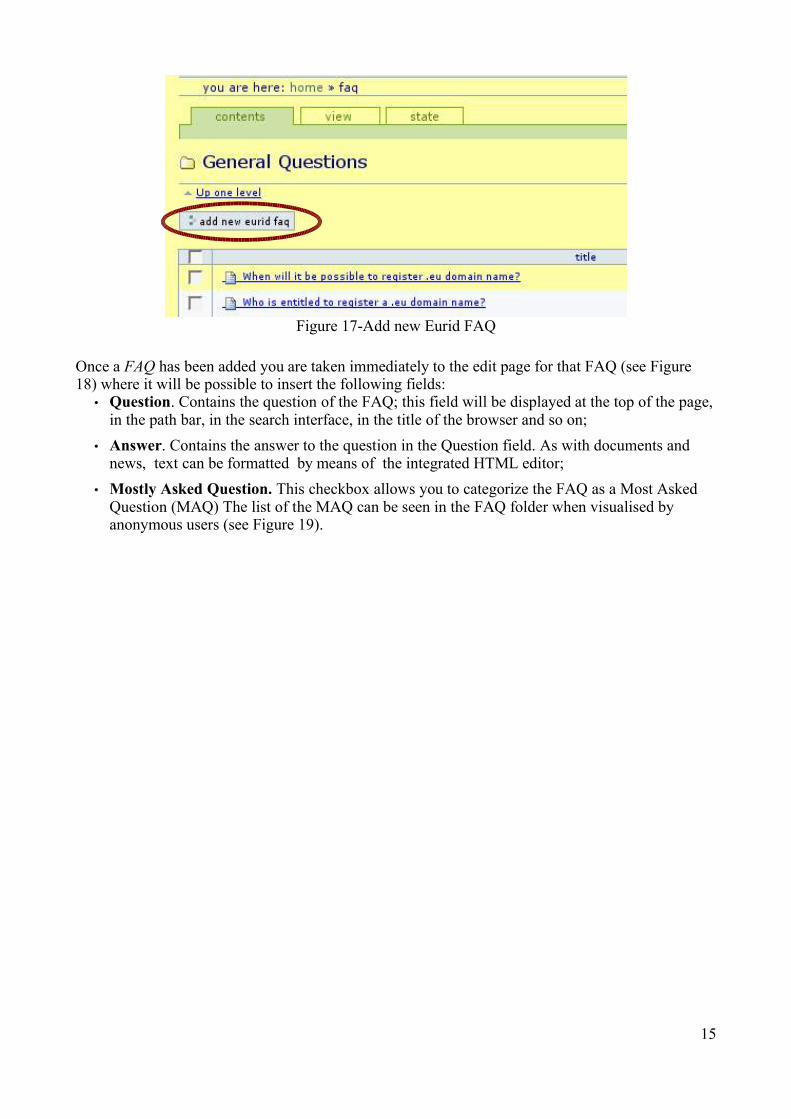
5.4.3. FAQ
The FAQs are divided into General Questions and Registrars Issue; to add a FAQ it is thereforenecessary to go to one of these two folders.
Once in the contents, of one of these folders, click on add new eurid faq button (seeFigure 17).
14
Figure 16-Edit News
Once a FAQ has been added you are taken immediately to the edit page for that FAQ (see Figure18) where it will be possible to insert the following fields:
• Question. Contains the question of the FAQ; this field will be displayed at the top of the page,in the path bar, in the search interface, in the title of the browser and so on;
• Answer. Contains the answer to the question in the Question field. As with documents andnews, text can be formatted by means of the integrated HTML editor;
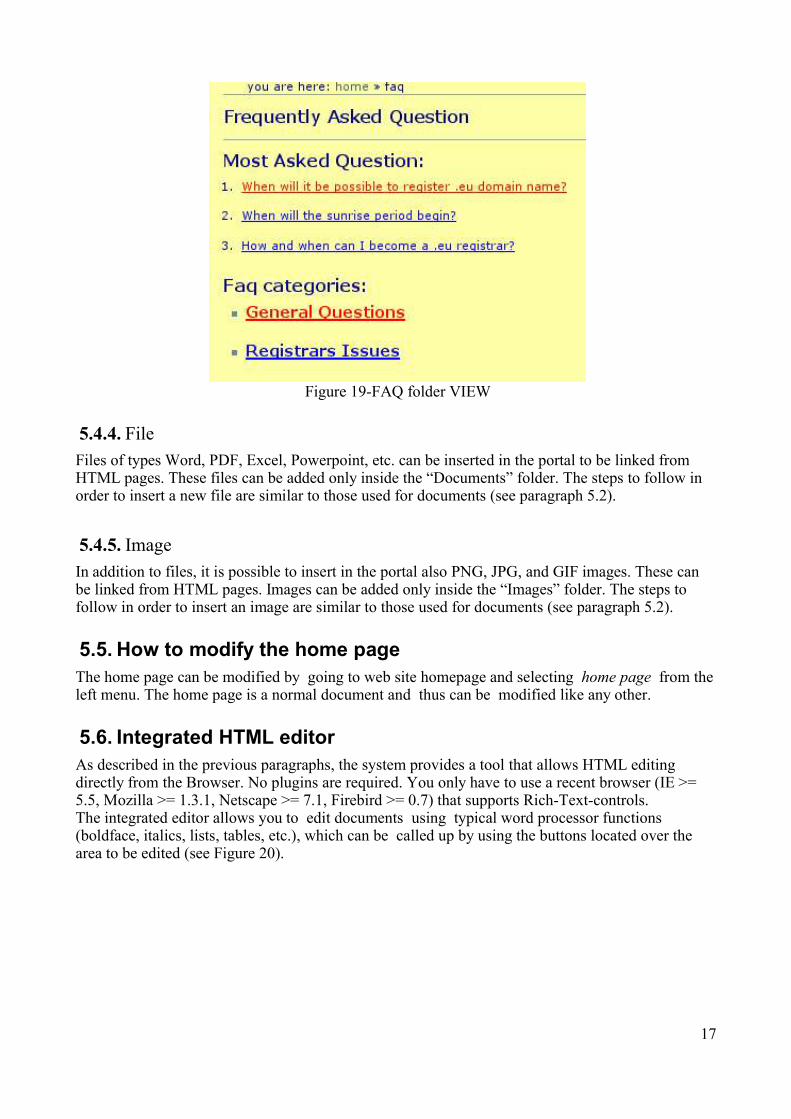
• Mostly Asked Question. This checkbox allows you to categorize the FAQ as a Most AskedQuestion (MAQ) The list of the MAQ can be seen in the FAQ folder when visualised byanonymous users (see Figure 19).
15
Figure 17-Add new Eurid FAQ

16
Figure 18-Edit FAQ
5.4.4. FileFiles of types Word, PDF, Excel, Powerpoint, etc. can be inserted in the portal to be linked fromHTML pages. These files can be added only inside the “Documents” folder. The steps to follow inorder to insert a new file are similar to those used for documents (see paragraph 5.2).
5.4.5. Image
In addition to files, it is possible to insert in the portal also PNG, JPG, and GIF images. These canbe linked from HTML pages. Images can be added only inside the “Images” folder. The steps tofollow in order to insert an image are similar to those used for documents (see paragraph 5.2).
5.5. How to modify the home pageThe home page can be modified by going to web site homepage and selecting home page from theleft menu. The home page is a normal document and thus can be modified like any other.
5.6. Integrated HTML editorAs described in the previous paragraphs, the system provides a tool that allows HTML editingdirectly from the Browser. No plugins are required. You only have to use a recent browser (IE >=5.5, Mozilla >= 1.3.1, Netscape >= 7.1, Firebird >= 0.7) that supports Rich-Text-controls.The integrated editor allows you to edit documents using typical word processor functions (boldface, italics, lists, tables, etc.), which can be called up by using the buttons located over thearea to be edited (see Figure 20).
17
Figure 19-FAQ folder VIEW
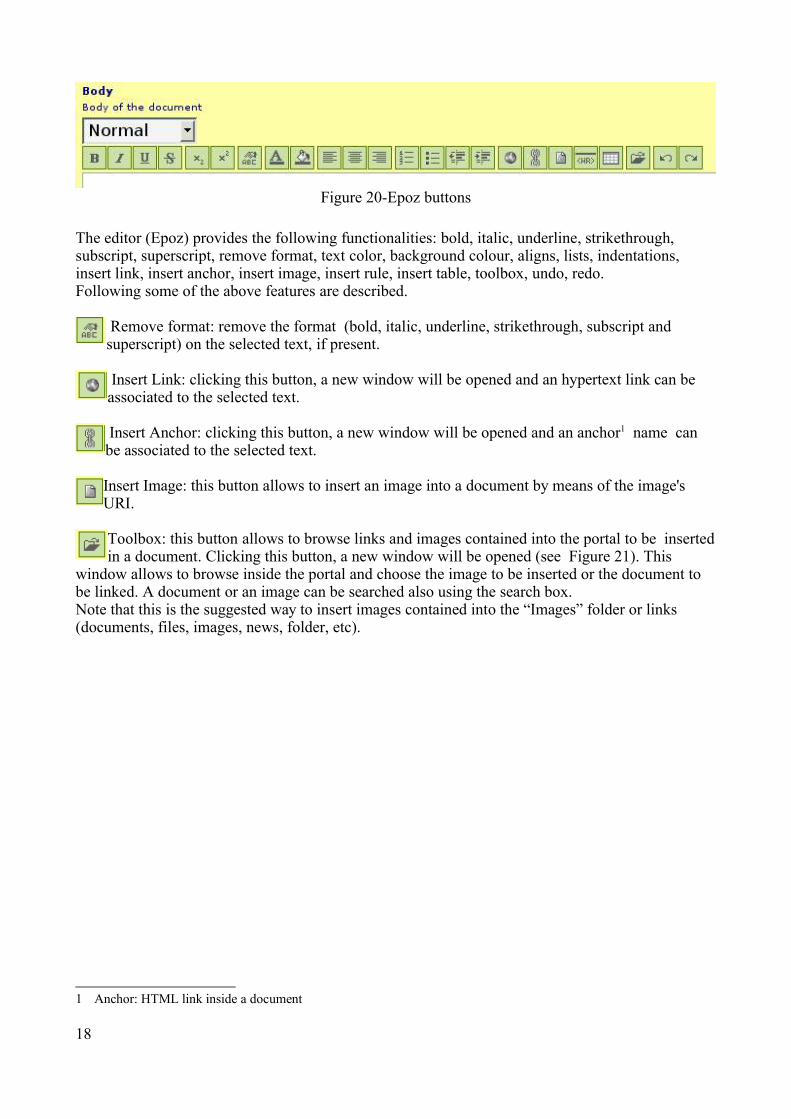
The editor (Epoz) provides the following functionalities: bold, italic, underline, strikethrough,subscript, superscript, remove format, text color, background colour, aligns, lists, indentations,insert link, insert anchor, insert image, insert rule, insert table, toolbox, undo, redo.Following some of the above features are described.
Remove format: remove the format (bold, italic, underline, strikethrough, subscript andsuperscript) on the selected text, if present.
Insert Link: clicking this button, a new window will be opened and an hypertext link can beassociated to the selected text.
Insert Anchor: clicking this button, a new window will be opened and an anchor1 name canbe associated to the selected text.
Insert Image: this button allows to insert an image into a document by means of the image'sURI.
Toolbox: this button allows to browse links and images contained into the portal to be insertedin a document. Clicking this button, a new window will be opened (see Figure 21). This
window allows to browse inside the portal and choose the image to be inserted or the document tobe linked. A document or an image can be searched also using the search box. Note that this is the suggested way to insert images contained into the “Images” folder or links(documents, files, images, news, folder, etc).
1 Anchor: HTML link inside a document
18
Figure 20-Epoz buttons
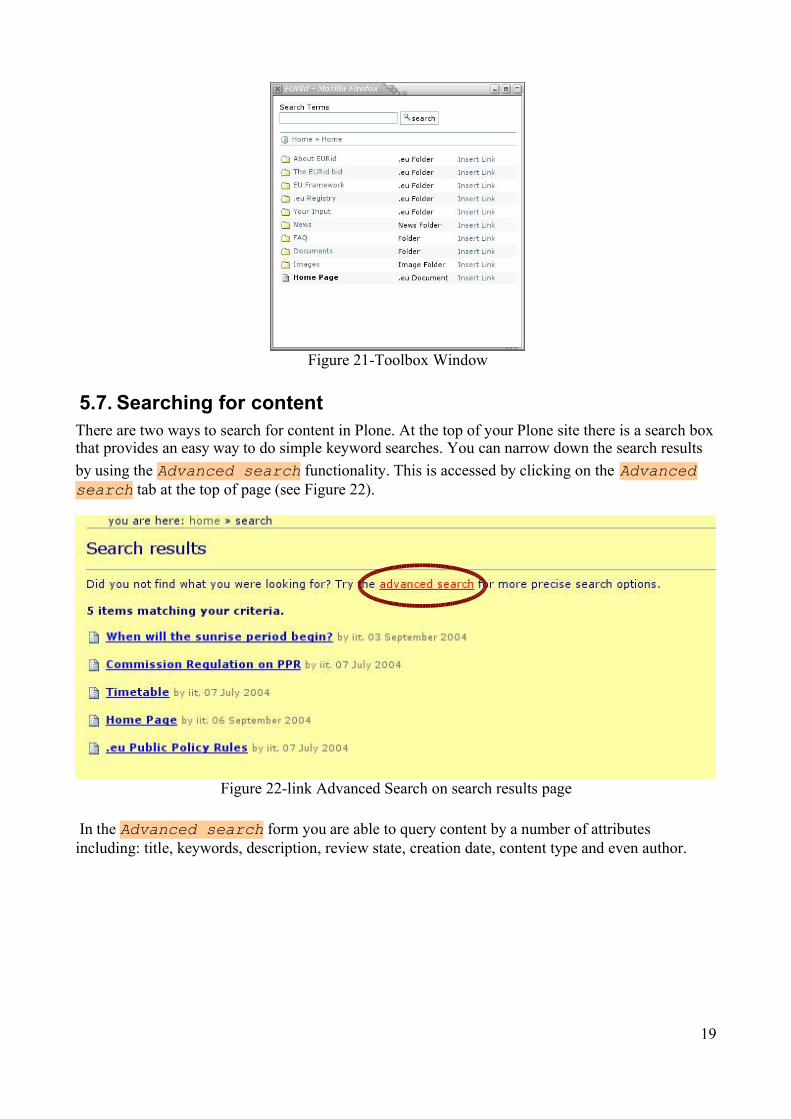
5.7. Searching for contentThere are two ways to search for content in Plone. At the top of your Plone site there is a search boxthat provides an easy way to do simple keyword searches. You can narrow down the search results
by using the Advanced search functionality. This is accessed by clicking on the Advancedsearch tab at the top of page (see Figure 22).
In the Advanced search form you are able to query content by a number of attributesincluding: title, keywords, description, review state, creation date, content type and even author.
19
Figure 22-link Advanced Search on search results page
Figure 21-Toolbox Window
6. The Workflow SystemWorkflow is the process used to manage objects in a website. An example is a company's pressrelease: an employee writes a press release and submits it to an editor for review before it ispublished on the website. This review process is called a workflow and is used by site managers toensure that site content is correct. Plone has a very powerful and flexible default workflow systemthat is built around Object States and User Roles.
6.1. Object StatesAn object's state determines whether it is available to the various types of users defined in Plone,and what other states that object can be transitioned to. Plone's default workflow includes fourstates: visible, pending, published and private.
• By default, objects are created in the visible state. All users can find visible objects throughthe search function and can access them directly by visiting the object url. Visible objects donot show up in the navigation tree. Visible objects within private folders are still visible to allusers and available through the search function. Visible objects are editable by their ownersand site managers.
• Pending objects have been submitted for publishing by site members. From an end-userstandpoint, they behave like objects in the visible state. The difference between the two typesis that pending objects are flagged for review; site reviewers are prompted to publish or rejectpending objects. Pending objects are editable only by managers.
• Published items are visible to all site visitors. They appear in search results and thenavigation tree. When a News becomes published it becomes visible under the News box inthe home page. Published items are editable only by managers, but can be retracted by ownersfor editing (retracting reverts an object to the visible state).
• Objects in the private state are visible and editable only by their owners and others withmanager access to the folder in which they exist. They will not appear in search results or onthe navigation tree for other users. Private items are editable by managers.
6.2. User RolesPlone uses roles to define what different users can see and do. In this way, Plone builds security intoevery aspect of its operation. The roles defined in a default Plone installation include anonymous,member, owner, reviewer and manger.
• Anyone who visits the site and does not log in takes on the anonymous role. In public sites,anonymous users can see published, pending and visible content by directly visiting a url or bysearching, however only published content is visible on the site navigation tree. If you have setyour site up as private, anonymous users cannot see anything.
• Members are users who have logged in to the site. Members have the added ability to createcontent in their own folder, which is then submitted to site reviewers to be published. In publicsites, members can see the same content as anonymous users. In private sites, members haveaccess to published, pending and visible content. Members may also set their own preferences.
• As a reviewer, you can publish or reject content submitted by members. When a reviewerlogs in, if there is content to be reviewed a "pending" message will appear in their personalbar. A review list also appears in the right-hand column of the page. Reviewers have access tothe same content as members.
• Members have the owner role for all content they create. This allows them to edit the content,
20
submit or retract it, or make it private. Assigning the owner role to other users is notrecommended.
• Site managers can see content in all states (visible, pending, published and private). Inaddition to all the capabilities of the member and reviewer, managers can add, edit, delete andmove content. Managers can also add, edit and delete users and assign them roles. Sitemanagers can give specific users additional rights in certain sections of the website. This canbe accomplished by assigning local roles to folders. Managers and owners have permission toassign local roles.
6.3. Transitions - Changing Object StatesOwners and managers can change the states of objects they control. The states that are available arecontrolled by pre-defined transitions. For example, site members can submit visible objects forreview or make them private and site reviewers can publish submitted items or reject them. Sitemanagers can also customize this portion of the workflow system.
To change an object's state in contents view, check the box next to the name of the object to bechanged and then click the change status button at the bottom of the page (see Figure 4). Scroll tothe bottom of the Publishing Process page and choose the desired state (see Figure 22), then clicksave.
21

One can also change states in item view. Simply click on the state tab of the “content bar” anda page like those in Figure 23 will appear; scroll to the bottom of the page, choose the desired stateand click save.
6.4. Publishing an objectObject owners can alter and edit objects in the visible state. Once an owner finishes editing anobject, it can be published by clicking the State tab. This opens a publishing form like in Figure23.
This form gives you several options:
• Effective Date and Expiration Date: The effective date is the first day an object should bemade available and the expiration date is the last day. Searches and navigation only showobjects within this date range. Leaving these items blank makes an object infinitely available.
• Comments: Here you can enter any comments or reason for the change in state you arerequesting. These comments will be preserved in the change log for the object.
22
Figure 23-Publishing Details.
possible state transitions
• Change State: The states to which a user can move an object. The states available here willdepend on your role. Members can submit objects or make them private. Once submitted,objects are available to users with reviewing privileges, who can then publish or retract them.
6.5. Reviewing objectsIf you have reviewing privileges, when you log in to your Plone web site, it is possible to present anindication with a list of the objects ready for review and then to select each object to review it.
In order to review an object click on the state tab and you will be presented with a form like theone above. At this point you have basically two choices - either approve an object and publish it (thepublish option) or reject it (the reject option). If you reject the object you will probably want toprovide a comment to the user explaining why you have rejected it.
6.6. Editing an object after it has been publishedManagers may edit objects that are in any state. Members and Reviewers cannot edit an object afterit has been published; they must first move it back into a visible state by retracting it. To do this,click on the state tab for the object and click retract. Then you can edit the object as much asyou wish and resubmit it. This ensures that the review process is maintained for objects that havebeen edited.
As an example, lets see how to edit a FAQ after it has been published. The steps are the following:
1. select the FAQ to be modified;
2. click on the state tab of the “content bar”, a page like those in Figure 23 will be shown;
3. select retract on the change state section, in order to change the FAQ status to visible;
4. now the FAQ is visible and so it is editable; click on the edit tab in order to change the FAQ asyou wish.
Now, if you want, you can re-submit the FAQ to a reviewer or re-public it following the processdescribed in paragraph 6.4.
23
Figures index
Figure 1-Navigation Menu 5Figure 2-Content Bar 5Figure 3-News view 6Figure 4-News contents 7Figure 5-Path bar 8Figure 6-Navigation Menu - Current Document Selected 8Figure 7-Up One Level Link 9Figure 8-Add new document 10Figure 9-New .eu Document 11Figure 10-Error reporting. 12Figure 11-select add .eu folder 12Figure 12-Edit a folder 13Figure 13-Create Default Document 13Figure 14-Latest 14Figure 15-add new eurid news 14Figure 16-Edit News 16Figure 17-Add new Eurid FAQ 17Figure 18-Edit FAQ 18Figure 19-FAQ folder VIEW 19Figure 20-Epoz buttons 20Figure 21-Toolbox Window 21Figure 22-link Advanced Search on search results page 21Figure 23-Publishing Details. 24
24