Embed Size (px)
Citation preview

DANA DiabecareⓇ
IISR User Manual
#다나2SR영문메뉴얼 rev.0 2007.7.3 5:43 PM 페이지1 001 Acrobat™ PDFWriter 300DPI 60LPI
Thank you for choosing the DANA DiabecareⓇ IISR Insilin Pump.
SOOIL Development Co., Ltd. has been committed to making scientific advancements in the development
and production of innovative medical solutions for the management, treatment and cure of diabetes
throughout the world since 1979. Your DANA DiabecareⓇ IISR has been designed and built with the most
advanced technology available to create a high quality and very reliable device for the subcutaneous delivery
of insulin. When used properly, your DANA DiabecareⓇ IISR will give you years of improved blood glucose
control while enhancing your quality of life.
The welfare of the patient has been the cornerstone of our company’s philosophy since 1979 when Dr.
Soo-Bong Choi and his father, Dr. Hyun Choi, designed their first insulin pump for patients in their diabetes
center. There are now more than 50,000 people throughout the world managing their diabetes with the
DANA Diabecare line of insulin infusion pumps.
The DANA DiabecareⓇ IISR Insulin Pump is the only pump that adds simplicity to the complex technology of
the device.
We welcome your comments and look forward to being key members of your diabetes team.
SOOIL Development Co., Ltd.
Soo-Bong Choi, M.D., Ph.D.
CEO
SOOIL Development Co., Ltd.
W a r n i n gPlease note, US law restricts this device to use by or on order of a physician.
#다나2SR영문메뉴얼 rev.0 2007.7.3 5:43 PM 페이지2 001 Acrobat™ PDFWriter 300DPI 60LPI

DANA DiabecareⓇ
IISR User Manual
#다나2SR영문메뉴얼 rev.0 2007.7.3 5:43 PM 페이지3 001 Acrobat™ PDFWriter 300DPI 60LPI
C o n t e n t s
1. Before using your DANA DiabecareⓇ IISR insulin pump, infusion set and reservoir
•Indications for use
•Safety precautions
•Cleaning your DANA DiabecareⓇ IISR insulin pump
•Explanation of “W a r n i n g”, “C a u t i o n”, and “N o t e”s y m b o l s
•Contents of DANA DiabecareⓇ IISR insulin pump kit
•Identification and description of your pump features
•Infusion Sets
2. Set-up and basic functions
•Explanation of display screens
- Initial display
- Basic display
•Inserting the battery
•Setting bolus doses, basal rates and the clock
- Setting a bolus
- Setting the basal rate
- Setting the clock
•Checking bolus doses, basal rates and reviewing memory data
•Suspending the pump
•User Setting
3. Filling and inserting a new reservoir
•Changing the reservoir
- Preparation
- Filling the reservoir with insulin
- Instructions for use of DANA Easy SETTER
- Inserting the reservoir into the pump
- Connecting the infusion set to your pump
- Priming the infusion set
- Inserting the infusion set
•Infusion sets
- EasyRelease
- EasyRelease II
- Soft-Release-R
4
4
5
5
5
6
7
8
8
8
9
1 0
1 1
1 3
1 4
1 5
1 7
1 8
2 1
2 1
2 2
2 3
2 3
2 4
2 4
2 6
2 7
2 7
3 0
3 3
#다나2SR영문메뉴얼 rev.0 2007.7.3 5:43 PM 페이지4 001 Acrobat™ PDFWriter 300DPI 60LPI

3 6
3 9
4 0
4 6
5 3
5 3
5 4
5 5
5 5
5 6
5 7
5 9
6 0
6 1
6 3
6 4
6 4
6 4
6 4
6 4
6 5
6 5
6 6
6 7
- Soft-Release-ST
•General Precautions for All Infusion Sets
4. Bolusing and temporary basal rates
•B o l u s
•Temporary basal
5. Remote Control
•Synchronize the Remote Control with the Pump
•B o l u s
•Lock Setting
•Setting the Clock
•Disconnect Remote Control and Insulin Pump
•Checking your blood glucose level
•Calculating your bolus dosage
•Glucose meter related error messages and troubleshooting
6. Troubleshooting
•When hypoglycemia (low blood sugar) occurs
•When hyperglycemia (high blood sugar) occurs
•Problem / Correction Action
7. List of alarms and audible signals
•Low reservoir
•ERROR screen
•Daily remainder
•Daily max
•Low battery
8. Specifications, symbols, warranty
•General specifications
•Classification and compliance with standards
•Universal symbols
•Warranty
#다나2SR영문메뉴얼 rev.0 2007.7.3 5:43 PM 페이지5 001 Acrobat™ PDFWriter 300DPI 60LPI
4
1. Before using your DANA DiabecareⓇ IISR Insulin Pump,infusion set and reservoir
Indications for Use
The DANA DiabecareⓇ IISR insulin pump, infusion set and reservoir are intended for the continuous delivery of insulin for the
management of diabetes mellitus. It is not intended for the delivery of blood or blood products.
Safety Precautions
1. Patients must not open the pump housing or handle any internal components.
2. The DANA DiabecareⓇ IISR insulin pump is intended for use with a proprietary infusion set, reservoir, and other accessories
specified in this booklet. Do not use the pump with any other infusion system or accessories.
3. If you experience any trouble with the pump, switch the pump off immediately and contact your healthcare provider or your
sales representative.
4. Use the pad of your finger to press the buttons. DO NOT use your fingernails or any sharp objects to press the buttons.
5. Avoid the following conditions for safe storage and transport of the DANA DiabecareⓇ I I S R :
1) Temperatures below -0.5°C or above 40°C .
2) Atmospheric pressure below 500mmHg or above 1060mmHg.
3) Humidity above 95%.
4) Exposure to excessive dust or a salty environment.
5) Exposure to explosive gas.
6) Exposure to direct sunlight.
7) Environments where an electromagnetic field is generated by a medical device.
6. The pump must not be used in the presence of intense electromagnetic fields, such as those generated by certain
electrically powered medical devices. The pump should be removed prior to the user having a CT Scan, MRI or X-ray.
7. The pump comes with factory default settings for alarms, maximum daily totals, basal and bolus doses. These settings
may be modified by a healthcare professional.
8. Remove the battery for long-term storage.
9. The reservoir and infusion set are intended for single use only. Do not reuse either the reservoir or infusion set.
10. Change the reservoir and the infusion set regularly, as recommended by your healthcare professional. Do not use either
for longer than 72 hours.
11. The shelf life of the reservoir and the infusion set is 3 years. Please check the expiration dates regularly and dispose of
any expired accessories.
#다나2SR영문메뉴얼 rev.0 2007.7.3 5:43 PM 페이지4 001 Acrobat™ PDFWriter 300DPI 60LPI

1. indicates the presence of a hazard which can cause severe personal injury, death or substantial property
damage if the warning is ignored.
2. Caution indicates the presence of a hazard which will or can cause minor personal injury or property damage if
the warning is ignored.
3. Note advises the user of installation, operation or maintenance information which is important but not hazard-
r e l a t e d .
5
1. Before using your DANA DiabecareⓇ IISR insulin pump, infusion set and reservoir
Cleaning your DANA DiabecareⓇ IISR insulin pump
1. The outside of the pump should be cleaned monthly.
2. When cleaning the pump, use a cloth moistened with water or a neutral pH detergent and wipe it with a dry cloth.
3. Do not use thinner, alcohol, benzene or similar solvents.
Explanation of “W a r n i n g ,”“C a u t i o n ,”and “N o t e”S y m b o l s
Contents of the Dana DiabecareⓇ IISR Insulin Pump Kit
INSULIN PUMP REMOTE CONTROL RESERVOIR (6) INFUSION SETS (6) DANA EASY SETTER (1) LINKING SCREW (2) BATTERY (2) ADHESIVE TAPE
B E L T BATTERY KEY (2) LEATHER CASE (2) BRA POUCH SHOWER POUCH SHOULDER POUCH TEGADERM MEFIX
W a r n i n g
C a u t i o n
N o t e
N o t e Additional accessories may be purchased separately
N o t e MEFIX is not available in Canada
™
#다나2SR영문메뉴얼 rev.0 2007.7.3 5:43 PM 페이지5 001 Acrobat™ PDFWriter 300DPI 60LPI

6
Identification and Description of the DANA IISR
The DANA DiabecareⓇ IISR insulin pump, infusion set and reservoir are intended for the continuous delivery of insulin for the
management of diabetes mellitus. It is not intended for the delivery of blood or blood products.
①Reservoir C o m p a r t m e n t
②B a t t e r yC o m p a r t m e n t
⑦ B a t t e r yC o m p a r t m e n t
③Reservoir Window
④Control Panel
⑤L C D
⑥Blood Glucose Meter Test Port
① Reservoir Compartment: The reservoir and linking screw are
inserted in this compartment. Turn cap clockwise to open.
②Battery Compartment: The battery is inserted in this
compartment. Turn cap counterclockwise to open.
⑦Battery Compartment: Push the cover of the battery to
the arrow direction to open.
③Reservoir Window: Remaining insulin amount can be
visually verified here.
⑥Blood Glucose Meter Test Port: Test strips are inserted
here for glucose monitoring.
④Control Panel: Contains the four buttons which are used
to increase and decrease settings, switch screens and
select functions.
⑤LCD: Displays status of system features and system
messages and serves as the user interface with pump
software. Lights automatically when any button is pressed.
① Press to increase insulin dosages, time and date.
② Press to decrease insulin dosages, time and date.
③ Press to move to the next choice on the LCD.
④ Press to select the function highlighted on the LCD.
①
②
③
④
N o t e Buttons will beep when pressed.
#다나2SR영문메뉴얼 rev.0 2007.7.3 5:43 PM 페이지6 001 Acrobat™ PDFWriter 300DPI 60LPI
7
1. Before using your DANA DiabecareⓇ IISR insulin pump, infusion set and reservoir
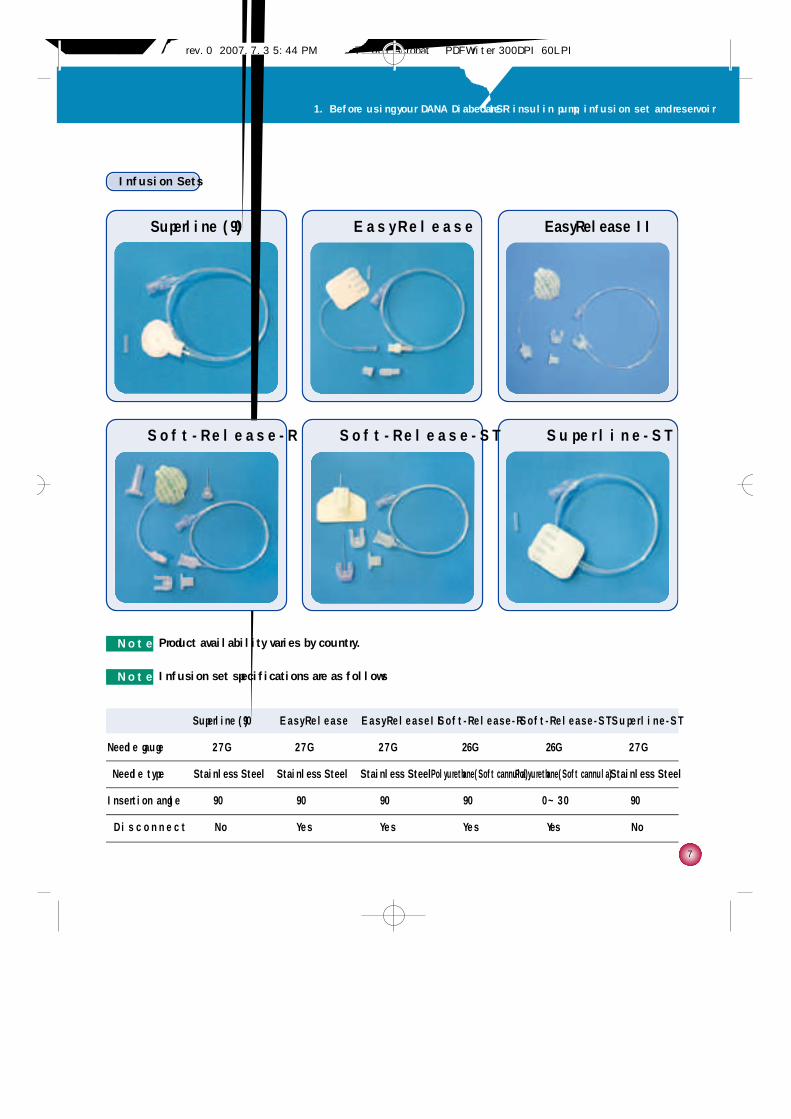
Infusion Sets
Superline (90。) E a s y R e l e a s e E a s y R e l e a s e I I S o f t - R e l e a s e - R S o f t - R e l e a s e - S T S u p e r l i n e - S T
Needle gauge 2 7 G 2 7 G 2 7 G 26G 26G 2 7 G
Needle type Stainless Steel Stainless Steel Stainless Steel Polyurethane(Soft cannula)Polyurethane(Soft cannula) Stainless Steel
Insertion angle 9 0° 9 0° 9 0° 9 0° 0 ~ 3 0° 9 0°
D i s c o n n e c t N o Y e s Y e s Y e s Yes N o
Superline (90。)
S u p e r l i n e - S T
EasyRelease IIE a s y R e l e a s e
S o f t - R e l e a s e - R S o f t - R e l e a s e - S T
N o t e Infusion set specifications are as follows
N o t e Product availability varies by country.
#다나2SR영문메뉴얼 rev.0 2007.7.3 5:44 PM 페이지7 001 Acrobat™ PDFWriter 300DPI 60LPI

8
2. Set-up and basic functions
Explanation of the display screens
Initial Display
①Displays current time and date.
②Displays remaining battery charge as 100%, 75%, 50%, 25%.
③Displays the amount of insulin remaining in the reservoir in units.
(1ml=100 units).
①
②
③
Basic Display
①CHECK/REVIEW icon - Choose the first icon (magnifying glass) to
check basal rates, previous bolus doses, last bolus, previous daily
totals and prime history (see page 15 for reviewing the history).
②BOLUS icon - Choose the second icon (syringe) to deliver bolus doses.
③TEMPORARY BASAL icon - Choose the third icon (person) for
temporary changes in basal rates for exercising or other events.
④SET/PROGRAM icon - Choose the fourth icon (sliding scale) to
set basal rates, preset bolus doses and set clock.
① ③
② ④
C a u t i o n For accurate reading of the remaining battery charge,
check the initial display immediately after delivering a bolus
N o t e Push any button while viewing the initial display to bring
up the basic display screen.
N o t e The DANA DiabecareⓇ IISR LCD screen will automatically go blank after one minute to conserve battery power.
Any button press will also activate the backlight for 10 seconds.
#다나2SR영문메뉴얼 rev.0 2007.7.3 5:44 PM 페이지8 001 Acrobat™ PDFWriter 300DPI 60LPI
9
2. Set-up and basic functions
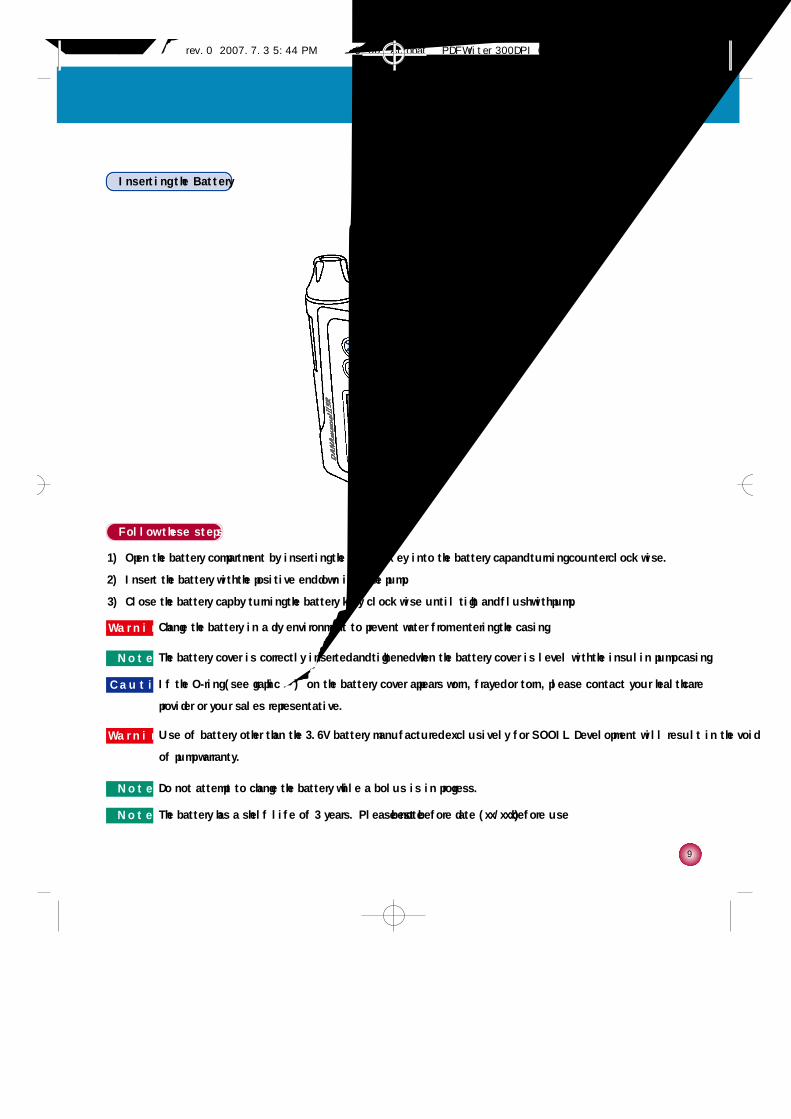
Inserting the Battery
Follow these steps
1) Open the battery compartment by inserting the battery key into the battery cap and turning counterclockwise.
2) Insert the battery with the positive end down into the pump.
3) Close the battery cap by turning the battery key clockwise until tight and flush with pump.
C a u t i o n If the O-ring (see graphic ①) on the battery cover appears worn, frayed or torn, please contact your healthcare
provider or your sales representative.
N o t e The battery cover is correctly inserted and tightened when the battery cover is level with the insulin pump casing.
N o t e Do not attempt to change the battery while a bolus is in progress.
N o t e The battery has a shelf life of 3 years. Please note “best before date (xx/xxx)”before use
W a r n i n gChange the battery in a dry environment to prevent water from entering the casing.
W a r n i n gUse of battery other than the 3.6V battery manufactured exclusively for SOOIL Development will result in the void
of pump warranty.
O - r i n g
graphic ①
#다나2SR영문메뉴얼 rev.0 2007.7.3 5:44 PM 페이지9 001 Acrobat™ PDFWriter 300DPI 60LPI
1 0
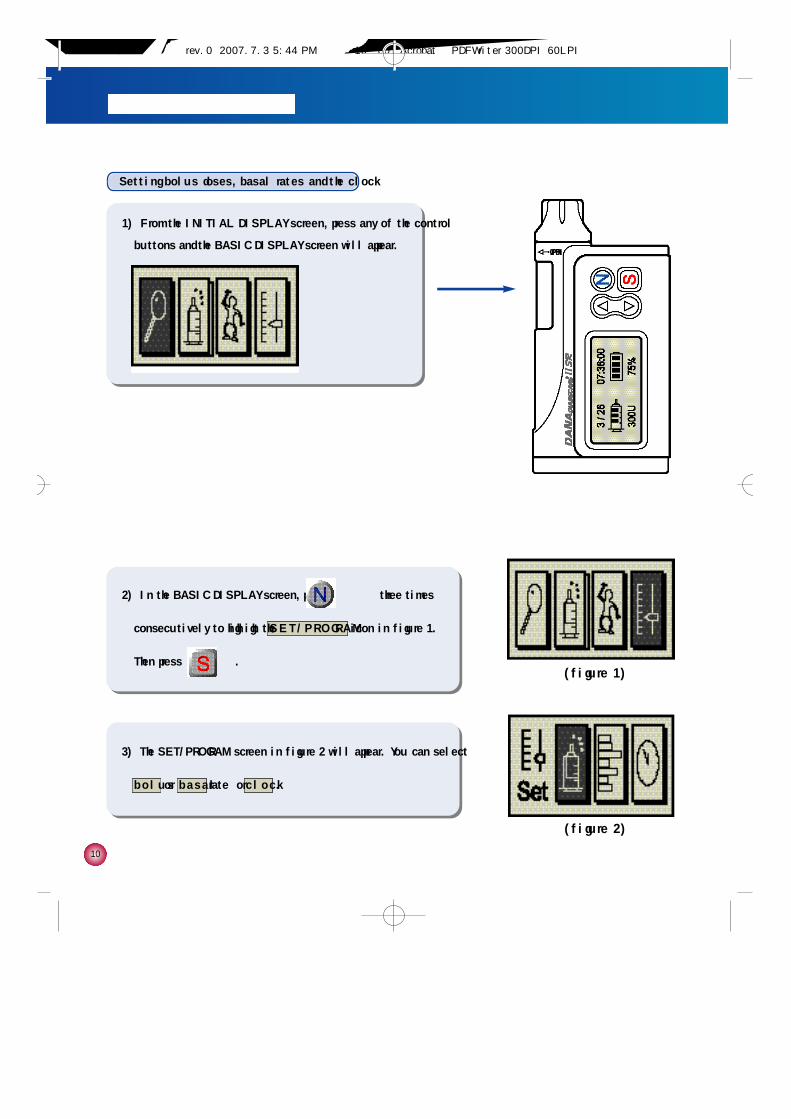
Setting bolus doses, basal rates and the clock
1) From the INITIAL DISPLAY screen, press any of the control
buttons and the BASIC DISPLAY screen will appear.
2) In the BASIC DISPLAY screen, press three times
consecutively to highlight the S E T / P R O G R A Micon in figure 1.
Then press .(figure 1)
(figure 2)
3) The SET/PROGRAM screen in figure 2 will appear. You can select
b o l u sor b a s a lrate or c l o c k.
#다나2SR영문메뉴얼 rev.0 2007.7.3 5:44 PM 페이지10 001 Acrobat™ PDFWriter 300DPI 60LPI
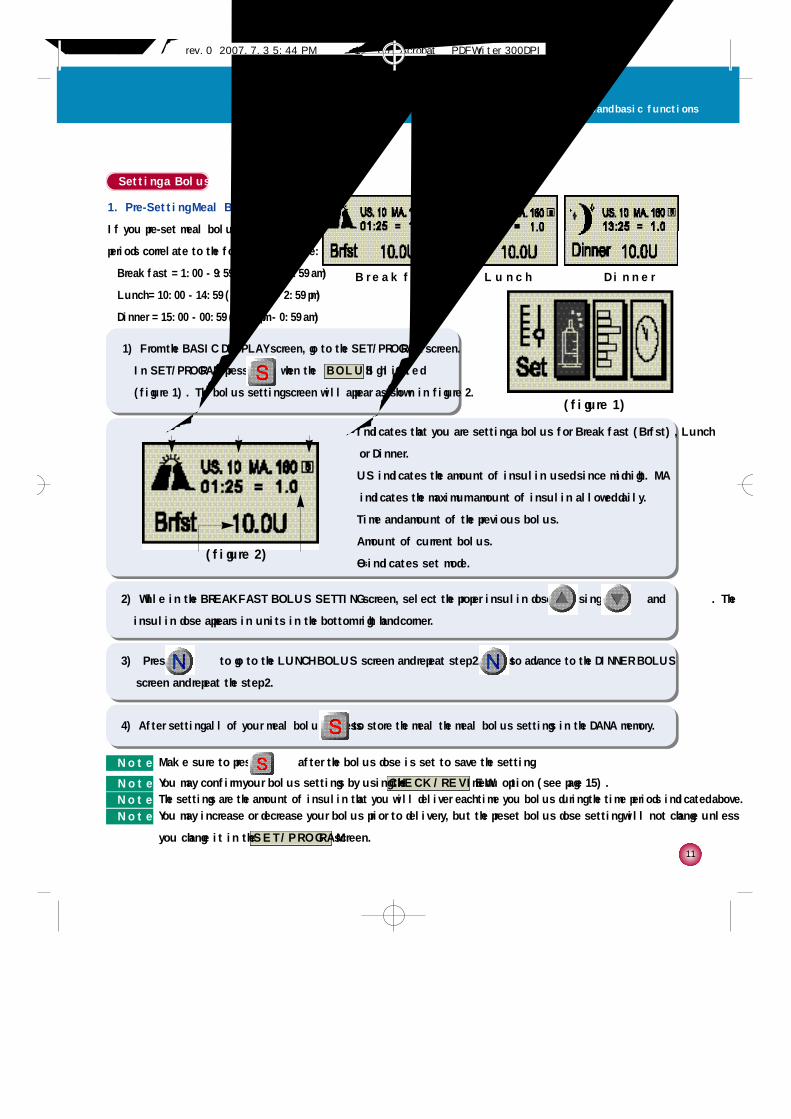
Setting a Bolus
1. Pre-Setting Meal Boluses
If you pre-set meal boluses, the following time
periods correlate to the following schedule:
•Breakfast = 1:00 - 9:59 (1:00 am - 9:59 am)
•Lunch = 10:00 - 14:59 (10:00 am - 2:59 pm)
•Dinner = 15:00 - 00:59 (3:00 pm - 0:59 am)
1 1
2. Set-up and basic functions
B r e a k f a s t L u n c h D i n n e r
(figure 1)
(figure 2)
①Indicates that you are setting a bolus for Breakfast (Brfst), Lunch
or Dinner.
②US indicates the amount of insulin used since midnight. MA
indicates the maximum amount of insulin allowed daily.
③Time and amount of the previous bolus.
④Amount of current bolus.
⑤□indicates set mode.
① ② ⑤
④ ③
2) While in the BREAKFAST BOLUS SETTING screen, select the proper insulin dose by using and . The
insulin dose appears in units in the bottom right hand corner.
3) Press to go to the LUNCH BOLUS screen and repeat step 2. Press to advance to the DINNER BOLUS
screen and repeat the step 2.
4) After setting all of your meal boluses press to store the meal the meal bolus settings in the DANA memory.
1) From the BASIC DISPLAY screen, go to the SET/PROGRAM screen.
In SET/PROGRAM press when the B O L U Sh i g h l i g h t e d
(figure 1). The bolus setting screen will appear as shown in figure 2.
N o t e Make sure to press after the bolus dose is set to save the setting.
N o t e You may confirm your bolus settings by using the C H E C K / R E V I E Wmenu option (see page 15).
N o t e The settings are the amount of insulin that you will deliver each time you bolus during the time periods indicated above.
N o t e You may increase or decrease your bolus prior to delivery, but the preset bolus dose setting will not change unless
you change it in the S E T / P R O G R A Mscreen.
S
#다나2SR영문메뉴얼 rev.0 2007.7.3 5:44 PM 페이지11 001 Acrobat™ PDFWriter 300DPI 60LPI
1 2
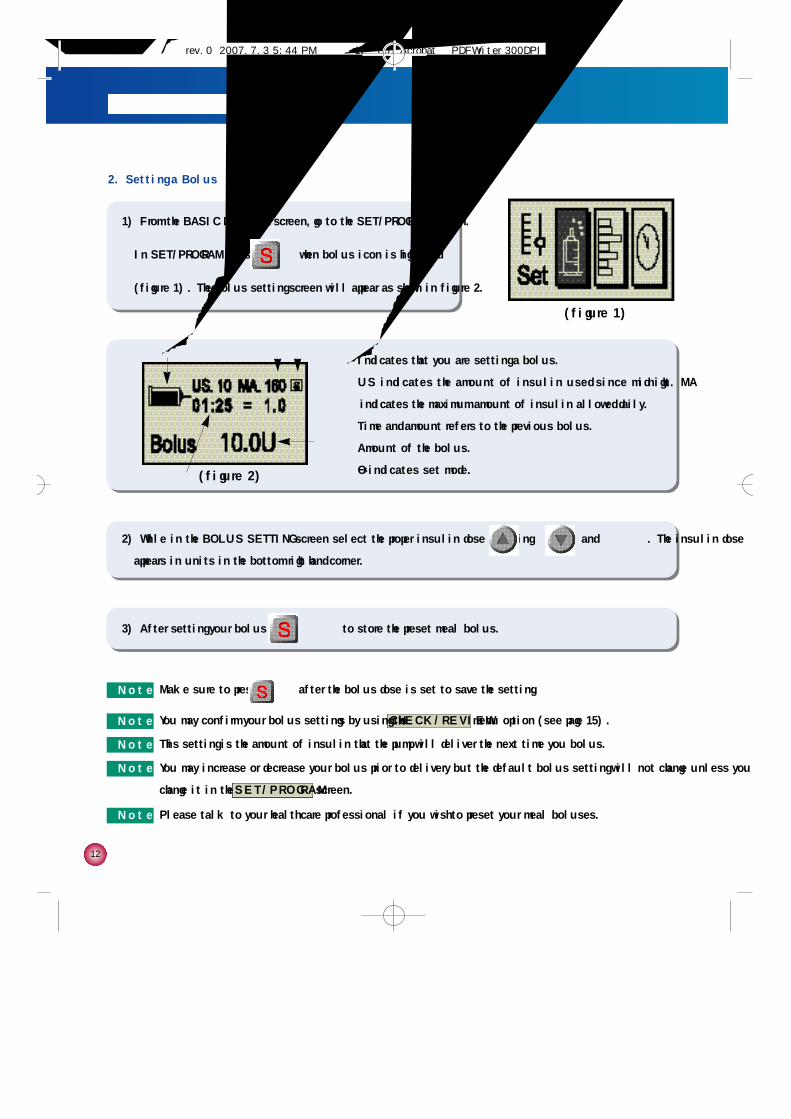
2. Setting a Bolus
①Indicates that you are setting a bolus.
②US indicates the amount of insulin used since midnight. MA
indicates the maximum amount of insulin allowed daily.
③Time and amount refers to the previous bolus.
④Amount of the bolus.
⑤□indicates set mode.
(figure 1)
(figure 2)
① ② ⑤
③
④
2) While in the BOLUS SETTING screen select the proper insulin dose by using and . The insulin dose
appears in units in the bottom right hand corner.
3) After setting your bolus press to store the preset meal bolus.
1) From the BASIC DISPLAY screen, go to the SET/PROGRAM screen.
In SET/PROGRAM press when bolus icon is highlighted
(figure 1). The bolus setting screen will appear as shown in figure 2.
N o t e Make sure to press after the bolus dose is set to save the setting.
N o t e You may confirm your bolus settings by using the C H E C K / R E V I E Wmenu option (see page 15).
N o t e This setting is the amount of insulin that the pump will deliver the next time you bolus.
N o t e Please talk to your health care professional if you wish to preset your meal boluses.
N o t e You may increase or decrease your bolus prior to delivery but the default bolus setting will not change unless you
change it in the S E T / P R O G R A Mscreen.
S
#다나2SR영문메뉴얼 rev.0 2007.7.3 5:44 PM 페이지12 001 Acrobat™ PDFWriter 300DPI 60LPI

1 3
2. Set-up and basic functions
(figure 1)
①Basal Profile, which shows basal rates in a graph from midnight to
midnight.
②Chronological time which corresponds to the highlighted section
of the basal profile.
③Total basal amount programmed for delivery in a 24 hour period.
④Basal Rate for the time period shown in ②.
⑤□indicates set mode.(figure 2)
① ② ⑤
④
③
Setting and Adjusting Basal Rates
1) From the BASIC DISPLAY screen, go to the SET/PROGRAM
screen. Press when the B A S A Licon is highlighted (figure 1)
in the SET/PROGRAM screen. The BASAL RATE SETTING screen
will appear as in figure 2.
2) The Basal Profile appears in the lower left side of the screen. Use to move between the 24 rates.
The corresponding chronological time will appear in the upper right corner. Use the and buttons to
change the basal rate for the highlighted time period.
3) After basal rates are set, press to save the settings in the DANA memory.
N o t e Basal rates can be adjusted in units per hour.
N o t e Figure 2 shows a basal profile that has been set in units per hour(u/h).
N o t e You may confirm your basal settings by using the C H E C K / R E V I E Wmenu option (see page 15).
S
#다나2SR영문메뉴얼 rev.0 2007.7.3 5:44 PM 페이지13 001 Acrobat™ PDFWriter 300DPI 60LPI

1 4
Setting the Clock
1) From the BASIC DISPLAY, go to the SET/PROGRAM screen. Press
to highlight the CLOCK icon and press (figure 1). The
CLOCK SETTING screen will appear as shown in figure 2.
2) U s e to move between the year and month and date, as well
as hours and minutes. Use a n d to make the desired
changes.
(figure 1)
(figure 2)
3) After making the changes press to save the setting and return
to the BASIC DISPLAY screen.
C a u t i o n You must set a.m. and p.m. correctly. If the clock shows 03:00 p.m. and you want 03:00 a.m. you must press
until the screen reflects your desired change.
N o t e The pump can be programmed in either 12 hour or 24 hour format.
#다나2SR영문메뉴얼 rev.0 2007.7.3 5:44 PM 페이지14 001 Acrobat™ PDFWriter 300DPI 60LPI

1 5
2. Set-up and basic functions
(figure 1)
(figure 2)
(figure 3)
(figure 4)
Checking Bolus Doses, Basal Rates and Reviewing Memory Data
1) In the BASIC DISPLAY screen press until the C H E C K / R E V I E W
icon is highlighted as in figure 1. Then press .
2) The Review icon will be highlighted as in figure 2 (if not, press
to change the highlighted icon). Then press .
3) The BASAL PROFILE screen (figure 3) will appear. Press to
move between basal profiles and confirm settings. To review the
previous meal bolus press .
4) The MEAL BOLUS screen (figure 4) will appear. Press to
move from one meal period to the next. Press to review the
history of the previous 500 boluses.
N o t e The CHK icon is used for reviewing both basal rates and bolus settings.
N o t e □indicates check mode.
N o t e If your bolus and basal dose rate settings are incorrect please return to the BASIC DISPLAY and choose the
SET/PROGRAM icon to make adjustments.
C
#다나2SR영문메뉴얼 rev.0 2007.7.3 5:44 PM 페이지15 001 Acrobat™ PDFWriter 300DPI 60LPI

1 6
(figure 5)
BOLUS HISTORY
1: 1/4 13:00 - 4 . 5
2: 1/4 07:30 - 5 . 0
(figure 6)
DAILY TOTAL HIST.
1: 1/4 - 1 5 . 0 U
2: 1/3 - 1 4 . 0 U
(figure 7)
PRIME HISTORY
1: 1/4 10:00 - 2 3 5
2: 1/1 20:30 - 2 2 5
(figure 8)
CARBO HISTORY
1: 9/24 14:59 80
2: 9/13 12:09 72
(figure 9)
SHIPPING INFO1. S/N : AGJ00019GF
2. COUNTRY : KOR
3. DATE : 12/SEP, 2006
5) Use and to review the Bolus History including date,
time and amount delivered (figure 5). Press to review the 500
previous Daily Totals.
6) Use and to review the Daily Total History including date
and the total amount of insulin (figure 6). Press to review the
500 previous Prime Amounts.
7) U s e a n d to review the Prime History including date,time and
amount (figure 7). Press to review the 500 previous Carbohydrate amount.
8) Use and to review the Carbo History including date,time and
amount (figure 8). Press to review the Shipping info screen.
9) In the Shipping Info(fugure 9)press to return to the basic display.
N o t e - Bolus History: Date, time and amount of past bolus deliveries.
- Daily Total History: Total bolus and basal delivery amount for each day.
- Prime History: Date and time of past primes, including the
amount of insulin left in the reservoir following each prime.
#다나2SR영문메뉴얼 rev.0 2007.7.3 5:44 PM 페이지16 001 Acrobat™ PDFWriter 300DPI 60LPI
1 7
2. Set-up and basic functions
(figure 1)
(figure 2)
(figure 3)
(figure 4)
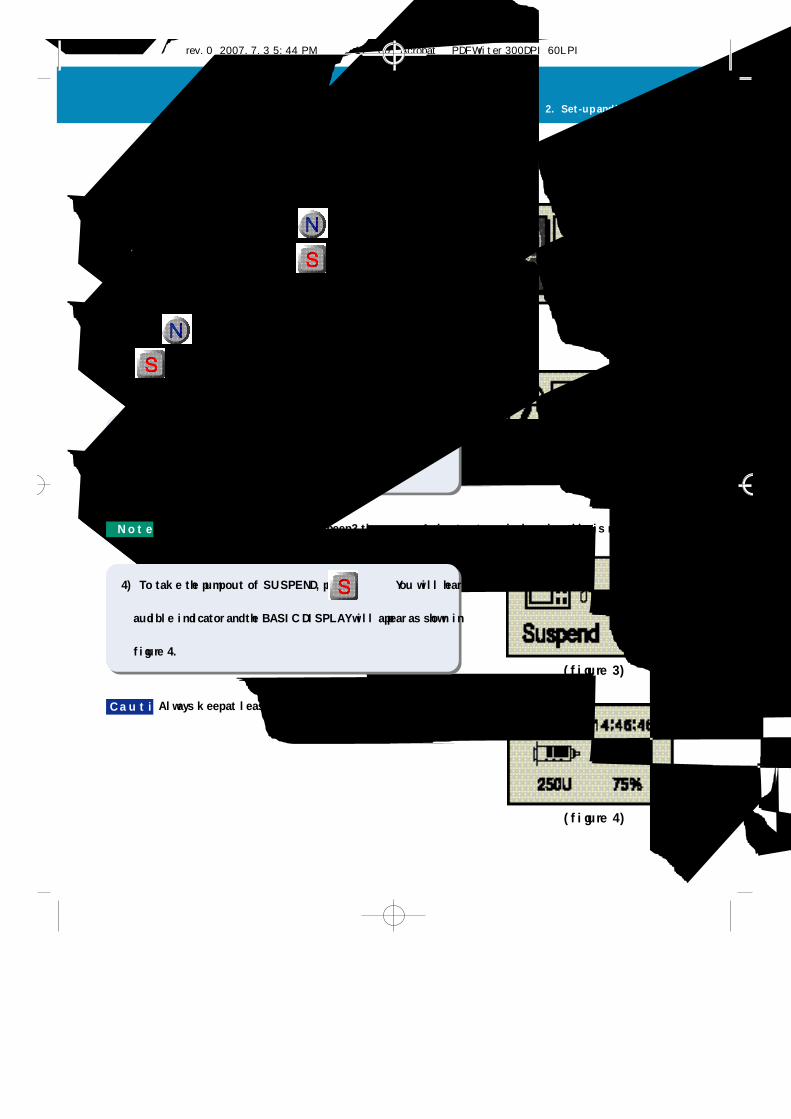
Suspending the pump
선택선택
1) In the BASIC DISPLAYscreen press to highlight the
CHECK/REVIEW icon. Then press .
2) Press to highlight the S U S P E N Dicon (figure 2). Then press
.
선택선택
3) The pump will give an audible tone and the screen will indicate the
pump is suspended (figure 3).
선택선택
4) To take the pump out of SUSPEND, press You will hear an
audible indicator and the BASIC DISPLAY will appear as shown in
figure 4.
C a u t i o n Always keep at least one power kit (2 batteries) available for backup.
N o t e When you suspend the pump it will beep 3 times every 4 minutes to remind you insulin is not being delivered.
#다나2SR영문메뉴얼 rev.0 2007.7.3 5:44 PM 페이지17 001 Acrobat™ PDFWriter 300DPI 60LPI
1 8
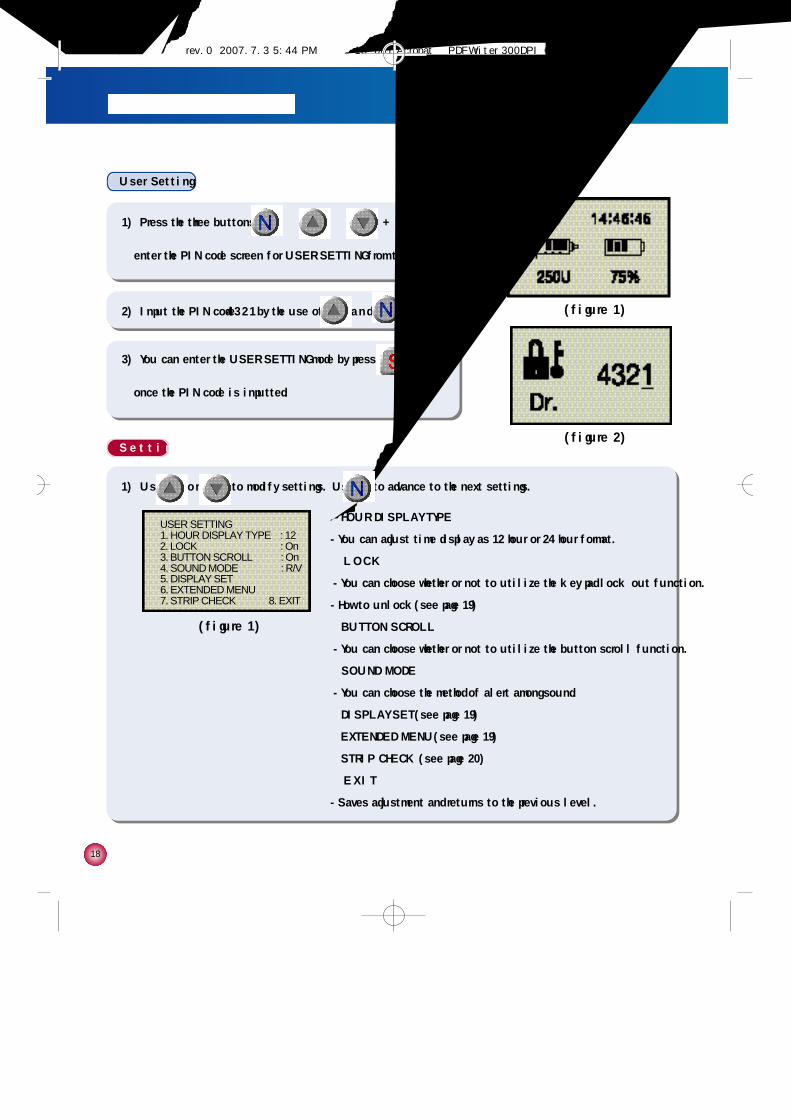
User Setting
(figure 1)
(figure 2)
1) Press the three buttons ( + + ) at once to
enter the PIN code screen for USER SETTING from the initial screen.
2) Input the PIN code “4 3 2 1”by the use of a n d b u t t o n s .
3) You can enter the USER SETTING mode by pressing b u t t o n
once the PIN code is inputted.
S e t t i n g
①HOUR DISPLAY TYPE
- You can adjust time display as 12 hour or 24 hour format.
② L O C K
- You can choose whether or not to utilize the key pad lock out function.
- How to unlock(see page 19)
③BUTTON SCROLL
- You can choose whether or not to utilize the button scroll function.
④SOUND MODE
- You can choose the method of alert among sound.
⑤DISPLAY SET(see page 19)
⑥EXTENDED MENU(see page 19)
⑦STRIP CHECK (see page 20)
⑧ E X I T
- Saves adjustment and returns to the previous level.
USER SETTING1. HOUR DISPLAY TYPE : 122. LOCK : On3. BUTTON SCROLL : On4. SOUND MODE : R/V5. DISPLAY SET6. EXTENDED MENU7. STRIP CHECK 8. EXIT
▶
(figure 1)
1) Use o r to modify settings. Use to advance to the next settings.
#다나2SR영문메뉴얼 rev.0 2007.7.3 5:44 PM 페이지18 001 Acrobat™ PDFWriter 300DPI 60LPI

1 9
2. Set-up and basic functions
N o t e How to unlock
①If the lock out feature is on, the following screen will appear.(figure 1)
②To unlock the pump, in the exact order press , , , .
③The following screen will appear(figure 2).
④Enter 1, 2, 3, 4 by using the up arrow and next key.
⑤The pump will return to the basic display.
(figure 1)
(figure 2)
⑤DISPLAY SET
1. LCD on time
- Adjust the duration of the LCD display by seconds.
2. EL on time
- Adjust the duration of the Backlight by seconds.
3. Language
- You can choose a language.
4. E X I T
- Saves adjustment and returns to the previous level.
DISPLAY SET1. LCD ON TIME(S) : 602. EL ON TIME(S) : 103. LANGUAGE : KO4. EXIT
⑥EXTENDED MENU
1. EXTENDED BOLUS
- Choose whether or not to utilize the Extended Bolus function.
2. U T I L I T Y
- Choose whether or not to utilize the Utility function.
3. NO CARBO MODE
- If the “NO CARBO MODE”was selected as “O f f”, a pop-up window
will display to perform the carbohydrate counting function, once you
checked your BG level by the DANA IISG pump. If the “NO CARBO
M O D E”was selected as “O n”, the pop-up window will not be activated
after the checking BG level.
4. E X I T
- Saves adjustment and returns to the previous level.
EXTENDED MENU1. EXTENDED BOLUS : On2. UTILITY : Off3. NO CARBO MODE : Off4. EXIT
(figure 3)
(figure 4)
▶
▶
#다나2SR영문메뉴얼 rev.0 2007.7.3 5:44 PM 페이지19 001 Acrobat™ PDFWriter 300DPI 60LPI
2 0
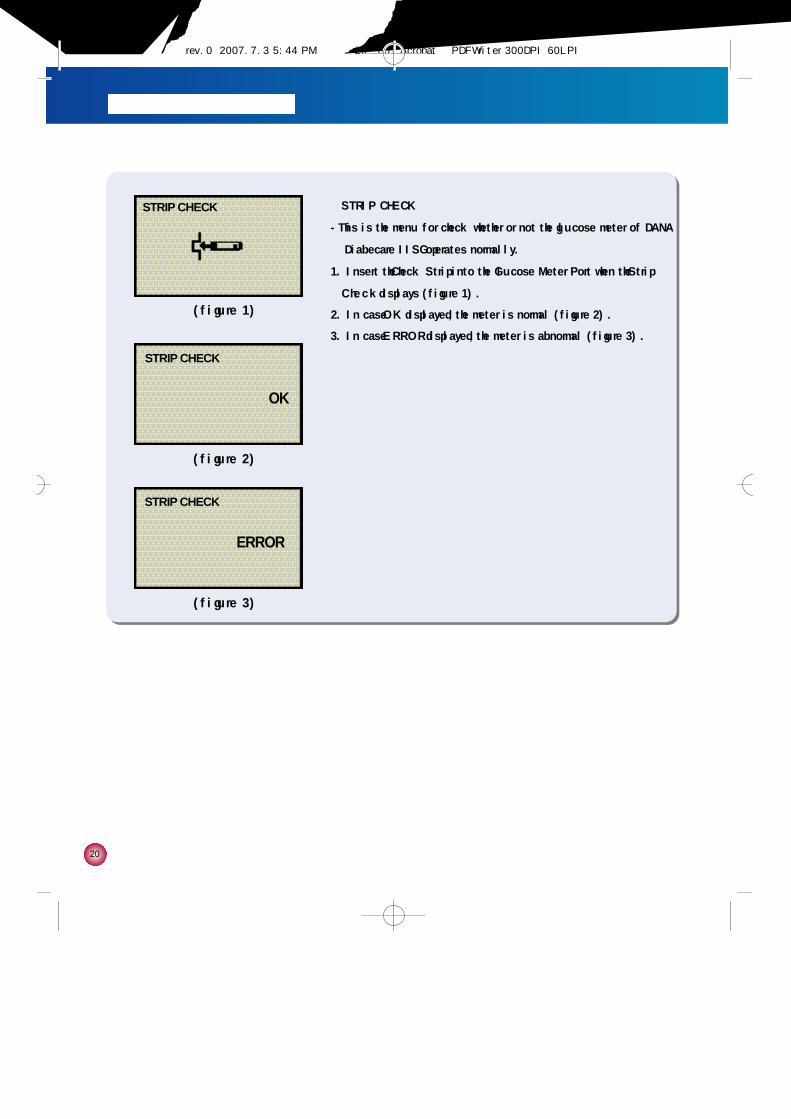
⑦STRIP CHECK
- This is the menu for check whether or not the glucose meter of DANA
Diabecare IISG operates normally.
1. Insert the “Check Strip”into the Glucose Meter Port when the “Strip
C h e c k”displays (figure 1).
2. In case “O K”displayed, the meter is normal (figure 2).
3. In case “E R R O R”displayed, the meter is abnormal (figure 3).
STRIP CHECK
(figure 1)
(figure 2)
(figure 3)
STRIP CHECK
E R R O R
STRIP CHECK
O K
#다나2SR영문메뉴얼 rev.0 2007.7.3 5:44 PM 페이지20 001 Acrobat™ PDFWriter 300DPI 60LPI
2 1
3. Filling and inserting a new reservoir
3. Filling and inserting a new reservoir
Changing the reservoir
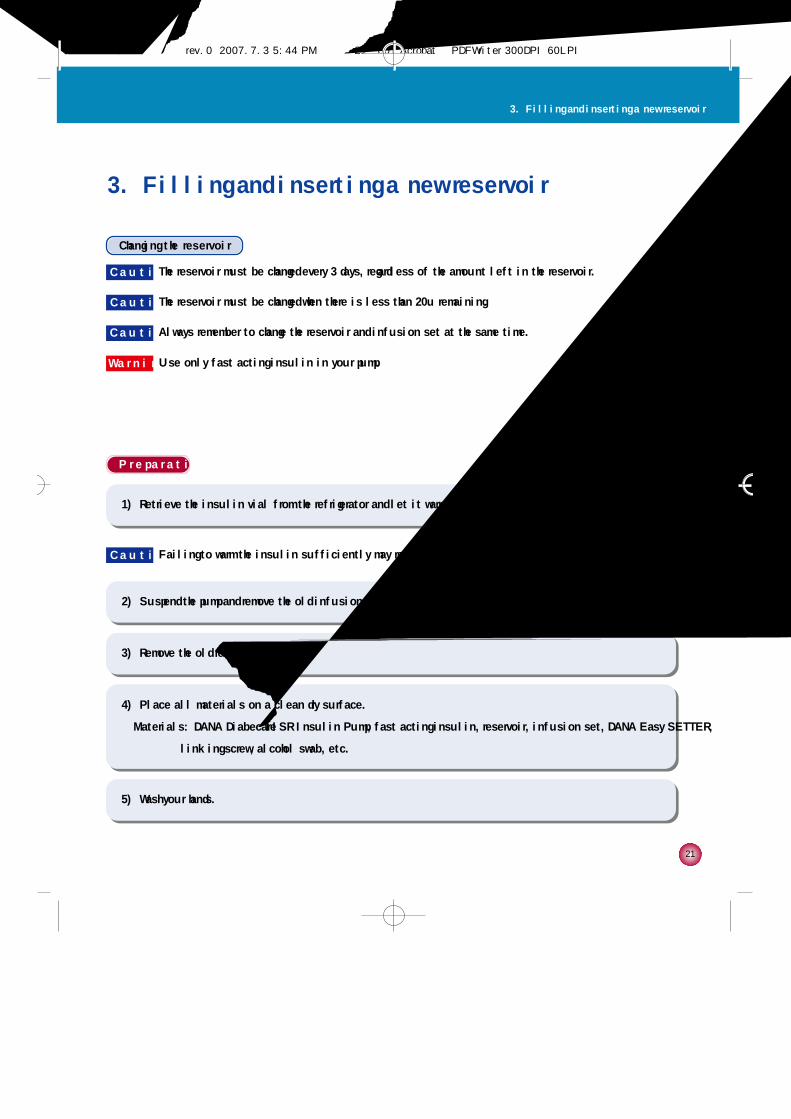
P r e p a r a t i o n
1) Retrieve the insulin vial from the refrigerator and let it warm up to room temperature for 15-30 minutes.
5) Wash your hands.
2) Suspend the pump and remove the old infusion set.
3) Remove the old reservoir.
4) Place all materials on a clean dry surface.
Materials: DANA DiabecareⓇ IISR Insulin Pump, fast acting insulin, reservoir, infusion set, DANA Easy SETTER,
linking screw, alcohol swab, etc.
C a u t i o n The reservoir must be changed every 3 days, regardless of the amount left in the reservoir.
C a u t i o n The reservoir must be changed when there is less than 20u remaining.
C a u t i o n Always remember to change the reservoir and infusion set at the same time.
C a u t i o n Failing to warm the insulin sufficiently may result in air bubbles in the reservoir.
W a r n i n gUse only fast acting insulin in your pump.
#다나2SR영문메뉴얼 rev.0 2007.7.3 5:44 PM 페이지21 001 Acrobat™ PDFWriter 300DPI 60LPI
2 2
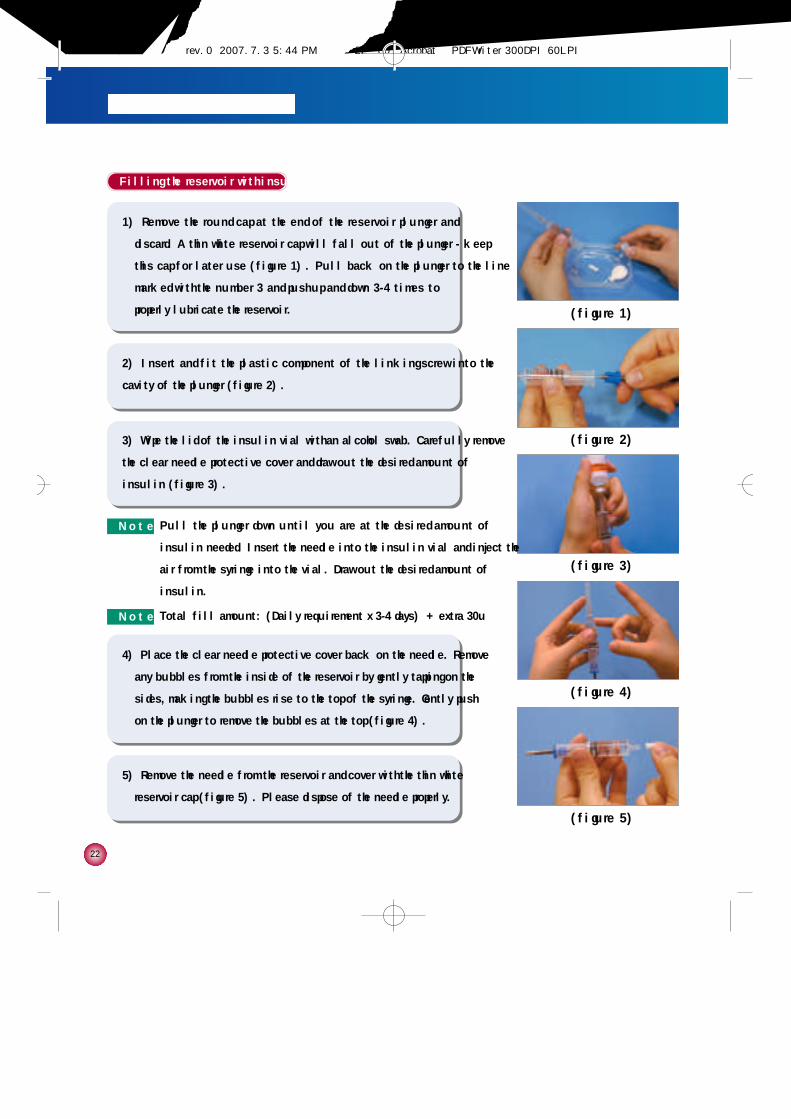
Filling the reservoir with insulin
1) Remove the round cap at the end of the reservoir plunger and
discard. A thin white reservoir cap will fall out of the plunger - keep
this cap for later use (figure 1). Pull back on the plunger to the line
marked with the number 3 and push up and down 3-4 times to
properly lubricate the reservoir.
2) Insert and fit the plastic component of the linking screw into the
cavity of the plunger (figure 2).
3) Wipe the lid of the insulin vial with an alcohol swab. Carefully remove
the clear needle protective cover and draw out the desired amount of
insulin (figure 3).
5) Remove the needle from the reservoir and cover with the thin white
reservoir cap (figure 5). Please dispose of the needle properly.
4) Place the clear needle protective cover back on the needle. Remove
any bubbles from the inside of the reservoir by gently tapping on the
sides, making the bubbles rise to the top of the syringe. Gently push
on the plunger to remove the bubbles at the top (figure 4).
(figure 1)
(figure 2)
(figure 3)
(figure 4)
(figure 5)
N o t e Pull the plunger down until you are at the desired amount of
insulin needed. Insert the needle into the insulin vial and inject the
air from the syringe into the vial. Draw out the desired amount of
insulin.
N o t e Total fill amount: (Daily requirement x 3-4 days) + extra 30u
#다나2SR영문메뉴얼 rev.0 2007.7.3 5:44 PM 페이지22 001 Acrobat™ PDFWriter 300DPI 60LPI
2 3
3. Filling and inserting a new reservoir
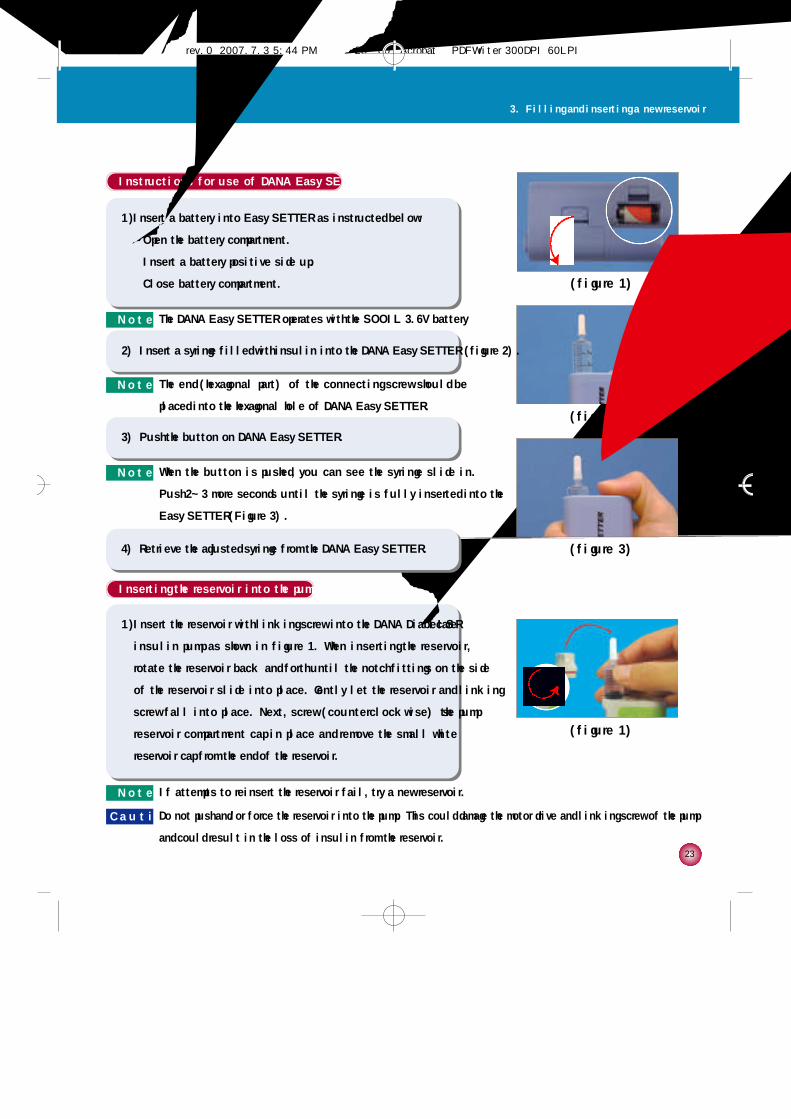
Inserting the reservoir into the pump
1 )Insert the reservoir with linking screw into the DANA DiabecareⓇ I I S R
insulin pump as shown in figure 1. When inserting the reservoir,
rotate the reservoir back and forth until the notch fittings on the side
of the reservoir slide into place. Gently let the reservoir and linking
screw fall into place. Next, screw (counterclockwise) the pump’s
reservoir compartment cap in place and remove the small white
reservoir cap from the end of the reservoir.
(figure 1)
N o t e If attempts to reinsert the reservoir fail, try a new reservoir.
C a u t i o n Do not push and/or force the reservoir into the pump. This could damage the motor drive and linking screw of the pump
and could result in the loss of insulin from the reservoir.
(figure 2)
(figure 1)
(figure 3)
N o t e The DANA Easy SETTER operates with the SOOIL 3.6V battery
Instructions for use of DANA Easy SETTER
1 )Insert a battery into Easy SETTER as instructed below:
①Open the battery compartment.
②Insert a battery positive side up.
③Close battery compartment.
2) Insert a syringe filled with insulin into the DANA Easy SETTER (figure 2).
4) Retrieve the adjusted syringe from the DANA Easy SETTER.
N o t e The end (hexagonal part) of the connecting screw should be
placed into the hexagonal hole of DANA Easy SETTER.
3) Push the button on DANA Easy SETTER.
N o t e When the button is pushed, you can see the syringe slide in.
Push 2~3 more seconds until the syringe is fully inserted into the
Easy SETTER(Figure 3).
#다나2SR영문메뉴얼 rev.0 2007.7.3 5:44 PM 페이지23 001 Acrobat™ PDFWriter 300DPI 60LPI
2 4
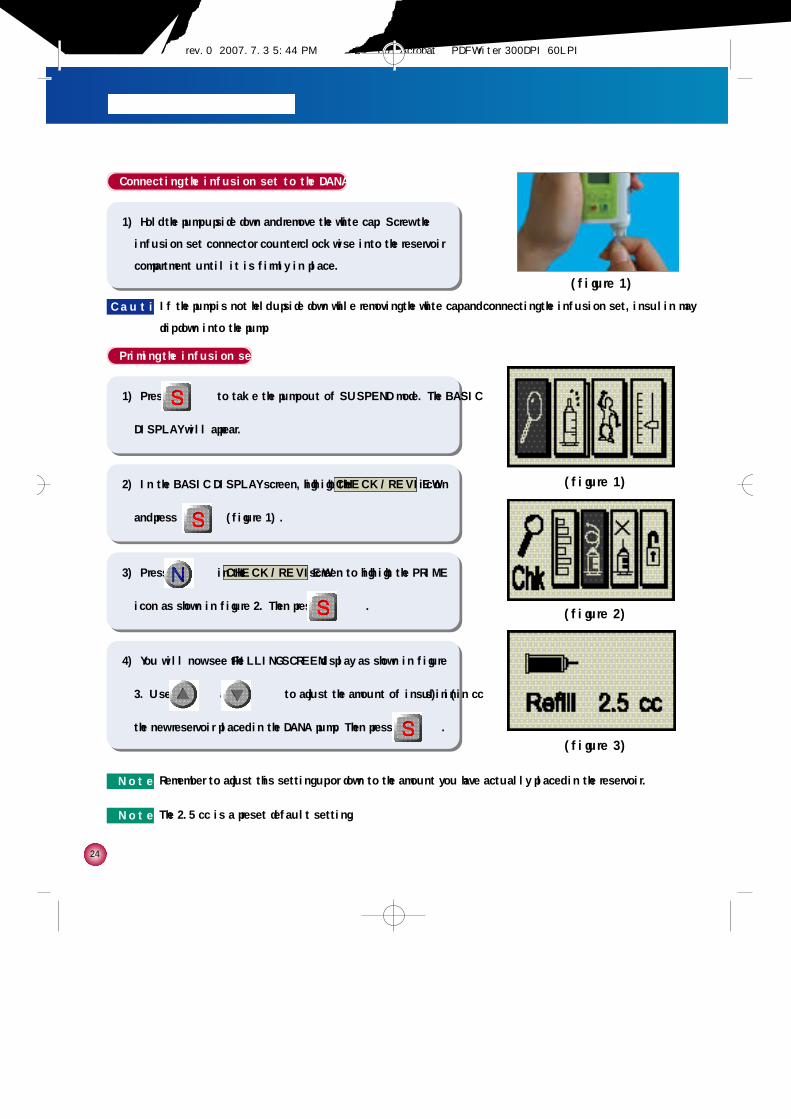
Priming the infusion set
1) Press to take the pump out of SUSPEND mode. The BASIC
DISPLAY will appear.
Connecting the infusion set to the DANA IISR
1) Hold the pump upside down and remove the white cap. Screw the
infusion set connector counterclockwise into the reservoir
compartment until it is firmly in place.
(figure 1)
2) In the BASIC DISPLAY screen, highlight the C H E C K / R E V I E Wi c o n
and press (figure 1).
3) Press in the C H E C K / R E V I E Wscreen to highlight the PRIME
icon as shown in figure 2. Then press .
4) You will now see the FILLING SCREEN display as shown in figure
3. Use and to adjust the amount of insulin (in cc’s) in
the new reservoir placed in the DANA pump. Then press .
(figure 1)
(figure 2)
(figure 3)
N o t e Remember to adjust this setting up or down to the amount you have actually placed in the reservoir.
N o t e The 2.5 cc is a preset default setting.
C a u t i o n If the pump is not held upside down while removing the white cap and connecting the infusion set, insulin may
drip down into the pump.
#다나2SR영문메뉴얼 rev.0 2007.7.3 5:44 PM 페이지24 001 Acrobat™ PDFWriter 300DPI 60LPI

2 5
3. Filling and inserting a new reservoir
6) You will hear the pump begin to infuse insulin into the infusion set.
The insulin amount on the PRIME screen will increase slowly and
“b u b b l e s”will appear at the end of the reservoir on the display as in
figure 5. You will see the insulin move towards the needle end of the
infusion set.
7) When you see a drop of insulin appear at the end of the infusion set needle, press to stop the priming sequence.
(figure 5)
5) The prime screen will appear as in figure 4. Press twice to
begin priming the infusion set.
(figure 4)N o t e Press once and the word “P R I M E”will be replaced by
“U P”a second later. The two words will flash back and forth
every two seconds. In order to commence priming you must
press the second time while the screen displays the word “U P”.
N o t e You will hear the pump beep for every 1.0 unit while priming is in progress.
N o t e The DANA DiabecareⓇ IISR insulin pump will allow 2 prime sequences every 12 hours (0:00 - 12:00, 12:00 -
N o t e It is recommended that the pump be primed a minimum of 15 units.
N o t e You may pause the prime temporarily by pressing . Press twice to resume the priming sequence.
C a u t i o n Make sure the needle is faced downwards so that insulin does not come in contact with the infusion set dressing.
C a u t i o n Always check and confirm all basal and bolus settings after changing the insulin reservoir. Visually confirm there is
no air in the infusion set tubing.
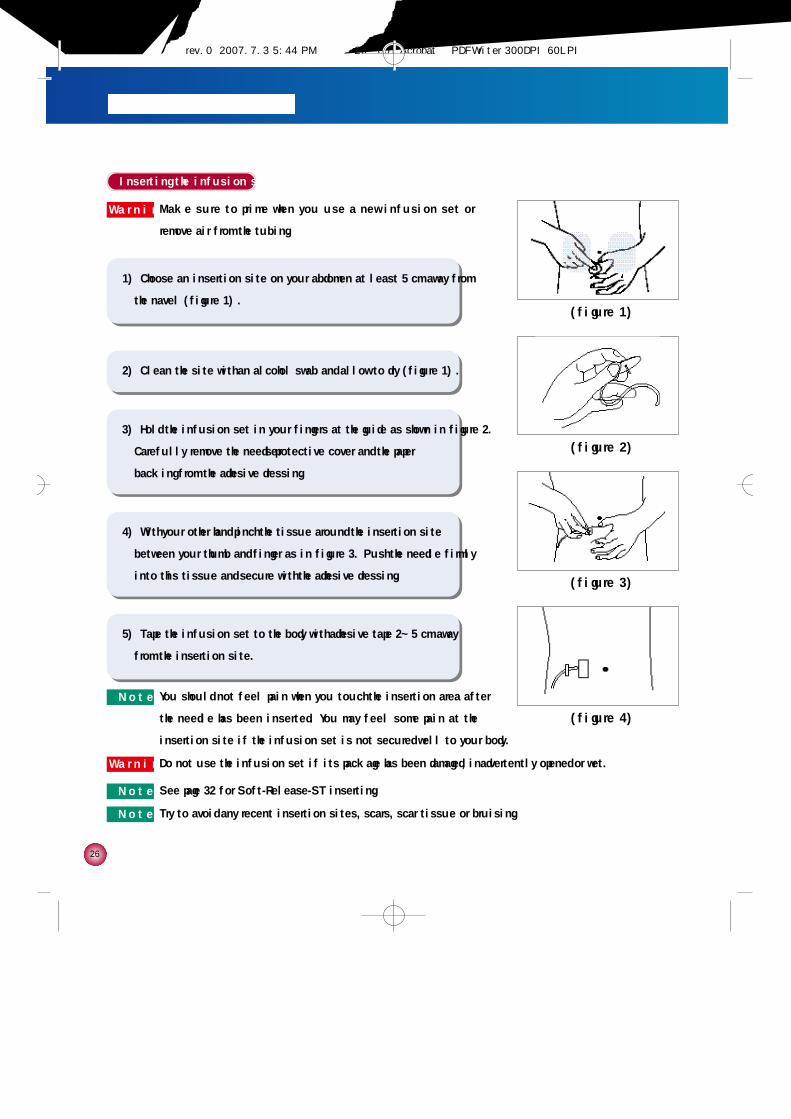
W a r n i n gMake sure to prime when you use a new infusion set or remove air from the tubing.
#다나2SR영문메뉴얼 rev.0 2007.7.3 5:44 PM 페이지25 001 Acrobat™ PDFWriter 300DPI 60LPI
2 6
Inserting the infusion set
1) Choose an insertion site on your abdomen at least 5 cm away from
the navel (figure 1).
2) Clean the site with an alcohol swab and allow to dry (figure 1).
5) Tape the infusion set to the body with adhesive tape 2~5 cm away
from the insertion site.
3) Hold the infusion set in your fingers at the guide as shown in figure 2.
Carefully remove the needle’s protective cover and the paper
backing from the adhesive dressing.
4) With your other hand pinch the tissue around the insertion site
between your thumb and finger as in figure 3. Push the needle firmly
into this tissue and secure with the adhesive dressing.
(figure 1)
(figure 2)
(figure 3)
(figure 4)
N o t e You should not feel pain when you touch the insertion area after
the needle has been inserted. You may feel some pain at the
insertion site if the infusion set is not secured well to your body.
N o t e See page 32 for Soft-Release-ST inserting.
W a r n i n gDo not use the infusion set if its package has been damaged, inadvertently opened or wet.
W a r n i n gMake sure to prime when you use a new infusion set or
remove air from the tubing.
N o t e Try to avoid any recent insertion sites, scars, scar tissue or bruising.
#다나2SR영문메뉴얼 rev.0 2007.7.3 5:44 PM 페이지26 001 Acrobat™ PDFWriter 300DPI 60LPI
2 7
3. Filling and inserting a new reservoir
Infusion Sets
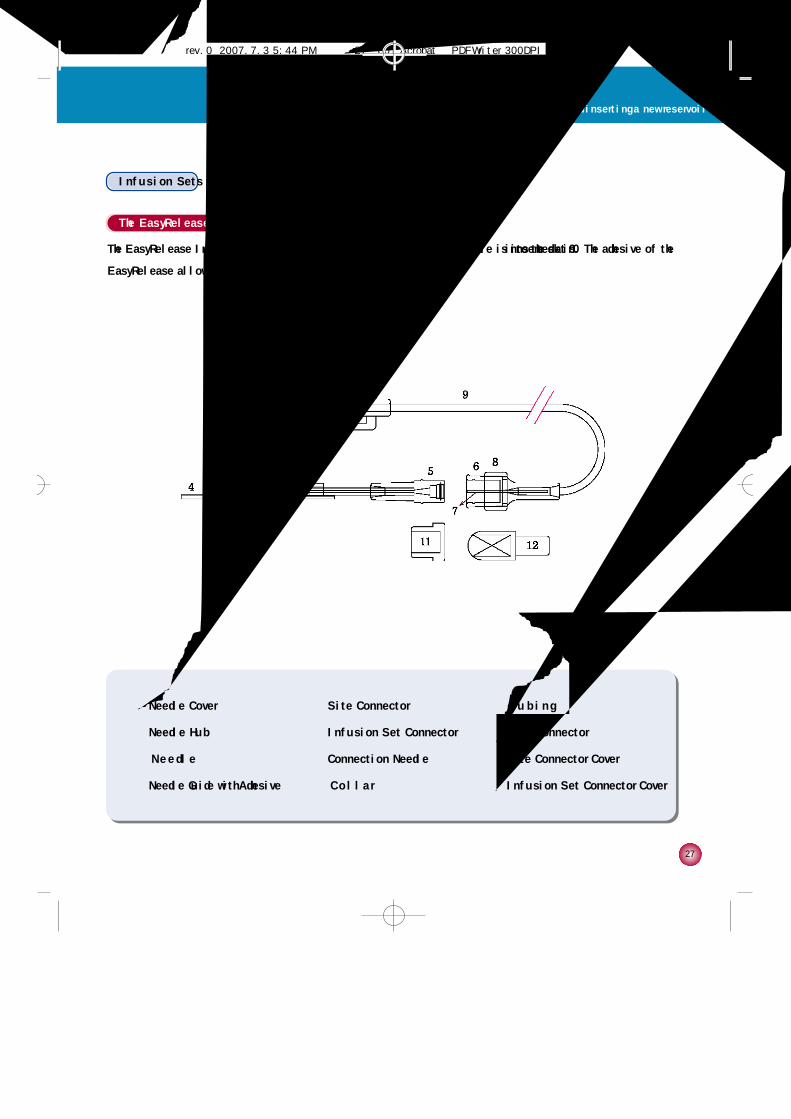
The EasyRelease Infusion Set
The EasyRelease Infusion Set is a stainless steel needle set. A needle is inserted at 90°into the skin. The adhesive of the
EasyRelease allows the needle to be fixed firmly in place.
①Needle Cover
②Needle Hub
③ N e e d l e
④Needle Guide with Adhesive
⑤Site Connector
⑥Infusion Set Connector
⑦Connection Needle
⑧ C o l l a r
⑨ T u b i n g
⑩Pump Connector
⑪Site Connector Cover
⑫Infusion Set Connector Cover
#다나2SR영문메뉴얼 rev.0 2007.7.3 5:44 PM 페이지27 001 Acrobat™ PDFWriter 300DPI 60LPI

1. Prior to Inserting the EasyRelease Infusion Set
1) Wash your hands before handling the infusion set.
2) Take out the EasyRelease Infusion Set from its package. Be careful not to touch the connector to any object that would
breach its sterility.
3) Screw the Pump Connector counterclockwise into the reservoir compartment until it is firmly in place.
4) Push the Set Connector firmly into the Site Connector and pull the
Collar back to secure the connection(figure 1).
2. Inserting the EasyRelease Infusion Set
1) Choose an insertion site on your abdomen at least 5 cm away from
the navel. Clean the site with an alcohol swab and allow to dry
(figure 2).
2) Prime the infusion set by following the instructions on page 23. Air
removal is complete when a drop of insulin appears at the end of
the needle (figure 3).
3) Carefully remove the needle’s protective cover (figure 4), and the
paper backing from the adhesive dressing (figure 5).
4) With your other hand pinch the tissue around the insertion site
between your thumb and finger. Push the needle firmly into the
tissue (figure 6).
5) Secure the needle with the adhesive dressing (figure 7).
6) Tape the infusion set to the body with adhesive tape 2~5 cm away
from the insertion site (figure 8).
2 8
I n s t r u c t i o n s
(figure 1) (figure 2)
(figure 3) (figure 4)
(figure 5) (figure 6)
(figure 7) (figure 8)N o t e Try to avoid any recent insertion sites, scars, scar tissue or bruising.
#다나2SR영문메뉴얼 rev.0 2007.7.3 5:44 PM 페이지28 001 Acrobat™ PDFWriter 300DPI 60LPI

2 9
3. Filling and inserting a new reservoir
3. Disconnecting the EasyRelease Infusion Set
1) Place the pump in SUSPEND (see page 17).
2) Push the Collar forward and pull the Infusion Set Connector out of
the Site Connector (figure 9).
3) Push the Infusion Set Connector Cover onto the Connection
Needle (figure 10). Make sure that this is done without bending the Connection Needle. This
prevents insulin from dripping out at the release site and keeps the Connection Needle clean.
4) Insert the Site Connector Cover into the Site Connector (figure 11).
5) Put your pump in a clean and safe place until you are ready to reconnect.
4. Reconnecting the EasyRelease Infusion Set
1) Wipe the tip of the Site Connector with an alcohol swab after removing the Site Connection
Cover (figure 12).
2) Remove the Infusion Set Connector Cover from the Infusion Set Connector (figure 12).
3) Take pump out of SUSPEND (see page 17).
4) Before reconnecting, program the pump to bolus 0.5~1 unit of insulin (see page 39) and
watch to ensure that a drop is visible from the Connection Needle tip (figure 14).
5) Gently slide the Infusion Set Connector into the Site Connector, and pull the Collar back to
secure the connection (figure 15).
5. Removing the EasyRelease Infusion Set
1) Place the pump in SUSPEND (see page 17).
2) Carefully remove the adhesive tape from the Tubing and needle insertion site.
3) Grab the Needle Guide in the same manner as if you were inserting it. Use your other hand to
apply slight pressure on the tissue around the insertion area. Gently pull out the needle.
4) Remove the infusion set from the pump by turning the Pump Connector clockwise and
pulling upwards.
(figure 10)(figure 9)
(figure 11)
(figure 12)
(figure 13)
(figure 14)
( f i g u r e 1 5 )
#다나2SR영문메뉴얼 rev.0 2007.7.3 5:44 PM 페이지29 001 Acrobat™ PDFWriter 300DPI 60LPI
3 0
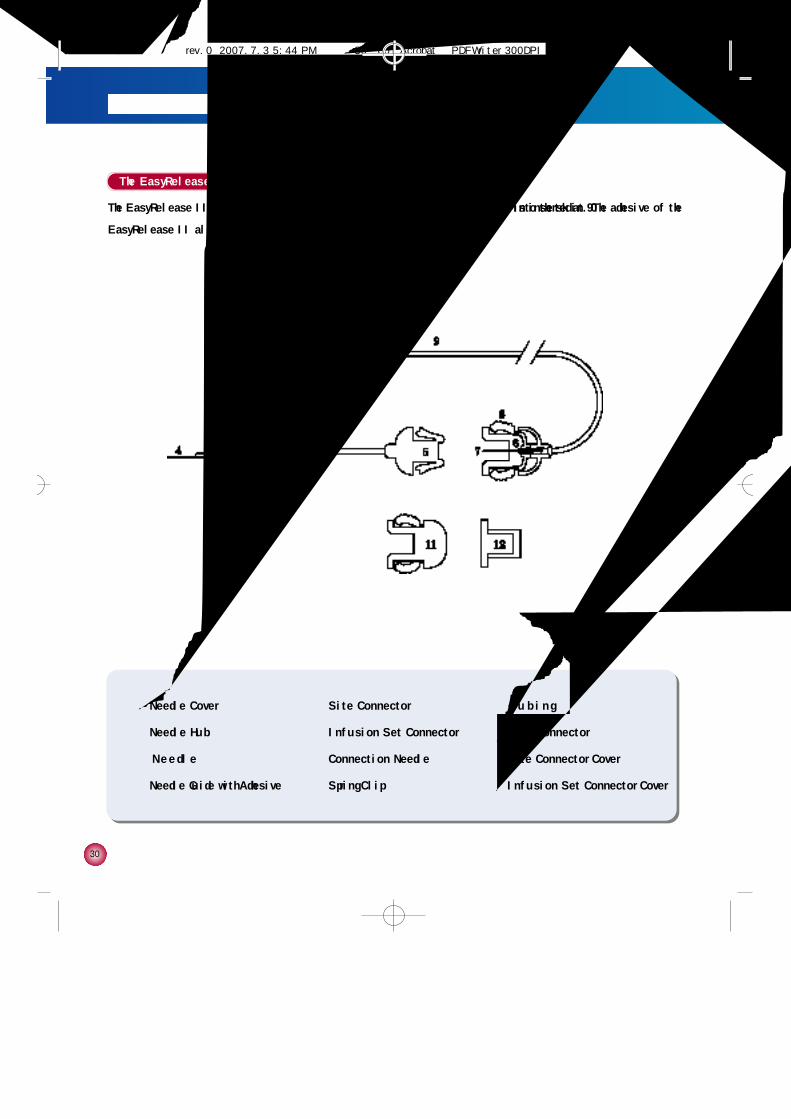
The EasyRelease II Infusion Set
The EasyRelease II Infusion Set is a stainless steel needle set. A needle is inserted at 90°into the skin. The adhesive of the
EasyRelease II allows the needle to be fixed firmly in place.
①Needle Cover
②Needle Hub
③ N e e d l e
④Needle Guide with Adhesive
⑤Site Connector
⑥Infusion Set Connector
⑦Connection Needle
⑧Spring Clip
⑨T u b i n g
⑩Pump Connector
⑪Site Connector Cover
⑫Infusion Set Connector Cover
#다나2SR영문메뉴얼 rev.0 2007.7.3 5:44 PM 페이지30 001 Acrobat™ PDFWriter 300DPI 60LPI

3 1
3. Filling and inserting a new reservoir
1. Prior to Inserting the EasyRelease II Infusion Set
1) Wash your hands before handling the infusion set.
2) Take out the EasyRelease II Infusion Set from its package. Be careful not to touch the connector to any object that
would breach its sterility.
3) Screw the Pump Connector counterclockwise into the reservoir
compartment until it is firmly in place.
4) Push the Set Connector firmly into the Site Connector and pull the
Collar back to secure the connection(figure 1).
2. Inserting the EasyRelease II Infusion Set
1) Choose an insertion site on your abdomen at least 5 cm away from
the navel. Clean the site with an alcohol swab and allow to dry
(figure 2).
2) Prime the infusion set by following the instructions on page 23. Air
removal is complete when a drop of insulin appears at the end of
the back side of needle (figure 3).
3) Carefully remove the needle’s protective cover (figure 4), and the
paper backing from the adhesive dressing (figure 5).
4) With your other hand pinch the tissue around the insertion site
between your thumb and finger. Push the needle firmly into the
tissue (figure 6).
5) Secure the needle with the adhesive dressing (figure 7).
6) Tape the infusion set to the body with adhesive tape 2~5 cm away from the insertion site (figure 8).
I n s t r u c t i o n s
(figure 1) (figure 2)
(figure 3) (figure 4)
(figure 5) (figure 6)
(figure 7) (figure 8)
N o t e Try to avoid any recent insertion sites, scars, scar tissue or bruising.
#다나2SR영문메뉴얼 rev.0 2007.7.3 5:44 PM 페이지31 001 Acrobat™ PDFWriter 300DPI 60LPI
3 2
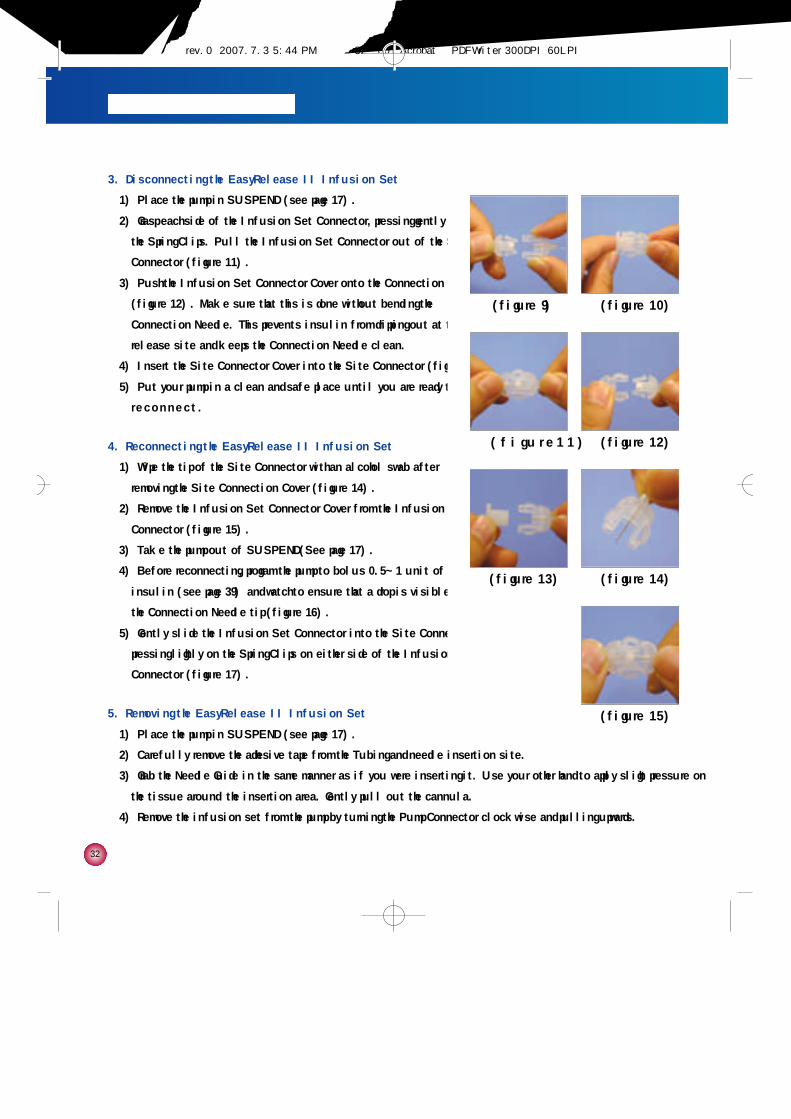
3. Disconnecting the EasyRelease II Infusion Set
1) Place the pump in SUSPEND (see page 17).
2) Grasp each side of the Infusion Set Connector, pressing gently on
the Spring Clips. Pull the Infusion Set Connector out of the Site
Connector (figure 11).
3) Push the Infusion Set Connector Cover onto the Connection Needle
(figure 12). Make sure that this is done without bending the
Connection Needle. This prevents insulin from dripping out at the
release site and keeps the Connection Needle clean.
4) Insert the Site Connector Cover into the Site Connector (figure 13).
5) Put your pump in a clean and safe place until you are ready to
r e c o n n e c t .
4. Reconnecting the EasyRelease II Infusion Set
1) Wipe the tip of the Site Connector with an alcohol swab after
removing the Site Connection Cover (figure 14).
2) Remove the Infusion Set Connector Cover from the Infusion Set
Connector (figure 15).
3) Take the pump out of SUSPEND(See page 17).
4) Before reconnecting, program the pump to bolus 0.5~1 unit of
insulin (see page 39) and watch to ensure that a drop is visible from
the Connection Needle tip (figure 16).
5) Gently slide the Infusion Set Connector into the Site Connector, by
pressing lightly on the Spring Clips on either side of the Infusion Set
Connector (figure 17).
5. Removing the EasyRelease II Infusion Set
1) Place the pump in SUSPEND (see page 17).
2) Carefully remove the adhesive tape from the Tubing and needle insertion site.
3) Grab the Needle Guide in the same manner as if you were inserting it. Use your other hand to apply slight pressure on
the tissue around the insertion area. Gently pull out the cannula.
4) Remove the infusion set from the pump by turning the Pump Connector clockwise and pulling upwards.
(figure 9) (figure 10)
( f i g u r e 1 1 ) (figure 12)
(figure 13) (figure 14)
(figure 15)
#다나2SR영문메뉴얼 rev.0 2007.7.3 5:44 PM 페이지32 001 Acrobat™ PDFWriter 300DPI 60LPI
3 3
3. Filling and inserting a new reservoir
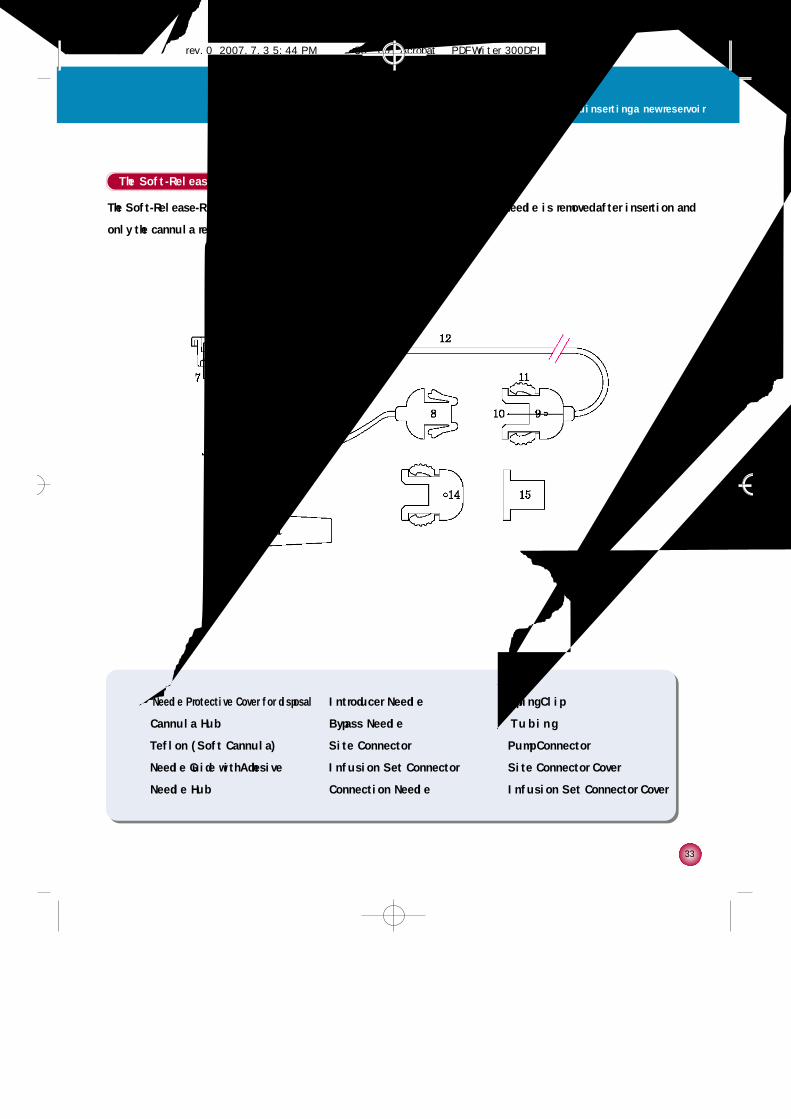
The Soft-Release-R Infusion Set
The Soft-Release-R is a soft cannula infusion set and is inserted at a 90°angle. The needle is removed after insertion and
only the cannula remains under the skin.
① Needle Protective Cover for disposal
②Cannula Hub
③Teflon (Soft Cannula)
④Needle Guide with Adhesive
⑤Needle Hub
⑥Introducer Needle
⑦Bypass Needle
⑧Site Connector
⑨Infusion Set Connector
⑩Connection Needle
⑪Spring Clip
⑫ T u b i n g
⑬Pump Connector
⑭Site Connector Cover
⑮Infusion Set Connector Cover
#다나2SR영문메뉴얼 rev.0 2007.7.3 5:44 PM 페이지33 001 Acrobat™ PDFWriter 300DPI 60LPI
3 4
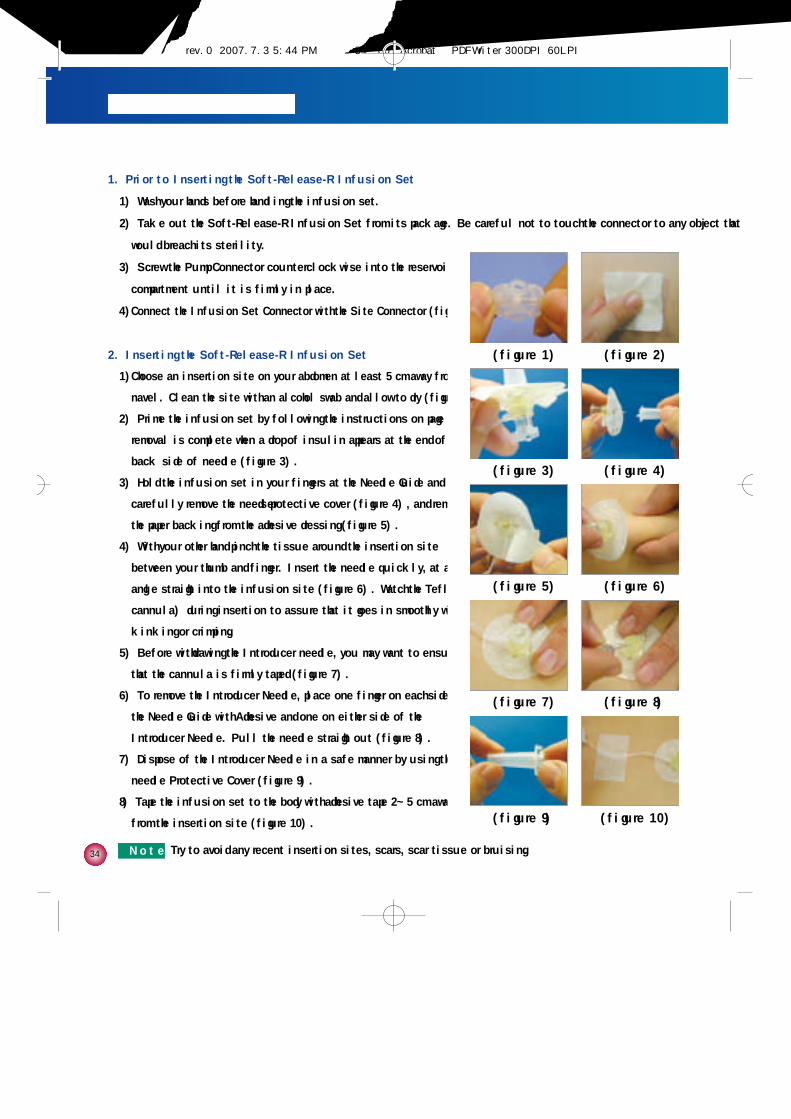
1. Prior to Inserting the Soft-Release-R Infusion Set
1) Wash your hands before handling the infusion set.
2) Take out the Soft-Release-R Infusion Set from its package. Be careful not to touch the connector to any object that
would breach its sterility.
3) Screw the Pump Connector counterclockwise into the reservoir
compartment until it is firmly in place.
4) Connect the Infusion Set Connector with the Site Connector (figure 1).
2. Inserting the Soft-Release-R Infusion Set
1) Choose an insertion site on your abdomen at least 5 cm away from the
navel. Clean the site with an alcohol swab and allow to dry (figure 2).
2) Prime the infusion set by following the instructions on page 23. Air
removal is complete when a drop of insulin appears at the end of the
back side of needle (figure 3).
3) Hold the infusion set in your fingers at the Needle Guide and
carefully remove the needle’s protective cover (figure 4), and remove
the paper backing from the adhesive dressing (figure 5).
4) With your other hand pinch the tissue around the insertion site
between your thumb and finger. Insert the needle quickly, at a 90°
angle straight into the infusion site (figure 6). Watch the Teflon (soft
cannula) during insertion to assure that it goes in smoothly without
kinking or crimping.
5) Before withdrawing the Introducer needle, you may want to ensure
that the cannula is firmly taped (figure 7).
6) To remove the Introducer Needle, place one finger on each side of
the Needle Guide with Adhesive and one on either side of the
Introducer Needle. Pull the needle straight out (figure 8).
7) Dispose of the Introducer Needle in a safe manner by using the
needle Protective Cover (figure 9).
8) Tape the infusion set to the body with adhesive tape 2~5 cm away
from the insertion site (figure 10).
(figure 2)(figure 1)
(figure 4)(figure 3)
(figure 6)(figure 5)
(figure 8)(figure 7)
(figure 10)(figure 9)
N o t e Try to avoid any recent insertion sites, scars, scar tissue or bruising.
#다나2SR영문메뉴얼 rev.0 2007.7.3 5:44 PM 페이지34 001 Acrobat™ PDFWriter 300DPI 60LPI

3 5
3. Filling and inserting a new reservoir
3. Disconnecting the Soft-Release-R Infusion Set
1) Place the pump in SUSPEND (see page 17).
2) Grasp each side of the Infusion Set Connector, pressing gently on
the Spring Clips. Pull the Infusion Set Connector out of the Site
Connector (figure 11).
3) Push the Infusion Set Connector Cover onto the Connection Needle
(figure 12). Make sure that this is done without bending the
Connection Needle. This prevents insulin from dripping out at the
release site and keeps the Connection Needle clean.
4) Insert the Site Connector Cover into the Site Connector (figure 13).
5) Put your pump in a clean and safe place until you are ready to
r e c o n n e c t .
4. Reconnecting the Soft-Release-R Infusion Set
1) Wipe the tip of the Site Connector with an alcohol swab after
removing the Site Connection Cover (figure 14).
2) Remove the Infusion Set Connector Cover from the Infusion Set
Connector (figure 15).
3) Take the pump out of SUSPEND(See page 17).
4) Before reconnecting, program the pump to bolus 0.5~1 unit of
insulin (see page 39) and watch to ensure that a drop is visible from
the Connection Needle tip (figure 16).
5) Gently slide the Infusion Set Connector into the Site Connector, by
pressing lightly on the Spring Clips on either side of the Infusion Set
Connector (figure 17).
5. Removing the Soft-Release-R Infusion Set
1) Place the pump in SUSPEND (see page 17).
2) Carefully remove the adhesive tape from the Tubing and needle insertion site.
3) Grab the Needle Guide in the same manner as if you were inserting it. Use your other hand to apply slight pressure on
the tissue around the insertion area. Gently pull out the cannula.
4) Remove the infusion set from the pump by turning the Pump Connector clockwise and pulling upwards.
(figure 11) (figure 12)
( f i g u r e 1 3 ) (figure 14)
(figure 15) (figure 16)
(figure 17)
#다나2SR영문메뉴얼 rev.0 2007.7.3 5:44 PM 페이지35 001 Acrobat™ PDFWriter 300DPI 60LPI
3 6
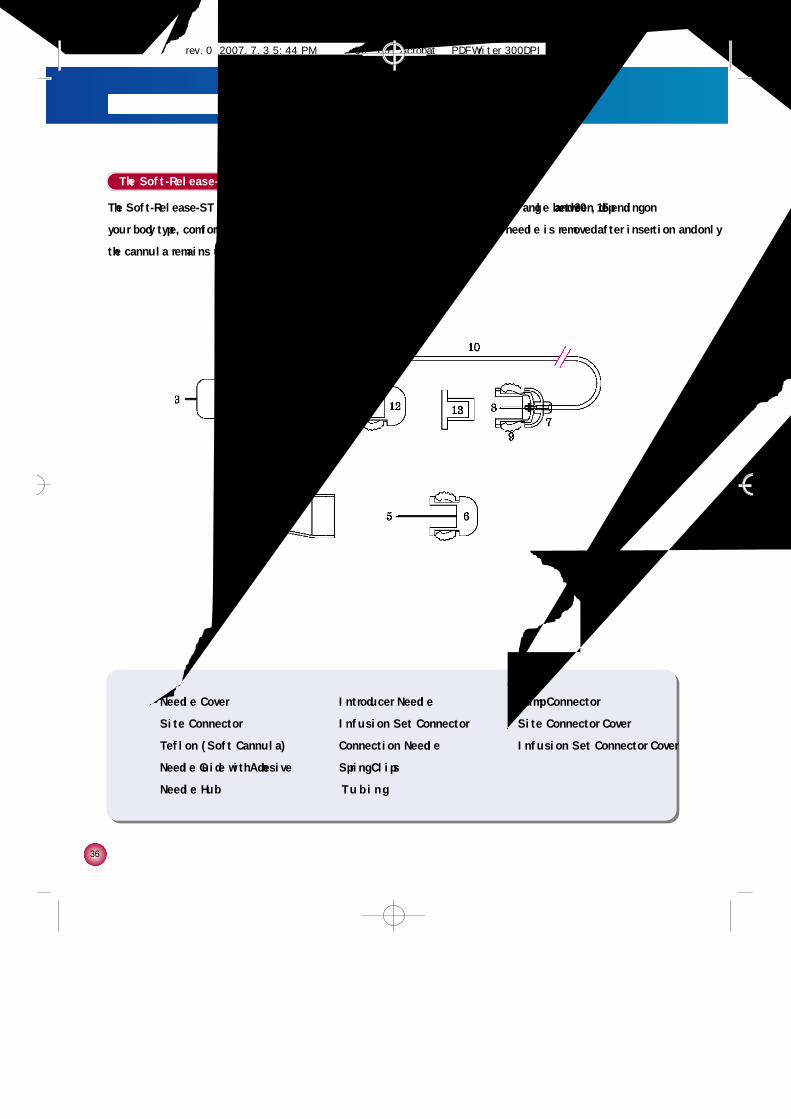
The Soft-Release-ST Infusion Set
The Soft-Release-ST is a soft cannula infusion set. It may be inserted at any angle between 15°and 30°, depending on
your body type, comfort and instructions from your healthcare professional. The needle is removed after insertion and only
the cannula remains under the skin.
①Needle Cover
②Site Connector
③Teflon (Soft Cannula)
④Needle Guide with Adhesive
⑤Needle Hub
⑥Introducer Needle
⑦Infusion Set Connector
⑧Connection Needle
⑨Spring Clips
⑩ T u b i n g
⑪Pump Connector
⑫Site Connector Cover
⑬Infusion Set Connector Cover
#다나2SR영문메뉴얼 rev.0 2007.7.3 5:44 PM 페이지36 001 Acrobat™ PDFWriter 300DPI 60LPI
3 7
3. Filling and inserting a new reservoir
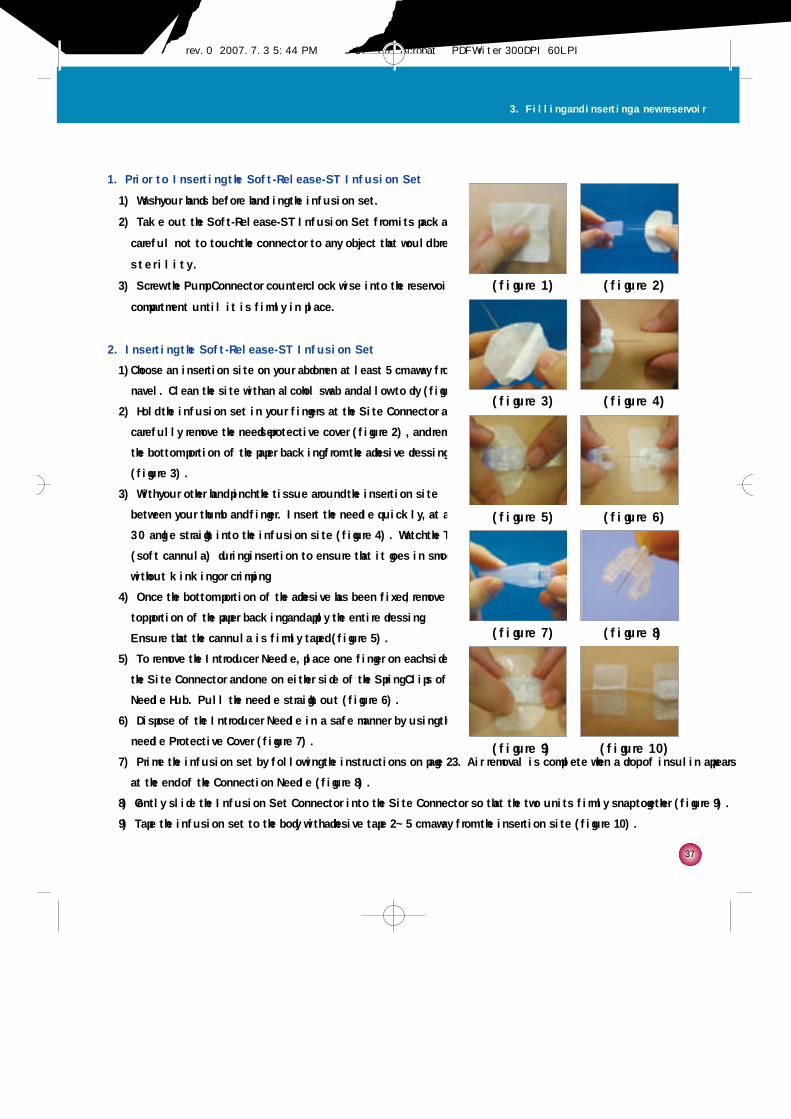
1. Prior to Inserting the Soft-Release-ST Infusion Set
1) Wash your hands before handling the infusion set.
2) Take out the Soft-Release-ST Infusion Set from its package. Be
careful not to touch the connector to any object that would breach its
s t e r i l i t y .
3) Screw the Pump Connector counterclockwise into the reservoir
compartment until it is firmly in place.
2. Inserting the Soft-Release-ST Infusion Set
1) Choose an insertion site on your abdomen at least 5 cm away from the
navel. Clean the site with an alcohol swab and allow to dry (figure 1).
2) Hold the infusion set in your fingers at the Site Connector and
carefully remove the needle’s protective cover (figure 2), and remove
the bottom portion of the paper backing from the adhesive dressing
(figure 3).
3) With your other hand pinch the tissue around the insertion site
between your thumb and finger. Insert the needle quickly, at a 15°-
3 0°angle straight into the infusion site (figure 4). Watch the Teflon
(soft cannula) during insertion to ensure that it goes in smoothly
without kinking or crimping.
4) Once the bottom portion of the adhesive has been fixed, remove the
top portion of the paper backing and apply the entire dressing.
Ensure that the cannula is firmly taped (figure 5).
5) To remove the Introducer Needle, place one finger on each side of
the Site Connector and one on either side of the Spring Clips of the
Needle Hub. Pull the needle straight out (figure 6).
6) Dispose of the Introducer Needle in a safe manner by using the
needle Protective Cover (figure 7).
7) Prime the infusion set by following the instructions on page 23. Air removal is complete when a drop of insulin appears
at the end of the Connection Needle (figure 8).
8) Gently slide the Infusion Set Connector into the Site Connector so that the two units firmly snap together (figure 9).
9) Tape the infusion set to the body with adhesive tape 2~5 cm away from the insertion site (figure 10).
(figure 2)(figure 1)
(figure 4)(figure 3)
(figure 6)(figure 5)
(figure 8)(figure 7)
(figure 10)(figure 9)
#다나2SR영문메뉴얼 rev.0 2007.7.3 5:44 PM 페이지37 001 Acrobat™ PDFWriter 300DPI 60LPI
3 8
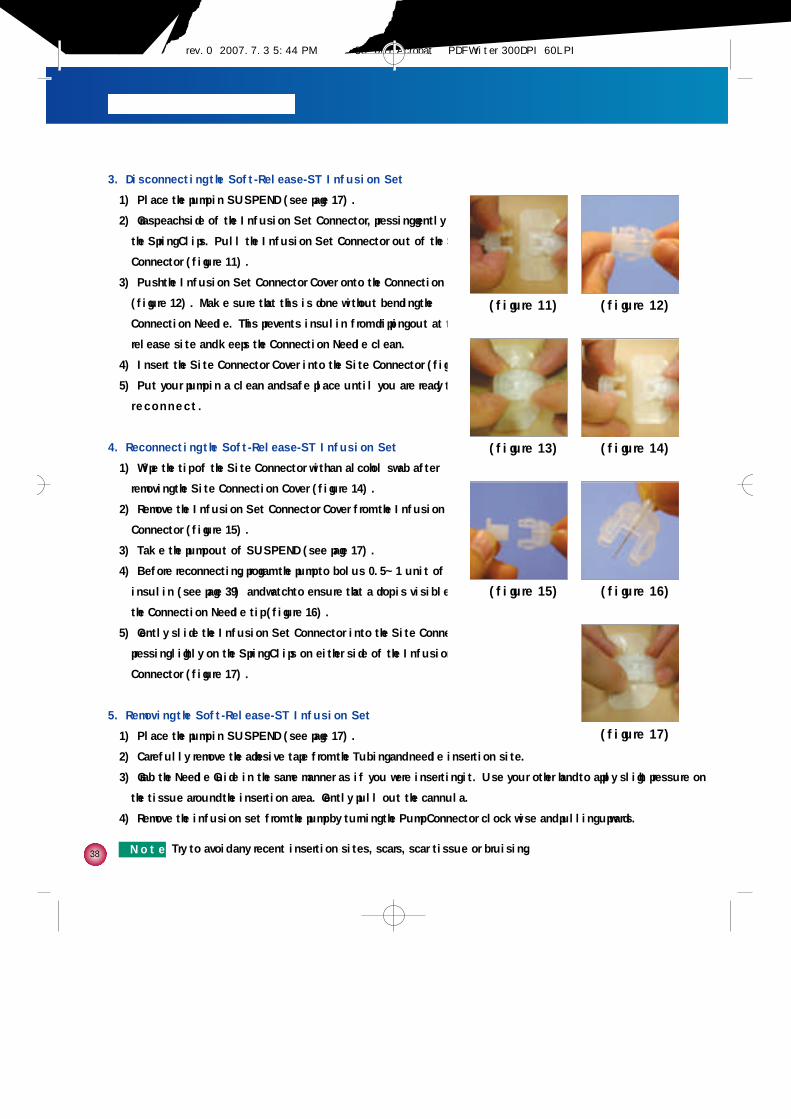
3. Disconnecting the Soft-Release-ST Infusion Set
1) Place the pump in SUSPEND (see page 17).
2) Grasp each side of the Infusion Set Connector, pressing gently on
the Spring Clips. Pull the Infusion Set Connector out of the Site
Connector (figure 11).
3) Push the Infusion Set Connector Cover onto the Connection Needle
(figure 12). Make sure that this is done without bending the
Connection Needle. This prevents insulin from dripping out at the
release site and keeps the Connection Needle clean.
4) Insert the Site Connector Cover into the Site Connector (figure 13).
5) Put your pump in a clean and safe place until you are ready to
r e c o n n e c t .
4. Reconnecting the Soft-Release-ST Infusion Set
1) Wipe the tip of the Site Connector with an alcohol swab after
removing the Site Connection Cover (figure 14).
2) Remove the Infusion Set Connector Cover from the Infusion Set
Connector (figure 15).
3) Take the pump out of SUSPEND (see page 17).
4) Before reconnecting, program the pump to bolus 0.5~1 unit of
insulin (see page 39) and watch to ensure that a drop is visible from
the Connection Needle tip (figure 16).
5) Gently slide the Infusion Set Connector into the Site Connector, by
pressing lightly on the Spring Clips on either side of the Infusion Set
Connector (figure 17).
5. Removing the Soft-Release-ST Infusion Set
1) Place the pump in SUSPEND (see page 17).
2) Carefully remove the adhesive tape from the Tubing and needle insertion site.
3) Grab the Needle Guide in the same manner as if you were inserting it. Use your other hand to apply slight pressure on
the tissue around the insertion area. Gently pull out the cannula.
4) Remove the infusion set from the pump by turning the Pump Connector clockwise and pulling upwards.
(figure 11) (figure 12)
(figure 13) (figure 14)
(figure 15) (figure 16)
(figure 17)
N o t e Try to avoid any recent insertion sites, scars, scar tissue or bruising.
#다나2SR영문메뉴얼 rev.0 2007.7.3 5:44 PM 페이지38 001 Acrobat™ PDFWriter 300DPI 60LPI
3 9
3. Filling and inserting a new reservoir
General Precautions for All Infusion Sets
1. Change the reservoir and the infusion set regularly as recommended by your healthcare professional. Do not use either for
longer than 72 hours.
2. The reservoir and infusion set are intended for single use only. Do not reuse either the reservoir or infusion set.
3. Do not use the reservoir or infusion set if the package has been damaged, inadvertently opened or wet.
4. The shelf life of the reservoir and the infusion set is 3 years. Please check expiration dates regularly and dispose of any
expired accessories.
5. Do not disconnect from your pump for more than one hour without discussing with your healthcare professional on how
you should compensate for missed insulin. Please remember that while disconnected from the pump, no insulin is being
infused. Carefully monitor blood glucose levels during periods of disconnection and after reconnection.
6. Check the infusion site often for redness, irritation and inflammation.
7. Remember to prime at least 15 units when you change your reservoir and infusion set to permit the pump to perform an
additional series of safety checks.
#다나2SR영문메뉴얼 rev.0 2007.7.3 5:44 PM 페이지39 001 Acrobat™ PDFWriter 300DPI 60LPI
4 0
4. Bolusing, temporary basal rates, calculating your bolusdosage and dose automation
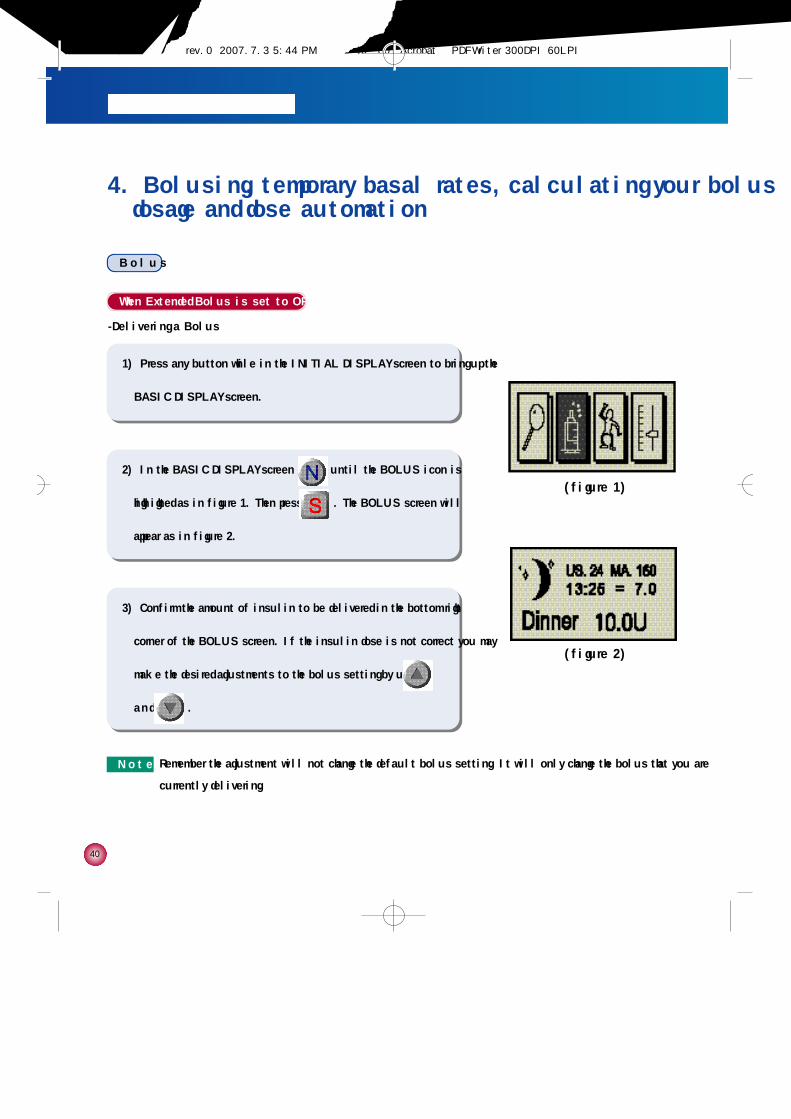
B o l u s
When Extended Bolus is set to OFF
-Delivering a Bolus
1) Press any button while in the INITIAL DISPLAY screen to bring up the
BASIC DISPLAY screen.
(figure 1)
(figure 2)
2) In the BASIC DISPLAY screen press until the BOLUS icon is
highlighted as in figure 1. Then press . The BOLUS screen will
appear as in figure 2.
3) Confirm the amount of insulin to be delivered in the bottom right
corner of the BOLUS screen. If the insulin dose is not correct you may
make the desired adjustments to the bolus setting by using
a n d .
N o t e Remember the adjustment will not change the default bolus setting. It will only change the bolus that you are
currently delivering.
#다나2SR영문메뉴얼 rev.0 2007.7.3 5:44 PM 페이지40 001 Acrobat™ PDFWriter 300DPI 60LPI
4 1
4. Bolusing, temporary basal rates, calculating your bolus dosage and dose automation
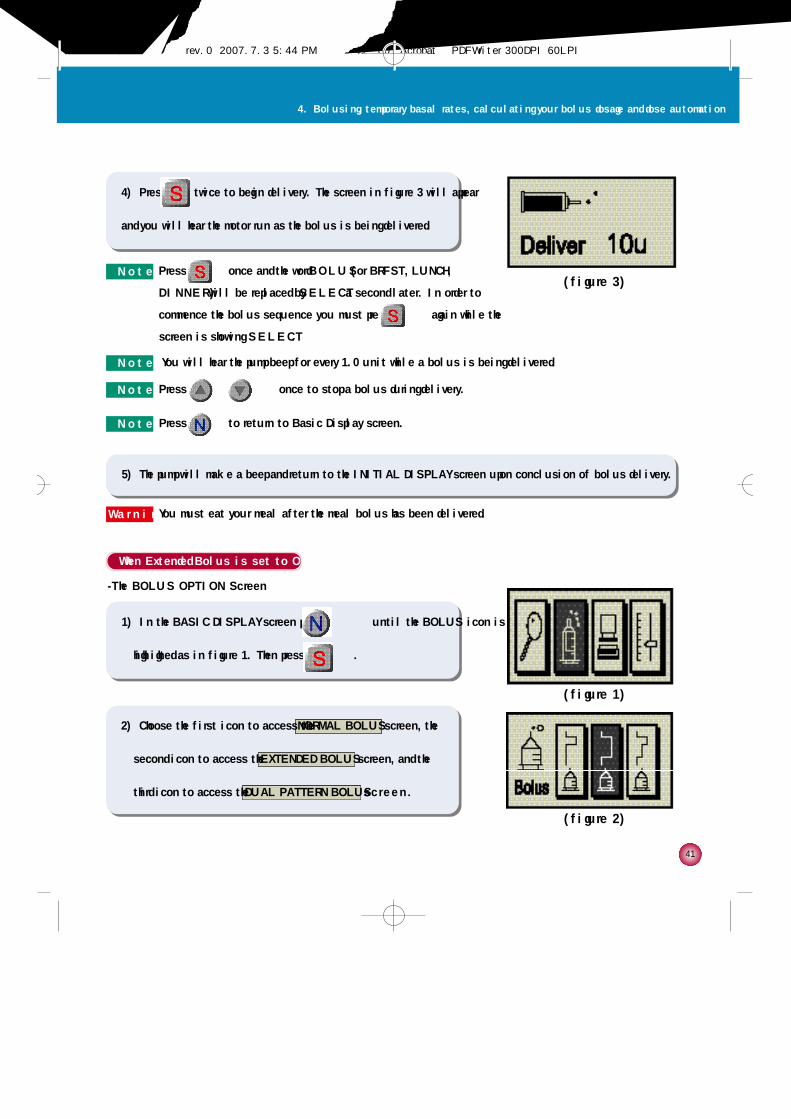
When Extended Bolus is set to ON
-The BOLUS OPTION Screen
(figure 1)
(figure 2)
(figure 3)
4) Press twice to begin delivery. The screen in figure 3 will appear
and you will hear the motor run as the bolus is being delivered.
5) The pump will make a beep and return to the INITIAL DISPLAY screen upon conclusion of bolus delivery.
1) In the BASIC DISPLAY screen press until the BOLUS icon is
highlighted as in figure 1. Then press .
2) Choose the first icon to access the NORMAL BOLUS screen, the
second icon to access the EXTENDED BOLUS screen, and the
third icon to access the DUAL PATTERN BOLUS s c r e e n .
N o t e Press once and the word “B O L U S”(or BRFST, LUNCH,
D I N N E R )”will be replaced by “S E L E C T”a second later. In order to
commence the bolus sequence you must press again while the
screen is showing “S E L E C T”.
N o t e You will hear the pump beep for every 1.0 unit while a bolus is being delivered.
N o t e Press to return to Basic Display screen.
W a r n i n gYou must eat your meal after the meal bolus has been delivered.
N o t e Press or once to stop a bolus during delivery.
#다나2SR영문메뉴얼 rev.0 2007.7.3 5:44 PM 페이지41 001 Acrobat™ PDFWriter 300DPI 60LPI
4 2
(figure 3)
(figure 4)
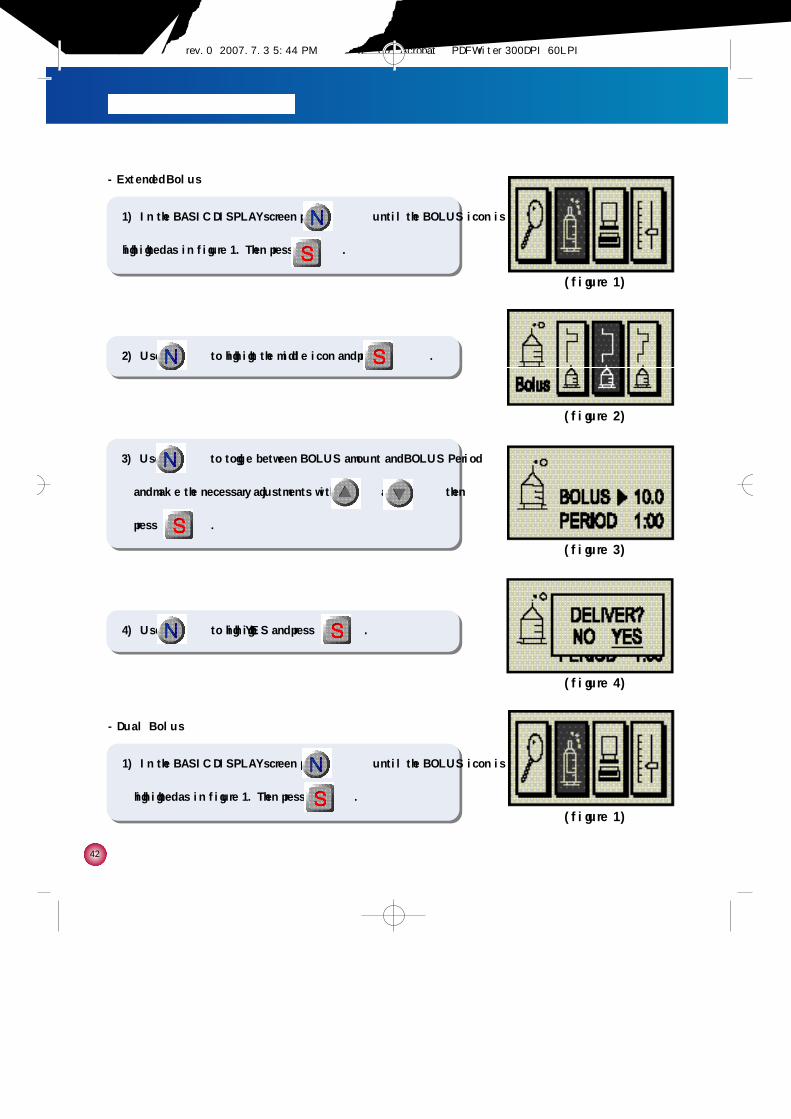
4) Use to highlight ‘Y E S’and press .
- Dual Bolus
1) In the BASIC DISPLAY screen press until the BOLUS icon is
highlighted as in figure 1. Then press .
(figure 1)
(figure 1)
- Extended Bolus
1) In the BASIC DISPLAY screen press until the BOLUS icon is
highlighted as in figure 1. Then press .
2) Use to highlight the middle icon and press .
(figure 2)
3) Use to toggle between BOLUS amount and BOLUS Period
and make the necessary adjustments with and then
press .
#다나2SR영문메뉴얼 rev.0 2007.7.3 5:44 PM 페이지42 001 Acrobat™ PDFWriter 300DPI 60LPI
4 3
4. Bolusing, temporary basal rates, calculating your bolus dosage and dose automation
(figure 4)
(figure 5)
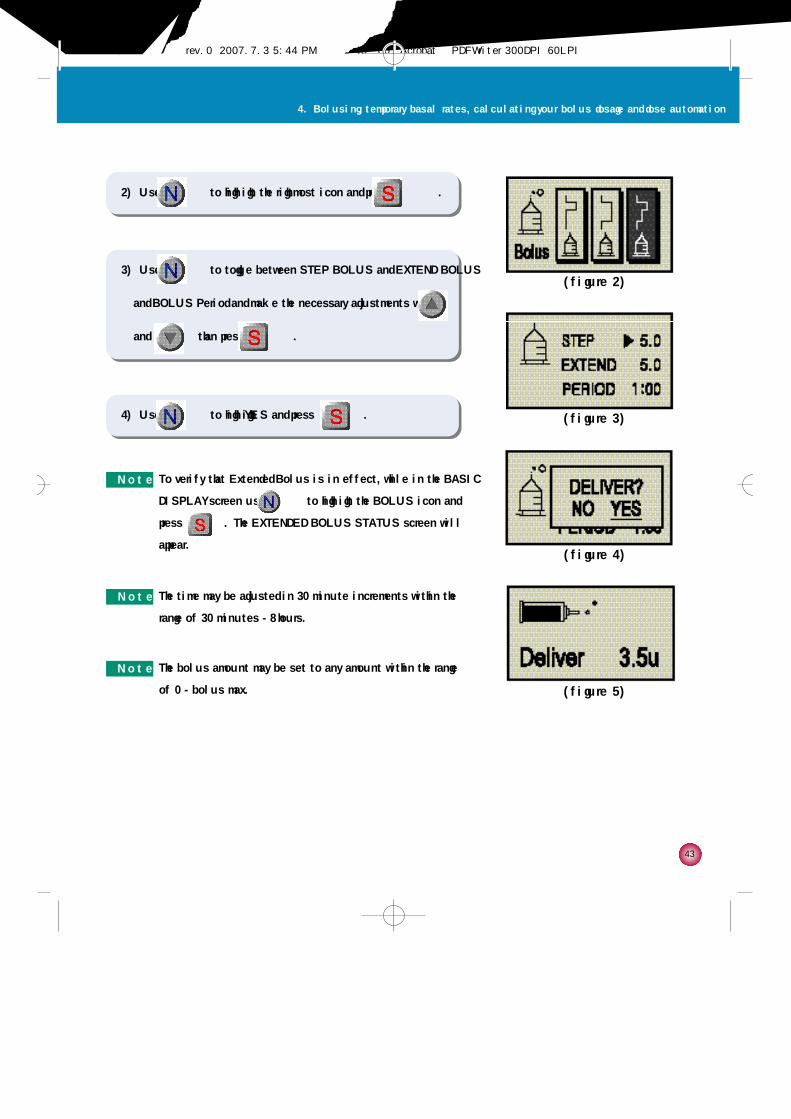
4) Use to highlight ‘Y E S’and press .
(figure 2)
(figure 3)
2) Use to highlight the rightmost icon and press .
N o t e To verify that Extended Bolus is in effect, while in the BASIC
DISPLAY screen use to highlight the BOLUS icon and
press . The EXTENDED BOLUS STATUS screen will
appear.
N o t e The time may be adjusted in 30 minute increments within the
range of 30 minutes - 8 hours.
N o t e The bolus amount may be set to any amount within the range
of 0 - bolus max.
3) Use to toggle between STEP BOLUS and EXTEND BOLUS
and BOLUS Period and make the necessary adjustments with
and than press .
#다나2SR영문메뉴얼 rev.0 2007.7.3 5:44 PM 페이지43 001 Acrobat™ PDFWriter 300DPI 60LPI
4 4
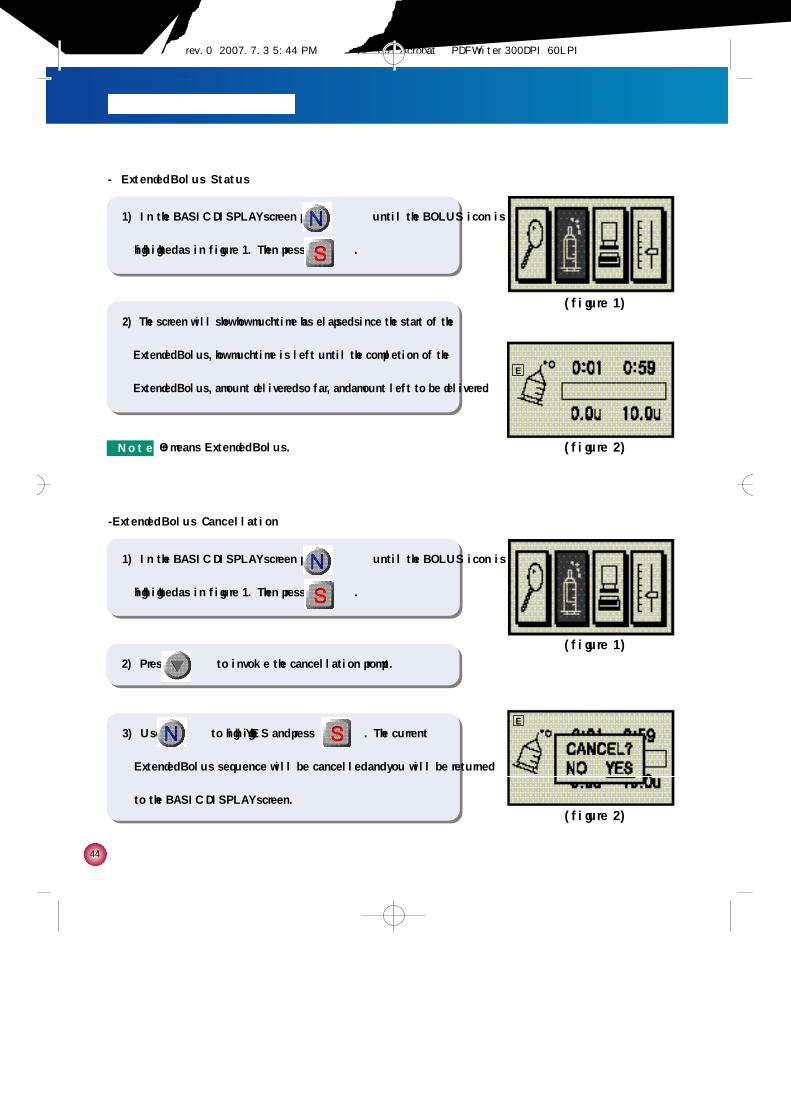
-Extended Bolus Cancellation
1) In the BASIC DISPLAY screen press until the BOLUS icon is
highlighted as in figure 1. Then press .
3) Use to highlight ‘Y E S’and press . The current
Extended Bolus sequence will be cancelled and you will be returned
to the BASIC DISPLAY screen.
(figure 1)
(figure 2)
2) Press to invoke the cancellation prompt.
- Extended Bolus Status
1) In the BASIC DISPLAY screen press until the BOLUS icon is
highlighted as in figure 1. Then press .
2) The screen will show how much time has elapsed since the start of the
Extended Bolus, how much time is left until the completion of the
Extended Bolus, amount delivered so far, and amount left to be delivered.
(figure 1)
(figure 2)
E
E
N o t e □means Extended Bolus.E
#다나2SR영문메뉴얼 rev.0 2007.7.3 5:44 PM 페이지44 001 Acrobat™ PDFWriter 300DPI 60LPI
4 5
4. Bolusing, temporary basal rates, calculating your bolus dosage and dose automation
(figure 3)
(figure 4)
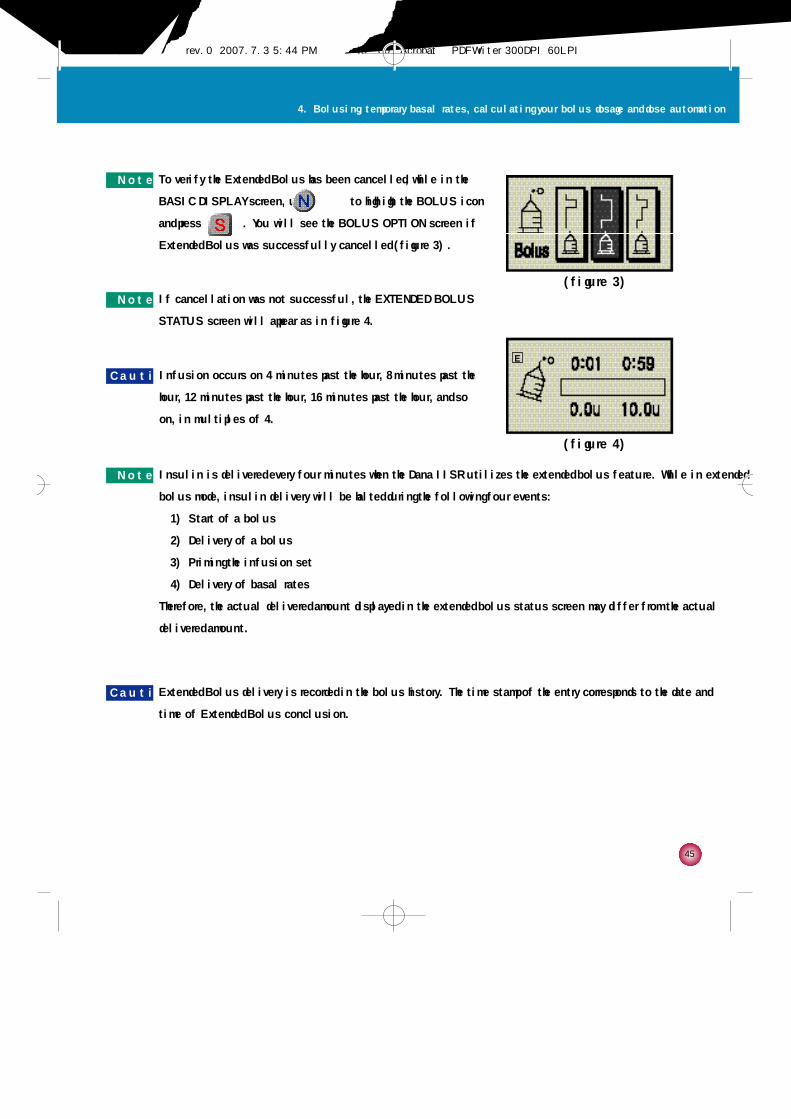
N o t e To verify the Extended Bolus has been cancelled, while in the
BASIC DISPLAY screen, use to highlight the BOLUS icon
and press . You will see the BOLUS OPTION screen if
Extended Bolus was successfully cancelled (figure 3).
N o t e If cancellation was not successful, the EXTENDED BOLUS
STATUS screen will appear as in figure 4.
C a u t i o n Extended Bolus delivery is recorded in the bolus history. The time stamp of the entry corresponds to the date and
time of Extended Bolus conclusion.
C a u t i o n Infusion occurs on 4 minutes past the hour, 8 minutes past the
hour, 12 minutes past the hour, 16 minutes past the hour, and so
on, in multiples of 4.
N o t e Insulin is delivered every four minutes when the Dana IISR utilizes the extended bolus feature. While in extended
bolus mode, insulin delivery will be halted during the following four events:
1) Start of a bolus
2) Delivery of a bolus
3) Priming the infusion set
4) Delivery of basal rates
Therefore, the actual delivered amount displayed in the extended bolus status screen may differ from the actual
delivered amount.
E
#다나2SR영문메뉴얼 rev.0 2007.7.3 5:44 PM 페이지45 001 Acrobat™ PDFWriter 300DPI 60LPI
4 6
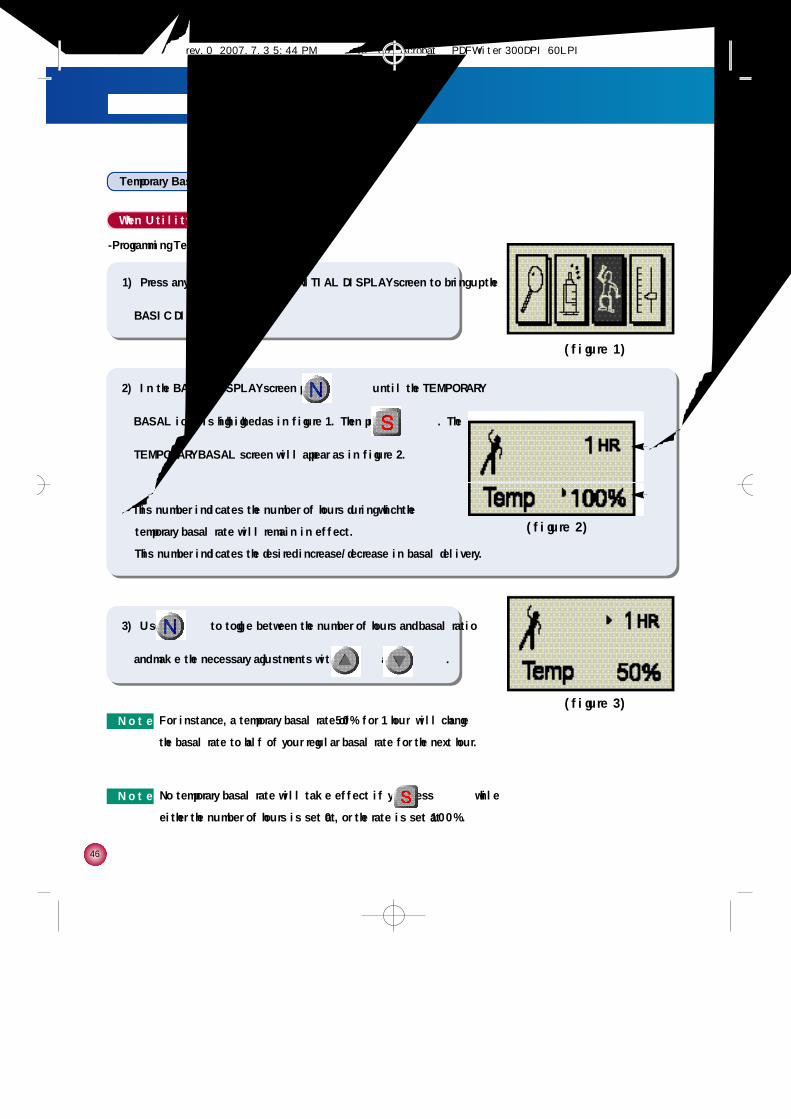
Temporary Basal
When Utility is set to OFF
-Programming Temporary Basal Rates
1) Press any button while in the INITIAL DISPLAY screen to bring up the
BASIC DISPLAY screen.
(figure 1)
(figure 3)
2) In the BASIC DISPLAY screen press until the TEMPORARY
BASAL icon is highlighted as in figure 1. Then press . The
TEMPORARY BASAL screen will appear as in figure 2.
①This number indicates the number of hours during which the
temporary basal rate will remain in effect.
②This number indicates the desired increase/decrease in basal delivery.
3) Use to toggle between the number of hours and basal ratio
and make the necessary adjustments with and .
(figure 2)
①
②
N o t e No temporary basal rate will take effect if you press while
either the number of hours is set at “0”, or the rate is set at “1 0 0 %”.
N o t e For instance, a temporary basal rate of “5 0 %”for “1 hour”will change
the basal rate to half of your regular basal rate for the next hour.
#다나2SR영문메뉴얼 rev.0 2007.7.3 5:44 PM 페이지46 001 Acrobat™ PDFWriter 300DPI 60LPI
4 7
4. Bolusing, temporary basal rates, calculating your bolus dosage and dose automation
(figure 4)
(figure 6)
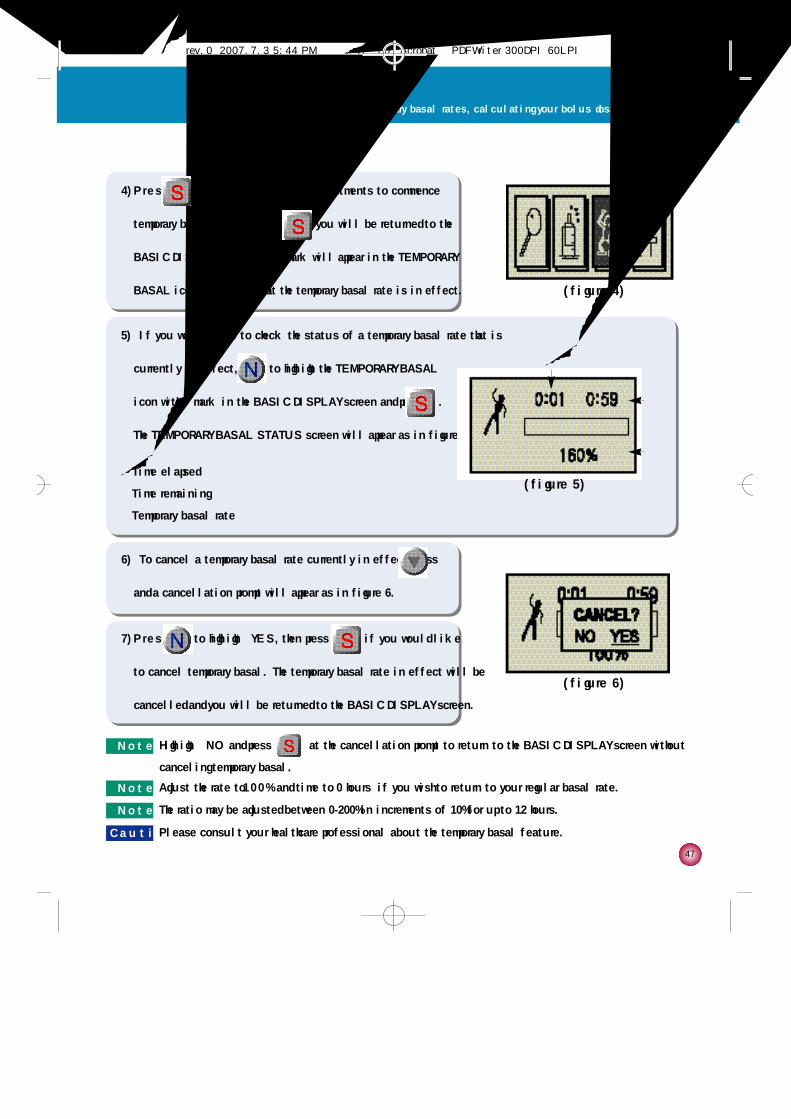
4) P r e s s after making the desired adjustments to commence
temporary basal. Upon pressing you will be returned to the
BASIC DISPLAY screen and a “v”mark will appear in the TEMPORARY
BASAL icon to indicate that the temporary basal rate is in effect.
6) To cancel a temporary basal rate currently in effect, press
and a cancellation prompt will appear as in figure 6.
5) If you would like to check the status of a temporary basal rate that is
currently in effect, use to highlight the TEMPORARY BASAL
icon with “v”mark in the BASIC DISPLAY screen and press .
The TEMPORARY BASAL STATUS screen will appear as in figure 5.
①Time elapsed
②Time remaining
③Temporary basal rate
7) P r e s s to highlight “Y E S”, then press if you would like
to cancel temporary basal. The temporary basal rate in effect will be
cancelled and you will be returned to the BASIC DISPLAY screen.
(figure 5)
①
③
②
N o t e Highlight “N O”and press at the cancellation prompt to return to the BASIC DISPLAY screen without
canceling temporary basal.
N o t e Adjust the rate to “1 0 0 %”and time to “0 hours”if you wish to return to your regular basal rate.
N o t e The ratio may be adjusted between 0-200% in increments of 10% for up to 12 hours.
C a u t i o n Please consult your healthcare professional about the temporary basal feature.
#다나2SR영문메뉴얼 rev.0 2007.7.3 5:44 PM 페이지47 001 Acrobat™ PDFWriter 300DPI 60LPI

4 8
When Utility is set to ON
-UTILITY MENU screen
1) In the BASIC DISPLAY screen, use to highlight the Utility icon
(Computer). Then press .
-Bolus Calculator
1) In the BASIC DISPLAY screen, use to highlight the UTIL icon.
Then press .(figure 1)
( f i g u r e 1 )
(figure 1)
(figure 2)
(figure 3)
2) If Temporary Basal is not activated your UTILITY MENU screen will
appear as in figure 2.
3) If Temporary Basal is in effect your UTILITY MENU screen will appear
as in figure 3.
N o t e Select the leftmost icon for the Bolus Calculator, middle icon for
Temporary Basal, and rightmost icon for Dose Automation.
(figure 2)
2) While in the UTILITY MENU screen, press to access the
BOLUS CALCULATOR screen.(figure 2)
3) In the BOLUS CALCULATOR screen, Use to move the cursor
on CARBO to adjust the amount of Carbohydrate with the use of
o r button. (figure 3)
①Displays current blood glucose level.
②Indicates the carbohydrate(g) to be consumed after Bolus delivery.
(figure 3)
①
②
#다나2SR영문메뉴얼 rev.0 2007.7.3 5:44 PM 페이지48 001 Acrobat™ PDFWriter 300DPI 60LPI

4 9
4. Bolusing, temporary basal rates, calculating your bolus dosage and dose automation
①Indicates your target blood glucose level.
②Amount of carbohydrates capable of being processed by 1u (unit) of insulin. (Carb/insulin ratio)
③Indicates Correction factor.
4) U s e to move between “Ideal Blood Glucose”, “C I R”, and
‘C F’, and use a n d to make the necessary
adjustments. Then press . The BOLUS CALCULATOR
RESULTS screen will appear as in figure 4.
①Indicates the amount of insulin required according to your present
blood glucose level.
②Indicates the amount of insulin required to process the amount of
carbohydrates specified.
③Indicates the amount of insulin remaining in your body from your
previous bolus amount(active insulin).
④Indicates the calculated bolus amount.
(figure 4)
③
①
②
(figure 5)
④
②
①
③
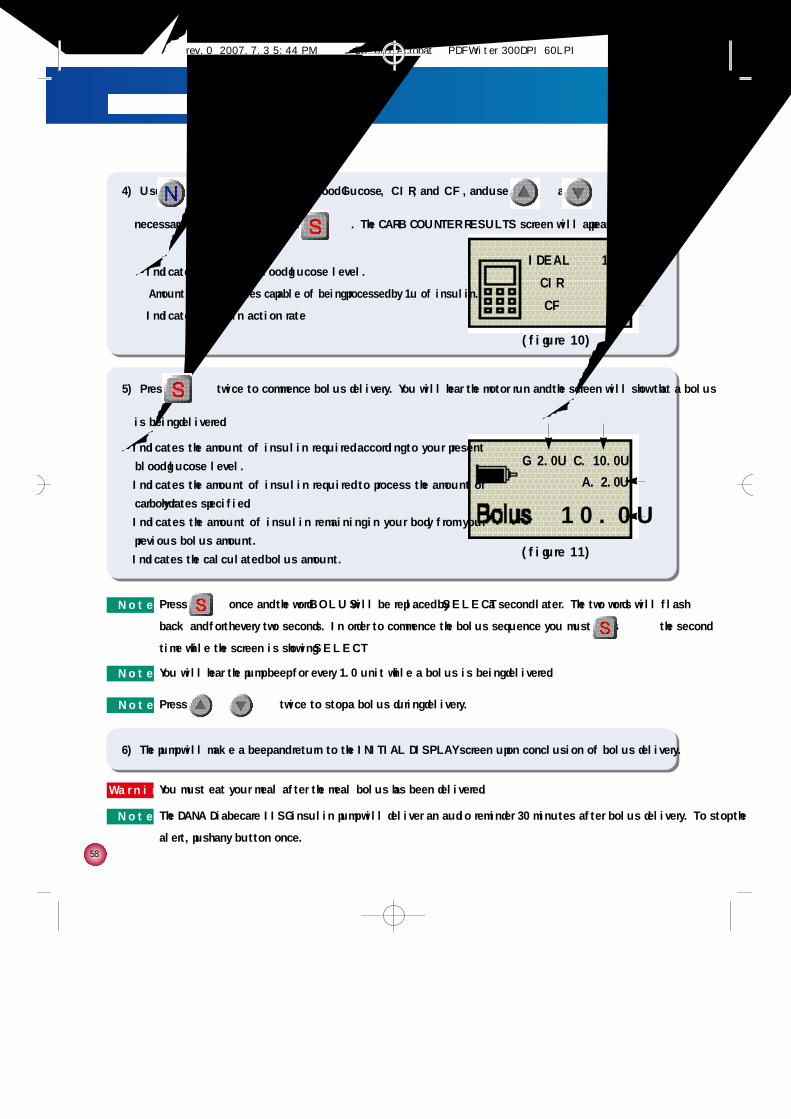
5) P r e s s twice to commence bolus delivery. You will hear the
motor run and the screen will show that a bolus is being delivered.
(figure 6)N o t e You will hear the pump beep for every 1.0 unit while a bolus is being
delivered.
N o t e Press once and the word “B O L U S”will be replaced by “S E L E C T”a second later. The two words will flash
back and forth every two seconds. In order to commence the bolus sequence you must press again while
the screen is showing “S E L E C T”.
N o t e Press or once to stop a bolus during delivery.
#다나2SR영문메뉴얼 rev.0 2007.7.3 5:44 PM 페이지49 001 Acrobat™ PDFWriter 300DPI 60LPI
5 0
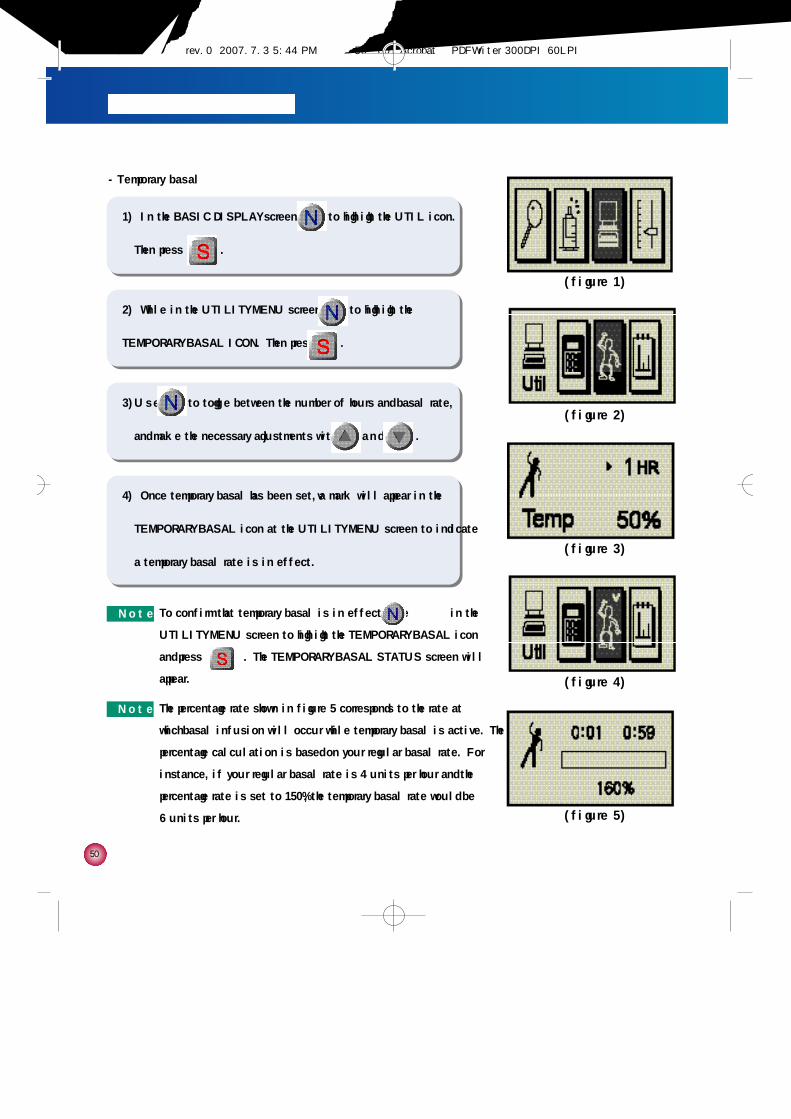
- Temporary basal
1) In the BASIC DISPLAY screen, use to highlight the UTIL icon.
Then press .
2) While in the UTILITY MENU screen, use to highlight the
TEMPORARY BASAL ICON. Then press .
3) U s e to toggle between the number of hours and basal rate,
and make the necessary adjustments with a n d .
(figure 1)
(figure 2)
(figure 3)
(figure 4)
(figure 5)
4) Once temporary basal has been set, a “v”mark will appear in the
TEMPORARY BASAL icon at the UTILITY MENU screen to indicate
a temporary basal rate is in effect.
N o t e To confirm that temporary basal is in effect, use in the
UTILITY MENU screen to highlight the TEMPORARY BASAL icon
and press . The TEMPORARY BASAL STATUS screen will
appear.
N o t e The percentage rate shown in figure 5 corresponds to the rate at
which basal infusion will occur while temporary basal is active. The
percentage calculation is based on your regular basal rate. For
instance, if your regular basal rate is 4 units per hour and the
percentage rate is set to 150%, the temporary basal rate would be
6 units per hour.
#다나2SR영문메뉴얼 rev.0 2007.7.3 5:44 PM 페이지50 001 Acrobat™ PDFWriter 300DPI 60LPI

5 1
4. Bolusing, temporary basal rates, calculating your bolus dosage and dose automation
- Temporary Basal Cancellation
1) In the BASIC DISPLAY screen, use to highlight the UTIL icon
(Computer) and press . The UTILITY MENU screen will appear.
(figure 1)
2) U s e to highlight the TEMPORARY BASAL icon and press
to access the TEMPORARY BASAL STATUS screen.
4) U s e to highlight “Y E S”and press to cancel temporary
basal. You will be returned to the BASIC DISPLAY screen upon
p r e s s i n g .
(figure 2)
(figure 3)
(figure 4)
3) Press to invoke the cancellation prompt.
N o t e If you do not wish to cancel, choose “N O”and press at the
cancellation prompt. You will be returned to the BASIC DISPLAY
screen upon pressing .
#다나2SR영문메뉴얼 rev.0 2007.7.3 5:44 PM 페이지51 001 Acrobat™ PDFWriter 300DPI 60LPI

5 2
5) Use to highlight “Y E S”and press .
- Dose Automation
1) In the BASIC DISPLAY screen, use to highlight the UTIL icon
and press .
(figure 1)
(figure 2)
2) U s e to highlight the rightmost icon and press t o
access the DOSE AUTOMATION screen.
4) U s e to confirm the time and rates. Use a n d t o
choose the desired basal pattern and press .
(figure 3)
(figure 4)
(figure 5)
N o t e You may verify your bolus and basal rates through the CHECK/REVIEW
menu option.
N o t e The Daily Total can be set to any value within the range of 0-Daily Max.
N o t e The percentage rate can be adjusted within the range of 0-100%.
3) Use to toggle between Daily total and Bolus and Basal and
make the necessary adjustments with and then press
.
N o t e □indicates pattern number. 4 different basal profiles are available for
s e l e c t i o n .
1
#다나2SR영문메뉴얼 rev.0 2007.7.3 5:44 PM 페이지52 001 Acrobat™ PDFWriter 300DPI 60LPI

5 3
N o t e An icon with four antennas will be displayed on the remote control
while the synchronization is attempting.
N o t e An icon with six antennas will be displayed on the remote control
once the synchronization is completed.
5. Remote Control
5. Remote Control
Synchronize the Remote Control with the Pump
(figure 1)
(figure 2)
(figure 3)
(figure 1)
B o l u s
2) While in the BOLUS SETTING screen, select the proper insulin dose
by using and . The insulin dose appears in units in the
bottom right hand corner.
1) In the BASIC DISPLAY screen press until the BOLUS icon is
highlighted as in figure 1. Then press . Then press .
1) Select the menu of connect icon at the basic menus display to
synchronize the remote control with the pump (figure 1).
#다나2SR영문메뉴얼 rev.0 2007.7.3 5:44 PM 페이지53 001 Acrobat™ PDFWriter 300DPI 60LPI
5 4
(figure 2)
(figure 3)
(figure 1)
(figure 2)
(figure 3)
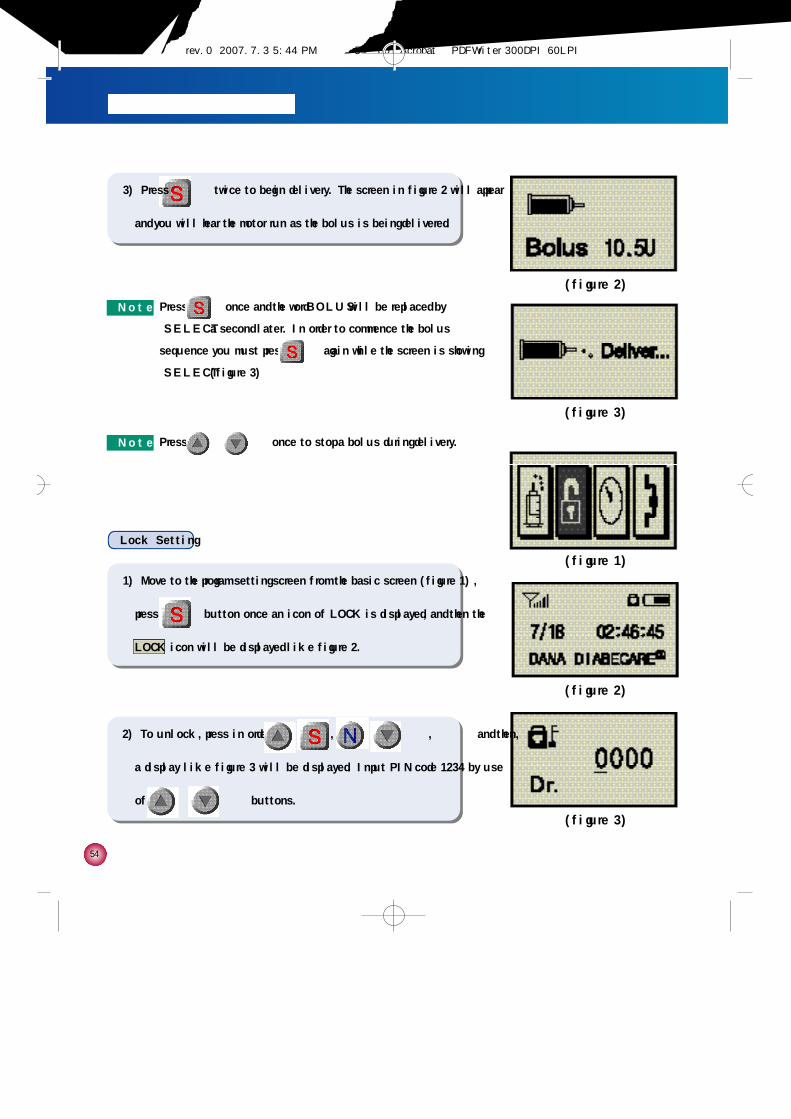
2) To unlock, press in order of , , , and then,
a display like figure 3 will be displayed. Input PIN code 1234 by use
of or buttons.
Lock Setting
3) Press twice to begin delivery. The screen in figure 2 will appear
and you will hear the motor run as the bolus is being delivered.
N o t e Press once and the word “B O L U S”will be replaced by
“S E L E C T”a second later. In order to commence the bolus
sequence you must press again while the screen is showing
“S E L E C T”(figure 3)
N o t e Press or once to stop a bolus during delivery.
1) Move to the program setting screen from the basic screen (figure 1),
press button once an icon of LOCK is displayed, and then the
LOCK icon will be displayed like figure 2.
#다나2SR영문메뉴얼 rev.0 2007.7.3 5:44 PM 페이지54 001 Acrobat™ PDFWriter 300DPI 60LPI
5 5
5. Remote Control
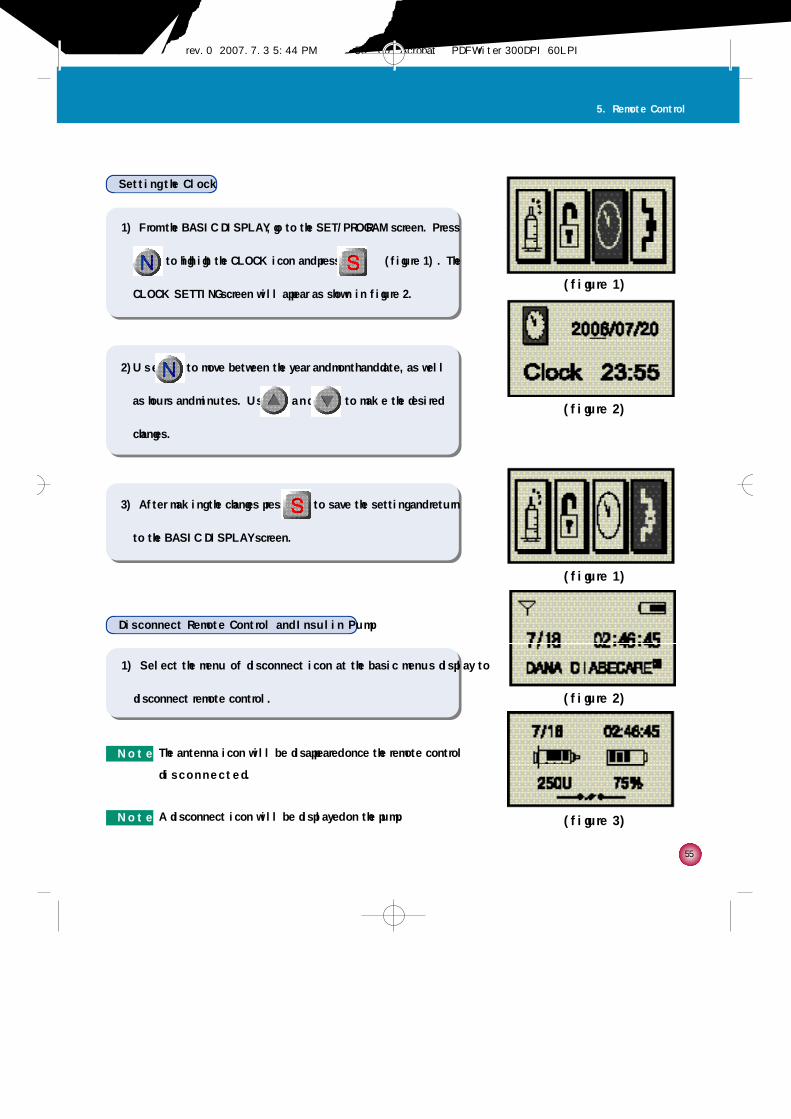
Setting the Clock
Disconnect Remote Control and Insulin Pump
(figure 1)
(figure 2)
(figure 1)
(figure 2)
(figure 3)
1) Select the menu of disconnect icon at the basic menus display to
disconnect remote control.
N o t e The antenna icon will be disappeared once the remote control
d i s c o n n e c t e d .
N o t e A disconnect icon will be displayed on the pump.
1) From the BASIC DISPLAY, go to the SET/PROGRAM screen. Press
to highlight the CLOCK icon and press (figure 1). The
CLOCK SETTING screen will appear as shown in figure 2.
2) U s e to move between the year and month and date, as well
as hours and minutes. Use a n d to make the desired
changes.
3) After making the changes press to save the setting and return
to the BASIC DISPLAY screen.
#다나2SR영문메뉴얼 rev.0 2007.7.3 5:44 PM 페이지55 001 Acrobat™ PDFWriter 300DPI 60LPI

5 6
1) After washing your hands, insert a DANA blood glucose strip into the
blood glucose meter test port (figure 1).
4) Clean your fingertip with an alcohol swab. Obtain a blood sample
with a blood sampling needle (figure 4).
2) The STRIP CODE SETTING screen will appear as in figure 2. Set the
STRIP CODE and press .
3) Verify that the display shows the OBTAIN BLOOD screen as in figure 3.
5) Apply the sample blood on the end of the strip (figure 5).
(figure 2)
(figure 3)
Checking your blood glucose level
(figure 1)
(figure 4)
(figure 5)
N o t e The STRIP CODE range is between 0 and 49. You must use the
code indicated on the DANA glucose strip packaging for
accurate results.
N o t e If the strip is removed from the test port while the display screen
appears as in figure 1 or figure 2, you will be returned to the
BASIC DISPLAY screen.
C a u t i o n Please leave the DANA Diabecare IISG insulin pump and its test
strips for 30 minutes in room temperature before use.
#다나2SR영문메뉴얼 rev.0 2007.7.3 5:44 PM 페이지56 001 Acrobat™ PDFWriter 300DPI 60LPI
5 7
5. Remote Control
(figure 6)
(figure 7)
(figure 8)
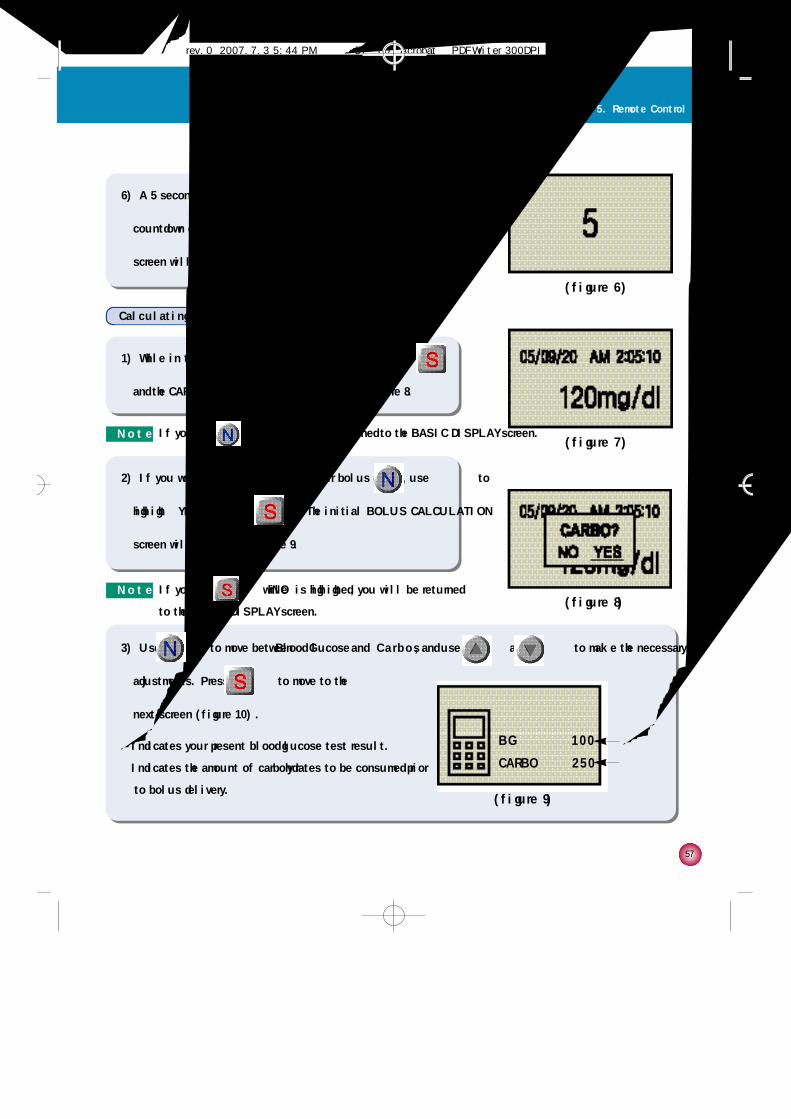
6) A 5 second countdown will appear as in figure 6. Once the
countdown concludes the BLOOD GLUCOSE TEST RESULT
screen will appear (date, time, blood glucose level) as in figure 7.
1) While in the BLOOD GLUCOSE TEST RESULT screen, press
and the CARB COUNTER prompt will appear as in figure 8.
2) If you would like to calculate your bolus dosage, use to
highlight ‘Y E S”and press . The initial BOLUS CALCULATION
screen will appear as in figure 9.
Calculating your bolus dosage
(figure 9)
①
②
①Indicates your present blood glucose test result.
②Indicates the amount of carbohydrates to be consumed prior
to bolus delivery.
BG ▶ 1 0 0
CARBO ▶ 2 5 0
N o t e If you press . you will be returned to the BASIC DISPLAY screen.
N o t e If you press while ‘N O’is highlighted, you will be returned
to the BASIC DISPLAY screen.
3) Use to move between ‘Blood Glucose’and ‘C a r b o s’, and use and to make the necessary
adjustments. Press to move to the
next screen (figure 10).
#다나2SR영문메뉴얼 rev.0 2007.7.3 5:44 PM 페이지57 001 Acrobat™ PDFWriter 300DPI 60LPI
5 8
(figure 10)
③
①
②①Indicates your target blood glucose level.
②Amount of carbohydrates capable of being processed by 1u of insulin.
③Indicates insulin action rate
4) Use to move between ‘Target Blood Glucose’, ‘C I R’, and ‘C F’, and use and to make the
necessary adjustments. Then press . The CARB COUNTER RESULTS screen will appear as in figure 11.
IDEAL ▶ 1 0 0
CIR 25
CF 50
N o t e Press once and the word “B O L U S”will be replaced by “S E L E C T”a second later. The two words will flash
back and forth every two seconds. In order to commence the bolus sequence you must press the second
time while the screen is showing “S E L E C T”.
N o t e You will hear the pump beep for every 1.0 unit while a bolus is being delivered.
N o t e Press or twice to stop a bolus during delivery.
(figure 11)
③
④
① ②
①Indicates the amount of insulin required according to your present
blood glucose level.
②Indicates the amount of insulin required to process the amount of
carbohydrates specified.
③Indicates the amount of insulin remaining in your body from your
previous bolus amount.
④Indicates the calculated bolus amount.
G. 2.0U C. 10.0U
A. 2.0U
1 0 . 0 U
5) Press twice to commence bolus delivery. You will hear the motor run and the screen will show that a bolus
is being delivered.
6) The pump will make a beep and return to the INITIAL DISPLAY screen upon conclusion of bolus delivery.
W a r n i n gYou must eat your meal after the meal bolus has been delivered.
N o t e The DANA Diabecare IISG insulin pump will deliver an audio reminder 30 minutes after bolus delivery. To stop the
alert, push any button once.
#다나2SR영문메뉴얼 rev.0 2007.7.3 5:44 PM 페이지58 001 Acrobat™ PDFWriter 300DPI 60LPI
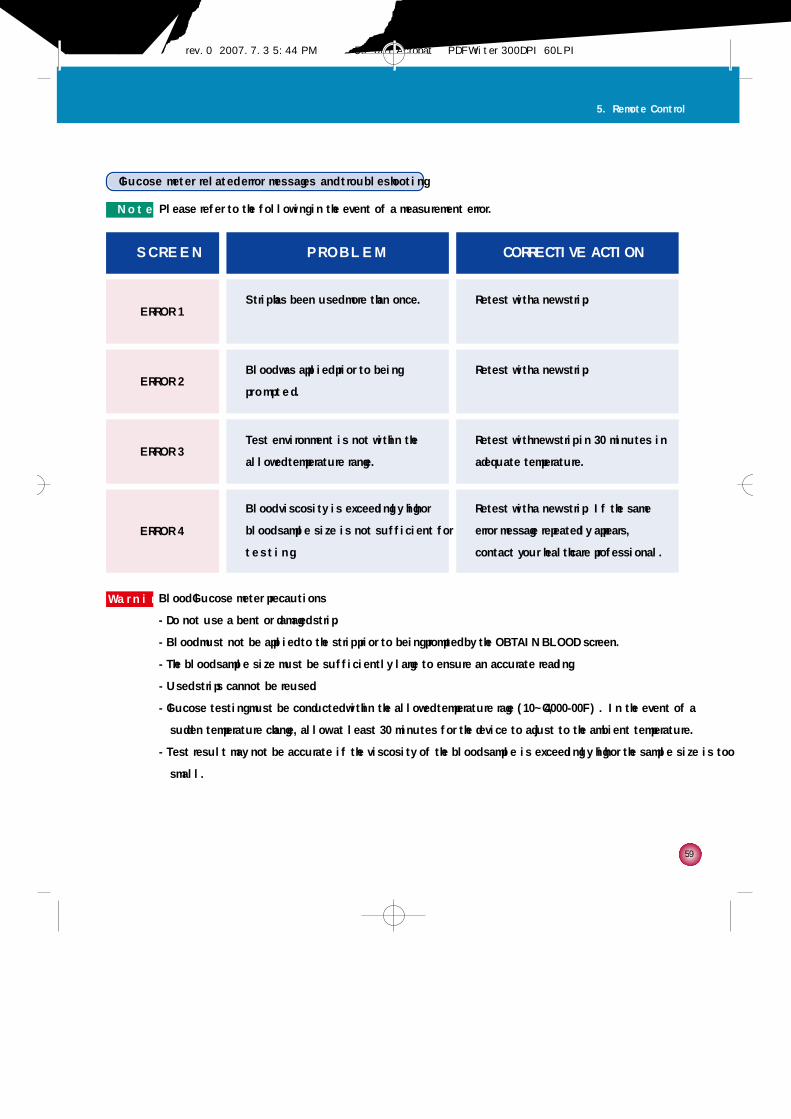
5 9
5. Remote Control
Glucose meter related error messages and troubleshooting
S C R E E N P R O B L E M CORRECTIVE ACTION
Strip has been used more than once.ERROR 1
Retest with a new strip.
Blood was applied prior to being
p r o m p t e d .ERROR 2
Retest with a new strip.
Test environment is not within the
allowed temperature range.ERROR 3
Retest with new strip in 30 minutes in
adequate temperature.
Blood viscosity is exceedingly high or
blood sample size is not sufficient for
t e s t i n g .
ERROR 4
Retest with a new strip. If the same
error message repeatedly appears,
contact your healthcare professional.
N o t e Please refer to the following in the event of a measurement error.
W a r n i n gBlood Glucose meter precautions
- Do not use a bent or damaged strip.
- Blood must not be applied to the strip prior to being prompted by the OBTAIN BLOOD screen.
- The blood sample size must be sufficiently large to ensure an accurate reading.
- Used strips cannot be reused.
- Glucose testing must be conducted within the allowed temperature rage (10~40°C, 00-00F). In the event of a
sudden temperature change, allow at least 30 minutes for the device to adjust to the ambient temperature.
- Test result may not be accurate if the viscosity of the blood sample is exceedingly high or the sample size is too
small.
#다나2SR영문메뉴얼 rev.0 2007.7.3 5:44 PM 페이지59 001 Acrobat™ PDFWriter 300DPI 60LPI
6 0
6. Troubleshooting
When hypoglycemia (low blood sugar) occurs
What is hypoglycemia (low blood sugar)?
Hypoglycemia occurs when the blood sugar level is low. Anyone using insulin should be familiar with the symptoms and
treatment of hypoglycemia.
What to do in case of hypoglycemia
1) Place the pump in SUSPEND mode.
2) Check your blood sugar level.
3) If the blood sugar level turns out to be low, treat with carbohydrates in accordance with the instructions of your diabetes
p r o f e s s i o n a l .
4) Check your blood sugar level again in 15-20 minutes. If it returns to normal, no immediate action is needed and you may
take the pump out of SUSPEND.
5) If not, refer to step 2 and retest in 15 minutes.
6) If hypoglycemia appears prior to a meal, consider bolusing while you consume your meal.
The main symptoms of hypoglycemia
•Headache and dizziness
• S w e a t i n g
• S h a k i n g
• H u n g e r
•Tingling / numbness
•Nausea or vomiting
•Fast heart rate
• C o n f u s i o n
N o t e If hypoglycemia does not resolve contact your health care professional.
#다나2SR영문메뉴얼 rev.0 2007.7.3 5:44 PM 페이지60 001 Acrobat™ PDFWriter 300DPI 60LPI

6 1
When Hyperglycemia (high blood sugar) occurs
What is Hyperglycemia (high blood sugar)?
Hyperglycemia (high blood sugar) can occur due to any interruption in the delivery of insulin. It is important to know that if
there is no insulin delivery you may experience an increase in your blood sugar which if undetected or untreated may cause
DKA (diabetic ketoacidosis).
The main symptoms of DKA:
•N a u s e a
•Vomiting
•Increased drowsiness
•Difficulty breathing
•D e h y d r a t i o n
•Abdominal pain
POSSIBLE CAUSE SUGGESTED RESPONSE
Consult with your diabetes professional to make adjustments for increased physical
activity. You may choose to use or modify temporary basal rates or decrease meal
boluses prior to activity.
Increased physical activity
Consult with your diabetes professional to adjust basal rates or meal boluses to
more accurately reflect your current intake.Eating less
Please refrain from consuming alcohol. Alcohol consumption
Check and review your bolus history and basal rates. Check with your diabetes
professional to make sure that your bolus is properly calculated as well as your
basal rates.
User error or
programming error
Check your blood sugar regularly and check with your diabetes professional to
make sure that your bolus is properly calculated as well as your basal rates.Incorrect settings
6. Troubleshooting
#다나2SR영문메뉴얼 rev.0 2007.7.3 5:44 PM 페이지61 001 Acrobat™ PDFWriter 300DPI 60LPI

6 2
What to do in case of high blood sugar:
1) Check your blood sugar level.
2) Check your pump for any problems.
3) If your blood sugar remains high, take an injection of fast-acting insulin and contact your diabetes professional.
POSSIBLE CAUSE SUGGESTED RESPONSE
Visually check display screen for remaining insulin and also visually check reservoir
in pump. Replace reservoir immediately.Empty reservoir
Examine infusion site to make sure that there is no leakage. Also examine the
connection of the infusion set to the pump and the infusion set connector.
Insulin leakage at infusion site,
disconnection site
or connection to pump
Change the infusion set.Pinched or obstructed
infusion set
Check your blood sugar regularly and check with your diabetes professional to
make sure that your bolus is properly calculated as well as your basal rates.Incorrect settings
Check to see if the pump is in SUSPEND or if there is enough insulin in the
reservoir. Check your bolus/basal settings, history, and time. Check the remaining
battery charge and replace if necessary.
Programming or user error
#다나2SR영문메뉴얼 rev.0 2007.7.3 5:44 PM 페이지62 001 Acrobat™ PDFWriter 300DPI 60LPI

6 3
Contact technical supportCannot change bolus/basal
s e t t i n g s
Contact technical support.Pump does not function
following CT or MRI scan
The DANA DiabecareⓇ IISR insulin pump will allow 2 prime sequences every 12
hours (0:00 - 12:00, 12:00 - 24:00).Pump will not prime
P r o b l e m Corrective Action
An abnormal LCD can occur when the battery charge is low. Check the remaining
battery charge after you administer a bolus dose. The life span of the battery is
usually 1 or 2 months, but varies among users. Some batteries are known to still
show a full charge after two months even though they are low on charge. To avoid
any battery mishaps we recommend that you change the battery every two
months or whenever there is a display problem with your screen.
Abnormal LCD
Problem / Correction Action
W a r n i n gIn case of device malfunction, stop using the pump immediately and contact technical support.
6. Troubleshooting
#다나2SR영문메뉴얼 rev.0 2007.7.3 5:44 PM 페이지63 001 Acrobat™ PDFWriter 300DPI 60LPI

6 4
LOW RESERVOIR screen appears
The low reservoir screen will appear when there are approximately 20 units remaining. The pump will alarm
every 30 seconds. Make a visual confirmation of remaining insulin through the reservoir cavity window on
the side of pump. After confirming that the reservoir is low, insert a new reservoir filled with insulin.
Daily Remainder
The daily remainder will appear if (Daily max-Daily infusion amount) < 10u. For instance if the daily max
is set to 100 units and the total infusion amount for one day exceeds 90 units the remainder will appear
on the screen.
Daily Max
Appears when the total infusion amount for one day has reached the daily max setting. If you require
more insulin per day, please consult your healthcare professional to extend the daily max setting.
ERROR screen appears
Suspend the pump, remove the infusion set and check your blood sugar, then check the reservoir amount. If less
than 10 to 15 units of insulin remain in the reservoir, replace it. If this does not correct the error, check for occlusion of
the infusion set. Visually check for any possible occlusion of the infusion set and take corrective measures (unkink
tubing, check for air bubbles, etc.). If this does not resolve the problem change both the reservoir and infusion set.
7. List of alarms and audible signals
Low Battery
The low battery screen will appear when the remaining battery charge is no longer sufficient for the pump
to operate. Please change the battery.
W a r n i n gFor safety we recommend that you change the reservoir when there are 10 to 15 units of insulin remaining.
N o t e A continuous alarm will sound.
Check Glucose
Time to check your blood glucose level.
N o t e A melody will play for 30 seconds.
W a r n i n g If ERROR screen persists, contact technical support.
#다나2SR영문메뉴얼 rev.0 2007.7.3 5:44 PM 페이지64 001 Acrobat™ PDFWriter 300DPI 60LPI

6 5
Classification and compliance with standards
•The DANA DiabecareⓇ IISR is classified as an internal powered equipment BF type under the standard of IEC 60601-1
(Medical Electrical Equipment, General Requirements for Safety).
•It is not suitable for use in the presence of a flammable anesthetic mixture by the standard of IEC 60601-1.
•The pump will continuously operate according to the user defined settings.
8. Specifications, symbols, warranty
DANA DiabecareⓇ IISR Insulin Pump General Specifications
3 . 0 4×1 . 7 8×0.79inch (77×4 5×2 0 m m )
61g (including battery)
3 mL (300 Units), insulin compatible reservoir
S i z e
Net Weight
Insulin Syringe
0 - 8 0 u
0-16.0 u/h
24 Settings
Meal Bolus Setting
Basal Rate Setting
Basal Profile
Swiss Micro DC motor
12 seconds
3.6V DC
M o t o r
Bolus Duration for 1 Unit
Power Supply
Sleep Mode, Screen Saver
4 minute intervals
Dual microprocessors for continuous cross checking
Energy Saver
Basal Delivery Increments
Integrated Circuit
7. List of alarms and audible signals / 8. Specifications, symbols, warranty
#다나2SR영문메뉴얼 rev.0 2007.7.3 5:44 PM 페이지65 001 Acrobat™ PDFWriter 300DPI 60LPI
(2) this device must accept any interference received, including interference that may cause undesired operation.
This device complies with Part 15 of the FCC Rules. Operation is subject to the following two conditions:
(1) this device may not cause harmful interference, and
.
Changes or modifications not expressly approved by the party responsible for compliance could void the user's authority to operate the equipment.
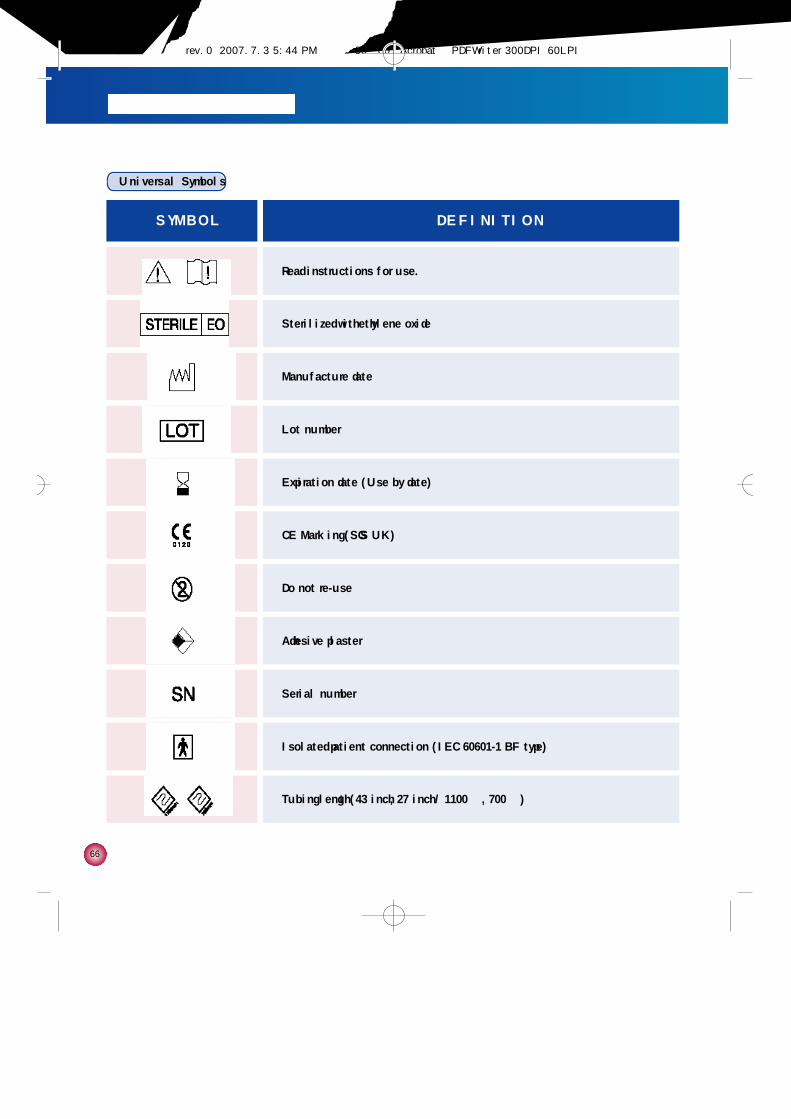
6 6
Universal Symbols
S Y M B O L D E F I N I T I O N
Read instructions for use.
Sterilized with ethylene oxide
Manufacture date
Lot number
Expiration date (Use by date)
CE Marking (SGS UK)
Do not re-use
Adhesive plaster
Serial number
Isolated patient connection (IEC 60601-1 BF type)
Tubing length (43 inch, 27 inch / 1100 ㎜, 700 ㎜)
#다나2SR영문메뉴얼 rev.0 2007.7.3 5:44 PM 페이지66 001 Acrobat™ PDFWriter 300DPI 60LPI
6 7
W A R R A N T YSOOIL Development Company Limited warrants that the DANA Diabecare insulin pump is free from defects in material and
workmanship under normal use and conditions and will warrant this for a period of four (4) years from the date of purchase
by the original purchaser. This limited warranty extends only to the original purchaser.
Should the pump fail to operate properly due to defect in material or workmanship during the warranty period, it may be
returned to SOOIL Development Co. Ltd., by shipment to its designated Distributor. The pump will be repaired or replaced at
S O O I L’s option without charge to the purchaser. Freight and other charges, where applicable, incurred in shipping a pump
for repair date is covered under this warranty. The warranty period shall not be extended from the original purchase.
This limited warranty is valid only if the DANA Diabecare insulin pump is used in accordance with all of the manufacturer’s
instructions. Note that this warranty does not extend to damage as a result of the following:
•Service or repairs performed by any person or entity other than a SOOIL authorized technician.
•Modifications or changes to the pump by the user or any other person after the date of manufacture.
•A force majeure or other event beyond the control of SOOIL or acts of negligence, misuse, or mishandling of the pump by
the user or any other person including but not limited to physical abuse of the product such as dropping or otherwise
damaging the DANA Diabecare pump.
•Failure to follow the manufacturer’s instructions, including those for storage, transport or cleaning for the DANA Diabecare
insulin pump.
•This warranty does not cover batteries, infusion sets, cartridges or other accessories of the DANA Diabecare insulin pump.
WARNING: Use of infusion sets, cartridges and batteries not specifically indicated by the manufacturer may result in harm or
injury to the user or the device. Please consult owner’s manual for full instructions.
Except as expressly set forth in this limited warranty, all other warranties are expressly disclaimed and excluded including,
without limitation, any warranties of fitness or merchantability for a particular purpose.
The remedies provided herein are the exclusive remedies available in the event of any breach hereof. Except for such
remedies, SOOIL Development Co. Ltd., its distributors, suppliers and agents shall not be liable for any losses, liabilities,
claims, or damages of any kind or nature whatsoever including, without limitation any indirect, consequential, incidental or
special damages caused by or arising from a defect of the insulin pump.
SOOIL Development Co., Ltd.:
196-1, Dogok-dong Kangnam-gu, Seoul,
KOREA 135-270
Tel:+82(2)3463-0041
F a x : + 8 2 ( 2 ) 3 4 6 3 - 7 7 0 7
Email: [email protected]
h t t p : / / w w w . s o o i l . c o m
7. Specifications, symbols, warranty
#다나2SR영문메뉴얼 rev.0 2007.7.3 5:44 PM 페이지67 001 Acrobat™ PDFWriter 300DPI 60LPI

w w w . s o o i l . c o m
IU-E-21 rev.0
#다나2SR영문메뉴얼 rev.0 2007.7.3 5:44 PM 페이지68 001 Acrobat™ PDFWriter 300DPI 60LPI


![[Lola] - Avioni Domace Konstrukcije Posle IISR](https://img.pdfslide.tips/doc/110x75/577cc61f1a28aba7119dc703/lola-avioni-domace-konstrukcije-posle-iisr.jpg)