Embed Size (px)
Citation preview

Duplicator Controller Functions( 拷贝控制器功能拷贝控制器功能拷贝控制器功能拷贝控制器功能 )
User's Manual( 操作操作操作操作手册手册手册手册 )Version: 1.5
注意注意注意注意::::关机后须超过关机后须超过关机后须超过关机后须超过 5 秒才能开秒才能开秒才能开秒才能开机机机机,,,,否则运否则运否则运否则运行行行行不正常不正常不正常不正常。。。。
Attention:Wait over 5 seconds to power on after shutdown to prevent the abnormaloperation of the system.
Copyright©2011 ACARD Technology Corp.Release: April 2011
使用手册中有关本产品的信息,于变更时不另行通知。手册中若出现错误,零售商亦不负任何责任。
ACARD 与 SCSIDE 均是信亿科技的注册商标。 Microsoft 与 Windows 则是美国微软公司的注册商标。此等商标皆为各自拥有者的知识产权。
本手册内容受国际版权法之保护。保留所有权益。未经本公司书面同意,不得以电子或机械方式复制、传送或抄写任何部分。
信亿科技研发生产的拷贝控制器仅能用于复制个人的影音资料。违反版权法是犯罪行为。信亿科技的磁盘储存控制器仅支持合法的备份。
信亿科技对使用者的非法行为不负任何责任。
Copyright and Trademarks( 著作权与商标著作权与商标著作权与商标著作权与商标 )
The information of the products in this manual is subject to change without prior notice and does not represent a commitment on the part of the vendor, who assumes no liability or responsibility for any errors that appear in this manual.
ACARD and SCSIDE are the trademarks of ACARD Technology Corp.
This manual contains materials protected under International Copyright Laws. All rights reserved. No part of this manual may be reproduced, transmitted or transcribed without the expressed written permission of the manufacturer and author of this manual.
ACARD’s Duplicator Controller is used for copying and editing personal audio and video data. Violating Copy Right is a criminal act. ACARD's Duplicator Controller only supports legal backup operation.
ACARD Technology Corp. is not responsible for illegal recording.
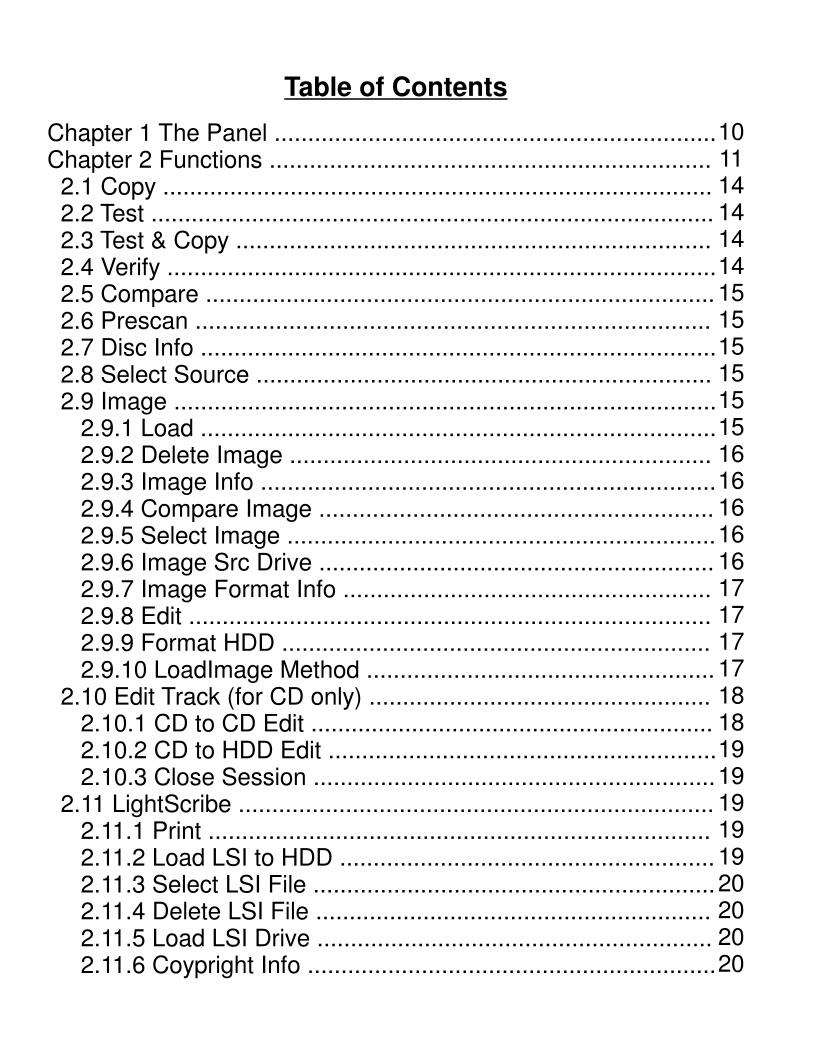
Table of Contents
Chapter 1 The Panel ..................................................................Chapter 2 Functions .................................................................. 2.1 Copy .................................................................................. 2.2 Test .................................................................................... 2.3 Test & Copy ....................................................................... 2.4 Verify .................................................................................. 2.5 Compare ............................................................................ 2.6 Prescan ............................................................................. 2.7 Disc Info ............................................................................. 2.8 Select Source .................................................................... 2.9 Image ................................................................................. 2.9.1 Load ............................................................................. 2.9.2 Delete Image ............................................................... 2.9.3 Image Info .................................................................... 2.9.4 Compare Image ........................................................... 2.9.5 Select Image ................................................................ 2.9.6 Image Src Drive ........................................................... 2.9.7 Image Format Info ....................................................... 2.9.8 Edit .............................................................................. 2.9.9 Format HDD ................................................................ 2.9.10 LoadImage Method .................................................... 2.10 Edit Track (for CD only) ................................................... 2.10.1 CD to CD Edit ............................................................ 2.10.2 CD to HDD Edit .......................................................... 2.10.3 Close Session ............................................................ 2.11 LightScribe ....................................................................... 2.11.1 Print ........................................................................... 2.11.2 Load LSI to HDD ........................................................ 2.11.3 Select LSI File ............................................................ 2.11.4 Delete LSI File ........................................................... 2.11.5 Load LSI Drive ........................................................... 2.11.6 Coypright Info .............................................................
1011141414141515151515151616161616171717171818191919191920202020
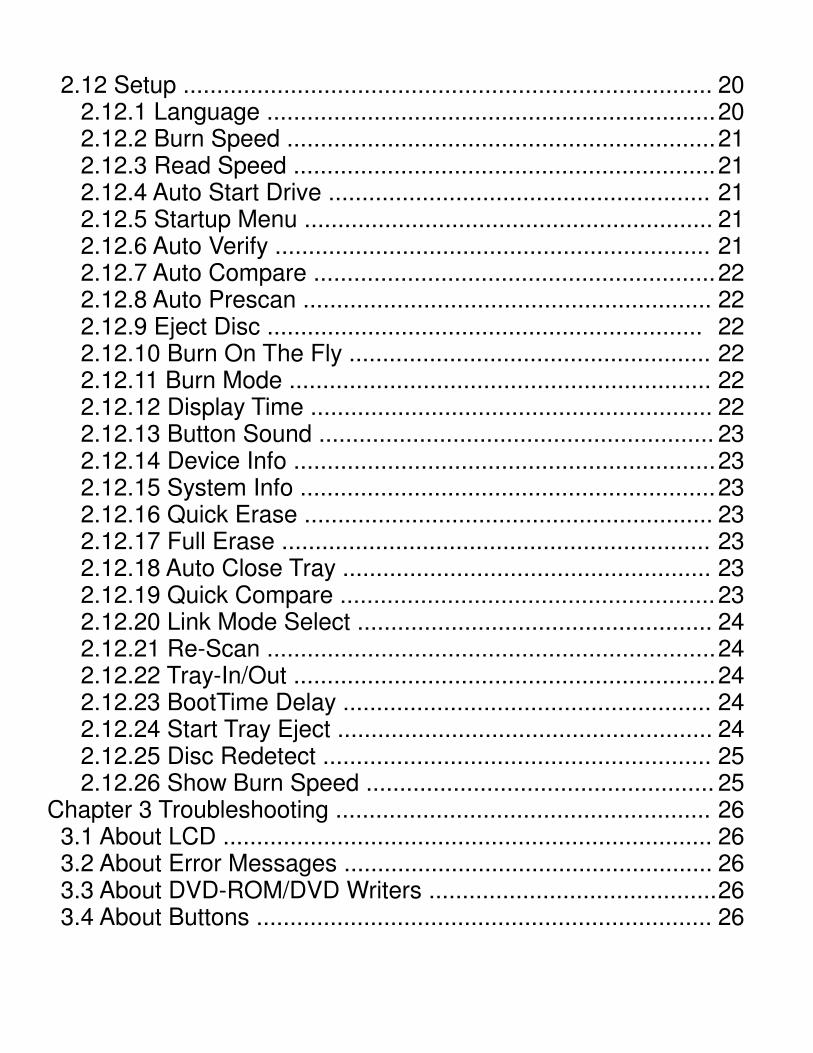
2.12 Setup ............................................................................... 2.12.1 Language ................................................................... 2.12.2 Burn Speed ................................................................ 2.12.3 Read Speed ............................................................... 2.12.4 Auto Start Drive ......................................................... 2.12.5 Startup Menu ............................................................. 2.12.6 Auto Verify ................................................................. 2.12.7 Auto Compare ............................................................ 2.12.8 Auto Prescan ............................................................. 2.12.9 Eject Disc ................................................................. 2.12.10 Burn On The Fly ...................................................... 2.12.11 Burn Mode ............................................................... 2.12.12 Display Time ............................................................ 2.12.13 Button Sound ........................................................... 2.12.14 Device Info ............................................................... 2.12.15 System Info .............................................................. 2.12.16 Quick Erase ............................................................. 2.12.17 Full Erase ................................................................ 2.12.18 Auto Close Tray ....................................................... 2.12.19 Quick Compare ........................................................ 2.12.20 Link Mode Select ..................................................... 2.12.21 Re-Scan ................................................................... 2.12.22 Tray-In/Out ............................................................... 2.12.23 BootTime Delay ....................................................... 2.12.24 Start Tray Eject ........................................................ 2.12.25 Disc Redetect .......................................................... 2.12.26 Show Burn Speed ....................................................Chapter 3 Troubleshooting ........................................................ 3.1 About LCD ......................................................................... 3.2 About Error Messages ....................................................... 3.3 About DVD-ROM/DVD Writers ........................................... 3.4 About Buttons ....................................................................
2020212121212122222222222223232323232323242424242425252626262626

3.5 About DVD Writer Not Readable ........................................ 3.6 About High Failure Rate ..................................................... 3.7 About Firmware Update .....................................................Appendix A LCD Messages .......................................................Appendix B LightScribe Utility Installation ..................................Appendix C LightScribe Utility Quick Guide ...............................
262626272931
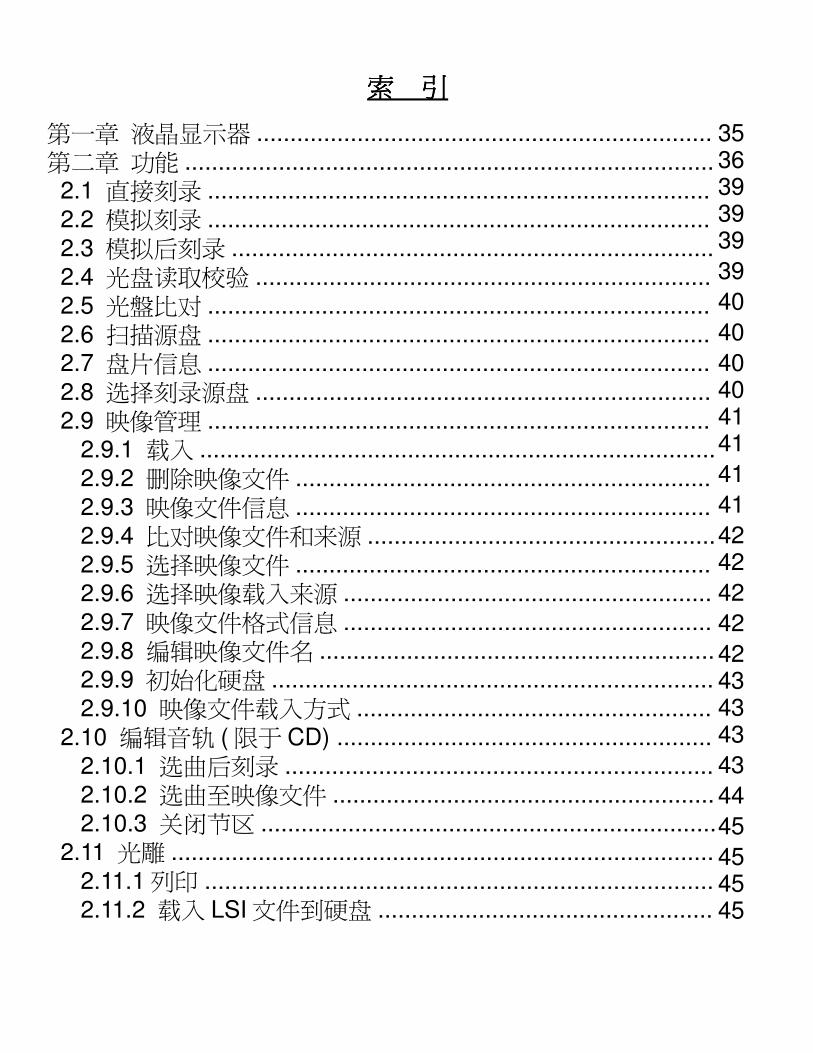
索 引索 引索 引索 引
第一章 液晶显示器 ....................................................................第二章 功能 ............................................................................... 2.1 直接刻录 ........................................................................... 2.2 模拟刻录 ...........................................................................
2.3 模拟后刻录 ........................................................................ 2.4 光盘读取校验 .................................................................... 2.5 光盤比对 ........................................................................... 2.6 扫描源盘 ........................................................................... 2.7 盘片信息 ...........................................................................
2.8 选择刻录源盘 .................................................................... 2.9 映像管理 ...........................................................................
2.9.1 载入 .............................................................................
2.9.2 删除映像文件 ..............................................................
2.9.3 映像文件信息 .............................................................. 2.9.4 比对映像文件和来源 ....................................................
2.9.5 选择映像文件 ..............................................................
2.9.6 选择映像载入来源 .......................................................
2.9.7 映像文件格式信息 .......................................................
2.9.8 编辑映像文件名 ........................................................... 2.9.9 初始化硬盘 ..................................................................
2.9.10 映像文件载入方式 .....................................................
2.10 编辑音轨 ( 限于 CD) ........................................................
2.10.1 选曲后刻录 ................................................................ 2.10.2 选曲至映像文件 ......................................................... 2.10.3 关闭节区 .................................................................... 2.11 光雕 .................................................................................
2.11.1 列印 ............................................................................ 2.11.2 载入 LSI 文件到硬盘 ..................................................
3536393939
39
40
40
40404141
41
41
4242
42
42
42434343
43
44
45
454545
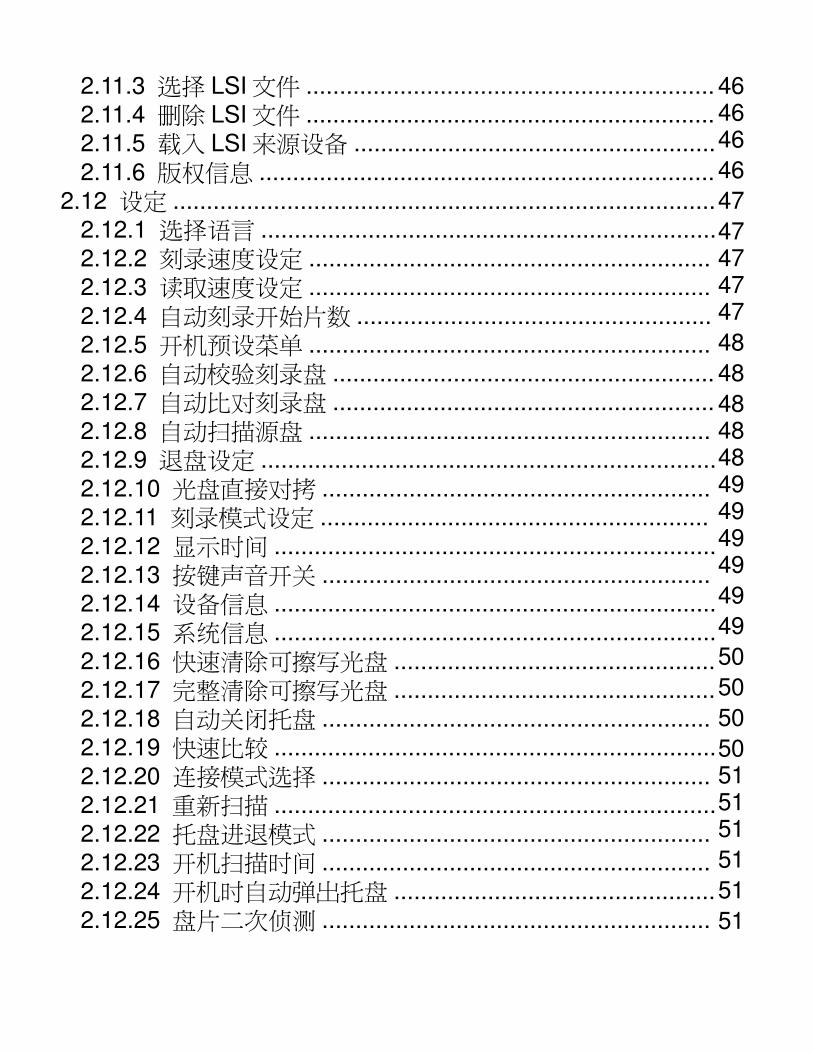
2.11.3 选择 LSI 文件 ............................................................. 2.11.4 删除 LSI 文件 ............................................................. 2.11.5 载入 LSI 来源设备 ......................................................
2.11.6 版权信息 .................................................................... 2.12 设定 ................................................................................. 2.12.1 选择语言 .................................................................... 2.12.2 刻录速度设定 ............................................................ 2.12.3 读取速度设定 ............................................................
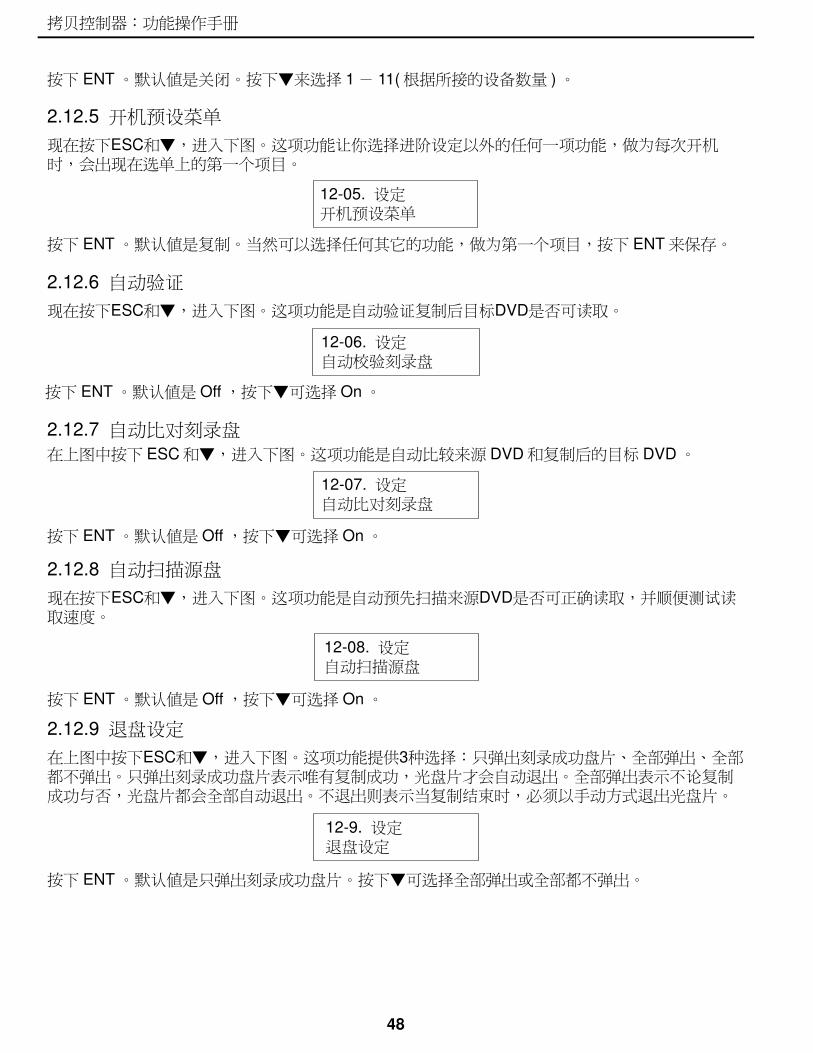
2.12.4 自动刻录开始片数 ..................................................... 2.12.5 开机预设菜单 ............................................................ 2.12.6 自动校验刻录盘 .........................................................
2.12.7 自动比对刻录盘 .........................................................
2.12.8 自动扫描源盘 ............................................................
2.12.9 退盘设定 ....................................................................
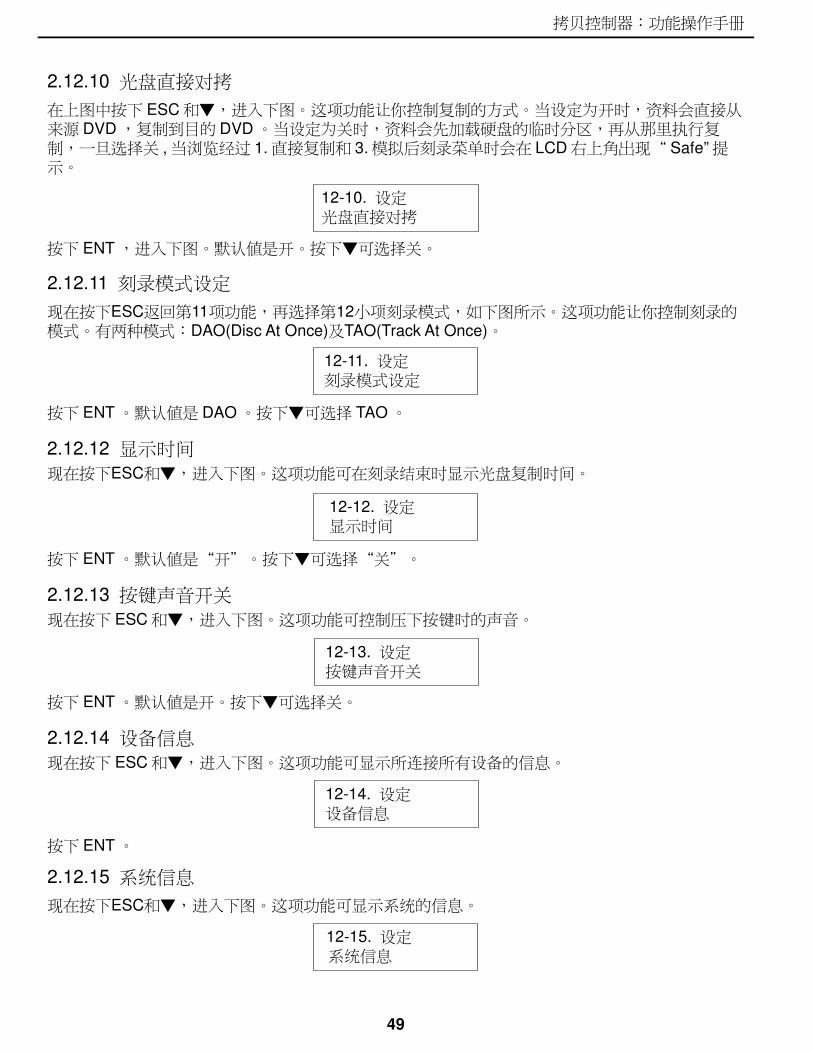
2.12.10 光盘直接对拷 .......................................................... 2.12.11 刻录模式设定 ..........................................................
2.12.12 显示时间 ..................................................................
2.12.13 按键声音开关 ..........................................................
2.12.14 设备信息 .................................................................. 2.12.15 系统信息 ..................................................................
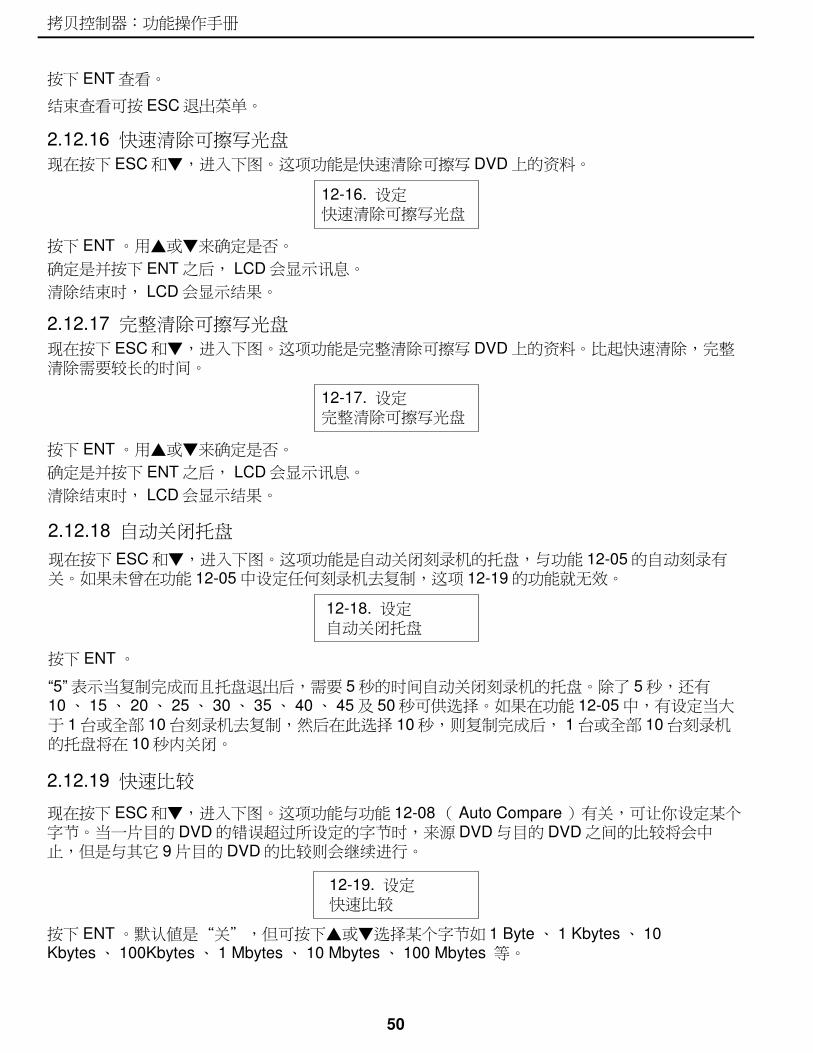
2.12.16 快速清除可擦写光盘 ................................................
2.12.17 完整清除可擦写光盘 ................................................ 2.12.18 自动关闭托盘 ..........................................................
2.12.19 快速比较 ..................................................................
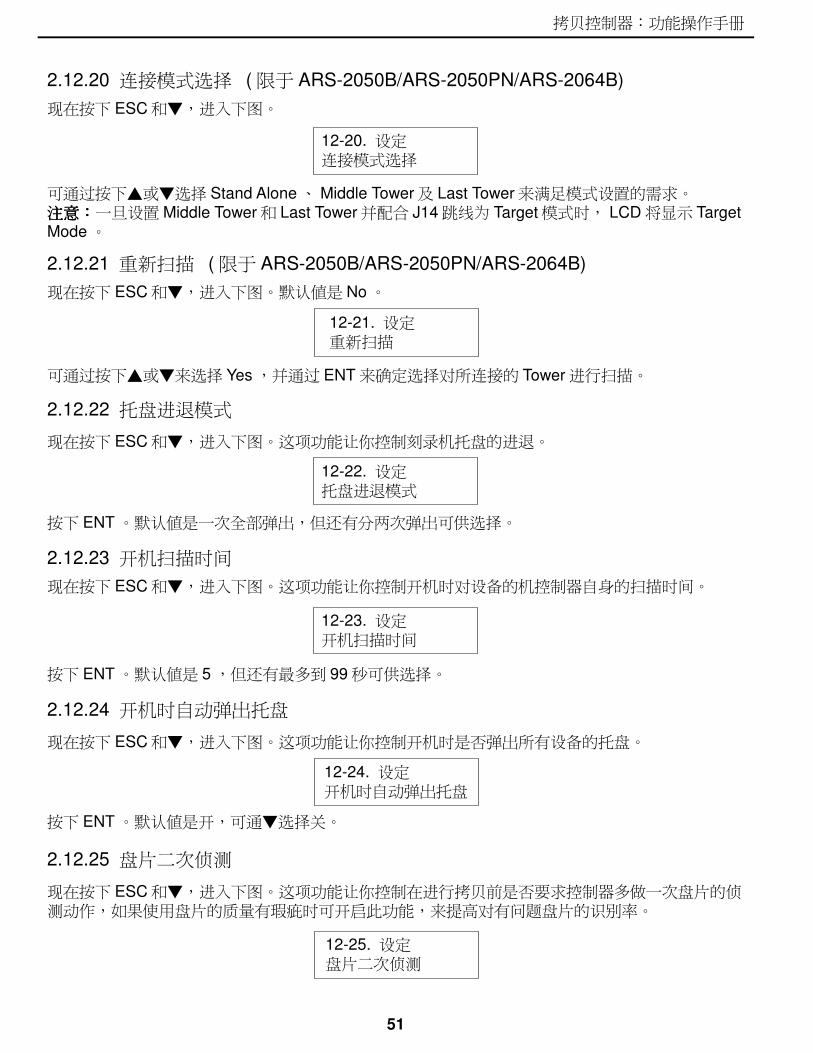
2.12.20 连接模式选择 .......................................................... 2.12.21 重新扫描 .................................................................. 2.12.22 托盘进退模式 ..........................................................
2.12.23 开机扫描时间 .......................................................... 2.12.24 开机时自动弹出托盘 ................................................
2.12.25 盘片二次侦测 ..........................................................
464646
46
47
47474747
48
48
48484849494949
49
49
50
50
50
50515151
51
51
51

2.12.26 显示拷贝速度 ..........................................................第三章 简易故障排除 ................................................................. 3.1 关于 LCD............................................................................
3.2 关于错误提示 .................................................................... 3.3 关于刻录机和光驱 ............................................................. 3.4 关于按钮 ........................................................................... 3.5 关于刻录机无法读取 .......................................................... 3.6 关于高失败率 ....................................................................
3.7 关于韧体升级 ....................................................................附录 A LCD 的讯息 ....................................................................
52
53
53
53535353535354
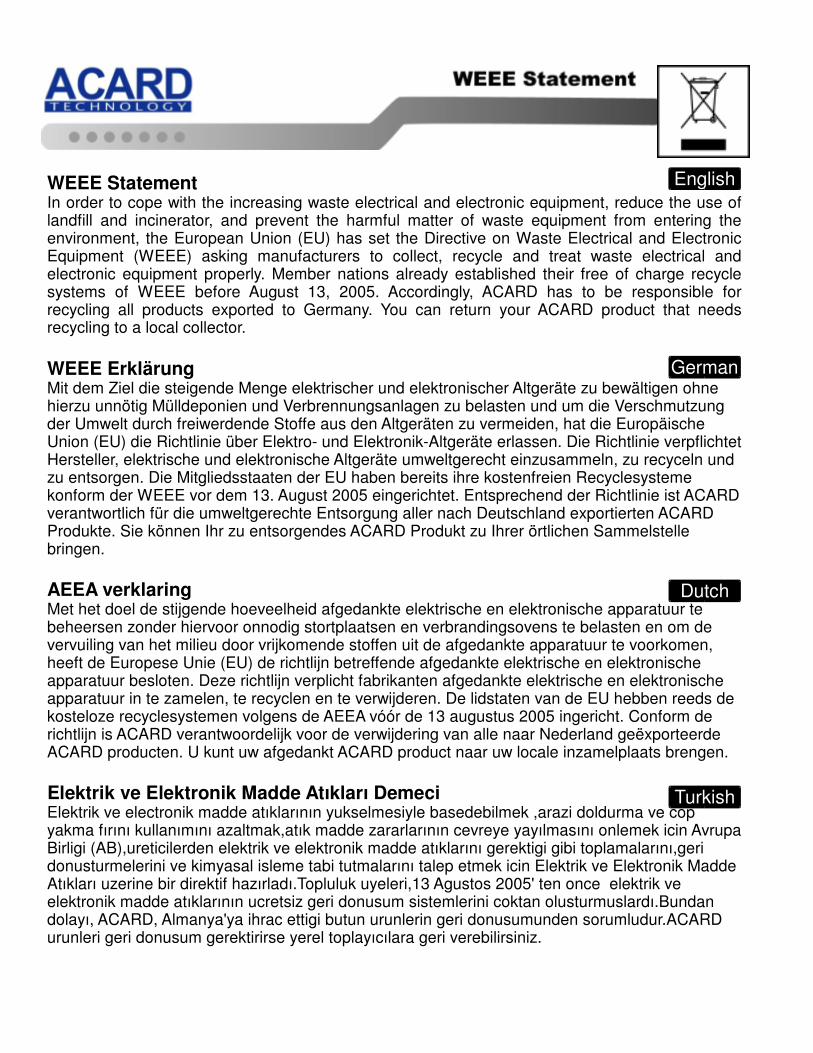
WEEE StatementIn order to cope with the increasing waste electrical and electronic equipment, reduce the use of landfill and incinerator, and prevent the harmful matter of waste equipment from entering the environment, the European Union (EU) has set the Directive on Waste Electrical and Electronic Equipment (WEEE) asking manufacturers to collect, recycle and treat waste electrical and electronic equipment properly. Member nations already established their free of charge recycle systems of WEEE before August 13, 2005. Accordingly, ACARD has to be responsible for recycling all products exported to Germany. You can return your ACARD product that needs recycling to a local collector.
WEEE ErklärungMit dem Ziel die steigende Menge elektrischer und elektronischer Altgeräte zu bewältigen ohne hierzu unnötig Mülldeponien und Verbrennungsanlagen zu belasten und um die Verschmutzung der Umwelt durch freiwerdende Stoffe aus den Altgeräten zu vermeiden, hat die Europäische Union (EU) die Richtlinie über Elektro- und Elektronik-Altgeräte erlassen. Die Richtlinie verpflichtet Hersteller, elektrische und elektronische Altgeräte umweltgerecht einzusammeln, zu recyceln und zu entsorgen. Die Mitgliedsstaaten der EU haben bereits ihre kostenfreien Recyclesysteme konform der WEEE vor dem 13. August 2005 eingerichtet. Entsprechend der Richtlinie ist ACARD verantwortlich für die umweltgerechte Entsorgung aller nach Deutschland exportierten ACARD Produkte. Sie können Ihr zu entsorgendes ACARD Produkt zu Ihrer örtlichen Sammelstelle bringen.
AEEA verklaringMet het doel de stijgende hoeveelheid afgedankte elektrische en elektronische apparatuur te beheersen zonder hiervoor onnodig stortplaatsen en verbrandingsovens te belasten en om de vervuiling van het milieu door vrijkomende stoffen uit de afgedankte apparatuur te voorkomen, heeft de Europese Unie (EU) de richtlijn betreffende afgedankte elektrische en elektronische apparatuur besloten. Deze richtlijn verplicht fabrikanten afgedankte elektrische en elektronische apparatuur in te zamelen, te recyclen en te verwijderen. De lidstaten van de EU hebben reeds de kosteloze recyclesystemen volgens de AEEA vóór de 13 augustus 2005 ingericht. Conform de richtlijn is ACARD verantwoordelijk voor de verwijdering van alle naar Nederland geëxporteerde ACARD producten. U kunt uw afgedankt ACARD product naar uw locale inzamelplaats brengen.
Elektrik ve Elektronik Madde Atıkları DemeciElektrik ve electronik madde atıklarının yukselmesiyle basedebilmek ,arazi doldurma ve cop yakma fırını kullanımını azaltmak,atık madde zararlarının cevreye yayılmasını onlemek icin Avrupa Birligi (AB),ureticilerden elektrik ve elektronik madde atıklarını gerektigi gibi toplamalarını,geri donusturmelerini ve kimyasal isleme tabi tutmalarını talep etmek icin Elektrik ve Elektronik Madde Atıkları uzerine bir direktif hazırladı.Topluluk uyeleri,13 Agustos 2005' ten once elektrik ve elektronik madde atıklarının ucretsiz geri donusum sistemlerini coktan olusturmuslardı.Bundan dolayı, ACARD, Almanya'ya ihrac ettigi butun urunlerin geri donusumunden sorumludur.ACARD urunleri geri donusum gerektirirse yerel toplayıcılara geri verebilirsiniz.
English
German
Dutch
Turkish
WEEE бюлетеньЧтобЫ с��ρaвиться с увеличивающимся ненуҗным электрическим и электронным оборудованием, уменъшите использование закапывания мусора и использования установки для сжигания отходов, препятствуйте вредному выбросам загрязнять окружановки среду, Европейский союз (EC) установил Директиву по Ненужному Электрическому и Электронному Оборудованию (WEEE) для того, чтобы изготовителей собрали, перерабатывали и вообще проявили внимание к ненужному электрическому и злектронному оборудованию должным образом. Члены нации установили бесплатную систему и электронному оборудованию должным образом. Члены нации установили бесплатную систему переработки WEEE до 13 августа 2005. Соответственно, ACARD обязан быть ответственным за то, что переработал все продукты, экспортируемые в Германию. Вы можете возвратнть ваш продукт ACARD, который нуждается в рециркуляции местному сборщику.
WEEE StatementAfin de gérer la quantité croissante de déchets électriques et électroniques, de réduire l’utilisation des décharges et des incinérateurs et d’éviter que des déchets nocifs ne polluent l’environnement, l’Union Européenne a publié la directive WEEE sur les déchets électriques et électroniques. Celle-ci spécifie que les fabricants doivent collecter, recycler et traiter l’équipement électronique et électrique usagé. Depuis le 13 août 2005, les pays membres ont mis en place un système de recyclage gratuit selon le WEEE,.De ce fait, Acard est responsable du recyclage de tous les produits exportés vers l’Allemagne. Vous pouvez mettre au rebut votre équipement ACARD usagé dans votre centre local de recyclage. Pour plus d’informations sur les lieux de mise au rebut des équipements usagés destinés au recyclage, veuillez contacter votre mairie, votre service de traitement des déchets ménagers ou le magasin où vous avez acheté le produit.
RAEECon la finalidad de reducir el incremento de residuos eléctricos y de material electrónico, reduciendo el uso de los vertederos e incineradoras y prevenir el preocupante aumento del contacto de estos residuos con el medio ambiente. Por este motivo la Unión Europea ha fijado la Directiva de Residuos de Aparatos Eléctricos y Electrónicos (RAEE) solicitando a los fabricantes la recolección, reciclaje y tratamiento de ests residuos correctamente. Los paises miembros ya han establecido su sistema de reciclaje gratuito de RAEE antes del 13 de Agosto del 2005. Por este motivo ACARD es el responsable del reciclaje de todos los productos exportados a Alemania. Usted puede devolver su producto Acard a un punto de recogida local cuando desee reciclarlo.
Dichiarazione WEEEPer far fronte all’aumento dei residui delle apparecchiature elettriche ed elettroniche, ridurre l'uso di materiale di riporto e degli inceneritori, ed impedire che il materiale nocivo delle apparecchiature residue entri a contatto con l'ambiente, l’ Unione Europea (UE) ha stabilito le Direttive sui Residui delle apparecchiature Elettriche ed Elettroniche (WEEE) chiedendo ai fornitori di raccogliere correttamente, riciclare e trattare le apparecchiature elettriche ed elettroniche residue. Le nazioni facenti parte dell’ Unione Europea hanno già stabilito il loro sistema gratuito di riciclaggio di questo materiale (WEEE) prima del 13 agosto 2005. Di conseguenza, ACARD è responsabile del riciclaggio di tutti i prodotti esportati in Germania. Potete restituire il vostro prodotto acquistato da ACARD che deve essere riciclato da un’ azienda specifica locale.
Russian
French
Spanish
Italian
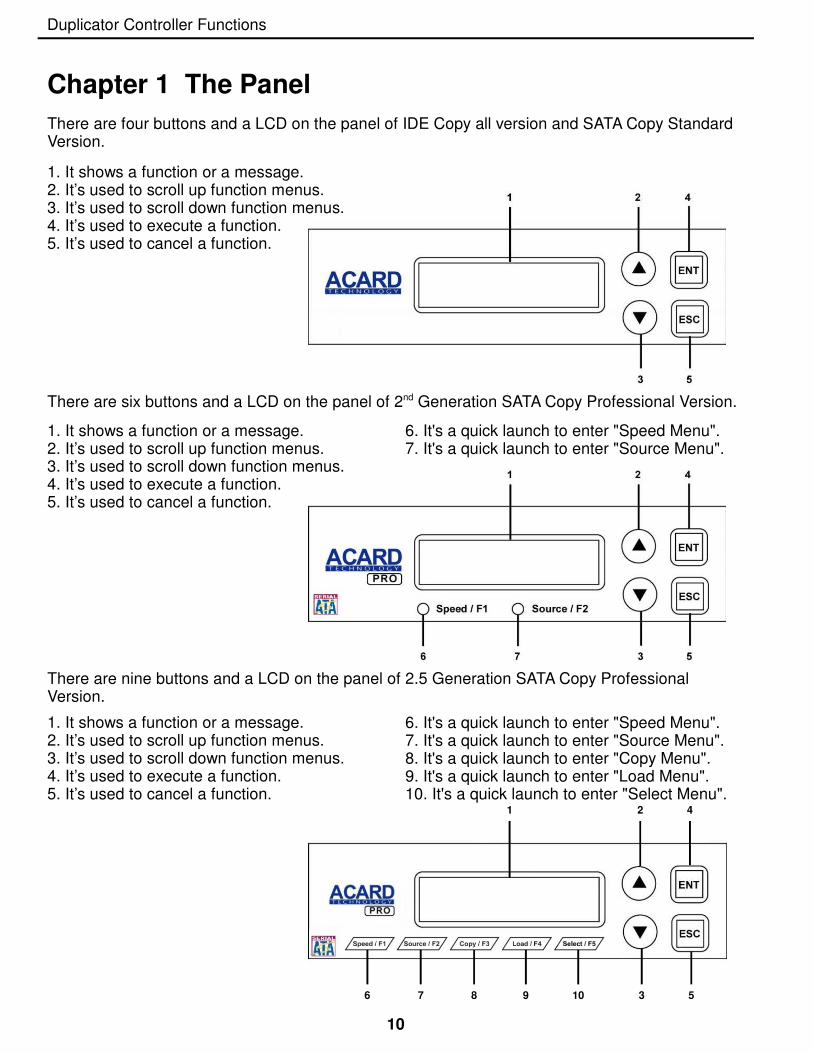
Chapter 1 The Panel
There are six buttons and a LCD on the panel of 2nd Generation SATA Copy Professional Version.
1. It shows a function or a message.2. It’s used to scroll up function menus.3. It’s used to scroll down function menus.4. It’s used to execute a function.5. It’s used to cancel a function.
There are four buttons and a LCD on the panel of IDE Copy all version and SATA Copy StandardVersion.
1. It shows a function or a message.2. It’s used to scroll up function menus.3. It’s used to scroll down function menus.4. It’s used to execute a function.5. It’s used to cancel a function.
10
Duplicator Controller Functions
6. It's a quick launch to enter "Speed Menu".7. It's a quick launch to enter "Source Menu".
There are nine buttons and a LCD on the panel of 2.5 Generation SATA Copy ProfessionalVersion.
1. It shows a function or a message.2. It’s used to scroll up function menus.3. It’s used to scroll down function menus.4. It’s used to execute a function.5. It’s used to cancel a function.
6. It's a quick launch to enter "Speed Menu".7. It's a quick launch to enter "Source Menu".8. It's a quick launch to enter "Copy Menu".9. It's a quick launch to enter "Load Menu".10. It's a quick launch to enter "Select Menu".
1
6
42
7 38 109 5
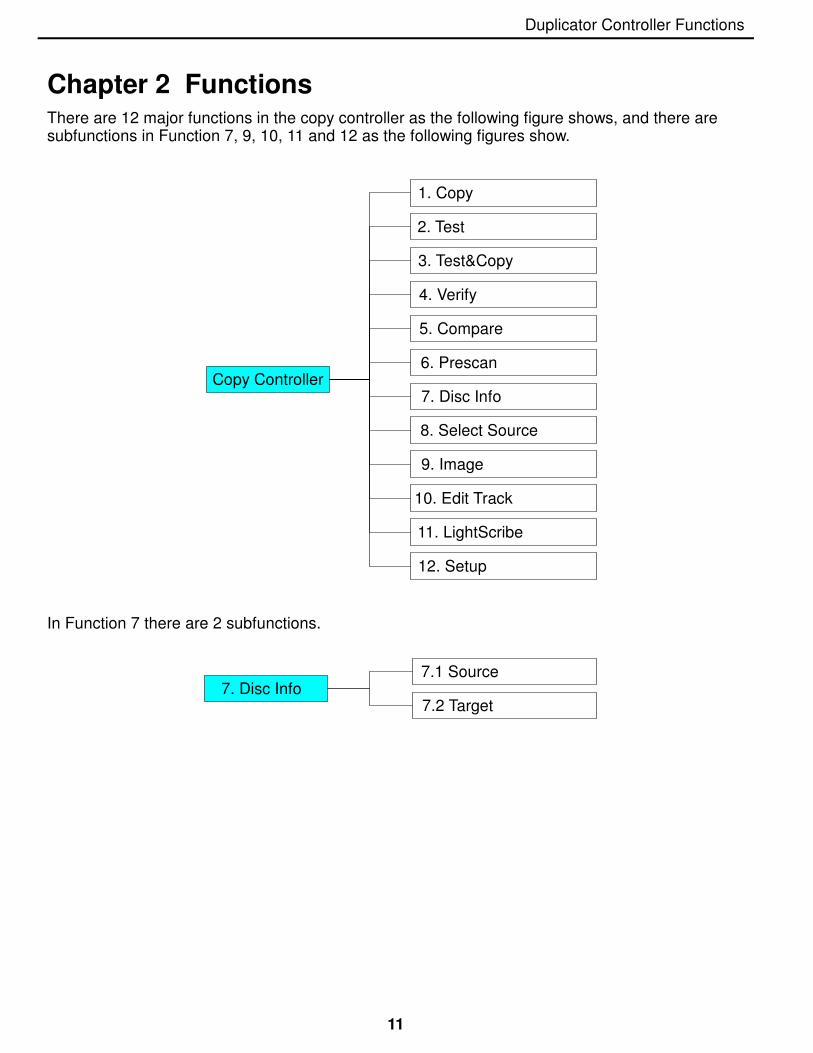
Chapter 2 FunctionsThere are 12 major functions in the copy controller as the following figure shows, and there are subfunctions in Function 7, 9, 10, 11 and 12 as the following figures show.
11
In Function 7 there are 2 subfunctions.
7.1 Source
7.2 Target 7. Disc Info
Copy Controller
1. Copy
2. Test
3. Test&Copy
4. Verify
5. Compare
6. Prescan
7. Disc Info
8. Select Source
9. Image
10. Edit Track
11. LightScribe
12. Setup
Duplicator Controller Functions
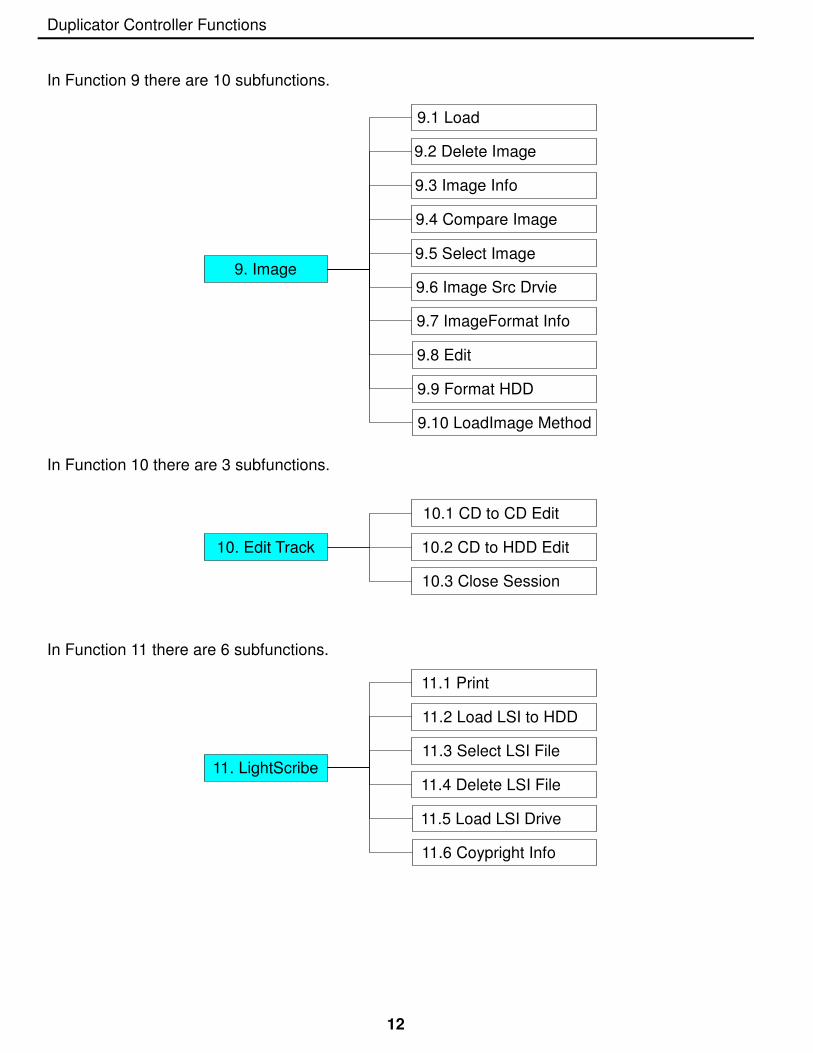
In Function 9 there are 10 subfunctions.
In Function 10 there are 3 subfunctions.
12
9.1 Load
9.2 Delete Image
9.3 Image Info
9.4 Compare Image
9.5 Select Image
9.6 Image Src Drvie
9.7 ImageFormat Info
9.8 Edit
9. Image
9.9 Format HDD
9.10 LoadImage Method
In Function 11 there are 6 subfunctions.
11.1 Print
11.2 Load LSI to HDD
11.3 Select LSI File
11.4 Delete LSI File 11. LightScribe
11.5 Load LSI Drive
11.6 Coypright Info
10.1 CD to CD Edit
10.2 CD to HDD Edit
10.3 Close Session
10. Edit Track
Duplicator Controller Functions
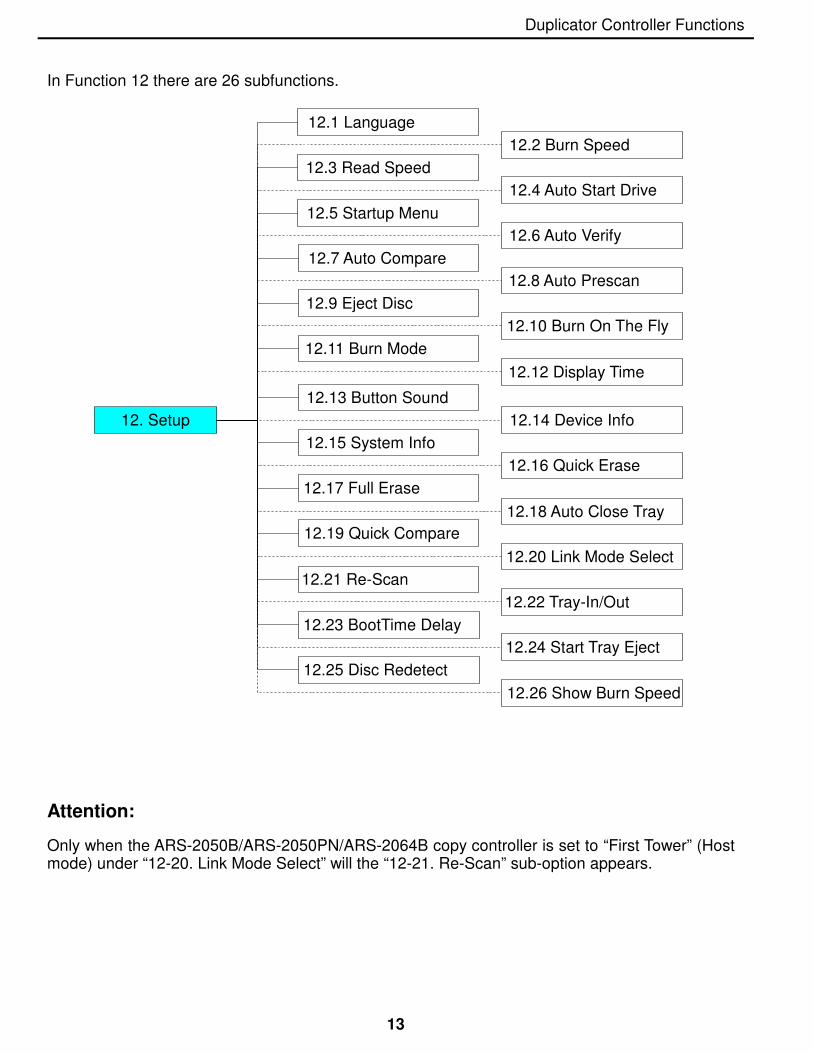
In Function 12 there are 26 subfunctions.
13
Attention:
Only when the ARS-2050B/ARS-2050PN/ARS-2064B copy controller is set to “First Tower” (Host mode) under “12-20. Link Mode Select” will the “12-21. Re-Scan” sub-option appears.
12. Setup
12.1 Language
12.2 Burn Speed
12.3 Read Speed
12.4 Auto Start Drive
12.5 Startup Menu
12.6 Auto Verify
12.7 Auto Compare
12.8 Auto Prescan
12.9 Eject Disc
12.10 Burn On The Fly
12.11 Burn Mode
12.12 Display Time
12.13 Button Sound
12.14 Device Info
12.15 System Info
12.16 Quick Erase
12.17 Full Erase
12.18 Auto Close Tray
12.19 Quick Compare
12.20 Link Mode Select
12.21 Re-Scan
12.22 Tray-In/Out
12.23 BootTime Delay
12.24 Start Tray Eject
12.25 Disc Redetect
12.26 Show Burn Speed
Duplicator Controller Functions
Among the 12 functions, Function 10 Edit Track is designed exclusively for editing a collection of favorite songs from CDs. During operation if you don’t understand an LCD message, see Appendix A .
14
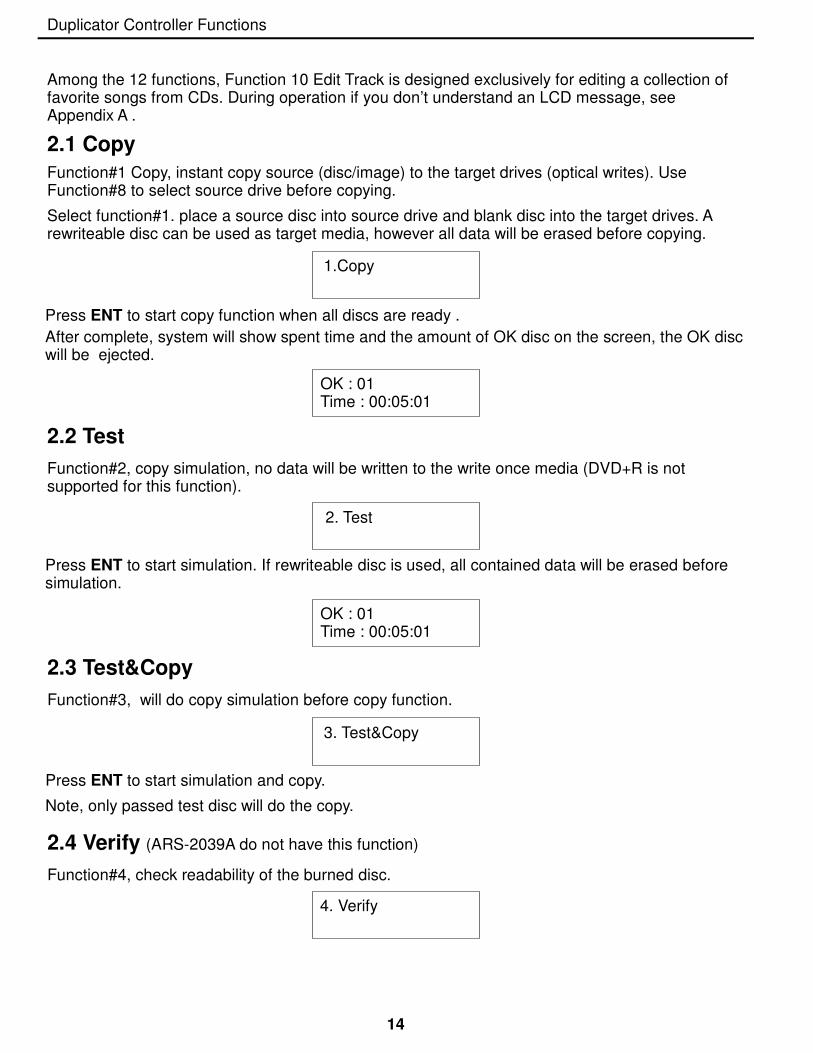
2.1 Copy
Function#1 Copy, instant copy source (disc/image) to the target drives (optical writes). Use Function#8 to select source drive before copying.
Select function#1. place a source disc into source drive and blank disc into the target drives. A rewriteable disc can be used as target media, however all data will be erased before copying.
1.Copy
Press ENT to start copy function when all discs are ready .
After complete, system will show spent time and the amount of OK disc on the screen, the OK disc will be ejected.
2.2 Test
Function#2, copy simulation, no data will be written to the write once media (DVD+R is not supported for this function).
2. Test
Press ENT to start simulation. If rewriteable disc is used, all contained data will be erased before simulation.
3. Test&Copy
2.3 Test&Copy
Function#3, will do copy simulation before copy function.
Press ENT to start simulation and copy.
Note, only passed test disc will do the copy.
OK : 01Time : 00:05:01
OK : 01Time : 00:05:01
4. Verify
2.4 Verify (ARS-2039A do not have this function)
Function#4, check readability of the burned disc.
Duplicator Controller Functions
15
5. Compare
2.5 Compare (ARS-2039A do not have this function)
Function#5, to check if target disc is identical to source disc.
Compare result :
OK : Source and target disc are identical
Fail : TOC not match, compare skipped due to contains do not match.
Diff : shows how many bytes are different.
2.6 Prescan
Function#6, to check if source disc is readable and without read error.
6. Prescan
2.7 Disc Info
Function#7, to report disc information, disc type and capacity.
7. Disc Info
8. Select Source
The drive on CH01 will be chosen as source device. Press ENT, and then press ▲ ▼ to select the source.
Assume that HDD is selected as the source device and selected partition contains no data, an error message “Source Drive Not Ready” will show on LCD while trying copy function. In that case,go to Function#9 Image to load the data into the chosen partition first.
2.8 Select Source (ARS-2040PX/2050P/5207B/5210B can select source from CH00 to CH05 only)
Function#8, to set which drive as source device.
9. Image
2.9 Image
Function#9 Image is valid only when a hard disk is installed. Disc is loaded to hard disk as an image file. Refer to page 11 for the menu.
2.9.1 Load
Load function loads whole disc data from any writers into the current partition of the hard disk. “P:A” means current partition is A.
9-01. Image P:ALoad
Duplicator Controller Functions
16
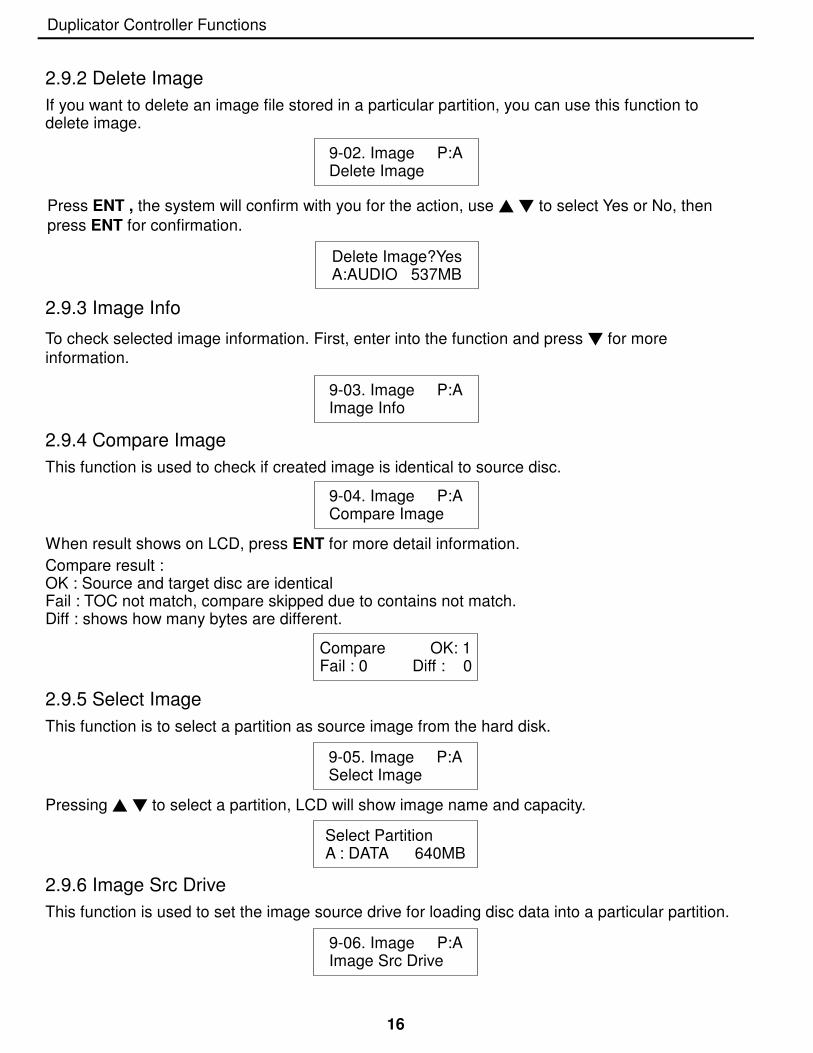
2.9.2 Delete Image
If you want to delete an image file stored in a particular partition, you can use this function to delete image.
9-02. Image P:ADelete Image
Press ENT , the system will confirm with you for the action, use ▲ ▼ to select Yes or No, then
press ENT for confirmation.
2.9.3 Image Info
To check selected image information. First, enter into the function and press ▼ for more
information.
9-03. Image P:AImage Info
2.9.4 Compare Image
This function is used to check if created image is identical to source disc.
9-04. Image P:ACompare Image
When result shows on LCD, press ENT for more detail information.
Compare result : OK : Source and target disc are identicalFail : TOC not match, compare skipped due to contains not match.Diff : shows how many bytes are different.
2.9.5 Select Image
This function is to select a partition as source image from the hard disk.
9-05. Image P:ASelect Image
Pressing ▲ ▼ to select a partition, LCD will show image name and capacity.
2.9.6 Image Src Drive
This function is used to set the image source drive for loading disc data into a particular partition.
Compare OK: 1Fail : 0 Diff : 0
Select PartitionA : DATA 640MB
Delete Image?YesA:AUDIO 537MB
9-06. Image P:AImage Src Drive
Duplicator Controller Functions
17
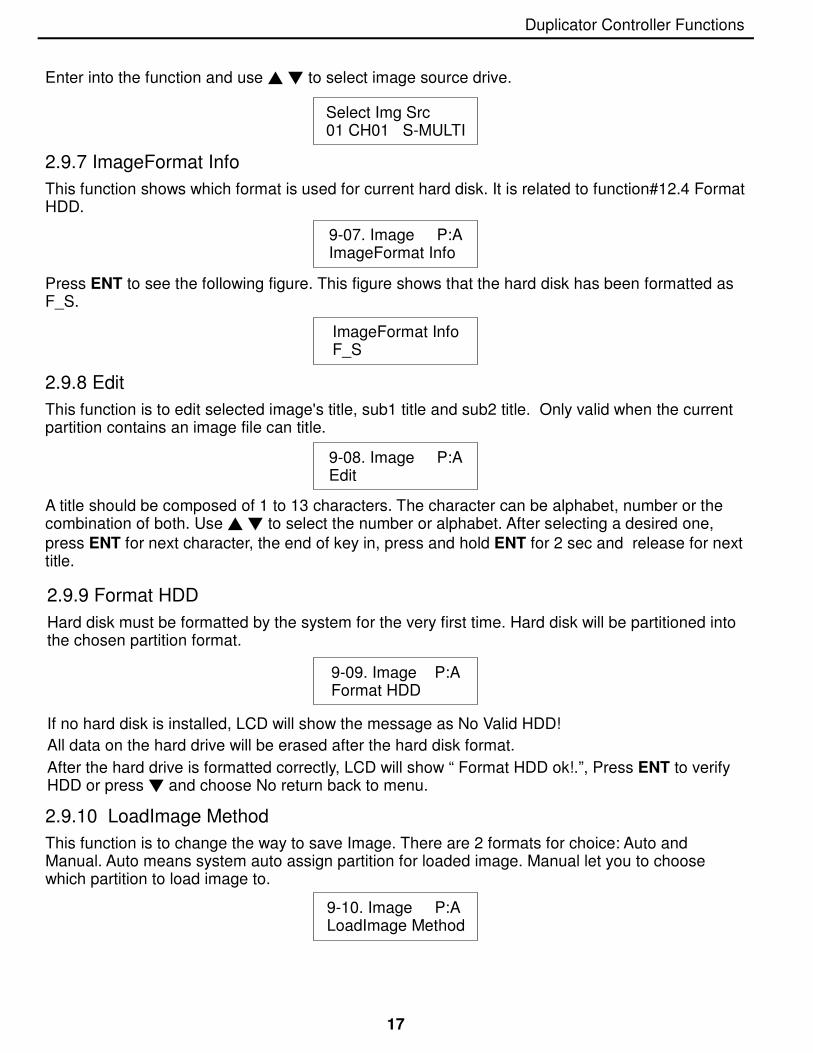
Enter into the function and use ▲ ▼ to select image source drive.
2.9.7 ImageFormat Info
This function shows which format is used for current hard disk. It is related to function#12.4 Format HDD.
9-07. Image P:AImageFormat Info
Press ENT to see the following figure. This figure shows that the hard disk has been formatted as F_S.
2.9.8 Edit
This function is to edit selected image's title, sub1 title and sub2 title. Only valid when the current partition contains an image file can title.
9-08. Image P:AEdit
A title should be composed of 1 to 13 characters. The character can be alphabet, number or the combination of both. Use ▲ ▼ to select the number or alphabet. After selecting a desired one,
press ENT for next character, the end of key in, press and hold ENT for 2 sec and release for next title.
2.9.9 Format HDD
Hard disk must be formatted by the system for the very first time. Hard disk will be partitioned into the chosen partition format.
9-09. Image P:AFormat HDD
If no hard disk is installed, LCD will show the message as No Valid HDD!
All data on the hard drive will be erased after the hard disk format.
After the hard drive is formatted correctly, LCD will show “ Format HDD ok!.”, Press ENT to verify HDD or press ▼ and choose No return back to menu.
Select Img Src01 CH01 S-MULTI
ImageFormat InfoF_S
2.9.10 LoadImage Method
This function is to change the way to save Image. There are 2 formats for choice: Auto and Manual. Auto means system auto assign partition for loaded image. Manual let you to choose which partition to load image to.
9-10. Image P:ALoadImage Method
Duplicator Controller Functions
18
2.10 Edit Track (for Audio CD only)
Function#10 Edit Track is exclusively designed for editing a collection of favorite songs from CDs. In other words, you can collect songs on a number of CDs and merge them into a single CD. There are 3 sub-functions: CD to CD, CD to HDD and Close Session. Refer to page 11 for the menu.
10. Edit Track
2.10.1 CD to CD Edit
To select songs from source CD, and then burn into a blank CD-R/RWs.
10-01. Edit Track CD to CD Edit
Enter into 10.-01 function, 1/10 means the number one of the 10 tracks, and 03:55 means the length of track.
Select Track 1/10 03:55
You can press ▼ to see the rest of tracks. If you want to select the track, press ENT then a “+” will
shows up, press ENT again will cancel the selection.
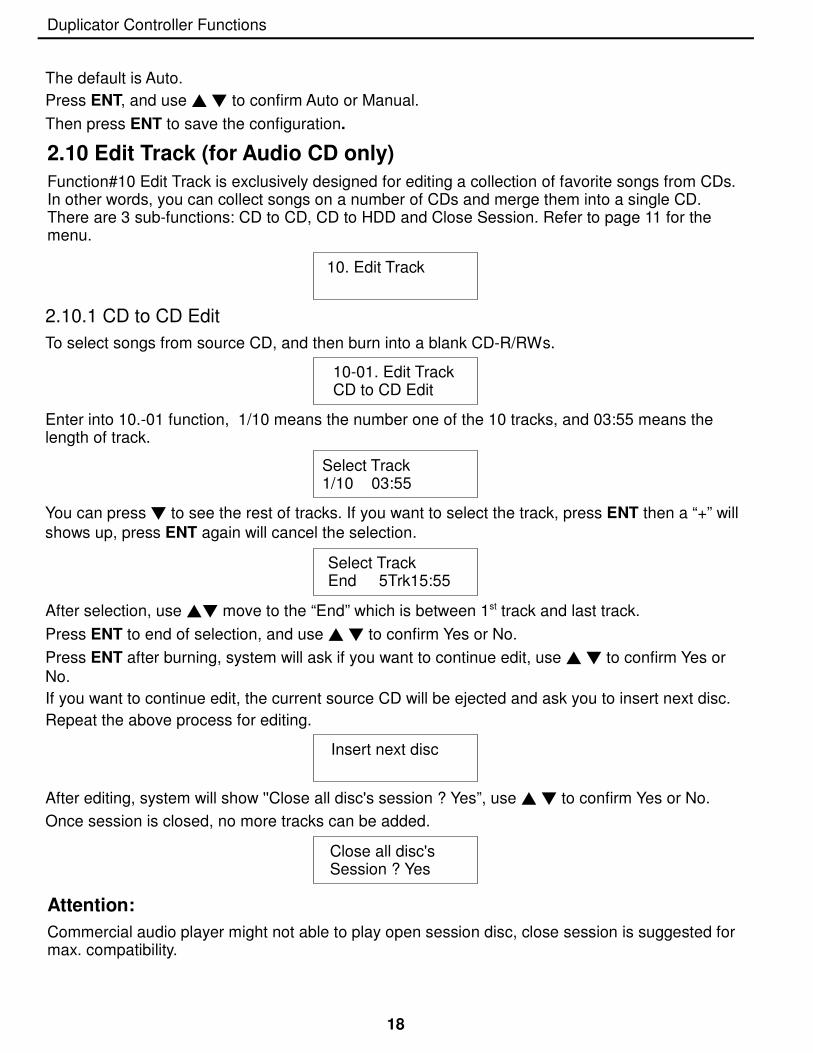
The default is Auto.
Press ENT, and use ▲ ▼ to confirm Auto or Manual.
Then press ENT to save the configuration.
Select Track End 5Trk15:55
After selection, use ▲▼ move to the “End” which is between 1st track and last track.
Press ENT to end of selection, and use ▲ ▼ to confirm Yes or No.
Press ENT after burning, system will ask if you want to continue edit, use ▲ ▼ to confirm Yes or No.
If you want to continue edit, the current source CD will be ejected and ask you to insert next disc.
Repeat the above process for editing.
Insert next disc
After editing, system will show ''Close all disc's session ? Yes”, use ▲ ▼ to confirm Yes or No.
Once session is closed, no more tracks can be added.
Close all disc's Session ? Yes
Attention:
Commercial audio player might not able to play open session disc, close session is suggested for max. compatibility.
Duplicator Controller Functions
19
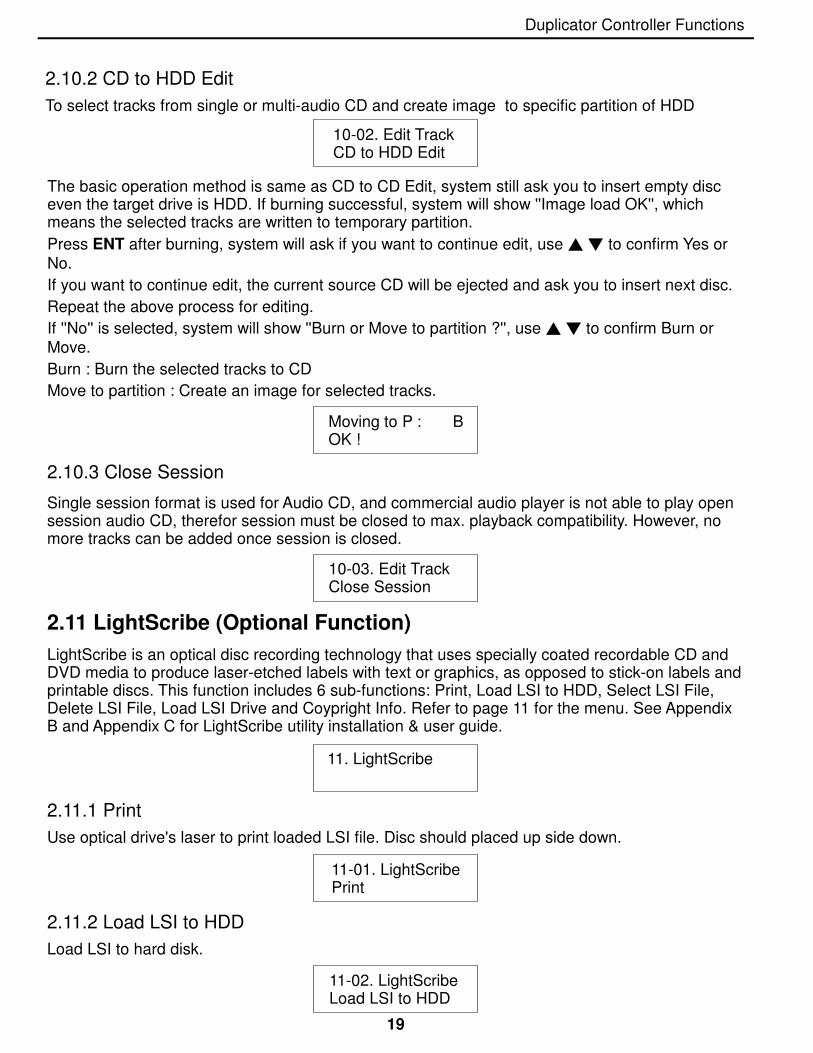
2.10.2 CD to HDD Edit
To select tracks from single or multi-audio CD and create image to specific partition of HDD
10-02. Edit Track CD to HDD Edit
The basic operation method is same as CD to CD Edit, system still ask you to insert empty disc even the target drive is HDD. If burning successful, system will show ''Image load OK'', which means the selected tracks are written to temporary partition.
Press ENT after burning, system will ask if you want to continue edit, use ▲ ▼ to confirm Yes or
No.
If you want to continue edit, the current source CD will be ejected and ask you to insert next disc.
Repeat the above process for editing.
If ''No'' is selected, system will show ''Burn or Move to partition ?'', use ▲ ▼ to confirm Burn or
Move.
Burn : Burn the selected tracks to CD
Move to partition : Create an image for selected tracks.
Moving to P : BOK !
10-03. Edit Track Close Session
2.10.3 Close Session
Single session format is used for Audio CD, and commercial audio player is not able to play open session audio CD, therefor session must be closed to max. playback compatibility. However, no more tracks can be added once session is closed.
2.11 LightScribe (Optional Function)
LightScribe is an optical disc recording technology that uses specially coated recordable CD and DVD media to produce laser-etched labels with text or graphics, as opposed to stick-on labels and printable discs. This function includes 6 sub-functions: Print, Load LSI to HDD, Select LSI File, Delete LSI File, Load LSI Drive and Coypright Info. Refer to page 11 for the menu. See Appendix B and Appendix C for LightScribe utility installation & user guide.
11. LightScribe
11-01. LightScribePrint
2.11.1 Print
Use optical drive's laser to print loaded LSI file. Disc should placed up side down.
11-02. LightScribe Load LSI to HDD
2.11.2 Load LSI to HDD
Load LSI to hard disk.
Duplicator Controller Functions
20
11-03. LightScribe Select LSI File
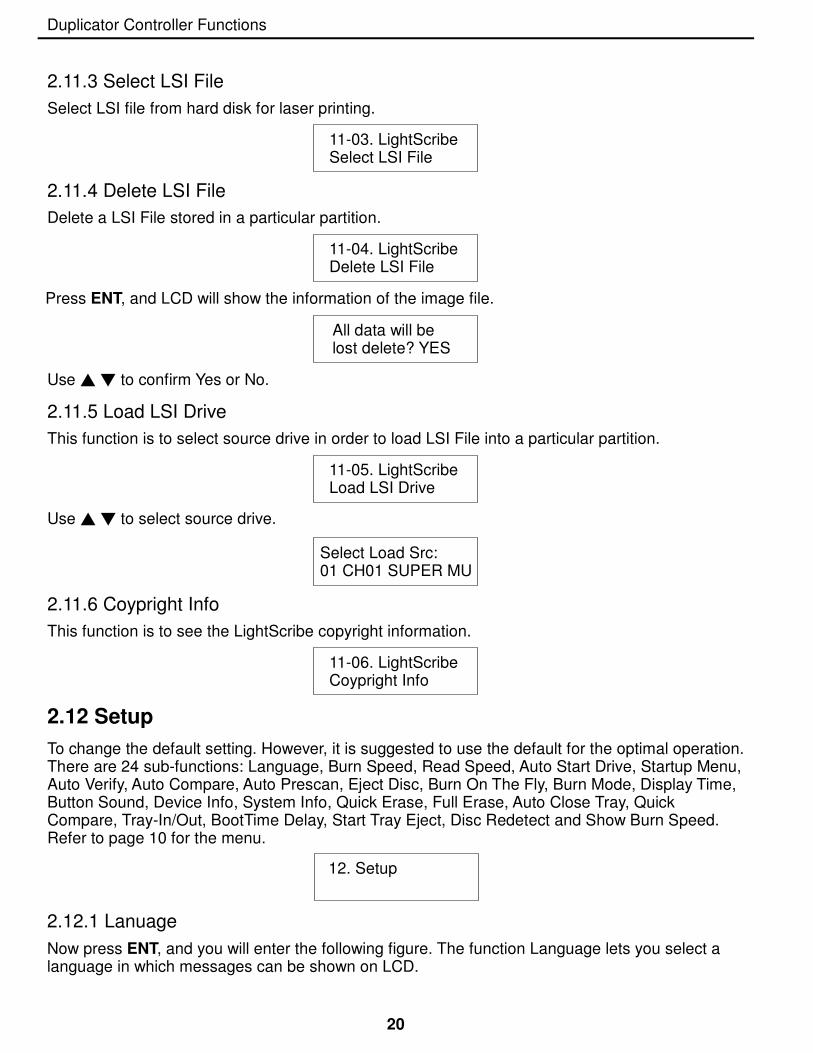
2.11.3 Select LSI File
Select LSI file from hard disk for laser printing.
Press ENT, and LCD will show the information of the image file.
11-04. LightScribe Delete LSI File
2.11.4 Delete LSI File
Delete a LSI File stored in a particular partition.
All data will be lost delete? YES
Use ▲ ▼ to confirm Yes or No.
11-05. LightScribe Load LSI Drive
2.11.5 Load LSI Drive
This function is to select source drive in order to load LSI File into a particular partition.
Select Load Src:01 CH01 SUPER MU
11-06. LightScribe Coypright Info
2.11.6 Coypright Info
This function is to see the LightScribe copyright information.
Use ▲ ▼ to select source drive.
12. Setup
2.12 Setup
To change the default setting. However, it is suggested to use the default for the optimal operation. There are 24 sub-functions: Language, Burn Speed, Read Speed, Auto Start Drive, Startup Menu, Auto Verify, Auto Compare, Auto Prescan, Eject Disc, Burn On The Fly, Burn Mode, Display Time, Button Sound, Device Info, System Info, Quick Erase, Full Erase, Auto Close Tray, Quick Compare, Tray-In/Out, BootTime Delay, Start Tray Eject, Disc Redetect and Show Burn Speed. Refer to page 10 for the menu.
2.12.1 Lanuage
Now press ENT, and you will enter the following figure. The function Language lets you select a language in which messages can be shown on LCD.
Duplicator Controller Functions

21
Press ENT. The default is English. Spanish, Japanese, Traditional Chinese and Simplified Chinese are made to order.
12-02. Setup Burn Speed
2.12.2 Burn Speed
Now press ESC and ▼ to enter the following figure. This function lets you control the burning
speed of CD writers.
Press ENT. The DVD Burn Speed will be shown and the default is 16X. Press▼ for change the
selection. The next one is BD Burn Speed and the default setting is 4X then Press ▼ to change
the selection to CD Burn speed and the default setting is 32X. Press▼ for change to Audio Burn
Speed the selection and the default is 16X.
12-03. Setup Read Speed
The default is maximum, the speed would depend on the reader drive's read speed and media type and format.
2.12.3 Read Speed
To change default reading speed of source disc.
12-04. Setup Auto Start Drive
The default is Off. Press ▼ to select 1 or 2(blank disc).
2.12.4 Auto Start Drive
System will auto start to copy or test once blank disc is ready.
12-01. Setup Language
12-05. Setup Startup Menu
The default is ''1.Copy'', and ''15.Adv Setup'' is not valid for this setting.
2.12.5 Start Up Menu
To select any function from #1 to # 13 as the first item appears on the screen whenever system is turned on.
2.12.6 Auto Verify
To set if auto verify target disc's readability after copy function.
12-06. Setup Auto Verify
Press ENT. The default is Off. Press ▼ to select On.
Duplicator Controller Functions

22
12-07. Setup Auto Compare
2.12.7 Auto Compare
To set if auto do comparison after copy function to check if source and target disc are identical.
The default is Off. Press ▼ to select On.
12-08. Setup Auto Prescan
2.12.8 Auto Prescan
To set if auto scan source disc before copy function.
The default is Off. Press ▼ to select On.
2.12.9 Eject Disc (ARS-2039A do not have this function)
There are 3 kinds of tray behavior when copy process is completed.
Eject Good Only: Only good disc will be ejected after burning.
Eject All Disc : All discs will be ejected after burning.
Do Not Eject : All discs stay in after burning.
12-9. Setup Eject Disc
The default is Eject Good Only.
2.12.10 Burn On The Fly
Burn On The Fly means data will be copied directly from the source disc to the target disc. When the setting is Off, the data will be loaded into temporary partition of HDD first, then copy from HDD to disc.
12-11. Setup Burn On The Fly
The default is On. Press ▼ to select Off.
2.12.11 Burn Mode
There are two modes: DAO (Disc At Once) and TAO (Track At Once).
12-11. Setup Burn Mode
The default is DAO. Press ▼ to select TAO.
2.12.12 Display Time
To set if display a timer while copying.
12-12. Setup Display Time
The default is On. Press ▼ to select Off.
Duplicator Controller Functions
23
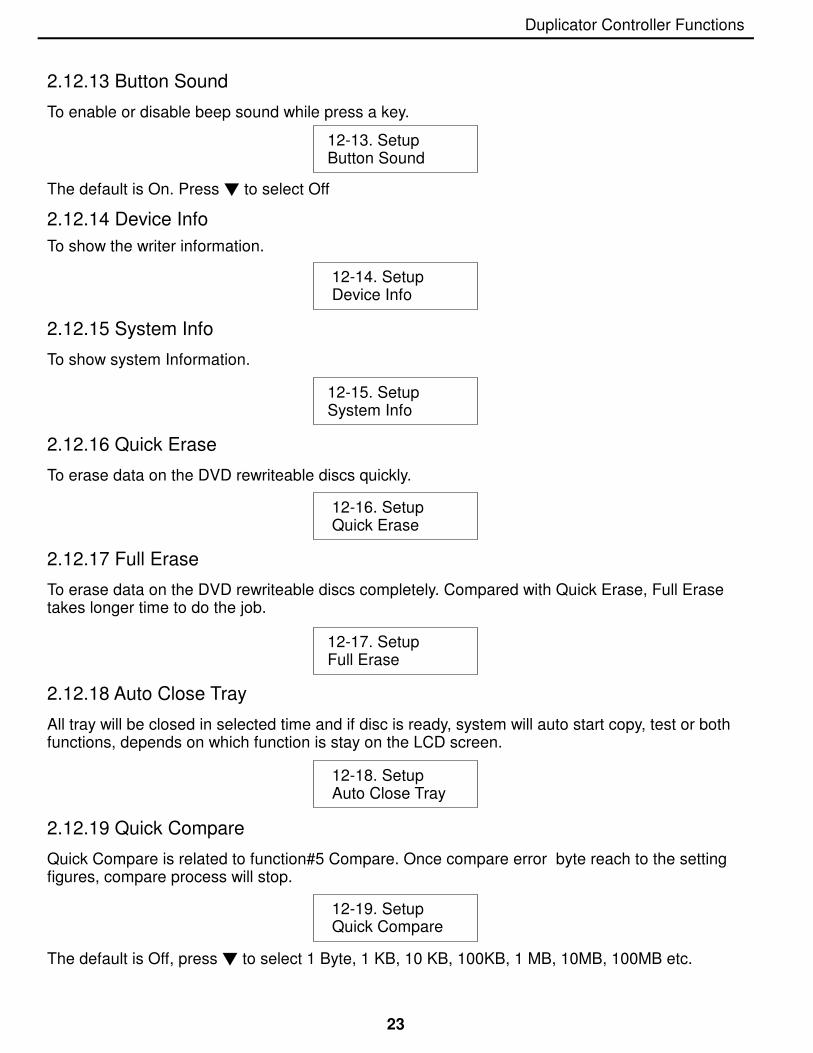
2.12.13 Button Sound
To enable or disable beep sound while press a key.
2.12.14 Device Info
To show the writer information.
12-13. Setup Button Sound
The default is On. Press ▼ to select Off
12-14. Setup Device Info
12-16. Setup Quick Erase
2.12.16 Quick Erase
To erase data on the DVD rewriteable discs quickly.
12-17. Setup Full Erase
2.12.17 Full Erase
To erase data on the DVD rewriteable discs completely. Compared with Quick Erase, Full Erase takes longer time to do the job.
12-15. Setup System Info
2.12.15 System Info
To show system Information.
12-18. Setup Auto Close Tray
2.12.18 Auto Close Tray
All tray will be closed in selected time and if disc is ready, system will auto start copy, test or both functions, depends on which function is stay on the LCD screen.
12-19. Setup Quick Compare
The default is Off, press ▼ to select 1 Byte, 1 KB, 10 KB, 100KB, 1 MB, 10MB, 100MB etc.
2.12.19 Quick Compare
Quick Compare is related to function#5 Compare. Once compare error byte reach to the setting figures, compare process will stop.
Duplicator Controller Functions
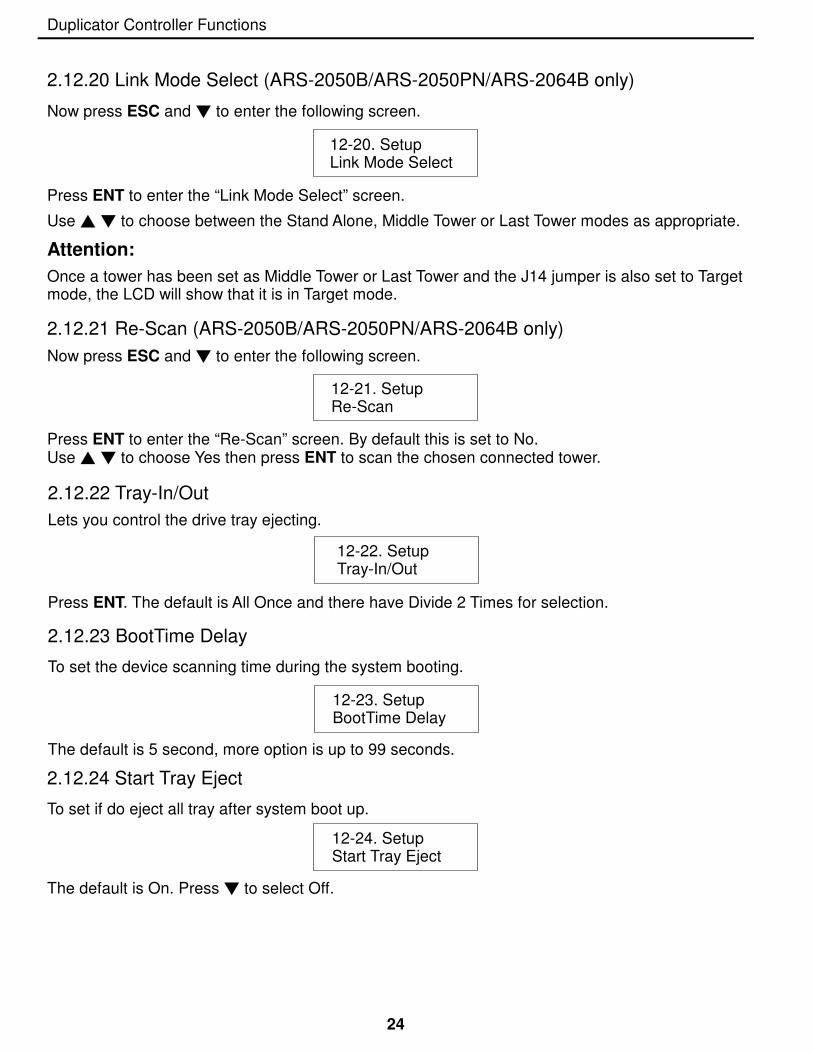
2.12.20 Link Mode Select (ARS-2050B/ARS-2050PN/ARS-2064B only)
Now press ESC and ▼ to enter the following screen.
Press ENT to enter the “Link Mode Select” screen.
Use ▲ ▼ to choose between the Stand Alone, Middle Tower or Last Tower modes as appropriate.
Attention:
Once a tower has been set as Middle Tower or Last Tower and the J14 jumper is also set to Target mode, the LCD will show that it is in Target mode.
12-20. SetupLink Mode Select
12-21. SetupRe-Scan
2.12.21 Re-Scan (ARS-2050B/ARS-2050PN/ARS-2064B only)
Now press ESC and ▼ to enter the following screen.
Press ENT to enter the “Re-Scan” screen. By default this is set to No.Use ▲ ▼ to choose Yes then press ENT to scan the chosen connected tower.
2.12.22 Tray-In/Out
Lets you control the drive tray ejecting.
12-22. Setup Tray-In/Out
Press ENT. The default is All Once and there have Divide 2 Times for selection.
The default is 5 second, more option is up to 99 seconds.
2.12.23 BootTime Delay
To set the device scanning time during the system booting.
12-23. Setup BootTime Delay
24
2.12.24 Start Tray Eject
To set if do eject all tray after system boot up.
12-24. Setup Start Tray Eject
The default is On. Press ▼ to select Off.
Duplicator Controller Functions

25
2.12.25 Disc Redetect
The function is designed specially for bad quality disc, the system will detect the disc one more time if disc recognition error occurred.
12-25. Setup Disc Redetect
The default is Off. Press ▼ to select On.
2.12.26 Show Burn Speed
Now press ESC and ▼ to enter the following figure. This function lets LCD shows the burning
speed of CD/DVD/BD writers.
12-26. Setup Show Burn Speed
The default is On. Press ▼ to select Off.
Duplicator Controller Functions
26
Chapter 3 Troubleshooting
3.1 About LCD
After you power up, if there is no display on the LCD, check if the connection of power cord is firm and the environment of power outlet is normal.
3.2 About Error Messages
During Copy, Test, Compare and Verify, etc. if you press ESC to abort, an error message will appear on LCD. Abortion may cause the copy controller to hang up,therefore you have to power on again.
If reading fails, an error message will appear on LCD. Get a new source DVD to try again.
If the copy controller hasn’t detected any device after powering on, an error message will appear on LCD.
3.3 About DVD-ROM/DVD WritersIf a DVD-ROM or a DVD writer cannot read, confirm the format of the source DVD and check if it is damaged.
Use any DVD writer to read the source DVD. If it works, the DVD-ROM is probably defective or not compatible with the source DVD.
3.4 About Buttons
If you press any one of the four buttons on the panel, but there is no response, it is perhaps that the button cannot function well. Inspect the jumper setting.
3.5 About DVD Writer Not Readable
After copying if the DVD writer is not readable, use Compare to examine, or get another DVD-ROM to test.
3.6 About High Failure Rate
If the failure rate of copying is high, do the following things to improve.● Lower the speed of DVD writer.● Inspect if the blank disc’s quality is good.● Update the firmware.● Inspect the DVD writer’s maximum writing speed. If the speed is over 8X, copy the data to a hard disk first, and then transmit to DVD.
3.7 About Firmware Update
If you cannot update the firmware, please inspect the firmware. Perhaps you have downloaded a wrong file.
Failure in firmware update may cause the copy controller to fail in booting. Under the circumstances, return the control board to distributor for repair.
Duplicator Controller Functions
27
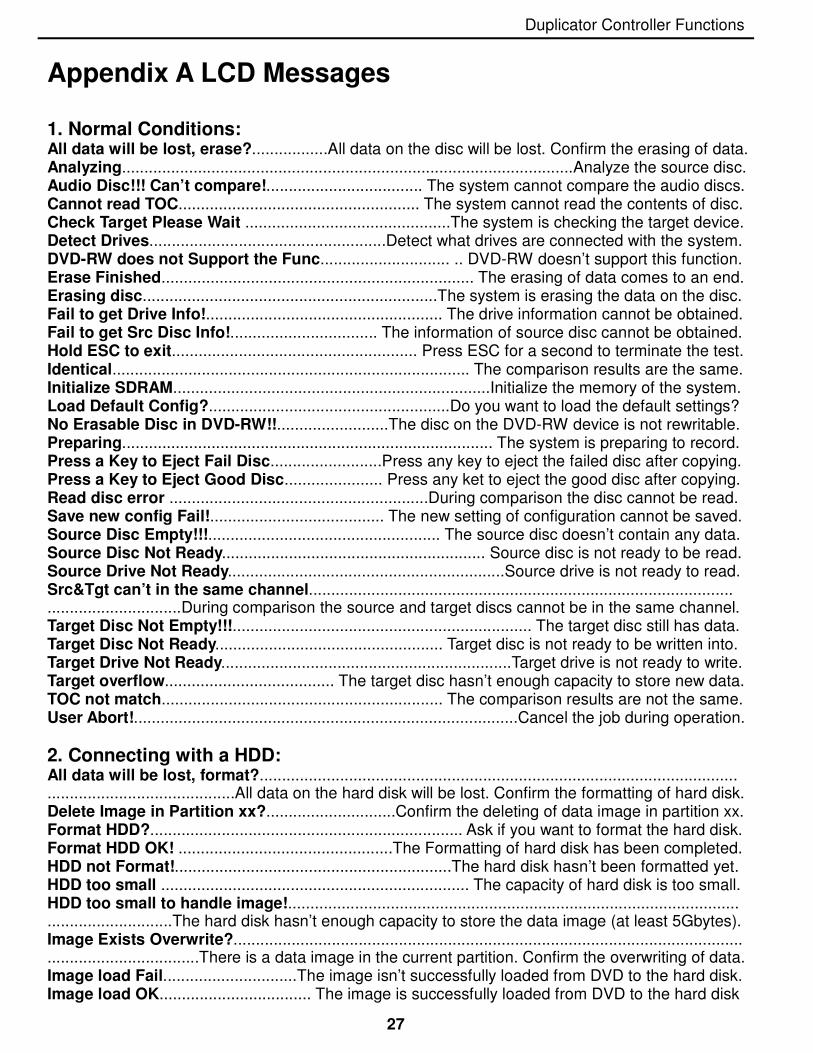
Appendix A LCD Messages
1. Normal Conditions:All data will be lost, erase?.................All data on the disc will be lost. Confirm the erasing of data.Analyzing.....................................................................................................Analyze the source disc.Audio Disc!!! Can’t compare!................................... The system cannot compare the audio discs.Cannot read TOC...................................................... The system cannot read the contents of disc.Check Target Please Wait ..............................................The system is checking the target device.Detect Drives.....................................................Detect what drives are connected with the system.DVD-RW does not Support the Func............................. .. DVD-RW doesn’t support this function.Erase Finished...................................................................... The erasing of data comes to an end.Erasing disc..................................................................The system is erasing the data on the disc.Fail to get Drive Info!..................................................... The drive information cannot be obtained.Fail to get Src Disc Info!................................. The information of source disc cannot be obtained.Hold ESC to exit....................................................... Press ESC for a second to terminate the test.Identical................................................................................ The comparison results are the same.Initialize SDRAM.......................................................................Initialize the memory of the system.Load Default Config?......................................................Do you want to load the default settings?No Erasable Disc in DVD-RW!!.........................The disc on the DVD-RW device is not rewritable.Preparing................................................................................... The system is preparing to record.Press a Key to Eject Fail Disc.........................Press any key to eject the failed disc after copying.Press a Key to Eject Good Disc...................... Press any ket to eject the good disc after copying.Read disc error ..........................................................During comparison the disc cannot be read.Save new config Fail!....................................... The new setting of configuration cannot be saved.Source Disc Empty!!!.................................................... The source disc doesn’t contain any data.Source Disc Not Ready........................................................... Source disc is not ready to be read.Source Drive Not Ready..............................................................Source drive is not ready to read.Src&Tgt can’t in the same channel.............................................................................................................................During comparison the source and target discs cannot be in the same channel.Target Disc Not Empty!!!................................................................... The target disc still has data.Target Disc Not Ready................................................... Target disc is not ready to be written into.Target Drive Not Ready.................................................................Target drive is not ready to write.Target overflow...................................... The target disc hasn’t enough capacity to store new data.TOC not match............................................................... The comparison results are not the same.User Abort!......................................................................................Cancel the job during operation.
2. Connecting with a HDD:All data will be lost, format?.....................................................................................................................................................All data on the hard disk will be lost. Confirm the formatting of hard disk.Delete Image in Partition xx?.............................Confirm the deleting of data image in partition xx.Format HDD?...................................................................... Ask if you want to format the hard disk.Format HDD OK! ................................................The Formatting of hard disk has been completed.HDD not Format!..............................................................The hard disk hasn’t been formatted yet.HDD too small ..................................................................... The capacity of hard disk is too small.HDD too small to handle image!.................................................................................................................................The hard disk hasn’t enough capacity to store the data image (at least 5Gbytes).Image Exists Overwrite?....................................................................................................................................................There is a data image in the current partition. Confirm the overwriting of data.Image load Fail..............................The image isn’t successfully loaded from DVD to the hard disk.Image load OK.................................. The image is successfully loaded from DVD to the hard disk
Duplicator Controller Functions
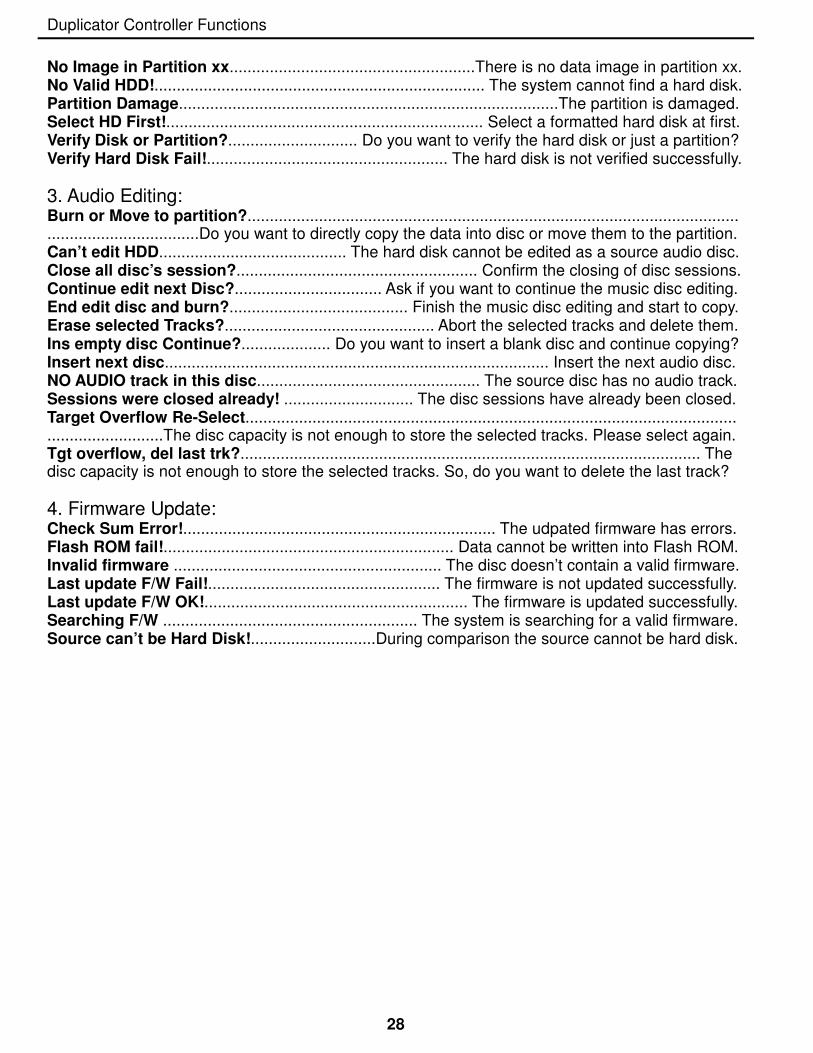
28
No Image in Partition xx.......................................................There is no data image in partition xx.No Valid HDD!.......................................................................... The system cannot find a hard disk.Partition Damage.....................................................................................The partition is damaged.Select HD First!....................................................................... Select a formatted hard disk at first.Verify Disk or Partition?............................. Do you want to verify the hard disk or just a partition?Verify Hard Disk Fail!...................................................... The hard disk is not verified successfully.
3. Audio Editing:Burn or Move to partition?.............................................................................................................. ..................................Do you want to directly copy the data into disc or move them to the partition.Can’t edit HDD.......................................... The hard disk cannot be edited as a source audio disc.Close all disc’s session?...................................................... Confirm the closing of disc sessions.Continue edit next Disc?................................. Ask if you want to continue the music disc editing.End edit disc and burn?........................................ Finish the music disc editing and start to copy.Erase selected Tracks?............................................... Abort the selected tracks and delete them.Ins empty disc Continue?.................... Do you want to insert a blank disc and continue copying?Insert next disc...................................................................................... Insert the next audio disc.NO AUDIO track in this disc.................................................. The source disc has no audio track.Sessions were closed already! ............................. The disc sessions have already been closed.Target Overflow Re-Select.............................................................................................................. ..........................The disc capacity is not enough to store the selected tracks. Please select again.Tgt overflow, del last trk?....................................................................................................... The disc capacity is not enough to store the selected tracks. So, do you want to delete the last track?
4. Firmware Update:Check Sum Error!...................................................................... The udpated firmware has errors.Flash ROM fail!................................................................. Data cannot be written into Flash ROM.Invalid firmware ............................................................ The disc doesn’t contain a valid firmware.Last update F/W Fail!.................................................... The firmware is not updated successfully.Last update F/W OK!........................................................... The firmware is updated successfully.Searching F/W ......................................................... The system is searching for a valid firmware.Source can’t be Hard Disk!............................During comparison the source cannot be hard disk.
Duplicator Controller Functions
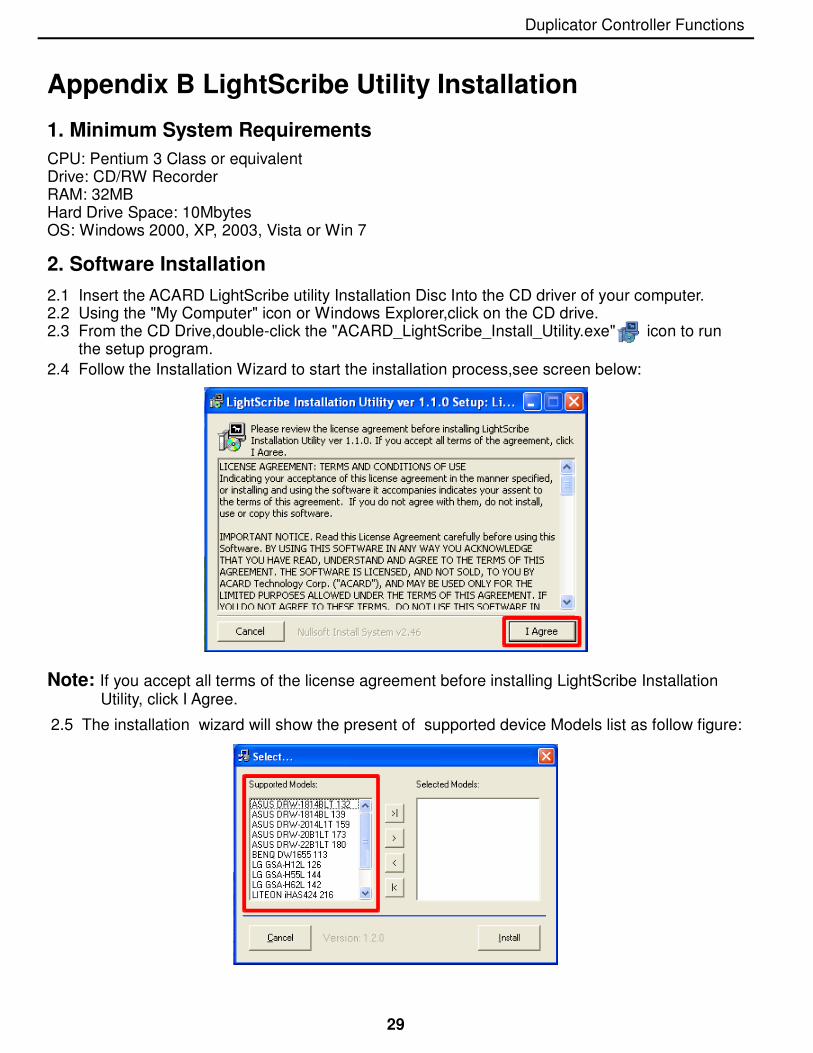
Appendix B LightScribe Utility Installation
1. Minimum System Requirements
CPU: Pentium 3 Class or equivalentDrive: CD/RW RecorderRAM: 32MBHard Drive Space: 10Mbytes OS: Windows 2000, XP, 2003, Vista or Win 7
2. Software Installation
Note: If you accept all terms of the license agreement before installing LightScribe Installation Utility, click I Agree.
2.1 Insert the ACARD LightScribe utility Installation Disc Into the CD driver of your computer.2.2 Using the "My Computer" icon or Windows Explorer,click on the CD drive.2.3 From the CD Drive,double-click the "ACARD_LightScribe_Install_Utility.exe" icon to run the setup program.
2.4 Follow the Installation Wizard to start the installation process,see screen below:
2.5 The installation wizard will show the present of supported device Models list as follow figure:
29
Duplicator Controller Functions
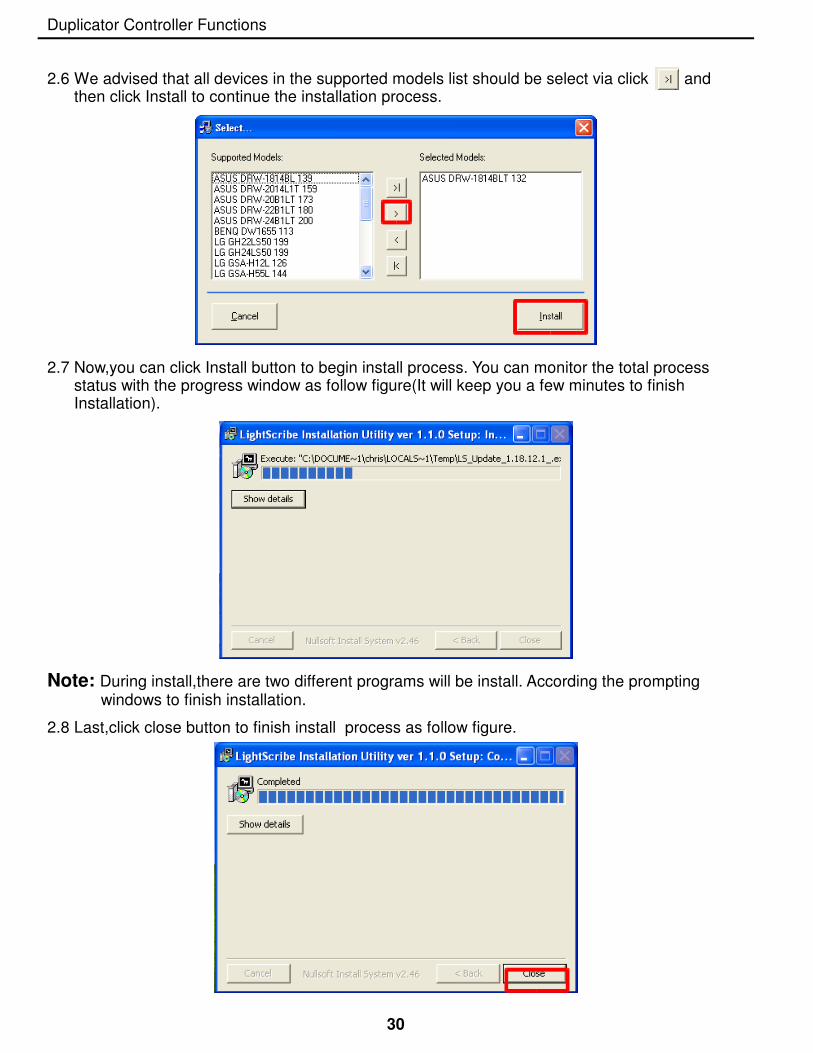
2.6 We advised that all devices in the supported models list should be select via click and then click Install to continue the installation process.
2.7 Now,you can click Install button to begin install process. You can monitor the total process status with the progress window as follow figure(It will keep you a few minutes to finish Installation).
Note: During install,there are two different programs will be install. According the prompting windows to finish installation.
2.8 Last,click close button to finish install process as follow figure.
30
Duplicator Controller Functions
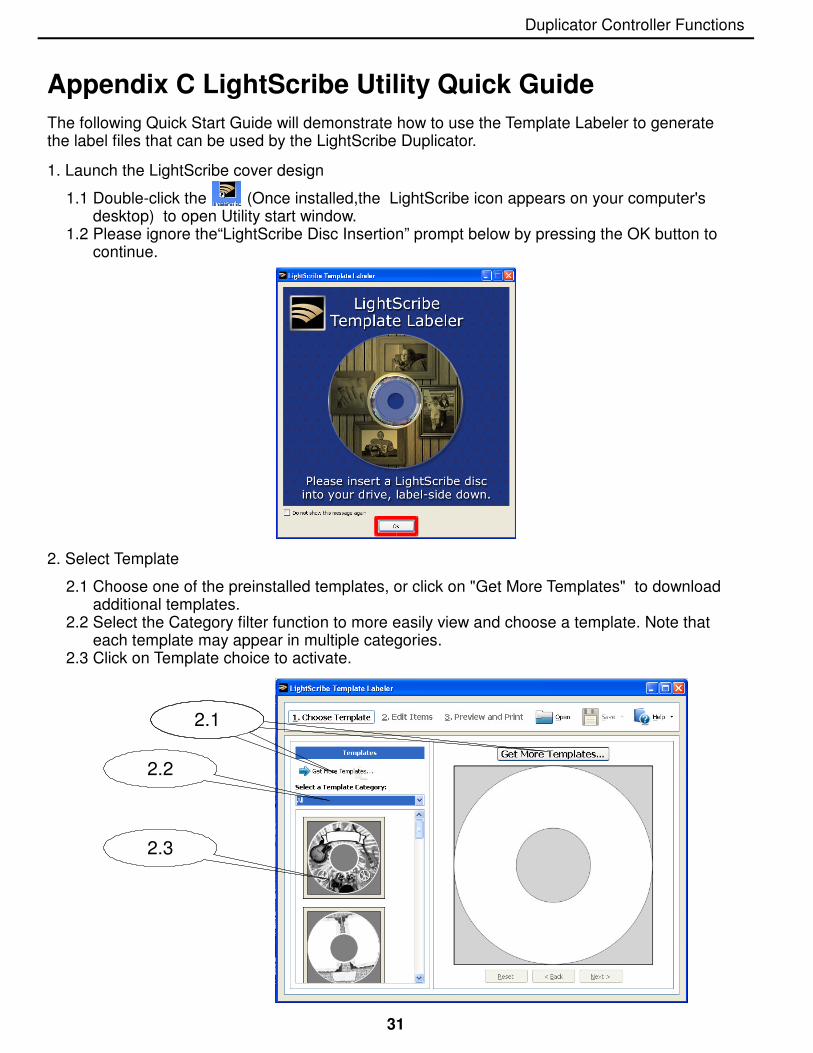
The following Quick Start Guide will demonstrate how to use the Template Labeler to generate the label files that can be used by the LightScribe Duplicator.
1. Launch the LightScribe cover design
1.1 Double-click the (Once installed,the LightScribe icon appears on your computer's desktop) to open Utility start window. 1.2 Please ignore the“LightScribe Disc Insertion” prompt below by pressing the OK button to continue.
2. Select Template
2.1 Choose one of the preinstalled templates, or click on "Get More Templates" to download additional templates.2.2 Select the Category filter function to more easily view and choose a template. Note that each template may appear in multiple categories.2.3 Click on Template choice to activate.
2.1
2.2
2.3
31
Appendix C LightScribe Utility Quick Guide
Duplicator Controller Functions
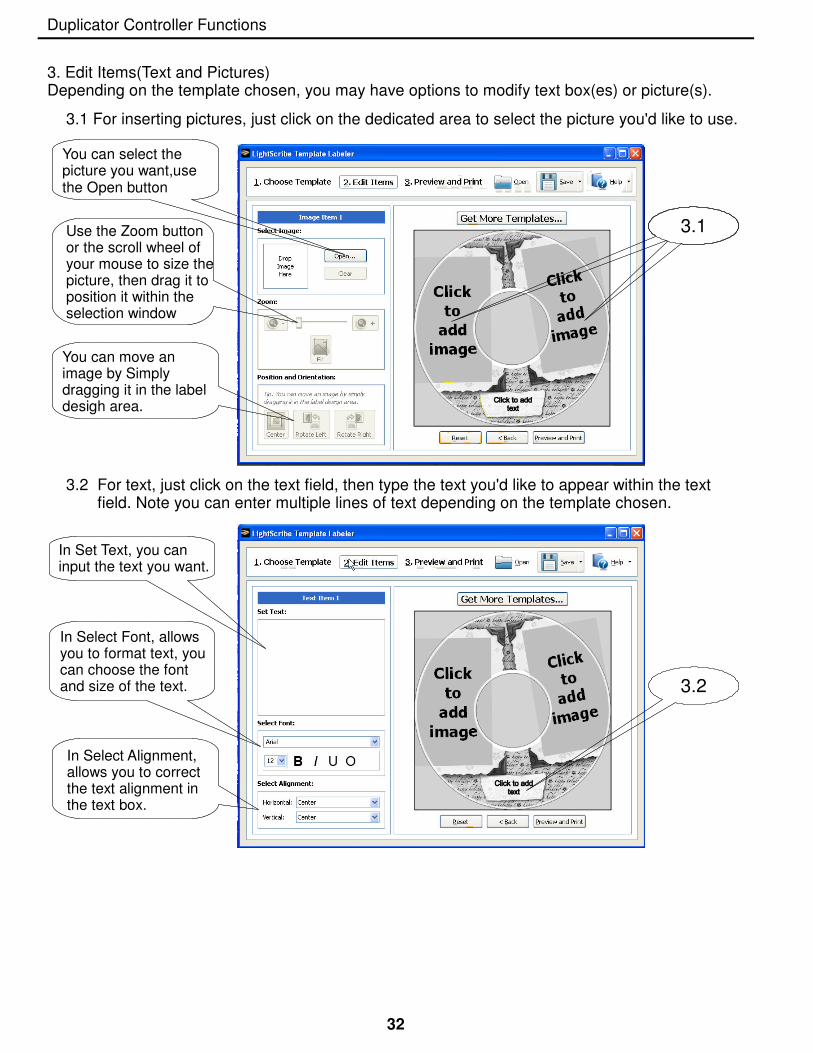
3. Edit Items(Text and Pictures)Depending on the template chosen, you may have options to modify text box(es) or picture(s).
3.1 For inserting pictures, just click on the dedicated area to select the picture you'd like to use.
3.1Use the Zoom button or the scroll wheel of your mouse to size the picture, then drag it to position it within the selection window
You can move an image by Simply dragging it in the label desigh area.
You can select the picture you want,use the Open button
3.2 For text, just click on the text field, then type the text you'd like to appear within the text field. Note you can enter multiple lines of text depending on the template chosen.
3.2
In Select Font, allows you to format text, you can choose the font and size of the text.
In Set Text, you can input the text you want.
In Select Alignment,allows you to correct the text alignment in the text box.
32
Duplicator Controller Functions
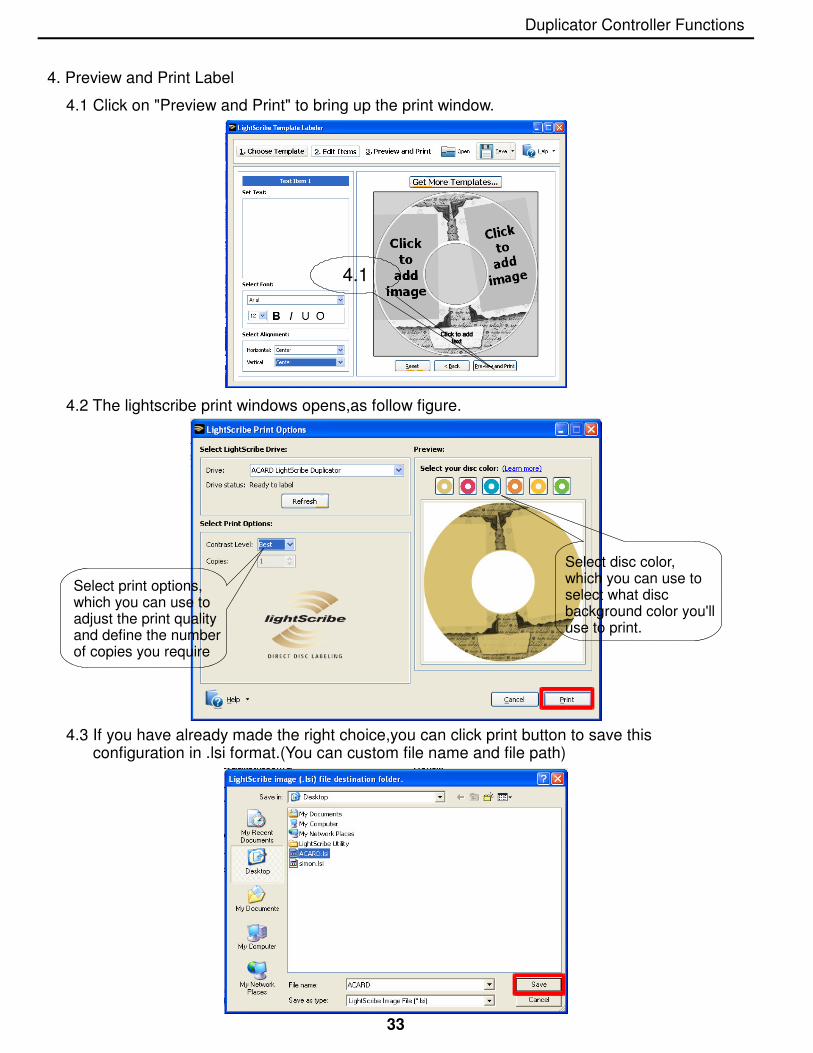
4. Preview and Print Label
4.1
4.2 The lightscribe print windows opens,as follow figure.
4.1 Click on "Preview and Print" to bring up the print window.
4.3 If you have already made the right choice,you can click print button to save this configuration in .lsi format.(You can custom file name and file path)
33
Select print options, which you can use to adjust the print qualityand define the numberof copies you require
Select disc color, which you can use to select what disc background color you'll use to print.
Duplicator Controller Functions
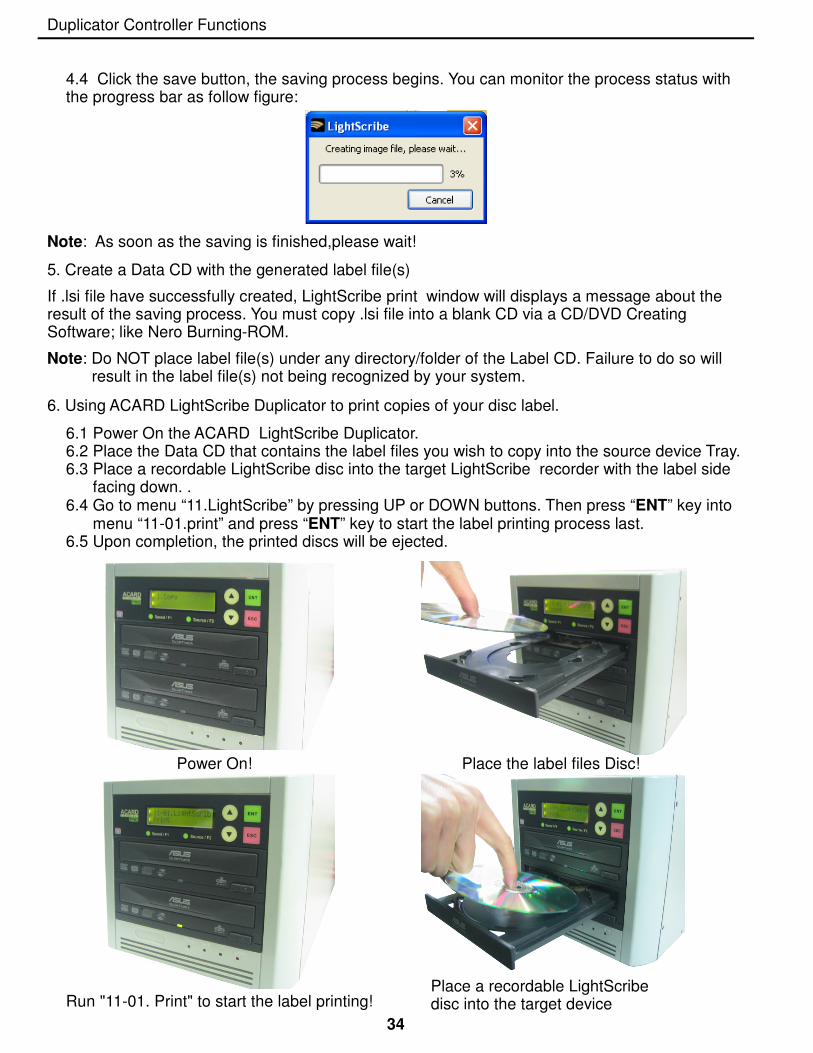
4.4 Click the save button, the saving process begins. You can monitor the process status with the progress bar as follow figure:
Note: As soon as the saving is finished,please wait!
5. Create a Data CD with the generated label file(s)
If .lsi file have successfully created, LightScribe print window will displays a message about the result of the saving process. You must copy .lsi file into a blank CD via a CD/DVD Creating Software; like Nero Burning-ROM.
Note: Do NOT place label file(s) under any directory/folder of the Label CD. Failure to do so will result in the label file(s) not being recognized by your system.
6. Using ACARD LightScribe Duplicator to print copies of your disc label.
6.1 Power On the ACARD LightScribe Duplicator.6.2 Place the Data CD that contains the label files you wish to copy into the source device Tray.6.3 Place a recordable LightScribe disc into the target LightScribe recorder with the label side facing down. .6.4 Go to menu “11.LightScribe” by pressing UP or DOWN buttons. Then press “ENT” key into menu “11-01.print” and press “ENT” key to start the label printing process last.6.5 Upon completion, the printed discs will be ejected.
Power On! Place the label files Disc!
Place a recordable LightScribe disc into the target deviceRun "11-01. Print" to start the label printing!
34
Duplicator Controller Functions
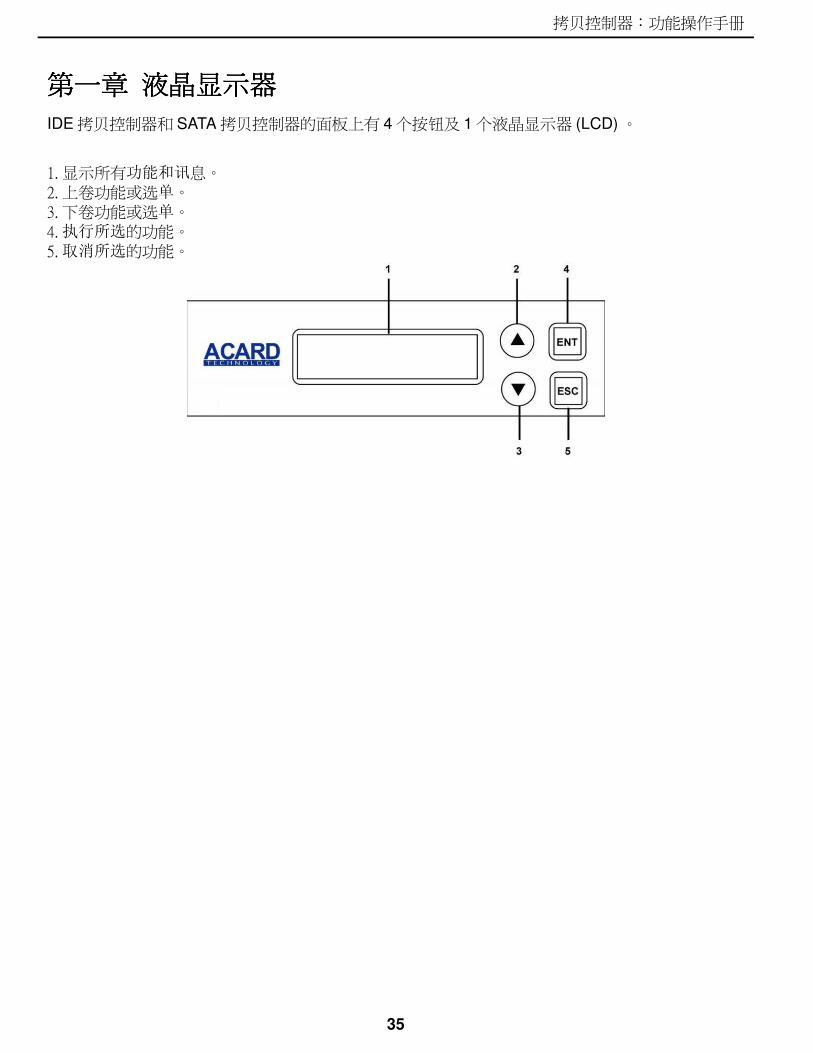
第一章 液晶显示器第一章 液晶显示器第一章 液晶显示器第一章 液晶显示器
IDE 拷贝控制器和 SATA 拷贝控制器的面板上有 4 个按钮及 1 个液晶显示器 (LCD) 。
1. 显示所有功能和讯息。2. 上卷功能或选单。3. 下卷功能或选单。4.执行所选的功能。5.取消所选的功能。
35
拷贝控制器:功能操作手册
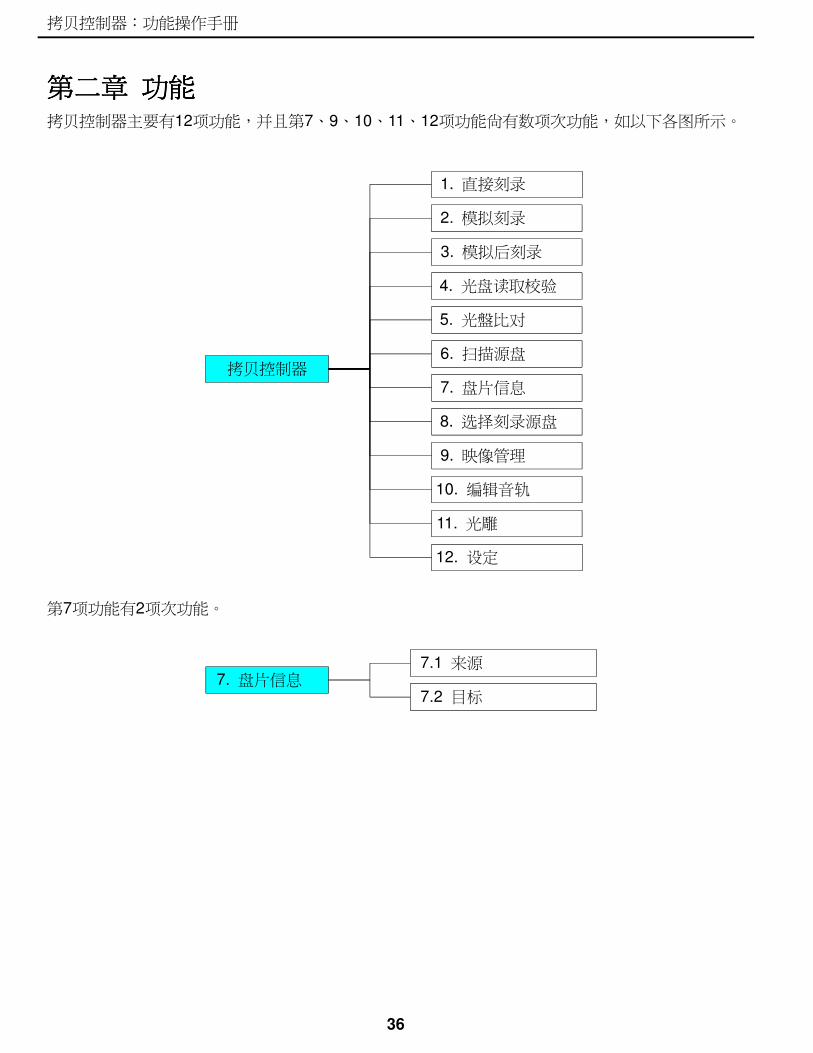
第二章 功能第二章 功能第二章 功能第二章 功能拷贝控制器主要有12项功能,并且第7、9、10、11、12项功能尚有数项次功能,如以下各图所示。
36
拷贝控制器
1. 直接刻录
2. 模拟刻录
3. 模拟后刻录
4. 光盘读取校验
5. 光盤比对
6. 扫描源盘
7. 盘片信息
8. 选择刻录源盘
9. 映像管理
10. 编辑音轨
11. 光雕
第7项功能有2项次功能。
7.1 来源
7.2 目标 7. 盘片信息
12. 设定
拷贝控制器:功能操作手册
37
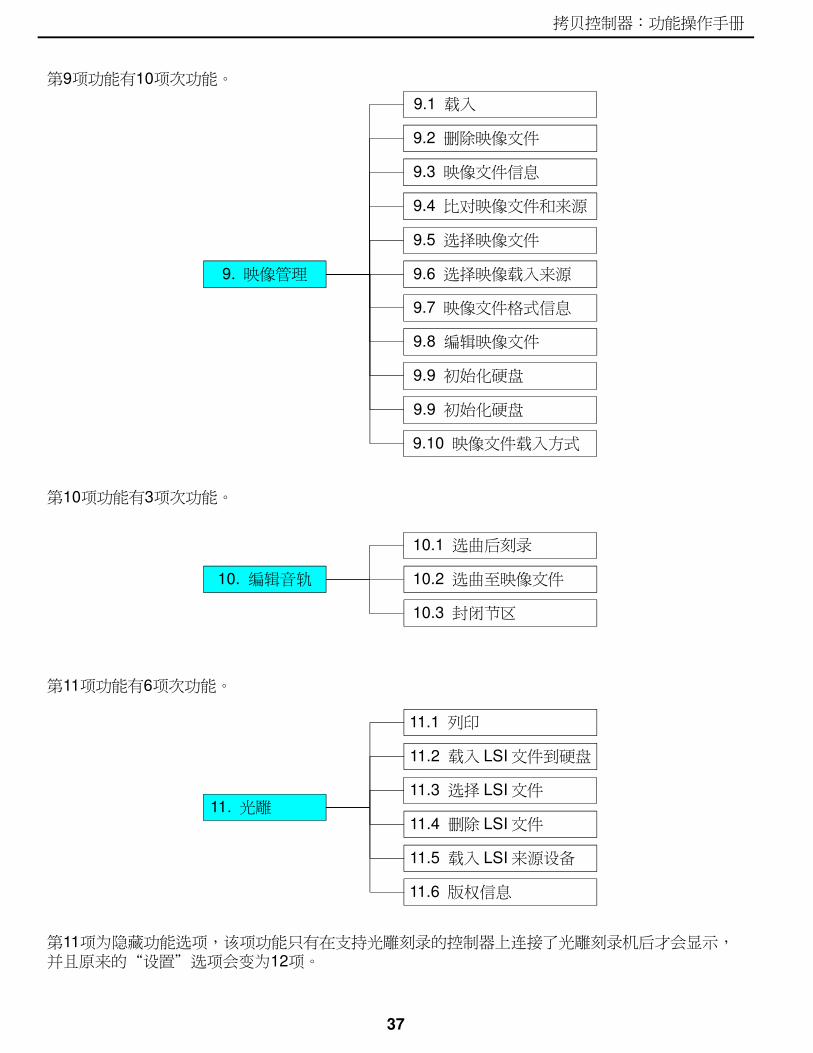
第10项功能有3项次功能。
10.1 选曲后刻录
10.2 选曲至映像文件
10.3 封闭节区
10. 编辑音轨
第9项功能有10项次功能。
9.1 载入
9.2 删除映像文件
9.3 映像文件信息
9.4 比对映像文件和来源
9.5 选择映像文件
9.6 选择映像载入来源
9.7 映像文件格式信息
9.8 编辑映像文件
9. 映像管理
9.9 初始化硬盘
第11项功能有6项次功能。
9.9 初始化硬盘
11.1 列印
11.2 载入 LSI 文件到硬盘
11.3 选择 LSI 文件
11.4 删除 LSI 文件 11. 光雕
11.5 载入 LSI 来源设备
11.6 版权信息
第11项为隐藏功能选项,该项功能只有在支持光雕刻录的控制器上连接了光雕刻录机后才会显示,并且原来的“设置”选项会变为12项。
9.10 映像文件载入方式
拷贝控制器:功能操作手册
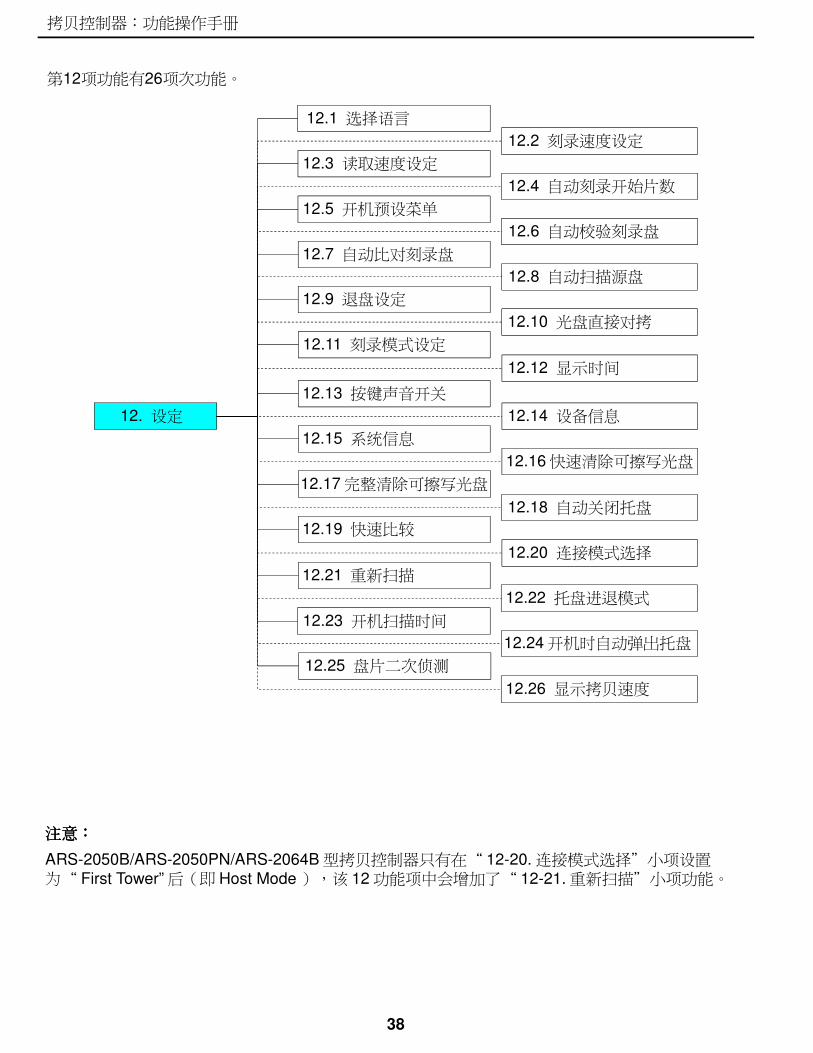
第12项功能有26项次功能。
38
12. 设定
12.1 选择语言
12.2 刻录速度设定
12.3 读取速度设定
12.4 自动刻录开始片数
12.5 开机预设菜单
12.6 自动校验刻录盘
12.7 自动比对刻录盘
12.8 自动扫描源盘
12.9 退盘设定
12.10 光盘直接对拷
12.11 刻录模式设定
12.12 显示时间
12.13 按键声音开关
12.14 设备信息
12.15 系统信息
12.16 快速清除可擦写光盘
12.17 完整清除可擦写光盘
12.18 自动关闭托盘
12.19 快速比较
12.20 连接模式选择
12.21 重新扫描
12.22 托盘进退模式
12.23 开机扫描时间
12.24 开机时自动弹出托盘
12.25 盘片二次侦测
12.26 显示拷贝速度
注意注意注意注意::::
ARS-2050B/ARS-2050PN/ARS-2064B 型拷贝控制器只有在“ 12-20. 连接模式选择”小项设置为“ First Tower” 后(即 Host Mode ),该 12 功能项中会增加了“ 12-21. 重新扫描”小项功能。
拷贝控制器:功能操作手册
操作中若对某些选项LCD讯息不了解,可参阅附录A。
2.1 直接刻直接刻直接刻直接刻录录录录
直接刻录是从来源 DVD 直接复制资料到空白的 DVD 片。复制前请确定来源 DVD-ROM 已放入DVD 盘片,如果有安装硬盘,可设置某个分割区里的资料为来源。如果你对复制没把握,可先用模拟刻录来测试。选择第 1 项功能直接刻录。将来源 DVD 盘片放入 DVD-ROM ,并将空白的 DVD 放入 DVD 刻录机中。含有旧资料的可擦写 DVD 也可使用,但旧资料会被自动删除。
1. 直接刻录 硬盘 :1 光驱 :11
按下 ENT 后, DVD-ROM 和 DVD 刻录机如果侦测到 DVD 盘片后便会开始复制。
LCD 会显示资料的容量和刻录的时间会递增,而完成的百分比则会递增。复制结束时, LCD 会显示此次拷贝的时间与总共成功的数量会交替显示。刻录成功的 DVD 盘片会自动退出。
2.2 模拟刻刻刻刻录录录录
模 刻拟刻录是仿真刻录的过程。模拟过程不会做数据真实写入,但是如果目标为可擦写 DVD 则光盘数据在测试时会被檫除。选择第 2 项功能模拟刻录。将来源 DVD 放入 DVD-ROM ,并将空白的 DVD 放入 DVD 刻录机。唯有 DVD-R 的光盘片支持此项功能。
按下 ENT 开始模拟刻录。如果用的是可擦写 DVD ,并含有数据,旧数据在仿真前将会被快速抹除掉。
用户中途终止测试不影响目标 DVD 盘片,但可擦写的 DVD 若有重要资料,可能受损。
39
2. 模拟刻录
2.3 模拟后刻后刻后刻后刻录录录录
模拟后刻录是指先模拟 , 模拟刻录通过后自动再进行刻录。
选择第 3 项功能模拟后刻录。将来源 DVD 放入 DVD-ROM ,并将空白的 DVD 放入 DVD 刻录机。
3. 模拟后刻录
按下 ENT 后会先开始模拟。
模拟结束时,通过测试的目标盘片会开始实际的刻录。
凡是通过测试的 DVD 片将立即被复制,而未通过的则不会。并且交替显示耗时和总共成功的数量(即同一来源刻录成功的总数量)。
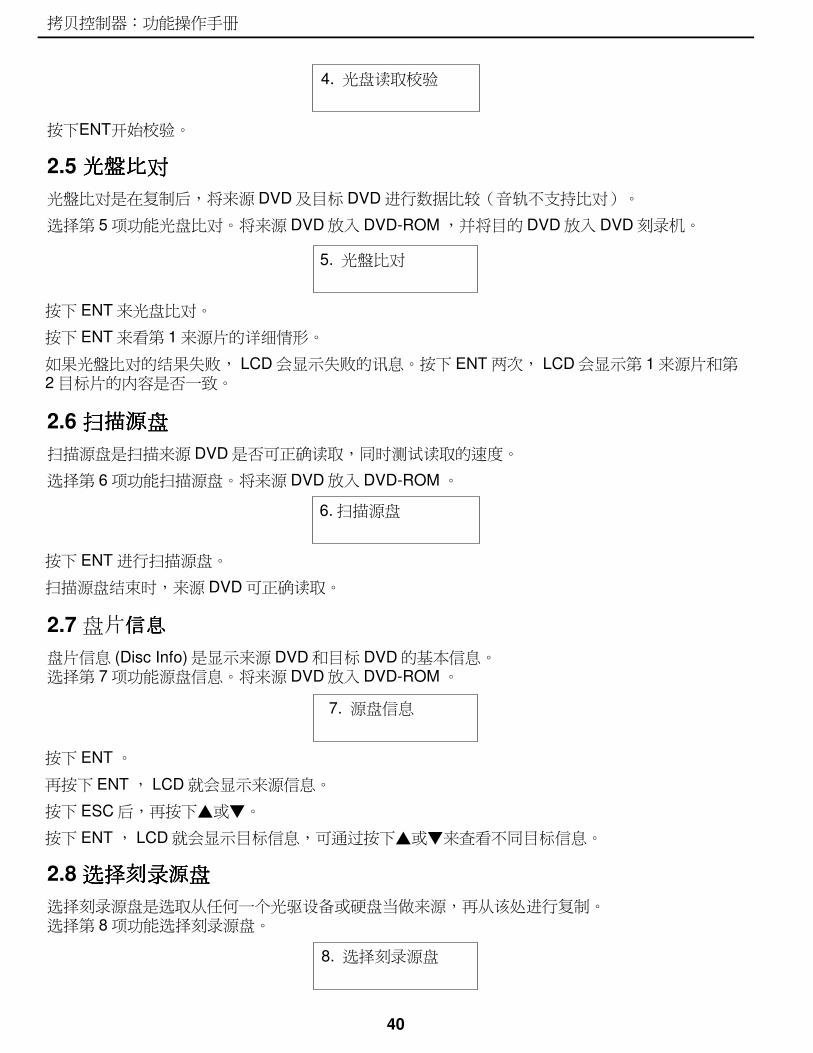
2.4 光光光光盘盘盘盘 取取取取读读读读 校校校校验验验验
光盘读取校验是检查复制后目的 DVD 是否可正确读取。
选择第 4 项功能光盘读取校验。
拷贝控制器:功能操作手册
40
5. 光盤比对
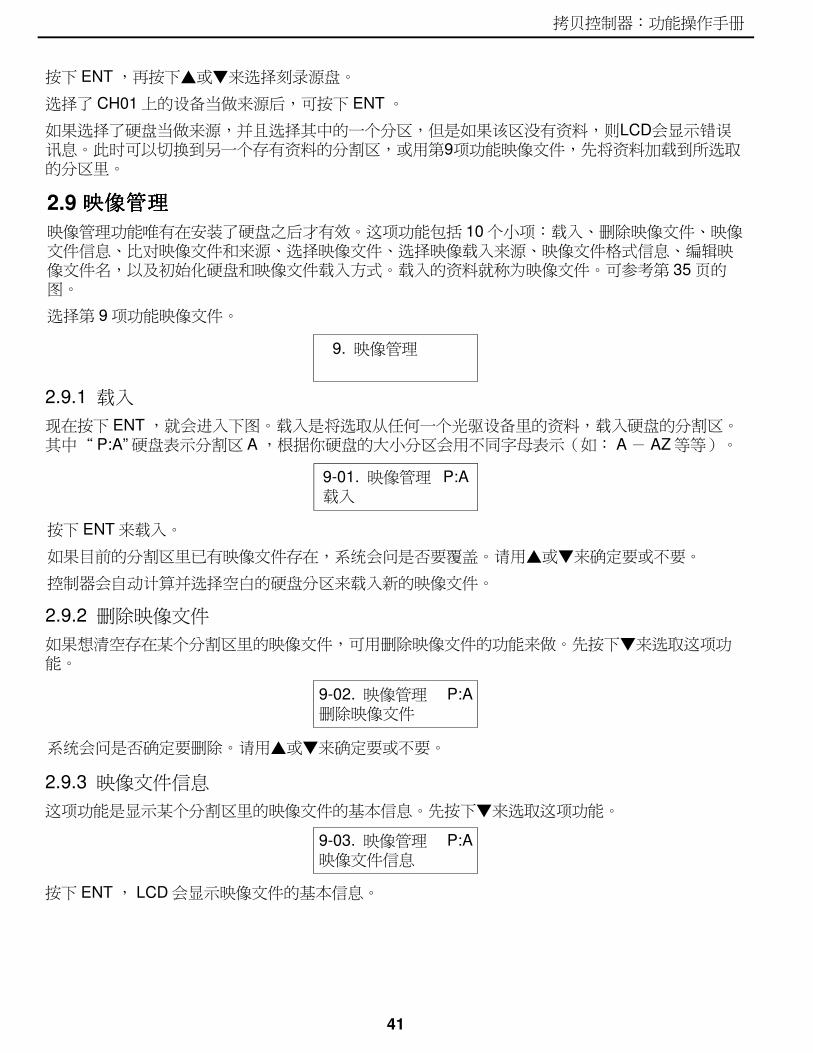
2.5 光盤比光盤比光盤比光盤比对对对对
光盤比对是在复制后,将来源 DVD 及目标 DVD 进行数据比较(音轨不支持比对)。
选择第 5 项功能光盘比对。将来源 DVD 放入 DVD-ROM ,并将目的 DVD 放入 DVD 刻录机。
按下 ENT 来光盘比对。
按下 ENT 来看第 1 来源片的详细情形。
如果光盤比对的结果失败, LCD 会显示失败的讯息。按下 ENT 两次, LCD 会显示第 1 来源片和第2 目标片的内容是否一致。
2.6 描源描源描源描源扫扫扫扫 盘盘盘盘
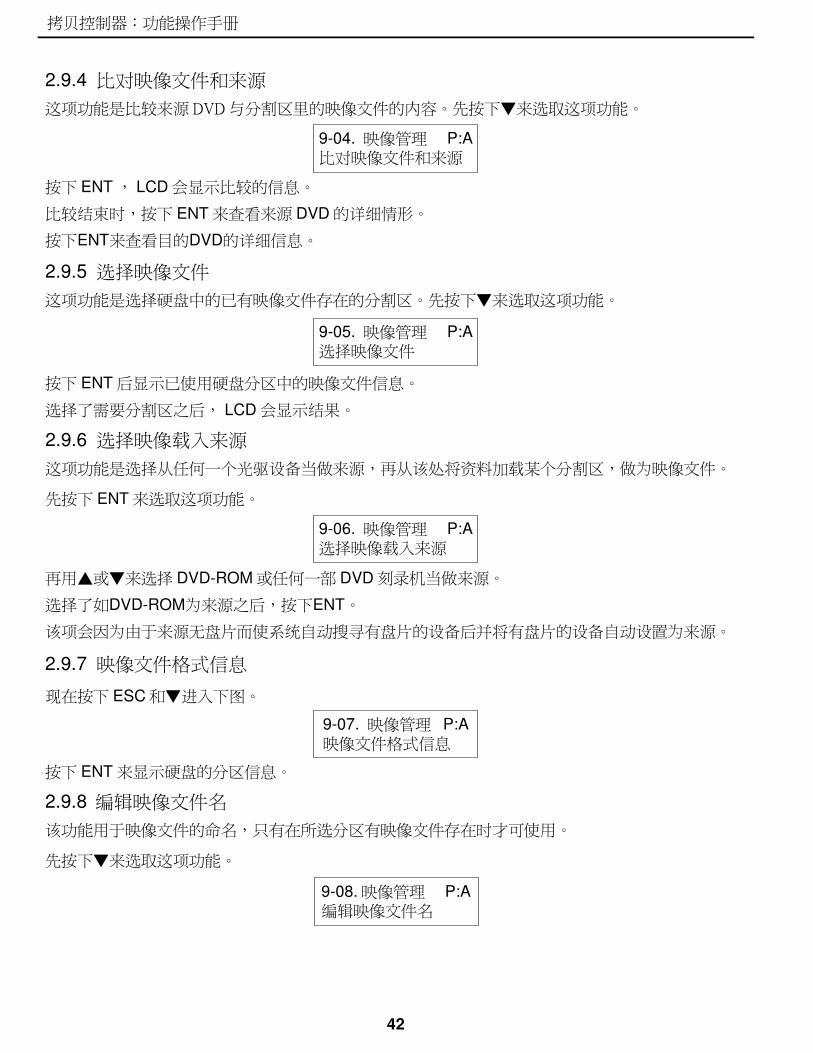
扫描源盘是扫描来源 DVD 是否可正确读取,同时测试读取的速度。
选择第 6 项功能扫描源盘。将来源 DVD 放入 DVD-ROM 。
6. 扫描源盘
按下 ENT 进行扫描源盘。
扫描源盘结束时,来源 DVD 可正确读取。
2.7 片盘 信息信息信息信息
盘片信息 (Disc Info) 是显示来源 DVD 和目标 DVD 的基本信息。选择第 7 项功能源盘信息。将来源 DVD 放入 DVD-ROM 。
按下 ENT 。
再按下 ENT , LCD 就会显示来源信息。
按下 ESC 后,再按下▲或▼。
按下 ENT , LCD 就会显示目标信息,可通过按下▲或▼来查看不同目标信息。
7. 源盘信息
按下ENT开始校验。
4. 光盘读取校验
2.8 刻刻刻刻选选选选择择择择 录录录录源源源源盘盘盘盘
选择刻录源盘是选取从任何一个光驱设备或硬盘当做来源,再从该处进行复制。选择第 8 项功能选择刻录源盘。
8. 选择刻录源盘
拷贝控制器:功能操作手册
41
按下 ENT ,再按下▲或▼来选择刻录源盘。
选择了 CH01 上的设备当做来源后,可按下 ENT 。
如果选择了硬盘当做来源,并且选择其中的一个分区,但是如果该区没有资料,则LCD会显示错误讯息。此时可以切换到另一个存有资料的分割区,或用第9项功能映像文件,先将资料加载到所选取的分区里。
2.9 映像管理映像管理映像管理映像管理
映像管理功能唯有在安装了硬盘之后才有效。这项功能包括 10 个小项:载入、删除映像文件、映像文件信息、比对映像文件和来源、选择映像文件、选择映像载入来源、映像文件格式信息、编辑映像文件名,以及初始化硬盘和映像文件载入方式。载入的资料就称为映像文件。可参考第 35 页的图。
选择第 9 项功能映像文件。
2.9.1 载入
现在按下 ENT ,就会进入下图。载入是将选取从任何一个光驱设备里的资料,载入硬盘的分割区。其中“ P:A” 硬盘表示分割区 A ,根据你硬盘的大小分区会用不同字母表示(如: A - AZ 等等)。
9. 映像管理
9-01. 映像管理 P:A载入
按下 ENT 来载入。
如果目前的分割区里已有映像文件存在,系统会问是否要覆盖。请用▲或▼来确定要或不要。
控制器会自动计算并选择空白的硬盘分区来载入新的映像文件。
2.9.2 删除映像文件
如果想清空存在某个分割区里的映像文件,可用删除映像文件的功能来做。先按下▼来选取这项功能。
系统会问是否确定要删除。请用▲或▼来确定要或不要。
9-02. 映像管理 P:A删除映像文件
2.9.3 映像文件信息
这项功能是显示某个分割区里的映像文件的基本信息。先按下▼来选取这项功能。
按下 ENT , LCD 会显示映像文件的基本信息。
9-03. 映像管理 P:A映像文件信息
拷贝控制器:功能操作手册
42
2.9.4 比对映像文件和来源
这项功能是比较来源 DVD 与分割区里的映像文件的内容。先按下▼来选取这项功能。
按下 ENT , LCD 会显示比较的信息。
比较结束时,按下 ENT 来查看来源 DVD 的详细情形。
按下ENT来查看目的DVD的详细信息。
9-04. 映像管理 P:A
比对映像文件和来源
2.9.5 选择映像文件
这项功能是选择硬盘中的已有映像文件存在的分割区。先按下▼来选取这项功能。
按下 ENT 后显示已使用硬盘分区中的映像文件信息。
选择了需要分割区之后, LCD 会显示结果。
9-05. 映像管理 P:A
选择映像文件
2.9.6 选择映像载入来源
这项功能是选择从任何一个光驱设备当做来源,再从该处将资料加载某个分割区,做为映像文件。
先按下 ENT 来选取这项功能。
再用▲或▼来选择 DVD-ROM 或任何一部 DVD 刻录机当做来源。
选择了如DVD-ROM为来源之后,按下ENT。
该项会因为由于来源无盘片而使系统自动搜寻有盘片的设备后并将有盘片的设备自动设置为来源。
9-06. 映像管理 P:A选择映像载入来源
2.9.7 映像文件格式信息
现在按下 ESC 和▼进入下图。
9-07. 映像管理 P:A映像文件格式信息
按下 ENT 来显示硬盘的分区信息。
9-08. 映像管理 P:A
编辑映像文件名
2.9.8 编辑映像文件名
该功能用于映像文件的命名,只有在所选分区有映像文件存在时才可使用。
先按下▼来选取这项功能。
拷贝控制器:功能操作手册
43
按下 ENT. 可使用字母或数字或者两者的组合来设置 1~13 个字符的映像名。可使用 ▲或 ▼来选择字母或数字,通过按下 ENT 来确定输入。
在输入结束后 , 按下 ENT 可进入如下菜单,进行子标题 1 文件名的设定 ( 具体设置重复以上的操作设置 ) 。
总共可以为同一个映像文件设置 3 个标题分别为主标题( Title )、子标题 1 ( Sub1 )和子标题2 ( Sub2 )。 可通过 ENT 逐个完成设定,或按 ESC 退出子标题的设定直接结束,你可以看到如下完成界面。(主标题的设定是必须的,如果有必要可继续为同一个映像文件设置一个到两个的子标题,并使用 ENT 确定输入, ESC 结束当前输入)。
9-09. 映像管理 P:A
初始化硬盘
2.9.9 初始化硬盘
现在按下 ESC 和▼,进入下图。这项功能是初始化硬盘,但是在格式化之后,硬盘上所有的资料都会被删除掉。
按下 ENT 。并通过▲或▼来选择是否初始化硬盘。
选择格式化后按 ENT , LCD 会显示”是”。
按下 ENT 來检测。检测结束时, LCD 会显示結果。
2.9.10 映像文件载入方式
现在按下 ESC 和▼,进入下图。这项功能是更改映像文件的保存方式,分别手动 Manual 与自动(默认)。
9-10. 映像管理 P:A映像文件载入方式
按下 ENT ,并通过▲或▼来更改默认值。
按下 ENT 來确定保存。
2.10 音音音音编编编编辑辑辑辑 轨轨轨轨(限于限于限于限于CD)
编辑音轨是专为编辑一套音乐 CD 选集而设计的。换言之,可从许多 CD 上搜集不同的音轨 ( 歌曲 ) ,再将其融入单一张 CD 。这项功能包括 4 个小项:选曲后刻录、选曲至映像文件、播放乐曲、关闭节区。可参考第 35 页的图。
选择第 10 项功能编辑音轨。
2.10.1 选曲后刻录
现在按下 ENT ,将会进入下图。 CD 对 CD 的功能让你可从 DVD-ROM 选择一个或多个音轨,再复制到空白的 CD 。
10. 编辑音轨
10-01. 编辑音轨 选曲后刻录
拷贝控制器:功能操作手册
44
现在按下 ENT 。 1/10 表示全部 10 个音轨(歌)的第 1 个,而 03:25 则表示音轨(歌曲)的长度。
可按下▼来看第 2 个音轨等。假设决定要选择第 1 个音轨,按下 ENT ,则” +” 将会出现在 1/10 旁边。但是再按下 ENT ,将会取消这项选择。
选择后,请用▼移到” End” 选单。
按下 ENT 来完成 CD 编辑,并用▲或▼来确定是否。
LCD 会显示复制信息。
“1/1” 表示所选择的全部音轨的第 1 个音轨,而此处也只选了 1 个音轨。复制结束时, LCD 会显示讯息。
系统会问是否要继续编辑。请用▲或▼来确定是否。
如果要继续编辑,目前的来源 CD 会自动退出,系统会要求插入另一片新的来源 CD 。
插入新的 CD 后,像先前一样按下 ENT 来编辑。假设决定要选择第 2 个音轨,按下 ENT ,则“ +” 将会出现在 2/10 旁边。
选择后,请用▼移到” End” 选单。
按下 ENT 来完成 CD 编辑,并用▲或▼来确定是否。
LCD 会显示复制信息。
“2/2” 表示所选择的全部音轨的第 2 个音轨,而到目前已从两片不同的 CD 选了两个音轨。复制结束时, LCD 会显示讯息。
系统会问是否要继续编辑。假设不想再继续,则按下▼来确定否。
现在按下 ENT ,系统会问是否要封闭所有 CD 的节区。请用▲或▼来确定是否。
封闭后 LCD 会显示信息。
2.10.2 选曲至映像文件
封闭节区后,按下 ESC 和▼,进入下图。 CD 对硬盘的功能让你可从 DVD-ROM 选择一个或多个音轨,再复制到硬盘的某个分割区里。
现在按下 ENT 。 1/10 表示全部 10 个音轨的第 1 个,而 03:25 则表示播放时间。
假设决定要选择第 1 个音轨,按下 ENT ,则” +” 将会出现在 1/10 旁边。但是再按下 ENT ,将会取消这项选择。
选择后,请用▼移到” End” 选单。
按下 ENT 来完成 CD 编辑,并用▲或▼来确定是否。
接着,做为映像文件的音轨将加载硬盘里。
加载结束时, LCD 会显示讯息。
系统会问是否要继续编辑。请用▲或▼来确定是否。
如果要继续编辑,目前的来源 CD 会自动退出,系统会要求插入另一片新的 CD 。
插入新的 CD 后,像先前一样按下 ENT 来编辑。假设要选择第 2 个音轨,按下 ENT ,则“ +” 将会出现在 2/10 旁边。
选择后,请用▼移到” End” 选单。
按下 ENT 来完成 CD 编辑,并用▲或▼来确定是否。
10-02. 编辑音轨 选曲至映像文件
拷贝控制器:功能操作手册
接着,做为映像文件的音轨将加载硬盘里。
加载结束时, LCD 会显示讯息。
系统会问是否要继续编辑。这次请用▼来确定否。
系统会问是否要从硬盘刻录到 CD ,或移入某个分割区。请用▼来确定要刻录。
按下 ENT 之后, LCD 会显示复制信息。
刻录结束时, LCD 会显示结果。
现在按下 ESC 。再按下▼,将资料从硬盘暂存区移入某个分割区。
按下 ENT 之后,必须选择一个欲将资料移入的分割区。假设选择 A 区。
按下 ENT 后, LCD 会显示移入信息 。
移入结束时, LCD 会显示结果。
如果所选的分割区存有影像资料,系统会提出需要覆写还是保存资料。请按下▼来覆写。
45
2.10.3 关闭节区
这项功能是封闭 CD ,使资料不再写入。封闭后可将 CD 放入任何正常的唱机里播放。现在按下 ESC 和▼来选择这项功能。
按下 ENT 后,系统会问是否确定要封闭。
按下 ENT 后, LCD 会显示讯息。
封闭结束时, LCD 会显示结果。
10-03. 编辑音轨 关闭节区
2.11 光雕光雕光雕光雕 ( 配功能配功能配功能配功能选选选选 ) ( 限于支持光雕的机型并限于支持光雕的机型并限于支持光雕的机型并限于支持光雕的机型并仅仅仅仅 连连连连接接接接光雕机光雕机光雕机光雕机)
光雕功能是为了支持光雕刻录而设计的。可以提供光雕机在光雕碟片上自定义打印自己喜好的图文。这项功能包括 6 个小项:列印、载入 LSI 文件到硬盘、选择 LSI 文件、删除 LSI 文件、选择载入 LSI 文件来源和版权信息。可参考第 35 页的图。
选择第 11 项功能编辑音轨。
11. 光雕
2.11.1 列印
按下 ENT ,进入下图。这项功能可以从来源打印自定义的图文到目标光雕刻录机。
11-01. 光雕 列印
按下 ENT ,即开始打印,并且在 LCD 上显示打印进程。
2.11.2 载入 LSI 文件到硬盘
现在按下 ESC 和▼进入下图。这项功能可以让你保存自定义的光雕文件到硬盘。
11-02. 光雕 载入 LSI 文件到硬盘
拷贝控制器:功能操作手册
按下 ENT ,即开始将来源的光雕文件保存到硬盘中,并且在 LCD 上显示保存的进程。
2.11.3 选择 LSI 文件
现在按下 ESC 和▼进入下图。这项功能可以让您选择某个保存到硬盘的光雕文件作为来源(必须选择硬盘为来源是方可生效)。
11-03. 光雕 选择 LSI 文件
按下 ENT 和▼进入选择需要的光雕文件。
最后只需按下 ENT 来确认选择。
2.11.4 删除 LSI 文件
现在按下 ESC 和▼进入下图。这项功能将删除对应分区中的所有光雕文件
11-04. 光雕 删除 LSI 文件
46
按下 ENT 后, LCD 显示如下:
所有的资料将会被消除? 是
按下▼来选择 Yes 来清除该分区上所有的光雕文件,或 No 退出。
2.11.5 载入 LSI 来源设备
现在按下 ESC 和▼进入下图。这项功能用于选择载入光雕文件到硬盘的来源设备。
11-05. 光雕 载入 LSI 来源设备
按下 ENT 后, LCD 显示如下:
选择载入来源 :
01 CH01 SUPER MU
按下▼来选择来源,并通过 ENT 确认保存。
2.11.6 版权信息
现在按下 ESC 和▼进入下图。这项功能用于用于查看光雕的版权信息。
11-06. 光雕 版权信息
按下 ENT 后, LCD 显示相关版权,可通过▼进行翻页查看。
拷贝控制器:功能操作手册
2.12 定定定定设设设设
设定这项功能可供改变默认值。一旦改变需按下 ENT 保存,然而仍建议使用默认值,以达到最佳运行效果。这项功能包括 26 个小项:选择语言、刻录速度设定、读取速度设定、自动刻录开始片数、开机预设菜单、自动校验刻录盘、自动对比刻录盘、自动扫描源盘、退盘设定、光盘直接对拷、刻录模式设定、显示时间、按键声音开关、设备信息、系统信息、快速清除可擦写光盘、完整清除可擦写光盘,自动关闭托盘、快速比较、连接模式选择、重新扫描、托盘进退模式、开机扫描时间、开机时自动弹出托盘、盘片二次侦测及显示拷贝速度。可参考第 42 页的图。
选择第 12 项功能设定。
按下 ENT 。默认值是英文、西班牙文、日文、繁体中文、简体中文是根据订购而设置。
2.12.1 选择语言
现在按下 ENT ,进入下图。这项功能可供选择一项语言,以便将讯息显示在 LCD 上。
12-01. 设定 选择语言
12. 设定
47
按下 ENT 进入 , 并使用▼进行选择不同类型碟片的刻录速度,分别有 DVD 刻录速度、蓝光刻录速度、 CD 刻录速度设定及音乐 CD 刻录速度 4 个子项。
2.12.2 刻录速度设定
现在按下 ESC 和▼进入下图。这项功能可设置不同盘片的刻录速度。
12-02. 设定 刻录速度设定
刻录速度设定DVD 刻录速度设定
DVD 刻录机的刻录速度,默认值是 16X 。蓝光的刻录速度,默认值是 4X 。 CD 刻录机的刻录速度,默认值是 32X 。音乐 CD 的刻录速度,默认值是 16X 。
按下 ENT 。默认值是最大。
2.12.3 读取速度设定
现在按下 ESC 和,▼进入下图。这项功能可控制读取目标 CD 的速度。
2.12.4 自动刻录开始片数
现在按下 ESC 和▼进入下图。这项功能是一旦将空白的 DVD 放入刻录机里,根据设置就自动执行复制或测试(需要和自动关闭托盘配合才可生效)。
12-03. 设定 读取速度设定
12-04. 设定 自动刻录开始片数
拷贝控制器:功能操作手册
48
按下 ENT 。默认值是关闭。按下▼来选择 1 - 11( 根据所接的设备数量 ) 。
2.12.5 开机预设菜单
现在按下ESC和▼,进入下图。这项功能让你选择进阶设定以外的任何一项功能,做为每次开机时,会出现在选单上的第一个项目。
12-05. 设定 开机预设菜单
按下 ENT 。默认值是复制。当然可以选择任何其它的功能,做为第一个项目,按下 ENT 来保存。
2.12.6 自动验证
现在按下ESC和▼,进入下图。这项功能是自动验证复制后目标DVD是否可读取。
按下 ENT 。默认值是 Off ,按下▼可选择 On 。
12-06. 设定 自动校验刻录盘
按下 ENT 。默认值是 Off ,按下▼可选择 On 。
2.12.7 自动比对刻录盘
在上图中按下 ESC 和▼,进入下图。这项功能是自动比较来源 DVD 和复制后的目标 DVD 。
12-07. 设定 自动比对刻录盘
2.12.8 自动扫描源盘
现在按下ESC和▼,进入下图。这项功能是自动预先扫描来源DVD是否可正确读取,并顺便测试读取速度。
12-08. 设定 自动扫描源盘
2.12.9 退盘设定
在上图中按下ESC和▼,进入下图。这项功能提供3种选择:只弹出刻录成功盘片、全部弹出、全部都不弹出。只弹出刻录成功盘片表示唯有复制成功,光盘片才会自动退出。全部弹出表示不论复制成功与否,光盘片都会全部自动退出。不退出则表示当复制结束时,必须以手动方式退出光盘片。
按下 ENT 。默认值是只弹出刻录成功盘片。按下▼可选择全部弹出或全部都不弹出。
12-9. 设定 退盘设定
按下 ENT 。默认值是 Off ,按下▼可选择 On 。
拷贝控制器:功能操作手册
49
按下 ENT ,进入下图。默认值是开。按下▼可选择关。
按下 ENT 。默认值是 DAO 。按下▼可选择 TAO 。
2.12.11 刻录模式设定
现在按下ESC返回第11项功能,再选择第12小项刻录模式,如下图所示。这项功能让你控制刻录的模式。有两种模式:DAO(Disc At Once)及TAO(Track At Once)。
12-11. 设定 刻录模式设定
2.12.12 显示时间
现在按下ESC和▼,进入下图。这项功能可在刻录结束时显示光盘复制时间。
按下 ENT 。默认值是“开”。按下▼可选择“关”。
12-12. 设定 显示时间
按下 ENT 。默认值是开。按下▼可选择关。
2.12.13 按键声音开关
现在按下 ESC 和▼,进入下图。这项功能可控制压下按键时的声音。
12-13. 设定 按键声音开关
2.12.10 光盘直接对拷
在上图中按下 ESC 和▼,进入下图。这项功能让你控制复制的方式。当设定为开时,资料会直接从来源 DVD ,复制到目的 DVD 。当设定为关时,资料会先加载硬盘的临时分区,再从那里执行复制,一旦选择关 , 当浏览经过 1. 直接复制和 3. 模拟后刻录菜单时会在 LCD 右上角出现“ Safe” 提示。
12-10. 设定 光盘直接对拷
2.12.14 设备信息
现在按下 ESC 和▼,进入下图。这项功能可显示所连接所有设备的信息。
12-14. 设定 设备信息
按下 ENT 。
2.12.15 系统信息
现在按下ESC和▼,进入下图。这项功能可显示系统的信息。
12-15. 设定 系统信息
拷贝控制器:功能操作手册
50
按下 ENT 。用▲或▼来确定是否。
确定是并按下 ENT 之后, LCD 会显示讯息。
清除结束时, LCD 会显示结果。
2.12.16 快速清除可擦写光盘
现在按下 ESC 和▼,进入下图。这项功能是快速清除可擦写 DVD 上的资料。
12-16. 设定 快速清除可擦写光盘
2.12.17 完整清除可擦写光盘
现在按下 ESC 和▼,进入下图。这项功能是完整清除可擦写 DVD 上的资料。比起快速清除,完整清除需要较长的时间。
按下 ENT 。用▲或▼来确定是否。
确定是并按下 ENT 之后, LCD 会显示讯息。
清除结束时, LCD 会显示结果。
12-17. 设定 完整清除可擦写光盘
2.12.18 自动关闭托盘
现在按下 ESC 和▼,进入下图。这项功能是自动关闭刻录机的托盘,与功能 12-05 的自动刻录有关。如果未曾在功能 12-05 中设定任何刻录机去复制,这项 12-19 的功能就无效。
按下 ENT 。
12-18. 设定 自动关闭托盘
“5” 表示当复制完成而且托盘退出后,需要 5 秒的时间自动关闭刻录机的托盘。除了 5 秒,还有10 、 15 、 20 、 25 、 30 、 35 、 40 、 45 及 50 秒可供选择。如果在功能 12-05 中,有设定当大于 1 台或全部 10 台刻录机去复制,然后在此选择 10 秒,则复制完成后, 1 台或全部 10 台刻录机的托盘将在 10 秒内关闭。
按下 ENT 查看。
结束查看可按 ESC 退出菜单。
2.12.19 快速比较
现在按下 ESC 和▼,进入下图。这项功能与功能 12-08 ( Auto Compare )有关,可让你设定某个字节。当一片目的 DVD 的错误超过所设定的字节时,来源 DVD 与目的 DVD 之间的比较将会中止,但是与其它 9 片目的 DVD 的比较则会继续进行。
12-19. 设定 快速比较
按下 ENT 。默认值是“关”,但可按下▲或▼选择某个字节如 1 Byte 、 1 Kbytes 、 10 Kbytes 、 100Kbytes 、 1 Mbytes 、 10 Mbytes 、 100 Mbytes 等。
拷贝控制器:功能操作手册
51
2.12.21 重新扫描 ( 限于 ARS-2050B/ARS-2050PN/ARS-2064B)
现在按下 ESC 和▼,进入下图。默认值是 No 。
12-21. 设定 重新扫描
可通过按下▲或▼来选择 Yes ,并通过 ENT 来确定选择对所连接的 Tower 进行扫描。
按下 ENT 。默认值是一次全部弹出,但还有分两次弹出可供选择。
2.12.22 托盘进退模式
现在按下 ESC 和▼,进入下图。这项功能让你控制刻录机托盘的进退。
12-22. 设定 托盘进退模式
按下 ENT 。默认值是 5 ,但还有最多到 99 秒可供选择。
2.12.23 开机扫描时间
现在按下 ESC 和▼,进入下图。这项功能让你控制开机时对设备的机控制器自身的扫描时间。
12-23. 设定 开机扫描时间
2.12.20 连接模式选择 ( 限于 ARS-2050B/ARS-2050PN/ARS-2064B)
现在按下 ESC 和▼,进入下图。
12-20. 设定 连接模式选择
可通过按下▲或▼选择 Stand Alone 、 Middle Tower 及 Last Tower 来满足模式设置的需求。注意注意注意注意::::一旦设置 Middle Tower 和 Last Tower 并配合 J14 跳线为 Target 模式时, LCD 将显示 Target
Mode 。
2.12.24 开机时自动弹出托盘
现在按下 ESC 和▼,进入下图。这项功能让你控制开机时是否弹出所有设备的托盘。
12-24. 设定 开机时自动弹出托盘
按下 ENT 。默认值是开,可通▼选择关。
2.12.25 盘片二次侦测
现在按下 ESC 和▼,进入下图。这项功能让你控制在进行拷贝前是否要求控制器多做一次盘片的侦测动作,如果使用盘片的质量有瑕疵时可开启此功能,来提高对有问题盘片的识别率。
12-25. 设定 盘片二次侦测
拷贝控制器:功能操作手册
52
按下 ENT 。默认值是关,可通▼选择开。
按下 ENT 。默认值是开。
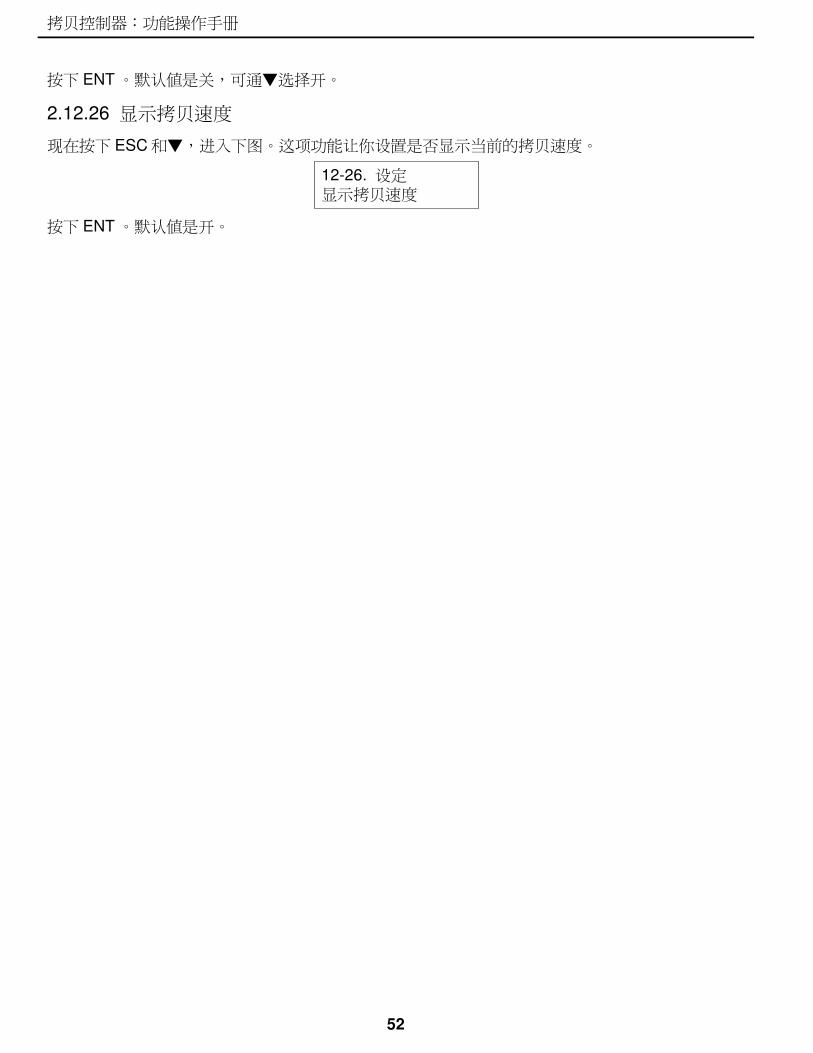
2.12.26 显示拷贝速度
现在按下 ESC 和▼,进入下图。这项功能让你设置是否显示当前的拷贝速度。
12-26. 设定 显示拷贝速度
拷贝控制器:功能操作手册
53
第三章 第三章 第三章 第三章 简易故障排除简易故障排除简易故障排除简易故障排除
3.1 关于关于关于关于 LCD
通电开机后,如果 LCD 没有显示,请检查电源线是否插好,电源是否正常供电。
3.2 关于错误提示关于错误提示关于错误提示关于错误提示
在系統复制或测试过程中,如果人为按下 ESC 终止, LCD 会显示错误讯息。可能导致设备非法操作而停止回应,因此须重新开机。
如果 LCD 显示读取来源失败,请更换一张新的来源 DVD 。
如果开机后 LCD 提示无法探测到所连接的设备,请重新检查连接部位确认正确连接及是否通电。
3.3 关于刻录机和光驱关于刻录机和光驱关于刻录机和光驱关于刻录机和光驱
如果刻录机和光驱无法正确读取盘片内容,请确认该设备是否支持来源盘片格式。 .
3.4 关于按钮关于按钮关于按钮关于按钮
如果按下面板上的任何一個按钮,系統都无反应,可能是按钮无法正常工作。请检查按键到拷备控制面板上的控制线是否松动。
3.5 关于刻录机无法读取关于刻录机无法读取关于刻录机无法读取关于刻录机无法读取
拷贝完成后如果无法读取,请使用比较来检查目标,或者更换另一台光驱来测试。
3.6 关于高失败率关于高失败率关于高失败率关于高失败率
如果拷贝过程中出现高失败率,按如下步骤操作:
●降低刻录机的刻录速度
●使用质量较好的空白盘片
●更新固件到最新版本
●检查 DVD 刻录机的最大刻录速度。如果速度超过 8X ,那么可以先将来源载入硬盘分区然后在以
硬盘为源进行刻录。
3.7 关于固件升级关于固件升级关于固件升级关于固件升级
可通过CD/DVD-ROM实现新版本固件升级。如果无法更新固件,请检查固件是否下载正常。更新固件失败可能会导致控制器无法启动。如果系统运行良好请不要随意更新固件。如果更新失败,请联络经销商维修。
拷贝控制器:功能操作手册
54
附录附录附录附录 A LCD 的讯息的讯息的讯息的讯息
1. 正常情况正常情况正常情况正常情况 :All data will be lost, erase?……..........................................… 光盘上所有的资料将流失,是否要删除Analyzing…………………………………………………............................................…… 分析来源光盘Audio Disc!!!Can’t compare!…………..........................................……………. 系统无法比较有声光盘Cannot read TOC……………………..........................................…………… 系统无法读取光盘的内容Check Target Please Wait…………………........................................…………... 系统正检查目的装置DVD-RW does not Support the Func……........................................…………DVD-RW 不支持此功能Detect Drives……………………………...........................................…….. 侦测系统是与什么光驱连接Erase Finished…………………………..........................................…………………… 资料的删除结束Erasing disc………………..........................................………………………. 系统正删除光盘上的资料Fail to get Drive Info!……………...........................................……………………. 未能获得光驱的信息Fail to get Src Disc Info!……...........................................…………………… 未能获得来源光盘的信息Hold ESC to exit………..........................................………………………… 按下 ESC 一秒来终止测试Identical……………………............................................……………………………….. 比较的结果一致Initialize SDRAM………............................................……………………………….….. 初始化系统内存Load Default Config?….........................................………………………………... 是否要加载默认值 ?No Erasable Disc in DVD-RW!.…..........................................………DVD-RW 上的光盘不是可抹写式Preparing…………………………...........................................………………………. 系统准备进行刻录Press a Key to Eject Fail Disc…….........................................…… 复制后按任一键来退出烧坏的光盘Press a Key to Eject Good Disc…........................................……. 复制后按任一键来退出烧好的光盘Read disc error……………………..........................................………………… 比较时光盘无法被读取Save new config Fail!…………………..........................................……………. 新的组态设定未能储存Source Disc Empty!!!………………..........................................………………. 来源光盘未含任何资料Source Disc Not Ready……………........................................……………... 来源光盘尚未准备被读取Source Drive Not Ready……………….........................................……………. 来源光驱尚未准备读取Src&Tgt can't in the same channel!........................................... 比较时来源和目的光盘不可同一信道Target Disc Not Empty!!!……………...........................................……………….. 目的光盘仍存有资料Target Disc Not Ready………….........................................………………… 目的光盘尚未准备被写入Target Drive Not Ready…….........................................……………………….. 目的光驱尚未准备写入Target overflow……………............................................…………….. 目的光盘无足够容量储存新资料TOC not match…………………………...........................................………………... 比较的结果不一致User Abort!………………………………............................................………………. 取消执行中的事务
2. 连接硬盘连接硬盘连接硬盘连接硬盘 :All data will be lost, format?….........................................… 硬盘上所有的资料将流失,是否要格式化Format HDD?……………………………………………............................................ 是否要格式化硬盘Format HDD OK!……………...........................................…………………………... 硬盘格式化已完成HDD not Format!…………...........................................………………………………... 硬盘尚未格式化HDD too small………………………...........................................………………………… 硬盘容量太小HDD too small to handle image!…...................................... 硬盘无足够容量来储存影像文件 ( 需 5G)
Image Exists Overwrite?……….........................................…. 目前的分割区有影像文件,是否要覆写Image load Fail………………..........................................……………. 影像文件未能从 DVD 加载硬盘Image load OK………………...........................................…………. 影像文件成功地从 DVD 加载硬盘No Image in Partition XX…………............................................…………………XX 分割区无影像文件
拷贝控制器:功能操作手册
55
No Valid HDD!……………………………............................................……………... 系统无法找到硬盘Partition Damage…………………..........................................………………………….…... 分割区受损Select HD First!…………………............................................………………… 先选择已格式化的硬盘Verify Disk or Partition?………...........................................………….... 要验证硬盘或只是一个分割区Verify Hard Disk OK!…………............................................……………………………… 硬盘验证成功Verify Hard Disk Fail!…………............................................……………………………… 硬盘验证失败Verify Partition Header!…………...........................................………………………. 验证分割区的页首
3. 韧体更新韧体更新韧体更新韧体更新 :Check Sum Error!…………………………….....................................………………… 更新的韧体有错Flash ROM fail!……………………....................................…………………… 资料未能写入快闪 ROM
Invalid firmware ……….....................................…………………………………… 光盘未含有效的韧体Last update F/W Fail!……………………………....................................………………… 韧体更新失败Last update F/W OK!……………………....................................………………………… 韧体更新成功Searching F/W………………...................................…………………………… 系统正搜寻有效的韧体Source can't be Hard Disk!……………………….........................................…. 比较时来源不可为硬盘Update F/W xxx to yyy?………..................................…………… 是否要将韧体从 xxx 更新为 yyy 版Updating F/W………………………………………….....................................………… 系统正更新韧体
拷贝控制器:功能操作手册
56
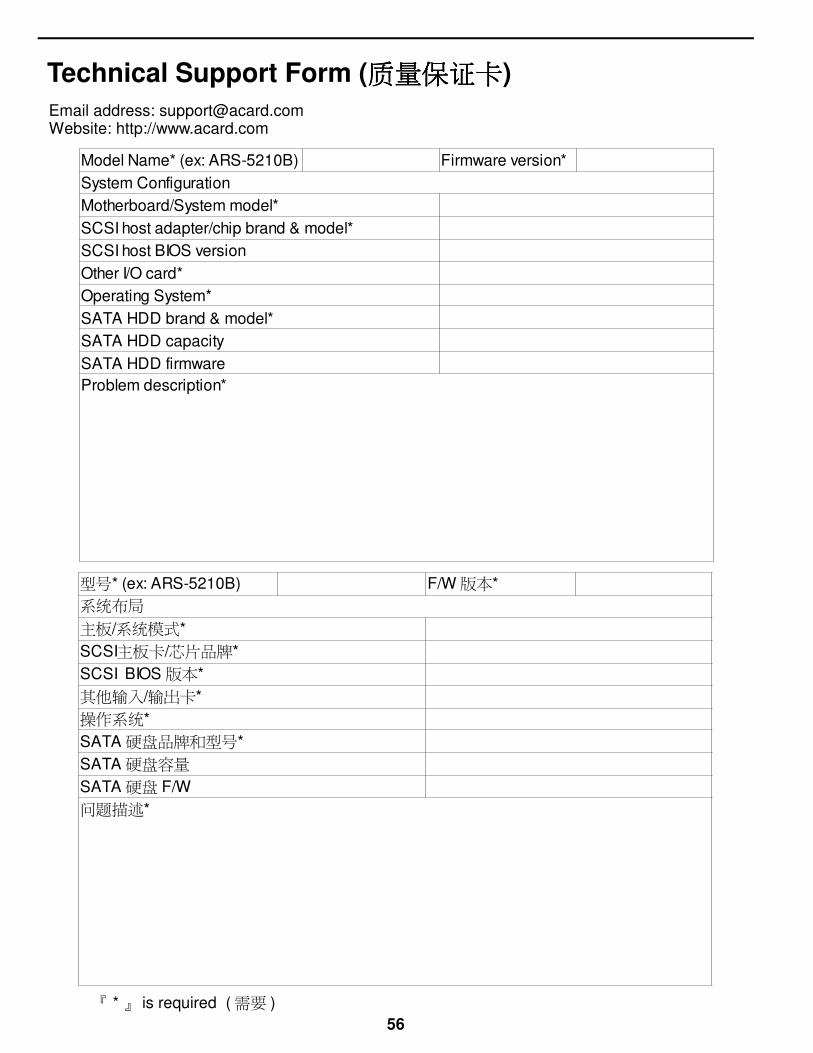
Technical Support Form (质量保证卡质量保证卡质量保证卡质量保证卡)
Email address: [email protected]: http://www.acard.com
Model Name* (ex: ARS-5210B) Firmware version*
System Configuration
Motherboard/System model*
SCSI host adapter/chip brand & model*
SCSI host BIOS version
Other I/O card*
Operating System*
SATA HDD brand & model*
SATA HDD capacity
SATA HDD firmware
Problem description*
『 * 』 is required ( 需要 )
系统布局
型号* (ex: ARS-5210B) F/W 版本*
主板/系统模式*
SCSI主板卡/芯片品牌*
SCSI BIOS 版本*
其他输入/输出卡*
操作系统*
SATA 硬盘品牌和型号*
SATA 硬盘容量
SATA 硬盘 F/W
问题描述*


![Annamalai University€¦ · Q5fTàr6TITÐ6ïJj56Ÿr, LDDD]I-Ö Duplicate Degree, Duplicate Mark Sheet, Consolidated Marksheet, Genuineness Certificate, Migration Certificate, LDC](https://img.pdfslide.tips/doc/110x75/5f4164120972927a1c23624e/annamalai-university-q5ftr6tit6jj56r-ldddi-duplicate-degree-duplicate.jpg)