Embed Size (px)
Citation preview
E‐VERIFYREFERENCEGUIDE
1STEdition
3/2012 Page 2 of 49
TableofContents
GETTING STARTED .............................................................................................................................................. 4
WALKING THROUGH THE GT E‐VERIFY INTEGRATED SOLUTION ............................................................................................... 4 E‐VERITY LOGISTICS ........................................................................................................................................................ 4
COMPLETING THE E‐VERIFY INITIAL TRANSACTION USING THE ELECTRONIC I‐9 .................................................... 5
RESPONSE RECEIVED: EMPLOYMENT AUTHORIZED ............................................................................................. 9
CLOSE CASE ................................................................................................................................................................... 9 REQUEST NAME REVIEW ................................................................................................................................................ 11
RESPONSE RECEIVED: SSA TENTATIVE NONCONFIRMATION .............................................................................. 13
CLOSING THE CASE ........................................................................................................................................................ 13 Employee Remaining Employed ........................................................................................................................... 13 Employee Being Terminated ................................................................................................................................ 15
INITIATING THE SSA REFERRAL ........................................................................................................................................ 16 “Contested” TNC Process ..................................................................................................................................... 20 “Not Contested” TNC Process .............................................................................................................................. 21
RESPONSE RECEIVED: DHS TENTATIVE NONCONFIRMATION .............................................................................. 22
CLOSING THE CASE ........................................................................................................................................................ 22 Employee Remaining Employed ........................................................................................................................... 22 Employee Being Terminated ................................................................................................................................ 24
INITIATING THE DHS REFERRAL ....................................................................................................................................... 25 “Contested” TNC Process – Submitting a Photo Document ................................................................................. 28 “Contested” TNC Process – Without (or after) Submitting a Photo Document ................................................... 29 “Not Contested” TNC Process .............................................................................................................................. 30
RESPONSE RECEIVED: CASE INCOMPLETE .......................................................................................................... 32
CLOSE CASE ................................................................................................................................................................. 32 DHS REVERIFY ............................................................................................................................................................. 32 SSA REVERIFY .............................................................................................................................................................. 33
RESPONSE RECEIVED: PHOTO MATCHING REQUIRED ......................................................................................... 35
REVIEWING/WORKING EXISTING CASES ............................................................................................................ 36
NAVIGATING TO THE CASE .............................................................................................................................................. 36 UNDERSTANDING THE E‐VERIFY CASE PAGE ....................................................................................................................... 36 Case Status and Actions ....................................................................................................................................... 37 Initial Verification Information ............................................................................................................................ 38 Eligibility Information .......................................................................................................................................... 38
E‐VERIFY EFORM (MANUAL) .............................................................................................................................. 39
INITIATING THE E‐VERIFY EFORM ..................................................................................................................................... 39 VIEWING AN E‐VERIFY EFORM ........................................................................................................................................ 44
APPENDIX A – V23 CHANGES ............................................................................................................................. 47
Two new response codes added to Table D‐6: DHS Referral Resolution Codes. .................................................. 47 Added new input parameters to the EmpInitBPVerif method. ............................................................................ 47 Added new input parameters to the EmpInitDABPVerif method. ........................................................................ 47 Created new response object for the EmpGetCaseDetails method. .................................................................... 47
3/2012 Page 3 of 49
New DHS ReVerify method added: EmpDMVDHSReVerify .................................................................................. 48 New method added: EmpGetListBCDocumentTypes ........................................................................................... 48 New response object added: EmpGetListBCDocumentTypesResp ....................................................................... 48 New method added: EmpGetSupportingDocumentTypes ................................................................................... 48 New response object added: EmpGetSupportingDocumentTypesResp ............................................................... 48 New method added: EmpGetIssuingAuthorities .................................................................................................. 49 New response object added: EmpGetIssuingAuthorities ..................................................................................... 49 New error codes added ........................................................................................................................................ 49 New List B Document table added to ICA ............................................................................................................ 49 New List C Document table added to ICA ............................................................................................................ 49 New Supporting Document table added to ICA ................................................................................................... 49 New Issuing Authorities table added to ICA......................................................................................................... 49 New Web Service test and production URLs ........................................................................................................ 49 Updated Appendix B‐Signature Page ................................................................................................................... 49
3/2012 Page 4 of 49
Gett ing Started Walking Through the GT E‐Verify Integrated Solution
When the final approver submits the I‐9 form, the initial E‐Verify system query is made using a web service call. This method allows the GT E‐Verify integration™ to verify the work authorization of all newly hired employees. Employee identification information is passed using 19 input parameters. The employee’s “employment eligibility” is returned in an eligibility code output parameter. The eligibility code returned to GT eForms™ by the E‐Verify system indicates whether: the employee is authorized for employment, a problem was encountered during the SSA check, or the employment verification request was automatically sent to a DHS Immigration Status Verifier (ISV) for manual resolution (because the online verification was inconclusive); among other related statuses which may return.
E‐Verify Logistics
Before the E‐Verify integration solution can be implemented, organizations need to meet DHS requirements for using CPS, a subsystem of the Verification Information System (VIS).
DHS requirements include:
A Memorandum of Understanding (MOU) must be established before any testing and data exchange can take place. This represents a valid contract between the customer and the DHS Verification Program.
The employer must complete a period of testing with the VIS contractor on a VIS test system in order to demonstrate the employer’s interface is working according to specifications. Only after successful testing will the employer be provided access to the VIS production system.
The employer must designate a Program Administrator who receives access to the VIS E‐Verify application. The Program Administrator must log on and successfully complete the online tutorial before the employer will be allowed to initiate testing on the VIS system.
3/2012 Page 5 of 49
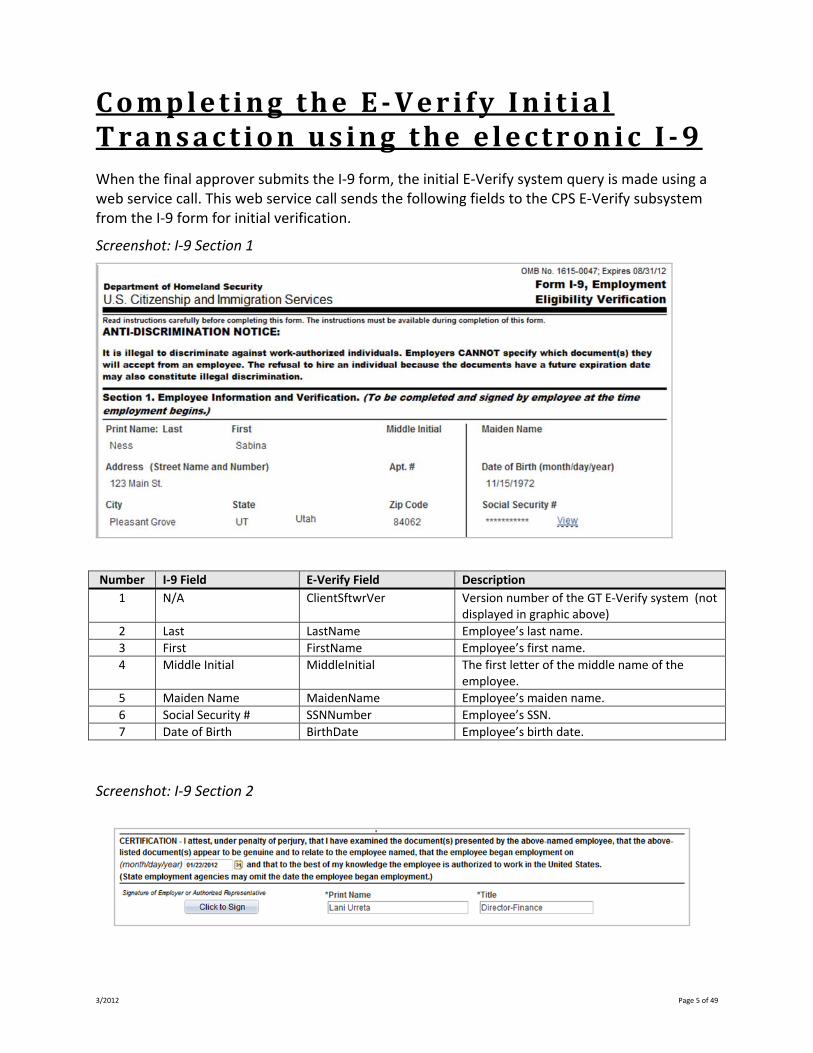
Complet ing the E ‐Veri fy In i t ia l Transact ion using the electronic I ‐9 When the final approver submits the I‐9 form, the initial E‐Verify system query is made using a web service call. This web service call sends the following fields to the CPS E‐Verify subsystem from the I‐9 form for initial verification.
Screenshot: I‐9 Section 1
Number I‐9 Field E‐Verify Field Description
1 N/A ClientSftwrVer Version number of the GT E‐Verify system (not displayed in graphic above)
2 Last LastName Employee’s last name.
3 First FirstName Employee’s first name.
4 Middle Initial MiddleInitial The first letter of the middle name of the employee.
5 Maiden Name MaidenName Employee’s maiden name.
6 Social Security # SSNNumber Employee’s SSN.
7 Date of Birth BirthDate Employee’s birth date.
Screenshot: I‐9 Section 2
3/2012 Page 6 of 49
Number I‐9 Field E‐Verify Field Description
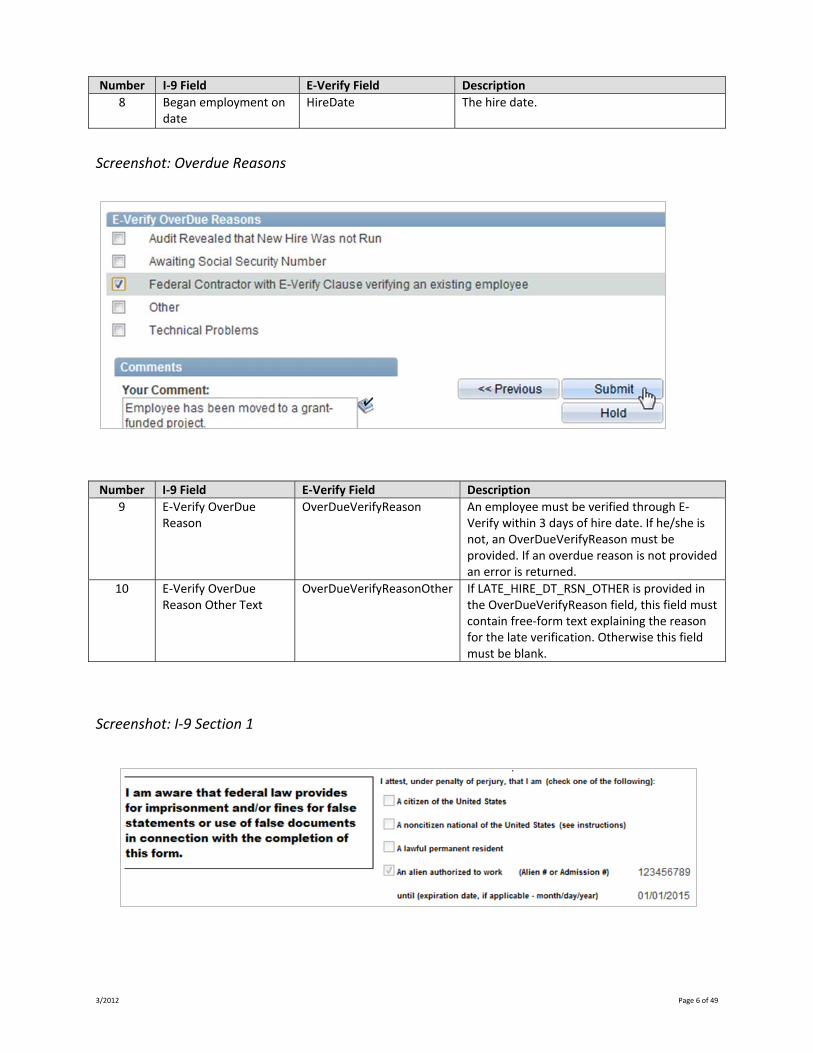
8 Began employment on date
HireDate The hire date.
Screenshot: Overdue Reasons
Number I‐9 Field E‐Verify Field Description
9 E‐Verify OverDue Reason
OverDueVerifyReason An employee must be verified through E‐Verify within 3 days of hire date. If he/she is not, an OverDueVerifyReason must be provided. If an overdue reason is not provided an error is returned.
10 E‐Verify OverDue Reason Other Text
OverDueVerifyReasonOther If LATE_HIRE_DT_RSN_OTHER is provided in the OverDueVerifyReason field, this field must contain free‐form text explaining the reason for the late verification. Otherwise this field must be blank.
Screenshot: I‐9 Section 1
3/2012 Page 7 of 49
Screenshot: I‐9 Section 2
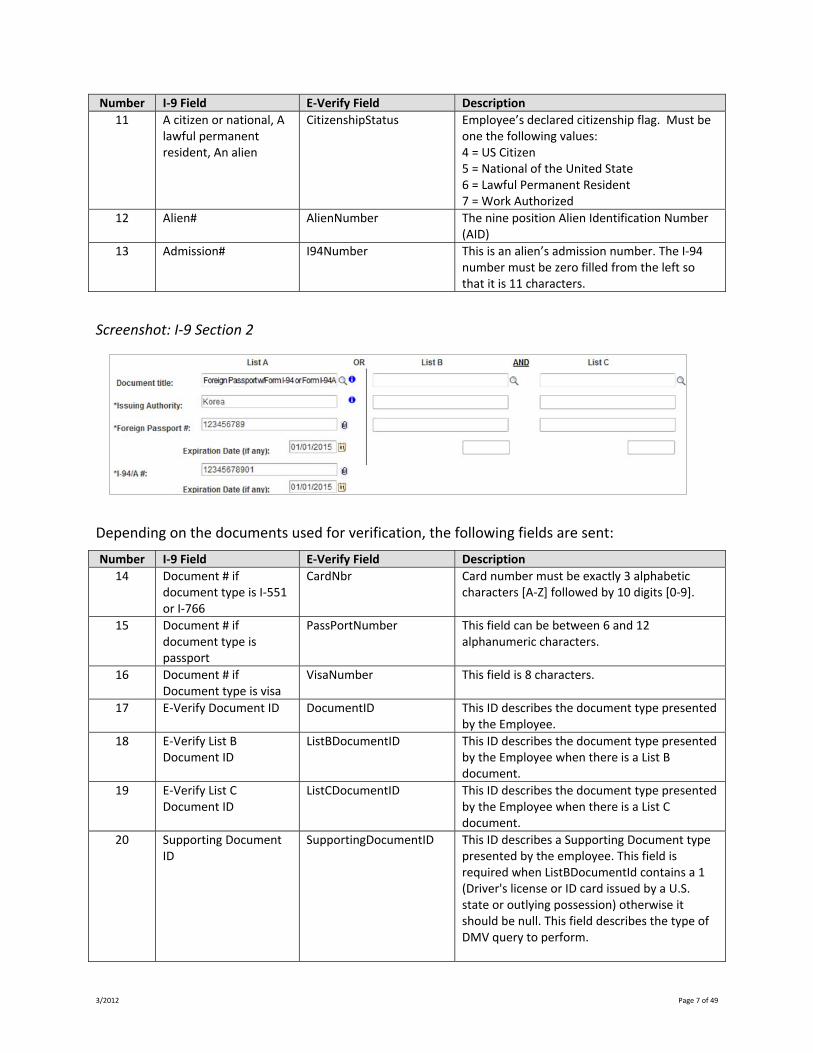
Depending on the documents used for verification, the following fields are sent:
Number I‐9 Field E‐Verify Field Description
14 Document # if document type is I‐551 or I‐766
CardNbr Card number must be exactly 3 alphabetic characters [A‐Z] followed by 10 digits [0‐9].
15 Document # if document type is passport
PassPortNumber This field can be between 6 and 12 alphanumeric characters.
16 Document # if Document type is visa
VisaNumber This field is 8 characters.
17 E‐Verify Document ID DocumentID
This ID describes the document type presented by the Employee.
18 E‐Verify List B Document ID
ListBDocumentID
This ID describes the document type presented by the Employee when there is a List B document.
19 E‐Verify List C Document ID
ListCDocumentID
This ID describes the document type presented by the Employee when there is a List C document.
20 Supporting Document ID
SupportingDocumentID This ID describes a Supporting Document type presented by the employee. This field is required when ListBDocumentId contains a 1 (Driver's license or ID card issued by a U.S. state or outlying possession) otherwise it should be null. This field describes the type of DMV query to perform.
Number I‐9 Field E‐Verify Field Description
11 A citizen or national, A lawful permanent resident, An alien
CitizenshipStatus Employee’s declared citizenship flag. Must be one the following values: 4 = US Citizen 5 = National of the United State 6 = Lawful Permanent Resident 7 = Work Authorized
12 Alien# AlienNumber The nine position Alien Identification Number (AID)
13 Admission# I94Number This is an alien’s admission number. The I‐94 number must be zero filled from the left so that it is 11 characters.
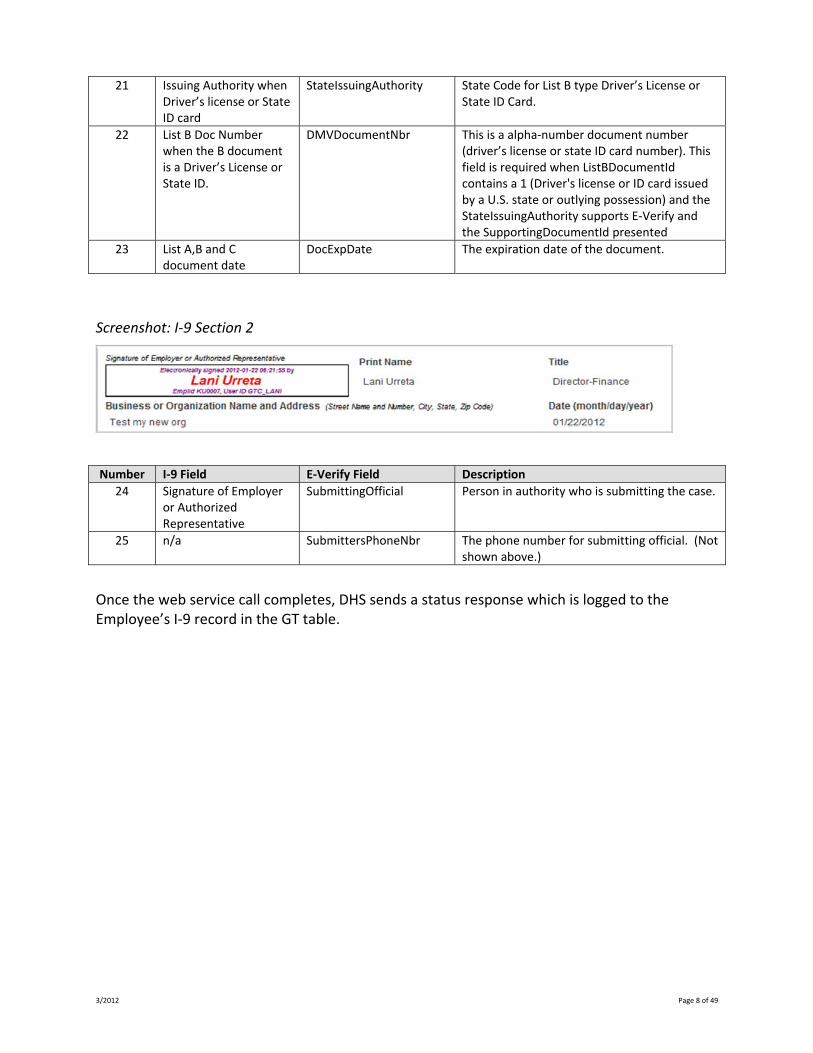
3/2012 Page 8 of 49
21 Issuing Authority when Driver’s license or State ID card
StateIssuingAuthority State Code for List B type Driver’s License or State ID Card.
22 List B Doc Number when the B document is a Driver’s License or State ID.
DMVDocumentNbr This is a alpha‐number document number (driver’s license or state ID card number). This field is required when ListBDocumentId contains a 1 (Driver's license or ID card issued by a U.S. state or outlying possession) and the StateIssuingAuthority supports E‐Verify and the SupportingDocumentId presented
23 List A,B and C document date
DocExpDate The expiration date of the document.
Screenshot: I‐9 Section 2
Number I‐9 Field E‐Verify Field Description
24 Signature of Employer or Authorized Representative
SubmittingOfficial Person in authority who is submitting the case.
25 n/a SubmittersPhoneNbr The phone number for submitting official. (Not shown above.)
Once the web service call completes, DHS sends a status response which is logged to the Employee’s I‐9 record in the GT table.
3/2012 Page 9 of 49
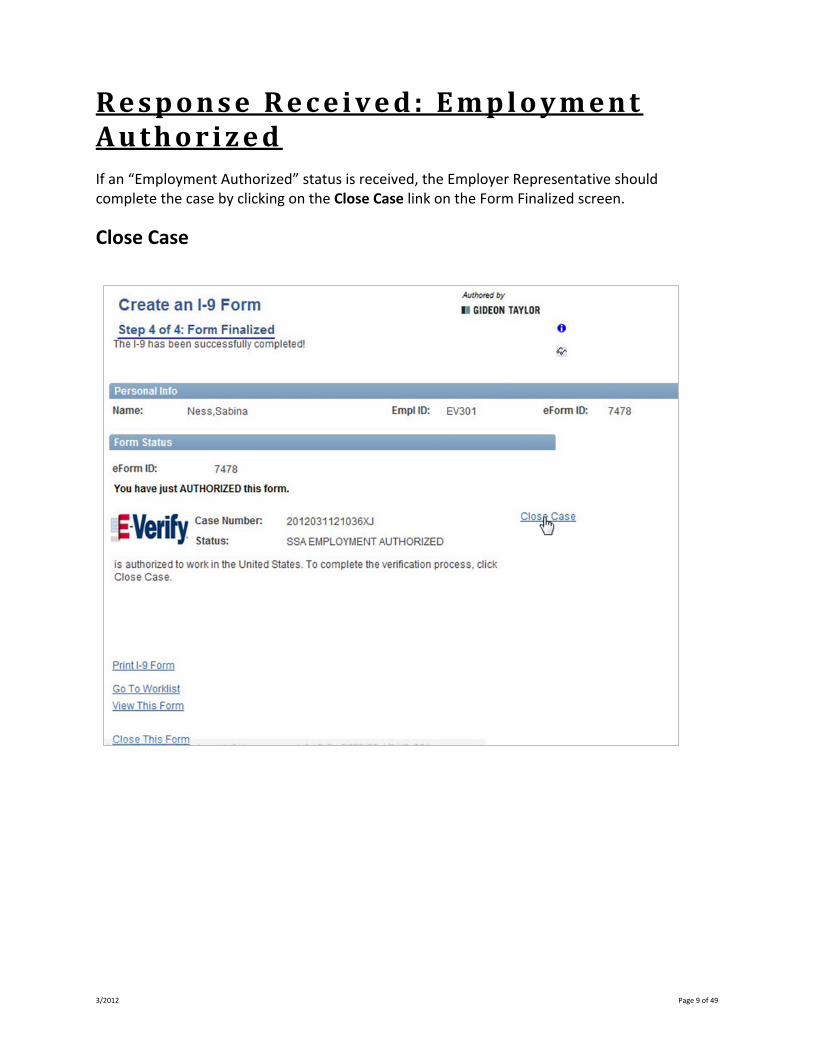
Response Received: Employment Authorized If an “Employment Authorized” status is received, the Employer Representative should complete the case by clicking on the Close Case link on the Form Finalized screen.
Close Case
3/2012 Page 10 of 49
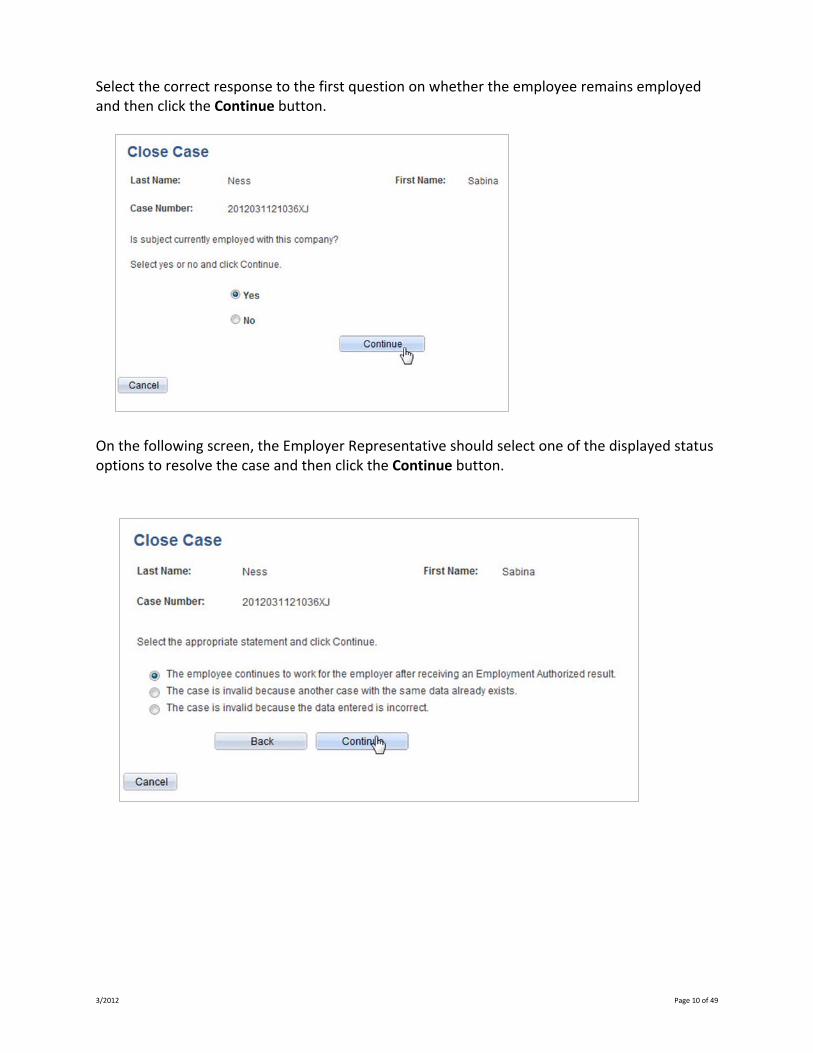
Select the correct response to the first question on whether the employee remains employed and then click the Continue button.
On the following screen, the Employer Representative should select one of the displayed status options to resolve the case and then click the Continue button.
3/2012 Page 11 of 49
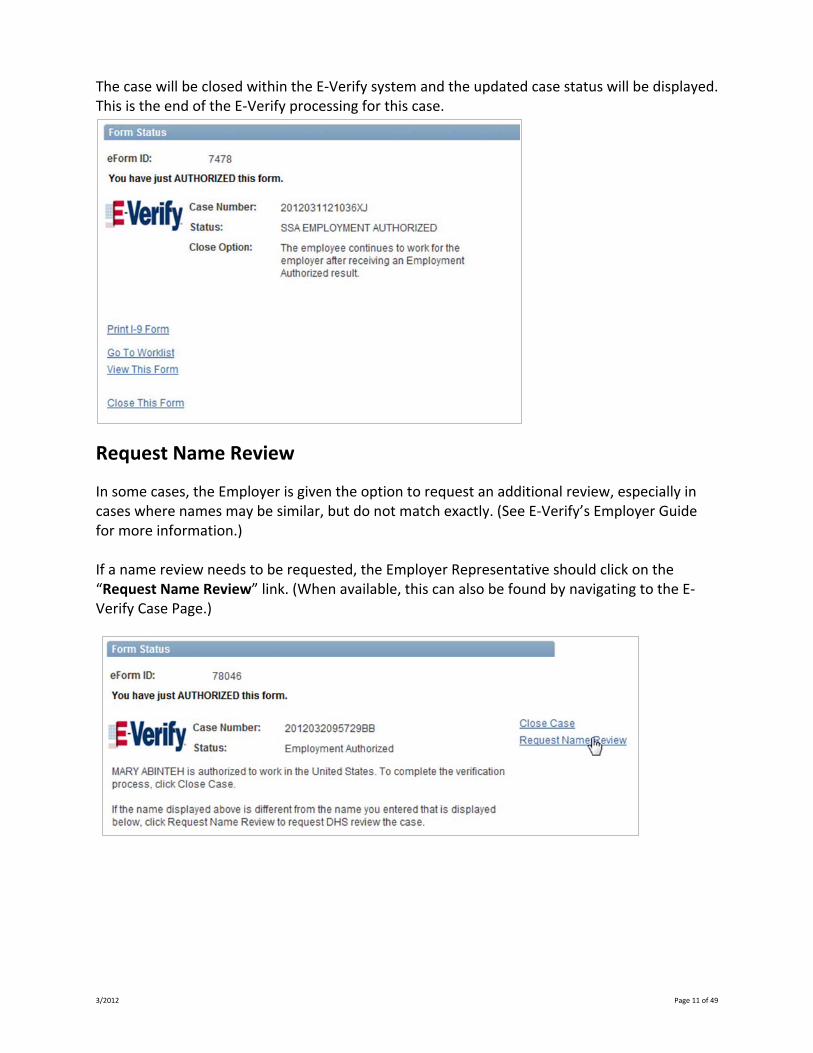
The case will be closed within the E‐Verify system and the updated case status will be displayed. This is the end of the E‐Verify processing for this case.
Request Name Review
In some cases, the Employer is given the option to request an additional review, especially in cases where names may be similar, but do not match exactly. (See E‐Verify’s Employer Guide for more information.) If a name review needs to be requested, the Employer Representative should click on the “Request Name Review” link. (When available, this can also be found by navigating to the E‐Verify Case Page.)
3/2012 Page 12 of 49
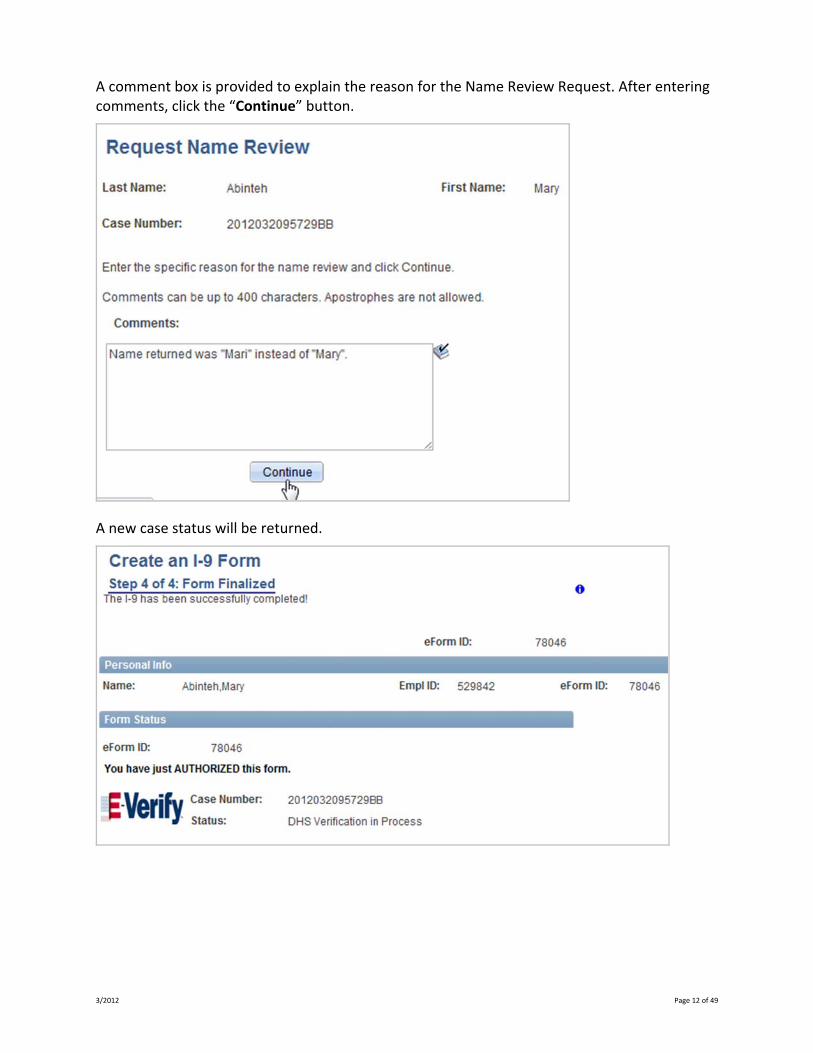
A comment box is provided to explain the reason for the Name Review Request. After entering comments, click the “Continue” button.
A new case status will be returned.
3/2012 Page 13 of 49
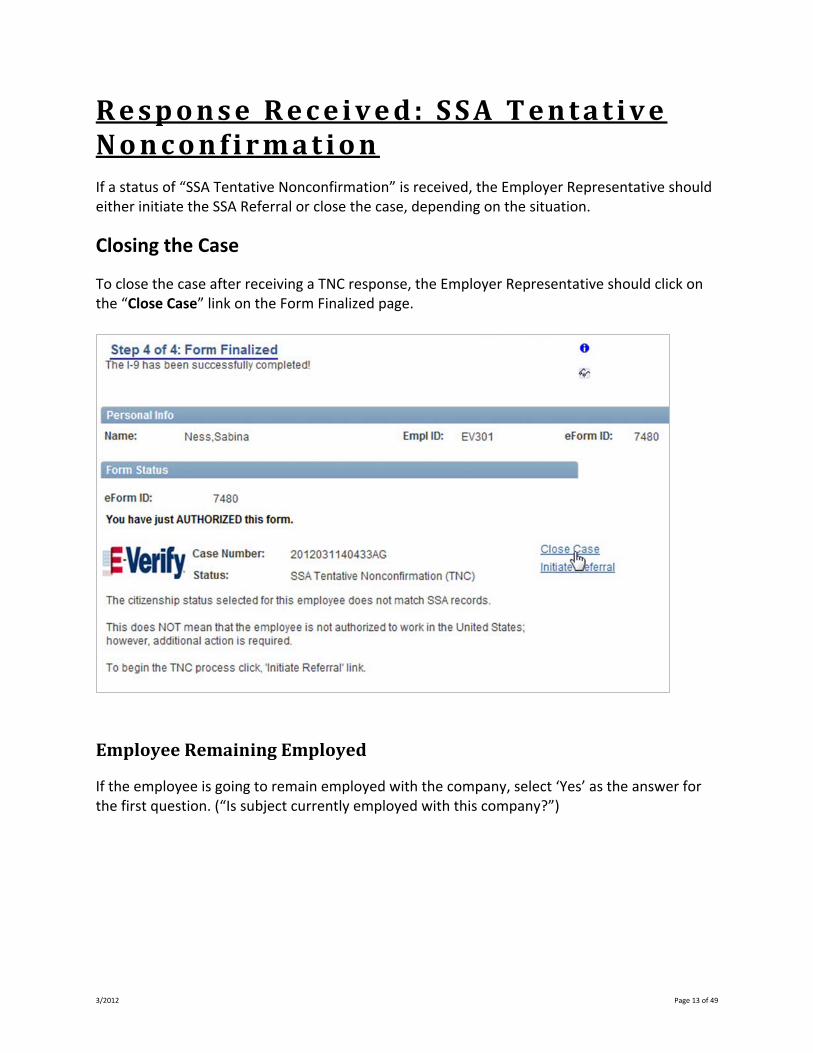
Response Received: SSA Tentat ive Nonconf irmat ion If a status of “SSA Tentative Nonconfirmation” is received, the Employer Representative should either initiate the SSA Referral or close the case, depending on the situation.
Closing the Case
To close the case after receiving a TNC response, the Employer Representative should click on the “Close Case” link on the Form Finalized page.
EmployeeRemainingEmployed
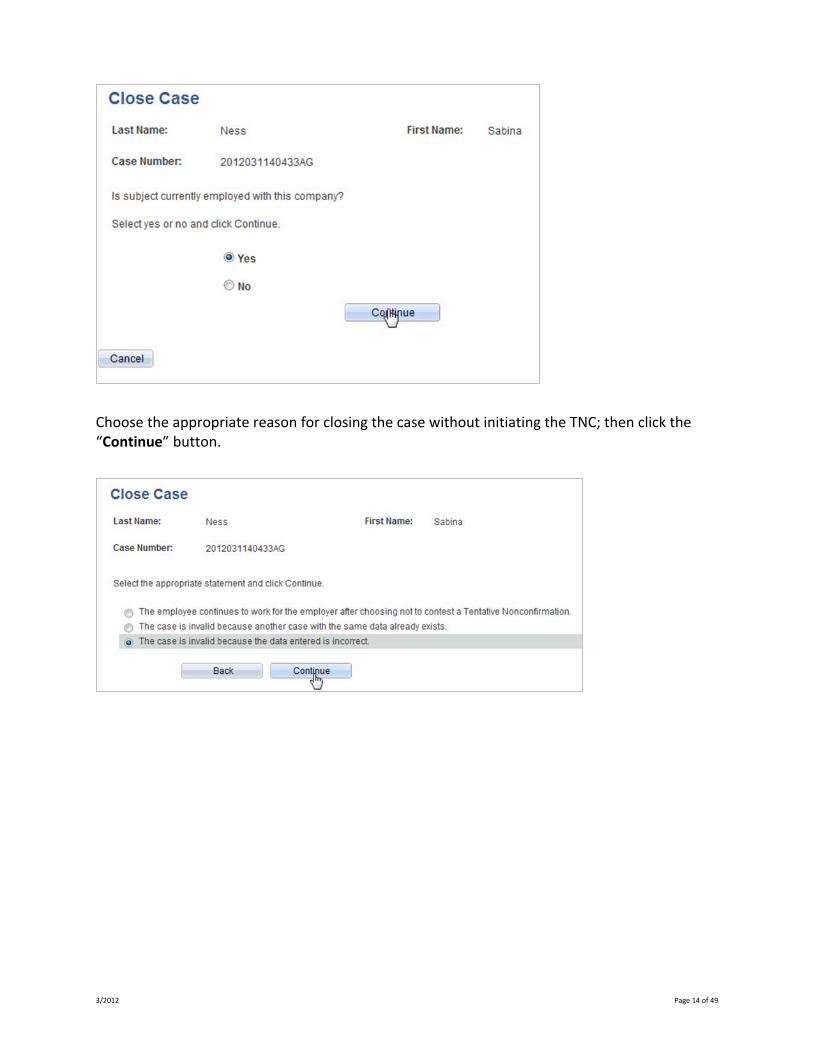
If the employee is going to remain employed with the company, select ‘Yes’ as the answer for the first question. (“Is subject currently employed with this company?”)
3/2012 Page 14 of 49
Choose the appropriate reason for closing the case without initiating the TNC; then click the “Continue” button.
3/2012 Page 15 of 49
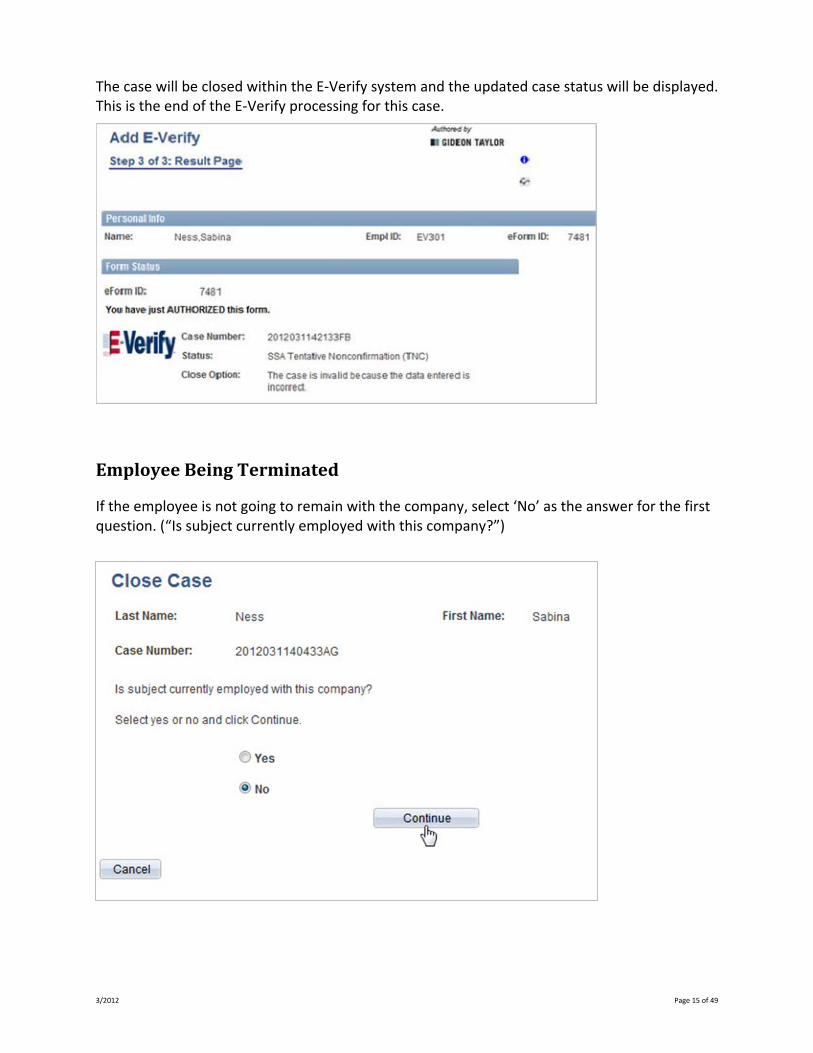
The case will be closed within the E‐Verify system and the updated case status will be displayed. This is the end of the E‐Verify processing for this case.
EmployeeBeingTerminated
If the employee is not going to remain with the company, select ‘No’ as the answer for the first question. (“Is subject currently employed with this company?”)

3/2012 Page 16 of 49
Choose the appropriate reason for closing the case without initiating the TNC; then click the “Continue” button.
The case will be closed within the E‐Verify system and the updated case status will be displayed. This is the end of the E‐Verify processing for this case.
Initiating the SSA Referral
If the data submitted was correct, the Employer must give the employee a notice from the agency which explains the situation and the employee’s options.
In most cases, the employee will elect to contest the Tentative Nonconfirmation (TNC) and the employer will need to refer the employee’s case to the SSA.
3/2012 Page 17 of 49
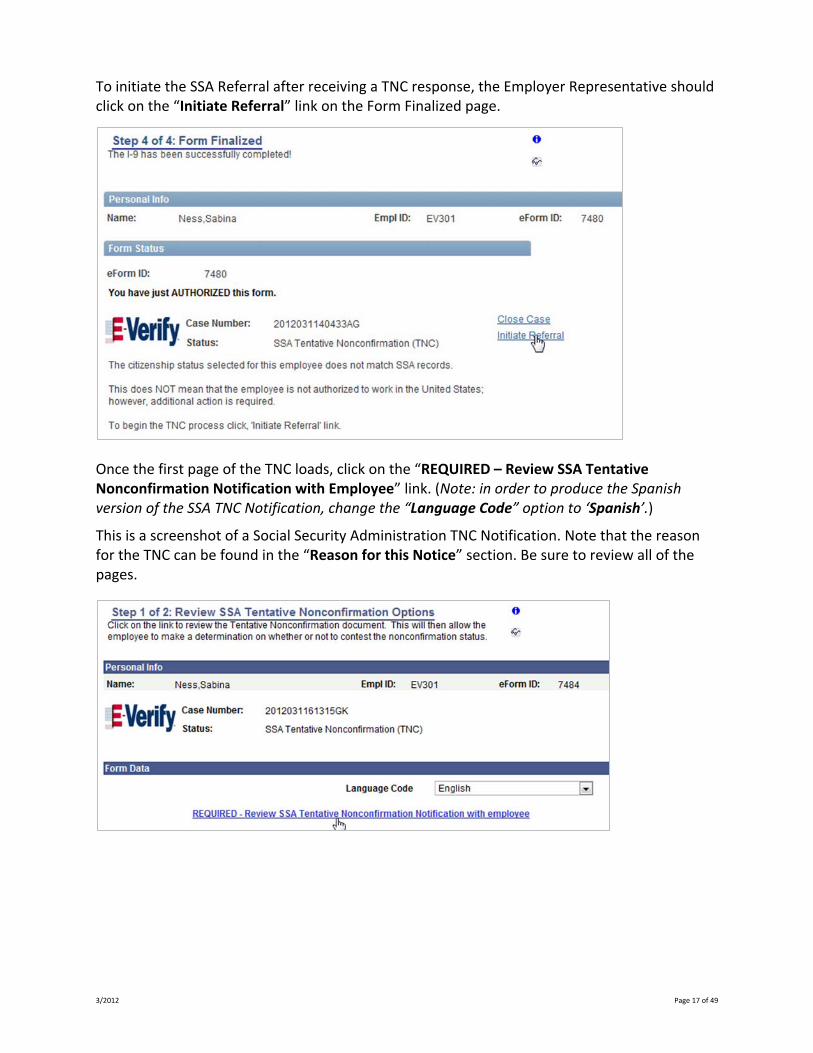
To initiate the SSA Referral after receiving a TNC response, the Employer Representative should click on the “Initiate Referral” link on the Form Finalized page.
Once the first page of the TNC loads, click on the “REQUIRED – Review SSA Tentative Nonconfirmation Notification with Employee” link. (Note: in order to produce the Spanish version of the SSA TNC Notification, change the “Language Code” option to ‘Spanish’.)
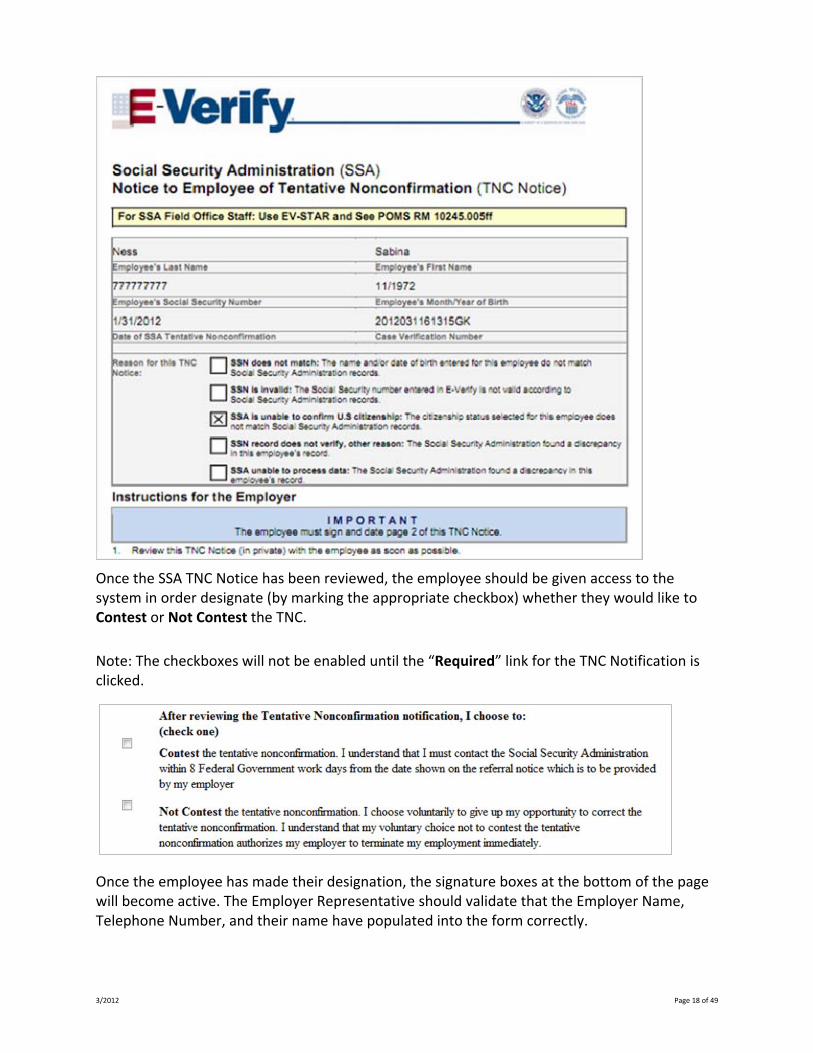
This is a screenshot of a Social Security Administration TNC Notification. Note that the reason for the TNC can be found in the “Reason for this Notice” section. Be sure to review all of the pages.
3/2012 Page 18 of 49
Once the SSA TNC Notice has been reviewed, the employee should be given access to the system in order designate (by marking the appropriate checkbox) whether they would like to Contest or Not Contest the TNC.
Note: The checkboxes will not be enabled until the “Required” link for the TNC Notification is clicked.
Once the employee has made their designation, the signature boxes at the bottom of the page will become active. The Employer Representative should validate that the Employer Name, Telephone Number, and their name have populated into the form correctly.
3/2012 Page 19 of 49
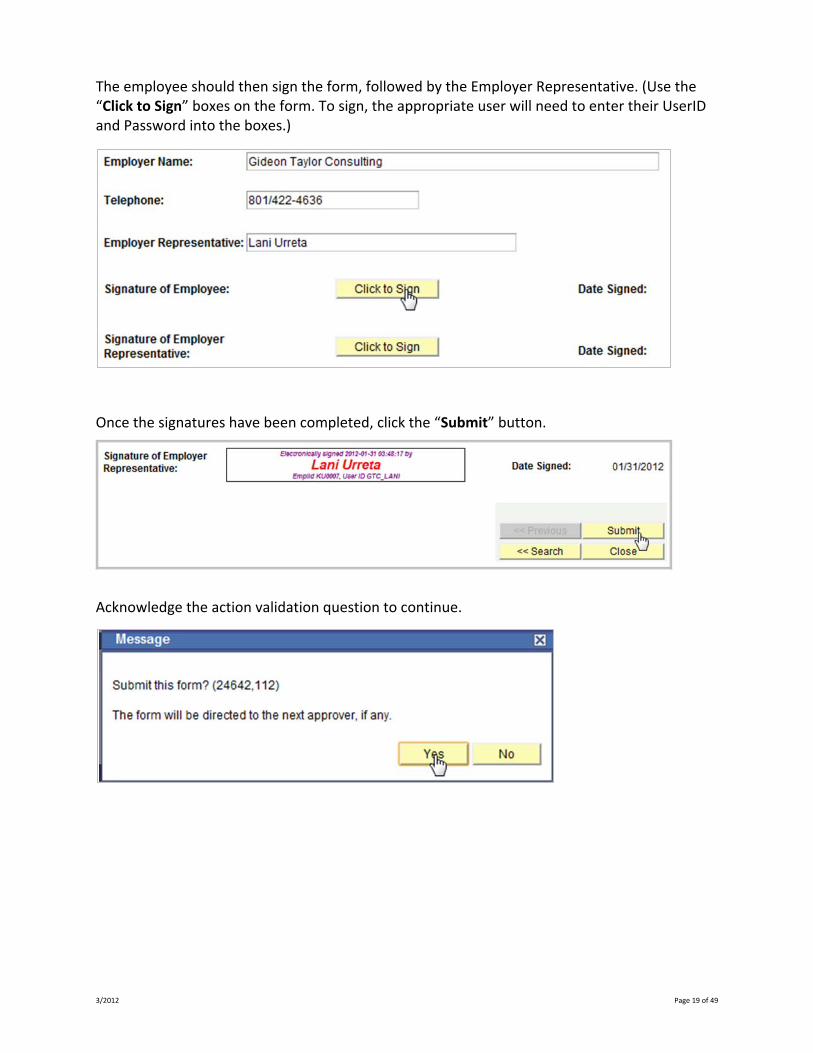
The employee should then sign the form, followed by the Employer Representative. (Use the “Click to Sign” boxes on the form. To sign, the appropriate user will need to enter their UserID and Password into the boxes.)
Once the signatures have been completed, click the “Submit” button.
Acknowledge the action validation question to continue.
3/2012 Page 20 of 49
“Contested”TNCProcess
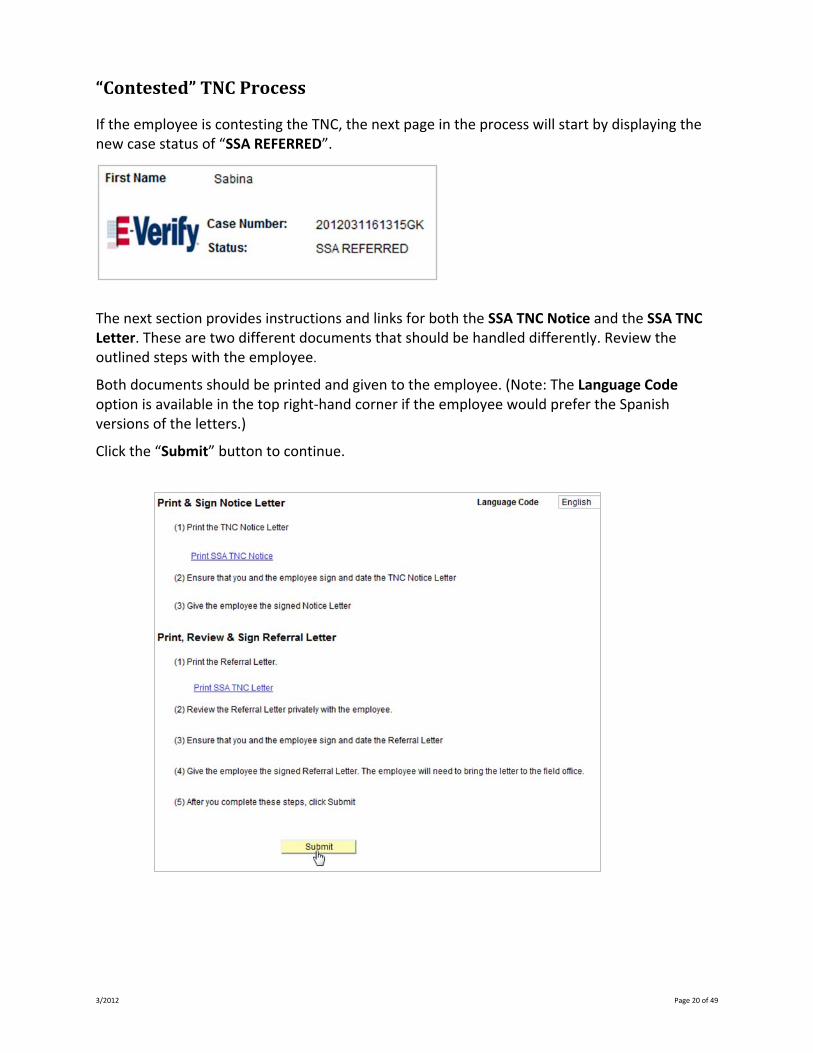
If the employee is contesting the TNC, the next page in the process will start by displaying the new case status of “SSA REFERRED”.
The next section provides instructions and links for both the SSA TNC Notice and the SSA TNC Letter. These are two different documents that should be handled differently. Review the outlined steps with the employee.
Both documents should be printed and given to the employee. (Note: The Language Code option is available in the top right‐hand corner if the employee would prefer the Spanish versions of the letters.)
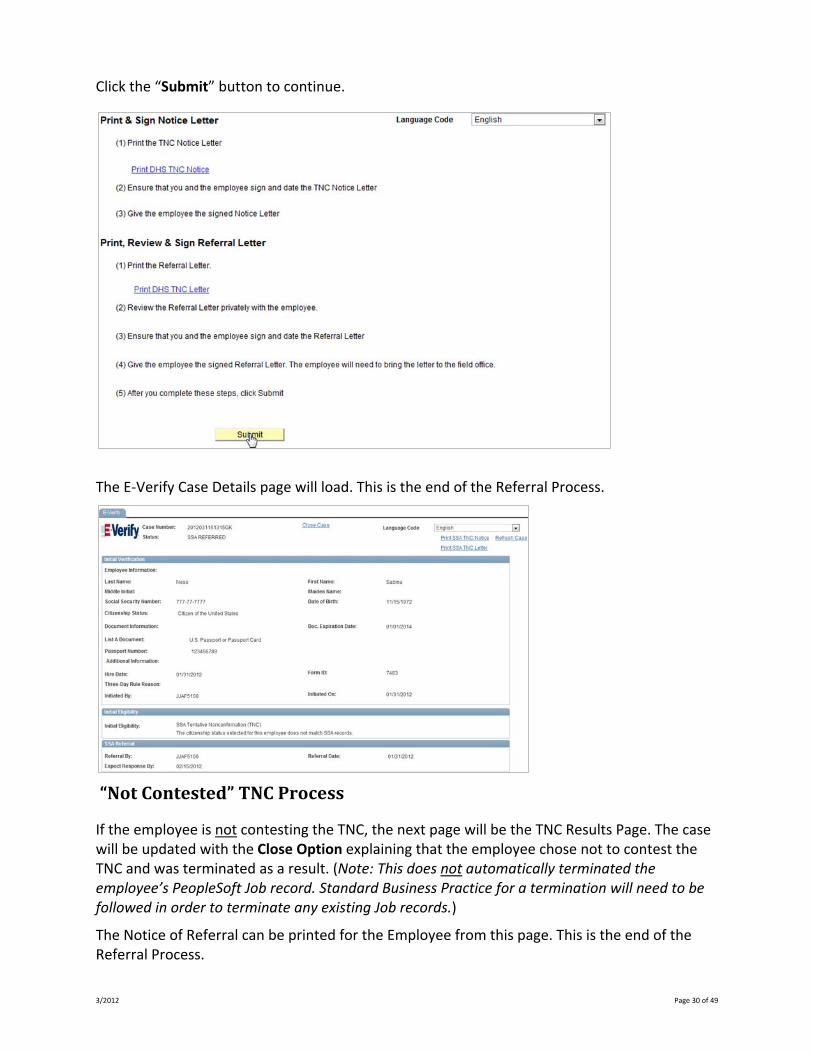
Click the “Submit” button to continue.
3/2012 Page 21 of 49
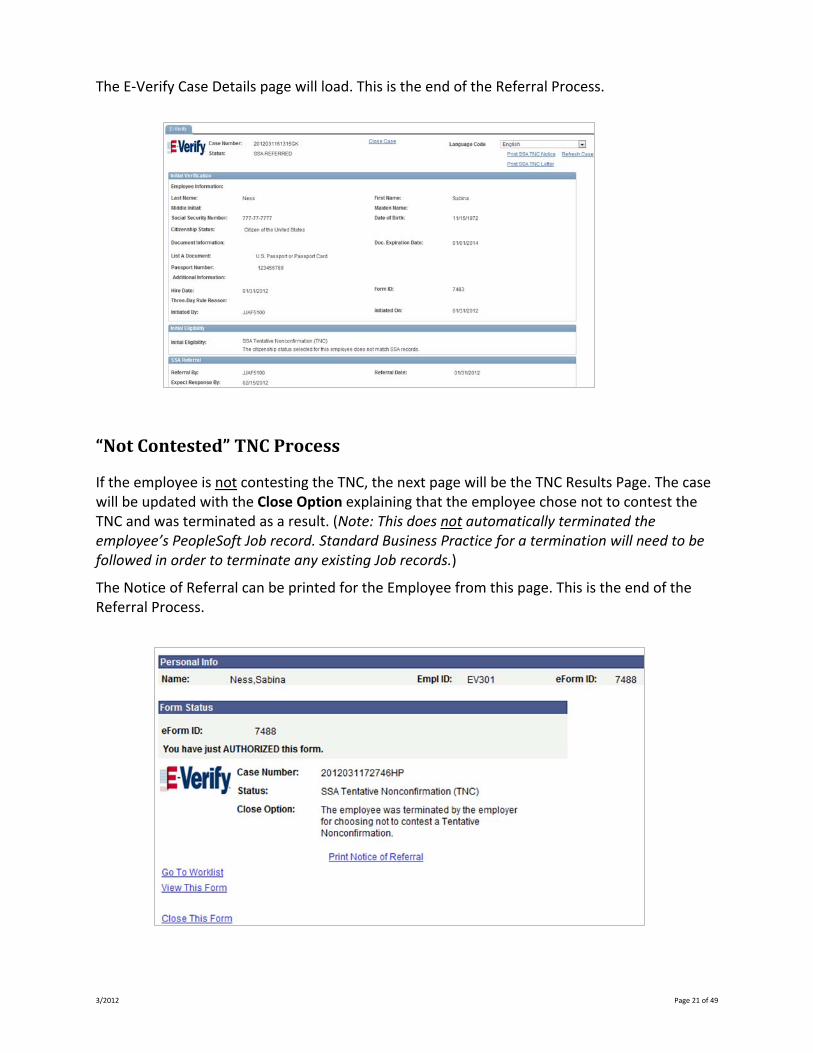
The E‐Verify Case Details page will load. This is the end of the Referral Process.
“NotContested”TNCProcess
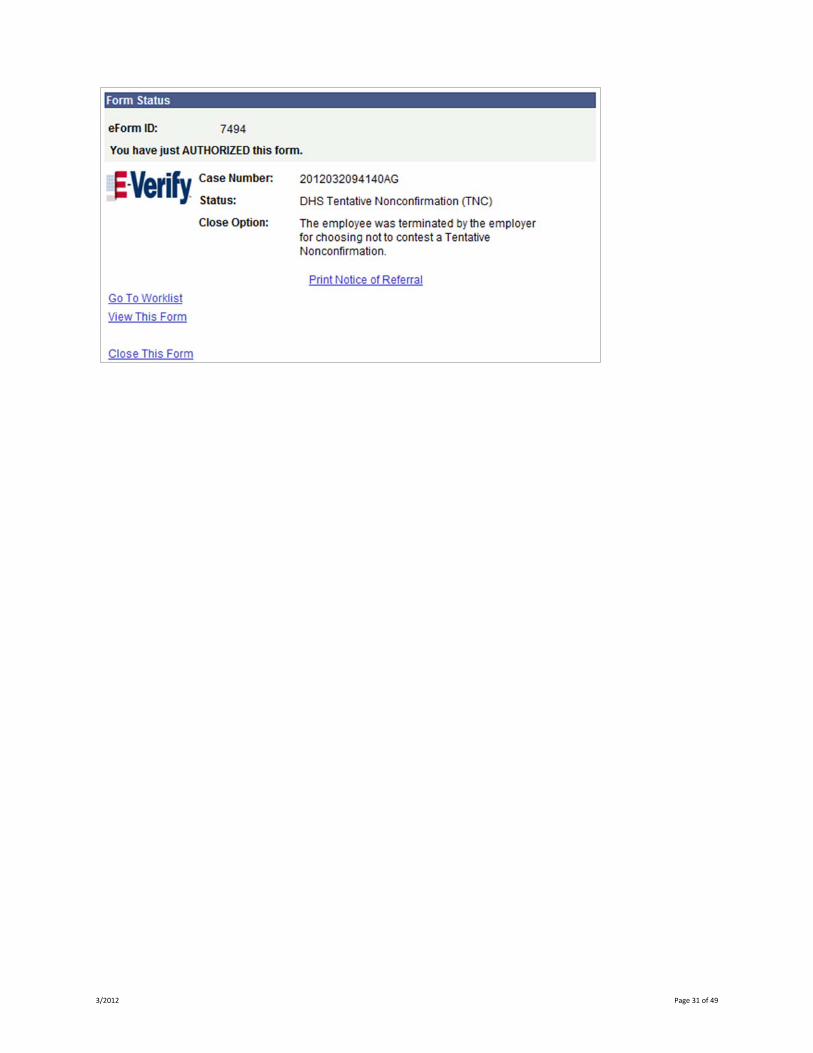
If the employee is not contesting the TNC, the next page will be the TNC Results Page. The case will be updated with the Close Option explaining that the employee chose not to contest the TNC and was terminated as a result. (Note: This does not automatically terminated the employee’s PeopleSoft Job record. Standard Business Practice for a termination will need to be followed in order to terminate any existing Job records.)
The Notice of Referral can be printed for the Employee from this page. This is the end of the Referral Process.
3/2012 Page 22 of 49
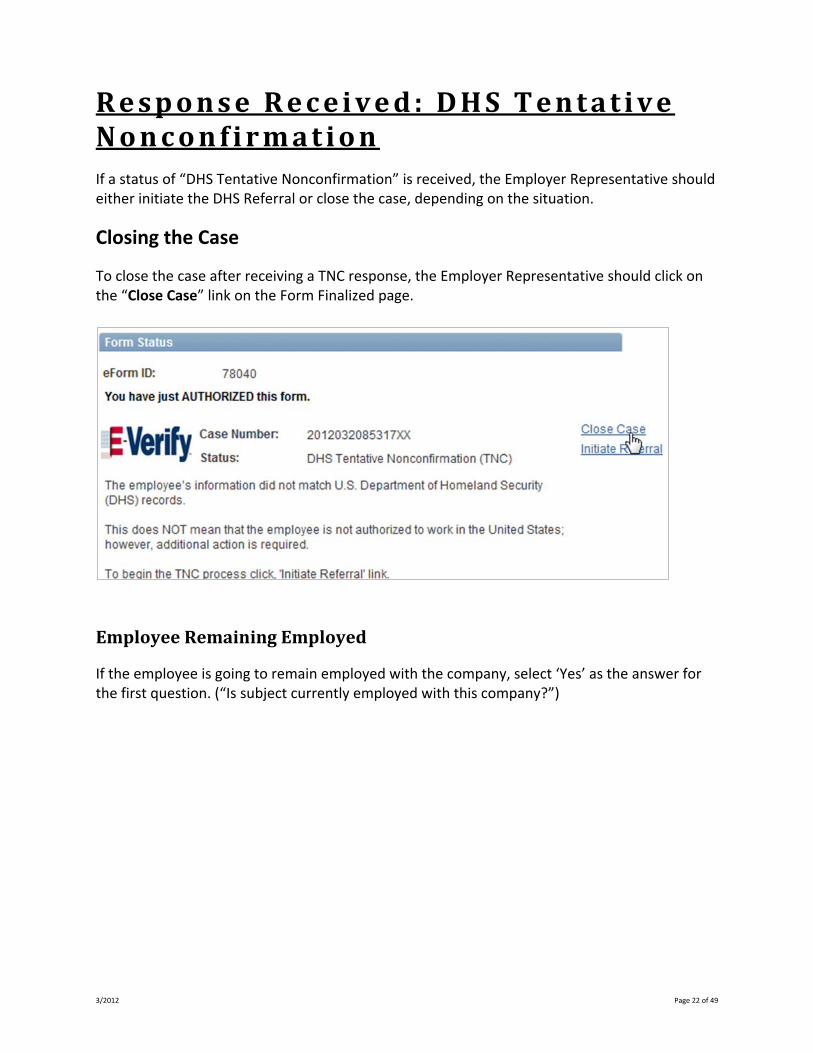
Response Received: DHS Tentat ive Nonconf irmat ion If a status of “DHS Tentative Nonconfirmation” is received, the Employer Representative should either initiate the DHS Referral or close the case, depending on the situation.
Closing the Case
To close the case after receiving a TNC response, the Employer Representative should click on the “Close Case” link on the Form Finalized page.
EmployeeRemainingEmployed
If the employee is going to remain employed with the company, select ‘Yes’ as the answer for the first question. (“Is subject currently employed with this company?”)

3/2012 Page 23 of 49
Choose the appropriate reason for closing the case without initiating the TNC; then click the “Continue” button.
The case will be closed within the E‐Verify system and the updated case status will be displayed. This is the end of the E‐Verify processing for this case.
3/2012 Page 24 of 49
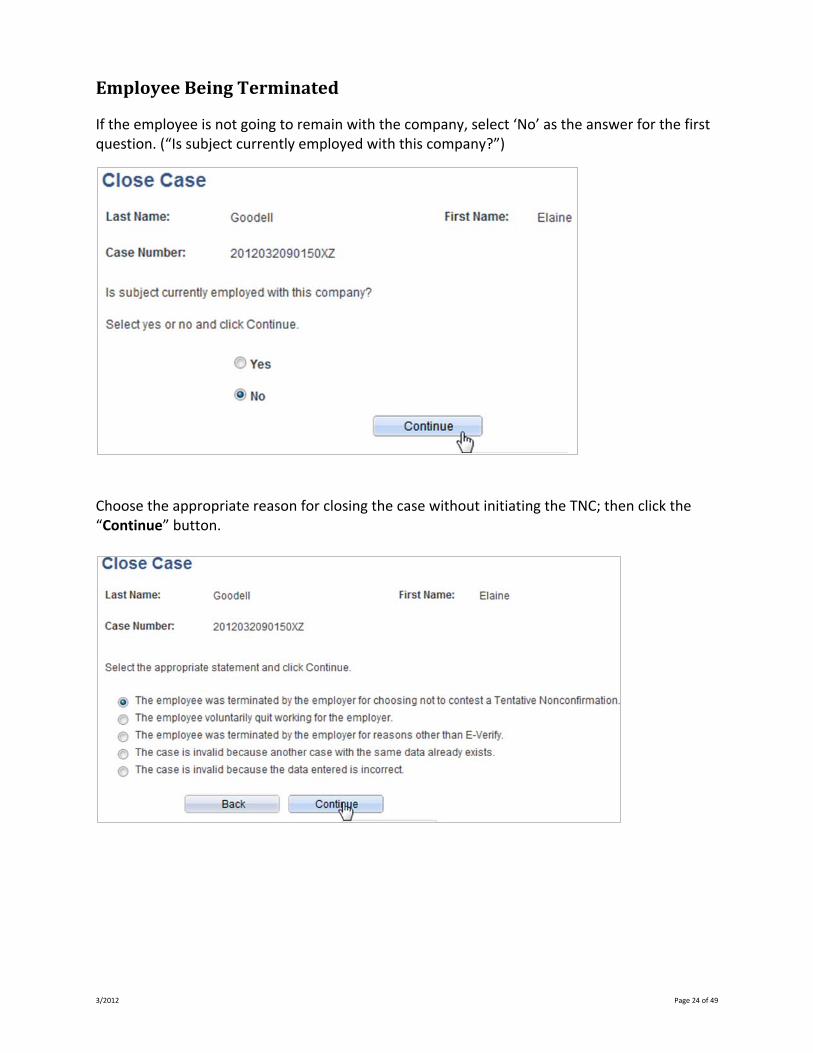
EmployeeBeingTerminated
If the employee is not going to remain with the company, select ‘No’ as the answer for the first question. (“Is subject currently employed with this company?”)
Choose the appropriate reason for closing the case without initiating the TNC; then click the “Continue” button.
3/2012 Page 25 of 49
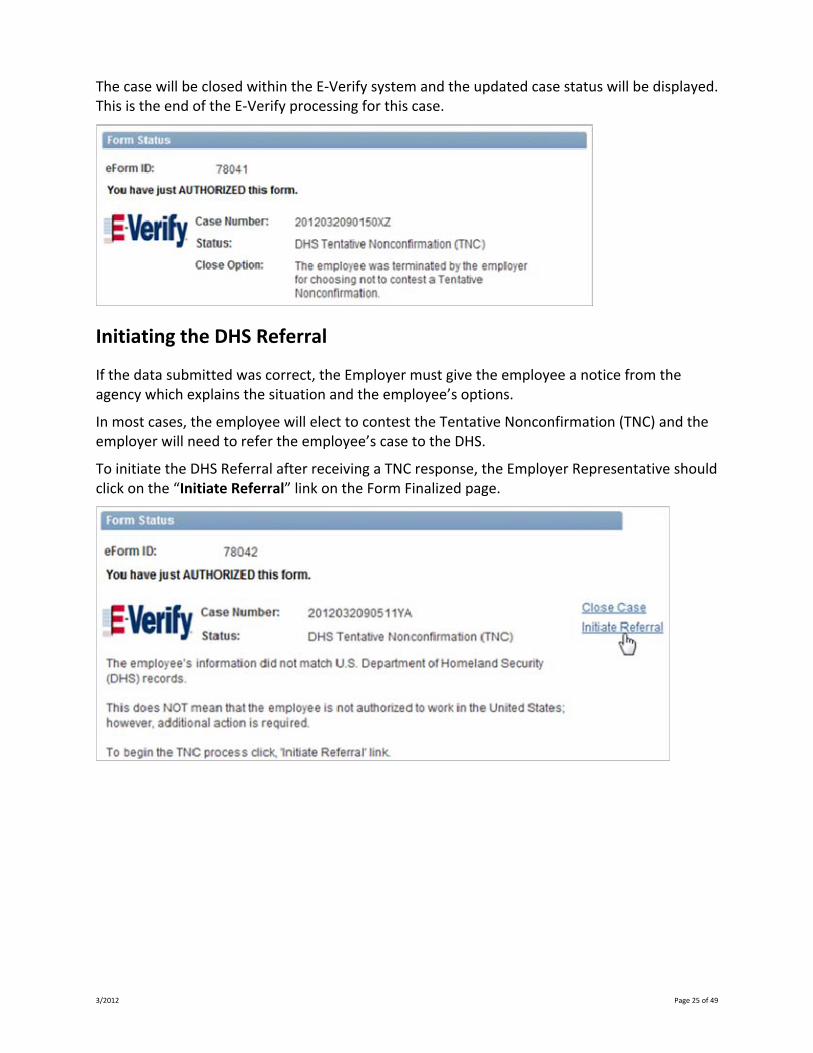
The case will be closed within the E‐Verify system and the updated case status will be displayed. This is the end of the E‐Verify processing for this case.
Initiating the DHS Referral
If the data submitted was correct, the Employer must give the employee a notice from the agency which explains the situation and the employee’s options.
In most cases, the employee will elect to contest the Tentative Nonconfirmation (TNC) and the employer will need to refer the employee’s case to the DHS.
To initiate the DHS Referral after receiving a TNC response, the Employer Representative should click on the “Initiate Referral” link on the Form Finalized page.
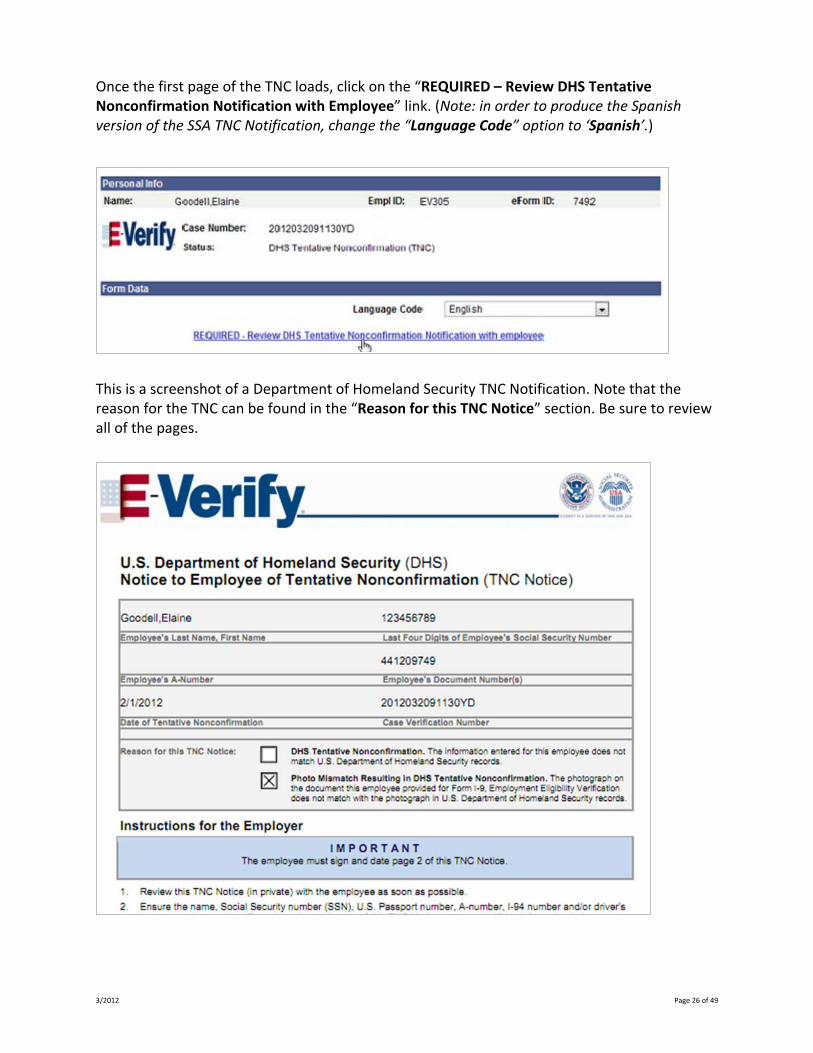
3/2012 Page 26 of 49
Once the first page of the TNC loads, click on the “REQUIRED – Review DHS Tentative Nonconfirmation Notification with Employee” link. (Note: in order to produce the Spanish version of the SSA TNC Notification, change the “Language Code” option to ‘Spanish’.)
This is a screenshot of a Department of Homeland Security TNC Notification. Note that the reason for the TNC can be found in the “Reason for this TNC Notice” section. Be sure to review all of the pages.
3/2012 Page 27 of 49
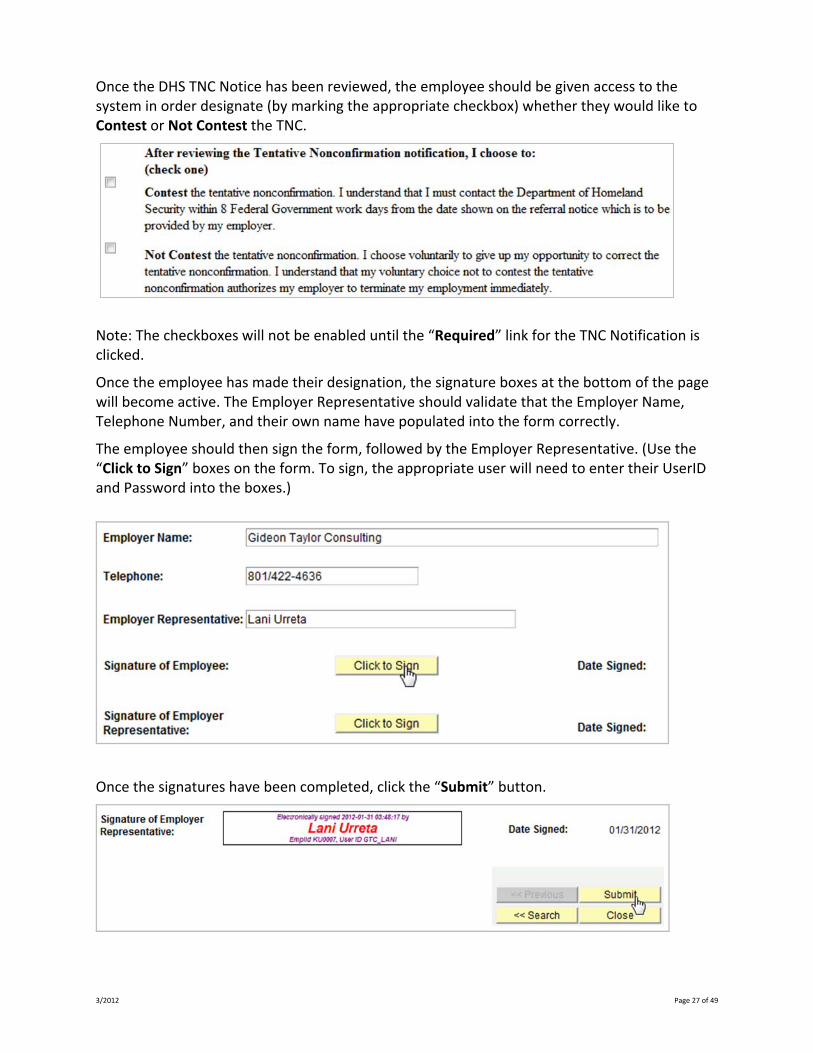
Once the DHS TNC Notice has been reviewed, the employee should be given access to the system in order designate (by marking the appropriate checkbox) whether they would like to Contest or Not Contest the TNC.
Note: The checkboxes will not be enabled until the “Required” link for the TNC Notification is clicked.
Once the employee has made their designation, the signature boxes at the bottom of the page will become active. The Employer Representative should validate that the Employer Name, Telephone Number, and their own name have populated into the form correctly.
The employee should then sign the form, followed by the Employer Representative. (Use the “Click to Sign” boxes on the form. To sign, the appropriate user will need to enter their UserID and Password into the boxes.)
Once the signatures have been completed, click the “Submit” button.
3/2012 Page 28 of 49
“Contested”TNCProcess–SubmittingaPhotoDocument
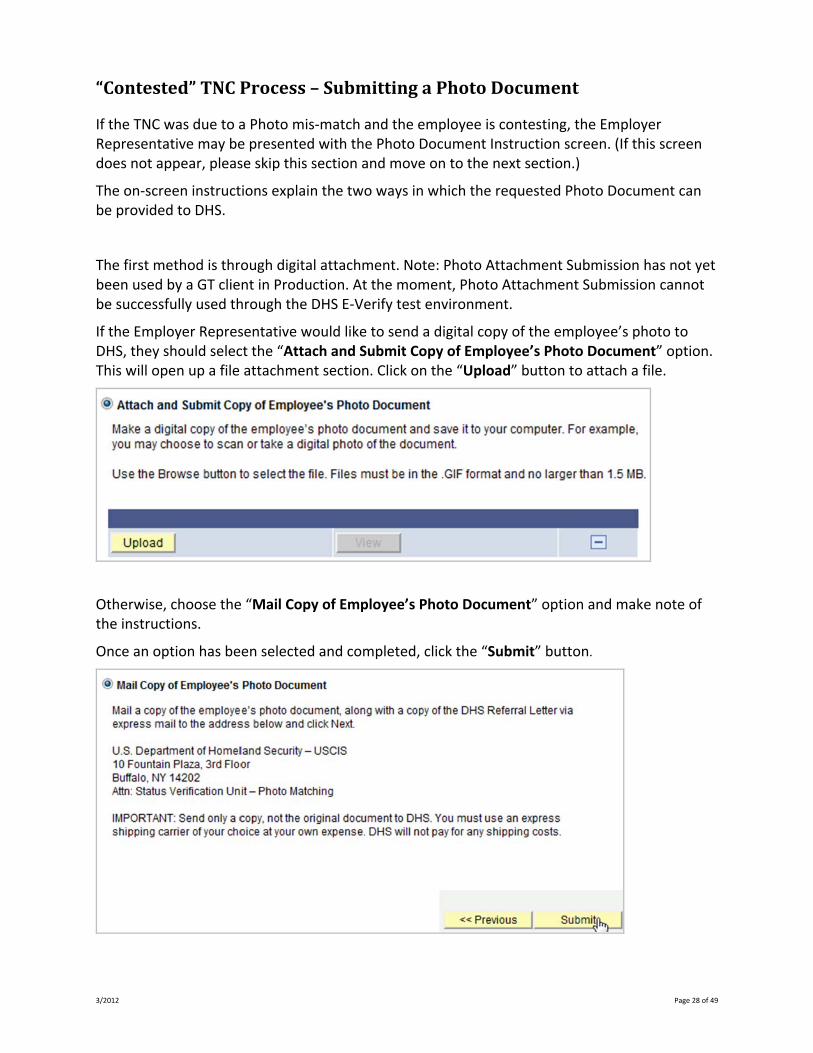
If the TNC was due to a Photo mis‐match and the employee is contesting, the Employer Representative may be presented with the Photo Document Instruction screen. (If this screen does not appear, please skip this section and move on to the next section.)
The on‐screen instructions explain the two ways in which the requested Photo Document can be provided to DHS.
The first method is through digital attachment. Note: Photo Attachment Submission has not yet been used by a GT client in Production. At the moment, Photo Attachment Submission cannot be successfully used through the DHS E‐Verify test environment.
If the Employer Representative would like to send a digital copy of the employee’s photo to DHS, they should select the “Attach and Submit Copy of Employee’s Photo Document” option. This will open up a file attachment section. Click on the “Upload” button to attach a file.
Otherwise, choose the “Mail Copy of Employee’s Photo Document” option and make note of the instructions.
Once an option has been selected and completed, click the “Submit” button.
3/2012 Page 29 of 49
“Contested”TNCProcess–Without(orafter)SubmittingaPhotoDocument
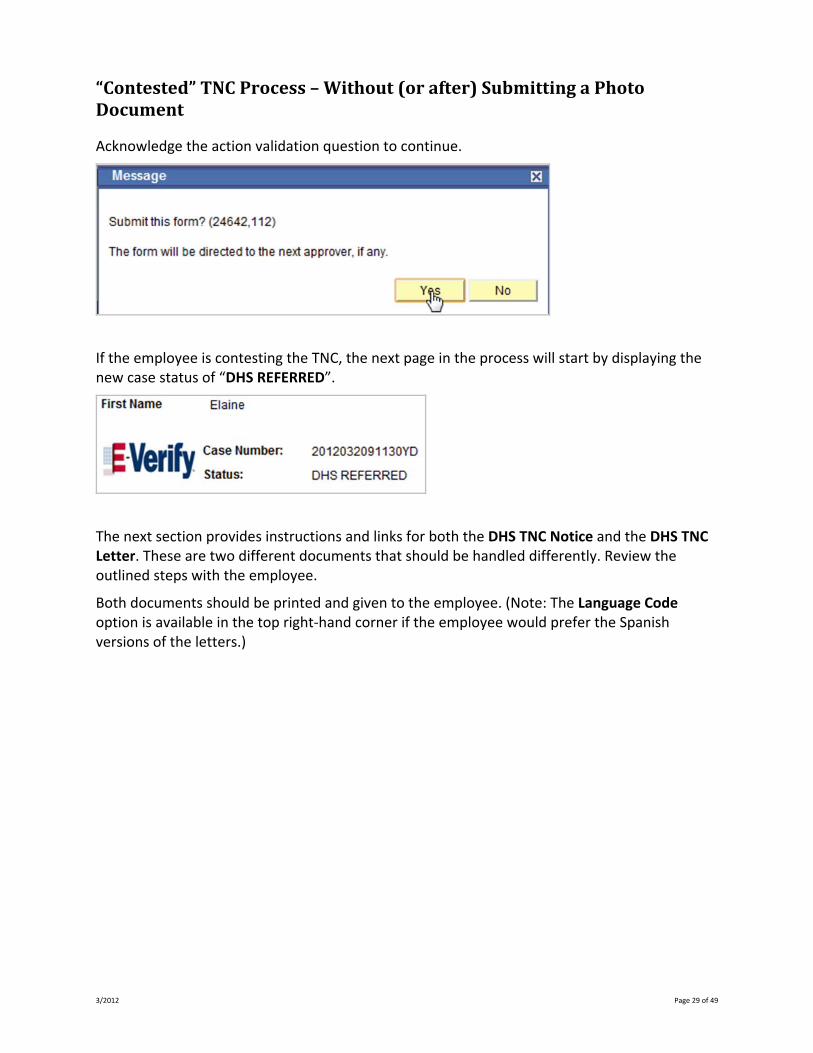
Acknowledge the action validation question to continue.
If the employee is contesting the TNC, the next page in the process will start by displaying the new case status of “DHS REFERRED”.
The next section provides instructions and links for both the DHS TNC Notice and the DHS TNC Letter. These are two different documents that should be handled differently. Review the outlined steps with the employee.
Both documents should be printed and given to the employee. (Note: The Language Code option is available in the top right‐hand corner if the employee would prefer the Spanish versions of the letters.)
3/2012 Page 30 of 49
Click the “Submit” button to continue.
The E‐Verify Case Details page will load. This is the end of the Referral Process.
“NotContested”TNCProcess
If the employee is not contesting the TNC, the next page will be the TNC Results Page. The case will be updated with the Close Option explaining that the employee chose not to contest the TNC and was terminated as a result. (Note: This does not automatically terminated the employee’s PeopleSoft Job record. Standard Business Practice for a termination will need to be followed in order to terminate any existing Job records.)
The Notice of Referral can be printed for the Employee from this page. This is the end of the Referral Process.
3/2012 Page 31 of 49
3/2012 Page 32 of 49
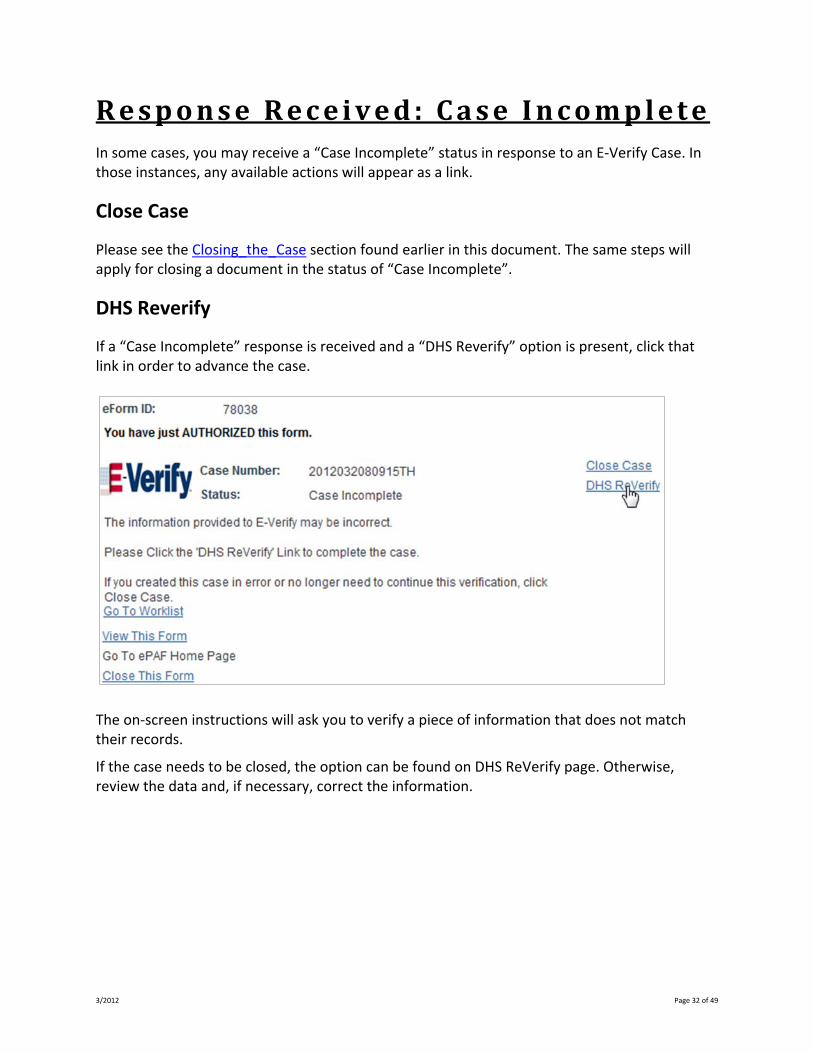
Response Received: Case Incomplete In some cases, you may receive a “Case Incomplete” status in response to an E‐Verify Case. In those instances, any available actions will appear as a link.
Close Case
Please see the Closing_the_Case section found earlier in this document. The same steps will apply for closing a document in the status of “Case Incomplete”.
DHS Reverify
If a “Case Incomplete” response is received and a “DHS Reverify” option is present, click that link in order to advance the case.
The on‐screen instructions will ask you to verify a piece of information that does not match their records.
If the case needs to be closed, the option can be found on DHS ReVerify page. Otherwise, review the data and, if necessary, correct the information.
3/2012 Page 33 of 49
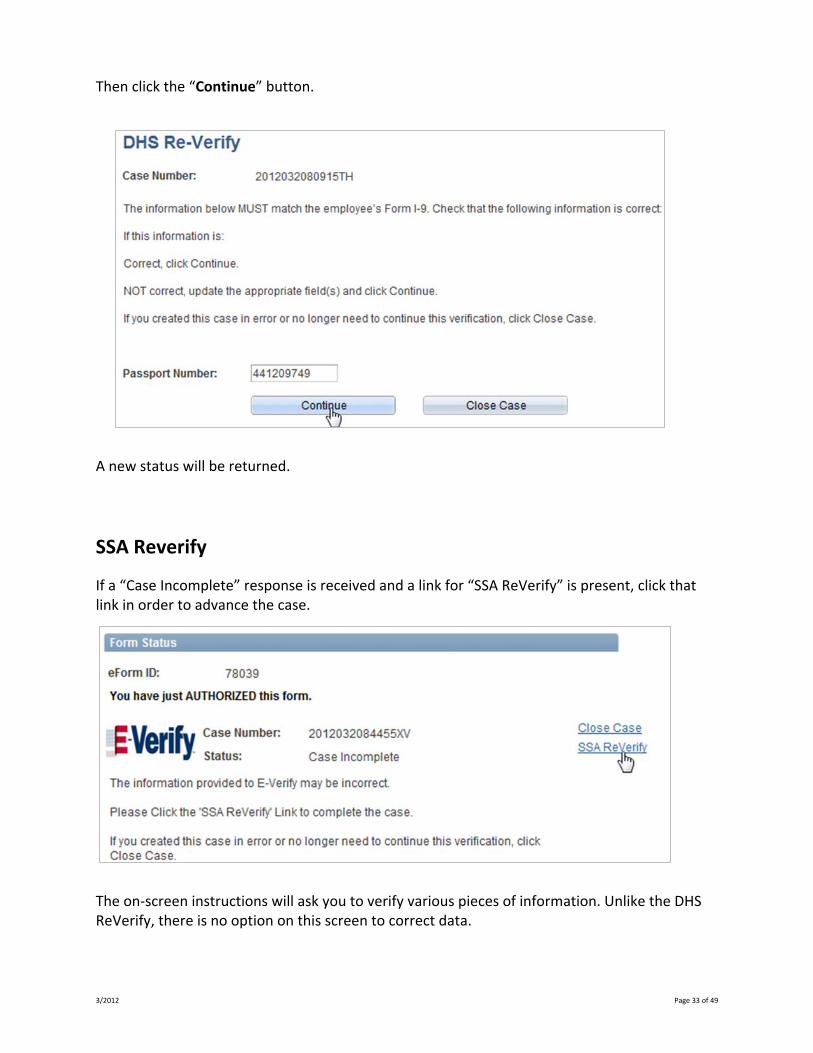
Then click the “Continue” button.
A new status will be returned.
SSA Reverify
If a “Case Incomplete” response is received and a link for “SSA ReVerify” is present, click that link in order to advance the case.
The on‐screen instructions will ask you to verify various pieces of information. Unlike the DHS ReVerify, there is no option on this screen to correct data.
3/2012 Page 34 of 49
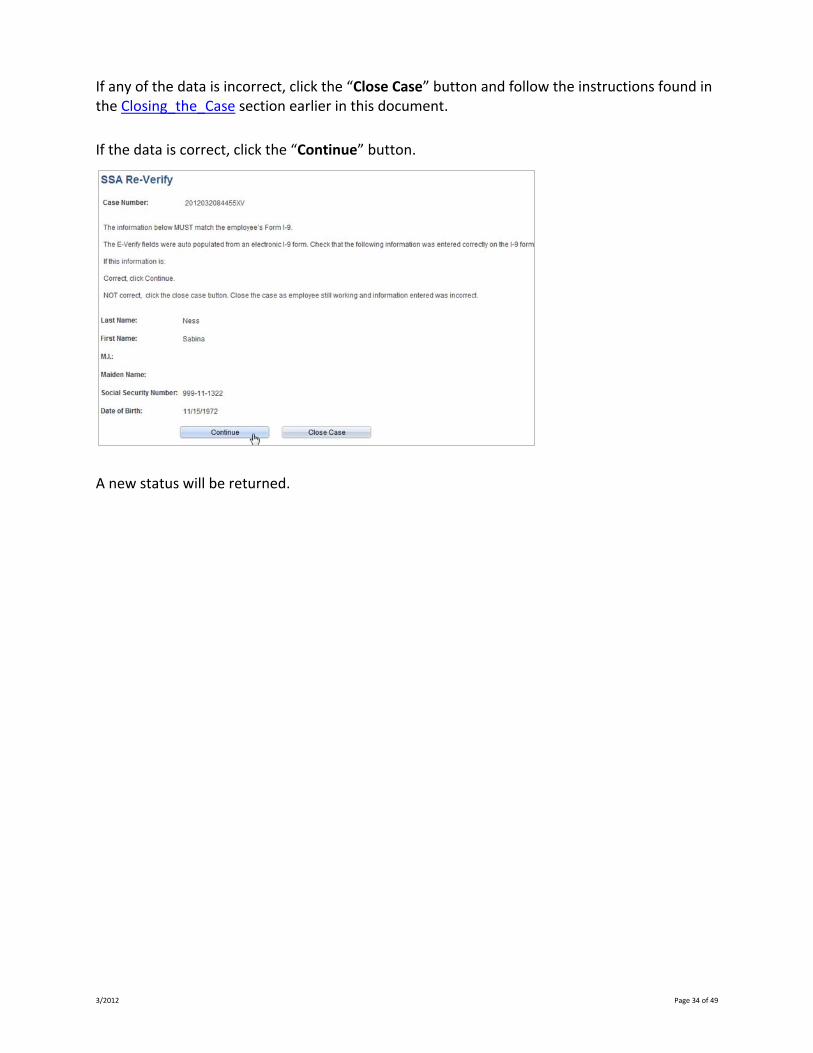
If any of the data is incorrect, click the “Close Case” button and follow the instructions found in the Closing_the_Case section earlier in this document.
If the data is correct, click the “Continue” button.
A new status will be returned.
3/2012 Page 35 of 49
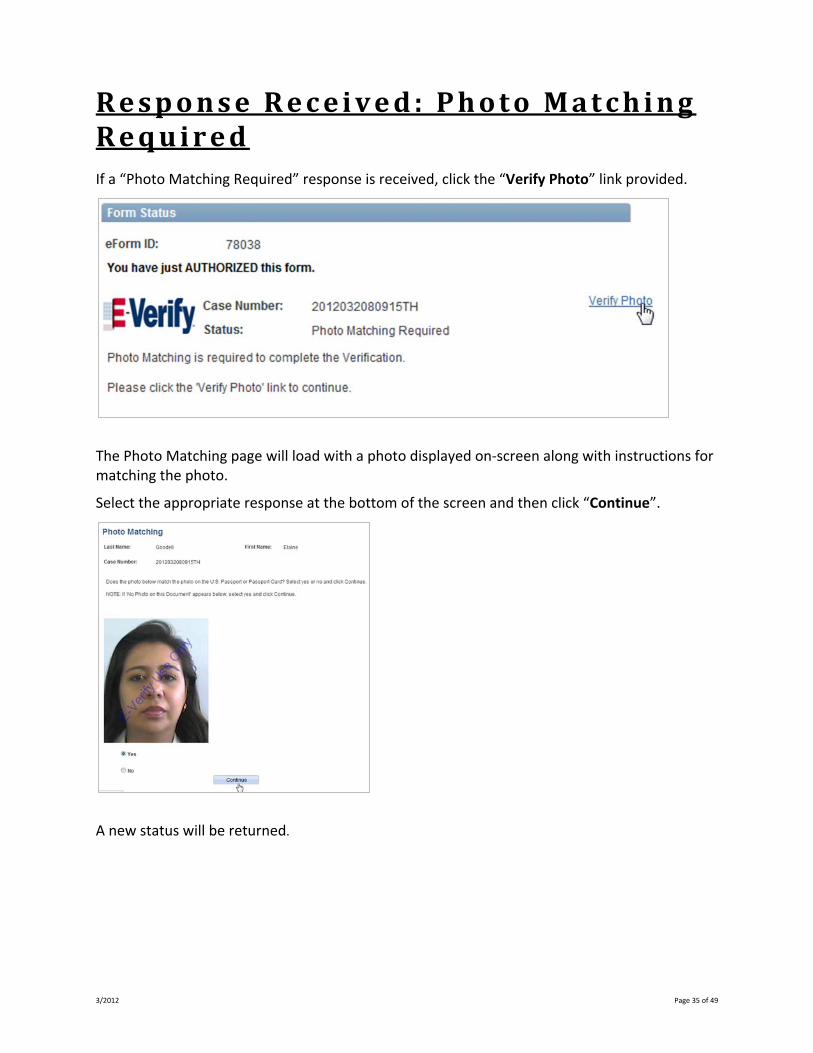
Response Received: Photo Matching Required If a “Photo Matching Required” response is received, click the “Verify Photo” link provided.
The Photo Matching page will load with a photo displayed on‐screen along with instructions for matching the photo.
Select the appropriate response at the bottom of the screen and then click “Continue”.
A new status will be returned.
3/2012 Page 36 of 49
Reviewing/Working Exist ing Cases Navigating to the Case
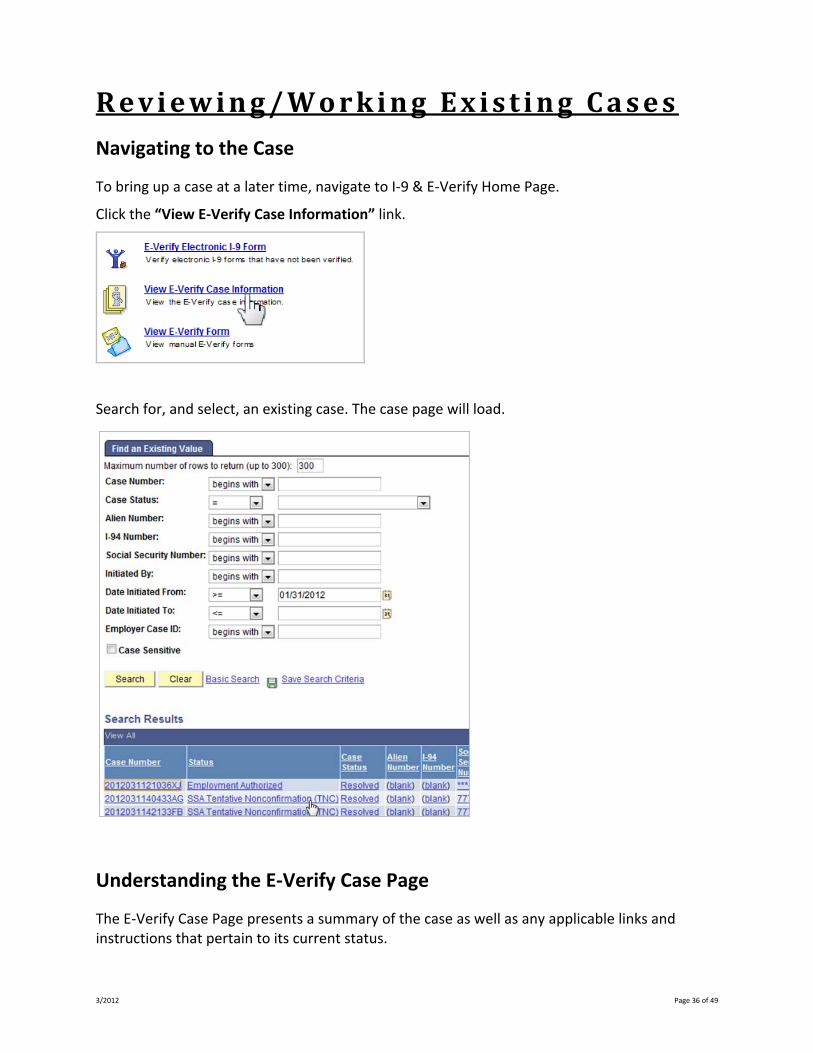
To bring up a case at a later time, navigate to I‐9 & E‐Verify Home Page.
Click the “View E‐Verify Case Information” link.
Search for, and select, an existing case. The case page will load.
Understanding the E‐Verify Case Page
The E‐Verify Case Page presents a summary of the case as well as any applicable links and instructions that pertain to its current status.
3/2012 Page 37 of 49
CaseStatusandActions
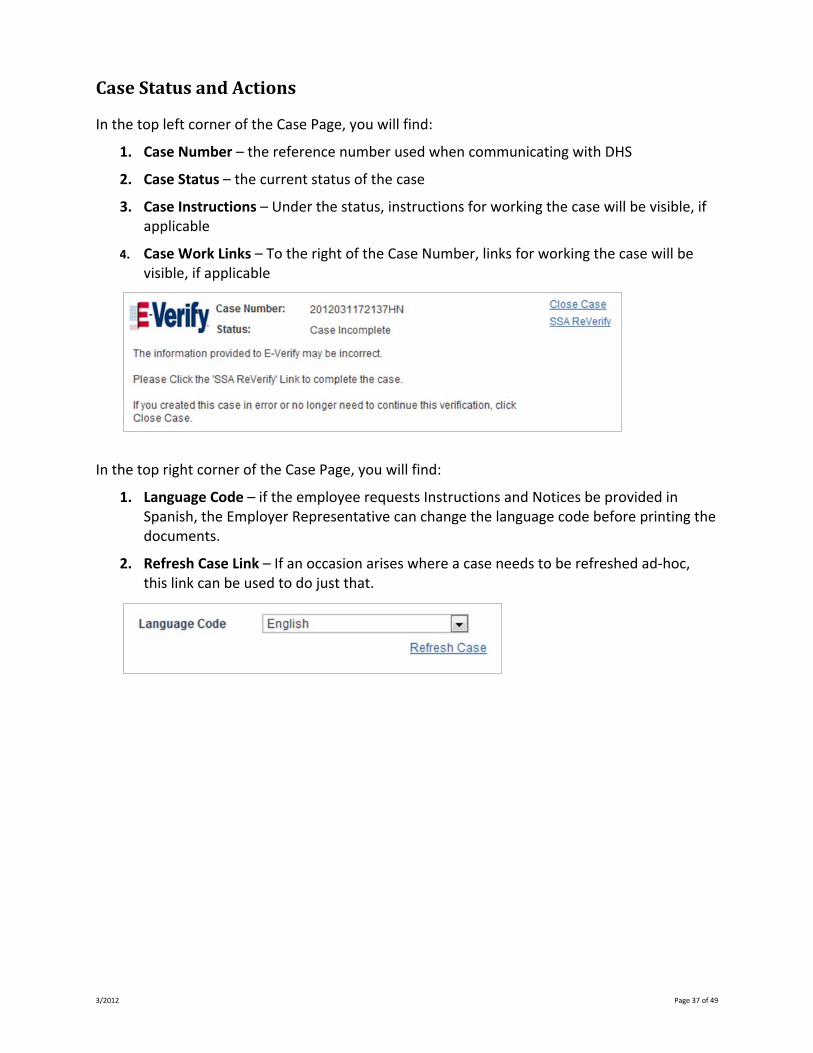
In the top left corner of the Case Page, you will find:
1. Case Number – the reference number used when communicating with DHS
2. Case Status – the current status of the case
3. Case Instructions – Under the status, instructions for working the case will be visible, if applicable
4. Case Work Links – To the right of the Case Number, links for working the case will be visible, if applicable
In the top right corner of the Case Page, you will find:
1. Language Code – if the employee requests Instructions and Notices be provided in Spanish, the Employer Representative can change the language code before printing the documents.
2. Refresh Case Link – If an occasion arises where a case needs to be refreshed ad‐hoc, this link can be used to do just that.

3/2012 Page 38 of 49
InitialVerificationInformation
The center of the page will display the initial verification information. This is the information that was transmitted to DHS through the GT E‐Verify process; whether through the I‐9 form or through the manual E‐Verify form.
EligibilityInformation
The Initial Eligibility will be displayed towards the bottom of the Case Page. This is the initial status that was received from DHS when the E‐Verify case was first submitted; whether through the I‐9 form or through the manual E‐Verify form.
If the case has gone through an additional status, such as a referral from the Employer, information pertinent to that status will be displayed below the Initial Eligibility.
3/2012 Page 39 of 49
E ‐Veri fy eForm (Manual) A less common path for submitting E‐Verify cases will be the E‐Verify eForm. This form only captures the data that is needed for an E‐Verify case to be created. This form only needs to be used in cases where a new I‐9 form should not be created for the employee.
Examples of when this might be used:
1. I‐9 form created using a receipt – If a receipt is used in Section 2 of the I‐9 form, an E‐Verify case will not be automatically initiated – the DHS E‐Verify system does not accept receipts. Once the non‐receipt document is provided by the employee, an E‐Verify eForm can be initiated to create the E‐Verify case.
2. Verification of a pre‐existing employee who falls under a specific category in which they need to be E‐Verified
3. Instances in which a paper I‐9 was used – If a paper I‐9 was used for an employee, an E‐Verify eForm can be initiated to create the E‐Verify case.
Initiating the E‐Verify eForm
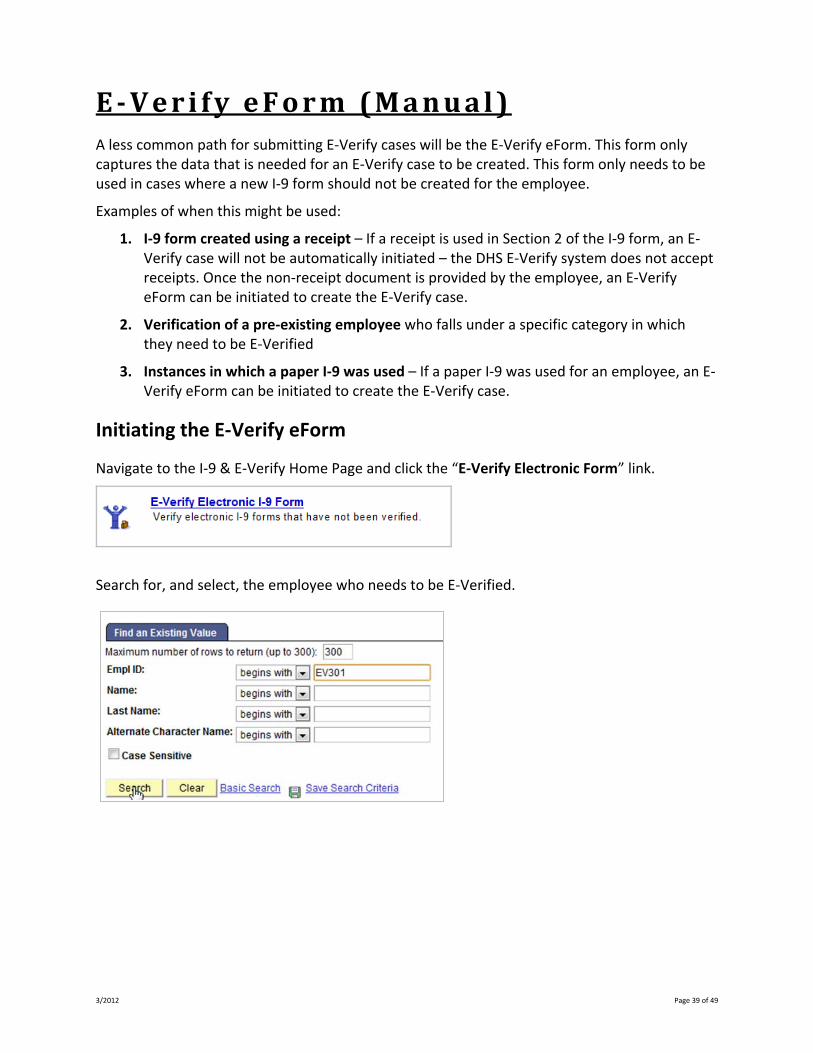
Navigate to the I‐9 & E‐Verify Home Page and click the “E‐Verify Electronic Form” link.
Search for, and select, the employee who needs to be E‐Verified.
3/2012 Page 40 of 49
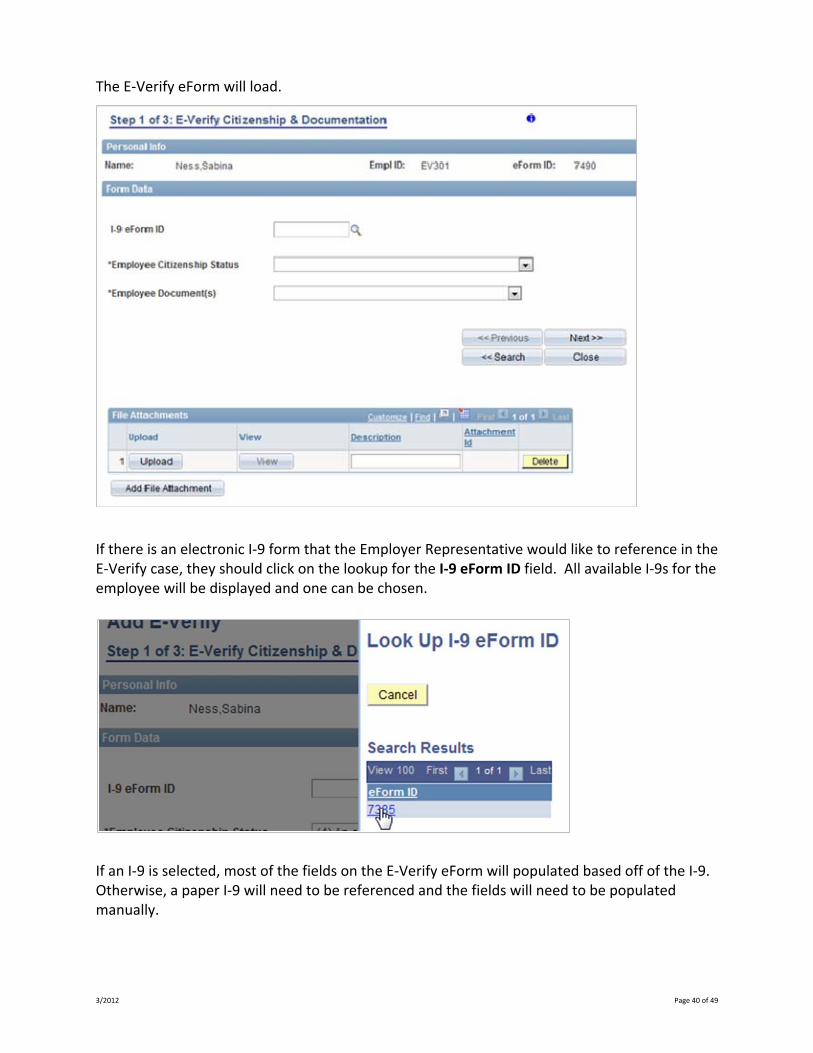
The E‐Verify eForm will load.
If there is an electronic I‐9 form that the Employer Representative would like to reference in the E‐Verify case, they should click on the lookup for the I‐9 eForm ID field. All available I‐9s for the employee will be displayed and one can be chosen.
If an I‐9 is selected, most of the fields on the E‐Verify eForm will populated based off of the I‐9. Otherwise, a paper I‐9 will need to be referenced and the fields will need to be populated manually.
3/2012 Page 41 of 49
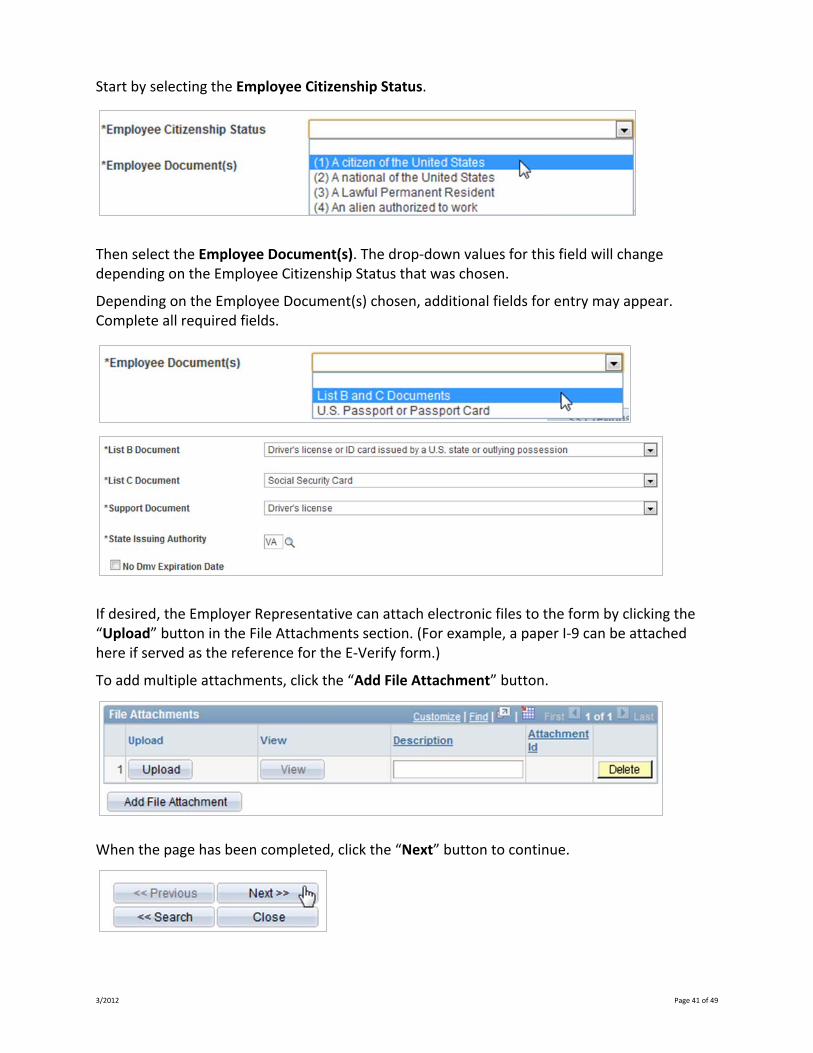
Start by selecting the Employee Citizenship Status.
Then select the Employee Document(s). The drop‐down values for this field will change depending on the Employee Citizenship Status that was chosen.
Depending on the Employee Document(s) chosen, additional fields for entry may appear. Complete all required fields.
If desired, the Employer Representative can attach electronic files to the form by clicking the “Upload” button in the File Attachments section. (For example, a paper I‐9 can be attached here if served as the reference for the E‐Verify form.)
To add multiple attachments, click the “Add File Attachment” button.
When the page has been completed, click the “Next” button to continue.
3/2012 Page 42 of 49
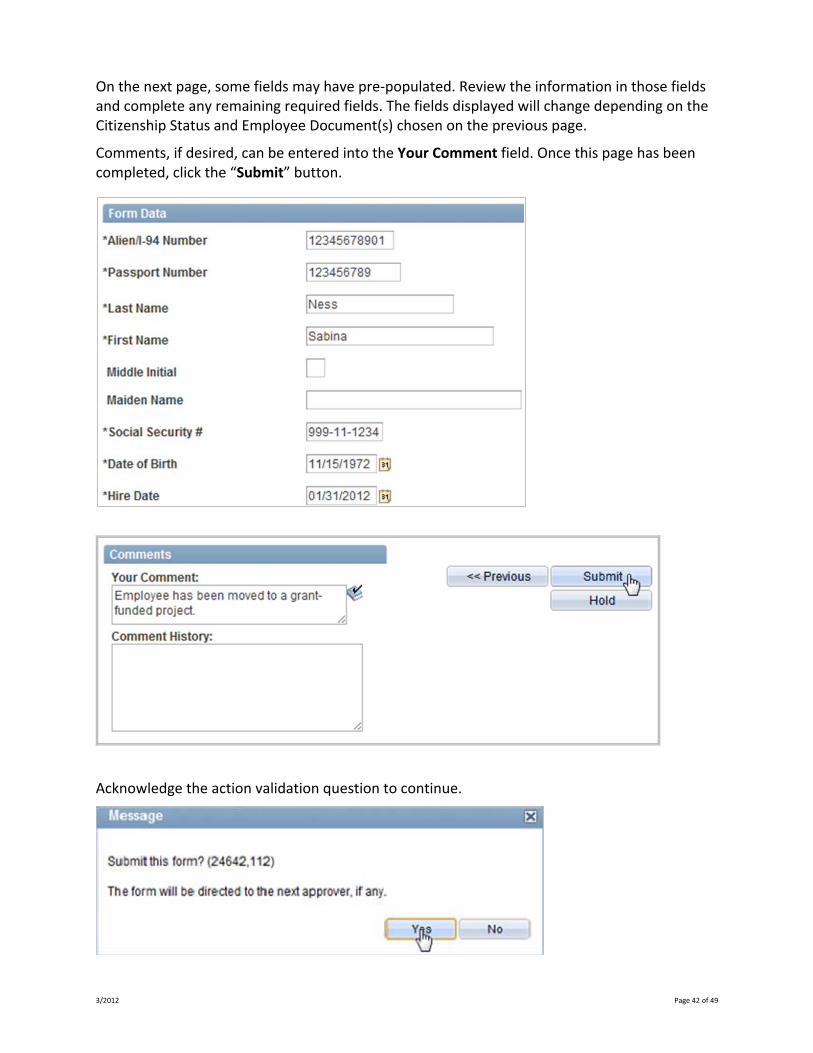
On the next page, some fields may have pre‐populated. Review the information in those fields and complete any remaining required fields. The fields displayed will change depending on the Citizenship Status and Employee Document(s) chosen on the previous page.
Comments, if desired, can be entered into the Your Comment field. Once this page has been completed, click the “Submit” button.
Acknowledge the action validation question to continue.
3/2012 Page 43 of 49
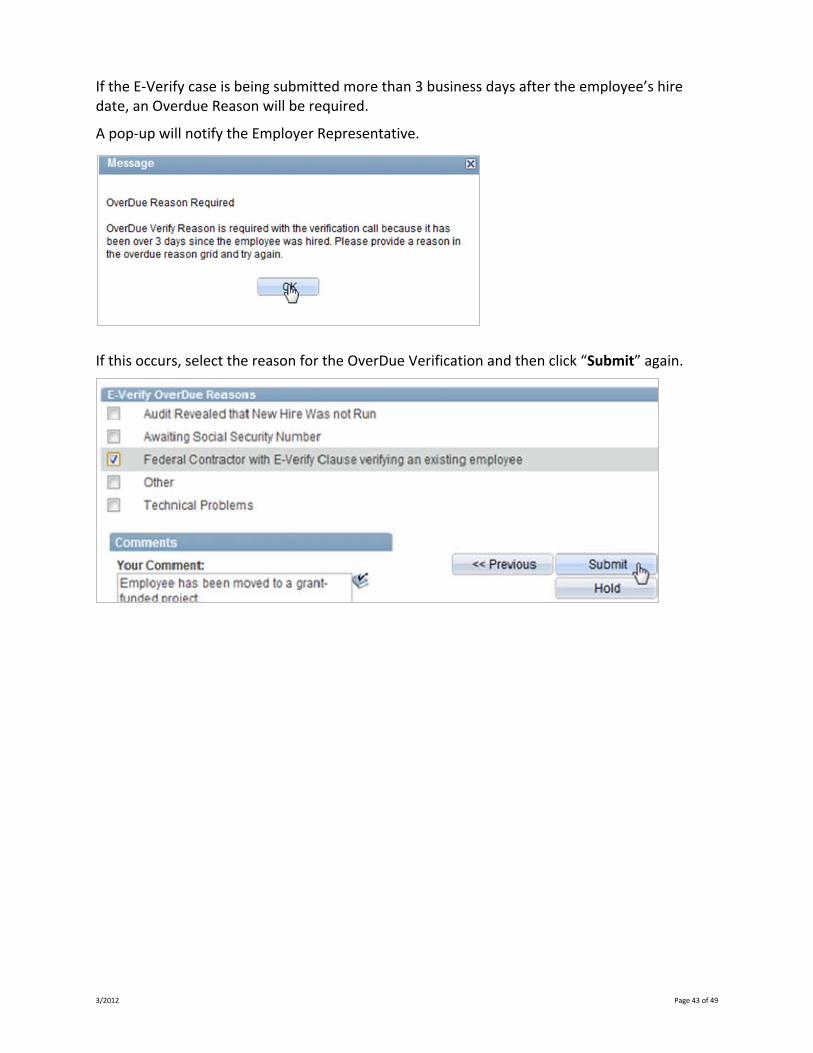
If the E‐Verify case is being submitted more than 3 business days after the employee’s hire date, an Overdue Reason will be required.
A pop‐up will notify the Employer Representative.
If this occurs, select the reason for the OverDue Verification and then click “Submit” again.
3/2012 Page 44 of 49
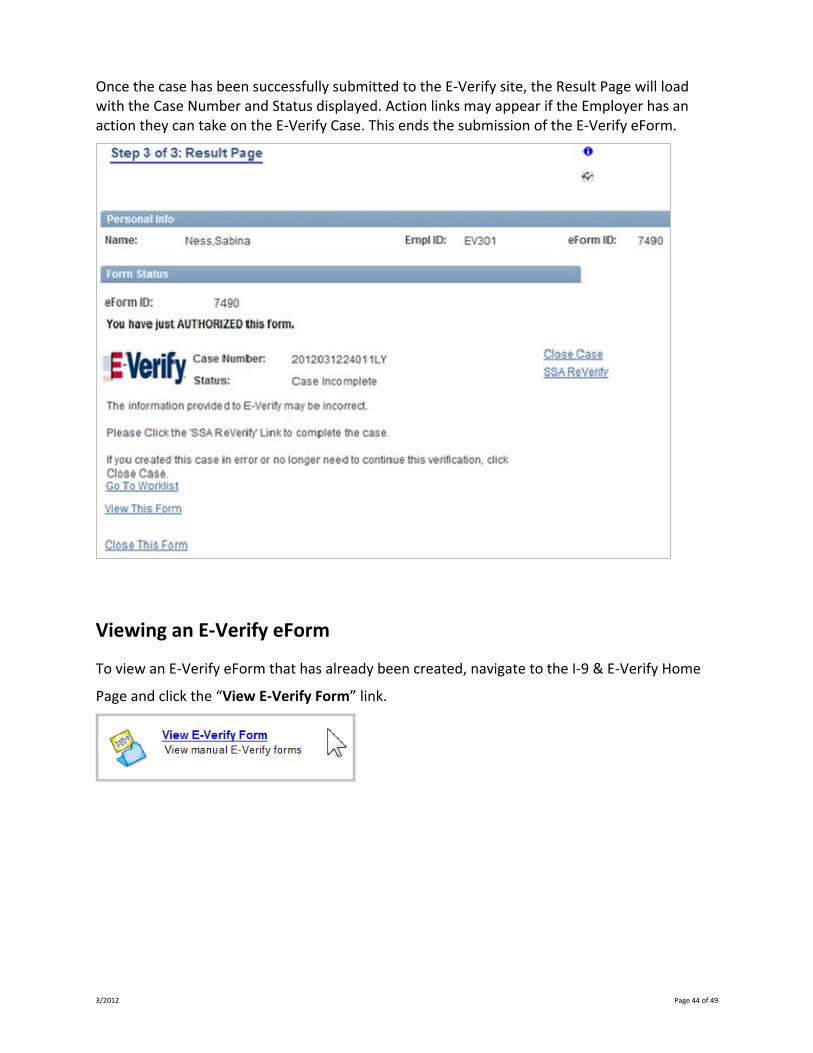
Once the case has been successfully submitted to the E‐Verify site, the Result Page will load with the Case Number and Status displayed. Action links may appear if the Employer has an action they can take on the E‐Verify Case. This ends the submission of the E‐Verify eForm.
Viewing an E‐Verify eForm
To view an E‐Verify eForm that has already been created, navigate to the I‐9 & E‐Verify Home
Page and click the “View E‐Verify Form” link.
3/2012 Page 45 of 49
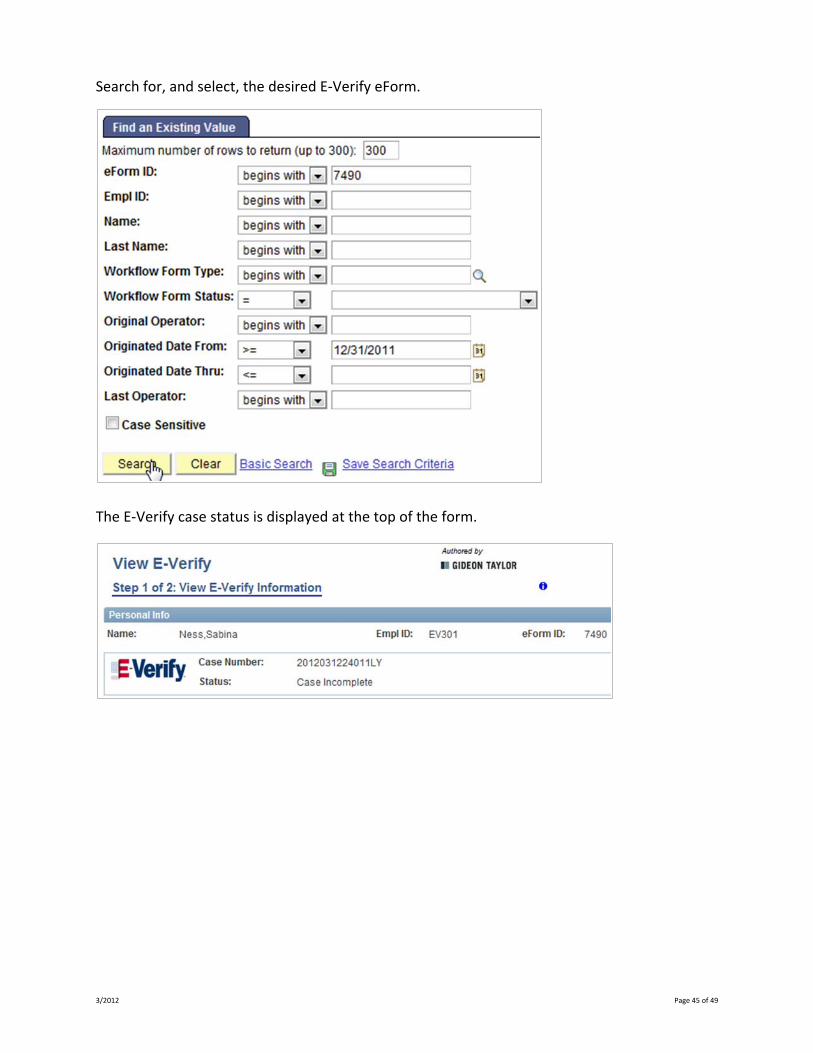
Search for, and select, the desired E‐Verify eForm.
The E‐Verify case status is displayed at the top of the form.
3/2012 Page 46 of 49
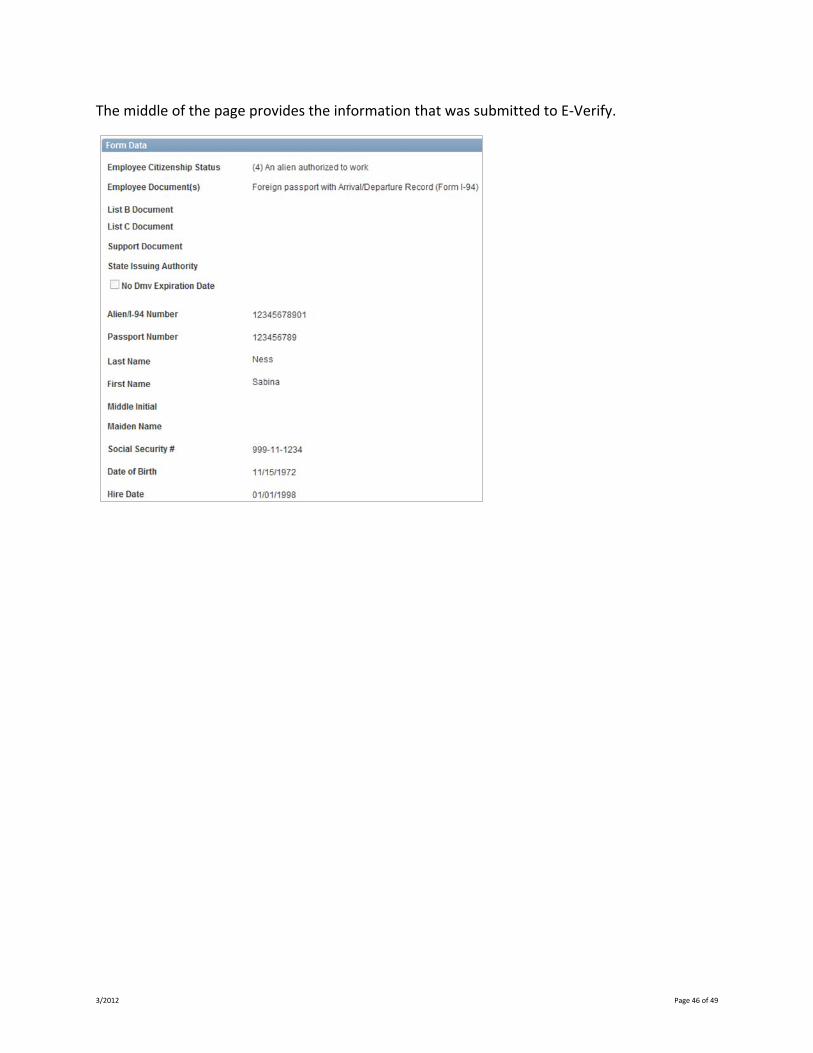
The middle of the page provides the information that was submitted to E‐Verify.
3/2012 Page 47 of 49
Appendix A – V23 Changes TwonewresponsecodesaddedtoTableD‐6:DHSReferralResolutionCodes.
Response Code “P” ‐Passport Data verified.
SVS has verified the referred data for a U.S. Citizen with a passport and is requesting the user to retrieve and confirm the passport photo.
Call EmpRetrievePhoto to retrieve the passport photo and then call EmpConfirmPhoto to either confirm or reject the photo (Note – If you reject the photo you will receive another DHS TNC and will be required to go through the DHS referral process again).
Response Code “X” ‐ Close and Resubmit the case.
SVS could not process the user’s passport data and is requesting that the current case be closed and another initial verification started for the user.
AddednewinputparameterstotheEmpInitBPVerifmethod.
Added the following input parameter:
ListBDocumentId
ListCDocumentId
SupportingDocumentId
StateIssuingAuthority
DMVDocumentNbr
DMVDocNoExpirationDate
AddednewinputparameterstotheEmpInitDABPVerifmethod.
Added the following input parameter:
ListBDocumentId
ListCDocumentId
SupportingDocumentId
StateIssuingAuthority
DMVDocumentNbr
DMVDocNoExpirationDate
CreatednewresponseobjectfortheEmpGetCaseDetailsmethod.
Method returns a new response object:
3/2012 Page 48 of 49
EmpGtCseDetailsResp23
New fields in response object:
InitiListBDocType
InitiListCDocType
InitiSupportingDocType
InitiStateIssuingAuthority
InitiDMVDocumentNbr
InitiNoDocExpDate (flag)
NewDHSReVerifymethodadded:EmpDMVDHSReVerify
This method is used to re‐verify a “Driver’s License” initial query that receives a 30 (Case Incomplete) Eligibility Code.
This method should be used when the initial query contains both:
1. Document Id: 12 (List B and C Documents)
2. List B Document Id: 1 (Driver's license or ID card issued by a U.S. state or outlying possession)
Newmethodadded:EmpGetListBCDocumentTypes
This method returns the list b and list c documents that are valid for a particular citizenship code.
The response object name is:
EmpGetListBCDocumentTypesResp
Newresponseobjectadded:EmpGetListBCDocumentTypesResp
This response object is returned by the EmpGetListBCDocumentTypes method.
This object contains an array of List B documents and an array of List C documents.
Newmethodadded:EmpGetSupportingDocumentTypes
This method returns a list of supporting documents that can be used with a particular list B document.
The response object name is:
EmpGetSupportingDocumentTypesResp
Newresponseobjectadded:EmpGetSupportingDocumentTypesResp
This response object is returned by the EmpGetSupportingDocumentTypes method.
3/2012 Page 49 of 49
This object contains an array of supporting document numbers.
Newmethodadded:EmpGetIssuingAuthorities
This method returns a list of Issuing Authorities (usually states) that can be used with a particular list B document.
The response object name is:
EmpGetIssuingAuthoritiesResp
Newresponseobjectadded:EmpGetIssuingAuthorities
This response object is returned by the EmpGetIssuingAuthorities method.
This object contains an array of Issuing Authorities (states).
Newerrorcodesadded
New error codes added to Appendix D Table D‐1 Errors ‐1140 thru ‐1157 added.
NewListBDocumenttableaddedtoICA
Table D‐10 List B Documents added to Appendix D.
NewListCDocumenttableaddedtoICA
Table D‐11 List C Documents added to Appendix D.
NewSupportingDocumenttableaddedtoICA
Table D‐12 Supporting Documents added to Appendix D.
NewIssuingAuthoritiestableaddedtoICA
Table D‐13 Issuing Authorities added to Appendix D.
NewWebServicetestandproductionURLs
The new URL for the test (stage) system is:
https://stage.e‐verify.uscis.gov/WebService/EmployerWebServiceV23.asmx
UpdatedAppendixB‐SignaturePage
Replaced Karl Brimmer with Laura Moore.