Embed Size (px)
Citation preview
Exercise1In this exercise, you’ll explore adding content to ArcGIS Online. First you’ll register an existing web
service, and then you’ll publish a new hosted service. You’ll also learn how to edit an item’s details.
RegisterArcGISServerMapService1. In your browser (preferably Firefox or Chrome), go http://www.arcgis.com/home .
2. Click Sign In in the top right corner, and log in with your ArcGIS Online credentials for your
organization.
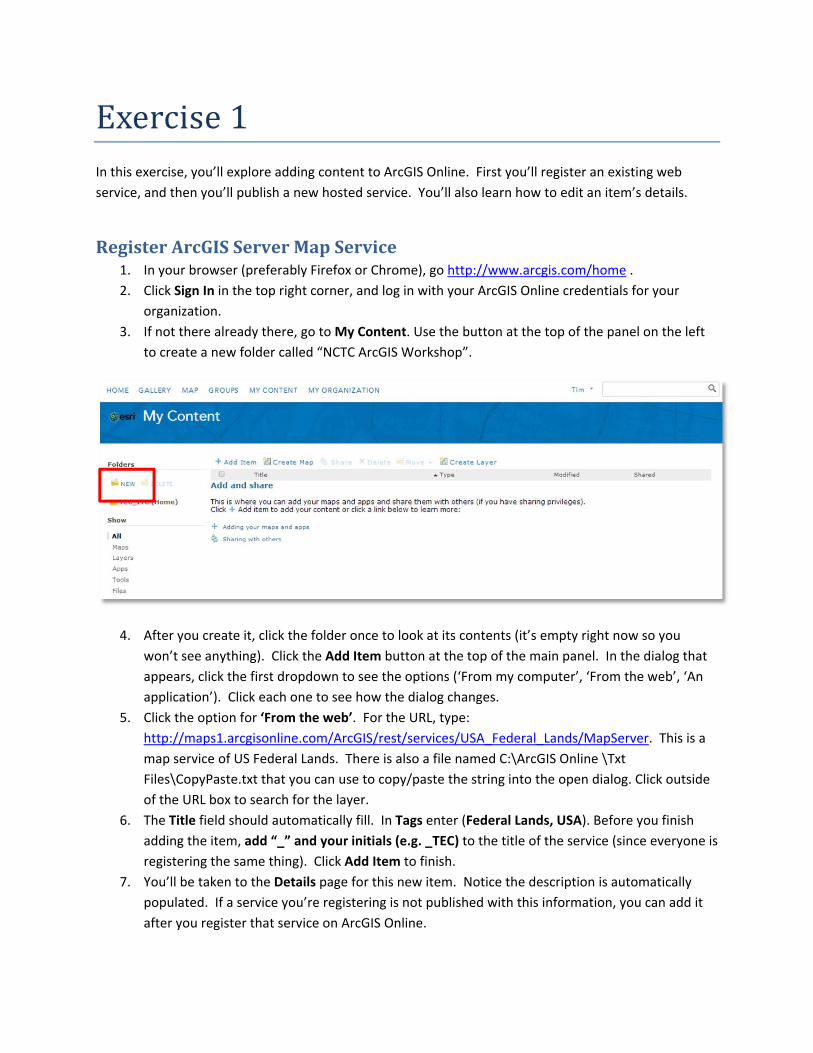
3. If not there already there, go to My Content. Use the button at the top of the panel on the left
to create a new folder called “NCTC ArcGIS Workshop”.
4. After you create it, click the folder once to look at its contents (it’s empty right now so you
won’t see anything). Click the Add Item button at the top of the main panel. In the dialog that
appears, click the first dropdown to see the options (‘From my computer’, ‘From the web’, ‘An
application’). Click each one to see how the dialog changes.
5. Click the option for ‘From the web’. For the URL, type:
http://maps1.arcgisonline.com/ArcGIS/rest/services/USA_Federal_Lands/MapServer. This is a
map service of US Federal Lands. There is also a file named C:\ArcGIS Online \Txt
Files\CopyPaste.txt that you can use to copy/paste the string into the open dialog. Click outside
of the URL box to search for the layer.
6. The Title field should automatically fill. In Tags enter (Federal Lands, USA). Before you finish
adding the item, add “_” and your initials (e.g. _TEC) to the title of the service (since everyone is
registering the same thing). Click Add Item to finish.
7. You’ll be taken to the Details page for this new item. Notice the description is automatically
populated. If a service you’re registering is not published with this information, you can add it
after you register that service on ArcGIS Online.
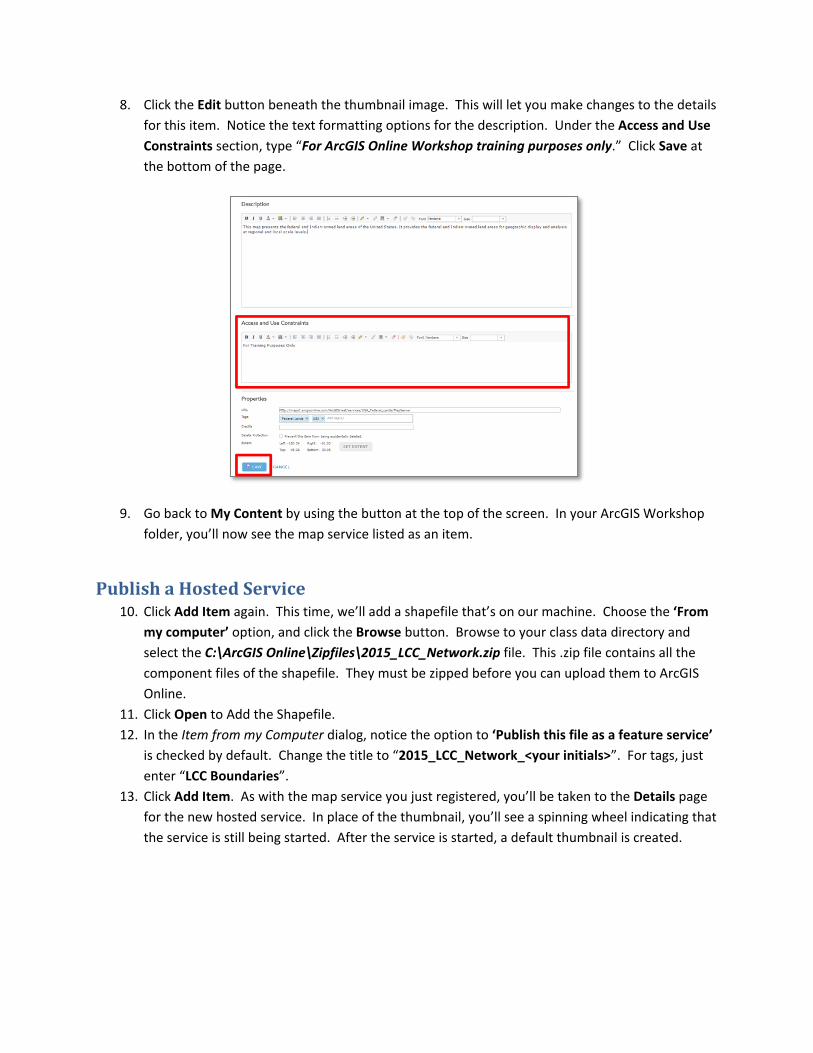
8. Click the Edit button beneath the thumbnail image. This will let you make changes to the details
for this item. Notice the text formatting options for the description. Under the Access and Use
Constraints section, type “For ArcGIS Online Workshop training purposes only.” Click Save at
the bottom of the page.
9. Go back to My Content by using the button at the top of the screen. In your ArcGIS Workshop
folder, you’ll now see the map service listed as an item.
PublishaHostedService10. Click Add Item again. This time, we’ll add a shapefile that’s on our machine. Choose the ‘From
my computer’ option, and click the Browse button. Browse to your class data directory and
select the C:\ArcGIS Online\Zipfiles\2015_LCC_Network.zip file. This .zip file contains all the
component files of the shapefile. They must be zipped before you can upload them to ArcGIS
Online.
11. Click Open to Add the Shapefile.
12. In the Item from my Computer dialog, notice the option to ‘Publish this file as a feature service’
is checked by default. Change the title to “2015_LCC_Network_<your initials>”. For tags, just
enter “LCC Boundaries”.
13. Click Add Item. As with the map service you just registered, you’ll be taken to the Details page
for the new hosted service. In place of the thumbnail, you’ll see a spinning wheel indicating that
the service is still being started. After the service is started, a default thumbnail is created.
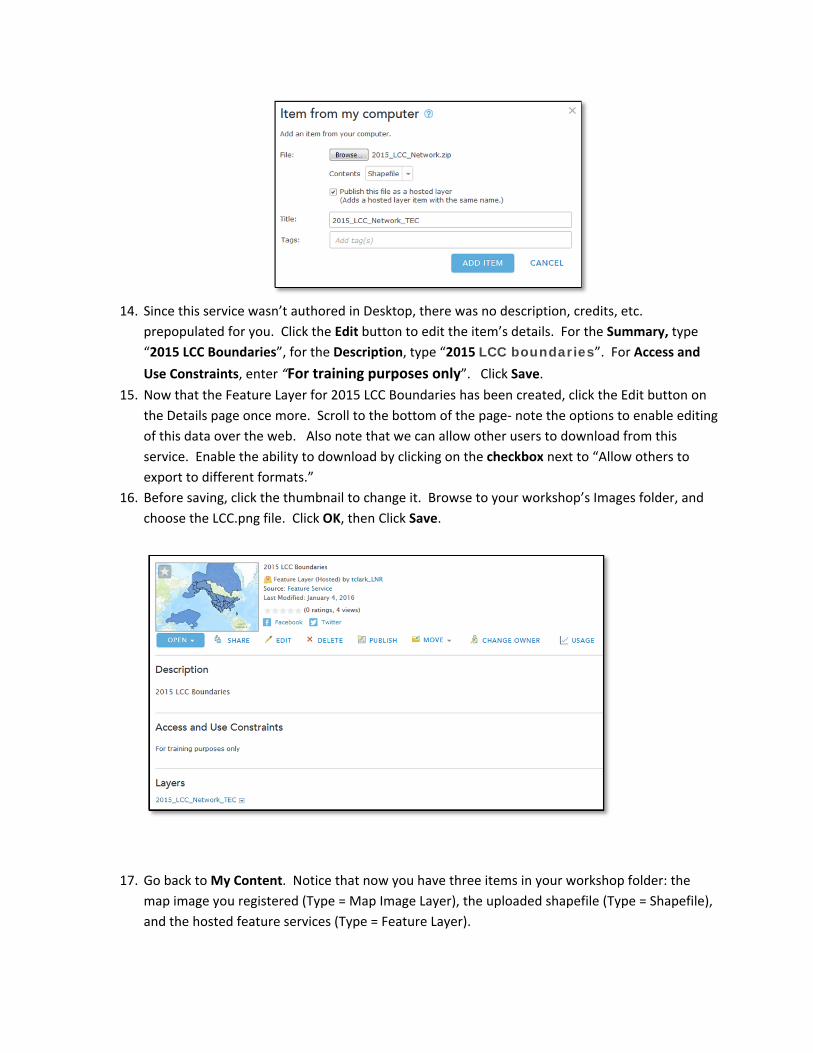
14. Since this service wasn’t authored in Desktop, there was no description, credits, etc.
prepopulated for you. Click the Edit button to edit the item’s details. For the Summary, type
“2015 LCC Boundaries”, for the Description, type “2015 LCC boundaries”. For Access and Use Constraints, enter “For training purposes only”. Click Save.
15. Now that the Feature Layer for 2015 LCC Boundaries has been created, click the Edit button on
the Details page once more. Scroll to the bottom of the page‐ note the options to enable editing
of this data over the web. Also note that we can allow other users to download from this
service. Enable the ability to download by clicking on the checkbox next to “Allow others to
export to different formats.”
16. Before saving, click the thumbnail to change it. Browse to your workshop’s Images folder, and
choose the LCC.png file. Click OK, then Click Save.
17. Go back to My Content. Notice that now you have three items in your workshop folder: the
map image you registered (Type = Map Image Layer), the uploaded shapefile (Type = Shapefile),
and the hosted feature services (Type = Feature Layer).
18. In the search bar at the top right of the screen, type “LCC” and hit Enter. You should see the
items from your content and others from your organization. To expand the search, uncheck the
box on the left next to ‘Only search in …. Now you’ll see results from any ArcGIS Online user
that has shared information publicly.
AddingExistingServicetoMapIn this section, you’ll use ArcGIS Online to create a web map. You’ll add layers of information from
different sources, configure symbology and pop‐ups, and save the map to your content.
1. Click the Map button at the top of the page to go to the ArcGIS Online mapping interface. If you
already had another map open already, click New Map near the top right corner, then select
Create New Map.
2. The default basemap may not be appropriate for the map you’re building, so click the Basemap
button near the top left to bring up the Basemap Gallery. Click on Topographic Map to switch
to that basemap.
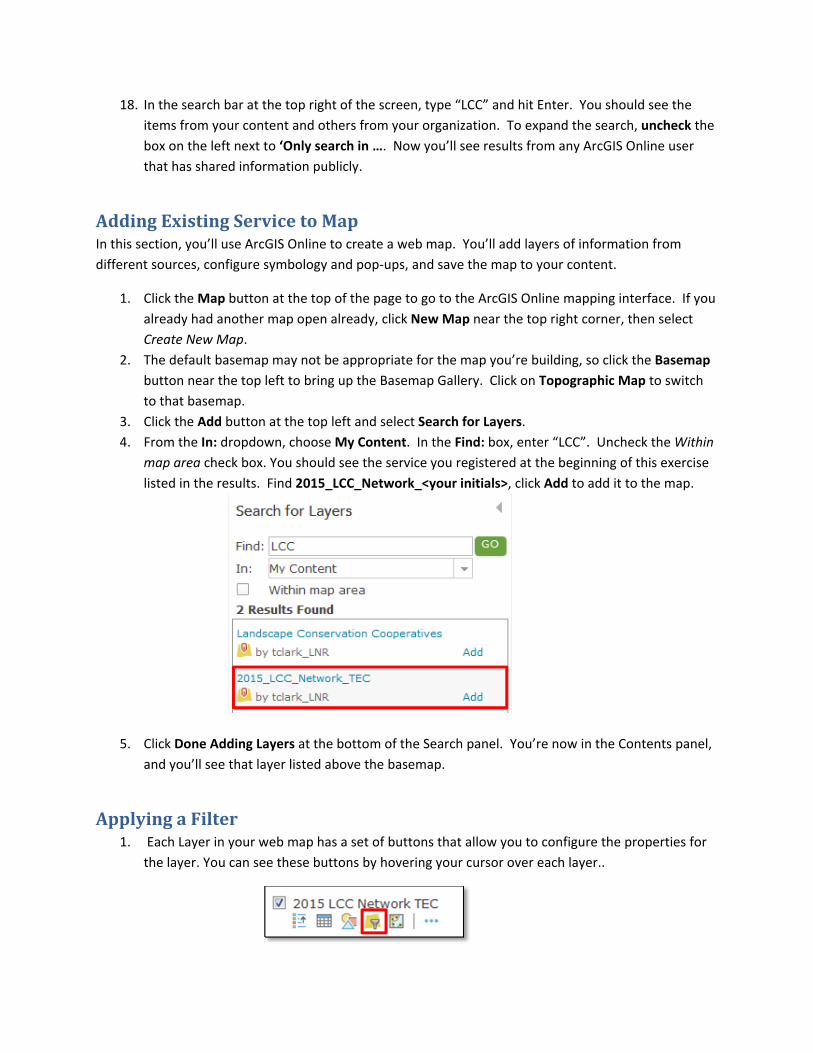
3. Click the Add button at the top left and select Search for Layers.
4. From the In: dropdown, choose My Content. In the Find: box, enter “LCC”. Uncheck the Within
map area check box. You should see the service you registered at the beginning of this exercise
listed in the results. Find 2015_LCC_Network_<your initials>, click Add to add it to the map.
5. Click Done Adding Layers at the bottom of the Search panel. You’re now in the Contents panel,
and you’ll see that layer listed above the basemap.
ApplyingaFilter1. Each Layer in your web map has a set of buttons that allow you to configure the properties for
the layer. You can see these buttons by hovering your cursor over each layer..
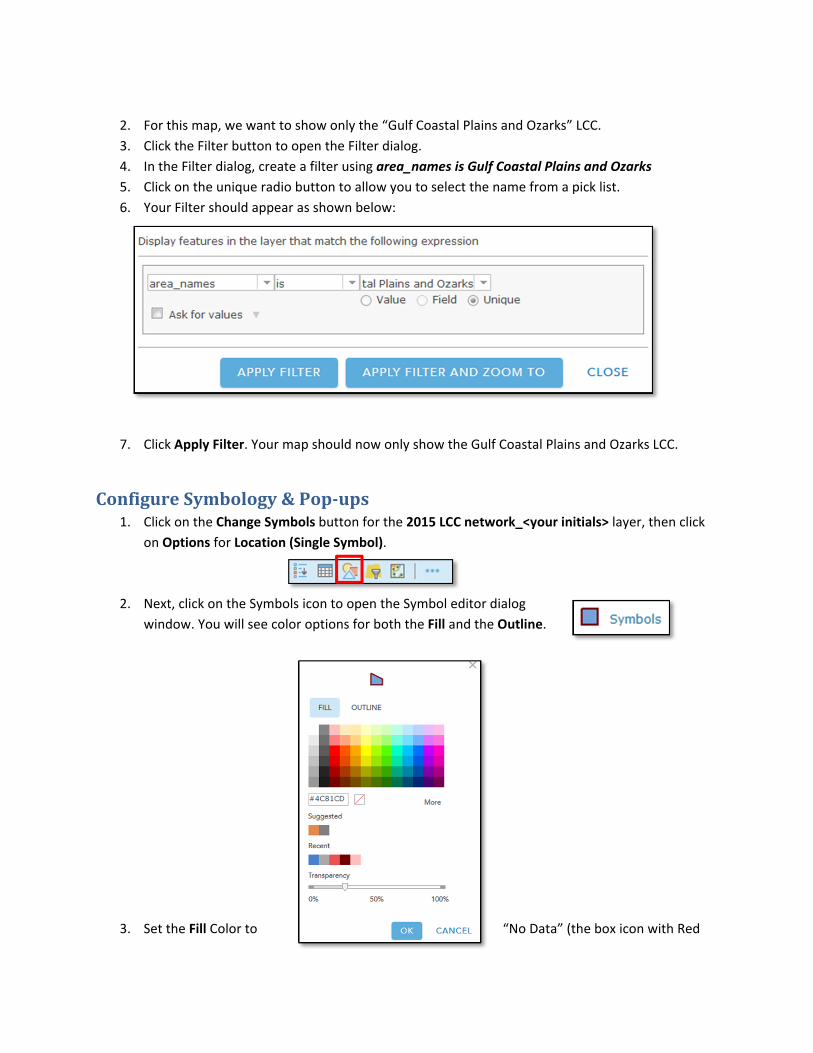
2. For this map, we want to show only the “Gulf Coastal Plains and Ozarks” LCC.
3. Click the Filter button to open the Filter dialog.
4. In the Filter dialog, create a filter using area_names is Gulf Coastal Plains and Ozarks
5. Click on the unique radio button to allow you to select the name from a pick list.
6. Your Filter should appear as shown below:
7. Click Apply Filter. Your map should now only show the Gulf Coastal Plains and Ozarks LCC.
ConfigureSymbology&Pop‐ups1. Click on the Change Symbols button for the 2015 LCC network_<your initials> layer, then click
on Options for Location (Single Symbol).
2. Next, click on the Symbols icon to open the Symbol editor dialog
window. You will see color options for both the Fill and the Outline.
3. Set the Fill Color to “No Data” (the box icon with Red
slash).
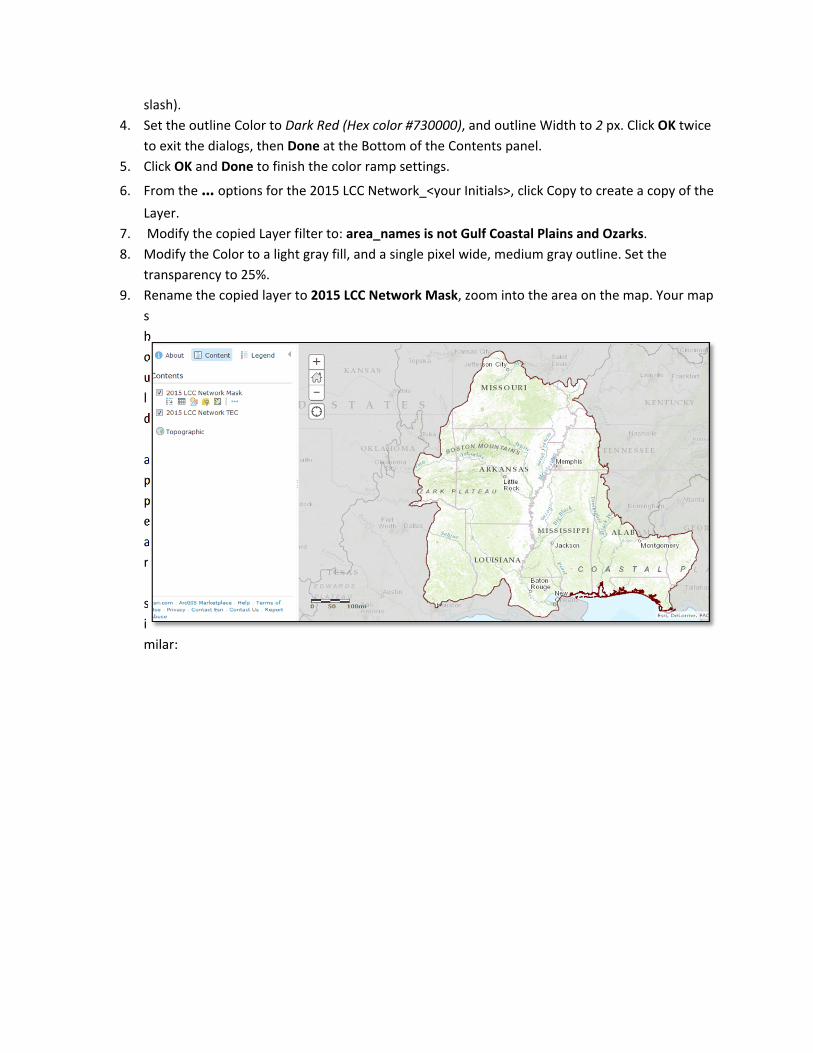
4. Set the outline Color to Dark Red (Hex color #730000), and outline Width to 2 px. Click OK twice
to exit the dialogs, then Done at the Bottom of the Contents panel.
5. Click OK and Done to finish the color ramp settings.
6. From the … options for the 2015 LCC Network_<your Initials>, click Copy to create a copy of the
Layer.
7. Modify the copied Layer filter to: area_names is not Gulf Coastal Plains and Ozarks.
8. Modify the Color to a light gray fill, and a single pixel wide, medium gray outline. Set the
transparency to 25%.
9. Rename the copied layer to 2015 LCC Network Mask, zoom into the area on the map. Your map
s
h
o
u
l
d
a
p
p
e
a
r
s
i
milar:

AddAdditionalLayerstoyourMap1. In Add Data, select Search for Layer.
2. Search In: ArcGIS Online, Find: owner:esri AND title:”USA Parks”. Select Add to add the Layer.
3. Modify the colors of the new layer:
4. Move your Layer below the LCC Network Mask.
5. In the Add Data Dialog, search for Layers using the Find string: owner:FWSGIS. Add the National
Wildlife Refuge Boundaries.
6. Using the More Options button …, remove the Popup from all of the layers except the National
Wildlife Refuge Boundaries.
7. Expand the National Wildlife Refuge Boundaries service by clicking on the name.
8. Select Configure Pop‐up from the More Options menu for the FWS Refuge Ownership
Boundaries. This dialog allows you to set the actions that happen when you click on a map
feature.
10. In the Configure Pop‐up menu, change the Pop‐up Title to {ORGNAME}
11. Click on Configure Attributes to check the fields you want to display.
12. Only Check, Complex Name, Division Name, Unit Name, Status Code and Primary Interest
Type. All other fields should not be checked.
13. Click on the SUM_GISACRES field, then set the Format to 0 decimal places.
14. Click OK, then click SAVE POP‐UP.
1. Click the dropdown arrow next to Save and select Save As to save your map.
2. In the Save Map dialog:
Enter title: Gulf Coastal Plains and Ozarks LLC Federal Lands <your Initials>
Enter Tags: ArcGIS Online Workshop
Enter Summary: “Map of Gulf Coastal Plains and Ozarks LLC with Federal Lands”
Save in Folder: NCTC ArcGIS Workshop
3. Click Home > My Content to return to your Contents page.
END of Exercise


![Vitti] : (Hiroshi Yamaoka) : "J 7 (Sam Kawa) : ANTENNNA VWD-300 . exercise 35 exercise 36 exercise 37 exercise 38 exercise 39 exercise 40 : exercise 41](https://img.pdfslide.tips/doc/110x75/5b479fdd7f8b9a824f8c0adb/anthony-vitti-hiroshi-yamaoka-j-7-sam-kawa-antennna-vwd-300-exercise.jpg)