Embed Size (px)
Citation preview

GeoMax Zenith35 Pro Series
Quick GuideVersion 1.1


Quick Guide 5
Quick Guide 23
Guía Rápida 43
Guide abrégé 63
Guida rapida 83
Guia Rápido 101
Краткое руководство 121
퀵가이드 139
en
de
es
fr
it
pt-br
ru
ko


GeoMax Zenith35 Pro Series
Quick GuideVersion 1.1

1 Important Information about yourInstrumentRead and follow the User Manual on the accompanying data storage devicebefore using the product.
Keep for future reference!
• Computing with software.• Recording measurements.• Carrying out measurement tasks using various GNSS measuring tech-
niques.• Recording GNSS and point related data.• Remote control of product.• Data communication with external appliances.• Measuring raw data and computing coordinates using carrier phase
and code signal from GNSS satellites.
☞
Intended use
Important Information about your Instrument 6
en

The product must not be disposed with household waste.
• FCC Part 15 (applicable in US)
• Hereby, GeoMax AG, declares that the radio equipment typeZenith35 Pro is in compliance with the essential requirements andother relevant provisions of Directive 2014/53/EC and other appli-cable European Directives. The declaration of conformity can beconsulted at http://www.geomax-positioning.de/Downloads.htm.
• This Class 2 equipment may be operated in: AT, BE, BG, CA, CH,CY, CZ, DE, DK, EE, ES, FI, FR, GB, GR, HU, IE, IS, IT, LT, LU, LV,MT, NL, NO, PL, PT, RU, RO, SE, SI, SK, US.
Conformity tonational regula-tions
Important Information about your Instrument 7
en

Class 2 equipment according European Directive 2014/53/EC(RED) for which following EEA Member States apply restrictionson the placing on the market or on the putting into service orrequire authorisation for use:• France• Italy• Norway (if used in the geographical area within a radius of
20 km from the centre of Ny-Ålesund)
• The conformity for countries with other national regulations notcovered by the FCC part 15 or European directive 2014/53/EC hasto be approved prior to use and operation.
• Japanese Radio Law and Japanese Telecommunications BusinessLaw Compliance.• This device is granted pursuant to the Japanese Radio Law
(電波法) and the Japanese Telecommunications Business Law(電気通信事業法).
• This device should not be modified (otherwise the granteddesignation number will become invalid).
Important Information about your Instrument 8
en
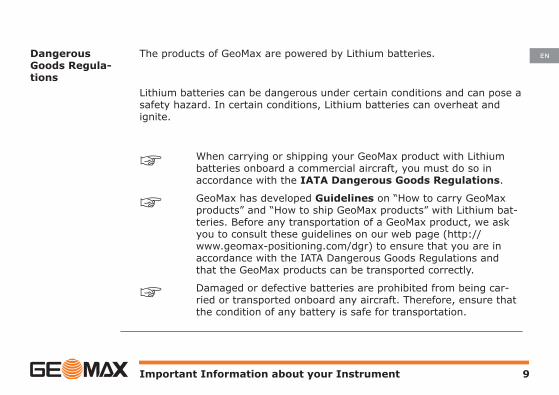
The products of GeoMax are powered by Lithium batteries.
Lithium batteries can be dangerous under certain conditions and can pose asafety hazard. In certain conditions, Lithium batteries can overheat andignite.
☞ When carrying or shipping your GeoMax product with Lithiumbatteries onboard a commercial aircraft, you must do so inaccordance with the IATA Dangerous Goods Regulations.
☞ GeoMax has developed Guidelines on “How to carry GeoMaxproducts” and “How to ship GeoMax products” with Lithium bat-teries. Before any transportation of a GeoMax product, we askyou to consult these guidelines on our web page (http://www.geomax-positioning.com/dgr) to ensure that you are inaccordance with the IATA Dangerous Goods Regulations andthat the GeoMax products can be transported correctly.
☞ Damaged or defective batteries are prohibited from being car-ried or transported onboard any aircraft. Therefore, ensure thatthe condition of any battery is safe for transportation.
DangerousGoods Regula-tions
Important Information about your Instrument 9
en

2 Instrument Components
010007_001
ab e
d
fcg
a TNC connector for UHFantenna
b LEMO port 1c Battery compartment
with SIM card andmicroSD card holder
d Keyboard with LEDs,ON/OFF button and Func-tion button
e LEMO port 2f TNC connector for UMTS
antennag Antenna Reference Plane
(ARP), where the instru-ment heights are meas-ured.
Zenith35 Procomponents
Instrument Components 10
en

Key Function
ON/OFF If Zenith35 Pro is off:Turns on Zenith35 Pro when held for 2 s.☞ While the Zenith35 Pro is booting the two
Power LEDs flash.
If Zenith35 Pro is already on:Turns off Zenith35 Pro when held for 2 s.
☞ All functions described assume the Zenith35 Pro is already on.
Key Function
Function Press and hold key for <1 s.
ON/OFF key
Function key
Instrument Components 11
en

Key Function
Switches the Zenith35 Pro between rover or basemode.
Press and hold key for 3 s.
Updates the base position coordinates when Zenith35Pro is in base mode. The RTK base LED flashes for2 s. When no position is available, the LED flashes 2times.
Press and hold key for 5 s.
Connects to the configured RTK base station or NTRIPserver when the Zenith35 Pro is in rover mode. TheRTK rover LED flashes for 2 s. No action if a rovermode is not configured.
Instrument Components 12
en

3 Environmental specificationsTemperatures (°C):
Instrument: -40 to +65 (opera-tion*)
-40 to +85 (storage)
Battery: -40 to +65 (opera-tion)
-40 to +70 (storage)
Protection:
IP68 (IEC 60529)
Vibration:
ASAE EP455 Section 5.15.1 Random, MIL-STD-810G, method 514.6E-I
Environmentalspecifications
Environmental specifications 13
en
Shock:
Withstands a 2 m (6.6 ft) pole topple over onto hard surface.
Humidity:
100% condensing
The effects of condensation are to be effectively counteracted by periodi-cally drying out the instrument.
* Tilt & Go functionality: -30°C to +65°C
Environmental specifications 14
en

4 TransportWhen transporting the equipment in the field, always make sure that you
• either carry the product in its original container,• or carry the tripod with its legs splayed across your shoulder, keeping
the attached product upright.
Never carry the product loose in a road vehicle, as it can be affected byshock and vibration. Always carry the product in its container, original pack-aging or equivalent and secure it.
When transporting the product by rail, air or sea, always use the completeoriginal GeoMax packaging, transport container and cardboard box, or itsequivalent, to protect against shock and vibration.
Transport in thefield
Transport in aroad vehicle
Shipping
Transport 15
en

When transporting or shipping batteries, the person responsible for theproduct must ensure that the applicable national and international rulesand regulations are observed. Before transportation or shipping, contactyour local passenger or freight transport company.
Shipping, trans-port of batteries
Transport 16
en

5 OperationThe battery must be charged before using it for the first time.
010034_001
2
3
010034_001
2
3
1
☞
Change batterystep-by-step
Operation 17
en
☞ The battery is inserted at the side of the instrument.
1. To remove a battery, push the slide fastener of the battery com-partment in the direction of the arrow with the open-lock symboland open the battery compartment.
2. Push the locker sideward and at the same time pull out the bat-tery. This releases the battery from its fixed position.
3. Remove the battery.
4. To insert battery, push the slide fastener of the battery compart-ment in the direction of the arrow with the open-lock symbol.
5. Open the battery compartment.
6. With the battery contacts facing upwards, slide the battery intothe battery compartment.
7. Push the battery backwards so that it locks into position.
8. Close the battery compartment and push the slide fastener in thedirection of the arrow with the close-lock symbol.
Operation 18
en
010038_001
1
2
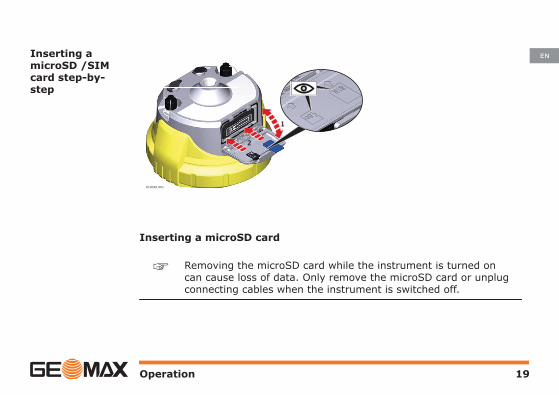
Inserting a microSD card
☞ Removing the microSD card while the instrument is turned oncan cause loss of data. Only remove the microSD card or unplugconnecting cables when the instrument is switched off.
Inserting amicroSD /SIMcard step-by-step
Operation 19
en

☞ The microSD card is inserted into a slot inside the battery com-partment of the instrument.
1. Push the slide fastener of the battery compartment in the direc-tion of the arrow with the open-lock symbol. Open the batterycompartment
2. Slide the microSD card with the logo facing upwards firmly intothe slot as shown inside the battery lid until it clicks into position.
Inserting a SIM card
☞ Inserting/removing the SIM card while the Zenith35 Pro is turnedon can result in permanent damage to the card. Only insert/remove the SIM card when the Zenith35 Pro is switched off.
☞ The SIM card is inserted into a slot inside the battery compart-ment.
1. Push the slide fastener of the battery compartment in the direc-tion of the arrow with the open-lock symbol. Open the batterycompartment
Operation 20
en

2. Slide the SIM card with the connectors facing downwards firmlyinto the slot as shown inside the battery lid until it clicks intoposition.
Operation 21
en

GeoMax AGwww.geomax-positioning.com
848673-1.1.0enOriginal text (848673-1.1.0en)© 2018 GeoMax AG, Widnau, Switzerland

GeoMax Zenith35 Pro Serie
Quick GuideVersion 1.1

1 Wichtige Informationen über IhrInstrumentLesen und befolgen Sie die Gebrauchsanweisung auf dem beigefügtenDatenträger, bevor Sie das Produkt verwenden.
Sorgfältig aufbewahren!
• Berechnung mit Software.• Aufzeichnen der Messungen.• Durchführung von Messaufgaben mit verschiedenen GNSS Messtech-
niken.• Aufzeichnung von GNSS und punktbezogenen Daten.• Fernbedienung des Produkts.• Datenkommunikation zu externen Geräten.• Messung von Rohdaten und Berechnen von Koordinaten mit Hilfe von
Trägerphase und Codesignalen von GNSS Satelliten.
☞
Verwendungs-zweck
Wichtige Informationen über Ihr Instrument 24
de
Das Produkt darf nicht im Hausmüll entsorgt werden.
• FCC Part 15 (applicable in US)
• Hereby, GeoMax AG, declares that the radio equipment typeZenith35 Pro is in compliance with the essential requirements andother relevant provisions of Directive 2014/53/EC and other appli-cable European Directives. The declaration of conformity can beconsulted at http://www.geomax-positioning.de/Downloads.htm.
• This Class 2 equipment may be operated in: AT, BE, BG, CA, CH,CY, CZ, DE, DK, EE, ES, FI, FR, GB, GR, HU, IE, IS, IT, LT, LU, LV,MT, NL, NO, PL, PT, RU, RO, SE, SI, SK, US.
Conformity tonational regulati-ons
Wichtige Informationen über Ihr Instrument 25
de

Class 2 equipment according European Directive 2014/53/EC(RED) for which following EEA Member States apply restrictionson the placing on the market or on the putting into service orrequire authorisation for use:• France• Italy• Norway (if used in the geographical area within a radius of
20 km from the centre of Ny-Ålesund)
• The conformity for countries with other national regulations notcovered by the FCC part 15 or European directive 2014/53/EC hasto be approved prior to use and operation.
• Japanese Radio Law and Japanese Telecommunications BusinessLaw Compliance.• This device is granted pursuant to the Japanese Radio Law
(電波法) and the Japanese Telecommunications Business Law(電気通信事業法).
• This device should not be modified (otherwise the granteddesignation number will become invalid).
Wichtige Informationen über Ihr Instrument 26
de

Die Produkte von GeoMax werden durch Lithiumakkus mit Energie versorgt.
Lithiumakkus können unter bestimmten Voraussetzungen gefährlich werdenund ein Sicherheitsrisiko darstellen. Unter bestimmten Voraussetzungenkönnen Lithiumakkus überhitzen und sich entzünden.
☞ Wenn Ihr GeoMax Produkt mit Lithiumakkus an Bord eines Ver-kehrsflugzeugs transportiert oder als Luftfracht versendet wird,muss dies in Übereinstimmung mit den IATA Gefahrgutvor-schriften geschehen.
☞ GeoMax hat Richtlinien bezüglich Transport und Versand vonGeoMax Produkten mit Lithiumakkus erstellt. Wir bitten Sie, vorjedem Transport eines GeoMax Produkts die Richtlinien aufunserer Webseite (http://www.geomax-positioning.com/dgr) zukonsultieren, um sicherzugehen, dass die GeoMax Produkte ent-sprechend der IATA-Gefahrgutvorschriften korrekt transportiertwerden.
Gefahrgutvor-schriften
Wichtige Informationen über Ihr Instrument 27
de

☞ Beschädigte oder defekte Akkus dürfen nicht an Bord einesFlugzeugs transportiert werden. Stellen Sie deshalb sicher, dassIhre Akkus sicher transportiert werden können.
Wichtige Informationen über Ihr Instrument 28
de
2 Instrumentenkomponenten
010007_001
ab e
d
fcg
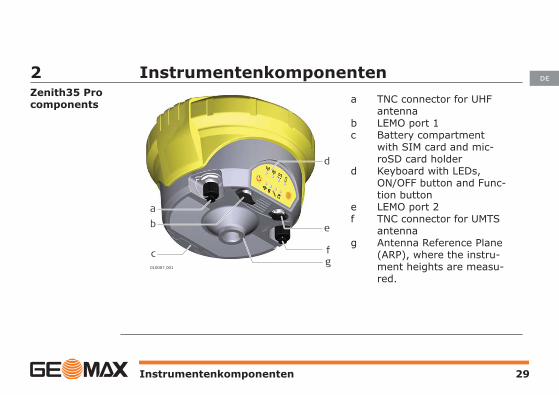
a TNC connector for UHFantenna
b LEMO port 1c Battery compartment
with SIM card and mic-roSD card holder
d Keyboard with LEDs,ON/OFF button and Func-tion button
e LEMO port 2f TNC connector for UMTS
antennag Antenna Reference Plane
(ARP), where the instru-ment heights are measu-red.
Zenith35 Procomponents
Instrumentenkomponenten 29
de

Key Function
ON/OFF If Zenith35 Pro is off:Turns on Zenith35 Pro when held for 2 s.☞ While the Zenith35 Pro is booting the two
Power LEDs flash.
If Zenith35 Pro is already on:Turns off Zenith35 Pro when held for 2 s.
☞ All functions described assume the Zenith35 Pro is already on.
Key Function
Function Press and hold key for <1 s.
ON/OFF key
Function key
Instrumentenkomponenten 30
de
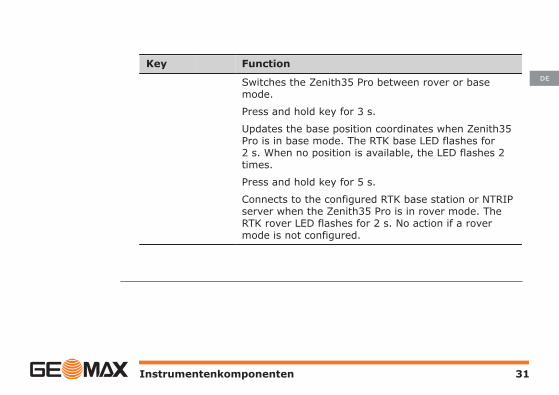
Key Function
Switches the Zenith35 Pro between rover or basemode.
Press and hold key for 3 s.
Updates the base position coordinates when Zenith35Pro is in base mode. The RTK base LED flashes for2 s. When no position is available, the LED flashes 2times.
Press and hold key for 5 s.
Connects to the configured RTK base station or NTRIPserver when the Zenith35 Pro is in rover mode. TheRTK rover LED flashes for 2 s. No action if a rovermode is not configured.
Instrumentenkomponenten 31
de

3 UmweltspezifikationenTemperaturen (°C):
Instrument: -40 bis +65(Betrieb*)
-40 bis +85 (Lage-rung)
Batterie: -40 bis +65 (Betrieb) -40 bis +70 (Lage-rung)
Schutz:
IP68 (IEC 60529)
Vibration:
ASAE EP455 Section 5.15.1 Random, MIL-STD-810G, Methode 514.6E-I
Umweltspezifika-tionen
Umweltspezifikationen 32
de

Schlag:
Hält Umkippen aus 2 m (6,6 ft) Höhe am Lotstock auf harten Oberflä-chen stand.
Feuchtigkeit:
100 % Kondensation
Den Auswirkungen von Kondensation sollte durch periodisches Austrock-nen des Instruments entgegengewirkt werden.
*Tilt & Go Funktionalität: -30 °C bis +65°C
Umweltspezifikationen 33
de

4 TransportAchten Sie beim Transport Ihrer Ausrüstung im Feld immer darauf, dass Sie
• das Produkt entweder im Originalbehälter transportieren,• oder das Stativ mit aufgesetztem und angeschraubtem Produkt auf-
recht zwischen den Stativbeinen über der Schulter tragen.
Transportieren Sie das Produkt niemals ungesichert in einem Fahrzeug. DasProdukt kann durch Schläge und Vibrationen Schaden nehmen. Es mussdaher immer in seinem Behälter, der Originalverpackung oder ähnlichemtransportiert und entsprechend gesichert werden.
Verwenden Sie beim Versand per Bahn, Flugzeug oder Schiff immer diekomplette GeoMax Originalverpackung mit Transportbehälter und Versand-karton, bzw. entsprechende Verpackungen. Die Verpackung sichert das Pro-dukt gegen Schläge und Vibrationen.
Transport imFeld
Transport ineinem Fahrzeug
Versand
Transport 34
de

Beim Transport oder Versand von Batterien / Akkus hat der Betreibersicherzustellen, dass die entsprechenden nationalen und internationalenGesetze und Bestimmungen beachtet werden. Kontaktieren Sie vor demTransport oder Versand Ihr lokales Personen- oder Frachttransportunter-nehmen.
Versand bzw.Transport vonBatterien /Akkus
Transport 35
de
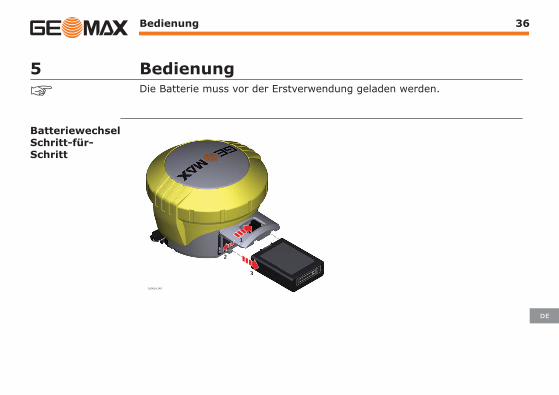
5 BedienungDie Batterie muss vor der Erstverwendung geladen werden.
010034_001
2
3
010034_001
2
3
1
☞
BatteriewechselSchritt-für-Schritt
Bedienung 36
de

☞ Die Batterie wird an der Seite des Instruments eingesetzt.
1. Zum Entfernen der Batterie schieben Sie den Verschluss des Bat-teriefachs in Richtung Pfeil mit dem Symbol „offen“ und öffnendas Batteriefach.
2. Drücken Sie den Sperrriegel zur Seite und ziehen Sie gleichzeitigden unteren Teil der Batterie heraus. Dies löst die Batterie vonihrer festen Position.
3. Entfernen Sie die Batterie.
4. Zum Einsetzen der Batterie schieben Sie den Verschluss des Bat-teriefachs in Richtung Pfeil mit dem Symbol „offen“.
5. Öffnen Sie das Batteriefach.
6. Legen Sie die Batterie, mit den Batteriekontakten nach oben wei-send, in das Batteriefach.
7. Schieben Sie die Batterie nach unten, sodass sie einrastet.
8. Schließen Sie das Batteriefach, indem Sie den Verschluss in Rich-tung Pfeil mit dem Symbol „geschlossen“ schieben.
Bedienung 37
de

010038_001
1
2
Einsetzen einer microSD-Karte
☞ Das Entnehmen der microSD-Karte, während das Instrument ein-geschaltet ist, kann zum Datenverlust führen. Entnehmen Sie diemicroSD-Karte oder ziehen Sie die Verbindungskabel erst ab,wenn das Instrument ausgeschaltet ist.
Einsetzen einermicroSD-/SIMKarte Schritt-für-Schritt
Bedienung 38
de
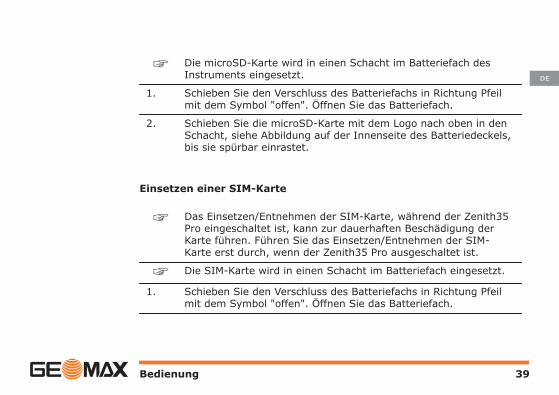
☞ Die microSD-Karte wird in einen Schacht im Batteriefach desInstruments eingesetzt.
1. Schieben Sie den Verschluss des Batteriefachs in Richtung Pfeilmit dem Symbol "offen". Öffnen Sie das Batteriefach.
2. Schieben Sie die microSD-Karte mit dem Logo nach oben in denSchacht, siehe Abbildung auf der Innenseite des Batteriedeckels,bis sie spürbar einrastet.
Einsetzen einer SIM-Karte
☞ Das Einsetzen/Entnehmen der SIM-Karte, während der Zenith35Pro eingeschaltet ist, kann zur dauerhaften Beschädigung derKarte führen. Führen Sie das Einsetzen/Entnehmen der SIM-Karte erst durch, wenn der Zenith35 Pro ausgeschaltet ist.
☞ Die SIM-Karte wird in einen Schacht im Batteriefach eingesetzt.
1. Schieben Sie den Verschluss des Batteriefachs in Richtung Pfeilmit dem Symbol "offen". Öffnen Sie das Batteriefach.
Bedienung 39
de

2. Schieben Sie die SIM-Karte mit Anschlüssen nach unten in denSchacht, siehe Abbildung auf der Innenseite des Batteriedeckels,bis sie spürbar einrastet.
Bedienung 40
de


GeoMax AGwww.geomax-positioning.com
848673-1.1.0deOriginaltext (848673-1.1.0en)© 2018 GeoMax AG, Widnau, Schweiz
GeoMax Zenith35 Pro Series
Guía RápidaVersión 1.1

1 Información importante de suinstrumentoAntes de utilizar el producto, lea y siga las instrucciones del manual de usoque se encuentra en el dispositivo de almacenamiento de datos adjunto.
¡Conservar para futuras consultas!
• Cálculo con software.• Registro de mediciones.• Efectuar tareas de medición aplicando diversas técnicas de levanta-
miento GNSS.• Registrar puntos GNSS y datos relacionados con los mismos.• Control remoto del producto.• Comunicación de datos con equipos externos.• Registro de datos brutos y cálculo de coordenadas mediante fase por-
tadora y señal de código de satélites GNSS.
☞
Utilización
Información importante de su instrumento 44
es

No deseche el producto con la basura doméstica.
• FCC Parte 15 (aplicable en EE. UU.)
• Por el presente, GeoMax AG, declara que el tipo de equipo de radiodel Zenith35 Pro cumple con los requerimientos básicos y otras dis-posiciones importantes de la Directiva 2014/53/EC y otras directi-vas europeas aplicables. La declaración de conformidad se puedeconsultar en http://www.geomax-positioning.de/Downloads.htm.
• Este equipo de Clase 2 se puede usar en: AT, BE, BG, CA, CH, CY,CZ, DE, DK, EE, ES, FI, FR, GB, GR, HU, IE, IS, IT, LT, LU, LV, MT,NL, NO, PL, PT, RU, RO, SE, SI, SK, US.
Conformidad conregulacionesnacionales
Información importante de su instrumento 45
es
Equipo de Clase 2 según la Directiva Europea 2014/53/EC(R&TTE) según la cual los siguientes estados miembros de la EEEaplican restricciones para ofrecerlo en el mercado o se requierede autorización para la puesta en servicio:• Francia• Italia• Noruega (si se utiliza en el área geográfica comprendida en
un radio de 20 km del centro de Ny-Ålesund)
• La conformidad para países con otras regulaciones nacionales queno sean cubiertas por la FCC parte 15 o la Directiva europea2014/53/CE debe ser aprobada antes del uso y operación.
• En cumplimiento con la ley de radio de Japón y la ley de comercio ytelecomunicaciones de Japón.• La concesión del equipo se otorga según la ley de radio de
Japón (電波法) y la ley de comercio y telecomunicaciones deJapón (電気通信事業法).
• El dispositivo no debe ser modificado (de lo contrario, elnúmero de concesión otorgado quedará invalidado).
Información importante de su instrumento 46
es

Los productos de GeoMax son alimentados por baterías de litio.
Las baterías de litio pueden ser peligrosos en ciertas condiciones y puedenrepresentar un peligro para la seguridad. En ciertas condiciones, las bate-rías de litio pueden recalentarse y provocar un incendio.
☞ Al llevar o enviar el GeoMax producto con baterías de litio abordo de un avión comercial, debe hacerlo de acuerdo con losIATA Dangerous Goods Regulations.
☞ GeoMaxha desarrollado Lineas guías sobre "como transpor-tarGeoMaxel producto" y "Como enviarGeoMaxel producto" conbaterías de Litio Antes de cualquier transporte de un GeoMaxproducto, le pedimos que consulte estas guías en nuestrapágina web (http://www.geomax-positioning.com/dgr) paraasegurarse de que se ajustan los IATA Dangerous Goods Regula-tions y que los GeoMax productos pueden ser transportadoscorrectamente.
Reglamentos deMercancías Peli-grosas
Información importante de su instrumento 47
es
☞ Baterías Dañadas o defectuosas están prohibidas de ser llevadaso transportadas a bordo de cualquier aeronave. Por lo tanto,asegúrese de que la condición de cualquier batería es segurapara el transporte.
Información importante de su instrumento 48
es
2 Componentes del instrumento
010007_001
ab e
d
fcg
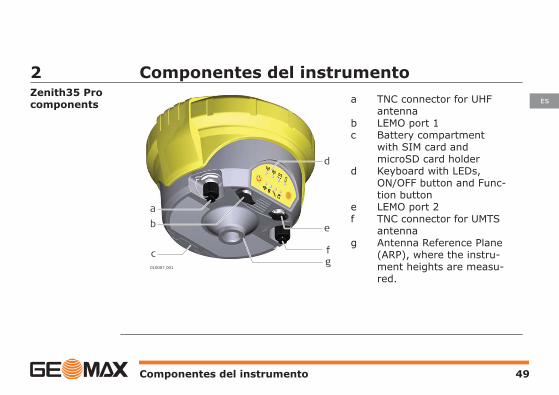
a TNC connector for UHFantenna
b LEMO port 1c Battery compartment
with SIM card andmicroSD card holder
d Keyboard with LEDs,ON/OFF button and Func-tion button
e LEMO port 2f TNC connector for UMTS
antennag Antenna Reference Plane
(ARP), where the instru-ment heights are measu-red.
Zenith35 Procomponents
Componentes del instrumento 49
es

Key Function
ON/OFF If Zenith35 Pro is off:Turns on Zenith35 Pro when held for 2 s.☞ While the Zenith35 Pro is booting the two
Power LEDs flash.
If Zenith35 Pro is already on:Turns off Zenith35 Pro when held for 2 s.
☞ All functions described assume the Zenith35 Pro is already on.
Key Function
Function Press and hold key for <1 s.
ON/OFF key
Function key
Componentes del instrumento 50
es
Key Function
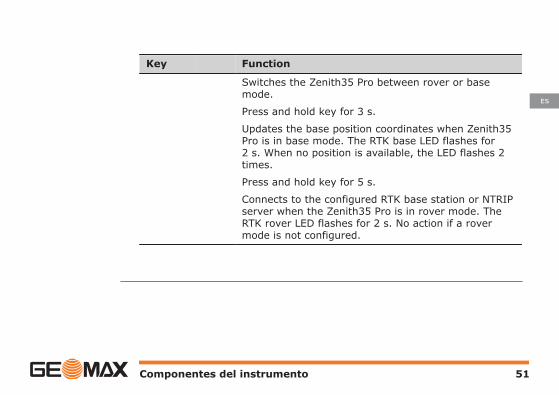
Switches the Zenith35 Pro between rover or basemode.
Press and hold key for 3 s.
Updates the base position coordinates when Zenith35Pro is in base mode. The RTK base LED flashes for2 s. When no position is available, the LED flashes 2times.
Press and hold key for 5 s.
Connects to the configured RTK base station or NTRIPserver when the Zenith35 Pro is in rover mode. TheRTK rover LED flashes for 2 s. No action if a rovermode is not configured.
Componentes del instrumento 51
es

3 Especificaciones ambientalesTemperaturas (°C):
Instrumento: -40 a +65 (opera-ción*)
-40 a +85 (almacena-miento)
Batería: -40 a +65 (opera-ción)
-40 a +70 (almacena-miento)
Protección:
IP68 (IEC 60529)
Vibración:
ASAE EP455 Sección 5.15.1 Random, MIL-STD-810G, metodo 514.6E-I
Especificacionesambientales
Especificaciones ambientales 52
es

Golpes:
Soporta caídas de 2 m (6.6 ft) desde el bastón sobre una superficierígida.
Humedad:
100% condensante
Los efectos de la condensación se pueden contrarrestar en forma efec-tiva secando periódicamente el instrumento.
* Tilt & Go funcionalidad: De -30 °C a +65°C
Especificaciones ambientales 53
es

4 TransporteCuando se transporte el equipo en el campo hay que procurar siempre
• llevar siempre el equipo en su maletín original,• o llevar al hombro el trípode con las patas abiertas, con el instru-
mento colocado y atornillado, todo ello en posición vertical.
No se debe transportar nunca el instrumento suelto en el vehículo ya quepodría resultar dañado por golpes o vibraciones. Siempre ha de transpor-tarse dentro de su estuche, con el embalaje original o equivalente y bienasegurado.
Para transportar el producto en tren, avión o barco utilizar siempre elembalaje original de GeoMax completo (estuche de transporte y caja decartón) u otro embalaje adecuado, para proteger el instrumento frente agolpes y vibraciones.
Transporte encampo
Transporte en unvehículo porcarretera
Envío
Transporte 54
es

Para el transporte o envío de baterías, el encargado del producto debe ase-gurarse que se observa la legislación nacional e internacional correspon-diente. Antes de efectuar el transporte o el envío, hay que contactar con lacompañía de transporte de pasajeros o mercancías.
Envío y trans-porte de lasbaterías
Transporte 55
es

5 FuncionamientoCargue la batería antes de usarla por primera vez.
010034_001
2
3
010034_001
2
3
1
☞
Reemplazo de labatería, paso apaso
Funcionamiento 56
es

☞ La batería se introduce en el lado del instrumento.
1. Para extraer una batería, presione el cierre de la cremallera delcompartimiento de la batería en la dirección de la flecha con elsímbolo de candado abierto y abra el compartimiento de la bate-ría.
2. Empuje el boton de cierre hacia el lado y al mismo tiempo saquela batería. De esta forma, se libera la batería de su posición fija.
3. Retirar la batería.
4. Para introducir la batería, presione el cierre de la cremallera delcompartimiento de la batería en la dirección de la flecha con elsímbolo de candado abierto.
5. Abrir el compartimento de la batería.
6. Con los contactos de la batería hacia arriba, deslice la batería enel compartimiento de la batería.
7. Empuje la batería hacia atrás de manera que encaje en su posi-ción.
Funcionamiento 57
es

8. Cierre el compartimiento de la batería y presione el cierre de lacremallera en la dirección de la flecha con el símbolo del segurocerrado.
010038_001
1
2
Colocación pasoa paso para tar-jetas microSD /SIM
Funcionamiento 58
es

Introducir una tarjeta microSD
☞ La extracción de la tarjeta microSD mientras el instrumento seencuentra encendido puede causar la pérdida de datos. Retirar latarjeta microSD o desconectar los cables sólo cuando el instru-mento esté apagado.
☞ La tarjeta microSD se introduce en la ranura que se encuentra enel compartimiento de la batería del instrumento.
1. Empujar el seguro deslizable del compartimiento de la batería enla dirección de la flecha con el símbolo de seguro abierto. Abra elcompartimiento de la batería
2. Deslice la tarjeta microSD con el logotipo mirando hacia arribafirmemente en la ranura como se muestra en el interior de latapa de la batería hasta que encaje en su posición.
Funcionamiento 59
es

Introducir una tarjeta SIM
☞ Introducir o retirar la tarjeta SIM mientras el Zenith35 Pro seencuentra encendido puede dañar la tarjeta. Introducir o retirarla tarjeta SIM sólo cuando el instrumento Zenith35 Pro esté apa-gado.
☞ La tarjeta SIM se introduce en la ranura situada en el interior delcompartimento de la batería.
1. Empujar el seguro deslizable del compartimiento de la batería enla dirección de la flecha con el símbolo de seguro abierto. Abra elcompartimiento de la batería
2. Deslice la tarjeta SIM con los conectores en dirección hacia abajofirmemente en la ranura como se muestra en el interior de latapa de la batería hasta que encaje en su posición.
Funcionamiento 60
es


GeoMax AGwww.geomax-positioning.com
848673-1.1.0esTraducción de la versión original (848673-1.1.0en)© 2018 GeoMax AG, Widnau, Switzerland

GeoMax Zenith35 Pro Series
Guide abrégéVersion 1.1

1 Informations importantes sur l'instrumentAvant l'emploi du produit, lire et respecter le manuel de l'utilisateur chargésur le périphérique de stockage de données fourni.
A conserver pour une consultation ultérieure !
• Calculs au moyen de logiciels.• Enregistrement de mesures.• Exécution de travaux de mesure utilisant différentes techniques de
mesure GNSS.• Enregistrement de données GNSS et de codes associés aux points.• Commande à distance du produit.• Echange de données avec des appareils extérieurs.• Mesure de données brutes et calcul de coordonnées en utilisant la
phase e porteuse et les signaux de code des satellites GNSS.
☞
Utilisation pré-vue
Informations importantes sur l'instrument 64
fr
Ne jetez pas ce produit avec les ordures ménagères.
• FCC partie 15, applicable aux États-Unis
• GeoMax AG déclare par la présente que le produit de type Zenith35Pro est conforme aux exigences fondamentales de la directive euro-péenne 2014/53/CE et d'autres directives européennes applicables.La déclaration de conformité est consultable sur : http://www.geomax-positioning.de/Downloads.htm.
• Cet équipement de classe 2 peut être utilisé dans les pays sui-vants : AT, BE, BG, CA, CH, CY, CZ, DE, DK, EE, ES, FI, FR, GB, GR,HU, IE, IS, IT, LT, LU, LV, MT, NL, NO, PL, PT, RU, RO, SE, SI, SK,US.
Conformité avecles prescriptionsnationales
Informations importantes sur l'instrument 65
fr

Équipement de classe 2 selon la directive européenne2014/53/CE (RED) pour lequel les pays membres de l'EEE sui-vants appliquent des restrictions à la commercialisation, à lamise en service ou demandent une autorisation pour son utilisa-tion :• France• Italie• Norvège (en cas d'utilisation dans un rayon de 20 km à
compter du centre de Ny-Ålesund)
• La conformité pour des pays dont la réglementation nationale n'estcouverte ni par les règles FCC partie 15 ni par la directive euro-péenne 2014/53/CE doit être approuvée préalablement à toute uti-lisation.
• Conformité avec la loi japonaise sur la radiodiffusion et avec la loijaponaise sur les télécommunications• Cet appareil est certifié conforme à la loi japonaise sur la
radiodiffusion (電波法) et à la loi japonaise sur les télécommuni-cations (電気通信事業法).
• Cet appareil ne doit pas être modifié (sinon le numéro de cer-tification devient invalide).
Informations importantes sur l'instrument 66
fr

Les produits de GeoMax sont alimentés par des batteries au lithium.
Les batteries au lithium peuvent être dangereuses dans certaines condi-tions et présenter un risque de sécurité. Dans certaines conditions, les bat-teries au lithium peuvent surchauffer et s'enflammer.
☞ Lors du transport ou de l'expédition du produit GeoMax avec desbatteries au lithium à bord d'un avion civil, il faut égalementrespecter les dispositions IATA sur les matières dangereuses.
☞ GeoMax a établi des consignes pour le transport des produitsGeoMax et l'expédition de produits GeoMax avec des batteriesau lithium. Avant de transporter un produit GeoMaxhttp://www.geomax-positioning.com/dgr, il convient de consulter cesconsignes sur le site Internet afin de veiller au respect des dis-positions IATA sur les matières dangereuses et au transport cor-rect des produits GeoMax.
Dispositions surles matières dan-gereuses
Informations importantes sur l'instrument 67
fr

☞ Le transport ou l'expédition de batteries endommagées oudéfectueuses est interdit. Il faut donc s'assurer de la sécurité detransport de toute batterie.
Informations importantes sur l'instrument 68
fr
2 Composants de l'instrument
010007_001
ab e
d
fcg
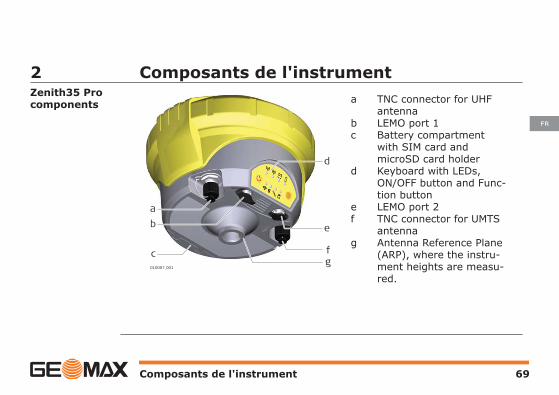
a TNC connector for UHFantenna
b LEMO port 1c Battery compartment
with SIM card andmicroSD card holder
d Keyboard with LEDs,ON/OFF button and Func-tion button
e LEMO port 2f TNC connector for UMTS
antennag Antenna Reference Plane
(ARP), where the instru-ment heights are measu-red.
Zenith35 Procomponents
Composants de l'instrument 69
fr

Key Function
ON/OFF If Zenith35 Pro is off:Turns on Zenith35 Pro when held for 2 s.☞ While the Zenith35 Pro is booting the two
Power LEDs flash.
If Zenith35 Pro is already on:Turns off Zenith35 Pro when held for 2 s.
☞ All functions described assume the Zenith35 Pro is already on.
Key Function
Function Press and hold key for <1 s.
ON/OFF key
Function key
Composants de l'instrument 70
fr

Key Function
Switches the Zenith35 Pro between rover or basemode.
Press and hold key for 3 s.
Updates the base position coordinates when Zenith35Pro is in base mode. The RTK base LED flashes for2 s. When no position is available, the LED flashes 2times.
Press and hold key for 5 s.
Connects to the configured RTK base station or NTRIPserver when the Zenith35 Pro is in rover mode. TheRTK rover LED flashes for 2 s. No action if a rovermode is not configured.
Composants de l'instrument 71
fr

3 EnvironnementTempératures (°C) :
Instrument : De -40 à +65 (ser-vice*)
De -40 à +85 (stoc-kage)
Batterie : De -40 à +65 (ser-vice)
De -40 à +70 (stoc-kage)
Protection :
IP68 (CEI 60529)
Vibrations :
ASAE EP455 Section 5.15.1 Random, MIL-STD-810G, méthode 514.6E-I
Environnement
Environnement 72
fr
Chocs :
Résiste à une chute d'une hauteur de 2 m (6,6 ft) sur une surface dure.
Humidité :
100 % avec condensa-tion
Il convient de neutraliser les effets de la condensation par un séchagecomplet périodique de l'instrument.
* Tilt & Go fonctionnalité : -30°C à +65°C
Environnement 73
fr

4 TransportLors du transport sur le terrain, toujours s'assurer de :
• transporter le produit dans son coffret d'origine,• ou de transporter le trépied sur l'épaule, l'instrument monté restant à
la verticale
Ne jamais transporter l’équipement dans un véhicule sans l’installer au pré-alable dans son coffret, il pourrait sinon être endommagé par des chocs oudes vibrations. Transportez toujours le produit dans son coffret, l’emballaged’origine ou un emballage équivalent et calez-le.
Utilisez l'emballage d'origine de GeoMax, le coffret de transport et le cartond'expédition ou équivalent pour tout transport par train, avion ou bateau. Ilsera ainsi protégé des chocs et des vibrations.
Transport sur leterrain
Transport dansun véhicule auto-mobile
Expédition
Transport 74
fr

Lors du transport ou de l'expédition de batteries, le responsable du produitdoit s'assurer du respect des lois et réglementations nationales et interna-tionales applicables. Avant le transport ou l'expédition, contacter la sociétélocale de transport de personnes ou de marchandises.
Expédition,transport de bat-teries
Transport 75
fr
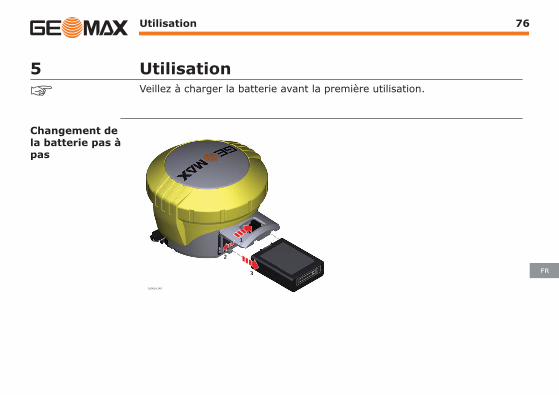
5 UtilisationVeillez à charger la batterie avant la première utilisation.
010034_001
2
3
010034_001
2
3
1
☞
Changement dela batterie pas àpas
Utilisation 76
fr

☞ La batterie est insérée sur le côté de l'instrument.
1. Pour enlever une batterie, pousser le fermoir à glissière du com-partiment de batterie dans la direction indiquée par la flèche(vers le symbole de verrou ouvert) et ouvrir le compartiment.
2. Pousser le verrou vers le côté et extraire simultanément la batte-rie. La position de la batterie est ainsi déverrouillée.
3. Retirer la batterie.
4. Pour insérer la batterie, pousser le fermoir à glissière du compar-timent de batterie dans la direction indiquée par la flèche (vers lesymbole de verrou ouvert).
5. Ouvrir le compartiment de batterie.
6. Les contacts de batterie étant orientés vers le haut, insérer labatterie dans le compartiment.
7. Pousser la batterie en arrière jusqu'à ce qu'elle soit calée.
8. Fermer le compartiment de batterie et pousser le fermoir à glis-sière dans la direction indiquée par la flèche (vers le symbole deverrou fermé).
Utilisation 77
fr

010038_001
1
2
Insertion d'unecartemicroSD/SIMpas à pas
Utilisation 78
fr

Insertion d'une carte microSD
☞ Retirer la carte microSD pendant que l'instrument est sous ten-sion peut entraîner des pertes de données. Retirer la cartemicroSD ou débrancher les câbles de connexion seulement lors-que l'instrument est hors tension.
☞ La carte microSD est insérée dans un logement à l'intérieur ducompartiment de batterie de l'instrument.
1. Pousser le fermoir à glissière du compartiment de batterie dansla direction indiquée par la flèche (vers le symbole de verrououvert). Ouverture du compartiment de batterie
2. Insérer la carte microSD, le logo tourné vers le haut, fermementdans la fente jusqu'en butée, conformément à l'illustration à l'in-térieur du couvercle du compartiment de batterie.
Utilisation 79
fr

Insertion d'une carte SIM
☞ Insérer/retirer la carte SIM pendant que le Zenith35 Pro est soustension peut provoquer un endommagement irréversible de lacarte. Insérer/retirer la carte SIM seulement si l'instrumentZenith35 Pro est hors tension.
☞ La carte SIM s'insère dans un logement du compartiment de labatterie.
1. Pousser le fermoir à glissière du compartiment de batterie dansla direction indiquée par la flèche (vers le symbole de verrououvert). Ouverture du compartiment de batterie
2. Insérer la carte SIM, les connecteurs tournés vers le bas, ferme-ment dans la fente jusqu'en butée, comme le montre l'illustrationà l'intérieur du couvercle du compartiment de batterie.
Utilisation 80
fr


GeoMax AGwww.geomax-positioning.com
848673-1.1.0frTraduction de la version originale (848673-1.1.0en)© 2018 GeoMax AG, Widnau, Suisse

Serie GeoMax Zenith35 Pro
Guida rapidaVersione 1.1
1 Importanti informazioni sullo strumentoPrima di utilizzare il prodotto, leggere e seguire le indicazioni del ManualeUtente contenuto nel dispositivo di memoria in dotazione.
Da conservare per futura consultazione.
• Esecuzione di calcoli mediante software.• Registrazione delle misure.• Esecuzione di operazioni di misurazione con tecniche GNSS.• Registrazione di dati GNSS.• Comando a distanza dello strumento.• Trasmissione dei dati con apparecchiature esterne.• Misura di dati grezzi e calcolo di coordinate mediante codice e fase dei
satelliti GNSS.
Il prodotto non deve essere smaltito insieme ai rifiuti domestici.
☞
Uso previsto
Importanti informazioni sullo strumento 84
it

• FCC parte 15 (in vigore negli Stati Uniti)
• GeoMax AG dichiara che l'apparecchiatura radio di tipo Zenith35 Proè conforme ai requisiti essenziali e alle altre disposizioni pertinentidella direttiva 2014/53/CE oltre che alle altre direttive europee invigore. La dichiarazione di conformità è consultabile all'indirizzo http://www.geomax-positioning.de/Downloads.htm.
• Questa apparecchiatura di classe 2 può essere utilizzata neiseguenti paesi: AT, BE, BG, CA, CH, CY, CZ, DE, DK, EE, ES, FI, FR,GB, GR, HU, IE, IS, IT, LT, LU, LV, MT, NL, NO, PL, PT, RU, RO, SE,SI, SK, US.
Conformità allalegislazionenazionale
Importanti informazioni sullo strumento 85
it
Apparecchiatura di classe 2 ai sensi della direttiva europea2014/53/CE (RED) per la quale i seguenti stati membri del SEEprevedono limitazioni alla commercializzazione e alla messa inesercizio o per il cui utilizzo richiedono autorizzazioni:• Francia• Italia• Norvegia (in caso di utilizzo entro un raggio di 20 km dal
centro di Ny-Ålesund)
• La conformità per i paesi in cui vigono altre disposizioni nazionalinon coperte dalla direttiva FCC, parte 15, o dalla direttiva europea2014/53/CE deve essere approvata prima della messa in esercizio.
• Conformità alle norme giapponesi che disciplinano le comunicazioniradio e al diritto commerciale giapponese in materia di telecomuni-cazioni.• Il presente dispositivo è conforme alle norme giapponesi che
disciplinano le comunicazioni radio (電波法) e al diritto commer-ciale giapponese in materia di telecomunicazioni (電気通信事業法).
• Questo dispositivo non deve essere modificato, altrimenti ilnumero di designazione non sarà più valido.
Importanti informazioni sullo strumento 86
it

I prodotti GeoMax sono alimentati con batterie al Litio.
Le batterie al litio possono essere pericolose in determinate condizioni epossono rappresentare un pericolo per la sicurezza. In determinate condi-zioni, le batterie al litio possono surriscaldarsi e prendere fuoco.
☞ Quando si trasporta o spedire il prodotto GeoMax con batterie allitio a bordo di un aereo commerciale, è necessario farlo in con-formità con le IATA Dangerous Goods Regulations.
☞ GeoMax ha sviluppato Linee guida su "Come portare prodotti GeoMax" e “Come spedire prodotti GeoMax“ con batterie al litio.Prima di ogni trasporto di un prodotto GeoMax, vi chiediamo diconsultare queste linee guida sulla nostra pagina web (http://www.geomax-positioning.com/dgr) per garantire che siano inconformità con le IATA Dangerous Goods Regulations e che iprodotti GeoMax siano trasportati correttamente.
☞ Su qualsiasi aereomobile è vietato il trasporto di batterie dan-neggiate o difettose. Pertanto, assicurarsi che la condizione diogni batteria sia sicura per il trasporto.
Regolazione BeniPericolosi
Importanti informazioni sullo strumento 87
it
2 Componenti dello strumento
010007_001
ab e
d
fcg
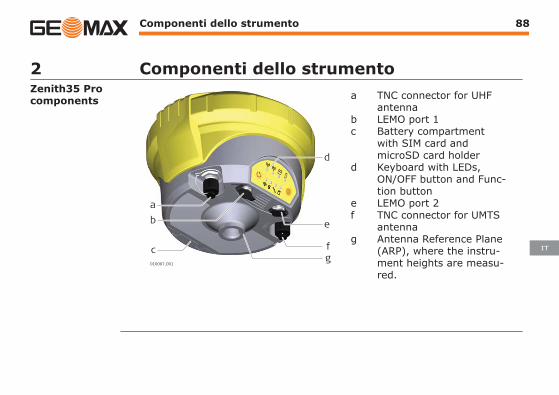
a TNC connector for UHFantenna
b LEMO port 1c Battery compartment
with SIM card andmicroSD card holder
d Keyboard with LEDs,ON/OFF button and Func-tion button
e LEMO port 2f TNC connector for UMTS
antennag Antenna Reference Plane
(ARP), where the instru-ment heights are measu-red.
Zenith35 Procomponents
Componenti dello strumento 88
it

Key Function
ON/OFF If Zenith35 Pro is off:Turns on Zenith35 Pro when held for 2 s.☞ While the Zenith35 Pro is booting the two
Power LEDs flash.
If Zenith35 Pro is already on:Turns off Zenith35 Pro when held for 2 s.
☞ All functions described assume the Zenith35 Pro is already on.
Key Function
Function Press and hold key for <1 s.
ON/OFF key
Function key
Componenti dello strumento 89
it
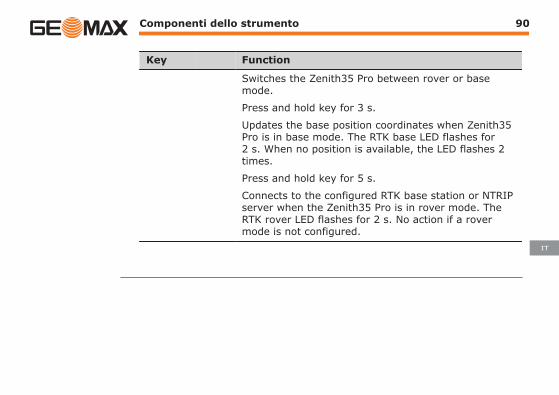
Key Function
Switches the Zenith35 Pro between rover or basemode.
Press and hold key for 3 s.
Updates the base position coordinates when Zenith35Pro is in base mode. The RTK base LED flashes for2 s. When no position is available, the LED flashes 2times.
Press and hold key for 5 s.
Connects to the configured RTK base station or NTRIPserver when the Zenith35 Pro is in rover mode. TheRTK rover LED flashes for 2 s. No action if a rovermode is not configured.
Componenti dello strumento 90
it
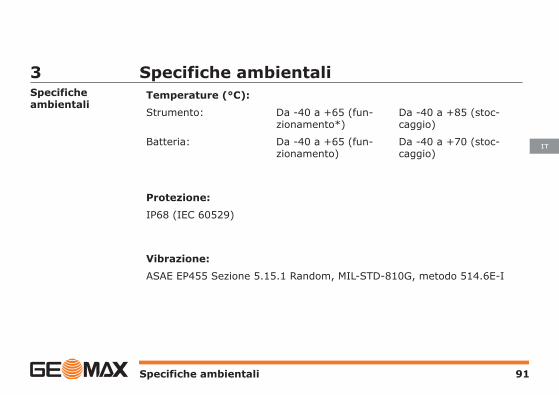
3 Specifiche ambientaliTemperature (°C):
Strumento: Da -40 a +65 (fun-zionamento*)
Da -40 a +85 (stoc-caggio)
Batteria: Da -40 a +65 (fun-zionamento)
Da -40 a +70 (stoc-caggio)
Protezione:
IP68 (IEC 60529)
Vibrazione:
ASAE EP455 Sezione 5.15.1 Random, MIL-STD-810G, metodo 514.6E-I
Specificheambientali
Specifiche ambientali 91
it

Urto:
Resistente a una caduta di 2 m dalla palina (6.6 ft) su superficie dura.
Umidità:
100% condensante
Gli effetti della condensa si possono contrastare in modo efficace asciu-gando periodicamente lo strumento.
* Tilt & Go funzionalità: Da -30 °C a +65°C
Specifiche ambientali 92
it

4 TrasportoPer il trasporto dell'apparecchiatura sul campo assicurarsi sempre di
• trasportare lo strumento nella sua custodia originale• o trasportare il treppiedi con le gambe aperte appoggiandolo sulla
spalla, tenendo sempre lo strumento in posizione eretta.
Non trasportare mai lo strumento senza custodia all'interno di un veicolostradale, perché potrebbe essere danneggiato da impatti e vibrazioni. Tra-sportare sempre il prodotto nella custodia, nella confezione originale o in uncontenitore equivalente e fissarlo in modo sicuro.
Quando si spedisce lo strumento per mezzo di treni, aerei o navi usare l'im-ballaggio originale GeoMax, il contenitore o il cartone per il trasporto, o unaltro imballaggio idoneo che protegga lo strumento da colpi e vibrazioni.
Trasporto incampagna
Trasporto in unveicolo stradale
Spedizione
Trasporto 93
it

Per il trasporto o la spedizione delle batterie, la persona responsabile delprodotto deve verificare il rispetto di leggi e regolamenti nazionali e inter-nazionali applicabili. Prima di trasportare o spedire le batterie, contattare ilproprio spedizioniere o società di trasporto locale.
Spedizione e tra-sporto delle bat-terie
Trasporto 94
it

5 FunzionamentoCaricare la batteria prima di utilizzarla per la prima volta.
010034_001
2
3
010034_001
2
3
1
☞
Descrizione det-tagliata delle fasiper la sostitu-zione della batte-ria
Funzionamento 95
it

☞ La batteria è inserita a lato dello strumento.
1. Per rimuovere la batteria, premere il bloccaggio a linguetta delcomparto della batteria nella direzione della freccia con il simbolodi lucchetto aperto e aprire il comparto.
2. Premere il blocco lateralmente e allo stesso tempo rimuovere labatteria. In questo modo si sgancia la batteria dalla posizionefissa.
3. Rimuovere la batteria.
4. Per inserire la batteria, premere il bloccaggio a linguetta del com-parto della batteria nella direzione della freccia con il simbolo dilucchetto aperto.
5. Apreire il comparto batteria.
6. Con i contatti della batteria verso l'alto, far scorrere la batterianell'alloggiamento.
7. Premere la batteria all'indietro così che si agganci in posizione.
8. Chiudere il comparto batteria e premere lo scorrevole in direzionedella freccia con il simbolo di lucchetto chiuso.
Funzionamento 96
it

010038_001
1
2
Inserimento di una scheda microSD
☞ Rimuovere la scheda microSD mentre lo strumento è acceso puòcausare perdita di dati. Rimuovere la scheda microSD o scolle-gare i cavi di collegamento solo quando lo strumento è spento.
Inserimento diuna schedamicroSD/SIMpasso a passo
Funzionamento 97
it

☞ La scheda microSD è inserita in uno slot all'interno del vano bat-teria dello strumento.
1. Premere il bloccaggio a linguetta del vano batteria in direzionedella freccia con il simbolo di lucchetto aperto. Aprire il compartobatteria
2. Far scorrere la microSD con il logo verso l'alto con decisione nelloslot come mostrato all'interno del coperchio del vano batteria finoa che va in posizione.
Inserimento di una scheda SIM
☞ L'inserimento/la rimozione della scheda SIM mentre Zenith35 Proè acceso può causare danni permanenti alla scheda. Inserire/rimuovere la scheda SIM solo quando Zenith35 Pro è spento.
☞ La scheda SIM è inserita in uno slot all'interno del vano batteria.
Funzionamento 98
it

1. Premere il bloccaggio a linguetta del vano batteria in direzionedella freccia con il simbolo di lucchetto aperto. Aprire il compartobatteria
2. Far scorrere la SIM con il lconnettore in basso con decisione nelloslot come mostrato all'interno del coperchio del vano batteria finoa che va in posizione.
Funzionamento 99
it

GeoMax AGwww.geomax-positioning.com
848673-1.1.0itTraduzione dal testo originale (848673-1.1.0en)© 2018 GeoMax AG, Widnau, Switzerland

GeoMax Série Zenith35 Pro
Guia RápidoVersão 1.1
1 Informações importantes sobre oinstrumentoLeia e siga o Manual do Usuário gravado no dispositivo de armazenamentode dados antes de usar o produto.
Manter para referência futura!
• Cálculo com software.• Gravação de medições.• Execução de tarefas de medição com várias técnicas de medição
GNSS.• Gravação de informação GNSS e dados de posição.• Controle Remoto do produto.• Intercambio de dados com aparelhos externos.• Medição de dados brutos e cálculo de coordenadas com fase da porta-
dora e sinal de código dos satélites GNSS.
☞
Pretenção de uso
Informações importantes sobre o instrumento 102
pt-br

O produto não deve ser descartado juntamente com o lixo doméstico.
• FCC Part 15 (applicable in US)
• Hereby, GeoMax AG, declares that the radio equipment typeZenith35 Pro is in compliance with the essential requirements andother relevant provisions of Directive 2014/53/EC and other appli-cable European Directives. The declaration of conformity can beconsulted at http://www.geomax-positioning.de/Downloads.htm.
• This Class 2 equipment may be operated in: AT, BE, BG, CA, CH,CY, CZ, DE, DK, EE, ES, FI, FR, GB, GR, HU, IE, IS, IT, LT, LU, LV,MT, NL, NO, PL, PT, RU, RO, SE, SI, SK, US.
Conformity tonational regula-tions
Informações importantes sobre o instrumento 103
pt-br

Class 2 equipment according European Directive 2014/53/EC(RED) for which following EEA Member States apply restrictionson the placing on the market or on the putting into service orrequire authorisation for use:• France• Italy• Norway (if used in the geographical area within a radius of
20 km from the centre of Ny-Ålesund)
• The conformity for countries with other national regulations notcovered by the FCC part 15 or European directive 2014/53/EC hasto be approved prior to use and operation.
• Japanese Radio Law and Japanese Telecommunications BusinessLaw Compliance.• This device is granted pursuant to the Japanese Radio Law
(電波法) and the Japanese Telecommunications Business Law(電気通信事業法).
• This device should not be modified (otherwise the granteddesignation number will become invalid).
Informações importantes sobre o instrumento 104
pt-br

O produto GeoMax é alimentado por baterias de Lítio.
As baterias de Lítio podem ser perigosas em determinadas condições epodem representar um risco de segurança. Em determinadas condições, asbaterias de Lítio podem superaquecer e pegar fogo.
☞ Ao carregar ou despachar o seu produto GeoMax com bateria deLítio a bordo de um avião comercial, você deve fazê-lo deacordo com os Regulamentações Sobre Mercadorias Peri-gosas IATA.
☞ A GeoMax desenvolveu Guias de "Como carregar produtos Geo-Max" e "Como despachar produtos GeoMax" com baterias deLítio. Antes de qualquer transporte de um produto GeoMax, nóspedimos a você que consulte estas Guias na nossa página web(http://www.geomax-positioning.com/dgr) para ter certeza deque você cumpre com as Regulamentações Sobre Produtos Peri-gosos IATA e que o produto GeoMax pode ser transportado cor-retamente.
Regulamentos deProdutos Perigo-sos
Informações importantes sobre o instrumento 105
pt-br

☞ Baterias defeituosas ou danificadas são proibidas de seremtransportadas a bordo de qualquer aeronave. Potanto, tenha acerteza de que as condições de qualquer bateria estão seguraspara transporte.
Informações importantes sobre o instrumento 106
pt-br

2 Componentes do Instrumento
010007_001
ab e
d
fcg
a TNC connector for UHFantenna
b LEMO port 1c Battery compartment
with SIM card andmicroSD card holder
d Keyboard with LEDs,ON/OFF button and Func-tion button
e LEMO port 2f TNC connector for UMTS
antennag Antenna Reference Plane
(ARP), where the instru-ment heights are measu-red.
Zenith35 Procomponents
Componentes do Instrumento 107
pt-br

Key Function
ON/OFF If Zenith35 Pro is off:Turns on Zenith35 Pro when held for 2 s.☞ While the Zenith35 Pro is booting the two
Power LEDs flash.
If Zenith35 Pro is already on:Turns off Zenith35 Pro when held for 2 s.
☞ All functions described assume the Zenith35 Pro is already on.
Key Function
Function Press and hold key for <1 s.
ON/OFF key
Function key
Componentes do Instrumento 108
pt-br
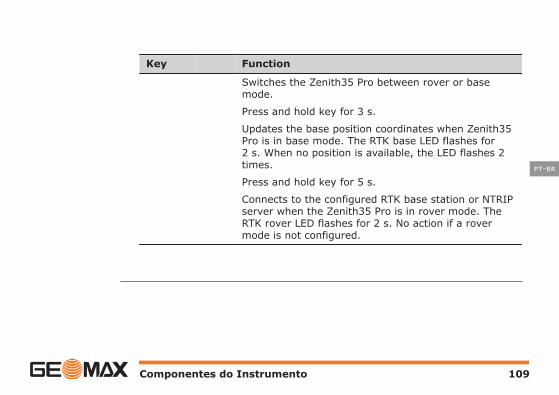
Key Function
Switches the Zenith35 Pro between rover or basemode.
Press and hold key for 3 s.
Updates the base position coordinates when Zenith35Pro is in base mode. The RTK base LED flashes for2 s. When no position is available, the LED flashes 2times.
Press and hold key for 5 s.
Connects to the configured RTK base station or NTRIPserver when the Zenith35 Pro is in rover mode. TheRTK rover LED flashes for 2 s. No action if a rovermode is not configured.
Componentes do Instrumento 109
pt-br
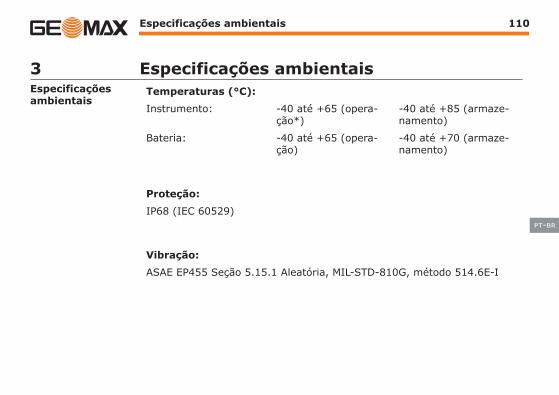
3 Especificações ambientaisTemperaturas (°C):
Instrumento: -40 até +65 (opera-ção*)
-40 até +85 (armaze-namento)
Bateria: -40 até +65 (opera-ção)
-40 até +70 (armaze-namento)
Proteção:
IP68 (IEC 60529)
Vibração:
ASAE EP455 Seção 5.15.1 Aleatória, MIL-STD-810G, método 514.6E-I
Especificaçõesambientais
Especificações ambientais 110
pt-br

Choque
Resistente ao tombo de bastão de 2 m sobre superfície dura
Umidade:
100% condensável
Os efeitos da condensação são eficazmente neutralizados através desecagem periódica do instrumento.
* Funcionalidade Tilt & Go: -30°C a +65°C
Especificações ambientais 111
pt-br
4 TransporteAo transportar o equipamento no campo, tenha a certeza que esteja
• transportar o produto no estojo original,• ou carregue no tripé com as patas abertas e apoiadas no seu ombro,
mantendo-o em pé.
Nunca transporte o produto solto em um veículo de estrada, porque poderáser afetado por choque ou vibrações. Sempre transporte o produto na suamaleta, na embalagem original ou equivalente e fixe-o.
O transporte do aparelho por via férrea, aérea ou marítima deve ser sem-pre efetuada com a embalagem original completa da GeoMax, estojo detransporte e caixa de papel cartão (ou outro meio equivalente) de modo aproteger o equipamento contra os choques e vibrações.
Transporte nocampo.
Transporte emum veículo deestrada
Remessa
Transporte 112
pt-br

Durante o transporte ou remessa das baterias, a pessoa responsável peloproduto deve assegurar que as regras aplicáveis e regulamentos nacionaise internacionais sejam observados. Antes do transporte e remessa, contateo transportador local ou a sua empresa de transporte de mercadorias.
Remessa, trans-porte das bate-rias
Transporte 113
pt-br

5 OperaçãoA bateria deve ser carregada antes de utilizá-la pela primeira vez.
010034_001
2
3
010034_001
2
3
1
☞
Troca da bateriapasso a passo
Operação 114
pt-br

☞ A bateria é inserida na lateral do instrumento.
1. Para remover a bateria, pressione a trava deslizante do seu com-partimento na direção da flecha com o símbolo de destravado eabra o respectivo compartimento.
2. Pressione a trava deslizante e, ao mesmo tempo, puxe a bateria.Isto libera a bateria da sua posição fixa.
3. Remova a bateria
4. Para inserir a bateria, pressione a trava deslizante na direção daflecha com o símbolo de destravado.
5. Abra o compartimento da bateria.
6. Com os contatos da bateria voltados para cima, deslize a bateriano seu compartimento.
7. Empurre a bateria para trás a fim de fixá-la na sua posição.
8. Feche o compartimento da bateria e pressione a trava deslizantena direção da flecha com símbolo de trava.
Operação 115
pt-br

010038_001
1
2
Inserindo um cartão microSD
☞ A remoção do cartão microSD com o instrumento ligado podecausar a perda de dados. Somente remova o cartão microSD oudesconecte os cabos de conexão com o instrumento desligado.
Inserindo umcartão microSD /SIM, passo apasso
Operação 116
pt-br

☞ O cartão microSD é inserido no compartimento da bateria do ins-trumento.
1. Empurre o fecho deslizante do compartimento na direção daseta, com o símbolo de desbloqueio. Abra o compartimento dabateria
2. Deslize firmemente o cartão microSD, com o seu logo voltadopara cima na sua respectiva abertura, até que ele se fixe na suaposição.
Inserindo um cartão SIM
☞ Inserção/remoção do cartão SIM com o Zenith35 Pro ligado poderesultar em dano permanente do cartão. Somente insira/removao cartão SIM com o Zenith35 Pro desligado.
☞ O cartão SIM é inserido na abertura localizada no compartimentoda bateria.
1. Empurre o fecho deslizante do compartimento na direção da setacom o símbolo de desbloqueio. Abra o compartimento da bateria.
Operação 117
pt-br

2. Deslize firmemente o cartão SIM, com os seus conectores volta-dos para baixo na sua respectiva abertura, até que ele se fixe nasua posição.
Operação 118
pt-br


GeoMax AGwww.geomax-positioning.com
848673-1.1.0pt-brTraduzido do texto original (848673-1.1.0en)© 2018 GeoMax AG, Widnau, Suíça

GeoMax Zenith35 Pro
Краткое руководствоВерсия 1.1

1 Важная информация о Вашем ИнструментеПеред использованием инструмента ознакомьтесь с Руководством пользова-теля.
Сохраняйте документацию для использования в дальнейшем в качестве спра-вочника!
• Вычисления при помощи ПО.• Запись измерений.• Решение геодезических задач с помощью различных технологий GNSS
измерений.• Запись GNSS данных.• Дистанционное управление прибором.• Обмен данными с внешними устройствами.• Измерение и вычисление координат местоположения в результате полу-
чения фазового и кодового решений по GNSS сигналам.
☞
Штатное использо-вание
Важная информация о Вашем Инструменте 122
ru
Продукт не должен утилизироваться вместе с бытовыми отходами.
• FCC Part 15 (applicable in US)
• Hereby, GeoMax AG, declares that the radio equipment type Zenith35 Pro isin compliance with the essential requirements and other relevant provisions ofDirective 2014/53/EC and other applicable European Directives. Thedeclaration of conformity can be consulted at http://www.geomax-positioning.de/Downloads.htm.
• This Class 2 equipment may be operated in: AT, BE, BG, CA, CH, CY, CZ, DE,DK, EE, ES, FI, FR, GB, GR, HU, IE, IS, IT, LT, LU, LV, MT, NL, NO, PL, PT,RU, RO, SE, SI, SK, US.
Conformity tonational regulations
Важная информация о Вашем Инструменте 123
ru

Class 2 equipment according European Directive 2014/53/EC (RED) forwhich following EEA Member States apply restrictions on the placing onthe market or on the putting into service or require authorisation for use:• France• Italy• Norway (if used in the geographical area within a radius of 20 km
from the centre of Ny-Ålesund)
• The conformity for countries with other national regulations not covered by theFCC part 15 or European directive 2014/53/EC has to be approved prior touse and operation.
• Japanese Radio Law and Japanese Telecommunications Business LawCompliance.• This device is granted pursuant to the Japanese Radio Law (電波法) and
the Japanese Telecommunications Business Law (電気通信事業法).• This device should not be modified (otherwise the granted designation
number will become invalid).
Питание оборудования GeoMax осуществляется литиевыми батареями.Правила по опас-ным материалам
Важная информация о Вашем Инструменте 124
ru

Литиевые батареи в некоторых условиях могут представлять опасность. В опре-деленных условиях, литиевые батареи могут нагреваться и воспламеняться.
☞ Перевозка товаров GeoMax, питающихcя от литиевых батарей,средствами авиации, должна осуществляться согласно ПравиламIATA по опасным материалам.
☞ GeoMax разработала Руководство по перевозке продуктовGeoMax и перемещению продуктов GeoMax с литиевыми бата-реями. Перед транспортировкой оборудования GeoMax, прочитайтеруководство по перевозке на сайте (http://www.geomax-positioning.com/dgr) и убедитесь, что не нарушаете Правила IATA поопасным материалам, а также что транспортировка оборудованияGeoMax организована правильно.
☞ Поврежденные или дефектные батареи запрещены к перевозке налюбом авиатранспортном средстве. Перед перевозкой удостоверь-тесь в качестве транспортируемых батарей.
Важная информация о Вашем Инструменте 125
ru

2 Составляющие инструмента
010007_001
ab e
d
fcg
a TNC connector for UHFantenna
b LEMO port 1c Battery compartment with
SIM card and microSD cardholder
d Keyboard with LEDs,ON/OFF button and Functionbutton
e LEMO port 2f TNC connector for UMTS
antennag Antenna Reference Plane
(ARP), where the instrumentheights are measured.
Zenith35 Procomponents
Составляющие инструмента 126
ru

Key Function
ON/OFF If Zenith35 Pro is off:Turns on Zenith35 Pro when held for 2 s.
☞ While the Zenith35 Pro is booting the twoPower LEDs flash.
If Zenith35 Pro is already on:Turns off Zenith35 Pro when held for 2 s.
☞ All functions described assume the Zenith35 Pro is already on.
Key Function
Function Press and hold key for <1 s.
Switches the Zenith35 Pro between rover or base mode.
ON/OFF key
Function key
Составляющие инструмента 127
ru

Key Function
Press and hold key for 3 s.
Updates the base position coordinates when Zenith35 Pro isin base mode. The RTK base LED flashes for 2 s. When noposition is available, the LED flashes 2 times.
Press and hold key for 5 s.
Connects to the configured RTK base station or NTRIP serverwhen the Zenith35 Pro is in rover mode. The RTK rover LEDflashes for 2 s. No action if a rover mode is not configured.
Составляющие инструмента 128
ru

3 Эксплуатационные характеристикиДиапазон температур (хC):
Приемник: -40 до +65 (диапазонрабочих температур*)
-40 до +85 (диапазонтемператур хранения)
Аккумулятор: -40 до +65 (диапазонрабочих температур)
-40 до +70 (диапазонтемператур хранения)
Уровень защиты:
IP68 (IEC 60529)
Вибрации:
ASAE EP455 Section 5.15.1 Random, MIL-STD-810G, method 514.6E-I
Эксплуатационныехарактеристики
Эксплуатационные характеристики 129
ru
Удары:
Выдерживает опрокидывание с вехи 2,0 м на твердую поверхность.
Влажность:
100%
Влияние конденсации влаги успешно устраняется периодической протиркойи просушкой инструмента.
* Tilt & Go функциональность: -30ДC до +65ДC
Эксплуатационные характеристики 130
ru
4 ТранспортировкаПри переноске инструмента в ходе полевых работ обязательно убедитесь втом, что он переносится:
• в оригинальном контейнере,• либо на штативе в вертикальном положении.
Никогда не перевозите изделие в транспортном средстве без оригинальноготранспортного контейнера, поскольку оно может быть повреждено ударом ивибрацией. Обязательно используйте для перевозки изделия контейнер, ориги-нальную или эквивалентную упаковку и надежно зафиксируйте его.
При транспортировке по железной дороге, на судах или самолетах обязательноиспользуйте полный комплект GeoMax для упаковки и транспортировки, либоаналогичные средства для защиты тахеометра от ударов и вибрации.
Транспортировка входе полевыхработ
Транспортировка вавтомобиле
Транспортировка
Транспортировка 131
ru

При транспортировке или перевозке аккумуляторов лицо, ответственное заоборудование, должно убедиться, что при этом соблюдаются все национальныеи международные требования к таким действиям. Перед транспортировкой обо-рудования обязательно свяжитесь с представителями компании-перевозчика.
Транспортировка иперевозка аккуму-ляторов
Транспортировка 132
ru
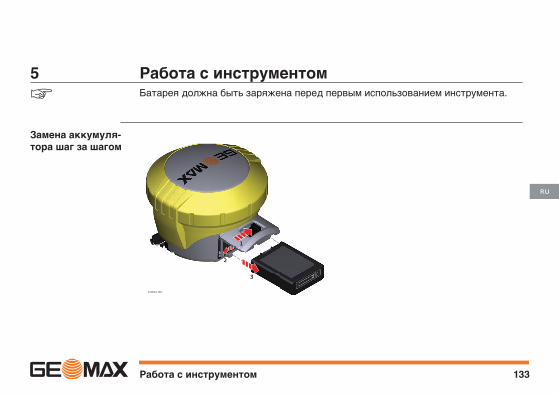
5 Работа с инструментомБатарея должна быть заряжена перед первым использованием инструмента.
010034_001
2
3
010034_001
2
3
1
☞
Замена аккумуля-тора шаг за шагом
Работа с инструментом 133
ru

☞ Аккумулятор вставляется сбоку прибора.
1. Чтобы извлечь батарею, сместите замок в направлении стрелки ссимволом отпирания и откройте крышку.
2. Отодвиньте задвижку вбок и в то же время вытащите аккумулятор.Батарея выйдет из фиксированного положения.
3. Батарея выйдет из отсека.
4. Чтобы вставить аккумулятор, переведите защелку батарейногоотсека в направлении стрелки с символом отпирания.
5. Откройте аккумуляторный отсек.
6. Вставьте батарею контактами вверх и задвиньте аккумуляторныйотсек.
7. Сместите батарею вверх, чтобы она заняла верное положение.
8. Закройте батарейный отсек, переведя защелку в направлениистрелки с символом запирания.
Работа с инструментом 134
ru

010038_001
1
2
Извлечение microSD карты.
☞ Извлечение карты microSD при включенном приемнике может приве-сти к потере данных. Извлекайте карту microSD или соединительныекабели, только когда приемник выключен.
Установка microSDкарты/SIM шаг зашагом.
Работа с инструментом 135
ru
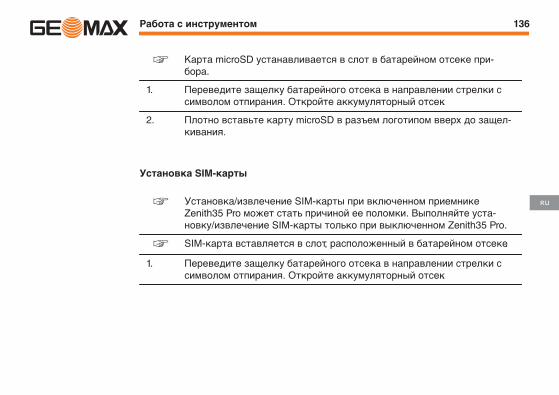
☞ Карта microSD устанавливается в слот в батарейном отсеке при-бора.
1. Переведите защелку батарейного отсека в направлении стрелки ссимволом отпирания. Откройте аккумуляторный отсек.
2. Плотно вставьте карту microSD в разъем логотипом вверх до защел-кивания.
Установка SIM-карты
☞ Установка/извлечение SIM-карты при включенном приемникеZenith35 Pro может стать причиной ее поломки. Выполняйте уста-новку/извлечение SIM-карты только при выключенном Zenith35 Pro.
☞ SIM-карта вставляется в слот, расположенный в батарейном отсеке.
1. Переведите защелку батарейного отсека в направлении стрелки ссимволом отпирания. Откройте аккумуляторный отсек.
Работа с инструментом 136
ru

2. Вставьте SIM-карту контактами вниз в гнездо до упора, как пока-зано внутри батарейного отсека до щелчка.
Работа с инструментом 137
ru

GeoMax AGwww.geomax-positioning.com
848673-1.1.0ruПеревод исходного текста (848673-1.1.0en)© 2018 GeoMax AG, Виднау, Швейцария

GeoMax Zenith35 Pro
퀵가이드버전 1.1

1 장비의 중요한 정보제품을 사용하기 전에 동봉된 데이터 보관 장치에 포함된 사용자 매뉴얼을 읽어보십시오.
보관하여 참고하십시오!
• 소프트웨어를 사용하여 계산• 측정값 저장• 다양한 GNSS 측량 테크닉을 사용하여 측정• GNSS & 데이터 관련점 저장• 제품 원격 제어• 외부 프로그램과 데이터 통신• GNSS 위성의 반송파 & 코드 시그널을 사용하여 원시 데이터 측정 & 좌표 계산
제품을 가정용 쓰레기와 함께 폐기하면 안 됩니다.
☞
올바른 사용
장비의 중요한 정보 140
ko

• FCC Part 15(미국 내 적용)
• GeoMax AG는 Zenith35 Pro 라디오장치가 Directive 2014/53/EC 및 기타European Directives의 필수 요구사항을 준수하였음을 알립니다. 적합 인증서는 http://www.geomax-positioning.de/Downloads.htm에서 확인할 수 있습니다.
• Class 2 제품은 다음 지역에서 사용 가능합니다. AT, BE, BG, CA, CH, CY, CZ,DE, DK, EE, ES, FI, FR, GB, GR, HU, IE, IS, IT, LT, LU, LV, MT, NL, NO, PL, PT,RU, RO, SE, SI, SK, US.
European Directive(유럽 인증) 2014/53/EC(R& TTE)를 준수한 Class 2 장비는 다음 EEA 국가에서 아무런 제약 없이 판매 및 서비스 가능합니다.• 프랑스• 이탈리아• 노르웨이(니알슨 지역 반경 20km 지역)
국제 규정 준수
장비의 중요한 정보 141
ko

• FCC Part 15 또는 European Directive 2014/53/EC에 해당하지 않는 기타 국제 규약이 있는 국가에 대한 적합성은 사용 및 작동 전에 인증을 받아야 합니다.
• 일본 라디오 법규 및 일본 통신 사업자 법률 준수.• 이 장치는 일본 라디오법률 (電波法) 및 일본 통신사법률(電気通信事業法)
을 준수하였습니다.• 이 장치를 개조하지 마십시오 (개조시 부여된 넘버는 무효입니다).
GeoMax 제품은 리튬 배터리로 전원을 공급합니다.
리튬 배터리는 특정 환경에서 위험할 수도 있기 때문에 안전하게 사용해야 합니다. 특정 환경에서 리튬 배터리가 과열 또는 점화될 수 있습니다.
☞ 리튬 배터리를 포함한 GeoMax 제품을 항공으로 운반하거나 배송할 때IATA 위험물 규약을 준수해야 합니다.
위험물 규정
장비의 중요한 정보 142
ko

☞ GeoMax는 리튬 배터리와 함께 "GeoMax 제품 운반" 및 "GeoMax 제품배송" 가이드라인을 제공합니다. GeoMax 제품 운송 전에 GeoMax 제품을 올바르게 운송할 수 있도록 IATA 위험물 규약을 준수하고 있는지 여부를 웹사이트(http://www.geomax-positioning.com/dgr)에서 확인하십시오.
☞ 손상이나 결함이 있는 배터리는 항공 운송이 금지됩니다. 운송하기 전에배터리 상태가 안전한지 확인하십시오.
장비의 중요한 정보 143
ko

2 장비 컴퍼넌트
010007_001
ab e
d
fcg
a UHF 안테나용 TNC 커넥터b LEMO 포트 1c MicroSD/SIM 카드 홀더가 있
는 배터리 소켓d LED, ON/OFF 버튼 및 기능
버튼이 있는 키보드e LEMO 포트 2f UMTS 안테나용 TNC 커넥터g 장비 높이 측정 시 사용되는
안테나 기준면(ARP).
Zenith35 Pro 컴퍼넌트
장비 컴퍼넌트 144
ko

키 기능
ON/OFF Zenith35 Pro가 꺼진 상태:2 초간 눌러 Zenith35 Pro를 켭니다.
☞ Zenith35 Pro가 부팅되는 동안 2개의 전원 LED가 반짝입니다.
Zenith35 Pro가 켜진 상태:2 초간 누르면 Zenith35 Pro가 꺼집니다.
☞ 아래 설명은 Zenith35 Pro가 켜진 상태의 기능입니다.
키 기능
기능 버튼을 1 초 미만 동안 눌렀다 놓습니다.
Zenith35 Pro를 이동국 또는 기준국 모드 간에 전환합니다.
ON/OFF 키
기능 키
장비 컴퍼넌트 145
ko

키 기능
3 초간 버튼을 눌렀다 놓습니다.
Zenith35 Pro가 기준국 모드인 경우, 기준값 좌표를 업데이트합니다. RTK 기준국 LED가 2초간 반짝입니다. 이용할 수 있는위치가 없는 경우, LED가 2회 반짝입니다.
5 초간 버튼을 눌렀다 놓습니다.
Zenith35 Pro가 이동국 모드인 경우, 설정한 RTK 기지국 또는NTRIP 서버로 연결합니다. RTK 이동국 LED가 2초간 반짝입니다. 이동국 모드가 설정되지 않은 경우, 아무런 반응도 하지않습니다.
장비 컴퍼넌트 146
ko

3 환경 사양온도(°C):
장비: -40 ~ +65(작동 시*) -40 ~ +85(보관 시)
배터리: -40 ~ +65(작동 시) -40 ~ +70(보관 시)
보호:
IP68(IEC 60529)
진동:
ASAE EP455 Section 5.15.1 Random, MIL-STD-810G, 방식 514.6E-I
충격:
2m 높이의 폴이 단단한 표면 위로 넘어지는 충격을 견딥니다.
환경 사양
환경 사양 147
ko

습도:
100% 비응축
정기적으로 장비를 건조하면 응축의 영향이 효과적으로 해소됩니다.
* Tilt & Go 기능: -30°C ~ +65°C
환경 사양 148
ko

4 운반현장에서 장비 운반시 다음을 확인하십시오.
• 오리지널 컨테이너를 사용하여 제품을 운반하십시오.• 또는 다리를 벌린 삼각대를 어깨에 붙혀 운반하십시오.
제품을 박스에서 개봉하여 운반하지 마십시오. 제품이 충격과 진동의 영향을 받을 수있습니다. 항상 케이스에 넣어 장비를 운반하십시오.
철로, 비행기, 선박을 통해 제품 운반 시, 원래의 GeoMax 패키지, 운반 컨테이너 및 판지 상자, 또는 이에 상응하는 도구를 항상 사용하여 충격과 진동으로부터 보호할 수있도록 하십시오.
배터리 운반 및 운송시 책임자는 국가 법률을 숙지하셔야합니다. 운송 전에 현지 운송업체에 문의하십시오.
현장 운반
차량으로 운반
선적
배터리 운반, 운송
운반 149
ko

5 작동최초 사용전에는 배터리를 반드시 충전해야합니다.
010034_001
2
3
010034_001
2
3
1
☞
배터리 교체 단계
작동 150
ko

☞ 배터리는 장비 측면에 삽입됩니다.
1. 배터리를 분리하려면 배터리 소켓의 잠금 장치를 열림 심볼이 있는 화살표방향으로 밀어서 열어줍니다.
2. 로커를 옆으로 밀면서 배터리를 당겨 뺍니다. 배터리가 고정 위치를 약간벗어납니다.
3. 배터리를 분리합니다.
4. 배터리를 삽입하려면 배터리 소켓의 잠금 장치를 열림 심볼이 있는 화살표방향으로 미십시오.
5. 배터리 소켓을 엽니다.
6. 배터리 접촉단자를 위로 가도록 하여 배터리 소켓에 배터리를 밀어 넣습니다.
7. 배터리를 아래로 밀어 제자리에 끼웁니다.
8. 배터리 소켓을 닫고, 배터리 소켓의 잠금 장치를 닫힘 심볼이 있는 화살표방향으로 미십시오.
작동 151
ko

010038_001
1
2
MicroSD 카드 삽입
☞ 장비가 켜져 있을 때 MicroSD 카드를 분리하면 데이터가 손실될 수 있습니다. 장비가 꺼진 상태에서만 MicroSD 카드를 분리하거나 케이블을 제거하십시오.
☞ MicroSD 카드는 장비 배터리 소켓의 내부 슬롯에 삽입됩니다.
MicroSD/SIM 카드삽입 단계
작동 152
ko

1. 배터리 소켓의 잠금 장치를 열림 심볼이 있는 화살표 방향으로 미십시오.배터리 소켓을 엽니다.
2. MicroSD 카드의 로고가 위로 가도록 하여 배터리 뚜껑 내부에서 클릭 소리가 날 때까지 슬롯에 단단히 고정되도록 밀어줍니다.
SIM 카드 삽입
☞ Zenith35 Pro가 켜진 상태에서 SIM 카드를 삽입/분리할 경우 카드가 손상될 수 있습니다. Zenith35 Pro가 꺼진 상태에서만 SIM 카드를 삽입/분리하십시오.
☞ SIM 카드는 배터리 소켓의 내부 슬롯에 삽입됩니다.
1. 배터리 소켓의 잠금 장치를 열림 심볼이 있는 화살표 방향으로 미십시오.배터리 소켓을 엽니다.
2. SIM 카드의 커넥터가 아래로 가도록 하여 배터리 뚜껑 내부에서 클릭 소리가 날 때까지 슬롯에 단단히 고정되도록 밀어줍니다.
작동 153
ko

GeoMax AGwww.geomax-positioning.com
848673-1.1.0ko번역본 (848673-1.1.0en)© 2018 GeoMax AG, Widnau, Switzerland


GeoMax AGwww.geomax-positioning.com
848673-1.1.0multilingualOriginal text (848673-1.1.0en)© 2018 GeoMax AG, Widnau, Switzerland