Embed Size (px)
DESCRIPTION
343434
Citation preview
M
L+
6 mm
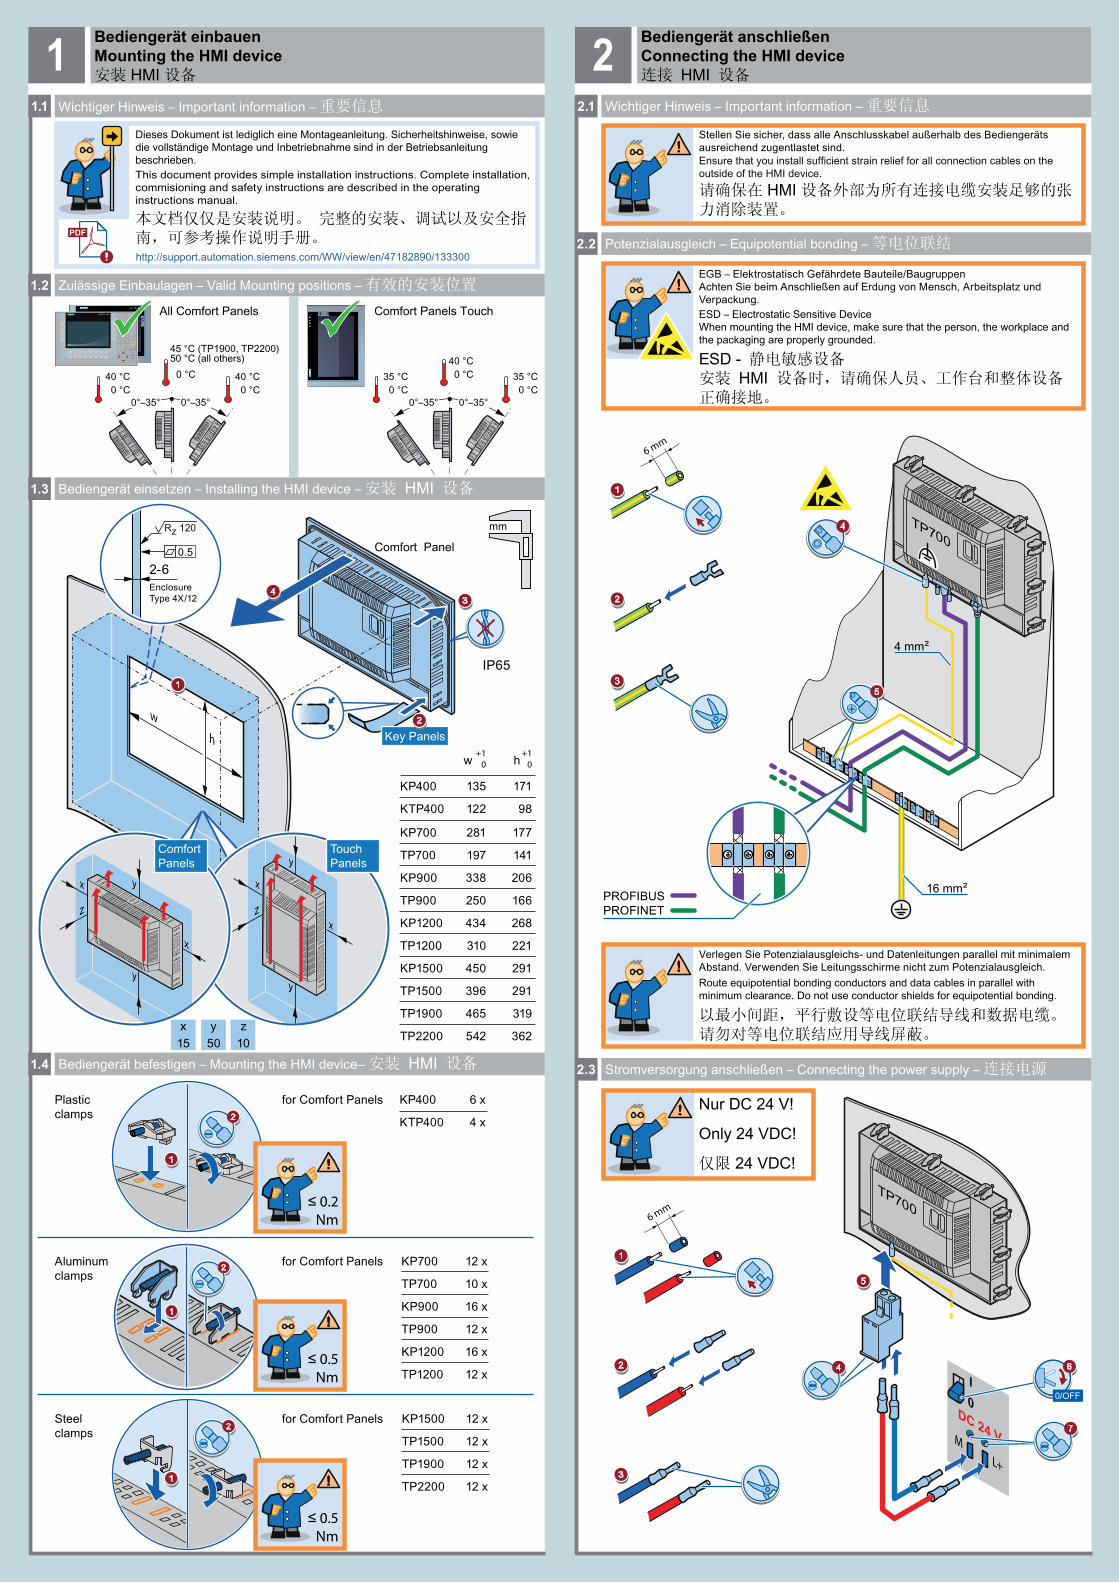
Verlegen Sie Potenzialausgleichs- und Datenleitungen parallel mit minimalem Abstand. Verwenden Sie Leitungsschirme nicht zum Potenzialausgleich.Route equipotential bonding conductors and data cables in parallel with minimum clearance. Do not use conductor shields for equipotential bonding.
以最小间距,平行敷设等电位联结导线和数据电缆。 请勿对等电位联结应用导线屏蔽。
http://support.automation.siemens.com/WW/view/en/47182890/133300
Dieses Dokument ist lediglich eine Montageanleitung. Sicherheitshinweise, sowie die vollständige Montage und Inbetriebnahme sind in der Betriebsanleitung beschrieben.This document provides simple installation instructions. Complete installation, commisioning and safety instructions are described in the operating instructions manual.
本文档仅仅是安装说明。 完整的安装、调试以及安全指南,可参考操作说明手册。
x y z15 50 10
Nur DC 24 V!
Only 24 VDC!
仅限 24 VDC!
EGB – Elektrostatisch Gefährdete Bauteile/BaugruppenAchten Sie beim Anschließen auf Erdung von Mensch, Arbeitsplatz und Verpackung. ESD – Electrostatic Sensitive DeviceWhen mounting the HMI device, make sure that the person, the workplace and the packaging are properly grounded.
ESD - 静电敏感设备安装 HMI 设备时,请确保人员、工作台和整体设备正确接地。
Stellen Sie sicher, dass alle Anschlusskabel außerhalb des Bediengeräts ausreichend zugentlastet sind.Ensure that you install sufficient strain relief for all connection cables on the outside of the HMI device.请确保在 HMI 设备外部为所有连接电缆安装足够的张力消除装置。
1.1 Wichtiger Hinweis – Important information – 重要信息
1.2 Zulässige Einbaulagen – Valid Mounting positions – 有效的安装位置
1.3 Bediengerät einsetzen – Installing the HMI device – 安装 HMI 设备
1.4 Bediengerät befestigen – Mounting the HMI device– 安装 HMI 设备 2.3 Stromversorgung anschließen – Connecting the power supply – 连接电源
Bediengerät einbauenMounting the HMI device安装 HMI 设备
1 Bediengerät anschließenConnecting the HMI device连接 HMI 设备
22.1 Wichtiger Hinweis – Important information – 重要信息
2.2 Potenzialausgleich – Equipotential bonding – 等电位联结
0/OFF
6
7
4
3
2
1
5
16 mm²
6 mm
3
2
1
4
5
4 mm²IP65
34
w
h
y
x
Touch Panels
x
y
z
1
ComfortPanels
y
z
x
x
y
TP700
PROFIBUSPROFINET
Comfort Panels Touch
2-60.5
EnclosureType 4X/12
TP700
1
2
≤ 0.5Nm
1
2
35 °C0 °C
35 °C0 °C
40 °C0 °C
0°–35° 0°–35°
40 °C0 °C
40 °C0 °C
50 °C (all others)0 °C
0°–35° 0°–35°
All Comfort Panels
+10
+10
KTP400
KP700
TP700
KP400 135
w
122
281
197
171
h
98
177
141
TP900
KP1200
KP900 338
250
434
206
166
268
TP1200 310 221
KP1500 450 291
TP1500 396 291
TP1900 465 319
TP2200 542 362
KTP400
KP400 6 x
4 x
KP700
TP700
12 x
10 x
TP900
KP1200
KP900 16 x
12 x
16 x
TP1200 12 x
KP1500 12 x
TP1500 12 x
TP1900 12 x
TP2200 12 x
mm
1
2
≤ 0.2Nm
45 °C (TP1900, TP2200)
Key Panels2
SIEMENS SIMATIC HMI
Plastic clamps
Aluminum clamps
Steel clamps
Comfort Panel
for Comfort Panels
for Comfort Panels
for Comfort Panels
1
2
≤ 0.5Nm

Technische Support-ZentraleCentral Technical Support技术支持中心
www.siemens.com/automation/support
SIMATIC HMI
KTP400 ComfortKP400 ComfortKP700 ComfortKP900 ComfortKP1200 ComfortKP1500 Comfort
TP700 ComfortTP900 ComfortTP1200 ComfortTP1500 ComfortTP1900 ComfortTP2200 Comfort
03/2012A5E02950329-04
Bediengerät einbauenMounting the HMI device安装 HMI 设备Bediengerät anschließenConnecting the HMI device连接 HMI 设备
Projekt transferierenTransferring a project传送项目
Reparatur und ErsatzteileService and spare parts维修和备件
www.automation.siemens.com/service
3.1 Projektierungs-PC anschließen – Connecting a configuring PC – 连接组态 PC
Projekt transferierenTransferring a project传送项目
3
3.2 Datenkanal parametrieren – Configuring the data channel – 组态数据通道
3.3 Transfer starten – Starting transfer – 启动传送
Beim Transfer eines Projekts wird das aktuelle Projekt auf dem Bediengerät überschrieben. Falls erforderlich, sichern Sie vor dem Transfer die Daten.
传送项目时,HMI 设备中的当前项目将被覆盖。 根据需要,在传送前保存现有数据。
Transferring a project will overwrite the current project on your HMI device.If required, save existing data before the transfer.
2.0
PC
2
1/ON
PC
3 4
0/OFF
1
5
1/ON
4
Control Panel
1
Transfer
2
USB Device
3
Transfer
1
WinCC2
3
5
4
http://support.automation.siemens.com/WW/view/en/49313233
Möglichkeiten für die Datenübertragung
数据传输方法Data transmission options
http://support.automation.siemens.com/WW/view/en/49313233
Transfermodus einstellen
设置传输模式Setting transfer mode