Embed Size (px)
Citation preview
How to manage photos stored in a QNAP NAS?
Importing photos/videos to a QNAP NAS
Use the Media Library to efficiently manage photos
Setup the Media Library
Organize photos with Photo Station
Starting Photo Station
Creating an album
Creating a smart album
Add face tags to photos (Only supported by x86-based QNAP NAS)
Browse PDF files
Search photos/videos
Backup/restore album information
Stream different photos/videos on Photo Station to different
multimedia devices
Use Photo Station to share photos/videos
Share photos/videos as you want
Upload photos/videos to social website
Sharing public albums

Importing photos/videos to a QNAP NAS
In Photo Station, contents are displayed according to shared folder permissions.
For example, if a user has read/write, or read-only permissions to a certain
shared folder, that user can see all of the photos and videos in the shared folder.
In other words, you can upload them to a shared folder, such as “/Multimedia”,
“/home”, or a new shared folder as long as you have write permissions. To create
a new shared folder, please go to “Control Panel” > “Privilege Settings” > “Shared
Folders”.
A user's home folder will be shown in the "Private Collection" inside Photo
Station and all other shared folders will be shown in “Shared Photos”. Sometimes
your photos may be mixed with unwanted images from other folders, but you can
use the content filter in “Settings” to determine what content to display.

To import a large number of files or folders, please follow the instructions
provided in the below table. You can also upload files using Photo Station, File
Station, FTP, or Qfile from your mobile device.
Windows Users Mac Users
Install the QNAP Qfinder utility on
your PC and set up a network drive.
You can then quickly upload files to
your preferred shared folders.
Run Qfinder for Mac and select "Go" >
"Connect to Server" (or use the
shortcut keys "Command + K" on your
keyboard) to establish a connection
with the QNAP NAS via SMB or AFP.
Note: Thumbnails for the multimedia files will be automatically generated to
enhance your user experience. The duration of this process may vary based on

the performance of your NAS and the total number of multimedia files.
Use the Media Library to efficiently manage photos
Setup the Media Library
The Photo Station is an application developed from a database known as the
Media Library. You can manage the Media Library settings in “Control Panel” >
“Applications” > “Multimedia Management”. The Media Library will scan and
index multimedia files from designated media folders. You can select whether to
scan for multimedia files manually or by schedule under the “Media Library” tab.
To set the Media Library to only scan for certain folders or media types, please
specify them under the “Media Folder” tab.
Note:
As the media folders in the Media Library are the content source for Photo
Station, Music Station, Video Station and DLNA Media Server; the contents
will be affected in those applications if new media folders are added or
existing media folders are removed from the Media Library.
The photo and video media folders you specified in the Media Library will
be used as the content source for Photo Station.

If an error occurs when indexing in the Media Library. You can right-click on a
photo in Photo Station to manually create thumbnails.
Organize photos with Photo Station
Starting Photo Station
Please ensure that Photo Station has been installed and enabled in the App
Center (QTS 4.2 and later versions only.)

Creating an album
An album is a virtual folder used to collect photos/videos, and you do not need to
worry about where files are stored on the QNAP NAS. You can click on
to create a new album.
Now add selected photos/videos to that album.

You can also drag photos/videos to “Album” on the left panel to create a new
album and drag more photos/videos from different folders to the newly-created
album for your customized collection.
If photos/videos have already been organized in folders, click “Folder” on the left
panel, and you can browse photos in the folder view. You can right click on a
folder that you prefer and select “Create New Album” to turn it into an album.
Select “Create a Smart Album” to create an album that automatically adds new

photos/videos when they are added to that folder. Selecting “Create subfolder to
Smart Album” will turn selected subfolders into individual smart albums.
Creating a smart album
A smart album automatically displays photos/videos that match search criteria
and can save a lot of time in photo management. To create a smart album, click
the “+” button next to “Smart Album”. In the album creation window, you can
configure the smart album with different search criteria such as “Today in
history”, “Period”, “Random”, “Tag”, or “All files”.
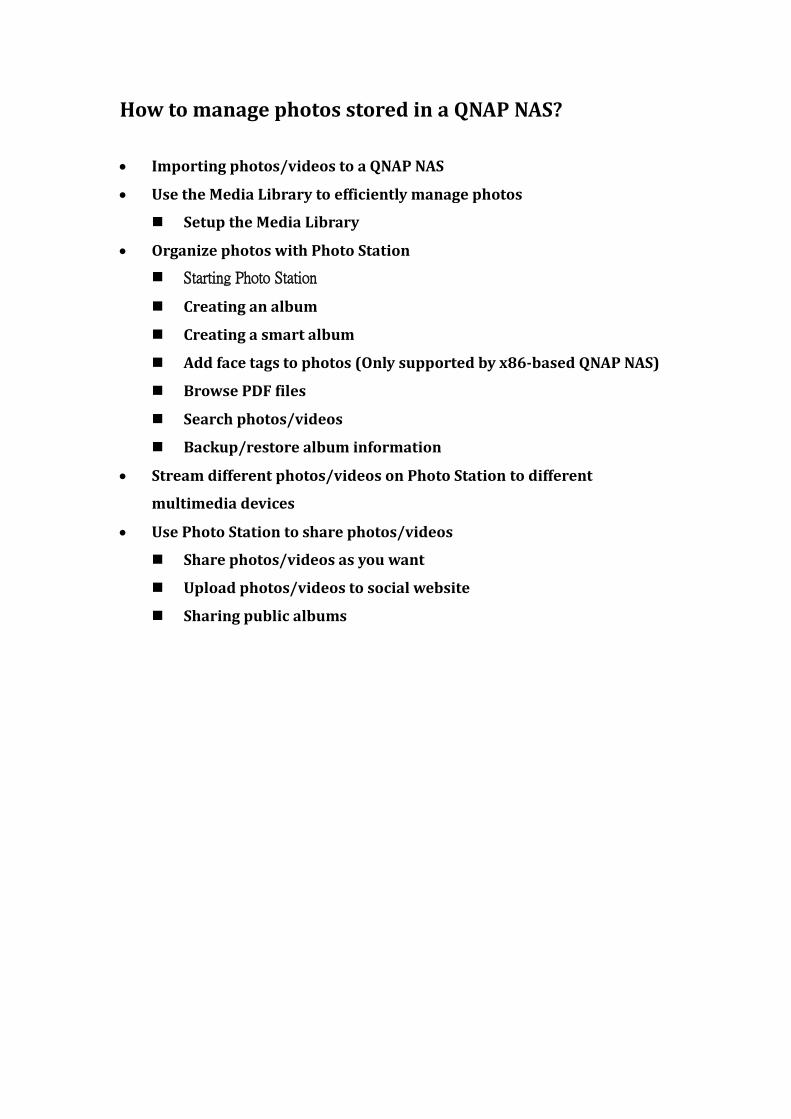
If “Today in history” is chosen as the search condition, photos taken on the same
date as today will be displayed. If you often take photos on certain, important
days such as birthdays or your wedding anniversary, you can specify a date to
show these special occasions immediately from the smart album.
If you want to organize photos/videos efficiently, you can specify a time period to
establish a travel album (for example: A trip to Germany for 12 days, from the 12
January until the 23 January).

Add face tags to photos (Only supported by x86-based QNAP NAS)
* The Photo Station Extension App must be installed before using this function.
After installing the Photo Station Extension App, go to "Settings" > "Face
Detection" to set up face detection folders. As the face detection function can
affect system performance, please avoid using it during peak NAS usage periods.

After setting up face detection folders, you can click to enable face
detection. Detected faces will be shown on the interface. You can add a face tag to
it, or manually change the face area.
Browse PDF files
* The Photo Station Extension App must be installed before using this function.
If you want to browse PDF files (such as comic books), after installing the Photo

Station Extension App, you will see PDF covers in the Photo Station. You can right
click on a PDF file to create a new album (convert the PDF file to an album), and
you can see the file's contents within Photo Station. From here you can enjoy
them and even stream them to network devices.
Search photos/videos
You can search by file size, camera brand, when the photo was taken, or by tags,
color labels, rating or description.

Stream different photos/videos on Photo Station to different
multimedia devices
* The Multimedia Extension Pack App must be installed before using this
function.
Select the photos/videos you want to stream then right-click and choose what
device to stream to (supports DLNA, AirPlay, and Chromecast devices).
When streaming, you can check the now-playing content on devices using the
below interface.


The now-playing devices will turn blue as below. You can keep selecting different
content to stream to other multimedia devices.
Backup/restore album configuration
We strongly recommend backing up configuration files of albums/smart albums
before rebuilding the media library or carrying out system migration. Please go
to "Settings" > "Backup/Restore", and click “Export” to backup the configuration
file to your PC. If an accident occurs that removes your albums/smart albums,

you can import the configuration file to restore them. Please note that if you
import the configuration file twice, the same albums will be created again.
Use Photo Station to share photos/videos
Share photos/videos as you want
Right-click on selected photos/videos and choose “share”, or click on the
toolbar. You can select to share photos as a slideshow link by email or publish to
social networking sites. Or you can create a share link and copy & paste it for
quick sharing with friends.

Upload photos/videos to social website
After selecting the sharing method, the Sharing Cart will appear. Select upload
files to directly upload photos/videos to Flickr, Picasa, Weibo or YouTube.
Sharing public albums
In the album creation window, you can also set the album for personal use,
sharing with NAS users, or sharing with the public. To change the album settings,
right click on an album and select “Album Settings”.

As a Photo Station administrator, you can even share a public album to the NAS
login screen (the photo-wall style login screen can be set in “Control Panel” >
“General Settings” > “Login Screen”.)
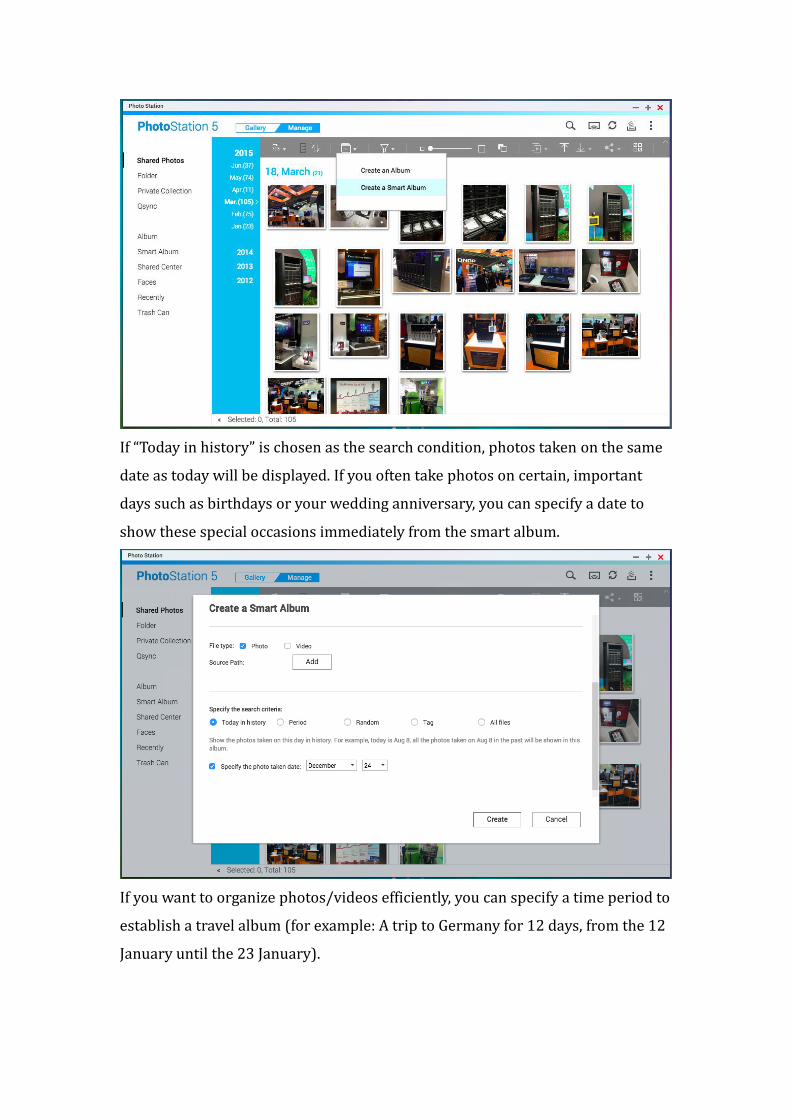
If an album is set to be shared with the public, you can click the “Share” button to
email a slideshow link, publish the link on social networking sites, or get a URL
for copy & pasting to blogs, forums, or instant messengers. You can still edit
album content, and the updated slideshows will be displayed when viewers click
the same link again.
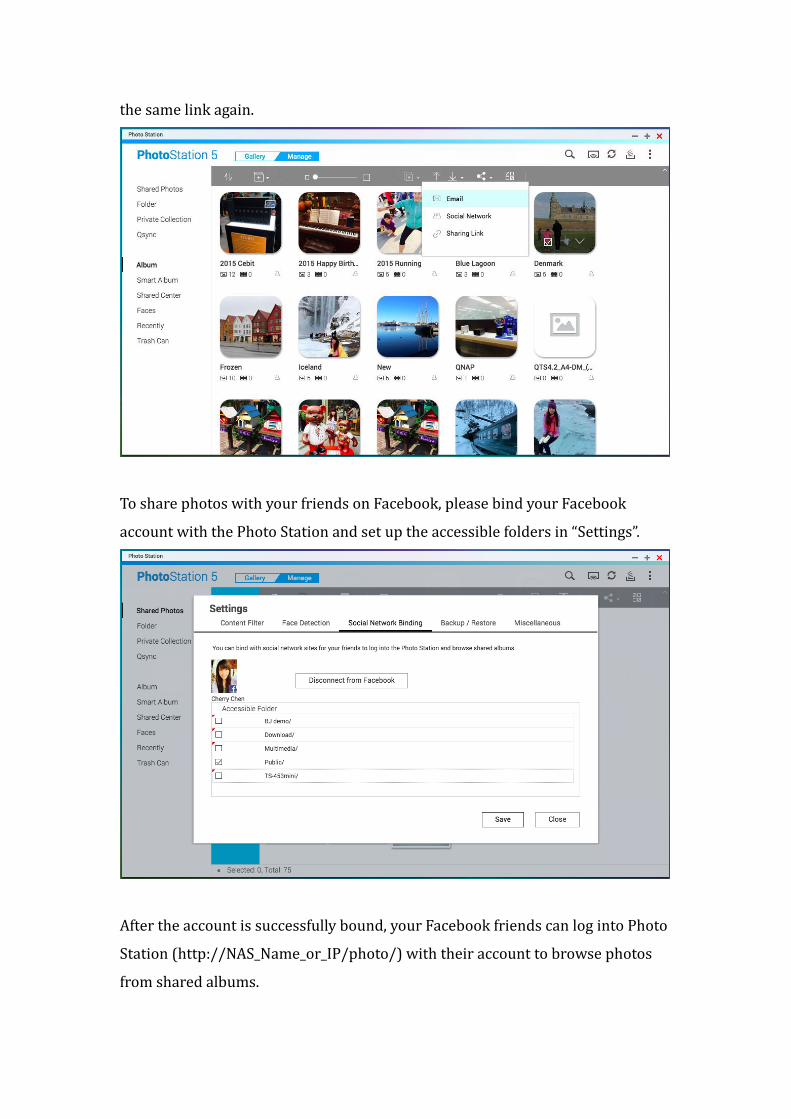
To share photos with your friends on Facebook, please bind your Facebook
account with the Photo Station and set up the accessible folders in “Settings”.
After the account is successfully bound, your Facebook friends can log into Photo
Station (http://NAS_Name_or_IP/photo/) with their account to browse photos
from shared albums.