Embed Size (px)
Citation preview

model / 型号 WH803 & WH903P
P/N: 40-50582-00
Water Heater / 电热水器 / Pemanas Air
Instruction Manual / 说明指示书 / Buku Panduan
Please read this manual carefully before operating this product. Keep this manual handy for further reference.请在使用此产品前,详读此说明书。并将之收藏以作日后参考。
Sila baca buku panduan ini dengan teliti sebelum menggunakan produk ini. Simpanlah untuk rujukan masa depan.
Important / 重要 / Mustahak
This manual is also available online.www.khind.com.my

3
Model
Voltage
Heater Power
Pump Type
Pump Power rating
Noise Level
Water Connection
Operating Connection
Protection Against Electric Shock
Degree of Protection
Minimum Water Flow Rate
Minimum Water Pressure
Maximum Water Pressure
Product Dimension (WxLxH)
Net Weight (kg)
WH803
240V~ 50/60Hz
3.75kW
-
-
-
15mm (1/2" BSP),
Single Point System
Open Outlet
Class I
IP25
3 Litres / minute
20 kPa (0.2 bar/ 2.9 psi)
0.3 Mpa (3bar/43.5psi)
340x240x95mm
1.8kg
WH903P
240V~ 50/60Hz
3.75kW
DC Pump
50W
<40dB
15mm (1/2" BSP),
Single Point System
Open Outlet
Class I
IP25
3 Litres / minute
20 kPa (0.2 bar/ 2.9 psi)
0.3 Mpa (3bar/43.5psi)
340x240x95mm
2.5kg
:::::::
::::::::
Specifications
*Specifications are subject to change without prior notice.
Schematic diagram
2
Parts identification
1. Power ON Indicator
2. ELSD ON Indicator
3. Power/Temperature Control Knob
4. ELSD Test Button
5. ELSD Reset Button
6. Shower Head
7. Shower Rail
8. Shower Hose
9. Filter Valve
10. Flow Regulator Valve
11. Pump ON/OFF Button (for WH903P only)
12. Pump Indicator (for WH903P only)
a. 2-in-1 Manual Reset Thermal-cut-out
& Thermostat
b. Thermistor
c. Heater Tank
d. PCB (Indicator)
e. PCB (ELSD)
f. PCB (Push Button & Control)
g. Flow Switch
h. Triac
i. Cable Clip
j. Terminal Block
k. Pump (for WH903P)
External Parts Identification
Internal Parts Identification
WH803 WH903P
WH803 WH903P
1
a
b
c
d
e
f
2
3
4
5
1
2
3
4
5
11
g
h
j
i
a
b
c
d
e
fg
h
j
i
k
12
6
7
8
9
10
WH903P (DC Pump)WH803
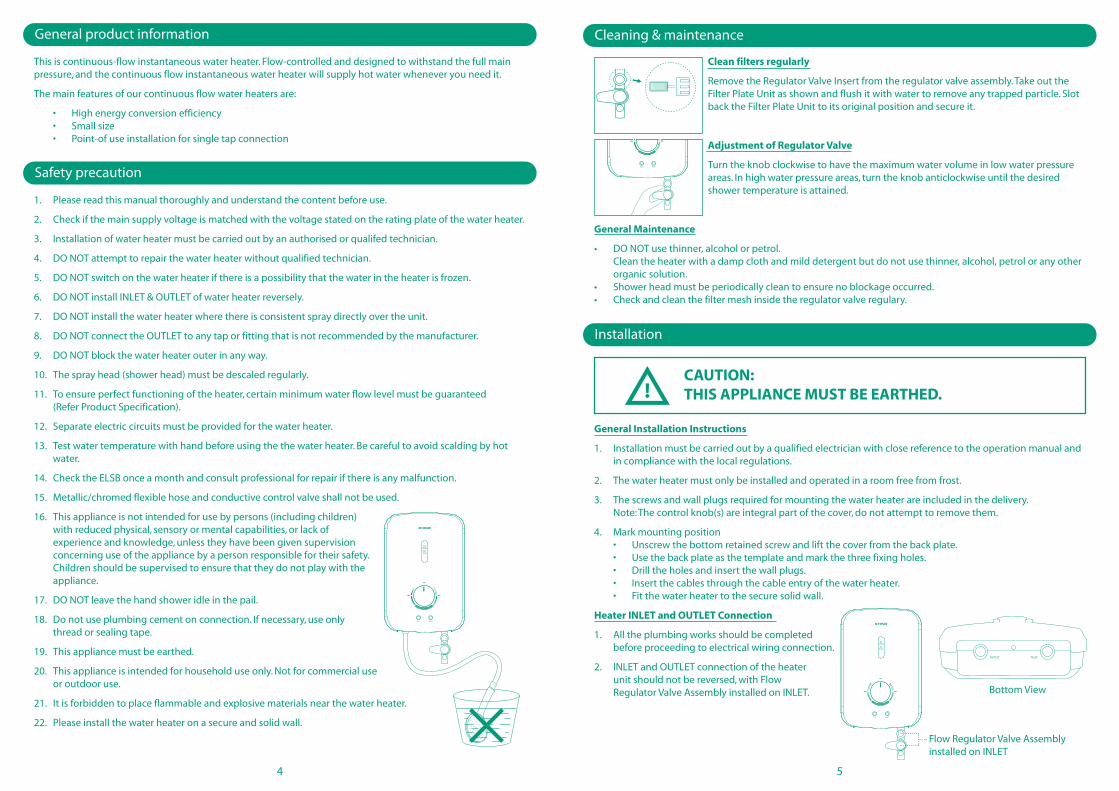
Cleaning & maintenance
Clean filters regularly
Remove the Regulator Valve Insert from the regulator valve assembly. Take out the Filter Plate Unit as shown and flush it with water to remove any trapped particle. Slot back the Filter Plate Unit to its original position and secure it.
Adjustment of Regulator Valve
Turn the knob clockwise to have the maximum water volume in low water pressure areas. In high water pressure areas, turn the knob anticlockwise until the desired shower temperature is attained.
General Maintenance
• DO NOT use thinner, alcohol or petrol. Clean the heater with a damp cloth and mild detergent but do not use thinner, alcohol, petrol or any other organic solution.• Shower head must be periodically clean to ensure no blockage occurred.• Check and clean the filter mesh inside the regulator valve regulary.
This is continuous-flow instantaneous water heater. Flow-controlled and designed to withstand the full main pressure, and the continuous flow instantaneous water heater will supply hot water whenever you need it.
The main features of our continuous flow water heaters are:
• High energy conversion efficiency • Small size • Point-of use installation for single tap connection
General product information
1. Please read this manual thoroughly and understand the content before use.
2. Check if the main supply voltage is matched with the voltage stated on the rating plate of the water heater.
3. Installation of water heater must be carried out by an authorised or qualifed technician.
4. DO NOT attempt to repair the water heater without qualified technician.
5. DO NOT switch on the water heater if there is a possibility that the water in the heater is frozen.
6. DO NOT install INLET & OUTLET of water heater reversely.
7. DO NOT install the water heater where there is consistent spray directly over the unit.
8. DO NOT connect the OUTLET to any tap or fitting that is not recommended by the manufacturer.
9. DO NOT block the water heater outer in any way.
10. The spray head (shower head) must be descaled regularly.
11. To ensure perfect functioning of the heater, certain minimum water flow level must be guaranteed (Refer Product Specification).
12. Separate electric circuits must be provided for the water heater.
13. Test water temperature with hand before using the the water heater. Be careful to avoid scalding by hot water.
14. Check the ELSB once a month and consult professional for repair if there is any malfunction.
15. Metallic/chromed flexible hose and conductive control valve shall not be used.
16. This appliance is not intended for use by persons (including children) with reduced physical, sensory or mental capabilities, or lack of experience and knowledge, unless they have been given supervision concerning use of the appliance by a person responsible for their safety. Children should be supervised to ensure that they do not play with the appliance.
17. DO NOT leave the hand shower idle in the pail.
18. Do not use plumbing cement on connection. If necessary, use only thread or sealing tape.
19. This appliance must be earthed.
20. This appliance is intended for household use only. Not for commercial use or outdoor use.
21. It is forbidden to place flammable and explosive materials near the water heater.
22. Please install the water heater on a secure and solid wall.
Safety precaution
54
Installation
General Installation Instructions
1. Installation must be carried out by a qualified electrician with close reference to the operation manual and in compliance with the local regulations.
2. The water heater must only be installed and operated in a room free from frost.
3. The screws and wall plugs required for mounting the water heater are included in the delivery. Note: The control knob(s) are integral part of the cover, do not attempt to remove them.
4. Mark mounting position • Unscrew the bottom retained screw and lift the cover from the back plate. • Use the back plate as the template and mark the three fixing holes. • Drill the holes and insert the wall plugs. • Insert the cables through the cable entry of the water heater. • Fit the water heater to the secure solid wall.
Heater INLET and OUTLET Connection
1. All the plumbing works should be completed before proceeding to electrical wiring connection.
2. INLET and OUTLET connection of the heater unit should not be reversed, with Flow Regulator Valve Assembly installed on INLET.
!CAUTION:THIS APPLIANCE MUST BE EARTHED.
OUTLET INLET
Flow Regulator Valve Assemblyinstalled on INLET
Bottom View

6 7
Installation Installation
• This appliance must be earthed.
• Do not switch on the electricity supply until the cover had been fitted.
• Notice: User is advised to test the built-in ELSD at least once a month.
Replacing the cover
• Note : It is necessary to engage the knobs in the correct position onto the spindles before the cover is located.
• Secure the cover with the screw provided. Remove the shower head from the flexible hose and point it to waste.
• Important: Turn the water valve fully open and let the water flow through the water heater to release any air which may be in the system and fill the water heater with water. The water heater must be full of water before heat setting are used.
• The water heater is now ready to use. We recommend that you allow your water heater to reach a stable temperature before you commence showering.
Test Run of Heater
a. Turn on the regulator valve and water should spray out from the shower head.
b. Switch on the main power supply - "POWER" LED would light up.
c. Turn on the temperature control knob clockwise to accelerate water flow.
d. The water should be warmed in a few seconds.
e. Test the ELSD by pressing "TEST" button. The unit should be tripped.
f. "POWER" and "ELSD" LED would light off.
g. Press "RESET" button. The unit will resume the earth leakage fault back to normal and the ELSD light on.
h. The heater is now ready for use.
How to use
Operating the heater
Power/ Temperature Control Knob
• The Control Knob has variable settings: OFF, MIN to MAX
• The OFF setting is cold water only. Adjustment of the external valve flow volume at this setting will only alter the force of the water from the spray head. It will not alter the water temperature.
3. Turn off the water supply at the isolating regulator valve. Connect the main water supply to the inlet of the water heater using 15mm Air Inlet Hose.
4. Turn on the main water supply and check for leaks in the pipe work connection to the water heater.
5. Connect Flexible Shower Hose to water heater OUTLET. Turn on the water mains to drain out all the plumbing dirt and fill up the heater tank. Then, connect the Flexible Shower Hose to the hand shower head. Note : The conical end of the Flexible Shower Hose should be fitted to the shower head.
6. Place the shower head in the holder.
7. Shower head must be periodically clean to ensure no blockage occurred.
WARNING : Metallic / chromed hose and conductive control valve shall not be used.
Fitting the Shower set
• Fit the two end brackets to the Rod• Place the brackets with rod onto the wall and mark the position on the two screw holes.• Fit the end brackets, holder and rod onto the wall with the wall plugs and screws.• Fit the Flexible Shower Hose to the shower head.
Electrical Connections
IMPORTANT NOTE ! SWITCH OFF THE MAIN SUPPLY BEFORE ELECTRICAL WORK
Note:1. The water heater must be permanently connected to the electricity supply, direct from the consumer unit via a double poles linked switch with a minimum contact gap of 3mm in both poles.
2. The main switch of the water heater must be located outside the bathroom.
3. The wiring must be connected to the main switch without the use of a plug or socket outlet.
4. The cable size required is determined by the kW rating of the water heater and the distance between the water heater and the consumer unit. If you are in any doubt, consult a qualify electrician.
5. The electrical rating of the water heater is shown on the rating label within the unit. (Refer to schematic wiring diagram)
Procedure
• Ensure electricity supply is switched off. The cable can be surface clipped, hidden or via conduit. Note : Conduit entry can only from rear.
• Route the cable into the water heater and connect to the terminal block as follows:-
Live Cable (White or Red) to terminal marked L Neutral cable (Blue or Black) to terminal marked N Earth cable (Green or Green/Yellow) to terminal marked E
Important: Ensure that the terminal block screws are fully tightened and that no cable insulation is trapped under the screws.
• The cable clamp must be used to secure the cable, the clamp is suitable for 6mm² cable or can be reversed for 10mm² cable.
• If cable larger than 10mm² is used, do not use the cable clamp but the cable must then be secure either by routing through conduit or in trunking or embedding in the wall, in accordance with IEE regulation.

Water too cool or cold
Water too hot
Unit switch off during use
Water ceases to flow
Water flow too low, “POWER” light OFF
Too much water flowing through the heater
Reduction in the ambient temperature
Defective heating element
Open circuit in wiring
Defective pump
Temperature setting too high
Defective PCB
Interruption of mains electrical supply
ELSD trip, possible earth leakage
Blockage of spray head, twisted or blocked flexible shower hose
No water supply
Flow rate too low to activate the heater
Troubleshooting
SYMPTOM POSSIBLE CAUSE(S)
Reduce the flow rate
Reduce the flow rate, switch to higher temperature setting
Renew heating element tank assembly
Check wiring
Test and repair / renew
Reduce temperature setting
Check and repair / renew
Check loss of power, MCB, switches and supply cabling
Check earth leakage and reset ELSD
Clean / renew spray head, check for free passage of water through hose. Replace as necessary
Check water supply, regulator valve open and no blockage
Press PUMP button until “POWER” ON
ACTION(S) / SOLUTION(S)
8 9
How to use
• The low power settings allow you to reduce the power used by the water heater.
• “MAX” is the full power setting, further adjustment of the temperature is via external valve control knob.
• The water temperature will be increased accordingly as the knob being turned clockwise from "MIN" to "MAX".
Note: Switch off the power supply when not in use.
Operating Features
Light Indicators:
POWER Indicator• Indicates when the heating element is switch on and water is flowing on the heat settings. • The light will not come on when the power setting is at the OFF position or insufficient water to activate the heater.
PUMP Indicator (for model WH903P only)• Indicates the booster pump is running. • The light will not come on when pump speed control is switched off.
ELSD Indicator (Electricity Leakage Sensor Device)• Indicates there is no earth leakage in the system and the shower unit is safe to operate.
Knob & Buttons Functions:
POWER/Temperature Control Knob• When the POWER control knob is set to OFF, it provides for cold shower. • The shower unit will get warmer as the control knob is turned clockwise towards position MAX.
PUMP ON/OFF Button (for model WH903P only)• When the pump control is turned on, the pump will automatically start when there is sufficient water flow through the shower unit and stop when water supply is turned off. • If the water flow is too low to start the heater or pump, just press this button and hold it for a few second to build up the pressure and the shower unit and pump will start up automatically.
TEST Button• Press the TEST button will simulate a earth leakage in the system and the unit will trip with ELSD indicator off.
RESET Button• Press the RESET button will resume the earth leakage fault back to normal and the ELSD light on.
IMPORTANT NOTICES:• The ELSD detects a very small fault (leakage current) which may occur in a circuit and isolate the electric supply to the heater, thus protect the users. • The heater, all exposed metal surface and pipe works within the bathroom MUST BE bonded and earthed. • Improper earthing may result in malfunction to the ELSD. Never use the heater is there is doubt on the earthing installation.• Test ELSD regularly to ensure the heater is safe to use.

11
型号
电压
加热器功率
泵类型
泵功率
噪音水平
进/出水口管连接径
操作连接
防触电保护等级
防护等级
最低水量流率
最低水压
最高进水压
产品尺寸(长x宽x高)
净重(公斤)
WH803
240V~ 50/60Hz3.75kW
-
-
-
15毫米(1/2"BSP)单一系统
开放式出水口
等级I
IP25
3公升/分钟
20kPa(0.2bar/2.9psi)
0.3MPa(3bar/43.5psi)
340 x 240 x 95毫米
1.8公斤
WH903P
240V~ 50/60Hz3.75kW
直流型泵
50W
<40dB
15毫米(1/2"BSP)单一系统
开放式出水口
等级I
IP25
3公升/分钟
20kPa(0.2bar/2.9psi)
0.3MPa(3bar/43.5psi)
340 x 240 x 95毫米
2.5公斤
:::::::::::::::
规格
*以上规格如有任何更改,恕不另行通知。
电路图
10
零件名称
1. 电源显示灯
2. 漏电(ELSD)显示灯
3. 电源/温度控制旋钮
4. ELSD测试按钮
5. ELSD复原调节按钮
6. 花洒
7. 支架和杆
8. 花洒软管
9. 过滤阀
10. 流水调节阀
11. 泵开关按钮(型号WH903P而已)
12. 泵显示灯(型号WH903P而已)
a. 2合1手动复位过热切断和恒温器
b. 热敏电阻器
c. 加热器水箱
d. 箱电路板(指示灯)
e. 电路板(ELSD)
f. 电路板(按钮和控制旋钮)
g. 浮动磁性开关
h. 三端双向可控硅
i. 电线夹
j. 接线端子
k. 泵(型号WH903P而已)
外部零件名称
内部零件名称
WH803 WH903P
WH803 WH903P
1
a
b
c
d
e
f
2
3
4
5
1
2
3
4
5
11
g
h
j
i
a
b
c
d
e
fg
h
j
i
k
12
6
7
8
9
10
WH903P(直流型泵)WH803

清洗和保养
定期清洁过滤网
从流水调节阀组件上拆下水调节阀嵌入物。如图所示取出过滤网并用水冲洗掉 被困杂物。然后将之置回原位。
使用流水调节阀
在低水压的地区,向顺时针方向旋转至最高水量位置来获取热水。在高水压的地 区,则逆时针方向旋转至最所需热水的位置。
一般维护
• 请勿使用稀释剂,酒精或汽油。用湿布和温和的清洁剂清洗水热器。请勿使用稀释剂、酒精、汽油或 任何其他有机溶液。• 必须定期清洗花洒以防止堵塞。• 定期检查并清洗流水调节阀内的滤网。
本产品是连续流动,即热式热水器。本产品可控制水压,流量,和提供您所需的热水。
本产品的主要特点是:
• 高能量转换效率• 体积小• 安装方便,单一水管连接
产品介绍
1. 在使用本产品前,请先阅读本说明书。
2. 确保本产品铭牌上的规格与电源电压一致。
3. 必须由授权或同等技术的人士来安装。
4. 请勿尝试修理加热器,所有维修工作都必须由合格的技术人士完成。
5. 如果热水器中的水冻结,切勿打开水热器。
6. 请勿倒置安装热水器的进水口和出水口。
7. 请勿将水热器安装在容易直接喷洒的区域。
8. 请勿将出水口连接到制造商不推荐的任何水龙头或接头上。
9. 在任何情况下,请勿妨碍水从水热器流出。
10. 喷头(花洒)必须定期除垢。
11. 为了确保热水器正常工作,必须保证达到最低水流量(参考产品规格)。
12. 必须为热水器提供单独的电路。
13. 在使用热水器前,请用手测试水温。注意不要被热水烫伤。
14. 每月检查一次漏电测试(ELSD),如果有任何故障,请咨询专业人员进行维修。
15. 请勿使用金属、镀铬软管和可导电流水调节阀。
16. 此电器不适合这些人士使用;小孩,体力弱及感官,精神上有障礙,缺少经验及知识者;除非有人监 督或指示如何操作,并负责操作人的安全。 小孩需紧密的监督,此电器严禁被小孩当玩具玩。
17. 请勿将花洒闲置及浸入桶中。
18. 连接进水口和出水口时,不可使用装水管的石膏。 改用白胶带或纱布即可。
19. 确保此热水器连接地线。
20. 此电器仅供室内家庭式使用。请勿用作商业或户外用途。
21. 禁止在热水器附近放置易燃易爆物品。
22. 请将热水器安装在坚实、牢固的墙壁上。
安全注意事项
1312
安装指南
一般安装指南
1. 必须由合格专业的技术人士来安装此热水器,并遵守说明书指南及符合当地政府的法规。
2. 只能在没有霜冻的室内环境中安装和操作热水器。
3. 包装中含有安装热水器所需的螺钉和墙塞。 备注:控制旋钮和按钮已与盖子一起组装,请勿尝试将其拆下。
4. 标记安装位置
• 拧开底部的螺丝,然后从背板上提起盖子。 • 使用背板作为模板并标记三个固定孔。 • 钻孔并在墙上插入墙塞。 • 将电源线穿过水热器的电线入口。 • 将热水器安装在坚实、牢固的墙壁上。
热水器的进水口和出水口连接
1. 在进行电线连接之前,应完成所有管道工程。
2. 请勿倒置安装水热器的进水口和出水口。 流水调节阀组装需连接至进水口。
3. 关闭流水调节阀上的供水。使用15毫米进水软 管将主供水连接到热水器的入口。
4. 打开主供水系统,检查热水器的管道连接、水 路系统是否有泄漏。
!注意:
确保此热水器连接地线。
OUTLET INLET
流水调节阀组装连接至进水口
底部视图

14 15
安装指南 安装指南
更换上盖
• 备注:在定位上盖前,必须将旋钮放在正确的位置上。
• 使用提供的螺丝来拧紧上盖。从花洒软管上取下花洒,以方便除垢。
• 重要事项:完全打开供水阀,让水流入热水器内,以排除其空气残留,才填满水热器箱。在设定所 需的温度前,请确保热水器箱已盛满水。
• 可以开始使用热水器。建议用户在开始淋浴前,先让热水器达到稳定的温度。
热水器运行测试
a. 打开流水调节阀,水将从花洒流出。
b. 接通电源,电源显示灯将亮起。
c. 顺时针转电源、温度控制旋钮以加速水流。
d. 水应在几秒钟内完成加热。
e. 按下ELSD测试按钮(“TEST”按钮),热水器将跳闸,电源显示灯和漏电(ELSD)显示灯将熄灭。
f. 按下ELSD复原调节按钮(“RESET”按钮)来恢复电源,ELSD显示灯将亮起。
g. 可以开始使用热水器。
使用方式
操作热水器
电源/温度控制旋钮
• 控制旋钮的选择设置:“OFF”,“MIN”到“MAX”
• OFF设置仅为冷水。 在此设置下,调整外部流水调节阀只会改变花洒的喷水力量而已,它不会改变水温。
• “MIN”最低功率设置,可降低热水器所使用的功率。
• “MAX”最高功率设置,可通过外部控制阀进一步调整温度。
• 当旋钮从“MIN”顺时针旋转到“MAX”时,水温会相应增加。
备注:不再使用水热器时,请关闭电源。
操作特征
显示灯:
电源显示灯• 表示已启动加热器元件, 水以预定的温度流出。• 当电源设置处于“OFF”位置或水量不足以启动加热器元件时,电源指示灯将不会亮起。
5. 将花洒软管连接到热水器的出水口。打开供水阀以冲排出任何在安装管道时所留下的污垢后,才填满 加热器水箱。然后,将花洒软管连接到花洒。 备注:花洒软管的锥形端应安装在花洒上。
6. 将花洒放在支架上。
7. 必须定期除垢,以确保花洒没有堵塞。
警告:请勿使用金属、镀铬软管和可导电流水调节阀。
安装花洒套装
• 将两个端部支架安装到杆上。 • 将带有杆的支架放在墙上,并在两个螺丝孔上标记位置。 • 使用墙塞和螺丝将端部支架,支架和杆安装及锁紧到墙壁上。 • 将花洒安装到花洒软管上。
电线连接
重要提示!在进行电线布置前,请关闭主电源。
备注:1. 热水器必须永久连接于电源线布置上,并通过一个双极杆型开关直接连接至此热水器,两极的最小隔 离间隙为3毫米。
2. 热水器的主开关必须安装在浴室外面。
3. 必须在不使用插头或插座的情况下将接线连接到主开关。
4. 所需的电源线尺寸取决于热水器的kW功率额定值,及此电器的距离位置。如果您有任何疑问,请咨询 合格的技术人士。
5. 热水器的电气规格可参阅热水器上的铭牌。(参考电路图)
步骤:• 确保关闭电源。电源线可以夹紧在表面,隐藏或通过导管安装。 备注:导管道入口只能从背方进入。
• 连接电源线入热水器的接线端子,如下:
火线 (白色或红色) 连接到标有“L”的端子 中性线 (蓝色或黑色) 连接到标有“N”的端子 接地线 (绿色或绿色/黄色) 连接到标有“E”的端子
重要事项:确保拧紧接线端子的螺丝,及没有电线绝缘层被困在螺丝底下。
• 必须使用电线夹来固定电源线。电线夹适合用于6mm²至10mm²的电源线。
• 如果使用大于10mm²的电源线,请不要使用电线夹;但必须按照IEE规定,通过导管布线或线槽或嵌入 墙壁来固定电源线。
• 确保此热水器连接地线。
• 在安装盖板前,请勿接通电源。
• 注意:建议用户每月至少进行一次内置ELSD漏电测试。

水过凉或过冷
水过热
本产品在使用过程中自动关闭
水停止流出
水流量太低,电源显示灯熄灭
太多水流过加热器元件
降低环境温度
加热器元件故障
电线开路
泵故障
温度设置太高
电路板故障
主电源中断
ELSD跳闸,可能漏电
花洒堵塞,花洒软管扭曲或阻塞没有供水
水流量太低,无法启动水热器
排除故障
问题 原因
降低水流量
降低水流量,切换到更高的温度设置
更换加热元件箱组件
检查接线
测试和维修/更换
降低温度设置
测试和维修/更换
检查电源供应,室内配线板(MCB),开关和电源线
检查漏电并复位ELSD
清洗/更换花洒,检查软管的水流是否顺畅。必要时更换
检查供水,打开流水调节阀,确保无堵塞
按住泵开关按钮几秒钟以增加压力直至电源显示灯亮起
措施、解决方案
16 17
使用方式
泵显示灯(型号WH903P而已)• 表示增压泵正在操作。• 关闭泵功能时,泵显示灯将不会亮起。
ELSD显示灯(漏电传感装置)• 表示系统中没有漏电,可以安全操作此水热器。
旋钮和按钮功能:
电源/温度控制旋钮• 当控制旋钮设置为OFF时,它将提供冷水淋浴。• 当控制旋钮顺时针转向“MAX”位置时,水温会变暖。
泵开关按钮(型号WH903P而已)• 按下此按钮时,需有足够的水量流过水热器装置,才可启动泵功能。供水关闭时,泵功能将停止。• 如果水流量太低而无法启动水热器或泵时,只需按住此按钮几秒钟以增加压力直至水热器和泵自动 启动。
“TEST”按钮(ELSD测试按钮) • 按下“TEST”按钮以模拟系统中的漏电,水热器将在ELSD显示灯熄灭时跳闸。
“RESET”按钮(ELSD复原调节按钮) • 按“RESET”按钮将恢复接地漏电故障,恢复电源,ELSD显示灯将亮起。
重要事项:
• ELSD可以检测到电路中少量漏电,并切断水热器的电源,从而保护用户的安全。 • 加热器元件,所有暴露的金属表面和浴室内的管道工作必须连接覆盖并接地。 • 不正确的接地可能导致ELSD故障。如果对接地装置存在疑问,切勿使用此热水器。• 需定期进行ELSD测试,以确保水热器安全及可靠。
19
ModelVoltanTaraf Kuasa PemanasJenis PamTaraf PamHad BunyiPenyambungan Air
Penyambungan OperasiPerlindungan Dari Kejutan elektrikTahap PerlindunganKadar Aliran MinimumTekanan MinimumTekana Masukan MaksimumDimensi Product (PxLxT)Berat Bersih (kg)
WH803240V~ 50/60Hz3.75kW---15mm (1/2" BSP),Sistem Penyambungan TunggalAliran Keluar BukaClass 1IP253 Liter/minit20 kPa (0.2 bar/2.9 psi)0.3 Mpa (3bar/43.5psi)340 x 240 x 95mm1.8kg
WH903P240V~ 50/60Hz3.75kWPam DC50W<40dB15mm (1/2" BSP), Sistem Penyambungan TunggalAliran Keluar BukaClass 1IP253 Liter/minit20 kPa (0.2 bar/2.9 psi)0.3 Mpa (3bar/43.5psi)340 x 240 x 95mm2.5kg
:::::::
::::::::
Spesifikasi
*Spesifikasi boleh diubahkan tanpa sebarang notis.
Gambarajah skematik
18
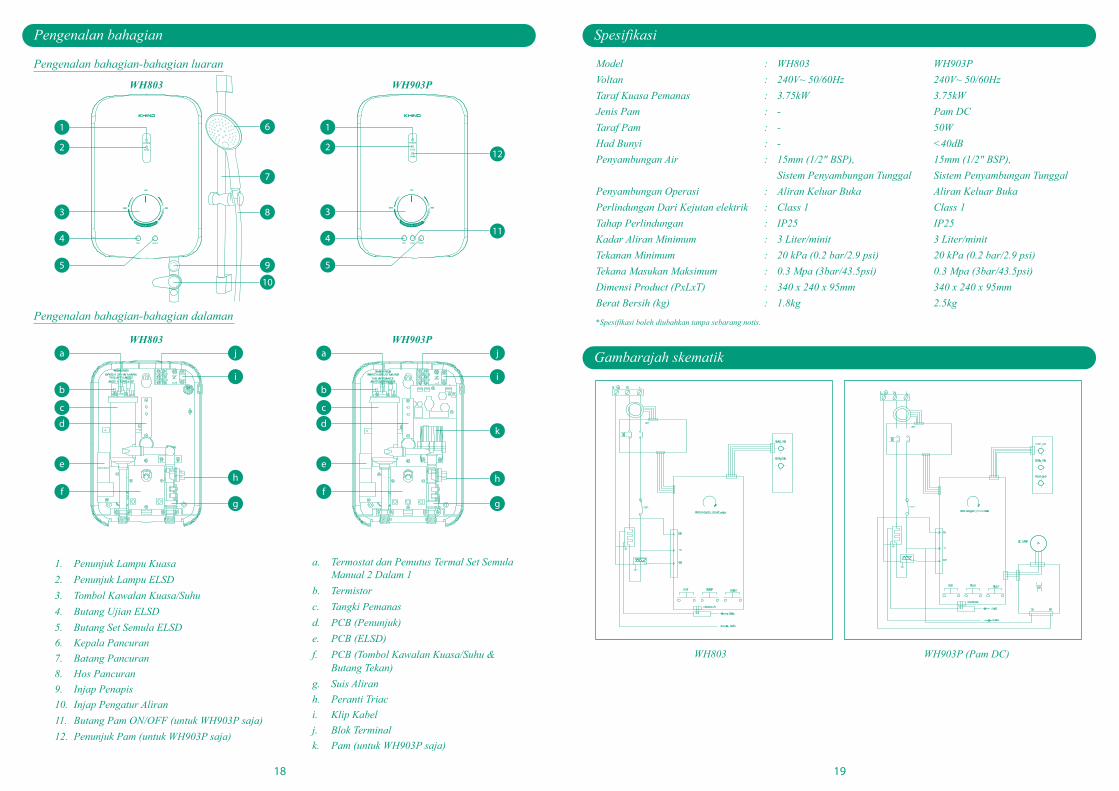
Pengenalan bahagian
1. Penunjuk Lampu Kuasa2. Penunjuk Lampu ELSD3. Tombol Kawalan Kuasa/Suhu4. Butang Ujian ELSD5. Butang Set Semula ELSD6. Kepala Pancuran7. Batang Pancuran8. Hos Pancuran9. Injap Penapis10. Injap Pengatur Aliran11. Butang Pam ON/OFF (untuk WH903P saja)12. Penunjuk Pam (untuk WH903P saja)
a. Termostat dan Pemutus Termal Set Semula Manual 2 Dalam 1b. Termistorc. Tangki Pemanasd. PCB (Penunjuk)e. PCB (ELSD)f. PCB (Tombol Kawalan Kuasa/Suhu & Butang Tekan)g. Suis Aliranh. Peranti Triaci. Klip Kabelj. Blok Terminalk. Pam (untuk WH903P saja)
Pengenalan bahagian-bahagian luaran
Pengenalan bahagian-bahagian dalaman
WH803 WH903P
WH803 WH903P
1
a
b
c
d
e
f
2
3
4
5
1
2
3
4
5
11
g
h
j
i
a
b
c
d
e
fg
h
j
i
k
12
6
7
8
9
10
WH903P (Pam DC)WH803

Pembersihan dan penyelenggaraan
Bersihkan Penapis Selalu
Keluarkan Injap Pengatur Aliran dari tempatnya. Cabut keluar Palt Penapis seperti yang ditunjukkan dan bersihkan dengan air untuk menanggalkan sisa-sisa yang tertinggal. Masukkan kembali Plat penapis tadi ke posisi asal dan kuncikan. Pelarasan Pada Injap Pengatur
Pusingkan tombol pada injap ini mengikut arah jam sehingga aliran air bertekanan rendah. Kemudian, pusingkan tombol ke arah berlawanan jam sehingga aliran air bertekanan tinggi.
Penyelenggaraan Umum
• Jangan gunakan tinner,alkohol atau patrol untuk membersihkannya.• Bersihkan perkakas dengan menggunakan kain lembap dan sabun yang lembut.• Selalu bersihkan kepala pancuran untuk mengelakkan aliran air dari terhalang.• Selalu periksa dan bersihkan Plat Penapis yang terdapat di Injap Pengatur.
Produk ini adalah Pemanas Air Segera Aliran Berterusan. Di reka untuk mengawal aliran tekanan air danmenghasilkan aliran air yang hangat secara segera dan berterusan apabila diperlukan.
Ciri-ciri utama pada produk ini adalah:
• Pengubahan tenaga bercekapan tinggi.• Saiz yang kecil.• Pemasangan untuk penyambungan paip tunggal yang mudah.
Pengenalan umum tentang produk
1. Sila baca manual ini secara keseluruhan sebelum menggunakan perkakas.
2. Pastikan maklumat pada plat penarafan adalah bersesuian dengan voltan bekalan .
3. Pemasangan perlu dilakukan oleh jurulektrik yang berkelayakan.
4. Segala kerja-kerja pembaikan perlu dilakukan oleh juruteknik yang berkelayakan.
5. Jangan hidupkan perkakas jika berlaku pembekuan di dalamnya.
6. Jangan pasang secara terbalik untuk aliran air masuk dan keluar pada pemanas.
7. Jangan pasang perkakas disesuatu tempat di mana unit mudah terkena air.
8. Jangan sambungkan aliran keluar ke paip atau apa-apa pemasangan yang tidak disyorkan oleh pihak pengilang.
9. Jangan ada halangan pada aliran air keluar dalam apa jua keadaan.
10. Sentiasa bersihkan kepala semburan/ pancuran air.
11. Untuk membuatkan perkakas berfungsi dengan baik, paras aliran minimum air perlu dipastikan.
12. Litar elektrik berasingan perlu disediakan untuk pemanas.
13. Rasa dahulu tahap kepanasan air dengan tangan sebelum menggunakannya. Berhati-hati agar tidak dilecurkan oleh air panas.
14. Periksa ELSB sebulan sekali dan rujuk kepada pakar untuk urusan pembaikan jika berlaku kerosakan.
15. Jangan gunakan hos fleksi metalik / krom dan injap kawalam konduktif pada perkakas.
16. Perkakas ini tidak sesuai digunakan oleh orang(termasuk kanak-kanak) yang berlainan upaya dari segi fizikal, deria dan mental, atau orang yang kurang pengalaman dan pengetahuan melainkan dengan pengawasan dan tunjuk ajar dari orang yang bertanggung jawab terhadap keselamatan mereka. Kanak-kanak harus diperhatikan agar tidak bermain dengan perkakas ini.
17. Jangan biarkan pancuran terpasang di dalam baldi.
18. Jangan gunakan simen paip untuk sambungan. Sekiranya perlu, gunakan pita pembalut sahaja.
19. Perkakas ini mesti dibumikan.
20. Perkakas ini hanya untuk kegunaan rumah sahaja. Bukan untuk kegunaan komersil atau penggunaan luaran.
21. Jangan meletakkan bahan mudah terbakar dan letupan berhampiran pemanas air.
22. Sila pasangkan perkakas ini pada dinding pepejal yang kukuh.
Langkah keselamatan
2120
Pemasangan
Arahan Pemasangan Umum
1. Pemasangan perlu dilakukan oleh jurulektrik yang berkelayakan ddengan merujuk kepada manual ini dan mematuhi peraturan -peraturan tempatan.
2. Perkakas mestilah dipasang dan dioperasi di dalam bilik yang bebas dari sejuk lampau.
3. Skru dan plagnya dibekalkan bersama di dalam pembungkusan perkakas. Nota: Tombol-tombol kawalan telah siap di pasangkan. Jangan tanggalkannya.
4. Tandakan posisi memasang: • longgarkan skru penahan yang terdapat di bawah perkakas dan tanggalkan penutup hadapan. • Gunakan plat belakang perkakas sebagai templat untuk menandakan kedududukan 3 lubang pemasangan. • Tebuk lubang dan masukkan plag skru. • Masukkan kabel melalui ruang masukannya yang terdapat pada perkakas. • Pasang perkakas ke dinding pepejal yang kukuh.
Penyambungan aliran masukan dan keluaran air pada perkakas.
1. Pastikan segala kerja-kerja paip telah seiap sepenuhnya sebelum meneruskan dengan kerja- kerja penyambungan elektrik.
2. Pastikan sambungan aliran masuk dan keluar air tidak dipasang secara terbalik, dengan injap henti berada di aliran masukan.
!PERHATIAN:PERKAKAS INI PERLU DIBUMIKAN
OUTLET INLET
Injap Pengatur Aliran dipasangpada aliran masukan
Pandangan Bawah

22 23
Pemasangan Pemasangan
• Perkakas ini perlu dibumikan.
• jangan hidupkan suis bekalan elektrik sehingga perkakas dipasang dengan penutup hadapannya.
• Peringatan: Anda disyorkan untuk menguji ELSD terbina-dalam yang terdapat pada perkakas sekali dalam sebulan.
Memasang semula Penutup Hadapan
• Nota: Pastikan kesemua tombol diletakkan dengan betul pada kedudukan gelendong sebelum memasang semula penutup hadapan.
• Gunakan skru yang dibekalkan untuk mengetatkan penutup hadapan. Kemudian letakkan kepala Pancuran ke arah bawah.
• Penting: Buka sepenuhnya injap bukaan air dan biarkan air mengalir melalui pemanas untuk melepaskan angin yang mungkin terdapat di dalam sistem. Penuhkan tangki dengan air dahulu sebelum menetapkan suhu memanas.
• Perkakas telah sedia untuk digunakan. Kami syorkan supaya dibiarkan dahulu air mencapai suhu yang diingini sebelum anda memulakan mandian.
Menguji Pemanas
a. Buka injap bukaan air dan air akan keluar melalui kepala pancuran.
b. Hidupkan suis pada bekalan kuasa utama - LED "KUASA" akan menyala.
c. Pusing tombol kawalan suhu mengikut arah jam.
d. Air yang keluar mestilah hangat dalam beberapa saat.
e. Lakukan ujian pada ELCD dengan menekan butang 'UJIAN'. Unit akan berhenti dari berfungsi.
f. Lampu LED "KUASA" dan "ELSD" akan terpadam.
g. Tekan butang 'SET SEMULA". Perkakas akan berfungsi kembali secara normal dan lampu "ELSD" bernyala.
h. Perkakas bolehlah digunakan semula.
Cara-cara menggunakan
Tombol Kawalan Kuasa/Suhu
• Perkakas didatangkan dengan tetapan kuasa berubah-ubah iaitu: OFF, MIN ke MAX.
• Tetapan OFF adalah untuk aliran air yang sejuk sahaja. Pelarasan injap luaran pada tetapan ini akan hanya meningkatkan isipadu aliran air yang keluar melalui kepala pancuran. Suhu pada air yang keluar tidak akan berubah.
• Tetapan MIN akan mengurangkan penggunaan kuasa pada pemanas. Tetapan pada MIN sesuai digunakan waktu musim panas.
3. Tutup paip yang membekalkan air. Sambungkan bekalan air utama ke saluran masukkan pada perkakas menggunakan Hos Aliran Masuk berukuran 15mm dengan pemasangan mampatan.
4. Buka paip air dan periksa jika terdapat sebarang kebocoran pada tempat pemyambungan ke perkakas.
5. Sambungkan Hos Pancuran Fleksi pada aliran keluar air. Bukakan air dan biarkan dahulu air keluar untuk membersihkan segala sisa-sisa kotoran semasa kerja penyambungan paip tadi serta penuhkan tangki pemanas. Seterusnya, sambungkan kepala pancuran pada hujung Hos Pancuran Fleksi. Nota: Hujung berbentuk kon pada Hos Pancuran Fleksi adalah untuk disambungkan dengan kepala pancuran.
6. Letakkan kepala pancuran ke pemegangnya.
7. Sentiasa bersihkan kepala pancuran ini untuk mengelakkan dari aliran air dari terhalang.
AMARAN: Jangan gunakan hos metalik / krom dan injap konduktif bersama perkakas.
Memasang Set Pancuran
• Pasang kedua-dua pendakap hujung ke batang rod.• Letakkan kedua-dua pendakap bersama batang rod tadi ke dinding dan tandakan kedudukan pendakap untuk membuat lubang skru di dinding.• Pasangkan pendakap, pemegang dan batang rod dengan skru. Ketatkan skru.• Pasang Hos Pancuran Fleksi ke kepala pancuran.
Penyambungan Elektrik
PENTING!MATIKAN SUIS BEKALAN KUASA UTAMA SEBELUM MELAKUKAN KERJA-KERJA ELEKTRIK
Nota:1. Perkakas ini perlu disambungkan terus secara tetap ke bekalan kuasa pautan polar berganda dengan jarak sentuhan minimum 3mm di kedua-dua polar.
2. Kedudukan Suis utama pemanas air mesti terletak di luar bilik mandi.
3. Pendawaian perlu disambungkan kepada suis utama tanpa menggunakan plag atau soket.
4. Saiz kabel bergantung kepada jumlah kW pemanas dan kedudukan jarak perkakas. Dapatkan nasihat dari jurulektrik berkelayakan sekiranya ada keraguan.
5. Sila rujuk pada plat penarafan elektrik yang terdapat pada perkakas. ( Rujuk pada diagram skematik )
Prosedur
• Pastikan bekalan kuasa telah dimatikan. Kabel wayar boleh dipasang dipermukaan dengan klip wayar, disembunyi atau menggunakan sesalur. Nota: Sesalur perlu masuk melalui bahagian belakang sahaja.
• Sambungkan kabel ke blok terminal yang terdapat pada perkakas seperti berikut:
L untuk Wayar Hidup (Warna Putih atau Merah) N untuk Wayar Neutral (Warna Biru atau Hitam) E untuk Wayar Bumi (Warna Hijau atau Hijau/Kuning)
Penting: Pastikan skru diikat dengan ketat dan tiada penebat wayar terlekat pada skru.
• Gunakan penyepit kabel untuk mengepilkan kabel pada perkakas. Penyepit ini sesuai untuk kabel bersaiz 6 hingga 10mm.
• Untuk saiz kabel melebihi 10mm, maka wayar tersebut perlulah masuk melalui sesalur atau melalui laluan dari dalam dinding, mengikuti paraturan IEE.

Air sangat sejuk
Air sangat panas
Perkakas terpadam semasa digunakan.
Air berhenti mengalir
Aliran air terlalu perlahan, lampu kuasa terpadam
Terlampau banyak air melalui pemanas.
Suhu ambien terlalu rendah.
Elemen pemanas rosak.
Litar terbuka pada wayar.
Pam telah rosak.
Tetapan suhu terlalu tinggi.
PCB telah rosak
Gangguan bekalan kuasa utama
ELSD menendang, mungkin berlaku lintas pintas
Kepala pancuran tersumbat, hos fleksi terpintal.
Tiada bekalan air.
Aliran air terlalu perlahan untuk mengaktifkan pemanas
Penyelesaian masalah
GEJALA SEBAB KEMINGKINAN
Kurangkan aliran air.
Kurankan aliran air, tinggikan tetapan suhu.
Tukar elemen pemanas yang baru.
Periksa wayar.
Uji dan baiki / Tukar.
Kurangkan tetapan suhu.
Periksa dan baiki / Tukar.
Periksa MCB, suis-suis dan kabel bekalan
Periksa kebocoran pembumiandan set semula ELSD.
Bersihkan / tukar kepala pancuran, betulkan pintalan pada hos fleksi.
Periksa bekalan air, buka injap Pengatur pastikan tiada halangan.
Tekan butang PAM hingga lampu menyala.
PENYELESAIAN
24 25
Cara-cara menggunakan
• Tetapan pada kuasa rendah mengurangkan kadar penggunaan elektrik pada perkakas anda.
• “Max” menunjukkan tetapan pada kuasa tertinggi, pelarasan suhu boleh juga dilakukan melalui tombol kawalan injap pengatur aliran yang berada diluar.
• Suhu air akan meningkat apabila tombol ini dipusingkan ikut arah jam dari “min” ke “max”.
Nota: Matikan suis bekalan kuasa sekiranya perkakas tidak digunakan.
Ciri-ciri Operasi
Indikasi Lampu:
Lampu KUASA• Menunjukkan elemen pemanas telah dihidupkan dan air mengalir pada kepanasan yang telah ditetapkan. • Lampu tidak akan menyala jika perkakas tidak dihidupkan atau aliran air tidak cukup untuk mengaktifkan pemanas.
Lampu PAM (WH903P sahaja)• Menunjukkan pam pendorong sedang berfungsi.
Lampu ELSD (Pengesan kebocoran elektrik)• Menunjukkan tiada berlaku kebocoran elektrik pada sistem dan perkakas selamat untuk digunakan.
Knob & Buttons Functions:
Tombol KUASA• Apabila tombol ini berada pada kedudukan OFF, aliran air keluar adalah sejuk.• Aliran air akan mula bertambah panas jika tombol dipusingkan mengikut arah jam ke arah MAX.
Butang PAM ON/OFF (WH903P sahaja)• Apabila butang ini di tekan dan aliran air yang memasuki perkakas adalah mencukupi, pam akan berfungsi secara automatik dan akan berhenti apabila bekalan air dimatikan.
• Jika aliran air terlalu perlahan untuk menghidupkan pemanas atau pam, tekan sahaja butang ini dalam beberapa saat untuk meningkat tekanan aliran yang akan menghidupkan pemanas serta pam.
Butang UJIAN• Tekan butang ini untuk memeriksa jika terdapat kebocoran elektrik di dalam sistem. ELSD akan memutuskan bekalan kuasa dan lampunya akan terpadam.
Butang SET SEMULA/RESET• Tekan butang ini selepas menguji kebocoran elektrik di dalam sistem. Lampu ELSD akan menyala semula dan perkakas boleh digunakan.
PERKARA PENTING:• ELSD dapat mengesan kebocoran elektrik walaupun sedikit. Ia akan memutuskan bekalan kuasa ke perkakas untuk melindungi keselamatan pengguna.
• Elemen pemanas, kesemua permukaan logam yang terdedah dan kerja-kerja paip di dalam bilik air perlu ditutup dan dibumikan. Jika pembumian tidak dilakukan dengan baik, akan menyebabkan ELSD tidak berfungsi.
• Jangan gunakan perkakas jika ada keraguan dengan pemasangan pembumian.
• Uji secara kerap ELSD untuk memastikan perkakas selamat untuk digunakan.


![[Www.manuallib.com]_ Crescent A100 说明书](https://img.pdfslide.tips/doc/110x75/55cf857c550346484b8e8b6c/wwwmanuallibcom-crescent-a100-.jpg)