Embed Size (px)
Citation preview
Instructions for the Academic Appointment Process via the Web Faculty Level
In order for an “Appointment Form Submitter” (at the faculty level) to initiate an appointment form via the Web, you must have a McGill ID and PIN number. If you do not have a PIN please contact the IST Customer Service Help Desk at 398‐3398. Before the hire process may start, you must ensure that the position number already exists in Banner. The person designated as “appointment form submitter” will take full responsibility for the information that is entered on the appointment form via the web. Any changes to the web appointment forms must be done by the appointment form submitter and only that person will be able to make the changes. The Academic Hire Appointment Process includes: New‐Hire: someone who has never worked at the university previously or has only worked as a casual (any position starting with “B”) Re‐hire: someone who has previously worked at the university and should only be used if there has been a break in service Additional Appointment: adding a new additional appointment to an employee’s existing record ACADEMIC APPOINTMENT PROCESS 1) Access MINERVA at http://www.mcgill.ca and click on “Minerva for faculty and Staff”. 2) MAIN MENU
Select Human Resources Administration Menu Select Appointment Processing Select Appointment Process Form: to create a person, new hire, re‐hire or add a job You are presented with your “Appointment List” which contains forms that you must act upon. If there are no records waiting for action this page will be empty. Note: Appointment form submitters will only see forms with a status of SUS and MOD in this view. To create a new appointment form, click on the create button.
Last updated: Tuesday, April 13, 2010 1
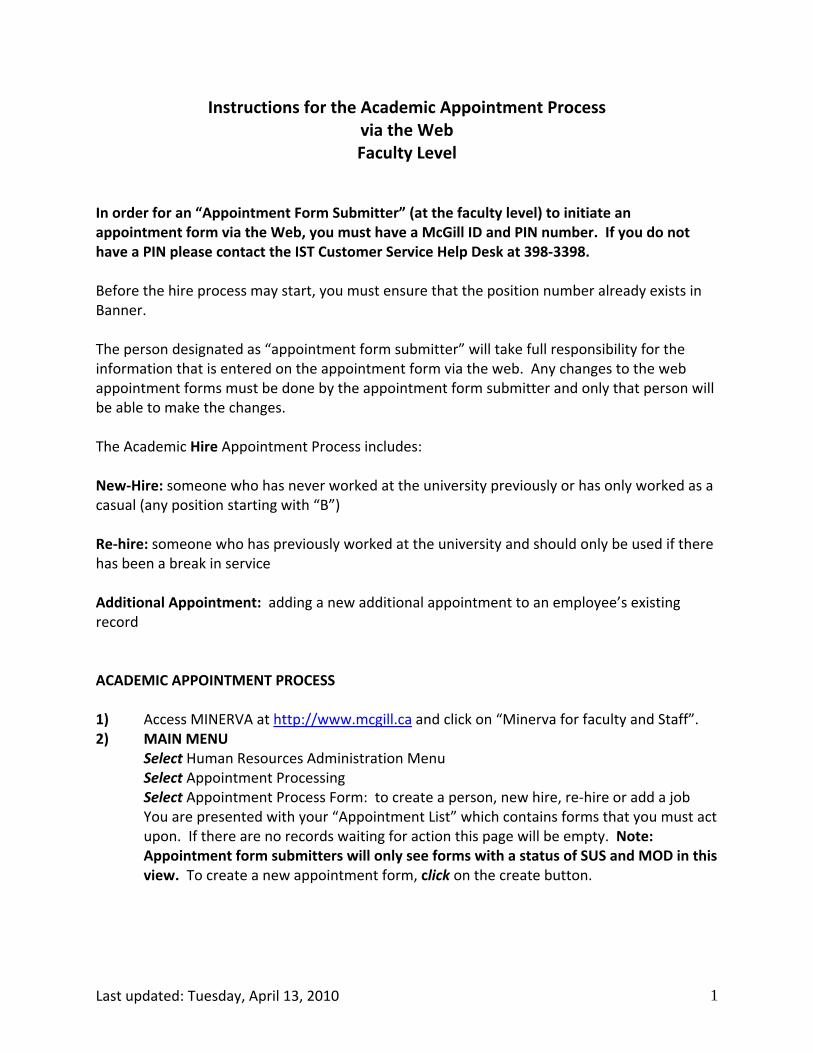
(* mandatory fields). All mandatory fields must be completed. Select: Orgn (5 digit numeric department number and description) Only the org for which you have security will be presented on the pick list. For university pooled positions, you must select the org 00957 (University Pooled Positions). However, this must be overridden later on, on the job form. Function ‐ Hire Group ‐ Academic E‐class ‐ The pick list is filtered according to the group selected. Position ‐ A list of valid active positions in your selected org and e‐class will be presented. Note: Single active positions may only be occupied by one person.
If you have made an error click on MENU (top right hand corner) or the “back” button and restart.
3) PERSON SEARCH: You are now ready to do the person search. It is crucial that an extensive search be performed in order to avoid the possibility of creating duplicate McGill ID’s (duplicate PIDMs). Students and employees have a unique McGill ID.
How to search for a person? When you enter the last and first names, ensure that a % is inserted before and after the names. Verify the person SIN, date of birth.
Last updated: Tuesday, April 13, 2010 2
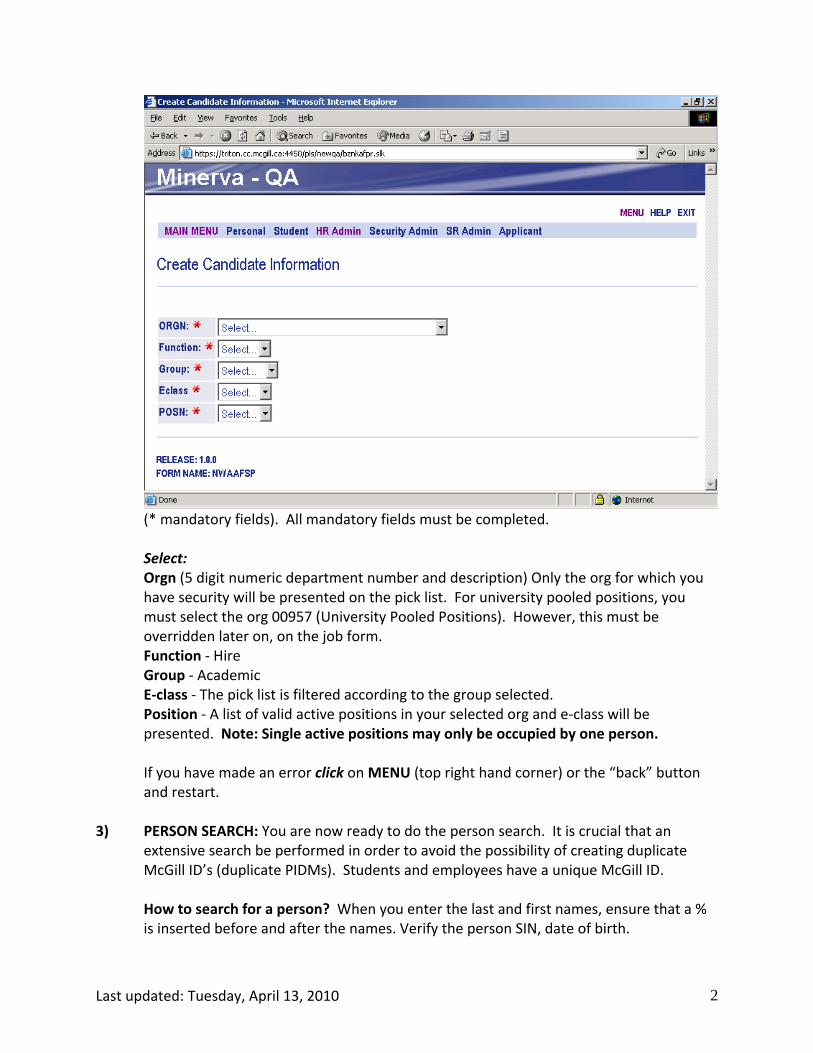
Behind the scenes a search is being done to find a match for the criteria entered. If a match is not found you will get the following message “Your search generated 0 results! Please try again.” See sample below: If your search generated more than 30 names you will receive the following message: “Your search generated more than 30 results! Please narrow down your search criteria and try again”.
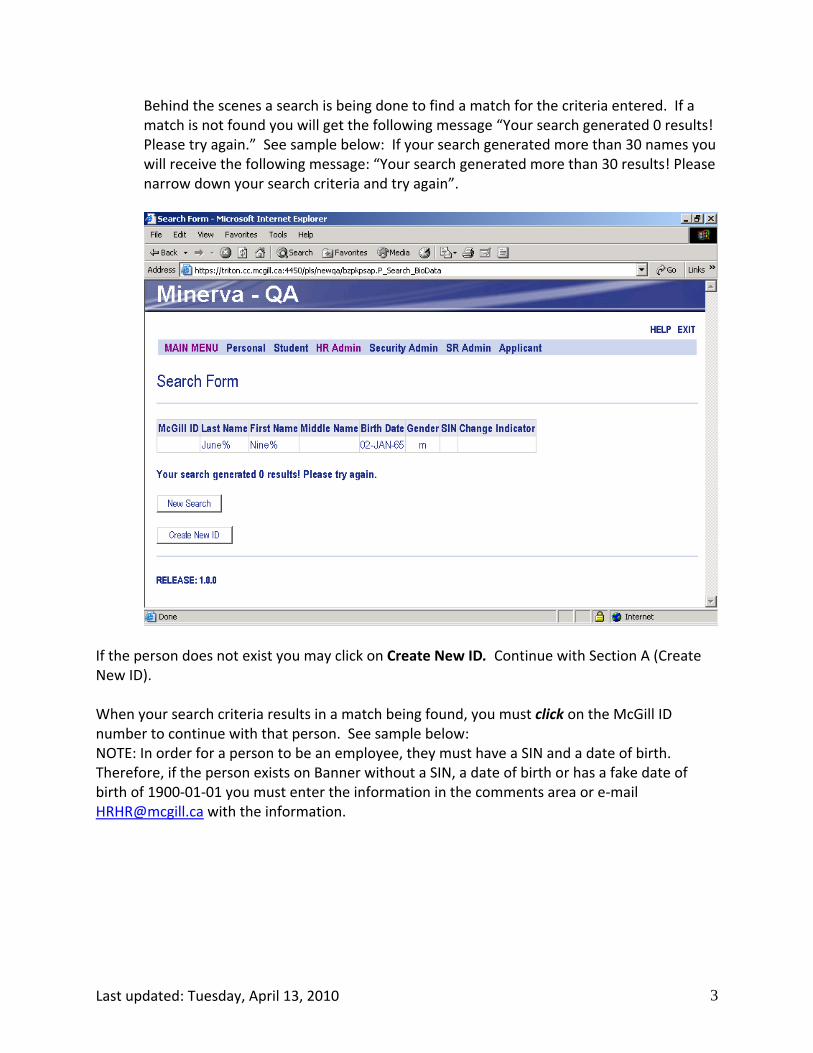
If the person does not exist you may click on Create New ID. Continue with Section A (Create New ID). When your search criteria results in a match being found, you must click on the McGill ID number to continue with that person. See sample below: NOTE: In order for a person to be an employee, they must have a SIN and a date of birth. Therefore, if the person exists on Banner without a SIN, a date of birth or has a fake date of birth of 1900‐01‐01 you must enter the information in the comments area or e‐mail [email protected] with the information.
Last updated: Tuesday, April 13, 2010 3
You are now presented with the “Appointment Form” (Personal Information). The information that is presented is the information that currently exists for the person on Banner. This information should be reviewed carefully and updated if there are changes to be made. See instructions below related to the change you want to make. To continue you must save. Go to Section B (Job Information). A. Create New ID Last and First Name: Enter names in mixed case. The way you enter the names is how they will appear on Banner and on the mail to the employees. SIN: Enter a valid Canadian SIN or select the appropriate SIN missing code. Citizenship Information: Select Country code from list. To find a country code you may type the first letter of the country name you wish to use. All the entries that begin with the selected letter will be presented and you may scroll down to select the entry you want. If citizenship is not Canadian, you must complete the visa information. Banner requires visa number and end dates for all visa types excluding permanent residents. Please note that for employees having employment authorizations, the start and end dates of the job should be within the start and end dates of the employment authorization. Home Address: Enter the home address in upper and lower case for the person being hired.
Last updated: Tuesday, April 13, 2010 4
Campus Address: This is the address where internal correspondence will be sent to the employee (cheque stub). Please note that an employee may only have one campus address. For those employees having multiple jobs in different departments, please ensure that the campus address being entered is where all internal correspondence including cheque stub should be sent. If no address exists it may be updated, the org will default but can be overridden and a building code must be entered. If an address exists in Banner, the address will not be brought over because it is free form in Banner and we cannot properly match the input fields. Instead, the message “Already exists” will be printed next to the Campus Address label. At this point you will have to verify the CA address in Banner (GYAADDR form). If incorrect it must be updated. Use the option “Modify Employee Addresses” under the HR Admin menu. External E‐mail Address: Should be entered for all applicants so that they may be contacted for various reasons (eg. Benefit enrollment,). This e‐mail address will be used until a McGill e‐mail address is assigned. At this point the information entered must be saved. Click on Save and Continue. When you save, the system assigns a McGill ID number and all the personal information except citizenship goes on Banner. If there is no PEAEMPL record on Banner it will create one with “Z6 ‐ Applicant” E‐class. The system has now created an appointment form with a document number (Doc No) and a status of SUS (suspend) and will present the Job Information form (see section B below) with defaulted information and information that must be entered. Once the personal information has been saved you may not make any changes or corrections in this application. You may see the personal information on Banner using GYAIDEN and GYAADDR. If you wish to make any changes you must contact Human Resources, Service Centre.
Last updated: Tuesday, April 13, 2010 5
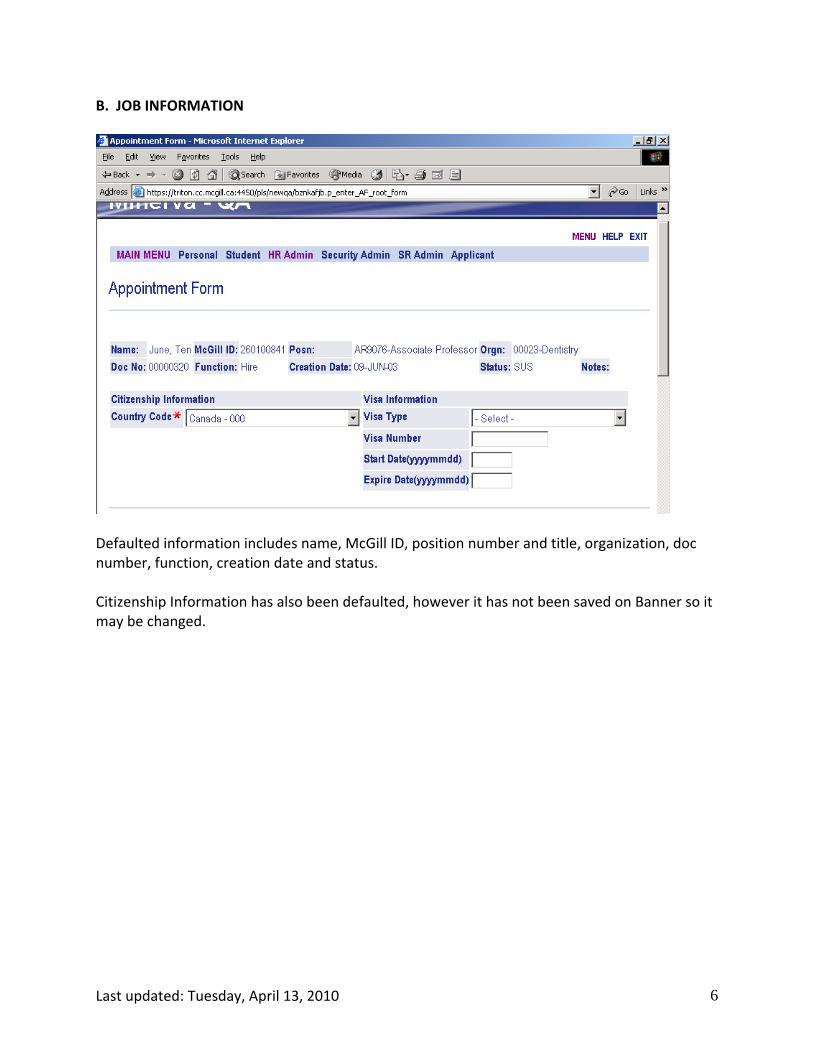
B. JOB INFORMATION
Defaulted information includes name, McGill ID, position number and title, organization, doc number, function, creation date and status. Citizenship Information has also been defaulted, however it has not been saved on Banner so it may be changed.
Last updated: Tuesday, April 13, 2010 6
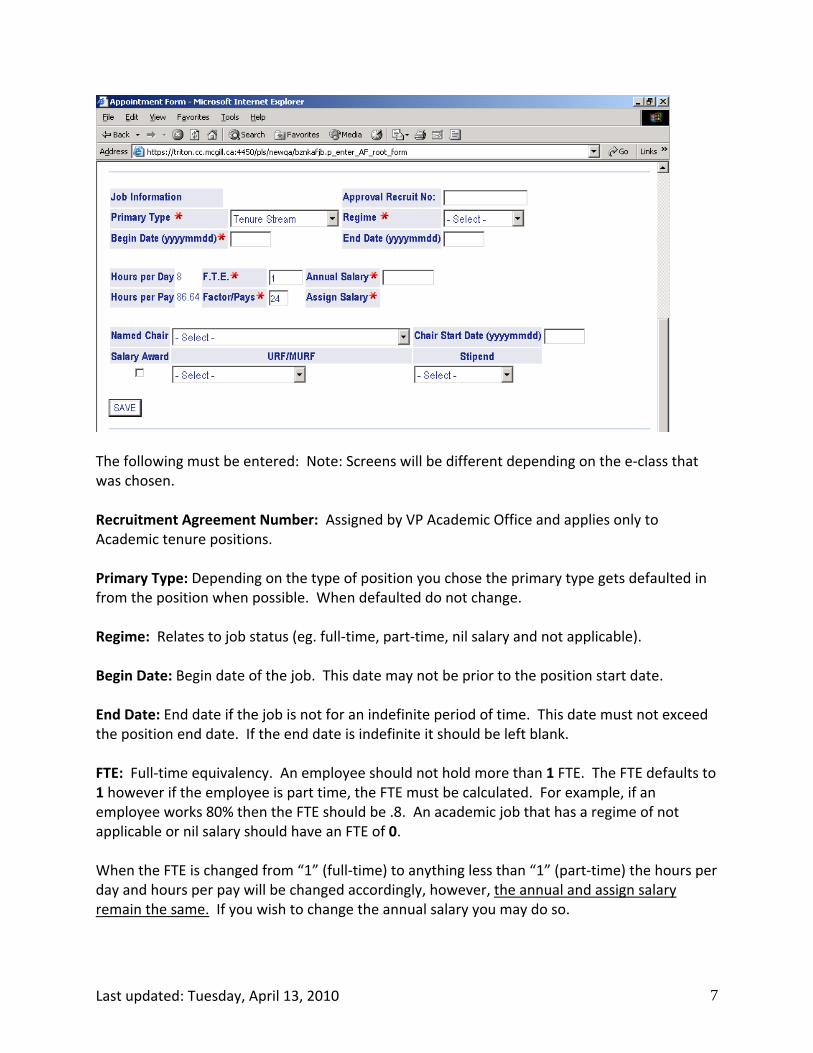
The following must be entered: Note: Screens will be different depending on the e‐class that was chosen. Recruitment Agreement Number: Assigned by VP Academic Office and applies only to Academic tenure positions. Primary Type: Depending on the type of position you chose the primary type gets defaulted in from the position when possible. When defaulted do not change. Regime: Relates to job status (eg. full‐time, part‐time, nil salary and not applicable). Begin Date: Begin date of the job. This date may not be prior to the position start date. End Date: End date if the job is not for an indefinite period of time. This date must not exceed the position end date. If the end date is indefinite it should be left blank. FTE: Full‐time equivalency. An employee should not hold more than 1 FTE. The FTE defaults to 1 however if the employee is part time, the FTE must be calculated. For example, if an employee works 80% then the FTE should be .8. An academic job that has a regime of not applicable or nil salary should have an FTE of 0. When the FTE is changed from “1” (full‐time) to anything less than “1” (part‐time) the hours per day and hours per pay will be changed accordingly, however, the annual and assign salary remain the same. If you wish to change the annual salary you may do so.
Last updated: Tuesday, April 13, 2010 7
Annual Salary: An annualized amount even if the job is less than one year. After you enter the annual salary press tab and the system will calculate the assign salary. A salary of $150,000 or greater will be displayed in red. Factor/Pays: Must be 24 even for a job that is less than one year. This will be frozen. Named Chair: To enter a named chair that does not exist on the named chair table, please contact HR Records at 4747. Begin Date: Begin date of the named chair. Salary Award: Must be indicated if the job has a salary award. URF/MRF: URF/MRF code is used to identify salary sources which were in replacement of 'hard funds' and were to be considered as 'hard funds' for purposes of salary policy, benefits, and others. The URF/MRF indicated that the total merit allocation and University contribution for benefits should take into account these 'soft' funds and not exclude them, as they were simply temporary replacements of hard funds/regular salary. Stipend: Long‐term stipend: stipend is maintained until eliminated through salary policies. Note: There are not new long –term stipends permitted. 1 year ex‐stipend: stipend will expire one year after the end of the appointment No ex‐stipend: stipend ends with the appointment If you require further clarification about stipend codes please contact VP Academic Office. At this point the information entered must be saved. Click on Save and Continue. When you save the job information it stays on the appointment form submitter’s “Appointment List” with a status of SUS (suspend) and you are presented with the FOAPAL information.
Last updated: Tuesday, April 13, 2010 8
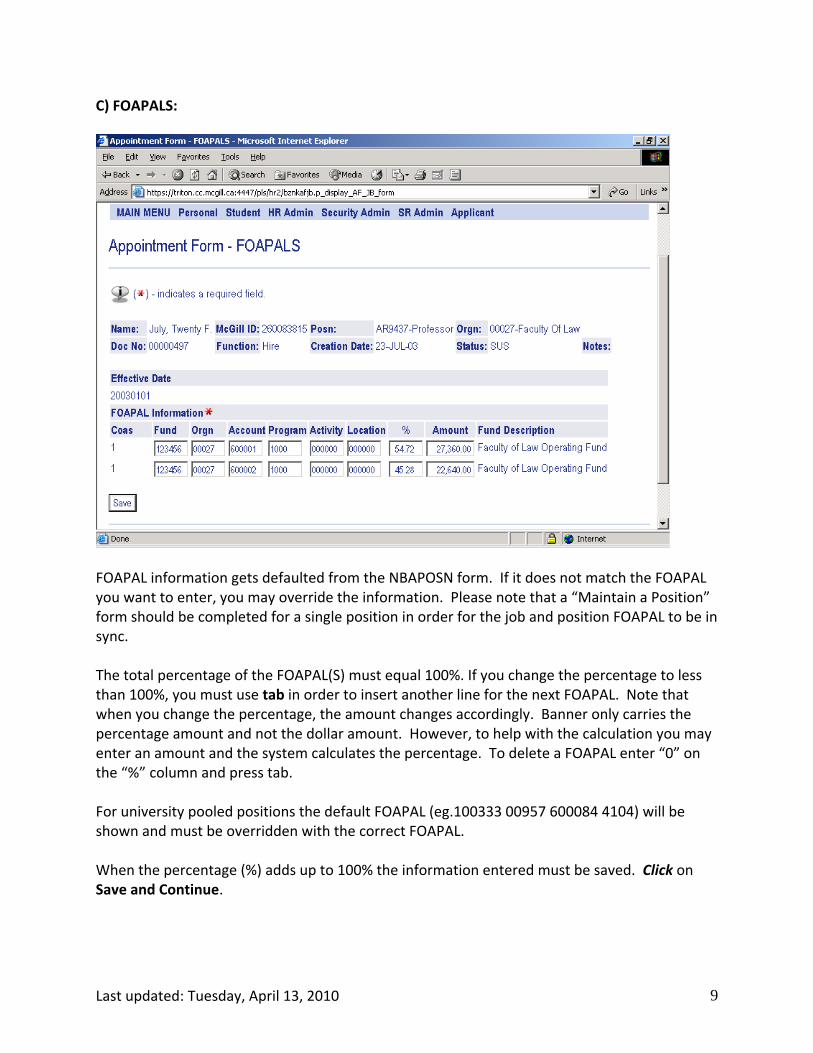
C) FOAPALS:
FOAPAL information gets defaulted from the NBAPOSN form. If it does not match the FOAPAL you want to enter, you may override the information. Please note that a “Maintain a Position” form should be completed for a single position in order for the job and position FOAPAL to be in sync. The total percentage of the FOAPAL(S) must equal 100%. If you change the percentage to less than 100%, you must use tab in order to insert another line for the next FOAPAL. Note that when you change the percentage, the amount changes accordingly. Banner only carries the percentage amount and not the dollar amount. However, to help with the calculation you may enter an amount and the system calculates the percentage. To delete a FOAPAL enter “0” on the “%” column and press tab. For university pooled positions the default FOAPAL (eg.100333 00957 600084 4104) will be shown and must be overridden with the correct FOAPAL. When the percentage (%) adds up to 100% the information entered must be saved. Click on Save and Continue.
Last updated: Tuesday, April 13, 2010 9
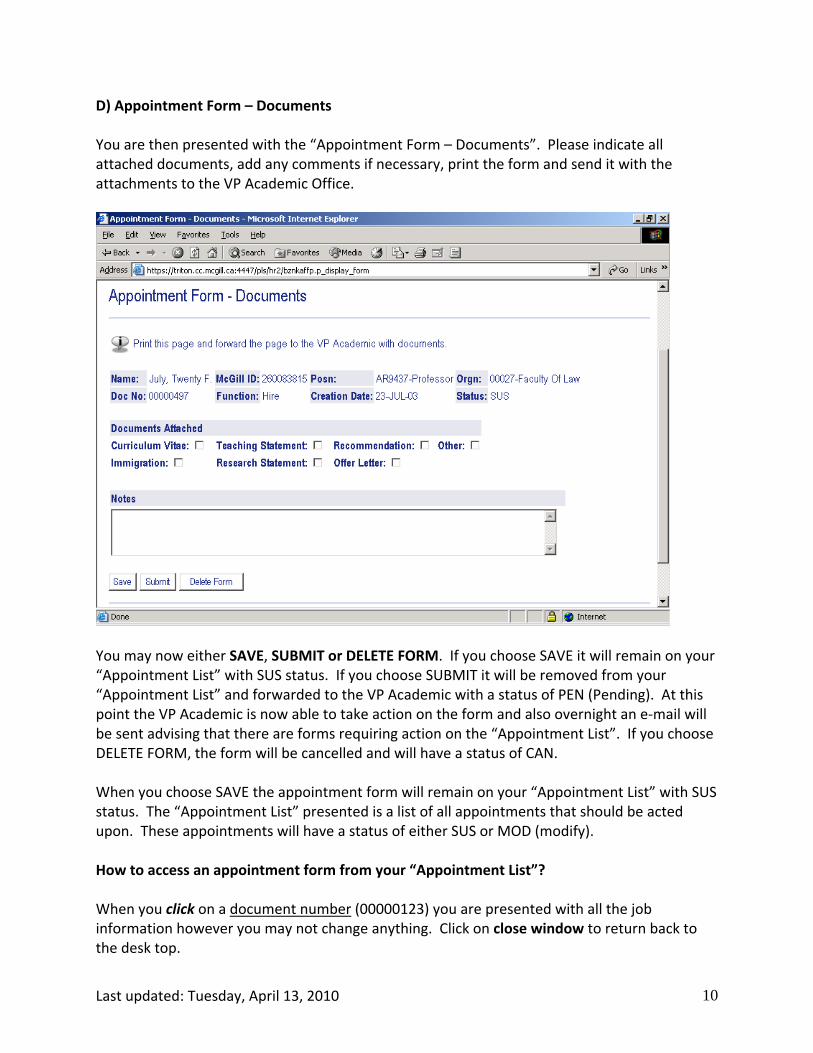
D) Appointment Form – Documents You are then presented with the “Appointment Form – Documents”. Please indicate all attached documents, add any comments if necessary, print the form and send it with the attachments to the VP Academic Office.
You may now either SAVE, SUBMIT or DELETE FORM. If you choose SAVE it will remain on your “Appointment List” with SUS status. If you choose SUBMIT it will be removed from your “Appointment List” and forwarded to the VP Academic with a status of PEN (Pending). At this point the VP Academic is now able to take action on the form and also overnight an e‐mail will be sent advising that there are forms requiring action on the “Appointment List”. If you choose DELETE FORM, the form will be cancelled and will have a status of CAN. When you choose SAVE the appointment form will remain on your “Appointment List” with SUS status. The “Appointment List” presented is a list of all appointments that should be acted upon. These appointments will have a status of either SUS or MOD (modify). How to access an appointment form from your “Appointment List”? When you click on a document number (00000123) you are presented with all the job information however you may not change anything. Click on close window to return back to the desk top.
Last updated: Tuesday, April 13, 2010 10
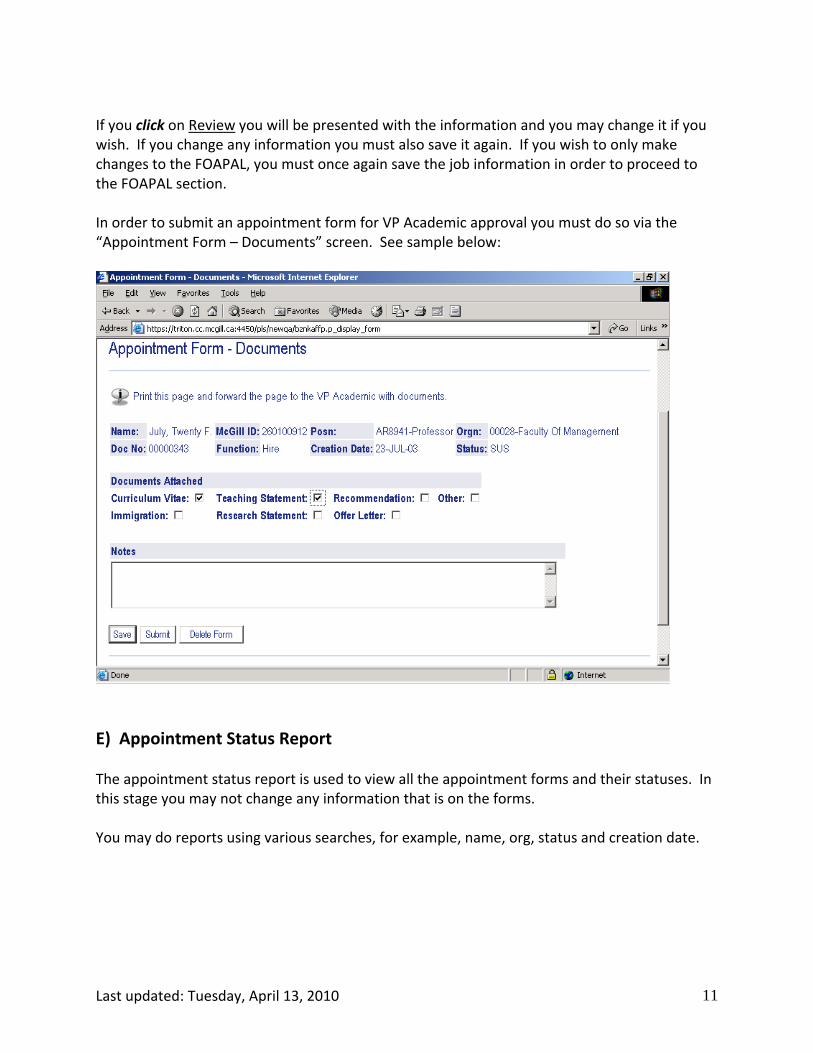
If you click on Review you will be presented with the information and you may change it if you wish. If you change any information you must also save it again. If you wish to only make changes to the FOAPAL, you must once again save the job information in order to proceed to the FOAPAL section. In order to submit an appointment form for VP Academic approval you must do so via the “Appointment Form – Documents” screen. See sample below:
E) Appointment Status Report The appointment status report is used to view all the appointment forms and their statuses. In this stage you may not change any information that is on the forms. You may do reports using various searches, for example, name, org, status and creation date.
Last updated: Tuesday, April 13, 2010 11
F) VP Academic Office To approve appointment forms the VP Academic should access the Appointment Process Form. The VP Academic will only see appointment forms that have a status of PEN or HLD on their “Appointment List”. Prior to going to the “Appointment Approval” VP Academic should review the appointment. If a form requires changes, VP Academic will send it back to the faculty (MOD status) to make the requested change. Once the appointment form submitter at the faculty level makes the changes and submits, it will return to VP Academic “Appointment List” with a status of PEN to approve. When VP Academic has authorized what has been entered on the appointment form it is ready to be approved. It disappears from VP Academic’s “Appointment List” and goes in a report with a status of APP. Overnight the system will create a job (without earnings) in Banner and will assign a suffix number. It will also override the PEAEMPL record with proper information when it can. If a PEAEMPL record already exists on Banner, it will not be changed (even if the status is terminated) it will be changed accordingly at a later date. The status of the form will now change to BAN. At this point the McGill ID and MINERVA PIN will be sent to the applicant via two separate e‐mails using the AF type e‐mail address. This will allow them to complete their personal data form (language of correspondence, education, etc) on MINERVA (Personal Menu) and enroll in benefits (Employee Menu). Note: If no e‐mail address is provided the information will not be sent to the applicant. The employee may obtain an ID card. If the form is rejected (REJ) a HR representative must take action. At this point the process is not yet complete because a HR representative must take action. The last step the HR representative must take is to enter an earnings code. This completes the final process and a pay cheque will be issued to the employee. An overnight procedure will change the status to COM and an estimated pay date will be displayed on the report.
Last updated: Tuesday, April 13, 2010 12
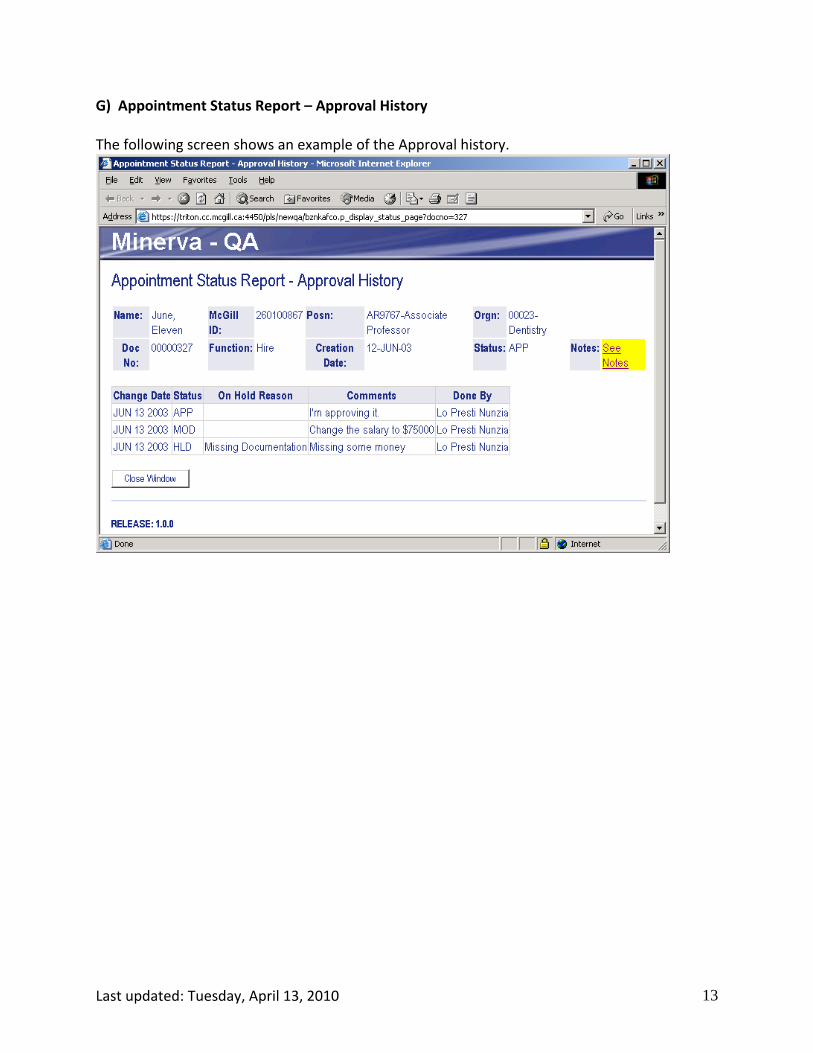
G) Appointment Status Report – Approval History The following screen shows an example of the Approval history.
Last updated: Tuesday, April 13, 2010 13
Last updated: Tuesday, April 13, 2010 14
APPENDIX A Status Definitions: DEP – Department: When the appointment information is saved by the department, it goes into a DEP status and remains on their “Appointment List” until submitted to their faculty. SUS – Suspended: When the appointment information is saved by the appointment form submitters, it goes into a SUS status and remains on their “Appointment List” until submitted to Human Resources, Salary Administration. PEN – Pending: Once submitted, the form goes into a PEN status for Salary Administration approval. Salary Administration is not authorized to make any changes to the appointment form that the appointment form submitter has entered. MOD – Modified: If there are changes to be made, Salary Administration will enter a MOD status and the form will be returned to the appointment form submitter to make the change. HLD – On Hold: Salary Administration may also choose to put the appointment form on a HLD status if there are necessary documents missing. APP‐ Approved: The record has been approved by Salary Administration. CAN – Cancelled: Only appointment form submitters can cancel a form when in a SUS status. It is also possible for an appointment form submitter to cancel an appointment form in a MOD status as advised by Salary Administration. BAN – BANNER: Salary Administration has approved and submitted the appointment form. The appointment form has been processed, passed all the edits and the information is now in BANNER (NBAJOBS, NYAJOBS, PEAEMPL, NYAJREC, etc.) however, it now requires action by HR coders in order to be paid. If you view the status report the job suffix is now there. REJ – Rejected (Batch): A problem has been encountered when adding a job to Banner. HR action is required. COM – Completed: This is the final stage in the appointment form approval process and a pay cheque will be issued to the employee. An estimated pay date is now on the report.