Embed Size (px)
Citation preview
1/10P100013728 A
de Stellantriebfr Servomoteuren Actuatorit Servomotorees Servomotorsv Ställdonnl Servomotorpl Napęd ustawczyru Приводzh 执行器
de Montagevorschriftfr Instruction de montageen Fitting instructionsit Istruzioni di montaggioes Instrucciones de montajesv Monteringanvisningnl Montagevoorschriftpl Instrukcja montażuru Инструкции по монтажуzh 安装说明
1-0152277AVF234SK008
1-0152279AVF234SK009
18,5 6057
M1
03
56
b
a 90
c
b
230
Type a b c
AVF234SK008/K009 64 289 44
AVF234SK008/K009
s24 (1x)
s6
T15
3
1
B10
515a
> 150 mm
> 150 mm
1.1
IP66
EN 60529
B10
545a
1.2
de Installationsanweisung für die Fachkraft / Monteurfr Conseils d‘installation pour le spécialiste / monteur en Guidelines for the technician / fitter it Informazioni per il personale specializzato di montaggioes Instrucciones para el especialista del ramo / montador sv Installationsinstruktion för installatör / montörnl Installatietip voor de vakman / monteurpl Instrukcja instalacji dla specjalisty/montażystyru Инструкции по установке для специалистовzh 适用于专业人员/安装人员的安装说明
EN60730400ms1AA
Typ
B11
817
Y07
552
MY07
544
Y07
545
5-95%RH
VorsichtAttentionCautionAttenzioneAttenciónObserverLetOstrożnieОсторожно小心
2/10P100013728 A
~ 0
B10
435
2
1
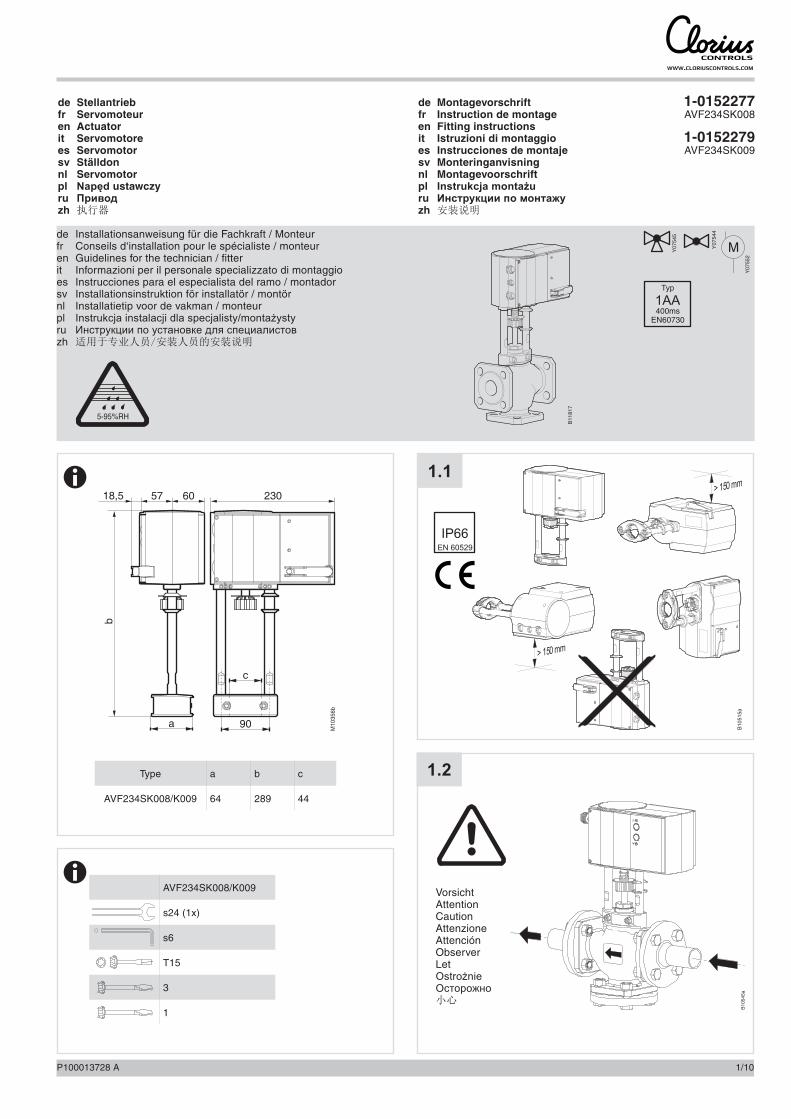
2.1
B10
437a
21
click
2.2
B10
516b
0 bar0 bar
M = 10 NmA
2
1
2.3a AVF234SK008
AVF234SK009
45˚
B10517b
2
3
0 bar0 bar
M = 10 NmA
1
click
45
2.3b AVF234SK008
AVF234SK009
4
WarnungAvertissementWarningAvvertenzaAdvertenciaWarningWaarschuwingOstrzeżenieПредупреждение警告
WarnungAvertissementWarningAvvertenzaAdvertenciaWarningWaarschuwingOstrzeżenieПредупреждение警告
3/10 P100013728 A
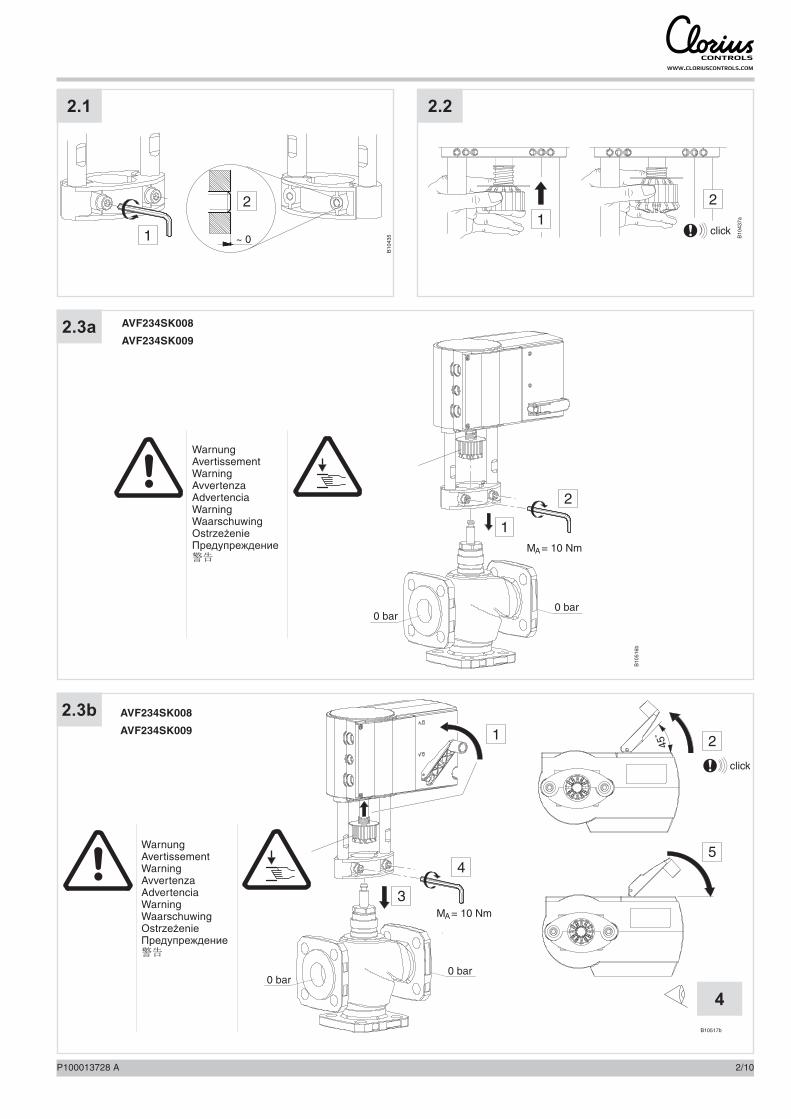
4
AutoManual
2.4
1 /smax.
4/10P100013728 A
B1
05
18
b
3.1
AVF234SK...
...008 ...009
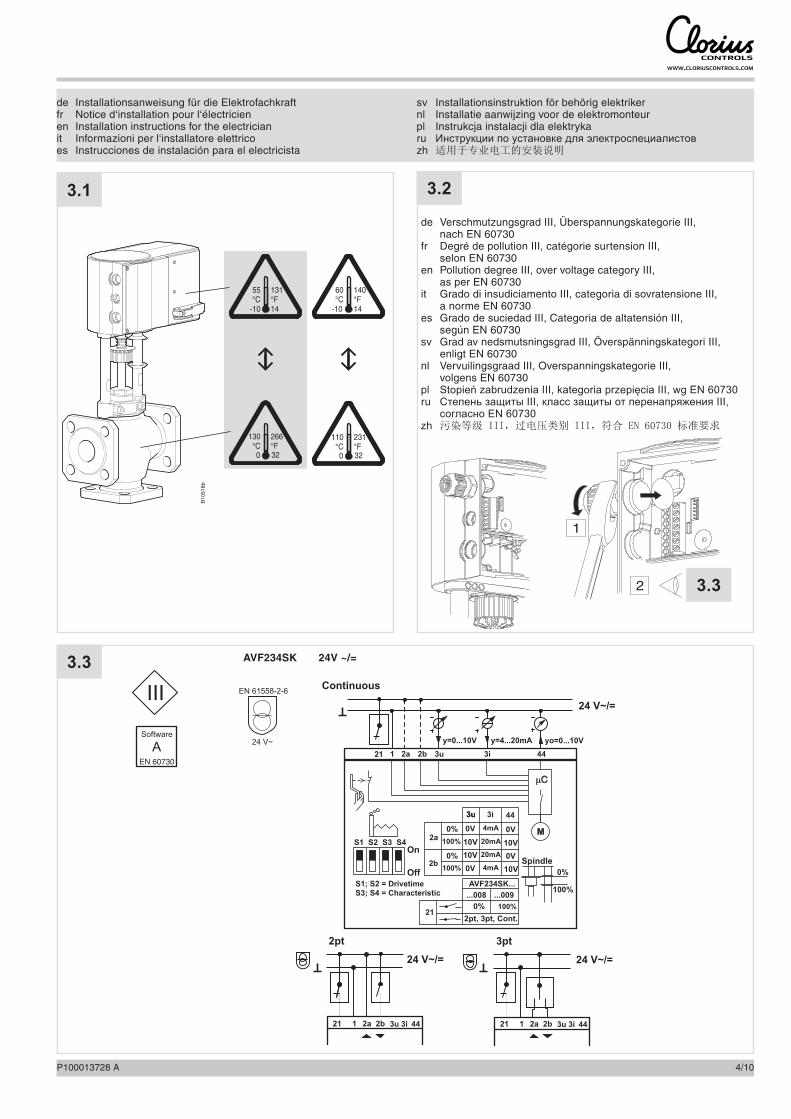
3.3 AVF234SK 24V ~/=
2
1
3.2
3.3
de Verschmutzungsgrad III, Überspannungskategorie III, nach EN 60730fr Degré de pollution III, catégorie surtension III, selon EN 60730en Pollution degree III, over voltage category III, as per EN 60730it Grado di insudiciamento III, categoria di sovratensione III, a norme EN 60730es Grado de suciedad III, Categoria de altatensión III, según EN 60730sv Grad av nedsmutsningsgrad III, Överspänningskategori III, enligt EN 60730nl Vervuilingsgraad III, Overspanningskategorie III, volgens EN 60730pl Stopień zabrudzenia III, kategoria przepięcia III, wg EN 60730ru Степень защиты III, класс защиты от перенапряжения III, согласно EN 60730zh 污染等级 III,过电压类别 III,符合 EN 60730 标准要求
EN 60730
Software
A
EN 61558-2-6
24 V~
III
55°C
-10
131°F14
60°C
-10
140°F14
130°C0
266°F32
110°C0
231°F32
de Installationsanweisung für die Elektrofachkraft fr Notice d‘installation pour l‘électricienen Installation instructions for the electricianit Informazioni per l‘installatore elettricoes Instrucciones de instalación para el electricista
sv Installationsinstruktion för behörig elektrikernl Installatie aanwijzing voor de elektromonteurpl Instrukcja instalacji dla elektrykaru Инструкции по установке для электроспециалистовzh 适用于专业电工的安装说明
5/10P100013728 A
Y07
552
MM
Y01
852
1 2 3 4
On
Off
1 2 3 4
On
Off
stroke
x2
1 2 3 4
On
Off
stroke Signal
str
oke
Signal
lin
1 2 3 4
On
Off
stroke
stro
ke
1 2 3 4
On
Off
stroke Signal
lin
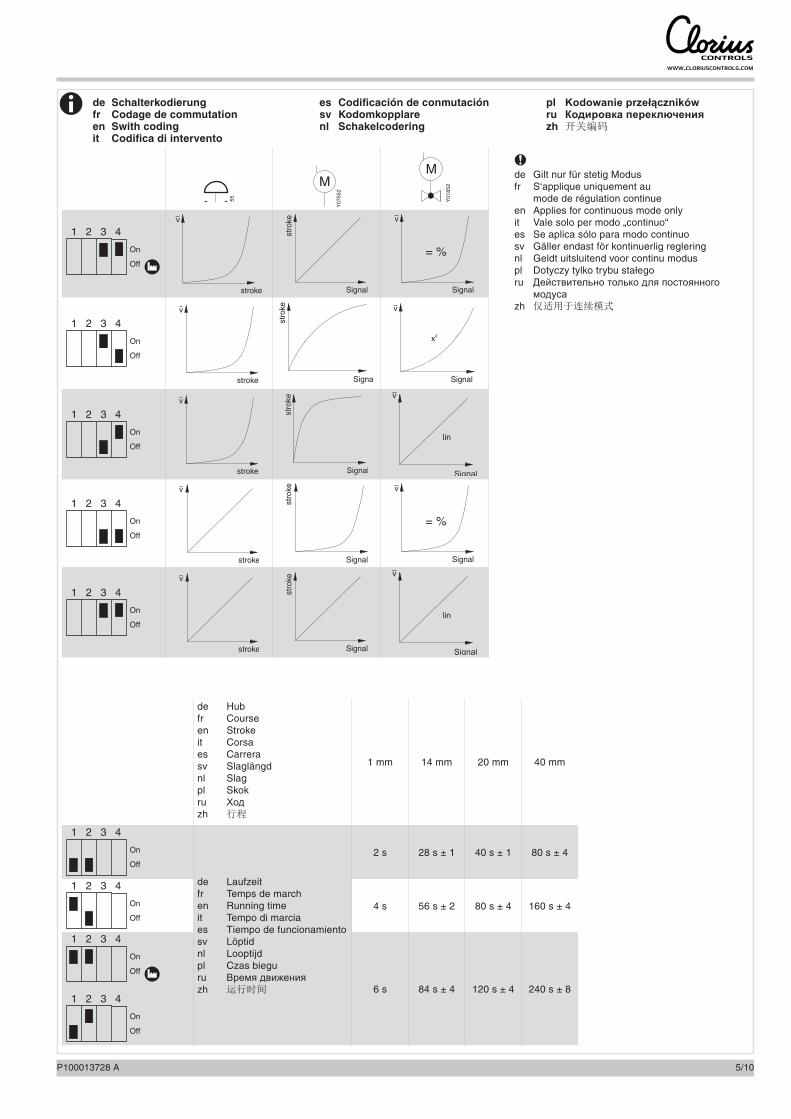
de Hubfr Courseen Strokeit Corsaes Carrerasv Slaglängdnl Slag pl Skokru Ходzh 行程
1 mm 14 mm 20 mm 40 mm
1 2 3 4
On
Off
de Laufzeitfr Temps de marchen Running timeit Tempo di marciaes Tiempo de funcionamientosv Löptidnl Looptijdpl Czas bieguru Время движенияzh 运行时间
2 s 28 s ± 1 40 s ± 1 80 s ± 4
1 2 3 4
On
Off4 s 56 s ± 2 80 s ± 4 160 s ± 4
1 2 3 4
On
Off
1 2 3 4
On
Off
6 s 84 s ± 4 120 s ± 4 240 s ± 8
de Schalterkodierung fr Codage de commutation en Swith coding it Codifica di intervento
es Codificación de conmutación sv Kodomkopplare nl Schakelcodering
pl Kodowanie przełączników ru Кодировка переключения zh 开关编码
de Gilt nur für stetig Modusfr S‘applique uniquement au mode de régulation continueen Applies for continuous mode onlyit Vale solo per modo „continuo“es Se aplica sólo para modo continuosv Gäller endast för kontinuerlig regleringnl Geldt uitsluitend voor continu moduspl Dotyczy tylko trybu stałegoru Действительно только для постоянного модусаzh 仅适用于连续模式
6/10 P100013728 A
B10
445
4
de
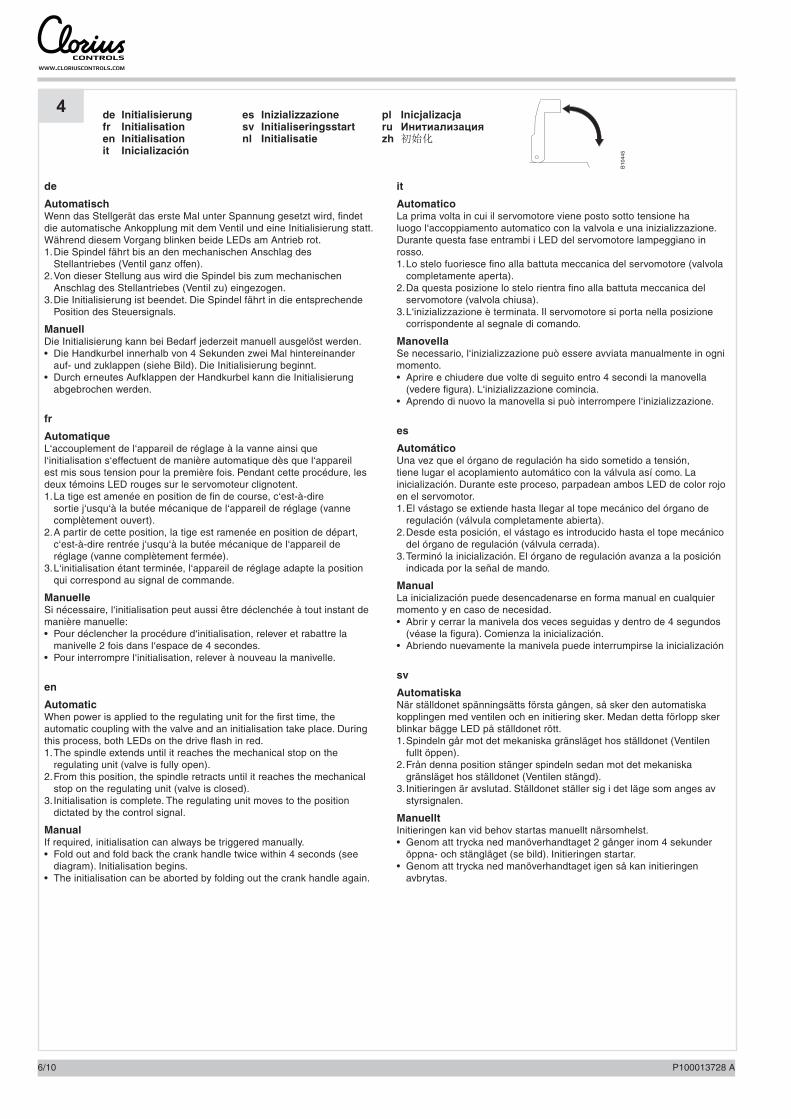
AutomatischWenn das Stellgerät das erste Mal unter Spannung gesetzt wird, findet die automatische Ankopplung mit dem Ventil und eine Initialisierung statt. Während diesem Vorgang blinken beide LEDs am Antrieb rot.1. Die Spindel fährt bis an den mechanischen Anschlag des
Stellantriebes (Ventil ganz offen).2. Von dieser Stellung aus wird die Spindel bis zum mechanischen
Anschlag des Stellantriebes (Ventil zu) eingezogen.3. Die Initialisierung ist beendet. Die Spindel fährt in die entsprechende
Position des Steuersignals.
ManuellDie Initialisierung kann bei Bedarf jederzeit manuell ausgelöst werden.• Die Handkurbel innerhalb von 4 Sekunden zwei Mal hintereinander
auf- und zuklappen (siehe Bild). Die Initialisierung beginnt.• Durch erneutes Aufklappen der Handkurbel kann die Initialisierung
abgebrochen werden.
fr
AutomatiqueL‘accouplement de l‘appareil de réglage à la vanne ainsi que l‘initialisation s‘effectuent de manière automatique dès que l‘appareil est mis sous tension pour la première fois. Pendant cette procédure, les deux témoins LED rouges sur le servomoteur clignotent.1. La tige est amenée en position de fin de course, c‘est-à-dire
sortie j‘usqu‘à la butée mécanique de l‘appareil de réglage (vanne complètement ouvert).
2. A partir de cette position, la tige est ramenée en position de départ, c‘est-à-dire rentrée j‘usqu‘à la butée mécanique de l‘appareil de réglage (vanne complètement fermée).
3. L‘initialisation étant terminée, l‘appareil de réglage adapte la position qui correspond au signal de commande.
ManuelleSi nécessaire, l‘initialisation peut aussi être déclenchée à tout instant de manière manuelle:• Pour déclencher la procédure d‘initialisation, relever et rabattre la
manivelle 2 fois dans l‘espace de 4 secondes.• Pour interrompre l‘initialisation, relever à nouveau la manivelle.
en
AutomaticWhen power is applied to the regulating unit for the first time, the automatic coupling with the valve and an initialisation take place. During this process, both LEDs on the drive flash in red.1. The spindle extends until it reaches the mechanical stop on the
regulating unit (valve is fully open).2. From this position, the spindle retracts until it reaches the mechanical
stop on the regulating unit (valve is closed).3. Initialisation is complete. The regulating unit moves to the position
dictated by the control signal.
ManualIf required, initialisation can always be triggered manually.• Fold out and fold back the crank handle twice within 4 seconds (see
diagram). Initialisation begins.• The initialisation can be aborted by folding out the crank handle again.
it
AutomaticoLa prima volta in cui il servomotore viene posto sotto tensione ha luogo l‘accoppiamento automatico con la valvola e una inizializzazione. Durante questa fase entrambi i LED del servomotore lampeggiano in rosso.1. Lo stelo fuoriesce fino alla battuta meccanica del servomotore (valvola
completamente aperta).2. Da questa posizione lo stelo rientra fino alla battuta meccanica del
servomotore (valvola chiusa).3. L‘inizializzazione è terminata. Il servomotore si porta nella posizione
corrispondente al segnale di comando.
ManovellaSe necessario, l‘inizializzazione può essere avviata manualmente in ogni momento.• Aprire e chiudere due volte di seguito entro 4 secondi la manovella
(vedere figura). L‘inizializzazione comincia. • Aprendo di nuovo la manovella si può interrompere l‘inizializzazione.
es
AutomáticoUna vez que el órgano de regulación ha sido sometido a tensión, tiene lugar el acoplamiento automático con la válvula así como. La inicialización. Durante este proceso, parpadean ambos LED de color rojo en el servomotor.1. El vástago se extiende hasta llegar al tope mecánico del órgano de
regulación (válvula completamente abierta).2. Desde esta posición, el vástago es introducido hasta el tope mecánico
del órgano de regulación (válvula cerrada).3. Terminó la inicialización. El órgano de regulación avanza a la posición
indicada por la señal de mando.
ManualLa inicialización puede desencadenarse en forma manual en cualquier momento y en caso de necesidad.• Abrir y cerrar la manivela dos veces seguidas y dentro de 4 segundos
(véase la figura). Comienza la inicialización.• Abriendo nuevamente la manivela puede interrumpirse la inicialización
sv
AutomatiskaNär ställdonet spänningsätts första gången, så sker den automatiska kopplingen med ventilen och en initiering sker. Medan detta förlopp sker blinkar bägge LED på ställdonet rött.1. Spindeln går mot det mekaniska gränsläget hos ställdonet (Ventilen
fullt öppen).2. Från denna position stänger spindeln sedan mot det mekaniska
gränsläget hos ställdonet (Ventilen stängd).3. Initieringen är avslutad. Ställdonet ställer sig i det läge som anges av
styrsignalen.
ManuelltInitieringen kan vid behov startas manuellt närsomhelst.• Genom att trycka ned manöverhandtaget 2 gånger inom 4 sekunder
öppna- och stängläget (se bild). Initieringen startar.• Genom att trycka ned manöverhandtaget igen så kan initieringen
avbrytas.
de Initialisierung fr Initialisation en Initialisation it Inicialización
es Inizializzazione sv Initialiseringsstart nl Initialisatie
pl Inicjalizacja ru Инитиализация zh 初始化
7/10P100013728 A
nl
AutomatischWanneer het corrigerend orgaan voor de eerste maal onder spanning wordt gezet, wordt zowel de automatische verbinding met de afsluiter als de initialisatie uitgevoerd. Tijdens dit proces knipperen beide LED‘s op de aandrijving rood.1. De spindel schuift tot aan de mechanische aanslag van het corrigerend
orgaan naar buiten (afsluiter volledig geopend).2. Vanuit deze stand wordt de spindel tot aan de mechanische aanslag
van het corrigerend orgaan naar binnen getrokken (afsluiter gesloten).3. De initialisatie is beëindigd. Het corrigerend orgaan gaat in de stand
staan die door het besturingssignaal is aangegeven.
HandmatigDe initialisatie kan zo nodig op elk moment handmatig in werking worden gesteld.• De handkruk tweemaal achtereenvolgens binnen 4 seconden open- en
dichtklappen (zie afbeelding). De initialisatie begint.• Door de handkruk opnieuw open te klappen kan de initialisatie worden
onderbroken.
pl
AutomatycznieGdy nastawnik jest pierwszy raz podłączany do napięcia, następuje automatyczne połączenie z zaworem oraz inicjalizacja.Podczas tego procesu obie diody LED na napędzie migają na czerwono.1. Wrzeciono przemieszcza się aż do mechanicznego ogranicznika
napędu ustawczego (zawór otwarty całkowicie)2. Z tej pozycji wrzeciono zostaje wciągnięte aż do mechanicznego
ogranicznika napędu ustawczego (zawór zamknięty).3. Inicjalizacja jest zakończona. Wrzeciono przemieszcza się do
odpowiedniej pozycji sygnału sterowania.
RęcznieW razie potrzeby inicjalizację można w każdej chwili uruchomić ręcznie.• W ciągu 4 sekund podnieść i opuścić dwa razy po kolei ręczną korbkę
(patrz rysunek). Rozpoczyna się inicjalizacja.• Przez ponowne podniesienie korbki ręcznej możliwe jest przerwanie
inicjalizacji.
ru
Автоматически При первом подключении прибора происходит автоматическое соединение с клапаном и инитиализация. В это время лампа LED мерцает красным светом. 1. Шпиндель движется до механического ограничителя
привода(клапан полностью открыт).2. Отсюда шпиндель движется до механического ограничителя
привода(клапан закрыт).3. Инитиализация закончена. Шпиндель идёт в соответствующее
положение управляющего сигнала.
РучноеИнициализация может быть произведена в любое время вручную.• Рукоятку в течение 4-х секунд 2 раза подряд открыть и закрыть(см.
рисунок).• Ещё одним открыванием рукоятки можно прервать
инитиализацию.
zh
自动调整单元首次通电时,将与阀门自动接合并执行初始化。在此过程中,执行器上的两个 LED 均闪烁红色光。1. 主轴伸出至执行器的机械止挡位置(阀门完全打开)。2. 从该位置起,主轴又收回至执行器的机械止挡位置(阀门关闭)。3. 初始化结束。主轴移动到控制信号指示的相应位置。
手动初始化过程可以根据需要随时手动启动。• 在 4 秒钟内将手摇柄连续上下拨动两次(见图示)。初始化开始。• 再次向上拨动手摇柄便可以中断初始化进程。
B10
446
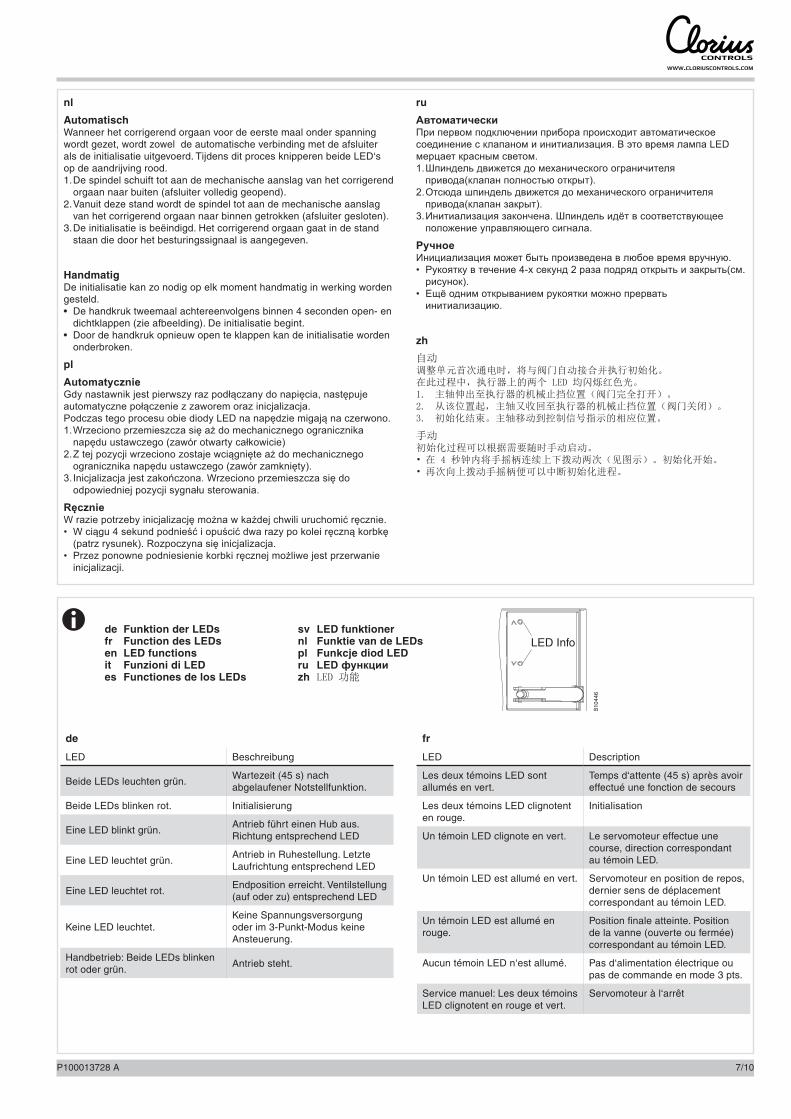
LED Infode Funktion der LEDs fr Function des LEDs en LED functions it Funzioni di LED es Functiones de los LEDs
sv LED funktioner nl Funktie van de LEDs pl Funkcje diod LED ru LED функции zh LED 功能
de
LED Beschreibung
Beide LEDs leuchten grün.Wartezeit (45 s) nach abgelaufener Notstellfunktion.
Beide LEDs blinken rot. Initialisierung
Eine LED blinkt grün.Antrieb führt einen Hub aus. Richtung entsprechend LED
Eine LED leuchtet grün.Antrieb in Ruhestellung. Letzte Laufrichtung entsprechend LED
Eine LED leuchtet rot.Endposition erreicht. Ventilstellung (auf oder zu) entsprechend LED
Keine LED leuchtet.Keine Spannungsversorgung oder im 3-Punkt-Modus keine Ansteuerung.
Handbetrieb: Beide LEDs blinken rot oder grün.
Antrieb steht.
fr
LED Description
Les deux témoins LED sont allumés en vert.
Temps d‘attente (45 s) après avoir effectué une fonction de secours
Les deux témoins LED clignotent en rouge.
Initialisation
Un témoin LED clignote en vert. Le servomoteur effectue une course, direction correspondant au témoin LED.
Un témoin LED est allumé en vert. Servomoteur en position de repos, dernier sens de déplacement correspondant au témoin LED.
Un témoin LED est allumé en rouge.
Position finale atteinte. Position de la vanne (ouverte ou fermée) correspondant au témoin LED.
Aucun témoin LED n‘est allumé. Pas d‘alimentation électrique ou pas de commande en mode 3 pts.
Service manuel: Les deux témoins LED clignotent en rouge et vert.
Servomoteur à l‘arrêt
8/10 P100013728 A
en
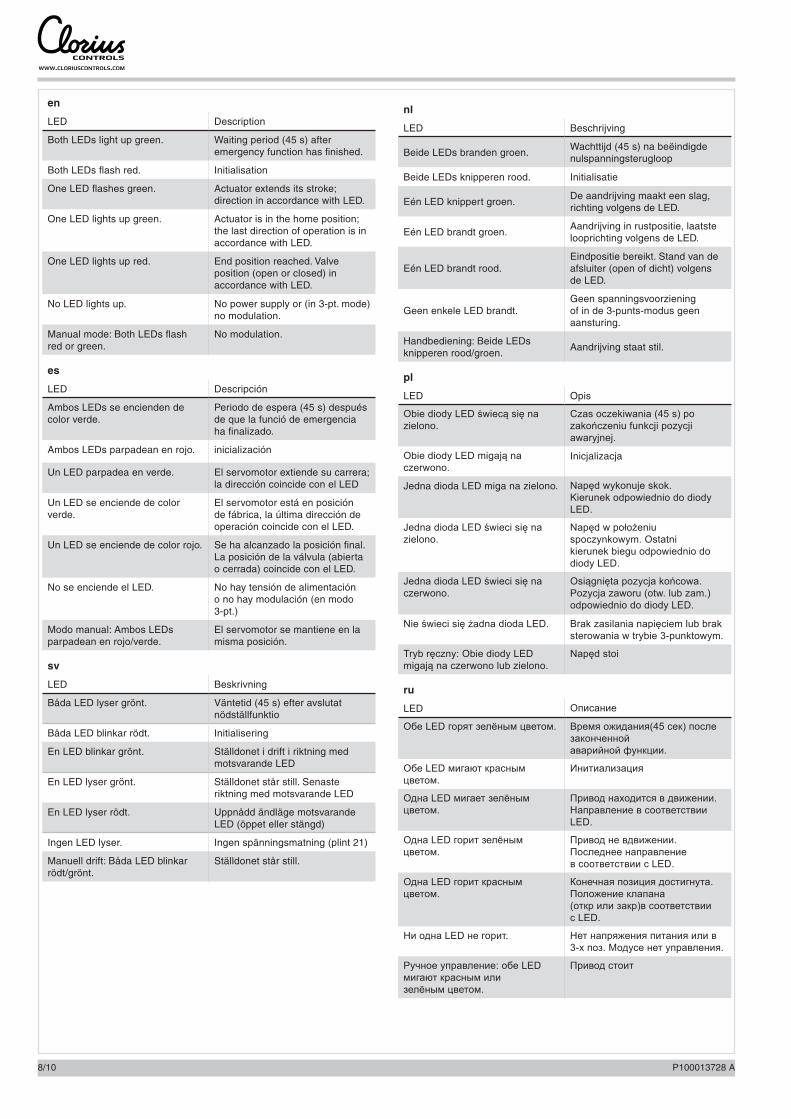
LED Description
Both LEDs light up green. Waiting period (45 s) after emergency function has finished.
Both LEDs flash red. Initialisation
One LED flashes green. Actuator extends its stroke; direction in accordance with LED.
One LED lights up green. Actuator is in the home position; the last direction of operation is in accordance with LED.
One LED lights up red. End position reached. Valve position (open or closed) in accordance with LED.
No LED lights up. No power supply or (in 3-pt. mode) no modulation.
Manual mode: Both LEDs flashred or green.
No modulation.
es
LED Descripción
Ambos LEDs se encienden de color verde.
Periodo de espera (45 s) después de que la funció de emergencia ha finalizado.
Ambos LEDs parpadean en rojo. inicialización
Un LED parpadea en verde. El servomotor extiende su carrera; la dirección coincide con el LED
Un LED se enciende de color verde.
El servomotor está en posición de fábrica, la última dirección de operación coincide con el LED.
Un LED se enciende de color rojo. Se ha alcanzado la posición final. La posición de la válvula (abierta o cerrada) coincide con el LED.
No se enciende el LED. No hay tensión de alimentación o no hay modulación (en modo 3-pt.)
Modo manual: Ambos LEDs parpadean en rojo/verde.
El servomotor se mantiene en la misma posición.
sv
LED Beskrivning
Båda LED lyser grönt. Väntetid (45 s) efter avslutat nödställfunktio
Båda LED blinkar rödt. Initialisering
En LED blinkar grönt. Ställdonet i drift i riktning med motsvarande LED
En LED lyser grönt. Ställdonet står still. Senaste riktning med motsvarande LED
En LED lyser rödt. Uppnådd ändläge motsvarande LED (öppet eller stängd)
Ingen LED lyser. Ingen spänningsmatning (plint 21)
Manuell drift: Båda LED blinkar rödt/grönt.
Ställdonet står still.
nl
LED Beschrijving
Beide LEDs branden groen.Wachttijd (45 s) na beëindigde nulspanningsterugloop
Beide LEDs knipperen rood. Initialisatie
Eén LED knippert groen.De aandrijving maakt een slag, richting volgens de LED.
Eén LED brandt groen.Aandrijving in rustpositie, laatste looprichting volgens de LED.
Eén LED brandt rood.Eindpositie bereikt. Stand van de afsluiter (open of dicht) volgens de LED.
Geen enkele LED brandt.Geen spanningsvoorziening of in de 3-punts-modus geen aansturing.
Handbediening: Beide LEDs knipperen rood/groen.
Aandrijving staat stil.
pl
LED Opis
Obie diody LED świecą się na zielono.
Czas oczekiwania (45 s) po zakończeniu funkcji pozycji awaryjnej.
Obie diody LED migają na czerwono.
Inicjalizacja
Jedna dioda LED miga na zielono. Napęd wykonuje skok.Kierunek odpowiednio do diody LED.
Jedna dioda LED świeci się na zielono.
Napęd w położeniu spoczynkowym. Ostatnikierunek biegu odpowiednio do diody LED.
Jedna dioda LED świeci się na czerwono.
Osiągnięta pozycja końcowa. Pozycja zaworu (otw. lub zam.) odpowiednio do diody LED.
Nie świeci się żadna dioda LED. Brak zasilania napięciem lub brak sterowania w trybie 3-punktowym.
Tryb ręczny: Obie diody LED migają na czerwono lub zielono.
Napęd stoi
ru
LED Описание
Обе LED горят зелёным цветом. Время ожидания(45 сек) после законченной аварийной функции.
Обе LED мигают красным цветом.
Инитиализация
Одна LED мигает зелёным цветом.
Привод находится в движении.Направление в соответствии LED.
Одна LED горит зелёным цветом.
Привод не вдвижении. Последнее направлениев соответствии с LED.
Одна LED горит красным цветом.
Конечная позиция достигнута. Положение клапана(откр или закр)в соответствии с LED.
Ни одна LED не горит. Нет напряжения питания или в 3-х поз. Модусе нет управления.
Ручное управление: обе LED мигают красным или зелёным цветом.
Привод стоит
9/10P100013728 A
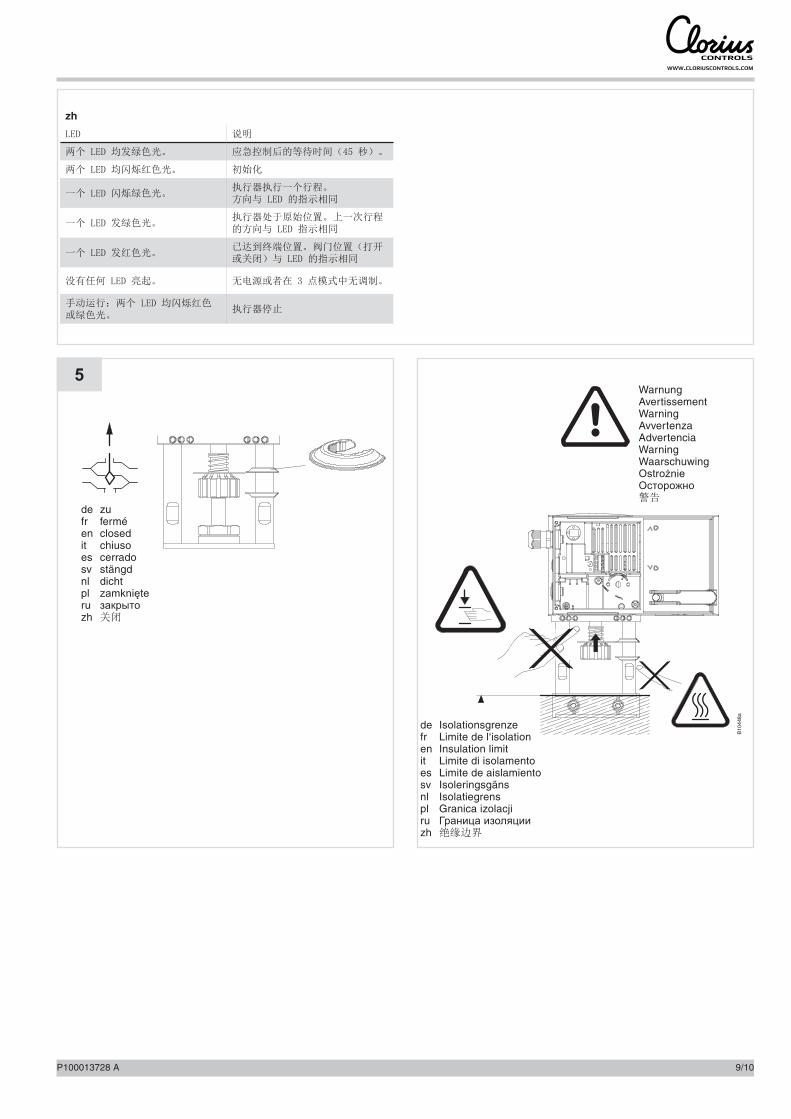
5
B10
448a
zh
LED 说明
两个 LED 均发绿色光。 应急控制后的等待时间(45 秒)。
两个 LED 均闪烁红色光。 初始化
一个 LED 闪烁绿色光。执行器执行一个行程。方向与 LED 的指示相同
一个 LED 发绿色光。执行器处于原始位置。上一次行程的方向与 LED 指示相同
一个 LED 发红色光。已达到终端位置。阀门位置(打开或关闭)与 LED 的指示相同
没有任何 LED 亮起。 无电源或者在 3 点模式中无调制。
手动运行:两个 LED 均闪烁红色或绿色光。
执行器停止
de zu fr fermé en closed it chiuso es cerrado sv stängd nl dichtpl zamknięteru закрытоzh 关闭
de Isolationsgrenze fr Limite de l‘isolation en Insulation limit it Limite di isolamento es Limite de aislamiento sv Isoleringsgäns nl Isolatiegrenspl Granica izolacjiru Граница изоляцииzh 绝缘边界
WarnungAvertissementWarningAvvertenzaAdvertenciaWarningWaarschuwingOstrożnieОсторожно警告
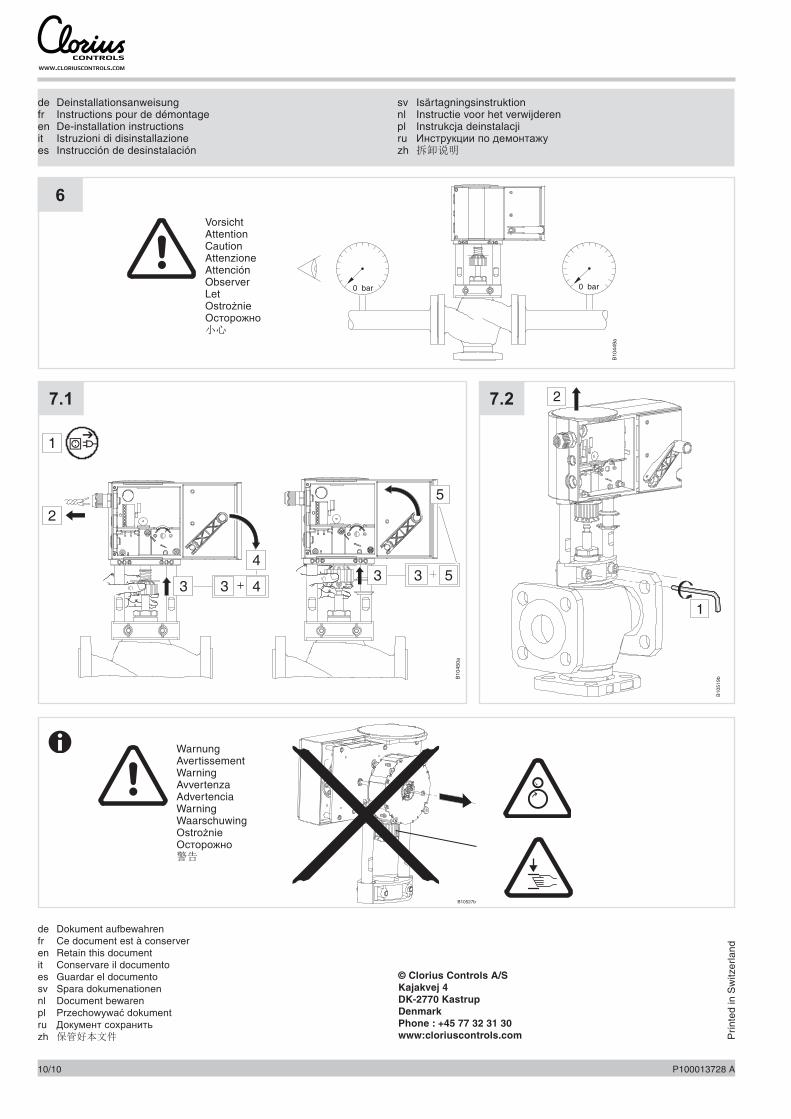
de Dokument aufbewahrenfr Ce document est à conserveren Retain this documentit Conservare il documentoes Guardar el documentosv Spara dokumenationennl Document bewaren pl Przechowywać dokumentru Документ сохранитьzh 保管好本文件
© Clorius Controls A/SKajakvej 4DK-2770 KastrupDenmarkPhone : +45 77 32 31 30www:cloriuscontrols.com P
rint
ed in
Sw
itzer
land
10/10 P100013728 A
0 bar
B1
04
49
a
0 bar
6
B1
04
50
a
2
43
1
5
3
4533
7.1
B10
519b
2
1
7.2
B10527b
de Deinstallationsanweisungfr Instructions pour de démontageen De-installation instructionsit Istruzioni di disinstallazionees Instrucción de desinstalación
sv Isärtagningsinstruktionnl Instructie voor het verwijderenpl Instrukcja deinstalacjiru Инструкции по демонтажуzh 拆卸说明
VorsichtAttentionCautionAttenzioneAttenciónObserverLetOstrożnieОсторожно小心
WarnungAvertissementWarningAvvertenzaAdvertenciaWarningWaarschuwingOstrożnieОсторожно警告