Embed Size (px)
Citation preview
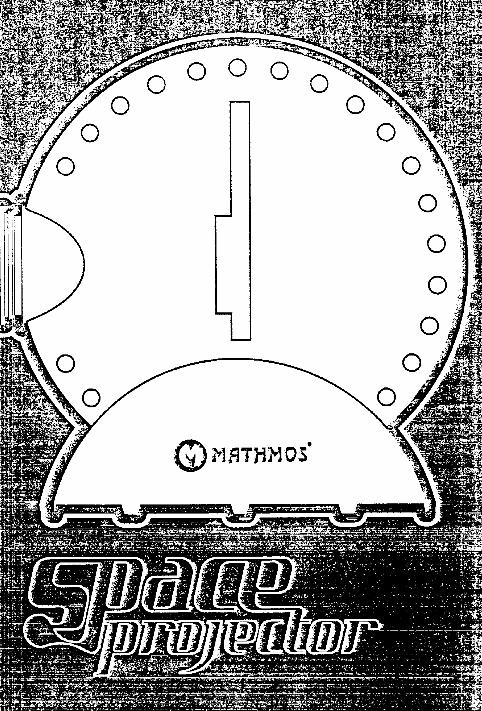
‘j INSTANDHALTUNG/WARTUNG mj l Nehmen Sie das Farbrad und den Diarahmen aus dem Projektor.; l Halten Sie den Projektor mit der Oberseite nach unten, so daß der Standfuß nach oben gerichtet ist. Schieben: Sie den Standfuß so, daß die Klemmen sich in der Mitte befinden. Dann entfernen Sie den Standfuß vom Projektor,
indem Sie die beiden Seitenflügel an der Innenseite des Standfusses auseinanderziehen. Versuchen Sie nicht dieKlemmen zusammenzudrücken.
t
Legen Sie den Projektor auf eine weiche Unterlage, so daß die Schrauben nach oben zeigen.Enffernen Sie die 6 Schrauben.Nehmen Sie den Deckel ab und entfernen Sie das Objektiv.
Ziehen Sie das Verbindungskabel aus dem Leuchtmittel und lösen Sie die 2 Schraubzwingen.
Verbindungskabel
(MUSS installiert sein)
Schraubenzwingenfür Leuchtmittel
l Ersetzen Sie das Leuchtmittel und schrauben Sie die Schraubzwingen wieder fest. Nicht zu fest anbringen!l Stecken Sie das Verbindungskabel wieder in das Leuchtmittel.l Schrauben Sie die 6 Schrauben wieder am Deckel an. Schrauben nicht zu fest anbringen.l Schrauben Sie das Objektiv wieder ein.l Klemmen Sie den Projektor wieder in den Standfuß.l Verwenden Sie einen Schraubenzieher der richtigen Grösse.l Verwechseln Sie nicht die Schrauben für die Schraubenzwingen vom Leuchtmittel mit den
Deckelschrauben (die Deckelschrauben sind länger).
1 R E I N I G U N G mSchalten Sie den Projektor ab und lassen ihn abkühlen, bevor Sie mit der Reinigung beginnen.
l Verwenden Sie ein feuchtes Tuch um das Projektor Gehäuse zu reinigen.Verwenden Sie ein antistatisches Tuch um das Objektiv zu säubern.
\Achten Sie darauf, keine Fingerabdrücke auf der Linse zu hinterlassen.

S P A C E P R O J E C T O R G E B R A U C H S A N L E I T U N G-
Der Spate Projector ist ein elektrisches Gerät der Klasse Ill (12V SELV-Stromkreis) mit einem Netzstecker derKlasse II. Der ‘Spate Projector’ entspricht den dafür relevanten Sicherheitsbestimmungen und hat jene Garantiezeitdie im Land des Erwerbs vorgeschrieben ist. Der Spate Projector ist nicht für den Gebrauch von Kindern geeignet.BITTE LESEN SIE DIE GEBRAUCHSANLEITUNG VOR INBETRIEBNAHME GENAU DURCH UND BEWAHRENSIE DIESE SORGFALTIG AUF
Diarahmen & Dia
Diarahmen-Fach
Objektiv --
Farbrad-Fach
Farbrad
-0
~ Das Farbradwird in die Mitte desProjektors eingefügt.
Projektor-GehäuseStandfuss
;.
Adaoter
1 AUFBAtiANLEITU;- -
-7- Nehmen Sie den Projektor aus der Verpackung und stellen Sie diesen auf eine ebene Oberfläche.l Nehmen Sie das Farbrad aus der Verpackung und stecken Sie dieses in das dafür vorgesehene Farbrad-Fach.l Schließen Sie den ‘Spate Projector’ an das Stromnetz an.l Blockieren Sienicht die Ventilationsschlitze im Adapter.l Nicht auf Teppiche aufstellen oder den für die Ventilation vorgesehenen Raum im Standfuß blockieren.l Fügen Sie das Farbrad in die richtige Seite des ‘Spate Projectors’ in den Schlitz (wie abbgebildet) ein.. Schieben Sie das Farbrad soweit in die Mitte bis es einrastet und es mittig im Projektor sitzt.l Adapter mit Füssen nach unten aufstellen.
1 I N B E T R I E B N A H M E [&ijl Richten Sie den Projektor auf eine Wand oder Decke.l Einen optimalen Effekt erzielen Sie auf einer weißen Oberfläche.l Die Helligkeit und Grösse des projezierten Bildes hängt vom Licht im Raum und dem Abstand des
Projektors zu der Wand ab.l Drehen Sie das Objektiv zur Scharfeinstellung nach links oder rechts um einen optimalen Effekt zu erzielen.l Wenn sich das Farbrad erhitzt, ändern sich die Farbeffekte. Es ist normal, daß das Farbenrad sehr heiss wird.l NICHT direkt in die Linse schauen.l NICHT unbeaufsichtigt mit Kindern lassen.l NICHT mehr als 6 Stunden hintereinander eingeschaltet lassen.l Das Farbrad NICHT schütteln.l Das Farbrad NICHT dem Sonnenlicht aussetzen.l Nur anschalten, wenn--der Projektor auf dem Standfuss fixiert ist und auf einer ebenen Oberfläche steht.
(sonst kommt es zur Uberhitzung)l Transformator ausstecken, wenn er nicht in ständigem Betrieb ist.
Z U B E H Ö R @Jl Es sind verschiedene Farbeffekte erhältlich. Es gibt das Mathmos ‘Spate Projector’ Zusatzmaterial von Ihrem
Mathmos Händler.l Für den Gebrauch dieses Zusatzmaterials gibt es den Diarahmen. Wenn nicht unmittelbar in Gebrauch
kann dieser im Diarahmen-Fach aufbewahrt werden.l Um unser Werbedia zu betrachten: Nehmen Sie das Farbrad aus dem Projektor und stecken Sie den
Diarahmen mit dem Dia in das Diarahmen-Fach, wie in der Abb. gezeigt, dann stellen Sie die Schärfe ein.l Versuchen Sie nicht Standard Fotodias mit dem Spate Projector zu verwenden.l Verwenden Sie ausschließlich Mathmos ‘Spate Projector’ Effekte und Zubehör. ---~
WENN DAS LEUCHTMITTEL DEFEKT ISTl Sollte das Leuchtmittel nicht leuchten, überprüfen Sie erst, ob der ‘Spate Projector’ richtig an das Stromnetz
angeschlossen wurde.l Wenn das Leuchtmittel noch nicht ordnungsgemäß funktioniert, dann besteht die Möglichkeit, daß das Leuchtmittel
defekt istund Sie dieses auswechseln müssen.
l Wenn das Problem weiterhin auftritt, wenden Sie sich bitte an Ihren Mathmos Fachhändler.WIE MAN DAS LEUCHTMITTEL AUSWECHSELTVERWENDEN Sie ausschließlich eine 20W 12V 10” Dichroic geschlossenes-Leuchtmittel 35mm Durchmesser
l Schalten Sie den ‘Spate Projector’ aus und lassen Sie ihn abkühlen bevor Sie das Leuchtmittel auswechselnl Leuchtmittel sind im Fachhandel erhältlich.\
l
. . . _. _ . . . _ . _, _ _ _ . _ _ . . . ..rw ,... *.,.-.-..r . - -
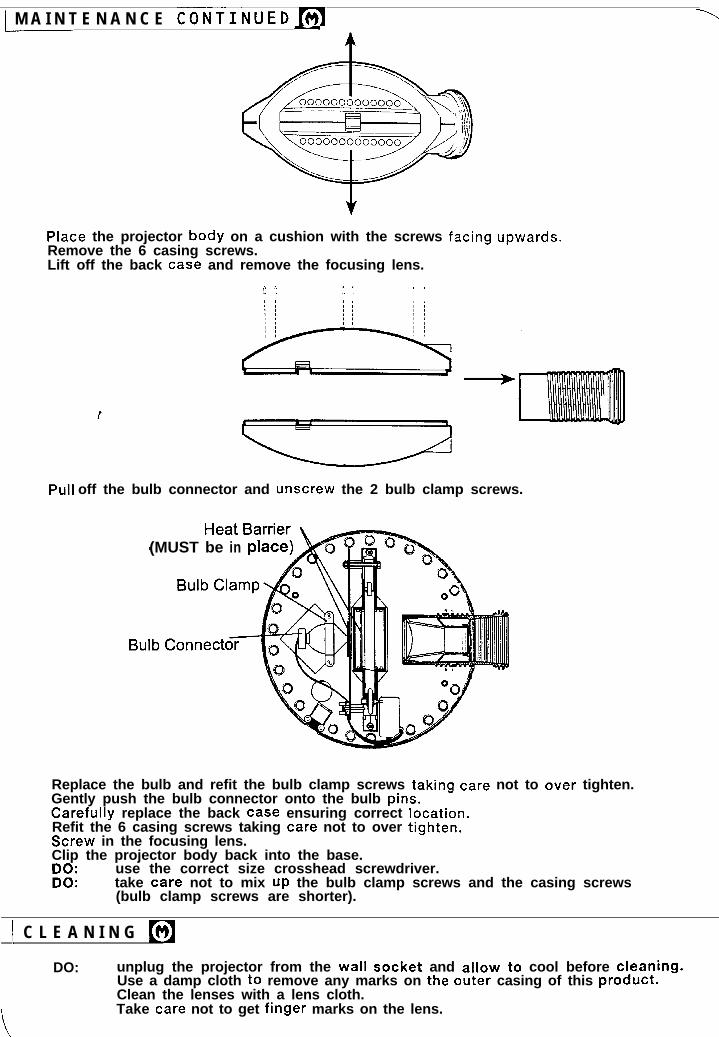
iL u .1 M A I N T E N A N C E CONTINUEDM
Place the projector body on a cushion with the screws facing upwards.Remove the 6 casing screws.Lift off the back case and remove the focusing lens.
PUH off the bulb connector and unscrew the 2 bulb clamp screws.
(MUST be in plac
Replace the bulb and refit the bulb clamp screws taking care not to over tighten.Gently push the bulb connector onto the bulb Pins.Carefully replace the back case ensuring correct location.Refit the 6 casing screws taking care not to over tighten.Screw in the focusing lens.Clip the projector body back into the base..El
use the correct size crosshead screwdriver.take care not to mix up the bulb clamp screws and the casing screws(bulb clamp screws are shorter).
1 C L E A N I N G m
DO: unplug the projector from the wall socket and allow to cool before cleaning.Use a damp cloth to remove any marks on the outer casing of this product.Clean the lenses with a lens cloth.Take care not to get finger marks on the lens.
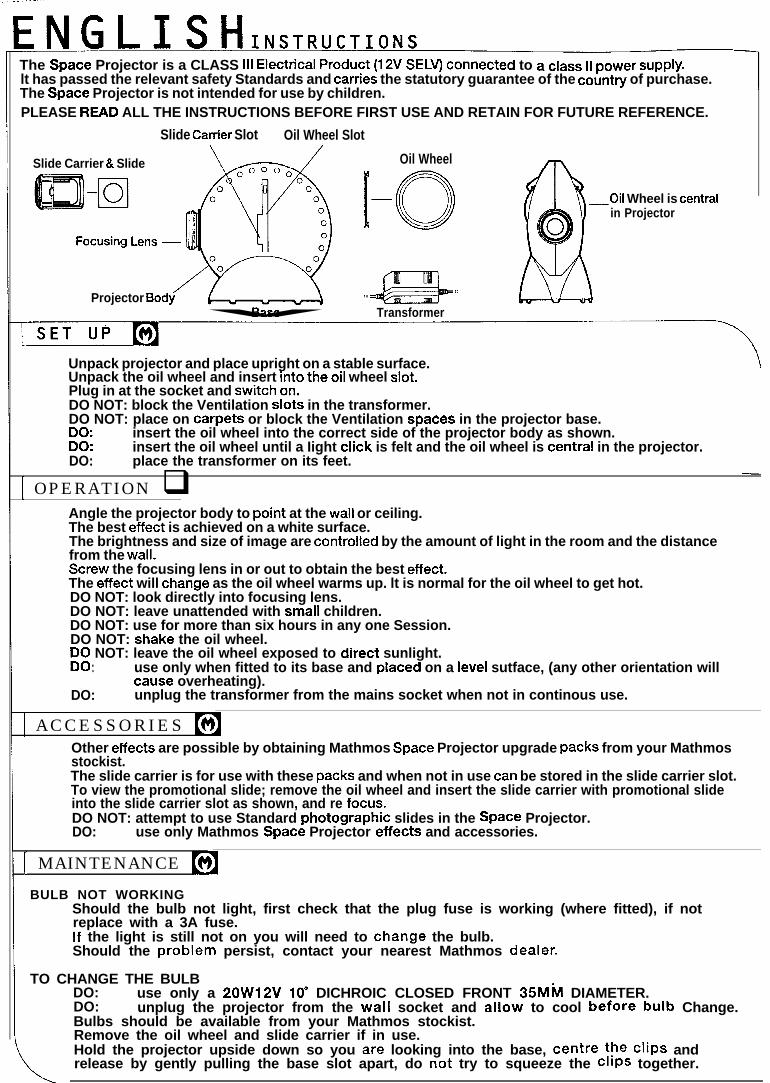
The Spate Projector is a CLASS Ill Electrical Product (12V SELV) connected to a class 11 power supply.lt has passed the relevant safety Standards and carries the statutory guarantee of the country of purchase.The Spate Projector is not intended for use by children.PLEASE READ ALL THE INSTRUCTIONS BEFORE FIRST USE AND RETAIN FOR FUTURE REFERENCE.
Slide Camer Slot Oil Wheel Slot
Slide Carrier & Slide Oil Wheel
-Oil Wheel is centralin Projector
Focusing Lens ~
H---YProjector Bodv
:=
::
Transformer
Unpack projector and place upright on a stable surface.Unpack the oil wheel and insert into the Oil wheel slot.Plug in at the socket and switch on.DO NOT: block the Ventilation Slots in the transformer.DO NOT: place on carpets or block the Ventilation spaces in the projector base..Ei
insert the oil wheel into the correct side of the projector body as shown.insert the oil wheel until a Iight click is felt and the oil wheel is central in the projector.
DO: place the transformer on its feet.
1 OPERATION qAngle the projector body to Point at the wall or ceiling.The best effect is achieved on a white surface.The brightness and size of image are controlled by the amount of light in the room and the distancefrom the Wall.Screw the focusing lens in or out to obtain the best effect.The effect will Change as the oil wheel warms up. lt is normal for the oil wheel to get hot.DO NOT: look directly into focusing lens.DO NOT: leave unattended with small children.DO NOT: use for more than six hours in any one Session.DO NOT: Shake the oil wheel.Eg NOT: leave the oil wheel exposed to direct sunlight... use only when fitted to its base and placed on a level sutface, (any other orientation will
Cause overheating).DO: unplug the transformer from the mains socket when not in continous use.
( ACCESSORIES flOther effects are possible by obtaining Mathmos Spate Projector upgrade Packs from your Mathmosstockist.The slide carrier is for use with these Packs and when not in use tan be stored in the slide carrier slot.To view the promotional slide; remove the oil wheel and insert the slide carrier with promotional slideinto the slide carrier slot as shown, and re focus.DO NOT: attempt to use Standard photographic slides in the Spate Projector.DO: use only Mathmos Spate Projector effects and accessories.
[ MAINTENANCE m
BULB NOT WORKINGShould the bulb not light, first check that the plug fuse is working (where fitted), if notreplace with a 3A fuse.If the light is still not on you will need to Change the bulb.Should the Problem persist, contact your nearest Mathmos dealer.
TO CHANGE THE BULBDO: use only a 2OW12V IO” DICHROIC CLOSED FRONT 35MM DIAMETER.DO: unplug the projector from the wall socket and allow to cool before bulb Change.Bulbs should be available from your Mathmos stockist.Remove the oil wheel and slide carrier if in use.Hold the projector upside down so you are looking into the base, centre fhe Clips andrelease by gently pulling the base slot apart, do not try to squeeze the Clips together.
w < ,<.... - --- -.--. -r.--. . . . . . . . <