Embed Size (px)
Citation preview
Le Hung – Lập Trình Viên .NET – Đại Học Đà Lạt Groups ASP.NET : https://www.facebook.com/groups/asp.net.dlu/
Mục lục JQUERY ................................................................................................................................. 2
jQuery - Căn bản ................................................................................................................. 3
jQuery - Event ...................................................................................................................... 4
jQuery - Mouse Event ........................................................................................................ 5
jQuery - hàm xử lý style .................................................................................................... 8
jQuery - Selector ............................................................................................................... 13
jQuery - mouse hover ........................................................................................................... 14
jQuery - effect ....................................................................................................................... 16
jQuery - append và prepend ................................................................................................. 19
jQuery - appendTo và prependTo................................................................................. 20
jQuery và hàm each.......................................................................................................... 21
jQuery - html và text ............................................................................................................. 24
jQuery - contains selector ..................................................................................................... 26
jQuery - XML.......................................................................................................................... 27
jQuery - empty và remove .................................................................................................... 29
jQuery - ajax .......................................................................................................................... 33

Le Hung – Lập Trình Viên .NET – Đại Học Đà Lạt Groups ASP.NET : https://www.facebook.com/groups/asp.net.dlu/
Tổng quan về các hàm trong jquery
Tài liệu tham khảo http://w3schools.com/jquery/jquery_ref_selectors.asp
http://www.visualjquery.net/
http://api.jquery.com/

Le Hung – Lập Trình Viên .NET – Đại Học Đà Lạt Groups ASP.NET : https://www.facebook.com/groups/asp.net.dlu/
JQUERY
jQuery - Căn bản Do jQuery thực chất là một thư viện của javascript. Do đó, jQuery cũng chỉ là một file js thông thường như những file javascript khác.
Việc đầu tiên phải làm khi bắt đầu sử dụng jQuery là phải khai báo, hay nói cách khác là load file jQuery javascript lên trên website của mình. Có hai cách để thực hiện việc này
1. Link trực tiếp tới file jQuery.
<head> <script src="http://code.jquery.com/jquery-latest.min.js"></script> </head>
2. Tải file jQuery.js về máy của mình và sử dụng như file js cá nhân.
Sử dụng jQuery như thế nào? Dùng từ khóa định nghĩa bởi jQuery. Có hai từ khóa: jQuery và $.
VD: jQuery("#test") hoặc $("#test")
Sử dụng jQuery để truy xuất tới một Element trong HTML như thế nào? Trước tiên, một element(là một thẻ trong html như div, table,...) có hai thuộc tính là id và name. Để truy xuất tới một element có 2 cách sau:
1. Với ID: jQuery("#element_id") hoặc $("#element_id").
2. Với name: jQuery("[name='element_name']") hoặc $("[name='element_name']"). Với element name bạn sẽ được trả ra một mảng các element có cùng name.
3. Ví dụ element id: Click vào button sẽ hiển thị ra alert
<script>
$(document).ready(function(){
$("#butAlert").click(function(){
alert("Bạn đã click vào button này.");
});
});
</script>
<input id="butAlert" type="button" value="Alert"/>
Ví dụ element name: Check vào một radio sẽ hiển thị alert
<script>
$(document).ready(function(){
$("[name='cks']").change(function(){
alert("Bạn đã chọn "+$(this).val()+" này.");
});
});
</script>
<input name="cks" type="radio" value="radio1"/>radio 1
<input name="cks" type="radio" value="radio2"/>radio 2
<input name="cks" type="radio" value="radio3"/>radio 3
<input name="cks" type="radio" value="radio4"/>radio 4

Le Hung – Lập Trình Viên .NET – Đại Học Đà Lạt Groups ASP.NET : https://www.facebook.com/groups/asp.net.dlu/
jQuery - Event Như ta đã biết các thẻ trong HTML thường hỗ trợ các sự kiện như: onclick, onkeydown, onmousedown... thường dưới dạng attribute và chúng ta phải định nghĩa hàm cho nó theo dạng sau: <div onclick="click()"/>
Vậy câu hỏi đặt ra là: jQuery có hỗ trợ cho chúng ta gọi những sự kiện này hay không?
Câu trả lời là có. jQuery hỗ trợ cho chúng ta hầu như là đầy đủ những sự kiện. Một số sự kiện thường dùng được jQuery hỗ trợ như là:
Mouse event(sự kiện chuột)
1. click: sự kiện này được gọi khi có một click chuột có nghĩa là bao gồm nhấn trái chuột
xuống và nhả ra(mouse down and mouse up).
2. mousedown: sự kiện này được gọi khi vừa nhấn trái chuột
3. mouseup: sự kiện này được gọi khi nhả chuột trái
4. mouseenter: sự kiện này được gọi khi con trỏ chuột di chuyển vào vùng quy định.
5. mouseleave: sự kiện này được gọi khi con trỏ chuột rời khỏi vùng quy định.
6. mousemove: sự kiện này được gọi khi con trỏ chuột di chuyển bên trong vùng quy định.
Keyboard event(sự kiện bàn phím) 1. keypress: sự kiện này được gọi khi một phím trên bàn phím được nhấn và nhả ra.
2. keydown: sự kiện này được gọi khi một phím trên bàn phím được nhấn xuống(chưa
nhả).
3. keyup: sự kiện này được gọi khi một phím trên bàn phím được nhả ra.
Other event(sự kiện khác)
1. focus: sự kiện xảy ra khi ta đang focus vào 1 element(con nháy trong textbox, viền trên button, radio, checkbox...).
2. blur: ngược lại focus
3. change: sự kiện này được gọi khi giá trị của một radio hoặc một checkbox được thay đổi(check - uncheck).
4. live và bind: dùng để gán hàm xử lý của một element.
5. scroll: bắt sự kiện của thanh scrollbar
Cú pháp chung $("#element_id").event_name(function(ObjectEventHandle){ code here }); $("[name='element_name']").event_name(function(ObjectEventHandle){ code
here });
Có thể có hoặc không có ObjectEventHandle
Tình huống
Khi ta click vào button thì sẽ hiển thị thêm chữ ở ô màu xám bên cạnh.
Code
<style>
#show{
float:left;
background-color:#EAEAEA;
border:1px solid black;
color:red;
width:200px;
height:200px;
margin-left:200px;

Le Hung – Lập Trình Viên .NET – Đại Học Đà Lạt Groups ASP.NET : https://www.facebook.com/groups/asp.net.dlu/
overflow:auto;
}
</style>
<script type="text/javascript">
$(document).ready(function(){
$("#butShow").click(function(){
$("#show").html($("#show").html()+" Click");
});
});
</script>
<div><div style="float:left;"><input type="button" value="Click me"
id="butShow"/></div><div id="show"></div></div>
jQuery - Mouse Event Bài viết này sẽ giới thiệu một số ví dụ đơn giản về các sự kiện chuột(mouse event) trong jQuery:
1. click
Tình huống: Click vào button hiển thị alert.
Code
<script type="text/javascript">
jQuery(document).ready(function(){
jQuery("#butClick").click(function(){
alert("Click");
});
});
</script>
<input type="button" value="Click me" id="butClick"/>
2. mousedown và mouseup
Tình huống: Nhấn trái chuột vào ô vuông xám bên trái thì ô vuông trắng bên phải sẽ hiển thị
dòng chữ tương ứng với sự kiện(mouse down hoặc mouse up).
Code
<div>
<style>
#rect_left_1{
background-color:gray;
border:1px solid black;
float:left;
width:200px;
height:200px;
}
#rect_right_1{
border:1px solid black;
float:left;
margin-left:50px;
width:200px;

Le Hung – Lập Trình Viên .NET – Đại Học Đà Lạt Groups ASP.NET : https://www.facebook.com/groups/asp.net.dlu/
height:200px;
color:red;
overflow:auto;
}
</style>
<script type="text/javascript">
$(document).ready(function(){
$("#rect_left_1").mousedown(function(){
$("#rect_right_1").html($("#rect_right_1").html()+" mousedown");
});
$("#rect_left_1").mouseup(function(){
$("#rect_right_1").html($("#rect_right_1").html()+" mouseup");
});
});
</script>
<div>
<div id="rect_left_1"></div>
<div id="rect_right_1"></div>
<div style="clear:both;"></div>
</div>
</div>
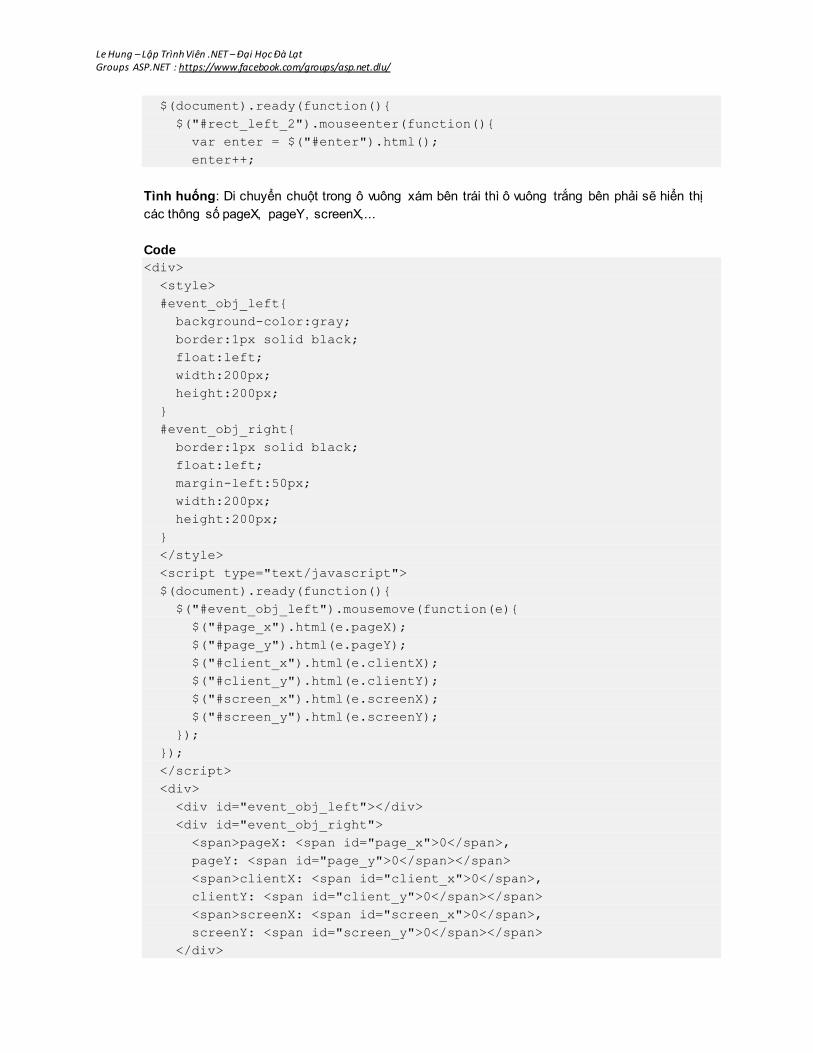
3. mouseenter, mouseleave và mousemove
Tình huống: Di chuyển chuột vào ô vuông xám bên trái thì ô vuông trắng bên phải sẽ hiển thị số
lần sự kiện xảy ra (mouse enter và mouse leave), riêng sự kiện mouse move thì sẽ hiển thị tọa
độ của con trỏ chuột trong ô xám.
Code
<div>
<style>
#rect_left_2{
background-color:gray;
border:1px solid black;
float:left;
width:200px;
height:200px;
}
#rect_right_2{
border:1px solid black;
float:left;
margin-left:50px;
width:200px;
height:200px;
}
</style>
<script type="text/javascript">
Le Hung – Lập Trình Viên .NET – Đại Học Đà Lạt Groups ASP.NET : https://www.facebook.com/groups/asp.net.dlu/
$(document).ready(function(){
$("#rect_left_2").mouseenter(function(){
var enter = $("#enter").html();
enter++;
Tình huống: Di chuyển chuột trong ô vuông xám bên trái thì ô vuông trắng bên phải sẽ hiển thị
các thông số pageX, pageY, screenX,...
Code
<div>
<style>
#event_obj_left{
background-color:gray;
border:1px solid black;
float:left;
width:200px;
height:200px;
}
#event_obj_right{
border:1px solid black;
float:left;
margin-left:50px;
width:200px;
height:200px;
}
</style>
<script type="text/javascript">
$(document).ready(function(){
$("#event_obj_left").mousemove(function(e){
$("#page_x").html(e.pageX);
$("#page_y").html(e.pageY);
$("#client_x").html(e.clientX);
$("#client_y").html(e.clientY);
$("#screen_x").html(e.screenX);
$("#screen_y").html(e.screenY);
});
});
</script>
<div>
<div id="event_obj_left"></div>
<div id="event_obj_right">
<span>pageX: <span id="page_x">0</span>,
pageY: <span id="page_y">0</span></span>
<span>clientX: <span id="client_x">0</span>,
clientY: <span id="client_y">0</span></span>
<span>screenX: <span id="screen_x">0</span>,
screenY: <span id="screen_y">0</span></span>
</div>

Le Hung – Lập Trình Viên .NET – Đại Học Đà Lạt Groups ASP.NET : https://www.facebook.com/groups/asp.net.dlu/
<div style="clear:both;"></div>
</div>
</div>
jQuery - hàm xử lý style Bài viết này nói về một số hàm dùng để can thiệp vào style của một element.
1. css: Dùng để lấy giá trị của một property của element trên website hoặc thiết lập giá trị cho css cho property.
o .css (css property name): trả về giá trị của một property.
o .css (css property, value): thiết lập giá trị cho một css property của element.
o .css ( {list of properties} ): dùng để thiết lập một nhóm các thuộc tính css.
Tình huống: Thay đổi CSS cho ô vuông màu xám : Nút Get: lấy ra giá trị của thuộc tính background-color.
Nút Set: thay đổi giá trị background-color.
Nút Group sẽ gán lại nhóm giá trị background-color, width, height.
Code
<div>
<style>
#css_left {
border:1px solid black;
background-color:gray;
width:200px;
height:200px;
float:left;
}
#css_right {
float:left;
margin-left:50px;
width:200px;
height:200px;
}
</style>
<script type="text/javascript">
jQuery(document).ready(function(){
jQuery("#butGet").click(function(){
alert("background-color: " + jQuery("#css_left").css("background-
color"));
});
jQuery("#butSet").click(function(){
jQuery("#css_left").css("background-color","red");
});
jQuery("#butGroup").click(function(){
jQuery("#css_left").css({"background-
color":"green","width":"100px","height":"100px"});
});
});
</script>

Le Hung – Lập Trình Viên .NET – Đại Học Đà Lạt Groups ASP.NET : https://www.facebook.com/groups/asp.net.dlu/
<div id="css_left"></div>
<div id="css_right">
<input type="button" value="Get" id="butGet"/>
<input type="button" value="Set" id="butSet"/>
<input type="button" value="Group" id="butGroup"/>
</div>
<div style="clear:both;"></div>
</div>
2. Các hàm thao tác với Attribute của một element.
o attr: Dùng để lấy giá trị của một attribute của element hoặc gán giá trị cho một attribute.
.attr (attribute name): trả về giá trị của một attribute của một element.
.attr (attribute name, value): thiết lập giá trị cho một attribute của element.
.attr ( {list of properties} ): dùng để thiết lập một nhóm các attribute cho element.
o removeAttr: Dùng để gở bỏ một attribute của một element.
.removeAttr (attribute name): gỡ bỏ một attribute ra khỏi một element.
Tình huống: Thay đổi attribute cho ảnh (thẻ img) o Nút Get: lấy ra giá trị trong attribute src của thẻ img bên trái.
o Nút Set One Attribute: Gán lại giá trị cho attribute src của thẻ img(đổi hình hiển thị).
o Nút Set Group Attribute: Gán lại giá cho các attribute src, title, alt của ảnh. Để kiểm tra bạn rê chuột vào ảnh sẽ thấy hiện lên dòng tooltip sesshomaru image
o Nút Remove Attribute: Gỡ bỏ thuộc tính title của ảnh( rê chuột vào ảnh để kiểm tra ảnh sẽ mất đi dòng tooltip).
Code
<div>
<style>
#attr_left {
background-color:gray;
width:122px;
height:122px;
float:left;
}
#attr_right {
float:left;
margin-left:50px;
width:122px;
height:122px;
}
</style>
<script type="text/javascript">
jQuery(document).ready(
function(){jQuery("#butGetAttr").click(function(){
alert("image src: " + jQuery("#myImage").attr("src"));
});
jQuery("#butOneAttr").click(function(){

Le Hung – Lập Trình Viên .NET – Đại Học Đà Lạt Groups ASP.NET : https://www.facebook.com/groups/asp.net.dlu/
jQuery("#myImage").attr("src","http://3.bp.blogspot.com/_wOkFJyJxw44/TD
noOg0ZO4I/AAAAAAAAABI/5AbUI47SOEU/s320/sesshomaru.jpeg");
});
jQuery("#butGroupAttr").click(function(){
jQuery("#myImage").attr({src:"http://1.bp.blogspot.com/_wOkFJyJxw44/TDn
oO_M2u0I/AAAAAAAAABQ/nb9K3zfolxg/s320/thSesshomaruChibi.jpg",title:"Ses
shomaru image",alt:"jquery attr image"});
});
jQuery("#butRemoveAttr").click(function(){
jQuery("#myImage").removeAttr("title");
});
});
</script>
<div id="attr_left">
<img style="display:block; margin:0px auto 10px; text-
align:center;cursor:pointer; cursor:hand;"
src="http://1.bp.blogspot.com/_wOkFJyJxw44/TDnoO_M2u0I/AAAAAAAAABQ/nb9K
3zfolxg/s320/thSesshomaruChibi.jpg" border="0" alt=""id="myImage" />
</div>
<div id="attr_right">
<input type="button" value="Get" id="butGetAttr"/>
<input type="button" value="Set One Attribute" id="butOneAttr"/>
<input type="button" value="Set Group Attribute" id="butGroupAttr"/>
<input type="button" value="Remove Attribute" id="butRemoveAttr"/>
</div>
<div style="clear:both;"></div>
</div>
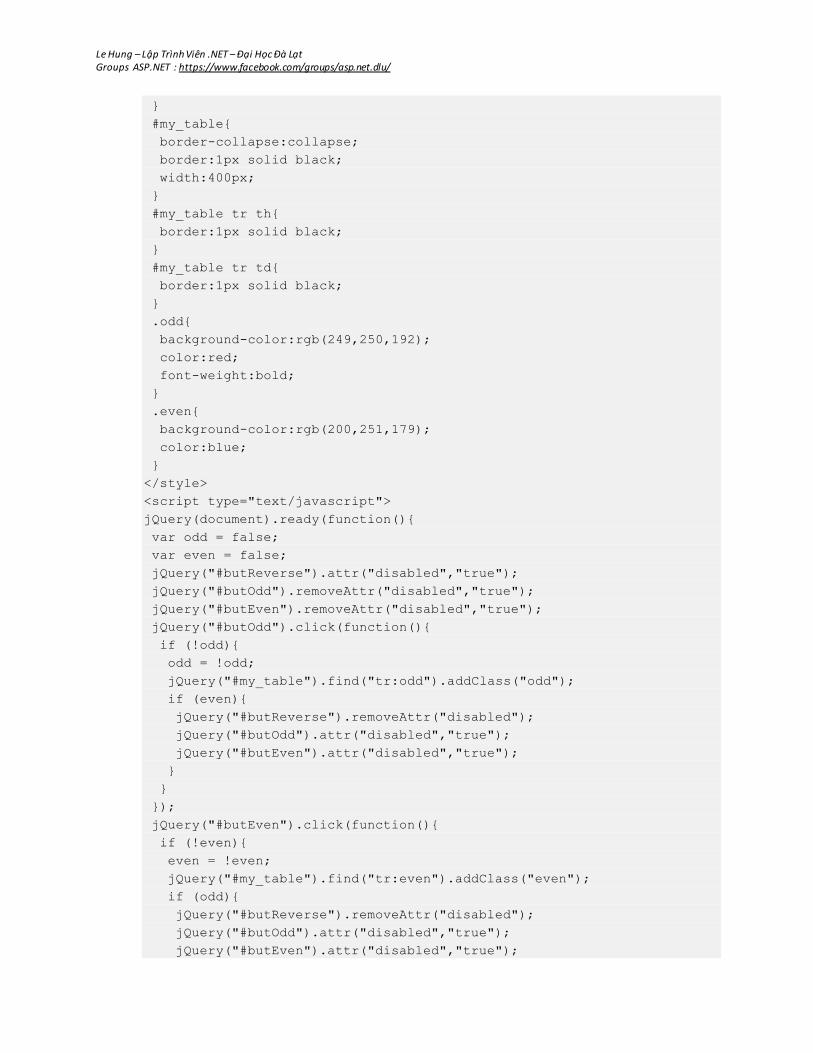
3. Các hàm thao tác về class
o .addClass (class name): Dùng để gán một class cho một element.
o .removeClass (class name): gỡ bỏ class ra khỏi attribute class của element.
Tình huống: Thay đổi class cho table o Nút Odd: dòng lẻ trong table sẽ xuất hiện màu nền vàng nhạt cho dòng đó.
o Nút Even: dòng chẵn trong table sẽ xuất hiện màu nền xanh nhạt cho dòng đó.
o Nút Reverse: đảo ngược hai class của dòng chẵn và lẻ.
Code
<div>
<b>Demo</b>
<style>
#table_left{
float:left;
}
#button_right{
float:left;padding-left:50px;
Le Hung – Lập Trình Viên .NET – Đại Học Đà Lạt Groups ASP.NET : https://www.facebook.com/groups/asp.net.dlu/
}
#my_table{
border-collapse:collapse;
border:1px solid black;
width:400px;
}
#my_table tr th{
border:1px solid black;
}
#my_table tr td{
border:1px solid black;
}
.odd{
background-color:rgb(249,250,192);
color:red;
font-weight:bold;
}
.even{
background-color:rgb(200,251,179);
color:blue;
}
</style>
<script type="text/javascript">
jQuery(document).ready(function(){
var odd = false;
var even = false;
jQuery("#butReverse").attr("disabled","true");
jQuery("#butOdd").removeAttr("disabled","true");
jQuery("#butEven").removeAttr("disabled","true");
jQuery("#butOdd").click(function(){
if (!odd){
odd = !odd;
jQuery("#my_table").find("tr:odd").addClass("odd");
if (even){
jQuery("#butReverse").removeAttr("disabled");
jQuery("#butOdd").attr("disabled","true");
jQuery("#butEven").attr("disabled","true");
}
}
});
jQuery("#butEven").click(function(){
if (!even){
even = !even;
jQuery("#my_table").find("tr:even").addClass("even");
if (odd){
jQuery("#butReverse").removeAttr("disabled");
jQuery("#butOdd").attr("disabled","true");
jQuery("#butEven").attr("disabled","true");
Le Hung – Lập Trình Viên .NET – Đại Học Đà Lạt Groups ASP.NET : https://www.facebook.com/groups/asp.net.dlu/
}
}
});
jQuery("#butReverse").click(function(){
jQuery("#my_table").find("tr:even").removeClass("even");
jQuery("#my_table").find("tr:odd").removeClass("odd");
jQuery("#my_table").find("tr:even").addClass("odd");
jQuery("#my_table").find("tr:odd").addClass("even");
});
});
</script>
<div id="table_left">
<table id="my_table">
<tr style="background-color:black;color:white;">
<th>STT</th><th>Họ và tên</th><th>Ngày sinh</th><th>Giới tính</th>
</tr>
<tr>
<td>1</td><td>Nguyễn Van A</td><td>01/01/1989</td><td>Nam</td>
</tr>
<tr>
<td>2</td><td>Trần Van B</td><td>01/08/1989</td><td>Nam</td>
</tr>
<tr>
<td>3</td><td>Trương Thị C</td><td>05/01/1989</td><td>Nữ</td>
</tr>
<tr>
<td>4</td><td>Phạm Thị D</td><td>02/06/1989</td><td>Nữ</td>
</tr>
<tr>
<td>5</td><td>Lê Văn E</td><td>03/07/1989</td><td>Nam</td>
</tr>
</table>
</div>
<div id="button_right"><input type="button" value="Odd" id="butOdd"
style="width:75px;"/>
<input type="button" value="Even" id="butEven" style="width:75px;"/>
<input type="button" value="Reverse" id="butReverse"
style="width:75px;" disabled/></div>
<div style="clear:both;"></div>
</div>
STT Họ và tên Ngày sinh Giới tính
1 Nguyễn Văn A 01/01/1989 Nam
2 Trần Văn B 01/08/1989 Nam
3 Trương Thị C 05/01/1989 Nữ
4 Phạm Thị D 02/06/1989 Nữ
5 Lê Văn E 03/07/1989 Nam
Le Hung – Lập Trình Viên .NET – Đại Học Đà Lạt Groups ASP.NET : https://www.facebook.com/groups/asp.net.dlu/
Một số câu hỏi thường gặp
1. Sự khác nhau giữa hàm css và hàm addClass?
Điểm khác nhau cơ bản nhất là hàm addClass thao tác trên attribute class của một element trong
khi đó hàm css thao tác trên attribute style.
2. Tại sao addClass rồi mà element vẫn không thay đổi ?
Bạn nên kiểm tra lại style của element vì class có độ ưu tiên thấp hơn style. Ở ví dụ phía trên
dòng tr đầu tiên có attribute style cố định do đó khi addClass vào các dòng lẻ các properties của
class không thể đè lên được các properties trong attribute style được vì độ ưu tiên thấp hơn.
3. Dùng hàm css để add một property cho một element vậy có cách nào remove
property đó ra hay không?
Câu trả lời là không. Do hàm css thao tác trên attribute style do đó khi đã add một property vào
rồi thì bạn không thể remove nó ra mà chỉ có thể thay đổi giá tri của nó. Nếu muốn remove được
thì tốt nhất là định nghĩa hai class khác nhau và sử dùng hàm addClass và removeClass.
4. Tại sao dùng hàm addClass nhiều lần thì thuộc tính class không đổi?
Do hàm addClass thao tác trên attribute class của element. Trên attribute class có thể tồn tại
song song nhiều class khác nhau. Do đó khi dùng liên tiếp thì nó sẽ tự động thêm class vào và
các properties trong hai class sẽ được overwrite lẫn nhau. VD: class="class1" dùng tiếp hàm
addClass("class2") ta sẽ có class="class1 class2"
jQuery - Selector jQuery selector là gì? jQuery selector là một cách gọi đến một hoặc nhiều đối tượng có một số đặc tính nhất định.
Ví dụ: gọi theo name, loại element, theo class,...
Các selector căn bản: 1. #element_id: Trả về một đối tượng có thuộc tính id được truyền vào.
2. [name='element_name']: Trả về một nhóm đối tượng có thuộc tính name được truyền vào.
3. element_type: Trả về một nhóm đối tượng cùng một loại. VD:
- jQuery("div") sẽ trả về toàn bộ các đối tượng là thẻ div.
- jQuery("form input") sẽ trả về toàn bộ các đối tượng là thẻ input nằm trong thẻ form.
- jQuery("#form_id input) sẽ trả về toàn bộ các đối tượng là thẻ input nằm trong thẻ form
có id là id truyền vào.
4. Kết hợp: cách gọi này gần giống như css sẽ tính từ trái sang phải theo thứ tự cha con.
- jQuery("#test_table tr") trả ra toàn bộ các thẻ tr của table có id là test_table.
- jQuery("div span") trả ra toàn bộ các thẻ span là con của thẻ div.
- jQuery("div p span") trả ra toàn bộ các thẻ span thẻ con của p và p phải là thẻ con của
div.
Một số phần mở rộng của selector:

Le Hung – Lập Trình Viên .NET – Đại Học Đà Lạt Groups ASP.NET : https://www.facebook.com/groups/asp.net.dlu/
1. .class_name : Thường dùng với selector theo name và type. Trả ra một nhóm các đối
tượng có class name tương ứng. VD:
- jQuery("div.test") sẽ trả ra một nhóm các đối tượng là thẻ div có thuộc tính class là test.
- jQuery("#my_ul li.select") trả ra một nhóm các đối tượng là thẻ li có class là select và thẻ
li là con của thẻ ul có id là my_ul.
2. :selected : Dùng để lấy ra các đối tượng có thuộc tính selected là true. VD:
- jQuery("option:selected") sẽ trả ra một nhóm các option có thuộc tính selected bằng true.
3. :checked : Thường dùng với checkbox và radio để lấy ra những đối tượng được
checked. VD:
- jQuery("[name='checkbox_list_name']:checked") sẽ trả ra một nhóm các checkbox theo
tên truyền vào có thuộc tính checked bằng true.
- jQuery("[name='radio_name']:checked") sẽ trả ra một nhóm các radio theo tên truyền vào có thuộc tính checked bằng true.
4. :disabled :Trả về các thẻ có thuộc tính disabled. VD:
- jQuery(":disabled") trả về toàn bộ các thẻ có thuộc tính disabled.
- jQuery("input:disabled") trả về toàn bộ các thẻ input có thuộc tính disabled.
- jQuery("form input:disabled") trả về toàn bộ các thẻ input nằm trong thẻ form có thuộc
tính disabled.
5. :odd : Trả về các thẻ có số thứ tự lẻ của đối tượng được chọn. VD:
- jQuery("li:odd") trả về toàn bộ các thẻ li trên toàn trang web có thứ tự lẻ(1, 3, 5...).
- jQuery("#ul_list li:odd") trả về toàn bộ các thẻ li con của đối tượng có id là ul_list có thứ
tự lẻ.
- jQuery("tr:odd") trả về toàn bộ các thẻ tr trên toàn trang web có thứ tự lẻ(1, 3, 5..).
- jQuery("#mytable tr:odd") trả về toàn bộ các thẻ tr con của đối tượng có id là mytable có
thứ tự lẻ.
6. :even : Trả về các thẻ có số thứ tự chẵn của đối tượng được chọn. VD:
- jQuery("li:even") trả về toàn bộ các thẻ li trên toàn trang web có thứ tự chẵn(2, 4, 6...).
- jQuery("#ul_list li:even") trả về toàn bộ các thẻ li con của đối tượng có id là ul_list có thứ
tự chẵn.
- jQuery("tr:even") trả về toàn bộ các thẻ tr trên toàn trang web có thứ tự chẵn(2, 4, 6...).
- jQuery("#mytable tr:even") trả về toàn bộ các thẻ tr con của đối tượng có id là mytable có
thứ tự chẵn.
jQuery - mouse hover Bài viết này đưa ra một ví dụ đơn giản về cách sử dụng event mouse hover trong jQuery. Chúng ta
thường sử dụng hover của css để thay đổi style của một element. Nếu ta muốn những xử lý phức tạp
được thực thi khi hover thì css không thể đáp ứng được => Vậy ta phải tự viết.
Syntax: .hover(MouseInFunction, MouseOutFunction)
MouseInFunction: Hàm được gọi tới khi con trỏ di chuyển vào element.
MouseOutFunction: Hàm được gọi tới khi con trỏ di chuyển ra khỏi element.
Ví dụ: Khi di chuyển con trỏ chuột vào ảnh thì ảnh sẽ được phóng to ra, khi con trỏ chuột rời khỏi ảnh kích thước ảnh trở lại như cũ.
Le Hung – Lập Trình Viên .NET – Đại Học Đà Lạt Groups ASP.NET : https://www.facebook.com/groups/asp.net.dlu/
Code
<script type="text/javascript"> jQuery(document).ready(function(){
jQuery("[name='hover_image']").css("top",(jQuery("#hover_div").position
().top + 20)+"px"); var left = 40; jQuery("[name='hover_image']").each(function(i,val){ jQuery(this).css("left",(jQuery("#hover_div").position().left +
left)+"px"); left+=100; }); jQuery("[name='hover_image']").hover(function(){//ham callback hoverIn jQuery(this).animate({ width:"+=20", height:"+=20", left:"-=10", top:"-=10", opacity:"1", filter:"alpha(opacity=100)" },300); },function(){//ham callback hoverOut jQuery(this).animate({ width:"-=20", height:"-=20", left:"+=10", top:"+=10", opacity:"0.4", filter:"alpha(opacity=40)" },300); }); }); </script> <style> #hover_div img{ float:left; position:absolute; width:60px; height:60px; opacity:0.4; filter:alpha(opacity=40) } </style> <div id="hover_div" style="height:120px;background-
color:#FBF9EA;border:1px solid black;"> <img name="hover_image"
src="http://1.bp.blogspot.com/_wOkFJyJxw44/TE1bCiez8WI/AAAAAAAAABk/7Yry

Le Hung – Lập Trình Viên .NET – Đại Học Đà Lạt Groups ASP.NET : https://www.facebook.com/groups/asp.net.dlu/
nOgOOLw/s400/puppy"/> <img name="hover_image"
src="http://1.bp.blogspot.com/_wOkFJyJxw44/TE1bCiez8WI/AAAAAAAAABk/7Yry
nOgOOLw/s400/puppy"/> <img name="hover_image"
src="http://1.bp.blogspot.com/_wOkFJyJxw44/TE1bCiez8WI/AAAAAAAAABk/7Yry
nOgOOLw/s400/puppy"/> </div>
jQuery - effect Trong bài này sẽ giới thiệu một số phương thức tạo và quản lý hiệu ứng mà jQuery đã cung cấp.
slideUp( [thời gian], [hàm thực thi khi hiệu ứng thực hiện xong])
slideDown( [thời gian], [hàm thực thi khi hiệu ứng thực hiện xong])
fadeIn( [thời gian], [hàm thực thi khi hiệu ứng thực hiện xong])
fadeOut( [thời gian], [hàm thực thi khi hiệu ứng thực hiện xong])
Các phương thức này có thể có hoặc không có tham số. Ngoài ra, ta có thể dùng chuỗi "slow" and "fast"
để qui định thời gian cho hiệu ứng.
Code
<div> <style> #effect_div_border{ display:block; width:600px; height:180px; } #effect_div{ display:block; } #effect_div img{ width:130px; height:130px; } </style> <script type="text/javascript"> jQuery(document).ready(function(){ var fade = false; var slide = false; jQuery("#fadein").click(function(){ if (fade){ jQuery("#effect_div").fadeIn(); fade=!fade; jQuery("#fadeout").removeAttr("disabled"); jQuery("#fadein").attr("disabled","true"); } });

Le Hung – Lập Trình Viên .NET – Đại Học Đà Lạt Groups ASP.NET : https://www.facebook.com/groups/asp.net.dlu/
jQuery("#fadeout").click(function(){ if (!fade){ jQuery("#effect_div").fadeOut(); fade=!fade; jQuery("#fadein").removeAttr("disabled"); jQuery("#fadeout").attr("disabled","true"); } }); jQuery("#slideup").click(function(){ if(!slide){ jQuery("#effect_div").slideUp(); slide=!slide; jQuery("#slidedown").removeAttr("disabled"); jQuery("#slideup").attr("disabled","true"); } }); jQuery("#slidedown").click(function(){ if(slide){ jQuery("#effect_div").slideDown(); slide=!slide; jQuery("#slideup").removeAttr("disabled"); jQuery("#slidedown").attr("disabled","true"); } }); }); </script> <div id="effect_div_border"> <input type="button" id="fadein" value="Fade In" disabled/> <input type="button" id="fadeout" value="Fade Out"/> <input type="button" id="slideup" value="Slide Up"/> <input type="button" id="slidedown" value="Slide Down" disabled/> <div id="effect_div"> <img
src="http://1.bp.blogspot.com/_wOkFJyJxw44/TDnoO_M2u0I/AAAAAAAAABQ/nb9K
3zfolxg/s320/thSesshomaruChibi.jpg"/> </div> </div> </div>
show
hide
toggle
slideToggle
Code
<div> <style>

Le Hung – Lập Trình Viên .NET – Đại Học Đà Lạt Groups ASP.NET : https://www.facebook.com/groups/asp.net.dlu/
#effect_div_border{ display:block; width:600px; height:180px; } .effect_div{ display:block; } .effect_div img{ width:130px; height:130px; } </style> <script type="text/javascript"> jQuery(document).ready(function(){ var show = false; jQuery("#show").click(function(){ if (show){ jQuery("#show-hide").show(); show=!show; jQuery("#hide").removeAttr("disabled"); jQuery("#show").attr("disabled","true"); } }); jQuery("#hide").click(function(){ if (!show){ jQuery("#show-hide").hide(); show=!show; jQuery("#show").removeAttr("disabled"); jQuery("#hide").attr("disabled","true"); } }); jQuery("#toggle").click(function(){ jQuery("#show-hide").toggle(); }); jQuery("#slidetoggle").click(function(){ jQuery("#show-hide").slideToggle(); }); }); </script> <input type="button" id="show" value="Show" disabled/> <input type="button" id="hide" value="Hide"/> <input type="button" id="toggle" value="Toggle"/> <input type="button" id="slidetoggle" value="Slide Toggle"/> <div id="effect_div_border"> <div class="effect_div" id="effect_div"> <img
src="http://1.bp.blogspot.com/_wOkFJyJxw44/TDnoO_M2u0I/AAAAAAAAABQ/nb9K

Le Hung – Lập Trình Viên .NET – Đại Học Đà Lạt Groups ASP.NET : https://www.facebook.com/groups/asp.net.dlu/
3zfolxg/s320/thSesshomaruChibi.jpg"/> </div> </div> </div>
jQuery - append và prepend append và prepend là hai hàm dùng để thao tác trên các con của một HTML DOM.
append(html): Chèn đoạn html text hoặc jQuery object vào cuối các thẻ con của HTML DOM
đang truy xuất.
prepend(html): Chèn đoạn html text hoặc jQuery object vào đầu các thẻ con của HTML DOM đang truy xuất.
Ví dụ ta có một thẻ ul có 3 thẻ li như sau:
<ul> <li>Con 1</li> <li>Con 2</li> <li>Con 3</li> </ul>
Giả sử ta muốn chèn một thẻ li có nội dung là Con 0 vào trong thẻ ul đó.
Hàm append sẽ chèn thẻ li đó vào sau thẻ li Con 3.
Hàm prepend sẽ chèn thẻ li đó vào trước thẻ Con 1.
Code
Ví dụ ta có một thẻ ul có 5 thẻ li như sau:
<script> jQuery(document).ready(function(){ jQuery("#butAppend").click(function(){ jQuery("#test_ul").append("<li>Con 0</li>"); }); jQuery("#butPrepend").click(function(){ jQuery("#test_ul").prepend("<li>Con 0</li>"); }); }); </script> <div> <div style="float:left;border:1px solid
gray;displày:block;width:350px;"> <ul id="test_ul"> <li>con 1</li> <li>con 2</li> <li>con 3</li> </ul> </div> <div style="float:left;padding:20px;"> <input type="button" id="butAppend" value="Append"/><br/> <input type="button" id="butPrepend" value="Prepend"/><br/> </div> </div>

Le Hung – Lập Trình Viên .NET – Đại Học Đà Lạt Groups ASP.NET : https://www.facebook.com/groups/asp.net.dlu/
Demo
jQuery - appendTo và prependTo Hàm appendTo và prependTo được dùng để chèn một đối tượng HTML DOM đang truy xuất vào đối
tượng HTML DOM ta chọn ở tham số của hàm. Có nghĩa là nó sẽ cắt toàn bộ đoạn HTML của đối tượng ta đang truy xuất để chèn vào đối tượng mà ta chọn ở tham số của hàm.
appendTo(jQuery selector): Chèn đối tượng HTML DOM đang được truy xuất vào cuối danh sách con của đối tượng được tham số selector chọn ra.
o VD: jQuery("#a").appendTo("#b"); có nghĩa là toàn bộ nội dung thẻ có id là a sẽ được chèn vào cuối thẻ có id là b
prependTo(jQuery selector): Chèn đối tượng HTML DOM đang được truy xuất vào đầu danh
sách con của đối tượng được tham số selector chọn ra.
o VD: jQuery("#a").prependTo("#b"); có nghĩa là toàn bộ nội dung thẻ có id là a sẽ được chèn vào đầu thẻ có id là b
Ví dụ ta có hai thẻ ul như sau:
<ul id="input_ul">
<li>chèn 1</li>
<li>chèn 2</li>
<li>chèn 3</li>
</ul>
<ul id="choose_ul">
<li>Con 1</li>
<li>Con 2</li>
</ul>
Khi ta nhấn nút:
appendTo thì toàn bộ thẻ input_ul sẽ được chèn vào sau thẻ li con 2
prependTo thì toàn bộ thẻ input_ul sẽ được chèn vào trước thẻ li con 1
Code
<script>
jQuery(document).ready(function(){
jQuery("#butAppendTo").click(function(){
jQuery("#input_ul").appendTo("#choose_ul");
});
jQuery("#butPrependTo").click(function(){
jQuery("#input_ul").prependTo("#choose_ul");
});
});
</script>
<div>
<div style="float:left;border:1px solid
gray;displày:block;width:350px;">
<ul id="input_ul">
<li>chèn 1</li>
<li>chèn 2</li>
<li>chèn 3</li>
</ul>

Le Hung – Lập Trình Viên .NET – Đại Học Đà Lạt Groups ASP.NET : https://www.facebook.com/groups/asp.net.dlu/
<ul id="choose_ul">
<li>Con 1</li>
<li>Con 2</li>
</ul>
</div>
<div style="float:left;padding:20px;">
<input type="button" id="butAppendTo" value="appendTo"/><br/>
<input type="button" id="butPrependTo" value="prependTo"/><br/>
</div>
</div>
Lưu ý:
Chỉ nên sử dụng hàm này khi biết rõ đối tượng bạn cần chèn là gì.
Tốt nhất nên dùng với cách select bằng id, tránh dùng hàm này với các selector trả về một mảng đối tượng như selector bằng name hoặc tag name. Ví dụ minh họa: Bạn hãy click nhiều lần vào bất kỳ
button nào bạn sẽ thấy hàm sẽ không chạy chính xác với các selector trả về một mảng đối tượng
Demo
jQuery và hàm each each là vòng lặp mà jQuery cung cấp sẵn cho ta, cách thức hàm each hoạt động tương tự như vòng lặp
foreach trong C#.

Le Hung – Lập Trình Viên .NET – Đại Học Đà Lạt Groups ASP.NET : https://www.facebook.com/groups/asp.net.dlu/
each( function() ) vòng lặp chạy tuần tự từ object đầu mảng tới object cuối mảng.
each( function(index) ) vòng lặp chạy tuần tự từ object đầu mảng tới object cuối mảng, có kèm theo biến thứ tự (index).
Lưu ý:
each lả một vòng lặp foreach được viết bằng jQuery.
Để truy xuất đối tượng đang được hàm each truy xuất tới ta dùng từ khóa this, cách dùng như sau jQuery(this)
Cú pháp:
Ví dụ với hàm each( function() ) ta có thẻ ul có ba thẻ con li, dùng hàm each hiện alert có nội dung là nội dung của thẻ li đang được truy xuất tới.
<script type="text/javascript"> jQuery(document).ready(function(){ jQuery("#butEach1").click(function(){ jQuery("#ul_1 li").each(function(){ alert("Đang truy xuất tới phần tử có nội dung: " +
jQuery(this).html()); }); }); }); </script> <div> <div style="float:left;border:1px color gray;background-
color:#EAEAEA;padding-right:20px;"> <ul id="ul_1"> <li>Dòng 1</li> <li>Dòng 2</li> <li>Dòng 3</li> </ul> </div> <div style="float:left;padding-left:20px;"><input type="button"
value="Each" id="butEach1"/></div> <div style="clear:both;"></div> </div>

Le Hung – Lập Trình Viên .NET – Đại Học Đà Lạt Groups ASP.NET : https://www.facebook.com/groups/asp.net.dlu/
Ví dụ với hàm each(function(index)) ta cũng có một thẻ ul với ba thẻ li con khi nhấn vào button Each
thì ta dùng hàm each để gắn giá trị index vào từng thẻ ul con.
<script type="text/javascript"> jQuery(document).ready(function(){ jQuery("#butEach2").click(function(){ jQuery("#ul_2 li").each(function(index){ jQuery(this).html(jQuery(this).html()+" "+index); }); }); }); </script> <div> <div style="float:left;border:1px color gray;background-
color:#EAEAEA;padding-right:20px;"> <ul id="ul_2"> <li>Dòng</li> <li>Dòng</li> <li>Dòng</li> </ul> </div> <div style="float:left;padding-left:20px;"><input type="button"
value="Each" id="butEach2"/></div> <div style="clear:both;"></div> </div>
Mình xin đính chính lại là each không chỉ hoạt động với mảng jQuery object mà còn có thể hoạt động với
mảng thông thường trong javascript
Cách thức sử dụng:
jQuery.each(array, callback function(index, value))
Giả sử ta có mảng gồm 10 phần tử bất kỳ, ta dùng hàm each duyệt qua từng phần tử.
Code
<script type="text/javascript"> jQuery(document).ready(function(){

Le Hung – Lập Trình Viên .NET – Đại Học Đà Lạt Groups ASP.NET : https://www.facebook.com/groups/asp.net.dlu/
var arr = [1,2,3,40,1,20,3,50]; jQuery("#arr_each_1").click(function(){ jQuery.each(arr, function(index,value){ alert("STT " + index + ": Gia tri "+value); }); }); }); </script> <input type="button" value="contains method" id="arr_each_1"/>
jQuery - html và text
html và text là hai hàm thường được dùng để thao tác với nội dung của một jQuery object.
html: Lấy ra toàn bộ nội dung của đồi tượng đang truy xuất dưới dạng HTML (bao gồm cả các thẻ div, table...).
html(html text): Thiết lập nội dung của đối tượng đang truy xuất bằng chuỗi HTML truyền vào.
text: Lấy toàn bộ nội dung của các thẻ HTML con nhưng bỏ qua các thẻ đó (không lấy ra các thẻ HTML như div, table,br...).
text (text): thay đổi chuỗi nội dung của đối tượng(cho dù bạn truyền chuỗi HTML vào nhưng mặc
định hàm này sẽ hiểu nó là text chứ không phải là mã HTML và sẽ hiển ra đúng những gì bạn truyền vào).
Ví dụ: ở đây ta có 1 thẻ div trong đó có chứa 2 thẻ p và một thẻ a(nội dung của nó là lorem text). Như sau:
<div style="float:left;border:1px color gray;background-
color:#EAEAEA;width:200px;" id="content_div">
<p>Lorem ipsum dolor sit amet, consectetur adipiscing elit. Fusce
semper sapien nec urna feugiat convallis sed sit amet velit.</p>
<p>Curabitur vehicula, dui eu rutrum sollicitudin.</p>
<a href="#">vehicula</a>

Le Hung – Lập Trình Viên .NET – Đại Học Đà Lạt Groups ASP.NET : https://www.facebook.com/groups/asp.net.dlu/
</div>
Nút getHTML: Lấy nội dung HTML của thẻ div(dùng hàm html)
Nút setHTML: dùng hàm html để set chuỗi HTML sau <b>Xin chao jQuery</b> cho thẻ div
Nút getText: Dùng hàm text lấy nội dung của thẻ div
Nút setText: Dùng hàm text thiết lập thử đoạn mã HTML sau <b>Xin chao jQuery</b> cho thẻ
div
Nút Restore: Khôi phục lại nội dung ban đầu của thẻ div
Code
<script type="text/javascript"> jQuery(document).ready(function(){ jQuery("#gettext").click(function(){ alert(jQuery("#content_div").text()); }); jQuery("#settext").click(function(){ jQuery("#content_div").text("<b>Xin chao jQuery</b>"); }); jQuery("#gethtml").click(function(){ alert(jQuery("#content_div").html()); }); jQuery("#sethtml").click(function(){ jQuery("#content_div").html("<b>Xin chao jQuery</b>"); }); }); </script> <div> <div style="float:left;border:1px color gray;background-
color:#EAEAEA;width:200px;" id="content_div"> <div>Lorem ipsum dolor sit amet, consectetur adipiscing elit. Fusce
semper sapien nec urna feugiat convallis sed sit amet velit.</div> <p>Curabitur vehicula, dui eu rutrum sollicitudin.</p> <a href="#">vehicula</a> </div> <div style="float:left;padding:0px 20px;"> <input type="button" value="getHtml" id="gethtml"/><br/> <input type="button" value="getText" id="gettext"/><br/> <input type="button" value="setHtml" id="sethtml"/><br/> <input type="button" value="setText" id="settext"/><br/> </div> <div style="clear:both;"></div> </div>
Le Hung – Lập Trình Viên .NET – Đại Học Đà Lạt Groups ASP.NET : https://www.facebook.com/groups/asp.net.dlu/
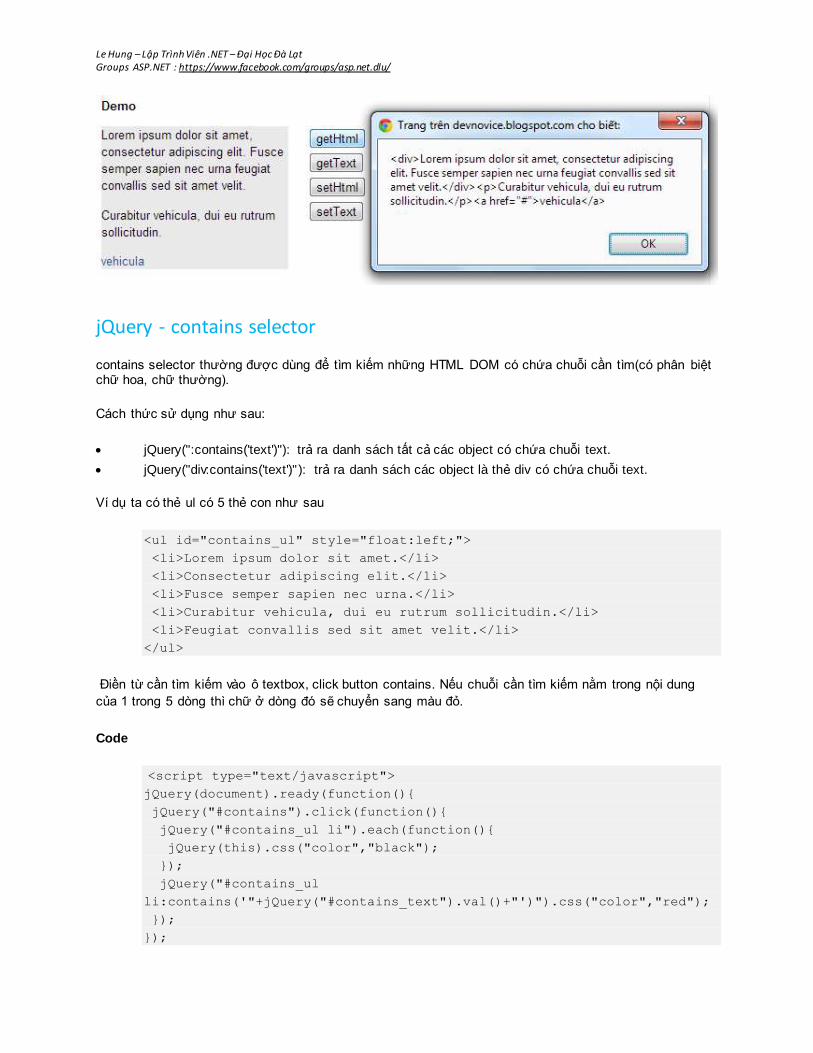
jQuery - contains selector
contains selector thường được dùng để tìm kiếm những HTML DOM có chứa chuỗi cần tìm(có phân biệt chữ hoa, chữ thường).
Cách thức sử dụng như sau:
jQuery(":contains('text')"): trả ra danh sách tất cả các object có chứa chuỗi text.
jQuery("div:contains('text')" ): trả ra danh sách các object là thẻ div có chứa chuỗi text.
Ví dụ ta có thẻ ul có 5 thẻ con như sau
<ul id="contains_ul" style="float:left;"> <li>Lorem ipsum dolor sit amet.</li> <li>Consectetur adipiscing elit.</li> <li>Fusce semper sapien nec urna.</li> <li>Curabitur vehicula, dui eu rutrum sollicitudin.</li> <li>Feugiat convallis sed sit amet velit.</li> </ul>
Điền từ cần tìm kiếm vào ô textbox, click button contains. Nếu chuỗi cần tìm kiếm nằm trong nội dung
của 1 trong 5 dòng thì chữ ở dòng đó sẽ chuyển sang màu đỏ.
Code
<script type="text/javascript"> jQuery(document).ready(function(){ jQuery("#contains").click(function(){ jQuery("#contains_ul li").each(function(){ jQuery(this).css("color","black"); }); jQuery("#contains_ul
li:contains('"+jQuery("#contains_text").val()+"')").css("color","red"); }); });

Le Hung – Lập Trình Viên .NET – Đại Học Đà Lạt Groups ASP.NET : https://www.facebook.com/groups/asp.net.dlu/
</script> <div> <ul id="contains_ul" style="float:left;"> <li>Lorem ipsum dolor sit amet.</li> <li>Consectetur adipiscing elit.</li> <li>Fusce semper sapien nec urna.</li> <li>Curabitur vehicula, dui eu rutrum sollicitudin.</li> <li>Feugiat convallis sed sit amet velit.</li> </ul> <div style="float:left;padding:20px 20px;"> <input type="text" value="" id="contains_text"/><br/> <input type="button" value="contains" id="contains"/><br/> </div> <div style="clear:both;"></div> </div>
jQuery - XML Khởi tạo XML
Để khởi tạo XML trong jQuery ta làm như sau:
var xml = $('<xml>');
xml.append("<?xml version=\"1.0\" encoding=\"UTF-8\"?>");
Biến xml giờ đây được hiểu là một XML object. Ta chỉ việc append các node con vào trong object này.
Thêm node
Hàm find được dùng để tìm kiếm các thẻ trong xml. Ví dụ ta muốn tạo một danh sách employee. Ta làm như sau:
//Đầu tiên ta tạo thẻ employees chứa các thẻ employee xml.append("<employees></employees>"); //Tạo thẻ employee con var employee = ""; employee += "<employee>"; employee += "<name>Tran Van A</name>";
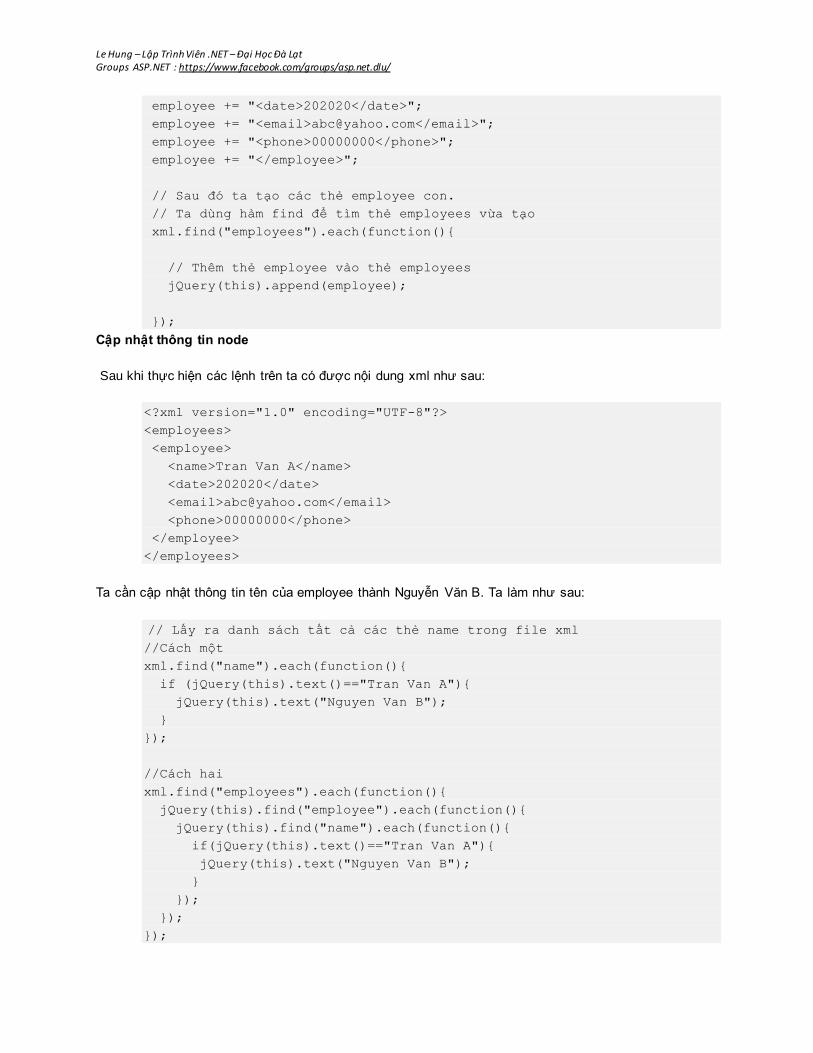
Le Hung – Lập Trình Viên .NET – Đại Học Đà Lạt Groups ASP.NET : https://www.facebook.com/groups/asp.net.dlu/
employee += "<date>202020</date>"; employee += "<email>[email protected]</email>"; employee += "<phone>00000000</phone>"; employee += "</employee>"; // Sau đó ta tạo các thẻ employee con. // Ta dùng hàm find để tìm thẻ employees vừa tạo xml.find("employees").each(function(){ // Thêm thẻ employee vào thẻ employees jQuery(this).append(employee); });
Cập nhật thông tin node
Sau khi thực hiện các lệnh trên ta có được nội dung xml như sau:
<?xml version="1.0" encoding="UTF-8"?> <employees> <employee> <name>Tran Van A</name> <date>202020</date> <email>[email protected]</email> <phone>00000000</phone> </employee> </employees>
Ta cần cập nhật thông tin tên của employee thành Nguyễn Văn B. Ta làm như sau:
// Lấy ra danh sách tất cả các thẻ name trong file xml //Cách một xml.find("name").each(function(){ if (jQuery(this).text()=="Tran Van A"){ jQuery(this).text("Nguyen Van B"); } }); //Cách hai xml.find("employees").each(function(){ jQuery(this).find("employee").each(function(){ jQuery(this).find("name").each(function(){ if(jQuery(this).text()=="Tran Van A"){ jQuery(this).text("Nguyen Van B"); } }); }); });

Le Hung – Lập Trình Viên .NET – Đại Học Đà Lạt Groups ASP.NET : https://www.facebook.com/groups/asp.net.dlu/
Xóa một node
Sau khi thực hiện lệnh cập nhật, ta có nội dung xml như sau
<?xml version="1.0" encoding="UTF-8"?> <employees> <employee> <name>Nguyen Van B</name> <date>202020</date> <email>[email protected]</email> <phone>00000000</phone> </employee> </employees>
Bây giờ ta sẽ xóa node name của employee có tên là Nguyen Van B ra khỏi nội dung XML(Dùng
hàmremove)
xml.find("employees").each(function(){ jQuery(this).find("employee").each(function(){ jQuery(this).find("name").each(function(){ if(jQuery(this).text()=="Nguyen Van B"){ // Dùng hàm remove để xóa node jQuery(this).remove(); } }); }); });
Nội dung file XML cuối cùng sẽ như sau
<?xml version="1.0" encoding="UTF-8"?> <employees> <employee> <date>202020</date> <email>[email protected]</email> <phone>00000000</phone> </employee> </employees>
jQuery - empty và remove
empty và remove thường được dùng để xóa các phần tử trong jQuery. Tuy hai hàm này có cùng chung một hành động nhưng chúng có một chút khác biệt như sau:
empty chỉ xóa các phần tử con của phần tử đang truy xuất.
remove giống hàm empty nhưng bao gồm cả phần tử đang truy xuất và phần tử con.

Le Hung – Lập Trình Viên .NET – Đại Học Đà Lạt Groups ASP.NET : https://www.facebook.com/groups/asp.net.dlu/
Ví dụ ta có một thẻ ul như sau:
<ul id="test_ul"> <li>lorem isum1</li> <li class="current">lorem isum2</li> <li>lorem isum3</li> <li>lorem isum4</li> </ul>
Khi ta sử dụng:
jQuery("#test_ul").empty() jQuery sẽ xóa toàn bộ nội dung của thẻ ul có id là test_ul nhưng vẫn
giữ lại bản thân thẻ đó.
<ul id="test_ul"> </ul>
jQuery("#test_ul").remove() jQuery sẽ xóa toàn bộ nội dung của thẻ ul có id là test_ul và xóa
luôn cả thẻ ul test_ul. Tuy nhiên hàm remove sẽ trả về đối tượng mà nó vừa remove để chúng ta có
khả năng lưu trữ và khôi phục lại khi cần
Demo ta có ô vuông bên trái chứa thẻ ul như trên và ô bên phải sẽ chứa giá trị trả về của lần lượt từng
câu lệnh phía trên.
Code
<style> .fly { float:left; display:inline; } .clean{ clear:both; } .current{ color:red; } </style> <script type="text/javascript"> jQuery(document).ready(function(){ jQuery("#butEmpty").click(function(){ var rmvObj = jQuery("#test_ul").empty(); jQuery("#showReturn").html(rmvObj); }); jQuery("#butRemove").click(function(){

Le Hung – Lập Trình Viên .NET – Đại Học Đà Lạt Groups ASP.NET : https://www.facebook.com/groups/asp.net.dlu/
var rmvObj = jQuery("#test_ul").remove(); jQuery("#showReturn").html(rmvObj); }); }); </script> <div> <div class="fly" style="width:200px;border:1px solid
gray;height:120px;"> <ul id="test_ul"> <li>lorem isum1</li> <li>lorem isum2</li> <li>lorem isum3</li> <li>lorem isum4</li> </ul> </div> <div class="fly" style="margin:0px 5px;"> <input type="button" value="empty" id="butEmpty"/><br/> <input type="button" value="remove" id="butRemove"/><br/> </div> <div class="fly" style="width:200px;border:1px solid
gray;height:120px;" id="showReturn"></div> <div class="clean"></div> </div>
jQuery - ajax jQuery ajax giúp chúng ta đơn giản hóa quá trình thực thi. Sau đây là một vài minh họa về tính tiện dụng
của JQuery ajax.
Cú pháp
jQuery.ajax({ type:"POST", //Phương thức gửi request là POST hoặc GET data:"id=12&name=abc", //tham số gửi kèm dataType:"xml", //kiểu dữ liệu trả về, mặc định là text url:"/login/servletLogin", //Đường dẫn tới nơi xử lý request ajax success: function (){ //hàm gọi về khi thực hiện thành công // mã lệnh } });
Ví dụ 1: Sử dụng HTML tạo một ví dụ đơn giản với jQuery ajax
Tạo một thư mục(ở đây tạm gọi là thư mục VD).
Vào thư mục VD tạo một file index.html có nội dung như sau
jQuery("#responseDiv").html(html); }

Le Hung – Lập Trình Viên .NET – Đại Học Đà Lạt Groups ASP.NET : https://www.facebook.com/groups/asp.net.dlu/
}); }); }); </script> </head> <body> <div> <input type="button" value="ajax" id="ajaxButton"/> </div> <div id="responseDiv"> </div> </body> </html>
Tiếp tục tạo file ajax.html có nội dung như sau
border-collapse:collapse;
}
#sampleTable td{
border: 1px solid black;
width:100px;
}
</style>
<table id="sampleTable">
<tr>
<td>Name</td>
<td>Year</td>
</tr>
<tr>
<td>Van A</td>
<td>1982</td>
</tr>
</table>
Mở file index.html bằng trình duyệt bất kỳ click vào button ajax bạn sẽ thấy toàn bộ nội dung của
file ajax.html được lấy về trang index.html.
Ví dụ 2: Dùng PHP tạo một ví dụ đơn giản với jQuery ajax.
Cài đặt ứng dụng chạy apache như Xampp hoặc Wamp. Start ứng dụng.
Tạo thư mục với tên là sample trong(thư mục htdocs đối với Xampp và www đối với Wamp)
Trong thư mục sample tạo file index.php có nội dung như sau:
<html>
<head>
<script src="http://code.jquery.com/jquery-1.4.2.js"></script>
<script type="text/javascript">
jQuery(document).ready(function(){
jQuery("#ajaxButton").click(function(){
jQuery.ajax({

Le Hung – Lập Trình Viên .NET – Đại Học Đà Lạt Groups ASP.NET : https://www.facebook.com/groups/asp.net.dlu/
type:"POST",
url:"ajax.php", //goi toi file ajax.php
data:"name="+jQuery("#name").val()+"&year="+jQuery("#year").val(),
//du lieu gui di
success:function(html){
jQuery("#responseDiv").html(html);
}
});
});
});
</script>
</head>
<body>
<table>
<tr>
<td>Name:</td>
<td><input type="text" id="name"/></td>
</tr>
<tr>
<td>Year:</td>
<td><input type="text" id="year"/></td>
</tr>
</table>
<div>
<input type="button" value="ajax" id="ajaxButton"/>
</div>
<div id="responseDiv">
</div>
</body>
</html>
Tạo tiếp file ajax.php trong thư mục sampe với nội dung như sau
<?php
$name = $_REQUEST['name'];//Lay parameter tu request
$year = $_REQUEST['year'];//Lay parameter tu request
echo "<div>".$name." sinh nam ".$year."</div>";//Noi dung tra ve
?>
Bây giờ bạn mở một trình duyệt web lên(IE hoặc firefox) lên gõ vào thanh địa chỉ như sau:
localhost/sample/
Bạn điền vào hai field Name và Year nhấn button ajax bạn sẽ thấy câu chào giống như hình
dưới.

Le Hung – Lập Trình Viên .NET – Đại Học Đà Lạt Groups ASP.NET : https://www.facebook.com/groups/asp.net.dlu/


![(jQuery Fundamentals) Fundamentos de jQuery191.13.234.92/.../Arquivos/LPA/JQuery/apostilas/apostila-jquery-br.pdf · Fundamentos de jQuery (jQuery Fundamentals) Rebecca Murphey []](https://img.pdfslide.tips/doc/110x75/6077fbbcb4f4d25f0363d510/jquery-fundamentals-fundamentos-de-jquery1911323492arquivoslpajqueryapostilasapostila-jquery-brpdf.jpg)