Embed Size (px)
DESCRIPTION
Arhitectura Calculatoarelor
Citation preview

Disciplina: Arhitectura calculatoarelor și InternetLaborator 1
Placa de bază: noțiuni despre bios, magistrală, soket, porturi
Placa de bază (engleză: motherboard) este placa principală a unui calculator, o componentă hardware complexă pe care sunt montate multe alte componente hardware ale PC-urilor sau ale altor aparate electronice computerizate.


Privire de ansamblu Placă de bază Acer E360 produsă de Foxconn din 2005
O arhitectură mai veche
Placa de bază conține și conectori electrici pentru comunicarea cu celelalte componente ale sistemului calculator. Pe placa de bază se conectează între ele unitatea centrală de prelucrare (UCP) și alte subsisteme și dispozitive electronice: interfețe, memorie, etc.

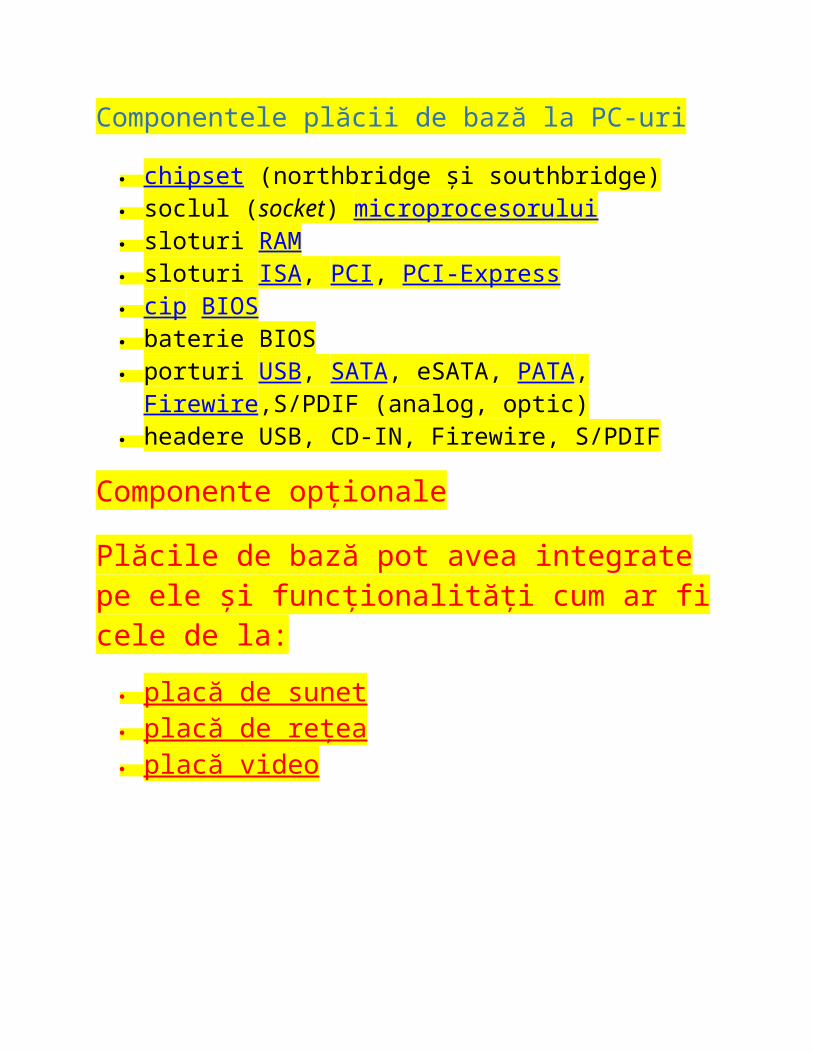
Componentele plăcii de bază la PC-uri
chipset (northbridge și southbridge) soclul (socket) microprocesorului sloturi RAM sloturi ISA, PCI, PCI-Express cip BIOS baterie BIOS porturi USB, SATA, eSATA, PATA, Firewire,S/PDIF (analog,
optic) headere USB, CD-IN, Firewire, S/PDIF
Componente opționale
Plăcile de bază pot avea integrate pe ele și funcționalități cum ar fi cele de la:
placă de sunet placă de rețea placă video


BIOS-ul, Basic Input/Output System, o componentă software de bază a calculatoarelor (PC-uri și servere) care face legătura între componentele fizice (hardware) și sistemul de operare utilizat pe mașina respectivă.
Câteva dintre companiile producătoare de BIOS-uri sunt: Award, American Microsystems, Inc. (AMI) și Phoenix Technologies Ltd. (Phoenix).

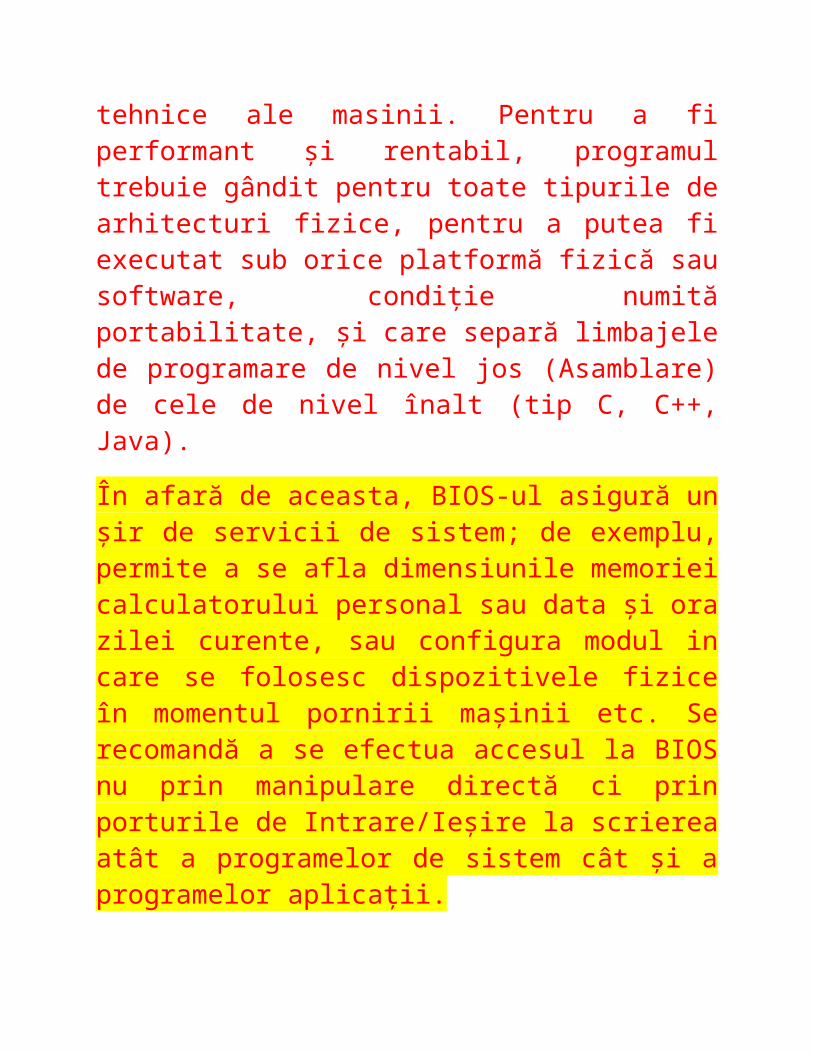
BIOS-ul îndeplinește trei funcții fundamentale:
1. Verificarea componentelor la pornirea calculatorului (Power On Self-Test sau POST)
2. Încărcarea sistemului de operare de pe discul dur (HDD) în memoria de lucru
3. Face legătură între sistemul de operare și unele dispozitive fizice
Sistemul de bază de intrare/ieșire BIOS este o interfață între programele sistemului de operare și partea fizică a calculatorului.
BIOS–ul izolează sistemul de operare și programele din mașină de particularitățile tehnice ale dispozitivelor fizice concrete și permite programatorilor să folosească operații de Intrare/Ieșire în interiorul programelor pe care le creează, fără a lua în seamă adresele dispozitivelor sau caracteristicile tehnice ale masinii. Pentru a fi performant și rentabil, programul trebuie gândit pentru toate tipurile de arhitecturi fizice, pentru a putea fi executat sub orice platformă fizică sau software, condiție numită portabilitate, și care separă limbajele de programare de nivel jos (Asamblare) de cele de nivel înalt (tip C, C++, Java).
În afară de aceasta, BIOS-ul asigură un șir de servicii de sistem; de exemplu, permite a se afla dimensiunile memoriei calculatorului personal sau data și ora zilei
curente, sau configura modul in care se folosesc dispozitivele fizice în momentul pornirii mașinii etc. Se recomandă a se efectua accesul la BIOS nu prin manipulare directă ci prin porturile de Intrare/Ieșire la scrierea atât a programelor de sistem cât și a programelor aplicații.
Programarea la nivelul BIOS-lui micșorează dependența programelor de schimbarea parametrilor tehnici ai calculatorului și prin aceasta mărește mobilitatea lor. Funcțiile de bază al BIOS–ului se caracterizează prin:
testarea calculatorului personal la punerea în priză asigurarea controlului dispozitivele externe servicii de sistem
http://ecomputernotes.com/fundamental/introduction-to-computer/difference-between-32-bit-and-64-bit

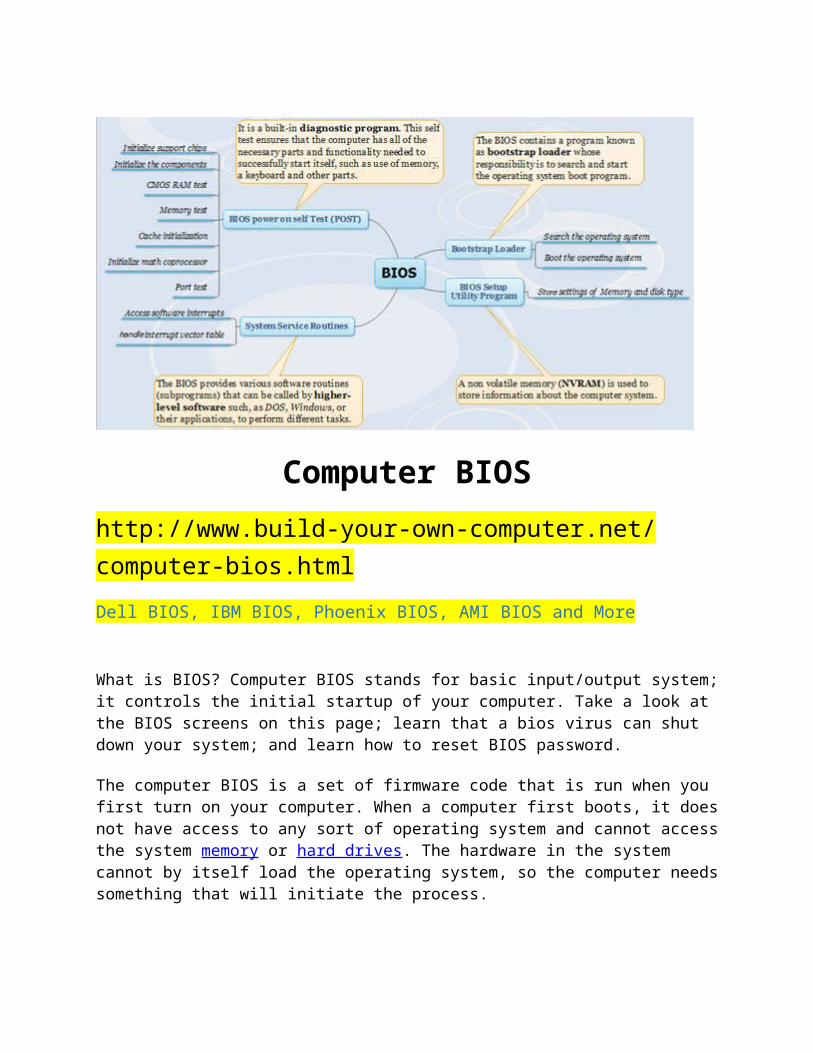
Computer BIOS
http://www.build-your-own-computer.net/computer-bios.html
Dell BIOS, IBM BIOS, Phoenix BIOS, AMI BIOS and More
What is BIOS? Computer BIOS stands for basic input/output system; it controls the initial startup of your computer. Take a look at the BIOS screens on this page; learn that a bios virus can shut down your system; and learn how to reset BIOS password.
The computer BIOS is a set of firmware code that is run when you first turn on your computer. When a computer first boots, it does not have access to any sort of operating system and cannot access the system memory or hard drives. The hardware in the system cannot by itself load the operating system, so the computer needs something that will initiate the process.
The primary function of the computer BIOS is to identify and initiate the components on the motherboard and to prepare the system for boot up. This preparation sets the components up so that the software programs of the operating system can load up and take control of them. This process is known as Bootstrapping.
There are 3 main computer BIOS makers. Award BIOS, AMI BIOS, and Phoenix BIOS. Dell BIOS and IBM BIOS are manufactured by third parties. Keep in mind that there really isn't a such thing as an Intel BIOS or Windows BIOS. The BIOS' are created by Award, AMI and Phoenix and are installed on the motherboard.
When you turn your computer on, it runs what is called a POST - Power On Self Test. The POST is a set of instructions that will initialize the system. The BIOS will also interact with the CMOS. The CMOS holds user customized data such as passwords, hard drive details, the date, and the time. The general order of device start-up during POST is...
1. Clock Generator2. Processor and Caches3. Chipset 4. System Memory 5. PCI Devices6. Graphics Controller 7. SATA and IDE Controllers - Hard drives, DVD/CD Drives8. I/O Controllers such as Keyboard and Mouse
The last thing the POST does is load the boot loader for the Operating System you are using, and pass control to it. You can set the boot order of the drives to allow you to boot from a flash drive, CD/DVD, or hard drive.
Introduction To BIOS Settings
Let me say here that changing certain settings in your setup can cause problems with your computer and can prevent you from booting. Some Motherboards today will come with BIOS Backup onboard so that if something were to go wrong, it can revert back to an older version. In the event that something does go wrong, remember that you can always reset your motherboard to the factory settings.
There are two ways that you can reset your computer BIOS. The easiest is to simply remove the battery from the motherboard, wait for about 20 minutes, and put it back in. If removing the battery does not work, you can toggle the motherboard's reset jumper. Refer to your motherboard manual to find out where the jumper is located. Some higher end boards even have a reset button that you can simply press (this is also known as: reset BIOS password).
Keep in mind also that you may never need to go into your computer BIOS settings, except when building your own computer (or in the very unfortunate circumstance of a BIOS virus). I'm not trying to scare anyone off here, just want you to make sure you are careful. Let's take a look at the BIOS settings...
BIOS Settings

When you first boot up your computer, you will either see the motherboard manufacturer's logo screen, or you will see the POST results screen. When you see either of these, press the "Delete" key on your keyboard. If the Delete key does not work, look for something onscreen to the effect of "F2 = Setup". This is the key that will get you into the computer BIOS screens. Once there, you should see a screen similar to the following:
Within the computer BIOS screens you will use the arrow keys on your keyboard to navigate around. The + and – (plus and minus) keys are used to adjust the settings, the enter key will confirm and save your settings and the ESC key will cancel your change, and take you back one screen.
Keep in mind that computer BIOS screens will differ from motherboard to motherboard, but the basic functionality that we will cover here will be pretty much the same. At any time during the process, you can refer to your motherboard manual. Most companies will include instructions for the different setup screens.
Standard CMOS Features Screen
The Standard CMOS Features BIOS Screen is where you can configure the following...
Time and Date Settings Floppy and Hard Drives Keyboard Settings
Monitor Settings
The main setting here to be concerned with is the Hard Drive. The keyboard and monitor are basically just there for legacy systems, as you either have one, or you don't.
The Time and Date settings can be adjusted here, as well as within your Operating System. The Hard Drives however need to be setup here in order for the BIOS to find and access them. Most modern motherboards will allow you to auto detect your hard drive. Simply highlight the IDE or SATA Primary drive and hit the Enter Key. You should see an option to autodetect your drive.

Advanced BIOS Features
To set the boot order of your computer, first go to Advanced BIOS Features from the main computer BIOS screen, then arrow down to Boot Sequence, and hit Enter. This will bring up a screen that will show you choices you can setup.
On some BIOS Screens, you will see the options listed out, as in this picture. Simply select what you want for the First, Second, and Third Boot Device. Most motherboards will come preset with Floppy as the first choice. If you do not have a floppy drive, I would recommend changing this to DVD Drive until you have your operating system installed, after that, you can set it to your primary hard drive.. You can also substitute USB Drive in that slot if you boot from External Drives or Flash Drives.
If you are using Windows XP Service Pack 2 or Vista, you should enable USB 2.0 support on your motherboard. This will speed up the communications with your USB devices.
This setting can be called different things, sometimes it is called OnChip PCI Device, sometimes USB 2.0 Support. Ensure that the OnChip USB Controller is enabled, and that USB 2.0 Controller is also enabled.
If you want to see what your computer is actually doing when it boots up, instead of the manufacturer's logo, find the option that says Full Screen Logo Display, and set it to disabled. This way, you will be able to see any errors or issues your computer may have at boot up, as well as monitor the progress of the boot.
Look for the Quick POST, or Quick Power On Self Test option. By setting this option to disabled, you can speed up your boot time. What this will do is reduce the number of times the system checks the memory from 3 times, to only once.

Select the correct display for video bios. Look for an option that says "Init Display First", or "Primary VGA BIOS", or "PEG Port/Graphic Adapter Priority".
If you are using a graphics card in your system, you can set this option to either AGP, or if you have PCI-E, set it to PEG. This will tell the system exactly which card to use, so it doesn't have to waste time searching all options.
System BIOS Cacheable and Video BIOS Cacheable options can both be set to disabled. These are settings for older systems using DOS, and are not used in newer systems. It doesn't hurt if they are enabled, but it'll speed things up if you turn them off.
By setting the APIC Mode option to Enabled, you can sometimes speed up the communications between the CPU, the Northbridge, and the Southbridge.
That's it for the advanced settings. There are many other more advanced settings, but you want to be very careful and do some detailed reading before changing them. Most will not break your computer, but some have the possibility of producing damage to your CPU or motherboard. Most notably, be sure you know exactly what you are doing when changing processor or memory voltages.
For more information on the other settings in the BIOS, consult your motherboard manual, or check out the overclocking guides at Tom's Hardware.

Studiu de caz- montarea unui calculator din componente
Componente necesare:
– o placa de baza, (un gigabyte in cazul de fata)– un procesor (intel core 2 duo)– un cooler pentru procesor (este in cutia procesorului)– un hard-disk– un dvd-rw (lg) aka cd-romul– o placa video (geforce 7300 gt)– memorii RAM – o carcasa
Explicatii:– procesorul este „creierul” calculatorului care are nevoie de un cooler (ventilator) care sa-l raceasca;– hard-disk –ul - este o memorie ne-volatila, adica informatiile raman salvate chiar si dupa ce ai oprit calculatorul. Este destul de incet ca viteza de scriere-citire. De obicei li se spune „harduri pe IDE” sau „harduri pe SATA”, dupa numele interfetei prin care comunica (IDE sau SATA). fiecare tip de interfata are alt tip de mufa– placa video – se ocupa de procesarea informatiilor care ajung la monitor. este o componenta specializata, axata pe functii matematice si procesarea elementelor 3d

– memoriile RAM (random access memory) – este o memorie volatila (informatia se pierde atunci cand se ia curentul), cu o viteza mult mai mare decat a hard-disk-ului, in care sunt stocate informatiile folosite cel mai des de aplicatiile deschise. cu cat mai mult, cu atat mai bine, si calculatorul se misca „mai repede”. Mai sunt cunoscute si sub numele de „simm-uri”– cd-rom – unitatea care citeste cd-uri. daca citeste dvd-uri e dvd-rom. daca scrie e cd-rw sau dvd-rw. 4 combinatii mari si late – carcasa – le tine pe toate la un loc, si asigura o ventilatie corespunzatoare. Este deseori numit „hard-ul”, si confundat cu hard-disk-ul.
placa de baza
1) – slotul pentru procesor2) – sloturi pentru memoriile RAM – memoria3) – sloturi SATA (doar pentru hard-diskuri)4) – mufa IDE – tot pentru hard-disk-uri / cd-rom5) – mufa de alimentare a placii de baza6) – Sloturi PCI (pentru placi grafice, placi de retea, placi de sunet)7) – slot PCI-express (exclusiv pentru placi grafice)8 ) – mufa pentru alimentarea cooler-ului
Step 1: Montarea procesorului:In cutia procesorului se afla:

un procesor si un cooler :D.
Se trage de siguranta de pe placa de baza in stanga (fata de cum e placa de baza), si se ridica. Se ridica si capacelul care fixeaza procesorul, si se scoate plasticul care protejeaza slot-ul. Procesorul (partea de sus – partea de jos) are 2 ciupituri pe margine, pentru a nu-l putea monta gresit. La fel si slot-ul de pe placa de baza. Mare grija sa nu indoiti vreun pin
Dupa ce ati montat procesorul in locas, fixati capacelul si inchideti cu siguranta.Cooler-ul trebuie sa aiba pasta conductoare pe partea care o sa vina in contact cu procesorul. Daca nu are „out-of-the-box”, atunci are un tubulet cu pasta, cu care trebuie uns procesorul.

Coolerul se apasa pe placa pana face „click” pentru fiecare din cele 4 picioruse. Un pic de atentie la cablu, trebuie pus in asa fel incat sa nu poata fi prins de catre ventilator.
Step 2: Montarea memoriilor RAM trebuie sa faca click, exista un singur fel de a monta memoriile.
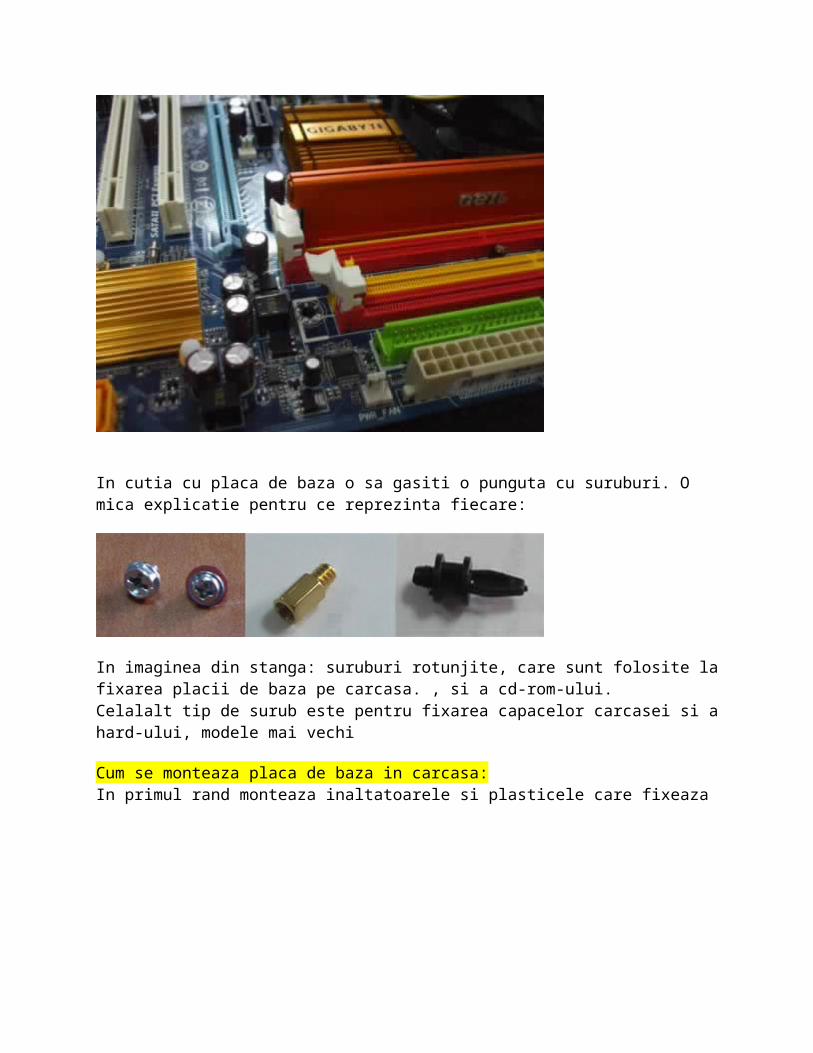
In cutia cu placa de baza o sa gasiti o punguta cu suruburi. O mica explicatie pentru ce reprezinta fiecare:
In imaginea din stanga: suruburi rotunjite, care sunt folosite la fixarea placii de baza pe carcasa. , si a cd-rom-ului. Celalalt tip de surub este pentru fixarea capacelor carcasei si a hard-ului, modele mai vechi

Cum se monteaza placa de baza in carcasa:In primul rand monteaza inaltatoarele si plasticele care fixeaza placa, ca in poza de mai sus.
Dupa aceea, se scoate placuta din spatele carcasei, pe unde vor iesi mufele, si se inlocuieste cu modelul cu care a venit placa de baza.
Mare atentie sa nu va taiati la mana in bucatile de metal, sunt foarte ascutite. Fata noua se monteaza din interiorul carcasei, prin presare.

Montarea cablurilor de la carcasa catre placa de baza.


Next se monteaza cd-rom-ul.
Next step, se fac legaturile la cd-rom si hard.

Next, conectarea cablurilor pentru interfata:
Cablul albastru este cablul IDE, iar cel galben cu mufa mica este SATA. Mai este un cablu in cutie, pentru conectarea la floppy. Daca hardul este pe IDE, se poate monta pe acelasi cablu cu cd-rom-ul (cablul IDE are 2 mufe, si pe acelasi cablu pot fi conectate 1 hard si 1 cd-rom)
Optional: se monteaza eventualele placi audio / de retea, in sloturile pci. la fel ca la placa video
Intrebari?
Aplicatii