Embed Size (px)
Citation preview
Penulis: Abdullah A. KoroEmail: [email protected] Update terakhir: 08/13/07
Langkah-langkah instalasi vmware pada Debian 4.0 (Etch)
Tutorial ini dibuat terinspirasi dari situs howtoforge.com dengan artikel berjudul “How to install vmware server on Debian 4.0 (Etch)”. Hal lain yang juga memicu tulisan ini yaitu dari kebutuhan agar dapat menggunakan bermacam-macam sistem operasi dalam satu komputer. Biasanya selama ini digunakan dual-boot. Namun dirasakan masih kurang karena sistem dual boot semisal satu komputer diinstall dua sistem operasi Windows XP dan Debian Linux. Ketika menggunakan Windows XP dan ingin pindah ke Debian Linux terpaksa harus restart komputer terlebih dahulu. Begitu juga sebaliknya.
Dengan adanya vmware ini, terutama vmware server yang untungnya lagi gratis, maka kita tidak perlu memboot bila ingin pindah dari sistem operasi yang satu dengan yang lain. Malah seolah-olah kita mempunyai beberapa atau banyak sistem operasi pada satu komputer. Hanya kekurangannya adalah kita harus mempunyai RAM yang cukup besar. Pengalaman pribadi, sekurangnya 512 MB RAM harus dimiliki. Karena RAM ini nantinya akan digunakan oleh sistem operasi utama/induk/tuan rumah (Host OS) dan juga akan digunakan oleh sistem operasi tamu (Guest OS).
Sebagai tambahan informasi, kami tidak menjamin anda pasti akan dapat menginstall vmware menggunakan langkah-langkah yang diberikan. Tetapi kami berusaha membagi pengalaman kami ini sebagai sesama pengguna. Anda juga bisa memberitahukan kami bila ada hal-hal yang salah pada dokumen tutorial ini.
Berikut sistem komputer yang digunakan:
● CPU: Intel P4 3.0 Ghz● RAM: 512● HDD: SATA 80 GB● IP Address: 192.168.0.106 (dari DHCP)
koro@debian:~$ /sbin/ifconfig eth0eth0 Link encap:Ethernet HWaddr 00:14:85:E5:A1:0D inet addr:192.168.0.106 Bcast:192.168.0.255 Mask:255.255.255.0 inet6 addr: 2001:e00:f00c:142:214:85ff:fee5:a10d/64 Scope:Global inet6 addr: fe80::214:85ff:fee5:a10d/64 Scope:Link UP BROADCAST RUNNING MULTICAST MTU:1500 Metric:1 RX packets:967271 errors:0 dropped:0 overruns:0 frame:0 TX packets:338481 errors:0 dropped:0 overruns:0 carrier:0 collisions:0 txqueuelen:1000 RX bytes:513268319 (489.4 MiB) TX bytes:41415344 (39.4 MiB) Interrupt:177 Base address:0xc000
● Isi file /etc/network/interfaces:
Halaman 1 dari 22 halaman
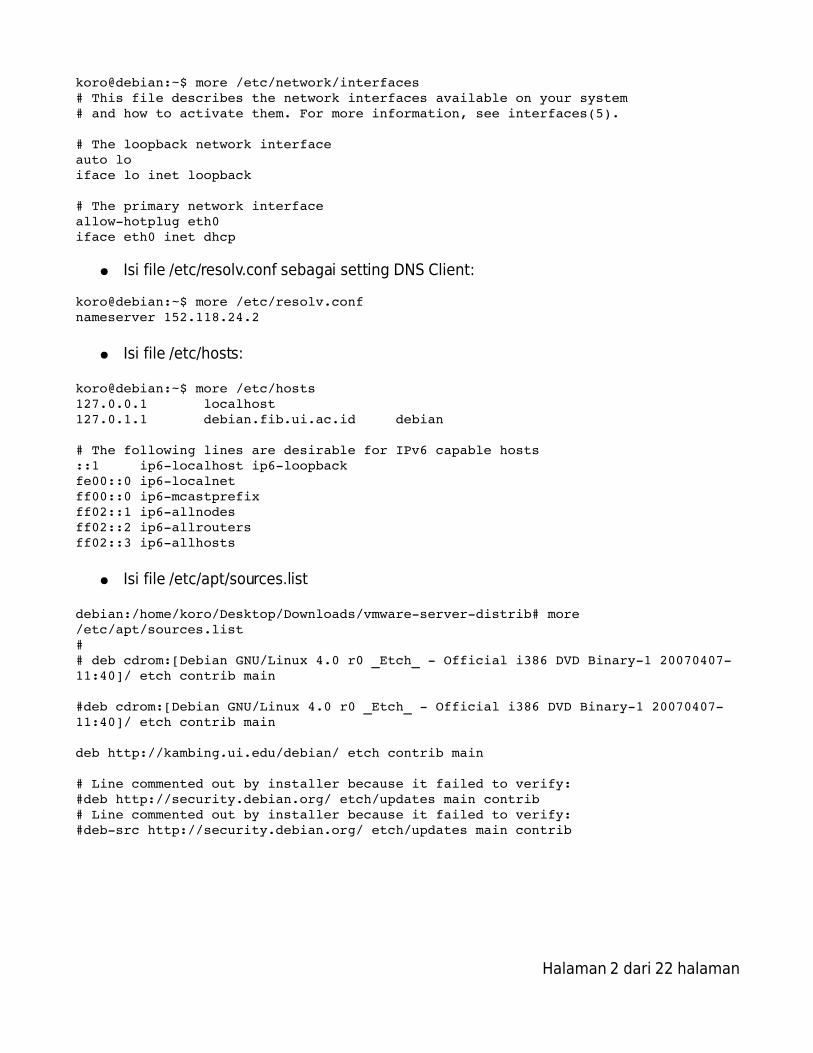
koro@debian:~$ more /etc/network/interfaces# This file describes the network interfaces available on your system# and how to activate them. For more information, see interfaces(5).
# The loopback network interfaceauto loiface lo inet loopback
# The primary network interfaceallowhotplug eth0iface eth0 inet dhcp
● Isi file /etc/resolv.conf sebagai setting DNS Client:
koro@debian:~$ more /etc/resolv.confnameserver 152.118.24.2
● Isi file /etc/hosts:
koro@debian:~$ more /etc/hosts127.0.0.1 localhost127.0.1.1 debian.fib.ui.ac.id debian
# The following lines are desirable for IPv6 capable hosts::1 ip6localhost ip6loopbackfe00::0 ip6localnetff00::0 ip6mcastprefixff02::1 ip6allnodesff02::2 ip6allroutersff02::3 ip6allhosts
● Isi file /etc/apt/sources.list
debian:/home/koro/Desktop/Downloads/vmwareserverdistrib# more /etc/apt/sources.list## deb cdrom:[Debian GNU/Linux 4.0 r0 _Etch_ Official i386 DVD Binary1 2007040711:40]/ etch contrib main
#deb cdrom:[Debian GNU/Linux 4.0 r0 _Etch_ Official i386 DVD Binary1 2007040711:40]/ etch contrib main
deb http://kambing.ui.edu/debian/ etch contrib main
# Line commented out by installer because it failed to verify:#deb http://security.debian.org/ etch/updates main contrib# Line commented out by installer because it failed to verify:#debsrc http://security.debian.org/ etch/updates main contrib
Halaman 2 dari 22 halaman
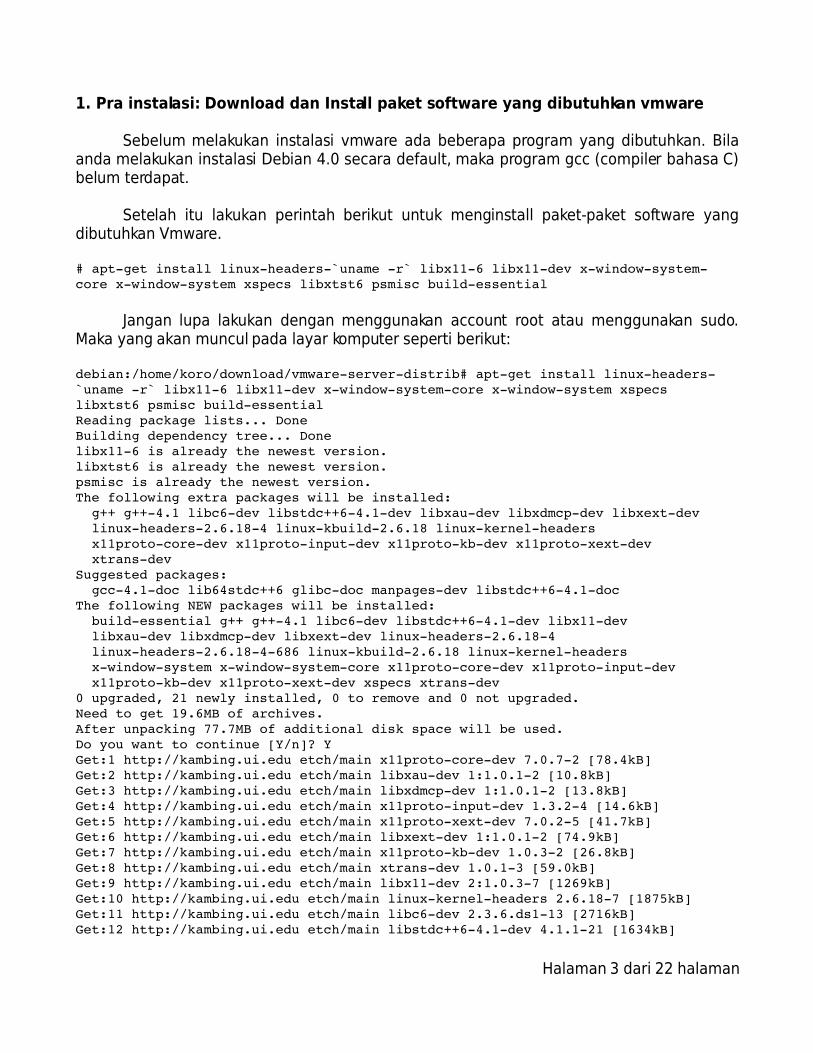
1. Pra instalasi: Download dan Install paket software yang dibutuhkan vmware
Sebelum melakukan instalasi vmware ada beberapa program yang dibutuhkan. Bila anda melakukan instalasi Debian 4.0 secara default, maka program gcc (compiler bahasa C) belum terdapat.
Setelah itu lakukan perintah berikut untuk menginstall paket-paket software yang dibutuhkan Vmware.
# aptget install linuxheaders`uname r` libx116 libx11dev xwindowsystemcore xwindowsystem xspecs libxtst6 psmisc buildessential
Jangan lupa lakukan dengan menggunakan account root atau menggunakan sudo. Maka yang akan muncul pada layar komputer seperti berikut:
debian:/home/koro/download/vmwareserverdistrib# aptget install linuxheaders`uname r` libx116 libx11dev xwindowsystemcore xwindowsystem xspecs libxtst6 psmisc buildessentialReading package lists... DoneBuilding dependency tree... Donelibx116 is already the newest version.libxtst6 is already the newest version.psmisc is already the newest version.The following extra packages will be installed: g++ g++4.1 libc6dev libstdc++64.1dev libxaudev libxdmcpdev libxextdev linuxheaders2.6.184 linuxkbuild2.6.18 linuxkernelheaders x11protocoredev x11protoinputdev x11protokbdev x11protoxextdev xtransdevSuggested packages: gcc4.1doc lib64stdc++6 glibcdoc manpagesdev libstdc++64.1docThe following NEW packages will be installed: buildessential g++ g++4.1 libc6dev libstdc++64.1dev libx11dev libxaudev libxdmcpdev libxextdev linuxheaders2.6.184 linuxheaders2.6.184686 linuxkbuild2.6.18 linuxkernelheaders xwindowsystem xwindowsystemcore x11protocoredev x11protoinputdev x11protokbdev x11protoxextdev xspecs xtransdev0 upgraded, 21 newly installed, 0 to remove and 0 not upgraded.Need to get 19.6MB of archives.After unpacking 77.7MB of additional disk space will be used.Do you want to continue [Y/n]? YGet:1 http://kambing.ui.edu etch/main x11protocoredev 7.0.72 [78.4kB]Get:2 http://kambing.ui.edu etch/main libxaudev 1:1.0.12 [10.8kB]Get:3 http://kambing.ui.edu etch/main libxdmcpdev 1:1.0.12 [13.8kB]Get:4 http://kambing.ui.edu etch/main x11protoinputdev 1.3.24 [14.6kB]Get:5 http://kambing.ui.edu etch/main x11protoxextdev 7.0.25 [41.7kB]Get:6 http://kambing.ui.edu etch/main libxextdev 1:1.0.12 [74.9kB]Get:7 http://kambing.ui.edu etch/main x11protokbdev 1.0.32 [26.8kB]Get:8 http://kambing.ui.edu etch/main xtransdev 1.0.13 [59.0kB]Get:9 http://kambing.ui.edu etch/main libx11dev 2:1.0.37 [1269kB]Get:10 http://kambing.ui.edu etch/main linuxkernelheaders 2.6.187 [1875kB]Get:11 http://kambing.ui.edu etch/main libc6dev 2.3.6.ds113 [2716kB]Get:12 http://kambing.ui.edu etch/main libstdc++64.1dev 4.1.121 [1634kB]
Halaman 3 dari 22 halaman
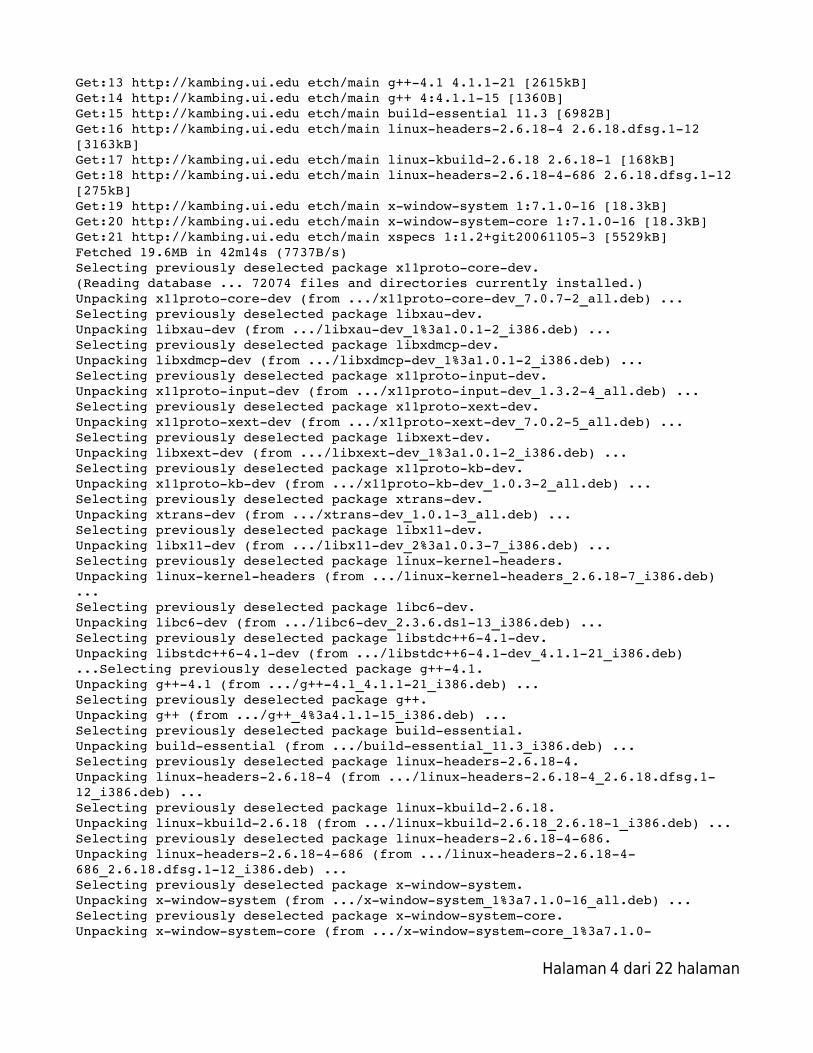
Get:13 http://kambing.ui.edu etch/main g++4.1 4.1.121 [2615kB]Get:14 http://kambing.ui.edu etch/main g++ 4:4.1.115 [1360B]Get:15 http://kambing.ui.edu etch/main buildessential 11.3 [6982B]Get:16 http://kambing.ui.edu etch/main linuxheaders2.6.184 2.6.18.dfsg.112 [3163kB]Get:17 http://kambing.ui.edu etch/main linuxkbuild2.6.18 2.6.181 [168kB]Get:18 http://kambing.ui.edu etch/main linuxheaders2.6.184686 2.6.18.dfsg.112 [275kB]Get:19 http://kambing.ui.edu etch/main xwindowsystem 1:7.1.016 [18.3kB]Get:20 http://kambing.ui.edu etch/main xwindowsystemcore 1:7.1.016 [18.3kB]Get:21 http://kambing.ui.edu etch/main xspecs 1:1.2+git200611053 [5529kB]Fetched 19.6MB in 42m14s (7737B/s)Selecting previously deselected package x11protocoredev.(Reading database ... 72074 files and directories currently installed.)Unpacking x11protocoredev (from .../x11protocoredev_7.0.72_all.deb) ...Selecting previously deselected package libxaudev.Unpacking libxaudev (from .../libxaudev_1%3a1.0.12_i386.deb) ...Selecting previously deselected package libxdmcpdev.Unpacking libxdmcpdev (from .../libxdmcpdev_1%3a1.0.12_i386.deb) ...Selecting previously deselected package x11protoinputdev.Unpacking x11protoinputdev (from .../x11protoinputdev_1.3.24_all.deb) ...Selecting previously deselected package x11protoxextdev.Unpacking x11protoxextdev (from .../x11protoxextdev_7.0.25_all.deb) ...Selecting previously deselected package libxextdev.Unpacking libxextdev (from .../libxextdev_1%3a1.0.12_i386.deb) ...Selecting previously deselected package x11protokbdev.Unpacking x11protokbdev (from .../x11protokbdev_1.0.32_all.deb) ...Selecting previously deselected package xtransdev.Unpacking xtransdev (from .../xtransdev_1.0.13_all.deb) ...Selecting previously deselected package libx11dev.Unpacking libx11dev (from .../libx11dev_2%3a1.0.37_i386.deb) ...Selecting previously deselected package linuxkernelheaders.Unpacking linuxkernelheaders (from .../linuxkernelheaders_2.6.187_i386.deb) ...Selecting previously deselected package libc6dev.Unpacking libc6dev (from .../libc6dev_2.3.6.ds113_i386.deb) ...Selecting previously deselected package libstdc++64.1dev.Unpacking libstdc++64.1dev (from .../libstdc++64.1dev_4.1.121_i386.deb) ...Selecting previously deselected package g++4.1.Unpacking g++4.1 (from .../g++4.1_4.1.121_i386.deb) ...Selecting previously deselected package g++.Unpacking g++ (from .../g++_4%3a4.1.115_i386.deb) ...Selecting previously deselected package buildessential.Unpacking buildessential (from .../buildessential_11.3_i386.deb) ...Selecting previously deselected package linuxheaders2.6.184.Unpacking linuxheaders2.6.184 (from .../linuxheaders2.6.184_2.6.18.dfsg.112_i386.deb) ...Selecting previously deselected package linuxkbuild2.6.18.Unpacking linuxkbuild2.6.18 (from .../linuxkbuild2.6.18_2.6.181_i386.deb) ...Selecting previously deselected package linuxheaders2.6.184686.Unpacking linuxheaders2.6.184686 (from .../linuxheaders2.6.184686_2.6.18.dfsg.112_i386.deb) ...Selecting previously deselected package xwindowsystem.Unpacking xwindowsystem (from .../xwindowsystem_1%3a7.1.016_all.deb) ...Selecting previously deselected package xwindowsystemcore.Unpacking xwindowsystemcore (from .../xwindowsystemcore_1%3a7.1.0
Halaman 4 dari 22 halaman
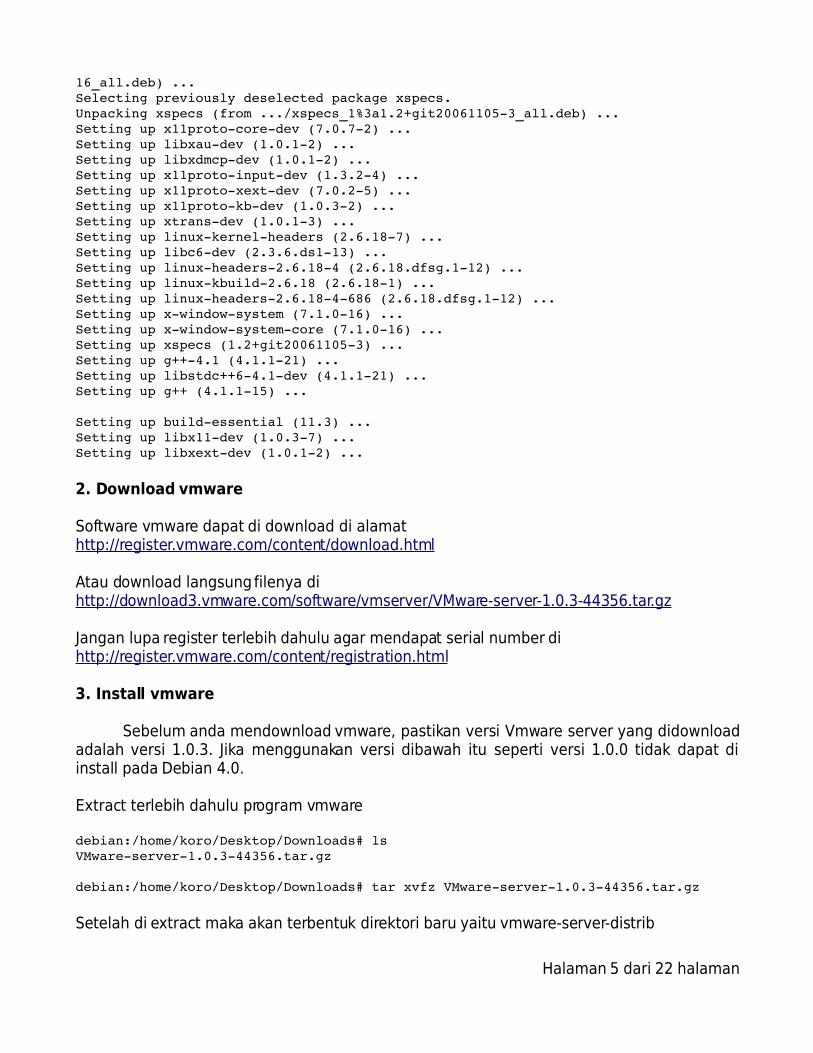
16_all.deb) ...Selecting previously deselected package xspecs.Unpacking xspecs (from .../xspecs_1%3a1.2+git200611053_all.deb) ...Setting up x11protocoredev (7.0.72) ...Setting up libxaudev (1.0.12) ...Setting up libxdmcpdev (1.0.12) ...Setting up x11protoinputdev (1.3.24) ...Setting up x11protoxextdev (7.0.25) ...Setting up x11protokbdev (1.0.32) ...Setting up xtransdev (1.0.13) ...Setting up linuxkernelheaders (2.6.187) ...Setting up libc6dev (2.3.6.ds113) ...Setting up linuxheaders2.6.184 (2.6.18.dfsg.112) ...Setting up linuxkbuild2.6.18 (2.6.181) ...Setting up linuxheaders2.6.184686 (2.6.18.dfsg.112) ...Setting up xwindowsystem (7.1.016) ...Setting up xwindowsystemcore (7.1.016) ...Setting up xspecs (1.2+git200611053) ...Setting up g++4.1 (4.1.121) ...Setting up libstdc++64.1dev (4.1.121) ...Setting up g++ (4.1.115) ...
Setting up buildessential (11.3) ...Setting up libx11dev (1.0.37) ...Setting up libxextdev (1.0.12) ...
2. Download vmware
Software vmware dapat di download di alamat http://register.vmware.com/content/download.html
Atau download langsung filenya di http://download3.vmware.com/software/vmserver/VMware-server-1.0.3-44356.tar.gz
Jangan lupa register terlebih dahulu agar mendapat serial number di http://register.vmware.com/content/registration.html
3. Install vmware
Sebelum anda mendownload vmware, pastikan versi Vmware server yang didownload adalah versi 1.0.3. Jika menggunakan versi dibawah itu seperti versi 1.0.0 tidak dapat di install pada Debian 4.0.
Extract terlebih dahulu program vmware
debian:/home/koro/Desktop/Downloads# lsVMwareserver1.0.344356.tar.gz
debian:/home/koro/Desktop/Downloads# tar xvfz VMwareserver1.0.344356.tar.gz
Setelah di extract maka akan terbentuk direktori baru yaitu vmware-server-distrib
Halaman 5 dari 22 halaman

debian:/home/koro/Desktop/Downloads# ls ltotal 104220rwrr 1 koro koro 106604355 20070810 18:24 VMwareserver1.0.344356.tar.gzdrwxrxrx 10 root root 4096 20070413 10:24 vmwareserverdistrib
Lalu masuklah ke direktori tersebut
debian:/home/koro/Desktop/Downloads# cd vmwareserverdistrib/debian:/home/koro/Desktop/Downloads/vmwareserverdistrib# ls ltotal 368drwxrxrx 2 root root 4096 20070413 10:24 bindrwxrxrx 2 root root 4096 20070413 10:24 docdrwxrxrx 3 root root 4096 20070413 10:24 etcrrr 1 root root 339962 20070413 10:24 FILESdrwxrxrx 2 root root 4096 20070413 10:24 installerdrwxrxrx 17 root root 4096 20070413 10:24 libdrwxrxrx 3 root root 4096 20070413 10:24 mandrwxrxrx 2 root root 4096 20070413 10:24 sbinlrwxrwxrwx 1 root root 23 20070813 08:15 vmwareinstall.pl > bin/vmwareuninstall.pldrwxrxrx 5 root root 4096 20070413 10:24 vmwarevix
Kemudian jalankan vmware-install.plAkan tetapi pastikan perl telah terinstall. Secara default installation perl akan terinstall.
debian:/home/koro/Desktop/Downloads/vmwareserverdistrib# ./vmwareinstall.plA previous installation of VMware software has been detected.
The previous installation was made by the tar installer (version 3).
Keeping the tar3 installer database format.
Uninstalling the tar installation of VMware Server.
Stopping VMware services: Virtual machine monitor done
The removal of VMware Server 1.0.0 build28343 for Linux completedsuccessfully. Thank you for having tried this software.
Installing the content of the package.
In which directory do you want to install the binary files?[/usr/bin]
What is the directory that contains the init directories (rc0.d/ to rc6.d/)?[/etc]
What is the directory that contains the init scripts?[/etc/init.d]
In which directory do you want to install the daemon files?
Halaman 6 dari 22 halaman
[/usr/sbin]
In which directory do you want to install the library files?[/usr/lib/vmware]
The path "/usr/lib/vmware" does not exist currently. This program is going tocreate it, including needed parent directories. Is this what you want?[yes]
In which directory do you want to install the manual files?[/usr/share/man]
In which directory do you want to install the documentation files?[/usr/share/doc/vmware]
The path "/usr/share/doc/vmware" does not exist currently. This program isgoing to create it, including needed parent directories. Is this what you want?[yes]
The installation of VMware Server 1.0.3 build44356 for Linux completedsuccessfully. You can decide to remove this software from your system at anytime by invoking the following command: "/usr/bin/vmwareuninstall.pl".
Before running VMware Server for the first time, you need to configure it byinvoking the following command: "/usr/bin/vmwareconfig.pl". Do you want thisprogram to invoke the command for you now? [yes]
Making sure services for VMware Server are stopped.
Stopping VMware services: Virtual machine monitor done
You must read and accept the End User License Agreement to continue.Press enter to display it.
VMWARE MASTER END USER LICENSE AGREEMENT
NOTICE: BY DOWNLOADING AND INSTALLING,COPYING OR OTHERWISE USING THE SOFTWARE, YOUAGREE TO BE BOUND BY THE TERMS OF THIS EULA.IF YOU DO NOT AGREE TO THE TERMS OF THIS EULA,YOU MAY NOT DOWNLOAD, INSTALL, COPY OR USE THESOFTWARE, AND YOU MAY RETURN THE UNUSEDSOFTWARE TO THE VENDOR FROM WHICH YOU ACQUIREDIT WITHIN THIRTY (30) DAYS AND REQUEST AREFUND OF THE LICENSE FEE, IF ANY, ALREADYPAID UPON SHOWING PROOF OF PAYMENT.
1. DEFINITIONS
1.1 "Designated Administrative Access" meansthat access to the standard userinterfaces of a given instance of theSoftware (designated in this section) thatyou may grant to a designated third partyfor which you have provided advance
Halaman 7 dari 22 halaman
written notice to VMware that you areproviding outsourced services and forwhose dedicated benefit you have licensed
Do you accept? (yes/no) yes
Thank you.
Configuring fallback GTK+ 2.4 libraries.
In which directory do you want to install the mime type icons?[/usr/share/icons]
What directory contains your desktop menu entry files? These files have a.desktop file extension. [/usr/share/applications]
In which directory do you want to install the application's icon?[/usr/share/pixmaps]
/usr/share/applications/vmwareserver.desktop: error: Categories values must be one of "Core", "Development", "Building", "Debugger", "IDE", "GUIDesigner", "Profiling", "RevisionControl", "Translation", "Office", "Calendar", "ContactManagement", "Database", "Dictionary", "Chart", "Email", "Finance", "FlowChart", "PDA", "ProjectManagement", "Presentation", "Spreadsheet", "WordProcessor", "Graphics", "2DGraphics", "VectorGraphics", "RasterGraphics", "3DGraphics", "Scanning", "OCR", "Photography", "Viewer", "Settings", "DesktopSettings", "HardwareSettings", "PackageManager", "Network", "Dialup", "InstantMessaging", "IRCClient", "FileTransfer", "HamRadio", "News", "P2P", "RemoteAccess", "Telephony", "WebBrowser", "WebDevelopment", "AudioVideo", "Audio", "Midi", "Mixer", "Sequencer", "Tuner", "Video", "TV", "AudioVideoEditing", "Player", "Recorder", "DiscBurning", "Game", "ActionGame", "AdventureGame", "ArcadeGame", "BoardGame", "BlocksGame", "CardGame", "KidsGame", "LogicGame", "RolePlaying", "Simulation", "SportsGame", "StrategyGame", "Education", "Art", "Construction", "Music", "Languages", "Science", "Astronomy", "Biology", "Chemistry", "Geology", "Math", "MedicalSoftware", "Physics", "Teaching", "Amusement", "Applet", "Archiving", "Electronics", "Emulator", "Engineering", "FileManager", "Shell", "ScreenSaver", "TeminalEmulator", "TrayIcon", "System", "Filesystem", "Monitor", "Security", "Utility", "Accessibility", "Calculator", "Clock", "TextEditor", "KDE", "GNOME", "GTK", "Qt", "Motif", "Java", "ConsoleOnly" (found "Application")desktopfileinstall created an invalid desktop file!Unable to install the .desktop menu entry file. You must add it to your menusby hand./usr/share/applications/vmwareconsoleurihandler.desktop: error: Categories values must be one of "Core", "Development", "Building", "Debugger", "IDE", "GUIDesigner", "Profiling", "RevisionControl", "Translation", "Office", "Calendar", "ContactManagement", "Database", "Dictionary", "Chart", "Email", "Finance", "FlowChart", "PDA", "ProjectManagement", "Presentation", "Spreadsheet", "WordProcessor", "Graphics", "2DGraphics", "VectorGraphics", "RasterGraphics", "3DGraphics", "Scanning", "OCR", "Photography", "Viewer", "Settings", "DesktopSettings", "HardwareSettings", "PackageManager", "Network", "Dialup", "InstantMessaging", "IRCClient", "FileTransfer", "HamRadio", "News", "P2P", "RemoteAccess", "Telephony", "WebBrowser", "WebDevelopment", "AudioVideo", "Audio", "Midi", "Mixer", "Sequencer", "Tuner", "Video", "TV", "AudioVideoEditing", "Player", "Recorder", "DiscBurning", "Game", "ActionGame", "AdventureGame", "ArcadeGame", "BoardGame", "BlocksGame", "CardGame", "KidsGame",
Halaman 8 dari 22 halaman
"LogicGame", "RolePlaying", "Simulation", "SportsGame", "StrategyGame", "Education", "Art", "Construction", "Music", "Languages", "Science", "Astronomy", "Biology", "Chemistry", "Geology", "Math", "MedicalSoftware", "Physics", "Teaching", "Amusement", "Applet", "Archiving", "Electronics", "Emulator", "Engineering", "FileManager", "Shell", "ScreenSaver", "TeminalEmulator", "TrayIcon", "System", "Filesystem", "Monitor", "Security", "Utility", "Accessibility", "Calculator", "Clock", "TextEditor", "KDE", "GNOME", "GTK", "Qt", "Motif", "Java", "ConsoleOnly" (found "Application")desktopfileinstall created an invalid desktop file!Unable to install the .desktop menu entry file. You must add it to your menusby hand.Trying to find a suitable vmmon module for your running kernel.
None of the prebuilt vmmon modules for VMware Server is suitable for yourrunning kernel. Do you want this program to try to build the vmmon module foryour system (you need to have a C compiler installed on your system)? [yes]
Using compiler "/usr/bin/gcc". Use environment variable CC to override.
What is the location of the directory of C header files that match your runningkernel? [/lib/modules/2.6.184686/build/include]
Extracting the sources of the vmmon module.
Building the vmmon module.
Using 2.6.x kernel build system.make: Entering directory `/tmp/vmwareconfig0/vmmononly'make C /lib/modules/2.6.184686/build/include/.. SUBDIRS=$PWD SRCROOT=$PWD/. modulesmake[1]: Entering directory `/usr/src/linuxheaders2.6.184686' CC [M] /tmp/vmwareconfig0/vmmononly/linux/driver.o CC [M] /tmp/vmwareconfig0/vmmononly/linux/hostif.o CC [M] /tmp/vmwareconfig0/vmmononly/common/cpuid.o CC [M] /tmp/vmwareconfig0/vmmononly/common/hash.o CC [M] /tmp/vmwareconfig0/vmmononly/common/memtrack.o CC [M] /tmp/vmwareconfig0/vmmononly/common/phystrack.o CC [M] /tmp/vmwareconfig0/vmmononly/common/task.o CC [M] /tmp/vmwareconfig0/vmmononly/common/vmx86.o CC [M] /tmp/vmwareconfig0/vmmononly/vmcore/moduleloop.o LD [M] /tmp/vmwareconfig0/vmmononly/vmmon.o Building modules, stage 2. MODPOST CC /tmp/vmwareconfig0/vmmononly/vmmon.mod.o LD [M] /tmp/vmwareconfig0/vmmononly/vmmon.komake[1]: Leaving directory `/usr/src/linuxheaders2.6.184686'cp f vmmon.ko ./../vmmon.omake: Leaving directory `/tmp/vmwareconfig0/vmmononly'The module loads perfectly in the running kernel.
Do you want networking for your virtual machines? (yes/no/help) [yes]
Configuring a bridged network for vmnet0.
The following bridged networks have been defined:
Halaman 9 dari 22 halaman

. vmnet0 is bridged to eth0
All your ethernet interfaces are already bridged.
Do you want to be able to use NAT networking in your virtual machines? (yes/no)[yes]
Configuring a NAT network for vmnet8.
Do you want this program to probe for an unused private subnet? (yes/no/help)[yes]
Probing for an unused private subnet (this can take some time)...
The subnet 192.168.207.0/255.255.255.0 appears to be unused.
The following NAT networks have been defined:
. vmnet8 is a NAT network on private subnet 192.168.207.0.
Do you wish to configure another NAT network? (yes/no) [no]
Do you want to be able to use hostonly networking in your virtual machines?[yes]
Configuring a hostonly network for vmnet1.
Do you want this program to probe for an unused private subnet? (yes/no/help)[yes]
Probing for an unused private subnet (this can take some time)...
The subnet 192.168.8.0/255.255.255.0 appears to be unused.
The following hostonly networks have been defined:
. vmnet1 is a hostonly network on private subnet 192.168.8.0.
Do you wish to configure another hostonly network? (yes/no) [no]
Extracting the sources of the vmnet module.
Building the vmnet module.
Using 2.6.x kernel build system.make: Entering directory `/tmp/vmwareconfig0/vmnetonly'make C /lib/modules/2.6.184686/build/include/.. SUBDIRS=$PWD SRCROOT=$PWD/. modulesmake[1]: Entering directory `/usr/src/linuxheaders2.6.184686' CC [M] /tmp/vmwareconfig0/vmnetonly/driver.o CC [M] /tmp/vmwareconfig0/vmnetonly/hub.o CC [M] /tmp/vmwareconfig0/vmnetonly/userif.o CC [M] /tmp/vmwareconfig0/vmnetonly/netif.o CC [M] /tmp/vmwareconfig0/vmnetonly/bridge.o CC [M] /tmp/vmwareconfig0/vmnetonly/procfs.o
Halaman 10 dari 22 halaman
CC [M] /tmp/vmwareconfig0/vmnetonly/smac_compat.o SHIPPED /tmp/vmwareconfig0/vmnetonly/smac_linux.x386.o LD [M] /tmp/vmwareconfig0/vmnetonly/vmnet.o Building modules, stage 2. MODPOST CC /tmp/vmwareconfig0/vmnetonly/vmnet.mod.o LD [M] /tmp/vmwareconfig0/vmnetonly/vmnet.komake[1]: Leaving directory `/usr/src/linuxheaders2.6.184686'cp f vmnet.ko ./../vmnet.omake: Leaving directory `/tmp/vmwareconfig0/vmnetonly'The module loads perfectly in the running kernel.
Please specify a port for remote console connections to use [902]
Configuring the VMware VmPerl Scripting API.
Building the VMware VmPerl Scripting API.
Using compiler "/usr/bin/gcc". Use environment variable CC to override.
Installing the VMware VmPerl Scripting API.
The installation of the VMware VmPerl Scripting API succeeded.
Generating SSL Server Certificate
In which directory do you want to keep your virtual machine files?[/var/lib/vmware/Virtual Machines]
The path "/var/lib/vmware/Virtual Machines" does not exist currently. Thisprogram is going to create it, including needed parent directories. Is thiswhat you want? [yes]
Please enter your 20character serial number.
Type XXXXXXXXXXXXXXXXXXXX or 'Enter' to cancel: 9AW0DY2U492C53H413H9
Starting VMware services: Virtual machine monitor done Virtual ethernet done Bridged networking on /dev/vmnet0 done Hostonly networking on /dev/vmnet1 (background) done Hostonly networking on /dev/vmnet8 (background) done NAT service on /dev/vmnet8 done
The configuration of VMware Server 1.0.3 build44356 for Linux for this runningkernel completed successfully.
4. Menjalankan vmware
Berikut langkah-langkah menjalan vmware. Klik icon Vmware dari: Menu -> Applications -> System Tools -> Vmware Server Console. Pada tutorial dibuat contoh membuat virtual machine Sistem Operasi Ubuntu 7.04.
Halaman 11 dari 22 halaman

Gambar 1.a: Tampilan menjalankan Vmware server console
Halaman 12 dari 22 halaman

Gambar 1.b: Tampilan awal vmware server console
Default instalasi vmware server pada gambar 1 diatas akan memilihkan kita untuk membuat koneksi ke localhost. Sebenarnya ada pilihan lain yaitu remote host. Pilihan kedua ini digunakan apabila anda ingin terhubung pada vmware server pada komputer lain.
Halaman 13 dari 22 halaman

Gambar 2: Tampilan setelah berhasil login
Halaman 14 dari 22 halaman
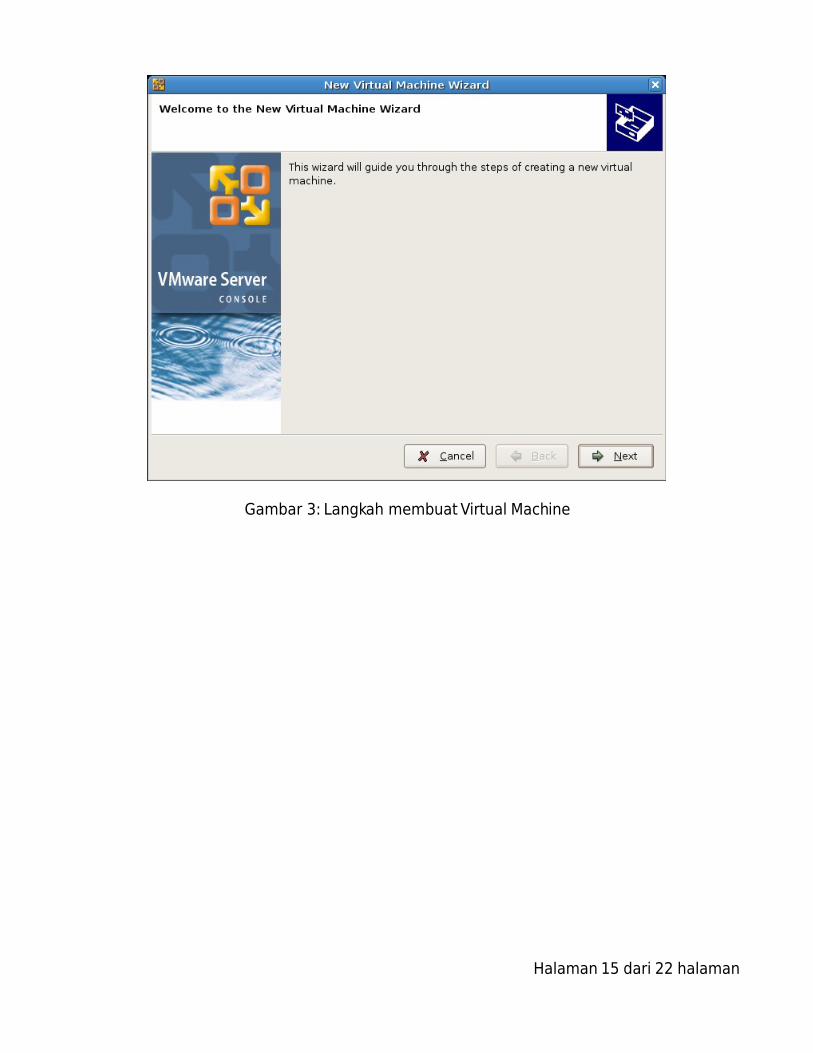
Gambar 3: Langkah membuat Virtual Machine
Halaman 15 dari 22 halaman

Gambar 4: Memlih konfigurasi Virtual Machine
Halaman 16 dari 22 halaman

Gambar 5: Memilih sistem operasi tamu
Halaman 17 dari 22 halaman
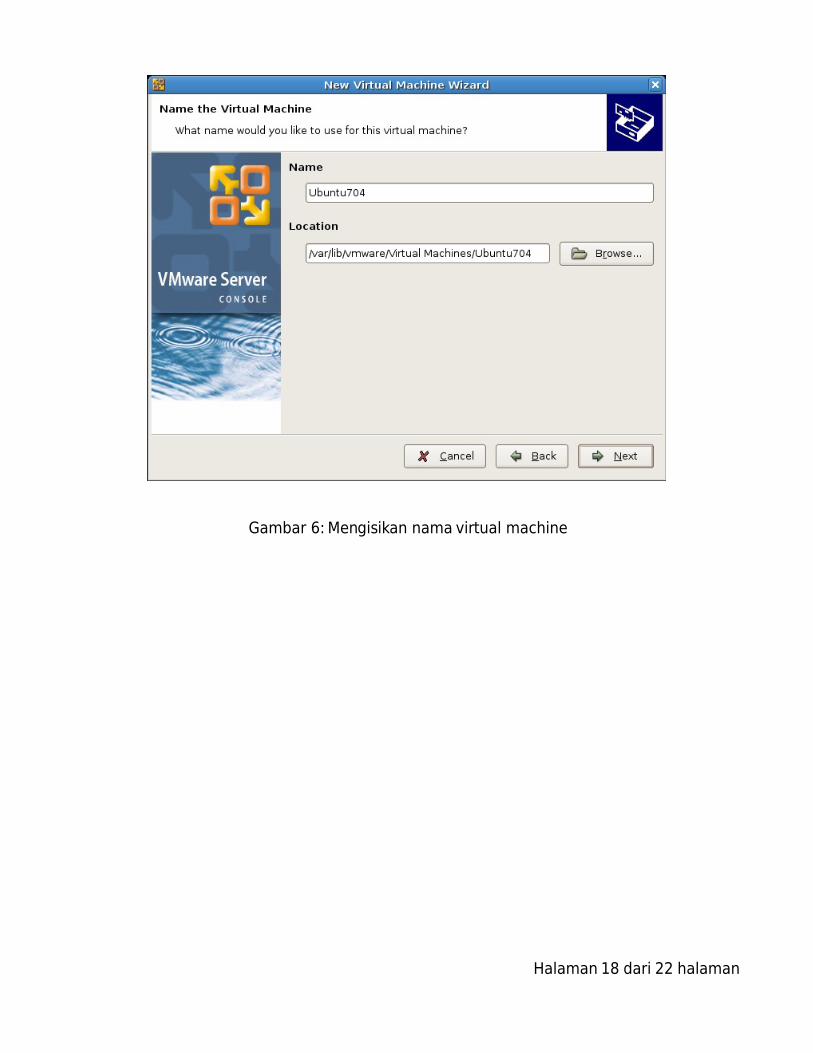
Gambar 6: Mengisikan nama virtual machine
Halaman 18 dari 22 halaman

Gambar 7: Memilih tipe jaringan
Halaman 19 dari 22 halaman

Gambar 8: menentukan ukuran harddisk
Halaman 20 dari 22 halaman
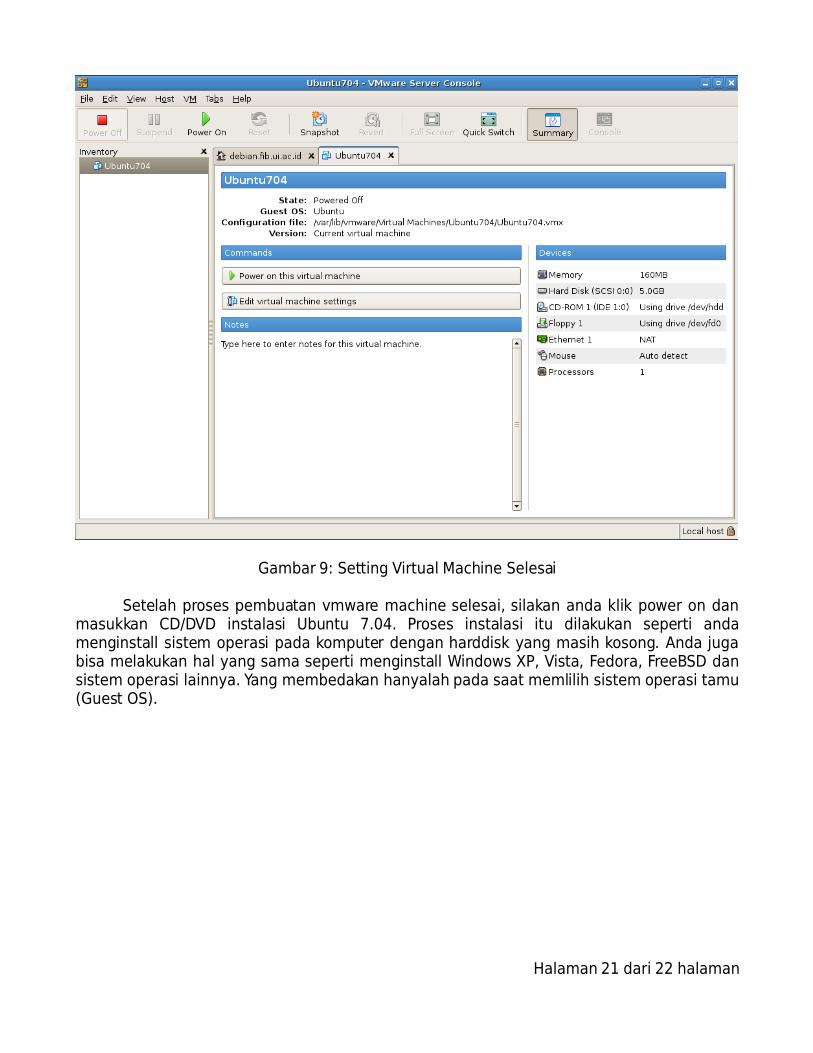
Gambar 9: Setting Virtual Machine Selesai
Setelah proses pembuatan vmware machine selesai, silakan anda klik power on dan masukkan CD/DVD instalasi Ubuntu 7.04. Proses instalasi itu dilakukan seperti anda menginstall sistem operasi pada komputer dengan harddisk yang masih kosong. Anda juga bisa melakukan hal yang sama seperti menginstall Windows XP, Vista, Fedora, FreeBSD dan sistem operasi lainnya. Yang membedakan hanyalah pada saat memlilih sistem operasi tamu (Guest OS).
Halaman 21 dari 22 halaman
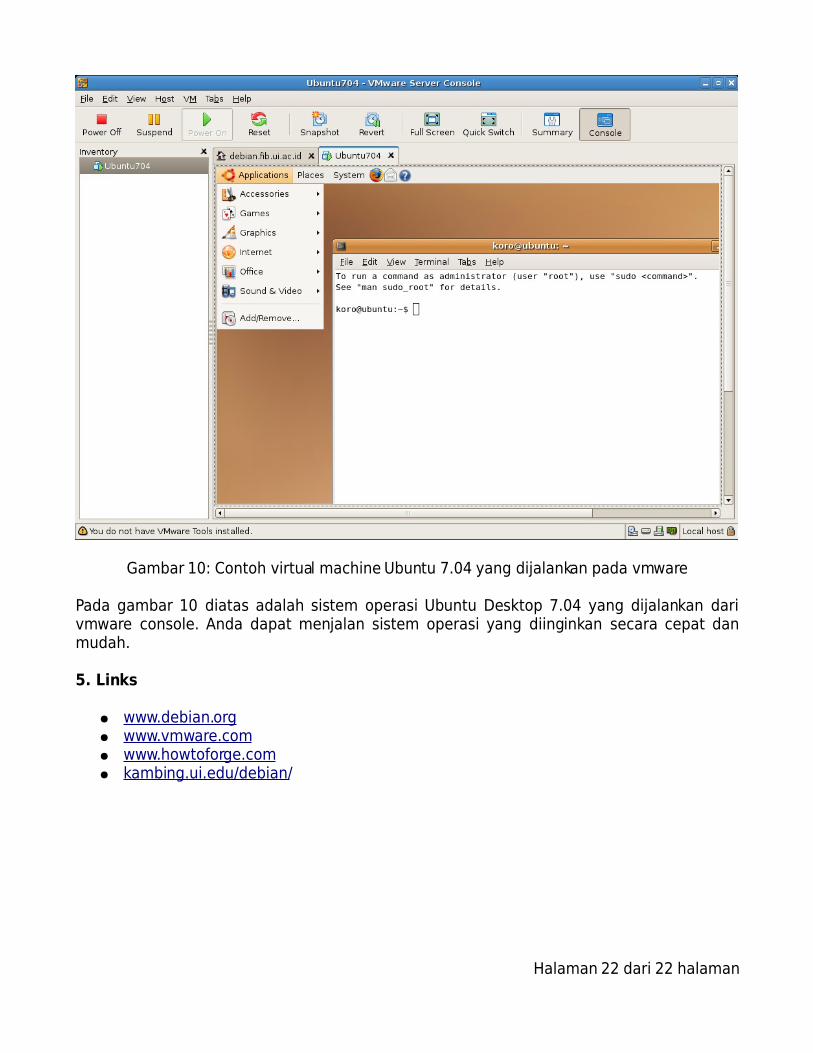
Gambar 10: Contoh virtual machine Ubuntu 7.04 yang dijalankan pada vmware
Pada gambar 10 diatas adalah sistem operasi Ubuntu Desktop 7.04 yang dijalankan dari vmware console. Anda dapat menjalan sistem operasi yang diinginkan secara cepat dan mudah.
5. Links
● www.debian.org ● www.vmware.com ● www.howtoforge.com ● kambing.ui.edu/debian/
Halaman 22 dari 22 halaman