Embed Size (px)
Citation preview

M a n u a l de Usuario

MOTOCICLETA MODELO:
FORZA 150MANUAL DE USUARIO Y MANTENIMIENTO
PARA LA MOTOCICLETA

MANUAL DEL USUARIO • FORZA 150
Aviso Importante
Información para nuevos conductores de motocicleta.Los primeros 1000 km son los más importantes para una motocicleta, ya que tienen un impacto significativo en el resto de su vida útil. Si la motocicleta se ajusta apropiadamente durante estos primeros kilómetros se puede garantizar una larga vida útil y un adecuado funcionamiento. Hacer correctamente el rodaje de una motocicleta puede hacer que la superficie parezca ser pulida y que combine a la perfección con el acabado. Manejar cuidadosamente garantiza buena maniobrabilidad y óptimo rendimiento de la motocicleta. Es de vital importancia que las partes de la motocicleta no se sobrecalienten.Para conocer el correcto método de rodaje con mayor detalle refiérase a la sección <¿Cómo hacer el rodaje de una nueva motocicleta correctamente?>Por favor lea el manual cuidadosamente y acate estrictamente las reglas e instrucciones ahí establecidas.Preste especial atención a las señales de “advertencia”, “precaución” y “aviso”, entre otras indicaciones; estas secciones tienen un significado especial y deben leerse con cuidado. Advertencia… hace referencia a indicaciones de seguridad que el conductor debe de seguir; ignorar esta información incrementa la posibilidad de sufrir un accidente.Precaución… acate las instrucciones aquí establecidas y tome las medidas necesarias para evitar dañar el vehículo.Aviso… El propósito de este manual es facilitar el mantenimiento y esclarecer las instrucciones que requieren de una explicación especial. Este manual es parte esencial de su motocicleta y debe permanecer con ella en todo momento, especialmente en caso de re-venta o traspaso de propietario

Prefacio
¡Gracias por preferir una de nuestras motocicletas! Utilizamos la tecnología y equipo de producción más avanzado para el diseño, el desarrollo y la producción de motocicletas. Esto nos permite garantizar un rendimiento verdaderamente confiable, y un acabado elegante, lujoso y a la moda. Conducir una motocicleta es una de los deportes más emocionantes; la motocicleta es el vehículo perfecto, es capaz de hacerlo disfrutar la interminable diversión de manejar. Antes de intentar conducir su motocicleta, por favor familiarícese con las reglas y requisitos que aparecen en este manual. Este manual abarca temas de correcta utilización, reparación y mantenimiento. Por favor apéguese a las indicaciones del manual, estas garantizarán que su motocicleta funcione normalmente por un período prolongado. En los puntos de venta autorizados y en los centros de servicio encontrará técnicos altamente capacitados que pueden asistirle en temas de mantenimiento.

MANUAL DEL USUARIO • FORZA 150
Contenido
CAPÍTULO 1. Instrucciones para el usuario 6
Posición de números de serie 7
CAPÍTULO 2. Ubicación de componentes 8
CAPÍTULO 3. Partes 10
CAPÍTULO 4: Instrucciones sobre el combustible y aceite del motor 23
CAPÍTULO 5: ¿Cómo hacer correctamente el rodaje de una motocicleta nueva? 25
CAPÍTULO 6. Revise antes de conducir 27
CAPÍTULO 7. Consejos para conducir 28
CAPÍTULO 8: Inspección y mantenimiento 32
CAPÍTULO 9: Medidas para reducir la contaminación 58
CAPÍTULO 10. Detección y resolución de problemas 58
CAPÍTULO 11. Guía de almacenamiento 61
CAPITULO 12: Lista de parámetros 64

6
CAPÍTULO 1. Instrucciones para el usuario
Guía para conducir su motocicleta con seguridad
Existe una condición para que las motocicletas funcionen apropiadamente. La condición es siempre prestar atención a la seguridad vial. Por favor siga las leyes de tránsito y las siguientes 6 consideraciones:
Utilice el casco de seguridadLa seguridad vial empieza con el uso del casco. El casco de seguridad es uno de los elementos más importantes de conducir una motocicleta, ya que es la primera barrera de protección contra accidentes de tránsito. Las lesiones en la cabeza son unos de los accidentes más graves, por lo tanto, asegúrese de siempre utilizar el casco y las gafas de protección.
Familiarícese con su motocicletaLas habilidades de conducir y el conocimiento mecánico son parte fundamental de la seguridad vial. Le recomendamos practicar en un espacio abierto para familiarizarse con su motocicleta y su operación. Recuerde, la práctica hace al maestro.
Conozca su límite de velocidadLa velocidad apta para conducir depende de la superficie, de las habilidades del conductor, y de las condiciones del clima. Conozca su propio límite y evite los accidentes. Conducir dentro de sus límites puede evitar un accidente.
Vestimenta adecuadaConducir con vestimenta holgada o a la moda no es ni seguro ni cómodo. Sentarse en el asiento para motocicleta, con la vestimenta adecuada, le hará sentirse libre. Los guantes, las botas, y el casco demostrarán claramente que usted es el conductor licenciado. Intente utilizar vestimenta ajustada de alta calidad.

MANUAL DEL USUARIO • FORZA 150
7
Preste mayor atención al conducir en condiciones lluviosasPor favor preste más atención al conducir en condiciones lluviosas. Recuerde que la distancia de frenado en condiciones lluviosas puede llegar a ser hasta el doble que en condiciones normales. Evite conducir sobre hoyos, pintura o aceite para evitar derrapar; el agua en la calle es peligrosa y puede causar accidentes. Evite doblar al acelerar. Preste especial atención al transitar sobre líneas de tren y sobre puentes, entre otros, y recuerde mantener una distancia apropiada entre la motocicleta y los otros vehículos.
Inspeccione el vehículo antes de conducirPor favor lea la sección <Revisar antes de conducir> cuidadosamente. Seguir las leyes de tránsito puede garantizar la seguridad del conductor y el pasajero
Posición de números de serieNúmero de chasis (VIN) Número de serie del motor
Ubicación de la placa metálica
8
Usted necesitará conocer el número de chasis (o número de identificación vehicular) y el número de serie del motor para registrar su vehículo. Este número puede ser especialmente útil al ordenar repuestos o al llevar el vehículo a un centro de servicio; el número ayudará a que el agente de servicio le asista mejor.El número de chasis (o número de identificación del vehículo) está grabado por láser sobre la carrocería. El número de serie del motor está grabado sobre el lado izquierdo del cárter. La placa metálica de identificación está montada sobre el chasis; ésta incluye los parámetros técnicos y la información del fabricante. Por favor anote este número en el espacio que aparece a continuación:
Número de Chasis:
Número de Serie del Motor:
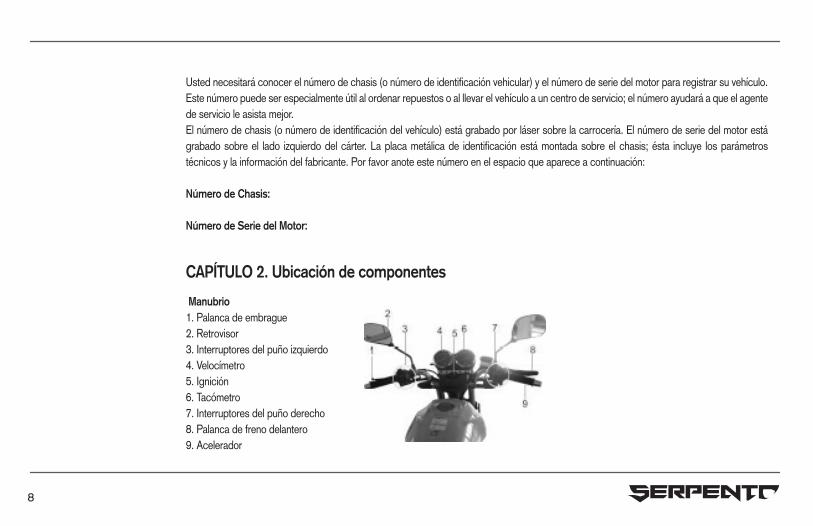
CAPÍTULO 2. Ubicación de componentes
Manubrio1. Palanca de embrague2. Retrovisor3. Interruptores del puño izquierdo4. Velocímetro5. Ignición6. Tacómetro7. Interruptores del puño derecho8. Palanca de freno delantero9. Acelerador

MANUAL DEL USUARIO • FORZA 150
9
Vista Izquierda1. Válvula de combustible2. Carburador3. Filtro de aire4. Gancho para el casco5. Neumático delantero6. Palanca de cambio7. Soporte central8. Soporte lateral9. Neumático trasero10. Espacio de carga Vista Derecha1. Batería y fusibles2. Bujías3. Paspiés trasero4. Paspiés delantero5. Pedal de freno trasero6. Tornillo de descarga de aceite7. Pedal de arranque

10
CAPÍTULO 3. Partes
Llave
La motocicleta viene con dos llaves. Una de las llaves es de repuesto; guárdela con cuidado.
Panel de instrumentos
Perilla de reinicio (1): Gírela en dirección contraria a las manecillas del reloj para reiniciar el kilometraje del odómetro de viajes y colocarlo en cero.Velocímetro (2): Mide la velocidad en kilómetros por horaOdómetro (3): Indica el kilometraje que ha recorrido la motocicleta desde que se comenzó a utilizar.Indicador de señal de giro (4): Se enciende un indicador en el panel “ ” y una luz intermitente cuando se activa la señal izquierda de

MANUAL DEL USUARIO • FORZA 150
11
cambio. Se enciende un indicador en el panel “ ” y una luz intermitente cuando se activa la señal derecha de cambio. Precaución: Si una de las luces de señal de cambio está dañada, los indicadores en el panel de instrumentos y las luces intermitentes pueden ser más lentas o más rápidas. Identifique la causa y arréglela.Indicador de marchas (5): Indica la marcha actual en que se encuentra la motocicleta. Hay 5 marchas. Los indicadores de los 5 números se encenderán cuando se cambie de marcha y cuando la motocicleta se encuentre en neutro, esos números se apagarán y se encenderá el indicador N de neutro.Indicador de luces altas (6): Se enciende una luz cuando se activan las luces altasTacómetro (7): Indica las velocidades en revoluciones por minutosMedidor de viaje (8): El medidor de viaje es un tipo de odómetro que se puede reiniciar. Está instalado en el odómetro. Se utiliza principalmente para medir distancias cortas o para calcular el consumo de combustible. Luz indicadora de marcha neutra (9): Se enciende una luz cuando la marcha está en neutro. Cuando otra marcha está activa, el indicador se apaga.
Interruptor de ignición
FIG1 FIG2
Como se muestra en las figuras anteriores, hay dos tipos de interruptores para los diferentes modelos, que pueden estar en tres posiciones:Posición OFF (apagado): En esta posición el circuito eléctrico está desconectado y se puede retirar la llave de la ignición. Posición ON (encendido): En esta posición el circuito eléctrico está encendido y no se puede retirar la llave de la ignición.
H
P
US
I
II
GNT
ON

12
Posición PARKING (estacionada): Para estacionar la motocicleta, gire la llave a la posición . En esta posición, la llave puede ser sacada y las luces de estacionamiento y luces frontales estarán encendidas para que pueda estacionar la motocicleta en la noche.Precaución: Antes de girar la llave a la posición , estacione el vehículo con su soporte lateral o central en una posición firme.Posición (FIG2): Para poder bloquear el manubrio, gire la barra hacia la izquierda, luego inserte la llave. Gire la llave en dirección a las manecillas del reloj para bloquear por completo el manubrio. Precaución: Si el manubrio está bloqueado, la motocicleta no se puede empujar; de lo contrario, perderá el balance.
Bloqueo del manubrio:
Si el interruptor de ignición es el tipo de la FIG1, la posición de bloque se muestra a continuación. Para bloquear el manubrio, gírelo hacia la izquierda, inserte la llave y gírelo en sentido de las manecillas del reloj. Precaución: Nunca mueva la motocicleta con el manubrio bloqueada, ya que podría perder balance.

MANUAL DEL USUARIO • FORZA 150
13
Puño izquierdo
Puño del embrague (1): Apriete la palanca del embrague cuando arranque el motor o al cambiar de marcha; esto interrumpe la transmisión de manera voluntaria y permite al conductor controlar el sistema de transmisión. Interruptor luz alta/baja (2): Deslice el interruptor a la posición de luz alta” ” para encender el foco de la luz alta; deslice el interruptor a la posición de luz baja “ ”para encender el foco de la luz baja.Interruptor de señal de giro: Se enciende un indicador en el panel “← ” y una luz intermitente cuando se activa la señal izquierda de cambio. Se enciende un indicador en el panel “← ” y una luz intermitente cuando se activa la señal derecha de cambio. Precaución: Utilice las señales de giro oportunamente al cambiar de carril o al doblar hacia una dirección. Desactive la direccional una vez que haya cambiado de carril. Bocina (3): Presione este botón “ ” para activar la bocina.

14
Puño derecho
Interruptor para apagar el motor (1): El interruptor está ubicado en la punta del panel de control del puño derecho. Cuando se presiona el interruptor “ ” en la posición de inicio, el interruptor se enciende y el motor puede encenderse. Este es un interruptor de emergencia. Si presiona el interruptor y queda en posición “ ” el circuito de arranque queda cortado completamente y no se puede encender el motor. Palanca del freno delantero (2): Para accionar el freno se debe apretar la palanca del freno delantero en sentido hacia el conductor. Ya que la motocicleta tiene un freno hidráulico, no presione el freno abruptamente o con excesiva fuerza. El apretar la palanca hará que se encienda la luz de freno automáticamente.Botón de arranque (3): Presionar este botón cerrará el circuito de arranque. El vehículo debe estar en neutro, el conductor debe ligeramente presionar la palanca de embrague, y asegurarse de que motor esté apagado antes de intentar girar la ignición.
Advertencia: No accione el botón de arranque por más de 5 segundos, de lo contrario es posible que ocurra una descarga que dañe el circuito y sobrecaliente el motor. Si después de varios intentos el vehículo no arranca, revise el sistema de arranque y de combustible.
Interruptor de luces (4): El deslizar el interruptor a la posición de encendido “ “ encenderá el foco delantero, foco trasero, panel instrumental y demás luces.
MANUAL DEL USUARIO • FORZA 150
15
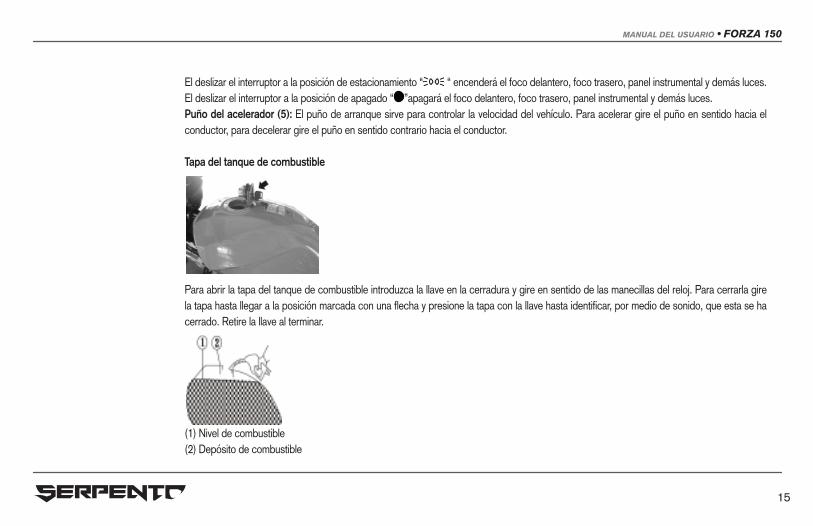
El deslizar el interruptor a la posición de estacionamiento “ “ encenderá el foco delantero, foco trasero, panel instrumental y demás luces. El deslizar el interruptor a la posición de apagado “ ”apagará el foco delantero, foco trasero, panel instrumental y demás luces. Puño del acelerador (5): El puño de arranque sirve para controlar la velocidad del vehículo. Para acelerar gire el puño en sentido hacia el conductor, para decelerar gire el puño en sentido contrario hacia el conductor.
Tapa del tanque de combustible
Para abrir la tapa del tanque de combustible introduzca la llave en la cerradura y gire en sentido de las manecillas del reloj. Para cerrarla gire la tapa hasta llegar a la posición marcada con una flecha y presione la tapa con la llave hasta identificar, por medio de sonido, que esta se ha cerrado. Retire la llave al terminar.
(1) Nivel de combustible (2) Depósito de combustible

16
Advertencia:Evite verter una cantidad excesiva de combustible; esto puede causar derrames. Nunca derrame gasolina sobre el motor caliente. El nivel de combustible no debe exceder de la parte inferior del hoyo de llenado, tal y como lo muestra la imagen, de lo contrario el combustible se derramará al expandirse y dañará los diferentes componentes de la motocicleta. Apague el motor cuando vaya a rellenar el tanque. Se prohíbe fumar mientras rellena el tanque.
Pedal de cambio
Este modelo de motocicleta está equipado con una transmisión de cinco velocidades (marchas). El pedal de cambio está acoplado al mecanismo de transmisión. Luego de cambiar de marcha el pedal de cambio regresará a su posición original, de manera que se pueda cambiar a la siguiente marcha. El modo neutro se encuentra entre la marcha baja y la segunda marcha. En el modo neutro, presione el pedal y una marcha más baja entrará. Cada vez que mueva el pedal hacia arriba, entrará una marcha más alta. Debido al mecanismo de transmisión, solo puede entrar una marcha a la vez. Para cambiar de segunda marcha a la marcha más baja, o de la marcha más baja a la segunda marcha, debe pasar por la posición neutra pero no detenerse allí. Para entrar en posición neutra, debe detenerse en el medio cuando está moviendo de la marcha baja a la segunda marcha. Cuando la transmisión está en posición neutra, la luz indicadora de posición neutra se enciende en el tablero de instrumentos. A pesar de que la lámpara está encendida, tenga cuidado y libere el embrague lentamente para asegurarse de que la transmisión esté realmente en posición neutra.

MANUAL DEL USUARIO • FORZA 150
17
Usar una marcha baja durante una conducción a alta velocidad, podría causar un aumento repentino en la velocidad del motor. Antes de entrar en una marcha baja, reduzca la velocidad de la motocicleta para evitar el desgaste innecesario de los componentes en el sistema de transmisión.
Pedal del freno trasero
El freno trasero se acciona por medio de un pedal. Al accionar el freno se encenderá la luz de frenado.
Soportes
Este modelo de motocicleta viene equipada con un soporte central (1) y un soporte lateral (2). Cuando quiera apoyar la motocicleta sobre el soporte central para estacionar el vehículo, coloque el pie sobre el soporte, sosténgase del manubrio con la mano izquierda, sosténgase de

18
la manigueta con la mano derecha y levante la motocicleta de su extremo trasero. La motocicleta se apoyará sobre el soporte con facilidad. El soporte lateral se utiliza temporalmente para apoyar el vehículo al estacionarlo por cortos períodos de tiempo. Para utilizarlo de manera correcta coloque el pie sobre el soporte y ejerza fuerza hasta llegar a la posición adecuada.
Tenga cuidado cuando estacione la motocicleta sobre una cuesta y asegúrese de que el manubrio apunte al extremo más elevado y de que el vehículo esté en primera; esto evitará que se deslice la motocicleta. Revise si el soporte lateral ha regresado a su posición original antes de arrancar el motor.Sistema Ahogador del Carburador
Esta motocicleta está equipada con un carburador de enriquecimiento, lo cual hace que el arranque sea más fácil. (1) De émbolo: Suba la palanca del ahogador a la posición más alta para poder arrancar el motor en frío. Después de comenzar, baje la palanca a la mitad y deje que el motor se caliente a una temperatura adecuada antes de regresar la palanca de enriquecimiento a su posición inicial.
(2) Sistema de enriquecimiento: Para arrancar un motor frio, ponga la palanca en la posición final. Una vez que el motor haya arrancado, suba la palanca a la posición media y deje que el motor se caliente gradualmente. Cuando el motor llegue a la temperatura normal de funcionamiento vuelva a poner la palanca del ahogador en la posición original.

MANUAL DEL USUARIO • FORZA 150
19
Nota:El sistema de enriquecimiento está diseñado para arrancar un motor frío. Cuando la temperatura es baja, el tiempo de calentamiento se prolongará adecuadamente (si no se hace el calentamiento, la transición de velocidad puede llegar a ser pobre).Durante la conducción, el sistema de enriquecimiento debe apagarse; de lo contrario el consumo de combustible puede aumentar. El cierre correcto del sistema de enriquecimiento es el siguiente: Para el carburador de vacío, empuje plenamente en la palanca; para el carburador de émbolo, baje la palanca hasta el final; para carburador de enriquecimiento, gire la palanca hasta el extremo frontal.Advertencia: Después de usar el sistema de enriquecimiento, ciérrelo oportunamente para evitar un sobrecalentamiento que podría dañar el codo silenciador.
Mecanismos de Arranque
El tirador de arranque está en el lado derecho del motor de la motocicleta. Debido al mecanismo de arranque por medio del pedal, el motor puede arrancar en cualquier marcha, siempre que el embrague esté suelto.
Advertencia:Asegúrese de que el tirador regrese a su posición original después de arrancar el motor.No utilice el pedal de arranque y el arrancador eléctrico al mismo tiempo.

20
Candado para el casco
La cerradura del casco está debajo del asiento en el lado izquierdo. Para abrir la cerradura de casco, inserte la llave en la cerradura y gírela hacia la derecha hasta que el bloqueo quede abierto. Enganche la hebilla del casco a la cerradura y gire la llave hacia la izquierda y luego saque la llave hasta que esté bloqueado completamentePrecaución: Nunca maneje con un casco enganchado a la cerradura pues podría ser inseguro para manejar.
Válvula de combustible
Este modelo de motocicleta está equipada con una válvula de control manual de tres posiciones: “ ” (abierto), “ ” (reserva), y “ ” (cerrado).

MANUAL DEL USUARIO • FORZA 150
21
Posición de ABIERTO “ ”La válvula de combustible debe normalmente estar en esta posición. Al accionar el acelerador el tanque de combustible alimenta de gasolina al carburador a través de la válvula de combustible.
Posición de RESERVA “ ”Si el nivel de gasolina del tanque de combustible es bajo, la válvula de combustible se debe girar a esta posición. El tanque de reserva es capaz de alimentar al carburador de 1.6 litros de combustible.
Posición de CERRADO “ ”La válvula de combustible debe estar en esta posición después de apagar el motor.
Advertencia:Dejar la válvula en la posición de ABIERTO “ ” puede causar que el carburador se llene de un exceso de combustible e incluso causar fugas a otras partes del motor. Arrancar el motor cuando el motor y el carburador están llenos de combustible puede causar serios daños al vehículo.
Aviso:Intente rellenar el tanque de combustible tan pronto como sea posible después de girar la válvula de combustible a la posición de “RESERVA.” Recuerde regresar la válvula a la posición de “ABIERTO” una vez que haya rellenado el tanque de combustible.
22
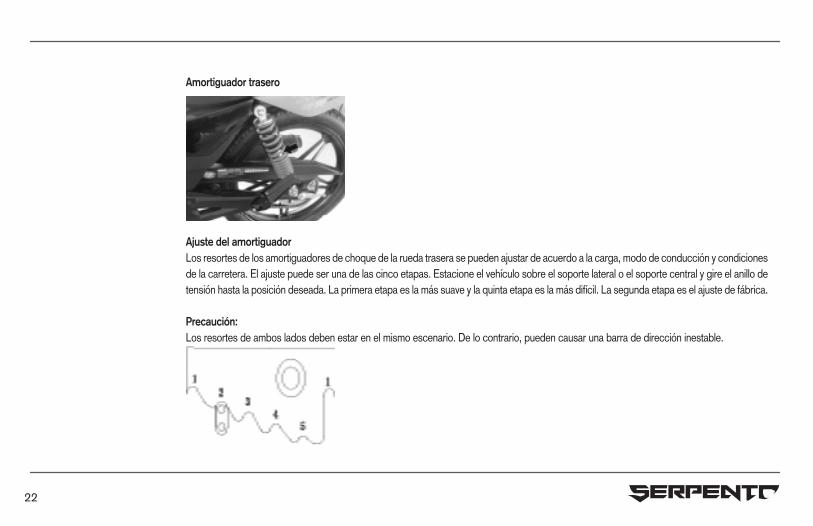
Amortiguador trasero
Ajuste del amortiguadorLos resortes de los amortiguadores de choque de la rueda trasera se pueden ajustar de acuerdo a la carga, modo de conducción y condiciones de la carretera. El ajuste puede ser una de las cinco etapas. Estacione el vehículo sobre el soporte lateral o el soporte central y gire el anillo de tensión hasta la posición deseada. La primera etapa es la más suave y la quinta etapa es la más difícil. La segunda etapa es el ajuste de fábrica.
Precaución:Los resortes de ambos lados deben estar en el mismo escenario. De lo contrario, pueden causar una barra de dirección inestable.

MANUAL DEL USUARIO • FORZA 150
23
Caja de Herramientas
La caja de herramientas está debajo del asiento. Para abrir la caja, inserte la llave de ignición y gírela en dirección a las manecillas del reloj. Luego, saque la cubierta de la caja.
CAPÍTULO 4: Instrucciones sobre el combustible y aceite del motor
GasolinaAdvertencia
La gasolina es inflamable y explosiva. Al manipular gasolina, se debe prestar atención para evitar quemaduras o accidentes.• Apague el motor, no fume, y mantenga alejada cualquier llama o chispa, en los lugares donde la gasolina se almacena o manipula. • El reabastecimiento de combustible se debe hacer en un lugar bien ventilado. Después de reabastecer, limpiar inmediatamente con agua cualquier gasolina que haya caído fuera del tanque de combustible.Por favor, utilice gasolina sin plomo # 93 o # 95 (GB17930-1999). Esto puede prolongar la vida útil de la bujía.
NotaSi el motor produce ruido, puede ser causado por el uso de combustible inadecuado. Reemplace con combustible correcto.

24
Gasolina etanolSi utiliza gasolina con etanol, por favor, utilice # 90 o superior de conformidad con GB18351-2004. No utilice gasolina con metanol, a pesar de que pueda contener agentes disolventes y anti corrosivos.
Nota• Si la gasolina con etanol se expone al agua en exceso, el etanol se puede separar, lo que resulta en la disminución del número de octano en la gasolina. Por lo tanto, el tiempo de almacenamiento no debe ser demasiado largo.• Antes de utilizar gasolina con etanol por primera vez, limpie el sistema de suministro de combustible y el tanque de combustible.• Siempre compre una cantidad apropiada de gasolina con etanol. Cuando el sello del tanque de combustible esté en mal estado o haya sido almacenado por mucho tiempo, la humedad puede incrementar, haciendo que baje el octano y la ignición resulte difícil o la potencia se debilite.
Aceite de Motor(Vea la tabla de mantenimiento)Utilizar aceite de motor para motocicletas de cuatro tiempos puede prolongar la vida útil de su motor. Por favor utilice aceite certificado por el Instituto Norteamericano de Petróleo (API) con nivel de servicio SE o SD. Utilice la siguiente tabla como referencia:
Se recomienda utilizar lubricante SE o SF Nivel SAE10W-30 para motores de cuatro tiempos.
Nota:El lubricante debe sustituirse a los primeros 1000 km o al primer mes, luego cada 3000 km a partir de ese momento. El volumen de aceite para el reemplazo debe ser de 850 ml o 1300ml después del reacondicionamiento. La calidad del aceite del motor es un factor importante que afecta a la vida útil del motor. Cambie el aceite del motor de acuerdo con el período de mantenimiento indicado en la tabla de mantenimiento (consulte la página 19). Cuando conduzca por zonas polvorientas, sustituya el aceite del motor con más frecuencia que lo estipulado en la tabla de mantenimiento.

MANUAL DEL USUARIO • FORZA 150
25
Explicación:Durante el tiempo frío en el noreste y el noroeste de China, es aconsejable que el usuario utilice aceite lubricante de alta calidad para temperaturas bajas. Se recomienda SE 10W-30 o SF 5W-30. Para temperaturas por debajo de -35 ° C, utilice lubricante nivel API SG o superior, clase 5W-30, de una marca reconocida.
Advertencia:Utilizar un lubricante de calidad inferior puede causar daños irreparables al motor y acortar seriamente la vida útil del motor.
CAPÍTULO 5: ¿Cómo hacer correctamente el rodaje de una motocicleta nueva?
En el prefacio de este manual se manifiesta que hacer correctamente el rodaje de una motocicleta nueva puede extender su vida útil y mejorar su rendimiento. El proceso apropiado de rodaje se explica a continuación:
Límite recomendado de aceleraciónLos límites de aceleración para una motocicleta nueva se detallan a continuación:
Primeros 800 Km Menos de 5 000 rpm
Hasta los primeros 1 600 Km Menos de 7 500 rpm
Después de los primeros 1 600 Km Menos de 10 000 rpm
Varíe la velocidad del motorEl motor debe cambiar de velocidad a menudo, en vez de permanecer siempre a la misma velocidad, para que cada componente adquiera presión de llenado. Cuando la presión baja, los componentes se enfrían. Estos procesos contribuyen a que se utilicen todos los componentes.

26
Para asegurar un buen desempeño del motor, es importante que cada componente se llene durante la prueba del vehículo. Pero recuerde que el motor no debe sobrecargarse. Cambie de velocidad con frecuencia; no conduzca la motocicleta sin cambiar marchas por un período prolongado. Acelere de manera sensata y apropiada durante el rodaje.
Evite conducir a velocidad constanteEvite conducir a bajas velocidades (carga liviana) por períodos prolongados; esto causa desgaste innecesario. Asegúrese de conducir dentro de los límites de velocidad establecidos (i.e.: no conducir a más de lo que permite el acelerador). Usted puede conducir su motocicleta a varias velocidades; sin embargo, durante los primeros 1600 kilómetros asegúrese de no conducir a su velocidad máxima.
Permita que el aceite de motor circule y lubrique el vehículo antes de conducirDespués de haber arrancado el motor e indiferentemente de si el motor esta frío o caliente, deje correr el motor en neutro para permitir que el aceite de motor circule y lubrique todas las partes del motor.
Revisión y mantenimiento: primera inspección general del vehículoLa primera inspección general (realizada a los 1000 km) es la más importante. Durante la revisión se deben reajustar las partes y componentes del motor, tallar los sujetadores y las abrazaderas, cambiar el aceite y remover la mugre. Esta inspección general realizada después de los primeros 1000 km garantizará que su motocicleta opere a su máximo rendimiento a lo largo de su vida útil.
Tenga cuidado:La inspección de los 1000 km debe realizarse según se establece en la sección “Detección y resolución de problemas” de este manual. Preste especial atención a los apartados que dicen “Cuidado” y “Advertencia.”

MANUAL DEL USUARIO • FORZA 150
27
CAPÍTULO 6. Revise antes de conducir
No olvide revisar los siguientes elementos antes de conducir su motocicleta; no ignore la importancia de estas revisiones.
Ítem Revisión
Manubrio 1. Revise que gire con suavidad.2. Revise la maniobrabilidad.3. Revise que no esté flojo.
Luces Revise que funcionen todas las luces (i.e.: luz alta, luz baja, luz de frenado, panel de instrumentos, señales de cambio, etc.).
Aceite del manubrio: Revise el nivel de aceite.
Sistema de frenos 1. Presione la palanca de frenado y accione el freno trasero.2. Revise que no patine la rueda.
Panel de instrumentos Revise que los indicadores de “neutro”, “nivel de aceite” y “señales de cambio” estén funcionando apropiadamente.
Puño acelerador 1. Verifique que el cable tenga la soltura necesaria. 2. Revise que el combustible fluya apropiadamente al acelerar y al desacelerar.
Neumáticos 1. Revise la presión del neumático.2. Revise la profundidad de los canales de la banda de rodamiento.3. Revise que no hayan grietas o abrasiones.
Bocina Revise que la bocina funcione correctamente.
Embrague 1. Verifique que el cable tenga la soltura necesaria.2. Movimientos suaves.
Combustible Revise que haya suficiente combustible para la distancia que planea recorrer.
Faja de transmisión 1. Revise que la faja esté ajustada.2. Revise que la faja esté debidamente lubricada

28
CAPÍTULO 7. Consejos para conducir
Advertencia:Si esta es su primera vez conduciendo este modelo de motocicleta, le recomendamos primero practicar en privado hasta que se sienta lo suficientemente confiado de sus habilidades de conducir y se haya familiarizado con su motocicleta. Recuerde regresar el soporte lateral a su posición original antes de conducir el vehículo.Al cruzar, no reduzca la velocidad por medio de la reducción de marchas; reduzca la velocidad de manera normal antes de cruzar.No reduzca la marcha al cruzar.Conducir con una mano es seriamente peligroso, ¡sostenga el manubrio con ambas manos!Recuerde apoyar el pie en el posapiés y nunca soltar el manubrio.Cuando la carretera está húmeda o mojada la fricción entre el neumático y la superficie es muy baja, lo que reduce la capacidad de frenado y la maniobrabilidad del vehículo. Maneje despacio cuando se enfrente a estas condiciones.Siga las leyes de tránsito y maneje por debajo del límite de velocidad.
Encienda el motor
Revise que la válvula de combustible esté en posición de “ENCENDIDO” ; introduzca la llave en la ignición y gírela en sentido de las manecillas del reloj para arrancar el motor. Si el vehículo está en neutro se encenderá la luz correspondiente en el panel de instrumentos.
Precaución:Cuando arranque el motor, las marchas deben estar en neutro, el embrague presionado y el conductor en posición correcta. Esto puede prevenir que la motocicleta lo lance hacia adelante en caso de equivocación con las marchas.

MANUAL DEL USUARIO • FORZA 150
29
1. Pulse el botón de arranque eléctrico de ignición. Nunca gire el puño del acelerador mientras presione el botón de arranque.
Nota:
Después de encender del motor, suelte inmediatamente el botón de arranque, para evitar efectos adversos para el motor.Si el motor no se pone en marcha después de 5 segundos, espere 10 segundos antes de hacer otro intento para evitar dañar la batería.En caso de fallo en el arranque del motor después de dos o tres intentos, gire el puño del acelerador de 1/8 o 1/4 vueltas y vuelva a intentarlo.Puede que el arranque se dificulte si la motocicleta no se ha utilizado durante un largo tiempo y se utiliza combustible de mala atomización. En este caso, no gire el puño del acelerador, pero repita el arranque.
2. Arrancar el motor con el pedal de arranque.Cuando la batería está descargada, el motor se puede arrancar con la palanca de arranque en un contragolpe.Gire el interruptor de encendido a posición ON.Patee el pedal de arranque con fuerza.
Motor fríoPonga la palanca de enriquecimiento del carburador (carburador de émbolo) o la palanca (carburador de vacío) a la posición más alta (émbolo) o tire de ella totalmente (carburador de vacío), mantenga el acelerador cerrado, y pulse el botón de arranque eléctrico; Después de arrancar el motor, presione la manija hasta la mitad (émbolo) o empuje la palanca a la mitad (al vacío) y espere a que el motor se caliente adecuadamente, antes de poner el mango o la palanca a la posición original. Cuanto más frío esté, más tiempo tomará calentar el motor. De lo contrario, la aceleración puede ser pobre.

30
Motor calienteGire el puño del acelerador entre 1.8 y 1.4 de vueltas y pulse el botón de arranque eléctrico para arrancar el motor. Cuando el motor esté caliente, no es necesario utilizar el sistema de enriquecimiento de carburador.
Advertencia
Nunca encienda el motor en espacios cerrados con poca ventilación. El monóxido de carbono del humo es altamente tóxico. Nunca deje la motocicleta encendida sin supervisión.
Tenga cuidadoNunca deje el motor encendido en posición estacionaria por un período largo de tiempo. De lo contrario el motor se puede sobrecalentar y las partes del motor se pueden dañar.
Arranque el motor con la transmisión en neutro, el embrague presionado y el conductor en posición normal de conducción.Presione firmemente el puño del embrague, espere un momento, presione hacia abajo la palanca de cambios para acoplarse a la primera marcha, gire el puño del acelerador lentamente hacia usted y suave y lentamente suelte el puño del embrague. De esta manera, la moto se moverá hacia adelante.Para cambiar a una marcha de más velocidad, primero desacelere un poco, suelte el acelerador y, al mismo tiempo, presione el puño del embrague, cambie la palanca de cambios a la siguiente marcha de velocidad más alta y suelte el puño del embrague, gire ligeramente el acelerador. De esta manera, la marcha más alta se puede acoplar gradualmente.
Nota:Para conducir a velocidades altas, siempre evite soltar el acelerador repentinamente. Se aconseja esperar a que el motor esté funcionando a 3000-5000rpm antes de liberar totalmente el acelerador. Esto puede evitar que el motor se apague debido a una combustión anormal.

MANUAL DEL USUARIO • FORZA 150
31
Uso del pedal de cambios
El dispositivo de control de velocidad variable puede hacer que el motor funcione apropiadamente dentro del límite de velocidad establecido. Seleccione cuidadosamente la velocidad y la marcha apropiada para un óptimo funcionamiento y evite conducir a altas velocidades con una marcha baja. No cambie de marcha sin accionar el embrague; ¡esto es muy peligroso! Para decelerar primero reduzca la marcha y la velocidad a una rango apropiado.
Tenga cuidado:Indiferentemente de la marcha en la que se encuentre, la motocicleta no es capaz de alcanzar las velocidades que aparecen en rojo en el velocímetro.
¿Cómo conducir en superficies inclinadas?Es recomendable reducir la marcha al conducir sobre superficies inclinadas, ya que de lo contrario el vehículo no recibirá la potencia apropiada y trabajará a velocidades muy reducidas. Recuerde cambiar de marcha con rapidez y fluidez para evitar perder impulso.Utilice el freno al ir cuesta abajo; recuerde que alternativamente puede también reducir la marcha.Recuerde: ¡evite revolucionar el motor a velocidades no recomendadas! ¿Cómo detener el vehículo y accionar el freno?Gire el acelerador en sentido contrario al conductor hasta reducir la velocidad a cero. Accione el freno delantero y trasero simultáneamente y con la misma fuerza. Reduzca la marcha para disminuir la velocidad.Ponga el vehículo en neutro y revise que se haya encendido el indicador en el panel de instrumentos.

32
Advertencia:La distancia segura de reacción y frenado aumenta conforme aumenta la velocidad. Asegúrese de siempre respetar y estimar la distancia segura de reacción y frenado para no colisionar con el vehículo que está en frente.Los nuevos conductores tienden a utilizar únicamente el freno trasero; esto desgasta acelerada e innecesariamente el sistema de frenos e incrementa la distancia segura de reacción y frenado.Usar solamente el freno trasero o el freno delantero es extremadamente peligroso ya que puede causar que el vehículo derrape y pierda el control. Preste especial atención y cuidado al conducir sobre carreteras mojadas. Frenar de repente sobre superficies desniveladas, sobre el pavimento o sobre carreteras lisas puede ser particularmente peligroso.
Deje el vehículo en primera y apóyelo sobre su soporte lateral si planea estacionarlo sobre una cuesta con pendiente suave; esto evitará que se deslice. Recuerde poner el vehículo en neutro antes de volver a arrancar el motor.Gire la ignición a la posición de “apagado.”Quite la llave del interruptor.Por seguridad, bloquee el manubrio.
CAPÍTULO 8: Inspección y mantenimiento
La tabla que aparece a continuación indica el kilometraje y los meses correspondientes a cada intervalo de servicio. Al final de cada intervalo se deberá revisar, lubricar y darle mantenimiento a la motocicleta, conforme al método de inspección que establece la tabla, especialmente si el vehículo se opera frecuentemente bajo condiciones de carga pesada, si se conduce a altas velocidades, o si se utiliza en espacios con mucho polvo. Para asegurar el buen funcionamiento del vehículo es de vital importancia realizar las inspecciones y darle mantenimiento a la motocicleta. La agencia de autos podrá asistirle con el sistema de transmisión, con los amortiguadores y con el eje de transmisión, ya que el buen funcionamiento de estas partes es clave y requiere conocimiento especializado para su reparación adecuada. Por su propia seguridad le recomendamos únicamente llevar a reparar su motocicleta a mecánicos debidamente capacitados.

MANUAL DEL USUARIO • FORZA 150
33
Tenga cuidado: Si requiere cambiar un repuesto le recomendamos utilizar únicamente partes originales. Indiferentemente de si usted tiene experiencia con reparaciones o no, le recomendamos dejar las reparaciones de los ítems marcados con una “*” en las manos de mecánicos debidamente capacitados. La instalación, reparación o mantenimiento de los ítems que no están marcados con “*” puede ser fácilmente realizada por cualquier persona.
Advertencia: La inspección de los 1000 km es sumamente importante y debe siempre completarse apenas el odómetro llegue a los 1000km. Esto garantizará que su motocicleta opere a su máximo rendimiento de manera segura y confiable. Lleve a cabo el mantenimiento regular según las instrucciones detalladas en este manual. Tabla de mantenimiento periódico
Intervalo: Basado en las lecturas del odómetro o en el número de meses.
Kilómetros 1000 5000 8000
Meses 5 20 40
* Batería (electrolitos) I I I
Carburador I I I
Bujía I C R
Filtro de combustible C - C

34
Nota: I = Inspección / T = Tallar / C = Limpiar / R = Reemplazar
Embrague I I I
Llantas I I I
Filtro de aire - C C
*Manguera de combustibleI I I
Reemplace cada cuatro años
* Tuercas y tornillos del chasís R R R
Faja de distribución C C C
*Aceite de transmisión T T T
*Frenos R R R
*Horquilla delantera I I I
Faja de transmisiónI I I
Limpie y lubrique cada 1000 km
* Dirección mecánica I I I
* Amortiguador trasero - I I
* Culatas de cilindros, tuercas y tornillos de la mufla T T T

MANUAL DEL USUARIO • FORZA 150
35
Tabla de lubricación
Caja de herramientasCon el fin de asistirle en el mantenimiento de su motocicleta, encuentre en el compartimiento del lado izquierdo trasero de la motocicleta una caja de herramientas.
IntervaloÍtem Cada 6 meses o cada 6 000 km
Cada 12 meses o cada 12 000 km
Cable del acelerador Aceitar -
Cable del embrague Aceitar -
Faja de transmisión Cambio de aceite cada 1000 km
Cigüeñal - Engrasar
Puño acelerador - Engrasar
Cable de frenos Aceitar
Cojinetes de piñón del ve-locímetro
- Engrasar
Pedal de frenado Aceitar o Engrasar
* Dirección mecánica Engrasar cada dos años o cada 20 000 km

36
Batería
Batería normalmente se almacena en el interior protector al lado derecho del marco. La batería para este modelo puede ser de tipo convencional o de tipo libre de mantenimiento.Instrucciones para el uso de la batería de tipo convencional:
Antes de usar, rellene con electrolitos a un nivel entre los límites superiores e inferiores. Durante el uso, el nivel del líquido debe mantenerse entre el límite superior y el límite inferior.
Advertencia: Una vez que la batería ha estado en uso, no se deberá añadir ácido sulfúrico diluido. Si el nivel de líquido desciende por debajo del límite inferior, llene con agua destilada hasta el límite superior. Nunca utilice agua de la tubería.
Precaución: Nunca obstruya, dañe o altere el tubo de ventilación de la batería. Por favor, asegúrese de que la manguera de ventilación se conecte al accesorio de ventilación de la batería, siempre manteniendo abierto el otro extremo. El tubo de ventilación y la batería se deben instalar correctamente.La polaridad del cableado de la batería debe ser siempre correcta. Conecte el cable rojo al cable positivo (+) y el verde al negativo (-). Una conexión incorrecta puede dañar el sistema de carga y la batería.

MANUAL DEL USUARIO • FORZA 150
37
Nota:Después de los primeros 1000 km y cada 3.000 km, lleve la batería adonde un distribuidor para que revise la gravedad de cada célula de batería utilizando un hidrómetro de electrolitos.1. Seguridad Los electrolitos contienen ácido fuerte y no deben entrar en contacto con la piel. Durante la operación, use el casco de seguridad y ropa de seguridad. En caso de que los electrolitos entren en los ojos, lave inmediatamente los ojos con abundante agua limpia durante al menos 15 minutos, antes de ir al hospital. En caso de ingerir electrolitos, tome una gran cantidad de agua o leche, y luego leche o aceite vegetal que contenga magnesio. Mantenga fuera del alcance de los niños.
2. Llenar con electrolitosAntes de llenar electrolito, retire la batería del vehículo.Compruebe si el electrolito se ajusta a los requisitos de especificación.Instrucciones para el uso de baterías tipo libre de mantenimiento:
No es necesario llenar con electrolitos antes y después de usar la batería. Para prolongar la vida útil, recargue completamente antes de usar.
38
Nota:Sin importar de qué tipo sea, la batería puede descargarse después de un largo periodo de almacenamiento. Después de sacarla del vehículo y recargarla, guárdela en un lugar fresco y bien ventilado. Cuando el vehículo no se vaya a utilizar por un largo periodo de tiempo, retire el negativo cable (-) de la batería.
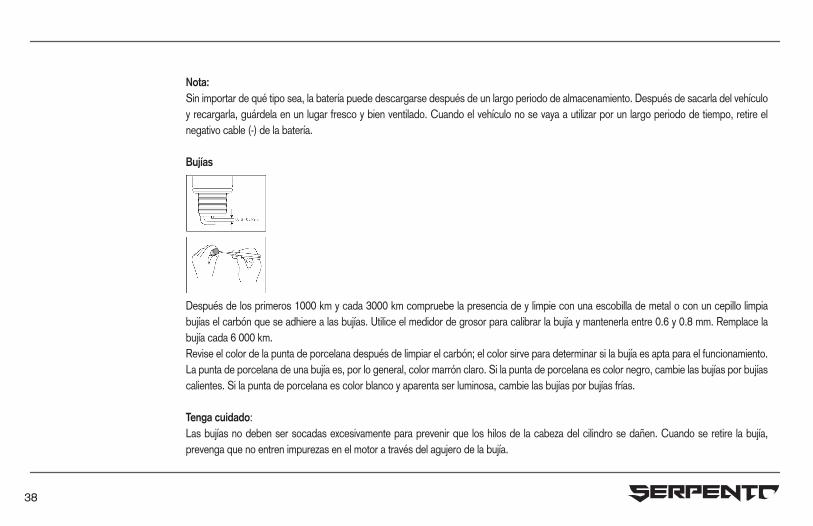
Bujías
Después de los primeros 1000 km y cada 3000 km compruebe la presencia de y limpie con una escobilla de metal o con un cepillo limpia bujías el carbón que se adhiere a las bujías. Utilice el medidor de grosor para calibrar la bujía y mantenerla entre 0.6 y 0.8 mm. Remplace la bujía cada 6 000 km.Revise el color de la punta de porcelana después de limpiar el carbón; el color sirve para determinar si la bujía es apta para el funcionamiento. La punta de porcelana de una bujía es, por lo general, color marrón claro. Si la punta de porcelana es color negro, cambie las bujías por bujías calientes. Si la punta de porcelana es color blanco y aparenta ser luminosa, cambie las bujías por bujías frías.
Tenga cuidado:Las bujías no deben ser socadas excesivamente para prevenir que los hilos de la cabeza del cilindro se dañen. Cuando se retire la bujía, prevenga que no entren impurezas en el motor a través del agujero de la bujía.
MANUAL DEL USUARIO • FORZA 150
39
Las bujías listadas anteriormente fueron diseñadas de forma específica para este modelo de motocicleta y tienen la capacidad de ajustarse a una gran cantidad de trabajos. Si la punta de porcelana de la bujía es de un color distinto al estándar, consulte con su agencia más cercana antes de reemplazarla. Utilizar una bujía que no esté en la lista puede causar daños en el motor. Le recomendamos siempre consultar con su centro de servicio más cercano antes de reemplazar la bujía; utilizar una bujía incorrecta puede causar serios daños en el motor.
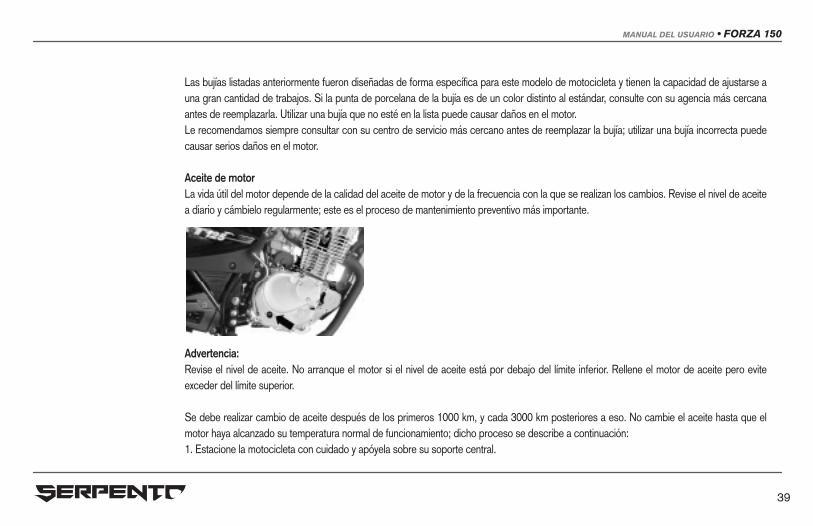
Aceite de motorLa vida útil del motor depende de la calidad del aceite de motor y de la frecuencia con la que se realizan los cambios. Revise el nivel de aceite a diario y cámbielo regularmente; este es el proceso de mantenimiento preventivo más importante.
Advertencia:Revise el nivel de aceite. No arranque el motor si el nivel de aceite está por debajo del límite inferior. Rellene el motor de aceite pero evite exceder del límite superior.
Se debe realizar cambio de aceite después de los primeros 1000 km, y cada 3000 km posteriores a eso. No cambie el aceite hasta que el motor haya alcanzado su temperatura normal de funcionamiento; dicho proceso se describe a continuación:1. Estacione la motocicleta con cuidado y apóyela sobre su soporte central.

40
2. Retire la tapa del depósito de aceite.3. Retire el tapón de drenaje que está en el fondo para drenar el aceite. 4. Después de vaciar el motor de todo su aceite reintroduzca el tapón de drenaje y ajústelo. Cambie el aceite colocando 950 ml de aceite nuevo, reintroduzca la varilla indicadora y talle la tapa.
5. Arranque la moto y manténgalo en ralentí por unos segundos.6. Pare el motor y espere un minuto. Revise el nivel de aceite. Si está por debajo de la marca, rellénelo.
Precaución:Por favor utilice siempre el aceite recomendado en este manual.
Sistema de frenosHay dos tipos de freno para el freno delantero y trasero del freno de la motocicleta, es decir, freno de tambor y el disco.Revise los frenos después de los primeros 1000 km y cada 3000 km después de eso. La operación correcta del sistema de frenos es fundamental para conducir adecuadamente. Siempre revise los frenos en talleres de servicio autorizados.

MANUAL DEL USUARIO • FORZA 150
41
Advertencia: Los frenos son parte de la seguridad personal. Manténgalos siempre bien ajustados.
Si el sistema de frenos o alguno de sus componentes necesita reparación, se recomienda que el trabajo sea realizado por un distribuidor autorizado. Ellos están equipadas con herramientas completas y técnicas competentes y capaces para hacerlo de una manera segura y económica.
Freno delanteroPara el freno, la distancia entre el estado natural y la acción de frenado se conoce como “juego libre”. Si el freno delantero es de tambor, el juego libre de la palanca de freno medido desde la palanca de freno debe ser de 10-20 mm.
1. Gire la tuerca de ajuste del freno hacia la derecha o hacia la izquierda frontal para ajustar el juego libre al valor especificado.2. Después de ajustar el juego libre, levante la rueda delantera del suelo. Gire la rueda delantera para comprobar si hay alguna resistencia. Al mismo tiempo, presione la palanca del freno delantero con firmeza y habrá una separación adecuada entre la maneta del freno delantero y del mango.Si el freno delantero es un freno de disco, el libre juego de la palanca de freno medida a soporte de la palanca será 5-10mm.El sistema de freno hidráulico se debe comprobar todos los días, como se detalla a continuación:1, Compruebe si hay fugas en el sistema de freno de la rueda delantera.2, Compruebe si hay alguna fuga o grieta en la tubería de presión de aceite.

42
3, La palanca del freno delantero debe tener una cierta fuerza elástica.4, Compruebe el desgaste del forro del freno de la rueda delantera.
Precaución:El sistema de frenos de disco de la rueda es un freno de alta presión. Por seguridad, el reemplazo de la tubería de aceite y el aceite hidráulico no excederá el intervalo especificado en el programa de mantenimiento especificado en este manual.
Líquido de frenos:
Peligro: Evite ingerir o entrar en contacto con el líquido de frenos; ¡es peligroso! Si ingiere accidentalmente el líquido, regurgítelo inmediatamente y visite a su doctor. Si el líquido entra en contacto con los ojos o con la piel, lave vigorosamente con abundante agua e inmediatamente acuda al hospital.
Precaución:El vehículo utiliza aceite hidráulico con etanol. No deberá mezclarse con silicato o petróleo líquido. De lo contrario, el sistema de frenos se podría dañar seriamente. Nunca use líquido fuera del envase o cualquier líquido sobrante, ya que puede estar húmedo. Debe utilizar únicamente

MANUAL DEL USUARIO • FORZA 150
43
líquido de frenos SAE J1703. Preste atención de no derramar aceite hidráulico en superficies plásticas o pintadas, para evitar corrosión.Compruebe el nivel del líquido en el depósito del líquido de frenos. Reponga con el líquido hidráulico especificado si el nivel es bajo. Junto con el desgaste de la pastilla de freno, el líquido en el tanque puede fluir a la tubería y el nivel puede llegar a bajar. La reposición del líquido de frenos es una parte importante del mantenimiento regular.
Forros de frenos
La importancia de revisar el desgaste del forro del freno de la llanta delantera es comprobar si el desgaste ha llegado al límite. Si el desgaste excede la marca del límite, el forro debe ser reemplazado con uno nuevo.

44
Precaución: No conduzca el vehículo inmediatamente después de reemplazar el forro del freno de disco. Presione la palanca de freno varias veces para permitir que el forro se extienda, el resorte del puño se acomode y el líquido de frenos circule bien.
Interruptor de la luz del freno delantero
El interruptor de la luz del freno frontal está ubicado debajo de la palanca de freno. Afloje el tornillo y mueva el interruptor hacia atrás y hacia adelante para encontrar un punto apropiado para que la lámpara se encienda de inmediato cuando se le aplique presión pero antes de que la palanca esté totalmente presionada. Freno trasero
Ajuste del freno traseroSi el freno trasero es un freno de tambor, para ajustar el pedal del freno trasero, ponga el pedal en la posición más cómoda posible para manejar rotando la tuerca de ajuste del pedal. Luego, rote la tuerca de juego libre (2) para mantener el juego libre (1) entre 20-30 mm.

MANUAL DEL USUARIO • FORZA 150
45
Juego libre
Tuerca de ajusteLímite de desgaste del freno trasero
Las líneas de límite de desgaste están impresas en los frenos traseros. Para revisar el desgaste del forro, siga los siguientes pasos:1. Revise que el sistema trasero de frenos se haya ajustado apropiadamente.

46
2. Accione el freno y compruebe que la extensión del freno esté dentro de los límites permisibles, como se muestra en la Fig. A.
Fig. A. Línea desgaste del freno trasero dentro del límite permitido1. Si la extensión del freno excede el límite, como se muestra en la Fig. B, llévelo al centro de servicio más cercano para que reemplacen la pieza.
Si el freno trasero es un freno de disco, lea los párrafos sobre el mantenimiento de los frenos de disco frontales para su mantenimiento.

MANUAL DEL USUARIO • FORZA 150
47
Interruptor de la luz del freno trasero
El interruptor de la luz del freno trasero está al lado derecho del chasís. Simplemente deslice el interruptor para que se encienda automáticamente la luz de frenado cada vez que accione el pedal.
La mufla
La mufla de la motocicleta se calienta a temperaturas altas cuando ha sido conducida por mucho tiempo, así que evita tocarla para evitar quemaduras.

48
Caja de fusibles
La caja de fusibles está ubicada en el protector al lado derecho del chasís. Se proporciona un fusible para todo el sistema eléctrico. Si tiene problemas con el sistema eléctrico, revise la caja de fusibles. Si el fusible se quema, debe reemplazar el fusible con uno 15A.
Tenga cuidado:Asegúrese de remplazar los fusibles dañados con repuestos del mismo amperaje para evitar quemar más fusibles.NO utilice papel aluminio, alambre de acero u otros sustitutos como repuesto. Si el fusible se quema con cierta regularidad y poco después de reemplazarlo, lo más seguro es que haya un problema con el circuito. En estos casos es recomendable llevar la motocicleta a recibir mantenimiento de inmediato.
¿Cómo cambiar un foco?Encuentre a las potencias para las distintas luces de la motocicleta en el capítulo 13 en la lista de parámetros. Asegúrese de cambiar las bombillas quemadas por repuestos con la misma potencia nominal. De lo contrario se puede causar una sobrecarga en el circuito y quemar prematuramente los focos.

MANUAL DEL USUARIO • FORZA 150
49
Tenga cuidado:Este modelo de motocicleta está equipado con luces reflectoras. Cuando cambie la bombilla evite manipular el lente reflector para no reducir su vida útil.Después de colocar la cobertura, evite socar excesivamente los tornillos al re ensamblar la direccional y luces de freno para no dañar sus coberturas.
Filtro de aireEl filtro de aire está hecho a base de espuma. Si se satura de polvo incrementará la resistencia del aire de entrada y disminuirá la potencia de salida; también incrementa el consumo de combustible. Recuerde revisar y limpiar el filtro de aire cada 3000 kilómetros.
Tenga cuidado:Si frecuentemente opera el vehículo en espacios con mucho polvo, usted deberá revisar el filtro de aire regularmente; ¡no espere a que transcurra el intervalo de servicio!
1. Desprenda la cobertura lateral del lado izquierdo de la motocicleta.2. Afloje el tornillo y retire la cobertura del filtro de aire.

50
3. Retire el filtro de aire.4. Limpie o reemplace el filtro; refiérase a la sección “Medidas para reducir la contaminación” para obtener más información.
¿Cómo limpiar el filtro de aire a base de espuma?Por favor siga el siguiente procedimiento para limpiar el filtro de aire:1. Limpie el filtro con la cantidad apropiada de detergente inflamable.2. Presione el filtro suavemente con la palma, tenga cuidado de no dañar el filtro.3. Introduzca el filtro a un recipiente con aceite y sumérjalo:
Limpieza del elemento de filtro de papelEl método de limpieza es el siguiente:1. Retire la placa lateral izquierda de protección.2. Retire el tornillo de la banda de tensión del conector del filtro de aire. Saque el tubo de admisión y separarlo del filtro.3. Saque el elemento filtrante.4. Golpee suavemente el filtro mientras la gira, para eliminar el polvo y soplar el polvo restante mediante el uso de aire comprimido.5. El elemento de filtro está hecho de papel y no se puede limpiar utilizando cualquier agente a base de aceite.

MANUAL DEL USUARIO • FORZA 150
51
Tenga cuidado:Verifique antes y después de limpiar el filtro que éste no esté agrietado. Si tiene grietas reemplace el filtro inmediatamente.Vuelva a instalar el filtro en el orden inverso. Asegúrese de que el elemento de filtro está firmemente fijado en la posición correcta y sea bien sellado.
Precaución:Nunca arranque el motor sin el filtro de aire instalado. El filtro de aire debe limpiarse o reemplazarse con más frecuencia si la motocicleta se utiliza en condiciones de polvo. Nunca arranque el motor sin el filtro instalado, o el motor que lleva se puede aumentar. Asegúrese de el filtro de aire se encuentra en buenas condiciones de trabajo, porque esta parte es muy importante para la vida útil del motor.
CarburadorUn carburador estable es vital para el buen funcionamiento de un motor. Desde incluso antes de que el propietario haya adquirido la motocicleta, el fabricante configura el rendimiento de la vaporización del carburador a un valor específico; NO cambie este valor. Note que pueda ajustar la holgura del cable de arranque y el ralentí con los tornillos correspondientes del carburador. Realice estos ajustes después de los primeros 1000 km y luego cada 3000 km, como se muestra a continuación:
¿Cómo ajustar el tornillo de ralentí del carburador?

52
1. Arranque el motor y déjelo correr hasta que haya alcanzado su temperatura normal de funcionamiento.2. Primero asegúrese de que el puño acelerador esté en posición cero, luego ajuste el tornillo de ralentí y acelere el motor hasta alcanzar 1400-100 revoluciones por minuto. Tenga cuidado: Ajuste el tornillo de ralentí del carburador ÚNICAMENTE después de que el motor alcance su temperatura normal de funcionamiento.
¿Cómo ajustar la holgura del cable de arranque?
1. Afloje la tuerca de fijación (1).2. Afloje o talle el tornillo de ajuste (2) hasta ajustar el rango de holgura a 0.5-1.0 mm.3. Después del ajuste vuelva a tallar la tuerca de fijación (1).
Peligro: Después de un ajuste asegúrese de que el puño acelerador regrese automáticamente a la posición de ralentí y se mantenga estable. Asegúrese también de que no aumente la velocidad de ralentí al doblar el vehículo.

MANUAL DEL USUARIO • FORZA 150
53
Ajuste de la holgura de la válvulaLa holgura de las válvulas se comprueba y se ajusta con el motor frío. 1. Retire la cubierta de protección del ventilador y la culata.2. Gire el rotor hacia la izquierda para alinear el marcador T del rotor con la línea vertical proyectada en la cubierta de la caja derecha. Asegúrese de que el pistón está en la parte superior de la carrera de compresión.3. Inserte un calibrador de holgura entre el tornillo de ajuste y el vástago de la válvula para asegurar una separación adecuada de la válvula de escape.4. Holgura estándar de válvulasHolgura de válvulas de admisión:0.04-0.05mmHolgura de las válvulas de escape:0.05-0.06mm5. Para obtener una holgura adecuada de las válvulas, desate la tuerca de ajuste y luego gire el tornillo de apareamiento. Gire la tuerca de ajuste y mida la holgura hasta que cumpla con los criterios.

54
Nota:Ya que la holgura de las válvulas impacta el rendimiento del motor, la inspección y el ajuste debe hacerse en intervalos regulares de tiempo según se especifica más adelante en este manual. La holgura de las válvulas aumenta con el paso del tiempo y por lo tanto afecta el rendimiento del motor produciendo ruidos fuertes y procesos anormales de aspiración/escape. Por lo tanto el ajuste periódico de la holgura de las válvulas debe ser realizado preferiblemente por profesionales con herramientas especiales. Para obtener un ajuste óptimo de la válvula, se recomienda llevar la motocicleta a un distribuidor o centro de mantenimiento autorizado. El ajuste de la holgura de las válvulas es esencial para las motocicletas nuevas una vez que llegan a los primero 1000 km.
¿Cómo ajustar la holgura del cable de embrague?Tense o afloje el cable del embrague para ajustar su holgura. Verifique que la holgura sea aproximadamente 4 mm antes de desacoplar una marcha. En caso de que se determine que la holgura es incorrecta, ajuste el cable por medio del siguiente proceso:
Afloje la tuerca (2) y gire la abrazadera de tensión (3) en sentido de las manecillas del reloj. Afloje la tuerca de la abrazadera de ajuste (6) y deslice la abrazadera de tensión (5) de un lado a otro hasta que la holgura sea aproximadamente 4 mm. La abrazadera de tensión (3) es útil para realizar ajustes de precisión. Después de realizado el ajuste, no olvide tallar las tuercas (2) y (6) y cubrirlas con el manguito de caucho.

MANUAL DEL USUARIO • FORZA 150
55
Ajuste de la faja de transmisión
(1) Tuerca de ajuste(2) Tuerca de fijación(3) Marca(4) Tuerca del eje de la llanta trasera
1. Estacione la motocicleta con cuidado y apóyela sobre su soporte central.2. Afloje la tuerca del eje de la llanta trasera.3. Afloje la tuerca de fijación.4. Rote el tornilla de ajuste hacia izquierda y la derecha para ajustar la cadena.
Nota:Cuando se instala una nueva cadena, es necesario verificar las dos ruedas de cadena. Reemplácelas si es necesario.La tensión de la cadena de deberá ajustarse cada 1.000 km, para mantener una distancia extraíble de 20 - 30 mm en el punto medio de las dos ruedas de cadena.

56
Precaución:El extremo abierto del cerrojo de conexión de la cadena deberá apuntar en sentido contrario de la dirección de rotación.
Cerrojo de la conexión de la cadena Dirección de rotaciónLimpieza y lubricación de la cadena de conducciónLa suciedad en la cadena de conducción puede intensificar el desgaste de la cadena. Por lo tanto, limpie la cadena de transmisión cada 1000 km con disolvente de limpieza, y lubrique con lubricante de cadena especial o aceite del motor.
LlantasCompruebe la presión de aire de las llantas y el patrón de desgaste después de los primeros 1000 km y cada 3000 km a partir de ese momento. Además del control regular, revise con regularidad la presión de las llantas para garantizar la máxima seguridad y vida útil.

MANUAL DEL USUARIO • FORZA 150
57
Presión de las llantasLa presión baja de las llantas puede intensificar el desgaste de las llantas y afectar gravemente la estabilidad de conducción, causando dificultades en las curvas. Pero, una presión demasiado alta de las llantas puede reducir el área de contacto entre las llantas y la superficie de la carretera, haciendo que las llantas se deslicen y se pierda el control. Es necesario mantener siempre la presión de las llantas dentro del límite especificado. El ajuste de la presión de las llantas debe hacerse cuando las llantas están frías.
Desgaste de las llantas Al conducir una motocicleta con las llantas excesivamente gastadas, la estabilidad de conducción es baja y puede salirse de control. Cuando la profundidad de la banda de rodadura de la llanta delantera se reduce a 1,6 mm o menos, es aconsejable sustituir la llanta. Cuando el patrón de banda de rodadura de la llanta trasera se reduce a 2 mm o menos, reemplace la llanta con una nueva.
Advertencia:Puede tener problemas si no utiliza llantas estándar. Le recomendamos sinceramente utilizar llantas estándar.La presión correcta de las llantas es muy importante para el funcionamiento normal del vehículo y la seguridad en la conducción. Compruebe el desgaste de las llantas y la presión de inflado de vez en cuando.

58
CAPÍTULO 9: Medidas para reducir la contaminación
Con el propósito de reducir las emisiones de humo y la contaminación sonora, preste especial atención a lo siguiente:Utilice siempre lubricante especial.Utilice gasolina que no contenga plomo.Ponga atención a cualquier sonido anormal del motor.
CAPÍTULO 10. Detección y resolución de problemas
En caso de que la motocicleta no arranque, verifique lo siguiente para detectar la causa del problema:1. El nivel de combustible.2. Que el combustible esté fluyendo de la válvula de combustible al carburador.3. Desensamble la tubería de combustible del carburador, gire la válvula a la posición de “ENCENDIDO” y verifique que el combustible fluya a través de la tubería.4. Si verifica que efectivamente el combustible fluye del tanque al carburador sin problema, el próximo paso es revisar que el sistema de ignición esté funcionando apropiadamente.
Advertencia:NO fume si le está dando mantenimiento o si está revisando el sistema de combustible. Siempre inspeccione el sistema de combustible en un espacio abierto.

MANUAL DEL USUARIO • FORZA 150
59
1. Retire una bujía de la culata.2. Gire la ignición a la posición de “encendido” y arranque el motor. Si el sistema de ignición funciona apropiadamente, el orificio donde estaba la bujía producirá chispas color azul. Lleve la motocicleta a que le den mantenimiento si nota la ausencia de chispas.
Peligro:No coloque la bujía cerca del orificio del que salió. El combustible puede causar chispas y fuego.
Para evitar descargas eléctricas, se recomienda poner la parte metálica de la bujía en contacto con una parte metálica sin pintura en la carrocería del vehículo. Para evitar accidentes por descarga eléctrica, cualquier persona que sufre de enfermedades del corazón no debería realizar esta revisión.
Si el motor no arranca, revise los siguientes ítems para localizar la causa. 1. Revise la reserva de combustible.2. Revise que el sistema de ignición esté funcionando apropiadamente.3. Revise que el ralentí del motor sea el apropiado.

60
Aviso:Antes de reparar cualquier falla consulte a su centro de servicio más cercano. Si la motocicleta aún está dentro del período de garantía, indíqueselo a su agente de ventas. Cualquier reparación realizada por su propia cuenta durante dicho período afectará los parámetros de la garantía. Tabla de mantenimiento del motor
Falla Causa Solución
El m
otor
no
arra
nca
o se
aho
ga
El combustible no llega al carburador
1. No hay combustible en el tanque.2. La válvula de combustible está cerrada.3. La válvula de combustible está dañada.4. Las canales de circulación están obstruido.5. La manguera principal de combustible está obstruida.
1. Rellene el tanque de combustible2. Gire la válvula a la posición de “ENCENDIDO”3. Limpie la válvula de combustible4. Abra el carburador5. Abra y limpie el carburador
El co
mbu
stib
le S
I lle
ga a
l car
bura
dor
El cable de alta tensión funciona apropiadamente, la bujía no hace chispa
1. Las bujías están llenas de polvo o mugre2. La bujía o el electrodo están dañados3. La bujía presenta un exceso de carbón4. La holgura de la bujía es incorrecta
1. Retire, limpie y seque la bujía2. Reemplace las bujías3. Limpie el depósito de carbón4. Ajuste la holgura
La bujía funciona apropiadamente, pero la presión que ejercen los cilindros es anormal
1. Hay fugas en la junta de la culata2. Una o más bujías están flojas3. El anillo de pistón está atorado4. El pistón o el anillo del pistón está dañado o presenta un exceso de desgaste5. Los cilindros presentan un exceso de desgaste6. Hay fugas en la tubería de alimentación
1. Talle los tornillos o remplace la junta2. Talle las bujías3. Retire el anillo y limpie el depósito de carbón4. Reemplace el pistón y/o el anillo del pistón5. Cambie el bloque de cilindros6. Talle o remplace los empaques

MANUAL DEL USUARIO • FORZA 150
61
CAPÍTULO 11. Guía de almacenamiento
Si usted no planea utilizar su motocicleta en invierno, o en cualquier otra estación por un período prolongado, es necesario que utilice los materiales, el equipo y la tecnología apropiada para darle mantenimiento especializado.
Motocicleta
Falla Causa Solución
Func
iona
mie
nto
anor
mal
del
mot
orSonido extraño proveniente del motor
1. Pistón y/o cilindro presenta exceso de desgaste2. Extremo grueso o delgado de la biela presenta exceso de desgaste3. Ignición mal ajustada4. Hay un exceso de carbón en la cámara de combustión5. La bujía se sobrecalienta
1. Reemplace la pieza dañada2. Reemplace los cojinetes y las demás partes relacionadas3. Ajuste le ignición4. Limpie el depósito de carbón5. Reemplace las bujías
Motor no funciona de manera estable
1. El carburador está sucio2. La tubería de aceite está obstruida3. Hay fugas de aire en el cárter4. Hay fugas entre el carburador y el motor5. La riqueza de mezcla de combustible no es apropiada
1. Lave el carburador2. Limpie o reemplace la tubería3. Remplace los empaques de aceite4. Talle los tornillos5. Ajuste el carburador
Motor se sobrecalienta
1. Piñón trasero no funciona apropiadamente2. El vehículo se ha operado bajo condiciones de carga pesada por un período prolongado3. La riqueza de la mezcla de combustible no es apropiada4. Falta de aceite de motor o de aceite de la caja de cambios, o uso de un aceite no estándar5. La faja de transmisión está muy tallada6. El freno no se desacopla
1. Ajustar el tiempo de control del piñón2. No sobrecargue el vehículo por períodos prolongados3. Ajuste el carburador4. Cambie o rellene el aceite de motor o el aceite de transmisión por uno apropiado5. Ajuste la faja de transmisión6. Ajuste la carrera libre del freno

62
Si planea guardar su motocicleta por un período prolongado siga el siguiente procedimiento de almacenaje: lave la motocicleta por completo; estacione la motocicleta sobre una superficie uniforme y apóyela sobre su soporte central para evitar que la motocicleta se caiga; gire el manubrio hasta su extremo izquierdo; retire la llave de la ignición. Cada uno de estos pasos es clave. Recuerde revisar íntegramente la motocicleta cuando quiera volver a utilizar el vehículo para garantizar su buen funcionamiento.
CombustibleVacíe el tanque de combustible antes de almacenar la motocicleta por períodos prolongados. El combustible es altamente inflamable y puede causar una explosión bajo ciertas condiciones. No estacione la motocicleta cerca de fuentes de fuego. No estacione la motocicleta en un espacio donde también se almacenen sustancias inflamables (i.e.: grano, carbón, algodón, etc.), el combustible es altamente inflamable y puede entrar en contacto con estas sustancias.
NeumáticosRecuerde verificar que la presión de las llantas sea apropiada. Si planea dejar las llantas a la intemperie, lávelas regularmente y manténgalas alejadas de la luz del sol y de la humedad. No permita que las llantas entren en contacto con un ácido, una base, un aceite, o cualquier otra sustancia, para evitar la corrosión.
BateríaRetire la batería, recárguela y manténgala fuera del alcance de niños antes de almacenar la motocicleta por períodos prolongados. Durante la estación de verano es recomendable cargar la batería una vez cada mes; durante la estación de invierno es recomendable cargar la batería una vez cada dos meses. Si no planea retirar la batería de la motocicleta, pero no la va a utilizar por un período prolongado, es recomendable cargar la batería una vez cada mes.
Instrucciones relativas a la batería

MANUAL DEL USUARIO • FORZA 150
63
Revise el nivel de electrolitos de la batería una vez al mes. Si el nivel está por debajo del límite inferior rellene la batería con agua destilada hasta que el nivel llegue al límite superior (no utilice agua de tubo).Mantenga la batería limpia. Si la batería o el cableado entran en contacto con el ácido de batería lave vigorosamente con abundante agua, seque la batería y cúbrala con grasa.
Si el motor no arranca, la bocina suena muy baja, o las luces no encienden, es posible que la batería esté dañada o baja de carga. Inmediatamente cargue la batería por aproximadamente 15 a 20 horas. Recuerde que almacenar la batería por períodos prolongados puede causar serios daños.
Si en la batería se forma un polvo blanco por sulfatación de postes, o si la batería no funciona después de cargarla por un período prolongado, es posible que la batería esté dañada y que requiera reemplazarla. 1. Limpie la motocicleta por completo.2. Desenrosque las bujías, accione el pedal de arranque para mantener el motor corriendo por un tiempo, e instale las bujías de nuevo.3. Instale la batería.
Aviso:Asegúrese de primero conectar el electrodo positivo y luego el negativo.
4. Ajuste la presión de las llantas conforme a lo establecido en este manual. 5. Lubrique todas las partes que lo requieran conforme a lo establecido en este manual.6. Complete el proceso de “Revise antes de conducir” conforme a lo establecido en este manual.
64
CAPITULO 12: Lista de parámetros
Los derechos de autor e interpretación de este manual pertenecen a Motorcycle Inc. No se permite reproducir, citar o reimprimir este manual sin el consentimiento previo de nuestra compañía.Toda la información, las descripciones de imágenes y las especificaciones en este manual son las más recientes antes de la publicación. Debido a cambios y mejoras, el contenido de este manual puede diferir de las condiciones actuales. Nuestra compañía se reserva el derecho de realizar modificaciones en cualquier momento. Las especificaciones y los parámetros de los productos están sujetos a cambios sin notificación previa.La configuración y distribución de repuestos podría variar en los diferentes países o regiones. Para más detalles, consulte con su distribuidor local.
www.motoserpento.com

MOTORCYCLE MODEL:
FORZA 150USER’S MANUAL & MAINTENANCE
FOR THE MOTORCYCLE
MANUAL DEL USUARIO • FORZA 150
Important Cautions
About running-in of a motorcycleThe first 1000 km operation is very important in the entire service life of a motorcycle. A correct running-in can guarantee both the longest service life and the best performance of the vehicle. Running-in can polish machined surfaces and form smooth engagement. Careful and patient running-in can make the motorcycle stable in driving and give a full play to its excellent performance. It is important not to do any operation that may cause overheat to engine components. For specific running-in method, please refer to “Running-in of a new vehicle”. Please carefully read the manual and strictly observe all instructions or descriptions. Special attention shall be paid to the contents emphasized with the terms of “warning” “caution” and “note”, etc. Warning……It concerns with personal safety. Ignoring it may result in accident. Precaution……It refers to operational methods that must be followed or measures that should be taken, so as to prevent damage. Note……It refers to special explanations to make maintenance or important descriptions more explicit. The operation manual shall be deemed as a permanent document of the motorcycle. When transfer the vehicle to others, the instruction manual shall also be transferred to the new owner.

Foreword
Thank you for your choosing our motorcycle. In design, development and manufacture of the series motorcycle, our company applies the latest advanced technology and equipment to provide you with a motorcycle that is reliable in performance, novel in design and elegant in appearance. Motorcycle driving is one of the most exciting sports. The motorcycle is an ideal means of transport. It can give you infinite driving pleasure. Before driving your motorcycle, please be familiar with all stipulations and requirements mentioned in the instruction manual. The instruction manual deals in the correct use, maintenance and maintenance of the motorcycle. Observing the following stipulations will provide a guarantee to your motorcycle for a long time use without trouble. The distributor has skillful and well trained technical professionals to provide the best maintenance and service to your motorcycle.

MANUAL DEL USUARIO • FORZA 150
Contenido
Chapter 1 User Instructions 6
Position of serial numbers 7
Chapter 2 Installation Position of Parts 8
Chapter 3 Control Part 10
Chapter 4 Instructions on fuel and engine oil 23
Chapter 5 Running-in of new motorcycle 25
Chapter 6 Inspection before Driving 27
Chapter 7 Essentials of Driving 28
Chapter 8 Inspection and Maintenance 32
Chapter 9 Measures to Reduce Pollution 58
Chapter 10 Troubleshooting 58
Chapter 11 Storage Method 61
Chapter 12 Parameter List 64

6
Chapter 1 User Instructions
Instructions on safe driving of motorcycle
There should be a condition for the motorcycle to serve your well. The condition is paying attention to safety at any time. Therefore, you must observe the traffic laws and follow the six points below.
Wear safety helmetSafe driving starts from wearing a safety helmet. This is an important factor in motorcycle driving. A high-quality safety helmet is the first thing of personal protection in motorcycle driving. The most serious traffic accident is head injury. Therefore, be sure to wear a safety helmet to drive a motorcycle, and wear a pair of proper protective glasses.
Please be familiar with the vehicle structureYour driving technique and your understanding of mechanical knowledge are the basis of safe driving. Make exercises in a spacious place without other vehicle and make yourself fully familiar with your motorcycle and control method. Be sure to keep in mind that, skill comes from practice.
Understand the limit of your safe speedDriving speed depends on road surface conditions, your skills and the weather. Understanding the limit may prevent accident. At any time, accident may be prevented as long as driving in the range of your skill.
Wear well-fitting dress Loose and fancy dress may make you uncomfortable and unsafe in your driving. Riding on the cradle, a well-fitting dress may give you freedom for activities of your arms and legs. Gloves, boots and safety helmet will show that you are qualified driver. High quality and tight dress shall be your selection.

MANUAL DEL USUARIO • FORZA 150
7
Pay more attention to safety during driving in rainy weatherPlease note that, in rainy days, the braking distance is two times as much as that in fine weather. Get away from any manhole cover, paint mark or oil stain surface to prevent slipping, wet roads are dangerous. Avoid abrupt steering during acceleration. Be careful when drive over railways and bridges and keep a safe distance with any vehicle in front.
Inspection before drivingPlease carefully read all instructions in “inspection before driving” of the manual to guarantee the safety of you and passengers.
Position of serial numbersChassis number (or VIN code) Engine number
Position of metal nameplate

8
Chassis number (or VIN code) and engine number is necessary for registration of your motorcycle. Such numbers are needed with order components or service, to allow the distributor to provide you with better service.
Chassis number (or VIN code) is on the riser pipe of chassis. Engine number is on the left side of crankcase. Metal nameplate is on the riser pipe of chassis, showing the main technical parameters, manufacturer and date of production of the motorcycle. Write the numbers in the spaces below, for future reference.
Chassis number:
Engine number:
Chapter 2 Installation Position of Parts
Handle bar instrument1 Clutch grip2 Rearview mirror 3 Left handlebar switch4 Speedometer5 Ignition switch6 Tachometer7 Right handlebar switch8 Front brake grip9 Accelerator

MANUAL DEL USUARIO • FORZA 150
9
Left side view1 Fuel tank switch 2 Carburetor 3 Air cleaner 4 Helmet lock 5 Front wheel 6 Gear lever7 Center stand8 Side stand9 Rear wheel10 Cargo shelf
Right side view 1 Battery and Fuse 2 Spark plug 3 Back foot shelf4 Front foot shelf 5 Rear brake pedal6 Discharge oil bolt7 Kickback start lever

10
Chapter 3 Control Part
Key
Two keys are provided. Please use one key and put the other in a safe place for future use.
Instrument panel
Reset knob (1): Turn it counterclockwise to reset the mileage number on the trip meter to zero.Speedometer (2): Shows the driving speed in km per hour.Odometer (3): Records the total distance that the motorcycle has traveled since it was used. Turning signal lamp (4): When left turning signal lamp is ON, the left turning signal indicator on the panel “ ”and turning signal lamp will

MANUAL DEL USUARIO • FORZA 150
11
flash. When right turning signal lamp is ON, the right turning signal indicator on the panel “ ”and turning signal lamp will flash. Precaution: If one of front and rear turning lights is damaged, the indicators on the instrument panel and the turning lights may be lit consistently, or may flash fast or slow. Then, timely locate the cause and carry out troubleshooting. Gearshift Indicator (5): This indicator will show the current gear where the motorcycle is. There are all 5 gears. The 5 number indicators will be lit in turn on shifting. However, when the gear shifter is set in the neutral mode, they will extinguish, but only neutral indicator (N) is lit.High beam indicator lamp (6): When the head light is in high beam, the indicator is lit. Tachometer (7): It shows the engine rotation speed in number of revolutions per minute.Trip meter (8): Trip meter is a kind of odometer that can be reset. It is installed in odometer. It is mainly used to count the distance of a short driving or for calculation of fuel consumption.Neutral gear indicator lamp (9): When the transmission is in neutral position, the indicator will be lit. When any other gear is engaged, the indicator goes OFF.
Ignition switch
FIG1 FIG2
There are two types, three-position as showed in following sketches, to be used for different models. (OFF) position: All circuits are disconnected and the key can be removed.
(ON) position: All igniting circuits are ON and the engine can be started. The key cannot be removed in this position.
H
P
US
I
II
GNT
ON

12
(Parking) Position (FIG1): To park the motorcycle, turn the key to . position. In this position, the key can be removed and the tail lamps (parking lamps) and front positioning lamps keep ON for parking on roadside at night.WARNING: Before turn the key to , position, park the vehicle with its side stand or central stand in a firm way.
Position (FIG2): In order to lock the handlebar, turn the bar to the left, then insert the key. Rotate it clockwise to full stop for locking the handlebar.WARNING: If the handlebar is locked, the motorcycle is never pushed any longer; otherwise you will lose balance.
Steering lock
If ignition switch is FIG1 type, the position of steering lock is shown as follows.To lock the steering handlebar, turn the handlebar to left, insert the key and turn it clockwise. Warning: When the steering handlebar is locked, never move the motorcycle or you may lose balance.

MANUAL DEL USUARIO • FORZA 150
13
Left handlebar control system
Clutch grip (1): To start the engine or make a gear shifting, press the grip to release the drive system and cut off the clutch. Dimmer switch (2): When dimmer switch is turned up to ” ” (high beam) position, the head light is in high beam and the high beam indicator lamp on the instrument panel is lit. On contrary, when it is turned down to “ ”(low beam) position, the low beam is lit. Turning signal operation When the switch is turned to left “← ” position, the left turning signal lamp is lit and the indicator lamp on instrument panel flashes. When the switch is turned to right “← ” position, the right turning signal lamp is lit and the indicator lamp on instrument panel flashes.Warning: Whenever you are going to change lane or make a turning, timely turn ON the turning signal lamp. After lane change or turning, timely turn the signal light OFF. Horn button (3): Press “ ” button and the horn will sound

14
Right handlebar control system
Engine shutdown switch (1): The switch is a rocker switch, located on the tip of right handlebar control panel, with the rockshaft at the center of the rocker. When it is pressed in “ ” start position, the switch is turned and the engine can be started. It is an emergency switch. If the switch is pressed i“ ” position, the starting circuit is completely cut off and the starter motor cannot be started. Do not put the switch in this position during driving. Front brake grip (2): To apply front wheel brake, slowly press the brake grip on the right handlebar. As the motorcycle adopts hydraulic braking←do not press it abruptly or forcefully. When the brake grip is pressed, the brake light will be lit automatically.Electric start button (3): Press button to turn on the start motor circuit. During starting, put in neutral gear position to cut off transmission and guarantee safety.WarningThe starter motor shall be operated not more than 5 seconds. Heavy discharge may cause overheat to circuit and starter motor. If starting is failed after several attempts, stop to check the fuel supply system and starting circuit (refer to “Troubleshooting”). Lighting switch (4): “ “ ON position When the switch is turned to this position, the head light, front position light, instrument panel light and rear tail light will be lit. “ “ parking light position When the switch is turned to this position, the front position light, instrument panel light and

MANUAL DEL USUARIO • FORZA 150
15
rear tail light will be lit. “ ” OFF position All the head light, front position light, instrument panel light and rear tail light go OFF.Accelerator grip (5): Accelerator grip is used to control the engine speed. To accelerate, turn the grip towards yourself. To decelerate, turn the grip away from yourself.
Fuel tank cap
To open fuel tank cap, insert the key and turn it clockwise. Then, the fuel tank cap can be removed together with the key. To replace the cap, align the arrow on the cap and press the cap, together with the key, into the fuel tank cap hole until a click sound is heard. Then, remove the key.
(1)Gasoline level (2) Filler

16
Warning:Do not fill the tank excessively. Never splash fuel to hot engine. No fuel shall be left on the upper part of the filler, or the fuel may overflow when fuel temperature risess and expands, causing hazard. During fuel refilling, shutdown the engine and turn the key to OFF position. Smoking or lighting fire is strictly forbidden during fuel refilling.
Gear lever
The motorcycle is provided with a 5-speed gear transmission. The gear lever connects to a ratchet mechanism in the transmission. After selecting a gear, the gear lever returns to the home position←so that the next gear can be selected. The neutral gear is between the low gear and two speed gear. From neutral position, press downs the gear lever to engage a low gear. Raise the gear lever one step to move forward a gear. Owing to the ratchet mechanism←it cannot move two or more gears up or down in one operation. To shift from 2-speed gear to low gear, or from low gear to 2-speed gear, it passes the neutral position but not stays there. To engage to neutral gear←stop it in the middle of moving from low gear to 2-speed gear. Precaution←When the transmission is in neutral position, the neutral indicator lamp is lit on the instrument board. Despite the lamp is lit, be careful to release the clutch grip slowly to make sure if the transmission is really in neutral position.

MANUAL DEL USUARIO • FORZA 150
17
When engaging into a low gear during high speed driving, the engagement of clutch may make a sudden increase in engine speed. Before engaging a low gear, slow down the motorcycle to prevent unnecessary wear of components in transmission system.
Rear brake pedal
Press down this pedal to apply rear wheel brake, and the brake indicator light is lit.
Stand
The vehicle is equipped with two stands, a center stand (1) and a side stand (2). If you want to use center stand to park the vehicle, grasp the handlebar with left hand and step on bar of stand, then lift rear rack to put vehicle

18
on stand.If you want to park vehicle with side stand, step on side stand end to front limit position on chassis.
CAUTION:If you park the vehicle on sloped ground, please let it head higher direction to prevent it from sliding down.For the sake of driving safety, before setting out, please make sure that stands are return to upper position and they don’t loose and swag.
Carburetor enrichment lever
To help starting, the vehicle is provided with carburetor enrichment system (1)Plunger carburetor←To start a cold engine, raise the enrichment lever to the highest position. After starting, lower the lever to a half way and allow the engine to warm up to a proper temperature, before returning the enrichment lever to its home position. (2)Wire type enrichment plunger carburetor: To start a cold engine, put the wire handle forward to the end position. After starting, put the handle to a middle position and allow the engine to warm up to a proper temperature, before returning the enrichment handle back to its home position.

MANUAL DEL USUARIO • FORZA 150
19
Note:The enrichment system is designed for starting a cold engine. When temperature is low, the warming time shall be extended properly (if no warming is made, the speed transition may become poor). During driving, the enrichment system shall be shutoff; otherwise the fuel consumption may be increased. The correct enrichment shutoff status is←For vacuum carburetor, fully push in the lever←For plunger carburetor, lower the lever to the end←For wire type enrichment carburetor, turn it to the front end. Warning:After using the enrichment system, shutoff it timely to prevent overheat that may damage the silencer elbow.
Kickback start lever
The kickback start lever is installed on the right side of the motor. Owing to motorial kickback starting mechanism, the engine can be started in any gear position provided the clutch is released.
Warning:After the engine is started, check if the start lever has returned to its normal position. Do not use the kick starter and electric starter at the same time.

20
Helmet lock
until the lock is open. Hook the buckle of helmet to the lock and turn the key counterclockwise until the lock is locked then pull out the key.WARNINGNever drive the vehicle with a helmet locked to the helmet lock.The helmet may hinder a safe driving.
Fuel switch
The vehicle is provided with manual fuel valve. There are three positions “ ” (Open), “ ” (Reserve), y “ ” (Close).

MANUAL DEL USUARIO • FORZA 150
21
“ ” Open position Generally, the fuel switch is in this position. When the accelerator grip is rotated, fuel flows from valve to carburetor.
“ ” Reserve positionIf the fuel level is too low, turn the fuel switch to this position and a certain amount of fuel in reserve can be available.
“ ” Close positionTurn the fuel switch to this position after the engine is shutdown.
Precaution:If the fuel switch is in “ ” Open position for a long time, fuel may overflow from carburetor to engine. Fuel in engine may cause serious mechanic damage during engine starting.
Note:IEvery time after turning the fuel switch to reserve position, refill the fuel tank immediately to the nearest gas station and return the fuel switch to open position.

22
Rear shock damper
Spring adjustmentThe shock damper springs of rear wheel can be adjusted according to the payload, driving mode and road conditions. The adjustment can be one of the five stages. Park the vehicle on its central stand or side stand and turn the spring tension ring to the required position. The first stage is the softest and the fifth stage is the hardest. The second stage is as the factory setting.
WARNINGThe springs of both sides must be at the same stage. Otherwise, they may cause an unstable steering bar.

MANUAL DEL USUARIO • FORZA 150
23
Tool kit
The tools box is behind the seat. To open the box, insert the ignition key and turn it clockwise and take down the box cover.
Chapter 4 Instructions on fuel and engine oil
FuelWarning
Gasoline is inflammable and explosive. When handling gasoline, attention should be paid to prevent burnt or accident. • In places where gasoline is stored or handled, shutdown the engine, do not smoke, and keep away from naked flame or spark. • Refueling shall be made in a well ventilated place. After refueling, immediately clean off any gasoline outside the fuel tank. Please #93 or #95 (GB17930-1999) unleaded gasoline. This may prolong the service life of spark plug.
Note! If the engine produces ping noise, it may be caused by using of improper fuel. Replace with correct fuel.

24
Ethanol gasoline If ethanol gasoline is used, please use #90 or higher conforming to GB18351-2004. Do not use methanol gasoline, even though it may contain cosolvent and anti-corrosion agent. Note! • If ethanol gasoline is exposed to water excessively, ethanol may be separated, resulting in decrease of gasoline octane number. Therefore, the storage time shall not be too long. • Before using ethanol gasoline for the first time, make a through cleaning of the fuel supply system and fuel tank. • Always buy a proper amount of ethanol gasoline. Once there is a poor fuel tank sealing or a long storage time, moisture content may increase, causing low octane number and resulting in difficult ignition or weak power.
Lubricant(Please refer to Regular Maintenance Table)Use high quality 4-stroke engine oil to prolong engine life. Engine oil shall be SE or SD product in API classification. Engine oil of proper viscosity shall be used according to local air temperature. There are three viscosity levels suitable for the engine, namely, SAE15W-40, SAE10W-30 and SAE5W-30. Refer to the figure below: SE or SF level SAE10W-30 4-stroke lubricant is recommended.
Note←Lubricant shall be replaced at 1000km or about one month for the first time, every 3000km thereafter. Oil volume is 850ml for replacement or 1300ml after overhaul. The quality of engine oil is a major factor affecting the service life of engine. Replace engine oil according to the maintenance period stated in maintenance table (please refer to Page 19). When driving in dusty area, engine oil shall be replaced more frequently than the stipulations in the maintenance table.

MANUAL DEL USUARIO • FORZA 150
25
Explanation: During cold weather in northeast and northwest China, it is advisable for user to use high quality low temperature lubricating oil. SE 10W-30 or SF 5W-30 is recommended. For temperature below -35°C, the following use time, API SG or higher class 5W-30 lubricant of notable brand is recommended.
Warning: Inferior lubricant may cause irretrievable loss to the engine and seriously shorten the service life of engine.
Chapter 5 Running-in of new motorcycle
The importance of correct new vehicle running-in was mentioned in Foreword. The correct running-in method is as follows. Maximum speed
The maximum speed during running-in period is shown in the table.
First 800 km <5000 rpm
At 1600 km <7500 rpm
After 1600 km <10000 rpm
Changes of engine speedDo not drive at a constant engine speed for a long time. For a better running-in, properly increase and reduce the throttle opening. Change engine speed from time to time to let various engine parts get “bearing” pressure. When the pressure is “unloaded”, the engine parts will cool

26
down, helping the fitting of different parts. During running-in period, engine load may be properly increased. Apply some load to engine parts to guarantee good fitting. This is every important, but do not apply excessive load to the engine.
Avoid driving at a low speedRunning at a certain low engine speed (with light load) can only polish the parts but cannot get a good running-in. So long as the upper limit of recommended throttle opening is not exceeded, drive the vehicle in various gears with proper acceleration. However, never drive at the maximum acceleration during the first 1600 km.
Make oil circulating before drivingAfter starting of warm or cold engine and before applying load or driving, let the engine run at idle speed for an adequate time. This allows lubricant to flow to all import engine parts, so as to reduce wearing and increase the service life. This also helps the engine to warm-up sufficiently.
First maintenance inspectionThe maintenance of the first 1000 km is the most important. During running-in period, all engine parts have been run-in and other parts engaged. Then, all parts shall be adjusted, all fasteners be tightened, contaminated engine oil be replaced and filter element be replaced. Timely making 1000 km maintenance can guarantee a long engine life and the best engine performance.
Precaution←1000 km maintenance shall be carried out according to the “Troubleshooting” in the manual. Pay special attention to the “precaution” and “warning” in the section.

MANUAL DEL USUARIO • FORZA 150
27
Chapter 6 Inspection before Driving
Before driving, make sure to carefully check the following items. Never ignore the importance of the inspection.
Contents Revisión
Steering handlebar 1. Smooth 2. Free steering 3. No loose
Lighting Operate all lamps -- head light, tail light, brake light, instrument board lighting lamp, turning signal lamps
Transmission oil Proper oil level
Brake 1. Adjust clearance of rear brake pedal and front brake grip2. No “spongy” feeling3. No leakage
Indicators Neutral gear, gear position, oil level indicators (or turning signal indicators)
Accelerator 1. Proper free play in accelerator wire2. Free fuel flow and reliable accelerator throttle valve returning to closed position
Tires 1. Correct air pressure2. Proper tread pattern depth3. No injury or cut
Horn Correct function
Clutch 1. Proper free play in clutch wire2. Smooth operation and full releasing.
Fuel Adequate fuel for the distance to drive.
Driving chain 1. Proper tightness2. Proper lubrication

28
Chapter 7 Essentials of Driving
Warning:If it is the first time for you to drive this type of motorcycle, you are advised to practice on a road away from highways, until you have completely been familiar with the control and operation of the vehicle. Before driving, make sure that the side stand is returned to the uplift position. Do not make gear shifting or deceleration in course of turning. Slow down to a safe speed before turning. Do not shift into a low gear during turning. It is dangerous to drive a motorcycle with a single hand. During driving, take a firm hold to the handlebar with both hands and put your feet on the foot board. In any event, never free your both hands from the handlebar. On a wet road, the friction force is low and so is the brake force and turning capability. Therefore, decelerate in advance. Observe the traffic laws and speed limit.
Engine startingMake sure the fuel switch is in open position and the engine shutdown switch in “ “ position. Insert the ignition key in ignition switch and turn it to ON position. If the transmission is in neutral position, the neutral indicator lamp is lit.
Warning:Make it a habit that, engage the neutral gear and firmly press the clutch grip before starting the engine. This can prevent dash forward in case of mistaking gear engagement.

MANUAL DEL USUARIO • FORZA 150
29
1 Press the electric starting button for ignition. Never rotate the accelerator grip when pressing the starting button.
Note:After engine ignition, immediately release the starting button, to avoid adverse effects to the engine. If the engine is not started after 5 seconds, wait for 10 seconds before making another attempt to prevent damaging the battery. In case of failure in engine starting after two or three attempts, rotate the accelerator grip for 1/8 or 1/4 turns and try again. A motorcycle not used for a long time and poor atomizing fuel may result in starting difficulty. In this case, do not rotate the accelerator grip, but repeat starting.
2 Starting with the kickback start leverWhen the battery is over discharged, the engine can be started by using the kickback start lever. Turn the ignition switch to ON position. Forcefully kick the kickback start lever.
Cold enginePut the carburetor enrichment handle (plunger carburetor) or lever (vacuum carburetor) to the highest position (plunger) or pull it fully out (vacuum carburetor), keep the accelerator closed, and press the electric start button; After the engine is started, press the handle half way down (plunger) or push the lever half way in (vacuum) and wait for the engine is adequately warmed-up, before putting the handle or lever to the original position. The colder it is, the longer warm-up time the engine takes. Otherwise, the acceleration may be poor.
30
Warm engineRotate accelerator grip for 1/8 - 1/4 turns, and press electric start button to start the engine. When the engine is warm, it is not necessary to use carburetor enrichment system.
Warning:Never start the engine in a room with poor or no ventilation. It is because carbon monoxide gas is poisonous. Never leave the motorcycle unattended with a running engine.
Precaution:Do not allow the engine run for a long time without driving, or the engine may get overheat causing damage to internal parts or chrome plating of exhaust system. Start driving the motorcycle
Precaution:Start the engine with the transmission in neutral position, the clutch engaged and driver riding in normal driving position. Firmly press the clutch grip, wait a little moment, press down the gear lever to engage the first gear, rotate the accelerator grip slowly to you and smoothly and slowly release the clutch grip. When the clutch is engaged, the motorcycle will move forward. To change into a higher speed gear, firstly decelerate a little, release the accelerator and, at the same time, press the clutch grip, shift the gear lever to the next higher speed gear position and release the clutch grip, slightly rotate the accelerator. In this way, the highest gear can be engaged gradually.
Note:For high speed driving, always avoid releasing the accelerator suddenly. it is advised to wait a moment when the engine is running at 3000-5000rpm before fully releasing the accelerator. This can prevent the engine from shutdown due to abnormal combustion.

MANUAL DEL USUARIO • FORZA 150
31
Use of transformation deviceTransformation device is able to allow the engine running smoothly within normal range of operation. The transmission gear ratio is carefully selected for the engine performance. Driver shall select gears suitable to general conditions but shall not use the clutch for the purpose of speed control. To decelerate, shift to a low gear to allow the engine running in a normal speed range.
Precaution:The engine speed shall not be in the red range of the tachometer in any gear. Driving on a slopeTo shift from a high gear to a low gear, control the speed in a safe speed range before gear shifting. Otherwise, abrupt deceleration (sudden rise of engine speed) may happen, causing gear impacts, sever parts wearing, or overbalance of the vehicle. it is dangerous.
Slope climbing: When going up a steep slope, the motorcycle may decelerate due to insufficient power. Then, immediately shift to a low gear to allow the engine running a normal power range. Pay attention that, gear shifting shall be made quickly to keep adequate forward momentum of the motorcycle. When going down a slope, use the engine for braking, by shifting into a lower gear. Be sure to keep in mind that, never drive too fast down a slope! Never allow the engine to run a very high speed for a long time.
Use of brake and parking methodRotate the accelerator grip outward to fully close the throttle. At the same time, apply the front and rear brakes with even forces. Use gear shifting to slow down. Before the motorcycle is stopped, firmly press the clutch grip, shift into neutral gear and observe the neutral indicator to make sure the neutral gear is engaged.

32
Warning:The faster the vehicle is driven, the longer the braking distance will be. Be sure to make correct estimation of the distance between you and the vehicle or object in front of you for adequate braking performance. An inexperienced driver always uses the rear brake only. This will cause premature wearing and too long a braking distance. It is dangerous to use front brake or rear brake only. This may cause slipping and out of control. On wet highway or other dull road surface and during turning, be extremely careful to apply the brake gently. Hard braking on rough or dull road surface is very dangerous. The motorcycle shall be parked on stable and flat ground. To park your motorcycle on a gentle slope by using the side stand, engage the first gear to prevent sliding off the side stand. Remember to shift to neutral gear before starting the engine. Turn the ignition switch to OFF position to shutdown the engine. Remove the key from ignition switch. Lock the steering bar for safety.
Chapter 8 Inspection and Maintenance
The following table shows the interval of regular maintenance in travel distance or number of months. At the end of an interval, be sure to carry out the specified inspection, lubrication and maintenance. If your motorcycle is used with heavy loads, such as high power driving in a dusty environment, the maintenance shall be carried out more frequently. Your distributor can give your further guide. The parts of steering gear, shock absorber, bearings and wheels are critical components, and require professional skills to repair. In the light of safety, it is advisable to the inspection and maintenance done by your distributor or qualified maintenance staff.

MANUAL DEL USUARIO • FORZA 150
33
Precaution:In regular maintenance, it may be necessary to replace one or more parts. For part replacement, it is advisable to use genuine parts or equivalent products. No matter if you are experienced in vehicle maintenance or not, the items with * mark shall be handled by your distributor or qualified maintenance staff. For the items without such mark, you can do it by yourself according to the instructions.
Warning:After correct running-in of 1000 km, maintenance is mandatory to ensure the safety of your motorcycle and give it a full play of its performance. Be sure to make regular maintenance thoroughly according to the instructions in the manual.
List of Regular Maintenance
Intervals:Based on the reading of odometer or No. of months
Km 1000 5000 8000
Months 5 20 40
* Battery ( specific gravity of electrolyte) I I I
Carburetor I I I
Spark plug I C R
Gasoline filter C - C

34
Note: Inspection: I, Tightening: T, Cleaning: C, Replace: R
Clutch I I I
Tires I I I
Air filter - C C
* Fuel hoseI I I
Replace once every 4 years
* Chassis bolts and nuts R R R
Crankshaft driving chain C C C
*Gearshift oil T T T
*Brakes R R R
*Front fork I I I
Driving chainI I I
Clean and lubricate once every 1,000 km
*Steering assembly I I I
Rear shock absorber - I I
* Cylinder nuts and exhausting pipe bolts T T T

MANUAL DEL USUARIO • FORZA 150
35
Lubrication Table
ToolsTo help you for regular maintenance, a set of tools is provided in the tool box on the rear left side of the vehicle.
IntervalsItems First 6,000 km or 6 months
Every 12,000 km or 12 months
Throttle cable Machine oil —
Clutch cable Machine oil —
Driving chain Apply oil every 1,000 km
* Brake cam shaft — Grease
Throttle control handlebar — Grease
Brake cable Machine oil —
Speedometer gearbox and wheel bearing
— Grease
Brake pedal Grease or machine oil —
* Steering gear Apply grease every 2 years or 20,000 km

36
Battery
Battery is normally stored inside the guard board on the right side of the frame. The battery for the model may be of conventional type or maintenance-free type. Direction for use of conventional type battery:
Before using, fill electrolyte to a level between the upper and lower limits. During using, the fluid level must be kept between the upper limit and lower limit. Warning:Once the battery has been in use, no diluted sulfuric acid shall be added. If the fluid level drops below the lower limit, fill distilled water to the upper limit. Never use tap water.
Precaution:Never damage, clog or alter the vent pipe for battery. Please make sure that the vent hose is connected to the vent fitting of battery, with the other end kept always open. The vent pipe and battery shall be installed correctly. The polarity of battery wiring shall be always correct. Connect the red wire to positive (+) and the green wire to negative (-). Wrong connection may damage the charging system and battery.

MANUAL DEL USUARIO • FORZA 150
37
Note:After the first 1000 km and every 3000 km, have the specific gravity of each battery cell checked by your distributor, by using an electrolyte hydrometer. .1. Safety← Electrolyte contains strong acid and shall be prevented from contacting the skin. During operation, wear safety helmet and safety clothing. In case that electrolyte gets in eyes, immediately wash the eyes with plenty of clear water for at least 15 minutes, before going to hospital. ← In case that electrolyte is drunk, drink a large amount of water or milk, and then milk or vegetable oil containing magnesia. ← Keep away from reach by children.
2. Electrolyte fillingBefore filling electrolyte, remove battery from the vehicle. Check if the electrolyte conforms to specification requirements. Direction for use of maintenance-free battery:
No electrolyte filling is necessary before and after battery using. To prolong the service life, fully recharge it before using.

38
Note:No matter what type it is, the battery may discharges and power may drop after a long store time. After removing from the vehicle and fully recharge, store it in a cool and well ventilated place. When the vehicle is not used for a long time, remove the negative (-) wire from battery.
Spark plug
After the first 1000 km and every 3000 km thereafter, clean off any carbon deposit from spark plug by using a small steel wire brush or a spark plug cleaner. Readjust the spark plug gap with a thickness feeler to keep it between 0.6 - 0.8 mm. Replace spark plug every 6000 km. When cleaning off carbon deposit, observe the color of the ceramic tip of spark plug. The color can tell you if standard spark plug suit your usage. If a standard spark plug shows wet or very dark, it may be better to use a spark plug with lower caloric value. A normal working spark plug shall be light gray or cotton yellow. If a spark plug is very white or even glowing, it means the spark plug was working in overheated conditions. Replace it with a spark plug of higher caloric value
Precaution:Spark plug shall not be over tightened to prevent the threads of cylinder head from being damaged. When spark plug is removed, prevent any impurities from getting into the engine through spark plug hole.

MANUAL DEL USUARIO • FORZA 150
39
Standard spark plug for the motorcycle is carefully selected and suitable for most operations. If the color of spark plug is found different from standard spark plug, it is advisable to contact your distributor before replacing with spark plug in a different heat resisting range. An improper spark plug may cause serious damage to the engine. A spark plug of other brand may result in operational difficulties. Therefore, consult with your distributor before selecting other brand spark plug. Engine oilA long service life of the engine depends on using high quality engine oil and regular oil replacement. Oil level check and regular oil replacement are very important tasks.
Check engine oil level
PrecautionEngine oil ruler shows the oil level. When oil level is low, never start the engine. Fill oil until the oil level is just below the upper limit of oil window.
Replace engine oil and oil strainer after the first 1000 km and every 3000 km thereafter. Oil replacement shall be carried out when the engine is still warm, so as to thoroughly drain old oil from the engine. The method is as follows: 1←Park the motorcycle by using the central stand.

40
2←Remove oil filler cap. 3 Remove drain plug from strainer cover on the engine bottom to drain oil. 4← Tighten the oil drain ring and fill fresh engine oil about 950 ml into the oil filler, before gently tightening the top cover. Note:If only oil is changed without replacing the element, the volume of fresh oil is 850 ml.
5 Start the engine and allow it running idle speed for several seconds. Precaution: Carefully check for any oil leakage around the filter element cover. 6←Shutdown the engine and wait for a minute before checking the oil level from engine oil ruler. The oil shall be kept on “F” (full) line. If the oil level is below “F” line, replenish until it reaches the “F”.
Precaution:Please use the engine oil recommended in “Instructions on fuel and engine oil”.
BrakeThere are two types of brake for the front and rear brake of the motorcycle, i.e., drum brake and disk brake. Check the brake after first 1000 km and every 3000 km thereafter. Correct braking operation is very important to safe driving. Be sure to carry out regular inspection of brake system by qualified distributor.
MANUAL DEL USUARIO • FORZA 150
41
Warning: Brake is related to personal safely and shall be kept in good order.
If the brake system or brake lining needs repair, you are strongly recommended to have the job done by your distributor. They are equipped with complete tools and proficient techniques and capable to do it in a safe and economical way.
Front brakeFor the brake, the distance from natural status to braking action is known as “free play”. If the front brake is a drum brake, the free play of brake lever measured at lever bracket shall be 10-20mm.
1← Rotate the adjusting nut of front brake clockwise or counterclockwise to adjust the free play to specified value. 2← After free play adjustment, lift the front wheel off the ground. Rotate the front wheel to check for any resistance. At the same time, press the front brake lever firmly and there shall be adequate clearance between the front brake lever and handgrip. If the front brake is a disk brake, the free play of brake lever measured at lever bracket shall be 5-10mm. Hydraulic brake system shall be checked everyday, as follows: 1← Check for leakage in the front wheel brake system. 2← Check for any leakage or crack in oil pressure pipe.

42
3←The front brake lever shall have a certain back spring force. 4← Check wearing conditions of front wheel brake lining.
Precaution←Wheel disk brake system is a high pressure brake. For safety, the replacement of oil pipe and hydraulic oil shall not exceed the interval specified in the maintenance schedule in the manual.
Brake fluid
Warning:It is harmful if brake fluid is drunk by mistake or contacts the eyes or skin. If it is drunk by mistake, spit it out by force. If it contacts skin or eyes, wash with plenty of clear water and go to hospital.
Precaution:The vehicle uses ethanol series hydraulic oil. It shall not be mixed with silicate or petroleum fluid. Otherwise, the brake system may be seriously damaged. Never use unpacked fluid or any fluid left over in the last maintenance, because moisture may get into the old fluid. Only SAE J1703 brake fluid shall be used. Pay attention not to splash hydraulic oil to paint or plastic surface, to prevent corrosion.

MANUAL DEL USUARIO • FORZA 150
43
Check the fluid level in the brake fluid tank. Replenish with specified hydraulic fluid if the level is low. Along with wearing of brake lining, fluid in the tank may flow to the pipe and the level may become low. Brake fluid replenishment shall be considered as an import item in regular maintenance.
Brake lining
The essential of checking the front wheel brake lining is to see if the lining is worn to the limit mark. If wearing exceeds the mark, the brake lining shall be replaced with a new one.

44
Warning: Do not drive immediately after replacing a new wheel disk brake lining. Press the braking grip for several times to allow the brake lining fully extended, the grip spring force restored, and the brake fluid is circulated smoothly.
Front brake light switch
The switch of front brake light is located below the brake grip. Loosen the screw and move the switch position back and forth to find a proper point so that the lamp is lit immediately when pressure is applied but before the grip is fully pressed. Rear brake
Adjustment of rear-wheel brakeIf the rear brake is drum brake, to adjust the rear-wheel brake pedal, set the pedal to the most comfortable position for driving by rotating the pedal adjustment nut. Then, rotate the free play adjusting nut (2) to keep the free play (1) between 20-30mm.
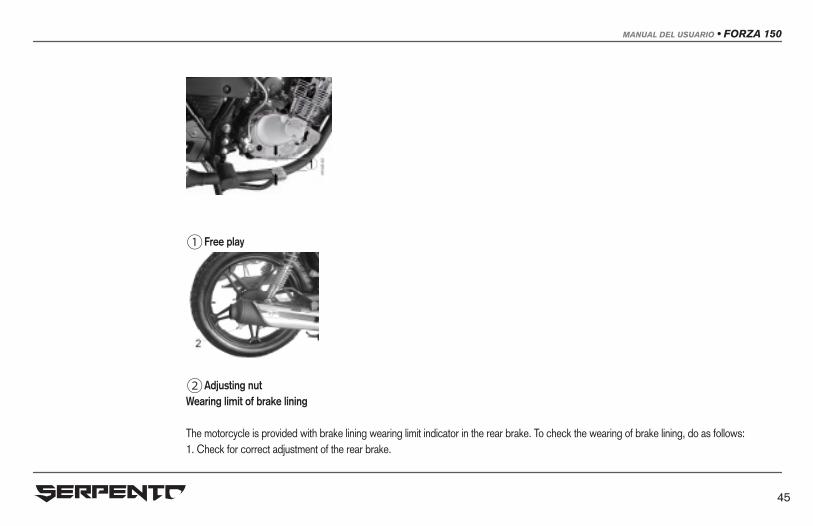
MANUAL DEL USUARIO • FORZA 150
45
Free play
Adjusting nutWearing limit of brake lining
The motorcycle is provided with brake lining wearing limit indicator in the rear brake. To check the wearing of brake lining, do as follows: 1. Check for correct adjustment of the rear brake.
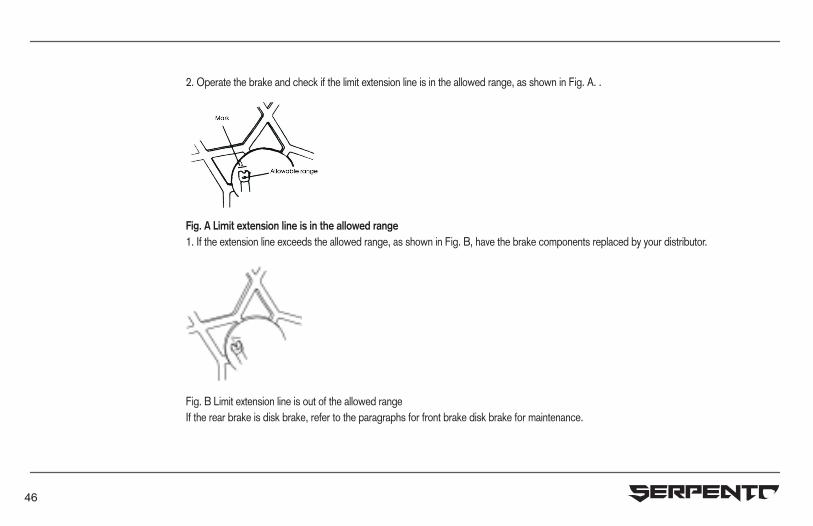
46
2. Operate the brake and check if the limit extension line is in the allowed range, as shown in Fig. A. .
Fig. A Limit extension line is in the allowed range1. If the extension line exceeds the allowed range, as shown in Fig. B, have the brake components replaced by your distributor.
Fig. B Limit extension line is out of the allowed rangeIf the rear brake is disk brake, refer to the paragraphs for front brake disk brake for maintenance.

MANUAL DEL USUARIO • FORZA 150
47
Rear brake light switch
Rear brake light switch is located at the right side of chassis. Adjust rear brake light switch as follows: Lift or lower the switch, so that, when the brake pedal is pressed, the lamp is lit before feeling a pressure.
Silencer
Please keep away from the motorcycle silencer after a long time driving, to avoid being burnt.

48
Fuse
The fuse box is located inside the guard board on the right side of the chassis. A fuse is provided for all the electrical system. In case of any trouble to electrical system, check the fuse first. If the fuse is blown out, replace it with the spare fuse (15A) in the fuse box.
Precaution:Always replace the blown fuse with a new one of the specified amperage. Never use aluminum foil, steel wire or other things as substitute for fuse. If a new fuse is blown in a short time, it means there is a major electric trouble. Contact your distributor immediately.
Replacement of bulbThe rating of bulbs can be found in Chapter 13 Parameter List. Always replace a bulb with a new one of the same rating. Otherwise, overload to electric system and premature bulb damage may be caused.
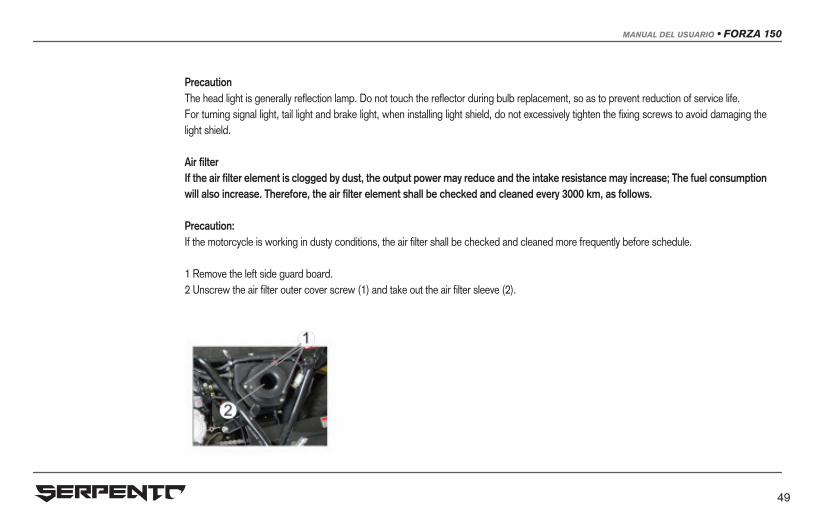
MANUAL DEL USUARIO • FORZA 150
49
PrecautionThe head light is generally reflection lamp. Do not touch the reflector during bulb replacement, so as to prevent reduction of service life. For turning signal light, tail light and brake light, when installing light shield, do not excessively tighten the fixing screws to avoid damaging the light shield.
Air filterIf the air filter element is clogged by dust, the output power may reduce and the intake resistance may increase; The fuel consumption will also increase. Therefore, the air filter element shall be checked and cleaned every 3000 km, as follows.
Precaution:If the motorcycle is working in dusty conditions, the air filter shall be checked and cleaned more frequently before schedule.
1 Remove the left side guard board. 2 Unscrew the air filter outer cover screw (1) and take out the air filter sleeve (2).

50
3 Take out the air filter foamed plastic sleeve shell. 4←Separate the foamed plastic from the outer frame.
Precaution1 During cleaning the filter element, check for any damage to the filter element and replace when necessary. 2 Never start the engine without the filter element installed, or the engine wearing may be increased. 3 Clean the foam type filter as follows:
Cleaning of paper filter elementCleaning method is as follows: 1←Remove the left side guard board. 2←Remove the tensioning band screw of air filter connector. Pull out the intake pipe and separate it from the filter. 3←Take out the filter element4←Pat the filter element while rotating it, to remove dust, and blow off remaining dust by using compressed air. 5← The filter element is made of paper and cannot be cleaned by using any oil-based agent.

MANUAL DEL USUARIO • FORZA 150
51
Precaution:Before and during cleaning, pay attention to check the filter element for any contamination, crack or damage. Replace it with a new one when necessary. Reinstall the filter in reverse order. Make sure the filter element is firmly fixed in correct position and reliably sealed.
Precaution:Never start the engine without the air filter installed. The air filter element must be cleaned or replaced more frequently if the motorcycle is used in dusty conditions. Never start the engine without the filter element installed, or the engine wearing may be increased. Be sure to the air filter element is in good working conditions, because this part is very important to engine service life.
CarburetorA stable carburetor is the basis of guaranteeing the engine performance. Before leaving the factory, carburetor has been adjusted to the best condition. Any unnecessary adjustment shall be avoided. Please note that, there are two adjustment items for carburetor, i.e., accelerator wire clearance and idle speed. Carry out adjustment after the first 1000 km and every 3000 km thereafter, as follows.
Adjustment of carburetor idle speed RPM

52
1← Start the engine and allow it to fully warmed-up without load. 2←Close the accelerator. Rotate the idle adjusting screw to keep the engine running at 1400±100 rpm. Precaution←Idle speed adjustment shall be carried out while the engine is fully warmed up. Idle speed adjustment shall be carried out while the engine is fully warmed up.
Adjustment of accelerator wire
Los componentes necesarios para ajustar la holgura del cable de arranque están debajo del puño acelerador; el método es el siguiente:1← Loosen the locking nut. 2← Rotate the adjuster to make the wire clearance between 0.5 - 1.0 mm. 3← After clearance adjustment, tighten the locking nut once again.
Precaution:: After accelerator wire adjustment, check the operation of accelerator grip. Engine idle speed shall not increase due to the adjustment, and the grip shall return to the closed position automatically.

MANUAL DEL USUARIO • FORZA 150
53
Adjustment of valve clearancevvThe valve clearance shall be checked and adjusted under the cooling condition of engines.1. Remove the fan guard and cylinder head cover.2. Turn the magnetor rotor anticlockwise to align the marker T of the rotor with the vertical line projected on the right case cover. Make sure that the piston is on the top of the compression stroke.3. Insert a clearance gauge between the adjusting screw and valve stem to ensure a proper clearance of the exhaust valve.4. Standard valve clearanceIntake valve clearance: 0.04-0.05mmExhaust valve clearance: 0.05-0.06mm5. To obtain a proper valve clearance, loose the adjusting nut and then turn the mating screw. Turn the adjusting nut on the completion of adjustment and measure the clearance until it meets the criteria.

54
Note:As the valve clearance imposes a marked impact on the engine performance, inspection and adjustment shall be severely observed at a regular time interval specified in the Scheduled Maintenance Scheme. The valve clearance increases with the passage of time and thus affects engine performances by producing loud noise and abnormal suction/exhaust processes. Therefore periodic adjustment, preferably done by professionals with special tools, of valve clearance is essential. To obtain an optimal valve clearance, the adjustment is recommended to be finished by the motorcycle distributors or the maintenance center. Valve clearance adjustment is essential for new motorcycles on the completion of their first 1000 km.
Adjustment of clutch Clutch adjustment is made through adjusting the tension of wire rope for clutch grip. Before feeling the gear disengagement by pressing the clutch grip, the wire clearance measured at clutch grip shall be 4 mm. If the clutch wire clearance is found incorrect, carry out adjustment as follows.
Loosen nut (2) and rotate the grip tensioning ring (3) clockwise to the stop. Loosen the wire rope adjusting ring lock nut (6), and rotate the wire tensioning ring (5) back and forth, until the grip clearance is about 4 mm. Grip tensioning ring (3) can be used for fine tuning. After the adjustment is completed, tighten locking nut (2) and (6), and cover them with rubber sleeve (4).
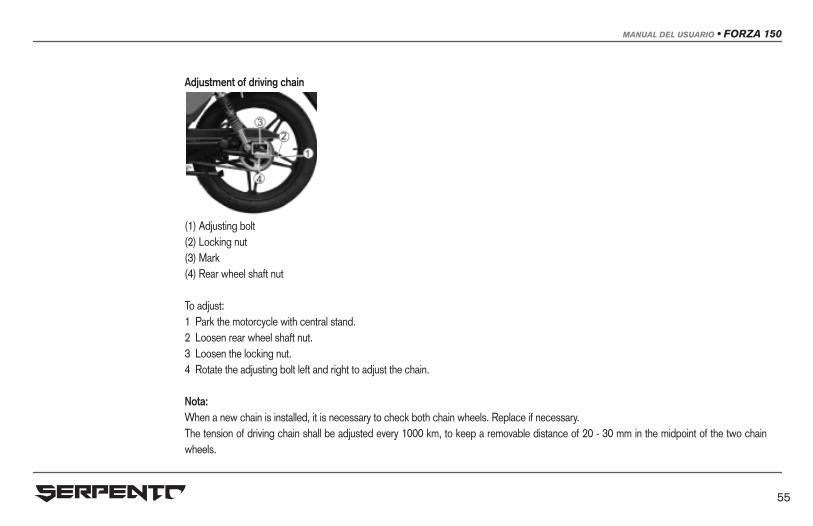
MANUAL DEL USUARIO • FORZA 150
55
Adjustment of driving chain
(1) Adjusting bolt(2) Locking nut(3) Mark(4) Rear wheel shaft nut
To adjust: 1← Park the motorcycle with central stand. 2← Loosen rear wheel shaft nut. 3← Loosen the locking nut. 4← Rotate the adjusting bolt left and right to adjust the chain.
Nota:When a new chain is installed, it is necessary to check both chain wheels. Replace if necessary. The tension of driving chain shall be adjusted every 1000 km, to keep a removable distance of 20 - 30 mm in the midpoint of the two chain wheels.

56
Precaution:The open end of driving chain connection clip shall point away from the direction of rotation.
Chain connector clip Direction of rotationCleaning and lubrication of driving chainDirt on driving chain may intensify the wearing of driving chain and chain wheels. Therefore, clean the driving chain every 1000 km with cleaning solvent, and lubricate it with special chain lubricant or engine oil.
TiresCheck the tire air pressure and tread pattern after first 1000 km and every 3000 km thereafter. Besides regular check, make it habit to check the tire air pressure from time to time, to ensure maximal safety and long life.

MANUAL DEL USUARIO • FORZA 150
57
Tire pressureA low tire pressure may intensify tire wearing and badly affect the driving stability, causing difficulties in turning. But, a too high tire pressure may reduce the contact area between tires and road surface, causing wheel-slip and even out of control. It is necessary to always keep the tire pressure within specified limit. Tire pressure adjustment shall be made when the tire is cold.
Tread patternWhen driving a motorcycle with over-worn tires, the driving stability is low and it may get out of control. When the depth of front wheel tread pattern is reduced to 1.6 mm or less, it is advisable to replace the cover tire. When the tread pattern of rear wheel is reduced to 2 mm or less, replace the tire with a new one.
Warning:Problems may happen if no standard tire is used. You are sincerely recommended to use standard tire. Correct tire inflation pressure is very important for normal vehicle performance and driving safety. Check the tire wear and inflation pressure from time to time.
58
Chapter 9 Measures to Reduce Pollution
To reduce exhaust emission and noise pollution, please follow the several points below: Use special purpose lubricantUse unleaded gasolineObserve any abnormal engine noise
Chapter 10 Troubleshooting
If the engine cannot be started, check the following items to locate the cause. 1← If there is fuel in fuel tank. 2← If fuel flows from fuel valve to carburetor. 3← Disconnect the fuel pipe from carburetor and turn the fuel valve to open position. Check if there is fuel flowing out of the pipe. 4← If it is confirmed that fuel can reach the carburetor, take the next step to check the ignition system.
Warning:Never allow fuel to flow everywhere. Collect it in a vessel. Keep fuel away from hot engine and exhaust pipe. During the operation, keep away from any flame or heat source. Smoking is strictly prohibited during fuel system checking. Carry out the work in a spacious place.
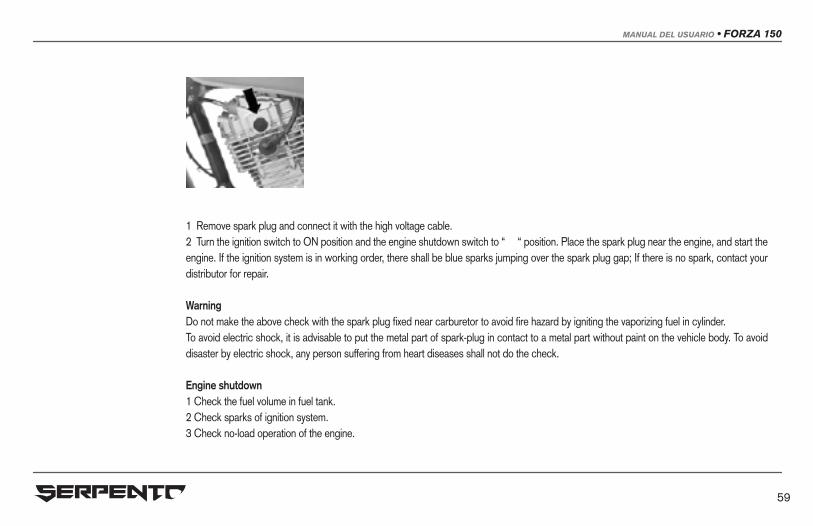
MANUAL DEL USUARIO • FORZA 150
59
1← Remove spark plug and connect it with the high voltage cable. 2← Turn the ignition switch to ON position and the engine shutdown switch to “ “ position. Place the spark plug near the engine, and start the engine. If the ignition system is in working order, there shall be blue sparks jumping over the spark plug gap; If there is no spark, contact your distributor for repair.
Warning:Do not make the above check with the spark plug fixed near carburetor to avoid fire hazard by igniting the vaporizing fuel in cylinder. To avoid electric shock, it is advisable to put the metal part of spark-plug in contact to a metal part without paint on the vehicle body. To avoid disaster by electric shock, any person suffering from heart diseases shall not do the check.
Engine shutdown1←Check the fuel volume in fuel tank. 2←Check sparks of ignition system. 3←Check no-load operation of the engine.

60
Trouble Cause Remedy
Engi
ne c
anno
t be
star
ted
or st
alls
sudd
enly
No fuel in carburetor
1. No fuel in fuel tank2. Fuel tank valve not opened3. Fuel tank valve clogged4. Float chamber needle valve hole clogged5. Main jet orifice clogged
1. Refueling2. Open the valve3. Clean fuel tank and fuel tank valve4. Disassemble and clean the carburetor5. Disassemble and clean the carburetor
Ther
e is
fuel
in c
arbu
reto
r
Sparking normal in high voltage cable and no sparking in spark plug
1. Oil stained spark plug2. Broken spark plug magnetic core or broken electrode3. Carbon deposit in spark plug electrode4. Incorrect spark plug gap
1. Remove, clean and dry it2. Replace spark plug3. Clean out carbon deposit4. Adjust the gap.
Normal sparking to spark plug, poor cylin-der compression
1. Leaking cylinder head gasket2. Loose spark plug3. Seized piston ring4. Excessively worn piston or broken piston ring5. Serious cylinder wearing6. Leaking intake pipe7. Damaged crankshaft sealing
1. Tighten screw or replace gasket2. Tighten spark plug3. Clean off carbon deposit in piston ring and ring groove4. Replace piston and piston ring5. Replace cylinder body6. Tighten or replace rubber ring7. Replace sealing

MANUAL DEL USUARIO • FORZA 150
61
Chapter 11 Storage Method
SIf the motorcycle is not used for a long time in winter or other seasons, it is necessary to carry out special maintenance with appropriate materials, equipment and techniques.
Trouble Cause Remedy
Abn
orm
al e
ngin
e op
erat
ion
Abnormal noise from engine
1. Serious worn out cylinder and piston2. Serious worn out needle bearings in small and big ends of connecting rod3. Premature ignition4. Excessive carbon deposit in combustion chamber5. Overheated spark plug
1. Replace cylinder body and piston2. Replace bearing and relate parts3. Adjust ignition time4. Clean out carbon deposit5. Replace spark plug
Unstable engine operation
1. Water or dirt in carburetor2. Clogged fuel passage3. Leaking crankcase4. Leaking connection between carburetor and engine5. Over-rich or over-thin gas mixture
1. Clean the carburetor2. Clean or replace fuel pipe3. Replace sealing4. Tighten screw5. Adjust carburetor
Overheat engine
1. Low gear driving over a long time2. Over loaded driving or long time driving with heavy load3. Over-rich or over-thin gas mixture4. Unqualified engine oil or insufficient transmission oil5. Slipping clutch6. Too tight chain7. Unreleased brake
1. Change gear position and control time2. Control load-carrying and rest from time to time for cooling3. Adjust carburetor4. Replace with qualified engine oil and fill oil to transmission case5. Adjust free play or replace clutch, friction lining and spring6. Adjust tension7. Adjust brake clearance
62
MotorcycleWhen a motorcycle is not used for a long time, make preparation before storage: Wash the motorcycle, park it with the central stand on a solid and flat ground and prevent it from rolling. Turn the handlebar of motorcycle to the left side and lock it. Remove the ignition key. For safety, select a place suitable for long time storage. To re-use the vehicle, carry out a complete inspection to ensure normal performance of all parts of the motorcycle.
FuelBefore storing the motorcycle, empty the fuel tank. Gasoline used in motorcycle is highly inflammable and even explosive under certain conditions. Therefore, never allow the motorcycle to get close to any fire. Never park the vehicle in a place storing articles subject to spontaneous combustion (such as grains, coal, cotton, etc.), because fire hazard may happen when the fuel in the vehicle contacts naked flame.
TiresMake tire inflation to normal pressure value. Keep the outside of tire clean. Avoid exposing to sunshine or moisture for a long time. Avoid contacting acid, alkali and oil to prevent tire corrosion.
BatteryWhen the vehicle is not used for a long time, remove the battery and fully recharge it before storing it in a place out of reach of children. Then, recharge it every month in summer and every two months in winter. If the battery is installed on the vehicle for a long time, recharge it every month.

MANUAL DEL USUARIO • FORZA 150
63
Steps during storageFor conventional battery, check electrolyte level every month. If the fluid level is low, timely replenish it with distilled water or pure water to the highest level mark. (Never use electrolyte or tap water)Battery shall be kept clean. Corrosion may happen if electrolyte is splashed to the vehicle body, terminal or wires. In case of corrosion, wash immediately with clear water and apply a coat of grease after drying off.
Insufficient power may cause difficulty in engine starting, weak horn sounding and no flashing turning signal light. Then, immediately recharge the battery for 15-20 hours. Note that, storing a low battery for a long time may cause battery damage.
When a battery has whitened plate electrodes, low power or low fluid level below the lower limit, and cannot restore the performance after a long time storage even after recharging, it means the service life has been terminated.
Steps of returning service1←Clean the entire motorcycle. 2←Remove spark plug; kick the kickback start lever to allow the engine rotating for several turns, before reinstalling spark plug. 3←Reinstall battery.
Note:Make sure to connect the positive connector before the negative one.
4←Adjust tire pressure according to the tire part of the the manual. 5←Lubricate all parts that require lubrication according to the manual. 6←“Check before driving” as instructed in the manual.

64
Chapter 12 Parameter List
The copyright and final power of interpretation of the manual belongs to our Motorcycle Inc. Without prior permission by our company., no part of the manual shall be reproduced, quoted or reprinted. All information, descriptions pictures and specifications in the manual are the latest before publishing. Owing to improvement or other changes, the contents of the manual may differ from actual conditions. our company reserves the right of modification at any time. Product specifications and parameters are subject to change without notice! Product configuration and spare parts supply may vary for different countries or regions. For details, please consult with your local distributor!
www.motoserpento.com

www.motoserpento.com