Embed Size (px)
Citation preview

Coletor de Dados Honeywell ScanPal EDA51
O computador móvel ScanPal EDA51, baseado em
plataforma Android, apresenta a combinação perfeita de
escaneamento de dados, processamento poderoso,
interface intuitiva com a tela touchscreen e conectividade
robusta em um design robusto e ergonômico. É ideal para
empresas de pequeno e médio porte aumentarem a
produtividade em aplicações de varejo, coleta e entrega e
serviços de campo.
www.bztech.com.br
P2
Disclaimer
Honeywell International Inc. (abbr. HII) reserves the rights to modify the specifications and other information
mentioned in this User Guide without prior notification. In any case, users should confirm with HII whether any
changes were made. This publication does not represent any commitments of HII.
HII is not responsible for any technical or editing errors or omissions contained in this manual, nor for any
incidents or indirect damages caused by providing, implementing or using this material. HII is not responsible for
the softwares or hardwares selected or used in order to achieve the desired results.
The proprietary information contained in this article is protected by copyright. All rights reserved. Without prior
written consent from HII, any form of photocopy, copy or translation into other languages is not allowed.
Trademark Rights
Android, Google and other marks are trademarks of Google Inc.
Other product names mentioned in this manual may be trademarks or registered trademarks of their respective
companies, which are owned by these companies.
Patents
For information on patents, please refer to www.hsmpats.com.
Copyright © 2018 Honeywell International Inc. All rights reserved.
P3
Contents
Chapter I - Features of ScanPal EDA51-X Enterprise Terminal ................................................................ 6
About EDA51-X Terminal ........................................................................................................................ 6
Battery ................................................................................................................................................... 10
Charging ............................................................................................................................................... 10
Replacing batteries ................................................................................................................................ 11
Battery icon ........................................................................................................................................... 14
Checking the remaining battery capacity ............................................................................................. 17
Battery life and maintenance ................................................................................................................ 17
Battery maintenance recommendations and safety protection measures ........................................... 18
Enabling Airplane mode ........................................................................................................................ 19
Switch on .............................................................................................................................................. 20
Unlocking the screen ............................................................................................................................ 20
Scanning Indicator ................................................................................................................................ 21
Setting screen backlight........................................................................................................................ 22
Audio features ....................................................................................................................................... 22
Enabling vibration mode ....................................................................................................................... 24
Audio settings ....................................................................................................................................... 25
Inserting SD card .................................................................................................................................. 26
File transfer ........................................................................................................................................... 27
View files on EDA51-X .......................................................................................................................... 27
EDA51-X Accessories........................................................................................................................... 28
Chapter II - User interface and application .............................................................................................. 29
User interface........................................................................................................................................ 30
Main page ............................................................................................................................................. 30
Navigation and function keys ................................................................................................................ 31
Status bar icons .................................................................................................................................... 31
Key Remap ........................................................................................................................................... 32
Viewing system messages ................................................................................................................... 33
Manage system messages ................................................................................................................... 33
Personalizing the main interface .......................................................................................................... 34
Customizing common applications ....................................................................................................... 34
Using GoogleTM ..................................................................................................................................... 34
Touch screen gestures.......................................................................................................................... 35
Setting time zone .................................................................................................................................. 35
Honeywell applications ......................................................................................................................... 36
GMS ...................................................................................................................................................... 37
Chapter III - Scan Function ...................................................................................................................... 38
Scan Function ....................................................................................................................................... 38
Changing scan settings ........................................................................................................................ 38
Data processing settings ...................................................................................................................... 39
Symbology settings ............................................................................................................................... 41
Imager settings ..................................................................................................................................... 42
Trigger settings ..................................................................................................................................... 42
Notification settings ............................................................................................................................... 43
Scanning barcodes ............................................................................................................................... 44
Scan Engine.......................................................................................................................................... 44
Chapter IV - Using Camera ...................................................................................................................... 45
Camera ................................................................................................................................................. 45
Zooming ................................................................................................................................................ 45
Changing camera settings .................................................................................................................... 45
Taking photos ........................................................................................................................................ 45
Shooting videos .................................................................................................................................... 45
Changing video settings ....................................................................................................................... 46
Chapter V - Using Telecommunication Function ...................................................................................... 47
Telecommunication Function ................................................................................................................ 47
Activating calls ...................................................................................................................................... 47
Making a call ......................................................................................................................................... 49
Answering a call .................................................................................................................................... 49
Switching applications during a call ...................................................................................................... 49
Making an emergency call .................................................................................................................... 50
Configuring call settings........................................................................................................................ 50
Chapter VI - Configuring Terminal ............................................................................................................ 51
Terminal configurations ......................................................................................................................... 51
Setting launch applications ................................................................................................................... 51
Structure of the Application Settings ..................................................................................................... 51
Networks& Internet ............................................................................................................................... 52
Connected devices ............................................................................................................................... 52
Devices and Google settings ................................................................................................................ 53
Honeywell Setting ................................................................................................................................. 54
System .................................................................................................................................................. 54
Network communication ....................................................................................................................... 55
Connect to Mobile network ................................................................................................................... 55
Connecting to Wi-Fi networks ............................................................................................................... 55
Add VPN ............................................................................................................................................... 57
Wireless Security .................................................................................................................................. 58
Bluetooth communication ..................................................................................................................... 58
USB Communication ............................................................................................................................ 58
Near Field Communication (NFC) ........................................................................................................ 58
Chapter VII - Management and Maintenance .......................................................................................... 59
Upgrading system software .................................................................................................................. 59
Restarting the Terminal ......................................................................................................................... 60
Restore factory settings ........................................................................................................................ 61
Chapter VIII - Specifications ..................................................................................................................... 62
Mechanical and environmental specifications ...................................................................................... 62
Display specifications ........................................................................................................................... 63
Language Support ................................................................................................................................ 63
Symbolgies Support .............................................................................................................................. 63
Scan Depth of Field (DOF) ................................................................................................................... 65

P4
Technical Support
If you need installation or troubleshooting help, please contact us via:
• Knowledge base: www.hsmknowledgebase.com
Honeywell knowledge base provides thousands of turnkey solutions. If the knowledge base can't help you
solve your problems, you can submit your questions or ask question on Honeywell technical support
website.
• Technical support website: www.hsmsupportportal.com
Login Honeywell technical support website to search for knowledge base, submit your difficulties or
questions, ask for call-back services or provide feedbacks. Please provide more detailed information
when filling the forms. You can also upload attachments for explanation.
• Contacts: www.honeywellaidc.com/locations
For the latest contacts, please visit our website.
Product Service and Maintenance
Honeywell International Inc. provide services for all of its products all over the world via its service centers. For
information about the site of service centers, please visit www.honeywellaidc.com and select English as preferred
language, then select Support > Contact Support > Service and Maintenance. Please contact our service center to
get RMA (Return Material Authorization) numbers before sending the products for maintenance.
To get Honeywell service during warranty or out of warranty, please send the product together with the purchase
date records to Honeywell service center (postage paid).
Limited Warranty
For information about the warranty, please visit www.honeywellaidc.com and select Chinese as preferred
language, tap Resources > Warranty.
Feedback
Your feedback is very important for us to improve the quality of documentation. Please contact technical
communication departments to submit your feedback on the User Guide:

P5
Chapter I - Features of ScanPal EDA51-X Enterprise Terminal
ScanPal EDA51-X (X refers to 0 and 1, as in all other cases below) (hereinafter called “EDA51-X” or “terminal”)
with Android 8.1 operating system will be introduced in this chapter. Users can learn something about the main
features, functions and accessories of this terminal from this chanpter.
About EDA51-X Terminal
Honeywell EDA51-X Enterprise Terminal is a smart phone for enterprise users, delivering stable and secure
enterprise data management and wireless communications through Android operating system. The main features
of ScanPal EDA51-X are: large-screen display, high-capacity battery, barcode imaging and extreme robustness.
• Android™ 8.1 OS.
• 2 GB dynamic RAM and 16GB flash memory.
• Large display with sensitive multi-touch screen.
• High-performance area imaging features with an ergonomic scan trigger.
• LTE/UMTS/CDMA/GSM wireless WAN communications ensure high-speed data transmission and
high-fidelity sound support for all network technologies.
• IEEE 802.11a/b/g/n/ac.
• Bluetooth 4.2.
• Near-field communication (NFC) technology for short-range wireless data transmission.
• High value-added software components support professional imaging and optical character recognition
(OCR) features.
• IP64 Ingress Protection.
• Reliable Micro SD slot that supports up to 128GB expansion.
• Integrated GPS receiver.
• 13 mega pixels color camera.
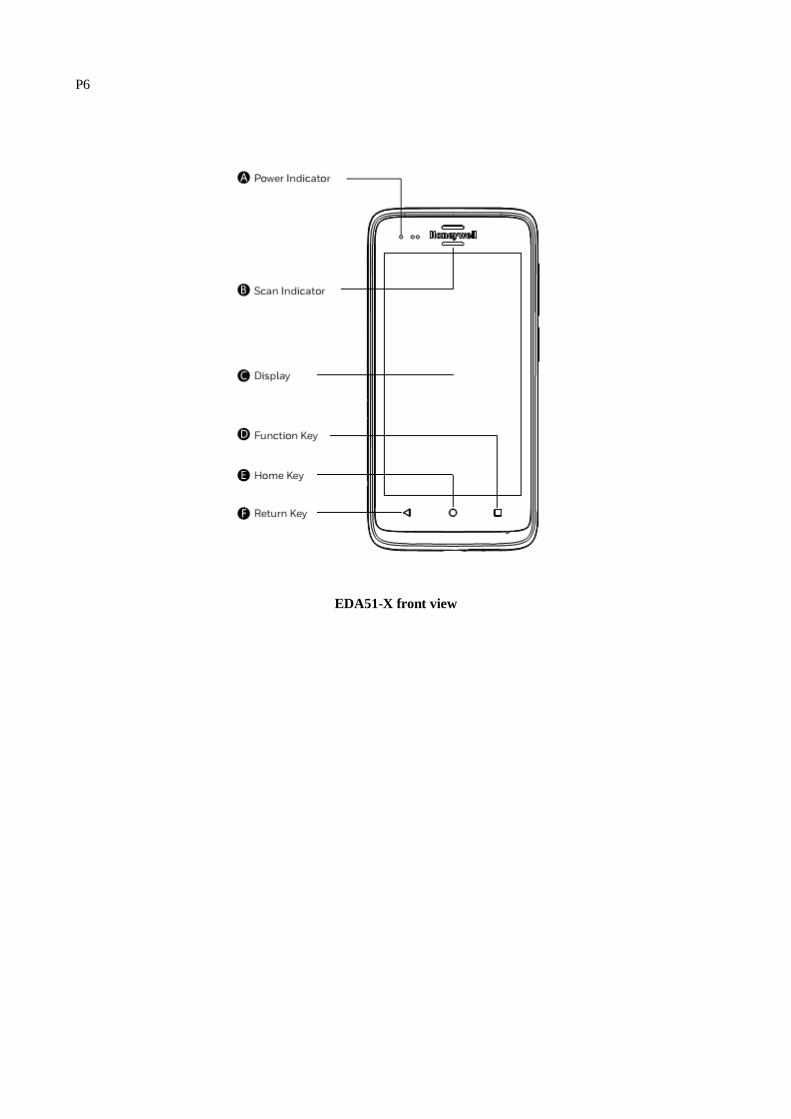
P6
EDA51-X front view

P7
EDA51-X side and bottom views

P8
EDA51-X rear view

P9
Battery
EDA51-X uses 3.8V rechargeable lithium ion battery as its main power supply. The battery capacity is 15.2
watt/hour. Battery life is influenced by many factors, such as: screen brightness, the length of time before the
screen automatically go to sleep, input configurations, extreme temperature and using behaviors, etc.
Honeywell suggests you to keep the battery charged to avoid data loss. Change battery only after switching off the
device as per normal. Switch on the device after completing change of battery.
If you need to buy a replaceable battery, please contact regional resellers.
We would recommend using only Honeywell’s lithium battery; any damage caused by use of non-Honeywell
battery is not covered by warranty.
Warning:
Improper use of the battery of this device can cause a fire or chemical burns. Please don't disassemble
the battery or heat it to 100 °C (212 °F) and above, or incinerate the battery. Make sure waste batteries
are properly disposed. Keep out of reach of the children.
Do not store the battery without using for a long time. If store the battery for over 3 months, please
make sure check the remaining battery power capacity over 30% every 3 months.
Charging
Before using EDA51-X, you need to make sure the battery (model number: BAT-EDA50) is fully charged. You
can charge the battery before or after installing it to EDA51-X. It will take about 5 hours for the battery to be fully
charged using original charger, quad bay charger, single cradle charger.
We would recommend using Honeywell’s original charger; any damage caused by use of non-Honeywell charger
is not covered by warranty
P10
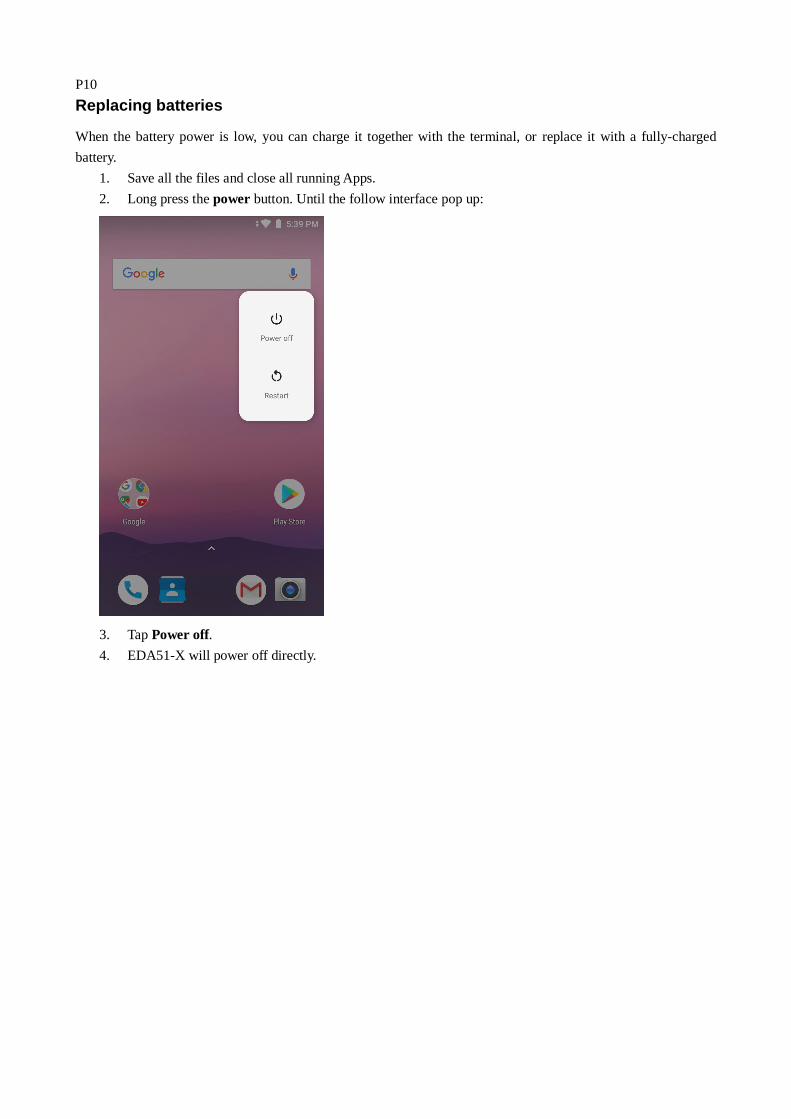
Replacing batteries
When the battery power is low, you can charge it together with the terminal, or replace it with a fully-charged
battery.
1. Save all the files and close all running Apps.
2. Long press the power button. Until the follow interface pop up:
3. Tap Power off.
4. EDA51-X will power off directly.

P11
5. After it's powered off, do as the following instructions manually:
1) Press down the battery cover safety button to move the lock to the unlock position at right;
2) Open the battery cover with the battery cover buckle handle;

P12
3) Insert the battery (Insert the non-connector side first, then press the battery down to establish
connection between the battery and the phone);
4) Press down the battery cover;

P13
5) Press down the battery cover safety button to move the battery cover safety lock to the lock position
at left.
Battery icon
Battery icon on the status bar shows the power status of the battery. The following table only contains several of
the icons. For detailed information about battery life and power remained, please go to Settings > Battery.
Battery icon
Icon Status
Battery power is 100% full
Battery power is 50% full
Battery power is too low. Replacing the battery right now.
The terminal has been connected to external power supply for charging.
Power indicator
LED flashing red
Battery failure occurs. Please replace the battery. If the failure still exists, please contact
Honeywell technical support.
P17
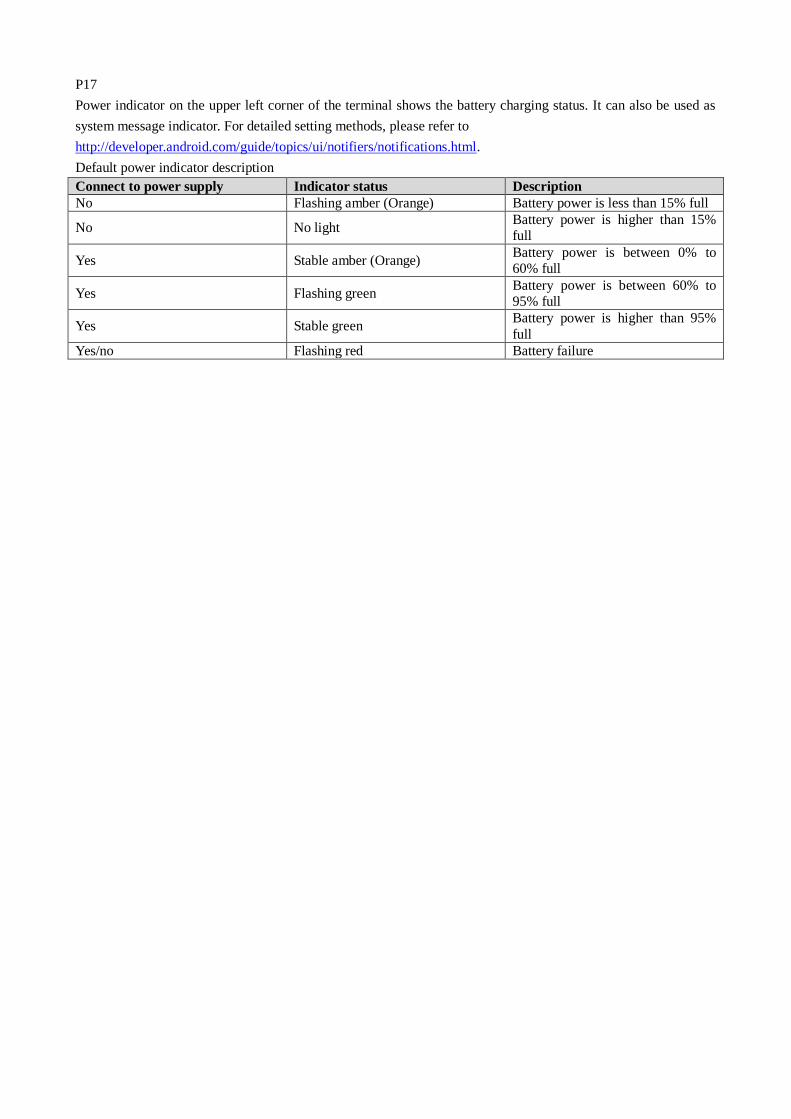
Power indicator on the upper left corner of the terminal shows the battery charging status. It can also be used as
system message indicator. For detailed setting methods, please refer to
http://developer.android.com/guide/topics/ui/notifiers/notifications.html.
Default power indicator description
Connect to power supply Indicator status Description
No Flashing amber (Orange) Battery power is less than 15% full
No No light Battery power is higher than 15%
full
Yes Stable amber (Orange) Battery power is between 0% to
60% full
Yes Flashing green Battery power is between 60% to
95% full
Yes Stable green Battery power is higher than 95%
full
Yes/no Flashing red Battery failure

P18
Changing power indicators
If the default indicators for battery charging (flashing green) are inappropriate for your environment, you can
change the indicator.
In addition to changing the default power indicator, you can also select:
• Default Battery LED
• No Battery LED
If you prefer the indicator to be solid amber and to change to solid green when in charging, you need to perform
Default Battery LED settings. If you prefer the indicator as message notification (application or device
management solution notification) indicator, you need to select No Battery LED settings.
Default power indicator meanings
Connect to power supply Indicator status Description
No Flashing red Battery power is less than 15% full
No No light Battery power is 15% or more
Yes Stable red Battery power is less than 15% full
Yes Stable amber Battery power is between 15% to
90% full
Yes Stable green Battery power is over 90% full
1. Tap Settings> Honeywell Settings>Battery LED
2. Select from the following options:
a. Default Battery LED
b. Honeywell Battery LED (Factory default settings)
c. No Battery LED

P19
Checking the remaining battery capacity
Except for the battery icon and power indicator, you can also get the battery capacity information from Settings.
1. Tap Settings
2. Tap Battery. The current percentage of remaining battery capacity and the remaining time will be
displayed. The list will present the power consumed by each application and service. For detailed usage
information, please tap the respective applications and services in the list.
Battery life and maintenance
The battery will discharge slowly if it's placed outside of the terminal. Honeywell technical support recommends
you store battery in a charger to maintain battery performance.
Tips for battery maintenance
If you have the following needs: Power saving plan:
Low power icon shows on the
screen or the power indicator
lights on when the terminal is in
use
Long press the power button and choose Turn Off. And the replace the battery
with fully charged one.
The terminal will not be in use
for 5 mins or more
Make sure no low power icon displayed and the power indicator doesn't light
on. Switch to sleep mode by pressing the Power button.
The terminal will be stored for
more than one day
• If you need to store this terminal for several days (like a weekend), you
need to install a fully charged battery or connect the terminal to the
power supply.
• If you need to store it for a longer time, remove the battery and charge it.
Put the terminal and the battery in a shady and cool place after the
battery is fully charged.
• If the battery is to be stored for several months, regular charging is
needed for excellent battery performance.
Store the battery outside the
terminal Put the battery in the charger.
P20
Battery maintenance recommendations and safety protection measures
• Fully charge the battery before using it. The battery is only partly charged when get packed.
• Refer to the chapter "charging" to get the right process for battery charging. Using the battery for other
devices may cause damages on the device or the battery.
• Avoid battery or terminal drops. If you suspect that a battery or terminal fails, send it to Honeywell
service center for verification.
• This battery can only replace another BAT-EDA51-X battery. These batteries have been tested and meet
the appropriate safety standards. If you need to replace the battery, please contact Honeywell service
representatives or the resellers.
• There are security risks in waste batteries. Before cleaning up the battery, stick the poles with insulation
tape.
• Do not modify the battery or attempt to insert foreign objects into the battery.
• Do not solder directly to the battery poles.
• Do not short connect the battery and put the battery away from metal objects.
• Do not drop or mechanically shock or extrude the battery.
• Do not disassemble or open the battery. Do not crush, bend or deform the battery; Do not puncture, shred
or burn the battery.
• Do not immerse the battery in water.

P21
Enabling Airplane mode
If you don't need to connect to any wireless network, you can enable the airplane mode to turn off all wireless
receivers to save power.
1. Tap Settings.
2. Tap Network & Internet.
3. Open Switch control of Airplane Mode to enable airplane mode.
P22
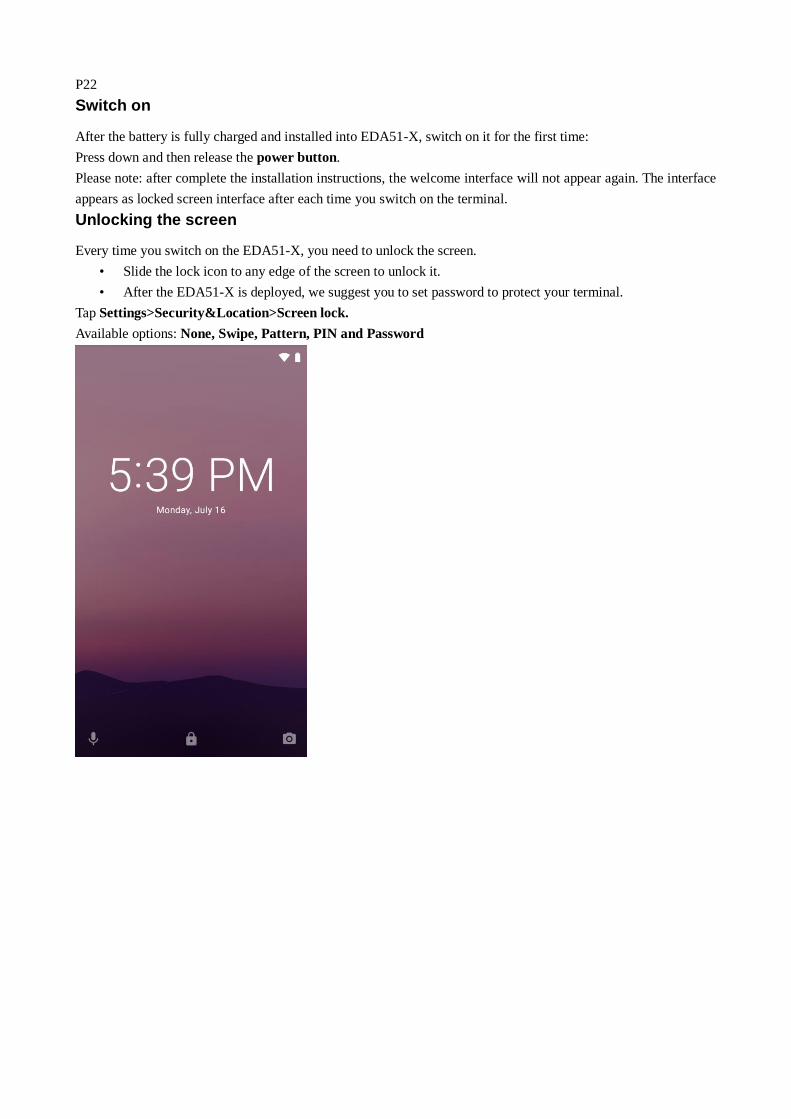
Switch on
After the battery is fully charged and installed into EDA51-X, switch on it for the first time:
Press down and then release the power button.
Please note: after complete the installation instructions, the welcome interface will not appear again. The interface
appears as locked screen interface after each time you switch on the terminal.
Unlocking the screen
Every time you switch on the EDA51-X, you need to unlock the screen.
• Slide the lock icon to any edge of the screen to unlock it.
• After the EDA51-X is deployed, we suggest you to set password to protect your terminal.
Tap Settings>Security&Location>Screen lock.
Available options: None, Swipe, Pattern, PIN and Password
P23
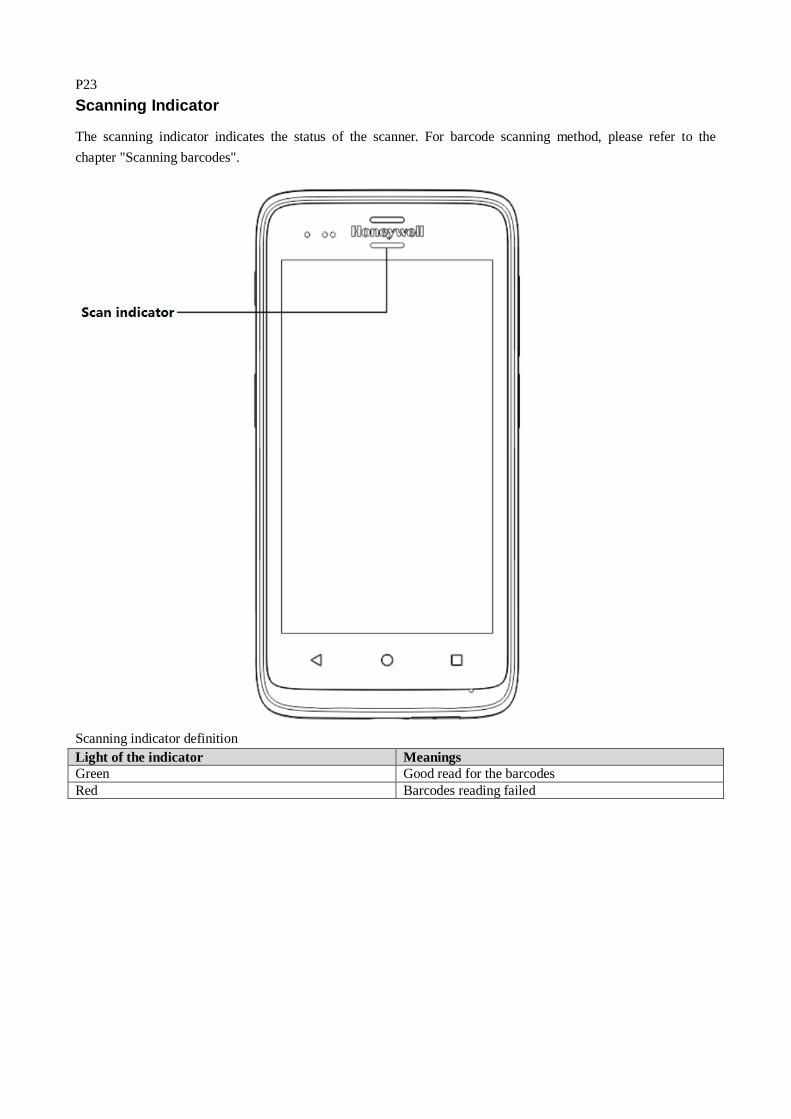
Scanning Indicator
The scanning indicator indicates the status of the scanner. For barcode scanning method, please refer to the
chapter "Scanning barcodes".
Scanning indicator definition
Light of the indicator Meanings
Green Good read for the barcodes
Red Barcodes reading failed

P24
Setting screen backlight
The terminal's screen is equipped with background light sensor which can automatically adjust backlight intensity
to save power and ensure the display readability. You may set the backlight intensity based on the environment.
1. Tap Settings.
2. Tap Display>Brightness level
3. Tap Adaptive brightness to automatically adjust the backlight intensity, or slide adjustment bar to set
the backlight intensity.
Audio features
EDA51-X is equipped with speaker, receiver and software utilities for volume setting.
Adjusting the ringtone volume for calls and messages
With the volume key on the side of the terminal, you can quickly adjust the ringtone volume.
Note: Volume key can only adjust ringtone volume for calls and messages. To adjust volumes of other sound, open
Settings >Sound.

P25
1. Press the key on the right side of the terminal (+ or-). Volume bar will show on the screen.
2. Adjust the volume by pressing volume key or slide volume bar.
3. Hold down the volume down (-) button or pull the volume indicator to the extreme left to activate
vibration mode.

P26
Enabling vibration mode
You can set the terminal to vibration/silence mode in the office.
Hold down the volume down (-) button or pull the volume indicator to the extreme left to activate vibration mode.
P27
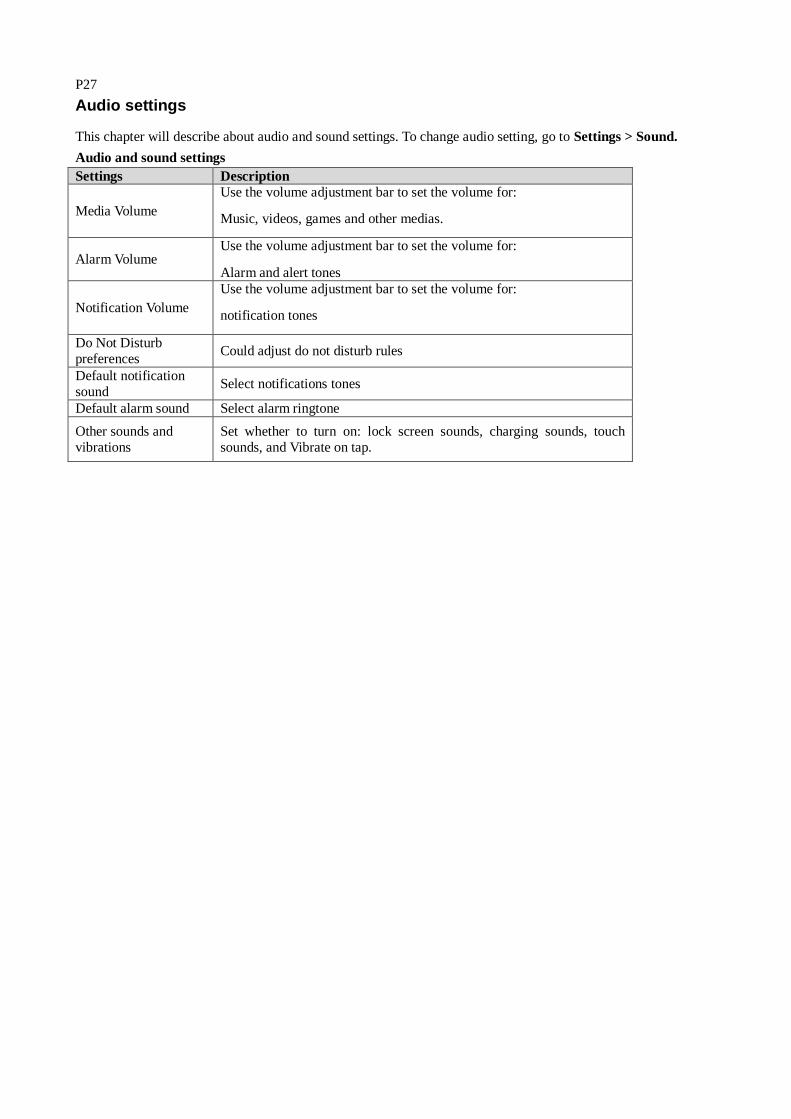
Audio settings
This chapter will describe about audio and sound settings. To change audio setting, go to Settings > Sound.
Audio and sound settings
Settings Description
Media Volume
Use the volume adjustment bar to set the volume for:
Music, videos, games and other medias.
Alarm Volume Use the volume adjustment bar to set the volume for:
Alarm and alert tones
Notification Volume
Use the volume adjustment bar to set the volume for:
notification tones
Do Not Disturb
preferences Could adjust do not disturb rules
Default notification
sound Select notifications tones
Default alarm sound Select alarm ringtone
Other sounds and
vibrations
Set whether to turn on: lock screen sounds, charging sounds, touch
sounds, and Vibrate on tap.
P28
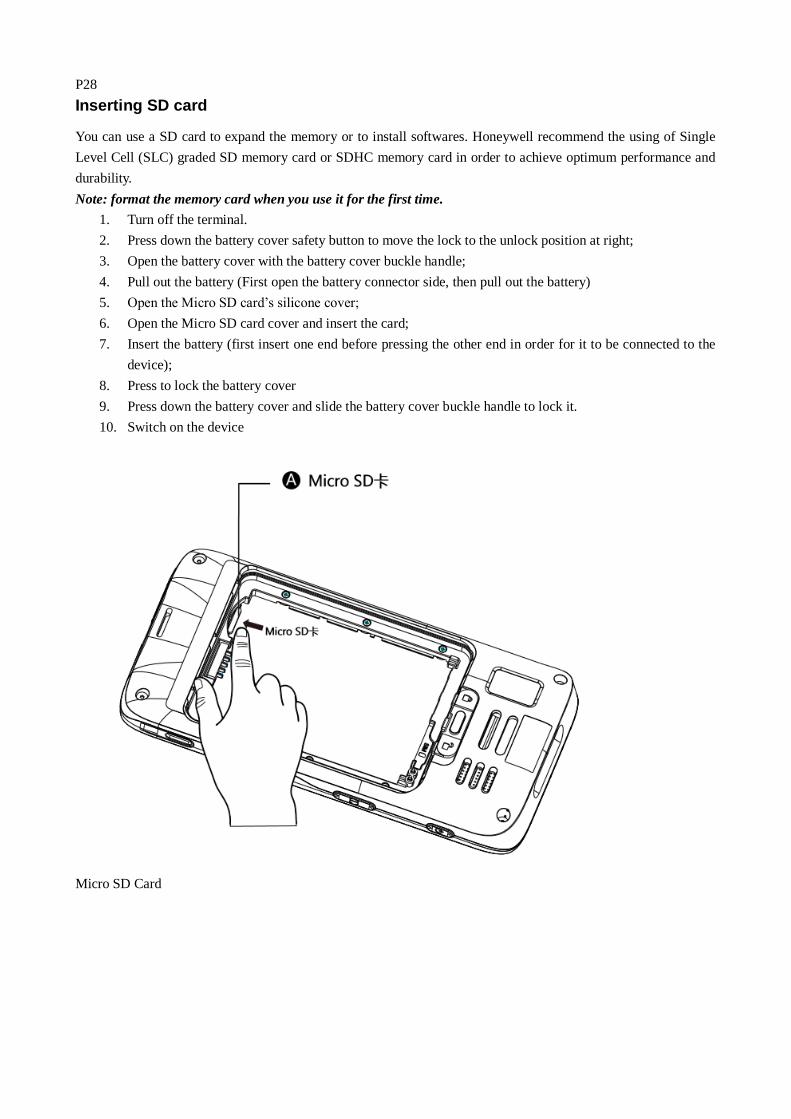
Inserting SD card
You can use a SD card to expand the memory or to install softwares. Honeywell recommend the using of Single
Level Cell (SLC) graded SD memory card or SDHC memory card in order to achieve optimum performance and
durability.
Note: format the memory card when you use it for the first time.
1. Turn off the terminal.
2. Press down the battery cover safety button to move the lock to the unlock position at right;
3. Open the battery cover with the battery cover buckle handle;
4. Pull out the battery (First open the battery connector side, then pull out the battery)
5. Open the Micro SD card’s silicone cover;
6. Open the Micro SD card cover and insert the card;
7. Insert the battery (first insert one end before pressing the other end in order for it to be connected to the
device);
8. Press to lock the battery cover
9. Press down the battery cover and slide the battery cover buckle handle to lock it.
10. Switch on the device
Micro SD Card

P29
File transfer
Files can be transferred between the terminal and a computer by using a USB adapter or standard USB cable. By
connecting the terminal to a computer with a USB cable, you can view the files in the terminal, or transfer the
files to the computer, or transfer files from the computer to the terminal. If you transfer files with a Mac computer,
you need to use Android File Transfer app (it can be download via www.android.com/filetransfer)
The terminal will connect with charging port as default and support MTP (Media Transfer Protocol) or PTP
(Picture Transfer Protocol). If you mainly transfer camera photos, you can use PTP connection settings. If the
computer with Windows system doesn't support MTP, you can use PTP transmission.
Follow below steps:
1. Connect EDA51-X to the computer.
2. Select Media device (MTP) or Camera (PTP) on the EDA51-X screen. EDA51-X will set your selection
as default selection.
3. View the files stored in EDA51-X. You can copy, delete or transfer the files between EDA51-X and the
computer.
Note: EDA51-X supports high-speed USB communication (USB2.0), with maximum data transfer rate at 480
Mbps.
View files on EDA51-X
Users can view the files in EDA51-X and its memory card through File Explorer.
1. Tap or pull upward >File manager .
2. Tap the folder name or file name to open the file.
Note: Due to system permission issues, some files cannot be opened. Based on your needs, you can select
respective apps to open the file.

P30
EDA51-X Accessories
EDA51-X terminal is equipped with original battery. All other accessories require separate order and shipment. If
necessary, please contact your local sales representatives.
For EDA 51-X accessories and description, please see below table:
Item Description
EDA51 home base Charging one EDA51 terminal and EDA51 battery simultaneously
EDA51 single cradle Charging one EDA51 terminal
EDA51 quad charging base Charging four EDA51 terminal simultaneously
EDA51 quad battery charging base Charging four EDA51 battery simultaneously
EDA51 scan handle Working with EDA51 terminal, easy to hold and scan
EDA51 hand strap EDA51 reserve buckle for hand strap
EDA51 Micro USB to 3.5mm audio
adaptor
EDA51 Micro USB to 3.5mm audio adaptor provide audio port for
CTIA standard wire headset.

P31
Chapter II - User interface and application
This chapter introduces the Android system user interface, and how to interact with the screen. Users can also
learn about a variety of Honeywell applications on the terminal through this chapter.

P32
User interface
Android 8.1 operating system user interface provides users with a perfect touch and easy navigation experience.
Main page
After switch on the terminal and setting up your preferred language, the main page will be displayed on the screen
first.
The main page description
Name Description
Status bar
The left side of the status bar displays system messages sent by the application,
such as information notifications. The right of the status bar displays the current
wireless and network connection status and remaining battery power.
Common applications The applications on this bar will be displayed on the main interface.
Search bar Use Google Search to search on the web or the terminal.
Status bar
Quick Search box
Common applications
Pull up or tap to show
all applications

P33
Navigation and function keys
There are navigation and function keys below the common applications in the main interface of EDA51-X; other
function keys are on the two sides of the terminal.
Navigation and function keys
Keys Description Functions
Return Return to the previous screen
Function Key Show the applications that have
been visited recently
Home Key Return to the main interface
Volume Increase or decrease the speaker
volume
Scan Button Press and hold to scan graphics
Power button Turn on, turn off, lock the screen
Status bar icons
Status and notification icons display the current network connections, power, notifications and sound settings.
Please refer the following table for detailed status bar icons:
Status and notification icons:
Icons Description Icons Description
Incomplete calendar events Sound is disabled
Not ringing alarm clock; alarm clock set Vibration mode has been enabled
New text messages or multimedia
information Battery power is 100% full
Text messages or multimedia
information transmission failed Being in charge with external power
supply
New mails
Airplane mode is enabled
Memory card is full
EDA51-X is syncing with a
Bluetooth-enabled device
EDA51-X is syncing with a
Bluetooth-enabled device Wi-Fi is connected, but with no signal
Network connected Wi-Fi signal is adequate

P34
Key Remap
1. Tap Settings > Honeywell Settings>Key Remap.
2. Touch the +
3. Click keys you want to redefine.
4. Tap KEYS or APPs to view options.
5. Select the required functions for the key. The new functions selected will be displayed under the name of
the key.
P35
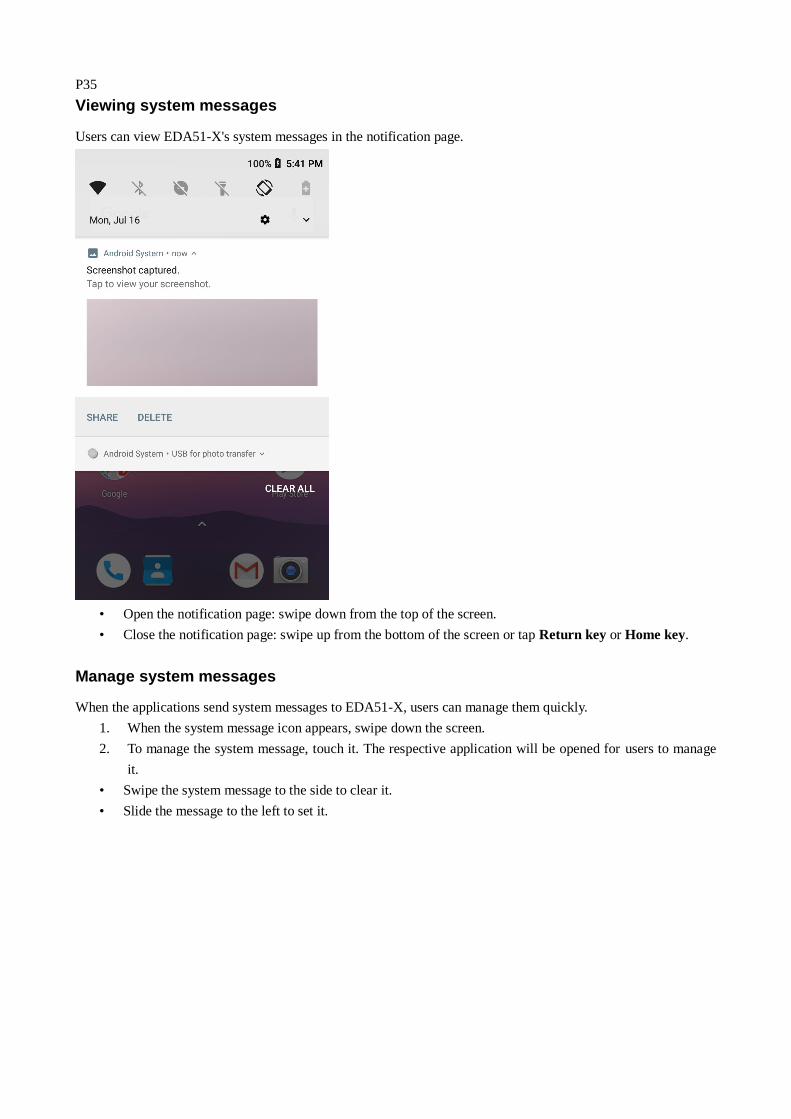
Viewing system messages
Users can view EDA51-X's system messages in the notification page.
• Open the notification page: swipe down from the top of the screen.
• Close the notification page: swipe up from the bottom of the screen or tap Return key or Home key.
Manage system messages
When the applications send system messages to EDA51-X, users can manage them quickly.
1. When the system message icon appears, swipe down the screen.
2. To manage the system message, touch it. The respective application will be opened for users to manage
it.
• Swipe the system message to the side to clear it.
• Slide the message to the left to set it.
P36
Personalizing the main interface
You can add application icons to either one of the main interface to open these applications more quickly.
1. Tap or pull upward . To display All applications.
2. To move the application icon to the main interface: long press the icons to be added to the main interface,
then slide your finger to place it on either one of the main interface.
To move the application icon to the main interface: long press the desktop- > widget- >long press the
widget icon, then slide your finger to place the control icon on either one of the main interface.
3. To remove the applications or widgets from the main interface: long press the icons and slide to X Delete
on the top of the interface.
4. Long press the blank area on the desktop, and display menu WALLPAPERS, WIDGETS and
SETTINGS.
Customizing common applications
Users can add applications to the common application bar to open these applications more quickly.
1. Tap or pull upward . To display All applications.
2. Long press the icons in the common application bar and slide it to the X Delete on the top of the
interface.
3. To add application icon to the common application bar: long press the application to be added to the
main interface, then slide your finger to place it in common applications.
Using GoogleTM
Use Google search engine at the top of the interface to help users find any information on the terminal or the
internet.
1. In any of the main screens, tap Google search box and enter search object. The search results on the
terminal (such as applications and contacts) will also appear on the network search result.
2. Tap a search prompt to start the search now, or simply tap the arrow to enter it into the search box
without searching immediately.

P37
Touch screen gestures
Use your finger can operate applications, menus, on-screen keyboard and other functions on the interface.
• Tap a function or application to select or start it.
• To enter a name or password, touch the place to enter and on-screen keyboard will appear for input.
Other touch screen gestures include:
• Long press: press an icon and hold until the system reacts.
• Drag: Press an icon, and then move your finger across the screen to the destination. For example: With
dragging method, you can rearrange some shortcuts on the main interface.
• Swipe or slide: Quickly move your finger on the screen and keep your finger touching on the screen. For
example, users can swipe the home screen to the left or right to view other home screens.
• Double-click: tap twice rapidly in a row on the map or other interface to enlarge it. Double-click again to
return to the original size.
• Kneading: In some applications, subjects can be zoomed out by kneading two fingers on the screen, or
zoom in by expanding two fingers.
Setting time zone
EDA51-X can automatically sync the time and date according to the network. Users can also set time zone for
their regions manually.
1. Tap Settings>System.
2. Tap Date & Time.
3. Uncheck Automatic date & time.
4. Tap Selecting Time zone and tap the time zone for your region.

P38
Honeywell applications
Honeywell helps users troubleshoot and connect the terminals to other devices and networks. Tap or pull upward
to show the applications below. For more details, please visit:
www.honeywellaidc.com.
Honeywell software applications available on EDA51-X
Icons Applications Descriptions
Demos
Scan Demo, NFC Demo and more included, allows testing and
using functions like Scan Demo and NFC.
Configure Autorun
Autorun application when the device is being activated
BattMon
Monitors battery-charging status
Diagnostic Information
Check equipment information, Honeywell applications, radio
frequency information, RAM and scanner
EZConfig
Configure equipment and applications through barcode and
configuration documents
IPConfig
View and set IP address
Ping
Network diagnostic tool to test whether the network is connected
Route
View routing information
Wire-lessTether
Display the paired Bluetooth set, if the paired BT set move
out of range, the terminal will alarm
Download Enterprise Application Lock (Applock)
Honeywell Applock is an Android application which allows you to configure the apps that may or may not be
allowed. The User Guide and installation procedure for Applock may be downloaded via:
www.honeywellaidc.com
Unlocking developer options
If you are a developer for EDA51-X, you can easily unlock developer options. Developer options can help you
test and troubleshoot during the process of developing EDA51-X. After Developer options is unlocked, the system
menu will present developer option connections.
1. Tap Settings.
2. Tap System
3. Tap About phone.
4. Click the Build number 7 times and notification as "You are now in developer mode" will appear.
GMS
EDA51-X joined in GMS packages of Google.
The App includes Google, Chrome, Gmail, Maps, YouTube, Drive, Play Music, Play Movies, Duo, Photos, Play
Store.

P40
Chapter III - Scan Function
This chapter describes how to scan barcodes and set scan functions.
Scan Function
Integrated scanner enables reading for 1D and 2D barcode, composite code and postcode. It supports
comprehensive, highly flexible scanning in real applications. Imaging Engine can capture black and white images,
such as signatures and damaged inventory lists.
How to transfer data via Android keyboard input?
Scan wedge feature enables transferring scanned barcode data to active applications via Android keyboard input.
Scan wedge function is enabled by default on EDA51-X. Users can use applications that can accept scan wedge
function through scanners or applications. If an application obtains scan function through Barcode Reader API,
the scan wedge function will be temporarily disabled.
Users can build customized applications in Software Development Kit (SDK) for EDA51-X. Please download
SDK at: www.honeywellaidc.com.
Changing scan settings
Changes made to the default file apply for all non-document applications.
1. Tap Settings.
2. Tap Honeywell settings
3. Tap Scan Settings.
4. Tap Internal Scanner
5. Tap Default profile.
6. Select Data Processing Settings, Symbology Settings, Decode Settings, Imager Settings, Trigger
Settings or Notification Settings.
7. Modify the setting to meet application needs.

P43
Restoring default scan settings
Users can easily cancel all the changes made to default folder and restore the factory defaults.
Note: Restore factory defaults for a certain setting, all the settings under this folder will be restored to factory
defaults.
1. Tap the icon on the upright of any Scan Settings interface.
2. Tap Restore all defaults.
Scanner default settings
Study the following table to learn about Data Processing Settings, Symbology Settings, Decode Settings, Imager
Settings, Trigger Settings and Notification Settings.
Data processing settings
Use data processing settings to set the barcode data processing patterns for EDA51-X.
Data processing settings
Settings Description Default
Wedge Enable or disable the transferring of barcode
data as Android Events when sending data to the
application.
Enabled
Charset Explain the selected character set when the
barcode is a character, options including:
• ISO-8859-1
• US-ASCII
• UTF-16
• UTF-16BE
• UTF-16LE
• UTF-8
The related BarCodeReader attributes:
PROPERTY_DATA_PROCESSOR_CHARSET
ISO-8859-1
Prefix Define the character to be added in front of the
decoding barcodes No
Suffix Define the character to be added at the end of
the decoding barcodes No
Data editing plugin Specify a free plug-in for data editing No
Symbology prefix
Specify a Symbology prefix to decode the barcode data
• None
• Honeywell
• AIM
No
Launch Browser To open or close URL barcode, if the barcode
start with http:// or https://, the browser will open the respective URL
The related BarCodeReader attributes:
PROPERTY_DATA_PROCESSOR_LAUNCH- BROWSER
Enable
Scan To Intent Enable or disable scan processing for specified
targets. Apply the barcode as the following Enabled
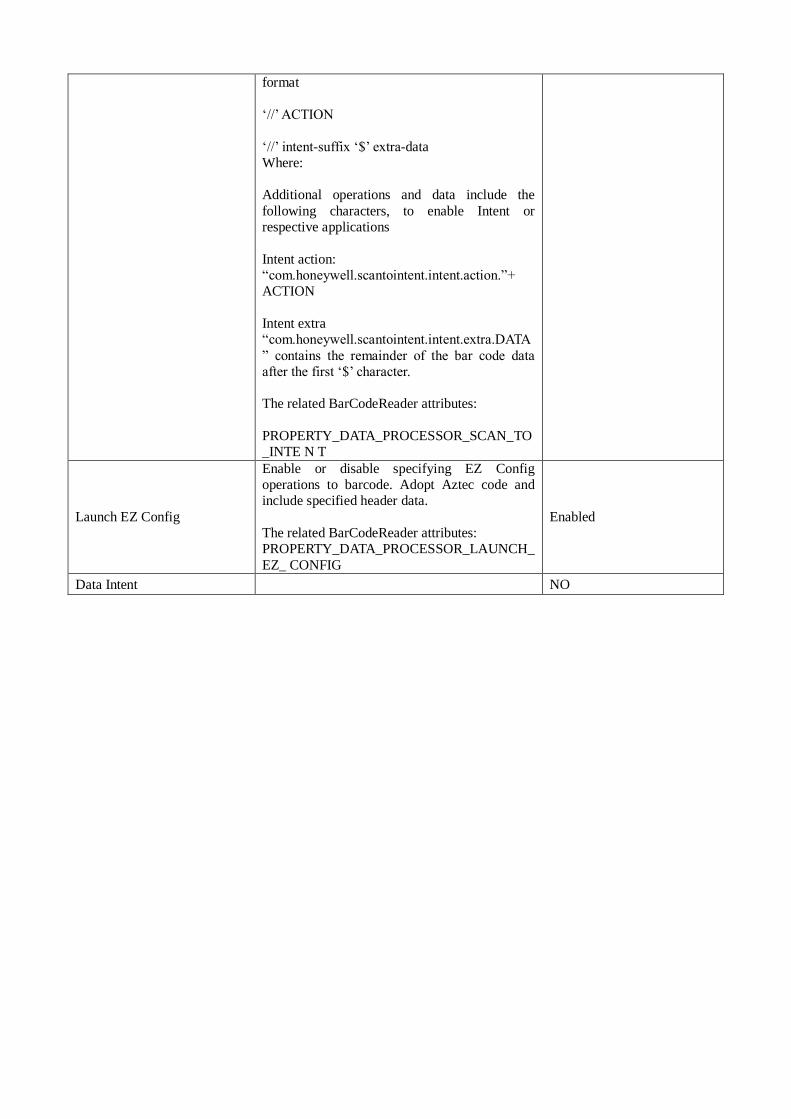
format
‘//’ ACTION
‘//’ intent-suffix ‘$’ extra-data
Where:
Additional operations and data include the
following characters, to enable Intent or
respective applications
Intent action:
“com.honeywell.scantointent.intent.action.”+
ACTION
Intent extra
“com.honeywell.scantointent.intent.extra.DATA
” contains the remainder of the bar code data
after the first ‘$’ character.
The related BarCodeReader attributes:
PROPERTY_DATA_PROCESSOR_SCAN_TO
_INTE N T
Launch EZ Config
Enable or disable specifying EZ Config
operations to barcode. Adopt Aztec code and
include specified header data.
The related BarCodeReader attributes:
PROPERTY_DATA_PROCESSOR_LAUNCH_
EZ_ CONFIG
Enabled
Data Intent NO
P46
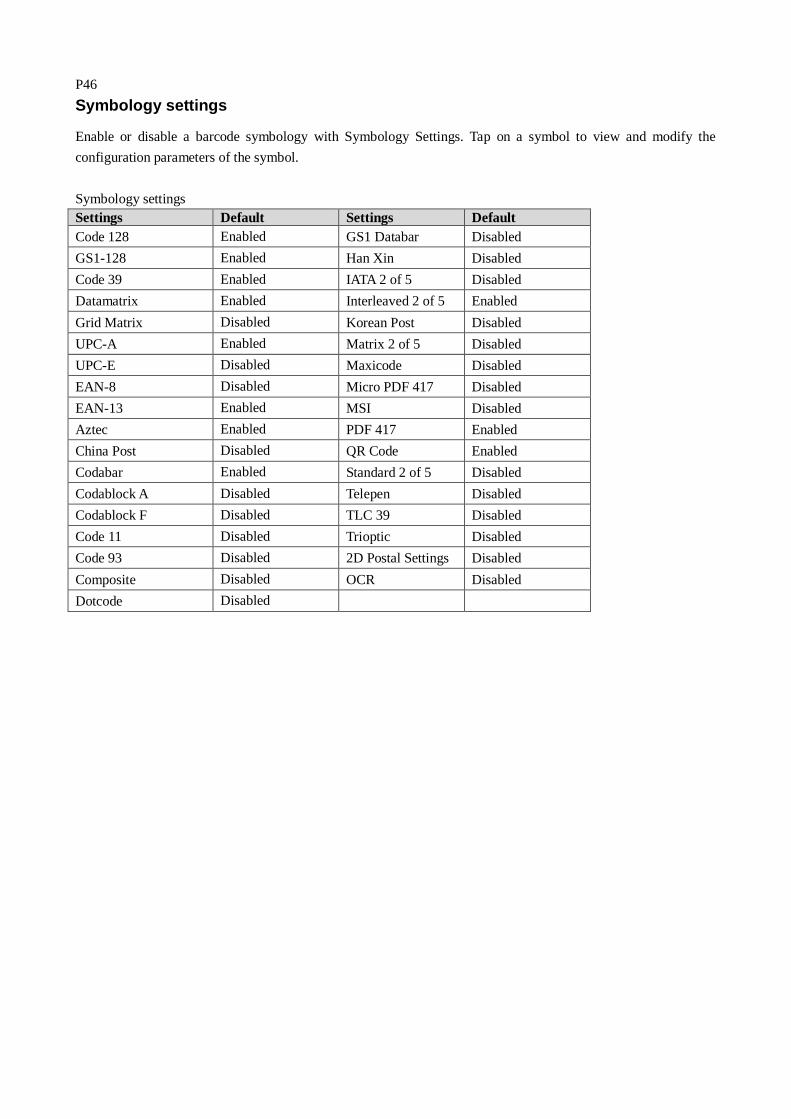
Symbology settings
Enable or disable a barcode symbology with Symbology Settings. Tap on a symbol to view and modify the
configuration parameters of the symbol.
Symbology settings
Settings Default Settings Default
Code 128 Enabled GS1 Databar Disabled
GS1-128 Enabled Han Xin Disabled
Code 39 Enabled IATA 2 of 5 Disabled
Datamatrix Enabled Interleaved 2 of 5 Enabled
Grid Matrix Disabled Korean Post Disabled
UPC-A Enabled Matrix 2 of 5 Disabled
UPC-E Disabled Maxicode Disabled
EAN-8 Disabled Micro PDF 417 Disabled
EAN-13 Enabled MSI Disabled
Aztec Enabled PDF 417 Enabled
China Post Disabled QR Code Enabled
Codabar Enabled Standard 2 of 5 Disabled
Codablock A Disabled Telepen Disabled
Codablock F Disabled TLC 39 Disabled
Code 11 Disabled Trioptic Disabled
Code 93 Disabled 2D Postal Settings Disabled
Composite Disabled OCR Disabled
Dotcode Disabled
P48
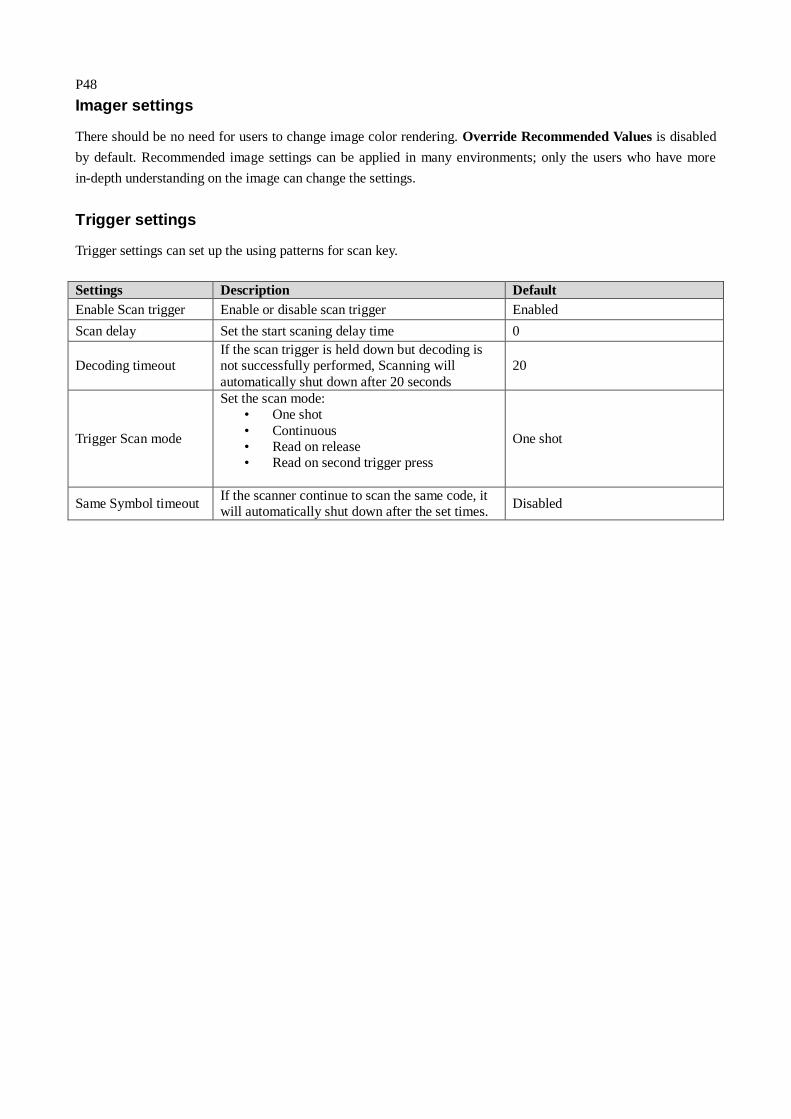
Imager settings
There should be no need for users to change image color rendering. Override Recommended Values is disabled
by default. Recommended image settings can be applied in many environments; only the users who have more
in-depth understanding on the image can change the settings.
Trigger settings
Trigger settings can set up the using patterns for scan key.
Settings Description Default
Enable Scan trigger Enable or disable scan trigger Enabled
Scan delay Set the start scaning delay time 0
Decoding timeout
If the scan trigger is held down but decoding is
not successfully performed, Scanning will
automatically shut down after 20 seconds
20
Trigger Scan mode
Set the scan mode:
• One shot
• Continuous
• Read on release
• Read on second trigger press
One shot
Same Symbol timeout If the scanner continue to scan the same code, it
will automatically shut down after the set times. Disabled
P49
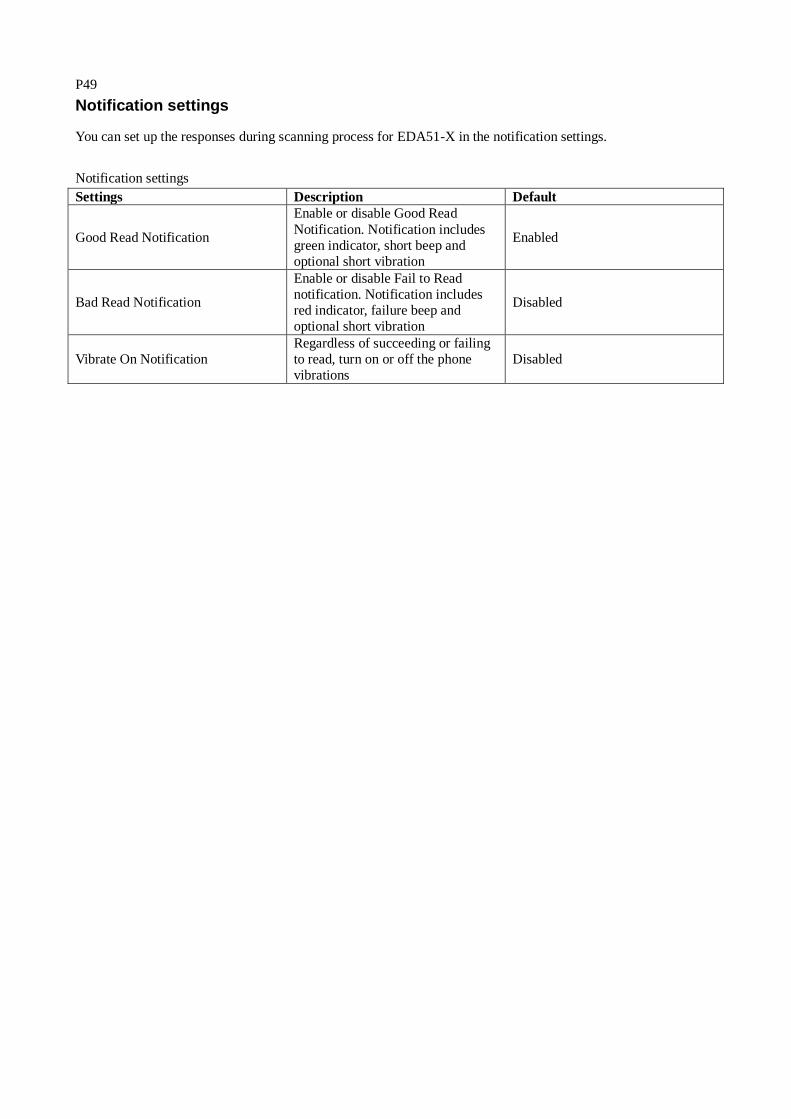
Notification settings
You can set up the responses during scanning process for EDA51-X in the notification settings.
Notification settings
Settings Description Default
Good Read Notification
Enable or disable Good Read
Notification. Notification includes
green indicator, short beep and
optional short vibration
Enabled
Bad Read Notification
Enable or disable Fail to Read
notification. Notification includes
red indicator, failure beep and
optional short vibration
Disabled
Vibrate On Notification
Regardless of succeeding or failing
to read, turn on or off the phone
vibrations
Disabled

P50
Scanning barcodes
Scan engine will emit scanning beams for accurate barcode aiming. It will also support a full range of 360°
scanning, which will make barcode scanning more convenient.
1. Tap or pull upward >Demos>ScanDemo.
2. Align the scanning window with the barcode and stably place the terminal a few inches away from the barcode.
3. Press one of the scan keys or tap Scan on the interface. Make sure the entire barcode is within the scanning beam range.
4. When the scanning is successfully completed, you will hear a "beep" sound, and the Good Read LED
will open immediately.
Note: Before scanning a barcode, you need to enable the desired barcode Symbology in the settings.
Scan Engine
EDA51-X equips Honeywell N6603 scan engine.
The N6603 series integrates Honeywell’s Adaptus 6.0 technology for unparalleled 1D and 2D scanning
performance.
Items Performance
Sensor Proprietary CMOS sensor with global shutter and 844 x 640 pixel resolution
Illumination White LED (exempt risk group)
Aiming 650 nm high-visibility red laser (class 2 laser safety)
Typical frame rate 60 frames per second (max.)
Motion Tolerance Up to 584 cm ( 230˝ ) per second in total darkness with 100% UPC at 10 cm (
4˝ ) distance
Field of View Horizontal Field Angle: 42.4° /Vertical Field Angle: 33
Scan Angles Tilt: 360°, Pitch: ± 45, Skew: ± 60°
Symbol Contrast 20% minimum reflectance

P51
Chapter IV - Using Camera
This chapter describes how to use the camera to take photos and videos.
Camera
EDA51-X is equipped with a 13 MP color camera which can be used to take photos and videos. The camera and
flash light are located on the back of the terminal. Tap Photos app to view all the photos and videos stored
on the terminal.
Adjust the camera and video settings in the Camera apps.
Zooming
Focus adjustment is realized by zooming actions of the fingers on the screen. Place two fingers on the screen at
the same time, then:
• Separate the two fingers in opposite directions to zoom in the images (enlarge objects).
• Fold the two fingers in opposite directions to zoom out the images
Changing camera settings
In order to obtain the best results when taking photos, users can change the camera settings beforehand.
1. Tap All Applications and then tap Camera .
2. Tap the Setting icon on the top right to view Camera Options.
3. Tap HDR or any icons to change the basic settings of the camera.
o When HDR is enabled, the terminal will automatically capture multiple photos and composite them into one to achieve the best possible image quality.
o Enable or disable various options, like viewfinder mode, storage location and image size.
Taking photos
1. Tap All Applications and then tap Camera .
2. Take the screen as a viewfinder and move the terminal until you get the images you want to capture.
3. Tap the screen to focus. By default, the camera automatically senses the ambient light, and the flashlight
will be opened if necessary.
4. Press the camera key to take photos
Shooting videos
This section describes how to use the camera function to shoot videos.
1. Tap All Applications and then tap Camera .
2. Tap Camera Shooting Options on the bottom right .
3. Tap to choose videos
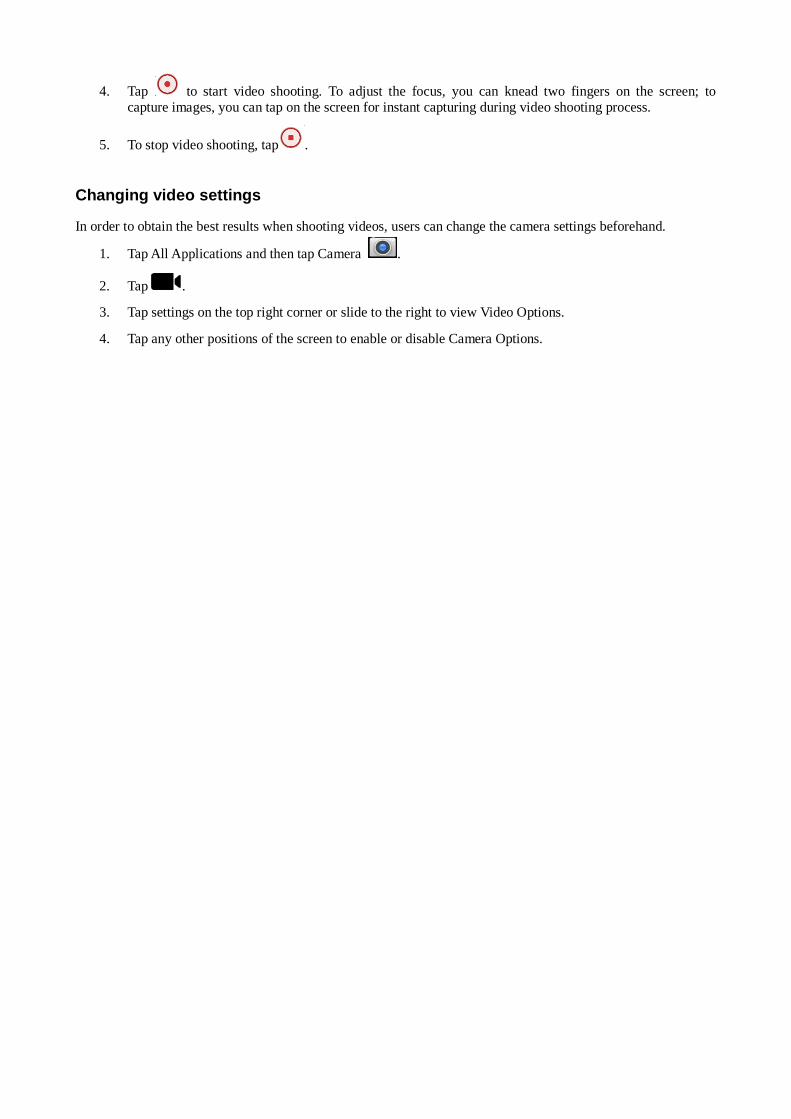
4. Tap to start video shooting. To adjust the focus, you can knead two fingers on the screen; to
capture images, you can tap on the screen for instant capturing during video shooting process.
5. To stop video shooting, tap .
Changing video settings
In order to obtain the best results when shooting videos, users can change the camera settings beforehand.
1. Tap All Applications and then tap Camera .
2. Tap .
3. Tap settings on the top right corner or slide to the right to view Video Options.
4. Tap any other positions of the screen to enable or disable Camera Options.
Chapter V - Using Telecommunication Function
You can use the phone function of the terminal (Only for EDA51-1 WWAN version) to make and receive calls, and to transmit data via wireless network as well.
Telecommunication Function
The phone function of the terminal is realized with a speaker and a microphone. The phone function also supports
a Bluetooth headset or hands-free device. The EDA51 will use loudspeaker mode without connecting Bluetooth
headsets or other external audio devices. The phone function is enabled by default.
This terminal supports the following network types:
GSM&EDGE: Band2/Band3/ Band5/Band8;
WCDMA: Band1/Band2/Band4/Band5/Band8/ Band9/ Band19;
CDMA: BC0/BC1/BC6
FDD-LTE: Band1/ Band2/ Band3/ Band4/ Band5/ Band7/ Band8/ Band9/Band19/Band20/ Band26;
TDD-LTE: Band38/ Band39/ Band40/ Band41;
When users enable the phone function and activate the service through wireless carriers, they can customize the phone features and network settings in the Mobile Network interface in Settings.
Note: EDA51-1 WWAN version supports automatic system time setting with network messages and timezone messages (NITZ).
Activating calls
Calls can be activated by inserting Nano SIM card in the terminal. Nano SIM card can be purchased from the network service provider.
1. Turn off the terminal.
2. Press down the battery cover safety button to move the lock to the unlock position at right;
3. Unlock the battery cover using its lock handle;
4. Remove the battery (remove it from its bottom end before pulling it out);
5. Open the cover of SIM card slot.
6. Insert the SIM card from the SIM card slot until hearing a click.
7. Press down the cover of SIM card.
8. Insert the battery (Insert the connector side first, then press the battery down to establish connection
between the battery and the phone).
9. Press down the battery cover (Insert the connector side first, then press down the battery cover).
10. Move the battery cover safety lock to the lock position at left.
11. Turn on the terminal.

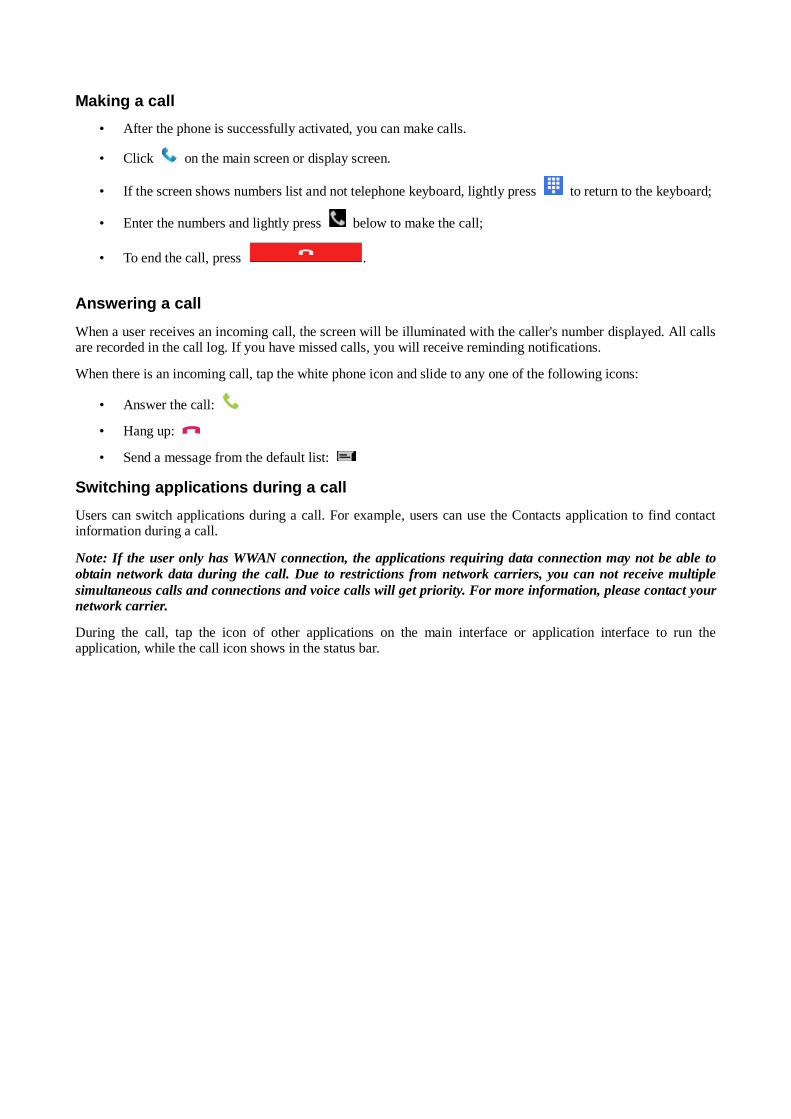
Making a call
• After the phone is successfully activated, you can make calls.
• Click on the main screen or display screen.
• If the screen shows numbers list and not telephone keyboard, lightly press to return to the keyboard;
• Enter the numbers and lightly press below to make the call;
• To end the call, press .
Answering a call
When a user receives an incoming call, the screen will be illuminated with the caller's number displayed. All calls are recorded in the call log. If you have missed calls, you will receive reminding notifications.
When there is an incoming call, tap the white phone icon and slide to any one of the following icons:
• Answer the call:
• Hang up:
• Send a message from the default list:
Switching applications during a call
Users can switch applications during a call. For example, users can use the Contacts application to find contact information during a call.
Note: If the user only has WWAN connection, the applications requiring data connection may not be able to
obtain network data during the call. Due to restrictions from network carriers, you can not receive multiple
simultaneous calls and connections and voice calls will get priority. For more information, please contact your network carrier.
During the call, tap the icon of other applications on the main interface or application interface to run the application, while the call icon shows in the status bar.

Making an emergency call
If SIM card has been misplaced, or if the user does not have valid SIM card, the user can still make emergency
calls. Under both circumstances the device will show no service access, but calls to emergency numbers (e.g. 112,
110, 911, 118, 119, 120, 122 or 999) will still be connected.
Configuring call settings
Users can customize phone settings, including display options, Sounds and vibration, Quick responses, Speed dial
Settings, Calls, Call blocking, Accessibility.
1. Tap .
2. Tap Settings to show Call Settings menu.
3. Change the settings based on your needs.
P54
Chapter VI - Configuring Terminal
This Chapter deals with configuration of EDA51-X. The user can also learn how to configure network
communication and wireless security.
Terminal configurations
Users can configure many parameters for the terminal, such as barcode symbologies to be decoded or network
settings. These parameters set by the user decide how the terminal works.
Users can configure the terminal in Application Settings.
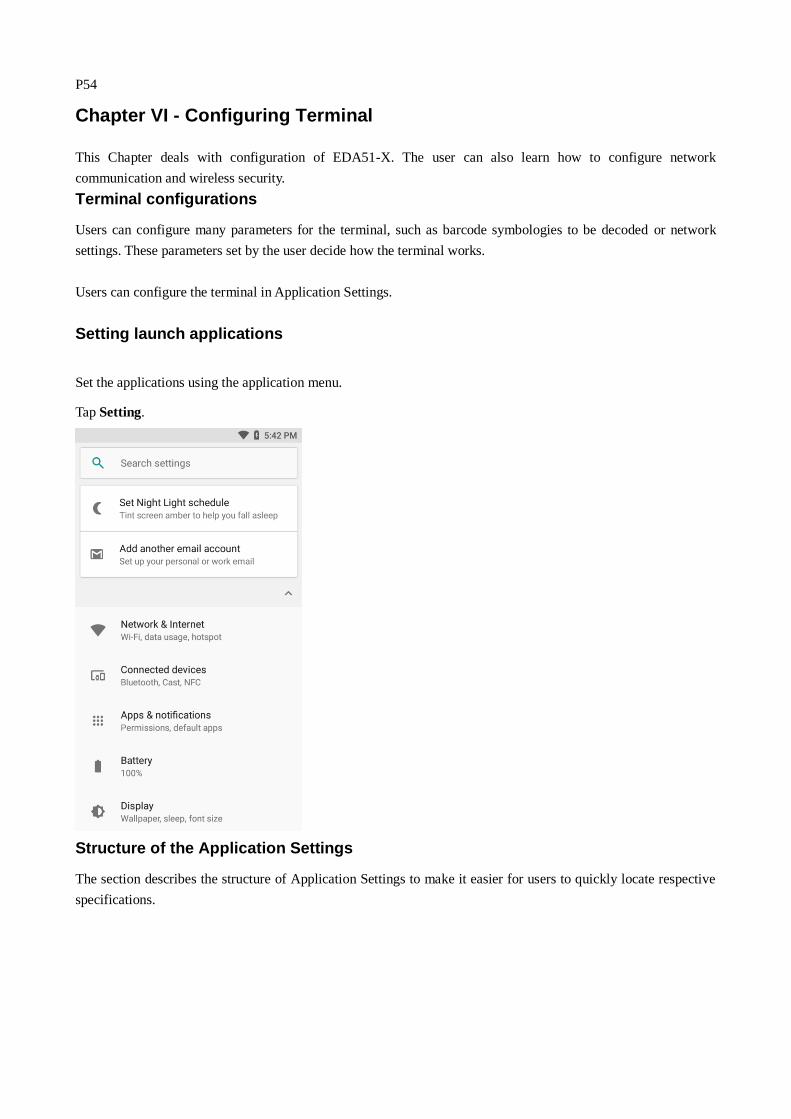
Setting launch applications
Set the applications using the application menu.
Tap Setting.
Structure of the Application Settings
The section describes the structure of Application Settings to make it easier for users to quickly locate respective
specifications.

P56
Suggestions
Automatically recommend quick access through intelligent pre-judgment of user’s needs.
Networks& Internet
Settings Introductions
Wi-Fi To enable or disable Wi-Fi radios. When Wi-Fi is enabled, available Wi-Fi networks can be
viewed by taping this bar.
Mobile network
(only supported by
EDA51-1 WWAN)
(This menu will be displayed after inserting SIM card) Enable or disable mobile data.
When it is enabled, tap the bar to view available mobile network).
Bluetooth To enable or disable Bluetooth radios. When Bluetooth connection is enabled,
Bluetooth-enabled devices within the range can be viewed by tapping this bar.
Data usage Displays the current usage of flow rate, including Wi-Fi and Cellular data. (Cellular data
will be displayed after sim card is inserted).
Hotspot & tethering
Use hotspot and tethering to provide Internet to other devices through your mobile data
connection. Apps can also create a hotspot to share content with nearby devices. (only
supported by EDA51-1 WWAN).
Mobile Plan Plans provided by network carriers.
VPN Set a password for accessing the virtual private network.
Airplane mode To enable or disable Airplane mode.
Connected devices
Control and indicate the devices which connected to EDA51 terminal.
Bluetooth Enable or Disable Bluetooth function, and setup Bluetooth connection with other devices.
Cast Cast the device screen onto a specific device
NFC enabling NFC allows NFC tag information to be read when the terminal touches NFC tag.
Android Beam when NFC is enabled, this function allows users to send the application contents from the
terminal directly to another NFC-supported device when the two get closer.
Printing Add printer to EDA51 terminal, provide printing service.
USB Display the USB port connection status.

P57
Devices and Google settings
Below list regular function and google settings.
Settings Introductions
Apps& Notifications Set whether the app allows notifications to be sent, and Shows applications downloaded
and on the run.
Battery Shows battery usage data and the current battery status.
Display Set screen brightness, wallpaper, screen timeout, font size and screen rotation.
Sound Set sound for calls and notifications, including the tone and volume.
Storage Shows the remaining memory space.
Security& Location Set screen lock and administrator privileges, including application installation and data
storage security. And To enable or disable location information (Google).
Users& Accounts Add toggle user, and Set up an e-mail account.
Accessibility Set auxiliary function level, for example: large font and text-to-speech output.
Google Related services of Google

P58
Honeywell Setting
Settings Introductions
Scan Settings Provide the scan settings, detail to refer ChaterIII
Key Remap Redefines buttons. For more information please refer to Chapter II, Key Remap
section
Key WakeUp Enable or Disable left/right scan key, volume up/down keys to wake up the
terminal.
Smart sensors Integrated sensor allows better power management
Provisioning Mode Enable or disable allowing unrestricted installation of applications, certifications,
configuration files and lecenses.
Battery Optimizer Optimize the terminal to power saving mode, under this mode some of the terminal
performance would be degraded and some of the applications can’t be used.
Battery LED Configuring battery LED lighting modes.
Battery Monitor Display the battery using stage, health and internal temperature.
HXLogger Activates Android Logcat and Linux Kernel log services to facilitate identification
of problems during the device’s operation
Honeywell Bug Reporter Enable or disable auto Send bug reports to Honeywell server
Web Applications Configure the Web application.
System
Settings Introductions
Languages & input Configure the terminal language and input keypad type
Gestures Define physical keys operation to have special function
Date & Time Configure all time and date settings.
Backup Back up user data to google driver
System update Check and update system update option
Reset options Reset the terminal to default setting and remove user data
About phone Shows information about the terminal system.
P59
Network communication
Users can connect the terminal to wireless and wired networks. Users can get the terminal connected via the
following ways:
• Mobile network
• 802.11 radios
• Bluetooth
• USB
Connect to Mobile network
Mobile network only supported on EDA51 WWAN version, like EDA51-1. Before using mobile network, need
insert activated local carrier’s Nano-SIM card.
1. Enter Settings>Mobile network>Mobile data
2. Tap mobile data to on(Default status is on)
3. Using the terminal transfer data through local carrier’s network.
Connecting to Wi-Fi networks
When communicating through wireless networks, EDA51-X transfer data through 802.11 radios. Before
connecting to a Wi-Fi network, users need to know the Security Protocol of the network and the certificates it
required. Usually, 802.11 radio is disabled by default.
1. Enter Settings > WLAN.
2. When the WLAN switch turns blue, tapping the WLAN bar will display the detected network list.
3. To search the network outside of the list, slide to the end of the list and tap Add network and enter the network name.
4. Tap on a network name to view its details.
If the network is secure, a form will pop up asking you to fill in the necessary information (for example:
certificate name, password or other credentials). To connect to a secure network, enter the required information,
and then tap Connect.
• To leave the network that has been connected, tap Forget. For example, users can choose to forget a network that they won't use again.
• To close the network information screen, tap Cancel.

Configuring Wi-Fi network proxy servers
If users need to connect to network resources through a proxy server, they need to configure a proxy server for
each Wi-Fi network added. By default, none of the Wi-Fi networks added by users has done proxy server settings.
1. Enter Application Settings screen, tap Wi-Fi to show available Wi-Fi networks.
2. Long press the network name, then tap Connect the Network, then a network setting list will pop up.
3. Choose Show Advanced Options at the bottom of the network setting list.
4. If the network does not have proxy server settings, tap None on the proxy server setting list, and then tap Manual Settings.
5. Enter the network proxy server settings.
6. Tap Save.
Note: Proxy server settings only apply to the Wi-Fi networks that users modified. Users should set proxy servers
for each network that requires the using of proxy server.
Disable Wi-Fi notifications
Wi-Fi is enabled by default. Users will receive notifications in the Status Bar when the terminal finds wireless
networks. Users can disable these notifications.
1. Enter Application Settings screen.
2. Tap Wi-Fi bar.
3. Tap the Settings icon on the top right.
4. Uncheck the Network notification to disable Wi-Fi Notifications.
P62
Connecting to a virtual private network
The terminal supports connection to virtual private networks (VPNs). This section describes how to add and
connect to VPNs. To configure a VPN, users must consult your network administrator. Users can view and change
VPN settings in the Application Settings.
Note: Before accessing VPN, users need to set a lock screen password.
Add VPN
Before connecting to a VPN, users must first add the relevant information of the VPN.
1. Enter Application Settings screen.
2. Tap Network & internet.
3. Tap VPN.
4. Tap VPN +.
5. Input the VPN information.
6. Tap Save, and VPN name will be displayed in the list.
Connect to VPN
1. Enter Application Settings screen.
2. Tap Network & internet.
3. Tap VPN.
4. Tap the VPN name in the list, and enter the certificate information based on the tips.
5. Tap Connect. The terminal gets connected to the VPN, and the status icons and notification will be
displayed.
To disconnect from the VPN, tap the notification.
Edit VPN information
1. Enter Application Settings screen.
2. Tap Network & internet.
3. Tap VPN.
4. Long press the name of the VPN to be edited and select Editing Networks from the list.
5. Edit VPN information based on your needs.
6. Tap Save after editing.
Wireless Security
The terminal provides the following security solutions for users' wireless network.
• WPA2™
• WPA
• 802.1x
• LEAP
• WEP
Before setting up security program, you must first enable the radio and set the date and SSID on the terminal. To
use 802.1x program, users must download a root certificate to the terminal. To use Transport Layer Security
protocol (TLS) together with 802.1x , users also need to download a user certificate first.
View and configure all of the wireless security settings in the Application Settings screen.
Bluetooth communication
EDA51-X supports Bluetooth communication, allowing users to get connected with other Bluetooth-enabled
devices.
Bluetooth radio can be restored to its current state by system resetting. If users have reset the system data, they
must re-establish the paired devices. Bluetooth status is displayed on the System Icon bar.
Pairing with a Bluetooth-enabled device
To connect to a Bluetooth-enabled device, users should enable Bluetooth radio first and then choose the device
from the detected device list.
1. Enter Application Settings screen.
2. Tap Connected devices.
3. Tap Bluetooth. If Bluetooth switch is off, slide it on.
4. Tap pair new device. It will display available Bluetooth-enabled device list.
5. Select the device to pair with. After Pairing Dialog Box is displayed, enter the device PIN code, and tap
OK. When the device and the terminal s have been successfully paired, the device name will appear in
the list of paired devices at the top.
6. To disconnect with the paired device, tap the Quick Setting icon beside the device name, and then tap
Cancel Pairing
Note: Before searching for and connecting to other Bluetooth-enabled devices, users must enable the Bluetooth
radio. By default, Bluetooth radio is disabled.
USB Communication
By communication via USB, users can transfer data to other devices or receive data from other devices with the
following accessories.
EDA51-X terminal can connect the USB device via micro USB2.0 port.
Near Field Communication (NFC)
NFC technology provides short-range wireless data transmission between EDA51-X with NFC tags or other
NFC-enabled devices near its back.
NFC-enabled EDA51-X models support the following operations:
NFC tag read / write mode: The terminal reads digital information from the NFC tag or writes information into
NFC tag.
Note: When in sleep mode (suspend mode) and lock-screen state, NFC radio will be temporarily disabled.
P69
Chapter VII - Management and Maintenance
This Chapter deals with software upgrade, resetting terminal and maintenance of EDA51-X.
Upgrading system software
The other system softwares of EDA51-X can be upgraded by downloading ".zip" files from the Technical Support
Website. Website: https://hsmftp.honeywell.com/
Upgrading AutoInstall application
1. Copy the upgrade file "EDA51_OTA_xxxxx_Update.zip " to the following EDA51-X's system folder:
o File Explorer\External Memory Card\Honeywell\Autoinstall
o IPSM\Honeywell\Autoinstall
2. Tap All Applications > AutoInstall Settings.
3. Choose Packages update, and EDA51-X will restart and install the upgrade file.
Manually upgrading Recovery Menu
1. Copy the file " EDA51_OTA_xxxxx_Update.zip " to the root directory of the T card.
2. Turn off the terminal, press and hold the "Power button" + "Volume+" key for about 15s, then the phone will enter Recovery Menu.
3. Press "Volume-", and select "Apply update from SD card". Press "Power button", select the zip file just copied, then press and hold the "Power button".
4. After the upgrading is completed, it will automatically move to Reboot System Now Menu. Please
press the "Power button" to restart the terminal.
P71
Restarting the Terminal
If the terminal or an application is locked or doesn't respond when pressing the power button, you need to restart
the terminal.
When restarting, the terminal will use the current configuration saved in the flash memory. Try the following ways
to restart the terminal:
• Restarting the system: Restarts the terminal’s operating system
• Restarting hardware: If there is no response after pressing the power button, hold it down for 13
seconds to force restart of the device
• Restore default settings: Clears all data in the terminal including all applications, data and files except
built-in files or data in the movable storage device
Restarting the system
When an application is not responding, you may need to restart the terminal to resolve the issue.
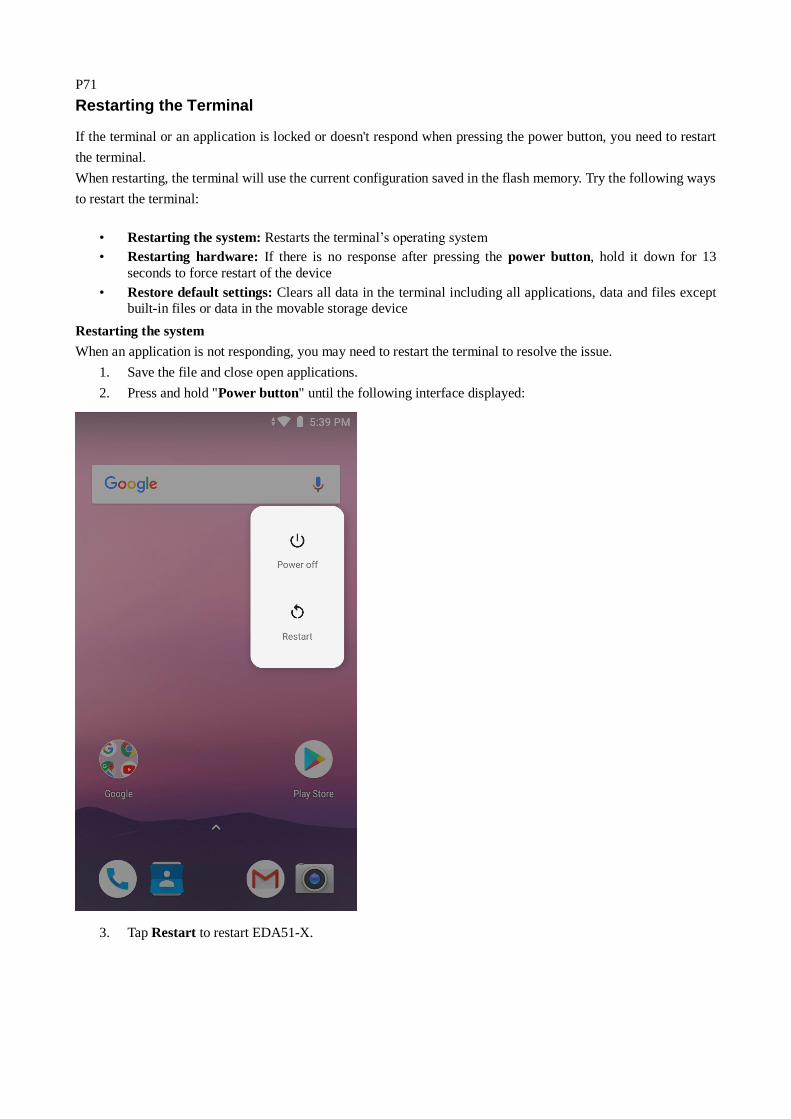
1. Save the file and close open applications.
2. Press and hold "Power button" until the following interface displayed:
3. Tap Restart to restart EDA51-X.

P72
Restore factory settings
If the terminal appears to be locked, try a cold boot. If resetting is invalid, try to restore factory settings, restart the
terminal to make it work again and do troubleshooting later.
1. Tap Settings.
2. Tap system.
3. Tap Reset options.
4. Tap Erase all data (Factory Reset).
5. Tap Reset Phone.
6. EDA51-X will restart and automatically clear user data.
Warning: This action will clear all data in the terminal, including all applications and data, but excluding data
stored in flash memory or external storage device.
Cleaning the terminal
In order to ensure the terminal in good working condition, you need to clean the scan window, camera and touch
screen. Based on the environmental conditions where the terminal is being used, clean these parts at regular
intervals. Use a clean, soft cloth which dampened with the following solvents for the cleaning, and quickly wipe it
with another piece of clean, soft cloth.
• Acetic acid (10% soluble in water)
• Ethanol (10% soluble in water)
• Neutral soap solution
Warnings: this product includes non-user-serviceable parts inside. Disassembling the product
may prevent warranty and cause internal damages to the product.
Note: We advise you not to open the battery cover or remove the battery, so as to avoid the
liquid flowing into the internal part of the terminal from the SIM card and SD card
interface.
1. Press the power button to enter standby mode.
2. Dip a clean cloth in detergent, then wrung out excessive water.
3. Wipe the scanning window, camera and flash area, avoiding touching these areas with hard objects or
abrasive materials.
4. Dry the cleaned area.
5. Make sure the terminal is fully dry before using it again.
P73
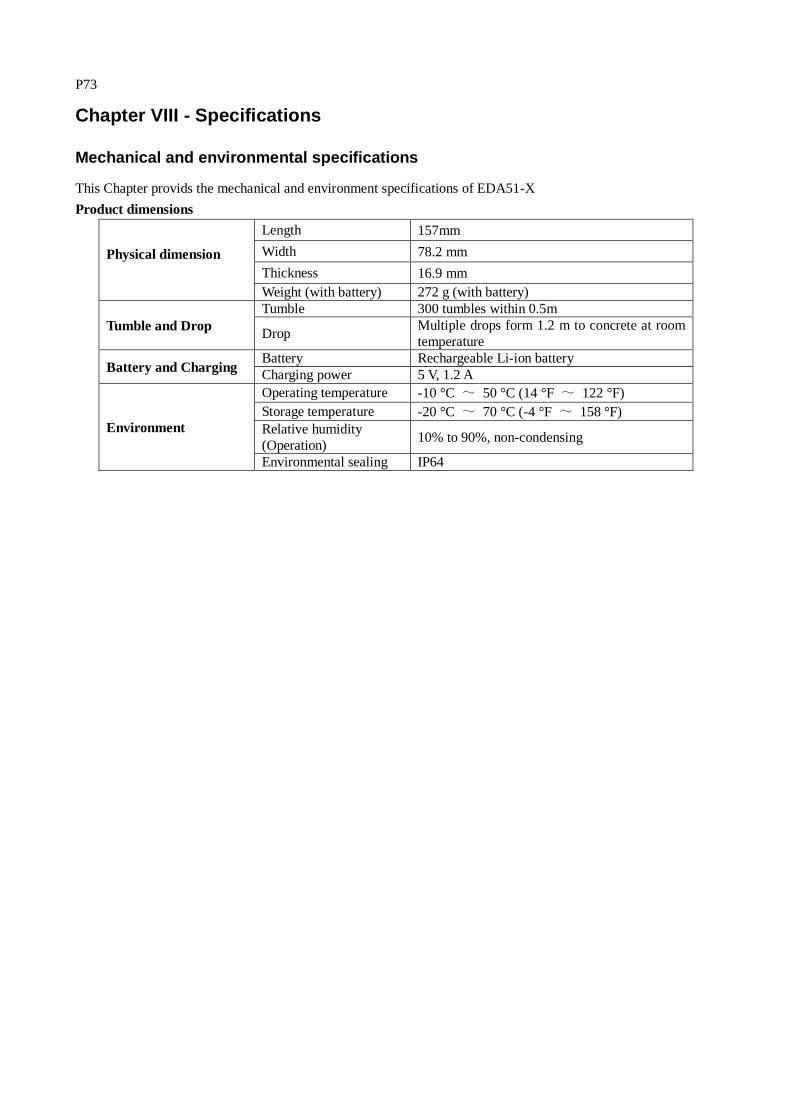
Chapter VIII - Specifications
Mechanical and environmental specifications
This Chapter provids the mechanical and environment specifications of EDA51-X
Product dimensions
Physical dimension
Length 157mm
Width 78.2 mm
Thickness 16.9 mm
Weight (with battery) 272 g (with battery)
Tumble and Drop
Tumble 300 tumbles within 0.5m
Drop Multiple drops form 1.2 m to concrete at room
temperature
Battery and Charging Battery Rechargeable Li-ion battery
Charging power 5 V, 1.2 A
Environment
Operating temperature -10 °C ~ 50 °C (14 °F ~ 122 °F)
Storage temperature -20 °C ~ 70 °C (-4 °F ~ 158 °F)
Relative humidity
(Operation) 10% to 90%, non-condensing
Environmental sealing IP64
P74
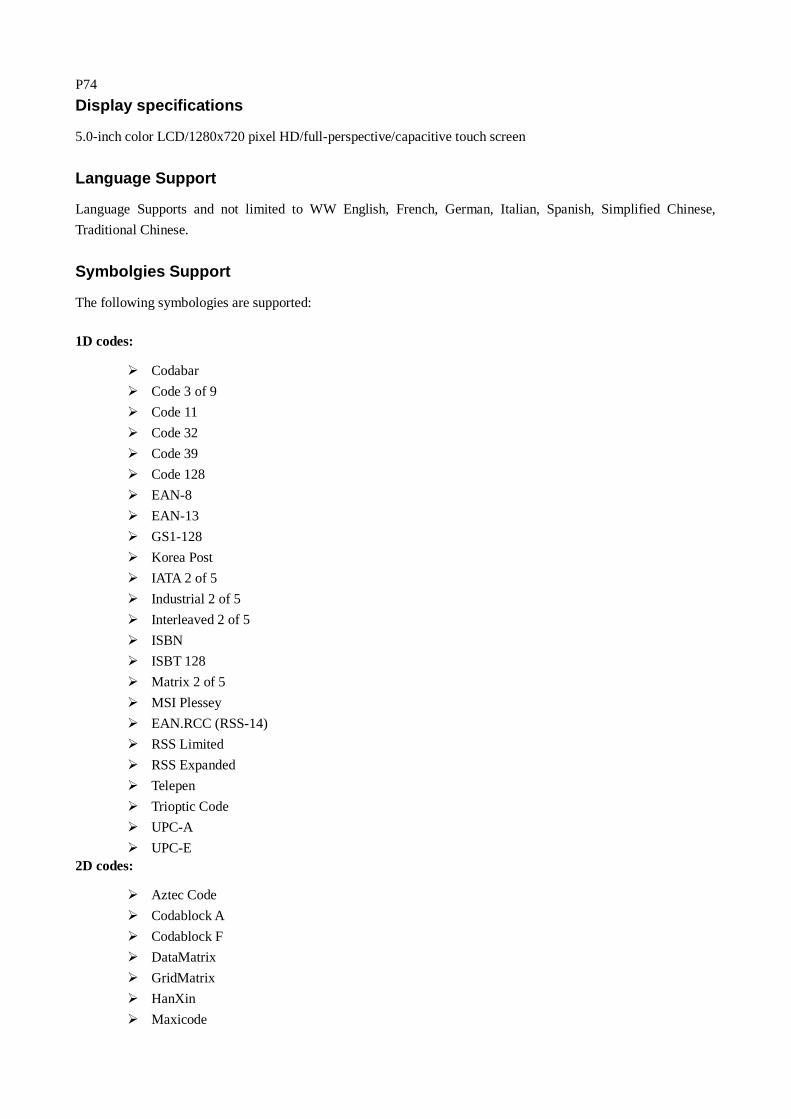
Display specifications
5.0-inch color LCD/1280x720 pixel HD/full-perspective/capacitive touch screen
Language Support
Language Supports and not limited to WW English, French, German, Italian, Spanish, Simplified Chinese,
Traditional Chinese.
Symbolgies Support
The following symbologies are supported:
1D codes:
Codabar
Code 3 of 9
Code 11
Code 32
Code 39
Code 128
EAN-8
EAN-13
GS1-128
Korea Post
IATA 2 of 5
Industrial 2 of 5
Interleaved 2 of 5
ISBN
ISBT 128
Matrix 2 of 5
MSI Plessey
EAN.RCC (RSS-14)
RSS Limited
RSS Expanded
Telepen
Trioptic Code
UPC-A
UPC-E
2D codes:
Aztec Code
Codablock A
Codablock F
DataMatrix
GridMatrix
HanXin
Maxicode

Micro PDF 417
MicroQr
PDF 417
QR Code
TLC39
OCR-A
OCR-B
Postal codes:
Australian Postcode
Canadian Postcode
KIX (Dutch) Postcode
Japanese Postcode
UK Postcode
Planet Code
Postnet
UsIntelligent
Info mail
UPU(ID-tag)
P76
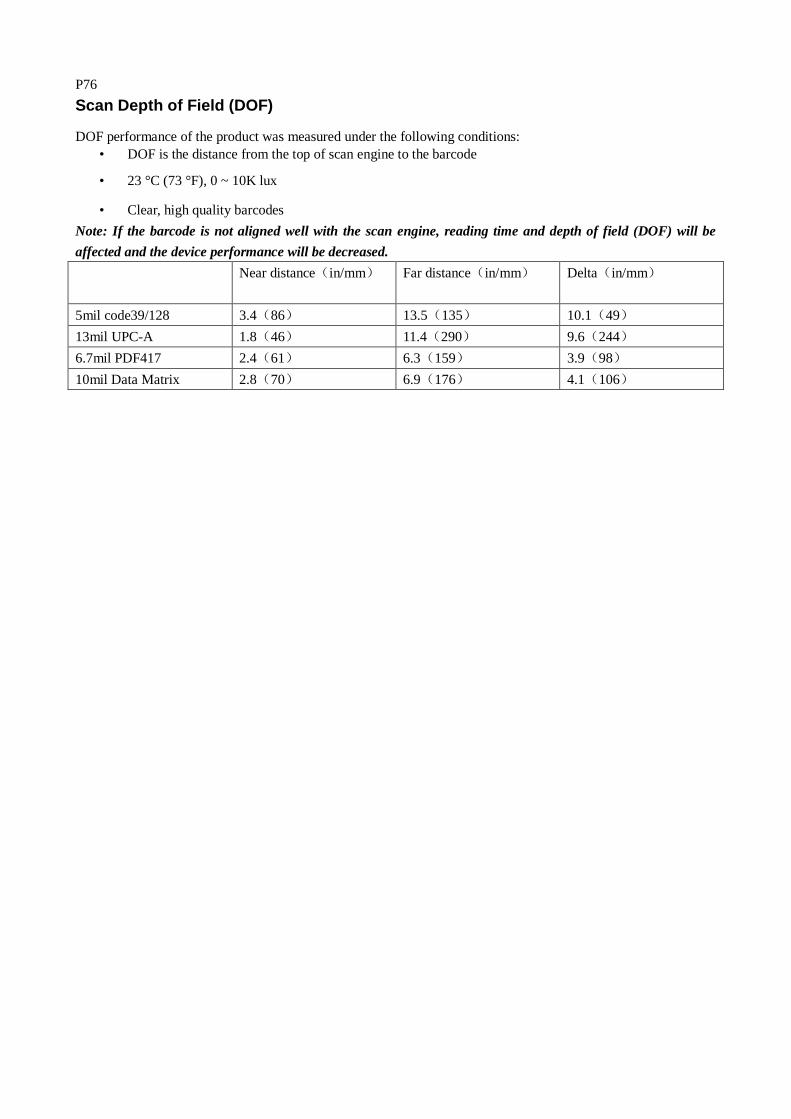
Scan Depth of Field (DOF)
DOF performance of the product was measured under the following conditions:
• DOF is the distance from the top of scan engine to the barcode
• 23 °C (73 °F), 0 ~ 10K lux
• Clear, high quality barcodes
Note: If the barcode is not aligned well with the scan engine, reading time and depth of field (DOF) will be
affected and the device performance will be decreased.
Near distance(in/mm)
Far distance(in/mm) Delta(in/mm)
5mil code39/128 3.4(86) 13.5(135) 10.1(49)
13mil UPC-A 1.8(46) 11.4(290) 9.6(244)
6.7mil PDF417 2.4(61) 6.3(159) 3.9(98)
10mil Data Matrix 2.8(70) 6.9(176) 4.1(106)