Embed Size (px)
Citation preview

SESTILIO Manuale Utente
User Manual
Interfaccia A/D‐D/A intelligente
Smart A/D‐D/A interface
Rev. 1.4 Febbraio/February 2019
© 2019 Officina Turini MU101233B

© Copyright 2012‐2019 Officina Turini
Tutti i diritti riservati.
La riproduzione di questo manuale, in parte o totale, può essere effettuata solo previa autorizzazione di OT.
Il contenuto di questo manuale é soggetto a modifiche senza preavviso.
OTA declina ogni responsabilità per eventuali errori che possono verificarsi in questo manuale.
Traduzione a cura di Helen Kleinlugtebeld
© Copyright 2012‐2019 Officina Turini
All rights reserved.
No part of this manual may be reproduced without written consent of OT.
The content of this manual is subject to change without prior notice.
OT declines all responsibility for any errors that may appear in this manual.
Translated by Helen Kleinlugtebeld

COME È SCRITTO QUESTO MANUALE Questo manuale è stato scritto in lingua Italiana ed Inglese. Sulla sinistra troviamo sempre la versione italiana mentre sulla destra è presente la versione in lingua Inglese.
HOW THIS MANUAL HAS BEEN WRITTEN This manual has been written in Italian and English. On the left side you will find the Italian version, on the right side you will find the English version.

4
INDICE INDEX CARATTERISTICHE INTRODUZIONE COME SI PRESENTA SERIGRAFIA E MAPPA DEI CONNETORI DIMENSIONI DELLA SCHEDA ALIMENTAZIONE COME SI CONNETTE INSTALLAZIONE SUL PERSONAL COMPUTER CONNETTORI DI INGRESSO / USCITA PROTOCOLLO SERIALE IMPOSTA IDENTIFICATIVO REVISIONE DEL PROGRAMMA TEMPERATURA PROCESSORE CONFIGURA PORTA K LEGGE CONFIGURAZIONE PORTA K CONFIGURA PORTE LVTTL (K,L) SCRIVE PORTE LVTTL LEGGE PORTE LVTTL GENERA UN IMPULSO SU UNA PORTA LVTTL LETTURA INGRESSI OPTOISOLATI LETTURA INGRESSI OPTOISOLATI SCRIVE USCITA OPTOISOLATA DI POTENZA GENERA UN IMPULSO SULL’ USCITA OPTOISOLATA DI POTENZA LETTURA RAM SCRITTURA RAM LETTURA EEPROM SCRITTURA EEPROM CONTROLLO PWM SCRITTURA SPI LETTURA SPI LETTURA SCRITTURA SPI SETTA LA VELOCITÁ DELLA SPI SELEZIONE CANALE SELEZIONE GUADAGNO CAMPIONATORE A/D CICLI AZZERAMENTO CICLI VOLTMETRO AMPEROMETRO TERMOMETRO RISPOSTA AL GRADINO SCRITTURA DAC SCRITTURA CONTEMPORANEA DAC GENERATORE DI FUNZIONI PID CONTROLLORI PID IMPLEMENTAZIONE PID SESTILIO PID K PID TEMPO POSIZIONAMENTO RAMPA MOTORE VELOCITA’ MOTORE CONTATORE MOTORE CALIBRAZIONE ASSE SVILUPPO E AGGIORNAMENTO SOFTWARE SCRIVERE UN APPLICAZIONE TESTARE SESTILIO ASCII TABLE NOTE CONTATTI
Pag. 5 6 7 8 9 10 12 13 14 23 26 27 28 29 30 31 32 33 34 35 36 37
38 39 40 41 42 43 44 45 46 47 48 49 50 51 52 53 54 56 57 59 60 61 62 63 66 67 68 69 70 71 72 73 74 75 77 79 80 81
FEATURES INTRODUCTION WHAT DOES IT LOOK LIKE SILKSCREEN AND CONNECTORS MAP BOARD DIMENSIONS POWER SUPPLY HOW TO CONNECT DRIVERS INSTALLATION INPUT / OUTPUT CONNECTORS SERIAL PROTOCOL IDENTIFICATION SETTINGS SOFTWARE REVISION CPU TEMPERATURE SET K PORT READ K PORT CONFIGURATION SET LVTTL PORTS (K, L) WRITE LVTTL PORTS READ LVTTL PORTS GENERATE A PULSE ON A LVTTL PORT READ OPTO‐ISOLATED INPUTS SET OPTO‐ISOLATED OUTPUT SET OPTO‐ISOLATED POWER OUTPUT GENERATE A PULSE ON POWER OPTO‐ISOLATED OUTPUT RAM READ RAM WRITE EEPROM READ EEPROM WRITE PWM CONTROLLER SPI WRITE SPI READ READ WRITE SPI SET THE SPI SPEED CHANNEL SELECTION GAIN SELECTION A/D SAMPLING ITERATIONS ITERATIONS RESET VOLTMETER AMPERE METER THERMOMETER TRANSIENT RESPONSE DAC WRITE SIMULTANEOUS DAC WRITE FUNCTION GENERATOR PID PID CONTROLLERS PID SESTILIO IMPLEMENTATION PID K PID TIME POSITIONING MOTOR SLOPE MOTOR SPEED MOTOR COUNTS AXIS CALIBRATION SOFTWARE DEVELOPMENT AND UPDATING WRITING AN APPLICATION SESTILIO TESTING ASCII TABLE NOTES CONTACTS
Page 5 6 7 8 9 10 12 13 14 23 26 27 28 29 30 31 32 33 34 35 36 37
38 39 40 41 42 43 44 45 46 47 48 49 50 51 52 53 54 56 57 59 60 61 62 63 66 67 68 69 70 71 72 73 74 75 77 79 80 81

CARATTERISTICHE Interfaccia A/D D/A intelligente.
Due canali A/D a 16 bit 1 M/s ad 8 ingressi.
Tensione di ingresso A/D 0‐10V.
Ingressi A/D a guadagno variabile a controllo digitale: +1, +2, +4, +5, +8, +10, +16 o +32 V/V.
Un totale di 16 ingressi analogici a 16 bit.
Due canali D/A a 12 bit 0‐5V con amplificatore.
16 + 10 bit di porta parallela bidirezionale (bit a bit) LVTTL compatibile 5V tollerante.
8 Uscite optoisolate.
8 Ingressi optoisolati.
4 Uscite optoisolate con transitor di potenza da 5.
Controllo di due motori passo‐passo bipolari da 2A per fase con controllo della corrente di fase.
Porta di connessione USB 2.0 duale, con una porta di connessione veloce ed una Porta Virtuale Seriale.
Connettore per LCD alfanumerico con controllo della retro illuminazione.
Ingresso per tastiera 8x8 tasti.
Porta di programmazione e debug JTAG.
Porta di espansione SPI.
Orologio calendario.
64 Kbyte RAM ad uso utente come area dati.
EEPROM da 128 Kbyte per memorizzazione dati utente.
Alimentazione da USB o da batteria Li‐Ion singola cella.
Ricarica della batteria da USB.
Libreria DLL per C/C++ Visual Basic e LabView
FEATURES Smart A/D – D/A interface.
Two 1M/s 8 channel 16‐bit A/D converter. A/D input range 0‐10V.
A/D inputs with digitally controlled selectable gain:+1, +2, +4, +5, +8, +10, +16 o +32 V/V.
16 analog inputs, 16‐bit.
Dual 12‐bit buffered D/A converter 0‐5V.
16+10 bit of bidirectional parallel port, LVTTL compatible 5V tolerant.
8 opto‐isolated outputs.
8 opto‐isolated inputs.
4 power opto‐isolated outputs with 5Aa collector current.
Two fase bipolar stepper motor control system with a 2A phase current.
Dual USB 2.0 connection with an high speed communication port and with a Virtual Com Port.
Alphanumeric LCD connector with backlight control.
Input for an optional 8x8 keyboard.
JTAG debugger and programmer port.
SPI expansion port.
RTC battery powered.
64 KByte RAM for user data storage.
128 KByte EEPROM for user data storage.
Powered by USB or by a single cell Li‐Ion battery.
USB Battery Charging
DLL library for C/C++, Visual Basic, LabView

6
INTRODUZIONE SESTILIO è una interfaccia AD/DA versatile con connessione USB in grado di funzionare in modo autonomo o collegata ad un PC. Con SESTILIO è possibile realizzare tante piccole automazioni o semplicemente acquisire grandezze fisiche. È uno strumento che non dovrebbe mai mancare in un laboratorio di elettronica.
INTRODUCTION SESTILIO is a versatile AD/DA interface with USB connection that can operate standalone or connected to a PC. With SESTILIO you can automate many routine tasks or you can simply use it for analog data sampling. It’s an essential tool for electronics laboratories.

7
COME SI PRESENTA WHAT DOES IT LOOK LIKE
Figura/Picture 1
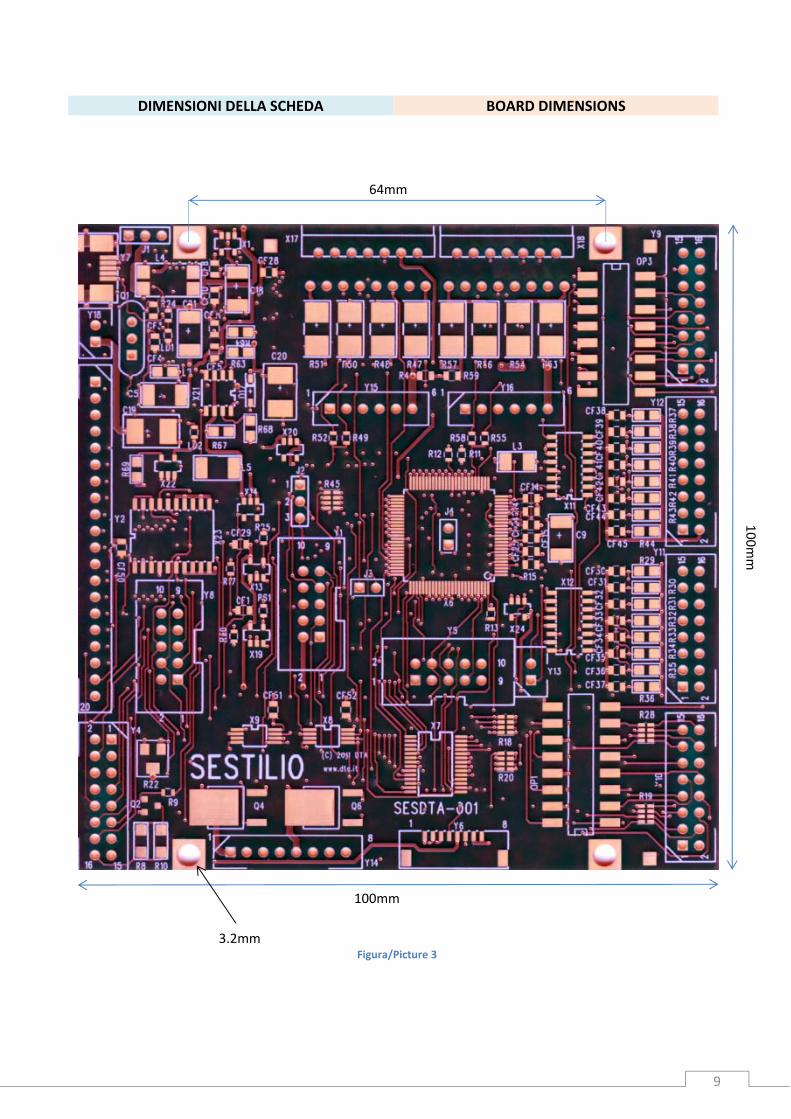
È una piccola scheda di 100x100 mm del peso di 76 g e presenta molti connettori.
It’s a small, light board (dimensions: 100x100mm, weight: 76 g) equipped with many connectors.
8
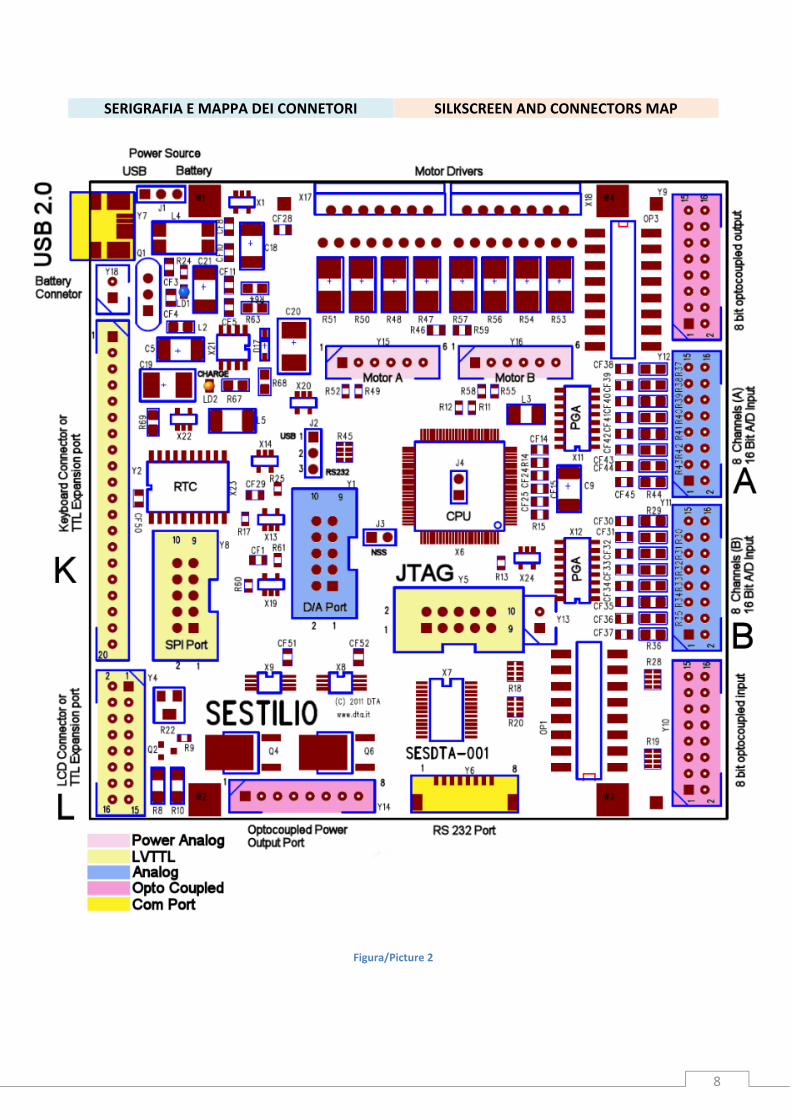
SERIGRAFIA E MAPPA DEI CONNETORI SILKSCREEN AND CONNECTORS MAP
Figura/Picture 2
9
DIMENSIONI DELLA SCHEDA BOARD DIMENSIONS
64mm
100mm
100mm
3.2mm Figura/Picture 3
10
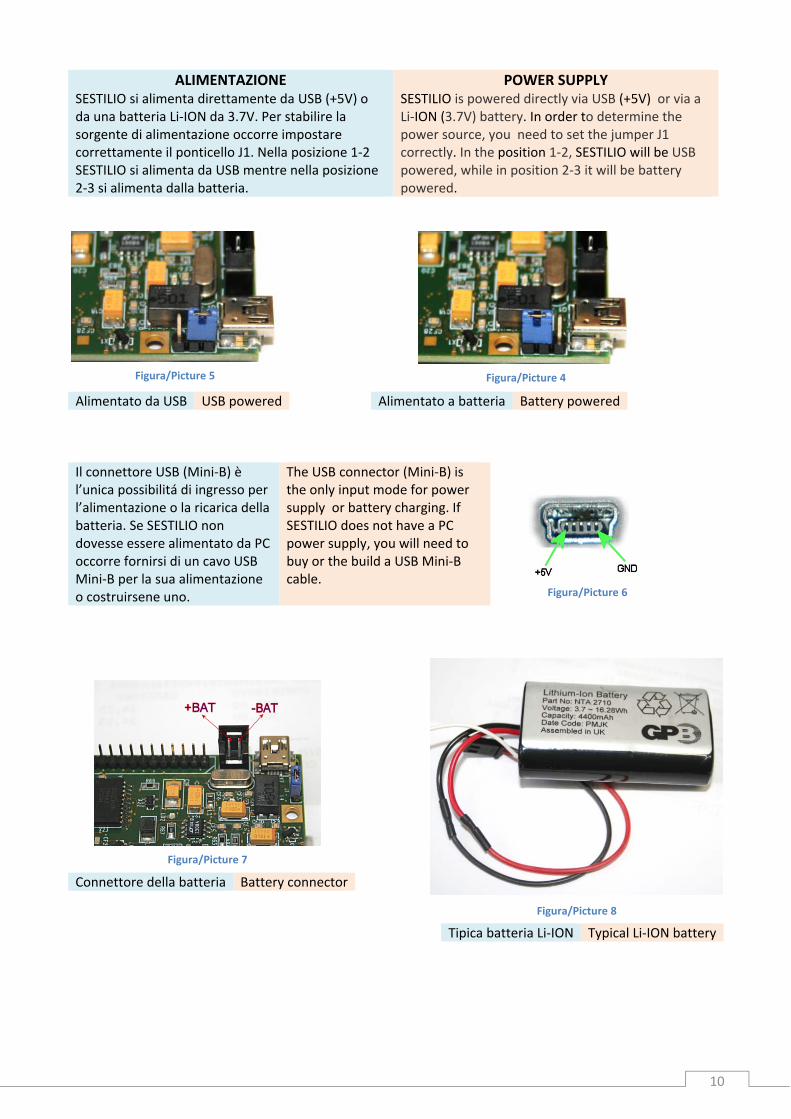
ALIMENTAZIONE SESTILIO si alimenta direttamente da USB (+5V) o da una batteria Li‐ION da 3.7V. Per stabilire la sorgente di alimentazione occorre impostare correttamente il ponticello J1. Nella posizione 1‐2 SESTILIO si alimenta da USB mentre nella posizione 2‐3 si alimenta dalla batteria.
POWER SUPPLY SESTILIO is powered directly via USB (+5V) or via a Li‐ION (3.7V) battery. In order to determine the power source, you need to set the jumper J1 correctly. In the position 1‐2, SESTILIO will be USB powered, while in position 2‐3 it will be battery powered.
Alimentato da USB USB powered Alimentato a batteria Battery powered
Il connettore USB (Mini‐B) è l’unica possibilitá di ingresso per l’alimentazione o la ricarica della batteria. Se SESTILIO non dovesse essere alimentato da PC occorre fornirsi di un cavo USB Mini‐B per la sua alimentazione o costruirsene uno.
The USB connector (Mini‐B) is the only input mode for power supply or battery charging. If SESTILIO does not have a PC power supply, you will need to buy or the build a USB Mini‐B cable.
Connettore della batteria Battery connector
Tipica batteria Li‐ION Typical Li‐ION battery
Figura/Picture 5 Figura/Picture 4
Figura/Picture 6
Figura/Picture 7
Figura/Picture 8

11
Figura/Picture 9
12
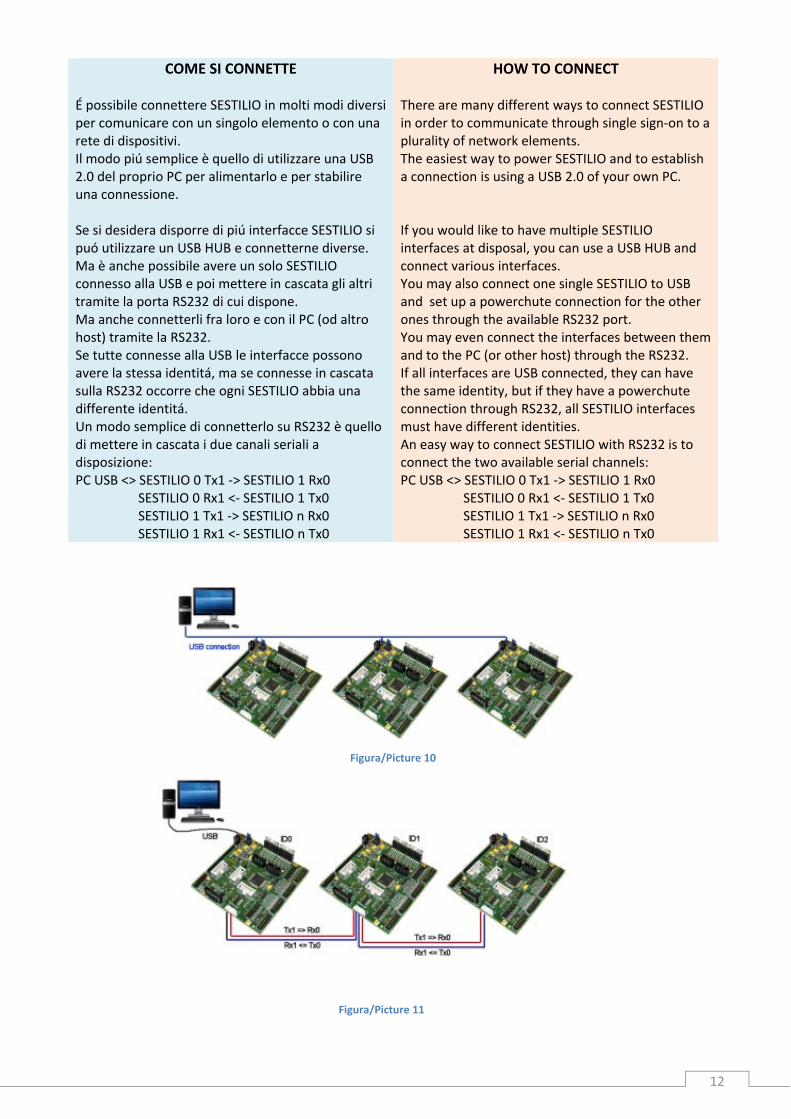
COME SI CONNETTE É possibile connettere SESTILIO in molti modi diversi per comunicare con un singolo elemento o con una rete di dispositivi. Il modo piú semplice è quello di utilizzare una USB 2.0 del proprio PC per alimentarlo e per stabilire una connessione. Se si desidera disporre di piú interfacce SESTILIO si puó utilizzare un USB HUB e connetterne diverse. Ma è anche possibile avere un solo SESTILIO connesso alla USB e poi mettere in cascata gli altri tramite la porta RS232 di cui dispone. Ma anche connetterli fra loro e con il PC (od altro host) tramite la RS232. Se tutte connesse alla USB le interfacce possono avere la stessa identitá, ma se connesse in cascata sulla RS232 occorre che ogni SESTILIO abbia una differente identitá. Un modo semplice di connetterlo su RS232 è quello di mettere in cascata i due canali seriali a disposizione: PC USB <> SESTILIO 0 Tx1 ‐> SESTILIO 1 Rx0 SESTILIO 0 Rx1 <‐ SESTILIO 1 Tx0 SESTILIO 1 Tx1 ‐> SESTILIO n Rx0 SESTILIO 1 Rx1 <‐ SESTILIO n Tx0
HOW TO CONNECT There are many different ways to connect SESTILIO in order to communicate through single sign‐on to a plurality of network elements. The easiest way to power SESTILIO and to establish a connection is using a USB 2.0 of your own PC. If you would like to have multiple SESTILIO interfaces at disposal, you can use a USB HUB and connect various interfaces. You may also connect one single SESTILIO to USB and set up a powerchute connection for the other ones through the available RS232 port. You may even connect the interfaces between them and to the PC (or other host) through the RS232. If all interfaces are USB connected, they can have the same identity, but if they have a powerchute connection through RS232, all SESTILIO interfaces must have different identities. An easy way to connect SESTILIO with RS232 is to connect the two available serial channels: PC USB <> SESTILIO 0 Tx1 ‐> SESTILIO 1 Rx0 SESTILIO 0 Rx1 <‐ SESTILIO 1 Tx0 SESTILIO 1 Tx1 ‐> SESTILIO n Rx0 SESTILIO 1 Rx1 <‐ SESTILIO n Tx0
Figura/Picture 10
Figura/Picture 11

13
Windows Server 2008 R2
Windows 7
Windows 7 x64
Windows Server 2008
Windows Server 2008 x64
Windows Vista
Windows Vista x64
Windows Server 2003
Windows Server 2003 x64
Windows XP
Windows XP x64
Windows ME
Windows 98
Linux
Mac OS X
Mac OS 9
Mac OS 8
Windows CE.NET (Version 4.2 and greater)
Android
Il programma di installazione puó essere scaricato da qui:
The driver installation program can be downloaded at the following link:
http://www.ftdichip.com/Drivers/D2XX.htm
Le istruzioni per l’installazione possono essere scaricate da qui:
Driver setup instructions can be downloaded at the following link:
http://www.ftdichip.com/Support/Documents/InstallGuides.htm
INSTALLAZIONE SUL PERSONAL COMPUTER
SESTILIO utilizza per la connessione USB un chip della FTDI, questo dispone di due canali (sulla medesima connessione), il primo rende disponibile una porta seriale virtuale, mentre il secondo permette di trasferire dati ad alta velocitá. Il primo canale offre una grande facilitá di utilizzo in quanto è possibile, con un semplice programma di emulazione terminale, utilizzare il SESTILIO digitando direttamente sulla tastiera. Mentre se si desidera effettuare trasferimenti di dati ad alta velocitá con un proprio programma scritto in C/C++, Visual Basic o LabView conviene utilizzare il secondo canale. Per la scrittura di un proprio programma occorre impiegare la libreria offerta dalla FTDI. Il programma di installazione è disponibile per i seguenti sistemi operativi:
DRIVERS INSTALLATION For the USB connection SESTILIO uses an FTDI chip. This chip is a dual‐channel chip (both on the same connection); the first channel provides a virtual COM port, while the second one allows high‐speed data transfer. The first channel provides the highest possible ease of use: through a simple terminal emulation program it is possible to use the SESTILIO typing directly with the keyboard. If you want to transfer data at high speed with its own program written in C/C+ +, Visual Basic or LabView, you can use the second channel. In order to write your own program, you need to use the library offered by FTDI. Drivers are available for the following operating systems:

DESCRIZIONE DEI CONNETTORI CONNECTOR DESCRIPTION
Y12 ‐ INGRESSO A ‐ A/D 16 BIT Y11 ‐ INGRESSO B ‐ A/D 16 BIT
Y12 – INPUT A ‐ A/D 16 BIT Y11 – INPUT B ‐ A/D 16 BIT
CONNETTORI DI INGRESSO / USCITA
1. 16 Ingressi A/D a 16 bit con guadagno variabile 0‐10V 1Ms/s
2. 2 Uscite D/A a 12 bit con amplificatore 0‐5V/0‐2.5V
3. 8 Uscite opto‐isolate 50mA 80V 4. 4 Uscite opto‐isolate 8A 100V 5. 8 Ingressi opto‐isolati 6. 16 Ingressi/Uscite LVTTL programmabili 7. Uscita LCD di testo con retro illuminazione 8. Porta di espansione SPI 9. Porta RS232 10. 2 Piloti per motore a passi 2A 40V
INPUT / OUTPUT CONNECTORS
1. 16 A/D inputs, 16‐bit, variable gain 0‐10V 1Ms/s
2. 2 D/A outputs with buffer, 12‐bit 0‐5V/0‐2.5V
3. 8 opto‐isolated outputs 50mA 80V 4. 4 opto‐isolated outputs 8A 100V 5. 8 opto‐isolated inputs 6. 16 programmable LVTTL inputs/outputs 7. LCD text output with back light control 8. SPI expansion port 9. RS232 port 10. 2 Stepper motor driver 2A 40V
SEGNALE/SIGNAL PIN CH0 1 GND 2 CH1 3 GND 4 CH2 5 GND 6 CH3 7 GND 8 CH4 9 GND 10 CH5 11 GND 12 CH6 13 GND 14 CH7 15 GND 16
Figura/Picture 12

Nella versione standard gli ingressi hanno un campo di ingresso di 0‐10V, con una impedenza di 20KΩ. Gli ingressi sono realizzati come segue:
The standard version has an input range of 0‐10V, with impedance of 20KΩ. Inputs are as follows:
Figura/Picture 13

16
Y1 ‐ USCITA – D/A 12 BIT Y1 – OUTPUT– D/A 12 BIT
SEGNALE/SIGNAL PIN DA 1: 0‐5V Buffered 1
+5V 2 DA 1: 0‐2.5V 3
GND 4 DA 0: 0‐5V Buffered 5
GND 6 DA 0: 0‐2.5V 7
GND 8 +2.5V Reference 9
GND 10
Le uscite amplificate ed il riferimento possono erogare una corrente massima di 30mA. Tutte le altre uscite possono fornire una corrente massima di 300uA.
Buffered outputs and the reference offer a maximum supply current of 30mA. All other outputs can supply a maximum current of 300uA.
Y9 –8 USCITE OPTOISOLATE Y9 – 8 OPTO‐ISOLATED OUTPUTS
SEGNALE/SIGNAL PIN
COLLECTOR 1 1 EMITTER 1 2
COLLECTOR 2 3 EMITTER 2 4
COLLECTOR 3 5 EMITTER 3 6
COLLECTOR 4 7 EMITTER 4 8
COLLECTOR 5 9 EMITTER 5 10
COLLECTOR 6 11 EMITTER 6 12
COLLECTOR 7 13 EMITTER 7 14
COLLECTOR 8 15 EMITTER 8 16
Figura/Picture 14
Figura/Picture 15

17
Configurazione dell optoisolatore Opto‐isolator connection
Specifiche del transistor di uscita Transistor output characteristics
PARAMETER RATING
Collector ‐ Emitter Voltage 80V Emitter – Collector Voltage 6V Collector Current 50mA Collector Power Dissipation 150mW
Y14 –4 USCITE OPTOISOLATE DI POTENZA Y14 – 4 OPTO‐ISOLATED POWER OUTPUTS
PARAMETER RATING
Collector ‐ Emitter Voltage 100V Collector Current 8A Collector Power Dissipation 1.75W
SEGNALE/SIGNAL PIN
COLLECTOR 1 1 EMITTER 1 2
COLLECTOR 2 3 EMITTER 2 4
COLLECTOR 3 5 EMITTER 3 6
COLLECTOR 4 7 EMITTER 4 8
Specifiche del transistor di uscita Transistor output characteristics
Figura/Picture 16
Figura/Picture 17
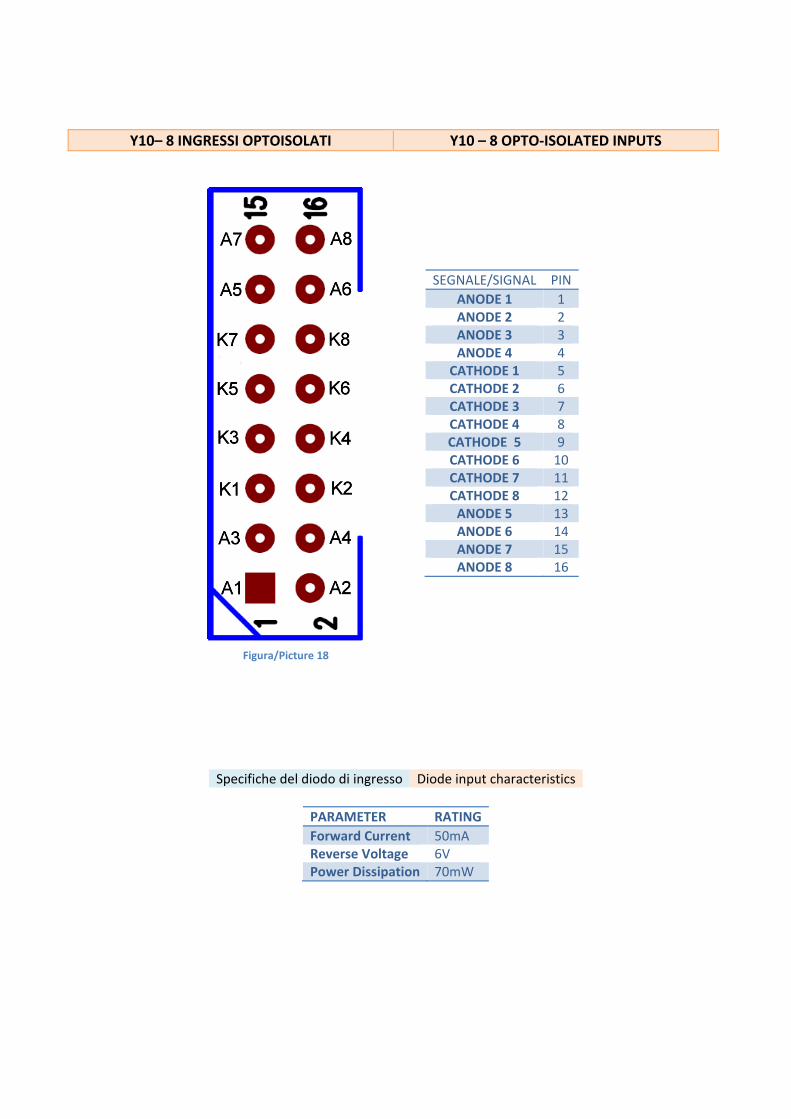
Y10– 8 INGRESSI OPTOISOLATI Y10 – 8 OPTO‐ISOLATED INPUTS
SEGNALE/SIGNAL PIN
ANODE 1 1 ANODE 2 2 ANODE 3 3 ANODE 4 4 CATHODE 1 5 CATHODE 2 6 CATHODE 3 7 CATHODE 4 8 CATHODE 5 9 CATHODE 6 10 CATHODE 7 11 CATHODE 8 12 ANODE 5 13 ANODE 6 14 ANODE 7 15 ANODE 8 16
Specifiche del diodo di ingresso Diode input characteristics
PARAMETER RATING
Forward Current 50mA Reverse Voltage 6V Power Dissipation 70mW
Figura/Picture 18

Y2–PORTA K‐ 16 BIT I/O Y2 – K PORT ‐ 16BIT I/O
Riservata per l’impiego di una tastiera PA[7:0], PB[7:0] puó essere configurata come ingressi o uscite da programma.
Reserved for keyboard PA[7:0] usage, PB[7:0] can be set as input or output via the software program.
SEGNALE/SIGNAL PIN
+5V 1 +3.3V 2 PB0 3 PB1 4 PB2 5 PB3 6 PB4 7 PB5 8 PB6 9 PB7 10 PA0 11 PA1 12 PA2 13 PA3 14 PA4 15 PA5 16 PA6 17 PA7 18
/RESET 19 GND 20
Figura/Picture 19

Y4–PORTA L (LCD) Y4 – L PORT (LCD)
SEGNALE/SIGNAL PIN
GND 1 +5V 2
LCD CONTRAST 3 CD (P46) 4 RW (GND) 5 E (P47) 6 D0 (P50) 7 D1 (P51) 8 D2 (P52) 9 D3 (P53) 10 D4 (P54) 11 D5 (P55) 12 D6 (P56) 13 D7 (P57) 14 GND 15 LED+ 16
Questa porta è normalmente riservata all’utilizzo di un LCD di testo, in alternativa tutti i bit coinvolti (Pxx) possono essere configurati come ingressi od uscite LVTTL.
This port is usually reserved for a text LCD. It may also be used as a general purpose port (LVTTL). To that end, all bits (Pxx) can be set as input or output via the software program.
Figura/Picture 20

Y8–PORTA SPI DI ESPANSIONE Y8 – SPI EXPANSION PORT
SEGNALE/SIGNAL PIN
A0 1 +5V 2 A1 3
MOSI 4 A2 5
MOSI 6 \CS 7 SCLK 8 GND 9 32KHz 10
Porta di espansione riservata a dispositivi SPI. Oltre ad i segnali tipici di questo standard sono presenti dei bit di indirizzo per poter selezionare fino ad otto dispositivi ed un segnale di orologio a 32 KHz, disponibile peró solo con l’opzione RTC.
Expansion port for SPI devices. In addition to the typical signals of this standard, there are several address bits to select a maximum of eight devices and a 32 KHz clock signal (only available with the RTC option).
Figura/Picture 21

Y6–PORTA SERIALE RS232 Y6 – RS232 SERIAL PORT
Questa porta seriale è in alternativa alla connessione USB. Affinché sia pienamente funzionante occorre che il ponticello J2 sia messo nella posizione 2‐3.
This serial port is an alternative to the USB connection. In order to be fully functional, you need to set jumper J2 to position 2‐3.
Y15,Y16–CONNETTORI PER MOTORE A PASSI Y15,Y16 – STEPPER MOTOR CONNECTORS
Su questi connettori è possibile collegare 2 motori passo‐passo. Fra i pin VDD e GND va applicata una tensione da 5 a 40 V massimi. Le bobine del motore (4 fili) vanno collegate fra A+ ed A‐ e tra B+ e B‐. La corrente massima supportata dal pilotaè di 2A, questo valore viene determinato dalla tensione di alimentazione presente sul pin VDD diviso la resistenza della bobina. In modalitá di mantenimento della coppia viene inserita automaticamente una resistenza da 7.5 ohm in serie ad ogni bobina. Differenti valori di resistenza possono essere richiesti in fase di ordine.
Two 2 stepper motors can be connected to these connectors. Between pins VDD and GND a voltage from 5 to 40V maximum has to be applied. The coils of the motor (4 wires) have to be connected between A+ and A‐ and between B+ and B‐. The maximum driver current is 2A, this value is determined by the supply voltage on the VDD pin divided by the coil resistance. In the holding torque mode a 7.5 ohms resistance is automatically added in series to each coil. Different resistor values can be requested at the time of order.
Figura/Picture 22
Figura/Picture 23

SYNC ID COMMAND PARAMETERS END Carattere di sincronizzazione. Carattere ASCII SPAZIO, valore decimale 32
Carattere usato come identificativo dell’unitá. Si posso utilizzare tutti i caratteri ad esclusione dello SPAZIO e del CR. Normalmente si utilizza: 0,1,…
Carattere che identifica il comando.
Lista dei parametri rappresentati da uno o piú caratteri. I parametri se non diversamente specificato sono sempre in decimale.
Carattere di fine stringa sempre rappresentato dal CR, valore decimale 13.
Synchronization character. ASCII SPAZIO Character, decimal Value 32.
Character used as unit ID. All characters can be used, except for the following ones: SPAZIO and CR. 0,1,… are normally
used.
Character identifying the command.
List of parameters represented by one or more characters. Unless otherwise indicated, the parameters are always decimal number values.
End‐of‐string character, always represented by the CR, decimal value 13.
PROTOCOLLO SERIALE Per comunicare con SESTILIO occorre stabilire prima una connessione in uno dei tre modi possibili:
1. Porta Virtuale Seriale su USB 2. Porta Parallela su USB 3. RS232
Qualunque sia il tipo di connessione scelto il protocollo è sempre lo stesso, solo utilizzando la Porta Parallela su USB si hanno anche dei comandi speciali che ne sfruttano appieno le caratteristiche. Il protocollo impiega solo caratteri ASCII e questo permette di lavorare con SESTILIO utilizzando un comune programma di emulazione terminale. Il protocollo è caratterizzato da un minimo di quattro campi ad un massimo di cinque campi. Ogni campo è definito da uno o piú caratteri secondo questo formato:
SERIAL PROTOCOL In order to communicate with SESTILIO, you need to establish a connection in one of the three possible ways:
1. Virtual Serial Port to USB 2. Parallel Port to USB 3. RS232
The protocol is always the same regardless of the type of connection. When using the Parallel Port to USB connection, you also have special commands at your disposal that fully exploit its characteristics. The protocol only uses ASCII characters, which enables you to work with SESTILIO through a common terminal emulation program. The protocol is characterized by a minimum of four and a maximum of five fields. Each field is defined by one or more characters of the following format:
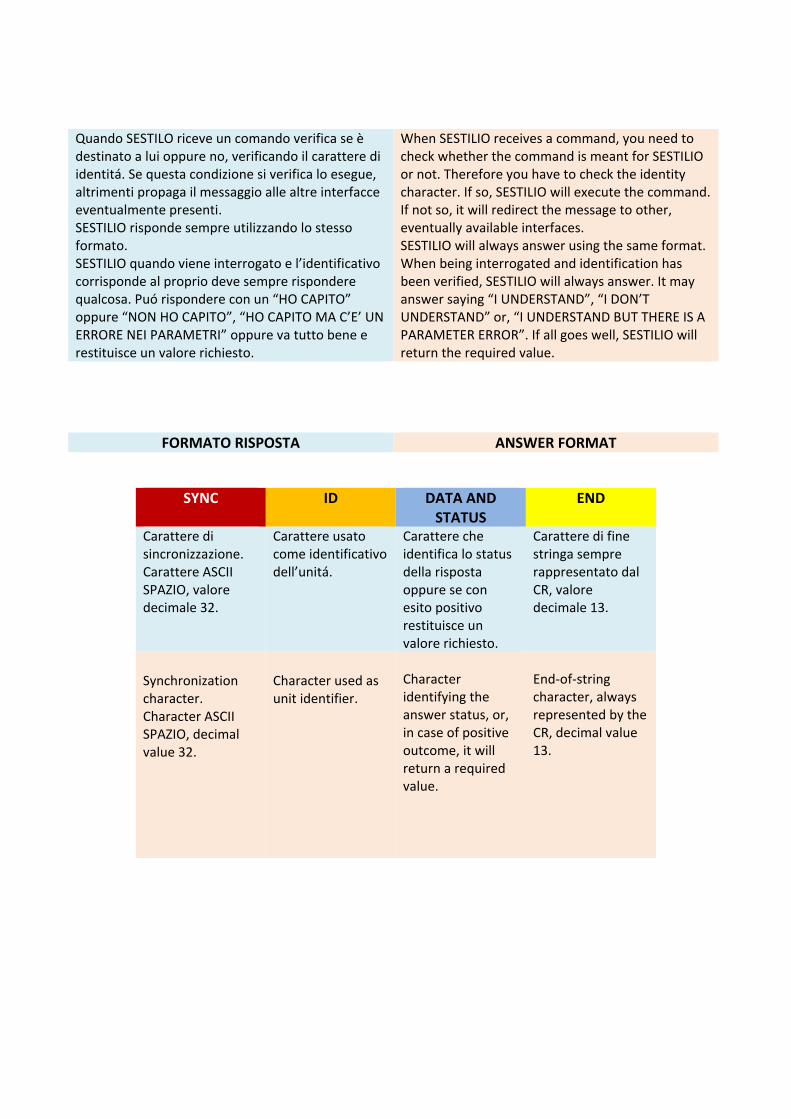
Quando SESTILO riceve un comando verifica se è destinato a lui oppure no, verificando il carattere di identitá. Se questa condizione si verifica lo esegue, altrimenti propaga il messaggio alle altre interfacce eventualmente presenti. SESTILIO risponde sempre utilizzando lo stesso formato. SESTILIO quando viene interrogato e l’identificativo corrisponde al proprio deve sempre rispondere qualcosa. Puó rispondere con un “HO CAPITO” oppure “NON HO CAPITO”, “HO CAPITO MA C’E’ UN ERRORE NEI PARAMETRI” oppure va tutto bene e restituisce un valore richiesto.
When SESTILIO receives a command, you need to check whether the command is meant for SESTILIO or not. Therefore you have to check the identity character. If so, SESTILIO will execute the command. If not so, it will redirect the message to other, eventually available interfaces. SESTILIO will always answer using the same format. When being interrogated and identification has been verified, SESTILIO will always answer. It may answer saying “I UNDERSTAND”, “I DON’T UNDERSTAND” or, “I UNDERSTAND BUT THERE IS A PARAMETER ERROR”. If all goes well, SESTILIO will return the required value.
FORMATO RISPOSTA ANSWER FORMAT
SYNC ID DATA AND STATUS
END
Carattere di sincronizzazione. Carattere ASCII SPAZIO, valore decimale 32.
Carattere usato come identificativo dell’unitá.
Carattere che identifica lo status della risposta oppure se con esito positivo restituisce un valore richiesto.
Carattere di fine stringa sempre rappresentato dal CR, valore decimale 13.
Synchronization character. Character ASCII SPAZIO, decimal value 32.
Character used as unit identifier.
Character identifying the answer status, or, in case of positive outcome, it will return a required value.
End‐of‐string character, always represented by the CR, decimal value 13.
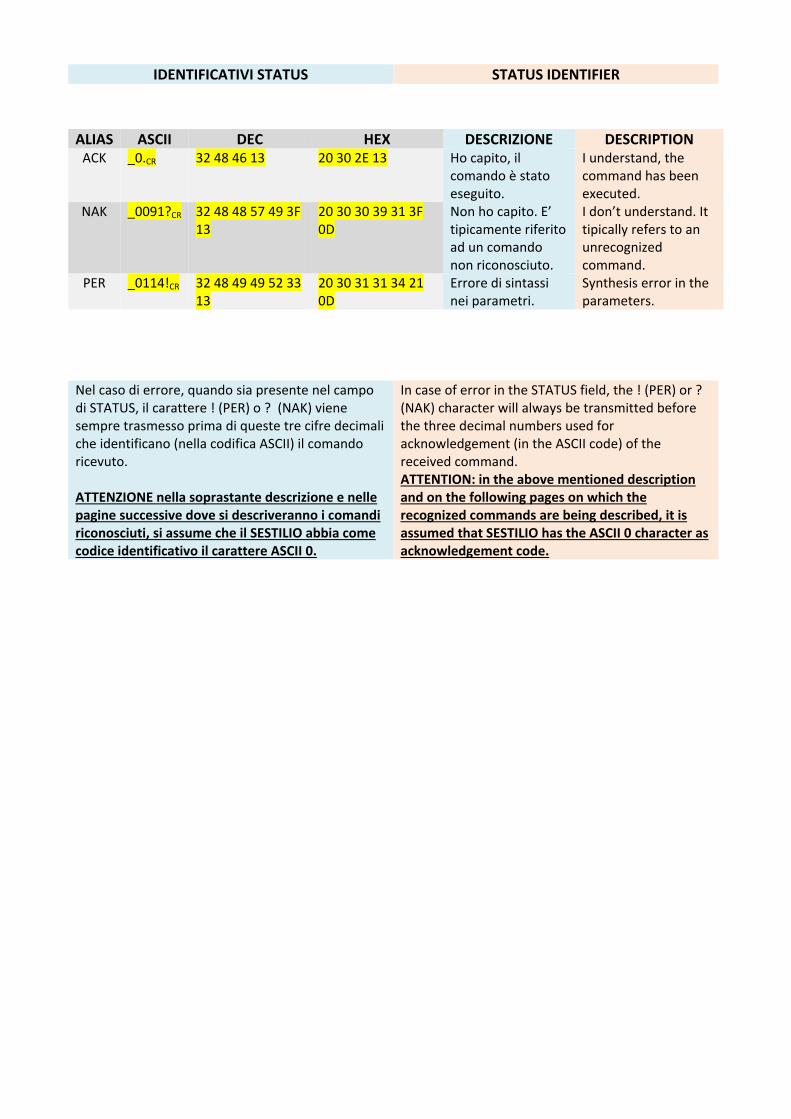
ALIAS ASCII DEC HEX DESCRIZIONE DESCRIPTION ACK _0.CR 32 48 46 13 20 30 2E 13 Ho capito, il
comando è stato eseguito.
I understand, the command has been executed.
NAK _0091?CR 32 48 48 57 49 3F 13
20 30 30 39 31 3F 0D
Non ho capito. E’ tipicamente riferito ad un comando non riconosciuto.
I don’t understand. It tipically refers to an unrecognized command.
PER _0114!CR 32 48 49 49 52 33 13
20 30 31 31 34 21 0D
Errore di sintassi nei parametri.
Synthesis error in the parameters.
Nel caso di errore, quando sia presente nel campo di STATUS, il carattere ! (PER) o ? (NAK) viene sempre trasmesso prima di queste tre cifre decimali che identificano (nella codifica ASCII) il comando ricevuto. ATTENZIONE nella soprastante descrizione e nelle pagine successive dove si descriveranno i comandi riconosciuti, si assume che il SESTILIO abbia come codice identificativo il carattere ASCII 0.
In case of error in the STATUS field, the ! (PER) or ? (NAK) character will always be transmitted before the three decimal numbers used for acknowledgement (in the ASCII code) of the received command. ATTENTION: in the above mentioned description and on the following pages on which the recognized commands are being described, it is assumed that SESTILIO has the ASCII 0 character as acknowledgement code.
IDENTIFICATIVI STATUS STATUS IDENTIFIER

26
IMPOSTAIDENTIFICATIVO IDENTIFICATIONSETTINGSCodifica: 73 Encoding: 73
ASCII: I ASCII: I
Parametri: 1 Parameters: 1
Par. Cifre/Caratteri Par. Digits/Chars
0 1 Carattere usato come identitá del SESTILIO
0 1 Character used as identity of SESTILIO
Risorse: Nessuna Resources: None
Vedi anche: Niente Seealso: None
Ritorna: ACK
Return: ACK
Descrizione: Imposta il codice da utilizzare come identificativo dell’unitá. Possono essere utilizzati tutti i caratteri ASCII ad esclusione dello SPAZIO e del CR. Normalmente, per una migliore analisi dei messaggi, si utilizzano i caratteri numerici 0…9.
Description: Sets the code to apply as unit identification. All ASCII characters can be used except for SPAZIO and CR. For an effective message analysis, usually the numeric characters 0…9 are used.
Esempio ‐ Example
Riceve ‐ Receive Trasmette ‐ Transmit
ASCII _0I0CR ASCII _0.CR
DECIMALE 32 48 73 48 13 DECIMAL 32 48 46 13

27
REVISIONEDELPROGRAMMA SOFTWAREREVISIONCodifica : 63 Encoding: 63
ASCII: ? ASCII: ?
Parametri: Nessuno Parameters: None
Risorse: Nessuna Resources: None
Vedi anche: Niente See also: None
Ritorna: Revisione del programma in centesimi
Return: Software revision in hundredths
Descrizione: Semplice comando che richiede la versione del programma di SESTILIO. Utilizzato anche per verificare la presenza di una unitá.
Description: Simple command that requires the SESTILIO program version. It is also used to check the presence of a unit.
Esempio ‐ Example
Riceve ‐ Receive Trasmette ‐ Transmit
ASCII _0?CR ASCII _0100CR
DECIMALE 32 48 63 13 DECIMAL 32 49 48 48 13
28
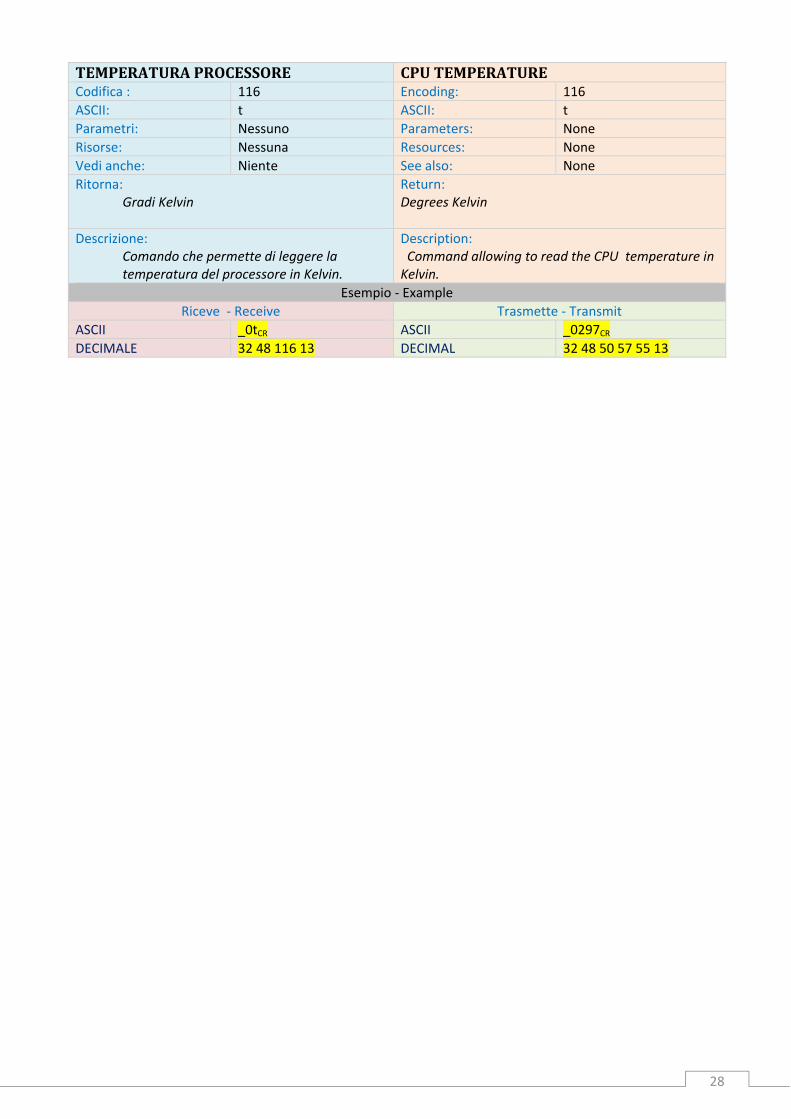
TEMPERATURAPROCESSORE CPUTEMPERATURECodifica : 116 Encoding: 116
ASCII: t ASCII: t
Parametri: Nessuno Parameters: None
Risorse: Nessuna Resources: None
Vedi anche: Niente See also: None
Ritorna: Gradi Kelvin
Return: Degrees Kelvin
Descrizione: Comando che permette di leggere la temperatura del processore in Kelvin.
Description: Command allowing to read the CPU temperature in Kelvin.
Esempio ‐ Example
Riceve ‐ Receive Trasmette ‐ Transmit
ASCII _0tCR ASCII _0297CR
DECIMALE 32 48 116 13 DECIMAL 32 48 50 57 55 13

29
CONFIGURAPORTAK SETKPORTCodifica: 112 Encoding: 112
ASCII: p ASCII: p
Parametri: 2 Parameters: 2
Par. Cifre/Caratteri Par. Digits/Chars
0 2 Valori: 00:26 Indirizzo registro.
0 2 Values: 00:26 Register address.
1 3 Valori: 000:255 Valore registro.
1 3 Values: 000:255 Register value.
Risorse: LVTTL PORT Resources: None
Vedi anche: Niente See also: None
Ritorna: ACK
Return: ACK
Descrizione: Scrive sulla porta di ingresso/uscita K. Questa porta è realizzata con un MCP23S17 e per un modo di programmazione avanzata occorre fare riferimento al rispettivo manuale. All’accensione questa porta viene messa in input. Nell’esempio sottostante la porta B viene impostata in uscita. Attenzione: usare con cautela questo comando in quanto puó compromettere il funzionamento dei comandi di scrittura/lettura della porta K.
Description: Writes on input / ouput port K.This port has been made with a MCP23S17. For an advanced programming mode, you need to refer to the respective manual. When starting, this port is set to the input mode. In the example below port B is set in the output mode.
Attention: please use this command carefully, as it may affect the functioning of the read/write commands of port K.
Esempio ‐ Example
Riceve ‐ Receive Trasmette ‐ Transmit
ASCII _0p01000CR ASCII _0.CR
DECIMALE 32 48 11248 49 48 48 48 13
DECIMAL 32 48 46 13

30
LEGGECONFIGURAZIONEPORTAK READKPORTCONFIGURATIONCodifica: 80 Encoding: 80
ASCII: P ASCII: P
Parametri: 1 Parameters: 1
Par. Cifre/Caratteri Par. Digits/Chars
0 2 Valori: 00:26 Indirizzo registro.
0 2
Risorse: LVTTL PORT Resources: LVTTL PORT
Vedi anche: Niente Seealso: None
Ritorna: Contenuto del registro
Return: ACK
Descrizione: Legge la porta di ingresso/uscita K. Questa porta è realizzata con un MCP23S17 e per un modo di programmazione avanzata occorre fare riferimento al rispettivo manuale. All’accensione questa porta messa in input. Nell’esempio sottostante si legge lo stato della porta A.
Description: Reads the input/output port K. This port has been made with a MCP23S17. For an advanced programming mode, you need to refer to the respective manual. When starting, this port is set to the input mode. In the example below the A port status is shown.
Esempio ‐ Example
Riceve ‐ Receive Trasmette ‐ Transmit
ASCII _0P18CR ASCII _0000CR
DECIMALE 32 48 80 49 56 13 DECIMAL 32 48 48 48 13

31
CONFIGURAPORTELVTTL(K,L) SETLVTTLPORTS(K,L)Codifica: 61 Encoding: 61
ASCII: = ASCII: =
Parametri: 2 Parameters: 2
Par. Cifre/Caratteri Par. Digits/Chars
0 1 Valori: 0:1 Indirizzo registro. 0 = P4 > LEN,LCD,LON 1 = P5 > LD[7:0] 2 = PA > K 3 = PB > K
0 1 Values: 0:1 Register address. 0 = P4 > LEN,LCD,LON 1 = P5 > LD[7:0] 2 = PA > K 3 = PB > K
1 3 Valori: 000:255 Configurazione a bit. 0 = Input 1 = Output
1 3 Values: 000:255 Configuration a bit. 0 = Input 1 = Output
Risorse: P4, P5, PA, PB Resources: P4, P5, PA, PB
Vedi anche: SCRIVE PORTE LVTTL, LEGGE PORTE LVTTL
See also: WRITE LVTTL PORTS, READ LVTTL PORTS
Ritorna: ACK
Return: ACK
Descrizione: I connettori Y2(K) e Y4(L) danno accesso a diverse porte LVTTL. Queste porte sono state pensate per essere utilizzate per una tastiera(Y2) e per un LCD (Y4) ma non facendone l’uso previsto possono essere liberamente impiegate per altro scopo. Questo comando vi permette di configurarle a piacere. La porta P4 controlla questi segnali: P4.7: LEN bit attivo sul pin 6 P4.6:LCD bit attivo sul pin4 P4.5:LON messa a 0 da sul pin16 + 5V La porta P5 controlla gli otto bit LD[7:0]. Nell’esempio sottostante P4.7 è in output, P4.6 e P4.5 sono messe in input.
Description: The Y2(K) and Y4(L) connectors enable access to various LVTTL ports. These ports have been created for a keyboard (Y2) and for a LCD (Y4). However, if not used to this end, they can be fully used for another purpose. This command enables you to configure the ports as you wish. Port P4 controls the following signals: P4.7: LEN bit active on pin 6 P4.6:LCD bit active on pin 4 P4.5:LON set to 0 on pin 16 + 5V Port P5 controls the eight bits LD[7:0].
In the example below P4.7 is set to output, P4.6 and P4.5 is set to input.
Esempio ‐ Example
Riceve ‐ Receive Trasmette ‐ Transmit
ASCII _0=0128CR ASCII _0.CR
DECIMALE 32 48 61 48 49 5056 13 DECIMAL 32 48 46 13

32
SCRIVEPORTE WRITEPORTSCodifica: 62 Encoding: 62
ASCII: > ASCII: >
Parametri: 2 Parameters: 2
Par. Cifre/Caratteri Par. Digits/Chars
0 1 Valori: 0:3 Indirizzo registro. 0 = P4 > LEN,LCD,LON 1 = P5 > LD[7:0] 2 = PA > K 3 = PB > K 4 = Uscita opto‐isolata 5 = Uscita opto‐isolata di potenza
0 1 Values: 0:3 Register address. 0 = P4 > LEN,LCD,LON 1 = P5 > LD[7:0] 2 = PA > K 3 = PB > K
1 3 Valori: 000:255 Dato.
1 3 Values: 000:255 Given.
Risorse: P4, P5,PA,PB,OPTO Resources: P4, P5,PA,PB,OPTO
Vedi anche: CONFIGURA PORTE , LEGGE PORTE
See also: SET PORTS, READ PORTS
Ritorna: ACK
Return: ACK
Descrizione: I connettori Y2(K) e Y4(L) danno accesso a diverse porte LVTTL. Queste porte sono state pensate per essere utilizzate per una tastiera(Y2) e per un LCD (Y4) ma non facendone l’uso previsto possono essere liberamente impiegate per altro scopo. Questo comando vi permette di scriverle a piacere. La porta P4 controlla questi segnali: P4.7: LEN bit attivo sul pin 6 P4.6:LCD bit attivo sul pin4 P4.5:LON messa a 0 da sul pin16 + 5V La porta P5 controlla gli otto bit LD[7:0]. Nell’esempio sottostante tutti i bit della porta P5 vengono messi ad 1.
Description: The Y2(K) and Y4(L) connectors enable access to various LVTTL ports. These ports have been crerated for a keyboard (Y2) and for a LCD (Y4). However, if not used to this end, they can be fully used for another purpose. This command enables you to write them as you wish. Port P4 controls the following signals: P4.7: LEN bit active on pin 6 P4.6:LCD bit active on pin 4 P4.5:LON set to 0 on pin16 + 5V Port P5 controls the eight bits LD[7:0].
In the example below all bits of port P5 are set to 1.
Esempio ‐ Example
Riceve ‐ Receive Trasmette ‐ Transmit
ASCII _0>1255CR ASCII _0.CR
DECIMALE 32 48 62 49 50 53 53 13 DECIMAL 32 48 46 13

33
LEGGEPORTELVTTL READLVTTLPORTSCodifica: 60 Encoding: 60
ASCII: < ASCII: <
Parametri: 1 Parameters: 1
Par. Cifre/Caratteri Par. Digits/Chars
0 1 Valori: 0:1 Indirizzo registro. 0 = P4 > LEN,LCD,LON 1 = P5 > LD[7:0]
0 1 Values: 0:1 Register address. 0 = P4 > LEN,LCD,LON 1 = P5 > LD[7:0]
Risorse: P4, P5 Resources: P4, P5
Vedi anche: CONFIGURA PORTE LVTTL , SCRIVE PORTE LVTTL
See also: SET LVTTL PORTS, WRITE LVTTL PORTS
Ritorna: Il contenuto della porta
Return: Port contents
Descrizione: I connettori Y2(K) e Y4(L) danno accesso a diverse porte LVTTL. Queste porte sono state pensate per essere utilizzate per una tastiera(Y2) e per un LCD (Y4) ma non facendone l’uso previsto possono essere liberamente impiegate per altro scopo. Questo comando vi permette di leggerle a piacere. La porta P4 controlla questi segnali: P4.7: LEN bit attivo sul pin 6 P4.6:LCD bit attivo sul pin4 P4.5:LON messa a 0 da sul pin16 + 5V La porta P5 controlla gli otto bit LD[7:0]. Nell’esempio sottostante viene letto il contenuto della porta P5.
Description: The Y2(K) and Y4(L) connectors enable access to various LVTTL ports. These ports have been crerated for a keyboard (Y2) and for a LCD (Y4). However, if not used to this end, they can be fully used for another purpose. This command enables you to write them as you wish. Port P4 controls the following signals: P4.7: LEN bit active on pin 6 P4.6:LCD bit active on pin 4 P4.5:LON set to 0 on pin16 + 5V Port P5 controls the eight bits LD[7:0].
In the example below the contents of port P5 are displayed. .
Esempio ‐ Example
Riceve ‐ Receive Trasmette ‐ Transmit
ASCII _0<1CR ASCII _0255CR
DECIMALE 32 48 62 49 13 DECIMAL 32 48 50 53 53 13

34
GENERAUNIMPULSOSUUNAPORTALVTTL
GENERATEAPULSEONALVTTLPORT
Codifica: 59 Encoding: 59
ASCII: ; ASCII: ;
Parametri: 5 Parameters: 5
Par. Cifre/Caratteri Par. Digits/Chars
0 1 Valori: 0:3 Indirizzo registro. 0 = P4 > LEN,LCD,LON 1 = P5 > LD[7:0] 2 = PA > K 3 = PB > K
0 1 Values: 0:3 Register address. 0 = P4 > LEN,LCD,LON 1 = P5 > LD[7:0] 2 = PA > K 3 = PB > K
1 3 Valori: 000:255 Valore iniziale.
1 3 Values: 000:255 Initial value.
2 3 Valori: 000:255 Valore finale
2 3 Values: 000:255 Final value.
3 5 Valori: 00000:65535 Durata impulso
3 5 Values: 00000:65535 Pulse duration
4 2 Valori: 0:2 Base dei tempi 0 = Clock di sistema 40.816ns 1 = us 2 = ms
4 2 Values: 0:2 Time base 0 = System clock 40.816ns 1 = us 2 = ms
Risorse: TIMER 4 Resources: TIMER 4
Vedi anche: CONFIGURA PORTE LVTTL
See also: SET LVTTL PORTS
Ritorna: ACK
Return: ACK
Descrizione: Genera un impulso di durata programmabile su una porta LVTTL.. La scrittura è bit a bit quindi il bit 0 scrive sull’uscita 1 e cosí di seguito. Nell’esempio sottostante si attiva l’uscita PB.1 per 10ms. Attenzione: l’ACK viene dato ad impulso completato. Ovviamente per funzionare occorre che in precedenza questa porta sia stata messa in uscita!
Description: Generates a pulse of programmable length on a LVTTL port. The writing is bit by bit, i.e bit 0 writes to output 1, and so on. In the example below output PB.1 per 10ms is activated. Attention: the ACK is generated at completed pulse. In order to function this port first needs to be set to output!
Esempio ‐ Example
Riceve ‐ Receive Trasmette ‐ Transmit
ASCII _0;3 000 001 00010 2CR ASCII _0.CR
DECIMALE 32 48 59 51 48 48 48 48 48 49 48 48 48 49 48 13
DECIMAL 32 48 46 13
35
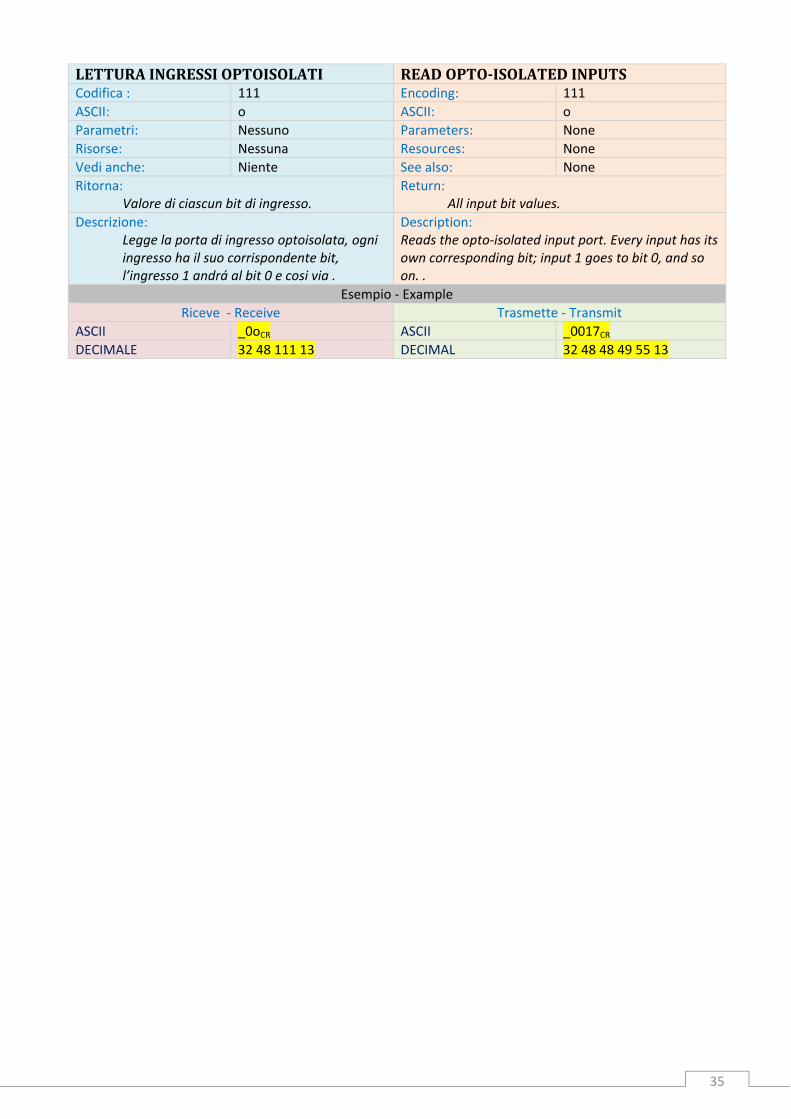
LETTURAINGRESSIOPTOISOLATI READOPTO‐ISOLATEDINPUTSCodifica : 111 Encoding: 111
ASCII: o ASCII: o
Parametri: Nessuno Parameters: None
Risorse: Nessuna Resources: None
Vedi anche: Niente See also: None
Ritorna: Valore di ciascun bit di ingresso.
Return: All input bit values.
Descrizione: Legge la porta di ingresso optoisolata, ogni ingresso ha il suo corrispondente bit, l’ingresso 1 andrá al bit 0 e cosi via .
Description: Reads the opto‐isolated input port. Every input has its own corresponding bit; input 1 goes to bit 0, and so on. .
Esempio ‐ Example
Riceve ‐ Receive Trasmette ‐ Transmit
ASCII _0oCR ASCII _0017CR
DECIMALE 32 48 111 13 DECIMAL 32 48 48 49 55 13

36
SCRIVEUSCITAOPTOISOLATA SETOPTO‐ISOLATEDOUTPUTCodifica: 81 Encoding: 81
ASCII: Q ASCII: Q
Parametri: 1 Parameters: 1
Par. Cifre/Caratteri Par. Digits/Chars
0 3 Valori: 000:255 Parametro che specifica il valore da scrivere.
0 3 Values: 000:255 Parameter specifying the setting value.
Risorse: Nessuna Resources: None
Vedi anche: Niente Seealso: None
Ritorna: ACK
Return: ACK
Descrizione: Scrive sulla porta di uscita optoisolata. La scrittura è bit a bit quindi il bit 0 scrive sull’uscita 1 e cosí di seguito. Nell’esempio sottostante si attiva l’uscita 8.
Description: Writes to the opto‐isolated output port. The writing is bit by bit, i.e. bit 0 writes to output 1, and so on. In the example below output 8 is activated.
Esempio ‐ Example
Riceve ‐ Receive Trasmette ‐ Transmit
ASCII _0Q128CR ASCII _0.CR
DECIMALE 32 48 81 49 50 56 13 DECIMAL 32 48 46 13

37
SCRIVEUSCITAOPTOISOLATADIPOTENZA SETOPTO‐ISOLATEDPOWEROUTPUTCodifica: 87 Encoding: 87
ASCII: W ASCII: W
Parametri: 2 Parameters: 2
Par. Cifre/Caratteri Par. Digits/Chars
0 1 Valori: 0:3 Selezione uscita. 0 = 1 Y14.1‐2 1 = 2 Y14.3‐4 2 = 3 Y14.5‐6 3 = 4 Y14.7‐8
0 1 Values: 0:3 Output selection. 0 = 1 Y14.1‐2 1 = 2 Y14.3‐4 2 = 3 Y14.5‐6 3 = 4 Y14.7‐8
1 1 Valori: 0:1 0=Disattiva 1=Attiva
1 1 Values: 0:1 0=Inactive 1=Active
Risorse: Nessuna Resources: None
Vedi anche: Niente See also: None
Ritorna: ACK
Return: ACK
Descrizione: Scrive sulla porta di uscita di potenza optoisolata. Nell’esempio sottostante si attiva l’uscita 1.
Description: Writes to the opto‐isolated power output port. In the example below output 1 is activated.
Esempio ‐ Example
Riceve ‐ Receive Trasmette ‐ Transmit
ASCII _0W01CR ASCII _0.CR
DECIMALE 32 48 87 48 49 13 DECIMAL 32 48 46 13

38
GENERAUNIMPULSOSULL’USCITAOPTOISOLATADIPOTENZA
GENERATEAPULSEONPOWEROPTO‐ISOLATEDOUTPUT
Codifica: 65 Encoding: 65
ASCII: A ASCII: A
Parametri: 5 Parameters: 5
Par. Cifre/Caratteri Par. Digits/Chars
0 1 Valori: 0:3 Identificatore uscita
0 1 Values: 0:3 Output identifier
1 1 Valori: 0:1 Valore iniziale.
1 1 Values: 0:1 Initial value.
2 1 Valori: 0:1 Valore finale
2 1 Values: 0:1 Final value.
3 5 Valori: 00000:65535 Durata impulso
3 5 Values: 00000:65535 Pulse duration
4 2 Valori: 0:2 Base dei tempi 0 = Clock di sistema 40.816ns 1 = us 2 = ms
4 2 Values: 0:2 Time base 0 = System clock 40.816ns 1 = us 2 = ms
Risorse: TIMER 4 Resources: TIMER 4
Vedi anche: Niente See also: None
Ritorna: ACK
Return: ACK
Descrizione: Genera un impulso di durata programmabile sulla porta di uscita di potenza optoisolata. Nell’esempio sottostante si attiva l’uscita 2 per 10ms. Attenzione: l’ACK viene dato ad impulso completato.
Description: Generates a pulse of programmable length to the power opto‐isolated output port. In the example below output 2 per 10ms is activated. Attention: the ACK is generated at completed pulse.
Esempio ‐ Example
Riceve ‐ Receive Trasmette ‐ Transmit
ASCII _0A101000102CR ASCII _0.CR
DECIMALE 32 48 65 49 48 49 48 48 48 49 48 50 13
DECIMAL 32 48 46 13

39
LETTURARAM RAMREADCodifica: 82 Encoding: 82
ASCII: R ASCII: R
Parametri: 3 Parameters: 3
Par. Cifre/Caratteri Par. Digits/Chars
0 1 Valori: 0:1 Selezione RAM
0 1 Values: 0:1 RAM selection
1 5 Valori: 0:32767 Indirizzo.
1 5 Values: 0:32767 Address.
2 5 Valori: 1:32768 Numero di byte da leggere
2 5 Values: 1:32768 Number of bytes read
Risorse: RAM Resources: RAM
Vedi anche: SCRITTURA RAM See also: RAM WRITE
Ritorna: Il contenuto della RAM
Return: The RAM contents
Descrizione: Permette di visualizzare il contenuto di una delle due RAM presenti. Nell’esempio sottostante si esegue la lettura della RAM 1 dall’indirizzo 0 per 4096 byte. La stringa che viene trasmessa dal SESTILIO viene ripetuta per il numero di byte richiesti. Questo comando sulla porta seriale puó risultare molto lento per la lettura di un gran numero di byte, in alternativa si puó utilizzare la connessione USB parallela che oltre a risultare molto piú efficiente permette una modalitá binaria semplicemente inserendo dopo la R il carattere @. Ne risulta che nel normale protocollo per leggere il contenuto di una locazione di memoria si trasmettono sulla seriale 6 byte mentre nella modalitá binaria viene inviato un solo byte.
Description: Enables to read the contents of one of the two available RAM. In the example below the reading of RAM 1 from address 0 per 4096 bytes is executed. The string that is being transmitted by SESTILIO, is repeated by the number of bytes required. The running of this command to the serial port could be very slow because of the large number of bytes. Alternatively you can use the parallel USB connection. This connection is much more efficient and allows a binary mode. Therefore you only need to add the @ character after the R. In the normal protocol, in order to read the contents of a memory location, these contents are transmitted to the serial 6 bytes, whereas in binary mode a single byte is transferred.
Esempio ‐ Example
Riceve ‐ Receive Trasmette ‐ Transmit
ASCII _0R10000004096CR ASCII _0233CR X Num
DECIMALE 32 48 82 49 48 48 48 48 48 48 52 48 57 54 13
DECIMAL 32 48 50 51 51 13

40
SCRITTURARAM RAMWRITECodifica: 114 Encoding: 114
ASCII: r ASCII: r
Parametri: 3 + n Parameters: 3 + n
Par. Cifre/Caratteri Par. Digits/Chars
0 1 Valori: 0:1 Selezione RAM
0 1 Values: 0:1 RAM selection
1 5 Valori: 0:32767 Indirizzo.
1 5 Values: 0:32767 Address.
2 5 Valori: 1:32768 Numero di byte da scrivere.
2 5 Values: 1:32768 Number of bytes to write.
3 3 Valori:0:255 Byte da scrivere
3 3 Values:0:255 Bytes to write
Risorse: RAM Resources: RAM
Vedi anche: LETTURA RAM See also: RAM READ
Ritorna: ACK
Return: ACK
Descrizione: Permette di inizializzare il contenuto di una RAM. Nell’esempio sottostante si vanno a scrivere 4 byte a partire dall’indirizzo 0: [0] = 1, [1] = 2, [2] =3, [4] = 4. Questo comando è fortemente limitato dalla dimensione del buffer seriale, essendo questo dimensionato a 32 byte non è possibile scrivere piú di 5 byte ad ogni singolo comando. Inoltre questo comando risulta essere molto lento nel momento in cui fosse necessario scrivere molti byte. Un modo molto piú efficiente è quello di utilizzare la connessione USB parallela, in questa modalitá è permessa anche un modo binario che non ha limiti sul numero di byte da trasferire e risulta molto efficiente. Per attivarla basta aggiungere il carattere @ dopo il comando ‘r’, riceveremo subito l’ACK ma potremo inviare di seguito il numero di byte programmato in modo binario.
Description: Enables to initialize the contents of a RAM. In the example below 4 bytes are written starting from address 0: [0] = 1, [1] = 2, [2] =3, [4] = 4.This command is very limited by the serial buffer size. The serial buffer size is 32 bytes; therefore it is not possible to write more than 5 bytes for every single command. Furthermore, this command is very slow when writing a large amount of bytes . A much more efficient method Is using the parallel USB connection. This connection allows a binary mode through which an unlimited amount of bytes can be transferred. In order to activate this mode, you only need to add the @ character after the command ‘r’. You will receive the ACK immediately, but consecutively you will be able to send the bytes written in binary mode.
Esempio ‐ Example
Riceve ‐ Receive Trasmette ‐ Transmit
ASCII _0r10000000004001002003004CR ASCII _0.CR
DECIMALE 32 48 114 49 48 48 48 48 48 48 48 48 48 52 48 48 49 48 48 50 48 48 51 48 48 52 13
DECIMAL 32 48 46 13
41
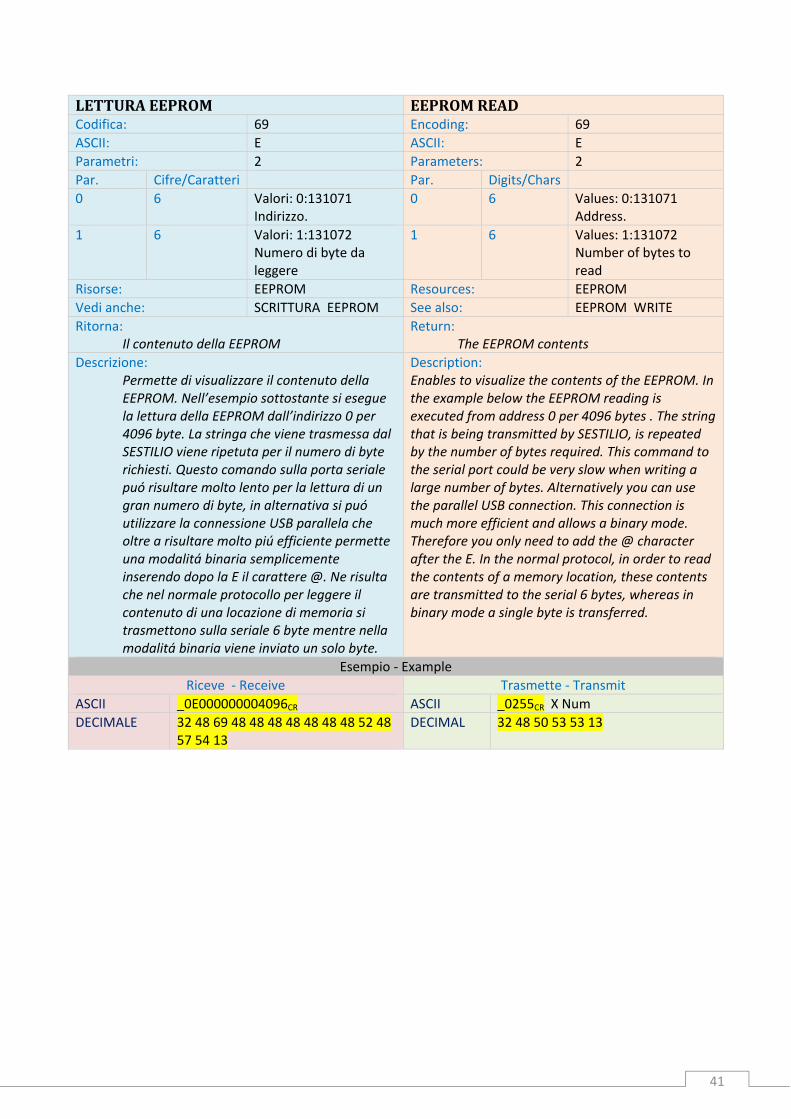
LETTURAEEPROM EEPROMREADCodifica: 69 Encoding: 69
ASCII: E ASCII: E
Parametri: 2 Parameters: 2
Par. Cifre/Caratteri Par. Digits/Chars
0 6 Valori: 0:131071 Indirizzo.
0 6 Values: 0:131071 Address.
1 6 Valori: 1:131072 Numero di byte da leggere
1 6 Values: 1:131072 Number of bytes to read
Risorse: EEPROM Resources: EEPROM
Vedi anche: SCRITTURA EEPROM See also: EEPROM WRITE
Ritorna: Il contenuto della EEPROM
Return: The EEPROM contents
Descrizione: Permette di visualizzare il contenuto della EEPROM. Nell’esempio sottostante si esegue la lettura della EEPROM dall’indirizzo 0 per 4096 byte. La stringa che viene trasmessa dal SESTILIO viene ripetuta per il numero di byte richiesti. Questo comando sulla porta seriale puó risultare molto lento per la lettura di un gran numero di byte, in alternativa si puó utilizzare la connessione USB parallela che oltre a risultare molto piú efficiente permette una modalitá binaria semplicemente inserendo dopo la E il carattere @. Ne risulta che nel normale protocollo per leggere il contenuto di una locazione di memoria si trasmettono sulla seriale 6 byte mentre nella modalitá binaria viene inviato un solo byte.
Description: Enables to visualize the contents of the EEPROM. In the example below the EEPROM reading is executed from address 0 per 4096 bytes . The string that is being transmitted by SESTILIO, is repeated by the number of bytes required. This command to the serial port could be very slow when writing a large number of bytes. Alternatively you can use the parallel USB connection. This connection is much more efficient and allows a binary mode. Therefore you only need to add the @ character after the E. In the normal protocol, in order to read the contents of a memory location, these contents are transmitted to the serial 6 bytes, whereas in binary mode a single byte is transferred.
Esempio ‐ Example
Riceve ‐ Receive Trasmette ‐ Transmit
ASCII _0E000000004096CR ASCII _0255CR X Num
DECIMALE 32 48 69 48 48 48 48 48 48 48 52 48 57 54 13
DECIMAL 32 48 50 53 53 13

42
SCRITTURAEEPROM EEPROMWRITECodifica: 101 Encoding: 101
ASCII: e ASCII: e
Parametri: 2 + n Parameters: 2 + n
Par. Cifre/Caratteri Par. Digits/Chars
0 6 Valori: 0:131071 Indirizzo.
0 6 Values: 0:131071 Address.
1 6 Valori: 1:131072 Numero di byte da scrivere.
1 6 Values: 1:131072 Number of bytes to write.
2 3 Valori:0:255 Byte da scrivere
2 3 Values:0:255 Bytes to write
Risorse: EEPROM Resources: EEPROM
Vedi anche: LETTURA EEPROM See also: EEPROM READ
Ritorna: ACK
Return: ACK
Descrizione: Permette di inizializzare il contenuto della EEPROM. Nell’esempio sottostante si vanno a scrivere 4 byte a partire dall’indirizzo 0: [0] = 1, [1] = 2, [2] =3, [4] = 4. Questo comando è fortemente limitato dalla dimensione del buffer seriale, essendo questo dimensionato a 32 byte non è possibile scrivere piú di 4 byte ad ogni singolo comando. Inoltre questo comando risulta essere molto lento nel momento in cui fosse necessario scrivere molti byte. Un modo molto piú efficiente è quello di utilizzare la connessione USB parallela, in questa modalitá è permessa anche un modo binario che non ha limiti sul numero di byte da trasferire e risulta molto efficiente. Per attivarla basta aggiungere il carattere @ dopo il comando ‘e’, riceveremo subito l’ACK ma potremo inviare di seguito il numero di byte programmato in modo binario.
Description: Enables to initialize the EEPROM contents. In the example below 4 bytes are written starting from address 0: [0] = 1, [1] = 2, [2] =3, [4] = 4. This command is very limited by the serial buffer size. The serial buffer size is 32 bytes; therefore it is not possible to write more than 4 bytes for every single command. Furthermore, this command is very slow when writing a large amount of bytes. A much more efficient method Is using the parallel USB connection. This connection allows a binary mode through which an unlimited amount of bytes can be transferred. In order to activate this mode, you only need to add the @ character after the command ‘e’. You will receive the ACK immediately, but consecutively you can send the bytes written in binary mode.
Esempio ‐ Example
Riceve ‐ Receive Trasmette ‐ Transmit
ASCII _0r000000000004001002003004CR ASCII _0.CR
DECIMALE 32 48 101 48 48 48 48 48 48 48 48 48 48 48 52 48 48 49 48 48 50 48 48 51 48 48 52 13
DECIMAL 32 48 46 13

43
CONTROLLOPWM PWMCONTROLLERCodifica: 119 Encoding: 119
ASCII: w ASCII: w
Parametri: 4 Parameters: 4
Par. Cifre/Caratteri Par. Digits/Chars
0 1 Valori: 0:3 Uscita di potenza impiegata.
0 1 Values: 0:3 Applied power output.
1 1 Valori: 0:1 0=Disabilita 1=Abilita
1 1 Values: 0:1 0=Disables 1=Enables
2 3 Valori:0:255 Durata livello alto PWM
2 3 Values:0:255 PWM high level duration
3 3 Valori:0:255 Durata livello basso PWM
3 3 Values:0:255 PWM low level duration
Risorse: USCITA DI POTENZA Resources: POWER OUTPUT
Vedi anche: Niente See also: None
Ritorna: ACK
Return: ACK
Descrizione: Le uscite di potenza optoisolate (Y14) possono anche essere impiegate come quattro distinti PWM. Questo accetta valori ad 8 bit per la parte bassa ed alta della sua forma d’onda. L’unitá di tempo è di 10 mS. Nell’esempio sottostante si abilita il PWM sull’uscita 1 con 10 mS di accensione e 20 mS di spegnimento.
Description: The opto‐isolated power outputs (Y14) may also be used as four separate PWM’s. This accepts 8‐bit values for the low and the high part of its waveform. The unit of time is 10 mS. In the example below the PWM is set to output 1 with 10 mS on‐line and 20 mS off‐line.
Esempio ‐ Example
Riceve ‐ Receive Trasmette ‐ Transmit
ASCII _0w01010020CR ASCII _0.CR
DECIMALE 32 48 119 48 49 48 49 48 48 50 48 13
DECIMAL 32 48 46 13

44
SCRITTURASPI SPIWRITECodifica: 117 Encoding: 117
ASCII: u ASCII: u
Parametri: 2 + n Parameters: 2 + n
Par. Cifre/Caratteri Par. Digits/Chars
0 1 Valori: 0: 7 Indirizzo.
0 1 Values: 0: 7 Address.
1 5 Valori: 1:65535 Numero di byte da scrivere.
1 5 Values: 1:65535 Number of bytes to write.
2 3 Valori:0:255 Byte da scrivere
2 3 Values:0:255 Bytes to write
Risorse: SPI Resources: SPI
Vedi anche: LETTURA SPI LS SPI
See also: SPI READ RW SPI
Ritorna: ACK
Return: ACK
Descrizione: Permette scrivere sulla porta di espansione SPI. Nell’esempio sottostante si vanno a scrivere 4 byte impostando i bit AM[2:0] a 1. Questo comando è fortemente limitato dalla dimensione del buffer seriale, essendo questo dimensionato a 32 byte non è possibile scrivere piú di 6 byte ad ogni singolo comando. Inoltre questo comando risulta essere molto lento nel momento in cui fosse necessario scrivere molti byte. Un modo molto piú efficiente è quello di utilizzare la connessione USB parallela, in questa modalitá è permessa anche un modo binario che non ha limiti sul numero di byte da trasferire e risulta molto efficiente. Per attivarla basta aggiungere il carattere @ dopo il comando ‘u’, riceveremo subito l’ACK ma potremo inviare di seguito il numero di byte programmato in modo binario.
Description: Enables to write to the SPI expansion port. In the example below 4 bytes are written by setting the AM[2:0] bits to 1. This command is very limited by the serial buffer size. The serial buffer size is 32 bytes; therefore it is not possible to write more than 6 bytes for every single command. Furthermore, this command is very slow when writing a large amount of bytes. A much more efficient method Is using the parallel USB connection. This connection allows a binary mode through which an unlimited amount of bytes can be transferred. In order to activate this mode, you only need to add the @ character after the command ‘u’. You will receive the ACK immediately, but consecutively you will be able to send the bytes written in binary mode.
Esempio ‐ Example
Riceve ‐ Receive Trasmette ‐ Transmit
ASCII _0u100004001002003004CR ASCII _0.CR
DECIMALE 32 48 117 49 48 48 48 48 52 48 48 49 48 48 50 48 48 51 48 48 52 13
DECIMAL 32 48 46 13

45
LETTURASPI SPIREADCodifica: 85 Encoding: 85
ASCII: U ASCII: U
Parametri: 2 Parameters: 2
Par. Cifre/Caratteri Par. Digits/Chars
0 1 Valori: 0:7 Indirizzo.
0 1 Values: 0:7 Address.
1 5 Valori: 1:65535 Numero di byte da leggere
1 5 Values: 1:65535 Number of bytes to read
Risorse: SPI Resources: SPI
Vedi anche: SCRITTURA SPI LS SPI
See also: SPI WRITE RW SPI
Ritorna: Cosa ricevuto sulla SPI
Return: Data received on SPI
Descrizione: Permette di visualizzare cosa ricevuto dalla SPI. Nell’esempio sottostante si esegue la lettura della SPI impostando a 1 i bit AM[2:0]. La stringa che viene trasmessa dal SESTILIO viene ripetuta per il numero di byte richiesti. Questo comando sulla porta seriale puó risultare molto lento per la lettura di un gran numero di byte, in alternativa si puó utilizzare la connessione USB parallela che oltre a risultare molto piú efficiente permette una modalitá binaria semplicemente inserendo dopo la U il carattere @. Ne risulta che nel normale protocollo per leggere il contenuto di una locazione di memoria si trasmettono sulla seriale 6 byte mentre nella modalitá binaria viene inviato un solo byte.
Description: Enables to visualize data received on SPI. In the example below the SPI read protocol is executed by setting the AM[2:0] bits to 1. The string that is being transmitted by SESTILIO, is repeated by the number of bytes required. This command to the serial port could be very slow when writing a large number of bytes. Alternatively you can use the parallel USB connection. This connection is much more efficient and allows a binary mode. Therefore you only need to add the @ character after the U. In the normal protocol, in order to read the contents of a memory location, these contents are transmitted to the serial 6 bytes, whereas in binary mode a single byte is transferred.
Esempio ‐ Example
Riceve ‐ Receive Trasmette ‐ Transmit
ASCII _0U10001CR ASCII _0233CR X Num
DECIMALE 32 48 85 49 48 48 48 49 13 DECIMAL 32 48 50 51 51 13

46
LETTURASCRITTURASPI SPIREADWRITECodifica: 126 Encoding: 126
ASCII: ~ ASCII: ~
Parametri: 2 + n Parameters: 2 + n
Par. Cifre/Caratteri Par. Digits/Chars
0 1 Valori: 0: 7 Indirizzo.
0 1 Values: 0: 7 Address.
1 3 Valori: 1:255 Numero di byte da scrivere/leggere.
1 3 Values: 1:255 Number of bytes to write/read.
2 3 Valori:0:255 Byte da scrivere
2 3 Values:0:255 Bytes to write
Risorse: SPI Resources: SPI
Vedi anche: LETTURA SPI SCRITTURA SPI
See also: SPI READ SPI WRITE
Ritorna: Cosa ricevuto sulla SPI
Return: Data received on SPI
Descrizione: Permette scrivere e leggere sulla porta di espansione SPI. Nell’esempio sottostante si vanno a scrivere 4 byte impostando i bit AM[2:0] a 1. Questo comando è fortemente limitato dalla dimensione del buffer seriale, essendo questo dimensionato a 32 byte non è possibile scrivere piú di 6 byte ad ogni singolo comando. Inoltre questo comando risulta essere molto lento nel momento in cui fosse necessario scrivere molti byte. Un modo molto piú efficiente è quello di utilizzare la connessione USB parallela, in questa modalitá è permessa anche un modo binario che non ha limiti sul numero di byte da trasferire e risulta molto efficiente. Per attivarla basta aggiungere il carattere @ dopo il comando ‘~’, riceveremo subito l’ACK ma potremo inviare di seguito il numero di byte programmato in modo binario e ricevere in altrettando modo i byte letti dalla SPI.
Description: Enables to write and to read on the SPI expansion port. In the example below 4 bytes are written by setting the AM[2:0] bits to 1. This command is very limited by the serial buffer size. The serial buffer size is 32 bytes; therefore it is not possible to write more than 6 bytes for every single command. Furthermore, this command is very slow when writing a large amount of bytes. A much more efficient method Is using the parallel USB connection. This connection allows a binary mode through which an unlimited amount of bytes can be transferred. In order to activate this mode, you only need to add the @ character after the command ‘~’. You will receive the ACK immediately, but consecutively you will be able to send the bytes written in binary mode and in the same way receive SPI read bytes.
Esempio ‐ Example
Riceve ‐ Receive Trasmette ‐ Transmit
ASCII _0~100004001002003004CR ASCII _0233CR X Num
DECIMALE 32 48 117 49 48 48 48 48 52 48 48 49 48 48 50 48 48 51 48 48 52 13
DECIMAL 32 48 50 51 51 13

47
SETTALAVELOCITÁDELLASPI SETTHESPISPEEDCodifica: 86 Encoding: 86
ASCII: V ASCII: V
Parametri: 1 Parameters: 1
Par. Cifre/Caratteri Par. Digits/Chars
0 1 Valori: 0:3 0 1 Values: 0:3
Risorse: Nessuna Resources: None
Vedi anche: Niente See also: None
Ritorna: ACK
Return: ACK
Descrizione: Imposta la velocitá di ricezione/trasmissione della SPI. 0 = 12.5 MHz 1 = 6.25 MHz 2 = 4.08 MHz 3 = 3.06 MHz 4 = 2.45 MHz 5 = 2.04 MHz 6 = 1.75 MHz 7 = 1.53 MHz 8 = 1.36 MHz 9 = 1.22 MHz
Description: Sets the SPI receiving / sending speed. 0 = 12.5 MHz 1 = 6.25 MHz 2 = 4.08 MHz 3 = 3.06 MHz 4 = 2.45 MHz 5 = 2.04 MHz 6 = 1.75 MHz 7 = 1.53 MHz 8 = 1.36 MHz 9 = 1.22 MHz
Esempio ‐ Example
Riceve ‐ Receive Trasmette ‐ Transmit
ASCII _0V0CR ASCII _0.CR
DECIMALE 32 48 86 48 13 DECIMAL 32 48 46 13

48
SELEZIONECANALE CHANNELSELECTIONCodifica: 99 Encoding: 99
ASCII: c ASCII: c
Parametri: 2 Parameters: 2
Par. Cifre/Caratteri Par. Digits/Chars
0 1 Valori: 0:1 Selezione AD: 0 = AD0 1 = AD1
0 1 Values: 0:1 AD selection: 0 = AD0 1 = AD1
1 1 Valori: 0:7 Selezione canale multiplexer.
1 1 Values: 0:7 Multiplexer channel selection.
Risorse: MUXA,MUXB Resources: MUXA,MUXB
Vedi anche: Niente See also: None
Ritorna: ACK
Return: ACK
Descrizione: Ogni convertitore A/D (AD0, AD1) dispone al suo ingresso di un multiplexer ad 8 canali a guadagno variabile, questo comando seleziona il canale di misura. Nell’esempio sottostante viene selezionato il canale 3 del convertitore A/D 0.
Description: All A/D convertors (AD0, AD1) have a variable gain, 8‐channel multiplexer input. This command selects the measuring channel. In the example below channel 3 of the A/D 0 convertor is selected.
Esempio ‐ Example
Riceve ‐ Receive Trasmette ‐ Transmit
ASCII _0c03CR ASCII _0.CR
DECIMALE 32 48 99 48 51 13 DECIMAL 32 48 46 13
49
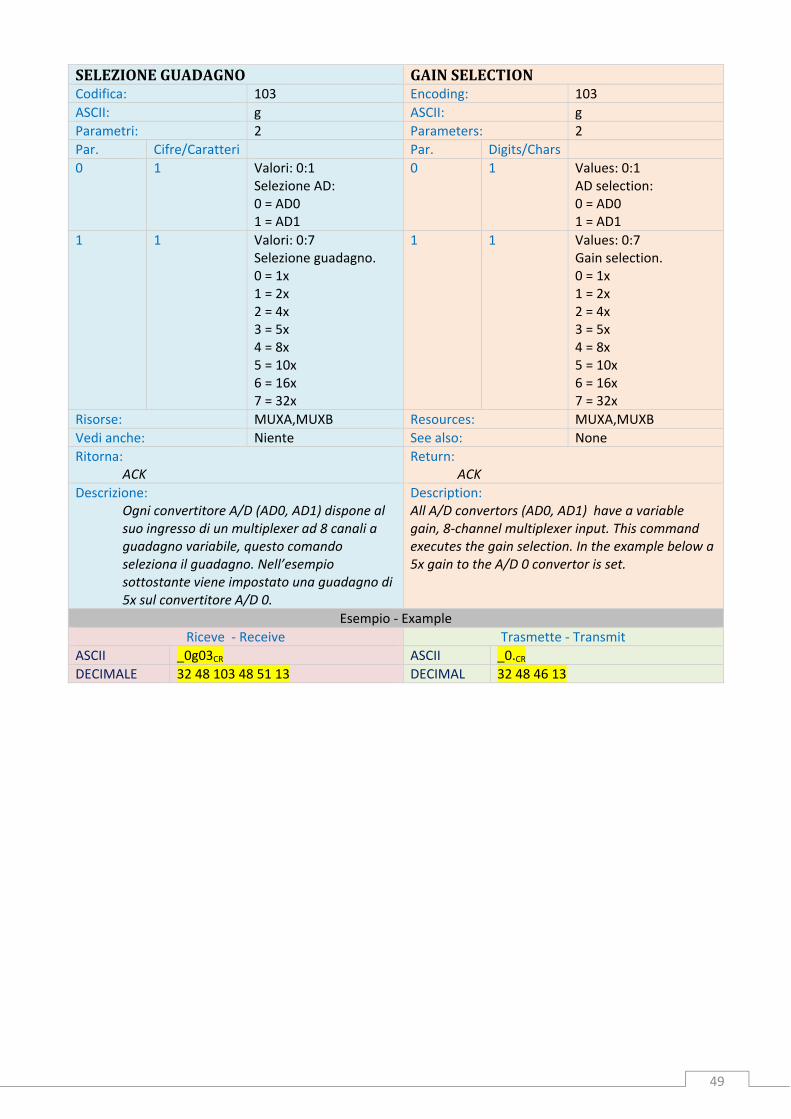
SELEZIONEGUADAGNO GAINSELECTIONCodifica: 103 Encoding: 103
ASCII: g ASCII: g
Parametri: 2 Parameters: 2
Par. Cifre/Caratteri Par. Digits/Chars
0 1 Valori: 0:1 Selezione AD: 0 = AD0 1 = AD1
0 1 Values: 0:1 AD selection: 0 = AD0 1 = AD1
1 1 Valori: 0:7 Selezione guadagno. 0 = 1x 1 = 2x 2 = 4x 3 = 5x 4 = 8x 5 = 10x 6 = 16x 7 = 32x
1 1 Values: 0:7 Gain selection. 0 = 1x 1 = 2x 2 = 4x 3 = 5x 4 = 8x 5 = 10x 6 = 16x 7 = 32x
Risorse: MUXA,MUXB Resources: MUXA,MUXB
Vedi anche: Niente See also: None
Ritorna: ACK
Return: ACK
Descrizione: Ogni convertitore A/D (AD0, AD1) dispone al suo ingresso di un multiplexer ad 8 canali a guadagno variabile, questo comando seleziona il guadagno. Nell’esempio sottostante viene impostato una guadagno di 5x sul convertitore A/D 0.
Description: All A/D convertors (AD0, AD1) have a variable gain, 8‐channel multiplexer input. This command executes the gain selection. In the example below a 5x gain to the A/D 0 convertor is set.
Esempio ‐ Example
Riceve ‐ Receive Trasmette ‐ Transmit
ASCII _0g03CR ASCII _0.CR
DECIMALE 32 48 103 48 51 13 DECIMAL 32 48 46 13
50
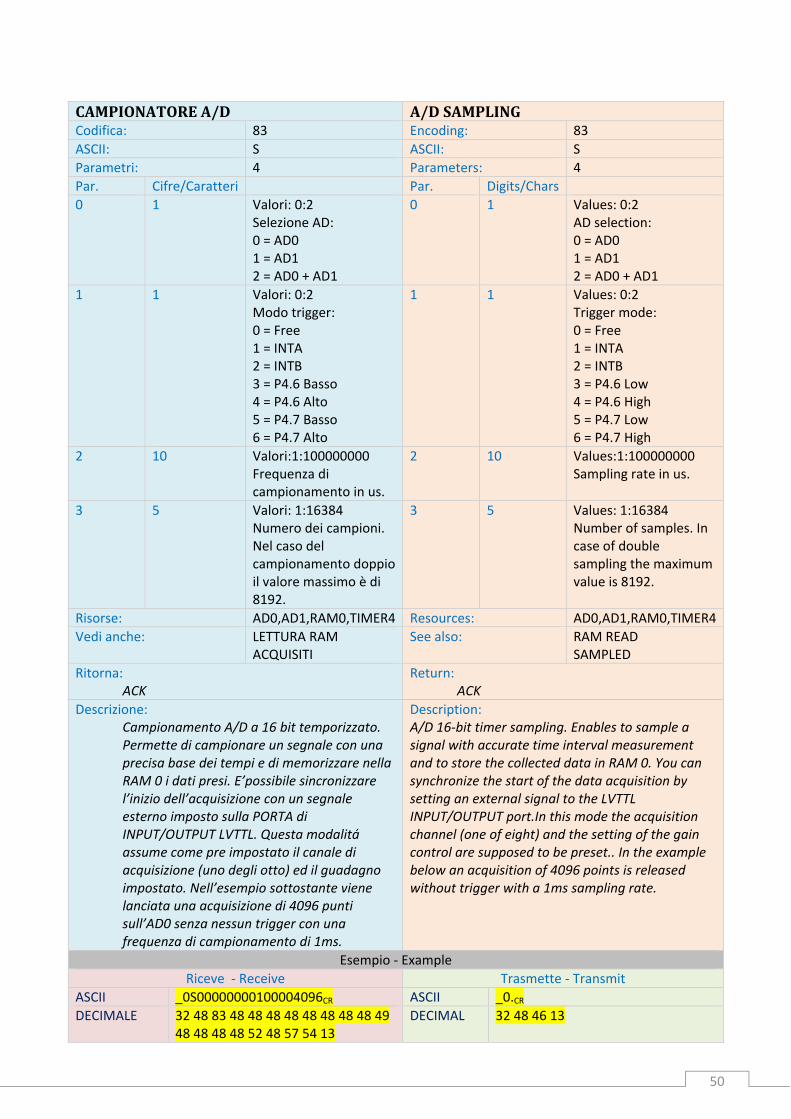
CAMPIONATOREA/D A/DSAMPLINGCodifica: 83 Encoding: 83
ASCII: S ASCII: S
Parametri: 4 Parameters: 4
Par. Cifre/Caratteri Par. Digits/Chars
0 1 Valori: 0:2 Selezione AD: 0 = AD0 1 = AD1 2 = AD0 + AD1
0 1 Values: 0:2 AD selection: 0 = AD0 1 = AD1 2 = AD0 + AD1
1 1 Valori: 0:2 Modo trigger: 0 = Free 1 = INTA 2 = INTB 3 = P4.6 Basso 4 = P4.6 Alto 5 = P4.7 Basso 6 = P4.7 Alto
1 1 Values: 0:2 Trigger mode: 0 = Free 1 = INTA 2 = INTB 3 = P4.6 Low 4 = P4.6 High 5 = P4.7 Low 6 = P4.7 High
2 10 Valori:1:100000000 Frequenza di campionamento in us.
2 10 Values:1:100000000 Sampling rate in us.
3 5 Valori: 1:16384 Numero dei campioni. Nel caso del campionamento doppio il valore massimo è di 8192.
3 5 Values: 1:16384 Number of samples. In case of double sampling the maximum value is 8192.
Risorse: AD0,AD1,RAM0,TIMER4 Resources: AD0,AD1,RAM0,TIMER4
Vedi anche: LETTURA RAM ACQUISITI
See also: RAM READ SAMPLED
Ritorna: ACK
Return: ACK
Descrizione: Campionamento A/D a 16 bit temporizzato. Permette di campionare un segnale con una precisa base dei tempi e di memorizzare nella RAM 0 i dati presi. E’possibile sincronizzare l’inizio dell’acquisizione con un segnale esterno imposto sulla PORTA di INPUT/OUTPUT LVTTL. Questa modalitá assume come pre impostato il canale di acquisizione (uno degli otto) ed il guadagno impostato. Nell’esempio sottostante viene lanciata una acquisizione di 4096 punti sull’AD0 senza nessun trigger con una frequenza di campionamento di 1ms.
Description: A/D 16‐bit timer sampling. Enables to sample a signal with accurate time interval measurement and to store the collected data in RAM 0. You can synchronize the start of the data acquisition by setting an external signal to the LVTTL INPUT/OUTPUT port.In this mode the acquisition channel (one of eight) and the setting of the gain control are supposed to be preset.. In the example below an acquisition of 4096 points is released without trigger with a 1ms sampling rate.
Esempio ‐ Example
Riceve ‐ Receive Trasmette ‐ Transmit
ASCII _0S00000000100004096CR ASCII _0.CR
DECIMALE 32 48 83 48 48 48 48 48 48 48 48 49 48 48 48 48 52 48 57 54 13
DECIMAL 32 48 46 13

51
CICLI ITERATIONSCodifica : 78 Encoding: 78
ASCII: N ASCII: N
Parametri: Nessuno Parameters: None
Risorse: Nessuna Resources: None
Vedi anche: CAMPIONATORE A/D See also: A/D SAMPLER
Ritorna: Numero dei cicli eseguiti
Return: Number of executed iterations
Descrizione: Alcuni comandi eseguono un numero programmato di cicli di acquisizioni o generazione di segnale, questo comando visualizza il valore corrente dei cicli effettuati.
Description: Some commands excute a set number of acquisition iterations or signal generator. This command displays the actual value of the executed iterations.
Esempio ‐ Example
Riceve ‐ Receive Trasmette ‐ Transmit
ASCII _0NCR ASCII _000297CR
DECIMALE 32 48 78 13 DECIMAL 32 48 48 48 50 57 55 13

52
AZZERAMENTOCICLI ITERATIONSRESETCodifica : 77 Encoding: 77
ASCII: M ASCII: M
Parametri: Nessuno Parameters: None
Risorse: Nessuna Resources: None
Vedi anche: CAMPIONATORE A/D See also: A/D SAMPLER
Ritorna: ACK
Return: ACK
Descrizione: Azzera il numero dei cicli da eseguire ed in pratica ferma tutti i processi di acquisizione o generazione del segnale.
Description: Resets the number of iterations to be executed, i.e. stops all acquisition processes or signal generator.
Esempio ‐ Example
Riceve ‐ Receive Trasmette ‐ Transmit
ASCII _0MCR ASCII _0.CR
DECIMALE 32 48 78 13 DECIMAL 32 48 46 13

53
VOLTMETRO VOLTMETERCodifica: 118 Encoding: 118
ASCII: v ASCII: v
Parametri: 2 Parameters: 2
Par. Cifre/Caratteri Par. Digits/Chars
0 1 Valori: 0:1 Selezione AD: 0 = AD0 1 = AD1
0 1 Values: 0:1 AD selection: 0 = AD0 1 = AD1
1 5 Valori: 1:65535 Numero dei campioni su cui effettuare la media.
1 5 Values: 1:65535 Number of samples on which the mean value has to be performed.
Risorse: AD0,AD1 Resources: AD0,AD1
Vedi anche: Niente See also: None
Ritorna: Valore di tensione in uV
Return: Voltage value in uV
Descrizione: Voltmetro, legge la tensione su di un canale di conversione specificato, tiene conto dell’attenuatore in ingresso e dell’eventuale guadagno impostato. Il canale di multiplexer è quello impostato. Nell’esempio sottostante si legge il convertitore AD0 con una media di 4096 punti. Attenzione la massima tensione di ingresso non deve eccedere i 20V mentre la massima tensione misurabile è di 10V.
Description: Voltmeter, reads the voltage on a specific conversion channel, taking into account the input attenuator and an eventual set gain. The multiplexer channel is the preset channel. In the example below the AD0 convertor with an average of 4096 points is shown. Attention: the maximum input voltage must not exceed 20. The maximum measurable voltage is 10V.
Esempio ‐ Example
Riceve ‐ Receive Trasmette ‐ Transmit
ASCII _0v004096CR ASCII _00000044196CR
DECIMALE 32 48 118 48 48 52 48 57 54 13 DECIMAL 32 48 48 48 48 48 48 52 52 49 57 54 13

54
AMPEROMETRO AMPEREMETERCodifica: 79 Encoding: 79
ASCII: O ASCII: O
Parametri: 6 Parameters: 6
Par. Cifre/Caratteri Par. Digits/Chars
0 1 Valori: 0:1 Selezione AD: 0 = AD0 1 = AD1
0 1 Values: 0:1 AD selection: 0 = AD0 1 = AD1
1 1 Valori: 0:7 Canale multiplexer per la misura della tensione di ingresso Vi
1 1 Values: 0:7 Multiplexer channel for Vi input voltage measurement
2 1 Valori: 0:7 Canale multiplexer per la misura della tensione di uscita Vo
2 1 Values: 0:7 Multiplexer channel for Vo output voltage measurement
3 1 Valori: 0:5 Selettore di scala: 0 = 100 A 1 = 101 100mA X Num 2 = 102 10 mA X Num 3 = 103 mA 4 = 104 100uA X Num 5 = 105 10uA X Num
3 1 Values: 0:5 Scale selector: 0 = 100 A 1 = 101 100mA X Num 2 = 102 10 mA X Num 3 = 103 mA 4 = 104 100uA X Num 5 = 105 10uA X Num
4 7 Valori: 1:1000000 Resistenza campione per la misura in mΩ
4 7 Values: 1:1000000 Sample resistance for measurement in mΩ
5 5 Valori: 1:65535 Numero dei campioni su cui effettuare la media.
5 5 Values: 1:65535 Number of samples on which the mean value has to be performed.
Risorse: AD0,AD1 Resources: AD0,AD1
Vedi anche: Niente See also: None
Ritorna: Valore di corrente nella scala selezionata.
Return: Power rate in the selected range
Descrizione: Amperometro, misura la corrente che attraversa una resistenza campione. Nell’esempio sottostante viene eseguita una misura di corrente utilizzando una resistenza campione da 1000 ohm, utilizzando i canali 0 e 1 del convertitore AD0 e si effettua una media su 100 misure.
Description: Ampere meter, measures the current flowing through a sample resistor. In the example below the current is measured with a 1000 ohm sample resistor, using channels 0 and 1 of the Ado convertor. An average value of 100 measurements is carried out. .
Esempio ‐ Example
Riceve ‐ Receive Trasmette ‐ Transmit
ASCII _0O0013100000000100CR ASCII _0044196CR
DECIMALE 32 48 118 48 48 52 48 57 54 13 DECIMAL 32 48 48 52 52 49 57 54 13
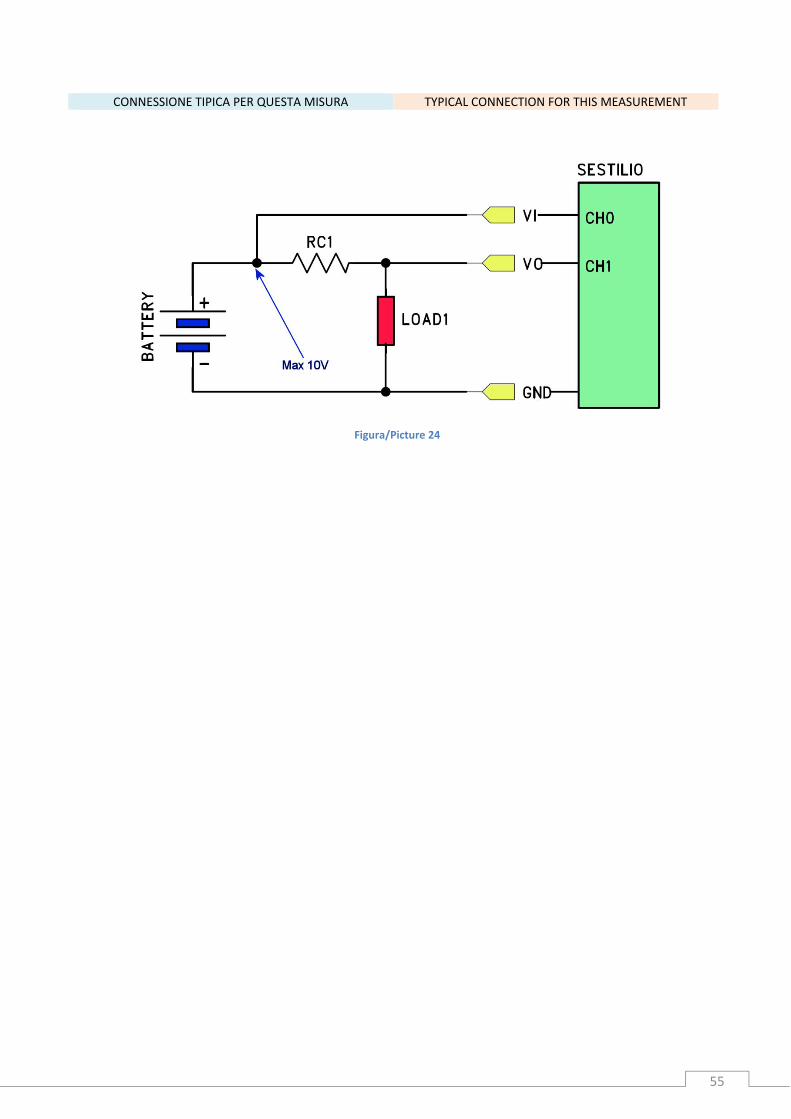
55
CONNESSIONE TIPICA PER QUESTA MISURA TYPICAL CONNECTION FOR THIS MEASUREMENT
Figura/Picture 24

56
Connessione tipica di un AD590 (la batteria rappresenta un generico generatore).
Tipical AD590 connection (the battery is the power source).
TERMOMETRO THERMOMETERCodifica: 84 Encoding: 84
ASCII: T ASCII: T
Parametri: 3 Parameters: 3
Par. Cifre/Caratteri Par. Digits/Chars
0 1 Valori: 0:1 Selezione AD: 0 = AD0 1 = AD1
0 1 Values: 0:1 AD selection: 0 = AD0 1 = AD1
1 1 Valori: 0:7 1 1 Values: 0:7
2 5 Valori: 1:65535 Numero dei campioni su cui effettuare la media.
2 5 Values: 1:65535 Number of samples on which the mean value has to be performed.
Risorse: AD0,AD1 Resources: AD0,AD1
Vedi anche: Niente See also: None
Ritorna: Valore di temperatura in mK
Return: Temperature value in mK
Descrizione: Questo comando e tramite l’impiego di un sensore AD590 permette di realizzare un preciso termometro. Nell’esempio sottostante si legge la temperatura dal canale 0 del convertitore AD0 eseguendo una media su 10 misure.
Description: This command enables the realizition of an accurate thermometer employing a AD590 sensor to that end. In the example below the temperature from channel 0 of the AD0 convertor is shown, carrying out an average value of 10 measurements.
Esempio ‐ Example
Riceve ‐ Receive Trasmette ‐ Transmit
ASCII _0T0000010CR ASCII _00293196CR
DECIMALE 32 48 84 48 48 48 48 48 49 48 13 DECIMAL 32 48 48 50 57 51 49 57 54 13
Figura/Picture 25

57
RISPOSTAALGRADINO TRANSIENTRESPONSECodifica: 110 Encoding: 110
ASCII: n ASCII: n
Parametri: 4 Parameters: 4
Par. Cifre/Caratteri Par. Digits/Chars
0 1 Valori: 0:1 Selezione D/A: 0 = DA0 1 = DA1
0 1 Values: 0:1 D/A selection: 0 = DA0 1 = DA1
1 4 Valori: 0:4095 Valore D/A
1 4 Values: 0:4095 D/A value
2 10 Valori:1:100000000 Frequenza di campionamento in us.
2 10 Values:1:100000000 Sampling frequency in us.
3 4 Valori: 1:8192 Numero dei campioni.
3 4 Values: 1:8192 Number of samples.
Risorse: AD0,AD1,RAM0,TIMER4 Resources: AD0,AD1,RAM0,TIMER4
Vedi anche: LETTURA RAM ACQUISITI
See also: RAM READ SAMPLED
Ritorna: ACK
Return: ACK
Descrizione: Comando che permette di misurare la risposta al gradino di un circuito sotto test. Si imposta il valore di tensione (V) da applicare al circuito (valore DA * 0.001186813) e contemporaneamente si da il via ad una acquisizione simultanea sui due canali AD. Alla fine troveremo nella RAM 0 il campionamento effettuato.Nell’esempio sottostante si imposta sul DA0 4.86V e si effettua un campionamento di 8192 punti con una frequenza di 1ms.
Description: Command allowing step response of a circuit under test. The voltage value (V) to be applied to the circuit is set (value DA * 0.001186813). At the same time, a simultaneous acquisition is realized on both AD channels. Finally, we’ll find the executed sampling procedure in RAM 0. In the example below 4.86V is being set on DA0 and a 8192 points sampling is executed with a 1 ms frequency.
Esempio ‐ Example
Riceve ‐ Receive Trasmette ‐ Transmit
ASCII _0n0409500000010008192CR ASCII _0.CR
DECIMALE 32 48 110 48 52 48 5753 48 48 48 48 48 48 49 48 48 48 56 49 57 50 13
DECIMAL 32 48 46 13

58
Per questo tipo di misura occorre collegare SESTILIO come in figura 26
For this measuring type you need to connect SESTILIO as shown in picture 26.
Nel caso che il componente sia un condensatore avremo:
If the component is a condenser, we’ll see:
Figura/Picture 26
Figura/Picture 27

59
SCRITTURADAC DACWRITECodifica: 100 Encoding: 100
ASCII: d ASCII: d
Parametri: 2 Parameters: 2
Par. Cifre/Caratteri Par. Digits/Chars
0 1 Valori: 0:1 Selezione DA: 0 = DA0 1 = DA1
0 1 Values: 0:1 DA selection: 0 = DA0 1 = DA1
1 4 Valori: 0:4095 Valore caricato
1 4 Values: 0:4095 Loaded value
Risorse: DA0,DA1 Resources: DA0,DA1
Vedi anche: SCRITTURA SIMULTANEA DAC
See also: SIMULTANEOUS DAC WRITE
Ritorna: ACK
Return: ACK
Descrizione: Imposta la tensione di un DA selezionato. I DA disponibili sono a 12 bit (4096 livelli) mentre il riferimento di tensione interno è a 2.43 V ed il buffer di uscita guadagna 2. Da cui ne deriva che per sapere quale numero scrivere per avere in uscita una tensione desiderata basta applicare la seguente formula:
n = Vout / 0.001186523 Nell’esempio sottostante il DA0 dará in uscita 2.43V
Description: Sets the voltage of a selected DA. The available DA are 12‐bit converters (4096 levels), the internal voltage reference is 2.43V and the output buffer gain is 2. So, in order to know which number to write to obtain the required output voltage, you just have to apply the following formula:
n = Vout / 0.001186523 In the example below DA0 has an output of 2.43V.
Esempio ‐ Example
Riceve ‐ Receive Trasmette ‐ Transmit
ASCII _0d02048CR ASCII _0.CR
DECIMALE 32 48 100 48 50 48 52 56 13 DECIMAL 32 48 46 13
60
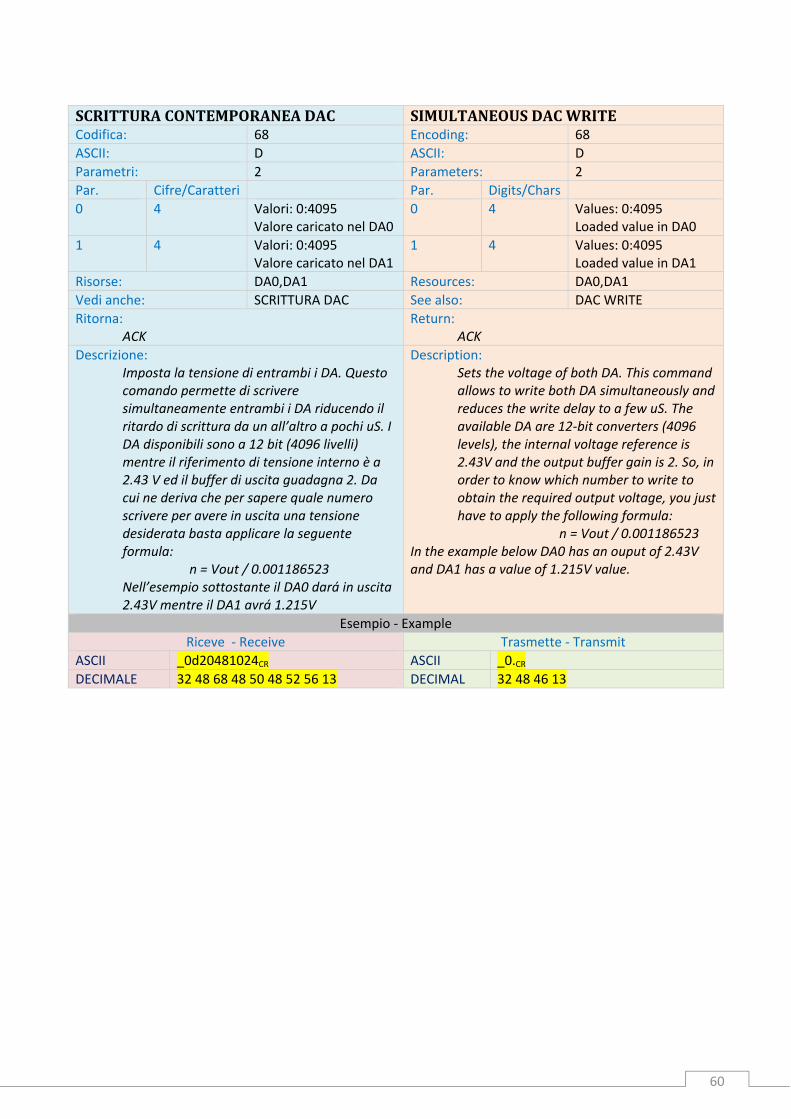
SCRITTURACONTEMPORANEADAC SIMULTANEOUSDACWRITECodifica: 68 Encoding: 68
ASCII: D ASCII: D
Parametri: 2 Parameters: 2
Par. Cifre/Caratteri Par. Digits/Chars
0 4 Valori: 0:4095 Valore caricato nel DA0
0 4 Values: 0:4095 Loaded value in DA0
1 4 Valori: 0:4095 Valore caricato nel DA1
1 4 Values: 0:4095 Loaded value in DA1
Risorse: DA0,DA1 Resources: DA0,DA1
Vedi anche: SCRITTURA DAC See also: DAC WRITE
Ritorna: ACK
Return: ACK
Descrizione: Imposta la tensione di entrambi i DA. Questo comando permette di scrivere simultaneamente entrambi i DA riducendo il ritardo di scrittura da un all’altro a pochi uS. I DA disponibili sono a 12 bit (4096 livelli) mentre il riferimento di tensione interno è a 2.43 V ed il buffer di uscita guadagna 2. Da cui ne deriva che per sapere quale numero scrivere per avere in uscita una tensione desiderata basta applicare la seguente formula:
n = Vout / 0.001186523 Nell’esempio sottostante il DA0 dará in uscita 2.43V mentre il DA1 avrá 1.215V
Description: Sets the voltage of both DA. This command allows to write both DA simultaneously and reduces the write delay to a few uS. The available DA are 12‐bit converters (4096 levels), the internal voltage reference is 2.43V and the output buffer gain is 2. So, in order to know which number to write to obtain the required output voltage, you just have to apply the following formula:
n = Vout / 0.001186523 In the example below DA0 has an ouput of 2.43V and DA1 has a value of 1.215V value.
Esempio ‐ Example
Riceve ‐ Receive Trasmette ‐ Transmit
ASCII _0d20481024CR ASCII _0.CR
DECIMALE 32 48 68 48 50 48 52 56 13 DECIMAL 32 48 46 13
61
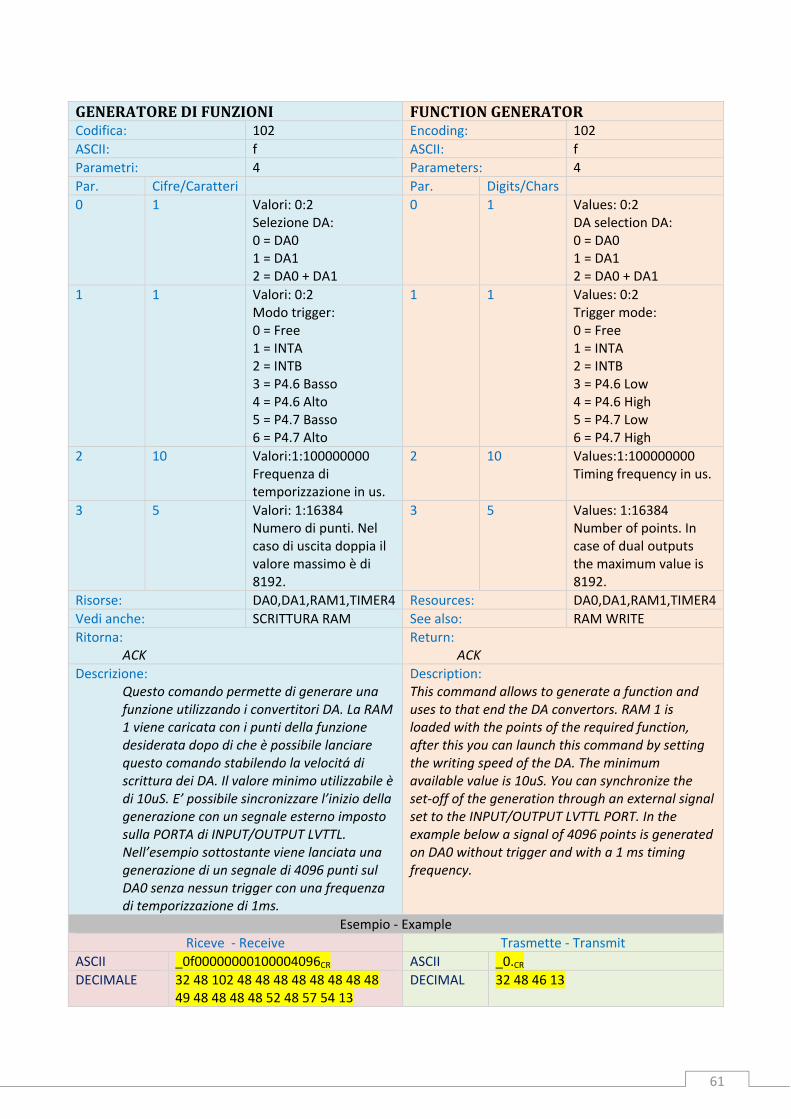
GENERATOREDIFUNZIONI FUNCTIONGENERATORCodifica: 102 Encoding: 102
ASCII: f ASCII: f
Parametri: 4 Parameters: 4
Par. Cifre/Caratteri Par. Digits/Chars
0 1 Valori: 0:2 Selezione DA: 0 = DA0 1 = DA1 2 = DA0 + DA1
0 1 Values: 0:2 DA selection DA: 0 = DA0 1 = DA1 2 = DA0 + DA1
1 1 Valori: 0:2 Modo trigger: 0 = Free 1 = INTA 2 = INTB 3 = P4.6 Basso 4 = P4.6 Alto 5 = P4.7 Basso 6 = P4.7 Alto
1 1 Values: 0:2 Trigger mode: 0 = Free 1 = INTA 2 = INTB 3 = P4.6 Low 4 = P4.6 High 5 = P4.7 Low 6 = P4.7 High
2 10 Valori:1:100000000 Frequenza di temporizzazione in us.
2 10 Values:1:100000000 Timing frequency in us.
3 5 Valori: 1:16384 Numero di punti. Nel caso di uscita doppia il valore massimo è di 8192.
3 5 Values: 1:16384 Number of points. In case of dual outputs the maximum value is 8192.
Risorse: DA0,DA1,RAM1,TIMER4 Resources: DA0,DA1,RAM1,TIMER4
Vedi anche: SCRITTURA RAM See also: RAM WRITE
Ritorna: ACK
Return: ACK
Descrizione: Questo comando permette di generare una funzione utilizzando i convertitori DA. La RAM 1 viene caricata con i punti della funzione desiderata dopo di che è possibile lanciare questo comando stabilendo la velocitá di scrittura dei DA. Il valore minimo utilizzabile è di 10uS. E’ possibile sincronizzare l’inizio della generazione con un segnale esterno imposto sulla PORTA di INPUT/OUTPUT LVTTL. Nell’esempio sottostante viene lanciata una generazione di un segnale di 4096 punti sul DA0 senza nessun trigger con una frequenza di temporizzazione di 1ms.
Description: This command allows to generate a function and uses to that end the DA convertors. RAM 1 is loaded with the points of the required function, after this you can launch this command by setting the writing speed of the DA. The minimum available value is 10uS. You can synchronize the set‐off of the generation through an external signal set to the INPUT/OUTPUT LVTTL PORT. In the example below a signal of 4096 points is generated on DA0 without trigger and with a 1 ms timing frequency.
Esempio ‐ Example
Riceve ‐ Receive Trasmette ‐ Transmit
ASCII _0f00000000100004096CR ASCII _0.CR
DECIMALE 32 48 102 48 48 48 48 48 48 48 48 49 48 48 48 48 52 48 57 54 13
DECIMAL 32 48 46 13
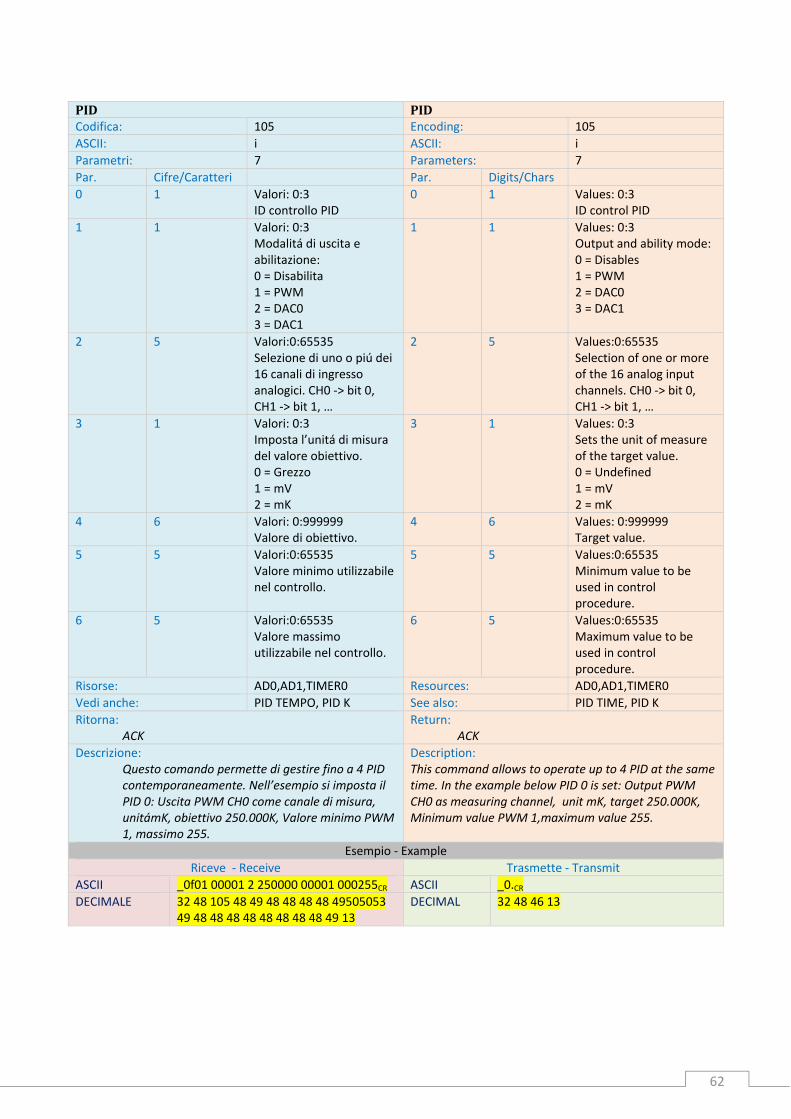
62
PID PIDCodifica: 105 Encoding: 105
ASCII: i ASCII: i
Parametri: 7 Parameters: 7
Par. Cifre/Caratteri Par. Digits/Chars
0 1 Valori: 0:3 ID controllo PID
0 1 Values: 0:3 ID control PID
1 1 Valori: 0:3 Modalitá di uscita e abilitazione: 0 = Disabilita 1 = PWM 2 = DAC0 3 = DAC1
1 1 Values: 0:3 Output and ability mode: 0 = Disables 1 = PWM 2 = DAC0 3 = DAC1
2 5 Valori:0:65535Selezione di uno o piú dei 16 canali di ingresso analogici. CH0 ‐> bit 0, CH1 ‐> bit 1, …
2 5 Values:0:65535Selection of one or more of the 16 analog input channels. CH0 ‐> bit 0, CH1 ‐> bit 1, …
3 1 Valori: 0:3 Imposta l’unitá di misura del valore obiettivo. 0 = Grezzo 1 = mV 2 = mK
3 1 Values: 0:3 Sets the unit of measure of the target value. 0 = Undefined 1 = mV 2 = mK
4 6 Valori: 0:999999Valore di obiettivo.
4 6 Values: 0:999999Target value.
5 5 Valori:0:65535Valore minimo utilizzabile nel controllo.
5 5 Values:0:65535Minimum value to be used in control procedure.
6 5 Valori:0:65535Valore massimo utilizzabile nel controllo.
6 5 Values:0:65535Maximum value to be used in control procedure.
Risorse: AD0,AD1,TIMER0 Resources: AD0,AD1,TIMER0
Vedi anche: PID TEMPO, PID K See also: PID TIME, PID K
Ritorna: ACK
Return:ACK
Descrizione: Questo comando permette di gestire fino a 4 PID contemporaneamente. Nell’esempio si imposta il PID 0: Uscita PWM CH0 come canale di misura, unitámK, obiettivo 250.000K, Valore minimo PWM 1, massimo 255.
Description:This command allows to operate up to 4 PID at the same time. In the example below PID 0 is set: Output PWM CH0 as measuring channel, unit mK, target 250.000K, Minimum value PWM 1,maximum value 255.
Esempio ‐ Example
Riceve ‐ Receive Trasmette ‐ Transmit
ASCII _0f01 00001 2 250000 00001 000255CR ASCII _0.CRDECIMALE 32 48 105 48 49 48 48 48 48 49505053
49 48 48 48 48 48 48 48 48 49 13 DECIMAL 32 48 46 13

63
Controllori PID Da Wikipedia, l'enciclopedia libera. Il controllo Proporzionale‐Integrale‐Derivativo, comunemente abbreviato come PID, è un sistema in retroazione negativa ampiamente impiegato nei sistemi di controllo. È il sistema di controllo in retroazione di gran lunga più comune nell'industria, in particolare nella versione PI (senza azione derivativa). Grazie a un input che determina il valore attuale è in grado di reagire a un eventuale errore positivo o negativo tendendo verso il valore 0. La reazione all'errore puo' essere regolata, cio' rende questo sistema molto versatile.
Fondamenti
Il controllore acquisisce in ingresso un valore da un processo, e lo confronta con un valore di riferimento. La differenza, il cosiddetto segnale di errore, viene quindi usata per determinare il valore della variabile di uscita del controllore, che è la variabile manipolabile del processo.
Il PID regola l'uscita in base a:
il valore del segnale di errore (azione proporzionale);
i valori passati del segnale di errore (azione integrale);
quanto velocemente il segnale di errore varia (azione derivativa).
I controllori PID sono relativamente semplici da comprendere, installare, e tarare al confronto con più complessi algoritmi di controllo basati sulla teoria del controllo ottimo e del controllo robusto. La taratura dei parametri avviene di solito attraverso semplici regole empiriche, come i metodi di Ziegler‐Nichols, che risultano in controllori stabilizzanti di buone prestazioni per la maggior parte dei processi. Molto spesso l'azione derivativa viene rimossa, risultando nel comunissimo controllore PI.
Limitazioni
I controllori PID sono spesso sufficienti a controllare processi industriali anche complessi, ma la loro semplicità risulta in una serie di limiti che è bene tener presente:
Non sono in grado di adattarsi a cambiamenti nei parametri del processo;
Non sono stabili, a causa della presenza dell'azione integrale (vedi Windup);
Alcune regole di taratura, come quelle di Ziegler‐Nichols, reagiscono male in alcune condizioni;
Sono intrinsecamente monovariabili, non possono quindi essere usati in sistemi inerentemente multivariabili come per esempio le colonne di distillazione.
Azioni di controllo di un PID
Le tre azioni di un PID vengono calcolate separatamente e semplicemente sommate algebricamente:
PID controllers Source: Wikipedia,the free encyclopedia. A Proportional‐Integral‐Derivative controller (PID‐controller) is a negative feedback mechanism widely used in control systems. It is the most common feedback control system used in industry, particularly in PI (not action‐derived) version. Thanks to an input that determines the actual value, the system will respond to an eventual positive or negative error and tend towards value 0. As the reaction towards the error can be adjusted, this system is very versatile.
Basis
The controller obtains a process input value and compares it to the desired setpoint. The difference between these two values, the “error” value, is then used to determine the variable output value. This value is the manipulable process variable.
The PID adjusts the output through:
the error signal value (proportional action);
the values transferred by the error signal (integral action);
rate of change of the error signal (derivative action).
The PID controllers are relatively easy to interpret, install and to calibrate in comparison with more complex control algorythms based on the optimal and robust theory. The parameter calibration usually takes place through simple empirical rules, like the Ziegler‐Nichols methods, resulting in reliable stabilizing controllers for most processes. Often the derivative action is removed, resulting in the very common PI controllor.
Limits
While PID controllers are applicable to many control problems in (even complex) industrial processes and often perform satisfactorily, they can perform poorly in some applications:
They do not react to changing process parameters;
Their performance in integral action is variable (see Windup);
Some calibration rules, such as the Ziegler‐Nichols rules, perform badly under certain circumstances;
They are intrinsically monovariable. As a consequence, they cannot be applied in inherent multivariable systems, such as fractionating columns.
PID controller actions
The three PIC actions are calculated separately and algebraically summed:

64
È perfettamente possibile regolare un processo con un simile controllore, che risulta anche in grado di stabilizzare processi instabili. Tuttavia, non è possibile garantire che il segnale d'errore "e" converga a zero: questo perché un'azione di controllo "u" è possibile solo se "e" è diverso da zero.
You can perfectly regulate a process with such controller that also can stabilize unstable processes. However, there is no guarantee that error signal "e" will to zero; i.e. a control action "u" is only possible if "e" is different from zero.
Azione integrale (I) L'azione integrale è proporzionale all'integrale nel tempo del segnale di errore "e", moltiplicato per la costante Ki:
Integral action (I) The integral action is proportional to the integral in the error signal time "e", multiplied by constant Ki:
Questa definizione dell'azione integrale fa sì che il controllore abbia memoria dei valori passati del segnale d'errore; in particolare, il valore dell'azione integrale non è necessariamente nullo se è nullo il segnale d'errore. Questa proprietà dà al PID la capacità di portare il processo esattamente al punto di riferimento richiesto, dove la sola azione proporzionale risulterebbe nulla. L'azione integrale è anche l'elemento metastabile di un PID, perché un ingresso costante non convergerà a un determinato valore. Il fenomeno del windup è dovuto alla presenza dell'integratore.
Azione derivativa (D)
Per migliorare le prestazioni del controllore si può aggiungere l'azione derivativa:
Through above mentioned integral action definition the controller has memory of the values that has been transferred by the error signal; in particular the integral action value is not necessarily zero if the error signal is zero. This property allows the PID to bring the process exactly to the required reference point where the single proportional action is zero. The integral action is also the metastable element of a PID, because a constant input will not converge to a defined value. The wind‐up phenomenon occurs in the presence of the integrator.
Derivative action (D) In order to improve the controller performance you can add the derivative action:
L'idea è compensare rapidamente le variazioni del segnale di errore: se vediamo che "e" sta aumentando, l'azione derivativa cerca di compensare questa deviazione in ragione della sua velocità di cambiamento, senza aspettare che l'errore diventi significativo (azione proporzionale) o che persista per un certo tempo (azione integrale). L'azione derivativa è spesso tralasciata nelle implementazioni dei PID perché li rende troppo sensibili: un PID con azione derivativa, per esempio, subirebbe una brusca variazione nel momento in cui il riferimento venisse cambiato quasi istantaneamente da un valore a un altro, risultando in una derivata di "e" tendente a infinito, o comunque molto elevata. Ciò sconsiglia l'applicazione dell'azione derivativa in tutti i casi in cui l'attuatore fisico non deve essere sottoposto a sforzi eccessivi.
Se ben tarata e se il processo è abbastanza "tollerante", comunque, l'azione derivativa può dare un contributo determinante alle prestazioni del controllore.
The idea is to quickly compensate the variations of the error signal: if "e" increases, the derivative action will try to compensate this deviation according to the rate of change, without waiting for the error to become significant (proportional action) o to persist for some time (integral action). The derivative action is often neglected in the implementation of PID controllers, as it causes them to be too sensitive. a PID with derivative action, for example, would suffer an abrupt variation the moment,in which the reference is changed almost instantly from one value to anther, resulting in a derivative of "e" tending to infinity or anyway being very high . This does not recommend application of the derivative action in cases in which it is not necessary to expose the physical actuator to too much strain.
If the derivative action is well calibrated and if the process is rather “tolerant”, the derivative action can contribute decisively to the controller performance anyway.
Azione proporzionale (P)
L'azione proporzionale è ottenuta moltiplicando il segnale d'errore "e" con un'opportuna costante:
Proportional action (P) The proportional action can be obtained by multiplying the error signal "e" by a suitable constant:
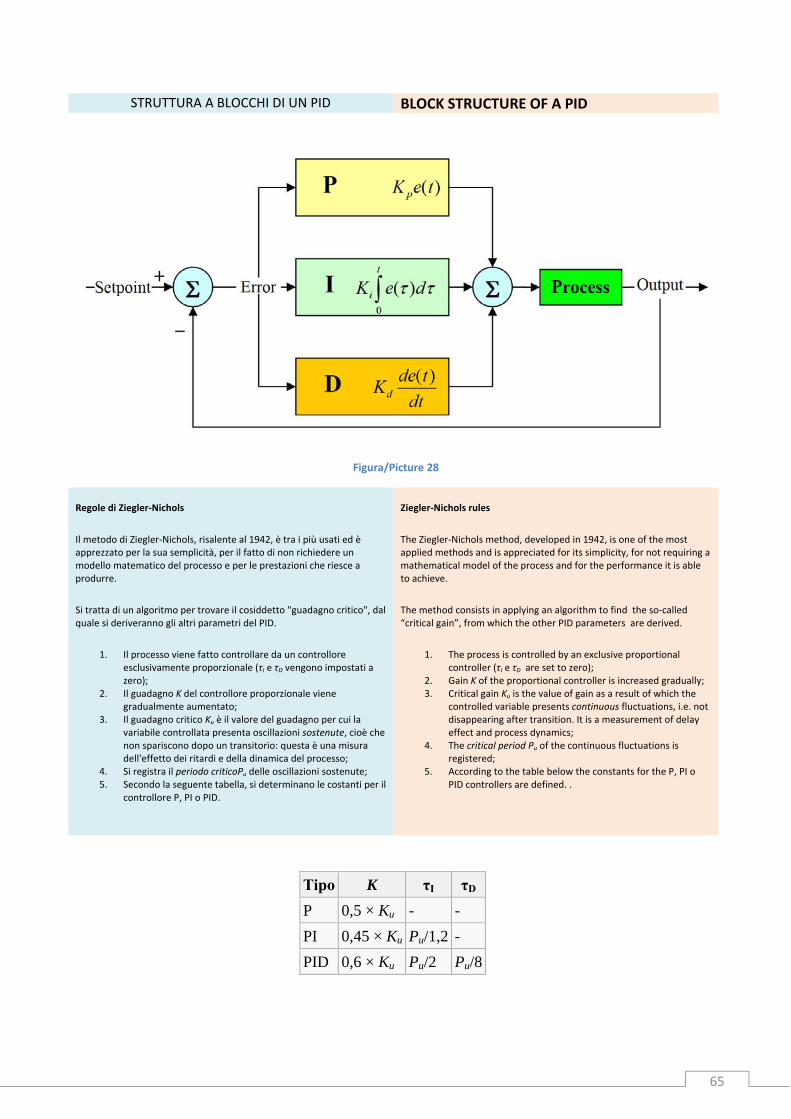
65
STRUTTURA A BLOCCHI DI UN PID BLOCK STRUCTURE OF A PID
Figura/Picture 28
Regole di Ziegler‐Nichols
Il metodo di Ziegler‐Nichols, risalente al 1942, è tra i più usati ed è apprezzato per la sua semplicità, per il fatto di non richiedere un modello matematico del processo e per le prestazioni che riesce a produrre.
Si tratta di un algoritmo per trovare il cosiddetto "guadagno critico", dal quale si deriveranno gli altri parametri del PID.
1. Il processo viene fatto controllare da un controllore esclusivamente proporzionale (τI e τD vengono impostati a zero);
2. Il guadagno K del controllore proporzionale viene gradualmente aumentato;
3. Il guadagno critico Ku è il valore del guadagno per cui la variabile controllata presenta oscillazioni sostenute, cioè che non spariscono dopo un transitorio: questa è una misura dell'effetto dei ritardi e della dinamica del processo;
4. Si registra il periodo criticoPu delle oscillazioni sostenute; 5. Secondo la seguente tabella, si determinano le costanti per il
controllore P, PI o PID.
Ziegler‐Nichols rules
The Ziegler‐Nichols method, developed in 1942, is one of the most applied methods and is appreciated for its simplicity, for not requiring a mathematical model of the process and for the performance it is able to achieve.
The method consists in applying an algorithm to find the so‐called “critical gain”, from which the other PID parameters are derived.
1. The process is controlled by an exclusive proportional controller (τI e τD are set to zero);
2. Gain K of the proportional controller is increased gradually; 3. Critical gain Ku is the value of gain as a result of which the
controlled variable presents continuous fluctuations, i.e. not disappearing after transition. It is a measurement of delay effect and process dynamics;
4. The critical period Pu of the continuous fluctuations is registered;
5. According to the table below the constants for the P, PI o PID controllers are defined. .
Tipo K τI τD
P 0,5 × Ku - -
PI 0,45 × Ku Pu/1,2 -
PID 0,6 × Ku Pu/2 Pu/8

66
IMPLEMENTAZIONE PID SESTILIO SESTILIO gestisce fino ad massimo di quattro PID, ciascun PID ha un suo identificativo (0:3) e puó agire su un diverso dispositivo di output. Gli output selezionabili sono:
1. Le 4 uscite di potenza utilizzabili in PWM 2. I due DAC disponibili
Il PID esegue 10 volte al secondo il suo ciclo, ma questo valore puó essere cambiato con il comando PID TEMPO. Il dato in ingresso viene preso da uno o piú canali A/D (16 canali disponibili) e nel caso i canali utilizzati per il campionamento siano piú di uno viene fatto il valore medio di questi. Prima di lanciare il comando PID occorre almeno uno volta avere definito le tre costanti base (Kp,Ki,Kd) con il comando PID K. Nel caso si scelga come uscita il PWM, l’uscita selezionata sará uguale dell’identificativo del PID. In pratica: PID ID 0 = Y14 PIN 1‐2 PID ID 1 = Y14 PIN 3‐4 PID ID 2 = Y14 PIN 5‐6 PID ID 3 = Y14 PIN 7‐8
PID SESTILIO IMPLEMENTATION SESTILIO operates up to four PID; every PID has its own ID (0:3) and can function on different output devices. The selectable outputs are:
1. The 4 power outputs used in PWM 2. The two available DACi
The PID runs 10 cycles per second. However, this value can be modified using the PID TEMPO. The input element is received by one or more A/D channels (16 available channels). If the channels used for sampling are more than one, the mean value of these channels is calculated. Before launching the PID command, it is necessary to define at least one time the three basic constants (Kp,Ki,Kd) using the PID K command. If PWM is chosen as output, the selected output will equal the PID identification. This means: PID ID 0 = Y14 PIN 1‐2 PID ID 1 = Y14 PIN 3‐4 PID ID 2 = Y14 PIN 5‐6 PID ID 3 = Y14 PIN 7‐8

67
PIDK PIDKCodifica: 75 Encoding: 75
ASCII: K ASCII: K
Parametri: 4 Parameters: 4
Par. Cifre/Caratteri Par. Digits/Chars
0 1 Valori: 0:3 PID ID.
0 1 Values: 0:3 PID ID.
1 1 Valori: 0:3 K ID. 0 = Kd 1 = Ki 2 = Kp
1 1 Values: 0:3 K ID. 0 = Kd 1 = Ki 2 = Kp
2 6 Valori: 0:999999 K selezionato
2 6 Values: 0:999999 K selected
3 6 Valori: 0:999999 Divisore di K selezionato
3 6 Values: 0:999999 Divisor of selected K
Risorse: AD0,AD1,TIMER0 Resources: AD0,AD1,TIMER0
Vedi anche: PID, PID TEMPO See also: PID, PID TIME
Ritorna: ACK
Return: ACK
Descrizione: Imposta le costanti tipiche del PID. Il valore che viene caricato è dato dal parametro 2 diviso il parametro 3. Nell’esempio sottostante si imposta: Kp = 1.73256
Description: Sets the typical constants of the PID. The load value is provided by parameter 2 divided by parameter 3. In the example below is set: Kp = 1.73256
Esempio ‐ Example
Riceve ‐ Receive Trasmette ‐ Transmit
ASCII _0K 0 2 173256 100000CR ASCII _0.CR
DECIMALE 32 48 75 48 50 4955 51 50 53 54 49 48 48 48 48 48 13
DECIMAL 32 48 46 13

68
PIDTEMPO PIDTIMECodifica: 115 Encoding: 115
ASCII: s ASCII: s
Parametri: 1 Parameters: 1
Par. Cifre/Caratteri Par. Digits/Chars
0 5 Valori: 1:65535 Divisore tempo di ciclo.
0 5 Values: 1:65535 Cycle time divisor.
Risorse: AD0, AD1, TIMER0 Resources: AD0, AD1, TIMER0
Vedi anche: PID, PID K See also: PID, PID K
Ritorna: ACK
Return: ACK
Descrizione: Come valore preimpostato il PID esegue un ciclo ogni 100 mS. Con questo comando è possibile cambiare questo valore. Il tempo di ciclo viene cosí calcolato: T (ms) = N * 100. Il tempo di ciclo impostato è valido per tutti i processi di PID. Nell’esempio sottostante il ciclo viene impostato ad 1 secondo.
Description: The PID is a preset value and runs a cycle every 100 mS.This command enables modification of beforementioned value. The cycle time is calculated as follows: T (ms) = N * 100. The set cycle time is valid for all PID processes. In the example below the cycle is set at 1 second.
Esempio ‐ Example
Riceve ‐ Receive Trasmette ‐ Transmit
ASCII _0s 00010CR ASCII _0.CR
DECIMALE 32 48 115 48 48 48 49 48 13 DECIMAL 32 48 46 13

69
POSIZIONAMENTO POSITIONINGCodifica: 120 Encoding: 120
ASCII: x ASCII: x
Parametri: 4 Parameters: 4
Par. Cifre/Caratteri Par. Digits/Chars
0 1 Valori: 0:1 Direzione asse 0.
0 1 Values: 0:1 Direction axis 0.
1 10 Valori: 0:4294967295 Passi da eseguire sull’asse 0.
1 10 Values: 0:4294967295 Steps to be executed on axis 0.
2 1 Valori: 0:1 Direzione asse 1.
2 1 Values: 0:1 Direction axis 1.
3 10 Valori: 0:4294967295 Passi da eseguire sull’asse 1.
3 10 Values: 0:4294967295 Steps to be executed on axis 1.
Risorse: TIMER4 Resources: TIMER4
Vedi anche: RAMPA MOTORE VELOCITA MOTORE CONTATORE MOTORE
See also: MOTOR SLOPE MOTOR SPEED MOTOR COUNTS
Ritorna: ACK
Return: ACK
Descrizione: Esegue un posizionamento su due assi nella direzione e per il numero di passi specificato. Nell’esempio sotto indicato si eseguono 1000 passi sull’asse 0 e 10000 passi sull’asse 1 con direzione opposta.
Description: Executes a positioning on two axes in the direction of and by the specified number of steps. In the example below 1000 steps are excuted on axis 0 and 10000 steps on axis 1 in opposite directions.
Esempio ‐ Example
Riceve ‐ Receive Trasmette ‐ Transmit
ASCII _0x 0 0000001000 10000010000CR ASCII _0.CR
DECIMALE 32 48 120 48 48 48 48 48 48 48 49 48 48 48 49 48 48 48 48 48 49 48 48 48 48 13
DECIMAL 32 48 46 13

70
RAMPAMOTORE MOTORSLOPECodifica: 47 Encoding: 47
ASCII: / ASCII: /
Parametri: 3 Parameters: 3
Par. Cifre/Caratteri Par. Digits/Chars
0 1 Valori: 0:1 ID asse.
0 1 Values: 0:1 ID axis.
1 1 Valori: 0:9 ID passo di accelerazione.
1 1 Values: 0:9 ID accelerating ramp.
2 5 Valori: 0:65535 Valore rampa.
2 5 Values: 0:65535 Slope value.
Risorse: TIMER4 Resources: TIMER4
Vedi anche: POSIZIONAMENTO VELOCITA MOTORE CONTATORE MOTORE
See also: POSITIONING MOTOR SPEED MOTOR COUNTS
Ritorna: ACK
Return: ACK
Descrizione: Il comando di posizionamento realizza, se il numero di passi è sufficiente, una rampa di accelerazione e decelerazione su 10 gradini di incremento o decremento della velocitá. I valori pre impostati sono: 0 = 50 1 = 55 2 = 60 3 = 67 4 = 78 5 = 86 6 = 100 7 = 120 8 = 150 9 = 200 Quelli indicati sono il numero di passi eseguiti ad ogni velocitá di rampa impostata. Questo comando permette di cambiare questi valori. Nell’esempio sottostante si imposta per l’asse 0, il primo valore di rampa a 48.
Description: If the number of steps is sufficient, the setting command realizes an accelerating and decelerating ramp on 10 levels of speed increase and decrease. The preset values are: 0 = 50 1 = 55 2 = 60 3 = 67 4 = 78 5 = 86 6 = 100 7 = 120 8 = 150 9 = 200 The indicated values represent the number of executed steps at every speed level of the setup ramp. This command allows modification of these values. In the example below the first ramp value for axis 0 is set at 48.
Esempio ‐ Example
Riceve ‐ Receive Trasmette ‐ Transmit
ASCII _0/0 0 00048 CR ASCII _0.CR
DECIMALE 32 48 4748 48 48 48 48 5256 13 DECIMAL 32 48 46 13

71
VELOCITA’MOTORE MOTORSPEEDCodifica: 45 Encoding: 45
ASCII: ‐ ASCII: ‐
Parametri: 3 Parameters: 3
Par. Cifre/Caratteri Par. Digits/Chars
0 1 Valori: 0:1 ID asse.
0 1 Values: 0:1 ID axis.
1 3 Valori: 0:255 Ritardo velocitá iniziale e finale (Vi).
1 3 Values: 0:255 Delay initial and final speed (Vi).
2 3 Valori: 0:255 Valore di decremento o incremento (Vd).
2 3 Values: 0:255 Increasing or decreasing value (Vd).
Risorse: TIMER4 Resources: TIMER4
Vedi anche: POSIZIONAMENTO RAMPA MOTORE CONTATORE MOTORE
See also: POSITIONING MOTOR SLOPE MOTOR COUNTS
Ritorna: ACK
Return: ACK
Descrizione: Questo comando influenza la velocitá di posizionamento del motore sull’ asse selezionato. Il posizionamento adotta una rampa di accelerazione che va da una velocitá minima, rappresentata da questo valore, ad una velocitá massima uguale a: Vf = Vi – Vd * 10 La base dei tempi utilizzata nel posizionamento e’di 100uS, il valore preimpostato di Vi è 12 e quello di Vd è 1. Ne consegue che con i valori preimpostati la massima velocitá raggiunta dal motore è di 2500 Hz, mentre quella di partenza è di 833 Hz. Nell’esempio sottostante si imposta per l’asse 0 la velocitá di partenza ed il valore di decremento.
Description: This command effects the speed setting of the motor on the selected axis.The setting adopts an acceleration ramp that goes from a minimum speed, represented by this value, to a maximum speed of: Vf = Vi – Vd * 10 The time base used for the setting is 100uS,the Vi preset value is 12 and the Vd preset value is 1. It follows that with the preset values the maximum speed attained by the motor is 2500 Hz and that the initial speed is 833 Hz. In the example below the initial speed and the decreasing value of axis (0) are set.
Esempio ‐ Example
Riceve ‐ Receive Trasmette ‐ Transmit
ASCII _0‐0 015 001 CR ASCII _0.CR
DECIMALE 32 45 48 48 49 53 48 48 49 13 DECIMAL 32 48 46 13

72
CONTATOREMOTORE MOTORCOUNTSCodifica: 88 Encoding: 88
ASCII: X ASCII: X
Parametri: 1 Parameters: 1
Par. Cifre/Caratteri Par. Digits/Chars
0 1 Valori: 0:1 ID asse.
0 1 Values: 0:1 ID axis.
Risorse: TIMER4 Resources: TIMER4
Vedi anche: POSIZIONAMENTO RAMPA MOTORE VELOCITA MOTORE
See also: POSITIONING MOTOR SLOPE MOTOR SPEED
Ritorna: Il numero dei passi che deve ancora eseguire
Return: The number of steps still to be executed.
Descrizione: Una volta lanciato un posizionamento puó essere necessario avere una idea di quanto manchi alla fine del processo, questo comando permette di leggere il numero di passi che devono essere ancora eseguiti sull’asse selezionato.
Description: After having launched a setting, it may be necessary to know how much time is needed to complete the process; this command allows to read the number of steps that still have to be executed on the selected axis.
Esempio ‐ Example
Riceve ‐ Receive Trasmette ‐ Transmit
ASCII _0X0CR ASCII _00000013321CR X Num
DECIMALE 32 48 88 13 DECIMAL 32 48 48 48 48 48 48 49 51 51 50 49 13
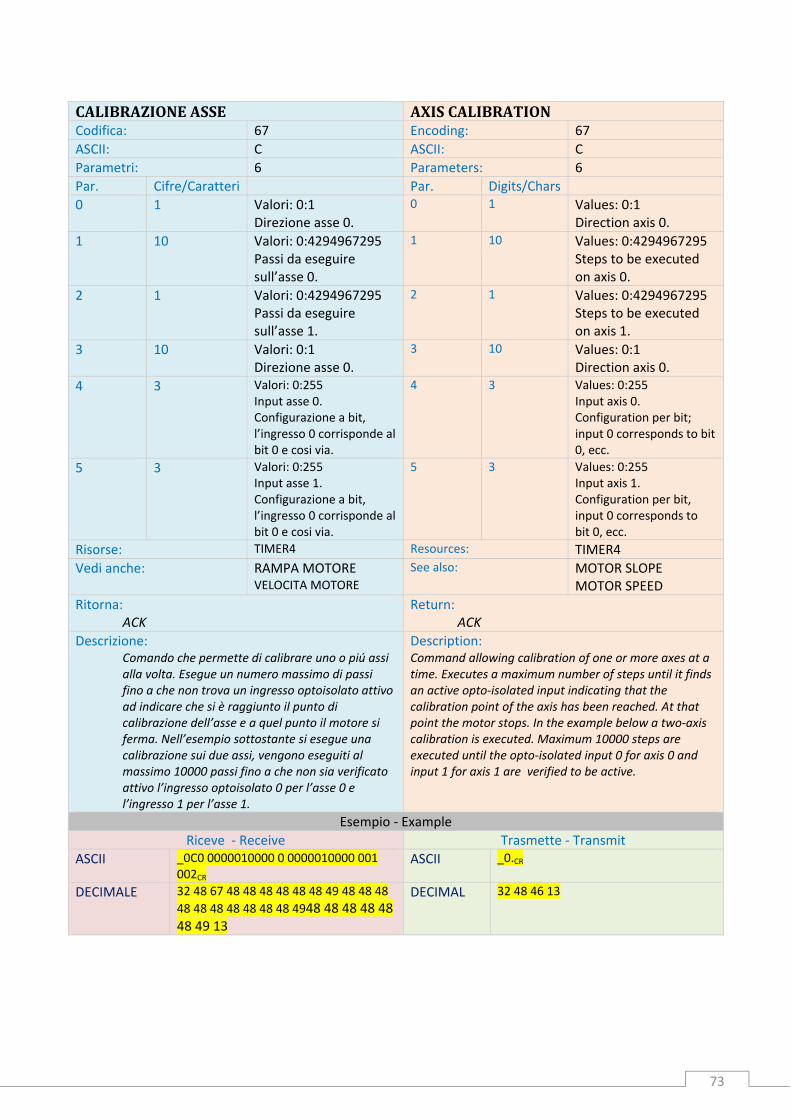
73
CALIBRAZIONEASSE AXISCALIBRATIONCodifica: 67 Encoding: 67
ASCII: C ASCII: C
Parametri: 6 Parameters: 6
Par. Cifre/Caratteri Par. Digits/Chars
0 1 Valori: 0:1 Direzione asse 0.
0 1 Values: 0:1 Direction axis 0.
1 10 Valori: 0:4294967295 Passi da eseguire sull’asse 0.
1 10 Values: 0:4294967295 Steps to be executed on axis 0.
2 1 Valori: 0:4294967295 Passi da eseguire sull’asse 1.
2 1 Values: 0:4294967295 Steps to be executed on axis 1.
3 10 Valori: 0:1 Direzione asse 0.
3 10 Values: 0:1 Direction axis 0.
4 3 Valori: 0:255 Input asse 0. Configurazione a bit, l’ingresso 0 corrisponde al bit 0 e cosi via.
4 3 Values: 0:255 Input axis 0. Configuration per bit; input 0 corresponds to bit 0, ecc.
5 3 Valori: 0:255 Input asse 1. Configurazione a bit, l’ingresso 0 corrisponde al bit 0 e cosi via.
5 3 Values: 0:255 Input axis 1. Configuration per bit, input 0 corresponds to bit 0, ecc.
Risorse: TIMER4 Resources: TIMER4
Vedi anche: RAMPA MOTORE VELOCITA MOTORE
See also: MOTOR SLOPE MOTOR SPEED
Ritorna: ACK
Return: ACK
Descrizione: Comando che permette di calibrare uno o piú assi alla volta. Esegue un numero massimo di passi fino a che non trova un ingresso optoisolato attivo ad indicare che si è raggiunto il punto di calibrazione dell’asse e a quel punto il motore si ferma. Nell’esempio sottostante si esegue una calibrazione sui due assi, vengono eseguiti al massimo 10000 passi fino a che non sia verificato attivo l’ingresso optoisolato 0 per l’asse 0 e l’ingresso 1 per l’asse 1.
Description: Command allowing calibration of one or more axes at a time. Executes a maximum number of steps until it finds an active opto‐isolated input indicating that the calibration point of the axis has been reached. At that point the motor stops. In the example below a two‐axis calibration is executed. Maximum 10000 steps are executed until the opto‐isolated input 0 for axis 0 and input 1 for axis 1 are verified to be active.
Esempio ‐ Example
Riceve ‐ Receive Trasmette ‐ Transmit
ASCII _0C0 0000010000 0 0000010000 001 002CR
ASCII _0.CR
DECIMALE 32 48 67 48 48 48 48 48 48 49 48 48 48
48 48 48 48 48 48 48 4948 48 48 48 48 48 49 13
DECIMAL 32 48 46 13

74
SVILUPPO E AGGIORNAMENTO SOFTWARE Il programma di gestione di SESTILIO è stato scritto in C con il sistema integrato della SiliconLaboratories. Questo ambiente di sviluppo puó essere facilmente scaricato dal loro sito e puó essere utile per sviluppare una propria applicazione o per aggiornare il programma esistente. http://www.silabs.com/Support%20Documents/Software/mcu_ide.exe Oltre a scaricare questo programma è anche consigliato acquistare l’USB Debug Adapter (DEBUGADPTR1‐USB) acquistabile a basso costo presso:
FARNELL: 1186943
MOUSER: 634‐DEBUGADPTR1‐USB
SOFTWARE DEVELOPMENT AND UPDATING The SESTILIO managing software is written in C with the integrated system of SiliconLaboratories. You can easily download this development environment from their website. It may be used to develop an own application or to update the existing software. http://www.silabs.com/Support%20Documents/Software/mcu_ide.exe Besides downloading this program, we also advise to purchase the USB Debug Adapter (DEBUGADPTR1‐USB) at a low price at:
FARNELL: 1186943
MOUSER: 634‐DEBUGADPTR1‐USB
Figura/Picture 29
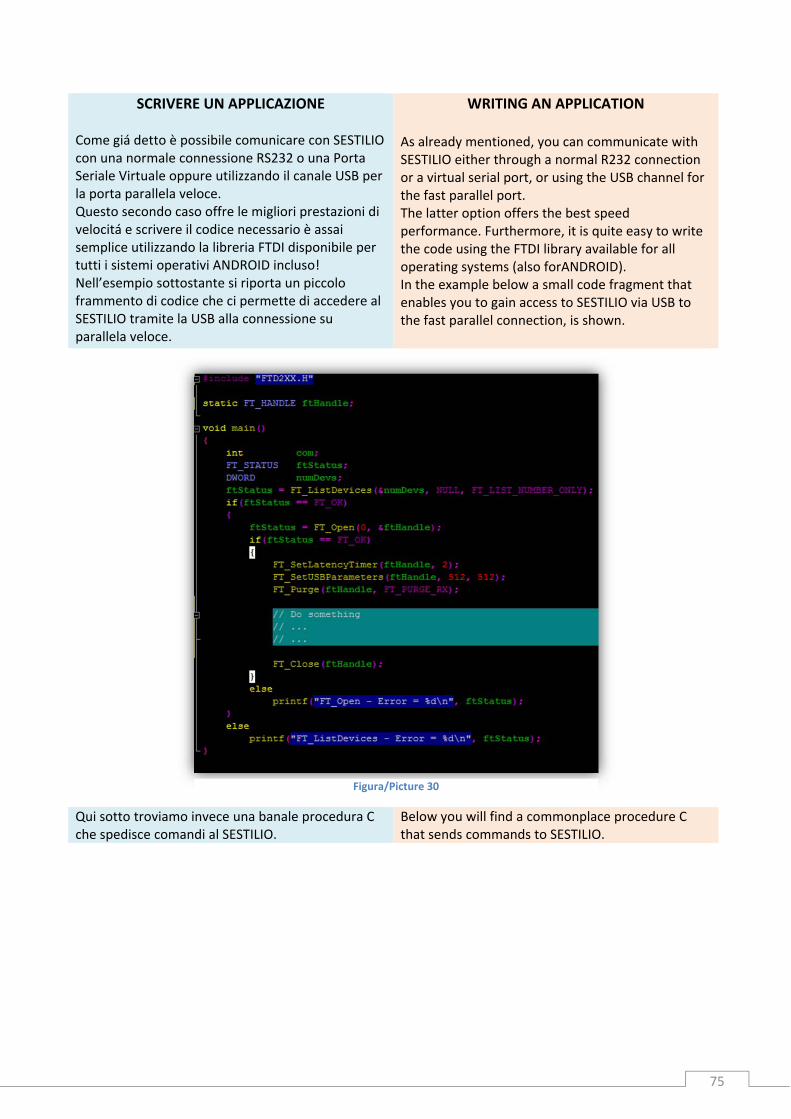
75
SCRIVERE UN APPLICAZIONE Come giá detto è possibile comunicare con SESTILIO con una normale connessione RS232 o una Porta Seriale Virtuale oppure utilizzando il canale USB per la porta parallela veloce. Questo secondo caso offre le migliori prestazioni di velocitá e scrivere il codice necessario è assai semplice utilizzando la libreria FTDI disponibile per tutti i sistemi operativi ANDROID incluso! Nell’esempio sottostante si riporta un piccolo frammento di codice che ci permette di accedere al SESTILIO tramite la USB alla connessione su parallela veloce.
WRITING AN APPLICATION
As already mentioned, you can communicate with SESTILIO either through a normal R232 connection or a virtual serial port, or using the USB channel for the fast parallel port. The latter option offers the best speed performance. Furthermore, it is quite easy to write the code using the FTDI library available for all operating systems (also forANDROID). In the example below a small code fragment that enables you to gain access to SESTILIO via USB to the fast parallel connection, is shown.
Qui sotto troviamo invece una banale procedura C che spedisce comandi al SESTILIO.
Below you will find a commonplace procedure C that sends commands to SESTILIO.
Figura/Picture 30

76
Sul nostro sito o sul CD‐ROM ricevuto con SESTILIO trovate anche un esempio completo funzionante scritto in C con VS2008 per Windows.
On our website or on the CD‐ROM, supplied together with SESTILIO, you will also find a complete, functioning example written in C with VS2008 for Windows.
Figura/Picture 31

77
TESTARE SESTILIO Una volta ricevuto SESTILIO la procedura piú semplice per verificarne il funzionamento è quello di provarlo con programma di emulazione terminale. Sul nostro sito e sul CD‐ROM in dotazione è disponibile TeraTerm è un buon programma di emulazione terminale. Per funzionare non necessita di essere installato ma basta semplicemente scompattarlo in una directory.Un volta scompattato il passo successivo è quello di accendere SESTILIO e per fare questo basta connetterlo ad una qualunque USB. Se è la prima volta che lo connettiamo sará necessario installare i drivers FTDI e qui vi rimandiamo al paragrafo ISTALLAZIONE, altrimenti occorre verificare (almeno la prima volta) quale sia la Porta Seriale Virtuale creata. Per fare questo occorre aprire le proprietá di sistema ed accedere a “Gestione Dispositivi” ed esaminare “Porte e Com” qui potremo vedere quale sia l’identificativo della porta seriale creata. A questo punto possiamo lanciare il TeraTerm eseguendo il file: ttermpro.exe È molto probabile che alla prima esecuzione venga visualizzato un messaggio di errore dove il programma si lamenta del fatto che non riesce a trovare la porta seriale. Anche se non doveste ricevere alcun errore conviene sempre (almeno la prima volta) verificare su quale porta si è connesso TeraTerm, per questo selezionate dal menu Setup ‐> Serial Port, vi comparirá qualcosa del genere:
SESTILIO TESTING After having received SESTILIO, the easiest procedure to test its functionality is to try it with a termal emulation program. On our website and on the CD‐ROM included is available TeraTerm. TeraTerm is a good terminal emulation program. In order to make it function, you do not need to install it. You can just unzip it in a directory. After you have unzipped it, you need to switch on SESTILIO. Therefore you only have to connect it to any USB. When connecting it for the first time, you need to install the FTDI drivers. Therefore we refer to paragraph “INSTALLATION”. If not, you have to verify (at least the first time) the Virtual Serial Port has been created. In order to to this, you need to open the system properties, then go to “Device Manager” and check “Porta and Com”. Here you will find the ID of the created serial port. After that you can launch TeraTerm. Therefore you have to run the following file: ttermpro.exe. At the first performance most likely an error message will be displayed saying that the program has not found the serial port. Even if you don’t receive any error message, we advise you to always check (at least the first time) to what port TeraTerm is connected. Therefore, please select Setup ‐> Serial Port from the menu. After this you will see something like shown in below picture:
Figura/Picture 32

78
Se la porta seriale fosse diversa da quella indicata va cambiata e dopo di che verificare che i restanti parametri siano uguali a quelli visualizzati nella figura 32. Adesso siamo pronti a eseguire il primo comando! Quindi digitate quanto segue: SPAZIO 0 ? ENTER Ovviamente i caratteri che rappresentano …. Se tutto funziona vi verrá risposto qualcosa del genere: _0100 Se non ci fosse alcuna risposta è molto probabile che vi siate connessi su di una porta seriale sbagliata, ma esiste anche un’altra possibilitá che l’ID dei SESTILIO non sia lo 0 allora come fare? Semplice inserite un ponticello fra i pin 14‐13 di Y4, uscite dal TeraTerm, spegnete SESTILIO e ricominciate da capo la procedura perché con il ponticello inserito SESTILIO viene inizializzato all’ID 0.
If the serial port is different from the indicated one, it has to be changed. Afther that, check if the remaining parameters are the same as those shown in picture 32. Now you can execute the first command! Therefore please type as follows: SPAZIO 0 ? ENTER Naturally the characters representing …. If everything goes well, you will receive the following kind of answer: _0100 If you do not receive any answer, either you connected to the wrong serial port or the ID of the SESTILIOs is not 0. Regarding the latter, you can solve the problem by doing the following: add a jumper between pins 14‐13 of Y4, exit TeraTerm, switch off SESTILIO and start the procedure all over again, as SESTILIO will initialize at ID 0 through the inserted jumper.
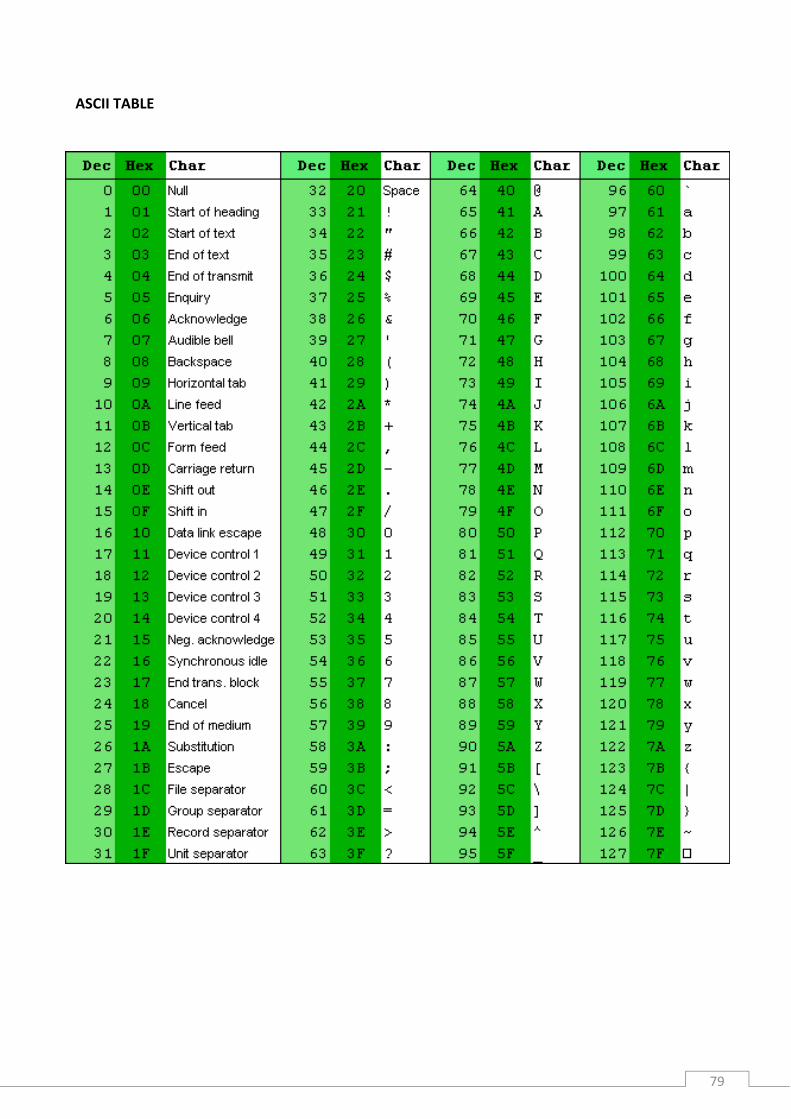
79
ASCII TABLE

NOTE – NOTES

81
CONTATTI CONTACTS
Officina Turini
Via G. Cei 67
56021 Cascina (PI)
ITALIA
Phone: +39 050 8665471
Fax: +39 050 8665471
E‐mail: [email protected]
Web: www.officinaturini.com
Le informazioni contenute in questo documento sono ritenute accurate in tutti gli aspetti al momento della pubblicazione, ma sono soggette a modifiche senza preavviso. O.T non si assume alcuna responsabilità per errori ed omissioni, e declina qualsiasi responsabilità per eventuali conseguenze derivanti dall'uso delle informazioni ivi contenute. Inoltre, OT non si assume alcuna responsabilità per il funzionamento delle funzionio per eventuali parametri non descritti. O.T. si riserva il diritto di apportare modifiche senza preavviso. O.T non fornisce alcuna garanzia o garantisce circa l'idoneità dei suoi prodotti per uno scopo specifico, né la O.T. si assume alcuna responsabilità derivante dall'applicazione o dall'utilizzo di qualsiasi prodotto o circuito, e declina espressamente qualsiasi responsabilità, compreso senza limitazione, danni accidentali o consequenziali. I prodotti O.T. non sono progettati, destinati o autorizzati per l'uso in applicazioni destinate a supportare o sostenere la vita, o per qualsiasi altra applicazione in cui il difetto del prodotto O.T. potrebbe creare una situazione in cui si possono verificare lesioni personali o la morte. Nel caso di acquisto o di utilizzo dei prodotti O.T. per qualsiasi applicazione non autorizzata, l’acquirente dovrà manlevare e tenere indenne O.T. da tutte le rivendicazioni e danni.
The information contained in this manual is believed to be complete, true and accurate in all respects at the time of publication but is subject to change without notice. O.T. assumes no responsibility for any errors and omissions, and accepts no responsibility for any consequences resulting from the use of information included herein. Additionally, O.T. assumes no responsibility for the functioning of undescribed features or parameters. O.T. reserves the right to make changes without further notice. O.T. makes no warranty, representation or guarantee regarding the suitability of its products for any particular purpose, nor does O.T. assume any liability arising out of the application or use of any products or circuits, and specifically disclaims any and all liability for any damages, including without limitation, any special, indirect, consequential or incidental damages. O.T. products are not designed, intended or authorized for use in applications intended to support or sustain life, or for any other application in which the failure of the O.T. product could create a situation where personal injury or death may occur. Should Buyer purchase or use O.T. products for any such unintended or unauthorized application, Buyer shall indemnify and hold O.T. harmless against all claims and damages.


![PARTESANA Kafka agli operai - [POLISCRITTURE] · 2 Questo scritto è un piccolo manuale per la lettura di tre rac-conti di Franz Kafka, Indagini di un cane, La tana e Josephine la](https://img.pdfslide.tips/doc/110x75/5c69683e09d3f2f5638d1912/partesana-kafka-agli-operai-poliscritture-2-questo-scritto-e-un-piccolo.jpg)