Embed Size (px)
Citation preview

MICROWAVE OVEN
FOUR MICRO-ONDES
MAGNETRON
MIKROWELLENHERD
فرن الميكروويف
User and maintenance manualEN
Handleiding voor gebruik en onderhoudNL
Bedienungs- und WartungsanleitungDE
Guide d’utilisation et d’entretienFR
ARدليل االستخدام والصيانة
I
ENGLISH
LANGUAGESEN PAGE 1
FR PAGE NL PAGE DE PAGE AR PAGE
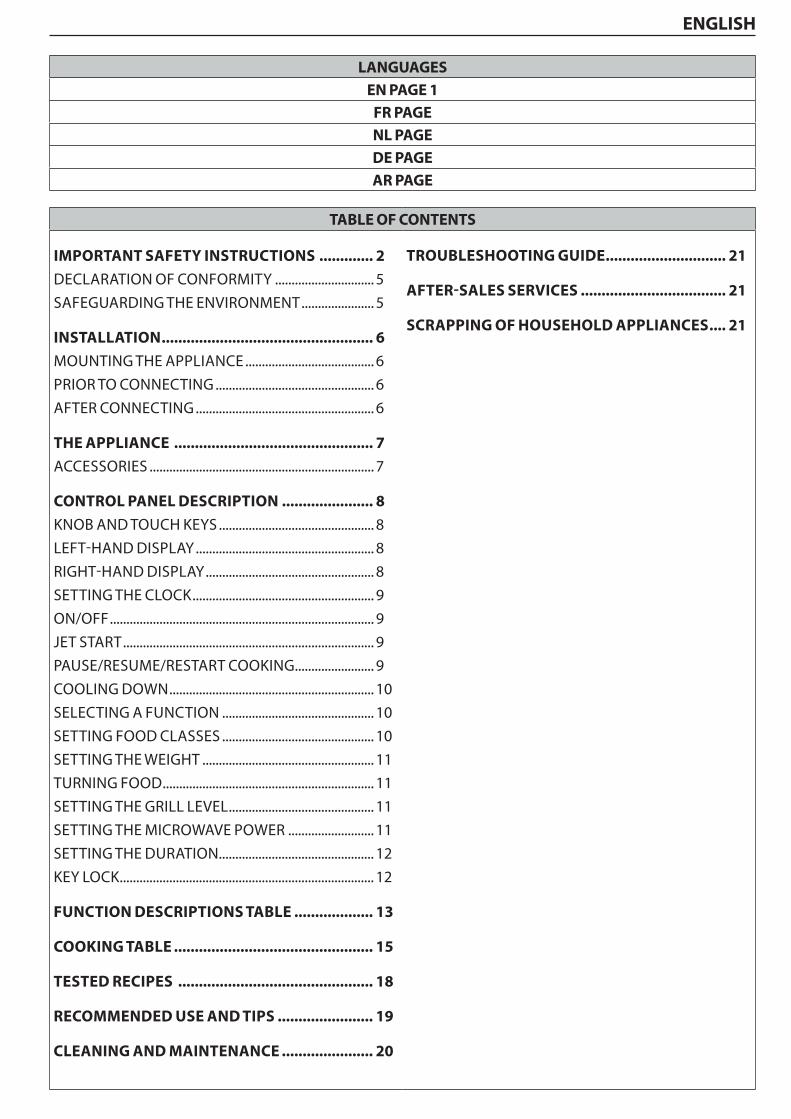
TABLE OF CONTENTS
IMPORTANT SAFETY INSTRUCTIONS ............. 2
DECLARATION OF CONFORMITY .............................. 5
SAFEGUARDING THE ENVIRONMENT ...................... 5
INSTALLATION ................................................... 6
MOUNTING THE APPLIANCE ....................................... 6
PRIOR TO CONNECTING ................................................ 6
AFTER CONNECTING ...................................................... 6
THE APPLIANCE ................................................ 7
ACCESSORIES .................................................................... 7
CONTROL PANEL DESCRIPTION ...................... 8
KNOB AND TOUCH KEYS ............................................... 8
LEFT-HAND DISPLAY ...................................................... 8
RIGHT-HAND DISPLAY ................................................... 8
SETTING THE CLOCK ....................................................... 9
ON/OFF ................................................................................ 9
JET START ............................................................................ 9
PAUSE/RESUME/RESTART COOKING ........................ 9
COOLING DOWN .............................................................. 10
SELECTING A FUNCTION .............................................. 10
SETTING FOOD CLASSES .............................................. 10
SETTING THE WEIGHT .................................................... 11
TURNING FOOD ................................................................ 11
SETTING THE GRILL LEVEL ............................................ 11
SETTING THE MICROWAVE POWER .......................... 11
SETTING THE DURATION ............................................... 12
KEY LOCK ............................................................................. 12
FUNCTION DESCRIPTIONS TABLE ................... 13
COOKING TABLE ................................................ 15
TESTED RECIPES ............................................... 18
RECOMMENDED USE AND TIPS ....................... 19
CLEANING AND MAINTENANCE ...................... 20
TROUBLESHOOTING GUIDE ............................. 21
AFTER-SALES SERVICES ................................... 21
SCRAPPING OF HOUSEHOLD APPLIANCES .... 21
EN 2
IMPORTANT SAFETY INSTRUCTIONS
This instruction shall also be available on website: www.whirlpool.euYOUR SAFETY AND THAT OF OTHERS IS VERY IMPORTANTThis manual and the appliance itself provide important safety warnings, to be read and observed at all times.
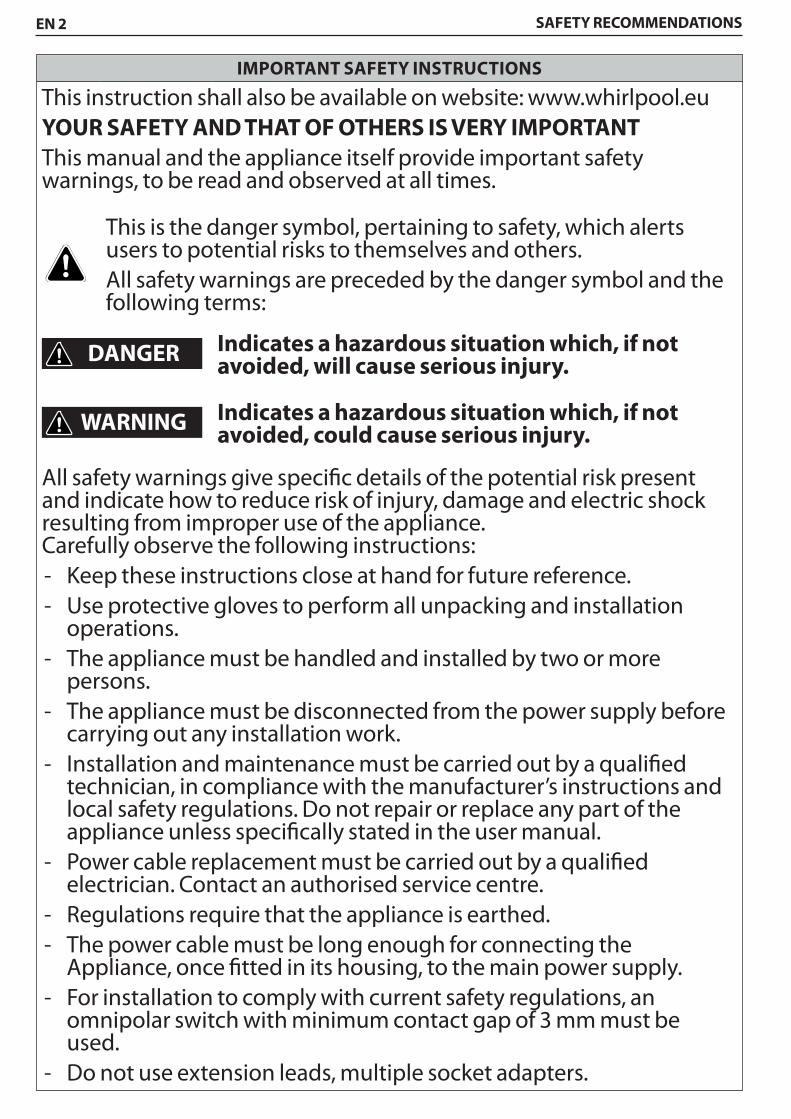
This is the danger symbol, pertaining to safety, which alerts users to potential risks to themselves and others.All safety warnings are preceded by the danger symbol and the following terms:
DANGER Indicates a hazardous situation which, if not avoided, will cause serious injury.
WARNING Indicates a hazardous situation which, if not avoided, could cause serious injury.
All safety warnings give specific details of the potential risk present and indicate how to reduce risk of injury, damage and electric shock resulting from improper use of the appliance. Carefully observe the following instructions: - Keep these instructions close at hand for future reference. - Use protective gloves to perform all unpacking and installation
operations. - The appliance must be handled and installed by two or more
persons. - The appliance must be disconnected from the power supply before
carrying out any installation work. - Installation and maintenance must be carried out by a qualified
technician, in compliance with the manufacturer’s instructions and local safety regulations. Do not repair or replace any part of the appliance unless specifically stated in the user manual.
- Power cable replacement must be carried out by a qualified electrician. Contact an authorised service centre.
- Regulations require that the appliance is earthed. - The power cable must be long enough for connecting the
Appliance, once fitted in its housing, to the main power supply. - For installation to comply with current safety regulations, an
omnipolar switch with minimum contact gap of 3 mm must be used.
- Do not use extension leads, multiple socket adapters.
SAFETY RECOMMENDATIONS
EN 3SAFETY RECOMMENDATIONS
- Do not connect the appliance to a socket which can be operated by remote control or timer.
- Do not pull the power supply cable. - The electrical components must not be accessible to the user after
installation. - Do not touch the appliance with any wet part of the body and do
not operate it when barefoot. - This appliance is designed solely for use as a domestic appliance for
cooking food. No other type of use is permitted (e.g.: heating rooms or outdoor use). The Manufacturer declines any liability for injury to persons or animals or damage to property if these advices and precautions are not respected.
- This appliance is intended to be used built-in. Do not use it freestanding or in a cabinet with door.
- The appliance and its accessible parts become hot during use. Care should be taken to avoid touching heating elements.
- Very young (0-3 years) and young children (3-8 years) shall be kept away unless continuously supervised.
- Children from 8 years and above and persons with reduced physical, sensory or mental capabilities or lack of experience and knowledge can use this appliance only if they are supervised or have been given instructions on safe appliance use and if they understand the hazards involved. Children shall not play with the appliance. Cleaning and user maintenance shall not be made by children without supervision.
- During and after use, do not touch the heating elements or interior surfaces of the appliance: risk of burns. Do not allow the appliance to come into contact with cloths or other flammable materials until all the components have cooled down completely.
- At the end of cooking, exercise caution when opening the appliance door, letting the hot air or steam exit gradually before accessing the appliance. Do not obstruct the vent apertures.
- Use oven gloves to remove pans and accessories, taking care not to touch the heating elements.
- Do not place flammable materials in or near the appliance: a fire may break out if the appliance is inadvertently switched on.
EN 4
- Do not use the microwave oven for heating anything in airtight sealed containers. The pressure increases and may cause damage when opening or may explode.
- Do not use the microwave oven for drying textiles, paper, spices, herbs, wood, flowers, fruit or other combustible materials. Fire could result.
- Do not leave the appliance unattended, especially when using paper, plastic or other combustible materials in the cooking process. Paper can char or burn and some plastics can melt if used when heating foods.
- Use containers suitable for use in a microwave oven only. - Overheating the liquid beyond boiling point can occur without
evidence of bubbling. This could result in a sudden boil over of the hot liquid.
- Do not use microwave oven for deep-frying, because the oil temperature cannot be controlled.
- After heating baby food or liquids in a baby bottle or in a baby food jar, always stir and check the temperature before serving. Ensure the lid and the teat is removed before heating.
- If alcoholic beverages are used when cooking foods (e.g. rum, cognac, wine), remember that alcohol evaporates at high temperatures. As a result, there is a risk that vapors released by the alcohol may catch fire upon coming into contact with the electrical heating element.
- Overheated oils and fats catch fire easily. Always remain vigilant when cooking foods rich in fat, oil or alcohol (e.g. rum, cognac, wine).
- Do not use microwave oven for cooking or reheating whole eggs with or without shell since they may explode even after microwave heating has ended.
- If material inside/outside the appliance should ignite or smoke is observed, keep appliance door closed and turn the appliance off. Disconnect the power cord or shut off power at the fuse or circuit breaker panel.
- Do not over-cook food. Fire could result. - Cleaning is the only maintenance normally required. Failure to
maintain the appliance in a clean condition could lead to deterioration of the surface that could adversely affect the life of the appliance and possibly result in a hazardous situation.
- Never use steam cleaning equipment.
SAFETY RECOMMENDATIONS
EN 5
DECLARATION OF CONFORMITY This appliance, which is intended to come into contact with foodstuffs, complies with European Regulation ( ) n. 1935/2004 and has been designed, manufactured and sold in conformity with the safety requirements of the “Low Voltage” directive 2006/95/CE (which replaces 73/23/CEE and subsequent amendments), the protection requirements of “EMC” 2004/108/CE.
SAFEGUARDING THE ENVIRONMENT
Disposal of packaging materialsThe packaging material is 100% recyclable and is marked with the recycle symbol ( ). The various parts of the packing must therefore be disposed of responsibly and in full compliance with local authority regulations governing waste disposal.
Energy saving tips - Only pre-heat the microwave oven if specified
in the cooking table or recipe. - Use dark lacquered or enameled baking moulds
as they absorb heat far better. - Switch the appliance off 10/15 minutes before
the set cooking time. Food requiring prolonged cooking will continue to cook even once the appliance is switched off.
Scrapping the product - This appliance is marked in conformity with
European Directive 2012/19/EU, Waste Electrical and Electronic Equipment (WEEE).
- By ensuring this product is disposed of correctly, you will help prevent potential negative consequences for the environment and human health, which could otherwise be caused by inappropriate waste handling of this product.
- The symbol on the product or on the accompanying documentation indicates that it should not be treated as domestic waste but must be taken to an appropriate collection centre for the recycling of electrical and electronic equipment.
SAFETY RECOMMENDATIONS
- Do not use harsh abrasive cleaners or sharp metal scrapers to clean the appliance door glass since they can scratch the surface, which may result in shattering of the glass.
- Do not use corrosive chemicals or vapors in this appliance. This type of appliance is specifically designed to heat or cook food. It is not designed for industrial or laboratory use.
- Do not remove any cover. - The door seals and the door seal areas must be regularly inspected
for damage. If these areas are damaged the appliance should not be operated until it has been repaired by an authorized service technician.
- Service only to be carried out by an authorized service technician. It is hazardous for anyone other than an authorized person to carry out any service or repair operation, which involves the removal of any cover, which gives protection against exposure to microwave energy.
EN 6
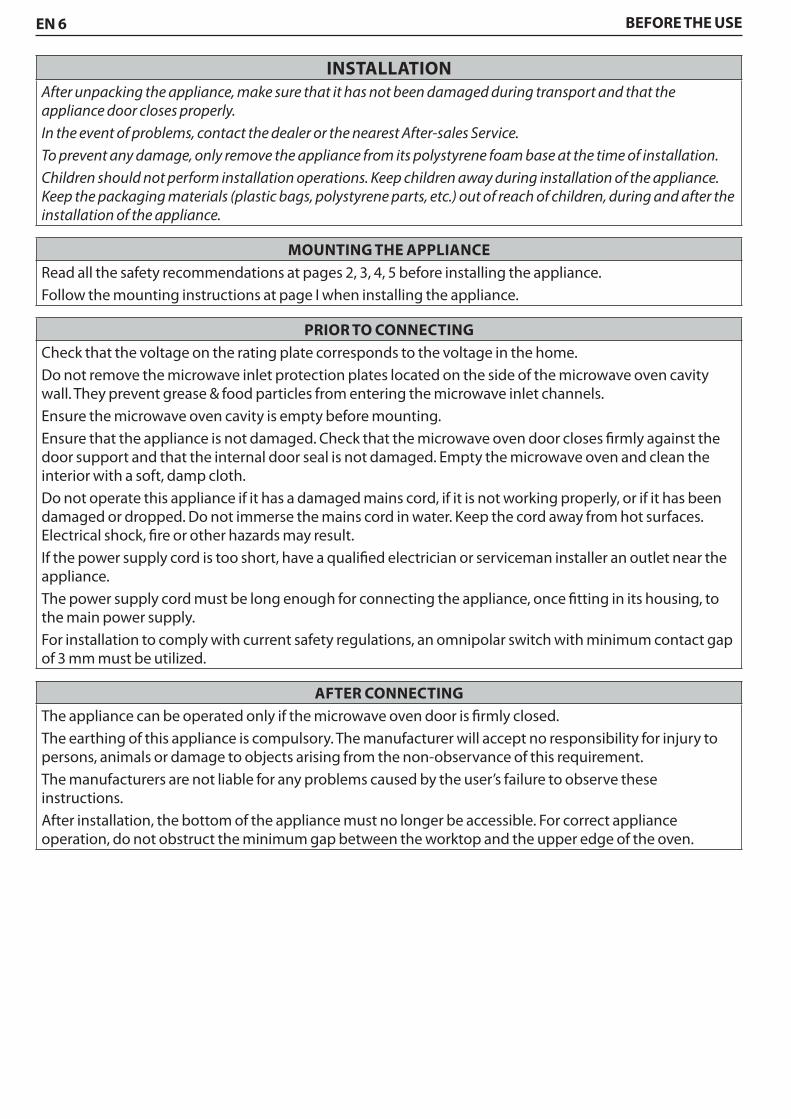
INSTALLATIONAfter unpacking the appliance, make sure that it has not been damaged during transport and that the appliance door closes properly.In the event of problems, contact the dealer or the nearest After-sales Service.To prevent any damage, only remove the appliance from its polystyrene foam base at the time of installation.Children should not perform installation operations. Keep children away during installation of the appliance. Keep the packaging materials (plastic bags, polystyrene parts, etc.) out of reach of children, during and after the installation of the appliance.
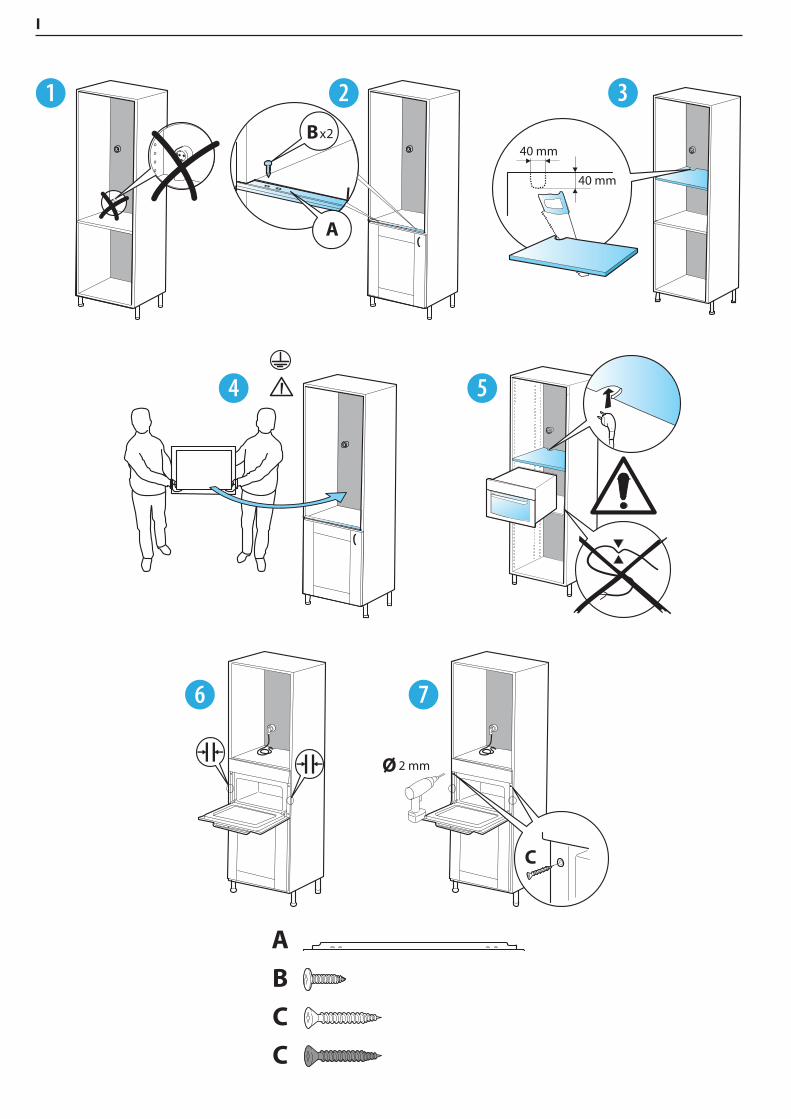
MOUNTING THE APPLIANCERead all the safety recommendations at pages 2, 3, 4, 5 before installing the appliance.Follow the mounting instructions at page I when installing the appliance.
PRIOR TO CONNECTINGCheck that the voltage on the rating plate corresponds to the voltage in the home.Do not remove the microwave inlet protection plates located on the side of the microwave oven cavity wall. They prevent grease & food particles from entering the microwave inlet channels.Ensure the microwave oven cavity is empty before mounting.Ensure that the appliance is not damaged. Check that the microwave oven door closes firmly against the door support and that the internal door seal is not damaged. Empty the microwave oven and clean the interior with a soft, damp cloth.Do not operate this appliance if it has a damaged mains cord, if it is not working properly, or if it has been damaged or dropped. Do not immerse the mains cord in water. Keep the cord away from hot surfaces. Electrical shock, fire or other hazards may result.If the power supply cord is too short, have a qualified electrician or serviceman installer an outlet near the appliance.The power supply cord must be long enough for connecting the appliance, once fitting in its housing, to the main power supply.For installation to comply with current safety regulations, an omnipolar switch with minimum contact gap of 3 mm must be utilized.
AFTER CONNECTINGThe appliance can be operated only if the microwave oven door is firmly closed.The earthing of this appliance is compulsory. The manufacturer will accept no responsibility for injury to persons, animals or damage to objects arising from the non-observance of this requirement.The manufacturers are not liable for any problems caused by the user’s failure to observe these instructions.After installation, the bottom of the appliance must no longer be accessible. For correct appliance operation, do not obstruct the minimum gap between the worktop and the upper edge of the oven.
BEFORE THE USE

EN 7USING THE APPLIANCE
THE APPLIANCE
1. Control panel
2. Cavity
3. Door
4. Upper heating element
5. Light
6. Data plate (not to be removed)
7. Glass plate turntable
ACCESSORIES
Fig. A Fig. B
Fig. C Fig. D
Fig. E Fig. F
A. Turntable support.Use only with the glass plate turntable.
B. Glass plate turntable.Use with all cooking cycles. To be placed on the turntable support.
C. Wire rack.To cook and bake.
D. Baking plate (only in some models).Never use in combination with microwaves.
E. Crisp plate (only in some models).Use the glass turntable as support.
F. Crisp handle (only in some models).To remove the hot crisp plate.
The number and the type of accessories may vary according to which model is purchased.
ACCESSORIES NOT SUPPLIED Other accessories can be purchased separately from the After-Sales Service.
NOTE: all of the accessories are dishwasher-safe.
EN 8
CONTROL PANEL DESCRIPTION
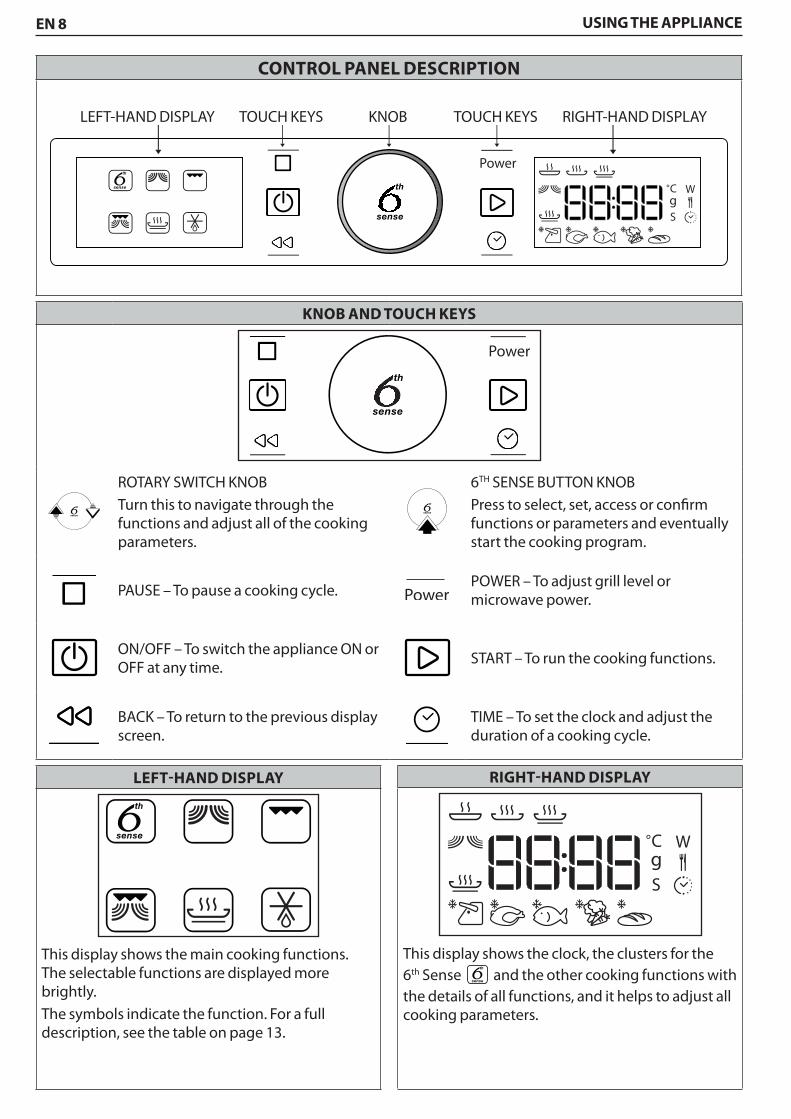
LEFT-HAND DISPLAY TOUCH KEYS KNOB TOUCH KEYS RIGHT-HAND DISPLAY
KNOB AND TOUCH KEYS
ROTARY SWITCH KNOBTurn this to navigate through the functions and adjust all of the cooking parameters.
6TH SENSE BUTTON KNOBPress to select, set, access or confirm functions or parameters and eventually start the cooking program.
PAUSE – To pause a cooking cycle.POWER – To adjust grill level or microwave power.
ON/OFF – To switch the appliance ON or OFF at any time.
START – To run the cooking functions.
BACK – To return to the previous display screen.
TIME – To set the clock and adjust the duration of a cooking cycle.
LEFT-HAND DISPLAY
This display shows the main cooking functions. The selectable functions are displayed more brightly.The symbols indicate the function. For a full description, see the table on page 13.
RIGHT-HAND DISPLAY
This display shows the clock, the clusters for the 6th Sense and the other cooking functions with the details of all functions, and it helps to adjust all cooking parameters.
USING THE APPLIANCE
EN 9
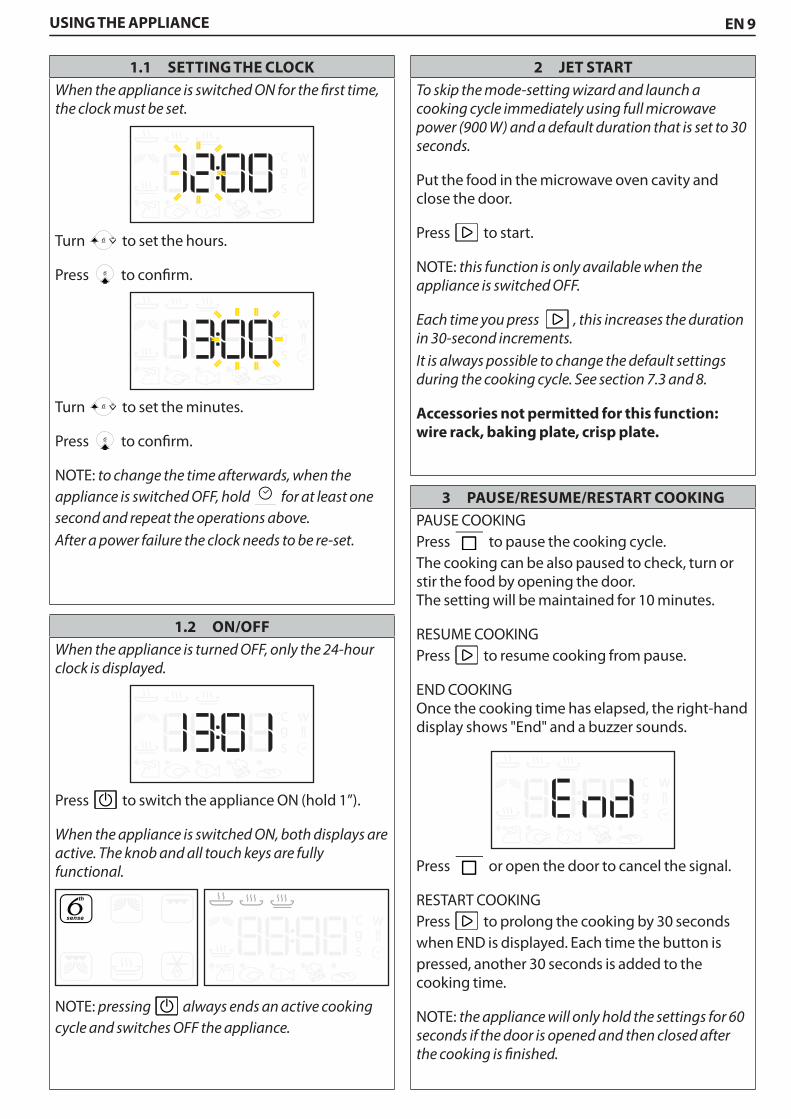
1.1 SETTING THE CLOCKWhen the appliance is switched ON for the first time, the clock must be set.
Turn to set the hours.
Press to confirm.
Turn to set the minutes.
Press to confirm.
NOTE: to change the time afterwards, when the appliance is switched OFF, hold for at least one second and repeat the operations above.After a power failure the clock needs to be re-set.
1.2 ON/OFFWhen the appliance is turned OFF, only the 24-hour clock is displayed.
Press to switch the appliance ON (hold 1”).
When the appliance is switched ON, both displays are active. The knob and all touch keys are fully functional.
NOTE: pressing always ends an active cooking cycle and switches OFF the appliance.
2 JET STARTTo skip the mode-setting wizard and launch a cooking cycle immediately using full microwave power (900 W) and a default duration that is set to 30 seconds.
Put the food in the microwave oven cavity and close the door.
Press to start.
NOTE: this function is only available when the appliance is switched OFF.
Each time you press , this increases the duration in 30-second increments.It is always possible to change the default settings during the cooking cycle. See section 7.3 and 8.
Accessories not permitted for this function: wire rack, baking plate, crisp plate.
3 PAUSE/RESUME/RESTART COOKINGPAUSE COOKING Press to pause the cooking cycle. The cooking can be also paused to check, turn or stir the food by opening the door. The setting will be maintained for 10 minutes.
RESUME COOKING Press to resume cooking from pause.
END COOKING Once the cooking time has elapsed, the right-hand display shows "End" and a buzzer sounds.
Press or open the door to cancel the signal.
RESTART COOKING Press to prolong the cooking by 30 seconds when END is displayed. Each time the button is pressed, another 30 seconds is added to the cooking time.
NOTE: the appliance will only hold the settings for 60 seconds if the door is opened and then closed after the cooking is finished.
USING THE APPLIANCE
EN 10
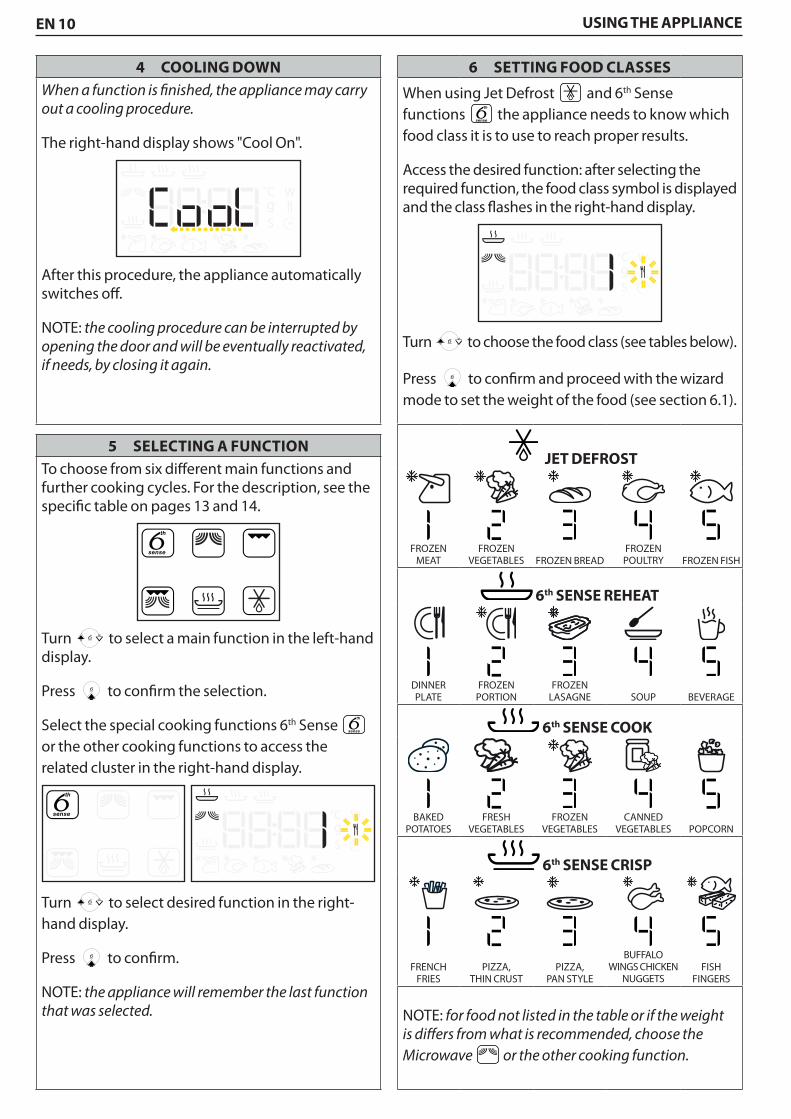
4 COOLING DOWNWhen a function is finished, the appliance may carry out a cooling procedure.
The right-hand display shows "Cool On".
After this procedure, the appliance automatically switches off.
NOTE: the cooling procedure can be interrupted by opening the door and will be eventually reactivated, if needs, by closing it again.
5 SELECTING A FUNCTIONTo choose from six different main functions and further cooking cycles. For the description, see the specific table on pages 13 and 14.
Turn to select a main function in the left-hand display.
Press to confirm the selection.
Select the special cooking functions 6th Sense or the other cooking functions to access the related cluster in the right-hand display.
Turn to select desired function in the right-hand display.
Press to confirm.
NOTE: the appliance will remember the last function that was selected.
6 SETTING FOOD CLASSES
When using Jet Defrost and 6th Sense functions the appliance needs to know which food class it is to use to reach proper results.
Access the desired function: after selecting the required function, the food class symbol is displayed and the class flashes in the right-hand display.
Turn to choose the food class (see tables below).
Press to confirm and proceed with the wizard mode to set the weight of the food (see section 6.1).
JET DEFROST
FROZEN MEAT
FROZEN VEGETABLES FROZEN BREAD
FROZEN POULTRY FROZEN FISH
6th SENSE REHEAT
DINNER PLATE
FROZEN PORTION
FROZEN LASAGNE SOUP BEVERAGE
6th SENSE COOK
BAKED POTATOES
FRESH VEGETABLES
FROZEN VEGETABLES
CANNED VEGETABLES POPCORN
6th SENSE CRISP
FRENCH FRIES
PIZZA, THIN CRUST
PIZZA, PAN STYLE
BUFFALO WINGS CHICKEN
NUGGETSFISH
FINGERS
NOTE: for food not listed in the table or if the weight is differs from what is recommended, choose the Microwave or the other cooking function.
USING THE APPLIANCE
EN 11
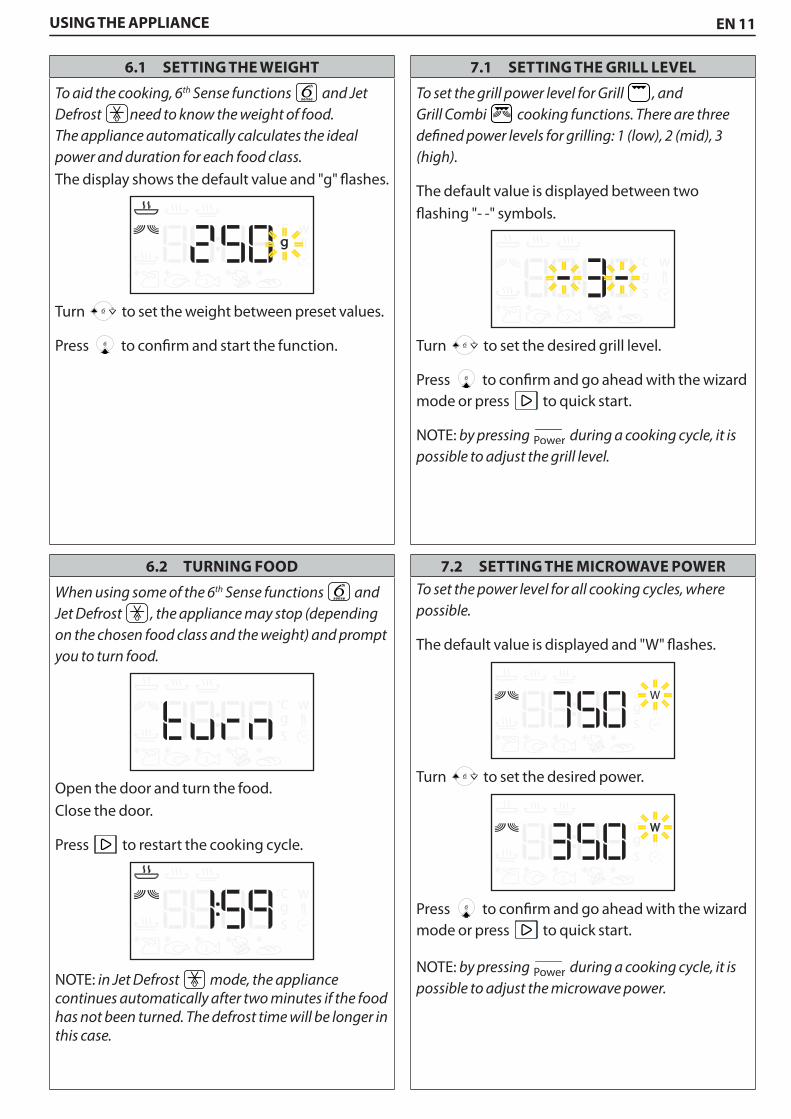
6.1 SETTING THE WEIGHT
To aid the cooking, 6th Sense functions and Jet Defrost need to know the weight of food. The appliance automatically calculates the ideal power and duration for each food class.The display shows the default value and "g" flashes.
Turn to set the weight between preset values.
Press to confirm and start the function.
6.2 TURNING FOOD
When using some of the 6th Sense functions and Jet Defrost , the appliance may stop (depending on the chosen food class and the weight) and prompt you to turn food.
Open the door and turn the food.Close the door.
Press to restart the cooking cycle.
NOTE: in Jet Defrost mode, the appliance continues automatically after two minutes if the food has not been turned. The defrost time will be longer in this case.
7.1 SETTING THE GRILL LEVEL
To set the grill power level for Grill , and Grill Combi cooking functions. There are three defined power levels for grilling: 1 (low), 2 (mid), 3 (high).
The default value is displayed between two flashing "- -" symbols.
Turn to set the desired grill level.
Press to confirm and go ahead with the wizard mode or press to quick start.
NOTE: by pressing during a cooking cycle, it is possible to adjust the grill level.
7.2 SETTING THE MICROWAVE POWERTo set the power level for all cooking cycles, where possible.
The default value is displayed and "W" flashes.
Turn to set the desired power.
Press to confirm and go ahead with the wizard mode or press to quick start.
NOTE: by pressing during a cooking cycle, it is possible to adjust the microwave power.
USING THE APPLIANCE

EN 12
8 SETTING THE DURATIONTo set the duration of a cooking cycle, except for the 6th Sense function.
The default value is displayed and flashes.
Turn to set the duration.
Press or to confirm and start cooking cycle.
NOTE: by turning during a cooking cycle, it is possible to adjust the duration.
Each time you press , this increases the duration in 30-second increments.
9 KEY LOCKTo lock the control panel buttons.
Hold for at least 5 seconds.
To deactivate.
Hold for at least 5 seconds.
NOTE: for safety reasons, the appliance can always be switched OFF during a cooking cycle by pressing
.
USING THE APPLIANCE
EN 13FUNCTION DESCRIPTIONS
FUNCTION DESCRIPTIONS TABLE6th
Sen
se fu
nct
ion
s
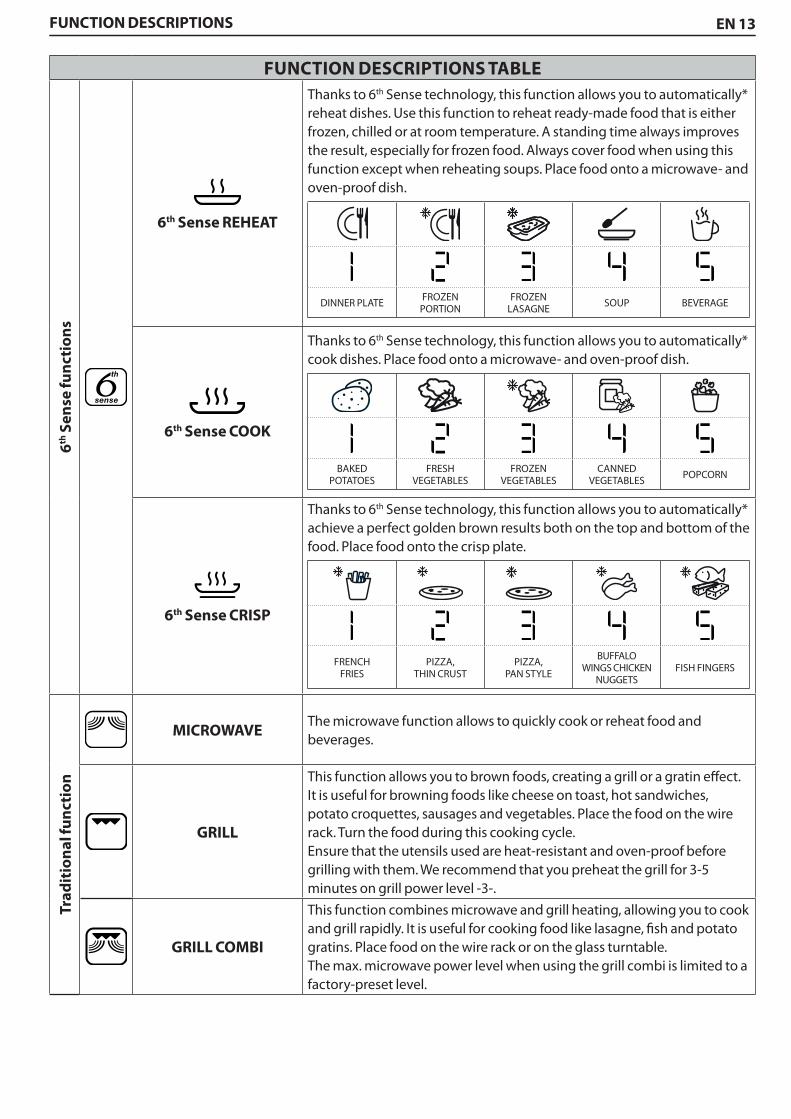
6th Sense REHEAT
Thanks to 6th Sense technology, this function allows you to automatically* reheat dishes. Use this function to reheat ready-made food that is either frozen, chilled or at room temperature. A standing time always improves the result, especially for frozen food. Always cover food when using this function except when reheating soups. Place food onto a microwave- and oven-proof dish.
DINNER PLATE FROZEN PORTION
FROZEN LASAGNE SOUP BEVERAGE
6th Sense COOK
Thanks to 6th Sense technology, this function allows you to automatically* cook dishes. Place food onto a microwave- and oven-proof dish.
BAKED POTATOES
FRESH VEGETABLES
FROZEN VEGETABLES
CANNED VEGETABLES POPCORN
6th Sense CRISP
Thanks to 6th Sense technology, this function allows you to automatically* achieve a perfect golden brown results both on the top and bottom of the food. Place food onto the crisp plate.
FRENCH FRIES
PIZZA, THIN CRUST
PIZZA, PAN STYLE
BUFFALO WINGS CHICKEN
NUGGETSFISH FINGERS
Trad
itio
nal
fun
ctio
n
MICROWAVEThe microwave function allows to quickly cook or reheat food and beverages.
GRILL
This function allows you to brown foods, creating a grill or a gratin effect. It is useful for browning foods like cheese on toast, hot sandwiches, potato croquettes, sausages and vegetables. Place the food on the wire rack. Turn the food during this cooking cycle. Ensure that the utensils used are heat-resistant and oven-proof before grilling with them. We recommend that you preheat the grill for 3-5 minutes on grill power level -3-.
GRILL COMBI
This function combines microwave and grill heating, allowing you to cook and grill rapidly. It is useful for cooking food like lasagne, fish and potato gratins. Place food on the wire rack or on the glass turntable. The max. microwave power level when using the grill combi is limited to a factory-preset level.
EN 14
Trad
itio
nal
fun
ctio
n
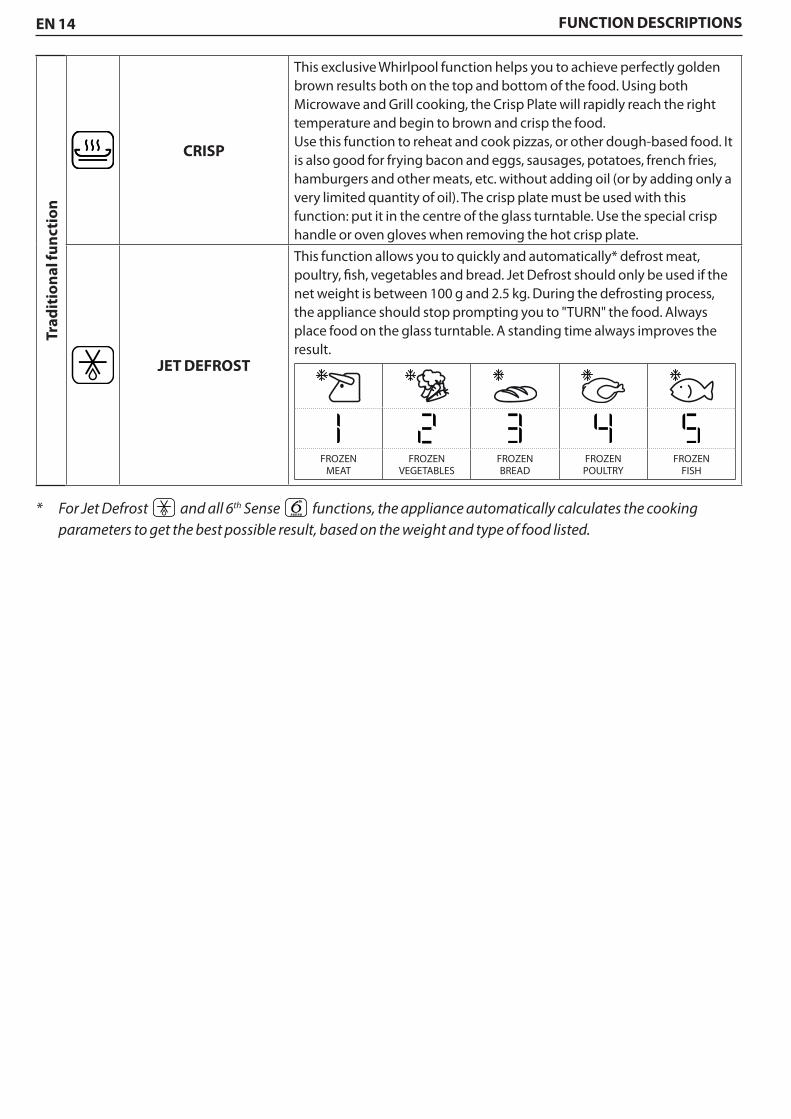
CRISP
This exclusive Whirlpool function helps you to achieve perfectly golden brown results both on the top and bottom of the food. Using both Microwave and Grill cooking, the Crisp Plate will rapidly reach the right temperature and begin to brown and crisp the food. Use this function to reheat and cook pizzas, or other dough-based food. It is also good for frying bacon and eggs, sausages, potatoes, french fries, hamburgers and other meats, etc. without adding oil (or by adding only a very limited quantity of oil). The crisp plate must be used with this function: put it in the centre of the glass turntable. Use the special crisp handle or oven gloves when removing the hot crisp plate.
JET DEFROST
This function allows you to quickly and automatically* defrost meat, poultry, fish, vegetables and bread. Jet Defrost should only be used if the net weight is between 100 g and 2.5 kg. During the defrosting process, the appliance should stop prompting you to "TURN" the food. Always place food on the glass turntable. A standing time always improves the result.
FROZEN MEAT
FROZEN VEGETABLES
FROZEN BREAD
FROZEN POULTRY
FROZEN FISH
* For Jet Defrost and all 6th Sense functions, the appliance automatically calculates the cooking parameters to get the best possible result, based on the weight and type of food listed.
FUNCTION DESCRIPTIONS
EN 15COOKING TABLE
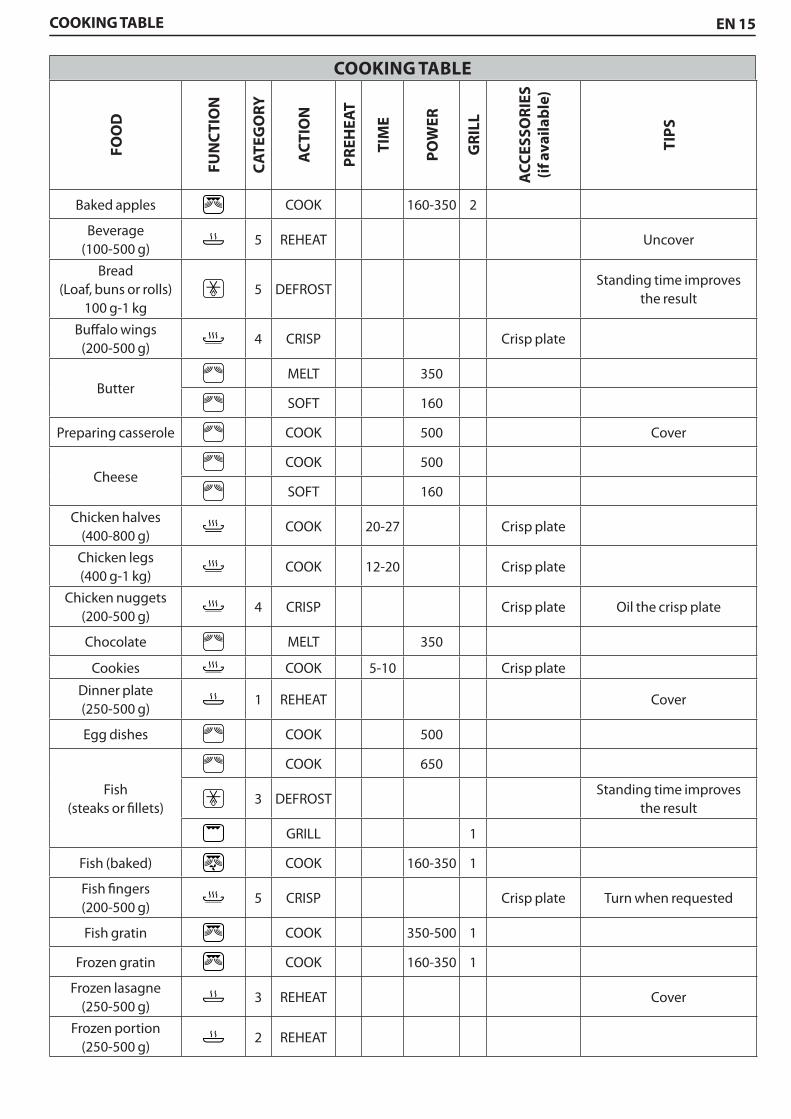
COOKING TABLE
FOO
D
FUN
CTI
ON
CAT
EGO
RY
AC
TIO
N
PR
EHEA
T
TIM
E
PO
WER
GR
ILL
ACC
ESSO
RIE
S (i
f ava
ilab
le)
TIP
S
Baked apples COOK 160-350 2
Beverage (100-500 g)
5 REHEAT Uncover
Bread (Loaf, buns or rolls)
100 g-1 kg5 DEFROST
Standing time improves the result
Buffalo wings (200-500 g)
4 CRISP Crisp plate
ButterMELT 350
SOFT 160
Preparing casserole COOK 500 Cover
CheeseCOOK 500
SOFT 160
Chicken halves (400-800 g)
COOK 20-27 Crisp plate
Chicken legs (400 g-1 kg)
COOK 12-20 Crisp plate
Chicken nuggets (200-500 g)
4 CRISP Crisp plate Oil the crisp plate
Chocolate MELT 350
Cookies COOK 5-10 Crisp plate
Dinner plate (250-500 g)
1 REHEAT Cover
Egg dishes COOK 500
Fish (steaks or fillets)
COOK 650
3 DEFROSTStanding time improves
the result
GRILL 1
Fish (baked) COOK 160-350 1
Fish fingers (200-500 g)
5 CRISP Crisp plate Turn when requested
Fish gratin COOK 350-500 1
Frozen gratin COOK 160-350 1
Frozen lasagne (250-500 g)
3 REHEAT Cover
Frozen portion (250-500 g)
2 REHEAT
EN 16
FOO
D
FUN
CTI
ON
CAT
EGO
RY
AC
TIO
N
PR
EHEA
T
TIM
E
PO
WER
GR
ILL
ACC
ESSO
RIE
S (i
f ava
ilab
le)
TIP
S
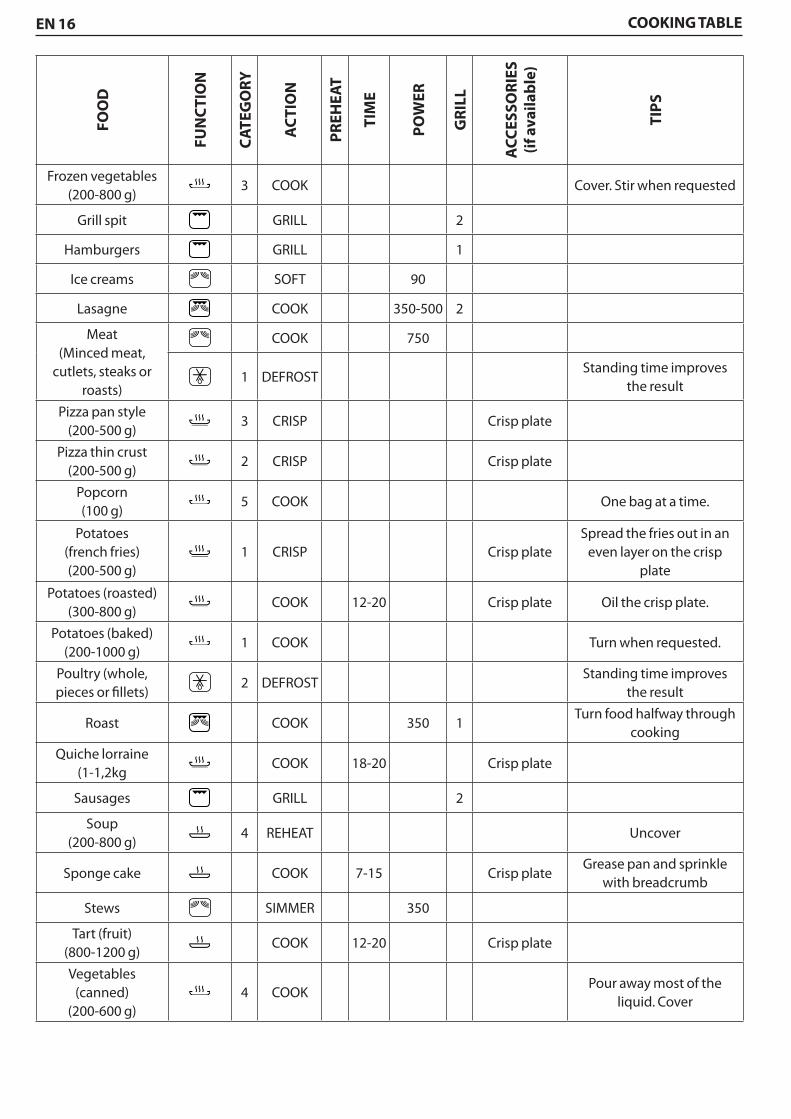
Frozen vegetables (200-800 g)
3 COOK Cover. Stir when requested
Grill spit GRILL 2
Hamburgers GRILL 1
Ice creams SOFT 90
Lasagne COOK 350-500 2
Meat (Minced meat,
cutlets, steaks or roasts)
COOK 750
1 DEFROSTStanding time improves
the result
Pizza pan style (200-500 g)
3 CRISP Crisp plate
Pizza thin crust (200-500 g)
2 CRISP Crisp plate
Popcorn (100 g)
5 COOK One bag at a time.
Potatoes (french fries) (200-500 g)
1 CRISP Crisp plateSpread the fries out in an
even layer on the crisp plate
Potatoes (roasted) (300-800 g)
COOK 12-20 Crisp plate Oil the crisp plate.
Potatoes (baked) (200-1000 g)
1 COOK Turn when requested.
Poultry (whole, pieces or fillets)
2 DEFROSTStanding time improves
the result
Roast COOK 350 1Turn food halfway through
cooking
Quiche lorraine (1-1,2kg
COOK 18-20 Crisp plate
Sausages GRILL 2
Soup (200-800 g)
4 REHEAT Uncover
Sponge cake COOK 7-15 Crisp plateGrease pan and sprinkle
with breadcrumb
Stews SIMMER 350
Tart (fruit) (800-1200 g)
COOK 12-20 Crisp plate
Vegetables (canned)
(200-600 g)4 COOK
Pour away most of the liquid. Cover
COOKING TABLE
EN 17
FOO
D
FUN
CTI
ON
CAT
EGO
RY
AC
TIO
N
PR
EHEA
T
TIM
E
PO
WER
GR
ILL
ACC
ESSO
RIE
S (i
f ava
ilab
le)
TIP
S
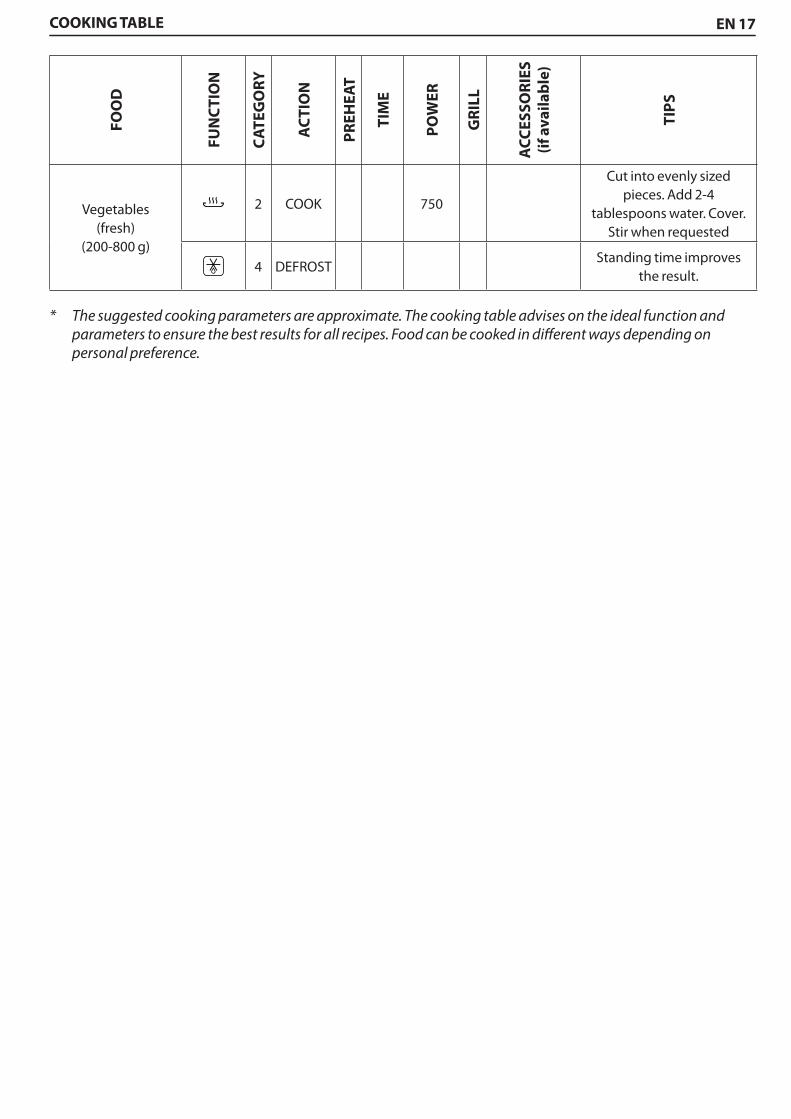
Vegetables (fresh)
(200-800 g)
2 COOK 750
Cut into evenly sized pieces. Add 2-4
tablespoons water. Cover. Stir when requested
4 DEFROSTStanding time improves
the result.
* The suggested cooking parameters are approximate. The cooking table advises on the ideal function and parameters to ensure the best results for all recipes. Food can be cooked in different ways depending on personal preference.
COOKING TABLE
EN 18
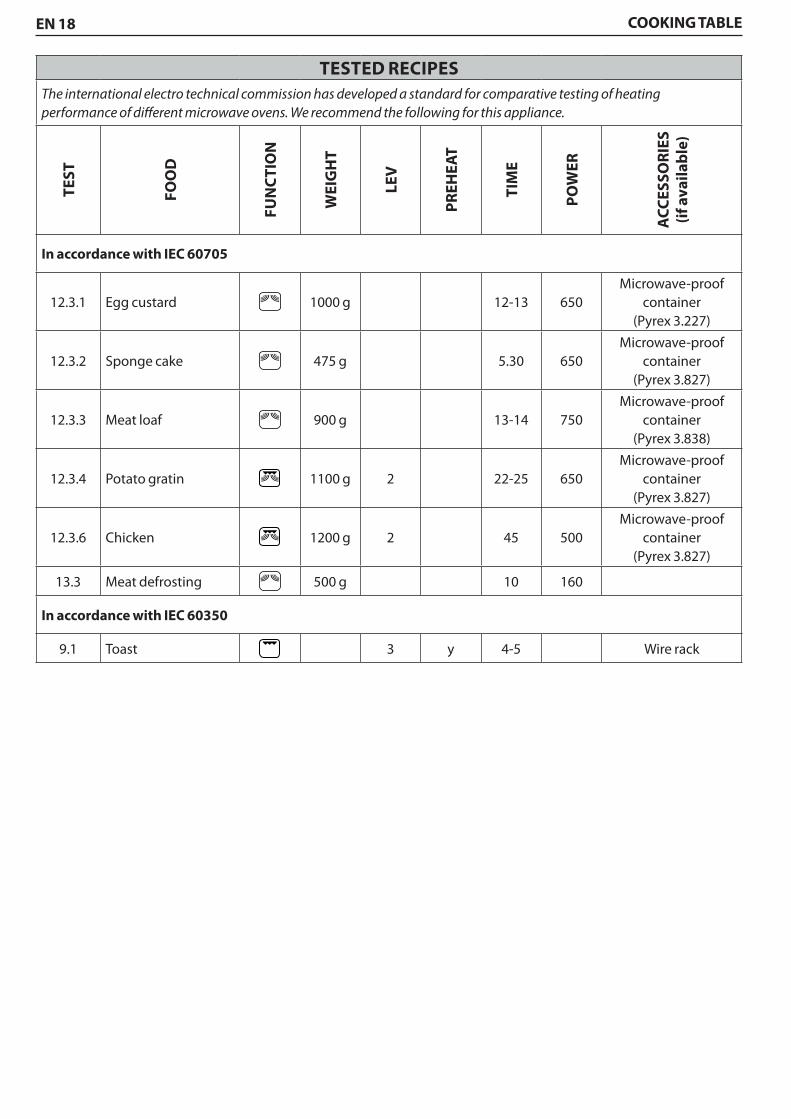
TESTED RECIPES The international electro technical commission has developed a standard for comparative testing of heating performance of different microwave ovens. We recommend the following for this appliance.
TEST
FOO
D
FUN
CTI
ON
WEI
GH
T
LEV
PR
EHEA
T
TIM
E
PO
WER
ACC
ESSO
RIE
S (i
f ava
ilab
le)
In accordance with IEC 60705
12.3.1 Egg custard 1000 g 12-13 650 Microwave-proof
container (Pyrex 3.227)
12.3.2 Sponge cake 475 g 5.30 650 Microwave-proof
container (Pyrex 3.827)
12.3.3 Meat loaf 900 g 13-14 750 Microwave-proof
container (Pyrex 3.838)
12.3.4 Potato gratin 1100 g 2 22-25 650Microwave-proof
container (Pyrex 3.827)
12.3.6 Chicken 1200 g 2 45 500Microwave-proof
container (Pyrex 3.827)
13.3 Meat defrosting 500 g 10 160
In accordance with IEC 60350
9.1 Toast 3 y 4-5 Wire rack
COOKING TABLE
EN 19USING THE APPLIANCE
RECOMMENDED USE AND TIPS
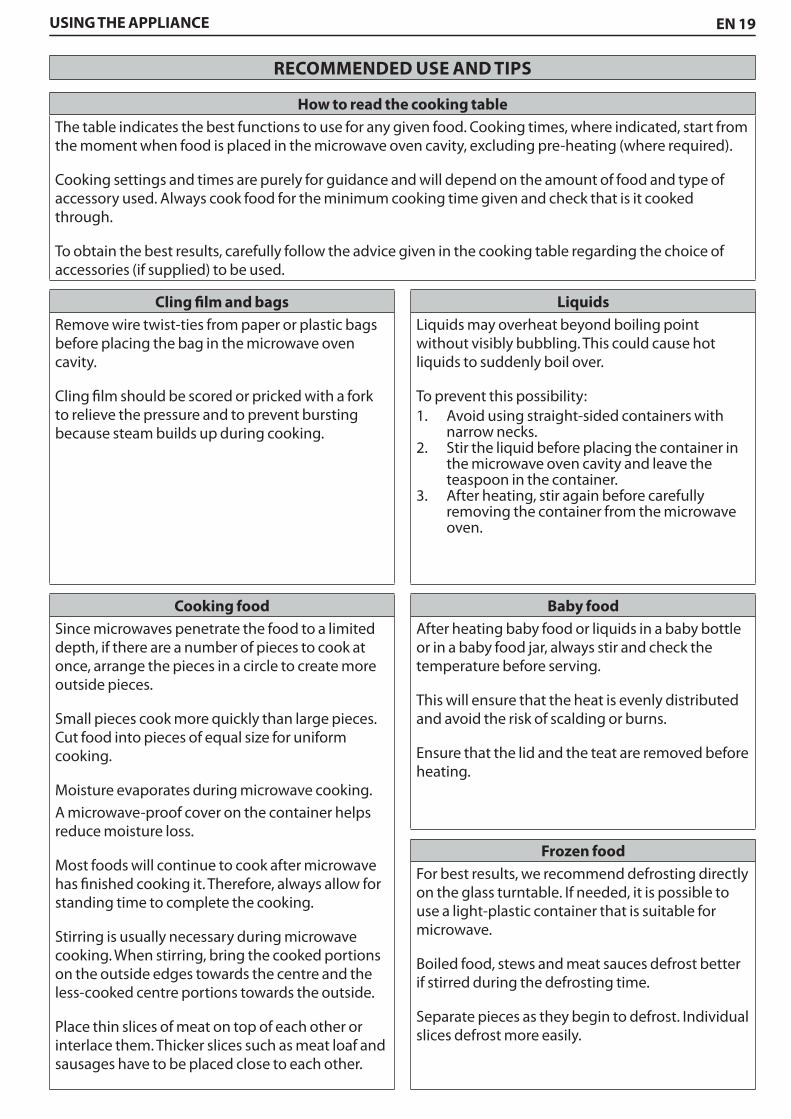
How to read the cooking tableThe table indicates the best functions to use for any given food. Cooking times, where indicated, start from the moment when food is placed in the microwave oven cavity, excluding pre-heating (where required).
Cooking settings and times are purely for guidance and will depend on the amount of food and type of accessory used. Always cook food for the minimum cooking time given and check that is it cooked through.
To obtain the best results, carefully follow the advice given in the cooking table regarding the choice of accessories (if supplied) to be used.
Cling film and bagsRemove wire twist-ties from paper or plastic bags before placing the bag in the microwave oven cavity.
Cling film should be scored or pricked with a fork to relieve the pressure and to prevent bursting because steam builds up during cooking.
Cooking foodSince microwaves penetrate the food to a limited depth, if there are a number of pieces to cook at once, arrange the pieces in a circle to create more outside pieces.
Small pieces cook more quickly than large pieces. Cut food into pieces of equal size for uniform cooking.
Moisture evaporates during microwave cooking. A microwave-proof cover on the container helps reduce moisture loss.
Most foods will continue to cook after microwave has finished cooking it. Therefore, always allow for standing time to complete the cooking.
Stirring is usually necessary during microwave cooking. When stirring, bring the cooked portions on the outside edges towards the centre and the less-cooked centre portions towards the outside.
Place thin slices of meat on top of each other or interlace them. Thicker slices such as meat loaf and sausages have to be placed close to each other.
LiquidsLiquids may overheat beyond boiling point without visibly bubbling. This could cause hot liquids to suddenly boil over.
To prevent this possibility:1. Avoid using straight-sided containers with
narrow necks.2. Stir the liquid before placing the container in
the microwave oven cavity and leave the teaspoon in the container.
3. After heating, stir again before carefully removing the container from the microwave oven.
Baby foodAfter heating baby food or liquids in a baby bottle or in a baby food jar, always stir and check the temperature before serving.
This will ensure that the heat is evenly distributed and avoid the risk of scalding or burns.
Ensure that the lid and the teat are removed before heating.
Frozen foodFor best results, we recommend defrosting directly on the glass turntable. If needed, it is possible to use a light-plastic container that is suitable for microwave.
Boiled food, stews and meat sauces defrost better if stirred during the defrosting time.
Separate pieces as they begin to defrost. Individual slices defrost more easily.
EN 20
CLEANING AND MAINTENANCECleaning is the only maintenance work that is normally required.
Failure to maintain the appliance in a clean condition could lead to deterioration of the surface, which could adversely affect the service life of the appliance and may result in a hazardous situation.
TipsDo not use metal scouring pads, abrasive cleansers, steel wool pads, gritty wash-cloths, etc. which can damage the control panel, and the interior and exterior appliance surfaces.
Use a sponge with a mild detergent or paper towel with spray glass cleaner.
Apply spray glass cleaner to a paper towel.
Do not spray directly onto the appliance.
At regular intervals, especially if spills have occurred, remove the turntable and the turntable support, and wipe the base of the appliance clean.
NOTE: this appliance is designed to operate with the turntable in place. Do not operate the appliance when the turntable has been removed for cleaning.
Microwave oven interiorUse a mild detergent, water and a soft cloth to clean the interior surfaces, front and rear of the door and the door opening.
Do not allow grease or food particles to build up around the door.
For stubborn stains, boil a cup of water in the microwave oven for 2 or 3 minutes. Steam will soften the marks.
Adding some lemon juice to a cup of water, placing this on the turntable and boiling for a few minutes can eliminate odours inside the microwave oven cavity.
Do not use steam-cleaning appliances.
Grill elementThe grill element does not need to be cleaned, because the intense heat will burn off any splashes, but the ceiling above it may need regular cleaning.
Use warm water, detergent and a sponge to do this. If the grill is not used regularly, it should be run for 10 minutes a month.
AccessoriesSoak the accessories in water with washing-up detergent immediately after use and handle them with oven gloves if they are still hot.
Food residues can be easily removed using a brush or sponge.
All accessories are dishwasher-safe.
AFTER USE

EN 21
SCRAPPING OF HOUSEHOLD APPLIANCES - This appliance is manufactured with recyclable or reusable materials. Scrap the appliance in accordance
with local regulations on waste disposal. Before scrapping, cut off the power cords so that the appliances cannot be connected to the mains.
- For further information on the treatment, recovery and recycling of household electrical appliances, contact a competent local authority, the collection service for household waste or the store where the appliance is purchased.
TROUBLESHOOTING GUIDE
The appliance does not work• The turntable support is in place.• The door is properly closed.• Check the fuses and ensure that there is power
available.• Check that the appliance has ample ventilation.
Wait for 10 minutes, then try to operate the appliance once more.
• Open and then close the door before you try again.
• Disconnect the appliance from the power supply. Wait for 10 minutes before reconnecting and trying again.
The electronic programmer does not workIf the display shows the letter "F" followed by a number, contact the nearest After-Sales Service.In this case, quote the number that follows the letter "F".
AFTER-SALES SERVICES
Before calling the After-Sales Service1. See if you can solve the problem yourself with
the help of the suggestions given in the "Troubleshooting guide".
2. Switch the appliance off and back on again to see if the fault persists.
If the above checks have been carried out and the fault still occurs, get in touch with the nearest After-Sales Service.
Always specify:• a brief description of the fault;• the type and exact model of the appliance;• the service number (number after the word
"Service" on the rating plate), located on the right-hand edge of the appliance cavity (visible when the appliance door is open).
AFTER USE
The service number is also indicated in the guarantee booklet.• your full address;• your telephone number.
NOTE: if any repairs are required, please contact an authorized After-sales Service (to guarantee that original spare parts will be used and repairs carried out correctly).

Whi
rlp
ool®
is a
regi
ster
ed tr
adem
ark
of W
hirl
poo
l, U
SA
4 0 0 0 1 0 8 4 1 5 5 7Printed in Italy
EN NL DEFR AR