Embed Size (px)
Citation preview
MTP850TETRA Portable Terminal
Basic User Guide
6866537D79-A
51 2 34 6
abc
7 8 90
def
ghi jkl mno
tuv
MENU
pqrs wxyz
6866537D79-A.book Seite i Mittwoch, 20. Juli 2005 10:39 10
51 2 34 6
abc
7 8 90
def
ghi jkl mno
tuv
MENU
pqrs wxyz
1
2
4
15 (a and b)
7
14
6
128
11 9
10
19
18
13
16
17 (b) 3
5
20 21
17 (a)
8 a
6866537D79-A.book Seite ii Mittwoch, 20. Juli 2005 10:39 10
En
glis
h
6866537D79-A.book Seite 1 Mittwoch, 20. Juli 2005 10:39 10
Contents
Safety Information . . . . . . . . . . . . . . . . . . . . . . . . . . . . . 4MTP850 Overview . . . . . . . . . . . . . . . . . . . . . . . . . . . . . . 5Controls and Indicators . . . . . . . . . . . . . . . . . . . . . . . . . . . . . . . 5Audio Signal Tones . . . . . . . . . . . . . . . . . . . . . . . . . . . . . . . . . . 7Key, Knob, and Button Overview . . . . . . . . . . . . . . . . . . . . . . . 10
On-Off/End/Home Key . . . . . . . . . . . . . . . . . . . . . . . . . . . 10Soft Keys . . . . . . . . . . . . . . . . . . . . . . . . . . . . . . . . . . . . . . 10Menu Key . . . . . . . . . . . . . . . . . . . . . . . . . . . . . . . . . . . . . 10Rotary Knob . . . . . . . . . . . . . . . . . . . . . . . . . . . . . . . . . . . 10Emergency Button . . . . . . . . . . . . . . . . . . . . . . . . . . . . . . 10Function Keys . . . . . . . . . . . . . . . . . . . . . . . . . . . . . . . . . 11Speaker Control Key . . . . . . . . . . . . . . . . . . . . . . . . . . . . . 12
The LED Status Indicator . . . . . . . . . . . . . . . . . . . . . . . . . . . . . 12To Enter the Menu Items . . . . . . . . . . . . . . . . . . . . . . . . . . . . . . 12To Return to the Previous Level . . . . . . . . . . . . . . . . . . . . . . . . 12To Exit the Menu Items . . . . . . . . . . . . . . . . . . . . . . . . . . . . . . . 12List of Menu Items . . . . . . . . . . . . . . . . . . . . . . . . . . . . . . . . . . 13The Display . . . . . . . . . . . . . . . . . . . . . . . . . . . . . . . . . . . . . . . . 15
Status Icons . . . . . . . . . . . . . . . . . . . . . . . . . . . . . . . . . . . 15Menu Icons . . . . . . . . . . . . . . . . . . . . . . . . . . . . . . . . . . . . 17Inbox Icons . . . . . . . . . . . . . . . . . . . . . . . . . . . . . . . . . . . . 17Contact Icons . . . . . . . . . . . . . . . . . . . . . . . . . . . . . . . . . . 18Text Entry Icons . . . . . . . . . . . . . . . . . . . . . . . . . . . . . . . . 18
Getting Started . . . . . . . . . . . . . . . . . . . . . . . . . . . . . . . . 20Battery . . . . . . . . . . . . . . . . . . . . . . . . . . . . . . . . . . . . . . . . . . . . 20
Installing the Battery . . . . . . . . . . . . . . . . . . . . . . . . . . . . . 20Replacing the Battery . . . . . . . . . . . . . . . . . . . . . . . . . . . . 20Charging the Battery . . . . . . . . . . . . . . . . . . . . . . . . . . . . . 21Battery Capacity Information . . . . . . . . . . . . . . . . . . . . . . . 21Attaching the Antenna . . . . . . . . . . . . . . . . . . . . . . . . . . . 22
Powering On/Off (On-Off/End/Home Key) . . . . . . . . . . . . . . . . 22Powering On (Emergency Button) . . . . . . . . . . . . . . . . . . . . . . 22Powering On with Transmit Inhibit (TXI) Active . . . . . . . . . . . . . 22
1
En
glish
6866537D79-A.book Seite 2 Mittwoch, 20. Juli 2005 10:39 10
Unlocking the MTP850 . . . . . . . . . . . . . . . . . . . . . . . . . . . . . . . 23Locking/Unlocking the Keypad . . . . . . . . . . . . . . . . . . . . . . . . . 23Selecting TMO or DMO Operation . . . . . . . . . . . . . . . . . 24Entering TMO or DMO . . . . . . . . . . . . . . . . . . . . . . . . . . . . . . . 24Group Calls . . . . . . . . . . . . . . . . . . . . . . . . . . . . . . . . . . . 25“My Groups” Folder . . . . . . . . . . . . . . . . . . . . . . . . . . . . . . . . . . 25
Selecting the “My Groups” Folder . . . . . . . . . . . . . . . . . . . 25Adding a Group (TMO/DMO) to the “My Groups” Folder . 25
Selecting a Group . . . . . . . . . . . . . . . . . . . . . . . . . . . . . . . . . . . 25Using the Rotary Knob . . . . . . . . . . . . . . . . . . . . . . . . . . . 25Using the Navigation Key . . . . . . . . . . . . . . . . . . . . . . . . . 25Using Alphabetic Search . . . . . . . . . . . . . . . . . . . . . . . . . . 26Using Folder Search . . . . . . . . . . . . . . . . . . . . . . . . . . . . . 26
Selecting a Folder . . . . . . . . . . . . . . . . . . . . . . . . . . . . . . . . . . . 26TMO Group Calls . . . . . . . . . . . . . . . . . . . . . . . . . . . . . . . . . . . 26
Making a TMO Group Call . . . . . . . . . . . . . . . . . . . . . . . . 26Receiving a TMO Group Call . . . . . . . . . . . . . . . . . . . . . . 26Receiving a TMO Broadcast Call . . . . . . . . . . . . . . . . . . . 27
DMO Group Calls . . . . . . . . . . . . . . . . . . . . . . . . . . . . . . . . . . . 27Making a DMO Group Call . . . . . . . . . . . . . . . . . . . . . . . . 27Receiving a DMO Group Call . . . . . . . . . . . . . . . . . . . . . . 27Exiting DMO . . . . . . . . . . . . . . . . . . . . . . . . . . . . . . . . . . . 27
Private, Phone, and PABX Calls . . . . . . . . . . . . . . . . . . 28Creating a Contact . . . . . . . . . . . . . . . . . . . . . . . . . . . . . . . . . . 28How to Dial . . . . . . . . . . . . . . . . . . . . . . . . . . . . . . . . . . . . . . . . 28
Dialing a Number . . . . . . . . . . . . . . . . . . . . . . . . . . . . . . . 28Dialing via the Contact List . . . . . . . . . . . . . . . . . . . . . . . . 28
Private Call . . . . . . . . . . . . . . . . . . . . . . . . . . . . . . . . . . . . . . . . 29Making a Private Call . . . . . . . . . . . . . . . . . . . . . . . . . . . . 29Receiving a Private Call . . . . . . . . . . . . . . . . . . . . . . . . . . 29
Phone and PABX Calls . . . . . . . . . . . . . . . . . . . . . . . . . . . . . . . 30Making a Phone or PABX Call . . . . . . . . . . . . . . . . . . . . . 30
Emergency Mode . . . . . . . . . . . . . . . . . . . . . . . . . . . . . . 31Entering or Exiting Emergency Mode . . . . . . . . . . . . . . . . . . . . 31Sending an Emergency Alarm (TMO Only) . . . . . . . . . . . . . . . . 31Hot Microphone Feature . . . . . . . . . . . . . . . . . . . . . . . . . . . . . . 32
2
En
glis
h
6866537D79-A.book Seite 3 Mittwoch, 20. Juli 2005 10:39 10
Making an Emergency Group Call . . . . . . . . . . . . . . . . . . . . . . 32Messages . . . . . . . . . . . . . . . . . . . . . . . . . . . . . . . . . . . . 33Sending a Status Message . . . . . . . . . . . . . . . . . . . . . . . . . . . . 33Sending a New Message . . . . . . . . . . . . . . . . . . . . . . . . . . . . . 33Sending a User-defined Message . . . . . . . . . . . . . . . . . . . . . . . 33Sending a Predefined Message . . . . . . . . . . . . . . . . . . . . . . . . 33Handling New Incoming Text Messages . . . . . . . . . . . . . . . . . . 33Handling Unread (New) Messages . . . . . . . . . . . . . . . . . . . . . . 34Tips & Tricks . . . . . . . . . . . . . . . . . . . . . . . . . . . . . . . . . . 35Quick Reference Guide . . . . . . . . . . . . . . . . . . . . . . . . . . 39
© Motorola Inc., 2005
MOTOROLA and the stylized M Logo are registered in the U.S. Patent and Trademark Office. All other product or service names are the property of their respective.
3
En
glish
6866537D79-A.book Seite 4 Mittwoch, 20. Juli 2005 10:39 10
Safety Information
This user guide covers the basic operation of the MTP850 Handportable Terminal. Please consult your dealer for further, more detailed information which is contained in the feature user guide 6866537D80_.
ATTENTION!The MTP850 is restricted to occupational use only to satisfy ICNIRP RF energy exposure requirements. Before using this product, read the RF energy awareness information and operating instructions in the Product Safety and RF Exposure booklet (Motorola Publication part number 6864117B25_) to ensure compliance with RF energy exposure limits.
Keep this User Guide and the Product Safetyand RF Exposure booklet in a safe place andmake it available to other operators in case theMTP850 is passed on to other people.
Before using this product, read the operating instructions for safe usage contained in the Product Safety and RF Exposure booklet 6864117B25_ enclosed with your MTP850.!
Caution
Copyright InformationThe Motorola products described in this manual may include copyrighted Motorola computer programs stored in semiconductor memories or other mediums. Laws in the United States and other countries preserve for Motorola certain exclusive rights for copyrighted computer programs, including the exclusive right to copy or reproduce in any form the copyrighted computer program. Accordingly, any copyrighted Motorola computer programs contained in the Motorola products described in this manual may not be copied or reproduced in any manner without the express written permission of Motorola. Furthermore, the purchase of Motorola products shall not be deemed to grant either directly or by implication, estoppel, or otherwise, any licence under the copyrights, patents, or patent applications of Motorola, except for the normal non-exclusive royalty-free licence to use that arises by operation of the law in the sale of a product.
4

En
glis
h
6866537D79-A.book Seite 5 Mittwoch, 20. Juli 2005 10:39 10
MTP850 Overview
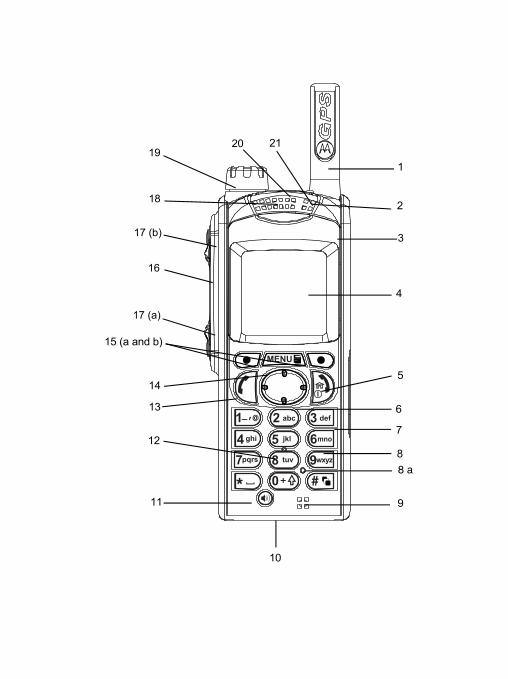
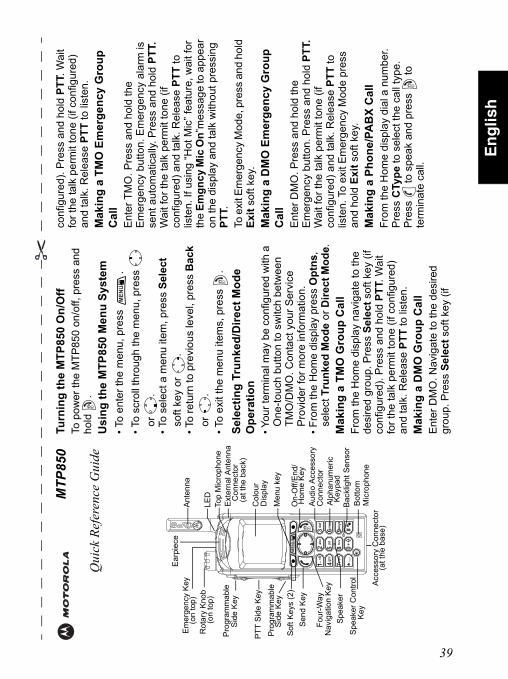
Controls and IndicatorsThe numbers below refer to the illustration on the inside front cover.
Number Description1 Antenna2 Top Microphone
Activated during half-duplex, high-audio calls such as Group Calls.
3 External Antenna ConnectorUsed with the digital car kit to connect the RF signal to the external antenna.(At the back of the MTP850)
4 Colour DisplayProvides alphanumeric text and images within 65,536 colours and 130 x 130 pixels with backlight, scalable fonts, and contrast.
5 On-Off/End//Home KeyPress and hold to turn the MTP850 On/Off.Press to end calls.Press to return to the Home display (idle screen).
6 Four-Way Navigation KeyPress up, down, left or right for list scrolling, while moving around the menu hierarchy, or for alphanumeric text editing.
7 Audio Accessory Connector (At the side of the MTP850)
8 Alphanumeric KeypadUse the keypad to enter alphanumeric characters for dialing, contact entries and text messages.
8 a Sensor for keypad backlight On/Off
9 Bottom MicrophoneActivated during half-duplex and full-duplex, low-audio calls such as Phone Calls.
10 Accessory ConnectorProvides connection for accessories.(At the base of the MTP850)
11 Speaker Control KeySelects earpiece (low audio) or speaker (high audio).
12 Speaker (under keypad)13 Send Key
Used to initiate or answer full-duplex calls (such as Phone Calls), or send status and text messages.
5
En
glish
6866537D79-A.book Seite 6 Mittwoch, 20. Juli 2005 10:39 10
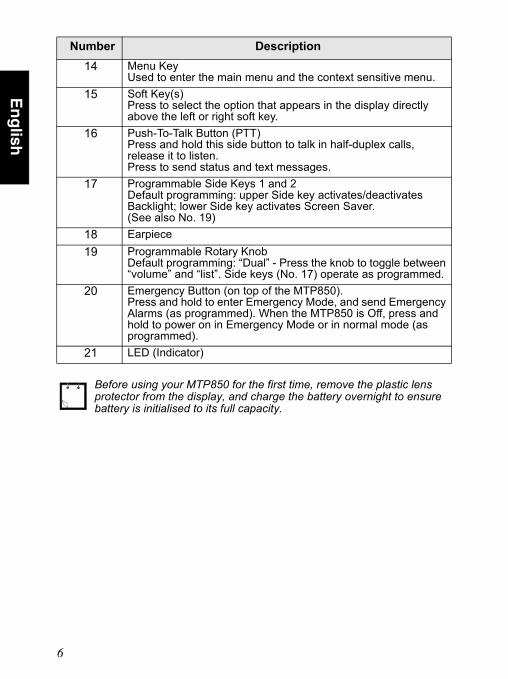
14 Menu KeyUsed to enter the main menu and the context sensitive menu.
15 Soft Key(s)Press to select the option that appears in the display directly above the left or right soft key.
16 Push-To-Talk Button (PTT)Press and hold this side button to talk in half-duplex calls, release it to listen.Press to send status and text messages.
17 Programmable Side Keys 1 and 2Default programming: upper Side key activates/deactivates Backlight; lower Side key activates Screen Saver.(See also No. 19)
18 Earpiece19 Programmable Rotary Knob
Default programming: “Dual” - Press the knob to toggle between “volume” and “list”. Side keys (No. 17) operate as programmed.
20 Emergency Button (on top of the MTP850).Press and hold to enter Emergency Mode, and send Emergency Alarms (as programmed). When the MTP850 is Off, press and hold to power on in Emergency Mode or in normal mode (as programmed).
21 LED (Indicator)
Before using your MTP850 for the first time, remove the plastic lens protector from the display, and charge the battery overnight to ensure battery is initialised to its full capacity.
Number Description
6
En
glis
h
6866537D79-A.book Seite 7 Mittwoch, 20. Juli 2005 10:39 10
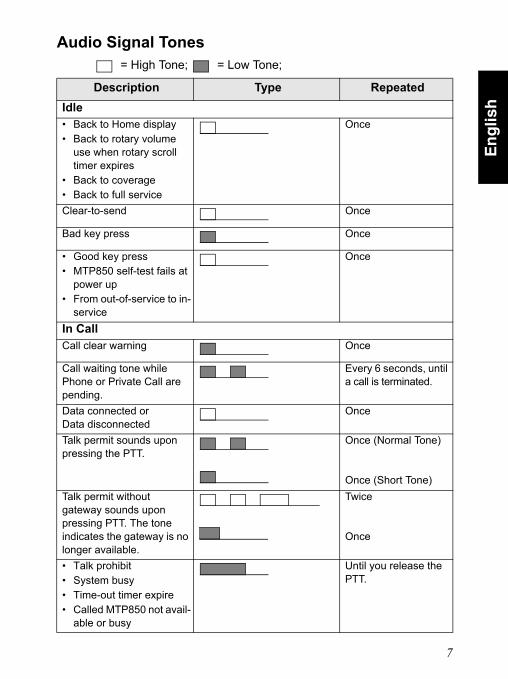
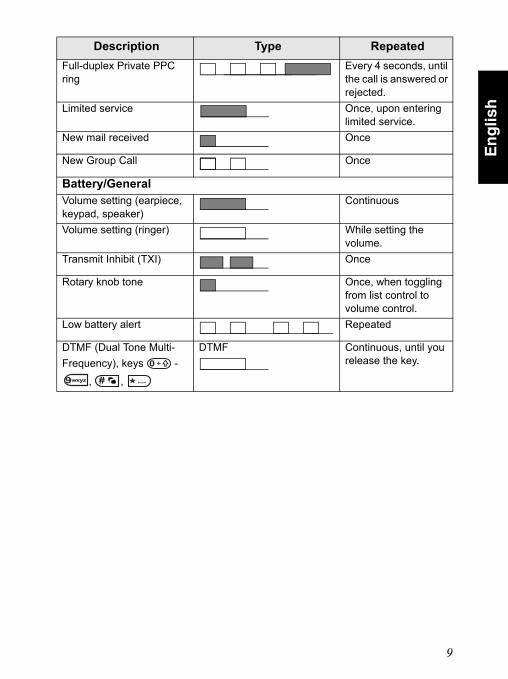
Audio Signal Tones = High Tone; = Low Tone;
Description Type RepeatedIdle• Back to Home display• Back to rotary volume
use when rotary scroll timer expires
• Back to coverage• Back to full service
Once
Clear-to-send Once
Bad key press Once
• Good key press• MTP850 self-test fails at
power up• From out-of-service to in-
service
Once
In CallCall clear warning Once
Call waiting tone while Phone or Private Call are pending.
Every 6 seconds, until a call is terminated.
Data connected or Data disconnected
Once
Talk permit sounds upon pressing the PTT.
Once (Normal Tone)
Once (Short Tone)Talk permit without gateway sounds upon pressing PTT. The tone indicates the gateway is no longer available.
Twice
Once
• Talk prohibit • System busy• Time-out timer expire• Called MTP850 not avail-
able or busy
Until you release the PTT.
7
En
glish
6866537D79-A.book Seite 8 Mittwoch, 20. Juli 2005 10:39 10
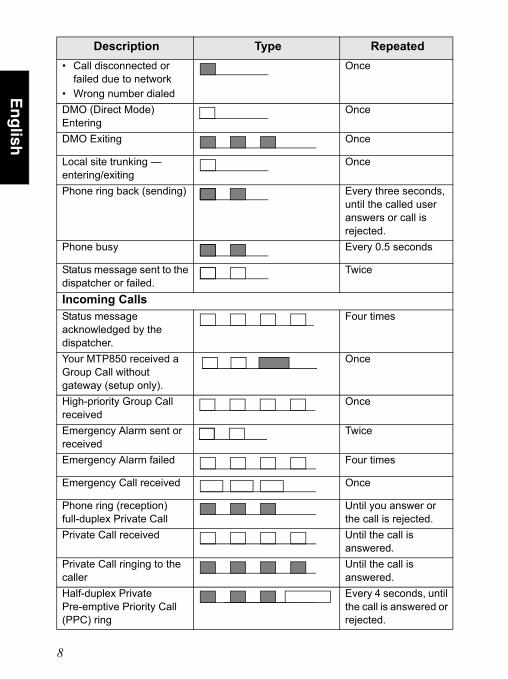
• Call disconnected or failed due to network
• Wrong number dialed
Once
DMO (Direct Mode) Entering
Once
DMO Exiting Once
Local site trunking —entering/exiting
Once
Phone ring back (sending) Every three seconds, until the called user answers or call is rejected.
Phone busy Every 0.5 seconds
Status message sent to the dispatcher or failed.
Twice
Incoming CallsStatus message acknowledged by the dispatcher.
Four times
Your MTP850 received a Group Call without gateway (setup only).
Once
High-priority Group Call received
Once
Emergency Alarm sent or received
Twice
Emergency Alarm failed Four times
Emergency Call received Once
Phone ring (reception)full-duplex Private Call
Until you answer or the call is rejected.
Private Call received Until the call is answered.
Private Call ringing to the caller
Until the call is answered.
Half-duplex Private Pre-emptive Priority Call (PPC) ring
Every 4 seconds, until the call is answered or rejected.
Description Type Repeated
8
En
glis
h
6866537D79-A.book Seite 9 Mittwoch, 20. Juli 2005 10:39 10
Full-duplex Private PPC ring
Every 4 seconds, until the call is answered or rejected.
Limited service Once, upon entering limited service.
New mail received Once
New Group Call Once
Battery/GeneralVolume setting (earpiece, keypad, speaker)
Continuous
Volume setting (ringer) While setting the volume.
Transmit Inhibit (TXI) Once
Rotary knob tone Once, when toggling from list control to volume control.
Low battery alert Repeated
DTMF (Dual Tone Multi-Frequency), keys -
, ,
DTMF Continuous, until you release the key.
Description Type Repeated
0
9wxyz
9
En
glish
6866537D79-A.book Seite 10 Mittwoch, 20. Juli 2005 10:39 10
Key, Knob, and Button OverviewOn-Off/End/Home Key
• Press and hold to turn the MTP850 On/Off.• Press to end calls.• Press to return to the Home display.
Soft KeysPress or to select the option that appears in the display directly above the left or right soft key.
Menu KeyPress to enter:• The menu. The MTP850 menus allow you to control your
MTP850 settings.
• Context sensitive menu (when icon is on) to view a list of items for the current menu.
Rotary KnobThe Service Provider can program the Rotary knob to one of the following uses:1. Dual control - the knob is used as both a volume control and to
scroll through lists. Press the knob to toggle between volume and list control (default programming).
2. List control - the knob is used to scroll lists (e.g. Talk group lists) or menu items. In this case volume control is always via the Side keys.
3. Volume control - the knob is used only as a volume control; turn clockwise to increase the audio volume level.
Press and hold the Rotary knob to lock it, press and hold it again to unlock. Powering Off also unlocks a locked Rotary knob.
Emergency ButtonPress and hold this button to enter Emergency Mode.When the MTP850 is powered down, press and hold this button to power On in Emergency Mode or in standard mode (as programmed).
MENU
10
En
glis
h
6866537D79-A.book Seite 11 Mittwoch, 20. Juli 2005 10:39 10
Function Keys
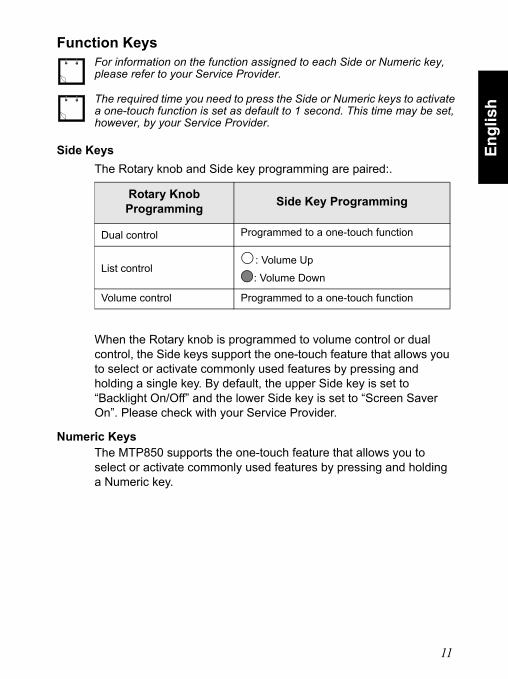
Side KeysThe Rotary knob and Side key programming are paired:.
When the Rotary knob is programmed to volume control or dual control, the Side keys support the one-touch feature that allows you to select or activate commonly used features by pressing and holding a single key. By default, the upper Side key is set to “Backlight On/Off” and the lower Side key is set to “Screen Saver On”. Please check with your Service Provider.
Numeric KeysThe MTP850 supports the one-touch feature that allows you to select or activate commonly used features by pressing and holding a Numeric key.
For information on the function assigned to each Side or Numeric key, please refer to your Service Provider.
The required time you need to press the Side or Numeric keys to activate a one-touch function is set as default to 1 second. This time may be set, however, by your Service Provider.
Rotary Knob Programming Side Key Programming
Dual control Programmed to a one-touch function
List control: Volume Up
: Volume Down
Volume control Programmed to a one-touch function
11
En
glish
6866537D79-A.book Seite 12 Mittwoch, 20. Juli 2005 10:39 10
Speaker Control Key
Press to activate the earpiece (low audio) or speaker (high audio), depending on the menu settings.
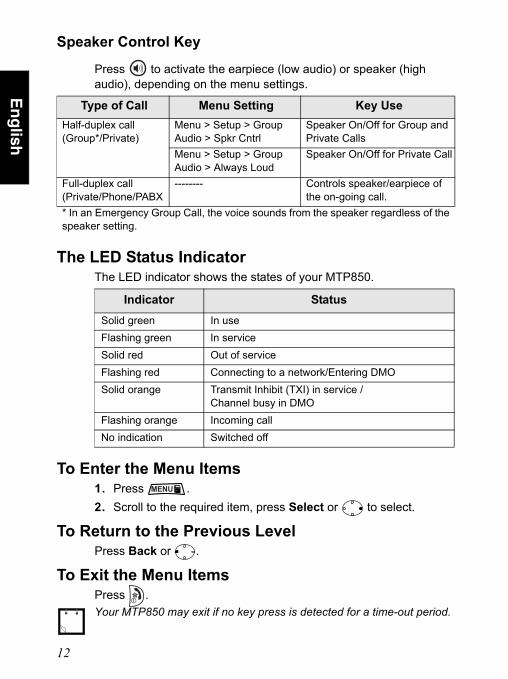
The LED Status IndicatorThe LED indicator shows the states of your MTP850.
To Enter the Menu Items1. Press .2. Scroll to the required item, press Select or to select.
To Return to the Previous LevelPress Back or .
To Exit the Menu ItemsPress .
Type of Call Menu Setting Key UseHalf-duplex call(Group*/Private)
Menu > Setup > Group Audio > Spkr Cntrl
Speaker On/Off for Group and Private Calls
Menu > Setup > Group Audio > Always Loud
Speaker On/Off for Private Call
Full-duplex call(Private/Phone/PABX
-------- Controls speaker/earpiece of the on-going call.
* In an Emergency Group Call, the voice sounds from the speaker regardless of the speaker setting.
Indicator StatusSolid green In useFlashing green In serviceSolid red Out of serviceFlashing red Connecting to a network/Entering DMOSolid orange Transmit Inhibit (TXI) in service /
Channel busy in DMOFlashing orange Incoming callNo indication Switched off
Your MTP850 may exit if no key press is detected for a time-out period.
MENU
12
En
glis
h
6866537D79-A.book Seite 13 Mittwoch, 20. Juli 2005 10:39 10
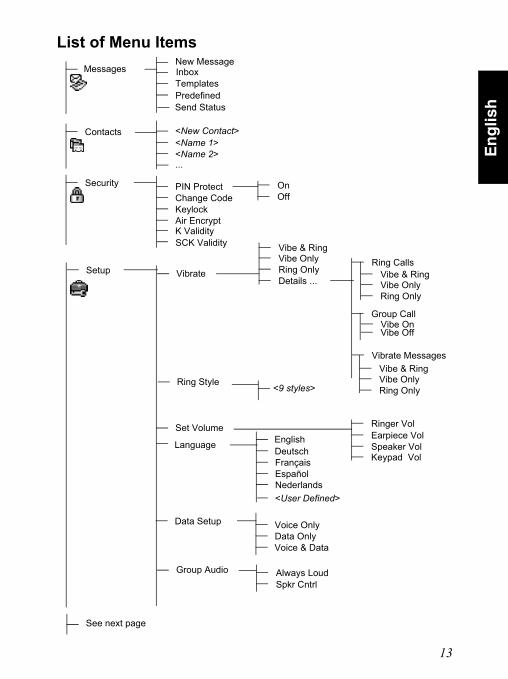
List of Menu Items
Send Status
InboxNew Message
TemplatesPredefined
Messages
Contacts <New Contact><Name 1><Name 2>
Security PIN ProtectChange CodeKeylockAir Encrypt
Language
Ring Style
EnglishDeutschFrançais
Setup
Voice OnlyData OnlyVoice & Data
Español
Data Setup
Vibrate
Set Volume
Nederlands
Ring OnlyDetails ...
Vibe OnlyVibe & Ring
Group Call
Vibrate Messages
Ring Calls
Earpiece VolSpeaker Vol
Ringer Vol
Keypad Vol
See next page
K ValiditySCK Validity
...
Ring OnlyVibe OnlyVibe & Ring
Ring OnlyVibe OnlyVibe & Ring
OnOff
Vibe OffVibe On
<9 styles>
<User Defined>
Group Audio Always LoudSpkr Cntrl
13
En
glish
6866537D79-A.book Seite 14 Mittwoch, 20. Juli 2005 10:39 10
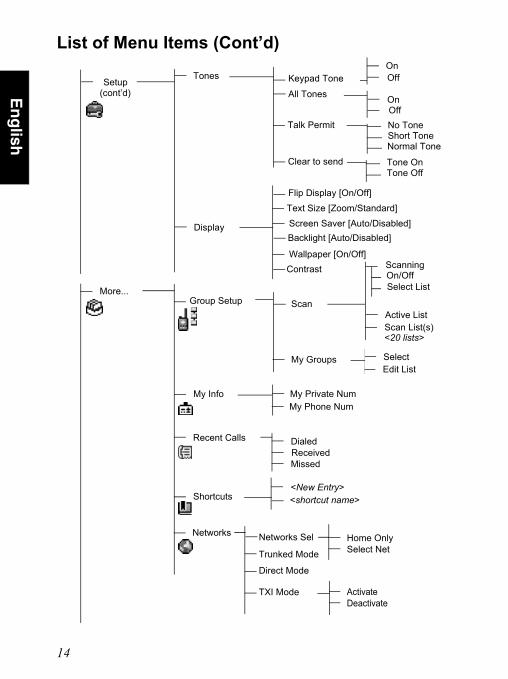
List of Menu Items (Cont’d)
Setup Keypad ToneTones
All Tones
OnOff
OnOff
(cont’d)
Talk Permit No ToneShort ToneNormal Tone
Display
Flip Display [On/Off]
Screen Saver [Auto/Disabled]Text Size [Zoom/Standard]
Backlight [Auto/Disabled]
Wallpaper [On/Off]Contrast
Networks Networks Sel Home Only Select NetTrunked Mode
Direct Mode
TXI Mode ActivateDeactivate
My Info My Private NumMy Phone Num
More...Group Setup
Scanning
Active ListScan List(s)
On/OffSelect List
Scan
My Groups
Recent Calls DialedReceivedMissed
Shortcuts<New Entry><shortcut name>
SelectEdit List
Clear to send Tone OnTone Off
<20 lists>
14
En
glis
h
6866537D79-A.book Seite 15 Mittwoch, 20. Juli 2005 10:39 10
Creating Menu ShortcutsUse shortcuts to access frequently-used menu items.Menu Shortcut Creation
Navigate to the menu item and press and hold as the item is highlighted.Menu Shortcut List
To look for assigned shortcuts, press and select More > Shortcuts > <shortcut name>.Menu Shortcut Use
From Home display, press and the Numeric key(s) assigned to the shortcut.
The DisplayWhen you use your MTP850, icons appear on the display to indicate the following conditions.
Status IconsStatus icons appear when your phone is engaged in certain activities or when you have activated certain features.
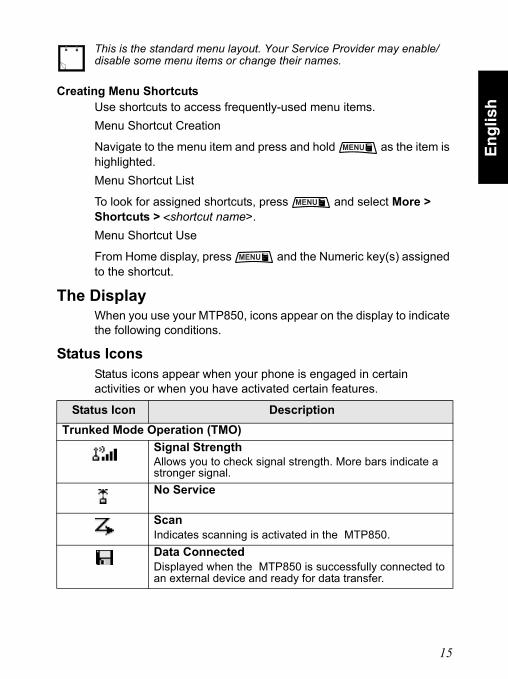
This is the standard menu layout. Your Service Provider may enable/disable some menu items or change their names.
Status Icon DescriptionTrunked Mode Operation (TMO)
Signal StrengthAllows you to check signal strength. More bars indicate a stronger signal.No Service
ScanIndicates scanning is activated in the MTP850.Data ConnectedDisplayed when the MTP850 is successfully connected to an external device and ready for data transfer.
MENU
MENU
MENU
15
En
glish
6866537D79-A.book Seite 16 Mittwoch, 20. Juli 2005 10:39 10
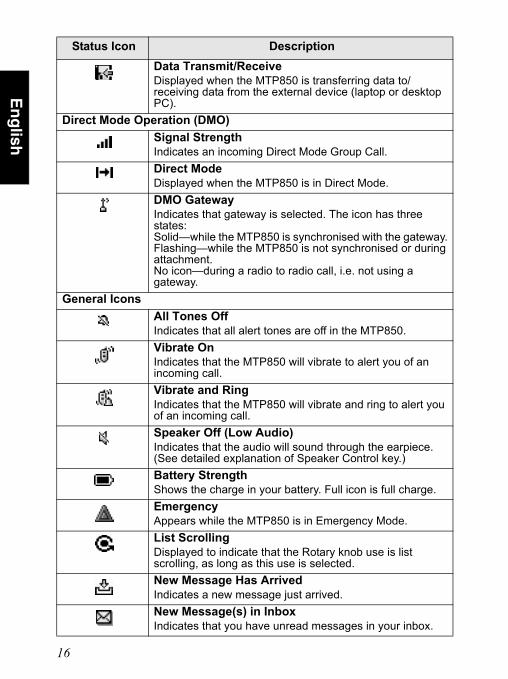
Data Transmit/ReceiveDisplayed when the MTP850 is transferring data to/receiving data from the external device (laptop or desktop PC).
Direct Mode Operation (DMO)Signal StrengthIndicates an incoming Direct Mode Group Call.Direct ModeDisplayed when the MTP850 is in Direct Mode.DMO GatewayIndicates that gateway is selected. The icon has three states:Solid—while the MTP850 is synchronised with the gateway. Flashing—while the MTP850 is not synchronised or during attachment.No icon—during a radio to radio call, i.e. not using a gateway.
General IconsAll Tones OffIndicates that all alert tones are off in the MTP850. Vibrate OnIndicates that the MTP850 will vibrate to alert you of an incoming call.Vibrate and RingIndicates that the MTP850 will vibrate and ring to alert you of an incoming call.Speaker Off (Low Audio)Indicates that the audio will sound through the earpiece. (See detailed explanation of Speaker Control key.)Battery StrengthShows the charge in your battery. Full icon is full charge.EmergencyAppears while the MTP850 is in Emergency Mode.List ScrollingDisplayed to indicate that the Rotary knob use is list scrolling, as long as this use is selected.New Message Has ArrivedIndicates a new message just arrived. New Message(s) in InboxIndicates that you have unread messages in your inbox.
Status Icon Description
16
En
glis
h
6866537D79-A.book Seite 17 Mittwoch, 20. Juli 2005 10:39 10
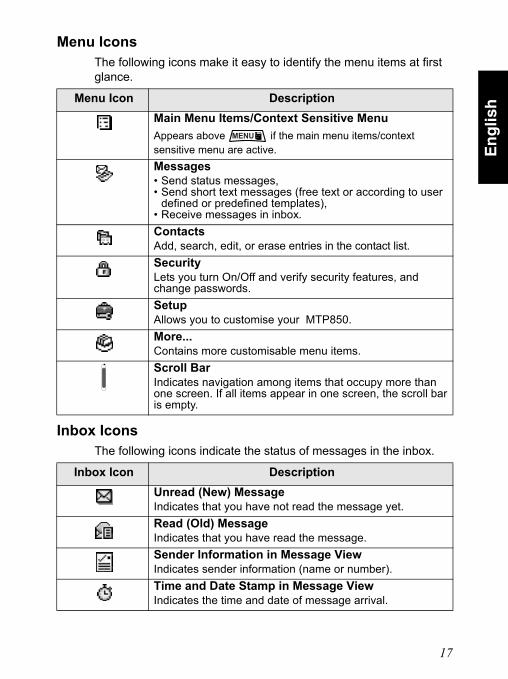
Menu IconsThe following icons make it easy to identify the menu items at first glance.
Inbox IconsThe following icons indicate the status of messages in the inbox.
Menu Icon DescriptionMain Menu Items/Context Sensitive MenuAppears above if the main menu items/context sensitive menu are active.Messages• Send status messages, • Send short text messages (free text or according to user
defined or predefined templates),• Receive messages in inbox.ContactsAdd, search, edit, or erase entries in the contact list.SecurityLets you turn On/Off and verify security features, and change passwords.SetupAllows you to customise your MTP850.More...Contains more customisable menu items.Scroll BarIndicates navigation among items that occupy more than one screen. If all items appear in one screen, the scroll bar is empty.
Inbox Icon DescriptionUnread (New) MessageIndicates that you have not read the message yet.Read (Old) MessageIndicates that you have read the message.Sender Information in Message ViewIndicates sender information (name or number).Time and Date Stamp in Message ViewIndicates the time and date of message arrival.
MENU
17
En
glish
6866537D79-A.book Seite 18 Mittwoch, 20. Juli 2005 10:39 10
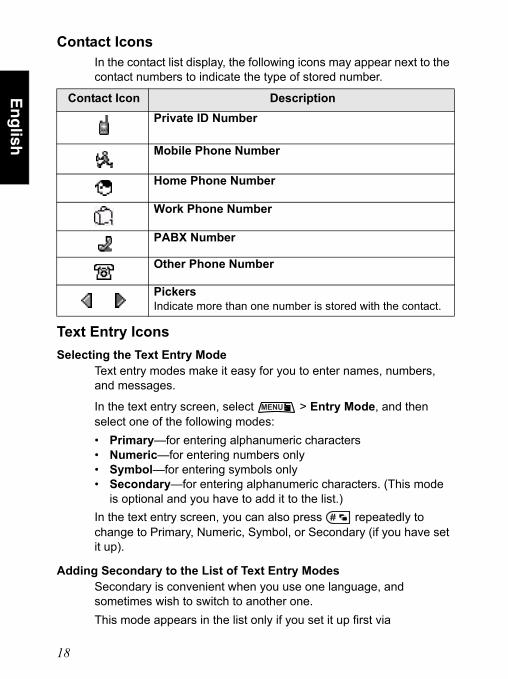
Contact IconsIn the contact list display, the following icons may appear next to the contact numbers to indicate the type of stored number.
Text Entry IconsSelecting the Text Entry Mode
Text entry modes make it easy for you to enter names, numbers, and messages.
In the text entry screen, select > Entry Mode, and then select one of the following modes: • Primary—for entering alphanumeric characters • Numeric—for entering numbers only • Symbol—for entering symbols only• Secondary—for entering alphanumeric characters. (This mode
is optional and you have to add it to the list.) In the text entry screen, you can also press repeatedly to change to Primary, Numeric, Symbol, or Secondary (if you have set it up).
Adding Secondary to the List of Text Entry Modes Secondary is convenient when you use one language, and sometimes wish to switch to another one. This mode appears in the list only if you set it up first via
Contact Icon DescriptionPrivate ID Number
Mobile Phone Number
Home Phone Number
Work Phone Number
PABX Number
Other Phone Number
PickersIndicate more than one number is stored with the contact.
MENU
18

En
glis
h
6866537D79-A.book Seite 19 Mittwoch, 20. Juli 2005 10:39 10
> Entry Setup. None is the default programming from factory and indicates no secondary entry mode is selected.
Selecting the Text Entry Method and LanguageThere are two text entry methods:• TAP—Enter letters, numbers and symbols by pressing an
Alphanumeric key one or more times.• iTAP—Let the terminal predict each word as you press an
Alphanumeric key.You can use these methods in the languages programmed in the terminal.
In the text entry screen, select > Entry Setup, and then change to one of the methods and its related language (for example: TAP English).
Text CapitalisationPress .
IconsIn the text entry screen, icons tell you which text entry mode and method you are using. A character counter icon indicates the number of entered characters.
Primary Icons Secondary Icons Description TAP—no capitalsTAP—capitalise next letter only
TAP—all capitals
iTAP—no capitals
iTAP—capitalise next letter only
iTAP—all capitals
Numeric Icon Description Enter numbers.Enter numbers in iTAP method.
Symbolic Icon Description Enter punctuation and symbols.
MENU
MENU
0
19
En
glish
6866537D79-A.book Seite 20 Mittwoch, 20. Juli 2005 10:39 10
Getting Started
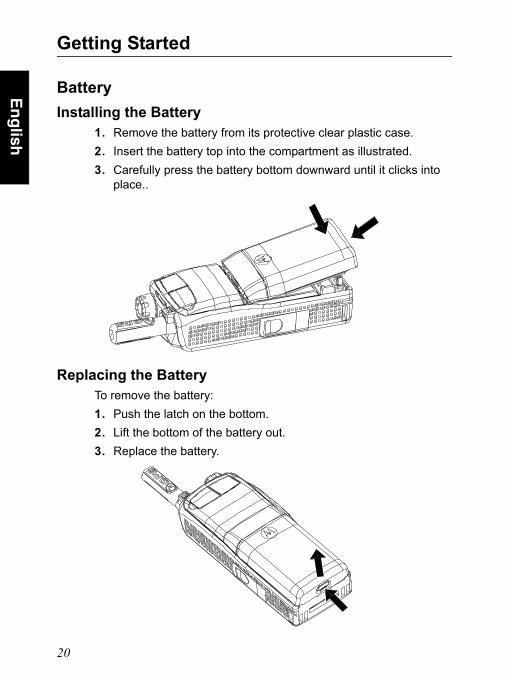
BatteryInstalling the Battery
1. Remove the battery from its protective clear plastic case.2. Insert the battery top into the compartment as illustrated.3. Carefully press the battery bottom downward until it clicks into
place..
Replacing the BatteryTo remove the battery: 1. Push the latch on the bottom. 2. Lift the bottom of the battery out. 3. Replace the battery.
20
En
glis
h
6866537D79-A.book Seite 21 Mittwoch, 20. Juli 2005 10:39 10
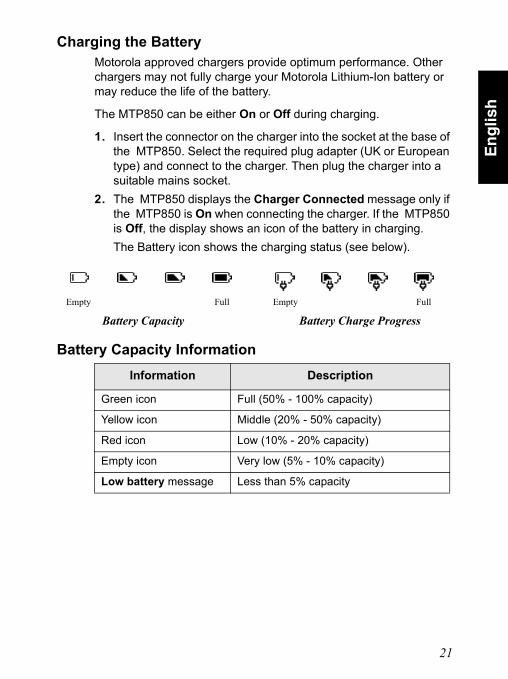
Charging the BatteryMotorola approved chargers provide optimum performance. Other chargers may not fully charge your Motorola Lithium-Ion battery or may reduce the life of the battery.
The MTP850 can be either On or Off during charging.
1. Insert the connector on the charger into the socket at the base of the MTP850. Select the required plug adapter (UK or European type) and connect to the charger. Then plug the charger into a suitable mains socket.
2. The MTP850 displays the Charger Connected message only if the MTP850 is On when connecting the charger. If the MTP850 is Off, the display shows an icon of the battery in charging.The Battery icon shows the charging status (see below).
Battery Capacity InformationInformation Description
Green icon Full (50% - 100% capacity)
Yellow icon Middle (20% - 50% capacity)
Red icon Low (10% - 20% capacity)
Empty icon Very low (5% - 10% capacity)
Low battery message Less than 5% capacity
Battery Charge Progress
FullEmpty
Battery Capacity
Empty Full
21
En
glish
6866537D79-A.book Seite 22 Mittwoch, 20. Juli 2005 10:39 10
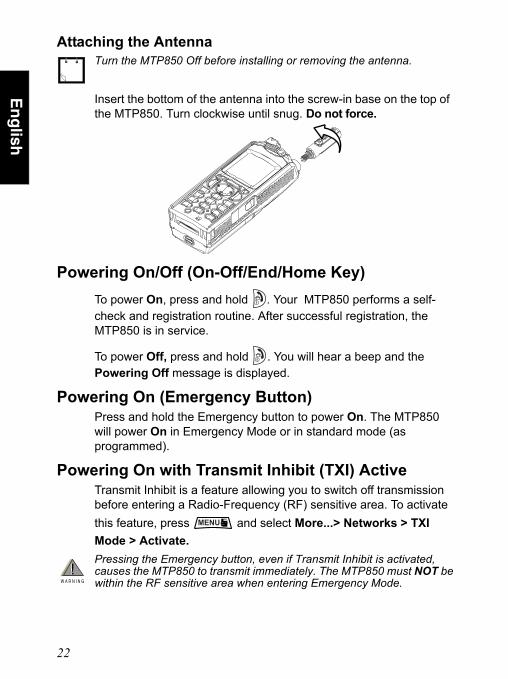
Attaching the Antenna
Insert the bottom of the antenna into the screw-in base on the top of the MTP850. Turn clockwise until snug. Do not force.
Powering On/Off (On-Off/End/Home Key)To power On, press and hold . Your MTP850 performs a self-check and registration routine. After successful registration, the MTP850 is in service.
To power Off, press and hold . You will hear a beep and the Powering Off message is displayed.
Powering On (Emergency Button)Press and hold the Emergency button to power On. The MTP850 will power On in Emergency Mode or in standard mode (as programmed).
Powering On with Transmit Inhibit (TXI) ActiveTransmit Inhibit is a feature allowing you to switch off transmission before entering a Radio-Frequency (RF) sensitive area. To activate this feature, press and select More...> Networks > TXI Mode > Activate.
Turn the MTP850 Off before installing or removing the antenna.
Pressing the Emergency button, even if Transmit Inhibit is activated, causes the MTP850 to transmit immediately. The MTP850 must NOT be within the RF sensitive area when entering Emergency Mode.
MENU
!W A R N I N G
!
22
En
glis
h
6866537D79-A.book Seite 23 Mittwoch, 20. Juli 2005 10:39 10
The TXI Mode remains active at power On. You will be asked whether to leave the TXI Mode On or not.
Press the Yes soft key to deactivate the TXI Mode. If the MTP850 was previously used in Trunked Mode, it will register to the network. If the MTP850 was previously used in Direct Mode, it will remain in Direct Mode.Press No in Trunked Mode and the MTP850 powers down; press No in Direct Mode and you remain in Direct Mode with TXI selected.
Unlocking the MTP850Your MTP850 may be locked at power up. To unlock the MTP850 after powering on, enter the code at the prompt. The MTP850 enters the default Home display.The unlock code is originally set to 0000. Your Service Provider may change this number before you receive your terminal.
Locking/Unlocking the KeypadPress to lock the keypad. Press again to unlock.
Ensure you have left the RF sensitive area before deactivating Transmit Inhibit.
When there is an incoming call and the keypad is locked, you can still
use the PTT, Rotary knob, , , and .
The Emergency button is not locked. Pressing the Emergency button unlocks the keypad.
!W A R N I N G
!
MENU MENU
23
En
glish
6866537D79-A.book Seite 24 Mittwoch, 20. Juli 2005 10:39 10
Selecting TMO or DMO Operation
Entering TMO or DMOEnter TMO or DMO in one of the following ways:• From the Home display press Optns and select Direct Mode if
the MTP850 is in TMO.• From the Home display press Optns and select Trunked Mode if
the MTP850 is in DMO.• Press and select More...> Networks > Trunked Mode if
the MTP850 is in DMO.• Press and select More...> Networks > Direct Mode if
the MTP850 is in TMO.• Press the TMO/DMO one-touch button (if programmed by your
Service Provider).You can make and receive the following types of calls when the MTP850 operates in Trunked Mode:• Group Calls • Private Calls• Phone Calls • PABX Calls — local (office) extension calls• Emergency Calls.You can make and receive Group Calls when the MTP850 operates in Direct Mode. This includes Emergency Group Calls.The MTP850 returns to the Home display when there is no activity for a few seconds.Your terminal can alert you of an incoming call. Select the alert settings in the Vibrate menu and Tones menu items.
MENU
MENU
24
En
glis
h
6866537D79-A.book Seite 25 Mittwoch, 20. Juli 2005 10:39 10
Group Calls
A Group Call is a communication between you and others in a group. A group is a pre-defined set of subscribers enabled to participate in and/or invoke a Group Call.Groups are organised in folders. Each folder may contain several groups.
“My Groups” FolderYou can organise your favourite groups into one folder called “My Groups”.
Selecting the “My Groups” Folder
From the Home display, press to quickly access the folder.
Adding a Group (TMO/DMO) to the “My Groups” Folder1. Press and select More > Group Setup > My Groups >
Edit List > [New Group].2. Select a group by alphabetic search (“TMO/DMO by abc”). Enter
the first character of the group name. Or select a group by folder search (“TMO/DMO by Folder”). Select the folder and select the group. The group is added to the “My Groups” folder.
Selecting a Group
Using the Rotary Knob(If programmed)From the Home display, press shortly on the Rotary knob and rotate until the requested group appears. Group selection occurs:• After a time-out, • Or, by pressing Select (if configured by your Service Provider).
Using the Navigation KeyFrom the Home display, scroll left or right until the requested group
When you navigate in the “My Groups” folder and select a DMO group, your terminal will switch between TMO and DMO (and vice-versa).
MENU
25
En
glish
6866537D79-A.book Seite 26 Mittwoch, 20. Juli 2005 10:39 10
appears. Then press Select to confirm selection.
Using Alphabetic SearchFrom the Home display, press Optns. Select a group by alphabetic search (“TG by abc”). Enter the first character of the group name. Select the group.
Using Folder SearchFrom the Home display, press Optns. Select a group by folder search (“TG by Folder”). Select the folder and select the group.
Selecting a FolderFrom the Home display, press Optns. Select Folder, and select the desired folder. The display shows the last selected group in that folder.
TMO Group CallsIn TMO the MTP850 is used with your Service Provider’s infrastructure.
Making a TMO Group Call1. From the Home display and if this is the required group, press
and hold the PTT. 2. Wait for the talk permit tone and then speak into the microphone.
Release the PTT button to listen.When you start a call, all members of the selected group who have their units turned on, will receive the Group Call.
Receiving a TMO Group CallUnless it is engaged in a call, your MTP850 will receive the Group Call. To answer the call, press and hold PTT.Your MTP850 shows the group name and the caller’s private number or alias if previously stored in your contact list.
If you are in an on-going Group Call and wish to make a new call, press to ignore the current call. Start the new call.
The No Group message is displayed when you are out of the normal coverage area of your selected group. You must then select a new group that is valid for your working location.
26
En
glis
h
6866537D79-A.book Seite 27 Mittwoch, 20. Juli 2005 10:39 10
Receiving a TMO Broadcast CallThe Broadcast Call (also called Site Wide Call) is a high-priority Group Call from the console operator (or dispatcher) to all users. The MTP850s are configured to monitor a Broadcast Call, but users cannot talk back.The Broadcast Call pre-empts an on-going Group Call that has the same (or lower) call priority.
DMO Group CallsIn DMO the MTP850 can be used without your Service Provider’s infrastructure.DMO allows communication with other terminals also operating in DMO, which are on the same frequency and group as your MTP850.
When you start a call, the members of the selected group who have their units turned on will receive the Group Call.In DMO the MTP850 can communicate with the trunking system (and vice-versa) if the Gateway option is enabled in the MTP850.
Making a DMO Group Call1. Enter Direct Mode by pressing Optns and selecting Direct
Mode. 2. Make sure that you have selected the required group. Press and
hold the PTT button. 3. Wait for the talk permit tone and then speak into the microphone.
Release the PTT button to listen.
Receiving a DMO Group CallYou can receive a DMO Group Call only when your MTP850 is in DMO.Unless it is engaged in a call, your MTP850 will receive the Group Call. To answer the call, press and hold PTT.Your MTP850 shows the group name and the caller’s private number or alias if previously stored in your contact list.
Exiting DMOTo exit DMO, press Optns and select Trunked Mode.
In DMO you can only place Group Calls and Emergency Group Calls.
27
En
glish
6866537D79-A.book Seite 28 Mittwoch, 20. Juli 2005 10:39 10
Private, Phone, and PABX Calls
Creating a Contact1. From the Home display, press Contcs. Select [New Contact]. 2. Enter name. Press Ok to confirm.
3. Press / and select the type of stored number (such as Private).
4. Enter number (#). Press Ok.5. Continue to enter other types and numbers, as you may keep
several numbers (Private, Mobile, Home, Work, PABX, Other) for the same person under the same contact name.
6. When finished, press Done. Press Back to return to Home display.
How to DialDialing a Number
1. From the Home display dial a number.2. Press CType repeatedly to select the call type (Private, Phone,
or PABX).
3. Press PTT or depending on the call type.
Dialing via the Contact ListYou can also use the contact list to select a number you previously stored. Press Contcs and search the stored number by scrolling ( or ) or by entering the first character of the contact name.
If the contact has more than one number, use / to select the number.
If you are in an on-going Group Call wish to make a new call, press to ignore the current call. Dial the number.
28
En
glis
h
6866537D79-A.book Seite 29 Mittwoch, 20. Juli 2005 10:39 10
Private CallA Private Call, also called Point-to-Point or individual call, is a call between two individuals. No other terminal can hear the conversation. This call can be a full-duplex call (if the system allows) instead of the standard half-duplex call.
Making a Private Call1. From the Home display dial a number.2. If Private is not the first type of call presented, press CType to
select the Private Call type.3. For a half-duplex call, press and release the PTT button. You will
hear a ringing tone. Wait for the called person to answer your call.Press and hold PTT. Wait for the talk permit tone (if configured) before talking, and release the PTT when listening.
For a full-duplex call, press and release . You will hear a ringing tone. Wait for the called person to answer your call.
4. To end the call, press . If the called person ends the call, the Call Ended message is displayed.
Receiving a Private Call1. The MTP850 switches to the incoming Private Call. The display
shows the caller’s identity.2. To answer an incoming half-duplex call, press PTT. To answer an
incoming full-duplex call (indicated by Spkror Erpce soft keys),
press .
3. To end the call, press .
While Transmit Inhibit is activated, an incoming Private Call is indicated, but you cannot answer the call.
Your terminal can alert you of an incoming call. Select the alert settings in the Vibrate menu and Tones menu items
29
En
glish
6866537D79-A.book Seite 30 Mittwoch, 20. Juli 2005 10:39 10
Phone and PABX CallsThe Phone Call allows you to call a landline telephone number or a cellular mobile phone number. The Private Automatic Branch Exchange (PABX) Call allows you to call local (office) extension numbers. This type of call needs to be activated by your Service ProviderIn this publication we use “phone number” when referring to these numbers.
Making a Phone or PABX Call1. From the Home display dial a number.2. If Phone or PABX are not the first type of call presented, press
CType repeatedly to select the Phone or PABX call type.3. Proceed as for making and receiving full-duplex Private Calls.
While Transmit Inhibit is activated, an incoming Phone or PABX Call is indicated, but you cannot answer the call.
30
En
glis
h
6866537D79-A.book Seite 31 Mittwoch, 20. Juli 2005 10:39 10
Emergency Mode
You can send and receive Emergency Group Calls in Trunked Mode or in Direct Mode. If your terminal is configured to operate through a gateway, Emergency calls can be placed through the gateway.You can initiate an Emergency Group Call to and receive it from• the selected group (TMO and DMO) (if tactical emergency) or • a pre-defined group (if non-tactical emergency). Contact your Service Provider to know which is the selected mode.Your Service Provider will configure the Emergency Alarm and Hot Microphone features.Emergency calls will be allocated emergency priority in the system.
Entering or Exiting Emergency ModeTo enter Emergency Mode, press and hold the Emergency button at the top of the MTP850.
To exit Emergency Mode, press and hold Exit. Your terminal will switch to the Home display.
Sending an Emergency Alarm (TMO Only)Your MTP850 will send an Emergency Alarm to the dispatcher (if configured by your Service Provider):• Automatically, upon entering Emergency Mode.• If you press the Emergency button again while the MTP850 is in
Emergency Mode.After sending the alarm, the display will show one of the following delivery reports:• Alarm Sent• Alarm FailedIn both cases, the display returns within a few seconds to the main screen of the Emergency Mode.
The required time you need to press the Emergency button is set to default to 0.5 seconds. The time can be configured by your Service Provider.
The Emergency Alarm is a special status message sent to the dispatcher monitoring the selected group. This can be used in dispatch systems to highlight emergency calls.
31
En
glish
6866537D79-A.book Seite 32 Mittwoch, 20. Juli 2005 10:39 10
Hot Microphone FeatureIf the Hot Microphone feature was programmed into your MTP850 by your Service Provider, you can make an Emergency Group Call and talk to the dispatcher (and members of your group) without the need to press and hold the PTT.The microphone will stay open for a time period (programmed by your Service Provider). The microphone will stay open until:• the Hot microphone time period expires• you press PTT during the Hot Microphone period• you press the End keyAt the end of the Hot Microphone the Hot Mic Ended message will be displayed and the MTP850 returns to the Emergency Mode. The Hot Microphone feature is disabled and PTT operation returns to normal.If required you can resume Hot Microphone by pressing the Emergency button again.
Making an Emergency Group CallTo initiate or answer a call while in Emergency Mode:• Press and hold PTT.• Wait for the talk permit tone (if configured) and talk. • Release PTT to listen.
Some systems do not support the Emergency Alarm feature when the user is in a “Local Area Service” area.
Pressing the Emergency button, even if Transmit Inhibit is activated, causes the MTP850 to transmit immediately. The MTP850 must NOT be within the RF sensitive area when entering Emergency Mode.
!W A R N I N G
!
32
En
glis
h
6866537D79-A.book Seite 33 Mittwoch, 20. Juli 2005 10:39 10
Messages
Sending a Status MessageSelect the desired group, then press and select Messages
> Send Status. Select status and press or PTT.
Sending a New MessagePress and select Messages > New Message. Write your
message. Select Send, or press or PTT. Select your mail
recipient or enter number. Select Send, or press or PTT to send the new message.
Sending a User-defined MessagePress and select Messages > Templates. Scroll and
choose your required template. Select Send, or press or PTT. Select your mail recipient or enter number. Select Send, or
press or PTT to send the message.
Sending a Predefined MessagePress and select Messages > Predefined. Scroll and choose your required template. Press and select Edit to edit the message. Type required information. Select Send, or
press or PTT to send the message.
Handling New Incoming Text MessagesYour MTP850 will alert you of an incoming message and enter the inbox automatically, if there is no on-going activity in the terminal.Scroll to the message and select Read soft key. To read a long message, press More to read the next page and Back to return to the previous page.
Then select Reply. Or Press and select to store/delete/delete all/forward.
MENU
MENU
MENU
MENU
MENU
MENU
33

En
glish
6866537D79-A.book Seite 34 Mittwoch, 20. Juli 2005 10:39 10
Handling Unread (New) MessagesPress and select Messages > Inbox. Scroll to the message and select Read soft key. To read a long message, press More to read the next page and Back to return to the previous page.
Press and select to store/delete/delete all/reply/forward.
MENU
MENU
34
En
glis
h
6866537D79-A.book Seite 35 Mittwoch, 20. Juli 2005 10:39 10
Tips & Tricks
Modeless OperationNo need to select a mode (Group / Private / Phone) before initiating a call. Just dial a number and press CType (call type) soft key to
decide what call it is (then press PTT or ).
Home KeyNot sure where you are? Want to get back to Home display? Press .
Backlight ControlYou can either disable backlight (covered operation) or have it automatically turned on, by any key press.You can also press the upper Side key - just to turn On/Off the backlight (if configured by your Service Provider).
One TouchYour Service Provider can program the two Side keys and the Numeric keys (0-9) to many functions such as Flip Display, TMO to DMO switching and vice-versa, etc.Press and hold the keys to see to which function they are programmed.
Menu Shortcuts• You can easily access any menu item, by pressing and a
Numeric key. (No delay between and the key!)• You can ask your Service Provider to program menu shortcuts.• You may also define a new shortcut: enter the menu item, press
and hold , and follow the instructions in the display.
High/Low Audio ControlYou can control audio routing (speaker/earpiece) for any Private or Group Call via the dedicated Speaker Control key.However, you can define via the menu to have all Group Calls in high audio ( > Setup > Group Audio).
MENU
MENU
MENU
MENU
35
En
glish
6866537D79-A.book Seite 36 Mittwoch, 20. Juli 2005 10:39 10
Unified Contact ListYou can keep several numbers (Private, Mobile, Home, Work, PABX, Other) for the same person under the same contact name. You can create up to 1000 contacts, and have a total of 1000 private numbers and 1000 phone numbers.
Text SizeYou can see the text on the display in two sizes: Standard or Zoomed ( > Setup > Display > Text Size).
Group CapacityYour Service provider can program up to 2048 groups for Trunked Mode, and up to 1024 groups for Direct Mode.
Flexible FoldersYou can ask your Service Provider to define how many groups will be in each folder (up to 256 folders).
“My Groups” FolderYou can select any group (TMO or DMO) and add it to your personal folder.
In the Home display, press to quickly access your “My Groups” folder.
Options (in the Home Display)You can easily change folder, select groups, switch between TMO and DMO (and vice-versa), and other functions via the Home display Options.
Easy Navigation while in MenuWhen scrolling up/down menu items, try also right/left scrolling. (This will select the item or return to previous level.)
Flipped Display On/OffWhen this feature is activated, the contents of the display are flipped upside down. This feature is particularly useful if you have to wear the MTP850 on the shoulder, belt, or lapel and at the same time wish to read the display upside down.
To activate/deactivate, press and select Setup > Display > Flip Display. Or press and hold the pre-programmed one-touch button.
MENU
MENU
36
En
glis
h
6866537D79-A.book Seite 37 Mittwoch, 20. Juli 2005 10:39 10
Dialed Call List - Quick Access
From the Home display press to access the list of the last dialed calls.
Automatic Scrolling via Navigation Key
In a list press and hold or for automatic scrolling.
Recent Calls Menu - Quick AccessFrom the Home display press .
37

En
glish
6866537D79-A.book Seite 38 Mittwoch, 20. Juli 2005 10:39 10
38
En
glis
h
6866
537D
79-A
.boo
k S
eite
39
Mitt
woc
h, 2
0. J
uli 2
005
10:
39 1
0
MTP
850
Qui
ck R
efer
ence
Gui
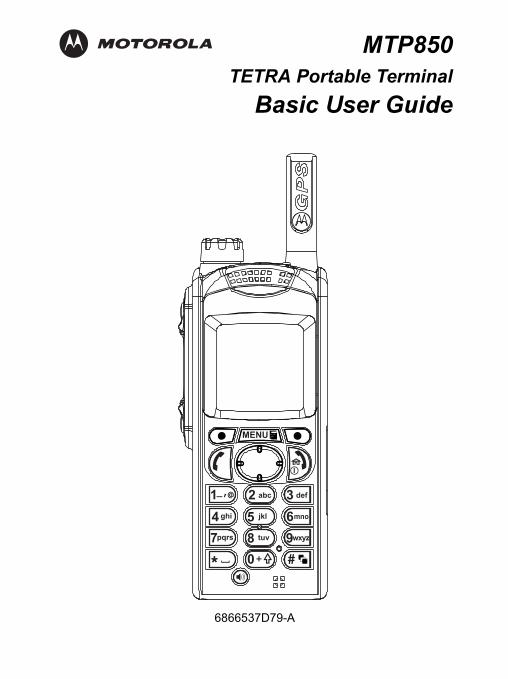
de
Turn
ing
the
MTP
850
On/
Off
To p
ower
the
MTP
850
on/o
ff, p
ress
and
ho
ld.
Usi
ng th
e M
TP85
0 M
enu
Syst
em• T
o en
ter t
he m
enu,
pre
ss.
• To
scro
ll th
roug
h th
e m
enu,
pre
ss
or
.
• To
sele
ct a
men
u ite
m, p
ress
Sel
ect
soft
key
or
.• T
o re
turn
to p
revi
ous
leve
l, pr
ess
Bac
k or
.• T
o ex
it th
e m
enu
item
s, p
ress
.Se
lect
ing
Trun
ked/
Dire
ct M
ode
Ope
ratio
n• Y
our t
erm
inal
may
be
conf
igur
ed w
ith a
O
ne-to
uch
butto
n to
sw
itch
betw
een
TMO
/DM
O. C
onta
ct y
our S
ervi
ce
Pro
vide
r for
mor
e in
form
atio
n.• F
rom
the
Hom
e di
spla
y pr
ess
Opt
ns,
sele
ct T
runk
ed M
ode
or D
irect
Mod
e.M
akin
g a
TMO
Gro
up C
all
From
the
Hom
e di
spla
y na
viga
te to
the
desi
red
grou
p. P
ress
Sel
ect s
oft k
ey (i
f co
nfig
ured
). P
ress
and
hol
d PT
T. W
ait
for t
he ta
lk p
erm
it to
ne (i
f con
figur
ed)
and
talk
. Rel
ease
PTT
to li
sten
.M
akin
g a
DM
O G
roup
Cal
lE
nter
DM
O. N
avig
ate
to th
e de
sire
d gr
oup.
Pre
ss S
elec
t sof
t key
(if
conf
igur
ed).
Pre
ss a
nd h
old
PTT.
Wai
t fo
r the
talk
per
mit
tone
(if c
onfig
ured
) an
d ta
lk. R
elea
se P
TT to
list
en.
Mak
ing
a TM
O E
mer
genc
y G
roup
C
all
Ent
er T
MO
. Pre
ss a
nd h
old
the
Em
erge
ncy
butto
n. E
mer
genc
y al
arm
is
sent
aut
omat
ical
ly. P
ress
and
hol
d PT
T.
Wai
t for
the
talk
per
mit
tone
(if
conf
igur
ed) a
nd ta
lk. R
elea
se P
TT to
lis
ten.
If u
sing
“Hot
Mic
” fea
ture
, wai
t for
th
e Em
gncy
Mic
On”
mes
sage
to a
ppea
r on
the
disp
lay
and
talk
with
out p
ress
ing
PTT.
To e
xit E
mer
genc
y M
ode,
pre
ss a
nd h
old
Exit
soft
key.
Mak
ing
a D
MO
Em
erge
ncy
Gro
up
Cal
lE
nter
DM
O. P
ress
and
hol
d th
e E
mer
genc
y bu
tton.
Pre
ss a
nd h
old
PTT.
W
ait f
or th
e ta
lk p
erm
it to
ne (i
f co
nfig
ured
) and
talk
. Rel
ease
PTT
to
liste
n. T
o ex
it E
mer
genc
y M
ode
pres
s an
d ho
ld E
xit s
oft k
ey.
Mak
ing
a Ph
one/
PAB
X C
all
From
the
Hom
e di
spla
y di
al a
num
ber.
Pre
ss C
Type
to s
elec
t the
cal
l typ
e.
Pre
ssto
spe
ak a
nd p
ress
to
term
inat
e ca
ll.
51
23
46
abc
78
90
def
ghi
jkl
mno
tuv
MEN
U
pqrs
wxy
z
Ante
nna
Top
Mic
roph
one
Col
our
Sof
t Key
s (2
)
Four
-Way
Men
u ke
y
On-
Off/
End/
Spea
ker
Alph
anum
eric
Spe
aker
Con
trol
Bot
tom
Acce
ssor
y C
onne
ctor
Rot
ary
Knob
LE
D
Send
Key
PTT
Sid
e K
eyD
ispl
ay
Key
pad
Key
Exte
rnal
Ant
enna
Con
nect
or
(at t
he b
ase)
(on
top)
Audi
o A
cces
sory
C
onne
ctor
(at t
he b
ack)
Nav
igat
ion
Key
Ear
piec
eE
mer
genc
y K
ey(o
n to
p)
Pro
gram
mab
le
Sid
e Ke
y
Pro
gram
mab
le
Sid
e K
ey
Mic
roph
one
Hom
e K
ey
Back
light
Sen
sor
MEN
U
39
En
glish
6866
537D
79-A
.boo
k S
eite
40
Mitt
woc
h, 2
0. J
uli 2
005
10:
39 1
0
Mak
ing
a H
alf-d
uple
x Pr
ivat
e C
all
From
the
Hom
e di
spla
y di
al a
num
ber.
Pre
ss C
Type
to s
elec
t the
cal
l typ
e.
Pre
ss a
nd re
leas
e PT
T. R
ingi
ng s
ound
s.
Cal
led
party
ans
wer
s. W
ait f
or th
e ca
lled
party
to fi
nish
spe
akin
g. P
ress
and
hol
d PT
T. W
ait f
or th
e ta
lk p
erm
it to
ne (i
f co
nfig
ured
) and
talk
. Rel
ease
PTT
to
liste
n. P
ress
to te
rmin
ate
call.
Mak
ing
a Fu
ll-du
plex
Priv
ate
Cal
lFr
om th
e H
ome
disp
lay
dial
a n
umbe
r. P
ress
CTy
pe to
sel
ect t
he c
all t
ype.
P
ress
and
rele
ase
. Rin
ging
sou
nds.
C
alle
d pa
rty a
nsw
ers.
Pre
ss to
te
rmin
ate
call.
Ans
wer
ing
a C
all
Your
MTP
850
switc
hes
to th
e in
com
ing
call
and
aler
ts y
ou o
f the
inco
min
g ca
ll.
To a
nsw
er th
e ca
ll, p
ress
for P
hone
/PA
BX
/Ful
l-dup
lex
Priv
ate
calls
or p
ress
PT
T fo
r all
othe
r cal
ls.
Send
ing
a St
atus
Mes
sage
Sel
ect t
he d
esire
d gr
oup,
then
pre
ss
and
sel
ect M
essa
ges
> Se
nd
Stat
us. S
elec
t sta
tus
and
pres
sor
PT
T.
Send
ing
a N
ew M
essa
geP
ress
and
sele
ct M
essa
ges
> N
ew M
essa
ge. W
rite
your
mes
sage
. S
elec
t Sen
d, o
r pre
ssor
PTT
. Sel
ect
your
mai
l rec
ipie
nt o
r ent
er n
umbe
r. S
elec
t Sen
d, o
r pre
ssor
PTT
to s
end
the
new
mes
sage
.Ti
ps &
Tric
ksH
ome
Key
Not
sur
e w
here
you
are
? W
ant t
o ge
t ba
ck to
Hom
e di
spla
y? P
ress
.B
ackl
ight
Con
trol
You
can
eith
er d
isab
le b
ackl
ight
(c
over
ed o
pera
tion)
or h
ave
it au
tom
atic
ally
turn
ed o
n, b
y an
y ke
y pr
ess.
You
can
also
pre
ss th
e up
per S
ide
key
- ju
st to
turn
On/
Off
the
back
light
(if
conf
igur
ed).
Men
u Sh
ortc
uts
You
can
easi
ly a
cces
s an
y m
enu
item
, by
pre
ssin
gan
d a
num
eric
key
. (N
o de
lay
betw
een
and
the
key!
)Yo
u ca
n as
k yo
ur S
ervi
ce P
rovi
der t
o pr
ogra
m m
enu
shor
tcut
s.Yo
u m
ay a
lso
defin
e a
new
sho
rtcut
: en
ter t
he m
enu
item
, pre
ss a
nd
hold
, and
follo
w th
e in
stru
ctio
ns
in th
e di
spla
y.H
igh/
Low
Aud
io C
ontr
olYo
u ca
n co
ntro
l aud
io ro
utin
g (s
peak
er /
earp
iece
) for
any
Priv
ate
or G
roup
Cal
l vi
a th
e de
dica
ted
spea
ker c
ontro
l key
.
How
ever
, you
can
def
ine
via
the
men
u to
ha
ve a
ll G
roup
cal
ls in
hig
h au
dio
(>
Setu
p >
Gro
up A
udio
).U
nifie
d C
onta
ct L
ist
You
can
keep
sev
eral
num
bers
(Priv
ate,
M
obile
, Hom
e, W
ork,
PA
BX
, Oth
er) f
or
the
sam
e pe
rson
und
er th
e sa
me
cont
act n
ame.
Te
xt S
ize
You
can
see
the
text
on
the
disp
lay
in
two
size
s: N
orm
al o
r Zoo
med
(
> Se
tup
> D
ispl
ay >
Tex
t Siz
e).
“My
Gro
ups”
Fol
der
You
can
sele
ct a
ny g
roup
(TM
O o
r DM
O)
and
add
it to
you
r per
sona
l fol
der.
In th
e H
ome
disp
lay,
pre
ssto
qu
ickl
y ac
cess
you
r “M
y G
roup
s” fo
lder
.
MEN
U
MEN
U
MEN
U
MEN
U
MEN
U
MEN
U
MEN
U
40