Embed Size (px)
Citation preview
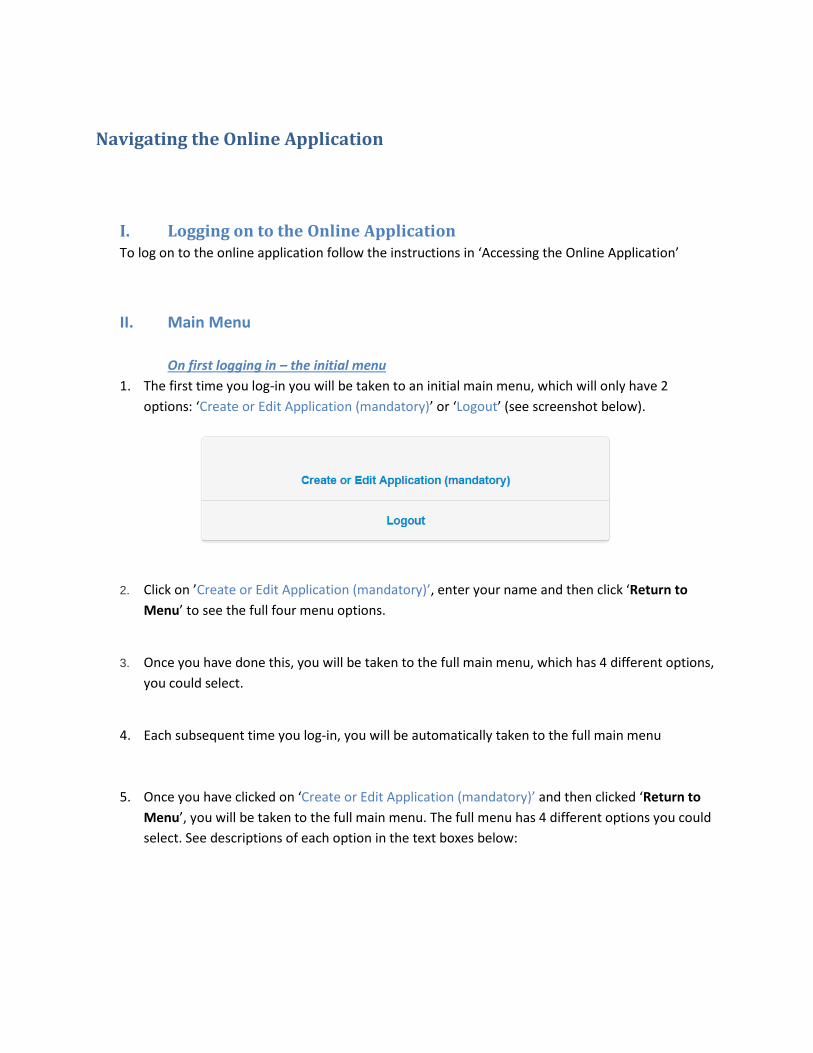
Navigating the Online Application
I. Logging on to the Online Application To log on to the online application follow the instructions in ‘Accessing the Online Application’
II. Main Menu
On first logging in – the initial menu
1. The first time you log-in you will be taken to an initial main menu, which will only have 2
options: ‘Create or Edit Application (mandatory)’ or ‘Logout’ (see screenshot below).
2. Click on ’Create or Edit Application (mandatory)’, enter your name and then click ‘Return to
Menu’ to see the full four menu options.
3. Once you have done this, you will be taken to the full main menu, which has 4 different options,
you could select.
4. Each subsequent time you log-in, you will be automatically taken to the full main menu
5. Once you have clicked on ‘Create or Edit Application (mandatory)’ and then clicked ‘Return to
Menu’, you will be taken to the full main menu. The full menu has 4 different options you could
select. See descriptions of each option in the text boxes below:
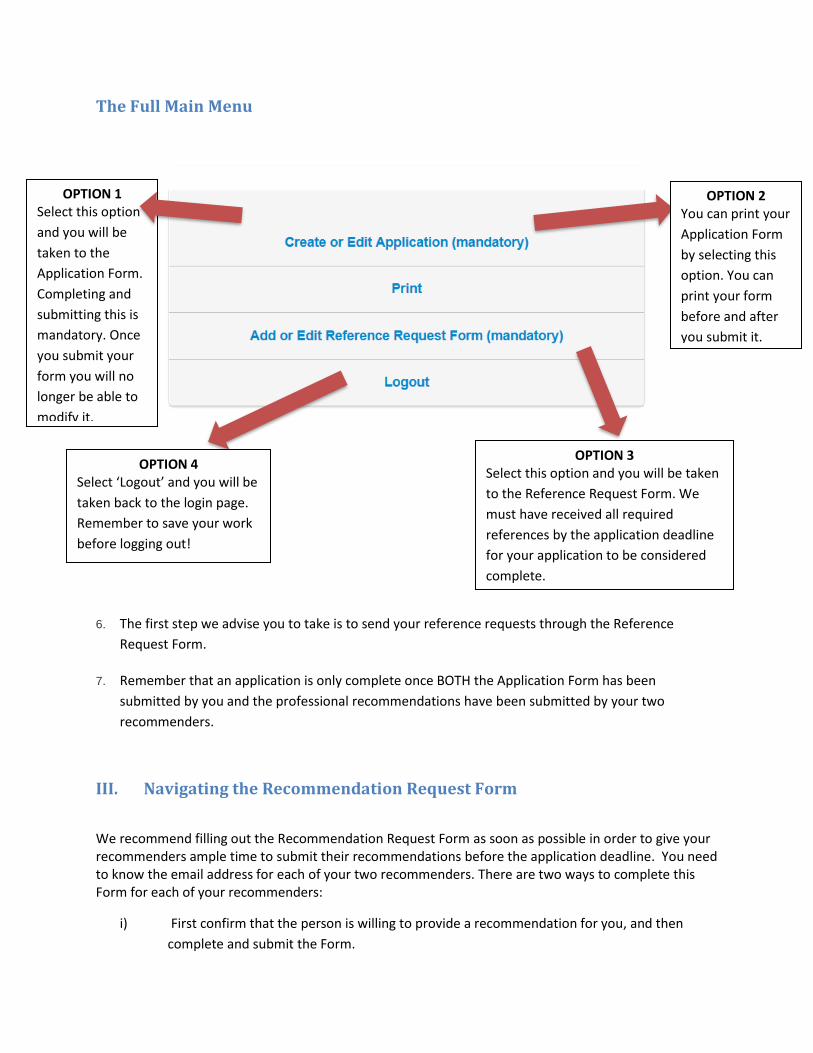
The Full Main Menu
6. The first step we advise you to take is to send your reference requests through the Reference
Request Form.
7. Remember that an application is only complete once BOTH the Application Form has been
submitted by you and the professional recommendations have been submitted by your two
recommenders.
III. Navigating the Recommendation Request Form
We recommend filling out the Recommendation Request Form as soon as possible in order to give your recommenders ample time to submit their recommendations before the application deadline. You need to know the email address for each of your two recommenders. There are two ways to complete this Form for each of your recommenders:
i) First confirm that the person is willing to provide a recommendation for you, and then
complete and submit the Form.
OPTION 1 Select this option
and you will be
taken to the
Application Form.
Completing and
submitting this is
mandatory. Once
you submit your
form you will no
longer be able to
modify it.
OPTION 2 You can print your
Application Form
by selecting this
option. You can
print your form
before and after
you submit it.
OPTION 3 Select this option and you will be taken
to the Reference Request Form. We
must have received all required
references by the application deadline
for your application to be considered
complete.
OPTION 4 Select ‘Logout’ and you will be
taken back to the login page.
Remember to save your work
before logging out!
ii) Draft and save the Recommendation Request Form, confirm that the person is willing to
provide a recommendation to you, and then submit the Form.
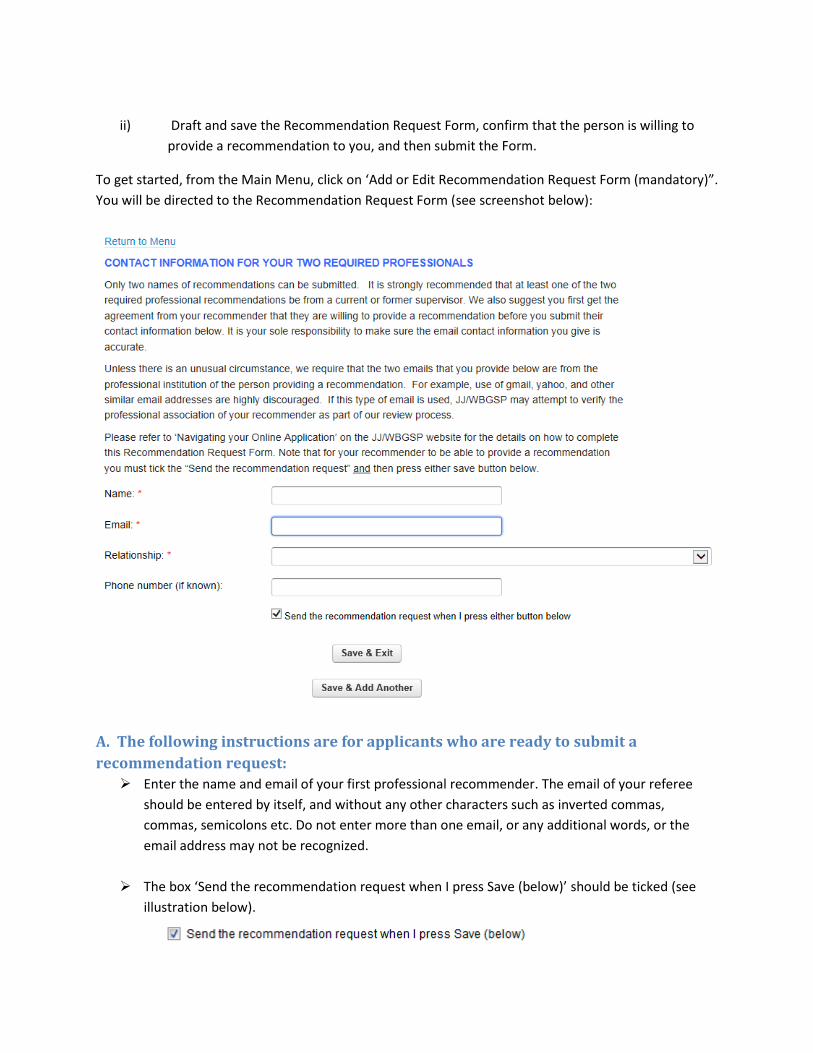
To get started, from the Main Menu, click on ‘Add or Edit Recommendation Request Form (mandatory)”.
You will be directed to the Recommendation Request Form (see screenshot below):
A. The following instructions are for applicants who are ready to submit a
recommendation request:
➢ Enter the name and email of your first professional recommender. The email of your referee
should be entered by itself, and without any other characters such as inverted commas,
commas, semicolons etc. Do not enter more than one email, or any additional words, or the
email address may not be recognized.
➢ The box ‘Send the recommendation request when I press Save (below)’ should be ticked (see
illustration below).
➢ Now you have three options:
Option 1. If you are now ready to enter your second recommendation request click ‘Save & Add
Another’.
Option 2. If you are not ready to enter your second recommendation, click ‘Save & Exit’.
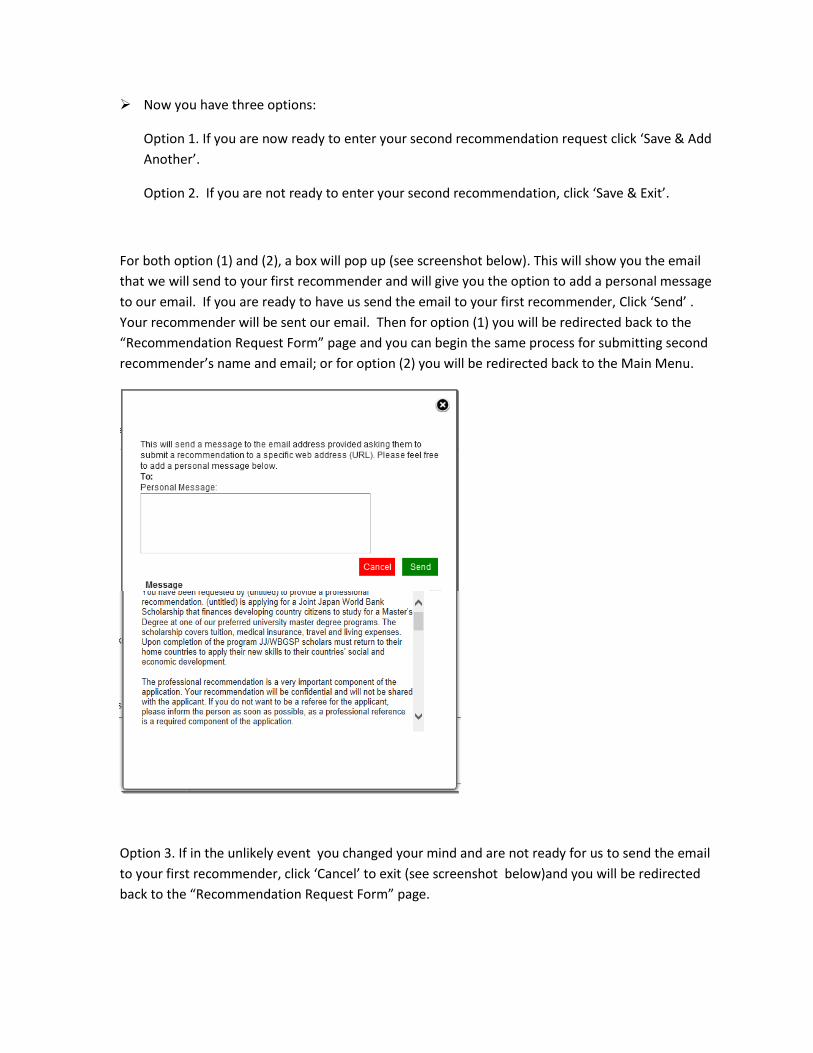
For both option (1) and (2), a box will pop up (see screenshot below). This will show you the email
that we will send to your first recommender and will give you the option to add a personal message
to our email. If you are ready to have us send the email to your first recommender, Click ‘Send’ .
Your recommender will be sent our email. Then for option (1) you will be redirected back to the
“Recommendation Request Form” page and you can begin the same process for submitting second
recommender’s name and email; or for option (2) you will be redirected back to the Main Menu.
Option 3. If in the unlikely event you changed your mind and are not ready for us to send the email
to your first recommender, click ‘Cancel’ to exit (see screenshot below)and you will be redirected
back to the “Recommendation Request Form” page.
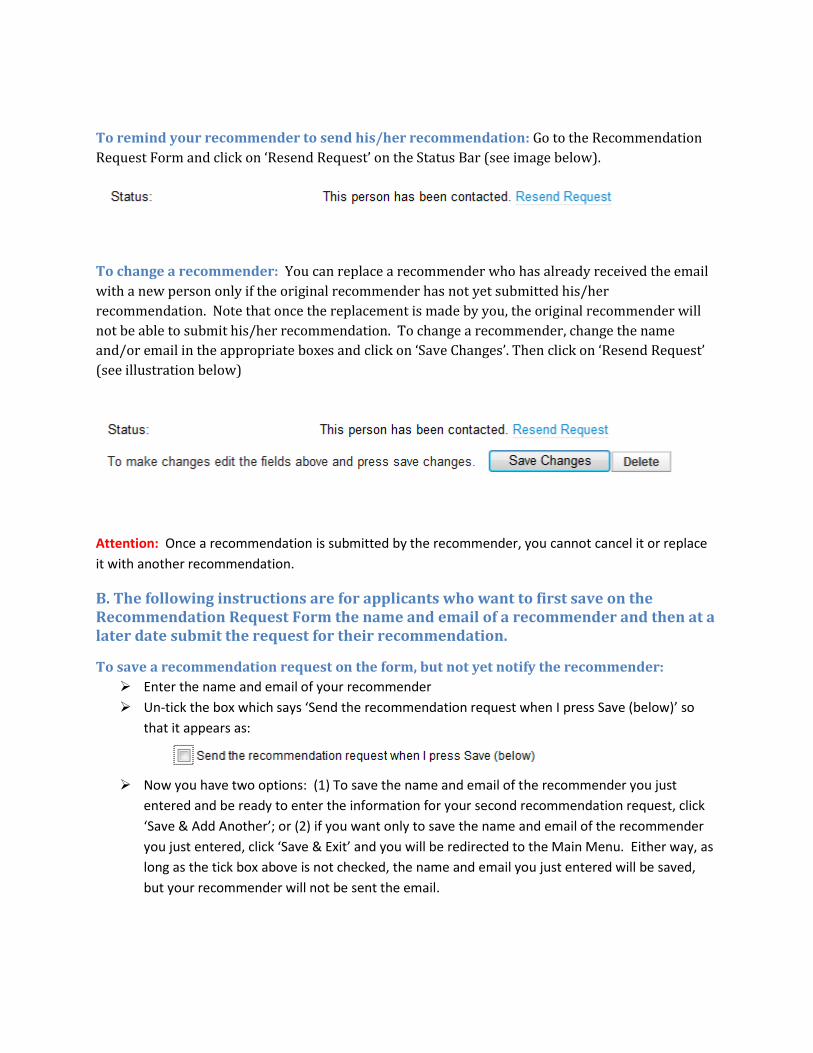
To remind your recommender to send his/her recommendation: Go to the Recommendation
Request Form and click on ‘Resend Request’ on the Status Bar (see image below).
To change a recommender: You can replace a recommender who has already received the email
with a new person only if the original recommender has not yet submitted his/her
recommendation. Note that once the replacement is made by you, the original recommender will
not be able to submit his/her recommendation. To change a recommender, change the name
and/or email in the appropriate boxes and click on ‘Save Changes’. Then click on ‘Resend Request’
(see illustration below)
Attention: Once a recommendation is submitted by the recommender, you cannot cancel it or replace
it with another recommendation.
B. The following instructions are for applicants who want to first save on the Recommendation Request Form the name and email of a recommender and then at a later date submit the request for their recommendation.
To save a recommendation request on the form, but not yet notify the recommender:
➢ Enter the name and email of your recommender
➢ Un-tick the box which says ‘Send the recommendation request when I press Save (below)’ so
that it appears as:
➢ Now you have two options: (1) To save the name and email of the recommender you just
entered and be ready to enter the information for your second recommendation request, click
‘Save & Add Another’; or (2) if you want only to save the name and email of the recommender
you just entered, click ‘Save & Exit’ and you will be redirected to the Main Menu. Either way, as
long as the tick box above is not checked, the name and email you just entered will be saved,
but your recommender will not be sent the email.
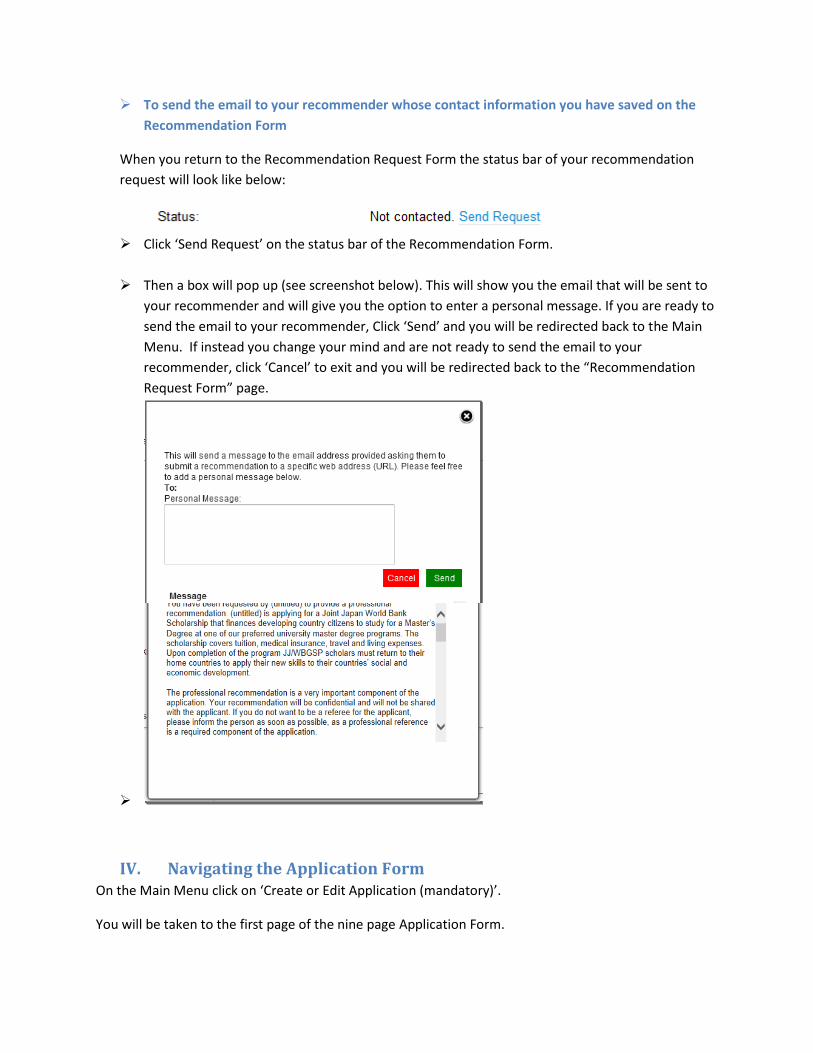
➢ To send the email to your recommender whose contact information you have saved on the
Recommendation Form
When you return to the Recommendation Request Form the status bar of your recommendation
request will look like below:
➢ Click ‘Send Request’ on the status bar of the Recommendation Form.
➢ Then a box will pop up (see screenshot below). This will show you the email that will be sent to
your recommender and will give you the option to enter a personal message. If you are ready to
send the email to your recommender, Click ‘Send’ and you will be redirected back to the Main
Menu. If instead you change your mind and are not ready to send the email to your
recommender, click ‘Cancel’ to exit and you will be redirected back to the “Recommendation
Request Form” page.
➢
IV. Navigating the Application Form On the Main Menu click on ‘Create or Edit Application (mandatory)’.
You will be taken to the first page of the nine page Application Form.
You will need to complete all nine sections (those marked with a red or black star “ * “ are mandatory)
and click ‘submit’ before your Application Form is submitted.
The nine sections of the Application form include:
1. Personal Data
2. Education
3. Preferred University Masters Program
4. Employment
5. Volunteer/Community involvement
6. Statement of Purpose
7. Required Documents
8. Signature Page
9. Review
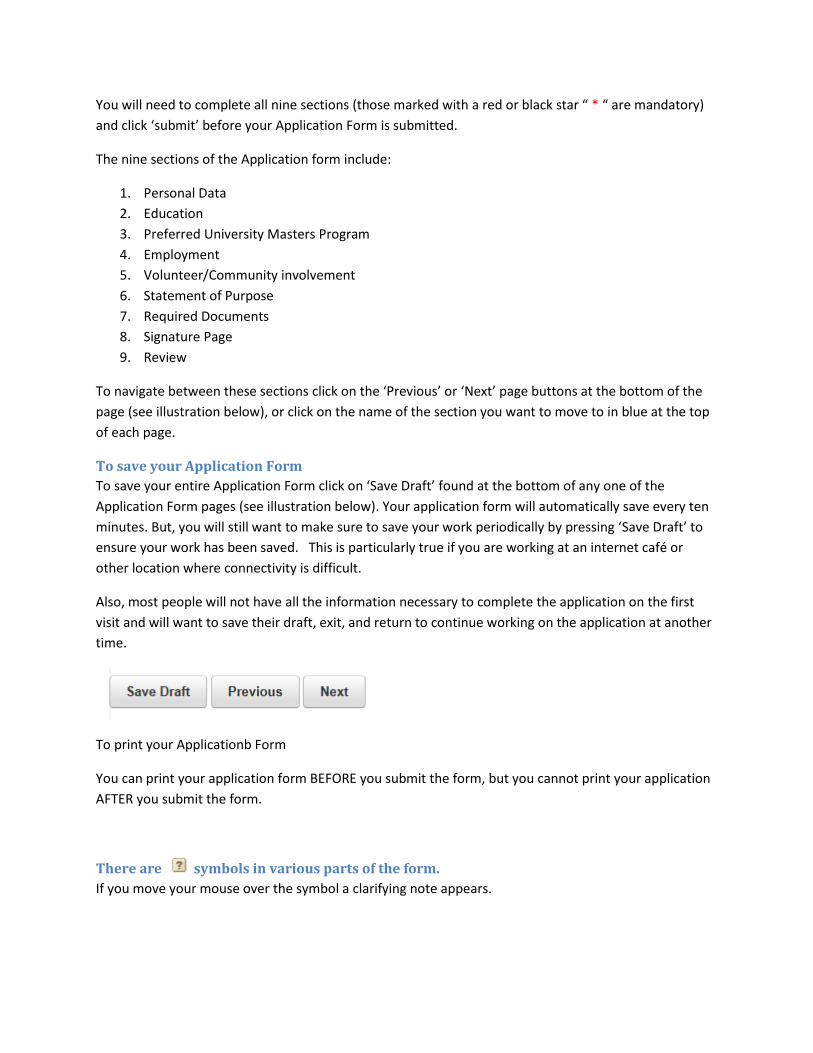
To navigate between these sections click on the ‘Previous’ or ‘Next’ page buttons at the bottom of the
page (see illustration below), or click on the name of the section you want to move to in blue at the top
of each page.
To save your Application Form
To save your entire Application Form click on ‘Save Draft’ found at the bottom of any one of the
Application Form pages (see illustration below). Your application form will automatically save every ten
minutes. But, you will still want to make sure to save your work periodically by pressing ‘Save Draft’ to
ensure your work has been saved. This is particularly true if you are working at an internet café or
other location where connectivity is difficult.
Also, most people will not have all the information necessary to complete the application on the first
visit and will want to save their draft, exit, and return to continue working on the application at another
time.
To print your Applicationb Form
You can print your application form BEFORE you submit the form, but you cannot print your application
AFTER you submit the form.
There are symbols in various parts of the form.
If you move your mouse over the symbol a clarifying note appears.
Accuracy of dates requested
When filling in your date of your signature, the exact month, day and year are required. However, for all
other dates requested we request you be accurate only regarding the month and year. The day can be
approximated.
Uploading your supporting documents
As detailed in the Application Guidelines, applicants are required to upload documents on the ‘Required
Documents’ page of the Application Form.
Documents must be uploaded in one of the following formats: pdf, doc, docx, xlx, xlsx, jpg, png.
Zip, tif and htm files are NOT acceptable formats.
Please make sure your documents are in the acceptable format before uploading them.
In the case you have more than one employer, please scan all of your proofs of employment together in
into one file and upload that file on the respective field. Do the same for #2a if you are required to
upload translations.
Signing your Application Form
After reading and agreeing to the conditions listed on the Signature Page, you must sign the form by
typing your name in the “signature” field and enter the date. Please print your name as it appears in the
PERSONAL DATA section of the application form in the following order:
(i) first (given) name
(ii) family name (otherwise known as surname)
Submitting your Application Form
Once you have filled out the 8 pages of your Application Form you will be taken to page 9: the ‘review’
page. Before you submit your form make sure that you have:
1. Completed all the ‘required’ questions (indicated with a red star *);
2. Uploaded all the required documents
3. Reviewed and Saved your Application Form
To submit, first save a draft of your Application at the bottom of the review page, and then click on the
submit button at the bottom of the review page (see illustration below):
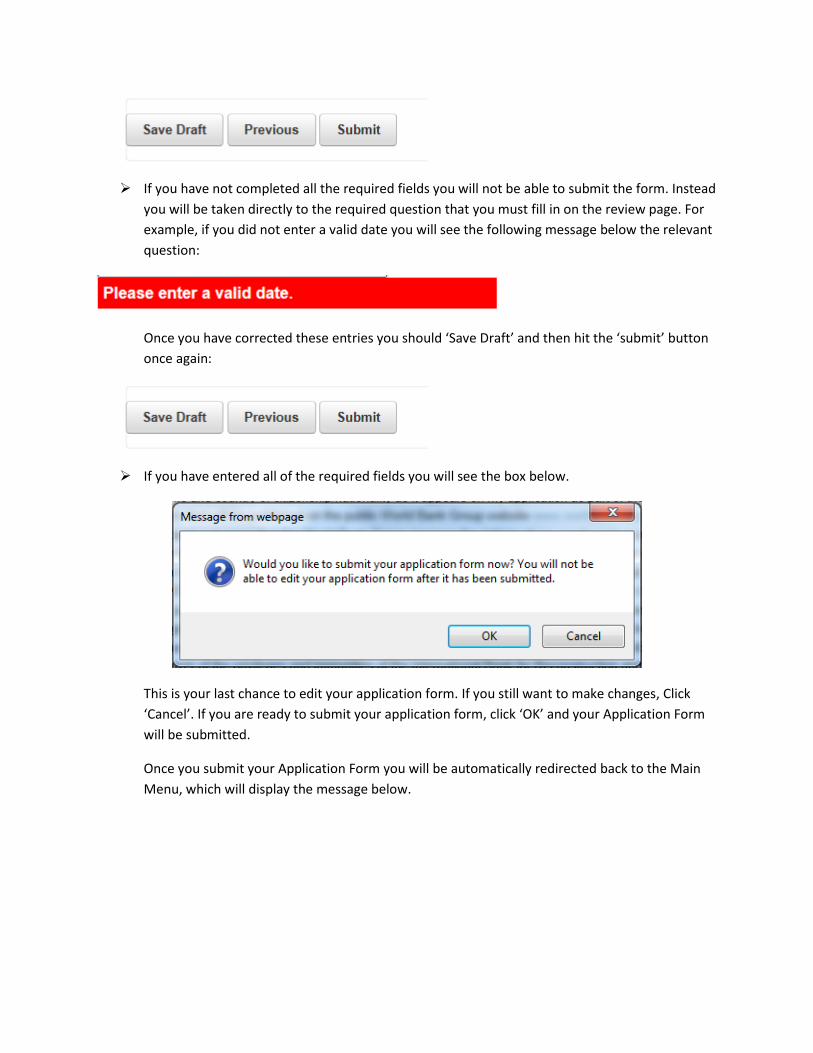
➢ If you have not completed all the required fields you will not be able to submit the form. Instead
you will be taken directly to the required question that you must fill in on the review page. For
example, if you did not enter a valid date you will see the following message below the relevant
question:
Once you have corrected these entries you should ‘Save Draft’ and then hit the ‘submit’ button
once again:
➢ If you have entered all of the required fields you will see the box below.
This is your last chance to edit your application form. If you still want to make changes, Click
‘Cancel’. If you are ready to submit your application form, click ‘OK’ and your Application Form
will be submitted.
Once you submit your Application Form you will be automatically redirected back to the Main
Menu, which will display the message below.
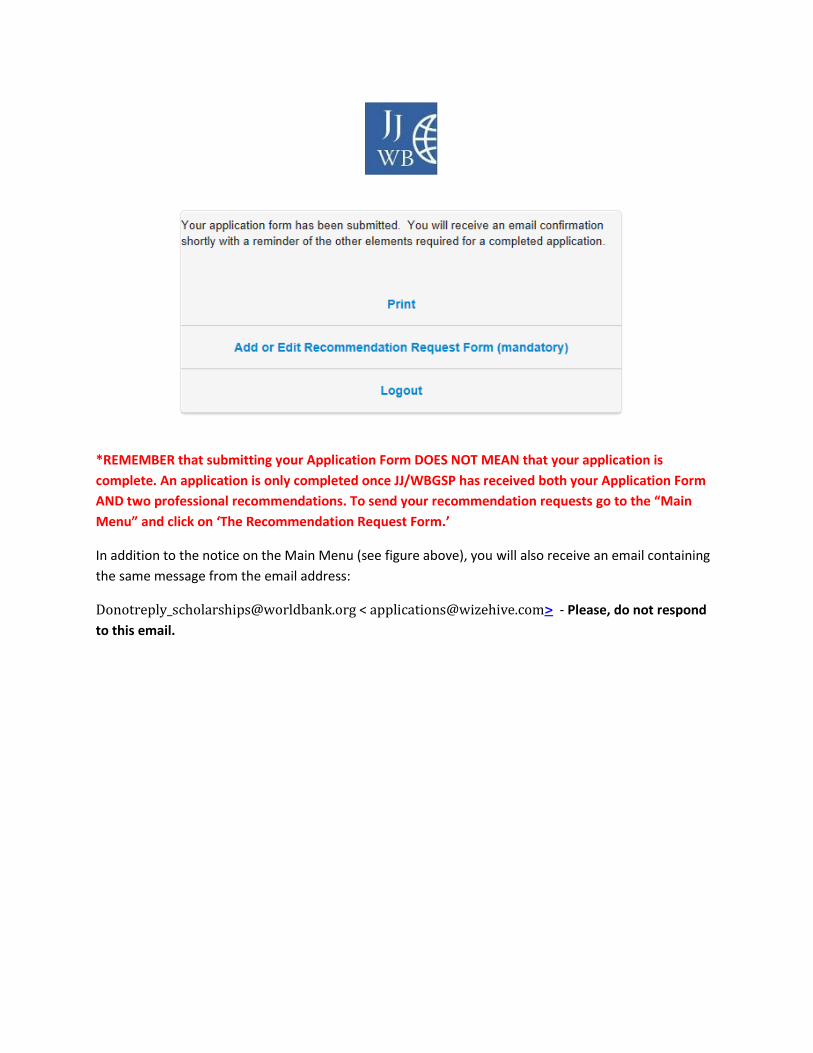
*REMEMBER that submitting your Application Form DOES NOT MEAN that your application is
complete. An application is only completed once JJ/WBGSP has received both your Application Form
AND two professional recommendations. To send your recommendation requests go to the “Main
Menu” and click on ‘The Recommendation Request Form.’
In addition to the notice on the Main Menu (see figure above), you will also receive an email containing
the same message from the email address:
[email protected] < [email protected]> - Please, do not respond
to this email.