Embed Size (px)
Citation preview

7/30/2019 ohaus js-10.pdf
http://slidepdf.com/reader/full/ohaus-js-10pdf 1/25
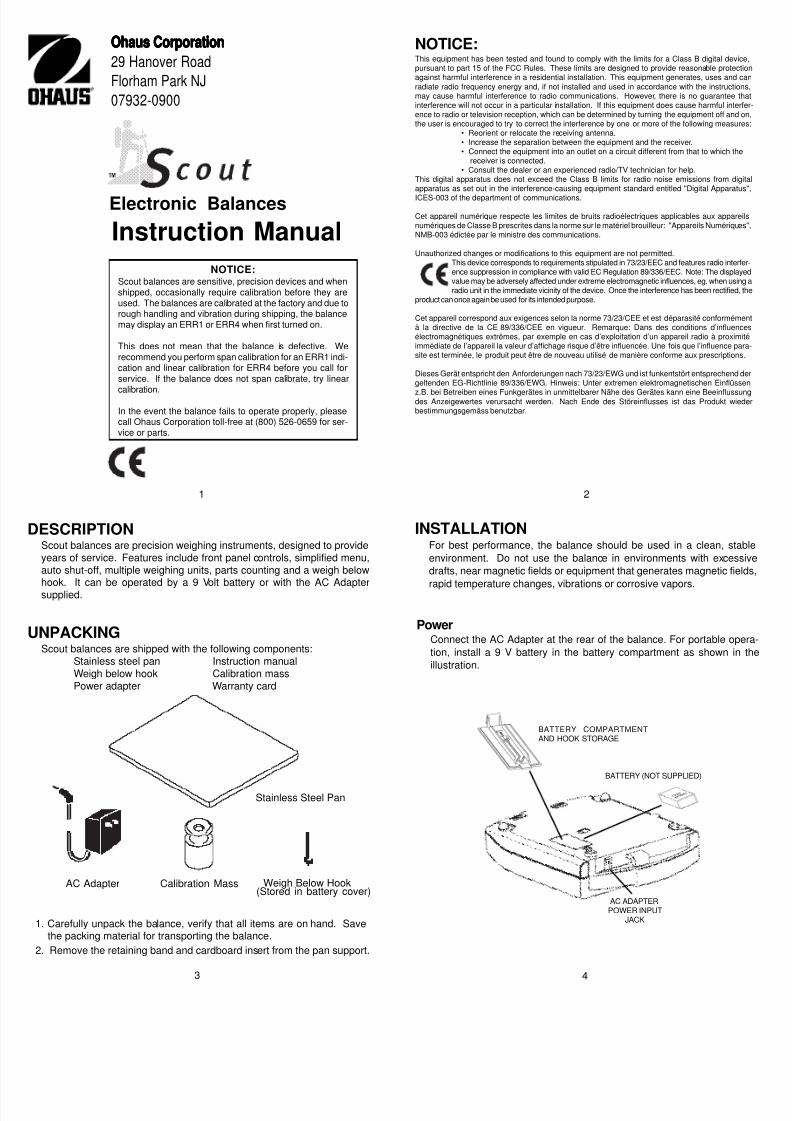
Ohaus Corporation
29 Hanover Road
Florham Park NJ
07932-0900
Electronic Balances
M o d e O f f
Z e r o O n
g
S c o u t I I

7/30/2019 ohaus js-10.pdf
http://slidepdf.com/reader/full/ohaus-js-10pdf 2/25
NOTICE:This equipment has been tested and found to comply with the limits for aClass B digital device, pursuant to part 15 of the FCC Rules. These limits aredesigned to provide reasonable protection against harmful interference in aresidential installation. This equipment generates, uses and can radiate radio
frequency energy and, if not installed and used in accordance with theinstructions, may cause harmful interference to radio communications.However, there is no guarantee that interference will not occur in a particularinstallation. If this equipment does cause harmful interference to radio ortelevision reception, which can be determined by turning the equipment offand on, the user is encouraged to try to correct the interference by one ormore of the following measures: Reorient or relocate the receiving antenna.• Increase the separation between the equipment and the receiver.• Connect the equipment into an outlet on a circuit different from that to which
the receiver is connected.• Consult the dealer or an experienced radio/TV technician for help.
This digital apparatus does not exceed the Class B limits for radio noiseemissions from digital apparatus as set out in the interference-causingequipment standard entitled "Digital Apparatus", ICES-003 of the departmentof communications.
Cet appareil numérique respecte les limites de bruits radioélectriquesapplicables aux appareils numériques de Classe B prescrites dans la normesur le matériel brouilleur: "Appareils Numériques", NMB-003 édictée par leministre des communications.
Unauthorized changes or modifications to this equipment are not permitted.
This device corresponds to requirements stipulated in 73/23/EEC andfeatures radio interference suppression in compliance with valid ECRegulation 89/336/EEC. Note: The displayed value may be adversely
affected under extreme electromagnetic influences, eg. when using a radio unitin the immediate vicinity of the device. Once the interference has been rectified,the product can once again be used for its intended purpose.
Cet appareil correspond aux exigences selon la norme 73/23/CEE et estdéparasité conformément à la directive de la CE 89/336/CEE en vigueur.Remarque: Dans des conditions d’influences électromagnétiques extrêmes, parexemple en cas d’exploitation d’un appareil radio à proximité immédiate deI’appareil la valeur d’affichage risque d’être influencée. Une fois que l’influence
parasite est terminée, le produit peut être de nouveau utilisé de manièreconforme aux prescriptions.
7/30/2019 ohaus js-10.pdf
http://slidepdf.com/reader/full/ohaus-js-10pdf 3/25
TABLE OF CONTENTS
DESCRIPTION .................................................................................................4
UNPACKING .....................................................................................................4
INSTALLATION .................................................................................................5
Power .................................................................................................5Pan Installation ..................................................................................5
Weigh Below Hook ............................................................................6
IMPORTANT INFORMATION ............................................................................6
TURNING THE BALANCE ON .........................................................................7
TURNING THE BALANCE OFF ........................................................................7
WEIGHING ........................................................................................................7
TARING ............................................................................................................7
MENU DESCRIPTION ......................................................................................8
AUTO SHUT-OFF ACTIVATION ......................................................................... 8
SPAN CALIBRATION ........................................................................................9
LINEARITY CALIBRATION ...............................................................................9
ACTIVATING UNITS ....................................................................................... 10
PARTS COUNTING ....................................................................................... 10
PRINT MENU................................................................................................. 11
SETTING PRINT MENU FUNCTIONS .......................................................... 12Entering the Print Menu .................................................................. 12
Power On/Off ................................................................................... 12
Baud Rate ....................................................................................... 12
Data Bits .......................................................................................... 13
Parity Bit .......................................................................................... 13
Stop Bits .......................................................................................... 13
Auto Print ......................................................................................... 13
Stable Data Output Only ................................................................. 14
PRINTING ...................................................................................................... 14
RS232 INTERFACE....................................................................................... 14
Hardware ........................................................................................ 14
RS232 Commands ......................................................................... 15
Output Formats ................................................................................ 15
Error Codes ..................................................................................... 16
CARE AND MAINTENANCE ......................................................................... 16TROUBLESHOOTING ................................................................................... 16
PARTS INFORMATION 17
7/30/2019 ohaus js-10.pdf
http://slidepdf.com/reader/full/ohaus-js-10pdf 4/25
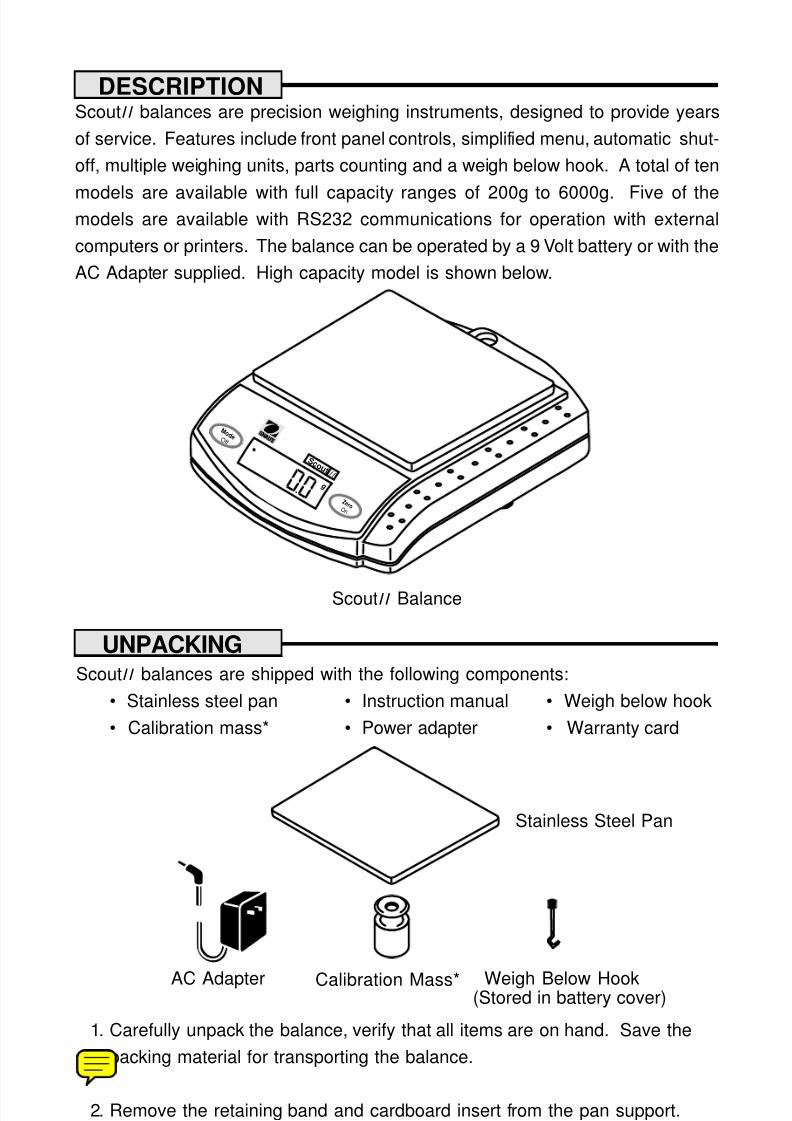
ScoutI I balances are precision weighing instruments, designed to provide years
of service. Features include front panel controls, simplified menu, automatic shut-
off, multiple weighing units, parts counting and a weigh below hook. A total of ten
models are available with full capacity ranges of 200g to 6000g. Five of themodels are available with RS232 communications for operation with external
computers or printers. The balance can be operated by a 9 Volt battery or with the
AC Adapter supplied. High capacity model is shown below.
DESCRIPTION
M o d e O f f
Z e r o O n
g
S c o u t I I
ScoutI I Balance
Calibration Mass*
Stainless Steel Pan
Weigh Below HookAC Adapter
UNPACKINGScoutI I balances are shipped with the following components:
• Stainless steel pan • Instruction manual • Weigh below hook
• Calibration mass* • Power adapter • Warranty card
(Stored in battery cover)

7/30/2019 ohaus js-10.pdf
http://slidepdf.com/reader/full/ohaus-js-10pdf 5/25
9 V O L T
B A T T E R
Y
BATTERY (NOT SUPPLIED)
AC ADAPTERPOWER INPUT JACK
BATTERY COMPARTMENT ANDHOOK STORAGE
RS232 JACK(CERTAIN MODELS)
PANSUPPORT
PAN
INSTALLATIONFor best performance, the balance should be used in a clean, stable environment.
Do not use the balance in environments with excessive drafts, near magnetic
fields or equipment that generates magnetic fields, rapid temperature changes,
vibrations or corrosive vapors.
PowerConnect the AC Adapter at the rear of the balance. For portable operation, install
a 9 V battery in the battery compartment as shown in the illustration.
Pan InstallationPlace the pan over the pan support as shown in the illustration.
M o d e O f f
Z
g
S c o u t I I
7/30/2019 ohaus js-10.pdf
http://slidepdf.com/reader/full/ohaus-js-10pdf 6/25
BOTTOM OF
BALANCE
WEIGH BELOW HOOK
SECURITYBRACKET
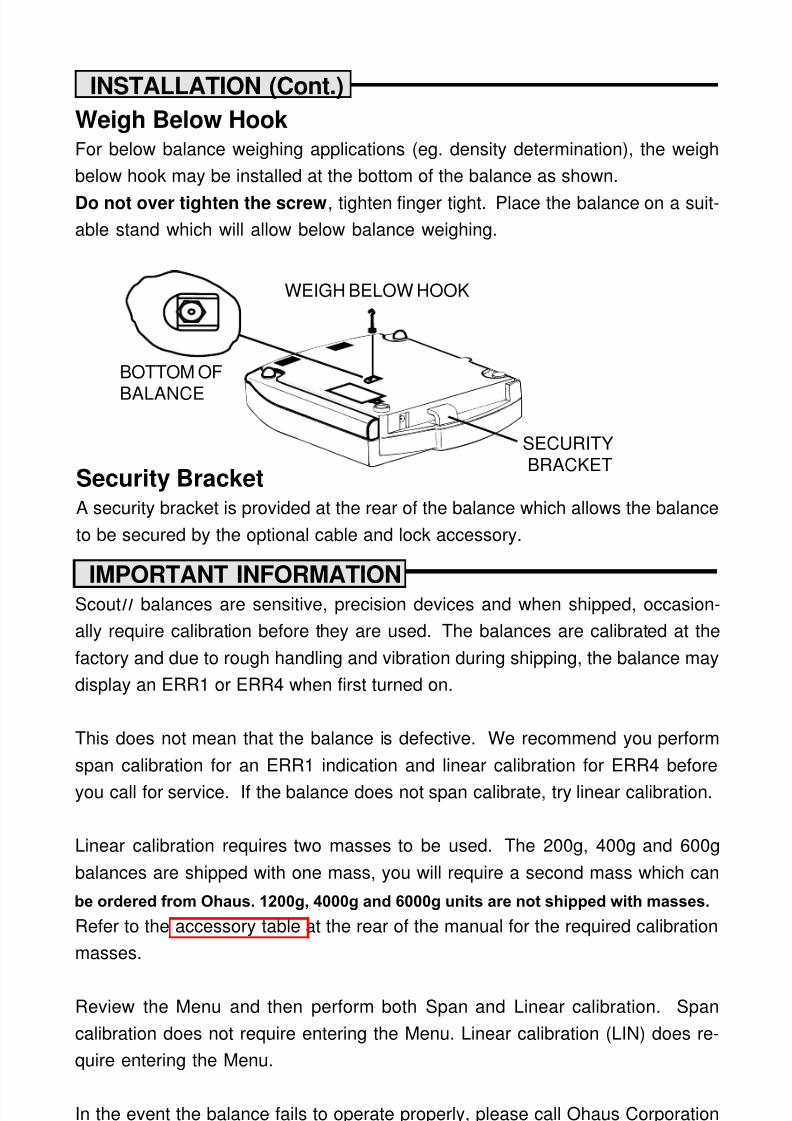
Weigh Below HookFor below balance weighing applications (eg. density determination), the weigh
below hook may be installed at the bottom of the balance as shown.
Do not over tighten the screw, tighten finger tight. Place the balance on a suit-
able stand which will allow below balance weighing.
Security BracketA security bracket is provided at the rear of the balance which allows the balance
to be secured by the optional cable and lock accessory.
IMPORTANT INFORMATIONScoutI I balances are sensitive, precision devices and when shipped, occasion-
ally require calibration before they are used. The balances are calibrated at the
factory and due to rough handling and vibration during shipping, the balance may
display an ERR1 or ERR4 when first turned on.
This does not mean that the balance is defective. We recommend you perform
span calibration for an ERR1 indication and linear calibration for ERR4 before
you call for service. If the balance does not span calibrate, try linear calibration.
Linear calibration requires two masses to be used. The 200g, 400g and 600g
balances are shipped with one mass, you will require a second mass which can
be ordered from Ohaus. 1200g and 6000g balances are not shipped with masses.
Refer to the accessory table at the rear of the manual for the required calibration
masses.
Review the Menu and then perform both Span and Linear calibration. Span
INSTALLATION (Cont.)
be ordered from Ohaus. 1200g, 4000g and 6000g units are not shipped with masses.
7/30/2019 ohaus js-10.pdf
http://slidepdf.com/reader/full/ohaus-js-10pdf 7/25
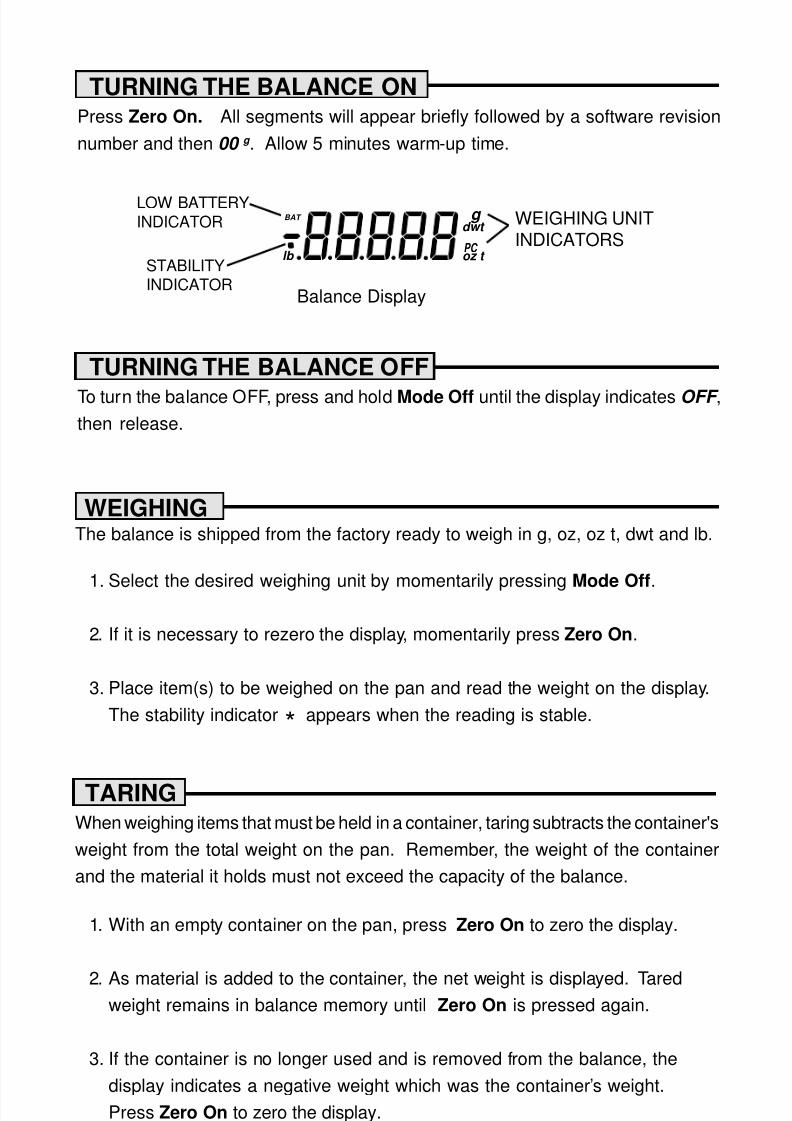
STABILITYINDICATOR
LOW BATTERY
INDICATOR WEIGHING UNITINDICATORS
Balance Display
*
TURNING THE BALANCE ONPress Zero On. All segments will appear briefly followed by a software revision
number and then 00 g . Allow 5 minutes warm-up time.
TURNING THE BALANCE OFF
To turn the balance OFF, press and hold Mode Off until the display indicates OFF ,
then release.
WEIGHINGThe balance is shipped from the factory ready to weigh in g, oz, oz t, dwt and lb.
1. Select the desired weighing unit by momentarily pressing Mode Off.
2. If it is necessary to rezero the display, momentarily press Zero On.
3. Place item(s) to be weighed on the pan and read the weight on the display.
The stability indicator appears when the reading is stable.
TARINGWhen weighing items that must be held in a container, taring subtracts the container's
weight from the total weight on the pan. Remember, the weight of the container
and the material it holds must not exceed the capacity of the balance.
1. With an empty container on the pan, press Zero On to zero the display.
2. As material is added to the container, the net weight is displayed. Taredweight remains in balance memory until Zero On is pressed again.
BAT
PC oz t
dwt g
lb
7/30/2019 ohaus js-10.pdf
http://slidepdf.com/reader/full/ohaus-js-10pdf 8/25
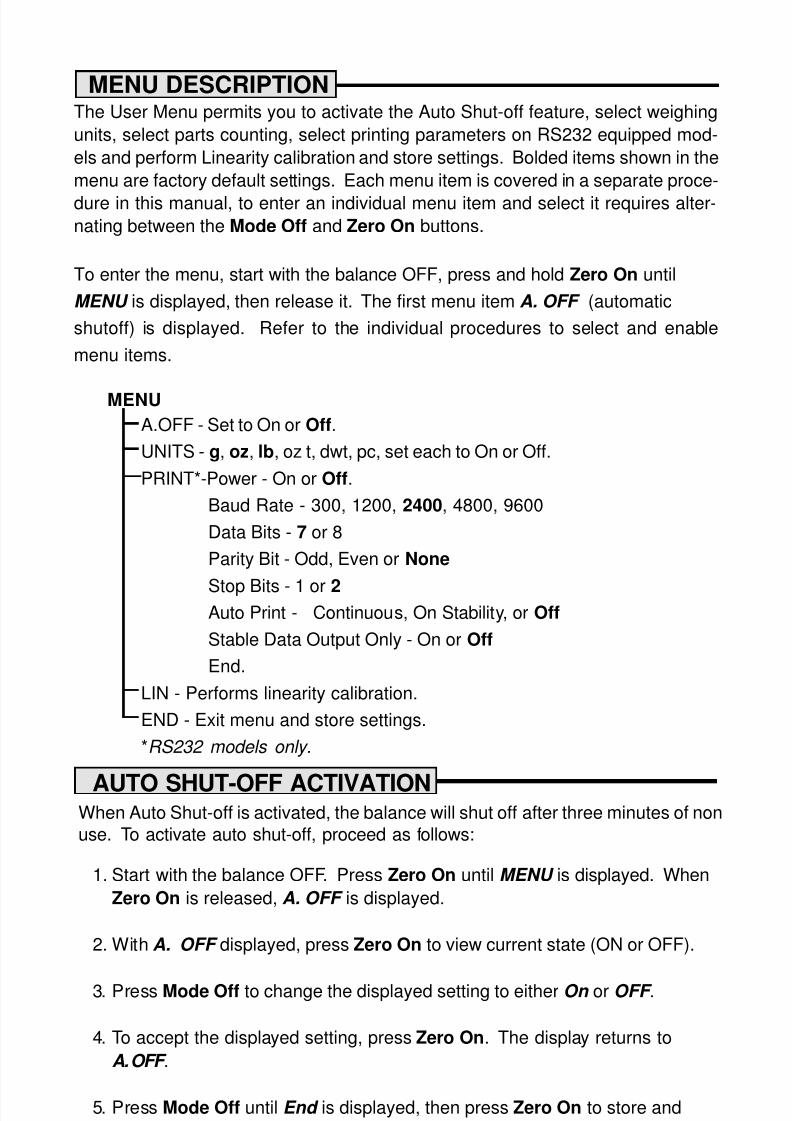
MENU DESCRIPTIONThe User Menu permits you to activate the Auto Shut-off feature, select weighing
units, select parts counting, select printing parameters on RS232 equipped mod-
els and perform Linearity calibration and store settings. Bolded items shown in the
menu are factory default settings. Each menu item is covered in a separate proce-
dure in this manual, to enter an individual menu item and select it requires alter-
nating between the Mode Off and Zero On buttons.
To enter the menu, start with the balance OFF, press and hold Zero On until
MENU is displayed, then release it. The first menu item A. OFF (automatic
shutoff) is displayed. Refer to the individual procedures to select and enable
menu items.
MENU
A.OFF - Set to On or Off.
UNITS - g, oz, lb, oz t, dwt, pc, set each to On or Off.
PRINT*-Power - On or Off.
Baud Rate - 300, 1200, 2400, 4800, 9600
Data Bits - 7 or 8
Parity Bit - Odd, Even or None
Stop Bits - 1 or 2Auto Print - Continuous, On Stability, or Off
Stable Data Output Only - On or Off
End.
LIN - Performs linearity calibration.
END - Exit menu and store settings.
*RS232 models only.
AUTO SHUT-OFF ACTIVATIONWhen Auto Shut-off is activated, the balance will shut off after three minutes of non
use. To activate auto shut-off, proceed as follows:
1. Start with the balance OFF. Press Zero On until MENU is displayed. When
Zero On is released, A. OFF is displayed.
2. With A. OFF displayed, press Zero On to view current state (ON or OFF).
3. Press Mode Off to change the displayed setting to either On or OFF .
7/30/2019 ohaus js-10.pdf
http://slidepdf.com/reader/full/ohaus-js-10pdf 9/25
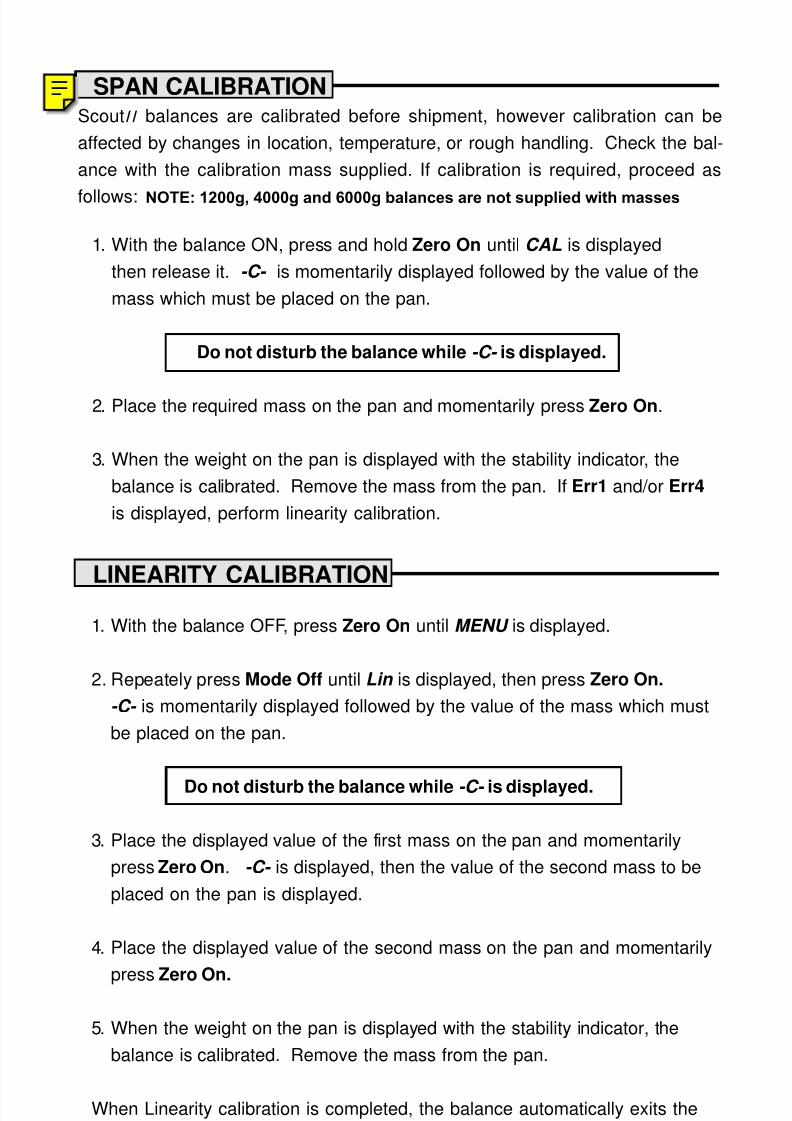
LINEARITY CALIBRATION
1. With the balance OFF, press Zero On until MENU is displayed.
2. Repeately press Mode Off until Lin is displayed, then press Zero On.
-C- is momentarily displayed followed by the value of the mass which must
be placed on the pan.
Do not disturb the balance while -C- is displayed.
3. Place the displayed value of the first mass on the pan and momentarily
press Zero On. -C- is displayed, then the value of the second mass to be
placed on the pan is displayed.
4. Place the displayed value of the second mass on the pan and momentarily
press Zero On.
SPAN CALIBRATIONScoutI I balances are calibrated before shipment, however calibration can be
affected by changes in location, temperature, or rough handling. Check the bal-
ance with the calibration mass supplied. If calibration is required, proceed as
follows: NOTE: 1200g and 6000g balances are not supplied with masses.
1. With the balance ON, press and hold Zero On until CAL is displayed
then release it. -C- is momentarily displayed followed by the value of the
mass which must be placed on the pan.
Do not disturb the balance while -C- is displayed.
2. Place the required mass on the pan and momentarily press Zero On.
3. When the weight on the pan is displayed with the stability indicator, the
balance is calibrated. Remove the mass from the pan. If Err1 and/or Err4
is displayed, perform linearity calibration.
NOTE: 1200g, 4000g and 6000g balances are not supplied with masses
7/30/2019 ohaus js-10.pdf
http://slidepdf.com/reader/full/ohaus-js-10pdf 10/25
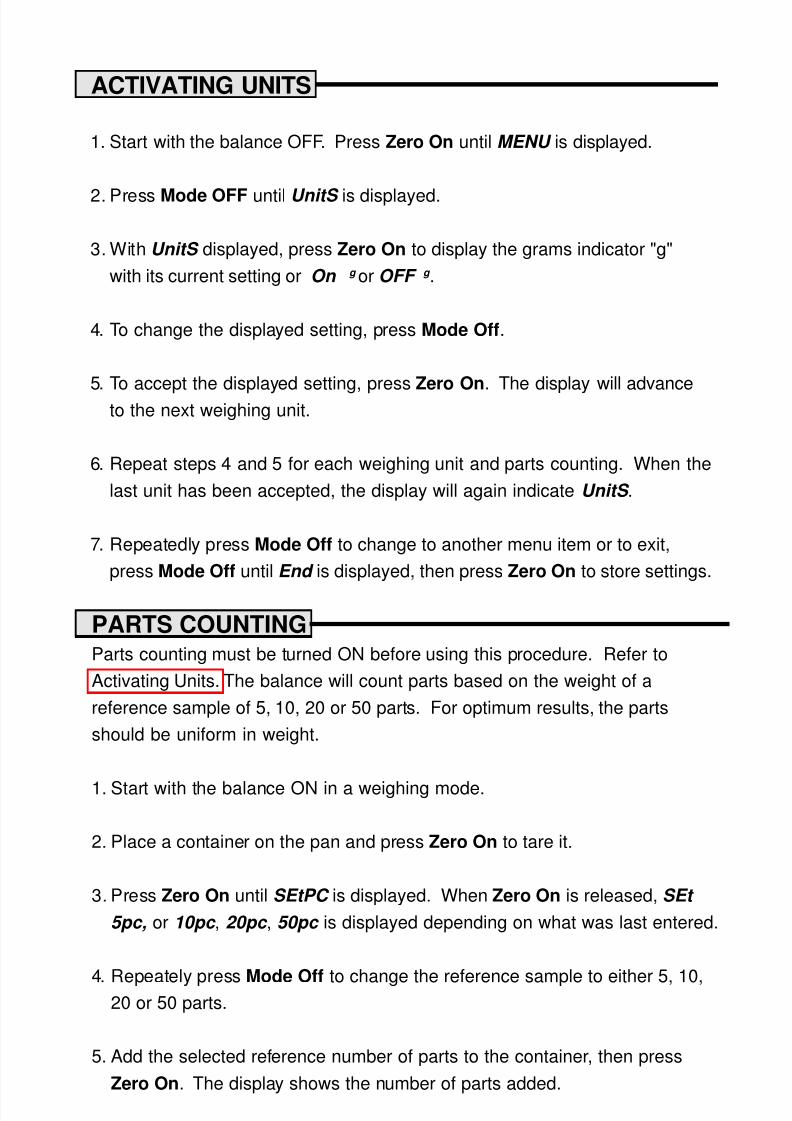
ACTIVATING UNITS
1. Start with the balance OFF. Press Zero On until MENU is displayed.
2. Press Mode OFF until UnitS is displayed.
3. With UnitS displayed, press Zero On to display the grams indicator "g"
with its current setting or On g or OFF g .
4. To change the displayed setting, press Mode Off.
5. To accept the displayed setting, press Zero On. The display will advanceto the next weighing unit.
6. Repeat steps 4 and 5 for each weighing unit and parts counting. When the
last unit has been accepted, the display will again indicate UnitS .
7. Repeatedly press Mode Off to change to another menu item or to exit,
press Mode Off until End is displayed, then press Zero On to store settings.
PARTS COUNTINGParts counting must be turned ON before using this procedure. Refer to
Activating Units. The balance will count parts based on the weight of a
reference sample of 5, 10, 20 or 50 parts. For optimum results, the parts
should be uniform in weight.
1. Start with the balance ON in a weighing mode.
2. Place a container on the pan and press Zero On to tare it.
3. Press Zero On until SEtPC is displayed. When Zero On is released, SEt
5pc, or 10pc , 20pc , 50pc is displayed depending on what was last entered.
4. Repeately press Mode Off to change the reference sample to either 5, 10,20 or 50 parts.
7/30/2019 ohaus js-10.pdf
http://slidepdf.com/reader/full/ohaus-js-10pdf 11/25
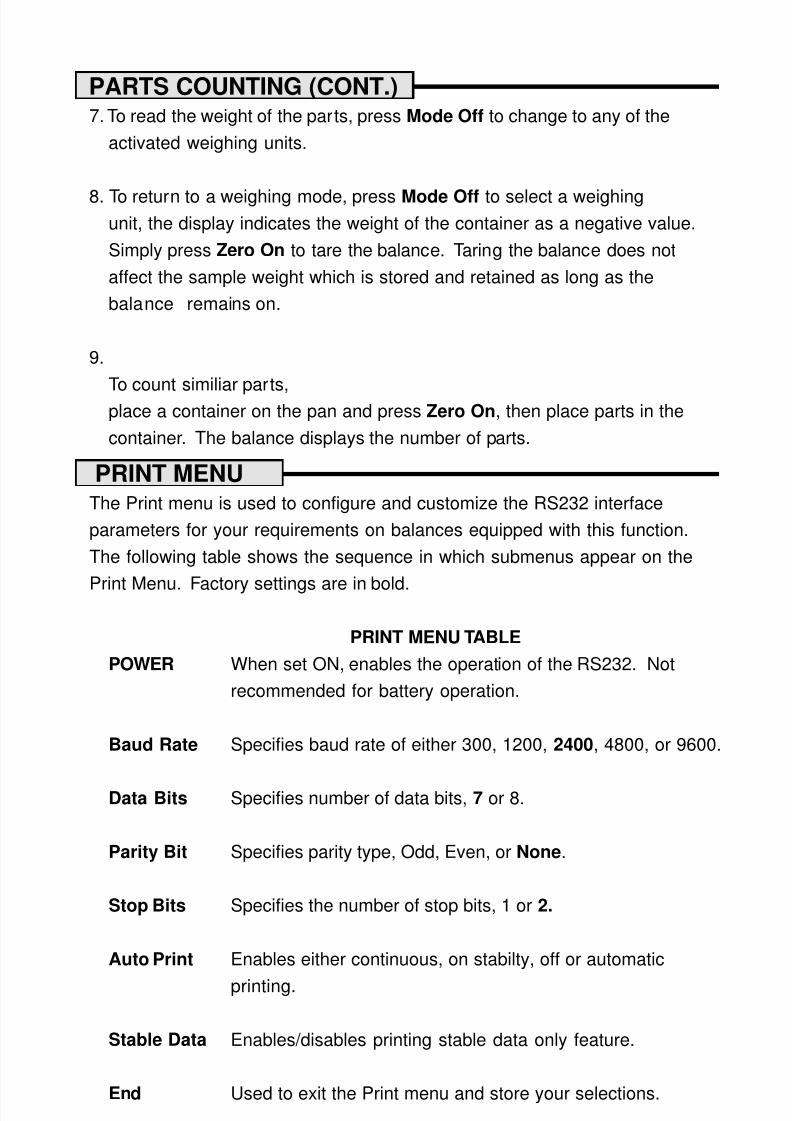
PARTS COUNTING (CONT.)7. To read the weight of the parts, press Mode Off to change to any of the
activated weighing units.
8. To return to a weighing mode, press Mode Off to select a weighingunit, the display indicates the weight of the container as a negative value.
Simply press Zero On to tare the balance. Taring the balance does not
affect the sample weight which is stored and retained as long as the
balance remains on.
9.
To count similiar parts,place a container on the pan and press Zero On, then place parts in the
container. The balance displays the number of parts.
PRINT MENUThe Print menu is used to configure and customize the RS232 interface
parameters for your requirements on balances equipped with this function.
The following table shows the sequence in which submenus appear on the
Print Menu. Factory settings are in bold.
PRINT MENU TABLE
POWER When set ON, enables the operation of the RS232. Not
recommended for battery operation.
Baud Rate Specifies baud rate of either 300, 1200, 2400, 4800, or 9600.
Data Bits Specifies number of data bits, 7 or 8.
Parity Bit Specifies parity type, Odd, Even, or None.
Stop Bits Specifies the number of stop bits, 1 or 2.
Auto Print Enables either continuous, on stabilty, off or automatic
printing.
7/30/2019 ohaus js-10.pdf
http://slidepdf.com/reader/full/ohaus-js-10pdf 12/25
SETTING PRINT MENU FUNCTIONSThis procedure permits you to set one or all of the RS232 communication param-
eters on balances equipped with RS232. Each parameter can be entered and set
individually.
ENTERING THE PRINT MENU1. Start with the balance OFF. Press Zero On until MENU is displayed.
2. Press Mode OFF until Print is displayed.
3. With Print displayed, press Zero On until PoWr is displayed. You may now
select to change any of the parameters in Power, Baud Rate, Data Bits,
Parity Bit, Stop Bits, Auto Print, Stable Data or End which saves all settings.
4. By repeately pressing Mode Off, you can enter any one of the above print
menu items. See following procedures.
POWER ON/OFF
1. With PoWr displayed, press Zero On.
2. Press Mode Off to change the displayed setting to On orOFF .
3. To accept the displayed setting, press Zero On. The display returns to
PoWr . To advance to Baud Rate, press Mode Off. If you don’t want to
change any other settings, press Mode Off until End is displayed, then
press Zero On to save settings.
BAUD RATE
1. With bAud displayed, press Zero On until either 300, 1200, 2400, 4800 or9600 is displayed.
2. Press Mode Off to change the displayed setting to either 300, 1200, 2400,
4800 or 9600 baud.
3. To accept the displayed setting, press Zero On. The display returns to
bAud . To advance to Data Bits, press Mode Off. If you don’t want to change
any other settings, press Mode Off untilEnd is displayed, then press Zero
On to sa e settings
7/30/2019 ohaus js-10.pdf
http://slidepdf.com/reader/full/ohaus-js-10pdf 13/25
DATA BITS
1. With dATa displayed, press Zero On until -7- or -8- is displayed.
2. Press Mode Off to change the displayed setting to either -7- or -8-.
3. To accept the displayed setting, press Zero On. The display returns to
dAtA. To advance to Parity Bit, press Mode Off. If you don’t want to change
any other settings, press the Mode Off until End is displayed, then press
Zero On to save setting.
PARITY BIT
1. With PAr displayed, press Zero On until Odd, EvEn or nonE is displayed.
2. Press Mode Off to change the displayed setting to either Odd, EvEn or
nonE.
3. To accept the displayed setting, press Zero On. The display returns to
PAr . To advance to Stop Bits, press Mode Off. If you don’t want to change
any other settings, press the Mode Off until End is displayed, then press
Zero On to save setting.
STOP BITS
1. With StoP displayed, press Zero On until either -1- or -2- is displayed.
2. Press Mode Off to change the displayed setting to either -1- or -2-.
3. To accept the displayed setting, press Zero On. The display returns to
StoP . To advance to Auto Print, press Mode Off. If you don’t want to change
any other settings, press the Mode Off until End is displayed, then press
Zero On to save setting.
AUTO PRINT
1. With APrnt displayed, press Zero On until OnStb, OFF or Cont is displayed.
2. Press Mode Off to change the displayed setting to either , OnStb, OFF orCont .
SETTING PRINT MENU FUNCTIONS (CONT.)
7/30/2019 ohaus js-10.pdf
http://slidepdf.com/reader/full/ohaus-js-10pdf 14/25
STABLE DATA OUTPUT ONLY
1. With PrStb displayed, press Zero On until On is displayed.
2. Press Mode Off to change the displayed setting to either On or OFF .
3. To accept the displayed setting, press Zero On. The display returns to
PrStb . If you don’t want to change any other settings, press the Mode Off
until End is displayed, then press Zero On to save settings.
SETTING PRINT MENU FUNCTIONS (CONT.)
RS232 INTERFACECertain models of ScoutI I balances are equipped with a bi-directional RS232
compatible interface for communication with printers and computers. When thebalance is connected directly to a printer, displayed data can be output at any time
by using the Auto Print feature.
NOTE: The AC Adapter is recommended to power the balance when the RS232
interface is used.
Connecting the balance to a computer enables you to operate the balance from
the computer, as well as receive data such as displayed weight and weighing
mode. The following sections describe the hardware and output signal formats
provided with the balance.
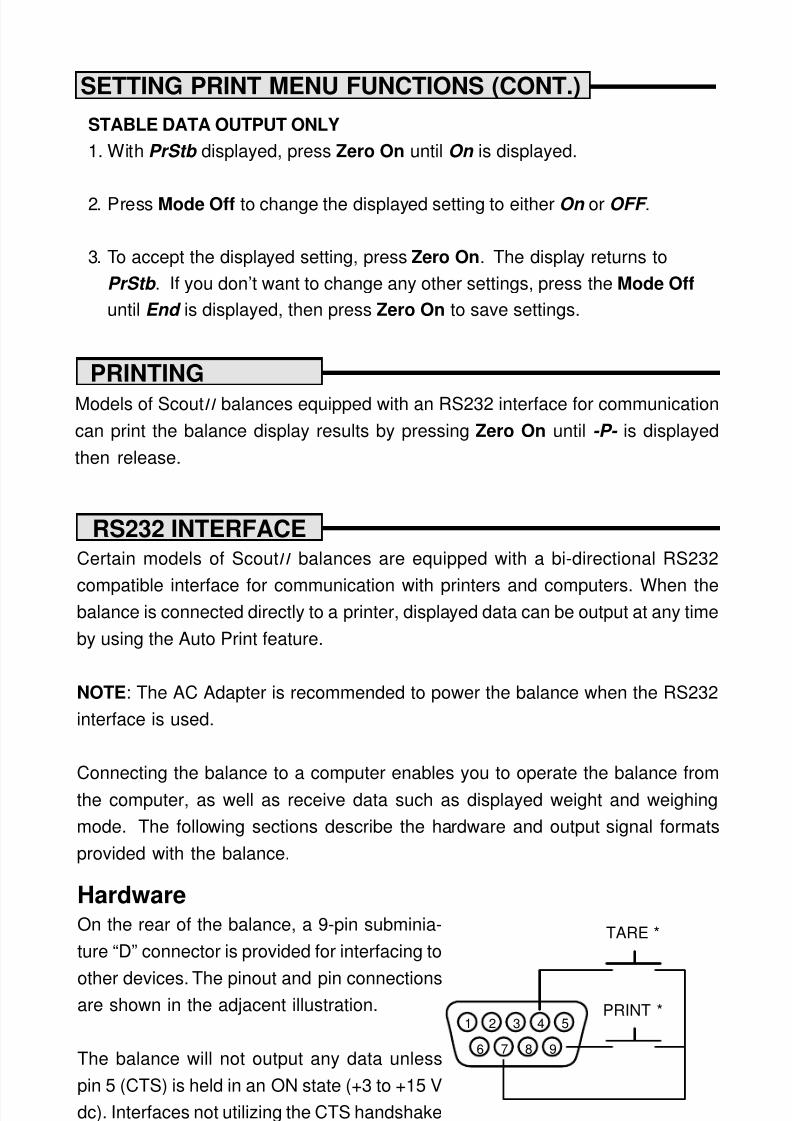
HardwareOn the rear of the balance, a 9-pin subminia-
ture “D” connector is provided for interfacing to
other devices. The pinout and pin connectionsare shown in the adjacent illustration. PRINT *
TARE *
PRINTINGModels of ScoutI I balances equipped with an RS232 interface for communication
can print the balance display results by pressing Zero On until -P- is displayed
then release.
7/30/2019 ohaus js-10.pdf
http://slidepdf.com/reader/full/ohaus-js-10pdf 15/25
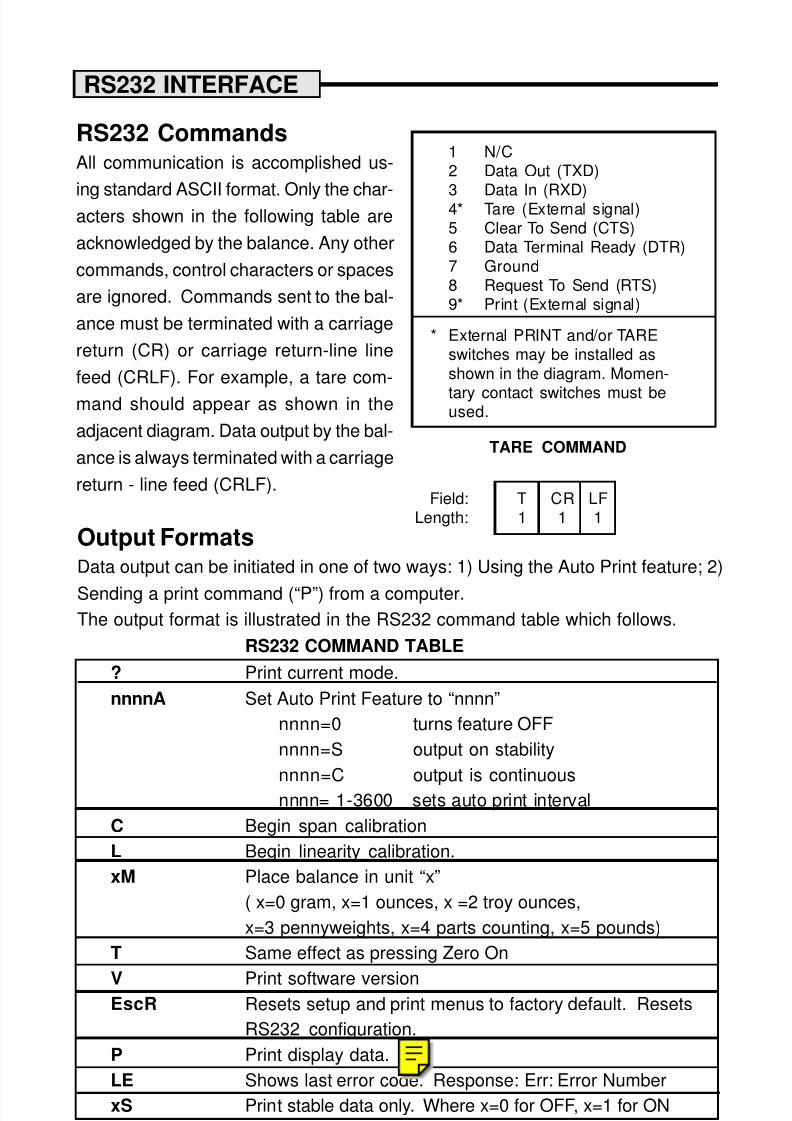
1 N/C2 Data Out (TXD)
3 Data In (RXD)4* Tare (External signal)5 Clear To Send (CTS)6 Data Terminal Ready (DTR)
7 Ground8 Request To Send (RTS)9* Print (External signal)
* External PRINT and/or TAREswitches may be installed as
shown in the diagram. Momen-
tary contact switches must beused.
RS232 CommandsAll communication is accomplished us-
ing standard ASCII format. Only the char-acters shown in the following table are
acknowledged by the balance. Any other
commands, control characters or spaces
are ignored. Commands sent to the bal-
ance must be terminated with a carriage
return (CR) or carriage return-line line
feed (CRLF). For example, a tare com-
mand should appear as shown in the
adjacent diagram. Data output by the bal-
ance is always terminated with a carriage
return - line feed (CRLF).
TARE COMMAND
Field: T CR LFLength: 1 1 1
RS232 INTERFACE
Output FormatsData output can be initiated in one of two ways: 1) Using the Auto Print feature; 2)
Sending a print command (“P”) from a computer.
The output format is illustrated in the RS232 command table which follows.
RS232 COMMAND TABLE
? Print current mode.
nnnnA Set Auto Print Feature to “nnnn”
nnnn=0 turns feature OFF
nnnn=S output on stability
nnnn=C output is continuous
nnnn= 1-3600 sets auto print interval
C Begin span calibration
L Begin linearity calibration.
xM Place balance in unit “x”
( x=0 gram, x=1 ounces, x =2 troy ounces,
x=3 pennyweights, x=4 parts counting, x=5 pounds)
T Same effect as pressing Zero On
V Print software versionEscR Resets setup and print menus to factory default. Resets
7/30/2019 ohaus js-10.pdf
http://slidepdf.com/reader/full/ohaus-js-10pdf 16/25
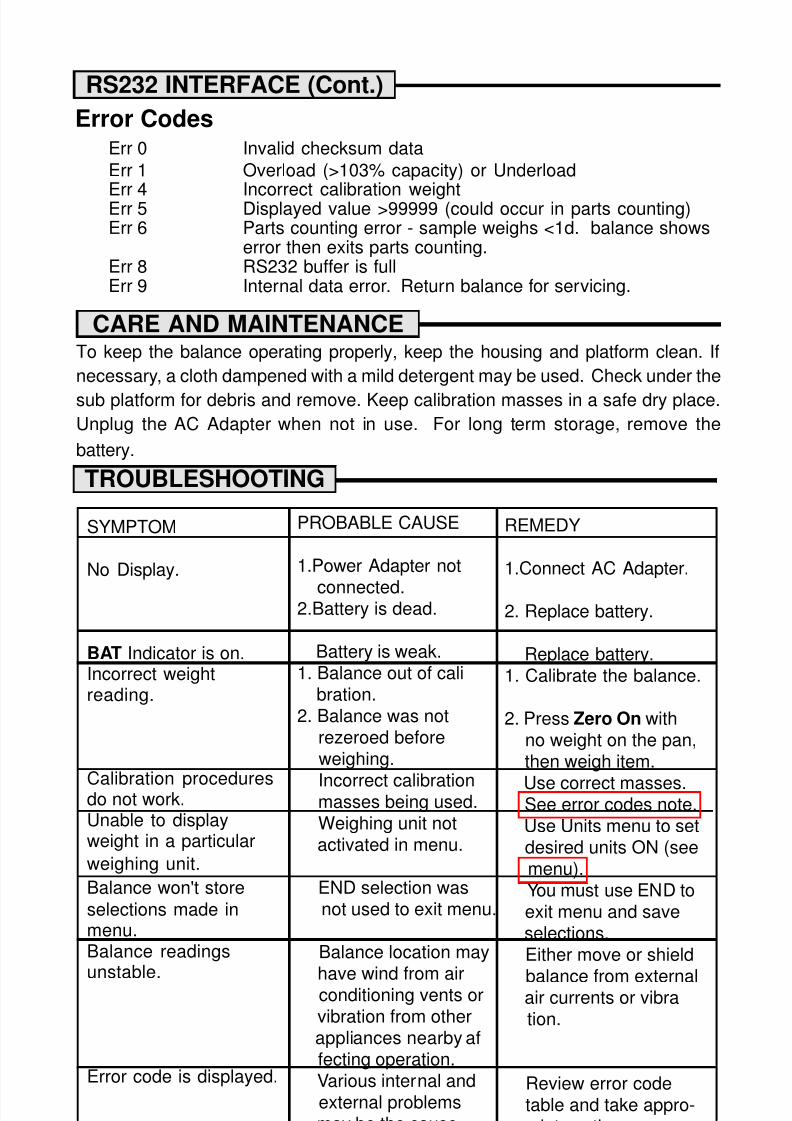
RS232 INTERFACE (Cont.)
Error CodesErr 0 Invalid checksum data
Err 1 Overload (>103% capacity) or Underload
Err 4 Incorrect calibration weightErr 5 Displayed value >99999 (could occur in parts counting)Err 6 Parts counting error - sample weighs <1d. balance shows
error then exits parts counting.Err 8 RS232 buffer is fullErr 9 Internal data error. Return balance for servicing.
CARE AND MAINTENANCETo keep the balance operating properly, keep the housing and platform clean. If
necessary, a cloth dampened with a mild detergent may be used. Check under the
sub platform for debris and remove. Keep calibration masses in a safe dry place.
Unplug the AC Adapter when not in use. For long term storage, remove the
battery.
SYMPTOM
No Display.
BAT Indicator is on.Incorrect weightreading.
Calibration proceduresdo not work.Unable to displayweight in a particular
weighing unit.
Balance won't store
selections made inmenu.Balance readingsunstable.
PROBABLE CAUSE
1.Power Adapter not
connected.2.Battery is dead.
Battery is weak.1. Balance out of cali
bration.2. Balance was not
rezeroed beforeweighing.
Incorrect calibrationmasses being used.Weighing unit notactivated in menu.
END selection wasnot used to exit menu.
Balance location may
have wind from airconditioning vents orvibration from other
REMEDY
1.Connect AC Adapter.
2. Replace battery.
Replace battery.1. Calibrate the balance.
2. Press Zero On withno weight on the pan,then weigh item.
Use correct masses. See error codes note.
Use Units menu to setdesired units ON (see
menu).You must use END toexit menu and saveselections.Either move or shield
balance from externalair currents or vibration
TROUBLESHOOTING
7/30/2019 ohaus js-10.pdf
http://slidepdf.com/reader/full/ohaus-js-10pdf 17/25
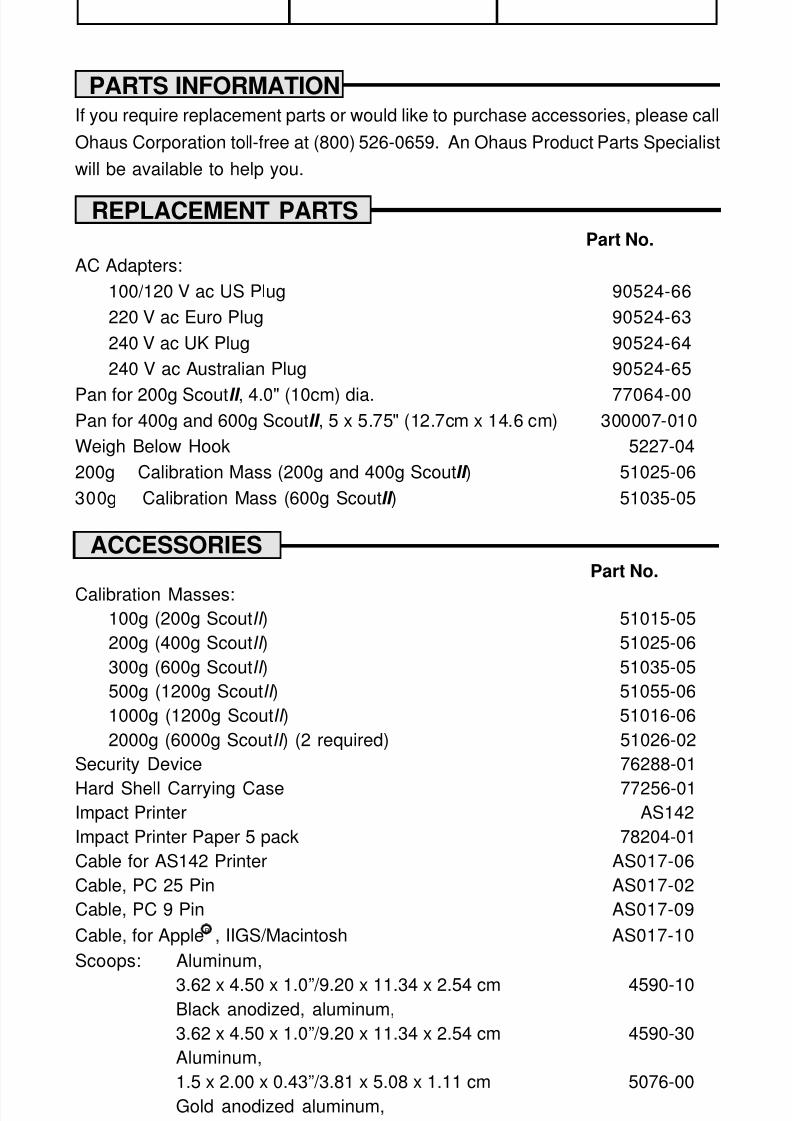
PARTS INFORMATIONIf you require replacement parts or would like to purchase accessories, please call
Ohaus Corporation toll-free at (800) 526-0659. An Ohaus Product Parts Specialist
will be available to help you.
REPLACEMENT PARTSPart No.
AC Adapters:
100/120 V ac US Plug 90524-66
220 V ac Euro Plug 90524-63
240 V ac UK Plug 90524-64
240 V ac Australian Plug 90524-65
Pan for 200g ScoutII , 4.0" (10cm) dia. 77064-00Pan for 400g and 600g ScoutII , 5 x 5.75" (12.7cm x 14.6 cm) 300007-010
Weigh Below Hook 5227-04
200g Calibration Mass (200g and 400g ScoutII ) 51025-06
300g Calibration Mass (600g ScoutII ) 51035-05
ACCESSORIESPart No.
Calibration Masses:
100g (200g ScoutII ) 51015-05
200g (400g ScoutII ) 51025-06
300g (600g ScoutII ) 51035-05
500g (1200g ScoutII ) 51055-06
1000g (1200g ScoutII ) 51016-06
2000g (6000g ScoutII ) (2 required) 51026-02
Security Device 76288-01
Hard Shell Carrying Case 77256-01Impact Printer AS142
Impact Printer Paper 5 pack 78204-01
Cable for AS142 Printer AS017-06
Cable, PC 25 Pin AS017-02
Cable, PC 9 Pin AS017-09
Cable, for AppleR , IIGS/Macintosh AS017-10
Scoops: Aluminum,
3.62 x 4.50 x 1.0” /9.20 x 11.34 x 2.54 cm 4590-10Black anodized, aluminum,
7/30/2019 ohaus js-10.pdf
http://slidepdf.com/reader/full/ohaus-js-10pdf 18/25
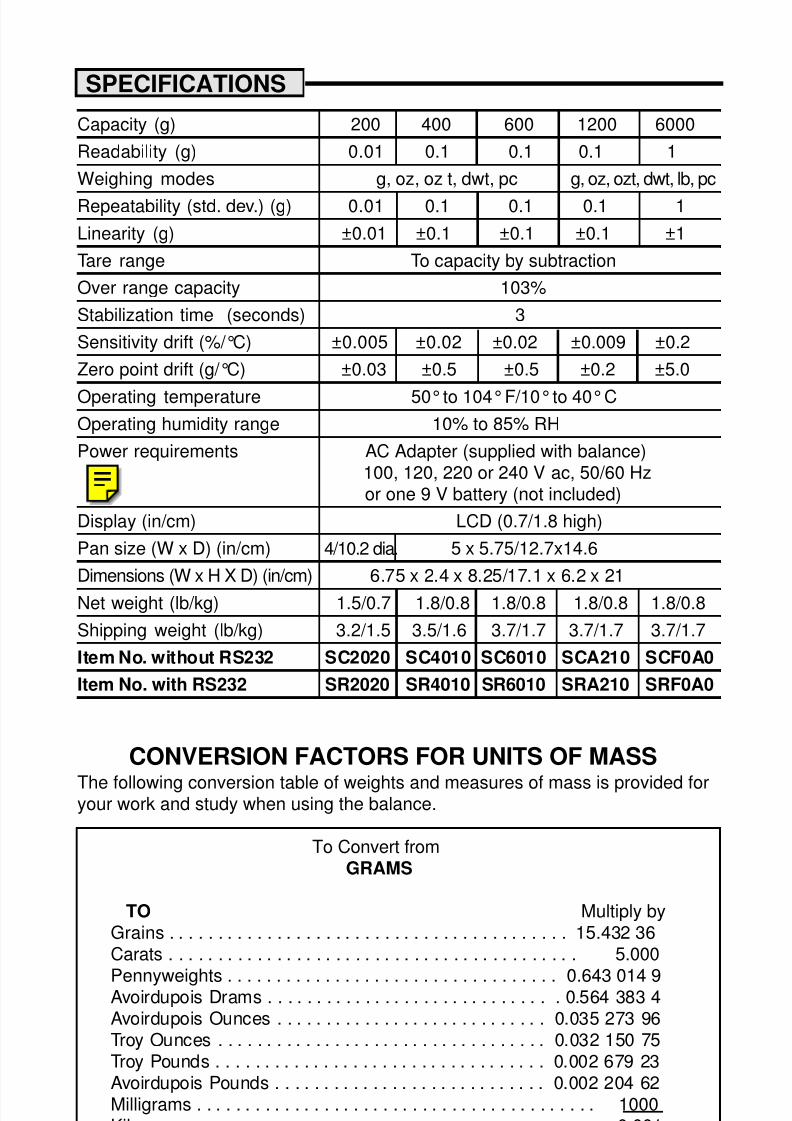
Capacity (g) 200 400 600 1200 6000
Readability (g) 0.01 0.1 0.1 0.1 1
Weighing modes g, oz, oz t, dwt, pc g, oz, ozt, dwt, lb, pc
Repeatability (std. dev.) (g) 0.01 0.1 0.1 0.1 1
Linearity (g) ±0.01 ±0.1 ±0.1 ±0.1 ±1
Tare range To capacity by subtraction
Over range capacity 103%
Stabilization time (seconds) 3
Sensitivity drift (%/ °C) ±0.005 ±0.02 ±0.02 ±0.009 ±0.2
Zero point drift (g/ °C) ±0.03 ±0.5 ±0.5 ±0.2 ±5.0
Operating temperature 50°to 104°F/10°to 40°C
Operating humidity range 10% to 85% RH
Power requirements AC Adapter (supplied with balance)100, 120, 220 or 240 V ac, 50/60 Hzor one 9 V battery (not included)
Display (in/cm) LCD (0.7/1.8 high)
Pan size (W x D) (in/cm) 4/10.2 dia. 5 x 5.75/12.7x14.6
Dimensions (W x H X D) (in/cm) 6.75 x 2.4 x 8.25/17.1 x 6.2 x 21
Net weight (lb/kg) 1.5/0.7 1.8/0.8 1.8/0.8 1.8/0.8 1.8/0.8
Shipping weight (lb/kg) 3.2/1.5 3.5/1.6 3.7/1.7 3.7/1.7 3.7/1.7
Item No. without RS232 SC2020 SC4010 SC6010 SCA210 SCF0A0
Item No. with RS232 SR2020 SR4010 SR6010 SRA210 SRF0A0
CONVERSION FACTORS FOR UNITS OF MASS
The following conversion table of weights and measures of mass is provided foryour work and study when using the balance.
To Convert fromGRAMS
TO Multiply byGrains . . . . . . . . . . . . . . . . . . . . . . . . . . . . . . . . . . . . . . . . . 15.432 36Carats . . . . . . . . . . . . . . . . . . . . . . . . . . . . . . . . . . . . . . . . . . 5.000
Pennyweights . . . . . . . . . . . . . . . . . . . . . . . . . . . . . . . . . . 0.643 014 9Avoirdupois Drams . . . . . . . . . . . . . . . . . . . . . . . . . . . . . . 0.564 383 4Avoirdupois Ounces 0 035 273 96
SPECIFICATIONS
7/30/2019 ohaus js-10.pdf
http://slidepdf.com/reader/full/ohaus-js-10pdf 19/25
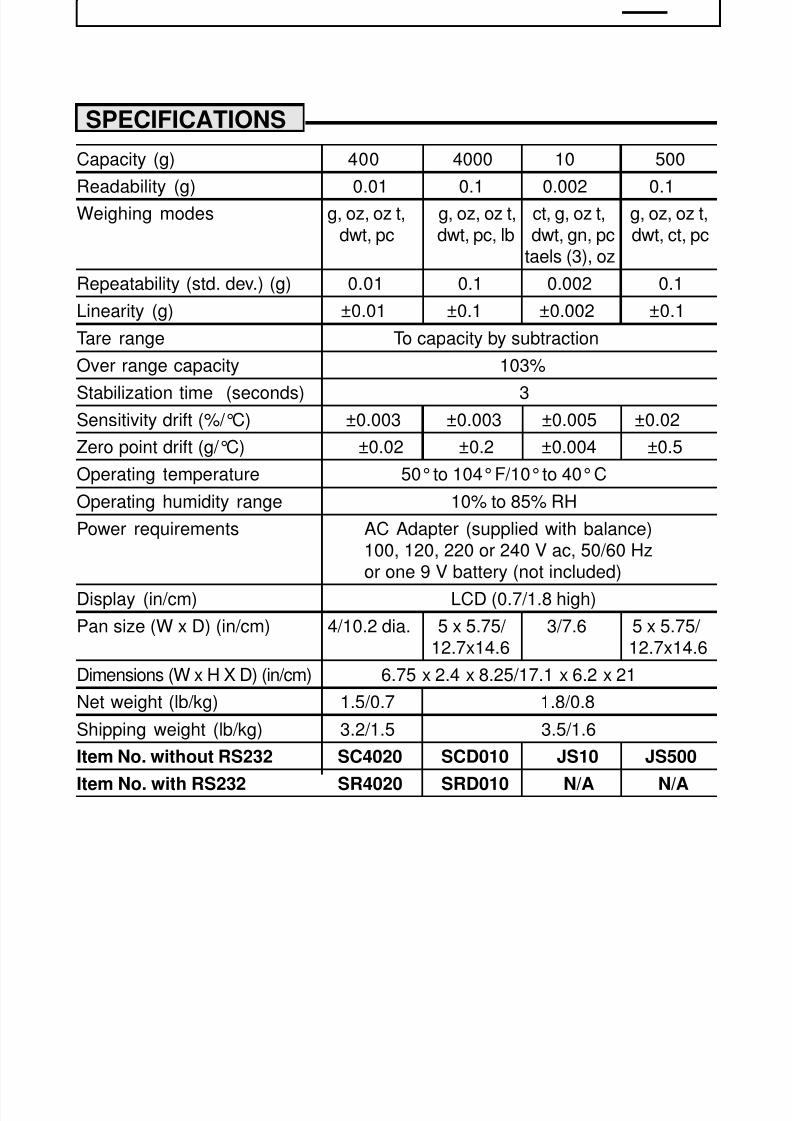
Capacity (g) 400 4000 10 500
Readability (g) 0.01 0.1 0.002 0.1Weighing modes g, oz, oz t, g, oz, oz t, ct, g, oz t, g, oz, oz t,
dwt, pc dwt, pc, lb dwt, gn, pc dwt, ct, pctaels (3), oz
Repeatability (std. dev.) (g) 0.01 0.1 0.002 0.1
Linearity (g) ±0.01 ±0.1 ±0.002 ±0.1
Tare range To capacity by subtraction
Over range capacity 103%
Stabilization time (seconds) 3Sensitivity drift (%/°C) ±0.003 ±0.003 ±0.005 ±0.02
Zero point drift (g/°C) ±0.02 ±0.2 ±0.004 ±0.5
Operating temperature 50° to 104° F/10° to 40° C
Operating humidity range 10% to 85% RH
Power requirements AC Adapter (supplied with balance)100, 120, 220 or 240 V ac, 50/60 Hzor one 9 V battery (not included)
Display (in/cm) LCD (0.7/1.8 high)
Pan size (W x D) (in/cm) 4/10.2 dia. 5 x 5.75/ 3/7.6 5 x 5.75/ 12.7x14.6 12.7x14.6
Dimensions (W x H X D) (in/cm) 6.75 x 2.4 x 8.25/17.1 x 6.2 x 21
Net weight (lb/kg) 1.5/0.7 1.8/0.8
Shipping weight (lb/kg) 3.2/1.5 3.5/1.6
Item No. without RS232 SC4020 SCD010 JS10 JS500
Item No. with RS232 SR4020 SRD010 N/A N/A
SPECIFICATIONS

7/30/2019 ohaus js-10.pdf
http://slidepdf.com/reader/full/ohaus-js-10pdf 20/25
LIMITED WARRANTYOhaus products are warranted against defects in materials and workmanshipfrom the date of delivery through the duration of the warranty period. During thewarranty period Ohaus will repair, or, at its option, replace any component(s) thatproves to be defective at no charge, provided that the product is returned, freightprepaid, to Ohaus.
This warranty does not apply if the product has been damaged by accident ormisuse, exposed to radioactive or corrosive materials, has foreign materialpenetrating to the inside of the product, or as a result of service or modificationby other than Ohaus. In lieu of a properly returned warranty registration card, thewarranty period shall begin on the date of shipment to the authorized dealer. Noother express or implied warranty is given by Ohaus Corporation. OhausCorporation shall not be liable for any consequential damages.
As warranty legislation differs from state to state and country to country, pleasecontact Ohaus or your local Ohaus dealer for further details.

7/30/2019 ohaus js-10.pdf
http://slidepdf.com/reader/full/ohaus-js-10pdf 21/25
Ohaus Corporation29 Hanover Road,
Florham Park, NJ 07932, USATel: (973) 377-9000F (973) 593 0359
7/30/2019 ohaus js-10.pdf
http://slidepdf.com/reader/full/ohaus-js-10pdf 22/25
NOTICE:This equipment has been tested and found to comply with the limits for a Class B digital devicpursuant to part 15 of the FCC Rules. These limits are designed to provide reasonable protectagainst harmful interference in a residential installation. This equipment generates, uses and c
radiate radio frequency energy and, if not installed and used in accordance with the instructionmay cause harmful interference to radio communications. However, there is no guarantee thinterference will not occur in a particular installation. If this equipment does cause harmful interence to radio or television reception, which can be determined by turning the equipment off and othe user is encouraged to try to correct the interference by one or more of the following measure
• Reorient or relocate the receiving antenna.• Increase the separation between the equipment and the receiver.• Connect the equipment into an outlet on a circuit different from that to which the
receiver is connected.• Consult the dealer or an experienced radio/TV technician for help.
This digital apparatus does not exceed the Class B limits for radio noise emissions from digapparatus as set out in the interference-causing equipment standard entitled "Digital Apparatu
ICES-003 of the department of communications.
Cet appareil numérique respecte les limites de bruits radioélectriques applicables aux apparenumériques de Classe B prescrites dans la norme sur le matériel brouilleur: "Appareils NumériqueNMB-003 édictée par le ministre des communications.
Unauthorized changes or modifications to this equipment are not permitted.This device corresponds to requirements stipulated in 73/23/EEC and features radio interfence suppression in compliance with valid EC Regulation 89/336/EEC. Note: The displayvalue may be adversely affected under extreme electromagnetic influences, eg. when usinradio unit in the immediate vicinity of the device. Once the interference has been rectified,
product can once again be used for its intended purpose.
Cet appareil correspond aux exigences selon la norme 73/23/CEE et est déparasité conformémà la directive de la CE 89/336/CEE en vigueur. Remarque: Dans des conditions d’influencélectromagnétiques extrêmes, par exemple en cas d’exploitation d’un appareil radio à proximimmédiate de I’appareil la valeur d’affichage risque d’être influencée. Une fois que l’influence pasite est terminée, le produit peut être de nouveau utilisé de manière conforme aux prescriptions
Dieses Gerät entspricht den Anforderungen nach 73/23/EWG und ist funkentstört entsprechend dgeltenden EG-Richtlinie 89/336/EWG. Hinweis: Unter extremen elektromagnetischen Einflüss
z.B. bei Betreiben eines Funkgerätes in unmittelbarer Nähe des Gerätes kann eine Beeinflussudes Anzeigewertes verursacht werden. Nach Ende des Störeinflusses ist das Produkt wiebestimmungsgemäss benutzbar.
1
43
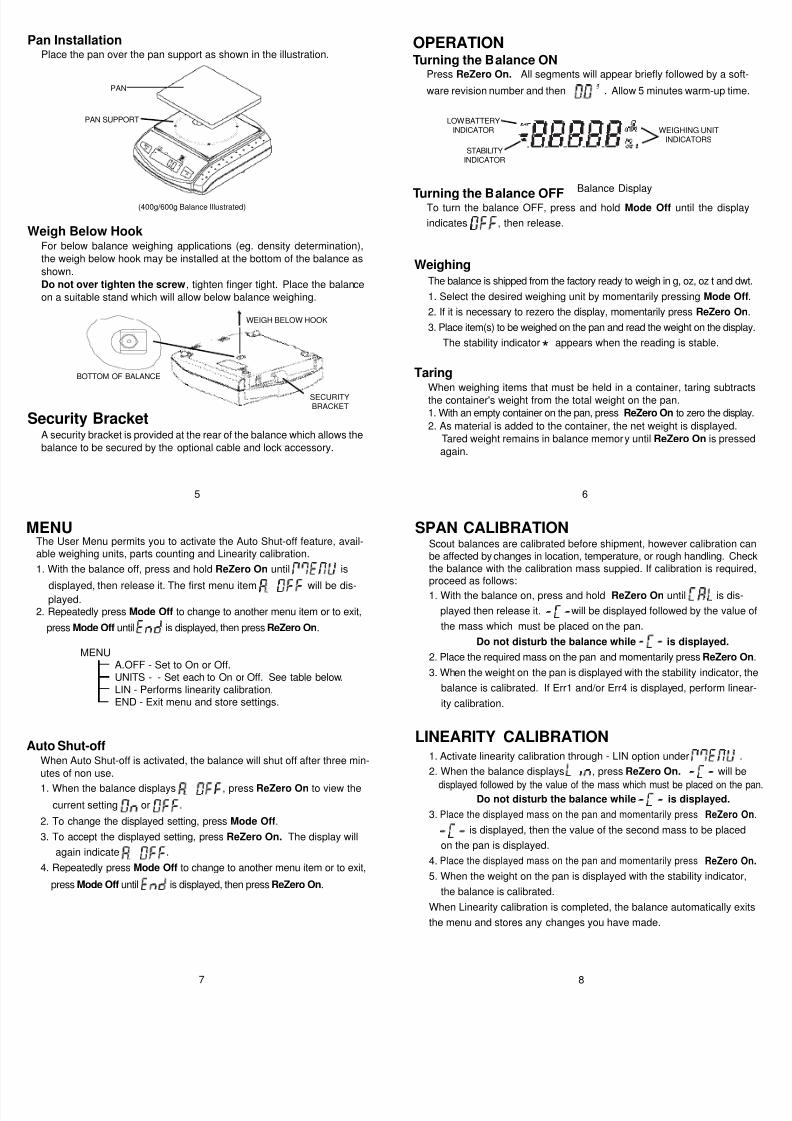
UNPACKINGScout balances are shipped with the following components:
Stainless steel pan Instruction manualWeigh below hook Calibration massPower adapter Warranty card
DESCRIPTIONScout balances are precision weighing instruments, designed to provideyears of service. Features include front panel controls, simplified menu,auto shut-off, multiple weighing units, parts counting and a weigh belowhook. It can be operated by a 9 Volt battery or with the AC Adaptersupplied.
Calibration Mass
Stainless Steel Pan
Weigh Below HookAC Adapter(Stored in battery cover)
1. Carefully unpack the balance, verify that all items are on hand. Savethe packing material for transporting the balance.
2. Remove the retaining band and cardboard insert from the pan support.
2
Ohaus CorporationOhaus CorporationOhaus CorporationOhaus CorporationOhaus Corporation
29 Hanover Road
Florham Park NJ
07932-0900
Electronic Balances
Instruction Manual
NOTICE:Scout balances are sensitive, precision devices and whenshipped, occasionally require calibration before they areused. The balances are calibrated at the factory and due torough handling and vibration during shipping, the balancemay display an ERR1 or ERR4 when first turned on.
This does not mean that the balance is defective. Werecommend you perform span calibration for an ERR1 indi-cation and linear calibration for ERR4 before you call forservice. If the balance does not span calibrate, try linear
calibration.
In the event the balance fails to operate properly, pleasecall Ohaus Corporation toll-free at (800) 526-0659 for ser-vice or parts.
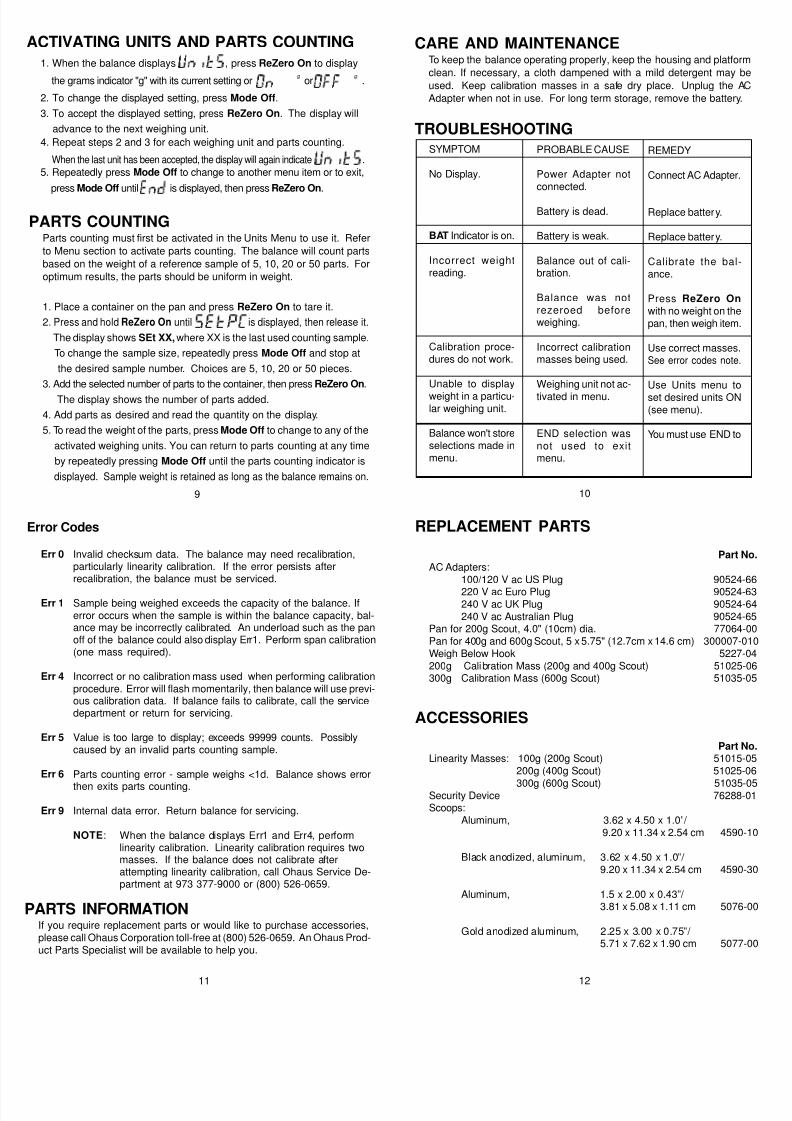
PowerConnect the AC Adapter at the rear of the balance. For portable ope
tion, install a 9 V battery in the battery compartment as shown in
illustration.
INSTALLATIONFor best performance, the balance should be used in a clean, sta
environment. Do not use the balance in environments with excess
drafts, near magnetic fields or equipment that generates magnetic fie
rapid temperature changes, vibrations or corrosive vapors.
BATTERY (NOT SUPPLIED)
AC ADAPTERPOWER INPUT
JACK
BATTERY COMPARTMENTAND HOOK STORAGE
7/30/2019 ohaus js-10.pdf
http://slidepdf.com/reader/full/ohaus-js-10pdf 23/25
LINEARITY CALIBRATION1. Activate linearity calibration through - LIN option under .
2. When the balance displays , press ReZero On. will b
displayed followed by the value of the mass which must be placed on theDo not disturb the balance while is displayed.
3. Place the displayed mass on the pan and momentarily press ReZero
is displayed, then the value of the second mass to be placed
on the pan is displayed.
4. Place the displayed mass on the pan and momentarily press ReZero
5. When the weight on the pan is displayed with the stability indicator
the balance is calibrated.
When Linearity calibration is completed, the balance automatically ex
the menu and stores any changes you have made.
5 6
8
PAN SUPPORT
(400g/600g Balance Illustrated)
Weigh Below HookFor below balance weighing applications (eg. density determination),
the weigh below hook may be installed at the bottom of the balance as
shown.
Do not over tighten the screw , tighten finger tight. Place the balance
on a suitable stand which will allow below balance weighing.
BOTTOM OF BALANCE
WEIGH BELOW HOOK
SECURITYBRACKET
Security BracketA security bracket is provided at the rear of the balance which allows the
balance to be secured by the optional cable and lock accessory.
SPAN CALIBRATIONScout balances are calibrated before shipment, however calibration cbe affected by changes in location, temperature, or rough handling. Chthe balance with the calibration mass suppied. If calibration is requirproceed as follows:
1. With the balance on, press and hold ReZero On until is dis
played then release it. will be displayed followed by the value
the mass which must be placed on the pan.
Do not disturb the balance while is displayed.
2. Place the required mass on the pan and momentarily press ReZero O
3. When the weight on the pan is displayed with the stability indicator,
balance is calibrated. If Err1 and/or Err4 is displayed, perform line
ity calibration.
Pan InstallationPlace the pan over the pan support as shown in the illustration.
7
PAN
OPERATIONTurning the Balance ON
Press ReZero On. All segments will appear briefly followed by a sof
ware revision number and then . Allow 5 minutes warm-up tim
Turning the Balance OFFTo turn the balance OFF, press and hold Mode Off until the displa
indicates , then release.
WeighingThe balance is shipped from the factory ready to weigh in g, oz, oz t and dw
1. Select the desired weighing unit by momentarily pressing Mode O
2. If it is necessary to rezero the display, momentarily press ReZero O
3. Place item(s) to be weighed on the pan and read the weight on the disp
The stability indicator appears when the reading is stable.
Taring
When weighing items that must be held in a container, taring subtrathe container's weight from the total weight on the pan.
1. With an empty container on the pan, press ReZero On to zero the disp
2. As material is added to the container, the net weight is displayed.
Tared weight remains in balance memory until ReZero On is press
again.
STABILITYINDICATOR
Balance Display
LOW BATTERYINDICATOR WEIGHING UNIT
INDICATORS
*
The User Menu permits you to activate the Auto Shut-off feature, avail-able weighing units, parts counting and Linearity calibration.
1. With the balance off, press and hold ReZero On until is
displayed, then release it. The first menu item will be dis-played.
2. Repeatedly press Mode Off to change to another menu item or to exit,
press Mode Off until is displayed, then press ReZero On.
MENUA.OFF - Set to On or Off.UNITS - - Set each to On or Off. See table below.LIN - Performs linearity calibration.END - Exit menu and store settings.
Auto Shut-offWhen Auto Shut-off is activated, the balance will shut off after three min-
utes of non use.
1. When the balance displays , press ReZero On to view the
current setting or .
2. To change the displayed setting, press Mode Off.
3. To accept the displayed setting, press ReZero On. The display will
again indicate .
4. Repeatedly press Mode Off to change to another menu item or to exit,
press Mode Off until is displayed, then press ReZero On.
MENU
7/30/2019 ohaus js-10.pdf
http://slidepdf.com/reader/full/ohaus-js-10pdf 24/25
10
11 12
9
PARTS INFORMATIONIf you require replacement parts or would like to purchase accessories,please call Ohaus Corporation toll-free at (800) 526-0659. An Ohaus Prod-uct Parts Specialist will be available to help you.
Error Codes
Err 0 Invalid checksum data. The balance may need recalibration,particularly linearity calibration. If the error persists afterrecalibration, the balance must be serviced.
Err 1 Sample being weighed exceeds the capacity of the balance. Iferror occurs when the sample is within the balance capacity, bal-ance may be incorrectly calibrated. An underload such as the panoff of the balance could also display Err1. Perform span calibration(one mass required).
Err 4 Incorrect or no calibration mass used when performing calibrationprocedure. Error will flash momentarily, then balance will use previ-ous calibration data. If balance fails to calibrate, call the servicedepartment or return for servicing.
Err 5 Value is too large to display; exceeds 99999 counts. Possiblycaused by an invalid parts counting sample.
Err 6 Parts counting error - sample weighs <1d. Balance shows error
then exits parts counting.
Err 9 Internal data error. Return balance for servicing.
NOTE: When the balance displays Err1 and Err4, performlinearity calibration. Linearity calibration requires twomasses. If the balance does not calibrate afterattempting linearity calibration, call Ohaus Service De-partment at 973 377-9000 or (800) 526-0659.
CARE AND MAINTENANCETo keep the balance operating properly, keep the housing and platfor
clean. If necessary, a cloth dampened with a mild detergent may b
used. Keep calibration masses in a safe dry place. Unplug the A
Adapter when not in use. For long term storage, remove the battery.
TROUBLESHOOTINGSYMPTOM
No Display.
BAT Indicator is on.
Incorrect weightreading.
Calibration proce-dures do not work.
Unable to display
weight in a particu-lar weighing unit.
Balance won't storeselections made inmenu.
PROBABLE CAUSE
Power Adapter notconnected.
Battery is dead.
Battery is weak.
Balance out of cali-bration.
Balance was notrezeroed beforeweighing.
Incorrect calibrationmasses being used.
Weighing unit not ac-
tivated in menu.
END selection wasnot used to exitmenu.
REMEDY
Connect AC Adapter.
Replace battery.
Replace battery.
Calibrate the bal-ance.
Press ReZero Onwith no weight on thepan, then weigh item.
Use correct masses.See error codes note.
Use Units menu toset desired units ON(see menu).
You must use END to
ACTIVATING UNITS AND PARTS COUNTING
1. When the balance displays , press ReZero On to display
the grams indicator "g" with its current setting or or .
2. To change the displayed setting, press Mode Off.
3. To accept the displayed setting, press ReZero On. The display will
advance to the next weighing unit.
4. Repeat steps 2 and 3 for each weighing unit and parts counting.
When the last unit has been accepted, the display will again indicate .
5. Repeatedly press Mode Off to change to another menu item or to exit,
press Mode Off until is displayed, then press ReZero On.
PARTS COUNTINGParts counting must first be activated in the Units Menu to use it. Refer
to Menu section to activate parts counting. The balance will count parts
based on the weight of a reference sample of 5, 10, 20 or 50 parts. For
optimum results, the parts should be uniform in weight.
1. Place a container on the pan and press ReZero On to tare it.
2. Press and hold ReZero On until is displayed, then release it.
The display shows SEt XX, where XX is the last used counting sample.
To change the sample size, repeatedly press Mode Off and stop at
the desired sample number. Choices are 5, 10, 20 or 50 pieces.
3. Add the selected number of parts to the container, then press ReZero On.
The display shows the number of parts added.
4. Add parts as desired and read the quantity on the display.
5. To read the weight of the parts, press Mode Off to change to any of the
activated weighing units. You can return to parts counting at any time
by repeatedly pressing Mode Off until the parts counting indicator is
displayed. Sample weight is retained as long as the balance remains on.
REPLACEMENT PARTS
Part AC Adapters:
100/120 V ac US Plug 90524
220 V ac Euro Plug 90524240 V ac UK Plug 90524240 V ac Australian Plug 90524
Pan for 200g Scout, 4.0" (10cm) dia. 77064Pan for 400g and 600g Scout, 5 x 5.75" (12.7cm x 14.6 cm) 300007-Weigh Below Hook 5227200g Calibration Mass (200g and 400g Scout) 51025300g Calibration Mass (600g Scout) 51035
ACCESSORIES
Part Linearity Masses: 100g (200g Scout) 51015
200g (400g Scout) 51025
300g (600g Scout) 51035Security Device 76288Scoops:
Aluminum, 3.62 x 4.50 x 1.0”/ 9.20 x 11.34 x 2.54 cm 4590
Black anodized, aluminum, 3.62 x 4.50 x 1.0”/ 9.20 x 11.34 x 2.54 cm 4590
Aluminum, 1.5 x 2.00 x 0.43”/ 3.81 x 5.08 x 1.11 cm 5076
Gold anodized aluminum, 2.25 x 3.00 x 0.75”/ 5.71 x 7.62 x 1.90 cm 5077
7/30/2019 ohaus js-10.pdf
http://slidepdf.com/reader/full/ohaus-js-10pdf 25/25
13 14
Ohaus Corporation29 Hanover Road,
Florham Park, NJ 07932, USA
Tel: (973) 377-9000,Fax: (973) 593-0359
LIMITED WARRANTYOhaus products are warranted against defects in materials and work-
manship from the date of delivery through the duration of the warranty
period. During the warranty period Ohaus will repair, or, at its option,
replace any component(s) that proves to be defective at no charge, pro-
vided that the product is returned, freight prepaid, to Ohaus.
This warranty does not apply if the product has been damaged by acci-
dent or misuse, exposed to radioactive or corrosive materials, has foreign
material penetrating to the inside of the product, or as a result of service
or modification by other than Ohaus. In lieu of a properly returned war-
ranty registration card, the warranty period shall begin on the date of
shipment to the authorized dealer. No other express or implied warranty
is given by Ohaus Corporation. Ohaus Corporation shall not be liable for
any consequential damages.
As warranty legislation differs from state to state and country to country,
please contact Ohaus or your local Ohaus dealer for further details.
CONVERSION FACTORS FOR UNITS OF MASSThe following conversion table of weights and measures of mass isprovided for your work and study when using the balance.
To Convert fromGRAMS
TO Multiply byGrains . . . . . . . . . . . . . . . . . . . . . . . . . . . .15.432 36Carats . . . . . . . . . . . . . . . . . . . . . . . . . . . . .5.000Pennyweights . . . . . . . . . . . . . . . . . . . . . . 0.643 014 9
Avoirdupois Drams . . . . . . . . . . . . . . . . . . 0.564 383 4Avoirdupois Ounces . . . . . . . . . . . . . . . . . 0.035 273 96Troy Ounces . . . . . . . . . . . . . . . . . . . . . . . 0.032 150 75
Troy Pounds . . . . . . . . . . . . . . . . . . . . . . . 0.002 679 23Avoirdupois Pounds . . . . . . . . . . . . . . . . . 0.002 204 62Milligrams . . . . . . . . . . . . . . . . . . . . . . . 1000Kilograms . . . . . . . . . . . . . . . . . . . . . . . . . 0.001
SPECIFICATIONS
Capacity (g) 200 400 600
Readability (g) 0.01 0.1 0.1
Weighing modes g, oz, oz t, dwt, parts counting
Repeatability (std. dev.) (g) 0.01 0.1 0.1
Linearity (g) ±0.01 ±0.1 ±0.1
Tare range To capacity by subtraction
Over range capacity 103%
Stabilization time (seconds) 3 3 3
Sensitivity drift (%/°C) ±0.005 ±0.02 ±0.02
Zero point drift (g/°C) ±0.03 ±0.5 ±0.5
Shift accuracy(1/2 capacity, 1/2 distance) (g) ± 0.01 ±0.1 ±0.1
Operating temperature 50°to 104°F/10°to 40°C
Operating humidity range 10% to 85% RH
Power requirements AC Adapter (supplied with balance)100, 120, 220 or 240 V ac, 50/60 Hzor one 9 V battery (not included)
Display (in/cm) LCD (0.7/1.8 high)
Pan size (W x D) (in/cm) 4/10.2 dia. 5 x 5.75/ 5 x 5.75/ 12.7x14.6 12.7 x14.6
Dimensions (W x H X D) (in/cm) 6.75 x 2.4 x 8.25/17.1 x 6.2 x 21
Net weight (lb/kg) 1.5/0.7 1.8/0.8 1.8/0.8Shipping weight (lb/kg) 3.2/1.5 3.5/1.6 3.7/1.7
Item No. SC2020 SC4010 SC6010


![· 4.4 js 43s * : js *ias * : 41.4.] .](https://img.pdfslide.tips/doc/110x75/603c2cf4d2498d188e4cf12f/-44-js-43s-js-ias-414-.jpg)