Embed Size (px)
Citation preview

OSP / QuickBooks Web Connector Setup

Overview
The OrderStream Pro Business Manager can be integrated in real time with QuickBooks® Financial Software. Key data flows automatically between applications as you enter it, eliminating delay, double entry and third‐party software.
Customers and Suppliers
All customer and supplier records are created and updated in OSP and exported to QB. OSP automatically assigns proprietary ID numbers to all records (e.g. “A12345”, “S98765”).
When OSP exports new and updated customer records and supplier records to QB, it looks for records on the QB side that contain the same customer ID or supplier ID, respectively. When OSP finds a matching ID in QB, it assumes that the record to be exported is an update of the matching QB record, and overwrites the matching QB record. When OSP finds no matching ID in QB, it creates a new record in QB.
If you are just getting started with QB or prefer to create a new company file, simply create new records in OSP normally and allow them to export to QB. The IDs will synchronize automatically.
If you already have a database of customer and / or supplier records defined in QB and wish to synchronize it with your OSP records, you will need to ensure that the record IDs in QB match the IDs that OSP assigns automatically to customer and supplier records. This is a one‐time manual task.
For larger databases, you may prefer to request the services of the OSP technical department to develop a one‐time transfer of records into OSP, rather than entering records into OSP manually. The same data will need to be re‐imported back into the source database with the customer and supplier IDs assigned by OSP.
Accounts Receivable
All invoices, debit memos and credit memos are created in OSP and exported automatically to QB. Each contains a reference to a specific customer account. If OSP can’t find a customer record on the QB side with a matching customer ID, it will simply create a new customer record in QB based on OSP data.

Customer Payments
Customer payment records may be entered into OSP directly and flow from there to QB, or you may choose to enter payments in QB and have them flow into OSP. The key is not to enter payments manually in both systems, so as to avoid duplicated data and effort. Please let your customer support representative know which direction you would prefer your payment data to flow.
Payment data enables OSP to calculate aging reports and credit limits and to filter commission statements on the basis of “paid” orders.
Accounts Payable
Supplier invoices, or “bills” as they are called on the QB side, may also be entered into either OSP or QB, depending on your preference, and can be configured to export automatically to the other system. As with payments, it’s important not to enter supplier invoices manually in both systems. Given the convenience of having your detailed cost data available and editable in front of you while you are vouching, we recommend submitting your supplier invoices in OSP.
Be sure to vouch the amount invoiced against the costs recorded on the corresponding purchase order in OSP in order to ensure proper cost of goods accounting and accurate commission accounting.
Inventory Assets
If you maintain an inventory, OSP enables you to track inventory levels, place orders from inventory (and enable your customers to order from inventory via an online store), and replenish your inventory.
When an inventory order is invoiced, an Inventory Asset account is credited on the QB side for the cost of the merchandise, and a Merchandise Cost (or Cost of Goods Sold) account is debited for that cost. And when PO for replenishing your inventory is vouched against a supplier invoice, your Inventory Asset account is credited.
Commissions
Commissions are not currently included in the data shared automatically between OSP and QB. Sales, gross margins, commissions earned and current commission statement balances are all calculated and presented to the appropriate users in OSP. The value of commission checks generated from QB should also be recorded in OSP, in order to keep commission statement balances current. OSP also enables you to “vouch” commission payments against earnings, in whole or in part (e.g. an advance may not initially be 100% offset by existing earnings, but may be eventually).
Setting up your QuickBooks® company file
In order to set up a QuickBooks® Company File to exchange real‐time data with OSP, please follow the instructions below.
IMPORTANT: when following these steps, please bear in mind that exact spelling and attention to detail is essential!
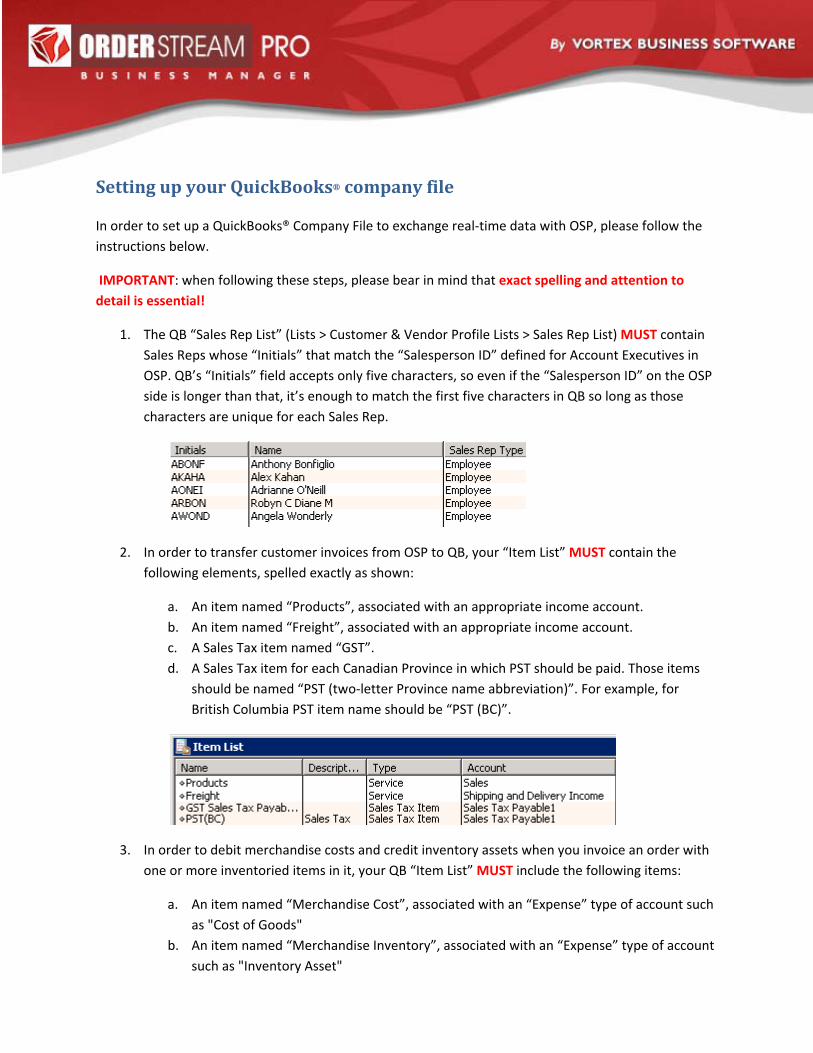
1. The QB “Sales Rep List” (Lists > Customer & Vendor Profile Lists > Sales Rep List) MUST contain Sales Reps whose “Initials” that match the “Salesperson ID” defined for Account Executives in OSP. QB’s “Initials” field accepts only five characters, so even if the “Salesperson ID” on the OSP side is longer than that, it’s enough to match the first five characters in QB so long as those characters are unique for each Sales Rep.
2. In order to transfer customer invoices from OSP to QB, your “Item List” MUST contain the following elements, spelled exactly as shown:
a. An item named “Products”, associated with an appropriate income account. b. An item named “Freight”, associated with an appropriate income account. c. A Sales Tax item named “GST”. d. A Sales Tax item for each Canadian Province in which PST should be paid. Those items
should be named “PST (two‐letter Province name abbreviation)”. For example, for British Columbia PST item name should be “PST (BC)”.
3. In order to debit merchandise costs and credit inventory assets when you invoice an order with one or more inventoried items in it, your QB “Item List” MUST include the following items:
a. An item named “Merchandise Cost”, associated with an “Expense” type of account such as "Cost of Goods"
b. An item named “Merchandise Inventory”, associated with an “Expense” type of account such as "Inventory Asset"

4. In order to transfer supplier invoices (or “bills” in QB’s language) from OSP to QB, your QB “Item List” MUST include the following items:
a. An item named “Merchandise Cost”, associated with an “Expense” type of account such as "Cost of Goods"
b. An item named “Freight Cost”, associated with an “Expense” type of account such as “Freight Cost”
c. An item named “Tax Cost”, associated with an “other current asset” type of account such as “Tax Paid”
5. In order to track inventory assets in QB, your QB “Item List” MUST include the following item:
a. An item named “Merchandise Inventory”, associated with an “Expense” type of account such as "Inventory Asset"
6. Optionally, a custom field named “Supplier_Account_No” may be defined for Vendor records. This field corresponds to each Supplier’s “Account number” as defined in OSP.
Customer Invoice transfers, in table format
The following table illustrates how customer invoices are transferred from OSP to QB. The content of the transfer depends on the type of merchandise (e.g. drop‐shipped, from inventory or to replenish inventory) in the order you have invoiced.
OSP Value Transferred
QB Item Targeted by Transfer
QB Account Associatedwith Transferred Item
Merchandise price (drop ship merchandise)
“Products” An income account such as “Merchandise Sales”
Merchandise price (inventory
“Products” An income account such as “Merchandise

merchandise) Sales” Additionally, a “bill” is transferred to your warehouse, based on the merchandise cost data in the corresponding warehouse PO. Total merchandise cost should credit a “Merchandise Inventory” item and debit a “Merchandise Cost” item.
Income accounts such as “Income Asset” and “Merchandise Cost”
Merchandise price (replenish merchandise)
(excluded from transfer) n/a
Miscellaneous flat charge
(Depends on the vendor / imprinter / warehouse to which the charge has been assigned)
(depends)
Freight price “Freight” An appropriate income account such as “Freight Sales”
Tax price A sales tax item named “Sales Tax‐Computed”, plus a Sales Tax item for each US state in which tax should be paid. Those items should be named “Sales Tax Payable‐(two‐letter state name abbreviation)”.
n/a
Supplier Invoice transfers, in table format
The following table illustrates how supplier invoices (or “bills” in QB terminology) are transferred from OSP to QB. The type of transfer that goes through depends on the type of PO you submit a supplier invoice for.
NOTE: It’s normal not to submit a supplier invoice for inventory POs. OSP adjusts your merchandise cost and inventory asset accounts automatically when you invoice the original inventory order. You should consider submitting a supplier invoice for an inventory PO only if there are additional freight and / or tax costs you would like to account for, or an adjustment you would like to make to the originally transferred merchandise cost.
PO Type OSP Value Transferred
QB Item Targeted by Transfer
QB Account Associated with Transferred Item
Drop‐ship Merchandise Cost
“Merchandise Cost” An “Expense” type of account such as "Cost of Goods"
Freight Cost “Freight Cost” An “Expense” type of account such as “Freight Cost”
Tax Cost “Tax Cost” An “other current asset” type of account such as “Tax Paid”
Inventory (your Warehouse is the Supplier) Merchandise
Cost
“Merchandise Cost” (as a debit)
An “Expense” type of account such as "Cost of Goods"
“Merchandise Inventory” (as a credit)
An “other current asset” type of account such as “Inventory Asset”

Freight Cost “Freight Cost” An “Expense” type of account such as “Freight Cost”
Tax Cost “Tax Cost” An “other current asset” type of account such as “Tax Paid”
Replenish (a Vendor ships to your Warehouse)
Merchandise Cost
“Merchandise Inventory” (as a debit)
An “other current asset” type of account such as “Inventory Asset”
Freight Cost “Freight Cost” An “Expense” type of account such as “Freight Cost”
Tax Cost “Tax Cost” An “other current asset” type of account such as “Tax Paid”

Setting up the QuickBooks Web Connector
The QuickBooks Web Connector (QBWC) is included in the QuickBooks software package and is usually installed by default together with the main QuickBooks system. It can be found at “Start” “Programs”
“QuickBooks” “QuickBooks Web Connector”. If QBWC is not already installed, it can be downloaded and installed free of charge from the Intuit web site: http://marketplace.intuit.com/webconnector/
Finding the path to your QuickBooks company file
The system administrators at OSP need to know the path to your QuickBooks® company file in order to configure the connector on the OSP side. Here’s how to find the path:
1. While the desired company file is open in QB, press F2. You’ll see an information box similar to that shown in Figure 1.
2. Select with your mouse all the text in the text box circled in red on Figure 1. Then, right‐click and select “Copy” from the menu.
3. Paste the copied path into an email to your OSP support representative.
Figure 1

In return, your support representative will send you a QBWC configuration file as an email attachment, as well as a communication password. Save the attached configuration file on your dedicated QB computer, in a location that’s easy to remember.
Configuring the QuickBooks Web Connector
1. Start QuickBooks and open the desired company file (if it did not open automatically). 2. Start QBWC (i.e. “Start” “Programs” “QuickBooks” “QuickBooks Web Connector”). 3. In the QBWC window, click the “Add an application” button.
Figure 2

4. Open the QWC configuration file received from your OSP support representative.
Figure 3

5. Click the “OK” button in the QBWC authorization window (see Figure 4)
Figure 4

6. Select “Yes, always;…” and click the “Continue…” button in the QuickBooks Application Certificate window (see Figure 5).
Figure 5

7. Click the “Done” button in the QuickBooks Access Confirmation window (see Figure 6).
Figure 6
8. Find and restore the QBWC window (it may hide itself in the bottom right corner of the task bar). Select the “Password” field in the “QBOSP Application” row and enter the password provided by your OSP support representative (see Figure 7), then press the “Tab” key.
Figure 7
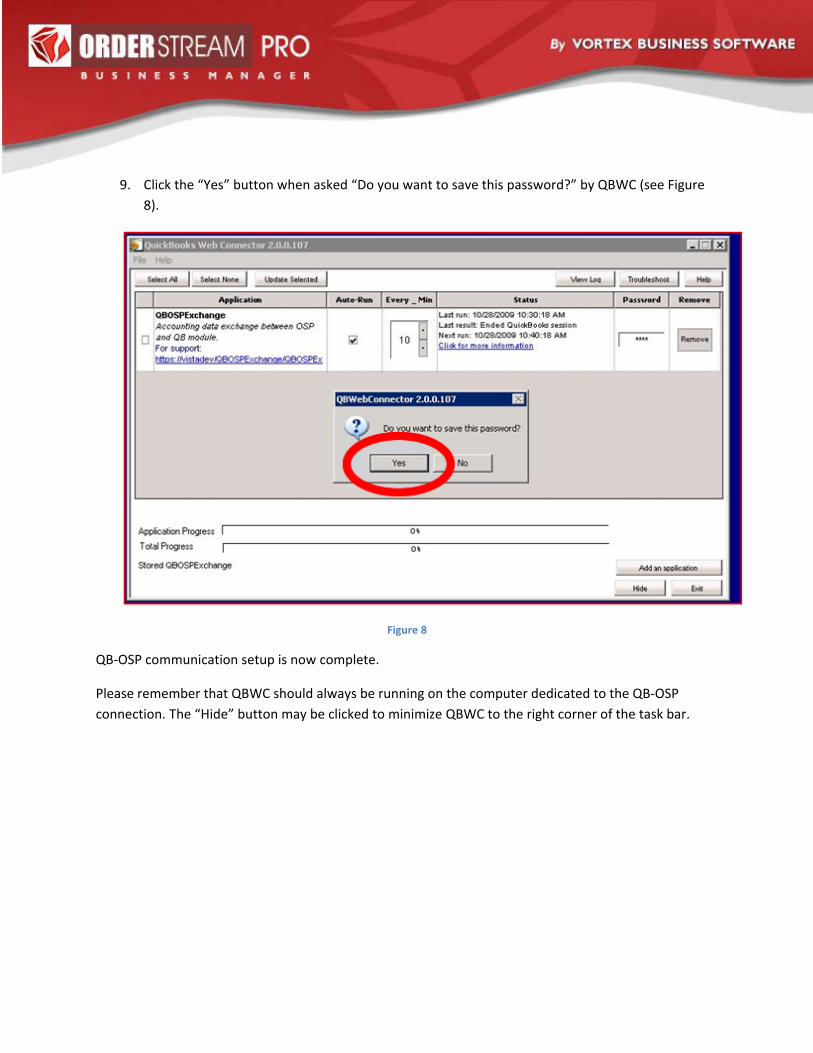
9. Click the “Yes” button when asked “Do you want to save this password?” by QBWC (see Figure 8).
Figure 8
QB‐OSP communication setup is now complete.
Please remember that QBWC should always be running on the computer dedicated to the QB‐OSP connection. The “Hide” button may be clicked to minimize QBWC to the right corner of the task bar.

Operating the Web Connection
The QB‐OSP connection operates over the internet. In order for the connection to work properly, the computer on which QuickBooks is installed should always be logged into with administrative privileges and have continuous HTTP and HTTPS access to the Internet. Software and hardware firewalls should not interfere with the connection unless they block outgoing HTTP and/or HTTPS traffic.
Once QBWC and the configuration file have been installed on the designated computer, you need to ensure that QBWC runs continuously in the background. Data transfers will accumulate in a queue when QBWC is not running. QBWC can be set up to start running automatically whenever the designated computer is started.
Transfers should start to flow in real‐time the day after the integration has been completed.
Transfers should succeed if: a. QB itself is not currently running on the designated computer (but is properly installed
there), or b. QB is running on the designated computer, and all QB company files are closed, or c. QB is running on the designated computer, and the desired destination QB company file is
open.
Transfers will not succeed if: 1. QBWC is not running, or 2. QB is running on the designated computer, and a QB company file other than the desired
destination file is open.
Nightly Transfer Logs
Every night you will receive an automatic email summary of how many invoices, customers and suppliers were transferred from OSP to QB, and how many payments were transferred from QB to OSP, during the previous 24 hours. If the transfer encountered any errors, they will be listed here.
The most common errors are due to an irregular set‐up of your QB company file (see page 4). Make sure that your QB “Sales Rep List” contains Sales Reps whose “Initials” that match the “Salesperson ID” defined for each Account Executive in OSP, and that the “Item List” contains an item named “Freight”, an item named “Products”, a Sales Tax item named “Sales Tax‐Computed” and a Sales Tax item for each US state in which tax should be paid. Exact spelling is essential!