Embed Size (px)
Citation preview

US Water Systems Big Blue Installation Guide
10” and 20” Singles, Doubles and Triples
Visit us online at
www.uswatersystems.com
REVISION # 1.1 REVISION DATE March 12, 2015
US Water Systems Corporate Office 1209 Country Club Road Indianapolis, IN 46234 1-800-608-8792 [email protected]
Owners Manual
2
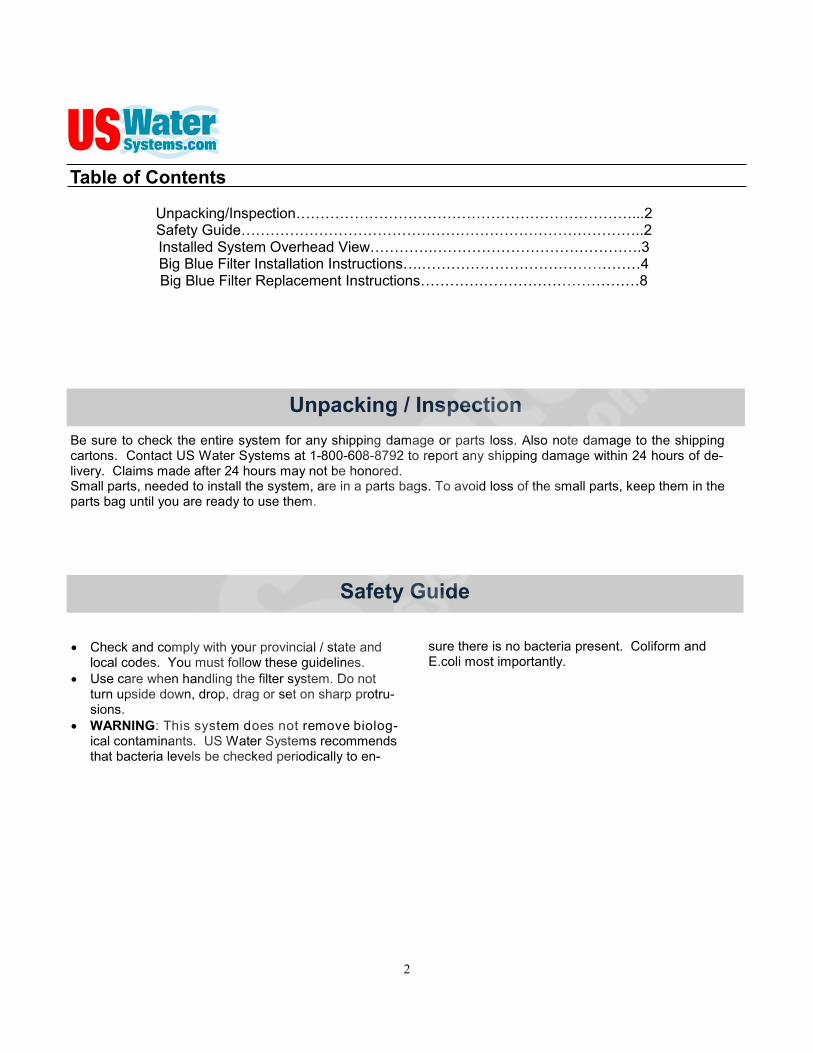
Table of Contents
Unpacking/Inspection……………………………………………………………...2 Safety Guide………………………………………………………………………..2 Installed System Overhead View………….…………………………………….3 Big Blue Filter Installation Instructions….………………………………………4 Big Blue Filter Replacement Instructions………………………………………8
Safety Guide
Be sure to check the entire system for any shipping damage or parts loss. Also note damage to the shipping cartons. Contact US Water Systems at 1-800-608-8792 to report any shipping damage within 24 hours of de-livery. Claims made after 24 hours may not be honored. Small parts, needed to install the system, are in a parts bags. To avoid loss of the small parts, keep them in the parts bag until you are ready to use them.
Unpacking / Inspection
Check and comply with your provincial / state and local codes. You must follow these guidelines.
Use care when handling the filter system. Do not turn upside down, drop, drag or set on sharp protru-sions.
WARNING: This system does not remove biolog-ical contaminants. US Water Systems recommends that bacteria levels be checked periodically to en-
sure there is no bacteria present. Coliform and E.coli most importantly.
3
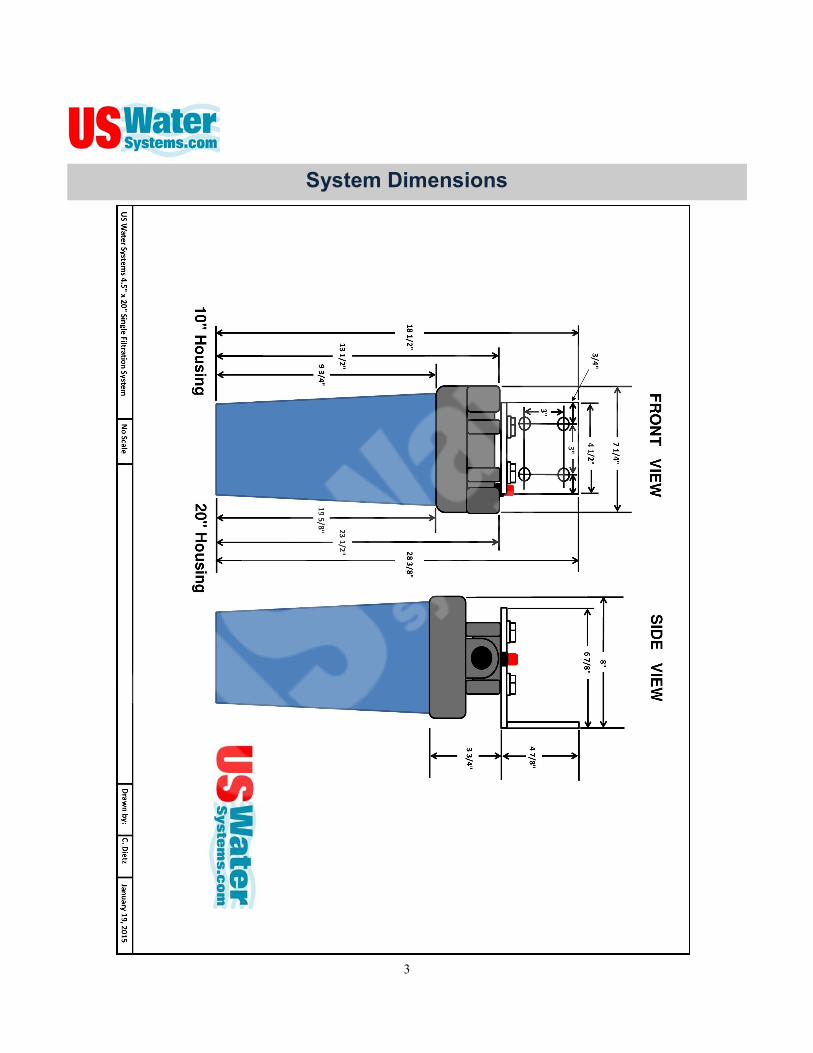
System Dimensions
4
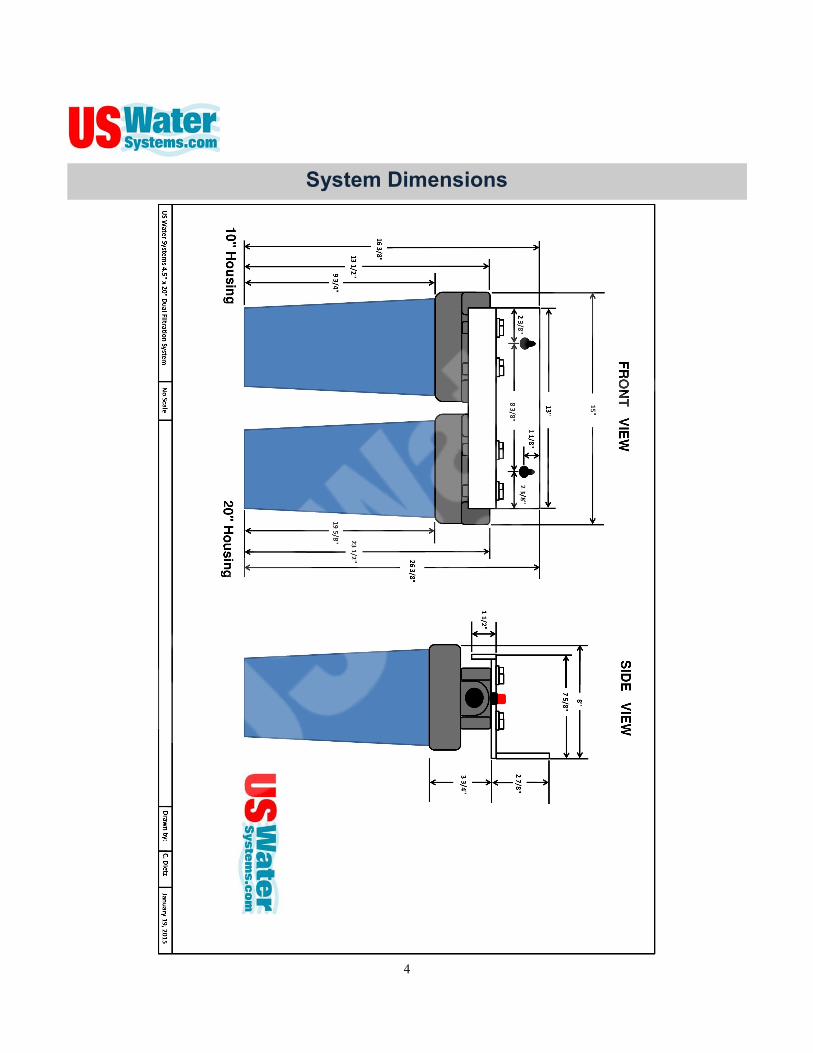
System Dimensions

5
System Dimensions
6
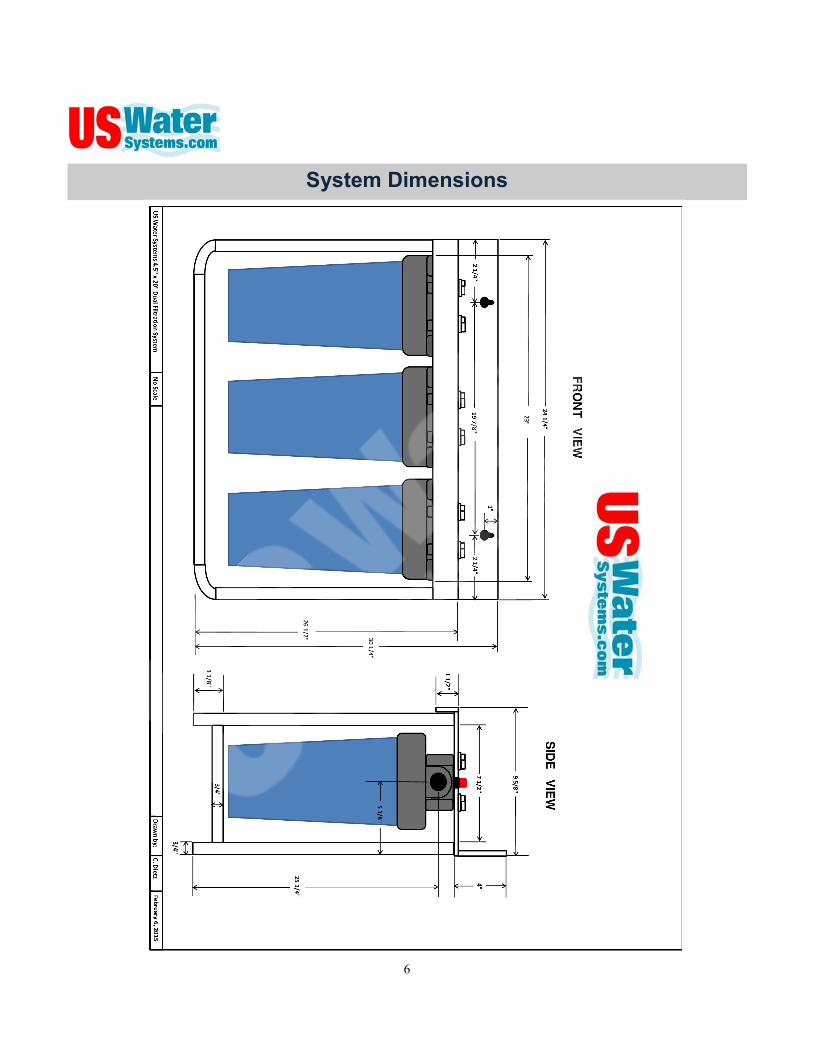
System Dimensions
7
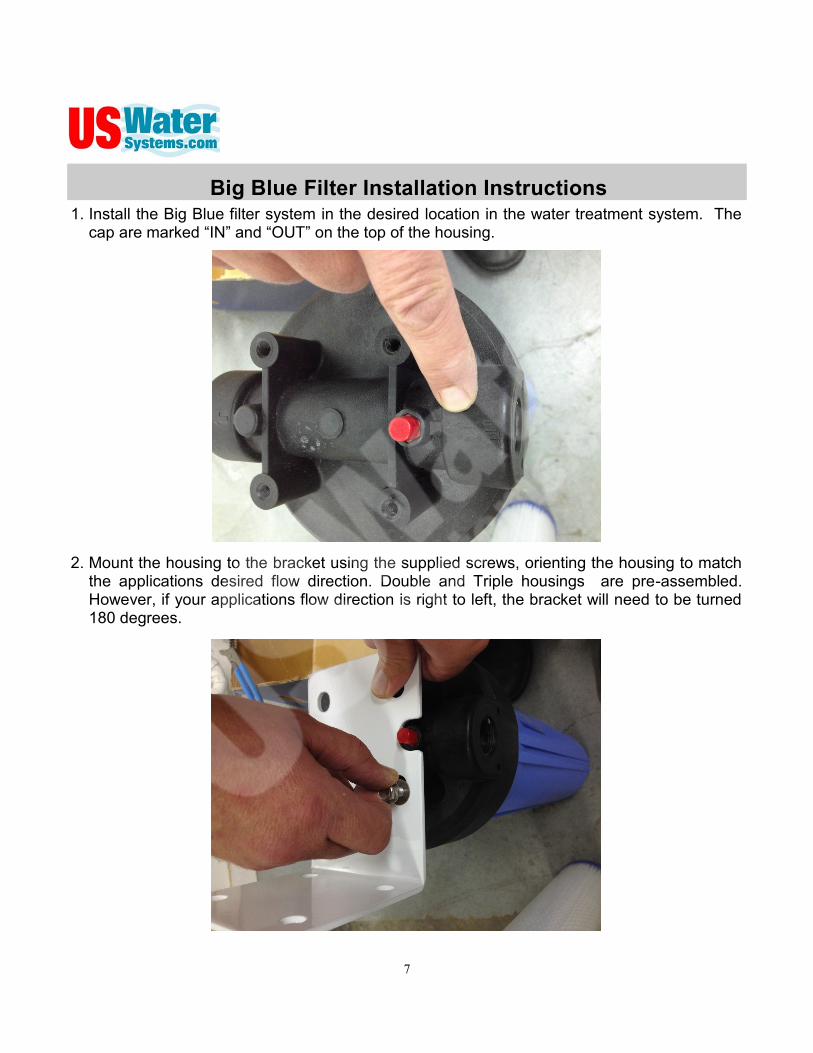
1. Install the Big Blue filter system in the desired location in the water treatment system. The cap are marked “IN” and “OUT” on the top of the housing.
2. Mount the housing to the bracket using the supplied screws, orienting the housing to match
the applications desired flow direction. Double and Triple housings are pre-assembled. However, if your applications flow direction is right to left, the bracket will need to be turned 180 degrees.
Big Blue Filter Installation Instructions
8
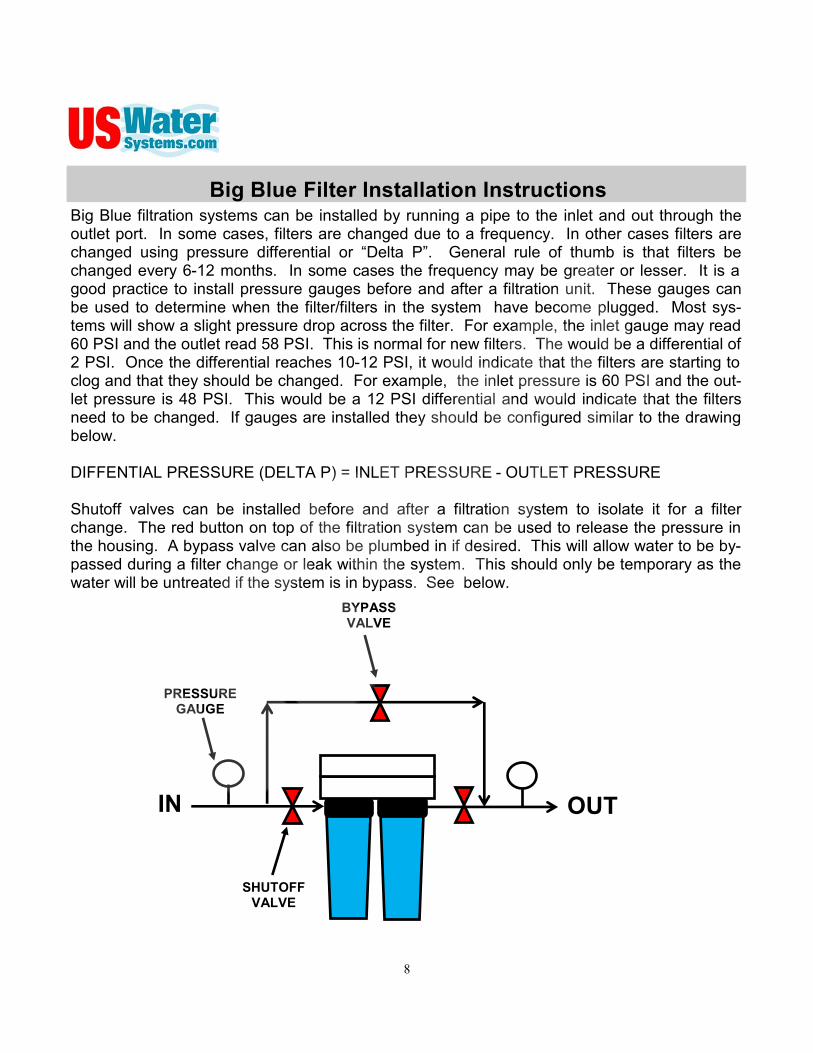
Big Blue filtration systems can be installed by running a pipe to the inlet and out through the outlet port. In some cases, filters are changed due to a frequency. In other cases filters are changed using pressure differential or “Delta P”. General rule of thumb is that filters be changed every 6-12 months. In some cases the frequency may be greater or lesser. It is a good practice to install pressure gauges before and after a filtration unit. These gauges can be used to determine when the filter/filters in the system have become plugged. Most sys-tems will show a slight pressure drop across the filter. For example, the inlet gauge may read 60 PSI and the outlet read 58 PSI. This is normal for new filters. The would be a differential of 2 PSI. Once the differential reaches 10-12 PSI, it would indicate that the filters are starting to clog and that they should be changed. For example, the inlet pressure is 60 PSI and the out-let pressure is 48 PSI. This would be a 12 PSI differential and would indicate that the filters need to be changed. If gauges are installed they should be configured similar to the drawing below. DIFFENTIAL PRESSURE (DELTA P) = INLET PRESSURE - OUTLET PRESSURE Shutoff valves can be installed before and after a filtration system to isolate it for a filter change. The red button on top of the filtration system can be used to release the pressure in the housing. A bypass valve can also be plumbed in if desired. This will allow water to be by-passed during a filter change or leak within the system. This should only be temporary as the water will be untreated if the system is in bypass. See below.
Big Blue Filter Installation Instructions
IN OUT
BYPASS VALVE
PRESSURE GAUGE
SHUTOFF VALVE
9
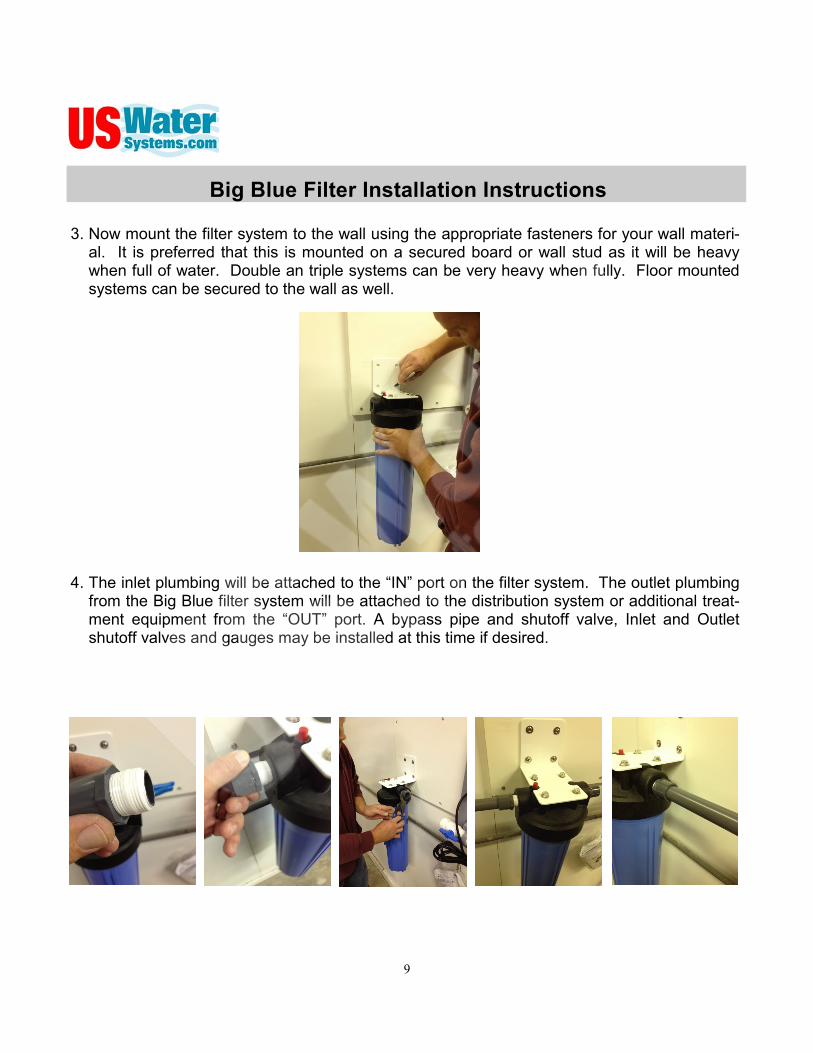
3. Now mount the filter system to the wall using the appropriate fasteners for your wall materi-
al. It is preferred that this is mounted on a secured board or wall stud as it will be heavy when full of water. Double an triple systems can be very heavy when fully. Floor mounted systems can be secured to the wall as well.
4. The inlet plumbing will be attached to the “IN” port on the filter system. The outlet plumbing
from the Big Blue filter system will be attached to the distribution system or additional treat-ment equipment from the “OUT” port. A bypass pipe and shutoff valve, Inlet and Outlet shutoff valves and gauges may be installed at this time if desired.
Big Blue Filter Installation Instructions
10
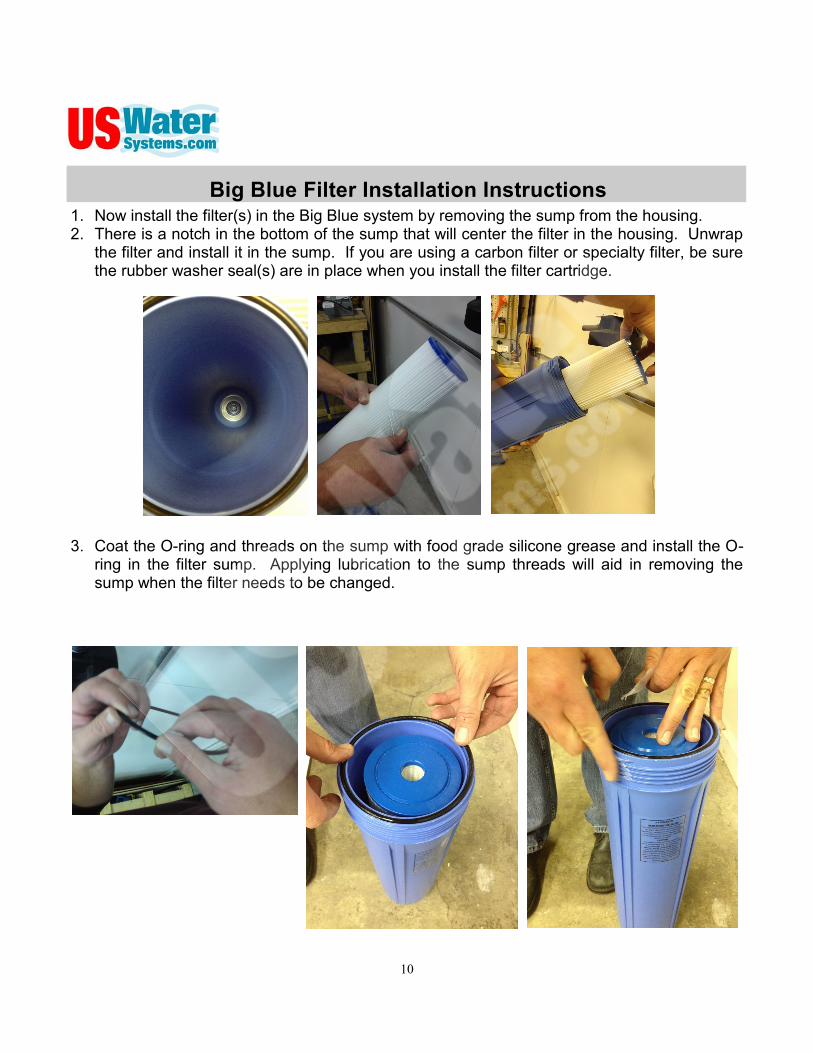
1. Now install the filter(s) in the Big Blue system by removing the sump from the housing. 2. There is a notch in the bottom of the sump that will center the filter in the housing. Unwrap
the filter and install it in the sump. If you are using a carbon filter or specialty filter, be sure the rubber washer seal(s) are in place when you install the filter cartridge.
3. Coat the O-ring and threads on the sump with food grade silicone grease and install the O-
ring in the filter sump. Applying lubrication to the sump threads will aid in removing the sump when the filter needs to be changed.
Big Blue Filter Installation Instructions

11
US Water Big Blue filter systems are designed using the “step down filtration” configuration. This means that the filter capability is stepped down from large to small. This is consistent with the micron rating on the filter. The reason for this is the particle size should reduced through each filter. This will reduce the frequency of the filter changes. If there were a 5 micron filter first then a 20 micron filter, the 5 micron filter would plug and the 20 would be virtually nothing. It is better to go with larger micron filters and step down to lower micron filters. Here is a table that shows how US Water filter systems are configured.
Single filtration systems used in different positions in the overall equipment configuration would still follow the same “step down filtration” method. This will reduce the filter change frequency but will also provide the best water quality.
Big Blue Filter Installation Instructions

12
4. Now install the sump in the filter cap and turn it clockwise to tighten the filter. Once it is hand tight, use the supplied wrench to tighten it an additional 1/4-1/2 turn. Repeat this step for each filter sump in the system.
5. Once the filter is installed the red button on the top of the filter can be used bleed the air out
of the chamber when the water is turned on to the system. NOTE: Carbon and other specialty filters may need to be flushed before use. It is a good
practice to flush new filters and check for discolored water. This should clear within a few minutes of flushing the filters.
Big Blue Filter Installation Instructions

13
1. Shutoff the water supply. 2. Open a faucet of spigot closest to the filter housing and allow all the water to empty from
the plumbing system. 3. Push the red button on the top of the filter housing to release the remaining water pressure. 4. Use the supplied filter wrench to remove the sump by turning it counterclockwise. WARNING! If the pressure is not released, the filter sump will be very difficult to get loose. It is imperative that the water pressure is released prior to attempting to remove the filter sump. 5. Remove the sump by spinning it counterclockwise until the sump is completely removed.
Big Blue Filter Replacement Instructions
14
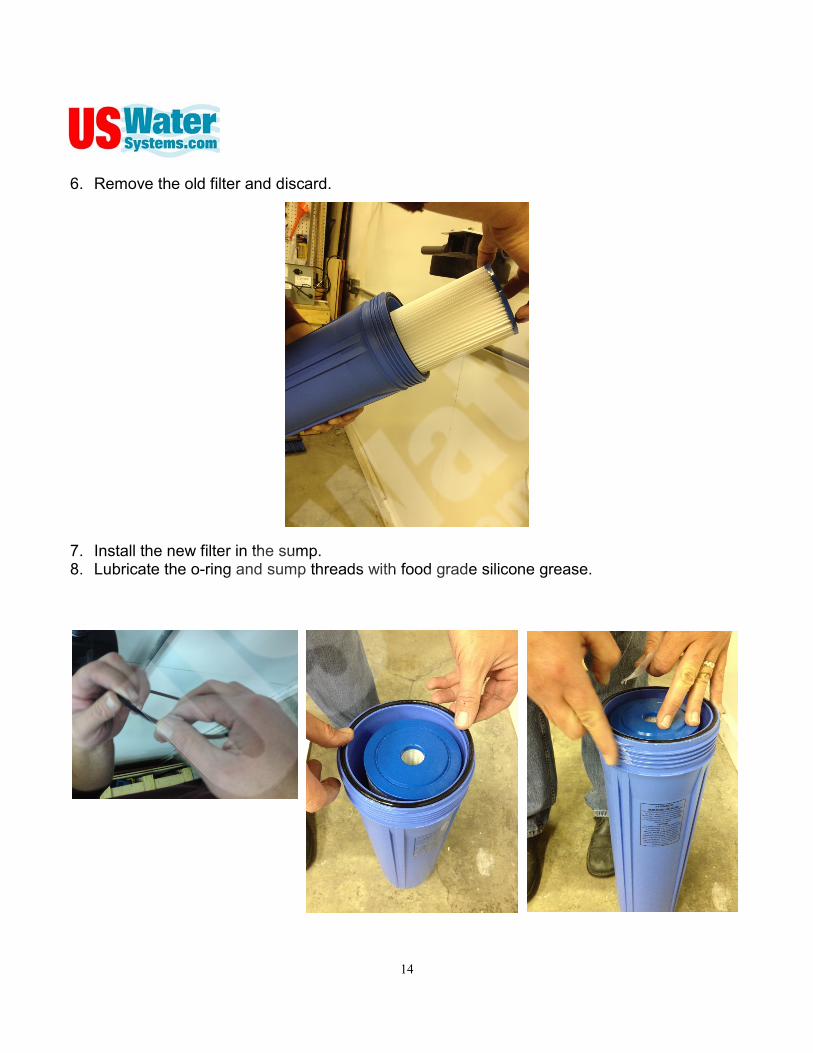
6. Remove the old filter and discard. 7. Install the new filter in the sump. 8. Lubricate the o-ring and sump threads with food grade silicone grease.

15
9. Install the filter sump in the filter cap by turning it clockwise until it is hand tight. NOTE: The housing should spin tight fairly easily. If not, add more lubrication to the sump threads. This will aid with removing the sump when the filter needs to be replaced again. 10. Once the filter sump is hand tight, tighten it an additional 1/4-1/2 turn with the supplied filter
wrench.
16
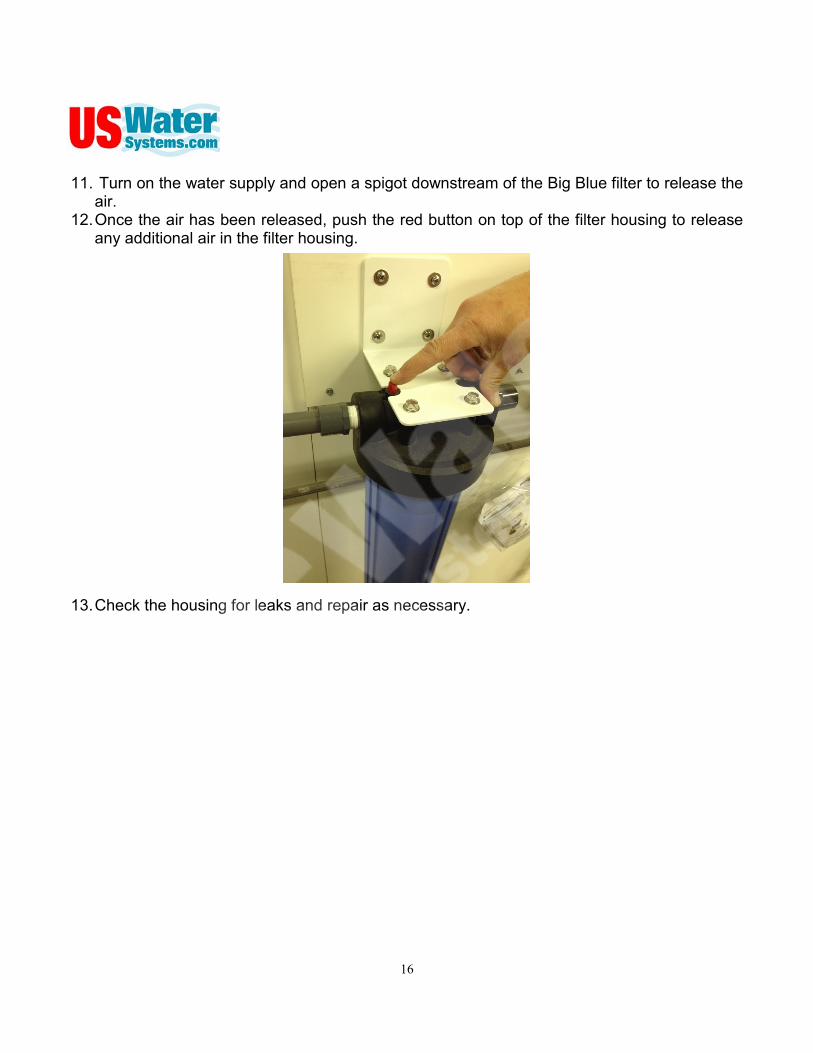
11. Turn on the water supply and open a spigot downstream of the Big Blue filter to release the air.
12. Once the air has been released, push the red button on top of the filter housing to release any additional air in the filter housing.
13. Check the housing for leaks and repair as necessary.