Embed Size (px)
Citation preview
■ Includes / Inclus / inklusive / Incluso / Incluye
■ Platform / Plateform / Plattform / Piattaforma / Plataforma
Instruction manual/ Mode d'emploi/ Bedienungsanleitung/ Foglio di istruzioni/ Hoja de Instrucciones
Quick Start Guide/ Guide de démarrage rapide / Schnellstart-Anleitung/ Guida introduttiva/ Guía de inicio rápido
Mouse & Keyboard Controller/ Contrôleur Souris & Clavier/ Maus- & Tastatur-Controller/ Mouse & Keyboard Controller/ Controlador por teclado y ratón
1901-53UK
TACTICAL ASSAULT COMMANDER
1
2 3 4 5
6
7 8 9 10
1 1
12
L3
L1
L2
R3
R1R2 SHARE
SNIPEFN
OPTIONS
QUICK
WALK
13 14 15
16
17 18 19 20
Thank you for purchasing this product. Before using this product please read the instructions carefully. After reading the instruction manual, please keep it for reference.
/ Merci d'avoir acheter ce produit. Lisez attentivement les instructions avant d'utiliser ce produit. Après avoir lu le feuillet d'instructions, conservez le bien pour future référence./ Vielen Dank, dass Sie sich fur dieses Produkt entschieden haben.Bevor Sie dieses Produkt verwenden, lesen
Sie bitte die Kurzanleitung sorgfältig durch. Heben Sie die Kurzanleitung zu Ihrer Information auf./ Grazie per aver scelto questo prodotto. Prima di utilizzare questo prodotto, leggere attentamente le istruzioni.
Una volta lette le istruzioni, conservarle per riferimenti futuri./ Te agradecemos la compra de este producto. Antes de usar este producto, por favor lea detenidamente las
instrucciones. Después de leer la hoja de instrucciones, por favor, guárdelo para futuras referencias.
PlayStation®4 / PlayStation®3Please note that the information provided is for the PlayStation®4 and PlayStation®3 systems.
Please refer to PlayStation®4 and PlayStation®3 system manuals for more information. This product does not feature light bar, motion sensors, or force feedback.
EN
PlayStation®4 / PlayStation®3Notez bien que les renseignements fournis sont pour la PlayStation®4 et PlayStation®3 systèmes.
Merci de vous référer au manuel de la système PlayStation®3 pour plus d'information.Ce produit ne dispose pas de fonction pour barre lumineuse, détecteurs de mouvement, ou retour de force.
FR
PlayStation®4 / PlayStation®3Bitte beachten Sie, dass die zur Verfügung gestellten Informationen für die PlayStation®4 undPlayStation®3 systeme.
Weitere Informationen finden Sie im Handbuch für die PlayStation®3 system.Dieses Produkt verfügt nicht über Lichtbalken, Bewegungssensoren, für Force-Feedback.
DE
PlayStation®4 / PlayStation®3Si prega di notare che le informazioni fornite sono il PlayStation®4 e PlayStation®3 sistema.
Per maggiori informazioni, vedi manuale di istruzioni per l'uso della sistema PlayStation®3.Questo prodotto non dispone di cuffie luce bar, sensori di movimento, per Force feedback.
IT
PlayStation®4 / PlayStation®3Tenga en cuenta que la información proporcionada es para la consola PlayStation®3 y PlayStation®4 sistemas.
Consulte el manual de la sistema PlayStation®3 si desea más información.Este producto no dispone de light bar, sensores de movimiento, o Force Feedback.
ES
Also compatible with PC* (Windows 10/8.1/8/7/Vista).Spare PC USB port required / Port USB / USB-Anschluss / Porta USB / Puerto USB*PC Compatibility not tested nor endorsed by Sony Interactive Entertainment Europe.
Instruction Manual / Mode d'emploi / Bedienungsanleitung/ Manuale di istruzioni / Manual de Instrucciones
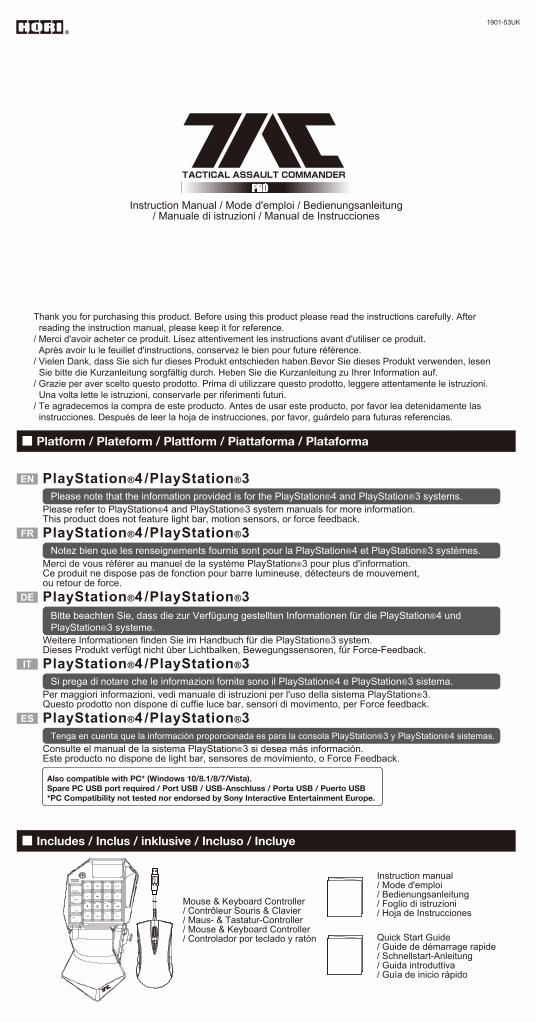
■ Layout / Connectique / Bezeichnung der Teile / Layout / Diseño
28
2627
29 32 33
30
21 2223
25
24
51
2 3 4
2018 19
31
67 8 9 10
1112 13 14 15
1617
34
37
3839
35 36
42 43
40 41
EDIT
OFFONPROFILE
1 2 3
UPDOWN UP
RIGHT
UP
RIGHT
LEFTLEFT
DOWN

EN
11 L3 button
8 Left analog stick (↑)
1 OPTIONS button
7 △ button
6 Quick button
5 SHARE button
2 PlayStation®4 : L2 buttonPlayStation®3 : L1 button
10 □ button
3 PlayStation®4 : R2 buttonPlayStation®3 : R1 button
4 PlayStation®4 : R1 buttonPlayStation®3 : R2 button
9 PlayStation®4 : L1 buttonPlayStation®3 : L2 button
16 ○ button
18 Snipe button
12 Left analog stick (←)
13 Left analog stick (↓)
14 Left analog stick (→)
19 ○ button
17 FN button
20 Walk Button
15 R3 button
21 Connector
22 Controller cable: 3.0m / 9.8ft
25 Display Panel
26 PS4TM / PS3TM System Toggle Switch
23 Touch pad functionality
27 DP/LS Toggle Switch
29 Palm Rest Adjustment Button
24 PS button
30 Analog Stick
28 USB port
31 × button
33 Config Switch
32 Profile Toggle Switch
37 R3 button + Scroll Wheel
38 Sensitivity Up
39 Sensitivity Down
43 PlayStation®4 : R1 buttonPlayStation®3 : R2 button
42 PlayStation®4 : L1 buttonPlayStation®3 : L2 button
41 PlayStation®4 : L2 buttonPlayStation®3 : L1 button
40 PlayStation®4 : R2 buttonPlayStation®3 : R1 button
34 Extension port
35 Connector
36 Mouse Cable
FR
11 Touche L3
8 gauche stick analogique (↑)
1 Touche OPTIONS
7 Touche △6 Bouton rapide
5 Touche SHARE
10 Touche □
2 PlayStation®4 : Touche L2PlayStation®3 : Touche L1
3 PlayStation®4 : Touche R2PlayStation®3 : Touche R1
4 PlayStation®4 : Touche R1PlayStation®3 : Touche R2
9 PlayStation®4 : Touche L1PlayStation®3 : Touche L2
16 Touche ○
18 Bouton Sniper
12 gauche stick analogique (←)
13 gauche stick analogique (↓)
14 gauche stick analogique (→)
19 Touche ○
17 Bouton FN
20 Bouton Marche
15 Touche R3
21 Connecteur
22 Câble du contrôleur
25 Panneau d'Affichage
29 Bouton de réglage
26 Système d'interrupteurPS3TM / PS4TM
23 Fonctionnalité du pavé tactile
27 Interrupteur DP / LS
24 Touche PS
30 Bouton multidirectionnel
28 ports USB
31 Touche ×
41 PlayStation®4 : Touche L2PlayStation®3 : Touche L1
40 PlayStation®4 : Touche R2PlayStation®3 : Touche R1
33 Commutateur Boutonsde Configuration
32 Profil interrupteur
37 Touche R3 + Molette
38 Sensitivity Stage Up
39 Sensitivity Stage Down
43 PlayStation®4 : Touche R1PlayStation®3 : Touche R2
42 PlayStation®4 : Touche L1PlayStation®3 : Touche L2
34 Port d'extension
35 Connecteur
36 Câble Souris
DE
11 L3-Taste
8 Linker Analog-Stick (↑)
1 OPTIONS-Taste
7 △-Taste
6 Quick-Taste
5 SHARE-Taste
10 □-Taste
2 PlayStation®4 : L2-TastePlayStation®3 : L1-Taste
3 PlayStation®4 : R2-TastePlayStation®3 : R1-Taste
4 PlayStation®4 : R1-TastePlayStation®3 : R2-Taste
9 PlayStation®4 : L1-TastePlayStation®3 : L2-Taste
16 ○-Taste
18 Snipe-Taste
12 Linker Analog-Stick (←)
13 Linker Analog-Stick (↓)
14 Linker Analog-Stick (→)
19 ○-Taste
17 FN-Taste
20 Gehen-Tastef
15 R3-Taste
21 Stecker
22 Kabel für die Steuerung
25 Anzeigefeld
26 PS4TM / PS3TM System Schalter
23 Touchpad-Funktionalität
27 DP / LS Kippschalter
29 Einstellknopf-Taste
24 PS-Taste
30 Steuerkreuz
28 USB Anschluesse
31 ×-Taste
41 PlayStation®4 : L2-TastePlayStation®3 : L1-Taste
40 PlayStation®4 : R2-TastePlayStation®3 : R1-Taste
33 Schalter für Button-Konfiguration
32 Profil-Schalter
37 R3-Taste + Scrollrad
38 Sensitivity Stage Up
39 Sensitivity Stage Down
43 PlayStation®4 : R1-TastePlayStation®3 : R2-Taste
42 PlayStation®4 : L1-TastePlayStation®3 : L2-Taste
34 Erweiterungsport
35 Stecker
36 Mauskabel
IT
11 Tasto L3
8 levetta sinistro (↑)
1 Tasto OPTIONS
7 Tasto △6 Tasto rapido5 Tasto SHARE
10 Tasto □
2 PlayStation®4 : Tasto L2PlayStation®3 : Tasto L1
3 PlayStation®4 : Tasto R2 PlayStation®3 : Tasto R1
4 PlayStation®4 : Tasto R1PlayStation®3 : Tasto R2
9 PlayStation®4 : Tasto L1PlayStation®3 : Tasto L2
16 Tasto ○
18 Pulsante Snipe
12 levetta sinistro (←)
13 levetta sinistro (↓)
14 levetta sinistro (→)
19 Tasto ○
17 Pulsante FN
20 Pulsante Cammina
15 Tasto R3
21 Connettore
22 Cavo unità di commando
25 Pannello display
26 PS3TM / PS4TM Toggle Switch sistema
23 Funzionalità del Touchpad
27 Interruttore DP / LS Commuta
29 Tasto regolazione
24 Tasto PS
30 Tasto direzionale
28 porte USB
31 Tasto ×
41 PlayStation®4 : Tasto L2PlayStation®3 : Tasto L1
40 PlayStation®4 : Tasto R2PlayStation®3 : Tasto R1
33 Selettore per la configurazionedel pulsante
32 Profilo interruttore
37 Tasto R3 + Scroll Wheel
38 Sensitivity Stage Up
39 Sensitivity Stage Down
42 PlayStation®4 : Tasto L1PlayStation®3 : Tasto L2
43 PlayStation®4 : Tasto R1PlayStation®3 : Tasto R2
34 Porta estensione
35 Connettore
36 Cavo del mouse
PlayStation®4 / PlayStation®3
ES
11 Botón L3
8 Stick izquierdo (↑)
1 Botón OPTIONS
7 Botón △6 Botón rápido
5 Botón SHARE
10 Botón □
2 PlayStation®4 : Botón L2PlayStation®3 : Botón L1
3 PlayStation®4 : Botón R2PlayStation®3 : Botón R1
4 PlayStation®4 : Botón R1PlayStation®3 : Botón R2
9 PlayStation®4 : Botón L1PlayStation®3 : Botón L2
16 Botón ○
19 Botón ○
18 Botón de Snipe
17 Botón de FN
20 Botón de caminar
15 Botón R3
12 Stick izquierdo (←)
13 Stick izquierdo (↓)
14 Stick izquierdo (→)
21 Conector
22 Cable del controlador
29 Botón ajuste
25 Panel de visualización
26 Interruptor de Toggle desistema PS4TM / PS3TM
23 Funcionalidad del Touchpad
27 Interruptor de DP/LS
24 Botón PS
30 Mando de dirección
28 puertos USB
31 Botón ×
41 PlayStation®4 : Botón L2PlayStation®3 : Botón L1
40 PlayStation®4 : Botón R2PlayStation®3 : Botón R1
33 Interruptor de configuraciónde botones
32 Interruptor de perfil
38 Sensitivity Stage Up
39 Sensitivity Stage Down
37 Botón R3 + Ruedade Desplazamiento
43 PlayStation®4 : Botón R1PlayStation®3 : Botón R2
42 PlayStation®4 : Botón L1PlayStation®3 : Botón L2
34 Puerto de extensión
36 Cable de ratón
35 Conector
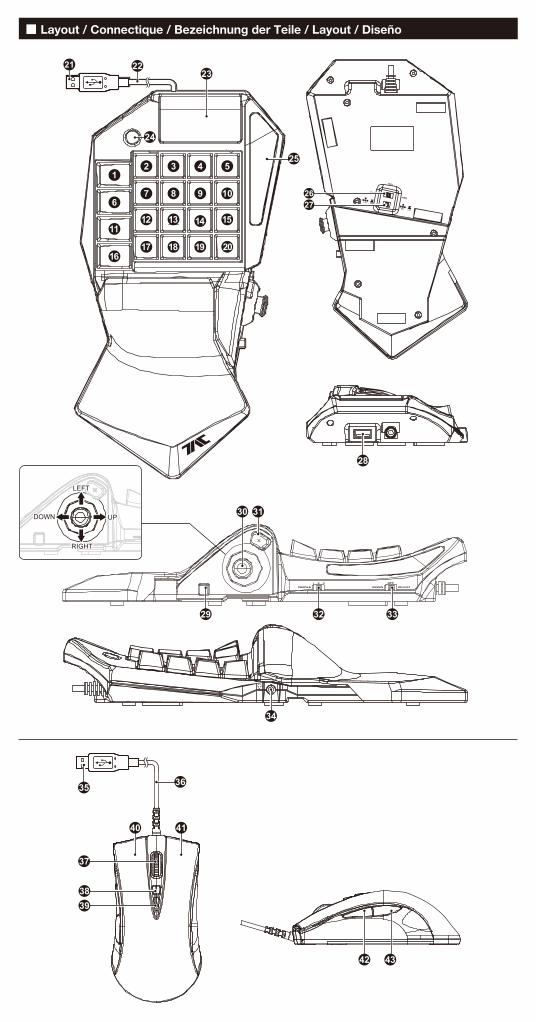
■ How to connect / Comment se connecter / Wie wird eingeschaltet / Cómo conectarlo / Come connettersi
EN 1.Insert the USB connector of the mouse into the USB port of the keyboard controller. In addition to the included mouse, other USB compliant mice may be used*. ※Not compatible with all mice. *Compatibility not tested nor endorsed by Sony Interactive Entertainment Europe.2. Please insert the USB connector of the controller into the USB port of the PlayStation®4. ※ Please set the PS4TM/PS3TM System Toggle Switch to the desired console before connecting the product.
FR 1.Insérez le connecteur USB de la souris dans le port USB du contrôleur du clavier. En plus de la souris fournie, toute autre souris conforme USB peut être utilisée ※Non compatible avec toutes les souris. * Compatibilité non-testée ni approuvée par Sony Interactive Entertainment Europe.2.Merci de bien vouloir insérer la prise USB du contrôleur à l'intérieur du port USB de la PlayStation®4. ※ Régler le commutateur système PS4TM/PS3TM sur la console souhaitée avant de brancher le produit.
DE 1.Stecken Sie den USB-Stecker des Maus am USB-Anschluss der Tastatur-Controller. Zusätzlich zu der mitgelieferten Maus, können andere USB-kompatible Mäuse verwendet werden. ※ Nicht kompatibel mit allen Mäusen. * Kompatibilität nicht geprüft noch von Sony Interactive Entertainment Europe unterstützt.2.Stecken Sie bitte den USB-Stecker des Controllers in den USB-Anschluss der PlayStation®4. ※ bitte korrigieren Sie die PS4TM / PS3TM -System umschalten auf die gewünschte Konsole wechseln, bevor Sie das Produkt.
IT 1.Inserire il connettore USB del mouse alla porta USB del controller tastiera. Oltre al mouse inclusi, può essere utilizzato topi conformi altro USB. ※ Non è compatibile con tutti i mouse. * La compatibilità non testato né approvato da Sony Interactive Entertainment Europe.2. Inserte el conector USB del mando en el puerto USB de la PlayStation®4. ※ Si prega di impostare la PS4TM / PS3TM-System Toggle Switch alla console desiderata prima di collegare il prodotto.
ES 1.Inserte el conector USB del ratón en el puerto USB del controlador de teclado. Además del ratón incluido, se puede utilizar otros ratones compatibles de USB. ※ No es compatible con todos los ratones. * Compatibilidad no probado ni aprobado por Sony Interactive Entertainment Europe.2.Si prega di inserire la presa USB del controller nella porta USB della PlayStation®4. ※ Por favor, ajuste el interruptor de Toggle de sistema PS4TM/PS3TM en la consola deseada antes de conectar el producto.
To PlayStation®4 / PlayStation®3 USB Port / Port USB PlayStation®4 / PlayStation®3/ Zum PlayStation®4 / PlayStation®3 USB-Port / PlayStation®4 / PlayStation®3 USB Port / Para el Puerto de PlayStation®4 / PlayStation®3
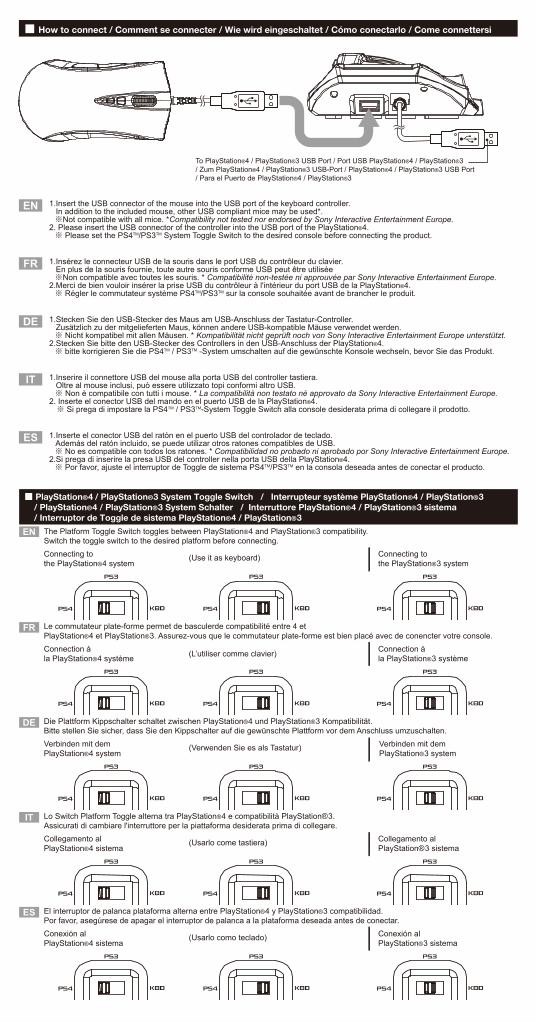
■ PlayStation®4 / PlayStation®3 System Toggle Switch / Interrupteur système PlayStation®4 / PlayStation®3 / PlayStation®4 / PlayStation®3 System Schalter / Interruttore PlayStation®4 / PlayStation®3 sistema / Interruptor de Toggle de sistema PlayStation®4 / PlayStation®3
Le commutateur plate-forme permet de basculerde compatibilité entre 4 etPlayStation®4 et PlayStation®3. Assurez-vous que le commutateur plate-forme est bien placé avec de conencter votre console.
FR
The Platform Toggle Switch toggles between PlayStation®4 and PlayStation®3 compatibility.Switch the toggle switch to the desired platform before connecting.
EN
Connecting tothe PlayStation®4 system
Connecting tothe PlayStation®3 system
(Use it as keyboard)
Connection àla PlayStation®4 système
Connection àla PlayStation®3 système (L’utiliser comme clavier)
(Verwenden Sie es als Tastatur)Verbinden mit demPlayStation®4 system
Verbinden mit demPlayStation®3 system
Die Plattform Kippschalter schaltet zwischen PlayStation®4 und PlayStation®3 Kompatibilität.Bitte stellen Sie sicher, dass Sie den Kippschalter auf die gewünschte Plattform vor dem Anschluss umzuschalten.
DE
(Usarlo come tastiera)Collegamento alPlayStation®4 sistema
Collegamento alPlayStation®3 sistema
Lo Switch Platform Toggle alterna tra PlayStation®4 e compatibilità PlayStation®3.Assicurati di cambiare l'interruttore per la piattaforma desiderata prima di collegare.
IT
(Usarlo como teclado)Conexión alPlayStation®4 sistema
Conexión alPlayStation®3 sistema
El interruptor de palanca plataforma alterna entre PlayStation®4 y PlayStation®3 compatibilidad.Por favor, asegúrese de apagar el interruptor de palanca a la plataforma deseada antes de conectar.
ES
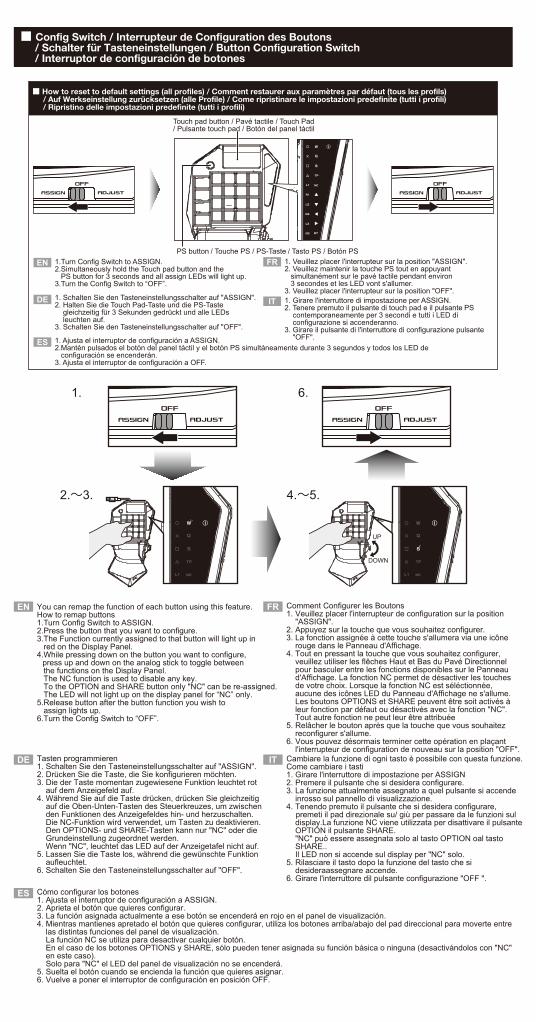
You can remap the function of each button using this feature.How to remap buttons1.Turn Config Switch to ASSIGN. 2.Press the button that you want to configure. 3.The Function currently assigned to that button will light up in red on the Display Panel.4.While pressing down on the button you want to configure, press up and down on the analog stick to toggle between the functions on the Display Panel. The NC function is used to disable any key. To the OPTION and SHARE button only "NC" can be re-assigned. The LED will not light up on the display panel for “NC” only.5.Release button after the button function you wish to assign lights up.6.Turn the Config Switch to “OFF”.
EN Comment Configurer les Boutons1. Veuillez placer l'interrupteur de configuration sur la position "ASSIGN".2. Appuyez sur la touche que vous souhaitez configurer.3. La fonction assignée à cette touche s'allumera via une icône rouge dans le Panneau d'Affichage.4. Tout en pressant la touche que vous souhaitez configurer, veuillez utiliser les flêches Haut et Bas du Pavé Directionnel pour basculer entre les fonctions disponibles sur le Panneau d'Affichage. La fonction NC permet de désactiver les touches de votre choix. Lorsque la fonction NC est séléctionnée, aucune des icônes LED du Panneau d'Affichage ne s'allume. Les boutons OPTIONS et SHARE peuvent être soit activés à leur fonction par défaut ou désactivés avec la fonction "NC". Tout autre fonction ne peut leur être attribuée5. Relâcher le bouton après que la touche que vous souhaitez reconfigurer s'allume.6. Vous pouvez désormais terminer cette opération en plaçant l'interrupteur de configuration de nouveau sur la position "OFF".
FR
Tasten programmieren1. Schalten Sie den Tasteneinstellungsschalter auf "ASSIGN".2. Drücken Sie die Taste, die Sie konfigurieren möchten.3. Die der Taste momentan zugewiesene Funktion leuchtet rot auf dem Anzeigefeld auf.4. Während Sie auf die Taste drücken, drücken Sie gleichzeitig auf die Oben-Unten-Tasten des Steuerkreuzes, um zwischen den Funktionen des Anzeigefeldes hin- und herzuschalten. Die NC-Funktion wird verwendet, um Tasten zu deaktivieren. Den OPTIONS- und SHARE-Tasten kann nur "NC" oder die Grundeinstellung zugeordnet werden. Wenn "NC", leuchtet das LED auf der Anzeigetafel nicht auf.5. Lassen Sie die Taste los, während die gewünschte Funktion aufleuchtet.6. Schalten Sie den Tasteneinstellungsschalter auf "OFF".
DE Cambiare la funzione di ogni tasto è possibile con questa funzione.Come cambiare i tasti1. Girare l'interruttore di impostazione per ASSIGN2. Premere il pulsante che si desidera configurare.3. La funzione attualmente assegnato a quel pulsante si accende inrosso sul pannello di visualizzazione.4. Tenendo premuto il pulsante che si desidera configurare, premeti il pad direzionale su/ giù per passare da le funzioni sul display.La funzione NC viene utilizzata per disattivare il pulsante OPTION il pulsante SHARE. "NC" può essere assegnata solo al tasto OPTION oal tasto SHARE.. Il LED non si accende sul display per "NC" solo.5. Rilasciare il tasto dopo la funzione del tasto che si desideraassegnare accende.6. Girare l'interruttore dil pulsante configurazione "OFF ".
IT
Cómo configurar los botones1. Ajusta el interruptor de configuración a ASSIGN.2. Aprieta el botón que quieres configurar.3. La función asignada actualmente a ese botón se encenderá en rojo en el panel de visualización.4. Mientras mantienes apretado el botón que quieres configurar, utiliza los botones arriba/abajo del pad direccional para moverte entre las distintas funciones del panel de visualización. La función NC se utiliza para desactivar cualquier botón. En el caso de los botones OPTIONS y SHARE, sólo pueden tener asignada su función básica o ninguna (desactivándolos con "NC" en este caso). Solo para "NC" el LED del panel de visualización no se encenderá.5. Suelta el botón cuando se encienda la función que quieres asignar.6. Vuelve a poner el interruptor de configuración en posición OFF.
ES
■ Config Switch / Interrupteur de Configuration des Boutons / Schalter für Tasteneinstellungen / Button Configuration Switch / Interruptor de configuración de botones
1.
2.~3. 4.~5.
6.
UP
DOWN
FR 1. Veuillez placer l'interrupteur sur la position "ASSIGN".2. Veuillez maintenir la touche PS tout en appuyant simultanément sur le pavé tactile pendant environ 3 secondes et les LED vont s'allumer.3. Veuillez placer l'interrupteur sur la position "OFF".
IT
1. Ajusta el interruptor de configuración a ASSIGN.2.Mantén pulsados el botón del panel táctil y el botón PS simultáneamente durante 3 segundos y todos los LED de configuración se encenderán.3. Ajusta el interruptor de configuración a OFF.
EN
DE 1. Schalten Sie den Tasteneinstellungsschalter auf "ASSIGN".2. Halten Sie die Touch Pad-Taste und die PS-Taste gleichzeitig für 3 Sekunden gedrückt und alle LEDs leuchten auf.3. Schalten Sie den Tasteneinstellungsschalter auf "OFF".
ES
1. Girare l'interruttore di impostazione per ASSIGN.2. Tenere premuto il pulsante di touch pad e il pulsante PS contemporaneamente per 3 secondi e tutti i LED di configurazione si accenderanno.3. Girare il pulsante di l'interruttore di configurazione pulsante "OFF".
1.Turn Config Switch to ASSIGN.2.Simultaneously hold the Touch pad button and the PS button for 3 seconds and all assign LEDs will light up.3.Turn the Config Switch to “OFF”.
■ How to reset to default settings (all profiles) / Comment restaurer aux paramètres par défaut (tous les profils) / Auf Werkseinstellung zurücksetzen (alle Profile) / Come ripristinare le impostazioni predefinite (tutti i profili) / Ripristino delle impostazioni predefinite (tutti i profili)
Touch pad button / Pavé tactile / Touch Pad/ Pulsante touch pad / Botón del panel táctil
PS button / Touche PS / PS-Taste / Tasto PS / Botón PS
■ Button configuration settings and sensitivity settings / Changer de profil / Profil-Schalter / Interrutore di profilo / Interruptor de perfil
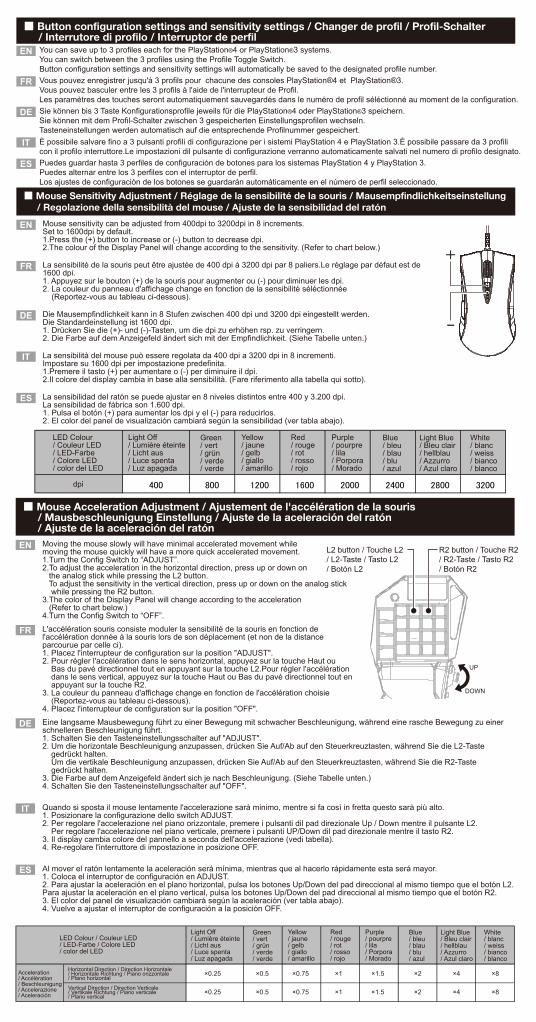
You can save up to 3 profiles each for the PlayStation®4 or PlayStation®3 systems.You can switch between the 3 profiles using the Profile Toggle Switch.Button configuration settings and sensitivity settings will automatically be saved to the designated profile number.
EN
Vous pouvez enregistrer jusqu'à 3 profils pour chacune des consoles PlayStation®4 et PlayStation®3. Vous pouvez basculer entre les 3 profils à l'aide de l'interrupteur de Profil. Les paramètres des touches seront automatiquement sauvegardés dans le numéro de profil séléctionné au moment de la configuration.
FR
Sie können bis 3 Taste Konfigurationsprofile jeweils für die PlayStation®4 oder PlayStation®3 speichern.Sie können mit dem Profil-Schalter zwischen 3 gespeicherten Einstellungsprofilen wechseln.Tasteneinstellungen werden automatisch auf die entsprechende Profilnummer gespeichert.
DE
È possibile salvare fino a 3 pulsanti profili di configurazione per i sistemi PlayStation 4 e PlayStation 3.È possibile passare da 3 profilicon il profilo interruttore.Le impostazioni dil pulsante di configurazione verranno automaticamente salvati nel numero di profilo designato.
IT
Puedes guardar hasta 3 perfiles de configuración de botones para los sistemas PlayStation 4 y PlayStation 3.Puedes alternar entre los 3 perfiles con el interruptor de perfil.Los ajustes de configuración de los botones se guardarán automáticamente en el número de perfil seleccionado.
ES
■ Mouse Sensitivity Adjustment / Réglage de la sensibilité de la souris / Mausempfindlichkeitseinstellung / Regolazione della sensibilità del mouse / Ajuste de la sensibilidad del ratón
La sensibilità del mouse può essere regolata da 400 dpi a 3200 dpi in 8 incrementi.Impostare su 1600 dpi per impostazione predefinita.1.Premere il tasto (+) per aumentare o (-) per diminuire il dpi.2.Il colore del display cambia in base alla sensibilità. (Fare riferimento alla tabella qui sotto).
IT
La sensibilidad del ratón se puede ajustar en 8 niveles distintos entre 400 y 3.200 dpi.La sensibilidad de fábrica son 1.600 dpi.1. Pulsa el botón (+) para aumentar los dpi y el (-) para reducirlos.2. El color del panel de visualización cambiará según la sensibilidad (ver tabla abajo).
ES
Die Mausempfindlichkeit kann in 8 Stufen zwischen 400 dpi und 3200 dpi eingestellt werden.Die Standardeinstellung ist 1600 dpi.1. Drücken Sie die (+)- und (-)-Tasten, um die dpi zu erhöhen rsp. zu verringern.2. Die Farbe auf dem Anzeigefeld ändert sich mit der Empfindlichkeit. (Siehe Tabelle unten.)
DE
La sensibilité de la souris peut être ajustée de 400 dpi à 3200 dpi par 8 paliers.Le réglage par défaut est de 1600 dpi.1. Appuyez sur le bouton (+) de la souris pour augmenter ou (-) pour diminuer les dpi.2. La couleur du panneau d'affichage change en fonction de la sensibilité séléctionnée (Reportez-vous au tableau ci-dessous).
FR
LED Colour/ Couleur LED/ LED-Farbe/ Colore LED/ color del LED
Light Off/ Lumière éteinte/ Licht aus/ Luce spenta/ Luz apagada
Green/ vert/ grün/ verde/ verde
Yellow/ jaune/ gelb/ giallo/ amarillo
Red/ rouge/ rot/ rosso/ rojo
Purple/ pourpre/ lila/ Porpora/ Morado
Blue/ bleu/ blau/ blu/ azul
Light Blue/ Bleu clair/ hellblau/ Azzurro/ Azul claro
White/ blanc/ weiss/ bianco/ blanco
dpi 400 800 1200 1600 2000 2400 2800 3200
Mouse sensitivity can be adjusted from 400dpi to 3200dpi in 8 increments.Set to 1600dpi by default.1.Press the (+) button to increase or (-) button to decrease dpi.2.The colour of the Display Panel will change according to the sensitivity. (Refer to chart below.)
EN
+
-
■ Mouse Acceleration Adjustment / Ajustement de l'accélération de la souris / Mausbeschleunigung Einstellung / Ajuste de la aceleración del ratón / Ajuste de la aceleración del ratón
LED Colour / Couleur LED/ LED-Farbe / Colore LED/ color del LED
Light Off/ Lumière éteinte/ Licht aus/ Luce spenta/ Luz apagada
Green/ vert/ grün/ verde/ verde
Yellow/ jaune/ gelb/ giallo/ amarillo
Red/ rouge/ rot/ rosso/ rojo
Purple/ pourpre/ lila/ Porpora/ Morado
Blue/ bleu/ blau/ blu/ azul
Light Blue/ Bleu clair/ hellblau/ Azzurro/ Azul claro
White/ blanc/ weiss/ bianco/ blanco
Acceleration/ Accélération/ Beschleunigung/ Accelerazione/ Aceleración
Horizontal Direction / Direction Horizontale/ Horizontale Richtung / Piano orizzontale/ Plano horizontal
Vertical Direction / Direction Verticale/ Vertikale Richtung / Piano verticale/ Plano vertical
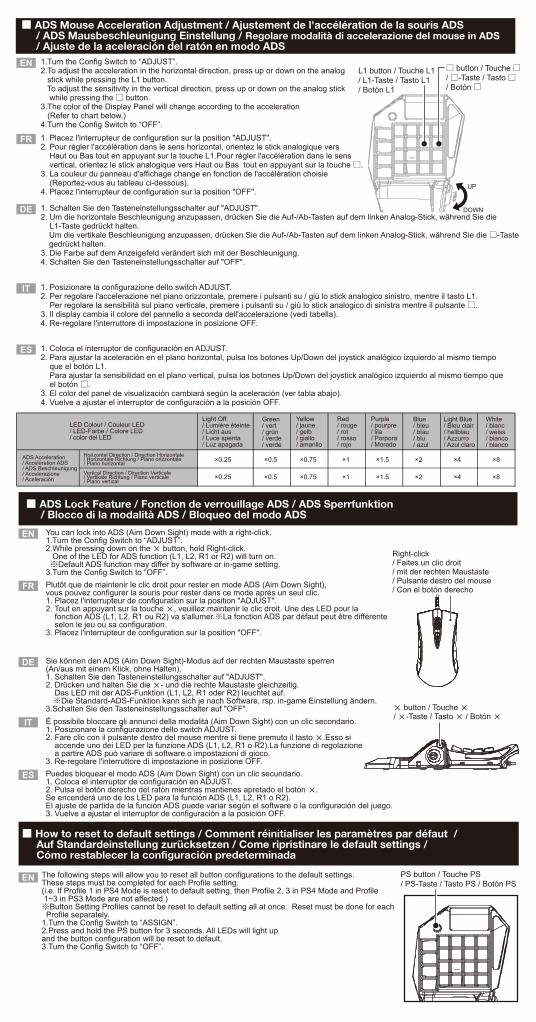
Quando si sposta il mouse lentamente l'accelerazione sarà minimo, mentre si fa così in fretta questo sarà più alto.1. Posizionare la configurazione dello switch ADJUST.2. Per regolare l'accelerazione nel piano orizzontale, premere i pulsanti dil pad direzionale Up / Down mentre il pulsante L2. Per regolare l'accelerazione nel piano verticale, premere i pulsanti UP/Down dil pad direzionale mentre il tasto R2.3. Il display cambia colore del pannello a seconda dell'accelerazione (vedi tabella).4. Re-regolare l'interruttore di impostazione in posizione OFF.
IT
Al mover el ratón lentamente la aceleración será mínima, mientras que al hacerlo rápidamente esta será mayor.1. Coloca el interruptor de configuración en ADJUST.2. Para ajustar la aceleración en el plano horizontal, pulsa los botones Up/Down del pad direccional al mismo tiempo que el botón L2.Para ajustar la aceleración en el plano vertical, pulsa los botones Up/Down del pad direccional al mismo tiempo que el botón R2.3. El color del panel de visualización cambiará según la aceleración (ver tabla abajo).4. Vuelve a ajustar el interruptor de configuración a la posición OFF.
ES
Eine langsame Mausbewegung führt zu einer Bewegung mit schwacher Beschleunigung, während eine rasche Bewegung zu einerschnelleren Beschleunigung führt.1. Schalten Sie den Tasteneinstellungsschalter auf "ADJUST".2. Um die horizontale Beschleunigung anzupassen, drücken Sie Auf/Ab auf den Steuerkreuztasten, während Sie die L2-Taste gedrückt halten. Um die vertikale Beschleunigung anzupassen, drücken Sie Auf/Ab auf den Steuerkreuztasten, während Sie die R2-Taste gedrückt halten.3. Die Farbe auf dem Anzeigefeld ändert sich je nach Beschleunigung. (Siehe Tabelle unten.)4. Schalten Sie den Tasteneinstellungsschalter auf "OFF".
DE
L'accélération souris consiste moduler la sensibilité de la souris en fonction del'accélération donnée à la souris lors de son déplacement (et non de la distanceparcourue par celle ci).1. Placez l'interrupteur de configuration sur la position "ADJUST".2. Pour régler l'accélération dans le sens horizontal, appuyez sur la touche Haut ou Bas du pavé directionnel tout en appuyant sur la touche L2.Pour régler l'accélération dans le sens vertical, appuyez sur la touche Haut ou Bas du pavé directionnel tout en appuyant sur la touche R2.3. La couleur du panneau d'affichage change en fonction de l'accélération choisie (Reportez-vous au tableau ci-dessous).4. Placez l'interrupteur de configuration sur la position "OFF".
FR
Moving the mouse slowly will have minimal accelerated movement whilemoving the mouse quickly will have a more quick accelerated movement.1.Turn the Config Switch to “ADJUST”.2.To adjust the acceleration in the horizontal direction, press up or down on the analog stick while pressing the L2 button. To adjust the sensitivity in the vertical direction, press up or down on the analog stick while pressing the R2 button.3.The color of the Display Panel will change according to the acceleration (Refer to chart below.)4.Turn the Config Switch to “OFF”.
EN L2 button / Touche L2/ L2-Taste / Tasto L2/ Botón L2
R2 button / Touche R2/ R2-Taste / Tasto R2/ Botón R2
UP
DOWN
×0.25 ×0.5 ×0.75 ×1 ×1.5 ×2 ×4 ×8
×0.25 ×0.5 ×0.75 ×1 ×1.5 ×2 ×4 ×8
■ Expansion port / Prise casque / Headset-Anschluss / Port Extension / Toma de auriculares
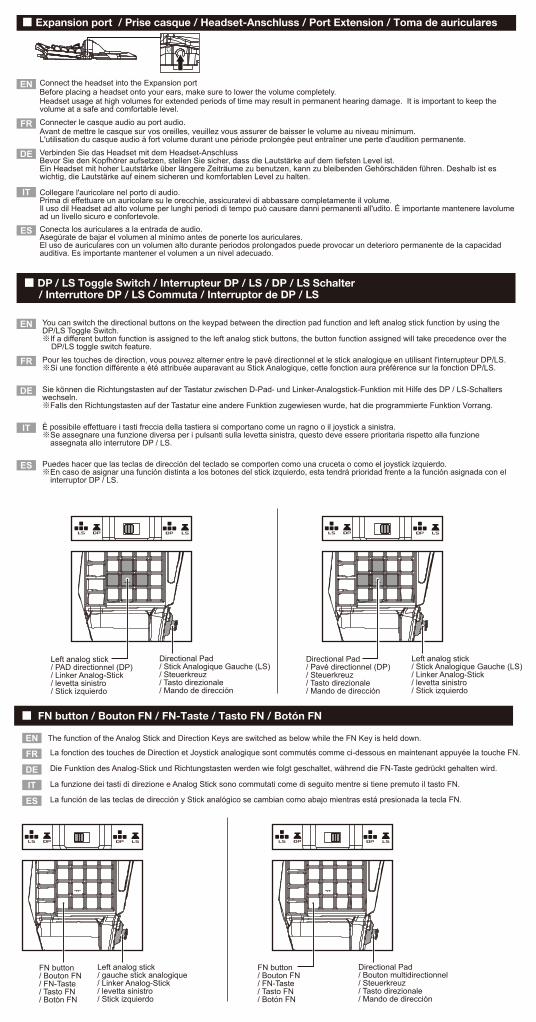
Connect the headset into the Expansion portBefore placing a headset onto your ears, make sure to lower the volume completely. Headset usage at high volumes for extended periods of time may result in permanent hearing damage. It is important to keep thevolume at a safe and comfortable level.
EN
Connecter le casque audio au port audio.Avant de mettre le casque sur vos oreilles, veuillez vous assurer de baisser le volume au niveau minimum.L'utilisation du casque audio à fort volume durant une période prolongée peut entraîner une perte d'audition permanente.
FR
Verbinden Sie das Headset mit dem Headset-AnschlussBevor Sie den Kopfhörer aufsetzen, stellen Sie sicher, dass die Lautstärke auf dem tiefsten Level ist.Ein Headset mit hoher Lautstärke über längere Zeiträume zu benutzen, kann zu bleibenden Gehörschäden führen. Deshalb ist eswichtig, die Lautstärke auf einem sicheren und komfortablen Level zu halten.
DE
Collegare l'auricolare nel porto di audio.Prima di effettuare un auricolare su le orecchie, assicuratevi di abbassare completamente il volume.Il uso dil Headset ad alto volume per lunghi periodi di tempo può causare danni permanenti all'udito. È importante mantenere lavolumead un livello sicuro e confortevole.
IT
Conecta los auriculares a la entrada de audio.Asegúrate de bajar el volumen al mínimo antes de ponerte los auriculares.El uso de auriculares con un volumen alto durante periodos prolongados puede provocar un deterioro permanente de la capacidadauditiva. Es importante mantener el volumen a un nivel adecuado.
ES
■ DP / LS Toggle Switch / Interrupteur DP / LS / DP / LS Schalter / Interruttore DP / LS Commuta / Interruptor de DP / LS
You can switch the directional buttons on the keypad between the direction pad function and left analog stick function by using theDP/LS Toggle Switch.※If a different button function is assigned to the left analog stick buttons, the button function assigned will take precedence over the DP/LS toggle switch feature.
EN
Pour les touches de direction, vous pouvez alterner entre le pavé directionnel et le stick analogique en utilisant l'interrupteur DP/LS.※Si une fonction différente a été attribuée auparavant au Stick Analogique, cette fonction aura préférence sur la fonction DP/LS.
FR
Sie können die Richtungstasten auf der Tastatur zwischen D-Pad- und Linker-Analogstick-Funktion mit Hilfe des DP / LS-Schalterswechseln. ※Falls den Richtungstasten auf der Tastatur eine andere Funktion zugewiesen wurde, hat die programmierte Funktion Vorrang.
DE
È possibile effettuare i tasti freccia della tastiera si comportano come un ragno o il joystick a sinistra.※Se assegnare una funzione diversa per i pulsanti sulla levetta sinistra, questo deve essere prioritaria rispetto alla funzione assegnata allo interrutore DP / LS.
IT
Puedes hacer que las teclas de dirección del teclado se comporten como una cruceta o como el joystick izquierdo.※En caso de asignar una función distinta a los botones del stick izquierdo, esta tendrá prioridad frente a la función asignada con el interruptor DP / LS.
ES
Left analog stick/ PAD directionnel (DP)/ Linker Analog-Stick/ levetta sinistro/ Stick izquierdo
Directional Pad/ Stick Analogique Gauche (LS)/ Steuerkreuz/ Tasto direzionale/ Mando de dirección
Left analog stick/ Stick Analogique Gauche (LS)/ Linker Analog-Stick/ levetta sinistro/ Stick izquierdo
Directional Pad/ Pavé directionnel (DP)/ Steuerkreuz/ Tasto direzionale/ Mando de dirección
The function of the Analog Stick and Direction Keys are switched as below while the FN Key is held down. EN La fonction des touches de Direction et Joystick analogique sont commutés comme ci-dessous en maintenant appuyée la touche FN. FR Die Funktion des Analog-Stick und Richtungstasten werden wie folgt geschaltet, während die FN-Taste gedrückt gehalten wird. DE La funzione dei tasti di direzione e Analog Stick sono commutati come di seguito mentre si tiene premuto il tasto FN. IT La función de las teclas de dirección y Stick analógico se cambian como abajo mientras está presionada la tecla FN. ES
FN button/ Bouton FN/ FN-Taste/ Tasto FN/ Botón FN
Directional Pad/ Bouton multidirectionnel/ Steuerkreuz/ Tasto direzionale/ Mando de dirección
Left analog stick/ gauche stick analogique/ Linker Analog-Stick/ levetta sinistro/ Stick izquierdo
FN button/ Bouton FN/ FN-Taste/ Tasto FN/ Botón FN
■ FN button / Bouton FN / FN-Taste / Tasto FN / Botón FN
■ Walk Button / Bouton Marche / Gehen-Tastef / Pulsante Cammina / Botón de caminar
LED Colour/ Couleur LED/ LED-Farbe/ Colore LED/ color del LED
Light Off/ Lumière éteinte/ Licht aus/ Luce spenta/ Luz apagada
Green/ vert/ grün/ verde/ verde
Yellow/ jaune/ gelb/ giallo/ amarillo
Red/ rouge/ rot/ rosso/ rojo
Purple/ pourpre/ lila/ Porpora/ Morado
Blue/ bleu/ blau/ blu/ azul
Light Blue/ Bleu clair/ hellblau/ Azzurro/ Azul claro
White/ blanc/ weiss/ bianco/ blanco
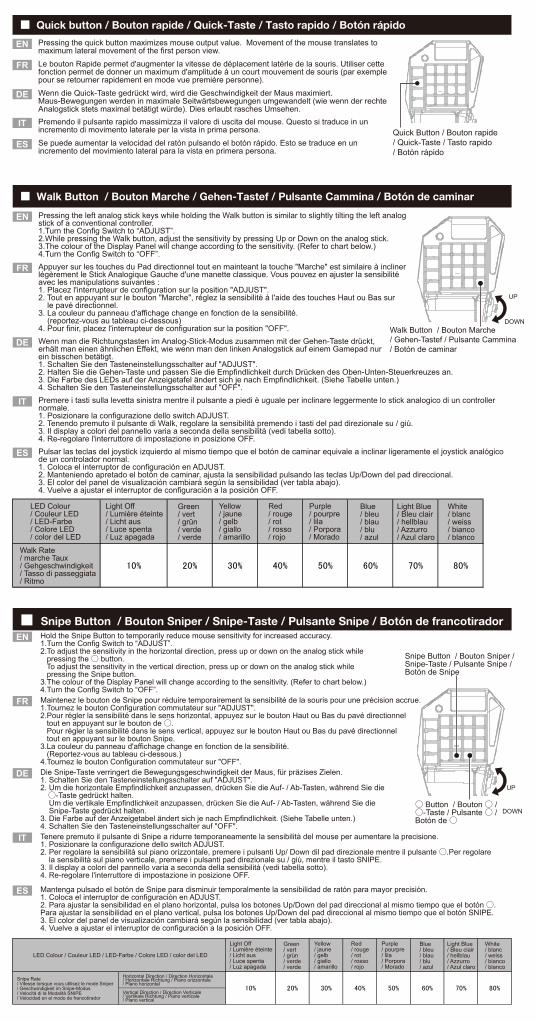
Walk Rate/ marche Taux/ Gehgeschwindigkeit/ Tasso di passeggiata/ Ritmo
10% 20% 30% 40% 50% 60% 70% 80%
Premere i tasti sulla levetta sinistra mentre il pulsante a piedi è uguale per inclinare leggermente lo stick analogico di un controllernormale.1. Posizionare la configurazione dello switch ADJUST.2. Tenendo premuto il pulsante di Walk, regolare la sensibilità premendo i tasti del pad direzionale su / giù.3. Il display a colori del pannello varia a seconda della sensibilità (vedi tabella sotto).4. Re-regolare l'interruttore di impostazione in posizione OFF.
IT
Wenn man die Richtungstasten im Analog-Stick-Modus zusammen mit der Gehen-Taste drückt,erhält man einen ähnlichen Effekt, wie wenn man den linken Analogstick auf einem Gamepad nurein bisschen betätigt.1. Schalten Sie den Tasteneinstellungsschalter auf "ADJUST".2. Halten Sie die Gehen-Taste und passen Sie die Empfindlichkeit durch Drücken des Oben-Unten-Steuerkreuzes an. 3. Die Farbe des LEDs auf der Anzeigetafel ändert sich je nach Empfindlichkeit. (Siehe Tabelle unten.)4. Schalten Sie den Tasteneinstellungsschalter auf "OFF".
DE
Appuyer sur les touches du Pad directionnel tout en mainteant la touche "Marche" est similaire à inclinerlégèrement le Stick Analogique Gauche d'une manette classique. Vous pouvez en ajuster la sensibilitéavec les manipulations suivantes :1. Placez l'interrupteur de configuration sur la position "ADJUST".2. Tout en appuyant sur le bouton "Marche", réglez la sensibilité à l'aide des touches Haut ou Bas sur le pavé directionnel.3. La couleur du panneau d'affichage change en fonction de la sensibilité. (reportez-vous au tableau ci-dessous)4. Pour finir, placez l'interrupteur de configuration sur la position "OFF".
FR
Pulsar las teclas del joystick izquierdo al mismo tiempo que el botón de caminar equivale a inclinar ligeramente el joystick analógicode un controlador normal.1. Coloca el interruptor de configuración en ADJUST.2. Manteniendo apretado el botón de caminar, ajusta la sensibilidad pulsando las teclas Up/Down del pad direccional.3. El color del panel de visualización cambiará según la sensibilidad (ver tabla abajo).4. Vuelve a ajustar el interruptor de configuración a la posición OFF.
ES
Pressing the left analog stick keys while holding the Walk button is similar to slightly tilting the left analogstick of a conventional controller.1.Turn the Config Switch to “ADJUST”.2.While pressing the Walk button, adjust the sensitivity by pressing Up or Down on the analog stick.3.The colour of the Display Panel will change according to the sensitivity. (Refer to chart below.)4.Turn the Config Switch to “OFF”.
EN
■ Snipe Button / Bouton Sniper / Snipe-Taste / Pulsante Snipe / Botón de francotirador
Mantenga pulsado el botón de Snipe para disminuir temporalmente la sensibilidad de ratón para mayor precisión.1. Coloca el interruptor de configuración en ADJUST.2. Para ajustar la sensibilidad en el plano horizontal, pulsa los botones Up/Down del pad direccional al mismo tiempo que el botón ○.Para ajustar la sensibilidad en el plano vertical, pulsa los botones Up/Down del pad direccional al mismo tiempo que el botón SNIPE.3. El color del panel de visualización cambiará según la sensibilidad (ver tabla abajo).4. Vuelve a ajustar el interruptor de configuración a la posición OFF.
ES
Tenere premuto il pulsante di Snipe a ridurre temporaneamente la sensibilità del mouse per aumentare la precisione.1. Posizionare la configurazione dello switch ADJUST.2. Per regolare la sensibilità sul piano orizzontale, premere i pulsanti Up/ Down dil pad direzionale mentre il pulsante ○.Per regolare la sensibilità sul piano verticale, premere i pulsanti pad direzionale su / giù, mentre il tasto SNIPE.3. Il display a colori del pannello varia a seconda della sensibilità (vedi tabella sotto).4. Re-regolare l'interruttore di impostazione in posizione OFF.
IT
Die Snipe-Taste verringert die Bewegungsgeschwindigkeit der Maus, für präzises Zielen.1. Schalten Sie den Tasteneinstellungsschalter auf "ADJUST".2. Um die horizontale Empfindlichkeit anzupassen, drücken Sie die Auf- / Ab-Tasten, während Sie die ○-Taste gedrückt halten. Um die vertikale Empfindlichkeit anzupassen, drücken Sie die Auf- / Ab-Tasten, während Sie die Snipe-Taste gedrückt halten.3. Die Farbe auf der Anzeigetabel ändert sich je nach Empfindlichkeit. (Siehe Tabelle unten.)4. Schalten Sie den Tasteneinstellungsschalter auf "OFF".
DE
Maintenez le bouton de Snipe pour réduire temporairement la sensibilité de la souris pour une précision accrue.1.Tournez le bouton Configuration commutateur sur "ADJUST".2.Pour régler la sensibilité dans le sens horizontal, appuyez sur le bouton Haut ou Bas du pavé directionnel tout en appuyant sur le bouton de ○. Pour régler la sensibilité dans le sens vertical, appuyez sur le bouton Haut ou Bas du pavé directionnel tout en appuyant sur le bouton Snipe.3.La couleur du panneau d'affichage change en fonction de la sensibilité. (Reportez-vous au tableau ci-dessous.)4.Tournez le bouton Configuration commutateur sur "OFF".
FR
LED Colour / Couleur LED / LED-Farbe / Colore LED / color del LED
Light Off/ Lumière éteinte/ Licht aus/ Luce spenta/ Luz apagada
Green/ vert/ grün/ verde/ verde
Yellow/ jaune/ gelb/ giallo/ amarillo
Red/ rouge/ rot/ rosso/ rojo
Purple/ pourpre/ lila/ Porpora/ Morado
Blue/ bleu/ blau/ blu/ azul
Light Blue/ Bleu clair/ hellblau/ Azzurro/ Azul claro
White/ blanc/ weiss/ bianco/ blanco
10% 20% 30% 40% 50% 60% 70% 80%
Snipe Rate/ Vitesse lorsque vous utilisez le mode Sniper/ Geschwindigkeit im Snipe-Modus/ Velocità di la Modalità SNIPE/ Velocidad en el modo de francotirador
Horizontal Direction / Direction Horizontale/ Horizontale Richtung / Piano orizzontale/ Plano horizontal
Vertical Direction / Direction Verticale/ Vertikale Richtung / Piano verticale/ Plano vertical
Hold the Snipe Button to temporarily reduce mouse sensitivity for increased accuracy.1.Turn the Config Switch to “ADJUST”.2.To adjust the sensitivity in the horizontal direction, press up or down on the analog stick while pressing the ○ button. To adjust the sensitivity in the vertical direction, press up or down on the analog stick while pressing the Snipe button.3.The colour of the Display Panel will change according to the sensitivity. (Refer to chart below.)4.Turn the Config Switch to “OFF”.
EN
■ Quick button / Bouton rapide / Quick-Taste / Tasto rapido / Botón rápido
IT Premendo il pulsante rapido massimizza il valore di uscita del mouse. Questo si traduce in unincremento di movimento laterale per la vista in prima persona.
ES Se puede aumentar la velocidad del ratón pulsando el botón rápido. Esto se traduce en unincremento del movimiento lateral para la vista en primera persona.
DE Wenn die Quick-Taste gedrückt wird, wird die Geschwindigkeit der Maus maximiert.Maus-Bewegungen werden in maximale Seitwärtsbewegungen umgewandelt (wie wenn der rechteAnalogstick stets maximal betätigt würde). Dies erlaubt rasches Umsehen.
FR Le bouton Rapide permet d'augmenter la vitesse de déplacement latérle de la souris. Utiliser cettefonction permet de donner un maximum d'amplitude à un court mouvement de souris (par exemplepour se retourner rapidement en mode vue première personne).
EN Pressing the quick button maximizes mouse output value. Movement of the mouse translates tomaximum lateral movement of the first person view.
Quick Button / Bouton rapide/ Quick-Taste / Tasto rapido/ Botón rápido
Walk Button / Bouton Marche/ Gehen-Tastef / Pulsante Cammina/ Botón de caminar
Snipe Button / Bouton Sniper /Snipe-Taste / Pulsante Snipe /Botón de Snipe
○ Button / Bouton ○ /○-Taste / Pulsante ○ /Botón de ○
UP
DOWN
UP
DOWN
■ Deadzone Adjustment / Réglage de la zone morte / Totzoneneinstellungen / Regolazione Deadzone / Ajuste de la zona muerta
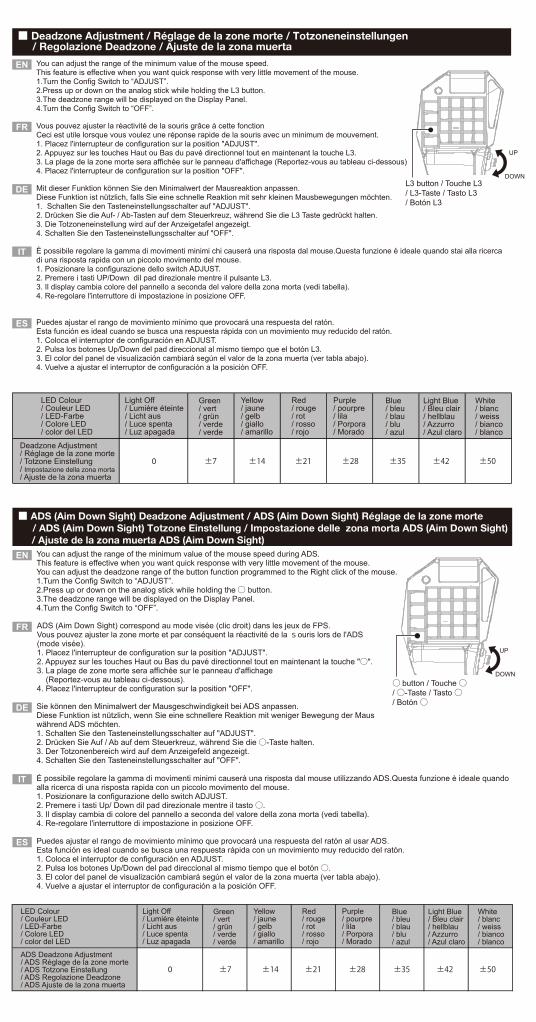
È possibile regolare la gamma di movimenti minimi chi causerà una risposta dal mouse.Questa funzione è ideale quando stai alla ricercadi una risposta rapida con un piccolo movimento del mouse.1. Posizionare la configurazione dello switch ADJUST.2. Premere i tasti UP/Down dil pad direzionale mentre il pulsante L3.3. Il display cambia colore del pannello a seconda del valore della zona morta (vedi tabella).4. Re-regolare l'interruttore di impostazione in posizione OFF.
IT
Mit dieser Funktion können Sie den Minimalwert der Mausreaktion anpassen. Diese Funktion ist nützlich, falls Sie eine schnelle Reaktion mit sehr kleinen Mausbewegungen möchten.1. Schalten Sie den Tasteneinstellungsschalter auf "ADJUST".2. Drücken Sie die Auf- / Ab-Tasten auf dem Steuerkreuz, während Sie die L3 Taste gedrückt halten.3. Die Totzoneneinstellung wird auf der Anzeigetafel angezeigt.4. Schalten Sie den Tasteneinstellungsschalter auf "OFF".
DE
Vous pouvez ajuster la réactivité de la souris grâce à cette fonctionCeci est utile lorsque vous voulez une réponse rapide de la souris avec un minimum de mouvement. 1. Placez l'interrupteur de configuration sur la position "ADJUST".2. Appuyez sur les touches Haut ou Bas du pavé directionnel tout en maintenant la touche L3.3. La plage de la zone morte sera affichée sur le panneau d'affichage (Reportez-vous au tableau ci-dessous)4. Placez l'interrupteur de configuration sur la position "OFF".
FR
You can adjust the range of the minimum value of the mouse speed.This feature is effective when you want quick response with very little movement of the mouse.1.Turn the Config Switch to “ADJUST”.2.Press up or down on the analog stick while holding the L3 button.3.The deadzone range will be displayed on the Display Panel.4.Turn the Config Switch to “OFF”.
EN
LED Colour/ Couleur LED/ LED-Farbe/ Colore LED/ color del LED
Light Off/ Lumière éteinte/ Licht aus/ Luce spenta/ Luz apagada
Green/ vert/ grün/ verde/ verde
Yellow/ jaune/ gelb/ giallo/ amarillo
Red/ rouge/ rot/ rosso/ rojo
Purple/ pourpre/ lila/ Porpora/ Morado
Blue/ bleu/ blau/ blu/ azul
Light Blue/ Bleu clair/ hellblau/ Azzurro/ Azul claro
White/ blanc/ weiss/ bianco/ blanco
Deadzone Adjustment/ Réglage de la zone morte/ Totzone Einstellung/ Impostazione della zona morta/ Ajuste de la zona muerta
Puedes ajustar el rango de movimiento mínimo que provocará una respuesta del ratón.Esta función es ideal cuando se busca una respuesta rápida con un movimiento muy reducido del ratón.1. Coloca el interruptor de configuración en ADJUST.2. Pulsa los botones Up/Down del pad direccional al mismo tiempo que el botón L3.3. El color del panel de visualización cambiará según el valor de la zona muerta (ver tabla abajo).4. Vuelve a ajustar el interruptor de configuración a la posición OFF.
ES
■ ADS (Aim Down Sight) Deadzone Adjustment / ADS (Aim Down Sight) Réglage de la zone morte / ADS (Aim Down Sight) Totzone Einstellung / Impostazione delle zona morta ADS (Aim Down Sight) / Ajuste de la zona muerta ADS (Aim Down Sight)
FR ADS (Aim Down Sight) correspond au mode visée (clic droit) dans les jeux de FPS. Vous pouvez ajuster la zone morte et par conséquent la réactivité de la souris lors de l'ADS (mode visée).1. Placez l'interrupteur de configuration sur la position "ADJUST".2. Appuyez sur les touches Haut ou Bas du pavé directionnel tout en maintenant la touche "○".3. La plage de zone morte sera affichée sur le panneau d'affichage (Reportez-vous au tableau ci-dessous).4. Placez l'interrupteur de configuration sur la position "OFF".
DE Sie können den Minimalwert der Mausgeschwindigkeit bei ADS anpassen.Diese Funktion ist nützlich, wenn Sie eine schnellere Reaktion mit weniger Bewegung der Mauswährend ADS möchten. 1. Schalten Sie den Tasteneinstellungsschalter auf "ADJUST".2. Drücken Sie Auf / Ab auf dem Steuerkreuz, während Sie die ○-Taste halten.3. Der Totzonenbereich wird auf dem Anzeigefeld angezeigt.4. Schalten Sie den Tasteneinstellungsschalter auf "OFF".
IT È possibile regolare la gamma di movimenti minimi causerà una risposta dal mouse utilizzando ADS.Questa funzione è ideale quandoalla ricerca di una risposta rapida con un piccolo movimento del mouse.1. Posizionare la configurazione dello switch ADJUST.2. Premere i tasti Up/ Down dil pad direzionale mentre il tasto ○.3. Il display cambia di colore del pannello a seconda del valore della zona morta (vedi tabella).4. Re-regolare l'interruttore di impostazione in posizione OFF.
ES Puedes ajustar el rango de movimiento mínimo que provocará una respuesta del ratón al usar ADS.Esta función es ideal cuando se busca una respuesta rápida con un movimiento muy reducido del ratón.1. Coloca el interruptor de configuración en ADJUST.2. Pulsa los botones Up/Down del pad direccional al mismo tiempo que el botón ○.3. El color del panel de visualización cambiará según el valor de la zona muerta (ver tabla abajo).4. Vuelve a ajustar el interruptor de configuración a la posición OFF.
EN You can adjust the range of the minimum value of the mouse speed during ADS.This feature is effective when you want quick response with very little movement of the mouse.You can adjust the deadzone range of the button function programmed to the Right click of the mouse.1.Turn the Config Switch to “ADJUST”.2.Press up or down on the analog stick while holding the ○ button.3.The deadzone range will be displayed on the Display Panel.4.Turn the Config Switch to “OFF”.
LED Colour/ Couleur LED/ LED-Farbe/ Colore LED/ color del LED
Light Off/ Lumière éteinte/ Licht aus/ Luce spenta/ Luz apagada
Green/ vert/ grün/ verde/ verde
Yellow/ jaune/ gelb/ giallo/ amarillo
Red/ rouge/ rot/ rosso/ rojo
Purple/ pourpre/ lila/ Porpora/ Morado
Blue/ bleu/ blau/ blu/ azul
Light Blue/ Bleu clair/ hellblau/ Azzurro/ Azul claro
White/ blanc/ weiss/ bianco/ blanco
ADS Deadzone Adjustment/ ADS Réglage de la zone morte/ ADS Totzone Einstellung/ ADS Regolazione Deadzone/ ADS Ajuste de la zona muerta
○ button / Touche ○/ ○-Taste / Tasto ○/ Botón ○
L3 button / Touche L3/ L3-Taste / Tasto L3/ Botón L3
UP
DOWN
UP
DOWN
0 ±7 ±14 ±21 ±28 ±35 ±42 ±50
0 ±7 ±14 ±21 ±28 ±35 ±42 ±50
LED Colour / Couleur LED/ LED-Farbe / Colore LED/ color del LED
Light Off/ Lumière éteinte/ Licht aus/ Luce spenta/ Luz apagada
Green/ vert/ grün/ verde/ verde
Yellow/ jaune/ gelb/ giallo/ amarillo
Red/ rouge/ rot/ rosso/ rojo
Purple/ pourpre/ lila/ Porpora/ Morado
Blue/ bleu/ blau/ blu/ azul
Light Blue/ Bleu clair/ hellblau/ Azzurro/ Azul claro
White/ blanc/ weiss/ bianco/ blanco
Horizontal Direction / Direction Horizontale/ Horizontale Richtung / Piano orizzontale/ Plano horizontal
Vertical Direction / Direction Verticale/ Vertikale Richtung / Piano verticale/ Plano vertical
ADS Acceleration/ Accélération ADS/ ADS Beschleunigung/ Accelerazione/ Aceleración
■ How to reset to default settings / Comment réinitialiser les paramètres par défaut / Auf Standardeinstellung zurücksetzen / Come ripristinare le default settings / Cómo restablecer la configuración predeterminada
■ ADS Mouse Acceleration Adjustment / Ajustement de l'accélération de la souris ADS / ADS Mausbeschleunigung Einstellung / Regolare modalità di accelerazione del mouse in ADS / Ajuste de la aceleración del ratón en modo ADS
1. Posizionare la configurazione dello switch ADJUST.2. Per regolare l'accelerazione nel piano orizzontale, premere i pulsanti su / giù lo stick analogico sinistro, mentre il tasto L1. Per regolare la sensibilità sul piano verticale, premere i pulsanti su / giù lo stick analogico di sinistra mentre il pulsante □.3. Il display cambia il colore del pannello a seconda dell'accelerazione (vedi tabella).4. Re-regolare l'interruttore di impostazione in posizione OFF.
IT
1. Coloca el interruptor de configuración en ADJUST.2. Para ajustar la aceleración en el plano horizontal, pulsa los botones Up/Down del joystick analógico izquierdo al mismo tiempo que el botón L1. Para ajustar la sensibilidad en el plano vertical, pulsa los botones Up/Down del joystick analógico izquierdo al mismo tiempo que el botón □.3. El color del panel de visualización cambiará según la aceleración (ver tabla abajo).4. Vuelve a ajustar el interruptor de configuración a la posición OFF.
ES
1. Schalten Sie den Tasteneinstellungsschalter auf "ADJUST".2. Um die horizontale Beschleunigung anzupassen, drücken Sie die Auf-/Ab-Tasten auf dem linken Analog-Stick, während Sie die L1-Taste gedrückt halten. Um die vertikale Beschleunigung anzupassen, drücken Sie die Auf-/Ab-Tasten auf dem linken Analog-Stick, während Sie die □-Taste gedrückt halten.3. Die Farbe auf dem Anzeigefeld verändert sich mit der Beschleunigung.4. Schalten Sie den Tasteneinstellungsschalter auf "OFF".
DE
1. Placez l'interrupteur de configuration sur la position "ADJUST".2. Pour régler l'accélération dans le sens horizontal, orientez le stick analogique vers Haut ou Bas tout en appuyant sur la touche L1.Pour régler l'accélération dans le sens vertical, orientez le stick analogique vers Haut ou Bas tout en appuyant sur la touche □.3. La couleur du panneau d'affichage change en fonction de l'accélération choisie (Reportez-vous au tableau ci-dessous).4. Placez l'interrupteur de configuration sur la position "OFF".
FR
1.Turn the Config Switch to “ADJUST”.2.To adjust the acceleration in the horizontal direction, press up or down on the analog stick while pressing the L1 button. To adjust the sensitivity in the vertical direction, press up or down on the analog stick while pressing the □ button.3.The color of the Display Panel will change according to the acceleration (Refer to chart below.)4.Turn the Config Switch to “OFF”.
ENL1 button / Touche L1/ L1-Taste / Tasto L1/ Botón L1
□ button / Touche □/ □-Taste / Tasto □/ Botón □
EN The following steps will allow you to reset all button configurations to the default settings.These steps must be completed for each Profile setting.(i.e. If Profile 1 in PS4 Mode is reset to default setting, then Profile 2, 3 in PS4 Mode and Profile 1~3 in PS3 Mode are not affected.)※Button Setting Profiles cannot be reset to default setting all at once. Reset must be done for each Profile separately.1.Turn the Config Switch to “ASSIGN”.2.Press and hold the PS button for 3 seconds. All LEDs will light upand the button configuration will be reset to default.3.Turn the Config Switch to “OFF”.
PS button / Touche PS/ PS-Taste / Tasto PS / Botón PS
■ ADS Lock Feature / Fonction de verrouillage ADS / ADS Sperrfunktion / Blocco di la modalità ADS / Bloqueo del modo ADS
Plutôt que de maintenir le clic droit pour rester en mode ADS (Aim Down Sight),vous pouvez configurer la souris pour rester dans ce mode après un seul clic.1. Placez l'interrupteur de configuration sur la position "ADJUST".2. Tout en appuyant sur la touche ×, veuillez maintenir le clic droit. Une des LED pour la fonction ADS (L1, L2, R1 ou R2) va s'allumer.※La fonction ADS par défaut peut être différente selon le jeu ou sa configuration.3. Placez l'interrupteur de configuration sur la position "OFF".
FR
Sie können den ADS (Aim Down Sight)-Modus auf der rechten Maustaste sperren(An/aus mit einem Klick, ohne Halten). 1. Schalten Sie den Tasteneinstellungsschalter auf "ADJUST".2. Drücken und halten Sie die ×- und die rechte Maustaste gleichzeitig. Das LED mit der ADS-Funktion (L1, L2, R1 oder R2) leuchtet auf. ※Die Standard-ADS-Funktion kann sich je nach Software, rsp. in-game Einstellung ändern.3.Schalten Sie den Tasteneinstellungsschalter auf "OFF".
DE
È possibile bloccare gli annunci della modalità (Aim Down Sight) con un clic secondario.1. Posizionare la configurazione dello switch ADJUST.2. Fare clic con il pulsante destro del mouse mentre si tiene premuto il tasto ×.Esso si accende uno dei LED per la funzione ADS (L1, L2, R1 o R2).La funzione di regolazione a partire ADS può variare di software o impostazioni di gioco.3. Re-regolare l'interruttore di impostazione in posizione OFF.
IT
Puedes bloquear el modo ADS (Aim Down Sight) con un clic secundario.1. Coloca el interruptor de configuración en ADJUST.2. Pulsa el botón derecho del ratón mientras mantienes apretado el botón ×.Se encenderá uno de los LED para la función ADS (L1, L2, R1 o R2).El ajuste de partida de la función ADS puede variar según el software o la configuración del juego.3. Vuelve a ajustar el interruptor de configuración a la posición OFF.
ES
You can lock into ADS (Aim Down Sight) mode with a right-click.1.Turn the Config Switch to “ADJUST”.2.While pressing down on the × button, hold Right-click. One of the LED for ADS function (L1, L2, R1 or R2) will turn on. ※Default ADS function may differ by software or in-game setting.3.Turn the Config Switch to “OFF”.
EN
Right-click/ Faites un clic droit/ mit der rechten Maustaste/ Pulsante destro del mouse/ Con el botón derecho
EDIT
OFFONPROFILE
1 2 3
× button / Touche ×/ ×-Taste / Tasto × / Botón ×
UP
DOWN
×0.25 ×0.5 ×0.75 ×1 ×1.5 ×2 ×4 ×8
×0.25 ×0.5 ×0.75 ×1 ×1.5 ×2 ×4 ×8
Rétablir la sensibilité en configuration par défautLa configuration de la sensibilité de chaque profil peut être faite en suivant les mêmes étapes que mentionnées précédement.Les réglages ci-dessous peuvent être rétablis par défaut.
※ Les profils ne peuvent pas être rétablis en réglages par défaut en une seule fois. Cette procédure doit être suivie pour chaque profils indépendamment.
Bouton Marche / Bouton Sniper / Réglage de la zone morte / ADS (Aim Down Sight) Réglage de la zone morte /Réglage de la sensibilité de la souris / Ajustement de l'accélération de la souris /Ajustement de l'accélération de la souris ADS / Fonction de verrouillage ADS / Eteindre le rétro-éclairage
FR
1. Placez l'interrupteur de configuration sur la position "ADJUST".2. Appuyez simultanément sur les touches OPTIONS et SHARE pendant 3 secondes.Toutes les LED s'allumeront et les réglages seront rétablis par défaut.3. Placez l'interrupteur de configuration sur la position "OFF".Setzten die Empfindlichkeitseinstellungen für die folgenden Funktionen wie gefolgt auf die Standardeinstellung zurück.
※Mit dieser Funktion kann nur ein Profil auf einmal zurückgesetzt werden.
Gehen-Taste / Snipe-Taste / Totzone / ADS (Aim Down Sight) Totzone / Mausempfindlichkeit /Mausbeschleunigung / ADS Mausbeschleunigung / ADS Sperrfunktion / Ausschalten der Hintergrundbeleuchtung
DE
1. Schalten Sie den Tasteneinstellungsschalter auf "ADJUST".2. Drücken Sie die OPTIONS- und die SHARE-Taste gleichzeitig für 3 Sekunden. Alle LEDs leuchten auf und die Empfindlichkeitseinstellungen werden auf die Grundeinstellung zurückgesetzt.3. Schalten Sie den Tasteneinstellungsschalter auf "OFF".
Ripristina la sensibilità di default.È possibile regolare la sensibilità per ogni profilo seguendo la procedura già spiegato.Queste sono le impostazioni che possono essere restituiti alla sua configurazione originale.
Non è possibile ripristinare tutte le impostazioni in una sola volta.Questo deve essere fatto separatamente per ogni profilo.1. Posizionare la configurazione dello switch ADJUST.2. Tenere premuti i pulsanti opzioni su azioni contemporaneamente per 3 secondi. Tutti i LED si accendono ed i pulsanti torneranno alle impostazioni di fabbrica.3. Re-regolare l'interruttore di impostazione in posizione OFF.
Pulsante passeggiata / pulsante cecchino / Impostazione della zona morta /Impostazione della zona morta ADS (Aim Down Sight) / Impostazione della sensibilità del mouse /Impostazione della accelerazione del mouse / Impostazione della accelerazione del mouse in modalità ADS / blocco di la modalità ADS / spegnimento della retroilluminazione
IT
Restablece la sensibilidad predeterminada.Se puede ajustar la sensibilidad para cada perfil siguiendo los pasos ya explicados.Estos son los ajustes que se pueden devolver a su configuración original.
No se pueden restaurar todos los ajustes a la vez.Esto debe hacerse por separado para cada perfil.1. Coloca el interruptor de configuración en ADJUST.2. Mantén pulsados los botones OPTIONS y SHARE simultaneamente durante 3 segundos. Se encenderán todos los LED y los botones recuperarán su configuración de fábrica.3. Vuelve a ajustar el interruptor de configuración a la posición OFF.
Botón de caminar / Botón de francotirador / Ajuste de la zona muerta /Ajuste de la zona muerta ADS (Aim Down Sight) / Ajuste de la sensibilidad del ratón /Ajuste de la aceleración del ratón / Ajuste de la aceleración del ratón en modo ADS /Bloqueo del modo ADS / Apagado de la retroiluminación
ES
DE Mit den folgenden Schritten können Sie die Tasteneinstellungen eines Profils auf die Grundeinstellung zurücksetzen.(D.h. wenn man mit dieser Funktion das Profil 1 zurücksetzt, hat es keinen Einfluss auf die Profile 2 und 3).1. Schalten Sie den Tasteneinstellungsschalter auf "ADJUST" und wählen Sie das gewünschte Profil.2. Halten Sie die PS-Taste für 3 Sekunden gedrückt. Alle LEDs leuchten auf und die Tastenkonfiguration wird auf die Grundeinstellung zurückgesetzt.3. Schalten Sie den Tasteneinstellungsschalter auf "OFF".
IT I passaggi seguenti spiegheranno come tornare a tutte le impostazioni pulsanti predefiniti.Questo processo deve essere seguitoper ciascun profilo di configurazione. (Es.: Se il profilo di default modalità PS4 1 viene ripristinato, i profili 2 e 3 della modalità PS4e PS3 Profili 1-3, quindi non sarà influenzato).Non è possibile ripristinare le impostazioni predefinite per tutti i profili in una sola volta.Questo deve essere fatto per ciascuno separatamente.1. Posizionare la configurazione dello switch REGOLARE.2. Tenere premuto il tasto PS per 3 secondi. Tutti i LED si accendono ed i pulsanti torneranno alle impostazioni di fabbrica.3. Re-regolare l'interruttore di impostazione in posizione OFF.
ES Los siguientes pasos te explicarán cómo devolver a todos los botones su configuración predeterminada.Este proceso debe seguirse para cada perfil de configuración. (Ej.: Si se restablece la configuración predeterminada en el perfil 1del modo PS4, los perfiles 2 y 3 del modo PS4 y los perfiles 1-3 del modo PS3 no se verán afectados).No se puede restaurar la configuración predeterminada para todos los perfiles a la vez. Esto debe hacerse para cada unopor separado.1. Coloca el interruptor de configuración en ADJUST.2. Mantén pulsado el botón PS durante 3 segundos. Se encenderán todos los LED y los botones recuperarán su configuración de fábrica.3. Vuelve a ajustar el interruptor de configuración a la posición OFF.
FR
1. Placez l'interrupteur de configuration sur la position "ASSIGN".2. Appuyez et maintenez la touche PS pendant 3 secondes. Tous les voyants seront allumés et la configuration par des boutons sera réinitialisée.3. Placez l'interrupteur de configuration sur la position "OFF".
Les étapes suivantes vont vous permettre de rétablir toutes les boutons en configuration par défaut.Ces étapes doivent être complétées pour chacun des profils.(ex : Si le profil 1 en mode PS4 est rétabli par défaut, alors les profils 2 et 3 en mode PS4 ainsi que les profils 1~3 en mode PS3 ne seront pas affectés)※ Les profils ne peuvent pas être rétablis en réglage par défaut en une seule fois. Cette procédure doit être suivie pour chaque profils indépendamment.
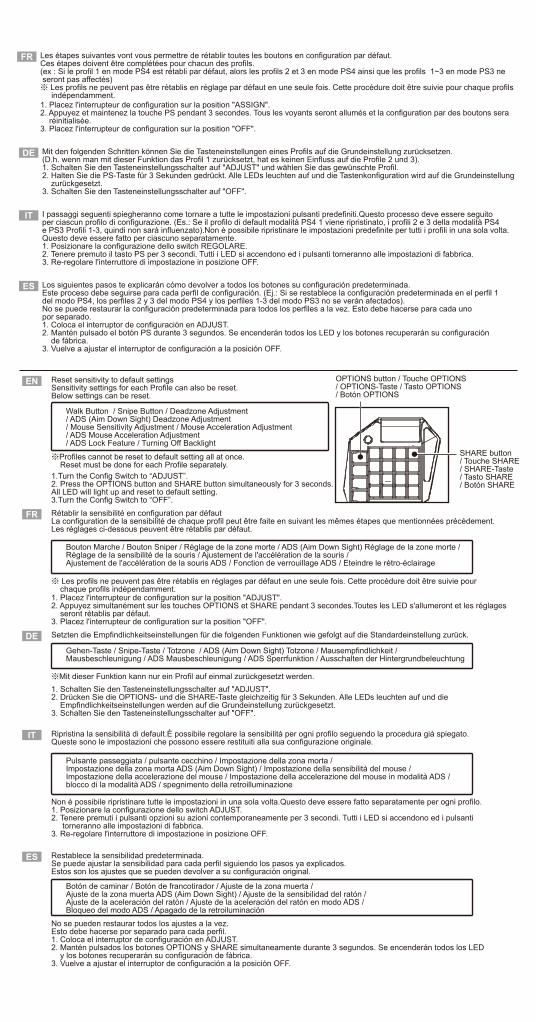
Reset sensitivity to default settingsSensitivity settings for each Profile can also be reset.Below settings can be reset.
※Profiles cannot be reset to default setting all at once. Reset must be done for each Profile separately.
Walk Button / Snipe Button / Deadzone Adjustment/ ADS (Aim Down Sight) Deadzone Adjustment/ Mouse Sensitivity Adjustment / Mouse Acceleration Adjustment/ ADS Mouse Acceleration Adjustment/ ADS Lock Feature / Turning Off Backlight
EN
1.Turn the Config Switch to “ADJUST”.2. Press the OPTIONS button and SHARE button simultaneously for 3 seconds.All LED will light up and reset to default setting.3.Turn the Config Switch to “OFF”.
OPTIONS button / Touche OPTIONS/ OPTIONS-Taste / Tasto OPTIONS/ Botón OPTIONS
SHARE button/ Touche SHARE/ SHARE-Taste/ Tasto SHARE/ Botón SHARE
Please retain contact information for future reference.The image on the packaging may differ from the actual product.The manufacturer reserves the right to change the product design or specifications without notice.HORI and HORI logo are registered trademarks of HORI.
Veuillez conserver les informations de contact pour toute référence ultérieure.L'image sur l'emballage peut être différente du produit réel.Le fabriquant se réserve le droit de changer le design du produit ou les caractéristiques techniques sans préavis.HORI et le logo de HORI sont des marques déposées de HORI.
WarrantyHORI warrants to the original purchaser that the product purchased new in its original packaging shall be free of any defects in material and workmanshipfor a period of two years from the original date of purchase.For more information, please visit http://store.horiuk.co.uk/warranty.For all warranty claims made within the first 30 days after purchase, please check with the retailer where the original purchase was made for details.If the warranty claim cannot be processed through the original retailer or for any other inquiries pertaining to our products,please address directly to HORI at [email protected].
Important!Before using the PlayStation®4 system with this product, read the PlayStation®4 system instruction manual for safety, health, and other informationregarding the use of the PlayStation®4 system.
A PlayStation®3 system software update is required in order to use this product.Not all features may be accessible or work properly if your PlayStation®4 system is not updated to the newest version.This product does not feature light bar, motion sensors, or force feedback.
ENGarantieHORI mandats à l'acheteur original que le produit acheté neuf dans son emballage d'origine doivent être exempts de tout défaut de matériel etde fabrication pour une période de deux ans à compter de la date d'achat originale.Pour plus d'informations, se il vous plaît visitez http://store.horiuk.co.uk/warranty.Pour toute demande de garantie dans les 30 jours après achat, veuillez vérifier auprèsde votre revendeur ou le produit à été acheté originelement.Si votre demande de garantie ne peut être prise en charge par votre revendeur ou pour toutes autres questions sur nos produits,veuillez vous adressez directement à Hori: [email protected].
Important ! Veuillez lire la section "Avis important pour la santé" dans le manuel de configuration d'installation de la PlayStation®4 système avantutilisation.
Afin d'utiliser ce produit, la version logicielle du système 2.80 ou ultérieure est requise sur votre PlayStation®3 système.Ce produit n'est pas compatible avec la PlayStation®2, PlayStation®, ou PS one®.* Toutes les fonctionnalités peuvent ne pas être accessibles ou fonctionner correctement si votre PlayStation®4 n'est pas mis à jourpour la dernière version.Ce produit ne dispose pas de fonction pour barre lumineuse / détecteurs de mouvement, ou retour de force.
FR
Warning. Not suitable for children under 36 months. Small parts. Avertissement. Ne convient pas aux enfants de moins de 36 mois. Contient des petites pièces.
Made in ChinaManufactured by Hori
Applicable to EUcountries only/ Applicable seulement aux pays de l'UE
“ ”, “PlayStation”, “ ” and “ ” are registered trademarks of Sony Interactive Entertainment Inc.Also, “ ” is a trademark of the same company. All rights reserved.
Licensed for sale in Europe, Africa, Middle East, Russia, India and Oceania. For use exclusively with PlayStation®3 and PlayStation®4.
ENPRODUCT DISPOSAL INFORMATIONWhere you see this symbol on any of our electrical products or packaging, it indicates that the relevant electrical product orbattery should not be disposed of as general household waste in Europe.To ensure the correct waste treatment of the product and battery, please dispose of them in accordance with any applicablelocal laws or requirements for disposal of electrical equipment or batteries. In so doing, you will help to conserve naturalresources and improve standards of environmental protection in treatment and disposal of electrical waste.Applicable to EU countries only.
FRINFORMATIONS SUR LA DESTRUCTION DU PRODUITLà où vous voyez un de ces symboles sur l'un de nos produits électriques, des ou d'emballage, cela signifie que le produit électrique oula batterie ne doit pas être éliminé avec les déchets ménagers en Europe.Pour assurer le traitement correct du produit et de la batterie, s'il vous plaît disposer en conformité avec les lois locales applicables ou lesexigences d'élimination des équipements électriques・batteries. Ce faisant, vous contribuerez à la conservation des ressources naturelleset d'améliorer les normes de protection de l'environnement dans le traitement et l'élimination des déchets d'équipements électriques.Applicable seulement aux pays de l'UE.
DEPRODUKTINFORMATION DESTRUCTIONWo Sie auf jedem unserer elektrischen Produkten oder Verpackungen sehen so oder Symbol Dies bedeutet, dass das Produkt oder die Batterienicht zusammen mit dem Hausmüll in Europa entsorgt werden.Um die richtige Verarbeitung des Produktes und der Batterie zu gewährleisten, wenden Sie sich bitte nach den geltenden lokalen Gesetzen oderentsorgen.Entsorgungsbestimmungen für elektrische · Batterien. Durch diese Vorgehensweise wird Ihnen helfen, Ressourcen zu schonen. Natürliche und die Verbesserung der Umweltschutzstandards für die Behandlung und Entsorgung von Altgeräten Elektro. Gilt nur für EU-Länder.
ITINFORMAZIONI SUL PRODOTTO DISTRUZIONEDove si vede o simbolo su uno qualsiasi dei nostri prodotti elettrici o sulla confezione questo significa che il prodotto elettrico o la batterianon devono essere smaltiti insieme ai rifiuti domestici in Europa.Per garantire la corretta elaborazione del prodotto e delle batterie, smaltirli in conformità con le leggi locali applicabili o requisiti dismaltimento per apparecchi elettrici · batterie. In questo modo, si contribuisce alla conservazione delle risorse Naturale e migliorare glistandard di protezione ambientale per il trattamento e lo smaltimento dei rifiuti di apparecchiature elettrica. Applicabile solo ai paesi UE.
ESINFORMACIÓN PARA TIRAR EL PRODUCTOCuando vea este símbolo en cualquiera de nuestros productos eléctricos o embalaje, indica que el producto o la batería eléctrica correspondiente no se deben tirar a la basura como general en Europa.Para garantizar el correcto tratamiento de los residuos del producto y de la batería, por favor, disponga de ellos de acuerdo con las leyes locales aplicables o requisitos para la eliminación de equipos eléctricos o baterías. Al hacerlo, estará ayudandoa conservar los recursos naturales y mejorar el nivel de protección del medio ambiente en el tratamiento y eliminación de residuos de aparatos eléctricos. Aplicable a los países de la UE y Turquía solamente.
This product features DUALSHOCK®4 Touchpad functionality / Ce produit dispose de la fonction pavé tactile DUALSHOCK®4/ Dieses Produkt verfügt über DUALSHOCK®4 Touchpad-Funktionalität / Questo prodotto offre la funzionalità del touchpad DUALSHOCK®4/ Este producto ofrece la funcionalidad de panel táctil DUALSHOCK®4
■ Touchpad Functionality / Pavé tactile / Touchpad-Funktionalität / Funzionalità dil Touchpad / Funcionalidad de panel táctil
■ Turning Off Backlight / Eteindre le rétro-éclairage / Ausschalten der Hintergrundbeleuchtung / Spegnimento di retroilluminazione / Apagado de la retroiluminación
■ System Requirements / Configuration minimale requise / System Anforderungen / Requisiti di sistema / Requisitos del sistema
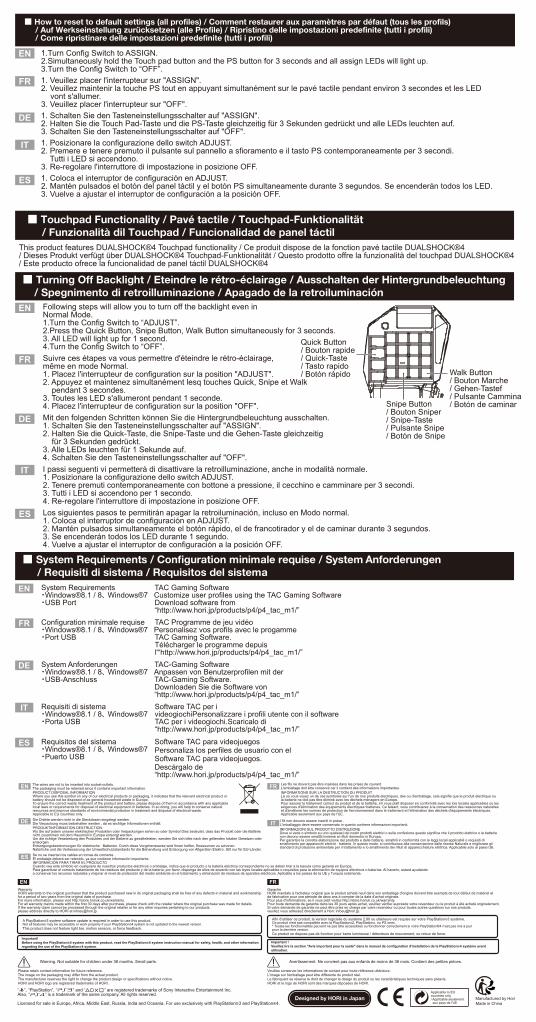
FR Suivre ces étapes va vous permettre d'éteindre le rétro-éclairage,même en mode Normal.1. Placez l'interrupteur de configuration sur la position "ADJUST".2. Appuyez et maintenez simultanément lesq touches Quick, Snipe et Walk pendant 3 secondes.3. Toutes les LED s'allumeront pendant 1 seconde.4. Placez l'interrupteur de configuration sur la position "OFF".
DE Mit den folgenden Schritten können Sie die Hintergrundbeleuchtung ausschalten.1. Schalten Sie den Tasteneinstellungsschalter auf "ASSIGN".2. Halten Sie die Quick-Taste, die Snipe-Taste und die Gehen-Taste gleichzeitig für 3 Sekunden gedrückt. 3. Alle LEDs leuchten für 1 Sekunde auf.4. Schalten Sie den Tasteneinstellungsschalter auf "OFF".
IT I passi seguenti vi permetterà di disattivare la retroilluminazione, anche in modalità normale.1. Posizionare la configurazione dello switch ADJUST.2. Tenere premuti contemporaneamente con bottone a pressione, il cecchino e camminare per 3 secondi.3. Tutti i LED si accendono per 1 secondo.4. Re-regolare l'interruttore di impostazione in posizione OFF.
ES Los siguientes pasos te permitirán apagar la retroiluminación, incluso en Modo normal.1. Coloca el interruptor de configuración en ADJUST.2. Mantén pulsados simultaneamente el botón rápido, el de francotirador y el de caminar durante 3 segundos.3. Se encenderán todos los LED durante 1 segundo.4. Vuelve a ajustar el interruptor de configuración a la posición OFF.
EN Following steps will allow you to turn off the backlight even inNormal Mode. 1.Turn the Config Switch to “ADJUST”.2.Press the Quick Button, Snipe Button, Walk Button simultaneously for 3 seconds.3. All LED will light up for 1 second.4.Turn the Config Switch to “OFF”.
Snipe Button/ Bouton Sniper / Snipe-Taste/ Pulsante Snipe/ Botón de Snipe
Quick Button/ Bouton rapide/ Quick-Taste/ Tasto rapido/ Botón rápido Walk Button
/ Bouton Marche/ Gehen-Tastef/ Pulsante Cammina/ Botón de caminar
FR 1. Veuillez placer l'interrupteur sur "ASSIGN".2. Veuillez maintenir la touche PS tout en appuyant simultanément sur le pavé tactile pendant environ 3 secondes et les LED vont s'allumer.3. Veuillez placer l'interrupteur sur "OFF".
IT 1. Posizionare la configurazione dello switch ADJUST.2. Premere e tenere premuto il pulsante sul pannello a sfioramento e il tasto PS contemporaneamente per 3 secondi. Tutti i LED si accendono.3. Re-regolare l'interruttore di impostazione in posizione OFF.
DE 1. Schalten Sie den Tasteneinstellungsschalter auf "ASSIGN".2. Halten Sie die Touch Pad-Taste und die PS-Taste gleichzeitig für 3 Sekunden gedrückt und alle LEDs leuchten auf.3. Schalten Sie den Tasteneinstellungsschalter auf "OFF".
ES 1. Coloca el interruptor de configuración en ADJUST.2. Mantén pulsados el botón del panel táctil y el botón PS simultaneamente durante 3 segundos. Se encenderán todos los LED.3. Vuelve a ajustar el interruptor de configuración a la posición OFF.
EN 1.Turn Config Switch to ASSIGN.2.Simultaneously hold the Touch pad button and the PS button for 3 seconds and all assign LEDs will light up.3.Turn the Config Switch to “OFF”.
■ How to reset to default settings (all profiles) / Comment restaurer aux paramètres par défaut (tous les profils) / Auf Werkseinstellung zurücksetzen (alle Profile) / Ripristino delle impostazioni predefinite (tutti i profili) / Come ripristinare delle impostazioni predefinite (tutti i profili)
TAC Programme de jeu vidéoPersonalisez vos profils avec le progammeTAC Gaming Software.Télécharger le programme depuis l'“http://www.hori.jp/products/p4/p4_tac_m1/”
Configuration minimale requise・Windows®8.1 / 8、 Windows®7・Port USB
FR
TAC-Gaming SoftwareAnpassen von Benutzerprofilen mit derTAC-Gaming Software.Downloaden Sie die Software von“http://www.hori.jp/products/p4/p4_tac_m1/”
System Anforderungen・Windows®8.1 / 8、 Windows®7・USB-Anschluss
DE
Software TAC per ivideogiochiPersonalizzare i profili utente con il softwareTAC per i videogiochi.Scaricalo di“http://www.hori.jp/products/p4/p4_tac_m1/”
Requisiti di sistema・Windows®8.1 / 8、 Windows®7・Porta USB
IT
Software TAC para videojuegosPersonaliza los perfiles de usuario con elSoftware TAC para videojuegos.Descárgalo de“http://www.hori.jp/products/p4/p4_tac_m1/”
Requisitos del sistema・Windows®8.1 / 8、 Windows®7・Puerto USB
ES
TAC Gaming SoftwareCustomize user profiles using the TAC Gaming SoftwareDownload software from “http://www.hori.jp/products/p4/p4_tac_m1/”
System Requirements・Windows®8.1 / 8、 Windows®7・USB Port
EN
The wires are not to be inserted into socket-outlets.The packaging must be retained since it contains important information.
Les fils ne doivent pas être insérées dans les prises de courant.L'emballage doit être conservé car il contient des informations importantes.
Se no se insertan los cables en tomas de corriente.El embalaje deberá ser retenido, ya que contiene información importante.
Die Drähte werden nicht in die Steckdosen eingelegt werden.Die Verpackung muss beibehalten werden , da es wichtige Informationen enthält.
I fili non devono essere inseriti in prese .L'imballaggio deve essere conservato in quanto contiene informazioni importanti.