Embed Size (px)
Citation preview
1
OPEN/CLOSE CHAMBER LIGHTS
ON/OFF
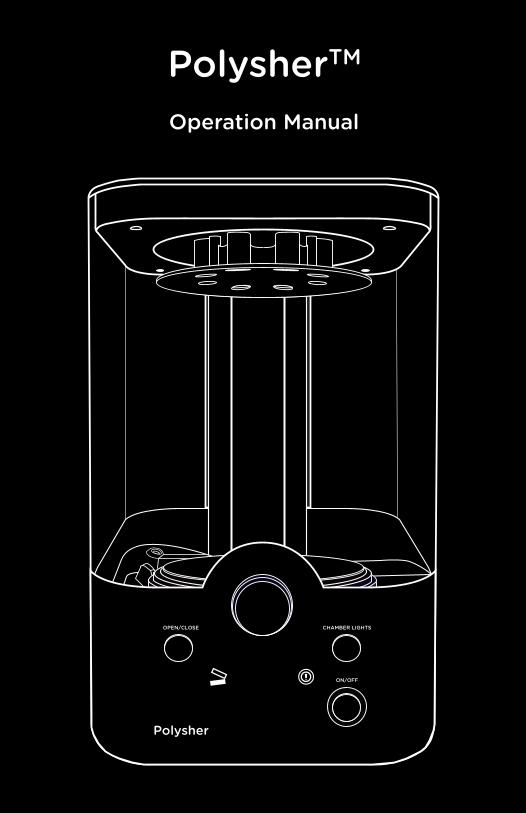
Polysher
PolysherTM
Operation Manual

中文说明书请访问For other languages, visitPour les autres langues, visitezFür andere Sprachen, Besuch
www.polysher.polymaker.com
3
Introduction
Important Safety Instructions
Specifications
Information on Disposal for Users
of Waste Electrical & Electronic Equipment
Package Contents
Essential Parts of the PolysherTM
Setting up your PolysherTM
Operating your PolysherTM
Maintenance and Troubleshooting
Contact Information
CONTENTS
4
5
6
6
7
8
10
12
14
15
4
INTRODUCTION
Thank you for purchasing the PolysherTM from Polymaker! With the PolysherTMand PolySmoothTM (purchased separately) you are ready to transcend the quality of your 3D prints!
PolySmoothTM is an entirely new 3D printing filament. It is extremely easy to print with (just like PLA), and works on just about any filament-based 3D printer. The support structure comes off very easily as well, making it ideal for complex geometries.
The real magic occurs when you put your PolySmoothTM prints into the PolysherTM. With Polymaker’s unique Micro-Droplet Polishing technology, the layer lines will magically disappear, leaving you with a truly finished object with shiny, smooth surfaces.
But this is just the beginning. We will keep on innovating, and bringing your more and more materials in the “polyshable” family. We cannot wait to see what you will create!
5
Isopropyl alcohol and ethanol are flammable. Do not use this apparatus in the presence of or near open flames or sparks. Keep away from heat and sources of ignition.
Use only isopropyl alcohol (also known as isopropanol or IPA) or ethanol2 with the PolysherTM. Use of any other solvent or liquid can result in irreversible damage to your PolysherTM and increased risk of fire or explosion.
Use the PolysherTM in a well-ventilated area. Avoid inhalation of alcohol vapor or mist.
Place the PolysherTM on a level surface. Operating the device on an unlevel surface may result in spills of alcohol.
Avoid prolonged skin contact with isopropyl alcohol or ethanol. In case of eye contact, follow the instructions provided by supplier of the alcohol.
Do not ingest isopropanol. If ingested, seek medical advice immediately and show the container or the label.
Do not block any ventilation openings.
Only use attachments/accessories specified by the manufacturer.
Refer all servicing to qualified service personnel.
For Use Only with the supplied Power Supply or equivalent power supply acceptable to the manufacturer.
If you have any question regarding the safety of the PolysherTM, please contact:
1 The distribution and use of isopropyl alcohol and/or ethanol may be restricted in certain countries. Please check your local law and act accordingly.
2 Isopropyl alcohol and ethanol with concentrations of no less than 70% can be used. Concentrations of 90% or higher are recommended for better polishing quality.
The PolysherTM requires the use of isopropyl alcohol or ethanol1. Please read this section carefully before operating your PolysherTM for the first time.
Read these instructions.
Keep these instructions.
Heed all warnings.
Follow all instructions.
IMPORTANT SAFETY INSTRUCTIONS
6
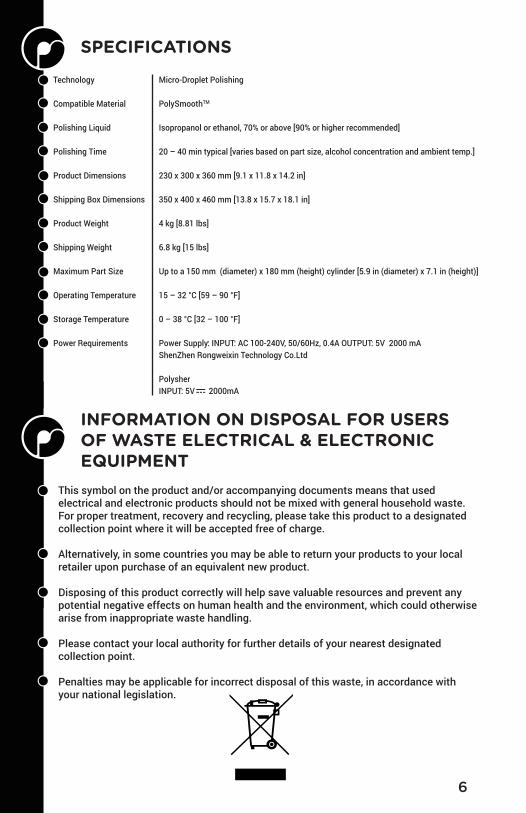
INFORMATION ON DISPOSAL FOR USERS OF WASTE ELECTRICAL & ELECTRONIC EQUIPMENT
This symbol on the product and/or accompanying documents means that used electrical and electronic products should not be mixed with general household waste. For proper treatment, recovery and recycling, please take this product to a designated collection point where it will be accepted free of charge.
Alternatively, in some countries you may be able to return your products to your local retailer upon purchase of an equivalent new product.
Disposing of this product correctly will help save valuable resources and prevent any potential negative effects on human health and the environment, which could otherwise arise from inappropriate waste handling.
Please contact your local authority for further details of your nearest designated collection point.
Penalties may be applicable for incorrect disposal of this waste, in accordance with your national legislation.
SPECIFICATIONS
Technology
Compatible Material
Polishing Liquid
Polishing Time
Product Dimensions
Shipping Box Dimensions
Product Weight
Shipping Weight
Maximum Part Size
Operating Temperature
Storage Temperature
Power Requirements
Micro-Droplet Polishing
PolySmoothTM
Isopropanol or ethanol, 70% or above [90% or higher recommended]
20 – 40 min typical [varies based on part size, alcohol concentration and ambient temp.]
230 x 300 x 360 mm [9.1 x 11.8 x 14.2 in]
350 x 400 x 460 mm [13.8 x 15.7 x 18.1 in]
4 kg [8.81 lbs]
6.8 kg [15 lbs]
Up to a 150 mm (diameter) x 180 mm (height) cylinder [5.9 in (diameter) x 7.1 in (height)]
15 – 32 °C [59 – 90 °F]
0 – 38 °C [32 – 100 °F]
Power Supply: INPUT: AC 100-240V, 50/60Hz, 0.4A OUTPUT: 5V 2000 mAShenZhen Rongweixin Technology Co.Ltd
PolysherINPUT: 5V 2000mA
7
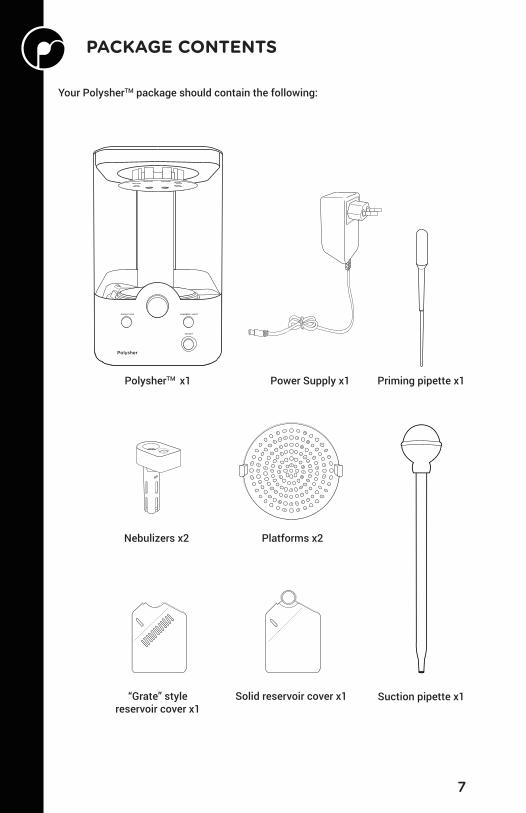
Your PolysherTM package should contain the following:
PACKAGE CONTENTS
OPEN/CLOSE CHAMBER LIGHTS
ON/OFF
Polysher
PolysherTM x1 Power Supply x1
Nebulizers x2
Priming pipette x1
Suction pipette x1“Grate” style reservoir cover x1
Solid reservoir cover x1
Platforms x2
8
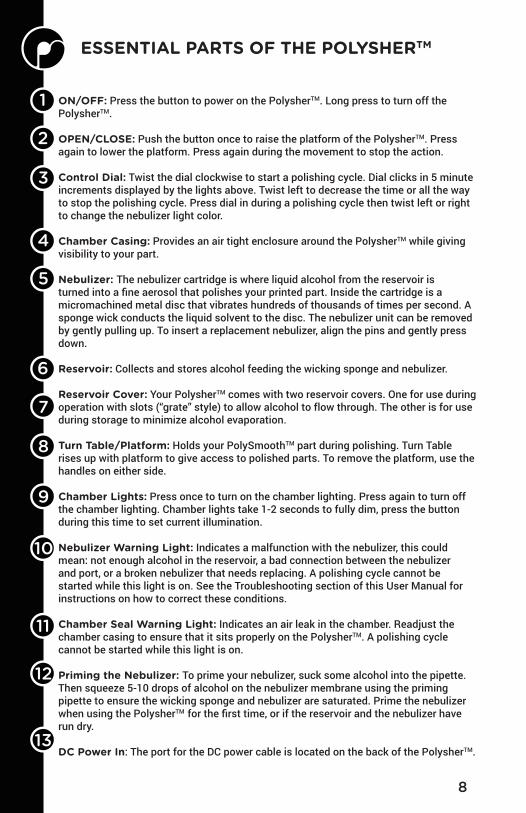
ON/OFF: Press the button to power on the PolysherTM. Long press to turn off the PolysherTM.
OPEN/CLOSE: Push the button once to raise the platform of the PolysherTM. Press again to lower the platform. Press again during the movement to stop the action.
Control Dial: Twist the dial clockwise to start a polishing cycle. Dial clicks in 5 minute increments displayed by the lights above. Twist left to decrease the time or all the way to stop the polishing cycle. Press dial in during a polishing cycle then twist left or right to change the nebulizer light color.
Chamber Casing: Provides an air tight enclosure around the PolysherTM while giving visibility to your part.
Nebulizer: The nebulizer cartridge is where liquid alcohol from the reservoir is turned into a fine aerosol that polishes your printed part. Inside the cartridge is a micromachined metal disc that vibrates hundreds of thousands of times per second. A sponge wick conducts the liquid solvent to the disc. The nebulizer unit can be removed by gently pulling up. To insert a replacement nebulizer, align the pins and gently press down.
Reservoir: Collects and stores alcohol feeding the wicking sponge and nebulizer.
Reservoir Cover: Your PolysherTM comes with two reservoir covers. One for use during operation with slots (“grate” style) to allow alcohol to flow through. The other is for use during storage to minimize alcohol evaporation.
Turn Table/Platform: Holds your PolySmoothTM part during polishing. Turn Table rises up with platform to give access to polished parts. To remove the platform, use the handles on either side.
Chamber Lights: Press once to turn on the chamber lighting. Press again to turn off the chamber lighting. Chamber lights take 1-2 seconds to fully dim, press the button during this time to set current illumination.
Nebulizer Warning Light: Indicates a malfunction with the nebulizer, this could mean: not enough alcohol in the reservoir, a bad connection between the nebulizer and port, or a broken nebulizer that needs replacing. A polishing cycle cannot be started while this light is on. See the Troubleshooting section of this User Manual for instructions on how to correct these conditions.
Chamber Seal Warning Light: Indicates an air leak in the chamber. Readjust the chamber casing to ensure that it sits properly on the PolysherTM. A polishing cycle cannot be started while this light is on.
Priming the Nebulizer: To prime your nebulizer, suck some alcohol into the pipette. Then squeeze 5-10 drops of alcohol on the nebulizer membrane using the priming pipette to ensure the wicking sponge and nebulizer are saturated. Prime the nebulizer when using the PolysherTM for the first time, or if the reservoir and the nebulizer have run dry.
DC Power In: The port for the DC power cable is located on the back of the PolysherTM.
ESSENTIAL PARTS OF THE POLYSHERTM
1
2
3
4
5
6
7
8
9
10
11
12
13
OPEN/CLOSE CHAMBER LIGHTS
ON/OFF
5
6
7
12
3
2
4
8
9
113
1011
10
SETTING UP YOUR POLYSHER
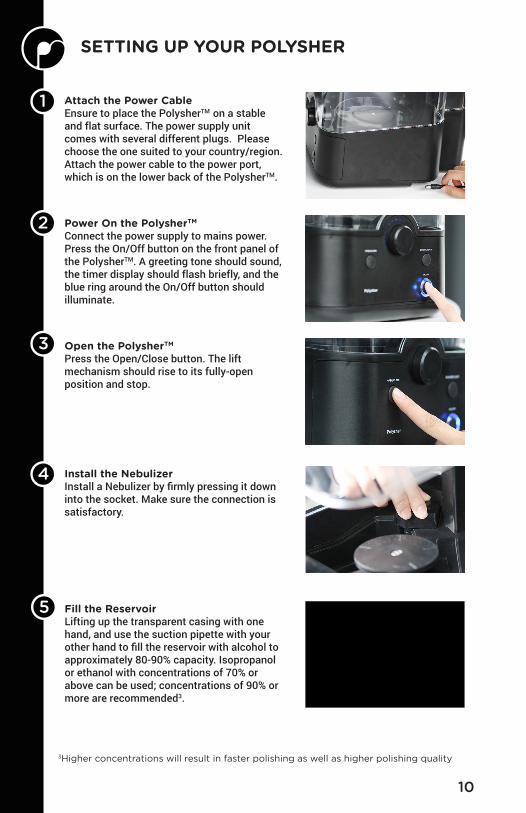
Attach the Power CableEnsure to place the PolysherTM on a stable and flat surface. The power supply unit comes with several different plugs. Please choose the one suited to your country/region. Attach the power cable to the power port, which is on the lower back of the PolysherTM.
Power On the PolysherTMConnect the power supply to mains power. Press the On/Off button on the front panel of the PolysherTM. A greeting tone should sound, the timer display should flash briefly, and the blue ring around the On/Off button should illuminate.
Open the PolysherTM
Press the Open/Close button. The lift mechanism should rise to its fully-open position and stop.
Install the NebulizerInstall a Nebulizer by firmly pressing it down into the socket. Make sure the connection is satisfactory.
Fill the ReservoirLifting up the transparent casing with one hand, and use the suction pipette with your other hand to fill the reservoir with alcohol to approximately 80-90% capacity. Isopropanol or ethanol with concentrations of 70% or above can be used; concentrations of 90% or more are recommended3.
3Higher concentrations will result in faster polishing as well as higher polishing quality
1
2
3
4
5
11
Prime the NebulizerOnce the sponge wick is fully saturated with solvent it will continue to conduct the liquid solvent to the nebulizer by capillary action. Initially, however, and also in the event of the PolysherTM not being used for an extended period of time, the top portion of the sponge will be dry and the nebulizer will not operate. It is necessary to first “prime” the sponge by dribbling 5-10 drops of alcohol directly onto the nebulizer itself using the priming pipette. The solvent will flow through the nebulizer’s micromachined pores and into the sponge.
Install the Reservoir CoverPlace the “grate” cover over the reservoir.
Install the PlatformSet the platform on the lift tray in the center of the lid.
6
7
8
12
OPERATING YOUR POLYSHERTM
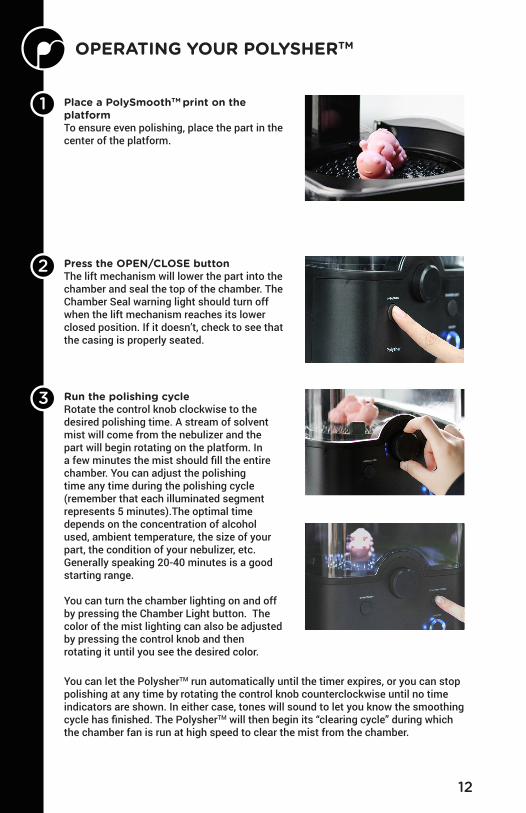
Run the polishing cycleRotate the control knob clockwise to the desired polishing time. A stream of solvent mist will come from the nebulizer and the part will begin rotating on the platform. In a few minutes the mist should fill the entire chamber. You can adjust the polishing time any time during the polishing cycle (remember that each illuminated segment represents 5 minutes).The optimal time depends on the concentration of alcohol used, ambient temperature, the size of your part, the condition of your nebulizer, etc. Generally speaking 20-40 minutes is a good starting range.
You can turn the chamber lighting on and off by pressing the Chamber Light button. The color of the mist lighting can also be adjusted by pressing the control knob and then rotating it until you see the desired color.
Press the OPEN/CLOSE buttonThe lift mechanism will lower the part into the chamber and seal the top of the chamber. The Chamber Seal warning light should turn off when the lift mechanism reaches its lower closed position. If it doesn’t, check to see that the casing is properly seated.
You can let the PolysherTM run automatically until the timer expires, or you can stop polishing at any time by rotating the control knob counterclockwise until no time indicators are shown. In either case, tones will sound to let you know the smoothing cycle has finished. The PolysherTM will then begin its “clearing cycle” during which the chamber fan is run at high speed to clear the mist from the chamber.
Place a PolySmoothTM print on the platformTo ensure even polishing, place the part in the center of the platform.
1
2
3
13
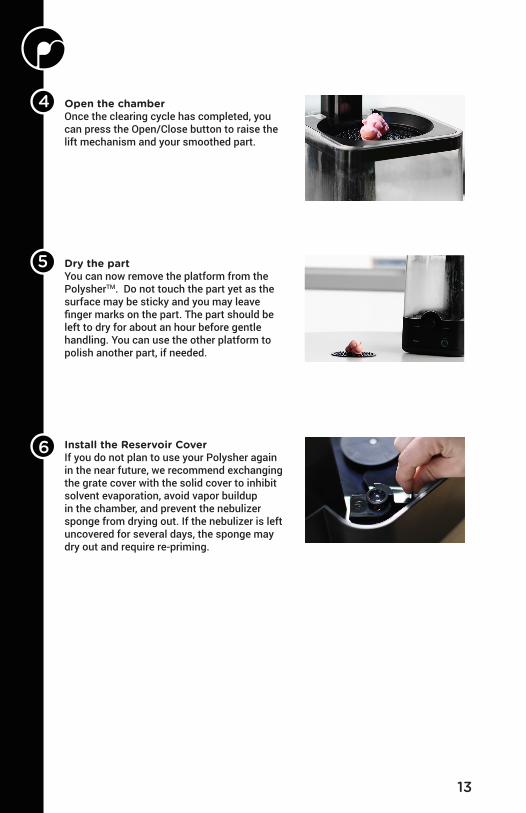
Open the chamberOnce the clearing cycle has completed, you can press the Open/Close button to raise the lift mechanism and your smoothed part.
Install the Reservoir CoverIf you do not plan to use your Polysher again in the near future, we recommend exchanging the grate cover with the solid cover to inhibit solvent evaporation, avoid vapor buildup in the chamber, and prevent the nebulizer sponge from drying out. If the nebulizer is left uncovered for several days, the sponge may dry out and require re-priming.
Dry the partYou can now remove the platform from the PolysherTM. Do not touch the part yet as the surface may be sticky and you may leave finger marks on the part. The part should be left to dry for about an hour before gentle handling. You can use the other platform to polish another part, if needed.
4
5
6
14
MAINTENANCE & TROUBLESHOOTING
What shall I do if the Nebulizer Warning Light is on?
If this happens during a polishing cycle, first try pressing the control knob and rotating it clockwise to start a new polishing cycle. If the problem persists, try the following:
Check the nebulizer unit to see if it is installed properly. Make sure the nebulizer is fully seated in its socket.
Check if the reservoir is empty. If this is the case, fill the reservoir, prime the nebulizer and start a new polishing cycle to see if the problem has been solved.
In case that neither of the above can solve the issue, try replacing the nebulizer with a new one (remember to prime the new nebulizer). If the problem is still on, contact us for additional assistance.
Draining the reservoir
A 30 mL pipette is provided for removing alcohol from the reservoir. Avoid any heat source, open flames or sparks when draining the reservoir. The alcohol, unless contaminated, can be repeatedly used for polishing.
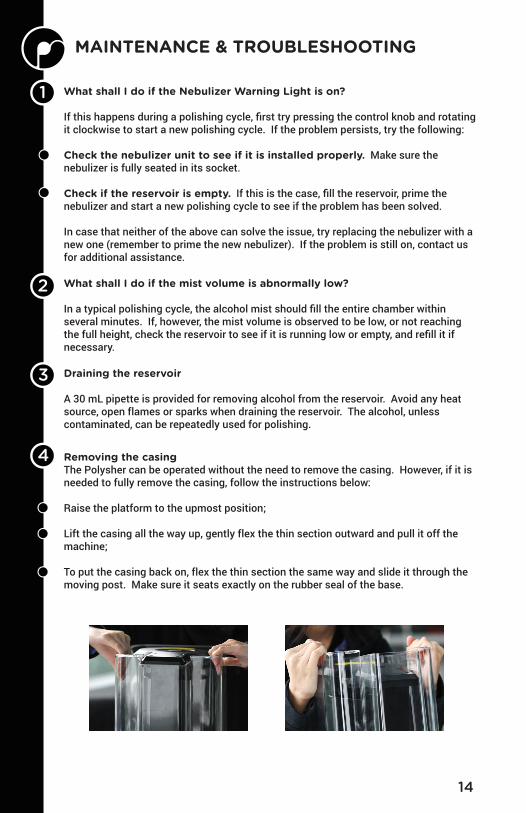
Removing the casingThe Polysher can be operated without the need to remove the casing. However, if it is needed to fully remove the casing, follow the instructions below:
Raise the platform to the upmost position;
Lift the casing all the way up, gently flex the thin section outward and pull it off the machine;
To put the casing back on, flex the thin section the same way and slide it through the moving post. Make sure it seats exactly on the rubber seal of the base.
What shall I do if the mist volume is abnormally low?
In a typical polishing cycle, the alcohol mist should fill the entire chamber within several minutes. If, however, the mist volume is observed to be low, or not reaching the full height, check the reservoir to see if it is running low or empty, and refill it if necessary.
1
2
3
4
15
CONTACT INFORMATION
For questions or further information, please contact us at:
800 Naxian RoadBuilding 1, Unit B, Suite 903
Pudong DistrictShanghai 200120
China
E-mail: [email protected]
facebook.com/Polymaker.3D
Visit polymaker.com and follow us on our social media channels for product updates, videos, tutorials and more!
twitter.com/Polymaker_3D
youtube.com/Polymaker
instagram.com/Polymaker_3D
pinterest.com/Polymaker
thingiverse.com/Polymaker_3D
facebook.com/groups/Polymaker
T

www.polymaker.comwww.polymaker.com