Embed Size (px)
Citation preview
Procedure Manualfrom scan, to plan, to guide

Contents
3
IntroductionSIMPLANT: A fully integrated dental implant treatment planning tool ..............................4
SIMPLANT Guide: Your link between implant planning and surgery ...............................5
Immediate Smile: Immediate temporary restoration, ready prior to surgery .................5
Step by step procedureStep 1 – Diagnosis and treatment planning ..................................................................................6
Step 2 – Preparing the scan ...............................................................................................................12
Step 3 – Taking the 3D scan ..............................................................................................................14
Step 4 – Converting the CT images into a 3D file...................................................................15
Step 5 – Surgery planning with SIMPLANT ................................................................................16
Step 6 – SIMPLANT Guide online ordering ................................................................................17
Step 7 – SIMPLANT Guide delivery ................................................................................................18
Step 8 – Performing surgery ..............................................................................................................19
Step 9 – Offering your patient an Immediate Smile ...............................................................21
Clinical guidelines .................................................................................................................................24
Treatment planning in a nutshellSIMPLANT Pro Workflow .....................................................................................................................25
SIMPLANT Planner Workflow .............................................................................................................27

4
Introduction
This manual provides step by step guidance on how to achieve the best possible implant treatment for your patient with SIMPLANT and SIMPLANT Guide.
SIMPLANT: A fully integrated dental implant treatment planning tool
SIMPLANT offers you a comprehensive 3D system for accurate and predictable implant treatment - from scanning and planning, to drilling and implant placement, to the ultimate Immediate Smile.
From scan• Continue working with your preferred implant brands
and CT and cone beam 3D scanning equipment – SIMPLANT is compatible with them all.
• Use our scan guidelines to optimize the quality of your images – guaranteed by an ongoing collaboration with the cone beam 3D vendors.
• Connect to DentalPlanit.com from within SIMPLANT to collaborate online with various local imaging centers and other service providers to quick start your case planning.
To plan• Assess your patient’s anatomy and see exactly how it
relates to your proposed restoration.
• Easily identify vital structures, simulate grafts, place realistic implants and abutments, analyze bone density and so much more.
• Use your data to create multiple treatment plans and present them to colleagues, your lab and even your patients to show them what your plan really entails.
5
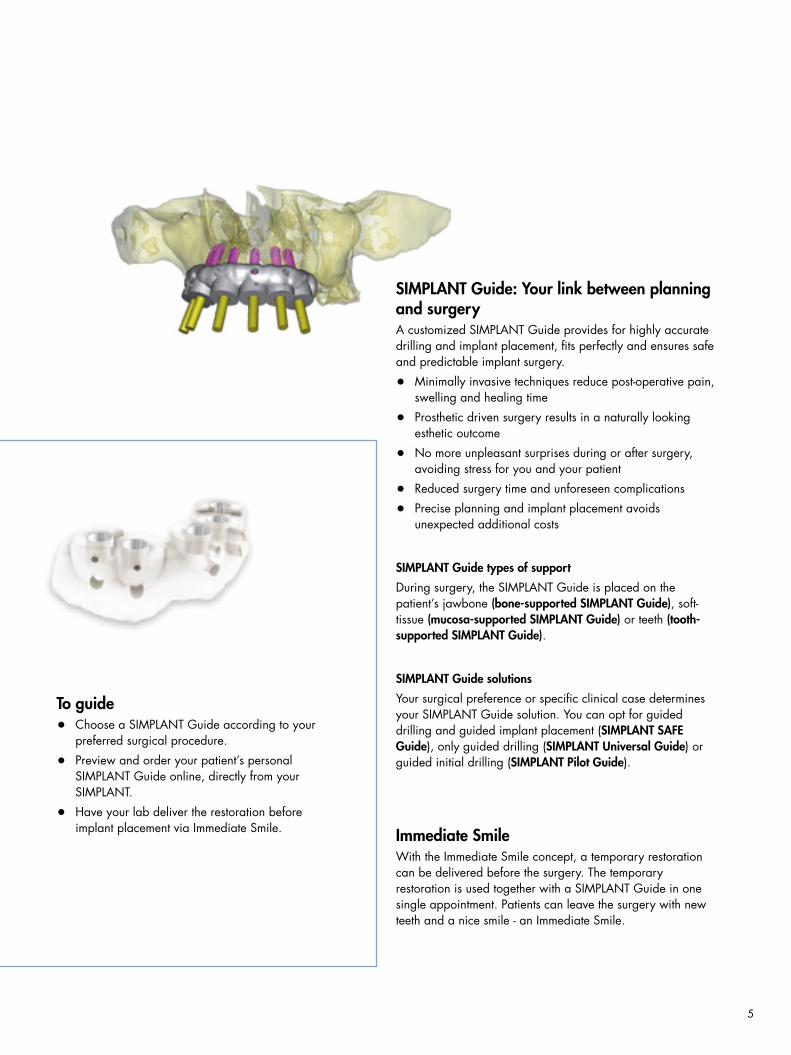
To guide• Choose a SIMPLANT Guide according to your
preferred surgical procedure.
• Preview and order your patient’s personal SIMPLANT Guide online, directly from your SIMPLANT.
• Have your lab deliver the restoration before implant placement via Immediate Smile.
SIMPLANT Guide: Your link between planning and surgeryA customized SIMPLANT Guide provides for highly accurate drilling and implant placement, fits perfectly and ensures safe and predictable implant surgery.
• Minimally invasive techniques reduce post-operative pain, swelling and healing time
• Prosthetic driven surgery results in a naturally looking esthetic outcome
• No more unpleasant surprises during or after surgery, avoiding stress for you and your patient
• Reduced surgery time and unforeseen complications
• Precise planning and implant placement avoids unexpected additional costs
SIMPLANT Guide types of support
During surgery, the SIMPLANT Guide is placed on the patient’s jawbone (bone-supported SIMPLANT Guide), soft-tissue (mucosa-supported SIMPLANT Guide) or teeth (tooth-supported SIMPLANT Guide).
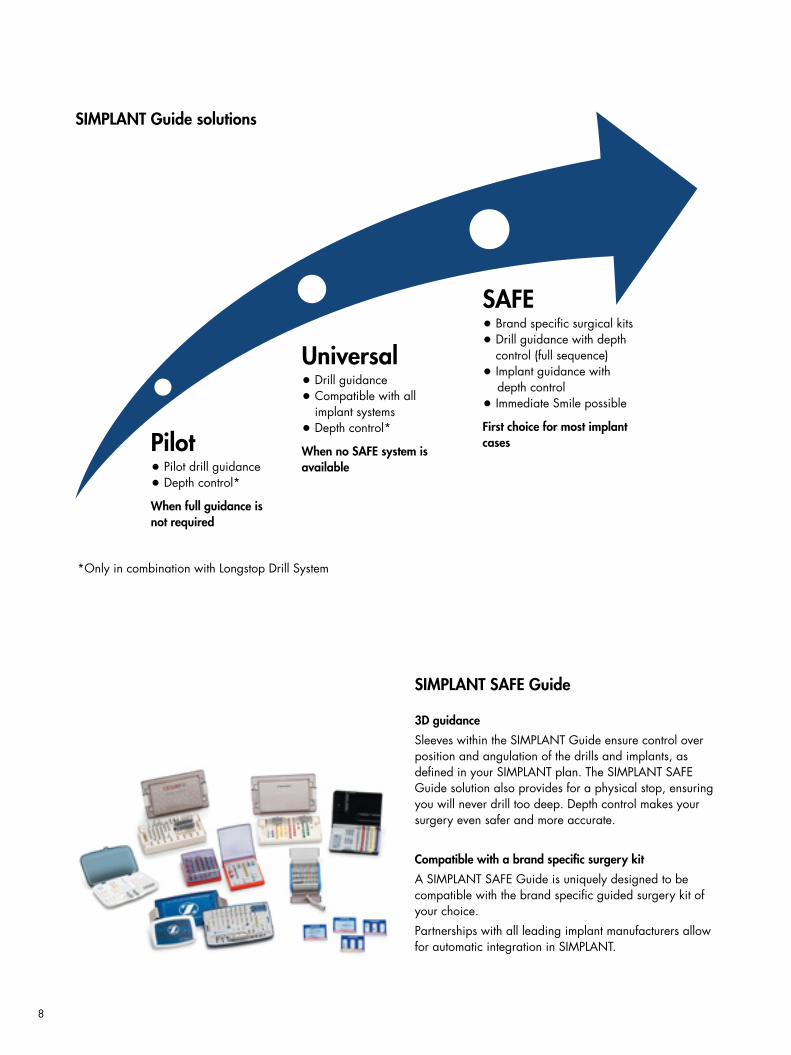
SIMPLANT Guide solutions
Your surgical preference or specific clinical case determines your SIMPLANT Guide solution. You can opt for guided drilling and guided implant placement (SIMPLANT SAFE Guide), only guided drilling (SIMPLANT Universal Guide) or guided initial drilling (SIMPLANT Pilot Guide).
Immediate SmileWith the Immediate Smile concept, a temporary restoration can be delivered before the surgery. The temporary restoration is used together with a SIMPLANT Guide in one single appointment. Patients can leave the surgery with new teeth and a nice smile - an Immediate Smile.
6
Step 1 – Diagnosis and treatment planning
Clinical examinationYour diagnosis and initial treatment plan will influence all steps that lead to successful implant treatment. Based on a clinical examination, you will determine what kind of implant treatment your patient needs:
• What are my patient’s needs?
• Is a fixed or removable prosthesis required?
• How many implants does my patient require?
• Does my patient want an immediate restoration?
• Are tooth extractions needed?
• Which type of SIMPLANT Guide should I use during surgery?
• Do I desire a tooth set-up visualization?
• Is flapless surgery required?
Choosing a tailored SIMPLANT GuideSIMPLANT allows you to plan your surgery in advance, taking into account clinical and esthetical considerations, but 3D implant treatment planning equally requires the use of a SIMPLANT Guide during actual surgery to place implants.
Additionally, the SIMPLANT Guide types of support and solutions you will use, may influence your treatment planning.
Step by step procedure
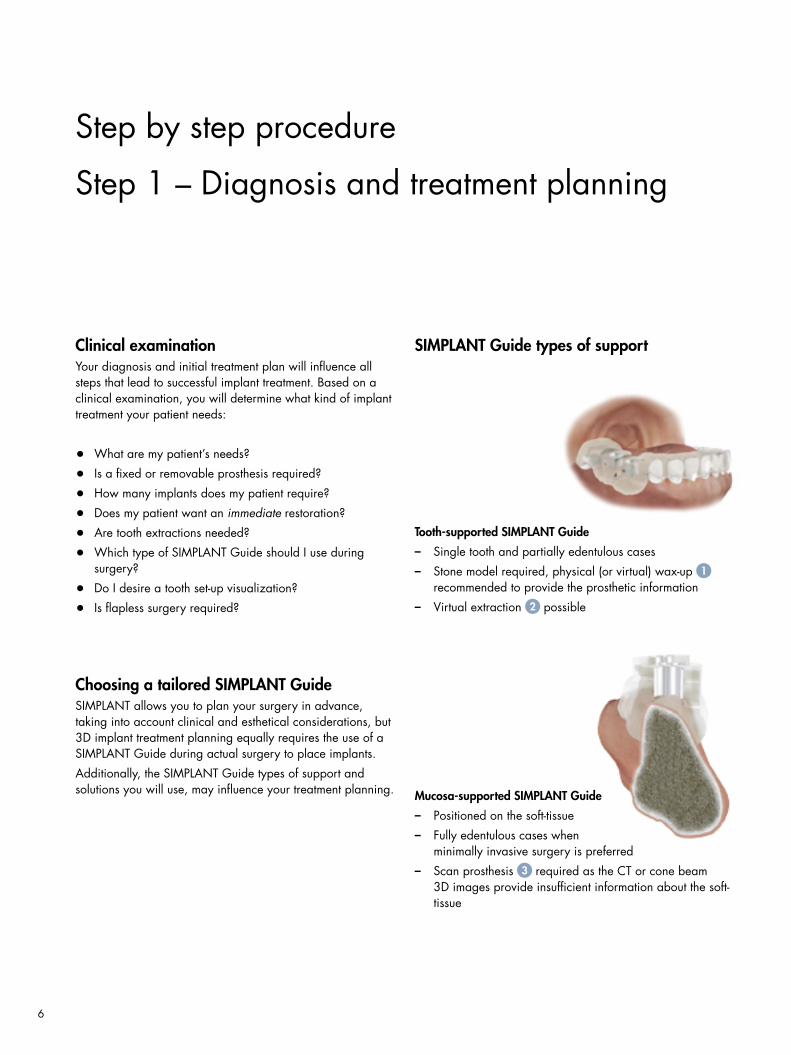
Mucosa-supported SIMPLANT Guide
– Positioned on the soft-tissue
– Fully edentulous cases when minimally invasive surgery is preferred
– Scan prosthesis 3 required as the CT or cone beam 3D images provide insufficient information about the soft-tissue
Tooth-supported SIMPLANT Guide
– Single tooth and partially edentulous cases
– Stone model required, physical (or virtual) wax-up 1 recommended to provide the prosthetic information
– Virtual extraction 2 possible
SIMPLANT Guide types of support

7
Bone-supported SIMPLANT Guide
– Positioned on the jawbone after raising mucoperiosteal flaps
– Suitable for partially or fully edentulous cases when increased visibility is needed or to allow augmentation and reduction procedures
– Sufficient bone surface support – at least 3cm – is essential for secure, effective guide positioning.
– Scan prosthesis 3 recommended to provide prosthetic information
Special SIMPLANT Guide type
Bone reduction guides To be entirely sure that you don’t take too much or too little bone away, your ridge reduction can be guided. A tailored bone reduction guide takes into account implant position and surrounding bone mass. It eliminates mistakes when removing sharp bone edges and ensures you remove only as much bone as required.
3 Scan prosthesisA scan prosthesis visualizes the desired tooth set-up in the CT and cone beam 3D images. These images help you determine how to place your patient’s implants from a clinical as well as an esthetical point of view. For a mucosa-supported SIMPLANT Guide, it’s the scan prosthesis that makes it possible to fabricate the SIMPLANT Guide. A scan prosthesis is simply made from a relined or new prosthesis with fiducial markers, i.e. Dual Scan Markers, added to it.
1 Stone modelTeeth, tooth fillings and brackets are deformed in CT and cone beam 3D images. A stable tooth-supported SIMPLANT Guide thus cannot be built based on these images alone. SIMPLANT, a SIMPLANT Master Dental Imaging Center or possibly your lab will produce a high resolution Optical Scan of a recent stone model with and without wax-up, to be merged with your scans.
2 Virtual extractionSIMPLANT makes it possible to design and produce a SIMPLANT Guide prior to tooth extraction. This allows you to immediately and accurately place an implant into an extraction socket. Make sure you remove any teeth that will be extracted during surgery from the stone model before sending it in.
8
SIMPLANT Guide solutions
3D guidance
Sleeves within the SIMPLANT Guide ensure control over position and angulation of the drills and implants, as defined in your SIMPLANT plan. The SIMPLANT SAFE Guide solution also provides for a physical stop, ensuring you will never drill too deep. Depth control makes your surgery even safer and more accurate.
Compatible with a brand specific surgery kit
A SIMPLANT SAFE Guide is uniquely designed to be compatible with the brand specific guided surgery kit of your choice.
Partnerships with all leading implant manufacturers allow for automatic integration in SIMPLANT.
• Drill guidance • Compatible with all
implant systems• Depth control*
When no SAFE system is available• Pilot drill guidance
• Depth control*
When full guidance is not required
Pilot
Universal• Brand specific surgical kits• Drill guidance with depth
control (full sequence)• Implant guidance with depth control• Immediate Smile possible
First choice for most implant cases
SAFE
*Only in combination with Longstop Drill System
SIMPLANT SAFE Guide

9
One guide
Insert the drill guiding instrument, brand specific drill key or DENTSPLY Implant’s Sleeve-on-Drill, to achieve optimal accuracy when drilling. This enables you to use only one guide.
Guided drilling and guided implant placement
For most implant systems, implant holders are attached to the implants allowing the implants to be placed through the guide, increasing accuracy and predictability of the implant position.
Immediate Smile possible
Because of 3D guidance and the possibility to order an Immediate Smile Model, your lab can fabricate a temporary restoration prior to surgery. Order the Immediate Smile Model of your 3D planning together with your SIMPLANT Guide. Or, directly order an Immediate Smile Bridge, a PMMA milled provisional restoration, prior to surgery.
Physical stop
Drill Key or Sleeve-on-Drill
Sleeve
SurgiGuide
Mucosa
Bone
Prolongation
Sleeve height
10
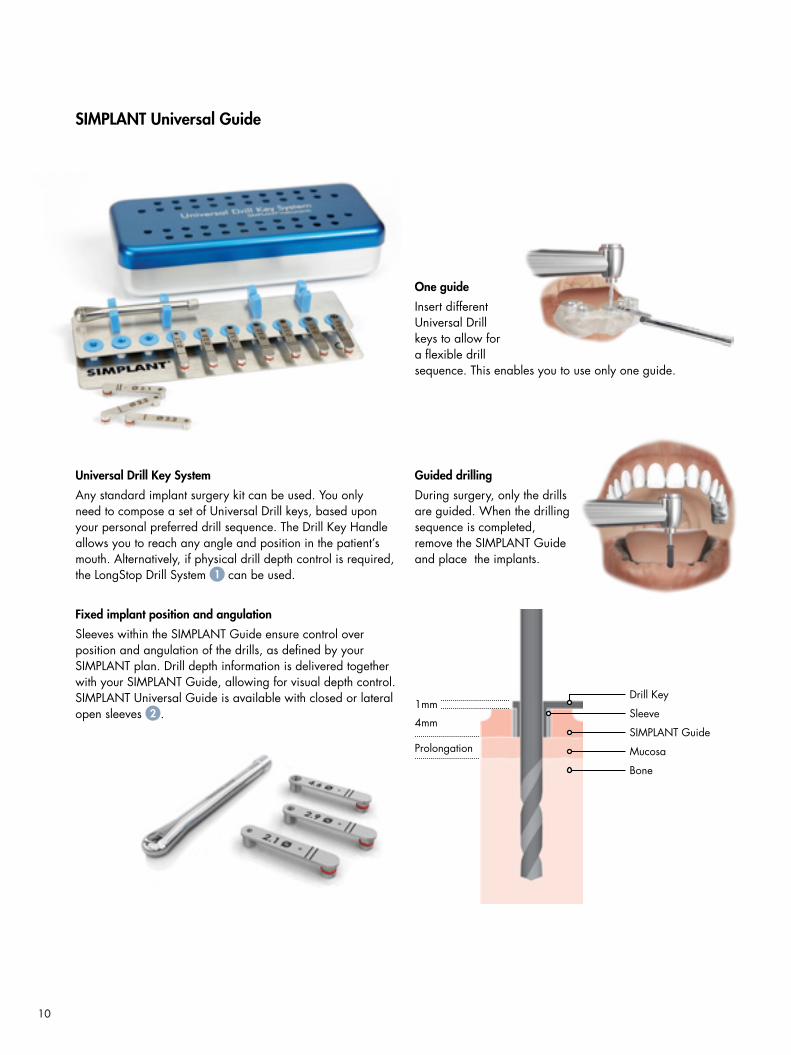
Universal Drill Key System
Any standard implant surgery kit can be used. You only need to compose a set of Universal Drill keys, based upon your personal preferred drill sequence. The Drill Key Handle allows you to reach any angle and position in the patient’s mouth. Alternatively, if physical drill depth control is required, the LongStop Drill System 1 can be used.
Fixed implant position and angulation
Sleeves within the SIMPLANT Guide ensure control over position and angulation of the drills, as defined by your SIMPLANT plan. Drill depth information is delivered together with your SIMPLANT Guide, allowing for visual depth control. SIMPLANT Universal Guide is available with closed or lateral open sleeves 2 .
Drill Key
Sleeve
SIMPLANT Guide
Mucosa
Bone
Prolongation
4mm
1mm
Guided drilling
During surgery, only the drills are guided. When the drilling sequence is completed, remove the SIMPLANT Guide and place the implants.
One guide
Insert different Universal Drill keys to allow for a flexible drill sequence. This enables you to use only one guide.
SIMPLANT Universal Guide
11
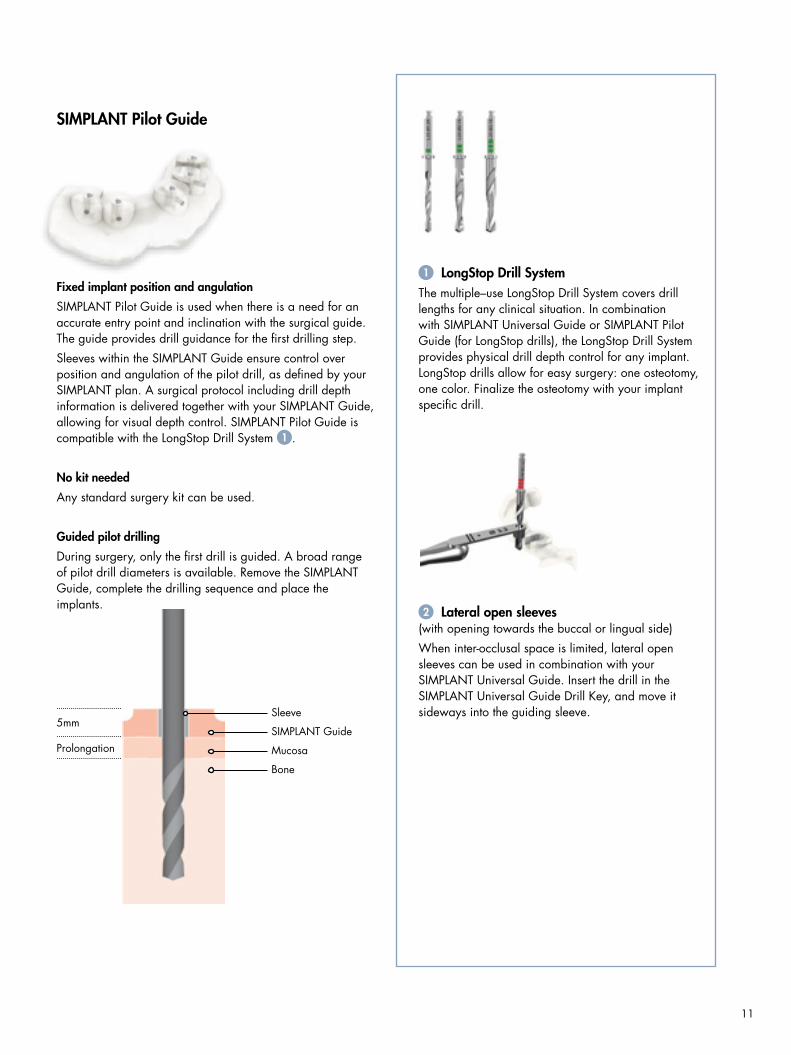
Fixed implant position and angulation
SIMPLANT Pilot Guide is used when there is a need for an accurate entry point and inclination with the surgical guide. The guide provides drill guidance for the first drilling step.
Sleeves within the SIMPLANT Guide ensure control over position and angulation of the pilot drill, as defined by your SIMPLANT plan. A surgical protocol including drill depth information is delivered together with your SIMPLANT Guide, allowing for visual depth control. SIMPLANT Pilot Guide is compatible with the LongStop Drill System 1 .
No kit needed
Any standard surgery kit can be used.
Guided pilot drilling
During surgery, only the first drill is guided. A broad range of pilot drill diameters is available. Remove the SIMPLANT Guide, complete the drilling sequence and place the implants.
2 Lateral open sleeves (with opening towards the buccal or lingual side)
When inter-occlusal space is limited, lateral open sleeves can be used in combination with your SIMPLANT Universal Guide. Insert the drill in the SIMPLANT Universal Guide Drill Key, and move it sideways into the guiding sleeve.
1 LongStop Drill SystemThe multiple–use LongStop Drill System covers drill lengths for any clinical situation. In combination with SIMPLANT Universal Guide or SIMPLANT Pilot Guide (for LongStop drills), the LongStop Drill System provides physical drill depth control for any implant. LongStop drills allow for easy surgery: one osteotomy, one color. Finalize the osteotomy with your implant specific drill.
Sleeve
SIMPLANT Guide
Mucosa
Bone
Prolongation
5mm
SIMPLANT Pilot Guide
12
Step 2 – Preparing the scan
Partially edentulous: prepare a stone model and wax-up
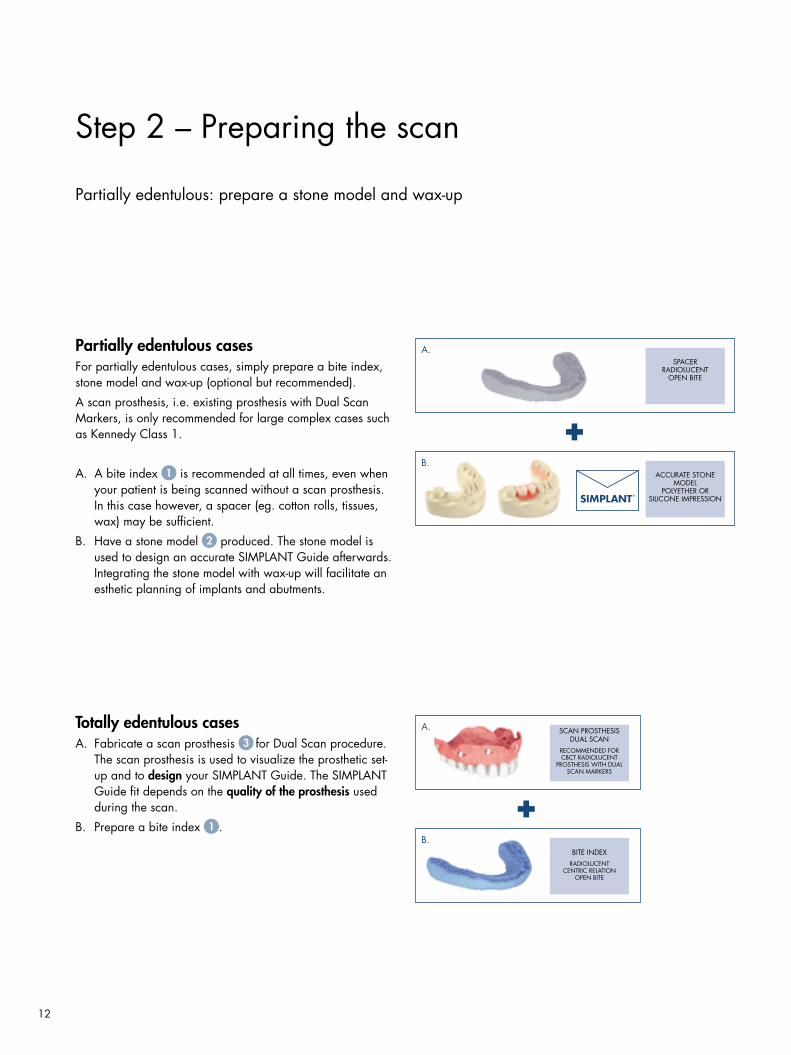
Partially edentulous cases For partially edentulous cases, simply prepare a bite index, stone model and wax-up (optional but recommended).
A scan prosthesis, i.e. existing prosthesis with Dual Scan Markers, is only recommended for large complex cases such as Kennedy Class 1.
A. A bite index 1 is recommended at all times, even when your patient is being scanned without a scan prosthesis. In this case however, a spacer (eg. cotton rolls, tissues, wax) may be sufficient.
B. Have a stone model 2 produced. The stone model is used to design an accurate SIMPLANT Guide afterwards. Integrating the stone model with wax-up will facilitate an esthetic planning of implants and abutments.
Totally edentulous casesA. Fabricate a scan prosthesis 3 for Dual Scan procedure.
The scan prosthesis is used to visualize the prosthetic set-up and to design your SIMPLANT Guide. The SIMPLANT Guide fit depends on the quality of the prosthesis used during the scan.
B. Prepare a bite index 1 .
SPACERRADIOLUCENT
OPEN BITE
A.
B.ACCURATE STONE
MODELPOLYETHER OR
SILICONE IMPRESSION
SCAN PROSTHESISDUAL SCAN
RECOMMENDED FOR CBCT RADIOLUCENT
PROSTHESIS WITH DUAL SCAN MARKERS
A.
B.BITE INDEX
RADIOLUCENTCENTRIC RELATION
OPEN BITE
13
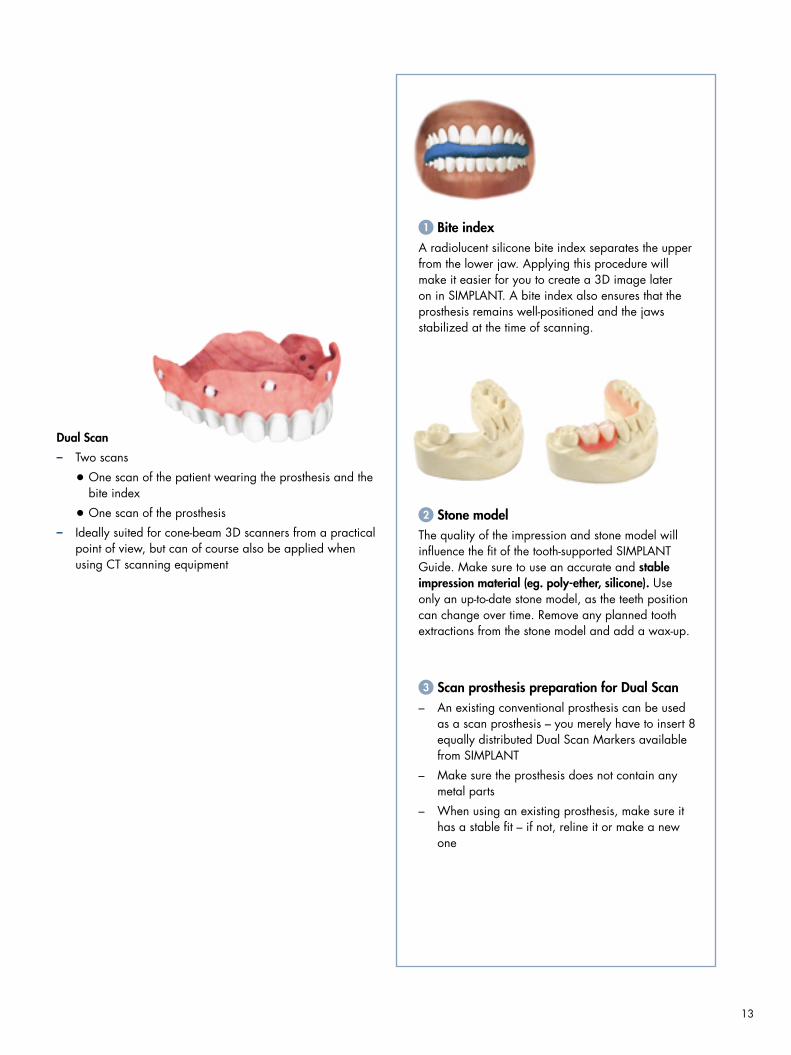
Dual Scan
– Two scans
• One scan of the patient wearing the prosthesis and the bite index
• One scan of the prosthesis
– Ideally suited for cone-beam 3D scanners from a practical point of view, but can of course also be applied when using CT scanning equipment
1 Bite indexA radiolucent silicone bite index separates the upper from the lower jaw. Applying this procedure will make it easier for you to create a 3D image later on in SIMPLANT. A bite index also ensures that the prosthesis remains well-positioned and the jaws stabilized at the time of scanning.
2 Stone modelThe quality of the impression and stone model will influence the fit of the tooth-supported SIMPLANT Guide. Make sure to use an accurate and stable impression material (eg. poly-ether, silicone). Use only an up-to-date stone model, as the teeth position can change over time. Remove any planned tooth extractions from the stone model and add a wax-up.
3 Scan prosthesis preparation for Dual Scan– An existing conventional prosthesis can be used
as a scan prosthesis – you merely have to insert 8 equally distributed Dual Scan Markers available from SIMPLANT
– Make sure the prosthesis does not contain any metal parts
– When using an existing prosthesis, make sure it has a stable fit – if not, reline it or make a new one

14
Step 3 – Taking the 3D scan
As a SIMPLANT user, you can work with both CT scanners and cone-beam 3D scanners of nearly any manufacturer – SIMPLANT is compatible with both types of scanning equipment. Fill out the scan prescription form and send the patient with this document to a nearby imaging center.
Have your imaging center follow the Single Scan or Dual Scan guidelines in order to obtain optimal CT images – every implant treatment planning starts with a CT or cone-beam 3D scan that has been taken with the correct parameters!
Check-list before referring the patient to the dental imaging center– Show the patient how to use the bite index and, for
edentulous cases, the scan prosthesis.
– Make sure the patient brings bite index and scan prescription form on the day of scanning.
15
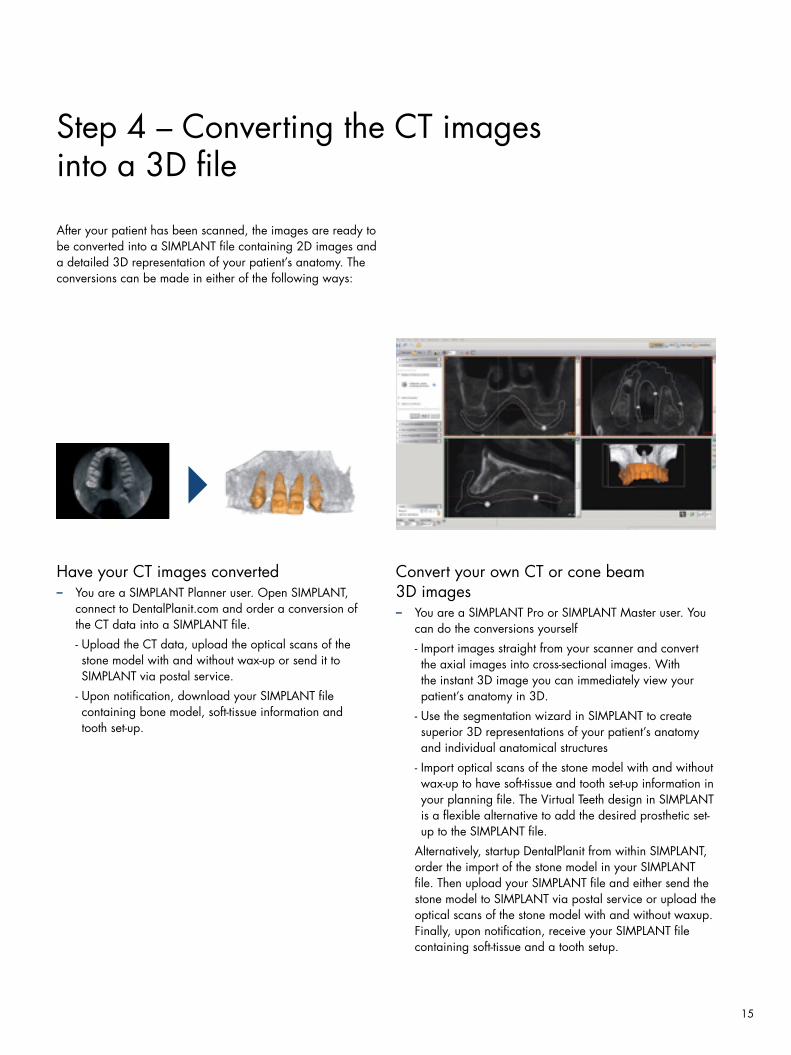
Step 4 – Converting the CT images into a 3D file
After your patient has been scanned, the images are ready to be converted into a SIMPLANT file containing 2D images and a detailed 3D representation of your patient’s anatomy. The conversions can be made in either of the following ways:
Have your CT images converted– You are a SIMPLANT Planner user. Open SIMPLANT,
connect to DentalPlanit.com and order a conversion of the CT data into a SIMPLANT file.
- Upload the CT data, upload the optical scans of the stone model with and without wax-up or send it to SIMPLANT via postal service.
- Upon notification, download your SIMPLANT file containing bone model, soft-tissue information and tooth set-up.
Convert your own CT or cone beam 3D images– You are a SIMPLANT Pro or SIMPLANT Master user. You
can do the conversions yourself
- Import images straight from your scanner and convert the axial images into cross-sectional images. With the instant 3D image you can immediately view your patient’s anatomy in 3D.
- Use the segmentation wizard in SIMPLANT to create superior 3D representations of your patient’s anatomy and individual anatomical structures
- Import optical scans of the stone model with and without wax-up to have soft-tissue and tooth set-up information in your planning file. The Virtual Teeth design in SIMPLANT is a flexible alternative to add the desired prosthetic set-up to the SIMPLANT file.
Alternatively, startup DentalPlanit from within SIMPLANT, order the import of the stone model in your SIMPLANT file. Then upload your SIMPLANT file and either send the stone model to SIMPLANT via postal service or upload the optical scans of the stone model with and without waxup. Finally, upon notification, receive your SIMPLANT file containing soft-tissue and a tooth setup.
16
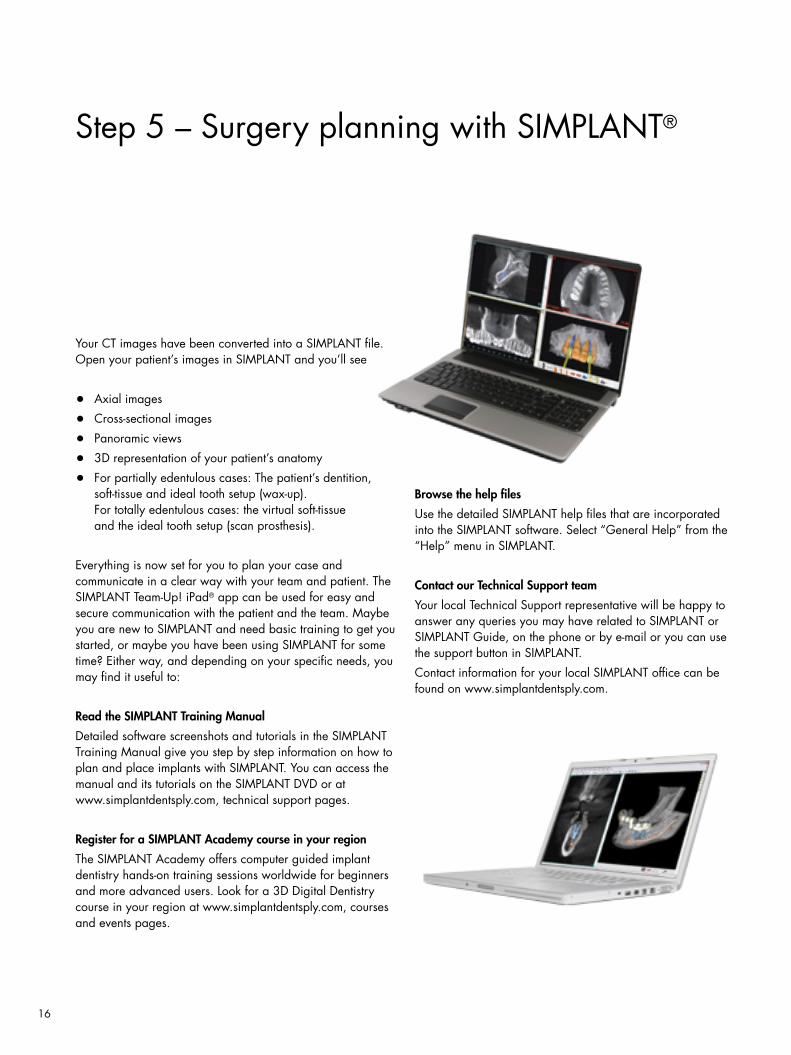
Step 5 – Surgery planning with SIMPLANT®
Your CT images have been converted into a SIMPLANT file. Open your patient’s images in SIMPLANT and you’ll see
• Axial images
• Cross-sectional images
• Panoramic views
• 3D representation of your patient’s anatomy
• For partially edentulous cases: The patient’s dentition, soft-tissue and ideal tooth setup (wax-up). For totally edentulous cases: the virtual soft-tissue and the ideal tooth setup (scan prosthesis).
Everything is now set for you to plan your case and communicate in a clear way with your team and patient. The SIMPLANT Team-Up! iPad® app can be used for easy and secure communication with the patient and the team. Maybe you are new to SIMPLANT and need basic training to get you started, or maybe you have been using SIMPLANT for some time? Either way, and depending on your specific needs, you may find it useful to:
Read the SIMPLANT Training Manual
Detailed software screenshots and tutorials in the SIMPLANT Training Manual give you step by step information on how to plan and place implants with SIMPLANT. You can access the manual and its tutorials on the SIMPLANT DVD or at www.simplantdentsply.com, technical support pages.
Register for a SIMPLANT Academy course in your region
The SIMPLANT Academy offers computer guided implant dentistry hands-on training sessions worldwide for beginners and more advanced users. Look for a 3D Digital Dentistry course in your region at www.simplantdentsply.com, courses and events pages.
Browse the help files
Use the detailed SIMPLANT help files that are incorporated into the SIMPLANT software. Select “General Help” from the “Help” menu in SIMPLANT.
Contact our Technical Support team
Your local Technical Support representative will be happy to answer any queries you may have related to SIMPLANT or SIMPLANT Guide, on the phone or by e-mail or you can use the support button in SIMPLANT.
Contact information for your local SIMPLANT office can be found on www.simplantdentsply.com.
17
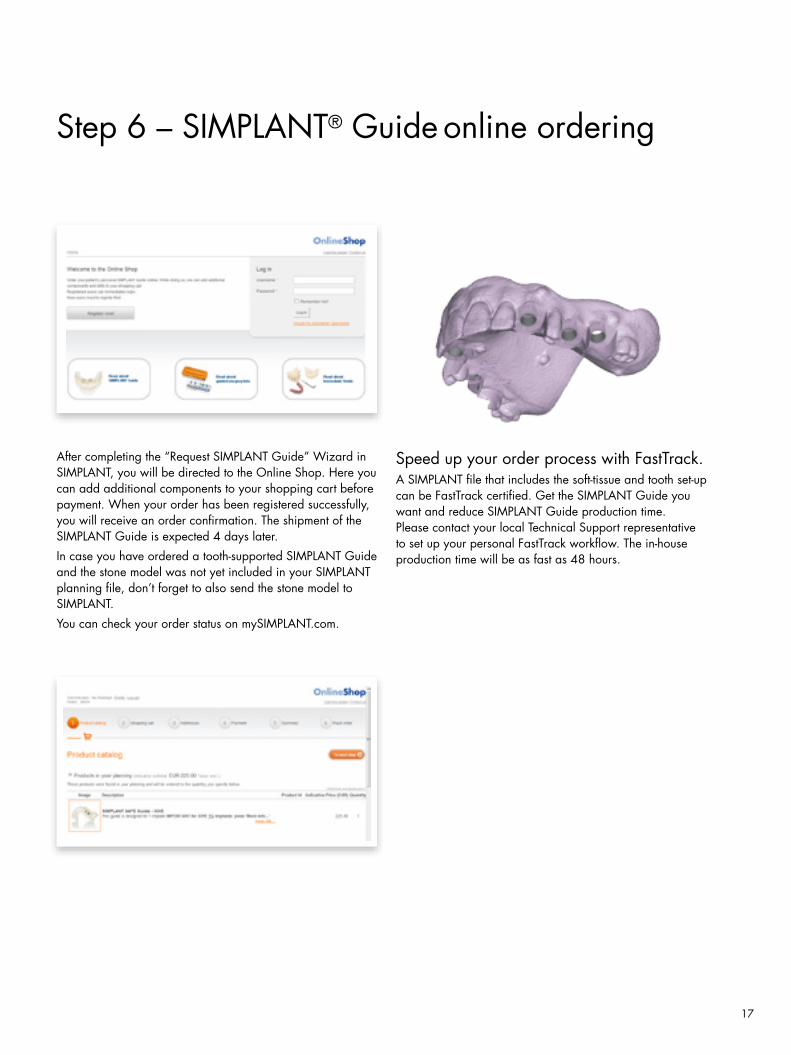
Step 6 – SIMPLANT® Guide online ordering
After completing the “Request SIMPLANT Guide” Wizard in SIMPLANT, you will be directed to the Online Shop. Here you can add additional components to your shopping cart before payment. When your order has been registered successfully, you will receive an order confirmation. The shipment of the SIMPLANT Guide is expected 4 days later.
In case you have ordered a tooth-supported SIMPLANT Guide and the stone model was not yet included in your SIMPLANT planning file, don’t forget to also send the stone model to SIMPLANT.
You can check your order status on mySIMPLANT.com.
Speed up your order process with FastTrack.A SIMPLANT file that includes the soft-tissue and tooth set-up can be FastTrack certified. Get the SIMPLANT Guide you want and reduce SIMPLANT Guide production time. Please contact your local Technical Support representative to set up your personal FastTrack workflow. The in-house production time will be as fast as 48 hours.
18
Step 7 – SIMPLANT® Guide delivery
Every SIMPLANT Guide is the result of a high precision manufacturing process and is subject to extensive quality control before shipment.
Your SIMPLANT Guide is delivered in a box together with the drilling and implant installation protocol. The unique number on the SIMPLANT Guide corresponds with the order ID number provided in the confirmation email following your order. Before performing your surgery, check the content of the delivery and compare with the enclosed drilling and installation protocol:
• SIMPLANT SAFE Guide – Verify that the components of your brand specific surgical kit correspond with the drilling and implant installation protocol.
• SIMPLANT Universal Guide – Verify that your Universal Drill keys correspond with the correct Drill Key Platform (Regular or Wide) as outlined in the drilling protocol.
• Evaluate the fit and stability of the SIMPLANT Guide and its correspondence with your pre-operative planning.
Tooth-supported SIMPLANT Guide: Check its positioning on the stone model and on the patient’s teeth. If the SIMPLANT Guide fits on the stone model but not on the patient’s teeth, it is possible that the impression has been deformed. Using proper impression material will minimize deformations. Use only an up-to-date stone model as the position of the teeth may change over time. Use your proper judgement whether to use the guide or not.
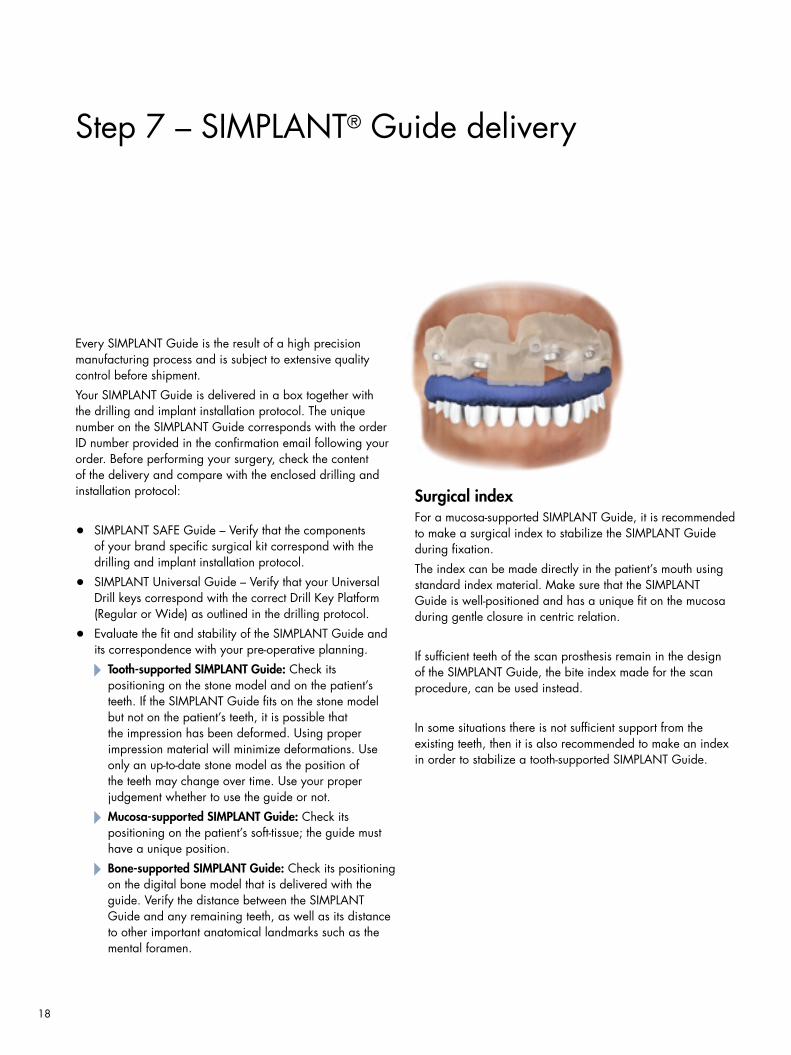
Mucosa-supported SIMPLANT Guide: Check its positioning on the patient’s soft-tissue; the guide must have a unique position.
Bone-supported SIMPLANT Guide: Check its positioning on the digital bone model that is delivered with the guide. Verify the distance between the SIMPLANT Guide and any remaining teeth, as well as its distance to other important anatomical landmarks such as the mental foramen.
Surgical index For a mucosa-supported SIMPLANT Guide, it is recommended to make a surgical index to stabilize the SIMPLANT Guide during fixation.
The index can be made directly in the patient’s mouth using standard index material. Make sure that the SIMPLANT Guide is well-positioned and has a unique fit on the mucosa during gentle closure in centric relation.
If sufficient teeth of the scan prosthesis remain in the design of the SIMPLANT Guide, the bite index made for the scan procedure, can be used instead.
In some situations there is not sufficient support from the existing teeth, then it is also recommended to make an index in order to stabilize a tooth-supported SIMPLANT Guide.
19
Step 8 – Performing surgery
1° Disinfection
Disinfect the SIMPLANT Guide before surgery
• Place the SIMPLANT Guide in a standard sterilization pouch.
• Apply sterilization by placing the pouch containing the SIMPLANT Guide in an autoclave for 20 minutes at 121°C. Make sure no mechanical forces are applied to the SIMPLANT Guide during sterilization.
• Let the SIMPLANT Guide cool down to room temperature before using the SIMPLANT Guide. Make sure no mechanical forces are applied to the SIMPLANT Guide during cooling down.
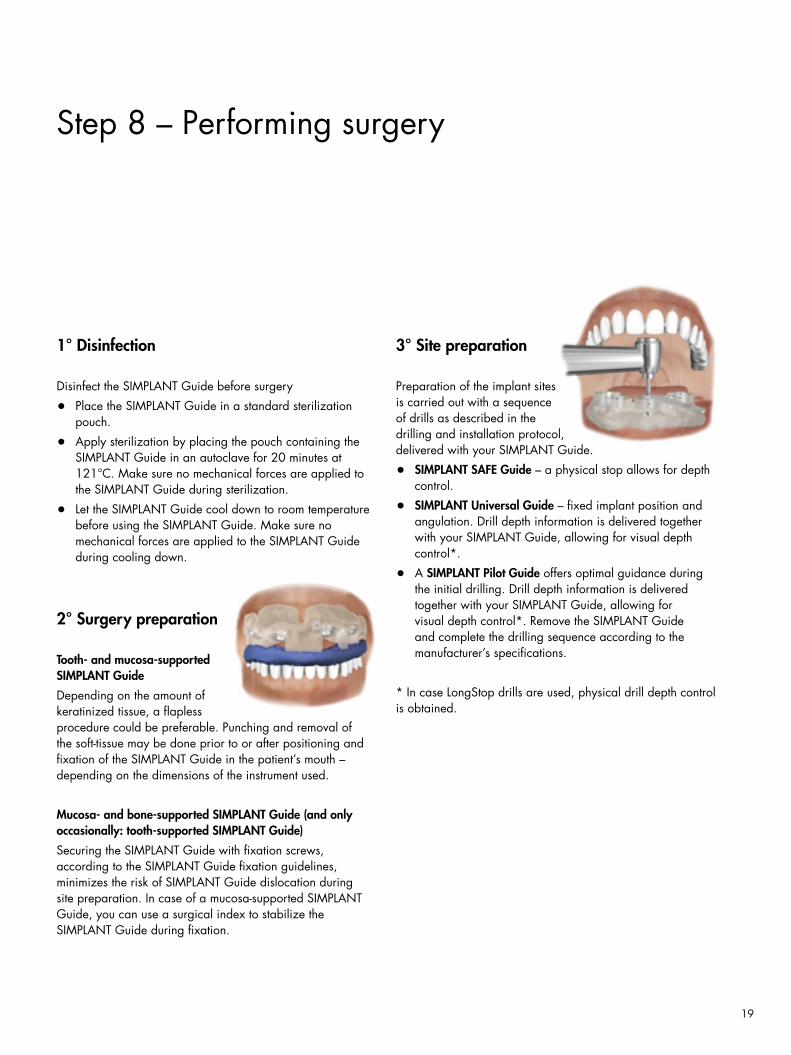
2° Surgery preparation
Tooth- and mucosa-supported SIMPLANT Guide
Depending on the amount of keratinized tissue, a flapless procedure could be preferable. Punching and removal of the soft-tissue may be done prior to or after positioning and fixation of the SIMPLANT Guide in the patient’s mouth – depending on the dimensions of the instrument used.
Mucosa- and bone-supported SIMPLANT Guide (and only occasionally: tooth-supported SIMPLANT Guide)
Securing the SIMPLANT Guide with fixation screws, according to the SIMPLANT Guide fixation guidelines, minimizes the risk of SIMPLANT Guide dislocation during site preparation. In case of a mucosa-supported SIMPLANT Guide, you can use a surgical index to stabilize the SIMPLANT Guide during fixation.
3° Site preparation
Preparation of the implant sites is carried out with a sequence of drills as described in the drilling and installation protocol, delivered with your SIMPLANT Guide.
• SIMPLANT SAFE Guide – a physical stop allows for depth control.
• SIMPLANT Universal Guide – fixed implant position and angulation. Drill depth information is delivered together with your SIMPLANT Guide, allowing for visual depth control*.
• A SIMPLANT Pilot Guide offers optimal guidance during the initial drilling. Drill depth information is delivered together with your SIMPLANT Guide, allowing for visual depth control*. Remove the SIMPLANT Guide and complete the drilling sequence according to the manufacturer’s specifications.
* In case LongStop drills are used, physical drill depth control is obtained.
20
If a crestal incision was made to allow for better visibility or augmentation procedures, the mucoperiosteal flap has to be repositioned and sutured.
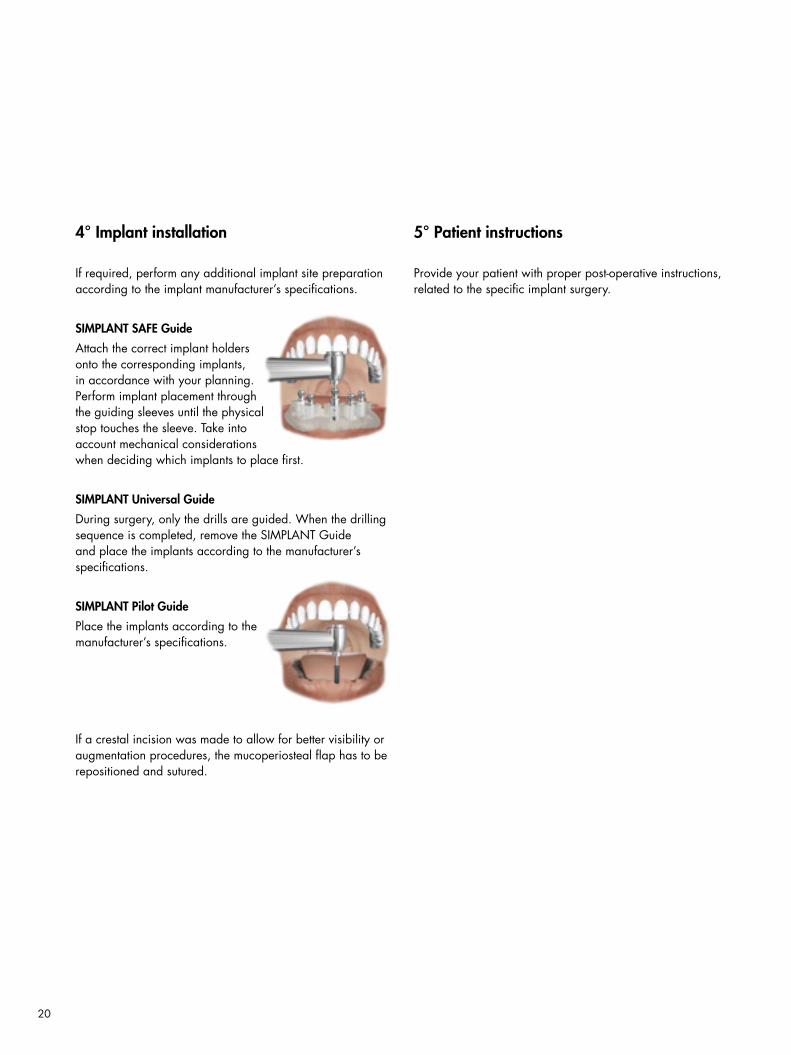
4° Implant installation
If required, perform any additional implant site preparation according to the implant manufacturer’s specifications.
SIMPLANT SAFE Guide
Attach the correct implant holders onto the corresponding implants, in accordance with your planning. Perform implant placement through the guiding sleeves until the physical stop touches the sleeve. Take into account mechanical considerations when deciding which implants to place first.
SIMPLANT Universal Guide
During surgery, only the drills are guided. When the drilling sequence is completed, remove the SIMPLANT Guide and place the implants according to the manufacturer’s specifications.
SIMPLANT Pilot Guide
Place the implants according to the manufacturer’s specifications.
5° Patient instructions
Provide your patient with proper post-operative instructions, related to the specific implant surgery.
21
Step 9 – Offering your patient an Immediate Smile®
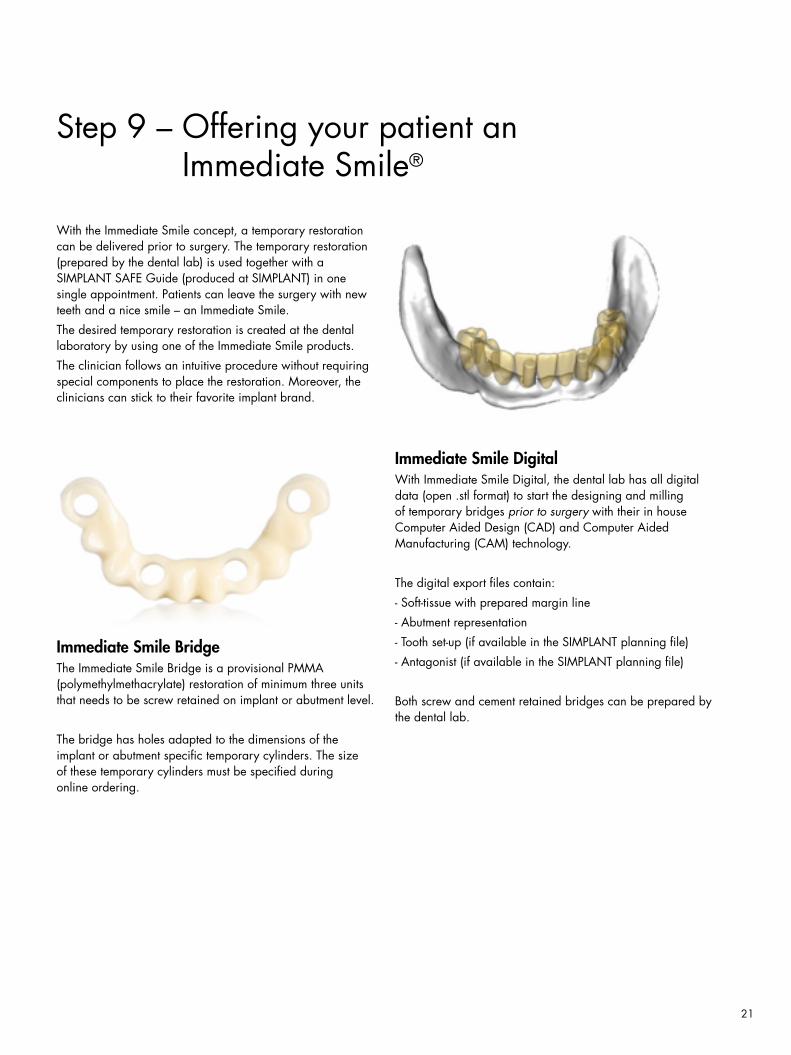
Immediate Smile Bridge The Immediate Smile Bridge is a provisional PMMA (polymethylmethacrylate) restoration of minimum three units that needs to be screw retained on implant or abutment level.
The bridge has holes adapted to the dimensions of the implant or abutment specific temporary cylinders. The size of these temporary cylinders must be specified during online ordering.
With the Immediate Smile concept, a temporary restoration can be delivered prior to surgery. The temporary restoration (prepared by the dental lab) is used together with a SIMPLANT SAFE Guide (produced at SIMPLANT) in one single appointment. Patients can leave the surgery with new teeth and a nice smile – an Immediate Smile.
The desired temporary restoration is created at the dental laboratory by using one of the Immediate Smile products.
The clinician follows an intuitive procedure without requiring special components to place the restoration. Moreover, the clinicians can stick to their favorite implant brand.
Immediate Smile Digital With Immediate Smile Digital, the dental lab has all digital data (open .stl format) to start the designing and milling of temporary bridges prior to surgery with their in house Computer Aided Design (CAD) and Computer Aided Manufacturing (CAM) technology.
The digital export files contain:
- Soft-tissue with prepared margin line
- Abutment representation
- Tooth set-up (if available in the SIMPLANT planning file)
- Antagonist (if available in the SIMPLANT planning file)
Both screw and cement retained bridges can be prepared by the dental lab.
22
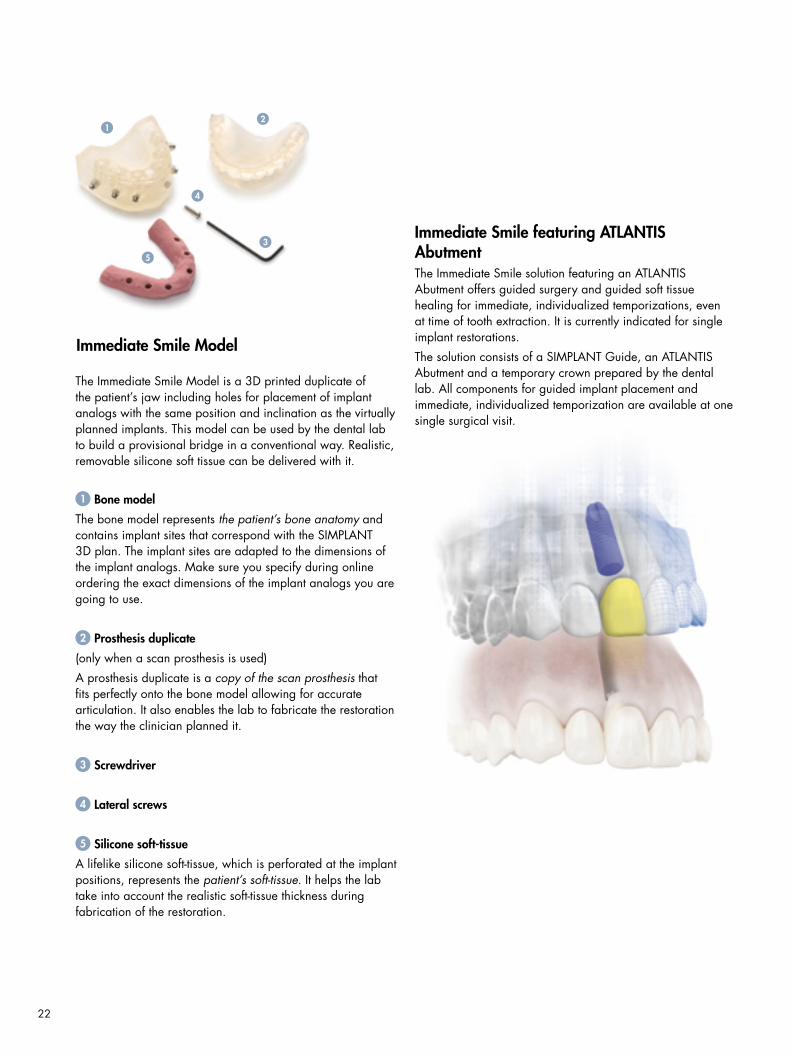
1 Bone model
The bone model represents the patient’s bone anatomy and contains implant sites that correspond with the SIMPLANT 3D plan. The implant sites are adapted to the dimensions of the implant analogs. Make sure you specify during online ordering the exact dimensions of the implant analogs you are going to use.
2 Prosthesis duplicate
(only when a scan prosthesis is used)
A prosthesis duplicate is a copy of the scan prosthesis that fits perfectly onto the bone model allowing for accurate articulation. It also enables the lab to fabricate the restoration the way the clinician planned it.
3 Screwdriver
4 Lateral screws
5 Silicone soft-tissue
A lifelike silicone soft-tissue, which is perforated at the implant positions, represents the patient’s soft-tissue. It helps the lab take into account the realistic soft-tissue thickness during fabrication of the restoration.
Immediate Smile Model
12
3
4
5
The Immediate Smile Model is a 3D printed duplicate of the patient’s jaw including holes for placement of implant analogs with the same position and inclination as the virtually planned implants. This model can be used by the dental lab to build a provisional bridge in a conventional way. Realistic, removable silicone soft tissue can be delivered with it.
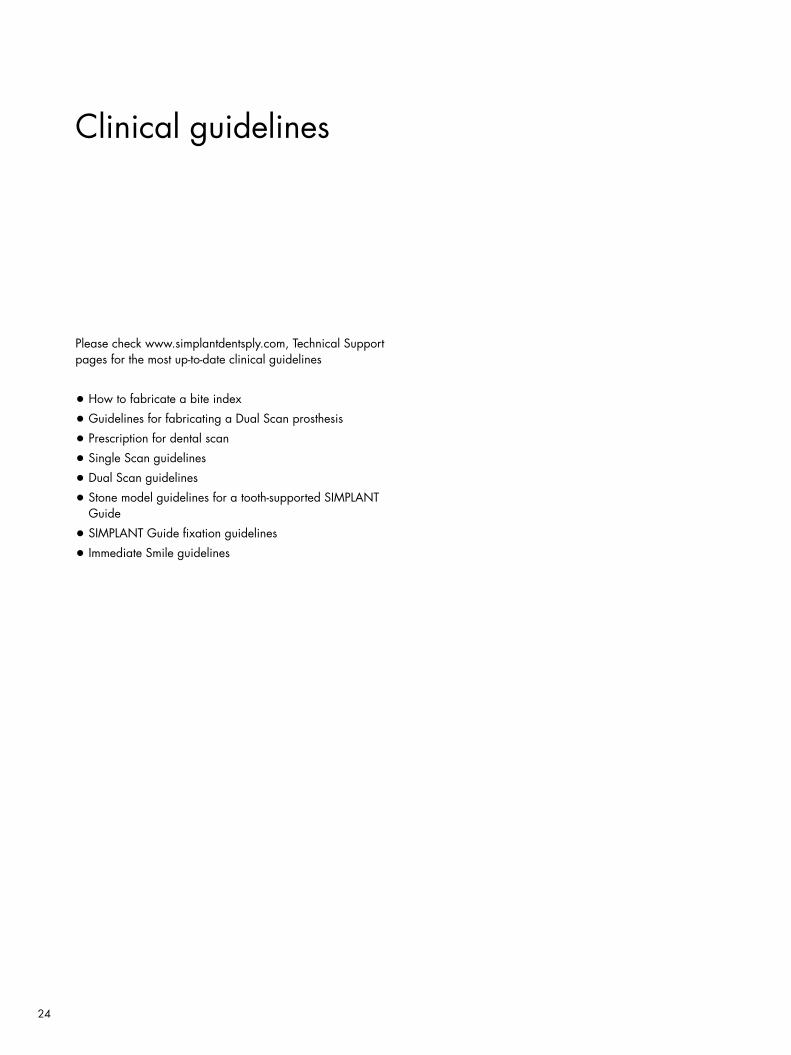
Immediate Smile featuring ATLANTIS AbutmentThe Immediate Smile solution featuring an ATLANTIS Abutment offers guided surgery and guided soft tissue healing for immediate, individualized temporizations, even at time of tooth extraction. It is currently indicated for single implant restorations.
The solution consists of a SIMPLANT Guide, an ATLANTIS Abutment and a temporary crown prepared by the dental lab. All components for guided implant placement and immediate, individualized temporization are available at one single surgical visit.

23
Guidelines for relining Immediate Smile solutions
1. The parallel temporary cylinders are placed in the patient’s mouth and tightened. The non-parallel cylinders are placed loosely inside the restoration.
2. The bridge, including the loose non-parallel cylinders, is positioned over the parallel cylinders. The screws of the non-parallel cylinders are tightened. At this moment the bridge has a loose fit around the cylinders.
3. The occlusion is checked, if necessary primary contacts are removed. It can be necessary to shorten or reshape the temporary cylinders. The tolerance between the bridge and the cylinders facilitates a correct alignment of the occlusion.
4. A composite cement (e.g. SmartCem2, DENTSPLY) is injected to secure the temporary cylinders onto the bridge one by one. Make sure the injection holes are clean and dry before injecting the cement.
Unscrew the cylinders and remove the bridge from the patient’s mouth. Finish by applying additional cement around the cylinders both at the occlusal and cervical side. Reshape the bridge at the cervical area to facilitate proper oral hygiene.
Place the bridge in the mouth and verify the occlusion.
For all multiple-unit Immediate Smile solutions (Bridge, Digital, Model), the dentist will receive a bridge with oversized holes that need to be relined.
24
Please check www.simplantdentsply.com, Technical Support pages for the most up-to-date clinical guidelines
• How to fabricate a bite index
• Guidelines for fabricating a Dual Scan prosthesis
• Prescription for dental scan
• Single Scan guidelines
• Dual Scan guidelines
• Stone model guidelines for a tooth-supported SIMPLANT Guide
• SIMPLANT Guide fixation guidelines
• Immediate Smile guidelines
Clinical guidelines
25
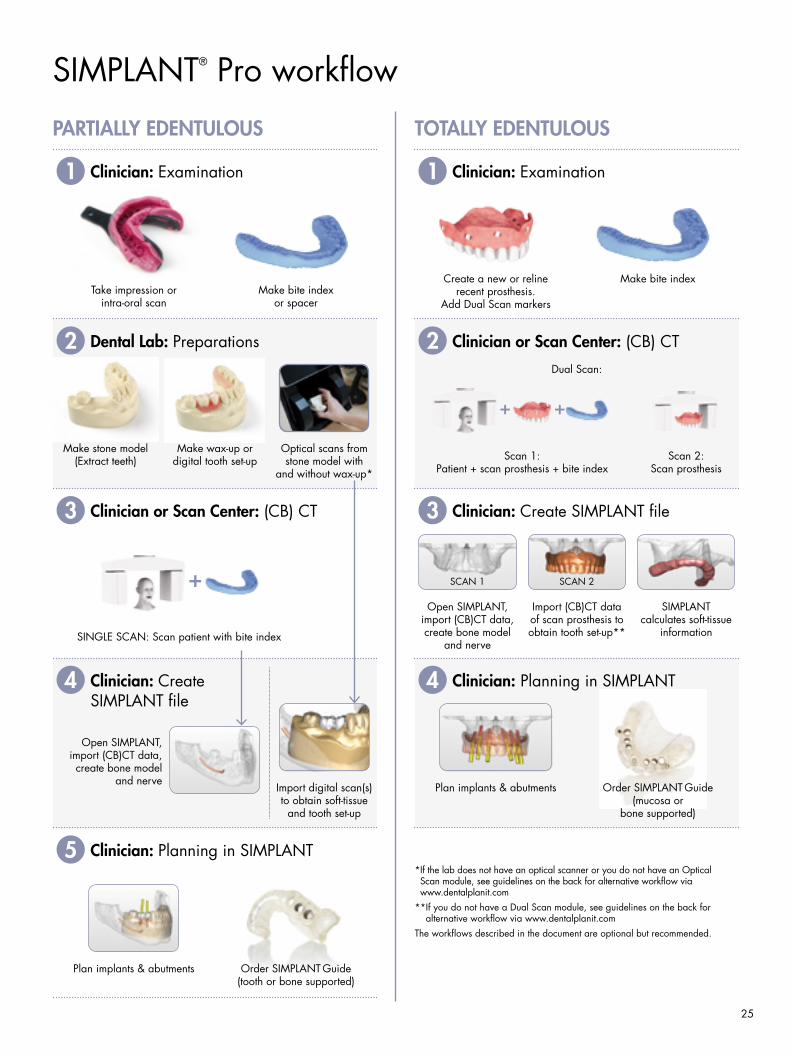
Clinician: Examination
Clinician or Scan Center: (CB) CT
Clinician: Create SIMPLANT file
Clinician: Planning in SIMPLANT
SIMPLANT® Pro workflow
PARTIALLY EDENTULOUS TOTALLY EDENTULOUS
Make bite index or spacer
Make stone model (Extract teeth)
Make wax-up or digital tooth set-up
Optical scans from stone model with
and without wax-up*
SINGLE SCAN: Scan patient with bite index
Open SIMPLANT, import (CB)CT data, create bone model
and nerve Import digital scan(s) to obtain soft-tissue
and tooth set-up
Plan implants & abutments
Scan 1: Patient + scan prosthesis + bite index
Open SIMPLANT, import (CB)CT data, create bone model
and nerve
Import (CB)CT data of scan prosthesis to obtain tooth set-up**
SIMPLANT calculates soft-tissue
information
Plan implants & abutments
Order SIMPLANT Guide (tooth or bone supported)
Create a new or reline recent prosthesis.
Add Dual Scan markers
1
2 2
3 3
4 4
5
Clinician: Examination
Dental Lab: Preparations
Clinician or Scan Center: (CB) CT
Clinician: Create SIMPLANT file
Clinician: Planning in SIMPLANT
Order SIMPLANT Guide(mucosa or
bone supported)
* If the lab does not have an optical scanner or you do not have an Optical Scan module, see guidelines on the back for alternative workflow via www.dentalplanit.com
** If you do not have a Dual Scan module, see guidelines on the back for alternative workflow via www.dentalplanit.com
The workflows described in the document are optional but recommended.
Take impression or intra-oral scan
Make bite index
1
Dual Scan:
Scan 2: Scan prosthesis
SCAN 1 SCAN 2
26
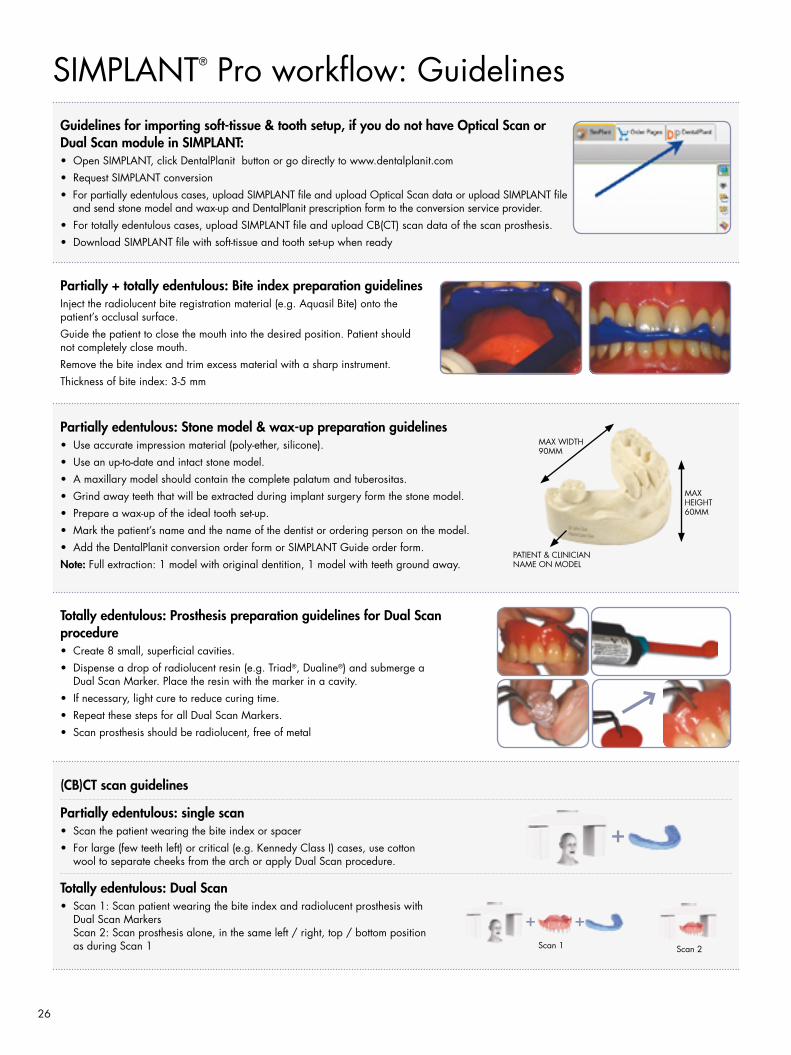
SIMPLANT® Pro workflow: Guidelines
(CB)CT scan guidelines Partially edentulous: single scan• Scan the patient wearing the bite index or spacer• For large (few teeth left) or critical (e.g. Kennedy Class I) cases, use cotton
wool to separate cheeks from the arch or apply Dual Scan procedure.
Totally edentulous: Dual Scan• Scan 1: Scan patient wearing the bite index and radiolucent prosthesis with
Dual Scan Markers Scan 2: Scan prosthesis alone, in the same left / right, top / bottom position as during Scan 1
MAX WIDTH 90MM
MAX HEIGHT 60MM
PATIENT & CLINICIAN NAME ON MODEL
Scan 1 Scan 2
Guidelines for importing soft-tissue & tooth setup, if you do not have Optical Scan or Dual Scan module in SIMPLANT:• Open SIMPLANT, click DentalPlanit button or go directly to www.dentalplanit.com• Request SIMPLANT conversion• For partially edentulous cases, upload SIMPLANT file and upload Optical Scan data or upload SIMPLANT file
and send stone model and wax-up and DentalPlanit prescription form to the conversion service provider.• For totally edentulous cases, upload SIMPLANT file and upload CB(CT) scan data of the scan prosthesis.• Download SIMPLANT file with soft-tissue and tooth set-up when ready
Partially + totally edentulous: Bite index preparation guidelines Inject the radiolucent bite registration material (e.g. Aquasil Bite) onto the patient’s occlusal surface. Guide the patient to close the mouth into the desired position. Patient should not completely close mouth.Remove the bite index and trim excess material with a sharp instrument. Thickness of bite index: 3-5 mm
Partially edentulous: Stone model & wax-up preparation guidelines• Use accurate impression material (poly-ether, silicone). • Use an up-to-date and intact stone model. • A maxillary model should contain the complete palatum and tuberositas.• Grind away teeth that will be extracted during implant surgery form the stone model.• Prepare a wax-up of the ideal tooth set-up.• Mark the patient’s name and the name of the dentist or ordering person on the model.• Add the DentalPlanit conversion order form or SIMPLANT Guide order form.Note: Full extraction: 1 model with original dentition, 1 model with teeth ground away.
Totally edentulous: Prosthesis preparation guidelines for Dual Scan procedure• Create 8 small, superficial cavities.• Dispense a drop of radiolucent resin (e.g. Triad®, Dualine®) and submerge a
Dual Scan Marker. Place the resin with the marker in a cavity.• If necessary, light cure to reduce curing time.• Repeat these steps for all Dual Scan Markers.• Scan prosthesis should be radiolucent, free of metal
27
Clinician: Examination
Clinician or Scan Center: (CB) CT
Clinician: Request SIMPLANT file
Clinician: Planning in SIMPLANT
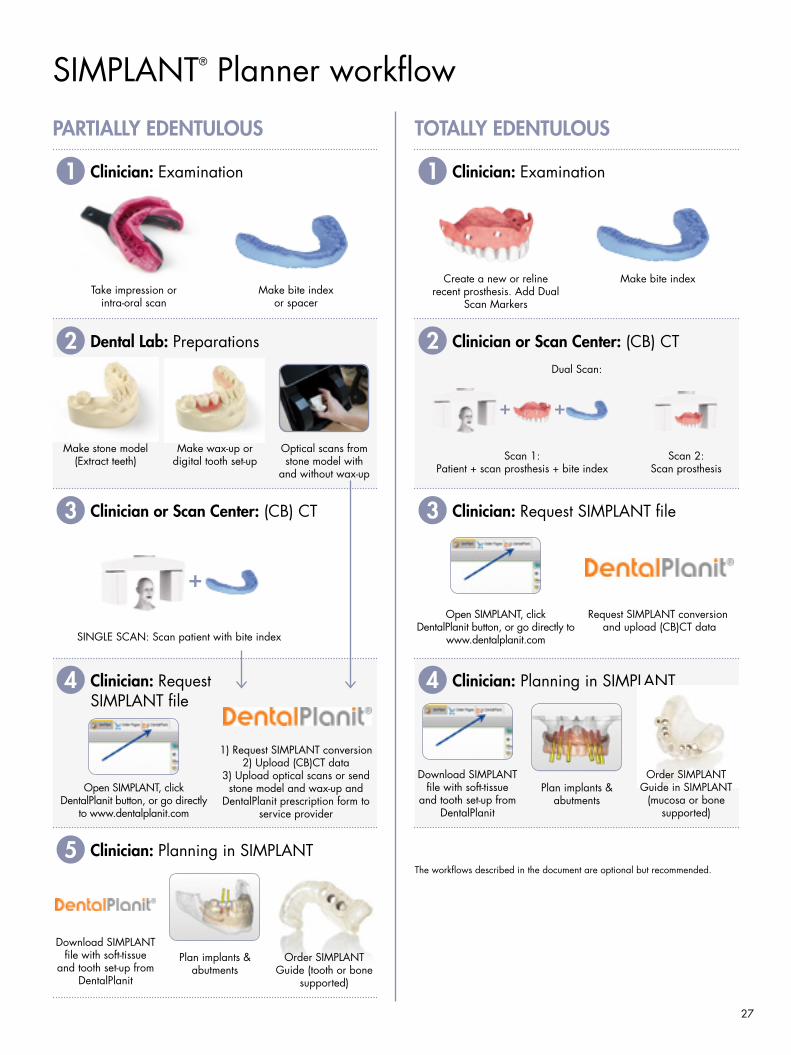
SIMPLANT® Planner workflow
PARTIALLY EDENTULOUS TOTALLY EDENTULOUS
Make bite index or spacer
Make stone model (Extract teeth)
Make wax-up or digital tooth set-up
Optical scans from stone model with
and without wax-up
SINGLE SCAN: Scan patient with bite index
Open SIMPLANT, click DentalPlanit button, or go directly
to www.dentalplanit.com
1) Request SIMPLANT conversion2) Upload (CB)CT data
3) Upload optical scans or send stone model and wax-up and
DentalPlanit prescription form to service provider
Plan implants & abutments
Scan 1: Patient + scan prosthesis + bite index
Plan implants & abutments
Order SIMPLANT
Guide (tooth or bone supported)
Create a new or reline recent prosthesis. Add Dual
Scan Markers
1
2 2
3 3
4 4
5
Clinician: Examination
Dental Lab: Preparations
Clinician or Scan Center: (CB) CT
Clinician: Request SIMPLANT file
Clinician: Planning in SIMPLANT
Order SIMPLANT
Guide in SIMPLANT (mucosa or bone
supported)
The workflows described in the document are optional but recommended.
Take impression or intra-oral scan
Make bite index
1
Dual Scan:
Scan 2: Scan prosthesis
Download SIMPLANT file with soft-tissue
and tooth set-up from DentalPlanit
Open SIMPLANT, click DentalPlanit button, or go directly to
www.dentalplanit.com
Request SIMPLANT conversion and upload (CB)CT data
Download SIMPLANT file with soft-tissue
and tooth set-up from DentalPlanit
28
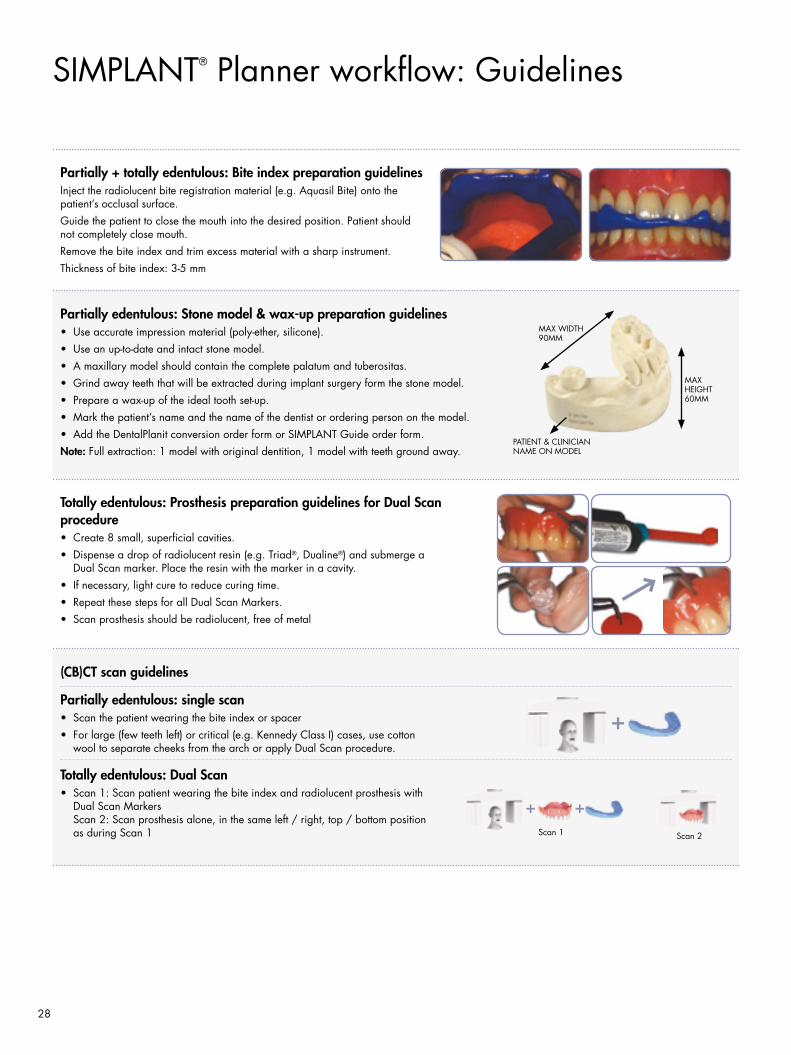
SIMPLANT® Planner workflow: Guidelines
(CB)CT scan guidelines Partially edentulous: single scan• Scan the patient wearing the bite index or spacer• For large (few teeth left) or critical (e.g. Kennedy Class I) cases, use cotton
wool to separate cheeks from the arch or apply Dual Scan procedure.
Totally edentulous: Dual Scan• Scan 1: Scan patient wearing the bite index and radiolucent prosthesis with
Dual Scan Markers Scan 2: Scan prosthesis alone, in the same left / right, top / bottom position as during Scan 1
MAX WIDTH 90MM
MAX HEIGHT 60MM
PATIENT & CLINICIAN NAME ON MODEL
Scan 1 Scan 2
Partially + totally edentulous: Bite index preparation guidelines Inject the radiolucent bite registration material (e.g. Aquasil Bite) onto the patient’s occlusal surface. Guide the patient to close the mouth into the desired position. Patient should not completely close mouth.Remove the bite index and trim excess material with a sharp instrument. Thickness of bite index: 3-5 mm
Partially edentulous: Stone model & wax-up preparation guidelines• Use accurate impression material (poly-ether, silicone). • Use an up-to-date and intact stone model. • A maxillary model should contain the complete palatum and tuberositas.• Grind away teeth that will be extracted during implant surgery form the stone model.• Prepare a wax-up of the ideal tooth set-up.• Mark the patient’s name and the name of the dentist or ordering person on the model.• Add the DentalPlanit conversion order form or SIMPLANT Guide order form.Note: Full extraction: 1 model with original dentition, 1 model with teeth ground away.
Totally edentulous: Prosthesis preparation guidelines for Dual Scan procedure• Create 8 small, superficial cavities.• Dispense a drop of radiolucent resin (e.g. Triad®, Dualine®) and submerge a
Dual Scan marker. Place the resin with the marker in a cavity.• If necessary, light cure to reduce curing time.• Repeat these steps for all Dual Scan Markers.• Scan prosthesis should be radiolucent, free of metal

29
Notes

30
Notes

31

DENTSPLY ImplantsAminogatan 1, Box 14, SE-431 21 Mölndal, SWEDENTel: +46 31 376 35 00, Fax: +46 31 376 30 10
www.simplantdentsply.com
About DENTSPLY ImplantsDENTSPLY Implants offers comprehensive solutions for all phases of implant therapy, including ANKYLOS®, ASTRA TECH Implant System™ and XiVE® implant lines, digital technologies, such as ATLANTIS™ patient-specific CAD/CAM solutions and SIMPLANT® guided surgery, SYMBIOS® regenerative solutions, and professional development programs. DENTSPLY Implants creates value for dental professionals and allows for predictable and lasting implant treatment outcomes, resulting in enhanced quality of life for patients.
About DENTSPLY InternationalDENTSPLY International Inc. is a leading manufacturer and distributor of dental and other healthcare products. For over 110 years, DENTSPLY’s commitment to innovation and professional collaboration has enhanced its portfolio of branded consumables and small equipment. Headquartered in the United States, the Company has global operations with sales in more than 120 countries.
DEN
TSPL
Y Im
plan
ts d
oes
not w
aive
any
rig
ht to
its
trade
mar
ks. 3
2670
466
-USX
-140
4 D
ENTS
PLY
IH. A
ll rig
hts
rese
rved
For SIMPLANT: DENTSPLY Implants NV, Research Campus 10, B-3500 Hasselt, Belgium