Embed Size (px)
Citation preview

110 | COMPUTER MUSIC NOVEMBER 2005 EXPERT ADVICE
YOUR QUESTIONS ANSWEREDIs FL Studio leaving a bitter taste in your mouth? Sweeten things up
with our solutions to your problems…
Fruitless labour
Q I originally bought FL 3.0 to freshen up my Roland DR-5 sounds and import
them into my Yamaha AW16G. I’m not a dedicated PC
musician, but I’ve upgraded to FL5 Producer and subscribed to your fine publication to figure out how some of this PC music malarkey works.
I’m a songwriter who plays
guitar, bass and a little keyboard (Oxygen8) and use the Yamaha AW16G for my DAW. The added advantage of FL5 was the ability to use keyboard sounds, strings and pads to fill out my tracks.
Unfortunately, I continue to be at a loss when it comes to generating drum patterns in FL, as I never could get the DR-5 to export a MIDI song of drum tracks into the program. Then, I
tried the Oxygen8, using layers and Split Children to create a drum kit that could trigger samples, with individual keys playing separate bits of the kit. As I write my parts by playing them live with a guitar in hand, until I find something that works with my guitar and bass tracks I need to be able to program just like you would on a standalone drum machine in FL Studio.
While I have played with the strings, pad samples and
effects for fun with some success, I really can’t create a song or any synth parts without having the rhythmic drum kit as a foundation to build on. I updated to FL5 specifically for the new drum machine feature, but that still doesn’t perform according to my needs.
Using the Oxygen8 with layers and Split Children changes the pitch of the samples and so is no good.
Is there a simple way to accomplish what I need using
Q&AFOCUS
FL Studio
“I CONTINUE TO BE AT A LOSS WHEN IT COMES TO GENERATING DRUM PATTERNS IN FL STUDIO”
STEP BY STEP Using the Piano Roll to program drum parts
3Make sure the Draw tool is selected (P key) and click to paste drum hits and build up a basic drum pattern. If you make a mistake, right-click on a drum
hit to delete it. You can adjust the individual velocities of drum hits using the Velocity lane at the bottom of the piano roll window.
2 Right-click on the FPC channel button and select Piano Roll to open the Piano Roll editing window (alternatively, you can use the keyboard shortcut
Alt+P). Notice that some of the notes have been labelled with the FPC drum pad names over on the left. >>
1 Start FL Studio and go straight to the Channels menu. Select Add One, then select FPC from the menu. After a short delay (while FL Studio loads the
individual drum samples), you should see an instance of FPC added to the step sequencer. >>
CMU92.focus 110CMU92.focus 110 13/9/05 6:30:41 pm13/9/05 6:30:41 pm
EXPERT ADVICE NOVEMBER 2005 COMPUTER MUSIC | 111
Q&A focusFL Studio
FL5 without buying another MIDI interface? I finally gave up and bought the Roland DR-880 but would still like to get some use out of FL5. Please remember, I’m a complete newbie to computers and MIDI, and I’m struggling to even get any useful help on the FL user forums.
J Scott Bell
A By the sound of things, you were well on the way to finding a workable
solution to your drum programming problem! While it is possible to separate out individual FPC drums using Layer channels, you need to carefully adjust each layer’s Transpose parameter (using the keyboard strip at the bottom of the Channel Settings window), otherwise the drum sounds will not play at their correct pitch – as you’ve already discovered.
A much simpler solution, however, is to program FPC drum patterns in the Piano Roll window rather than using the step sequencer, as this enables you to program all drum hits together in one window, and also helps to prevent the step sequencer window from getting crowded with a lot of extra Layer channels. In fact, the Piano Roll window can be specially adapted for FPC channels – the keyboard down the left hand side of the window labels the keys that trigger individual FPC drum pads. Handy!
Another advantage of using this window to program drum loops is that it provides advanced quantise features. These can be used to add a bit of feeling to programmed drum parts, moving away from the rigid, programmed feel of the step sequencer.
Give me more
QWhen I create complicated projects in FL Studio, I sometimes
find that I’m running out of send channels to use. For example, occasionally I use two reverbs, (one short, one long – as I learned in a tutorial in cm) and I
also often use two different delays in the other two send channels. Is there any way that I can create more than four send channels? If not, is there a cunning workaround for this rather basic limitation? Or will I just have to resort to doubling up effects, rather than sharing them between channels, and take the CPU hit which occurs as a result?
Damien Jones, Cardiff
A Unfortunately, there’s currently no way to add to the four send channels
provided in FL Studio’s mixer. There are rumours that this issue may be addressed in a forthcoming update, but for now we have to put up with
this particular limitation.As you say, one workaround
involves using additional instances of each effect that you’d otherwise place in a send channel. The most obvious drawback with this, of course, is increased CPU usage, but with the monstrous power of today’s computers, this isn’t as much of an issue as it used to be.
Another solution is to share effects between channels by
chaining them together. For example, you might place a delay plug-in into mixer channel 5 and then route the outputs of channels 3 and 4 into the input of channel 5. Although this approach does work, you can’t control how heavily the shared effect is applied to each individual input.
Yet another alternative (and probably the best one of all, in our opinion) is to employ FL Studio as a ReWire slave and use a ReWire host with more advanced mixing facilities and more in the way of sends – like Cubase SX, Sonar or Live, for example. As a side note, many people take this exact approach when working around the relatively primitive mixing facilities in Propellerhead’s Reason.
VST’d off!
Q I’ve just installed a load of new VST plug-in synths and effects (including the
entire CM Studio, as it goes) but for some reason they don’t show up in FL Studio. Can you help me figure out what I’m doing wrong?
Chris, Essex
A SIMPLER SOLUTION IS TO PROGRAM FPC DRUM PATTERNS IN THE PIANO ROLL WINDOW
A In most VST hosts, newly installed plug-ins show up without any configuration by
the user. In FL Studio, however, a bit more work is required. First of all, the program needs to know where to look for them. You can set this parameter in Options»File Settings. Most people install VST Plug-ins to C:\Program Files\Steinberg\Vstplugins, in order to share a single plug-in installation between all available hosts.
Next, FL Studio needs to be configured to list each plug-in in the Channels»Add one submenu. To do this, select Channels»Add one»More…, then click on the Refresh button at the bottom right corner of the window and select Fast scan (recommended). If you’ve correctly configured your VST plug-in directory as described above, you should see all of your VST plug-ins appear in the list, highlighted in red. Click the checkboxes next to the ones you want to use, then double-click the one that you want to insert into the current project. You’ll also need to repeat the process for effects plug-ins, if required.
Next time you go to the Channels»Add one submenu, you should find all of your favourite VST plug-ins listed alongside the plug-ins that are bundled with FL Studio.
Speak volumes
QWhen I’m working with the new FPC drum machine, I really like the
way you can route different drum sounds to separate mixer channels. This is especially
1Unfortunately FL Studio only offers four send channels at present, but we’re sure those plucky Belgians will have that sorted soon…
1Plug it in, baby: make sure your VST Plug-in directory is properly configured for the list to appear
CMU92.focus 111CMU92.focus 111 13/9/05 6:30:48 pm13/9/05 6:30:48 pm
112 | COMPUTER MUSIC NOVEMBER 2005 EXPERT ADVICE
Q&A focus FL Studio
represent approximately 75% velocity. This, as you can imagine, is highly troublesome. Incidentally, Arturia are yet to get in touch with me regarding this issue. Disappointing.
Jack Fryer, London
A The Arturia Minimoog V aims to be a very accurate emulation of the real thing,
and from a sonic point of view it certainly does get very close. But the emulation goes further still – even the limitations of the original Minimoog synth have been reproduced in software; including a lack of touch sensitivity (ie, the ability to respond to note velocity).
If you require per-note velocity sensitivity, your only option is to use a different soft synth altogether. Almost all non-emulation soft synths support this, so you’ll have
plenty of options to choose from. On the other hand, if you really want to stick with the Minimoog sound, you can always automate the Minimoog V’s volume output. Follow the three-step walkthrough
useful if I want to use different effects on individual drum sounds. On occasion, however, I’d like to be able to change the volume of all of the drum parts together. If I alter the volume of the FPC plug-in in the step sequencer, the effects sometimes sound different. Is there a way to stop this happening, or a better method of doing the some thing? Doesn’t FL Studio have some
kind of group or bus feature that will enable me to change the volume of all the parts?
Joe
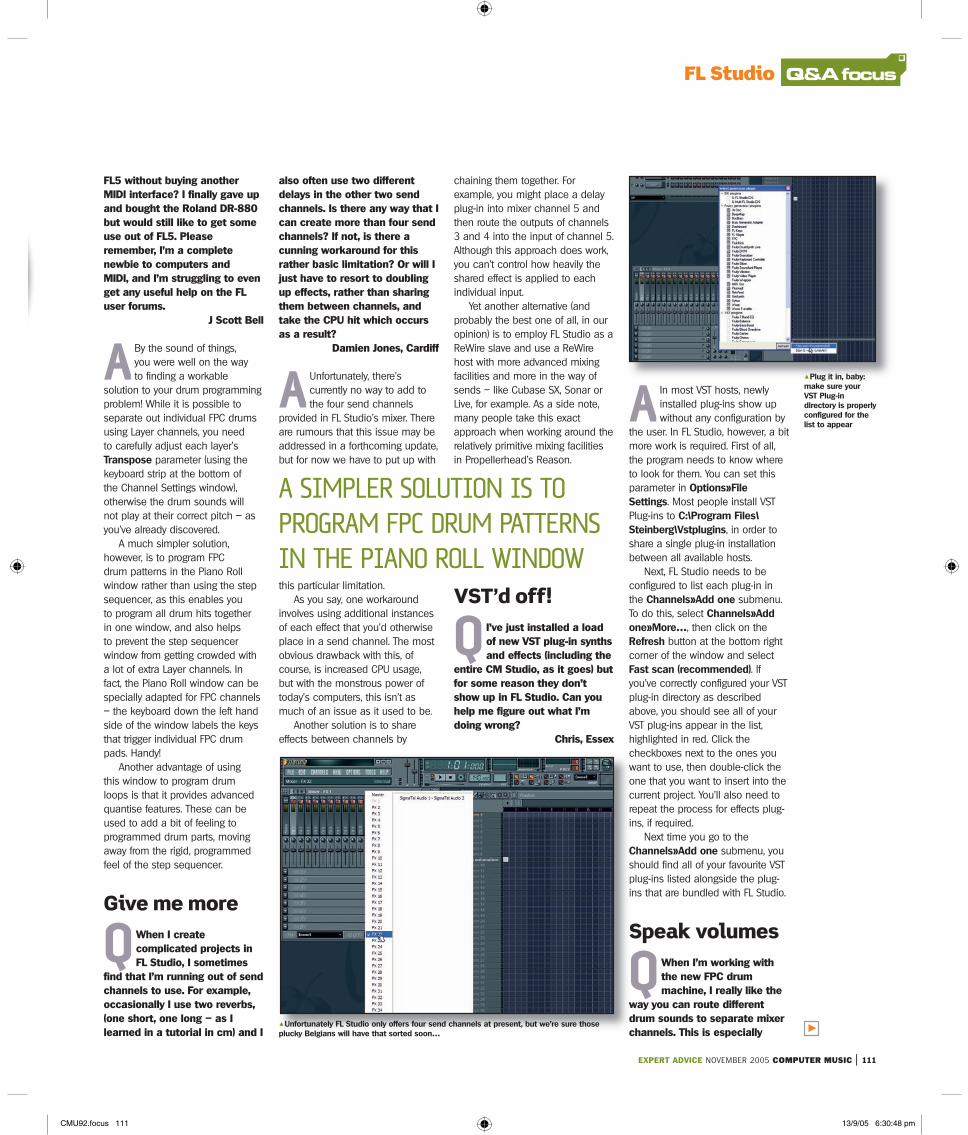
A The best way to do this is to use a free mixer channel as a ‘group’ channel and route
the output of all of your FPC channels into that, using the black drop-down box at the bottom of the mixer window. You should then be able to adjust the volume of the
drums group channel without affecting the balance of levels or effects on each drum sound.
Obviously, this technique works for any group of instruments, even if they’re not all produced by the same Generator. Judicious use of group channels can greatly simplify and speed up the mixing process. It also makes it very easy to mix a track down into five or so ‘stem’ mixes using FL Studio’s disk recording feature.
Minimood
Q I have an important query regarding FL Studio 5 and its compatibility with
the Arturia Minimoog V software synth. Basically, the Minimoog seems to ignore any variations of velocity I have played or
programmed into the Piano Roll or step sequencer. Regardless of what’s specified by me (with the exception of velocity 0, in which case no ‘hit’ takes place), the output always seems to
EVEN THE LIMITATIONS OF THE ORIGINAL MINIMOOG SYNTH HAVE BEEN REPRODUCED
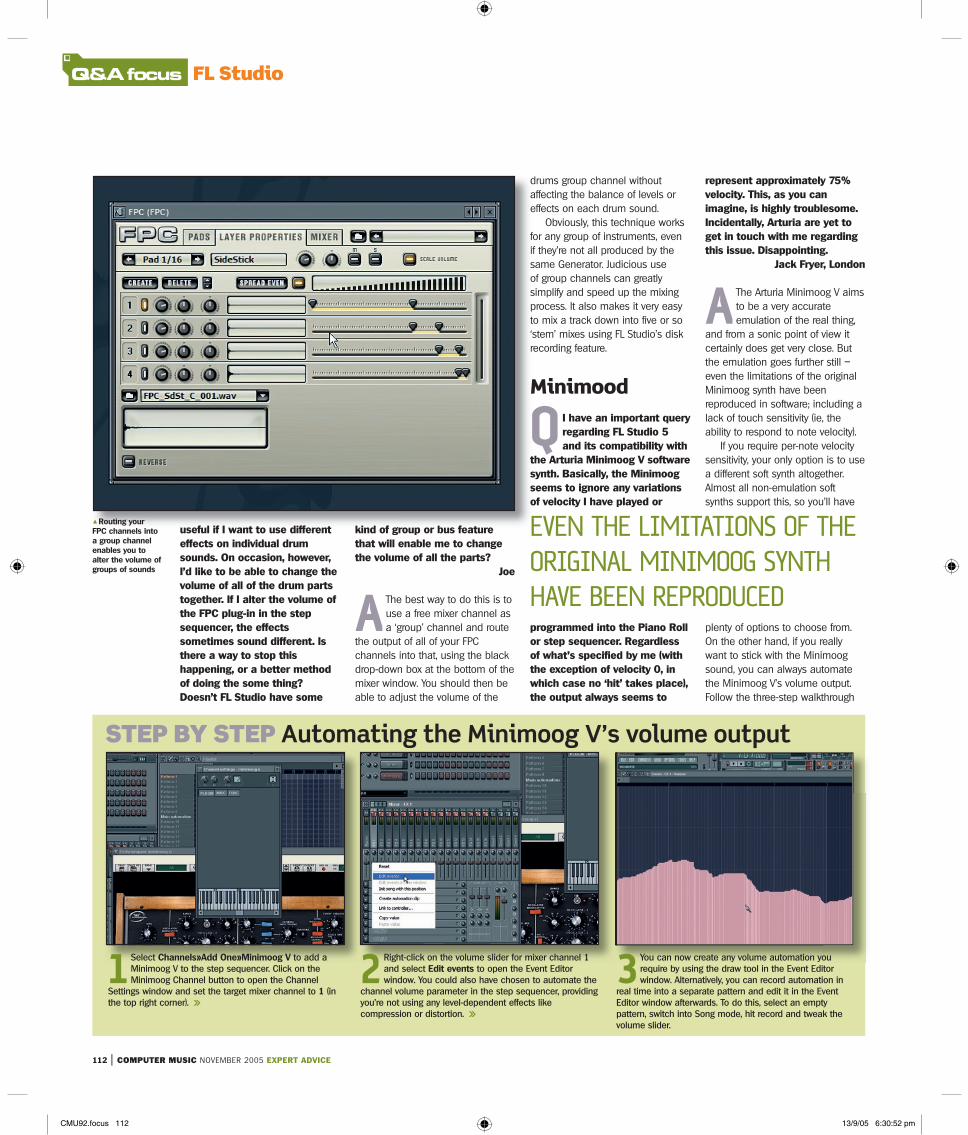
STEP BY STEP Automating the Minimoog V’s volume output
3 You can now create any volume automation you require by using the draw tool in the Event Editor window. Alternatively, you can record automation in
real time into a separate pattern and edit it in the Event Editor window afterwards. To do this, select an empty pattern, switch into Song mode, hit record and tweak the volume slider.
2 Right-click on the volume slider for mixer channel 1 and select Edit events to open the Event Editor window. You could also have chosen to automate the
channel volume parameter in the step sequencer, providing you’re not using any level-dependent effects like compression or distortion. >>
1 Select Channels»Add One»Minimoog V to add a Minimoog V to the step sequencer. Click on the Minimoog Channel button to open the Channel
Settings window and set the target mixer channel to 1 (in the top right corner). >>
1Routing your FPC channels into a group channel enables you to alter the volume of groups of sounds
CMU92.focus 112CMU92.focus 112 13/9/05 6:30:52 pm13/9/05 6:30:52 pm

EXPERT ADVICE NOVEMBER 2005 COMPUTER MUSIC | 113
Q&A focusFL Studio
on the left-hand page to find out how it’s done.
A bit of bother
Q I’ve noticed there’s an option in the FL Studio mixer to enable 32-bit
recording. CDs use 16-bit, and they sound pretty good to me, so why bother using this higher quality, since it doubles the hard disk space taken up by the file? I tried comparing 32-bit and 16-bit recordings made in FL Studio and I couldn’t hear any difference. Assuming it isn’t a pointless feature, when should I use 32-bit?
M. Adams, Newport
A The jury’s still out on whether 16-bit sound is really ‘good enough’. Given
that most of the new high definition audio formats use 24-bit, there’s obviously demand out there for something better. But that doesn’t answer your question as to why FL Studio provides 32-bit audio recording capability.
Internally, FL Studio uses 32-bit audio so that high sound quality is maintained right along the signal path. While 16-bit is generally OK for playback purposes, a superior quality is required when performing
a lot of DSP operations on an audio signal, one after the other – rounding errors and noise can become a problem otherwise.
Sometimes it’s useful to employ FL Studio’s disk recording feature to bounce CPU intensive parts to disk. 32-bit recording is therefore needed to maintain a true 32-bit signal path after bouncing to disk. In other words, it’s a good idea to enable the 32-bit option when bouncing parts within FL Studio or if recording from a high quality source (ie, a good quality 24-bit audio interface).
If you only have a 16-bit soundcard, there really isn’t any
point in recording raw audio with 32-bit mode enabled, but be aware that the noise can become a problem if you apply any dynamic processing to the signal after it’s been recorded. For instance, a compressor has a nasty habit of making background noise clearly audible, by raising the level of any quiet parts. Possible solutions to this issue include the employment of a third party gate plug-in (or FL Studio’s Peak Controller), or automating the volume of the offending recording – to bring the output down between phrases of a vocal take, for example.
Channel it out
Q In cm90, (Sound Like… Plump DJs) you said that Guru’s sample pads can
be routed to their own output channel in Cubase. Is it possible to do this kind of thing in FL Studio 5 with NI battery or some other drum machine?
Redsnappy
A Yes, this is perfectly possible, providing the drum synth in question offers multiple
outputs and you have a soundcard or audio interface with ASIO drivers and lots of outputs. The secret lies in making sure multiple outputs are enabled (they are by default for FPC) to send each individual output to a separate mixer channel and to route each mixer channel to its own soundcard output. Follow the three-step walkthrough below to make it happen. cm
1To 32-bit or not to 32-bit, that is the question: FL Studio uses it, but not everyone sees the point in going quite this high
COMING SOON:ABLETON LIVE 5In issue 94, our experts will be solving your Live 5 problems. Mail your questions on the latest version of Ableton’s performance DAW, no matter how basic or advanced, to [email protected].
STEP BY STEP Enabling multiple outputs in FL Studio 5
3 In the mixer, select the first channel and use the black output assignment drop-down to select an alternative soundcard output. Repeat this process for
the rest of the FPC-assigned mixer channels (ie, mixer channels one to six in this case).
2 Change the pad output assignments to taste. Typically, you’ll want to give the kick and snare drums their own channel, as these types of drums are often
processed in isolation with individual effects. >> 1 Load an instance of FPC into the step sequencer.
Open the Channel Settings window for FPC and route it to the first mixer channel. In the FPC window, click
on the Mixer tab. At the top of each pad channel, you’ll find the output channel number (these are offset from the assigned main mixer channel). >>
CMU92.focus 113CMU92.focus 113 13/9/05 6:30:59 pm13/9/05 6:30:59 pm