Embed Size (px)
Citation preview
Leben im Bad Living bathrooms
SensoWash® SlimMounting instructions Shower toilet unit
Instrucciones de montaje Accesorio para el WC con ducha
Notice de montage Abattant WC douche
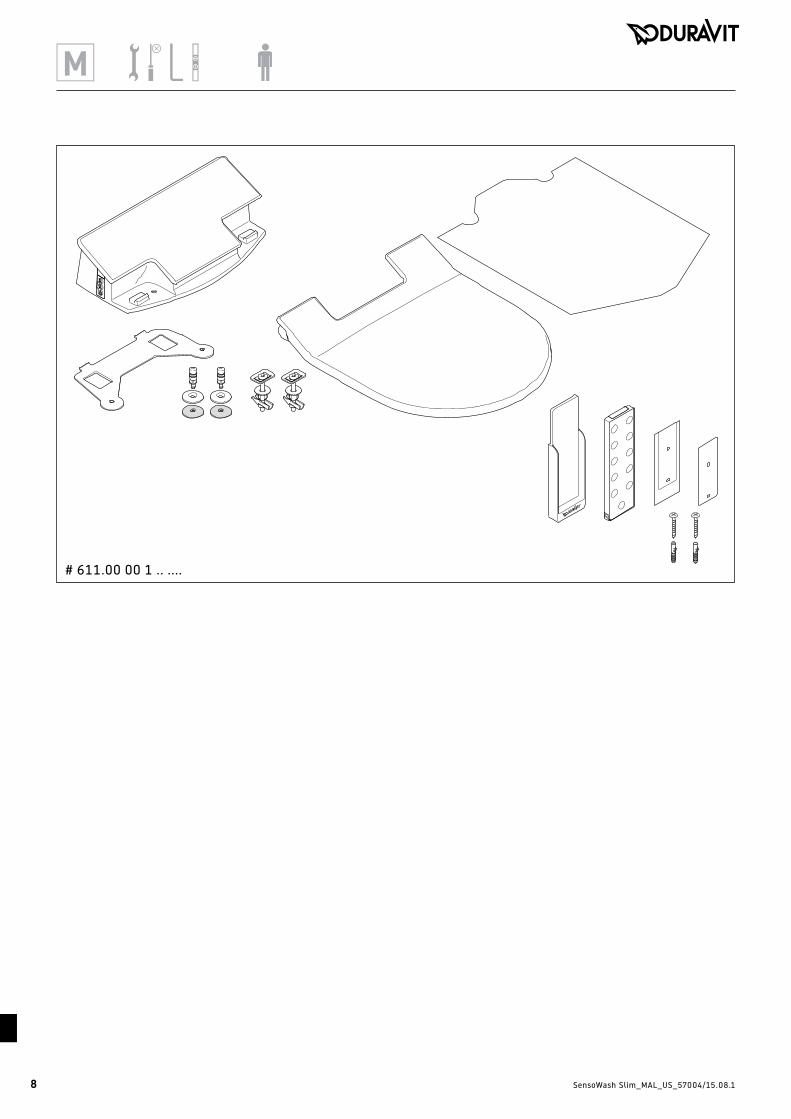
安裝說明 智慧馬桶座組件
# 611.00 00 1 .. ....
2 SensoWash Slim_MAL_US_57004/15.08.1
3 SensoWash Slim_MAL_US_57004/15.08.1
esenImportant information
Información importante
Remarques importantes
重要資訊
Installation, Montaje, Montage, 安装
frzh
-tw

SensoWash Slim_MAL_US_57004/15.08.1
Important information
en Safety instructions
danger risk of fatal electric shock!
Do NOT remove individual shower toilet components.
> If the supply cord on this unit is damaged, it must be replaced by the manufacturer, the service agent or similarly qualified persons in order to avoid a hazard.
> Appliances have to be correctly earthed.
Mounting instructionsPlease read pre-installation information sheets prior to the installation. These are available to download on the Internet at www.duravit.com.
An installation video of the complete shower toilet is available at duravit.com/mnt_sewa_slim.
Simply use this QR code
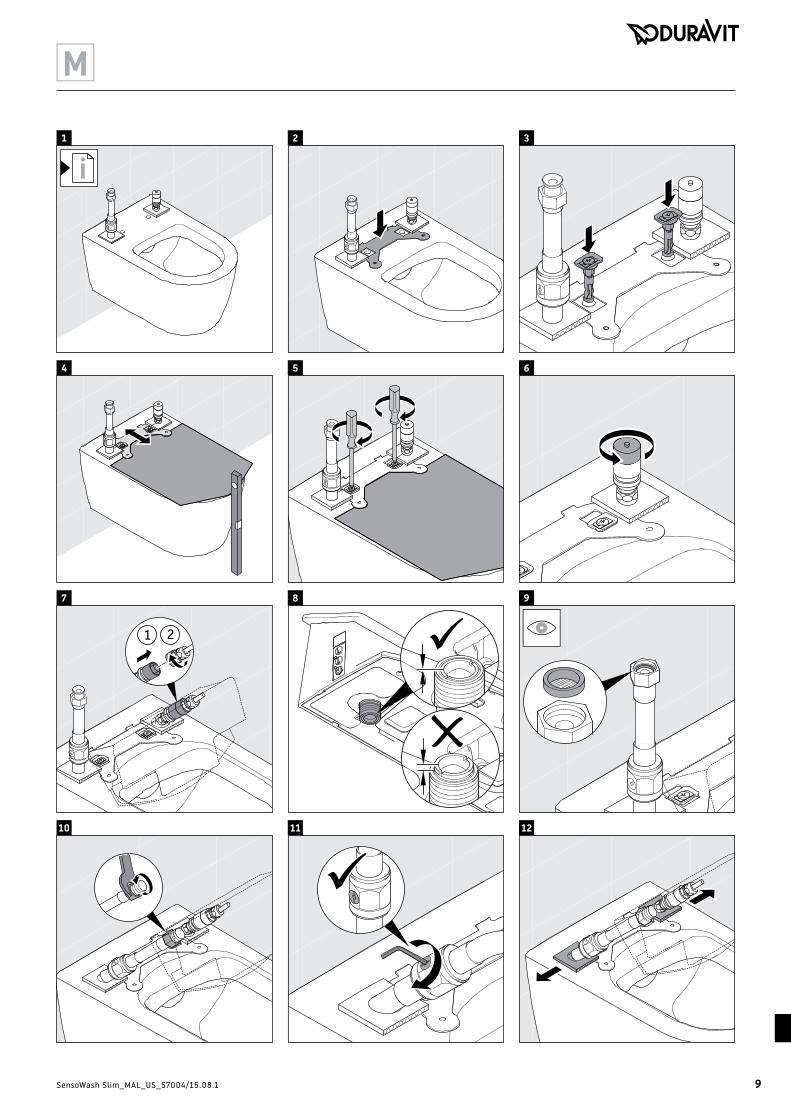
1 Checking the installation requirements (diagram 1)The installation of the WC ceramics with pre-installation of the shower toilet water and power supplies is described in sepa-rate instructions.
> Ensure that the supplies and WC ceramics have been installed and mounted according to the instructions and regulations.
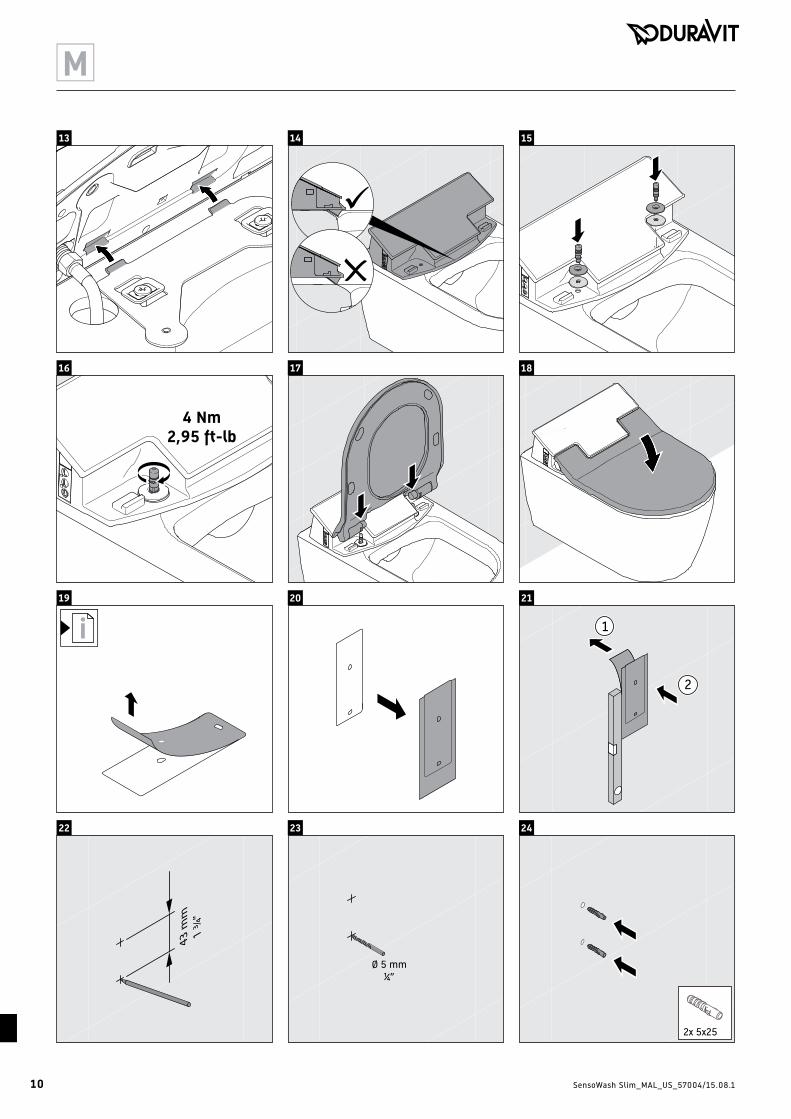
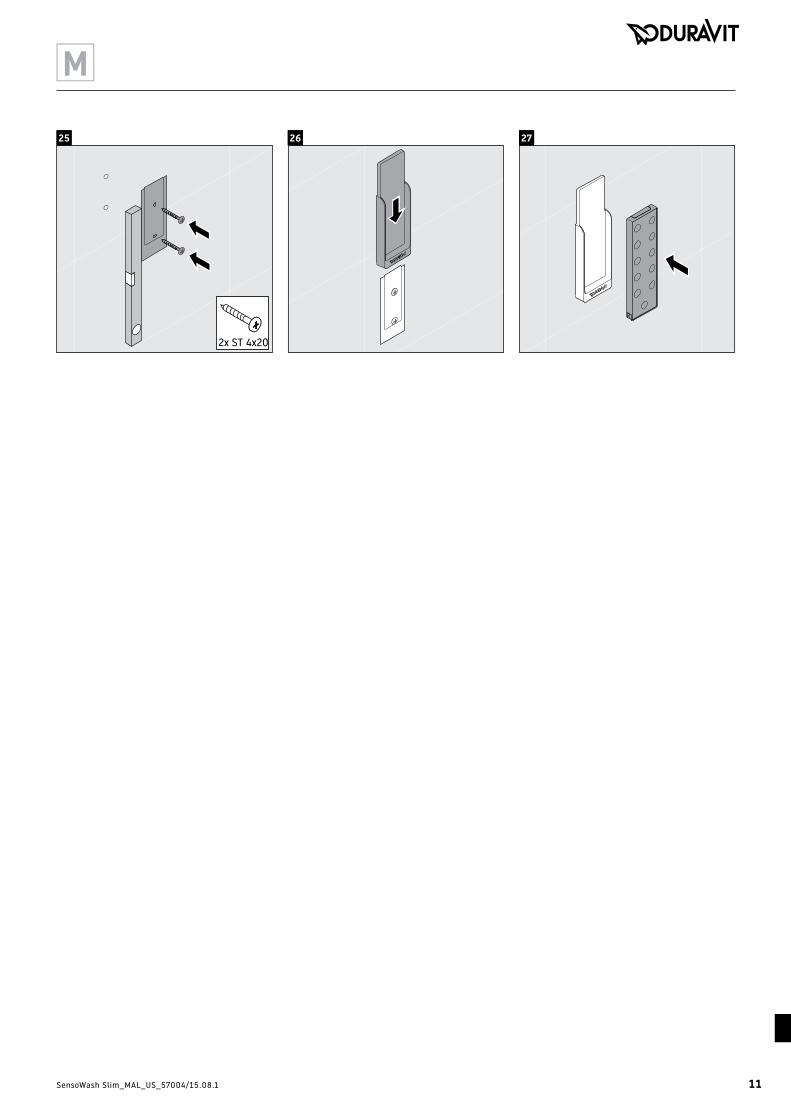
19 Positioning the metal bracket (diagram 19)
> Continue with step 22 for screw mounting.
> Follow the instructions up to step 21 for mounting with adhesive and then continue with step 26.
Mounting instructions informationThese mounting instructions come as part of the Duravit shower toilet and should be read carefully prior to installation.
explanation of the key words and symbols
danger Indicates a hazardous situation which, if not avoided, will result in death or serious injury.
notiCe Is used to address practices not related to physical injury
Link to the mounting information in this section
target readership and qualificationsThe shower toilet and associated water connection should only be installed by qualified plumbers. The electrical installation should only be carried out by qualified electricians.
notiCe risk of product and/or property damage!
> Observe the local installation regulations and any country-specific standards at all times.
notiCe risk of product damage due to freezing water!
> Do not install the shower toilet in rooms at risk of frost. The room temperature must not be less than 39°F (4 °C).
notiCe risk of product damage due to condensation!
> Leave the unit switched off for a few hours if it has previously been moved from a cold location to a warm location.
4
SensoWash Slim_MAL_US_57004/15.08.1
Información importante
es
advertencias de seguridad
Peligro ¡Peligro de muerte por descarga eléctrica!
> NO desmontar los diferentes componentes del asiento con lavado.
> Si se ha dañado el cable de conexión eléctrico de este aparato, este tendrá que ser cambiado por el fabricante o el servicio de asistencia técnica del mismo o por una persona cualificada similar, para evitar cualquier peligro.
> Poner a tierra el aparato de forma correcta.
indicaciones de montajeAntes de llevar a cabo el montaje, hay que tener en cuenta las fichas de preinstalación. Pueden descargarse en Internet del sitio web www.duravit.com.
Puede encontrar un vídeo de instalación de todo el asiento con lavado en duravit.com/mnt_sewa_slim.
Utilice para ello simplemente este código QR
1 Comprobar los requisitos de montaje (imagen 1)El montaje de la cerámica del WC con insta-lación previa de la alimentación de agua y de corriente del asiento con lavado se describe en otras instrucciones. > Asegúrese de que las alimentaciones y la cerámica del WC se instalen y se monten de conformidad con las instrucciones y las disposiciones.
19 Colocar el soporte de metal (imagen 19) > Proseguir con el paso 22 para el montaje con tornillos.
> Proseguir con el paso 21 para el montaje con adhesivos y después con el paso 26.
instrucciones de montajeEstas instrucciones de montaje acompañan al asiento con lavado Duravit y es necesario leerlas cuidadosamente antes del montaje.
explicación de las indicaciones y símbolos de advertencia
Peligro Describe una situación peli gro-sa que provocará la muerte o daños permanentes si no se evita.
aviSo Describe daños que no afectan a la persona.
Se refiere a una indicación de montaje en este capítulo
instaladores y cualificaciónEl asiento con lavado y la instalación corres-pondiente de agua solo pueden ser montados por instaladores de sanitarios con la formación adecuada. La instalación eléctrica solo podrán realizarla instaladores eléctricos cualificados.
aviSo ¡riesgo de daños en el producto o de daños materiales!
> Deberán cumplirse sin restricciones las instrucciones de instalación de las empresas de suministro locales y las normas específicas de cada país.
aviSo ¡riesgo de daños en el producto por agua helada!
> NO monte el asiento con lavado en espacios en los que cabe el riesgo de que se produzcan heladas. La temperatura ambiente no deberá ser inferiora los 39°F (4 °C).
aviSo ¡riesgo de daños en el producto por la humedad de condensación!
> Deje el aparato apagado durante algunas horas si el aparato ha sido llevado anteriormente de un sitio frío a uno caliente.
5
SensoWash Slim_MAL_US_57004/15.08.1
Remarques importantes
fr
instructions de sécurité
danger danger de mort par électrocution !
> NE PAS démonter les différents composants du WC douche.
> Si le câble d'alimentation de cet appareil est endommagé, il doit être remplacé par le fabricant ou son service après-vente ou une personne avec un niveau de compétence équivalent afin d'éviter tout danger.
> Mettre l'appareil correctement à la terre.
Consignes de montageAvant le montage, lire les fiches techniques de pré-installation. Celles-ci peuvent être téléchargées sur Internet via le site www.duravit.com.
Une vidéo d’installation du WC douche complet est disponible sur duravit.com/mnt_sewa_slim.
Il vous suffit d'utiliser pour cela ce code QR
1 vérifier les conditions de montage (graphique 1)Le montage de la cuvette de WC en céramique avec pré-installation de l’alimentation en eau est décrit dans une notice séparée. > S’assurer que les alimentations et la cuvette de WC en céramique ont été ins-tallées conformément à la notice et aux instructions.
19 Positionner le support en métal (graphique 19) > Pour le montage par vissage, poursuivre à l’étape 22.
> Pour le montage par collage, suivre la notice jusqu'à l'étape 21 puis poursuivre à l'étape 26.
Concernant la notice de montageCette notice de montage fait partie du WC douche Duravit et doit être lue attentivement avant le montage.
explication des avertissements et symboles
danger Décrit une situation dangereuse pouvant entraîner la mort ou des dommages irréversibles si elle n'est pas évitée.
aviS Décrit des dommages qui ne concernent pas la personne.
Voir la consigne de montage dans ce chapitre
groupe cible et qualificationLe WC douche et le raccord d’eau correspondant doivent exclusivement être montés par des installateurs sanitaires dûment formés. L'installation électrique doit uniquement être réalisée par des installateurs électriques qualifiés.
aviS risque d'endommagement du produit et/ou de dommages matériels !
> Les prescriptions d'installation des entreprises de fournitures locales et les normes nationales doivent impérativement être appliquées.
aviS risque d'endommagement des produits par l'eau gelée !
> Ne PAS monter le WC douche dans des locaux exposés au gel. La température ambiante ne doit pas être inférieure à 39°F (4 °C).
aviS risque d'endommagement du produit par l'humidité de condensation !
> Laisser l'appareil éteint pendant quelques heures si celui-ci a été déplacé auparavant d'un endroit froid vers un endroit chaud.
6
SensoWash Slim_MAL_US_57004/15.08.1
zh-t
w
重要資訊
安全說明
危險
觸電致死的危險!不可拆卸獨立智慧馬桶座元件 > 如果設備上的電源線損壞,必須由製造商、維修代理或類似的合格人員更換,以便產生危險。 > 裝置必須正確接地。
安裝說明
安裝前請閱讀安裝前資訊表。可在 www.duravit.com 下載。
可在 duravit.com/mnt_sewa_slim 取得智慧馬桶座的完整安裝影片。
只需使用二維碼
1 檢查安裝要求(圖 1)馬桶安裝和智慧馬桶座供水供電的安裝前在說明中分開描述。 > 確保供水供電和馬桶部分已按照說明和規定安裝。
19 將金屬支架放正(圖 19) > 從步驟 22 繼續,執行螺釘安裝。 > 遵守說明至步驟 21 執行粘貼安裝,然後從步驟 26 繼續。
安裝說明資訊
Duravit 智慧馬桶座當中附有安裝說明,安裝前請務必詳細閱讀。
關鍵字和符號的說明
危險 表示該危險狀況會導致死
亡或嚴重受傷。
公告 用於與身體受傷無關的說
明。
請參閱本章節中的安裝資訊
目標讀者群和資格要求
僅限由合格的水電工進行智慧馬桶座和相關水管接頭的安裝。僅限由合格的電工來進行電氣安裝。
公告 產品和/或財產受損的危
險! > 始終遵守本地安裝法規和國家規定的標準。
公告 產品因水結凍而損壞的危
險! > 不可將智慧馬桶座安裝在有可能結霜的房間。室內溫度不可低於 39°F (4 °C)。
公告 產品因冷凝而損壞的危
險! > 若之前將智慧馬桶座從低溫處移至較溫暖處,請將設備關機幾小時。
7
SensoWash Slim_MAL_US_57004/15.08.18
# 611.00 00 1 .. ....
SensoWash Slim_MAL_US_57004/15.08.1
1 2
9
10 11 12
7 8 9
4 5 6
1 2 3
SensoWash Slim_MAL_US_57004/15.08.1
4 Nm2,95 ft-lb
1
2
Ø 5 mm¼”
43 m
m1
¾”
2x 5x25
10
22 23 24
19 20 21
16 17 18
13 14 15
SensoWash Slim_MAL_US_57004/15.08.1
2x ST 4x20
11
X X X272625
Best
.-Nr.
5700
4/15
.08.
1 W
e re
serv
e th
e ri
ght t
o m
ake
tech
nica
l im
prov
emen
ts a
nd e
nhan
ce th
e ap
pear
ance
of t
he p
rodu
cts
show
n.
Duravit AGP.O. Box 240Werderstr. 3678132 HornbergGermanyPhone +49 78 33 70 0Fax +49 78 33 70 [email protected]
Duravit NYC105 Madison AvenueNew York, NY 10016Toll Free 888-DURAVITPhone 212 686 0033Fax 212 686 [email protected]
Duravit USA, Inc.2205 Northmont Pkwy., Ste. 200Duluth, GA 30096Toll Free 888-DURAVITPhone 770 931 3575Fax 770 931 [email protected]