Embed Size (px)
Citation preview

SERVER ADMINISTRATION Konfigurasi Server 1. IP Virtual = Sesuai dengan kondisi lab. Jaringan yang diberikan 2. IP LAN = 192.168.55.1/24 Konfigurasi Client 3. IP LAN = 192.168.55.xxx/24 4. Proxy = 192.168.55.1 Keterangan : xxx merupakan address antara 2 sampai 254 Konfigurasi Server 1. Sistem Operasi = OS Linux 2. Port proxy = 3128 3. DNS server = dengan domain www.sekolah.sch.id 4. FTP Server = dengan domain : ftp.sekolah.sch.id 5. Virtual directory = dengan format : http://www.sekolah.sch.id 6. Domain baru = dengan nama : http://www.institusi.com 7. Proxy server = dengan Blocking Site http://www.institusi.com
A. Setting NIC a. Dalam hal ini kita membutuhkan 2 alamat IP dalam 1 NIC. b. Buka file “interfaces” di /etc/network/interfaces edit seperti gambar di bawah ini.
IP eth0 : 192.168.55.1 IP LAN IP eth0:1 : 192.168.55.2 IP Virtual root@server~:# nano /etc/network/interfaces
This file describes the network interfaces available on your system
# and how to activate them. For more information, see interfaces(5).
# The loopback network interface
auto lo
iface lo inet loopback
# The primary network interface
auto eth0
iface eth0 inet static
address 192.168.55.1
netmask 255.255.255.0
network 192.168.55.0
broadcast 192.168.55.255
gateway 192.168.55.10
# dns-* options are implemented by the resolvconf package, if installed
dns-nameservers 192.168.55.1
dns-search sekolah.sch.id
up ip addr add 192.168.55.2/24 brd 192.168.55.255 dev eth0 label eth0:1
c. Restart settingan NIC kita.
root@server:~# /etc/init.d/networking restart
Running /etc/init.d/networking restart is deprecated because it may not enable again some
interfaces ... (warning).
Reconfiguring network interfaces...done.
d. Cek apakah IP kita sudah tersetting dengan baik.
root@server:~# ifconfig
eth0 Link encap:Ethernet HWaddr 08:00:27:79:89:1b
inet addr:192.168.55.1 Bcast:192.168.55.255 Mask:255.255.255.0
inet6 addr: fe80::a00:27ff:fe79:891b/64 Scope:Link
UP BROADCAST RUNNING MULTICAST MTU:1500 Metric:1
RX packets:248 errors:0 dropped:0 overruns:0 frame:0
TX packets:190 errors:0 dropped:0 overruns:0 carrier:0
collisions:0 txqueuelen:1000
RX bytes:23287 (22.7 KiB) TX bytes:26394 (25.7 KiB)
eth0:1 Link encap:Ethernet HWaddr 08:00:27:79:89:1b
inet addr:192.168.55.2 Bcast:192.168.55.255 Mask:255.255.255.0
UP BROADCAST RUNNING MULTICAST MTU:1500 Metric:1
lo Link encap:Local Loopback
inet addr:127.0.0.1 Mask:255.0.0.0
inet6 addr: ::1/128 Scope:Host
UP LOOPBACK RUNNING MTU:16436 Metric:1
RX packets:28 errors:0 dropped:0 overruns:0 frame:0
TX packets:28 errors:0 dropped:0 overruns:0 carrier:0
collisions:0 txqueuelen:0
RX bytes:2196 (2.1 KiB) TX bytes:2196 (2.1 KiB)

B. Setting Domain Name System a. Install paket bind9 sebagai aplikasi DNS kita.
root@server:~# apt-get install bind9
Reading package lists... Done
Building dependency tree
Reading state information... Done
The following extra packages will be installed:
bind9utils
Suggested packages:
bind9-doc resolvconf ufw
The following NEW packages will be installed:
bind9 bind9utils
0 upgraded, 2 newly installed, 0 to remove and 0 not upgraded.
Need to get 0 B/454 kB of archives.
After this operation, 1,389 kB of additional disk space will be used.
Do you want to continue [Y/n]? y
b. Masuk ke direktori “/etc/bind/” kemudian kita edit file “named.conf.local” ( kita buat 2 DNS di dalamnya yaitu: sekolah.sch.id dan institusi.com ) root@server:~# cd /etc/bind/
root@server:/etc/bind# nano named.conf.local
//
// Do any local configuration here
//
// Consider adding the 1918 zones here, if they are not used in your
// organization
//include "/etc/bind/zones.rfc1918";
zone "sekolah.sch.id" {
type master;
file "/etc/bind/db.for1";
};
zone "institusi.com" {
type master;
file "/etc/bind/db.for2";
};
zone "55.168.192.in-addr.arpa" {
type master;
file "/etc/bind/db.rev";
};
c. Restart konfigurasi file “named.conf.local” jika terdapat tulisan failed coba cek kembali file tersebut. root@server:/etc/bind# /etc/init.d/bind9 restart
Stopping domain name service...: bind9 waiting for pid 1544 to die.
Starting domain name service...: bind9.
d. Kita copy file “db.local” dengan mengubah nama menjadi “db.for1”(sekolah.sch.id) dan “db.for2”(institusi.com). Serta “db.127” menjadi “db.rev”. root@server:/etc/bind# cp db.local db.for1
root@server:/etc/bind# cp db.local db.for2
root@server:/etc/bind# cp db.127 db.rev
e. Edit file “db.for1” (sekolah.sch.id), “db.for2” (institusi.com) dan “db.rev” i. db.for1
root@server:/etc/bind# nano db.for1
;
; BIND data file for local loopback interface
;
$TTL 604800
@ IN SOA server.sekolah.sch.id. root.sekolah.sch.id. (
2 ; Serial
604800 ; Refresh
86400 ; Retry
2419200 ; Expire
604800 ) ; Negative Cache TTL
;
@ IN NS server.sekolah.sch.id.
server IN A 192.168.55.1
www IN CNAME server
ftp IN CNAME server

ii. db.for2 root@server:/etc/bind# nano db.for2
;
; BIND data file for local loopback interface
;
$TTL 604800
@ IN SOA server.institusi.com. root.institusi.com. (
2 ; Serial
604800 ; Refresh
86400 ; Retry
2419200 ; Expire
604800 ) ; Negative Cache TTL
;
@ IN NS server.institusi.com.
server IN A 192.168.55.2
www IN CNAME server
ftp IN CNAME server
iii. db.rev
root@server:/etc/bind# nano db.rev
;
; BIND reverse data file for local loopback interface
;
$TTL 604800
@ IN SOA server.sekolah.sch.id. root.sekolah.sch.id. (
1 ; Serial
604800 ; Refresh
86400 ; Retry
2419200 ; Expire
604800 ) ; Negative Cache TTL
;
IN NS server.sekolah.sch.id.
IN NS server.institusi.com.
1 IN PTR server.sekolah.sch.id.
2 IN PTR server.institusi.com.
f. Restart konfigurasi bind9 kita. root@server:/etc/bind# /etc/init.d/bind9 restart
Stopping domain name service...: bind9 waiting for pid 1688 to die.
Starting domain name service...: bind9.
g. Kita ujicoba DNS kita dengan menggunakan nslookup.
root@server:/etc/bind# nslookup
> www.sekolah.sch.id
Server: 192.168.55.1
Address: 192.168.55.1#53
www.sekolah.sch.id canonical name = server.sekolah.sch.id.
Name: server.sekolah.sch.id
Address: 192.168.55.1
> ftp.sekolah.sch.id
Server: 192.168.55.1
Address: 192.168.55.1#53
ftp.sekolah.sch.id canonical name = server.sekolah.sch.id.
Name: server.sekolah.sch.id
Address: 192.168.55.1
> www.institusi.com
Server: 192.168.55.1
Address: 192.168.55.1#53
www.institusi.com canonical name = server.institusi.com.
Name: server.institusi.com
Address: 192.168.55.2
> 192.168.55.1
Server: 192.168.55.1
Address: 192.168.55.1#53
1.55.168.192.in-addr.arpa name = server.sekolah.sch.id.
> 192.168.55.2
Server: 192.168.55.1
Address: 192.168.55.1#53
2.55.168.192.in-addr.arpa name = server.institusi.com.

C. Setting WEB server a. Install apache2, php5, links sebagai paket yang kita butuhkan.
root@server:~# apt-get install apache2 php5 links
Reading package lists... Done
Building dependency tree
Reading state information... Done
The following extra packages will be installed:
apache2-mpm-prefork apache2-utils apache2.2-bin apache2.2-common
libapache2-mod-php5 libapr1 libaprutil1 libaprutil1-dbd-sqlite3 libaprutil1-ldap
libonig2 libqdbm14 php5-cli php5-common php5-suhosin ssl-cert
Suggested packages:
apache2-doc apache2-suexec apache2-suexec-custom php-pear openssl-blacklist
The following NEW packages will be installed:
apache2 apache2-mpm-prefork apache2-utils apache2.2-bin apache2.2-common
libapache2-mod-php5 libapr1 libaprutil1 libaprutil1-dbd-sqlite3 libaprutil1-ldap
libonig2 libqdbm14 links php5 php5-cli php5-common php5-suhosin ssl-cert
0 upgraded, 18 newly installed, 0 to remove and 0 not upgraded.
Need to get 0 B/9,241 kB of archives.
After this operation, 25.4 MB of additional disk space will be used.
Do you want to continue [Y/n]? y
b. Pindah ke direkori “/etc/apache2/sites-available”. Kemudian kita copy file “default” menjadi “web1” (sekolah.sch.id) dan “web2” (institusi.com) root@server:~# cd /etc/apache2/sites-available/
root@server:/etc/apache2/sites-available# cp default web1
root@server:/etc/apache2/sites-available# cp default web2
c. Edit file website kita.
i. web1 root@server:/etc/apache2/sites-available# nano web1
NameVirtualHost 192.168.55.1:80
<VirtualHost 192.168.55.1:80>
ServerAdmin [email protected]
ServerName www.sekolah.sch.id
DocumentRoot /home/web1/
<Directory />
Options FollowSymLinks
AllowOverride None
</Directory>
<Directory /home/web1/>
Options Indexes FollowSymLinks MultiViews
AllowOverride None
Order allow,deny
allow from all
</Directory>
ScriptAlias /cgi-bin/ /usr/lib/cgi-bin/
<Directory "/usr/lib/cgi-bin">
AllowOverride None
Options +ExecCGI -MultiViews +SymLinksIfOwnerMatch
Order allow,deny
Allow from all
ii. web2 root@server:/etc/apache2/sites-available# nano web2
NameVirtualHost 192.168.55.2:80
<VirtualHost 192.168.55.2:80>
ServerAdmin [email protected]
ServerName www.institusi.com
DocumentRoot /home/web2/
<Directory />
Options FollowSymLinks
AllowOverride None
</Directory>
<Directory /home/web2/>
Options Indexes FollowSymLinks MultiViews
AllowOverride None
Order allow,deny
allow from all
</Directory>
ScriptAlias /cgi-bin/ /usr/lib/cgi-bin/
<Directory "/usr/lib/cgi-bin">
AllowOverride None
Options +ExecCGI -MultiViews +SymLinksIfOwnerMatch
Order allow,deny
Allow from all

d. Pindah ke “/etc/apache2/sites-enable”. Mengaktifkan apache2 agar bisa 2 website, aktifkan web kita (web1 dan web2), dan menonaktifkan website default. root@server:/etc/apache2/sites-available# cd ../sites-enabled/
root@server:/etc/apache2/sites-enabled# a2enmod userdir
Enabling module userdir.
Run '/etc/init.d/apache2 restart' to activate new configuration!
root@server:/etc/apache2/sites-enabled# a2ensite web1
Enabling site web1.
Run '/etc/init.d/apache2 reload' to activate new configuration!
root@server:/etc/apache2/sites-enabled# a2ensite web2
Enabling site web2.
Run '/etc/init.d/apache2 reload' to activate new configuration!
root@server:/etc/apache2/sites-enabled# a2dissite default
Site default disabled.
Run '/etc/init.d/apache2 reload' to activate new configuration!
e. Membuat direktori untuk website kita.
root@server:~# mkdir /home/web1
root@server:~# mkdir /home/web2
f. Membuat file index.html di kedua direktori website kita
root@server:/home/web1/# nano index.html
<html>
<title>UKP 2012/2013</title>
<body>
<h1 align="center">UJI KOMPETENSI PRODUKTIF</h1>
<p align="center">Nama : John The Ripper</br>
<p align="center">NIS : 1234567</br>
</body>
</html>
root@server:/home/web2/# nano index.html
<html>
<title>UKP 2012/2013</title>
<body>
<h1 align="center">UKP TAHUN 2013/2012</h1>
<p align="center">Nama : John The Ripper</br>
<p align="center">NIS : 1234567</br>
</body>
</html>
g. Restart web server
root@server:~# /etc/init.d/apache2 restart
Restarting web server: apache2[Mon Feb 04 04:39:07 2013] [warn] NameVirtualHost *:80 has no
VirtualHosts
... waiting [Mon Feb 04 04:39:09 2013] [warn] NameVirtualHost *:80 has no VirtualHosts
h. Uji coba di browser www.sekolah.sch.id www.institusi.com
D. Setting FTP a. Install paket proftpd untuk ftp server kita.
root@server:~# apt-get install proftpd
Reading package lists... Done
Building dependency tree
Reading state information... Done
Note, selecting 'proftpd-basic' instead of 'proftpd'
The following extra packages will be installed:
libfile-copy-recursive-perl proftpd-basic update-inetd
Suggested packages:
proftpd-doc proftpd-mod-mysql proftpd-mod-pgsql proftpd-mod-ldap proftpd-mod-odbc
proftpd-mod-sqlite openbsd-inetd inet-superserver
The following NEW packages will be installed:
libfile-copy-recursive-perl proftpd-basic update-inetd
0 upgraded, 3 newly installed, 0 to remove and 0 not upgraded.
Need to get 0 B/2,370 kB of archives.

After this operation, 4,215 kB of additional disk space will be used.
Do you want to continue [Y/n]? y
Kemudian kita pilih standalone
âââââââââââââââââââââââââââââ⤠ProFTPd configuration ââââââââââââââââââââââââââââââ
â ProFTPd can be run either as a service from inetd, or as a standalone server. â
â Each choice has its own benefits. With only a few FTP connections per day, it â
â is probably better to run ProFTPd from inetd in order to save resources. â
â â
â On the other hand, with higher traffic, ProFTPd should run as a standalone â
â server to avoid spawning a new process for each incoming connection. â
â â
â Run proftpd: â
â â
â from inetd â
â standalone â
â â
â â
â <Ok> â
â â
âââââââââââââââââââââââââââââââââââââââââââââââââââââââââââââââââââââââââââââââââââ
b. Buat user baru contoh “john”
root@server:~# adduser john
Adding user `john' ...
Adding new group `john' (1001) ...
Adding new user `john' (1001) with group `john' ...
Creating home directory `/home/john' ...
Copying files from `/etc/skel' ...
Enter new UNIX password:
Retype new UNIX password:
passwd: password updated successfully
Changing the user information for john
Enter the new value, or press ENTER for the default
Full Name []:
Room Number []:
Work Phone []:
Home Phone []:
Other []:
Is the information correct? [Y/n] y
c. Ubah permission di folder user “john” menjadi 777 (full access). root@server:~# chmod 777 /home/john
d. Uji coba dengan menggunakan cmd, browser dan explorer. i. CMD
C:\>ftp
ftp> open
To 192.168.55.1
Connected to 192.168.55.1.
220 ProFTPD 1.3.3a Server (Debian) [::ffff:192.168.55.1]
User (192.168.55.1:(none)): john
331 Password required for john
Password:
230 User john logged in
ftp> mkdir testing
257 "/home/john/testing" - Directory successfully created
ftp> ls
200 PORT command successful
150 Opening ASCII mode data connection for file list
testing
226 Transfer complete
ftp: 9 bytes received in 0.00Seconds 9000.00Kbytes/sec.
ftp> dir
200 PORT command successful
150 Opening ASCII mode data connection for file list
drwxr-xr-x 2 john john 4096 Feb 3 20:45 testing
226 Transfer complete
ftp: 64 bytes received in 0.00Seconds 64000.00Kbytes/sec.
ftp>
ii. Browser
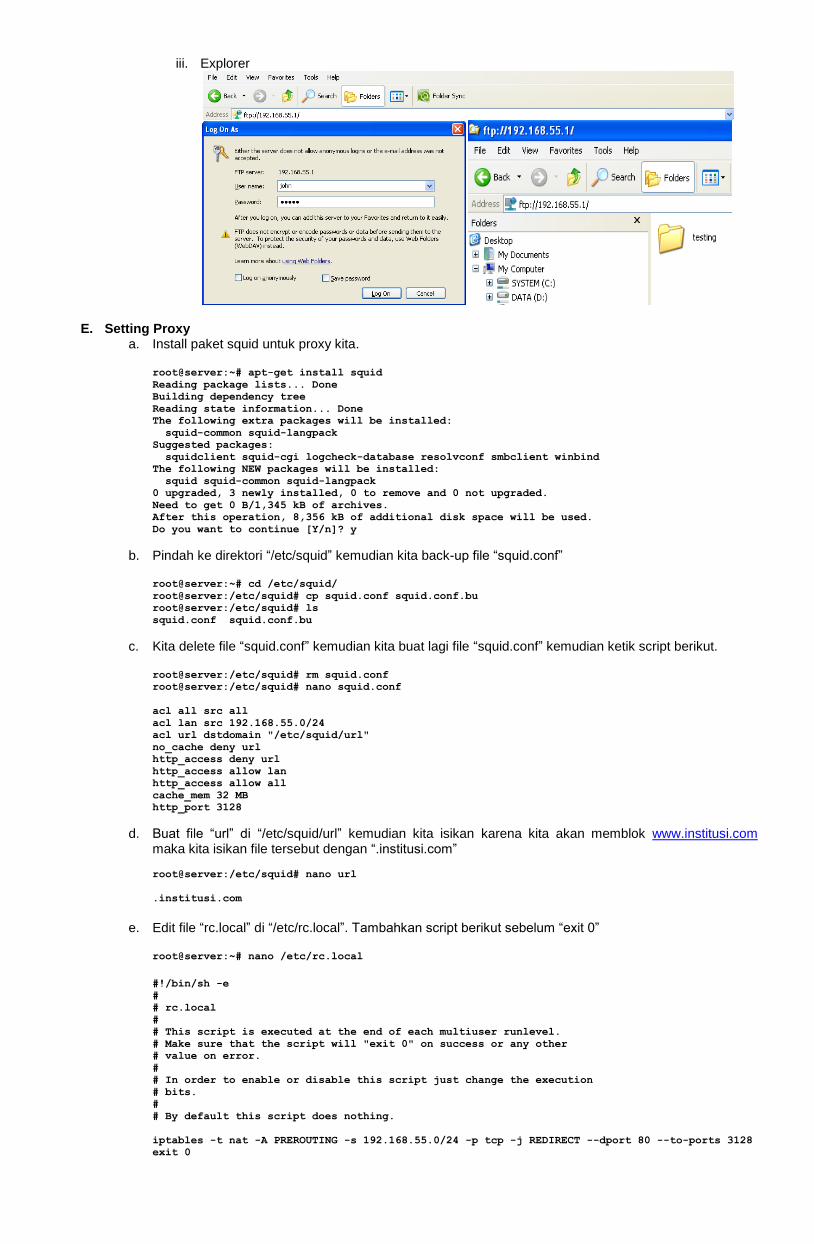
iii. Explorer
E. Setting Proxy a. Install paket squid untuk proxy kita.
root@server:~# apt-get install squid
Reading package lists... Done
Building dependency tree
Reading state information... Done
The following extra packages will be installed:
squid-common squid-langpack
Suggested packages:
squidclient squid-cgi logcheck-database resolvconf smbclient winbind
The following NEW packages will be installed:
squid squid-common squid-langpack
0 upgraded, 3 newly installed, 0 to remove and 0 not upgraded.
Need to get 0 B/1,345 kB of archives.
After this operation, 8,356 kB of additional disk space will be used.
Do you want to continue [Y/n]? y
b. Pindah ke direktori “/etc/squid” kemudian kita back-up file “squid.conf” root@server:~# cd /etc/squid/
root@server:/etc/squid# cp squid.conf squid.conf.bu
root@server:/etc/squid# ls
squid.conf squid.conf.bu
c. Kita delete file “squid.conf” kemudian kita buat lagi file “squid.conf” kemudian ketik script berikut. root@server:/etc/squid# rm squid.conf
root@server:/etc/squid# nano squid.conf
acl all src all
acl lan src 192.168.55.0/24
acl url dstdomain "/etc/squid/url"
no_cache deny url
http_access deny url
http_access allow lan
http_access allow all
cache_mem 32 MB
http_port 3128
d. Buat file “url” di “/etc/squid/url” kemudian kita isikan karena kita akan memblok www.institusi.com maka kita isikan file tersebut dengan “.institusi.com”
root@server:/etc/squid# nano url
.institusi.com
e. Edit file “rc.local” di “/etc/rc.local”. Tambahkan script berikut sebelum “exit 0”
root@server:~# nano /etc/rc.local
#!/bin/sh -e
#
# rc.local
#
# This script is executed at the end of each multiuser runlevel.
# Make sure that the script will "exit 0" on success or any other
# value on error.
#
# In order to enable or disable this script just change the execution
# bits.
#
# By default this script does nothing.
iptables -t nat -A PREROUTING -s 192.168.55.0/24 -p tcp -j REDIRECT --dport 80 --to-ports 3128
exit 0

f. Restart server kita. root@server~# reboot
g. Buka browser firefox kemudian setting IP proxy di firefox kita. Kita kali ini menggunakan manual proxy.
Jangan lupa untuk menambahkan ftp.sekolah.sch.id di “No proxy for”
h. Uji coba apakah proxy kita berhasil i. www.sekolah.sch.id
ii. www.institusi.com
iii. ftp.sekolah.sch.id
root@server:~# good luck